

Page 1

Operating Guide | Warranty
Operating Guide Warranty
Model Number | C27H26B | Direct View TV
Model Number C27J28B
Direc t View TV
© Copyright 2003, Zenith Electronics Corporation
© Copyright 2003, Zenith Electronics Corporation
J3W41321A_En_Cover 24/03/2006, 2:21 PM1
Page 2
The lightning flash with arrowhead symbol, within an equilateral
triangle is intended to alert the user to the presence of uninsulated
dangerous voltage within the product's enclosure that may be of
sufficient magnitude to constitute a risk of electric shock.
CAUTION:
ELECTRIC
COVER
PARTS INSIDE. REFER SERVICING
QUALIFIED SERVICE PERSONNEL.
TO REDUCE THE RISK OF
SHOCK, DO NOT REMOVE
(OR BACK). NO USER-SERVICEABLE
TO
The exclamation point within an equilateral triangle is intended to alert
the user to the presence of important operating and maintenance
(servicing) instructions in the literature accompanying the appliance.
CAUTION: Changes or modifications not expressly approved by the party responsible for compliance with the FCC
Rules could void the user's authority to operate this equipment.
WARNING: TO PREVENT FIRE OR SHOCK HAZARD, DO NOT EXPOSE THIS APPLIANCE TO RAIN OR
MOISTURE.
IMPORTANT SAFEGUARDS
1. READ INSTRUCTIONS
All the safety and operating instructions should be read before the unit is operated.
2. RETAIN INSTRUCTIONS
The safety and operating instructions should be retained for future reference.
3. HEED WARNINGS
All warnings on the unit and in the operating instructions should be adhered to.
4. FOLLOW INSTRUCTIONS
All operating and use instructions should be followed.
5. CLEANING
Unplug this unit from the wall outlet before cleaning. Do not use liquid cleaners or aerosol cleaners. Use a damp cloth for
cleaning the exterior cabinet only.
6. ATTACHMENTS
The manufacturer of this unit does not make any recommendations for attachments, as they may cause hazards.
7. WATER AND MOISTURE
Do not use this unit near water. For example, near a bathtub, washbowl, kitchen sink, laundry tub, in a wet basement, or
near a swimming pool.
8. ACCESSORIES
Do not place this unit on an unstable cart, stand, tripod, bracket, or table.
The unit may fall, causing serious injury, and serious damage to the unit.
8A. An appliance and cart combination should be moved with care. Quick stops, excessive
force, and uneven surfaces may cause the appliance and cart combination to overturn.
9. VENTILATION
Slots and openings in the cabinet back or bottom are provided for ventilation, to ensure reliable operation of the unit and
to protect it from overheating. These openings must not be blocked or covered. The openings should never be blocked by
placing the unit on a bed, sofa, rug, or other similar surface. This unit should never be placed near or over a radiator or
heat source. This unit should not be placed in a built-in installation, such as a bookcase, or rack unless proper ventilation
is provided or the manufacturer's instructions have been adhered to.
10. POWER SOURCE
This unit should be operated only from the type of power source indicated on the rating plate. If you are not sure of the
type of power supply to your home, consult your appliance dealer or local power company. For units intended to operate
from battery power, or other sources, refer to the operating instructions.
11. GROUNDING OR POLARIZATION
This unit is equipped with a polarized alternating current line plug (a plug having one blade wider than the other). This
plug will fit into the power outlet only one way. This is a safety feature. If you are unable to insert the plug fully into the
outlet, try reversing the plug. If the plug should still fail to fit, contact your electrician to replace your obsolete outlet. Do
not defeat the safety purpose of the polarized plug. If your unit is equipped with a 3-wire grounding-type plug, a plug
having a third (grounding) pin, this plug will only fit into a grounding-type power outlet. This too, is a safety feature. If you
are unable to insert the plug into the outlet, contact your electrician to replace your obsolete outlet. Do not defeat the safety
purpose of the grounding-type plug.
12. POWER-CORD PROTECTION
Power-supply cords should be routed so that they are not likely to be walked on or pinched by items placed upon or
against them, paying particular attention to cords at plugs, convenience receptacles, and the point where they exit from
the appliance.
PORTABLE CART WARNING
(symbol provided by RETAC)
S3126A
2
J3W41321A_En_P02-09 24/03/2006, 2:21 PM2
Page 3
13. LIGHTNING
To protect your unit during a lightning storm, or when it is left unattended and unused for long periods of time, unplug it
from the wall outlet and disconnect the antenna or cable system. This will prevent damage to the unit due to lightning and
power line surges.
14. POWER LINES
An outside antenna system should not be located in the vicinity of overhead power lines, other electric light or power
circuits, or where it can fall into such power lines or circuits. When installing an outside antenna system, extreme care
should be taken to keep from touching such power lines or circuits as contact with them might be fatal.
15. OVERLOADING
Do not overload wall outlets and extension cords as this can result in a risk of fire or electric shock.
16. OBJECT AND LIQUID ENTRY
Do not push objects through any openings in this unit as they may touch dangerous voltage points or short out parts that
could result in fire or electric shock. Never spill or spray any type of liquid into the unit.
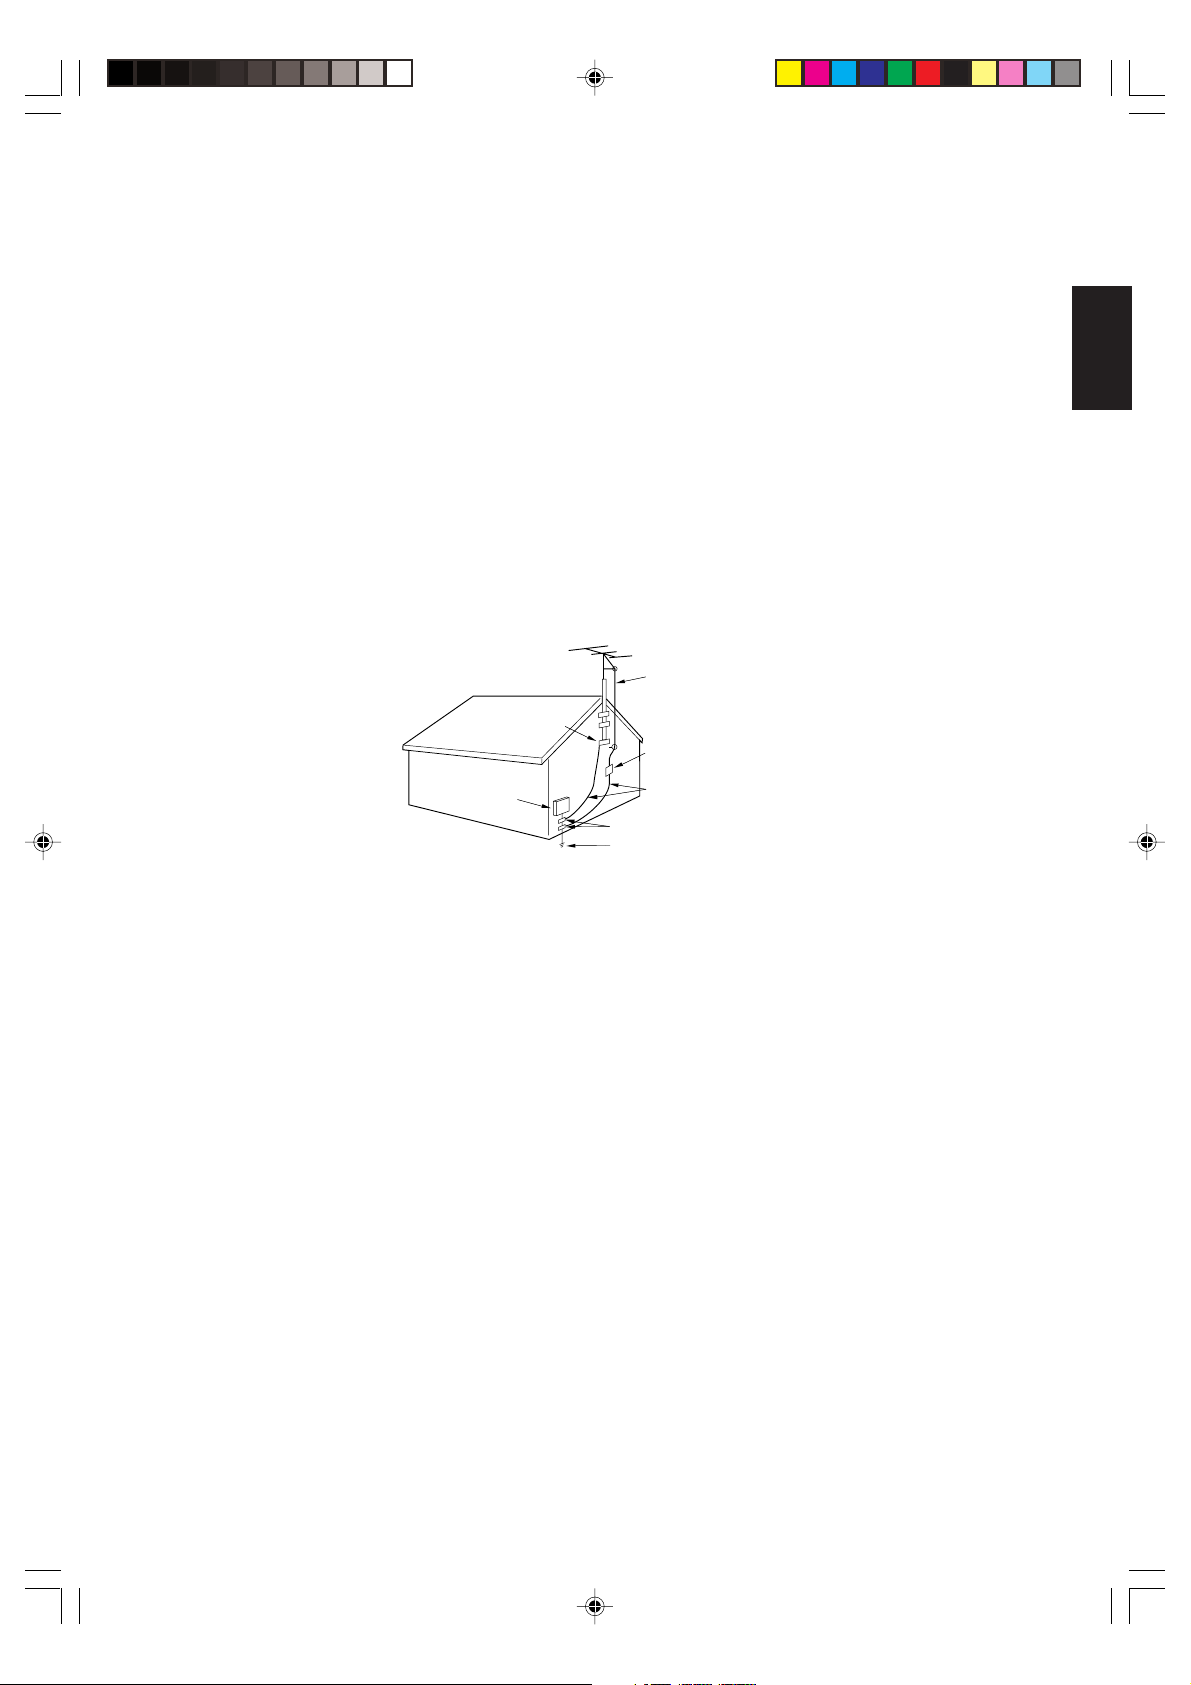
17. OUTDOOR ANTENNA GROUNDING
If an outside antenna or cable system is connected to the unit, be sure the antenna or cable system is grounded to provide
some protection against voltage surges and built-up static charges. Section 810 of the National Electrical Code, ANSI/
NFPA 70, provides information with respect to proper grounding of the mast and supporting structure, grounding of the
lead-in wire to an antenna discharge unit, size of grounding conductors, location of antenna discharge unit, connection to
grounding electrodes, and requirements for the grounding electrode.
EXAMPLE OF ANTENNA GROUNDING AS PER NATIONAL ELECTRICAL CODE
ANTENNA LEAD IN WIRE
GROUND CLAMP
ANTENNA DISCHARGE UNIT
ELECTRIC
SERVICE
EQUIPMENT
NEC-NATIONAL ELECTRICAL CODE
S2898A
(NEC SECTION 810-20)
GROUNDING CONDUCTORS
(NEC SECTION 810-21)
GROUND CLAMPS
POWER SERVICE GROUNDING ELECTRODE SYSTEM
(NEC ART 250, PART H)
ENGLISH
18. SERVICING
Do not attempt to service this unit yourself as opening or removing covers may expose you to dangerous voltage or other
hazards. Refer all servicing to qualified service personnel.
19. DAMAGE REQUIRING SERVICE
Unplug this unit from the wall outlet and refer servicing to qualified service personnel under the following conditions:
a. When the power-supply cord or plug is damaged.
b. If liquid has been spilled, or objects have fallen into the unit.
c. If the unit has been exposed to rain or water.
d. If the unit does not operate normally by following the operating instructions. Adjust only those controls that are
covered by the operating instructions, as an improper adjustment of other controls may result in damage and will
often require extensive work by a qualified technician to restore the unit to its normal operation.
e. If the unit has been dropped or the cabinet has been damaged.
f. When the unit exhibits a distinct change in performance, this indicates a need for service.
20. REPLACEMENT PARTS
When replacement parts are required, be sure the service technician uses replacement parts specified by the manufacturer
or those that have the same characteristics as the original part.
Unauthorized substitutions may result in fire, electric shock or other hazards.
21. SAFETY CHECK
Upon completion of any service or repairs to this unit, ask the service technician to perform safety checks to determine that
the unit is in proper operating condition.
22. HEAT
The product should be situated away from heat sources such as radiators, heat registers, stoves, or other products
(including amplifiers) that produce heat.
23. NOTE TO CATV SYSTEM INSTALLER
This reminder is provided to call the CATV system installer's attention to Article 820-40 of the NEC that provides guidelines
for proper grounding and, in particular, specifies that the cable ground shall be connected to the grounding system of the
building, as close to the point of cable entry as practical.
J3W41321A_En_P02-09 27/03/2006, 9:21 AM3
3
Page 4
Contents
PREPARATIONS
IMPORTANT SAFEGUARDS ...................................................... 2
Contents ....................................................................................... 4
Features ....................................................................................... 5
Power source ............................................................................... 5
Parts and functions ...................................................................... 6
Remote control ............................................................................. 7
Antenna connections.................................................................... 8
Cable TV connections .................................................................. 9
Connections to other equipment ................................................ 10
Starting setup ............................................................................. 14
Setting the language .................................................................. 15
Memorizing channels ................................................................. 16
OPERATION
TV operation............................................................................... 18
Setting the V-Chip ...................................................................... 20
Locking channels ....................................................................... 23
Locking the video inputs............................................................. 24
Setting the front panel lock......................................................... 25
Labeling channels ...................................................................... 26
Setting the clock ......................................................................... 27
Setting the on timer .................................................................... 28
Setting the off timer .................................................................... 29
Setting the picture size ............................................................... 30
Picture control adjustment.......................................................... 31
Resetting your picture adjustment.............................................. 31
Closed Caption........................................................................... 32
CC advanced ............................................................................. 33
Selecting Stereo / Second Audio Program (SAP) ...................... 34
Selecting the digital output ......................................................... 34
Selecting the audio language ..................................................... 35
Resetting your audio adjustment................................................ 35
Checking the Digital-signal strength........................................... 36
OTHERS
Troubleshooting ......................................................................... 37
Specifications ............................................................................. 38
LIMITED WARRANTY POLICY ................................................. 39
4
J3W41321A_En_P02-09 24/03/2006, 2:21 PM4
Page 5
Features
High Quality Picture Horizontal Resolution more than 500 lines exceeds Super VHS (400 lines) or Laser
Disc (430 lines) in resolution.
Compatible with a wide range of audio outputs Digital Audio Jack (Coaxial) - When a component with a built-
in Dolby Digital decoder is connected, Dolby Digital sound can produce the effect of being in a movie theater or a
concert hall.
• Integrated Digital Tuner - You can view digital broadcasting without using a Digital TV Set-Top Box.
• Closed Caption Decoder With Full Text Mode - Displays text captions or full screen text on the screen for
hearing impaired viewers.
• Picture Adjustments Using The Remote Control - The On-Screen display allows precise remote control
adjustment of BRIGHTNESS, CONTRAST, COLOR, TINT and SHARPNESS.
• Programmable TV Sleep Timer - Operable from the remote control, the TV can be programmed for up to
120 minutes to turn off automatically.
• V-Chip - The V-Chip function can read the rating of a TV program or movie content if the program is encoded
with this information. V-chip will allow you to set a restriction level.
• Stereo/SAP Reception - This TV is designed to receive stereo and second audio program (SAP) broadcasts
where available.
• S-Video/Component Video jacks - A VCR, DVD player, satellite receiver or other audio/video component
can be connected to this unit.
• Video Input Jacks - This unit is equipped with 3 types of video input jacks. The component video in jacks
and S-video in jack enable you to watch the DVD player or the video devices with a high quality picture.
• On-Screen 3 Language Display - You can select one of 3 languages, English, Spanish or French for on-
screen programming.
* Manufactured under license from Dolby Laboratories. “Dolby” and the double-D symbol are trademarks of
Dolby Laboratories.
ENGLISH
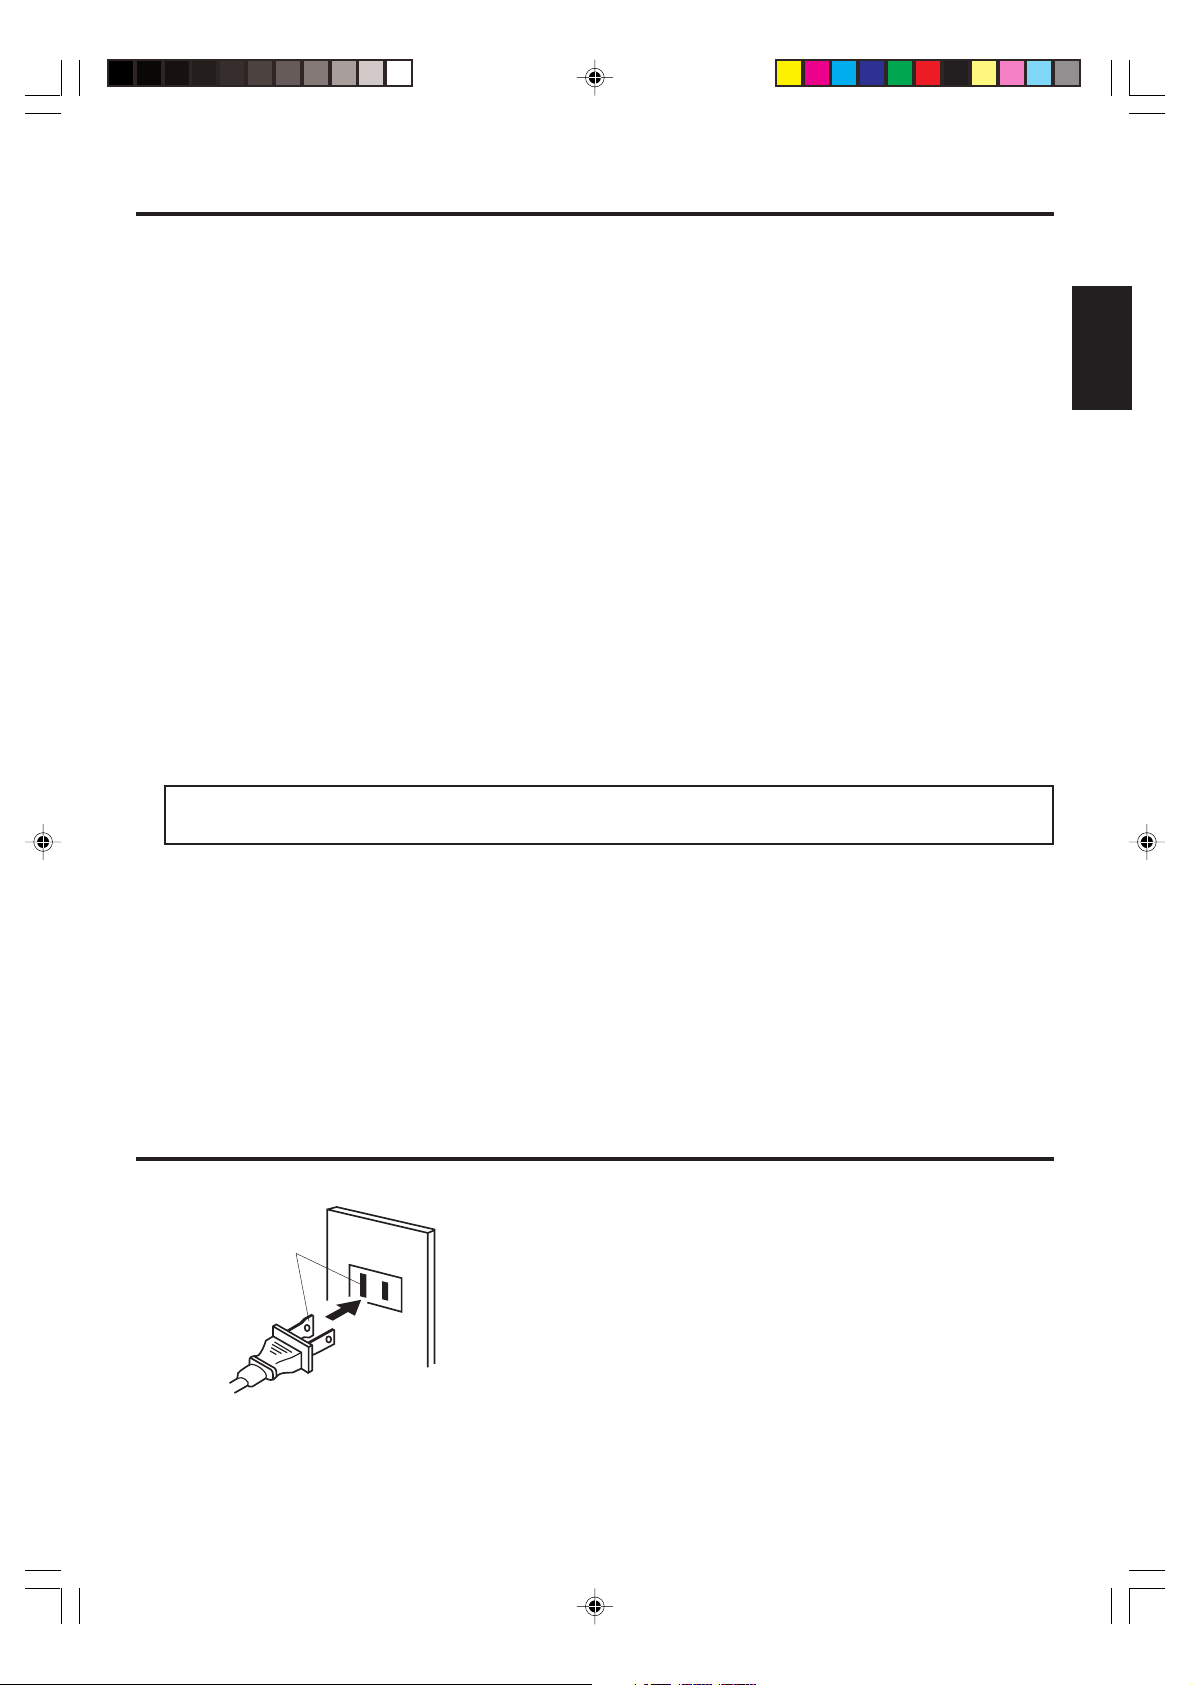
Wider Hole
and Blade
Polarized AC Cord Plug
(One blade is wider than the other.)
J3W41321A_En_P02-09 24/03/2006, 2:21 PM5
AC Outlet
Power source
TO USE AC POWER SOURCE
Use the AC polarized line cord provided for operation on AC. Insert
the AC cord plug into a standard 120V 60Hz polarized AC outlet.
NOTES:
Never connect the AC line cord plug to other than the specified
•
voltage (120V 60Hz). Use the attached power cord only.
If the polarized AC cord does not fit into a non-polarized AC
•
outlet, do not attempt to file or cut the blade. It is the user’s
responsibility to have an electrician replace the obsolete outlet.
If you cause a static discharge when touching the unit and the
•
unit fails to function, simply unplug the unit from the AC outlet
and plug it back in. The unit should return to normal operation.
5
Page 6

Parts and functions
Front
POWER button
Remote sensor
AUDIO (L/R)/VIDEO IN jacks (VIDEO2)
*CHANNEL ▲/▼ buttons
* To display the menu screen.
Press both
CHANNEL ▲/▼ buttons and
screen operations.
VOLUME
▲/▼
buttons
Rear
*VOLUME
at the same time to display the menu screen.
VOLUME
▲/▼
buttons can be used to select the desired setting during the menu
▲/▼
buttons
AC power cord
RF IN (VHF/UHF) jack
S-VIDEO IN jack
6
J3W41321A_En_P02-09 24/03/2006, 2:22 PM6
AUDIO (L/R)/VIDEO IN jacks
(VIDEO1)
COAXIAL DIGITAL
AUDIO OUT jack
COMPONENT IN jacks
Page 7
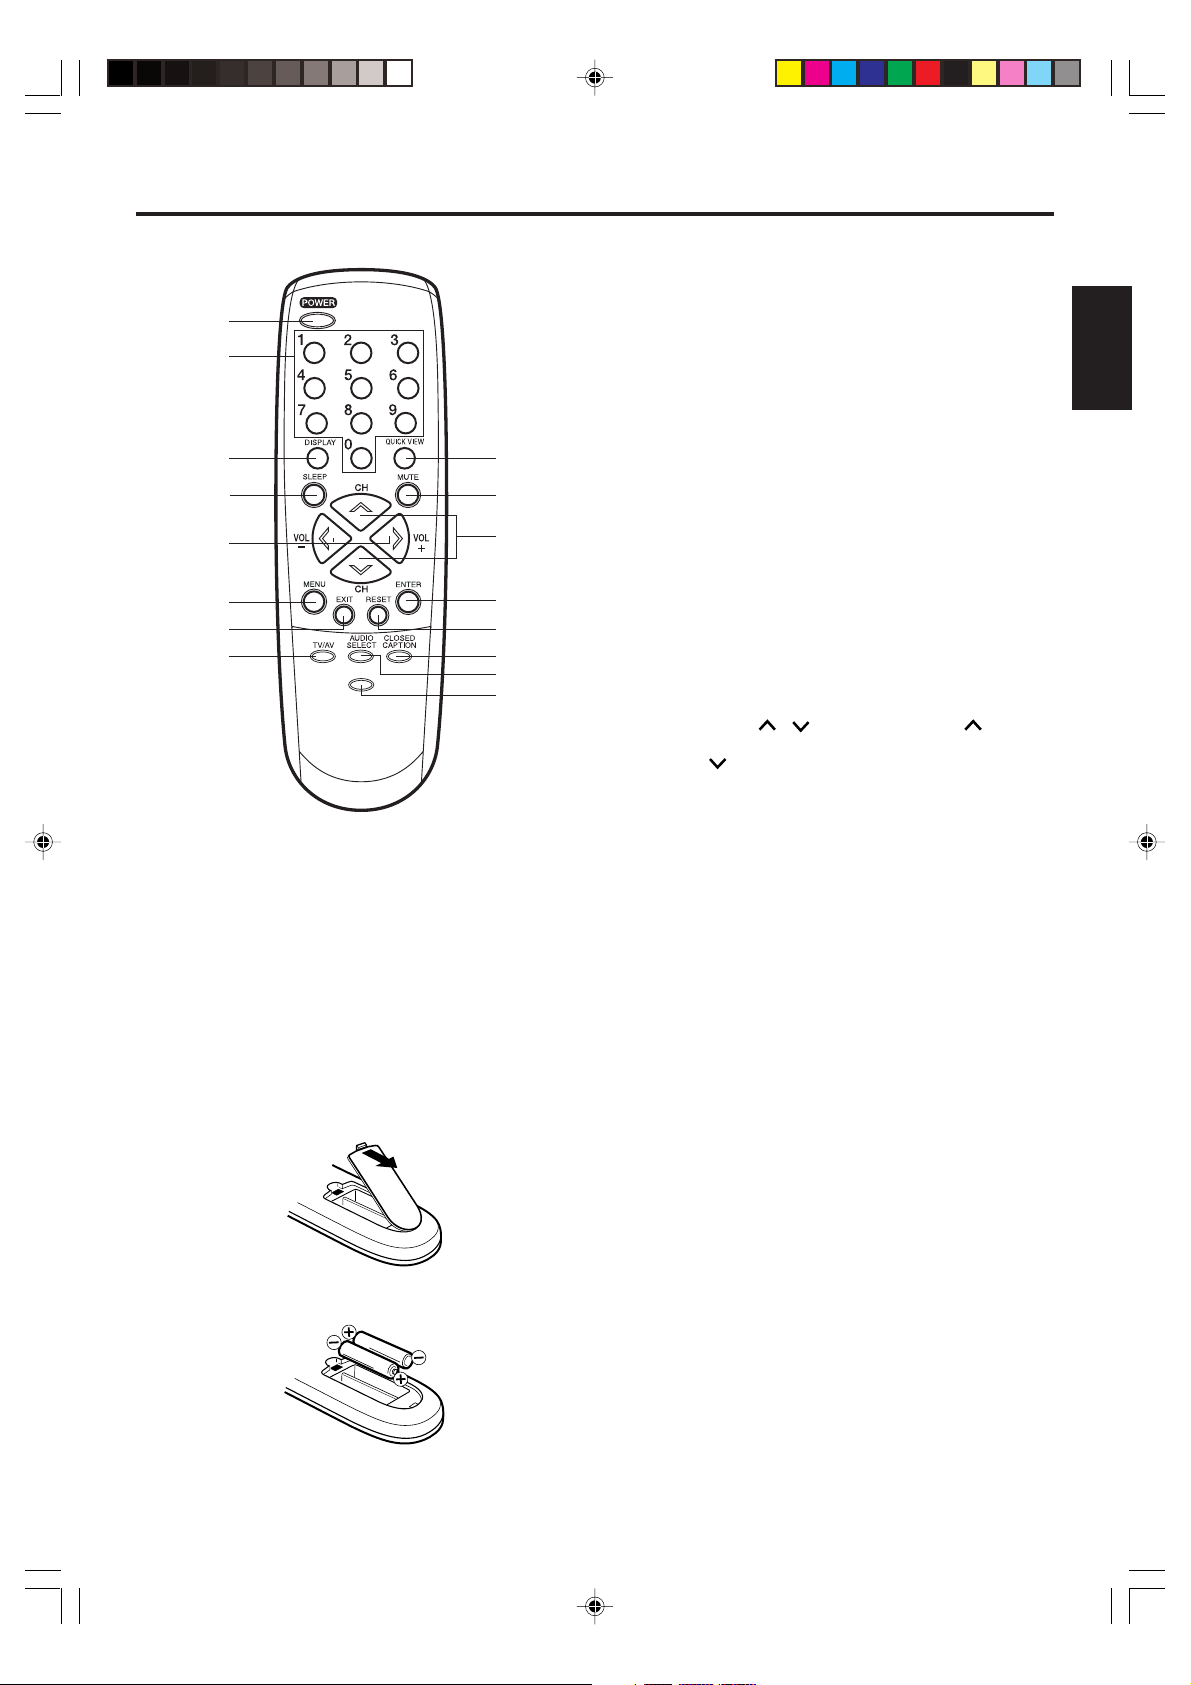
Remote control
8
4. SLEEP Button - To set the TV to turn off after a preset
amount of time, press the SLEEP button. The clock will
count up 10 minutes each time the button is pressed in
the order of 0h00m, 0h10m,...1h50m,2h00m After the sleep
1
2
3
–/
4
5
6
7
PICTURE
SIZE
9
10
11
12
13
14
15
16
1. POWER Button - Press to turn the TV on. Press again to
turn the TV off.
2. Direct Channel Selection Buttons (0-9) - Allow direct
access to any channel.
3. -/DISPLAY Button - When the TV is receiving an analog
signal pressing this button will display the current information on-screen. When the TV is receiving a digital,
pressing this button once will display the digital information on-screen; pressing it a second time will display the
analog information on-screen. To remove the display
from the screen, press this button again. This button is
also the “-“ button used when selecting digital channels.
Before using the remote control, batteries must first be installed.
HOW TO INSTALL BATTERIES
1. Open the battery compartment cover.
2. Install two “AAA” batteries (not supplied).
3. Replace the battery compartment cover.
time is programmed, the display will disappear then reappear
momentarily every ten minutes to remind you the sleep
timer function is operating. To confirm the sleep time setting,
press the SLEEP button once and the remaining time will
be momentarily displayed. To cancel sleep time, press the
SLEEP button repeatedly until the display turns to 0h00m.
5. VOL (VOLUME) + / - Buttons - Press the + button to
increase, or the - button to decrease the volume level.
Use to select the desired setting during the menu screen
operation.
6. MENU Button -
7. EXIT Button - Press remove the menu screen.
8. TV/AV Button -
SELECTION menu to select the video input source.
9. QUICK VIEW Button - This button allows you to go back
to the previous channel selected by pressing the
QUICK VIEW button. Press this button again to return to
the channel you were watching.
10. MUTE Button -
The TV will be silenced and the symbol “MUTE” will appear
on the screen. The muting feature can be released by
pressing the MUTE button again or one of the VOL
+ or - buttons.
11. CH (CHANNEL) / Buttons - Press the button to
change to a higher numbered channel set into memory.
Press the button to change to a lower numbered channel
set into memory.
Use to select the desired setting during the menu screen
operation.
12. ENTER Button - Press to enter or select information for
On-Screen operations while in the adjustment menu.
13. RESET Button - Press to reset the menu screen picture
and sound adjustments to their factory preset positions
while in the adjustment menu.
14.
CLOSED CAPTION Button - Press this button to display
CLOSED CAPTION menu.
15. AUDIO SELECT Button - Press this button to display
AUDIO menu.
16. PICTURE SIZE Button - Press this button to change
the picture size.
Press to display the menu screen function.
Press this button to display SOURCE
To turn off the sound, press this button once.
Use two “AAA” size batteries (not supplied). The batteries
may last approximately one year depending on how much
the remote control is used. For best performance, it is
recommended that batteries should be replaced on a yearly
basis, or when the remote operation becomes erratic. Do
not mix old and new batteries or different types.
BATTERY PRECAUTIONS
These precautions should be followed when using batteries
in this device:
• Use only the size and type of batteries specified.
• Be sure to follow the correct polarity when installing the
batteries as indicated in the battery compartment.
Reversed batteries may cause damage to the device.
• Do not mix different types of batteries together (e.g.
Alkaline and Carbon-zinc) or old batteries with fresh ones.
• If the device is not to be used for a long period of time,
remove the batteries to prevent damage or injury from
possible battery leakage.
Do not try to recharge batteries not intended to be recharged;
•
they can overheat and rupture (follow battery manufacturer's
directions).
ENGLISH
7
J3W41321A_En_P02-09 24/03/2006, 2:22 PM7
Page 8
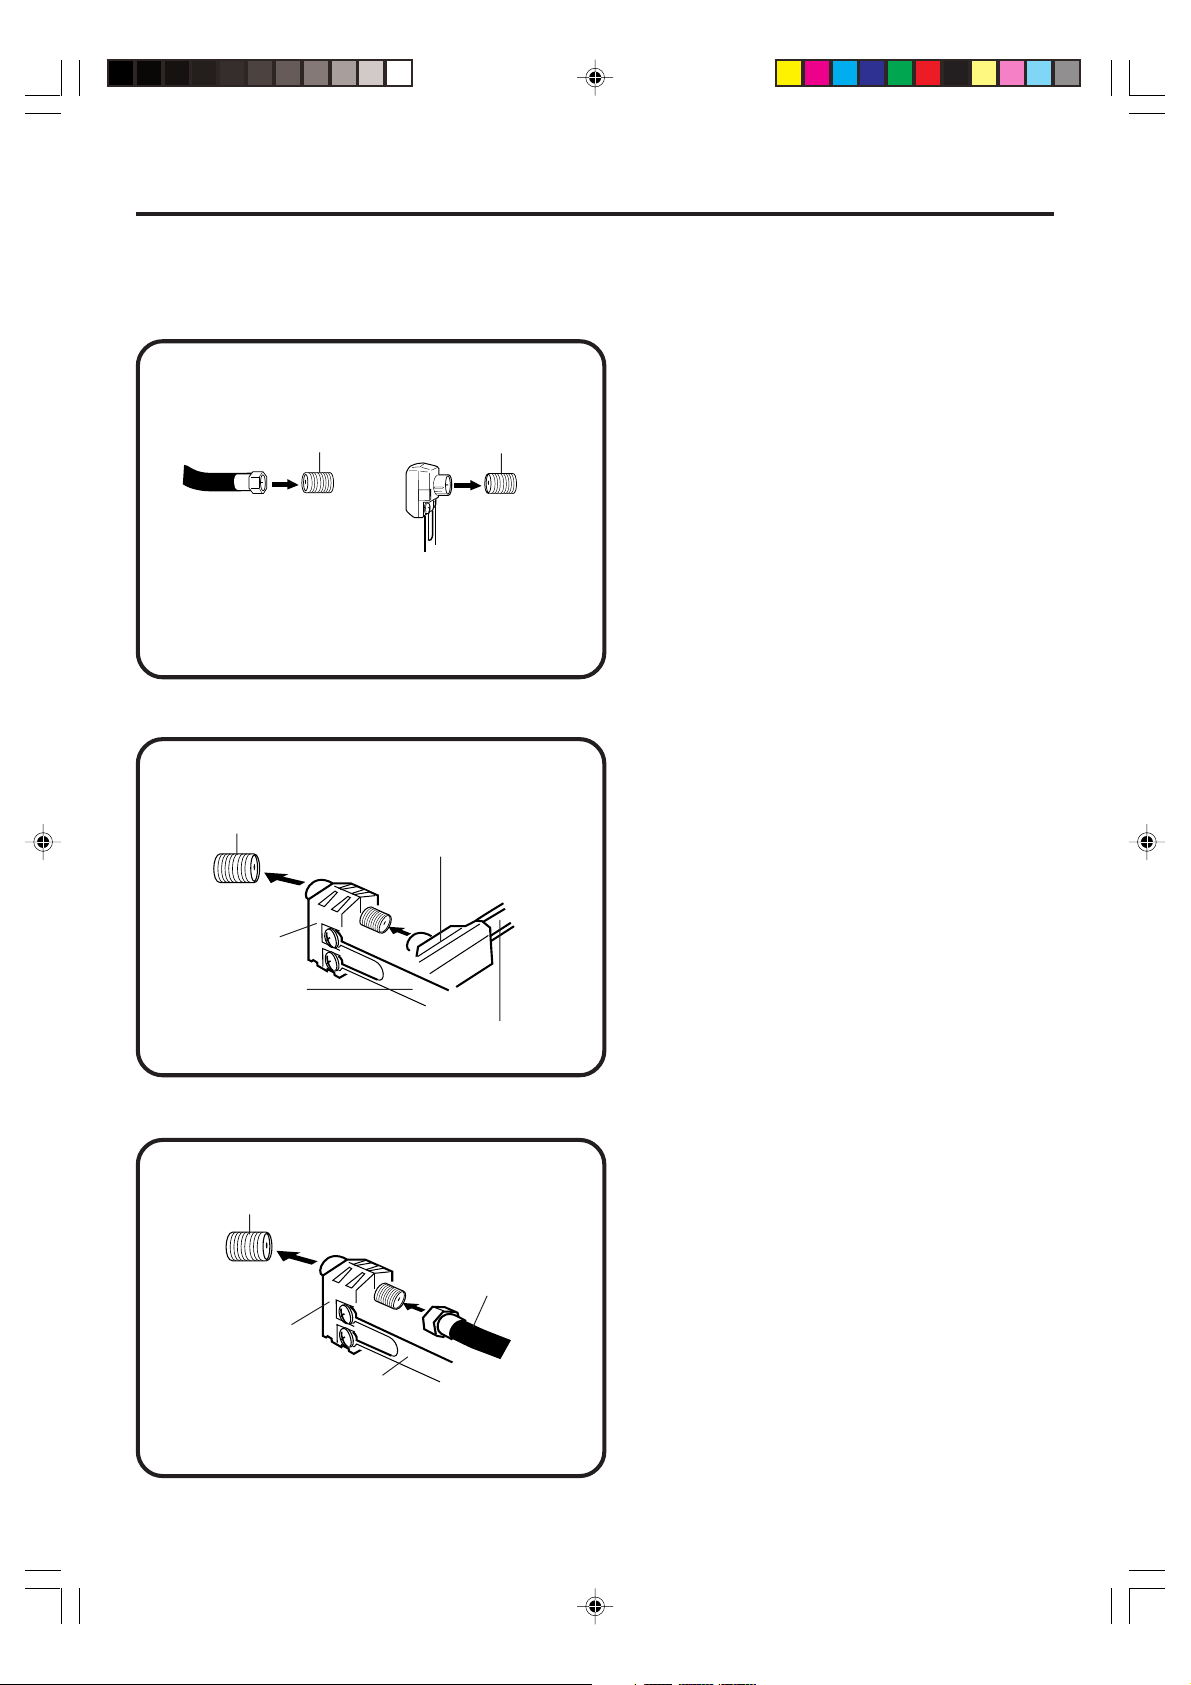
Antenna connections
If you are using an indoor or outdoor antenna, follow the instructions below that correspond to your antenna
system. If you are using a cable TV service (CABLE), see page 9 for Cable TV connections.
Combination VHF/UHF Antenna (Single 75 ohm Cable or 300 ohm Twin-lead Wire)
Connect the 75 ohm Cable from the Combination
VHF/UHF Antenna to the RF IN Jack.
75 ohm
Coaxial
Cable
RF IN
jack
300-75 ohm
Matching
Transformer
RF IN
jack
If your Combination VHF/UHF Antenna has a 300
ohm Twin-lead Wire, the use of the 300-75 ohm
Matching Transformer may be necessary.
Combination VHF/UHF Antenna (Separate VHF and UHF 300 ohm Twin-lead Wires)
Connect the UHF 300 ohm Twin-lead Wire to the
RF IN
jack
Combiner
UHF 300 ohm
300-75 ohm
Matching
Transformer
Combiner (not supplied). Connect the VHF 300
ohm Twin-lead Wire to the 300-75 ohm Matching
Transformer. Attach the Transformer to the Combiner, then attach the Combiner to the RF IN Jack.
VHF 300 ohm
Separate VHF/UHF Antennas (75 ohm VHF Cable and 300 ohm UHF Twin-lead Wires)
RF IN
jack
VHF 75 ohm
Combiner
UHF 300 ohm
Connect the VHF 75 ohm cable and UHF 300 ohm
Twin-lead Wire to the Combiner. Attach the Combiner to the RF IN Jack.
8
J3W41321A_En_P02-09 24/03/2006, 2:22 PM8
Page 9
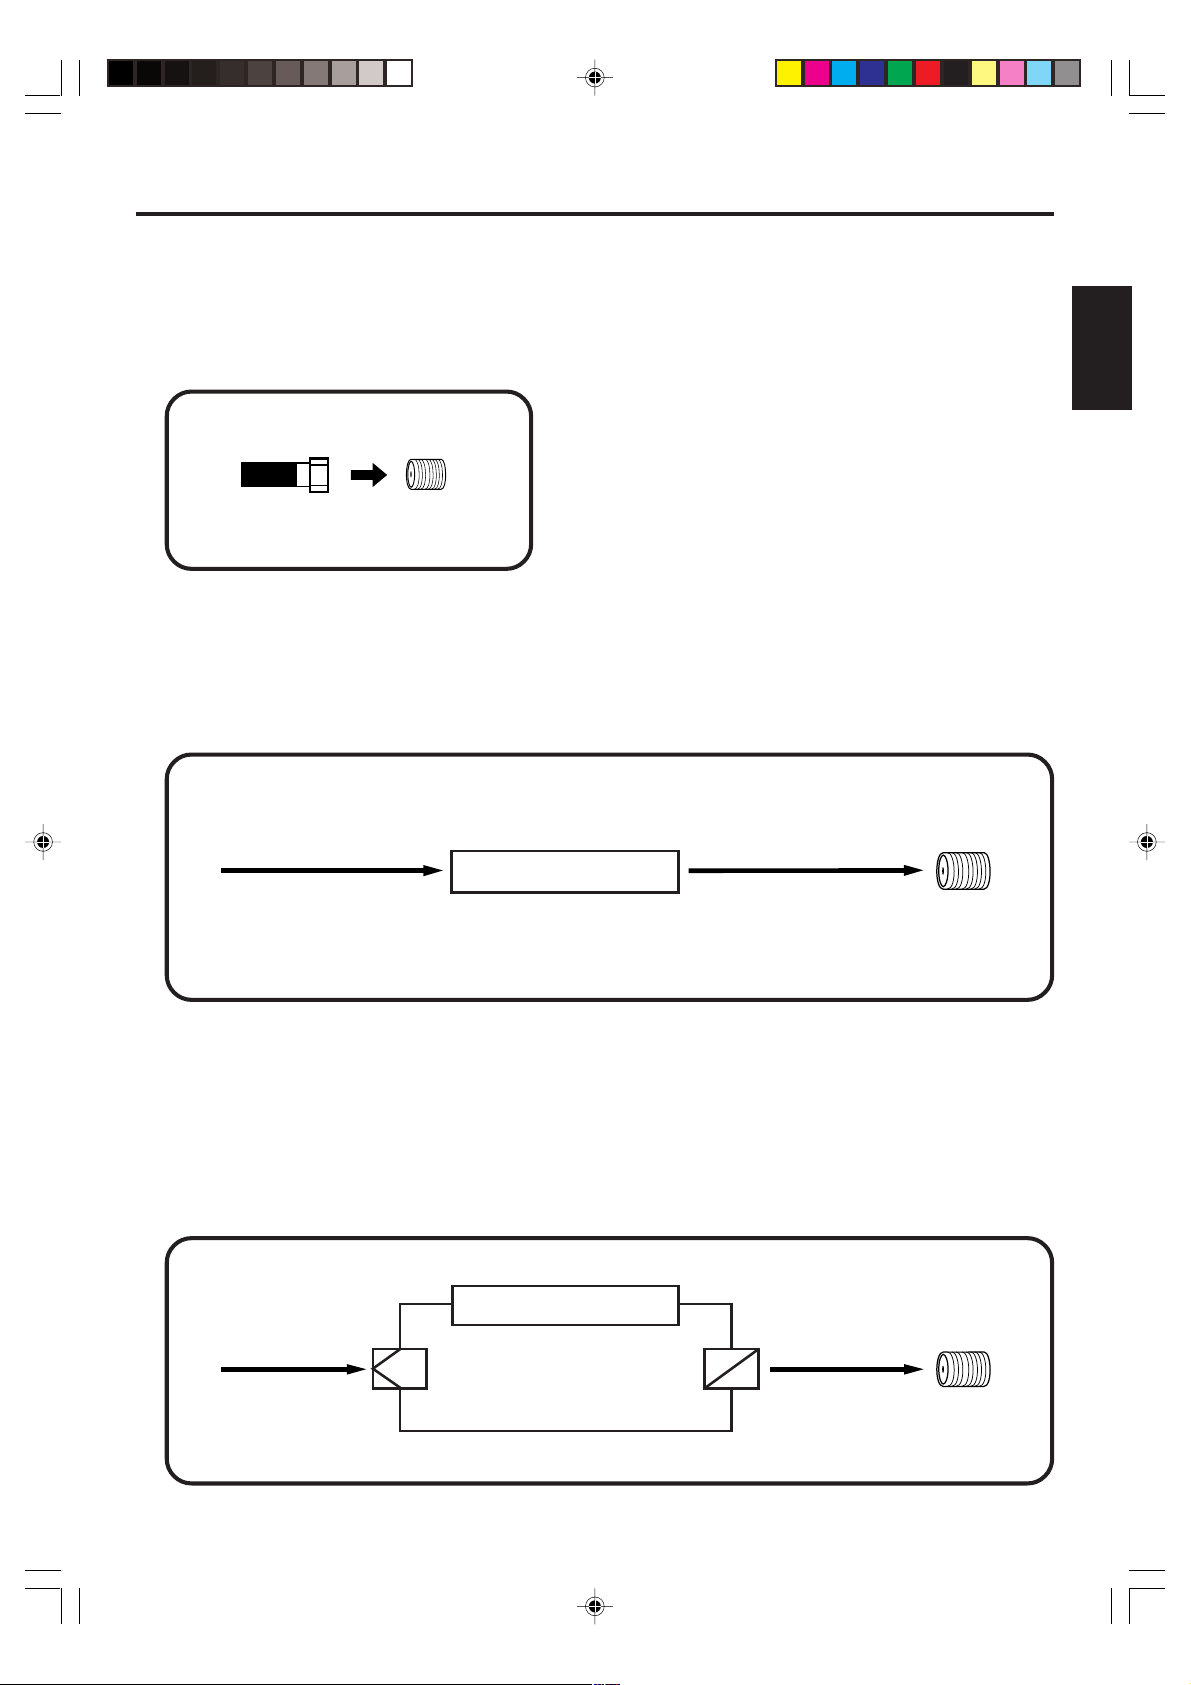
Cable TV connections
This unit has an extended tuning range and can tune most cable channels without using a Cable TV
Converter box. Some Cable TV companies offer “premium pay channels” in which the signal is
scrambled. Descrambling these signals for normal viewing requires the use of a descrambler device
which is generally provided by the Cable TV company.
FOR SUBSCRIBERS TO BASIC CABLE TV SERVICE
RF IN
jack
75 ohm
Coaxial Cable
FOR SUBSCRIBERS TO SCRAMBLED CABLE TV SERVICE
If you subscribe to a Cable TV service which requires the use of a Converter/Descrambler box, connect the
incoming 75 ohm Coaxial Cable to the Converter/Descrambler box. Using another 75 ohm Coaxial Cable,
connect the output jack of the Converter/Descrambler box to the RF IN Jack on the unit. Follow the connections
shown below. Set the unit to the output channel of the Converter/Descrambler box (usually channel 3 or 4) and
use the Converter/Descrambler box to select channels.
For basic cable service not requiring a Converter/Descrambler
box, connect the 75 ohm Coaxial Cable directly to the RF IN
Jack on the back of the unit.
ENGLISH
RF IN
Incoming 75 ohm
CABLE TV Cable
Converter/
Descrambler
75 ohm Cable to unit
jack
FOR SUBSCRIBERS TO UNSCRAMBLED BASIC CABLE TV SERVICE WITH
SCRAMBLED PREMIUM CHANNELS
If you subscribe to a Cable TV service in which basic channels are unscrambled and premium channels require the
use of a Converter/Descrambler box, you may wish to use a signal Splitter and an A/B Switch box (available from
the Cable TV company or an electronics supply store). Follow the connections shown below. With the switch in the
“B” position, you can directly tune any nonscrambled channels on your unit. With the switch in the “A” position, tune
your unit to the output of the Converter/Descrambler box (usually channel 3 or 4) and use the Converter/Descrambler
box to tune scrambled channels.
Incoming 75 ohm
CABLE TV Cable
Splitter
Converter/
Descrambler
A/B Switch
75 ohm Cable
A
B
to unit
RF IN
jack
J3W41321A_En_P02-09 24/03/2006, 2:22 PM9
9
Page 10

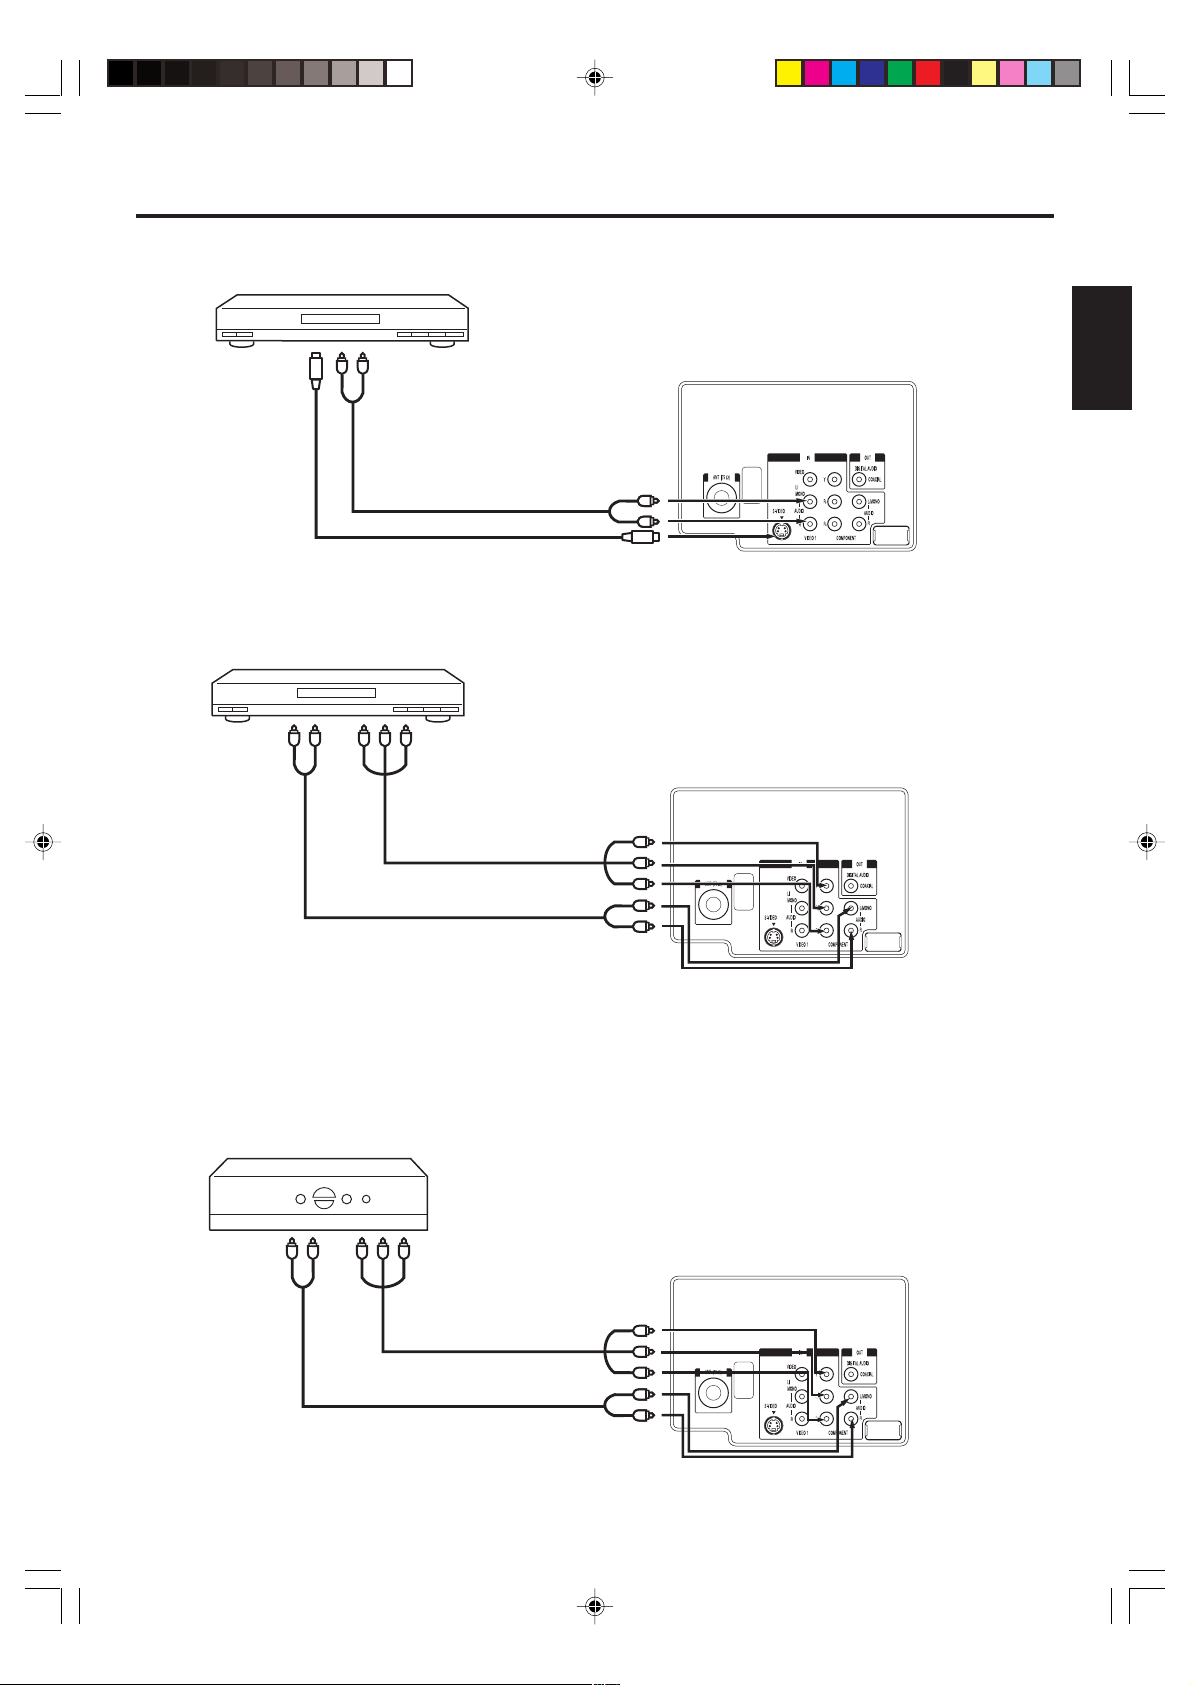
Connections to other equipment
The exact arrangement you use to interconnect various video and audio components to the TV is dependent on
the model and features of each component. Check the Owner's Manual provided with each component for the
location of video and audio inputs and outputs.
The connection diagrams below are offered as suggestions. You may need to modify them to accommodate
your particular assortment of components. The diagrams are intended to show component video and audio
interconnections only.
Selecting the video input source
Press TV/AV to view a signal from another device connected to your TV, such
as a VCR or DVD player. You can select ANT, VIDEO1, VIDEO2 (on the front
panel), or COMPONENT depending on which input jacks you used to connect
your devices.
Pressing TV/AV on the remote control displays the current signal source
(press TV/AV again or 0-3 to change).
To connect the TV to a VCR
To Audio/Video OUT
SOURCE SELECTION
0. ANT
1. VIDEO1
2. VIDEO2
3. COMPONENT
/0-3 : SELECT
Audio/Video cord (not supplied)
To AUDIO/VIDEO IN
Rear of the TV
To connect the TV to a VCR with an S-Video cord
If you connect a VCR with a S-VIDEO cord to the S-VIDEO IN jack on the rear of the TV, you must also connect
the audio cords to the AUDIO IN jacks on the rear of the TV. The S-VIDEO cord only carries the video signal.
The audio signal is separate.
To S-Video OUT To Audio OUT
To AUDIO IN
Audio cord (not supplied)
S-Video cord (not supplied)
To S-VIDEO IN
NOTE:
When the S-video cord and the video cord are connected to each jack at the same time, the S-video cord takes
precedence over the video cord.
Rear of the TV
10
J3W41321A_En_P10-13 24/03/2006, 2:22 PM10
Page 11
Connections to other equipment (continued)
To connect the TV to a DVD player/Satellite receiver
If your DVD player or Satellite receiver has a S-Video out jack, connect cords as shown.
To S-Video OUT
To Audio OUT
Audio cord (not supplied)
S-Video cord (not supplied)
To AUDIO IN
To S-VIDEO IN
Rear of the TV
To connect the TV to a DVD player with component video
If your DVD player has component video out jacks, connect your TV to a DVD player using a component video
cord. It can greatly enhance picture quality and performance.
YPBP
Audio cord (not supplied)
To Component OUTTo Audio OUT
R
Video cord (not supplied)
ENGLISH
To COMPONENT IN
Rear of the TV
NOTE:
This unit is only capable of displaying 480i interlaced signal when connected to a digital device with component
video outputs. If you input a 480p, 720p or 1080i signal to the component video inputs, “COMPONENT” will be
displayed on a black screen. If this screen appears, set the digital device’s component output to 480i.
To connect the TV to a DTV receiver/set-top box
If you connect a DTV receiver/set-top box, connect your TV to it by using a component video cord.
YPBP
R
To Component OUTTo Audio OUT
Video cord (not supplied)
Audio cord (not supplied)
To COMPONENT IN
Rear of the TV
11
J3W41321A_En_P10-13 24/03/2006, 2:22 PM11
Page 12
Connections to other equipment (continued)
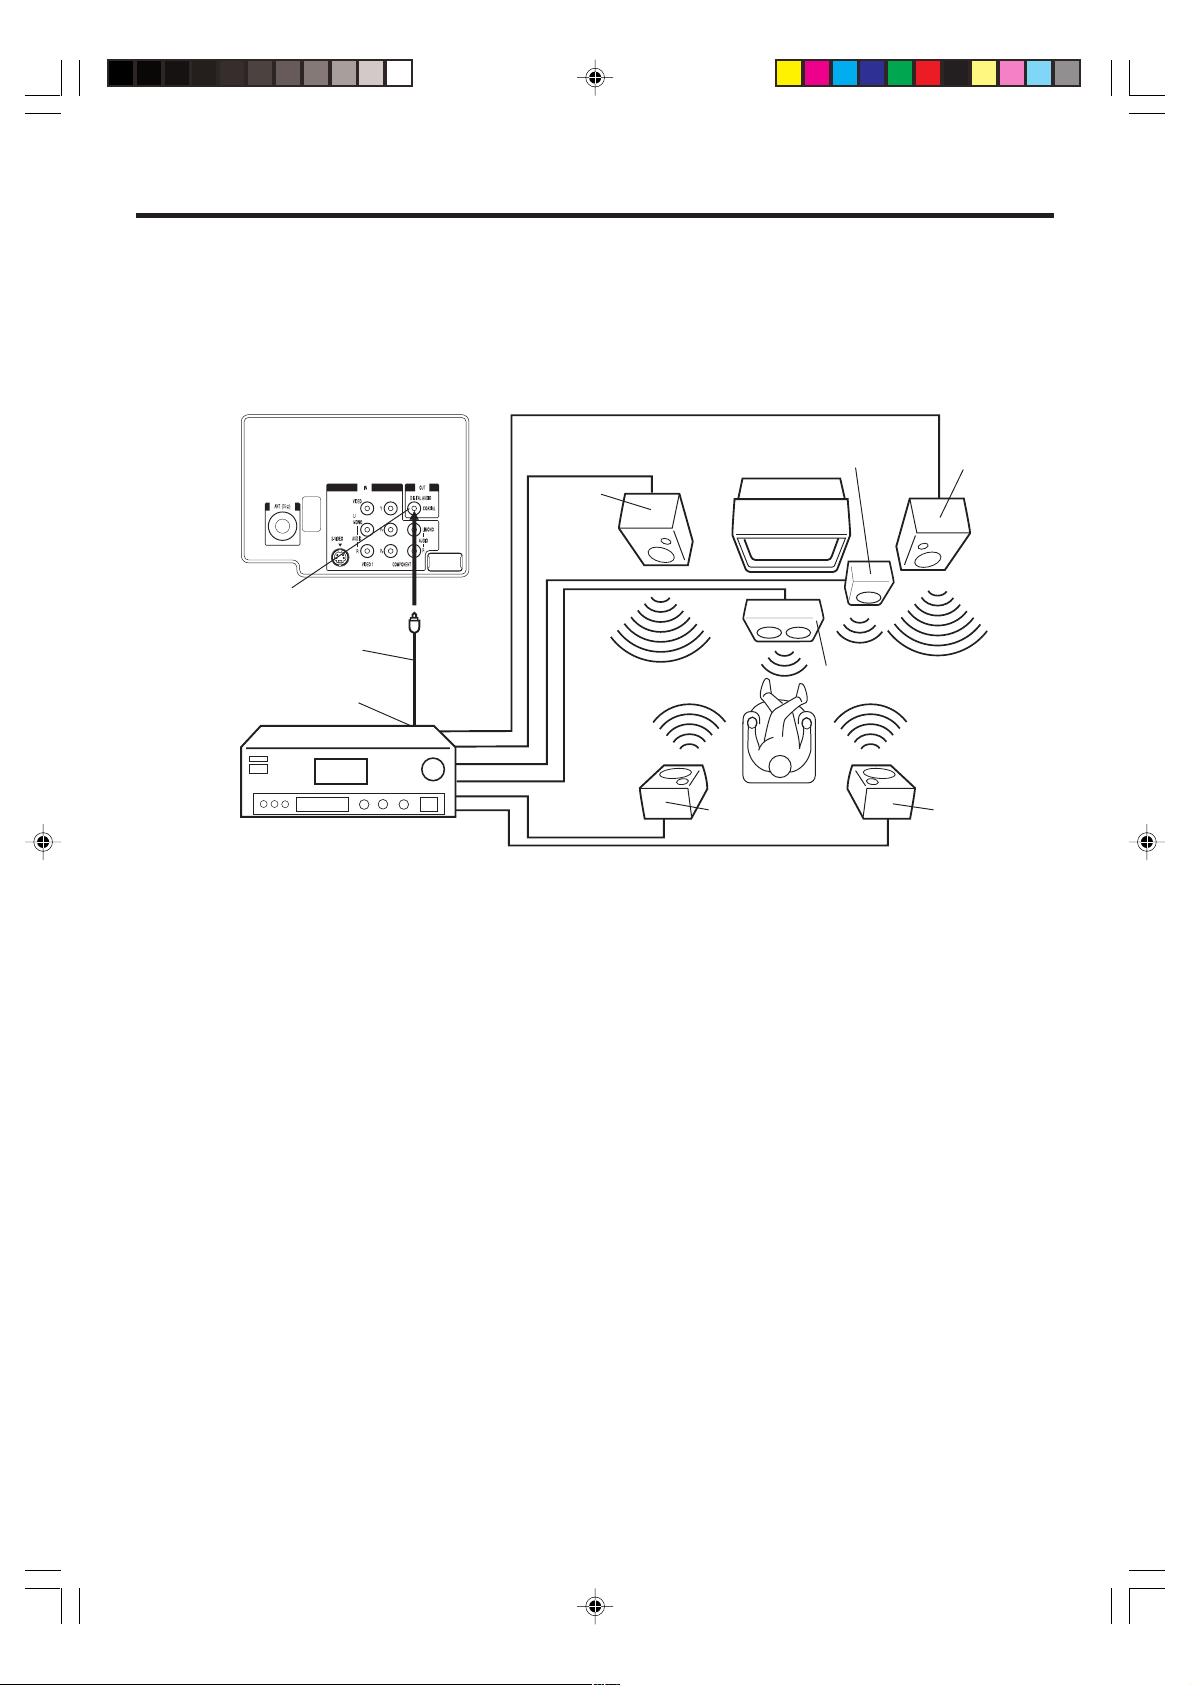
Using an AV Amplifier with built-in digital surround
If you are using an Amplifier with built-in digital surround sound as follows, you can enjoy various audio systems
including Dolby Digital Surround audio that sounds just like the movie.
Connect an AV amplifier with built-in Dolby Digital decoder, or etc as shown below.
Rear of the TV
Front
Speaker
TV
Front
Speaker
(Left)
COAXIAL DIGITAL
AUDIO OUTPUT
Coaxial digital cable
(not supplied)
Center Speaker
To Coaxial Digital
Audio Input
(Right)Subwoofer
NOTES:
AV Amplifier with built-in digital surround
decoder as listed above
Surround
Speaker (Left)
Surround
Speaker
(Right)
• When you make the connection above, on the AV Amplifier, do not set DOLBY DIGITAL to DOLBY DIGITAL “ON”.
If you do, a loud noise will emit from the speakers possibly causing damage to your hearing or to the speakers.
• This unit does not apply to DTS audio out. There will be no sound output if connected to AV amplifier with built-in
DTS decoder.
12
J3W41321A_En_P10-13 24/03/2006, 2:22 PM12
Page 13
Connections to other equipment (continued)
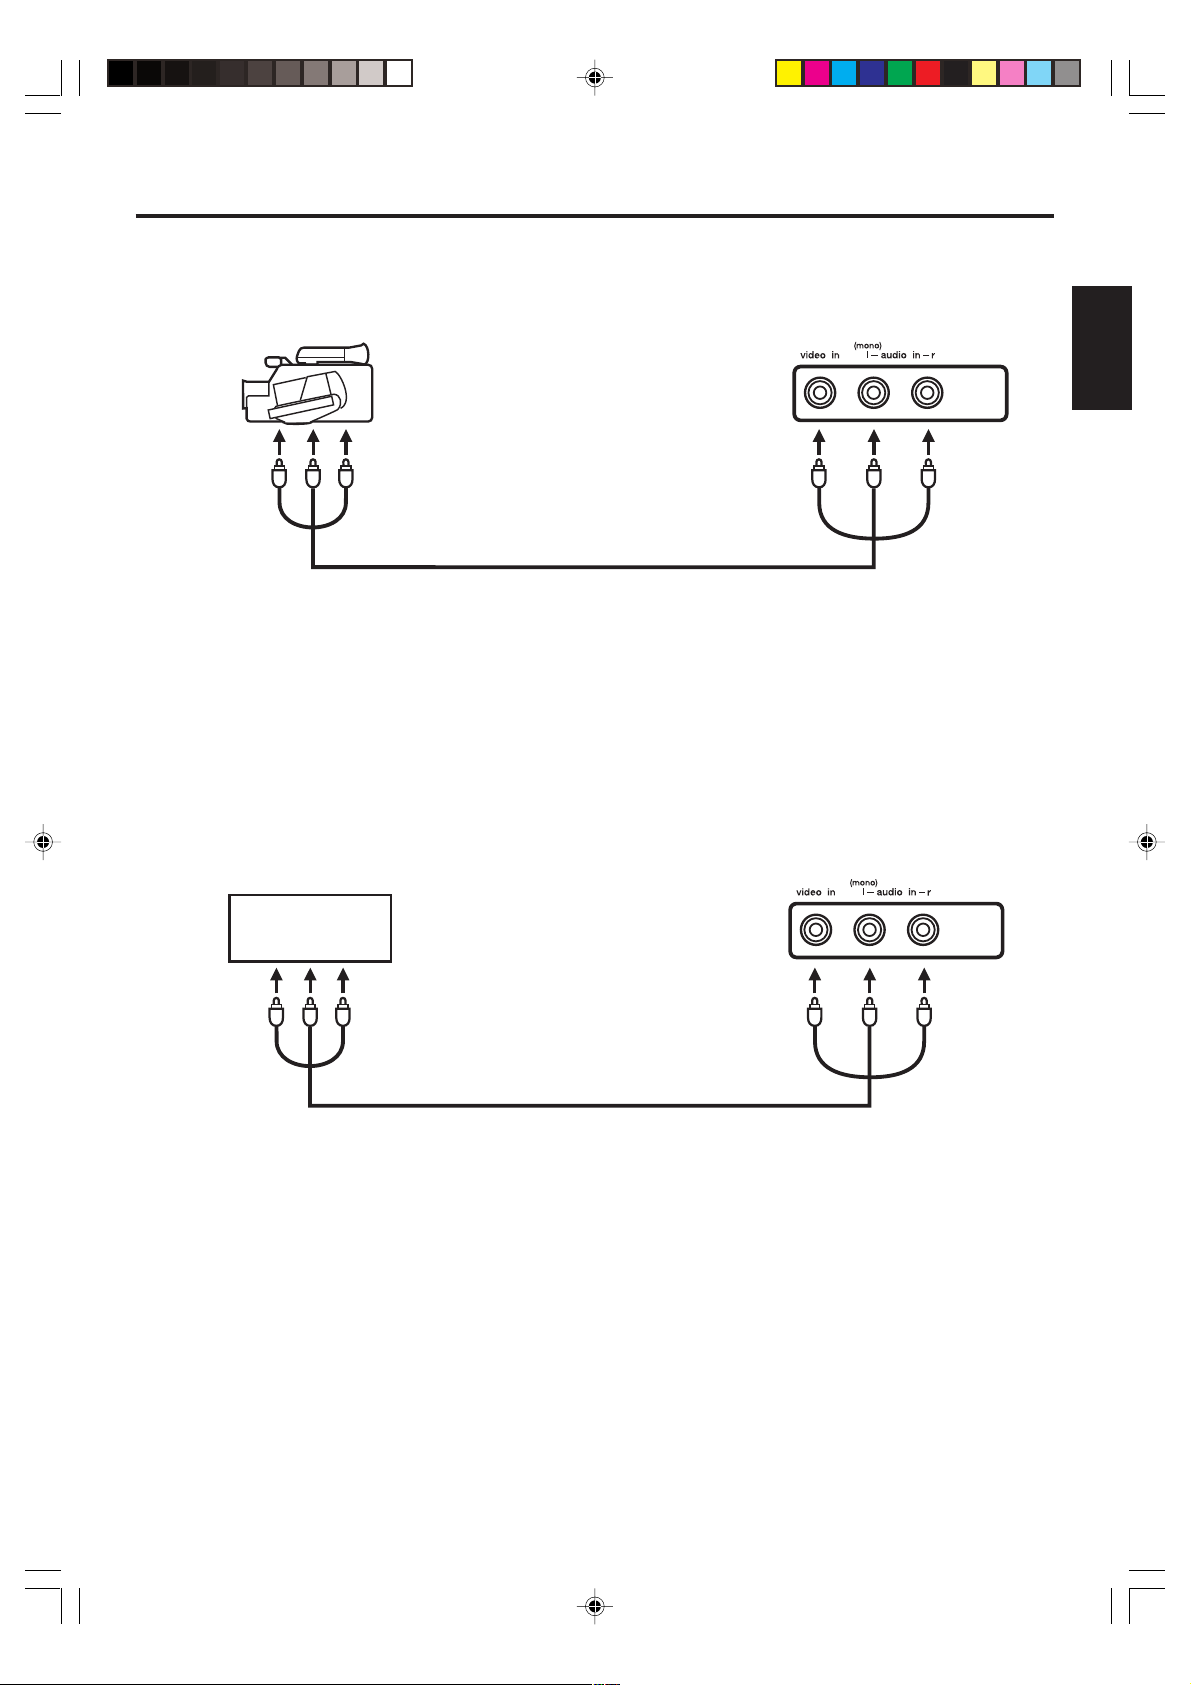
To connect the TV to a camcorder
To playback from a camcorder, connect the camcorder to the TV as shown.
Front of the TV
To Audio/Video OUT
Audio/Video cord (not supplied)
To connect the TV to a Game
The TV can also be used as a display device for many video games. However, due to the wide variety of signals
generated by these devices and subsequent hook-up variations required, they have not all been included in the
suggested connection diagrams. You'll need to consult each component's Owner's Manual for additional
information.
ENGLISH
TV GAME
Front of the TV
To Audio/Video OUT
Audio/Video cord (not supplied)
J3W41321A_En_P10-13 24/03/2006, 2:22 PM13
13
Page 14

Starting setup
:SELECT ENTER : SET
LANGUAGE / LANGUE / IDIOMA
ENGLISH
FRANÇAIS
ESPAÑOL
:SELECT ENTER : SET
CHANNEL PLAN
TV
CABLE
:SELECT ENTER : SET
AUTO SETUP
START
CANCEL
The STARTING SETUP menu appears
the first time you turn on the TV, and
assists you to select the menu
language, specify the TV/CABLE
setting, and program your channels
automatically.
-/
IMPORTANT: Make sure that the antenna or cable TV system
connection is made!
1
Press POWER. The starting
setup function begins and
the Language setup menu
appears on the screen.
Press
or
to select
your desired language, then
press ENTER.
2
Press
or
to select “TV”
or “CABLE”, then press
ENTER.
Press or to select
3
“START”, then press ENTER.
If you select “CANCEL” and
press ENTER, the STARTING
SETUP stops and changes to
the TV screen.
PICTURE
SIZE
Now the “AUTO SETUP” starts. After the starting setup is com-
4
pleted, the TV channel appears on the screen.
• Depending on the reception condition, it may take approximately
10 minutes to complete memorizing digital cable channels.
Please be patient.
NOTE:
If you press EXIT in the process of “AUTO SETUP”, the STARTING
SETUP stops and changes to the normal screen.
When you make a menu selection, your changes occur immediately.
•
You do not have to press EXIT to see your changes.
• When you are finished programming the menus, press EXIT.
14
J3W41321A_En_P14-17 24/03/2006, 2:22 PM14
Page 15
SETUP
LANGUAGE ENGLISH
CLOCK SET
TV/CABLE CABLE
AUTO CH MEMORY
ADD/DELETE
:SELECT :ADJUST
SETUP
LANGUAGE ENGLISH
ENGLISH/ FRANÇAIS /ESPAÑOL
CLOCK SET
TV/CABLE CABLE
AUTO CH MEMORY
ADD/DELETE
:SELECT :ADJUST
Setting the language
You can choose from three different
languages (English, French and
Spanish) for the on-screen displays.
-/
Press MENU. The menu screen will appear.
1
Then press or
2
(SETUP) menu.
Press
3
or
to select
to select
“LANGUAGE”.
Press or to select the desired language: English
4
(ENGLISH), French (FRANÇAIS) or Spanish (ESPAÑOL).
Press EXIT to return to the normal screen.
5
ENGLISH
PICTURE
SIZE
NOTE:
If no buttons are pressed for more than
15 seconds, the MENU screen will return to normal TV-operation automatically.
J3W41321A_En_P14-17 24/03/2006, 2:22 PM15
15
Page 16
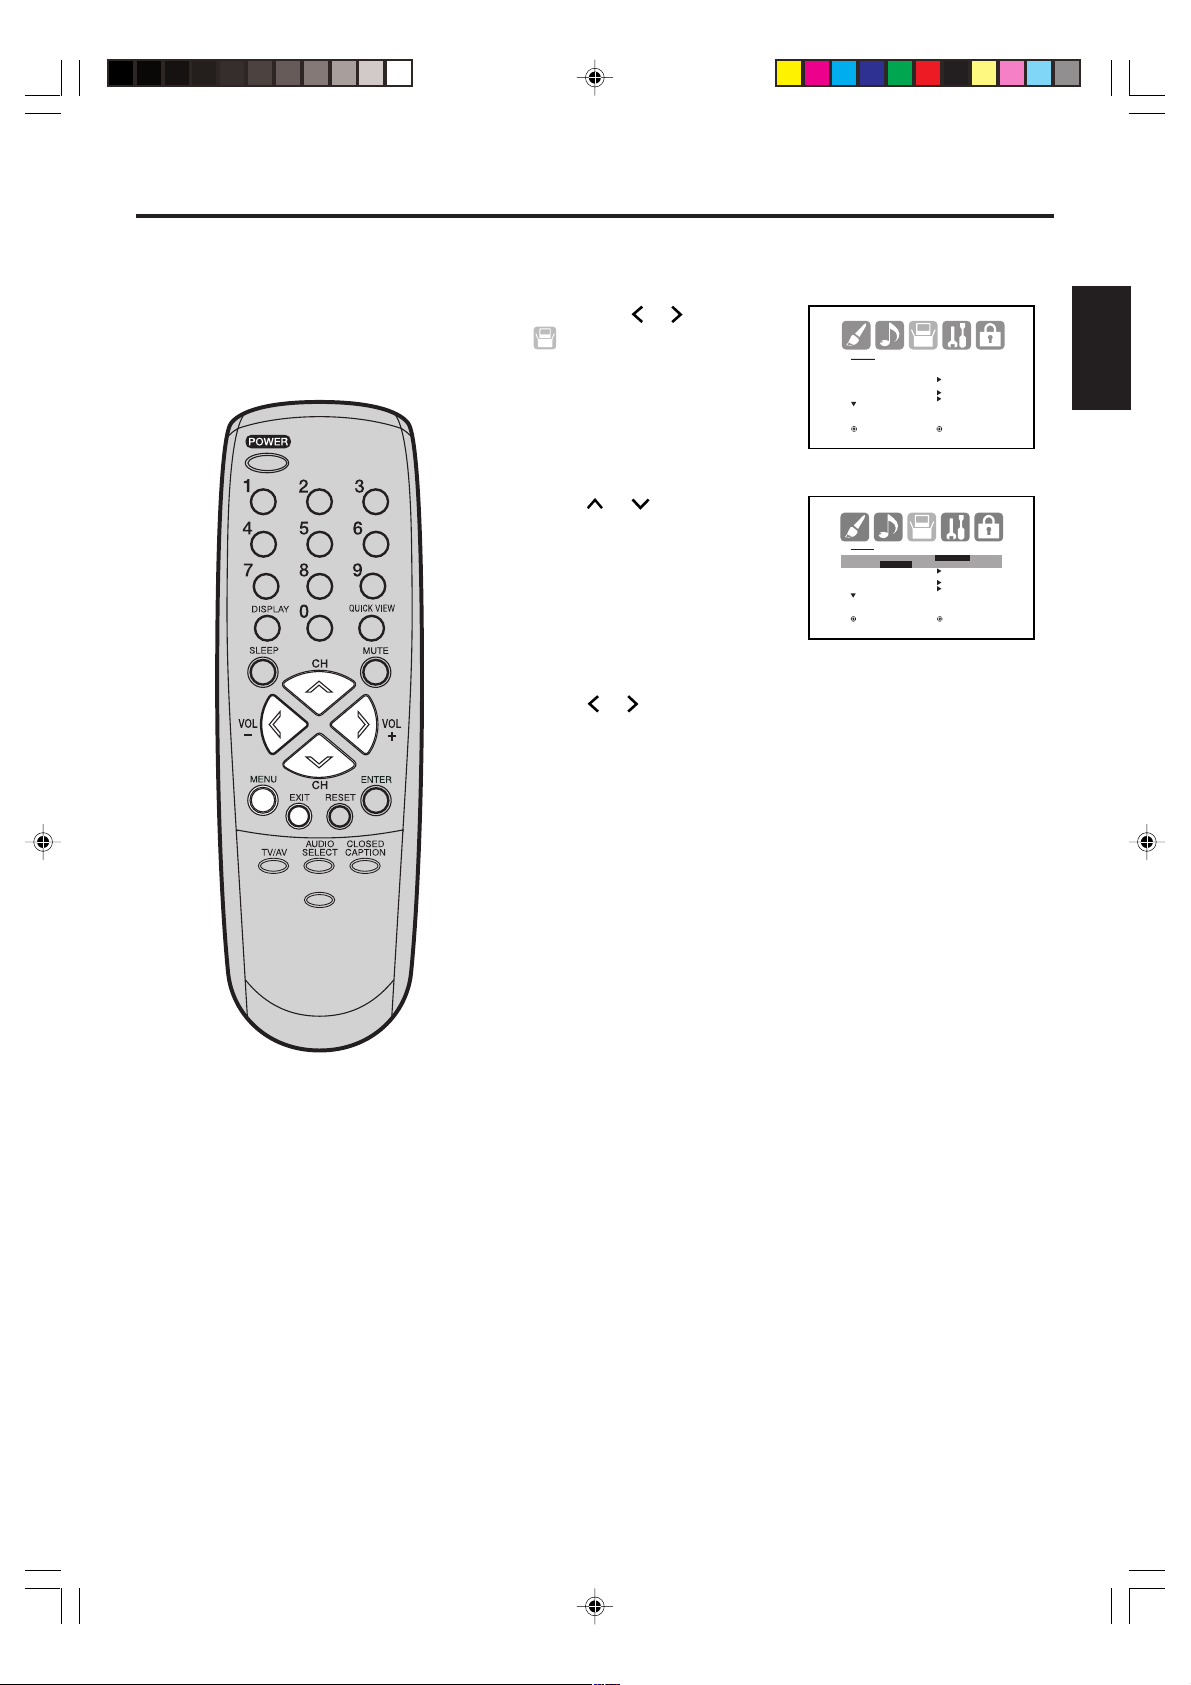
Memorizing channels
This TV is equipped with a channel memory feature which allows channels to skip up or down to the next
channel set into memory, skipping over unwanted channels. Before selecting channels, they must be programmed into the TV’s memory. This TV can receive up to 250 VHF/UHF channels and 500 cable TV channels.
To use this TV with an antenna, set the TV/CABLE menu option to the TV mode. When shipped from the factory,
this menu option is in the CABLE mode.
TV/CABLE selection
Press MENU. The menu screen will appear.
1
Press
2
-/
Press or to select
3
“TV/CABLE”.
Press or to select “TV”
PICTURE
SIZE
4
or “CABLE”.
TV
CABLE - CABLE TV channels
or to select
(SETUP) menu.
- VHF/UHF channels
SETUP
LANGUAGE ENGLISH
CLOCK SET
TV/CABLE CABLE
AUTO CH MEMORY
ADD/DELETE
:SELECT :ADJUST
SETUP
LANGUAGE ENGLISH
CLOCK SET
TV/CABLE TV/CABLE
AUTO CH MEMORY
ADD/DELETE
:SELECT :ADJUST
SETUP
LANGUAGE ENGLISH
CLOCK SET
TV/CABLE TV/CABLE
AUTO CH MEMORY
ADD/DELETE
:SELECT :ADJUST
16
J3W41321A_En_P14-17 24/03/2006, 2:23 PM16
5
Press EXIT to return to the normal screen.
CABLE CHART
The chart below is typical of many cable system channel allocations.
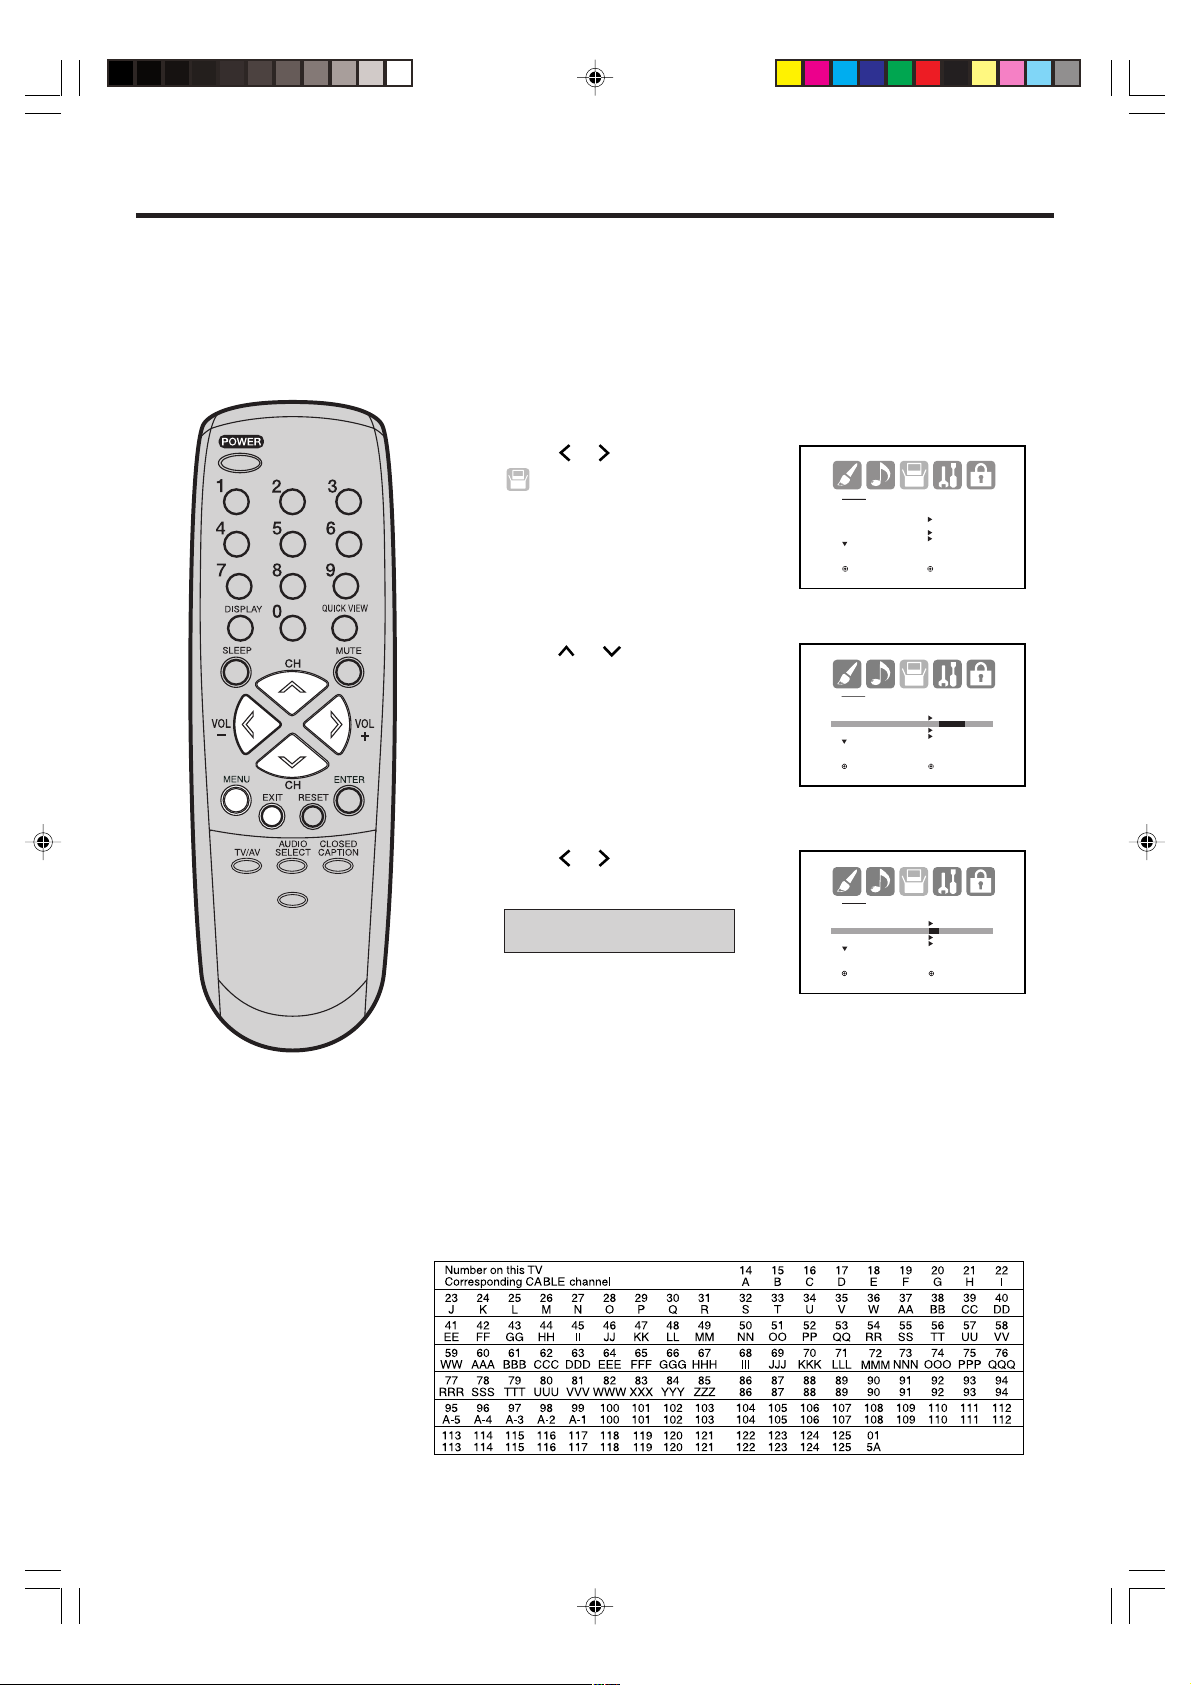
Page 17
Memorizing channels (continued)
Automatic memory tuning
Press MENU. The menu screen will appear.
1
Press
2
(SETUP) menu, then press
or to select “AUTO CH
MEMORY”.
Press
3
memorizing all the channels
available in your area.
-/
• Depending on the reception
or to select
or . The TV will begin
condition, it may take
SETUP
LANGUAGE ENGLISH
CLOCK SET
TV/CABLE CABLE
AUTO CH MEMORY
ADD/DELETE
:SELECT :ADJUST
AUTO CH MEMORY
EXIT : CANCEL
PROGRAMMING NOW
PLEASE WAIT
ENGLISH
approximately 10 minutes to
complete memorizing digital
cable channels, please be patient.
To add/delete channels
Press MENU. The menu screen will appear.
1
Press or to select
2
PICTURE
SIZE
(SETUP) menu, then press or
to select “ADD/DELETE”.
Press
or . The ADD/
DELETE menu will appear.
SETUP
LANGUAGE ENGLISH
CLOCK SET
TV/CABLE CABLE
AUTO CH MEMORY
ADD/DELETE
:SELECT :ADJUST
NOTES:
• Some new channels may be
appeared. So, it is recommended
to do the “AUTO CH MEMORY”
procedure periodically.
• To return from ADD/DELETE menu
to SETUP menu, select “SETUP
MENU”, then press
or .
Press or to select
3
“ADD/DELETE”, then press
Select the desired channel to
4
be memorized or deleted using
or
.
Press
or to select “ADD”
or “DELETE”, whichever
function you want to perform.
Repeat step 4 for other channels you want to add or delete,
5
.
ADD/ DELETE
ADD/ DELETE
CH SIGNAL
1 ANALOG DELETE
2 ANALOG ADD
3 ANALOG DELETE
4 ANALOG DELETE
5 ANALOG ADD
5-001 DIGITAL ADD
5-002 DIGITAL ADD
CLEAR ALL
SETUP MENU
:SELECT :ADJUST
ADD/DELETE
ADD/DELETE
CH SIGNAL
1 ANALOG ADD/DELETE
2 ANALOG ADD
3 ANALOG DELETE
4 ANALOG DELETE
5 ANALOG ADD
5-001 DIGITAL ADD
5-002 DIGITAL ADD
CLEAR ALL
SETUP MENU
:SELECT :ADJUST
then press ENTER.
Press EXIT to return to the normal screen.
6
CLEAR ALL
All channels are deleted from the channel memory.
Press
then press
or
to select “CLEAR ALL” as in step 3 above,
or .
17
J3W41321A_En_P14-17 24/03/2006, 2:23 PM17
Page 18
TV operation
To turn on the TV, press POWER.
1
Adjust the volume level by pressing
2
VOL + or – . The volume level will be
indicated on the screen by green
bars. As the volume level increases,
so do the number of bars. If the
volume decreases, the number of
green bars also decreases.
Set the TV/CABLE menu
3
option to the appropriate
position (see page 16).
VOLUME 32
TV - VHF/UHF channels
CABLE - CABLE TV channels
-/
PICTURE
SIZE
Press the Direct Channel Selection
4
buttons to select the channel.
TO SELECT ANALOG CHANNELS
1-9: Press 0 twice, then 1-9 as
needed. Example, to select
channel 2, press 0 0 2.
10-99: Press 0, then the remaining 2 digits. Example, to select
channel 12, press 0 1 2.
100-125: Press the 3 digits in order. Example, to select channel 120,
press 1 2 0.
TO SELECT DIGITAL CHANNELS
Press the first 3 digits, then press the “–/DISPLAY” button, followed by
the remaining 3 digits.
Example, to select channel 015-001, press 0 1 5 – 0 0 1.
ABCD
ANT
12
• If a channel is selected with only audio content, “AUDIO ONLY”
will be displayed on the screen.
• If a channel is selected with a weak digital signal, “DIGITAL
CHANNEL SIGNAL STRENGTH IS LOW” will be displayed on the
screen.
• If a channel is selected to which you have not subscribed,
“DIGITAL CHANNEL IS SCRAMBLED” will be displayed on
the screen.
NOTES:
If a channel with no broadcast is
•
selected, the sound will automatically be muted.
•
If a station being viewed stops
broadcasting, the TV will automatically shut itself off after 15 minutes.
18
J3W41321A_En_P18-24 24/03/2006, 2:23 PM18
VHF/UHF/CABLE CHANNELS
TV CABLE
VHF
2-13
UHF
14-69
14-36 (A) (W)
37-59 (AA) (WW)
60-85 (AAA) (ZZZ)
86-94 (86) (94)
95-99 (A-5) (A-1)
100-125 (100) (125)
01 (5A)
VHF
2-13
STD/HRC/IRC
Page 19
TV operation (continued)
STEREO
SAP
TV-PG L V
ON TIMER 8:30AM
OFF TIMER 11:30PM
SLEEP TIMER 2h00m
ANT
ABCD
CABLE
7
CLOCK12:00AM MON
4:3
CH
/
Press and release CH or . The
channel automatically stops at the
next channel set into memory.
For proper operation, before selecting
channels, they should be set into the
memory. See pages 16 and 17
“Memorizing channels”.
ABCD
ANT
12
ENGLISH
DISPLAY
Press -/DISPLAY to display the current information on the screen.
When the TV receives a digital signal, press
15-1
once, the digital information will appear.
• Broadcast program name
• Station name
• Remaining time
Monoscope_4801_1
Remaining Time 0:20
CH-1
TV-14
No program information is available.
• Audio language • Program name
-/
• V-CHIP RATING • V-Chip mark
•
Closed Caption mark
Press -/DISPLAY again, the analog
information will appear.
• Clock
• Channel number or VIDEO mode
selected
• Channel label (if preset)
•
Stereo or SAP (second audio program)
audio status
• Content rating
PICTURE
SIZE
• On timer, Off timer, Sleep time (if preset)
• Picture size
Press -/DISPLAY again to clear the call display.
English
12:00 PM
CC
NOTE:
When the TV receives an analog
signal, -/DISPLAY shows only
analog information.
J3W41321A_En_P18-24 24/03/2006, 2:23 PM19
QUICK VIEW
This button allows you to go back to the
last channel selected by pressing
QUICK VIEW. Press QUICK VIEW
again to return to the last channel you
were watching.
ABCD
ANT
7
MUTE
Press MUTE to switch off the sound.
The unit’s sound will be silenced and
“MUTE” will appear on the screen. The
sound can be switched back on by pressing
this button again or one of the VOL + or
– buttons.
MUTE
SLEEP
To set the unit to turn off after a
preset amount of time, press
SLEEP on the remote control. The
clock will count up 10 minutes for
each press of the SLEEP
(0h00m, 0h10m, ...1h50m, 2h00m).
After the sleep time is
programmed, the display will
appear briefly every ten minutes to remind you that the sleep timer is
operating. To confirm the sleep timer setting, press SLEEP and the
remaining time will be displayed for a few seconds. To cancel the
sleep timer, press SLEEP repeatedly until the display turns to
0h00m.
button
SLEEP
2h00m
19
Page 20
Setting the V-Chip
An age limitation can be set to restrict children from viewing or hearing violent scenes or pictures that
you may choose to exclude. The restriction applies to “TV RATING” and “MOVIE RATING” if this data is
transmitted. You may set this restriction separately. To use the V-Chip function, you must register a
password.
To register a password
Press MENU. The menu
1
screen will appear.
Then press
or to select
(LOCKS) menu.
LOCKS
V-CHIP SET
LOCK
FRONT PANEL LOCK
NEW PASSWORD
:SELECT :ADJUST
-/
Press or to display
2
the password entering
LOCKS
NEW PASSWORD
[0-9] : SELECT ENTER : SET
LOCKS
NEW PASSWORD
[0-9] : SELECT ENTER : SET
EXIT : END
EXIT : END
PICTURE
SIZE
mode.
Select and enter a password
3
(4 digits)
buttons (0-9),
using the number
then press
ENTER.
“ ” appears instead of the number.
Enter the same password
4
again to confirm, then press
ENTER.
The password is now
LOCKS
CONFIRM PASSWORD
registered and the V-Chip
menu will appear on the
[0-9] : SELECT ENTER : SET
EXIT : END
screen.
NOTES:
• If you forget the password, contact
the dealer that you purchased the unit
from.
• To avoid forgetting the password, write
it down and keep it in a safe place.
20
J3W41321A_En_P18-24 24/03/2006, 2:23 PM20
Page 21
Setting the V-Chip (continued)
To set the V-CHIP
Press MENU, then press or to
1
-/
PICTURE
SIZE
To use the TV after the TV is protected.
When a program is received that is
blocked by the V-Chip, press MUTE and
enter the password, then press ENTER.
When the password is entered correctly
the protection will be temporarily
overridden. If the TV is turned off, or the
channel is changed the V-Chip
restriction will be reactivated.
NOTES:
• The V-Chip function is activated only
on programs and input sources that
have the rating signal.
• The V-CHIP SET (DTV) will only be
selectable when the unit receives a
digital broadcast using the new rating
system. It may take several minutes
for the intial V-Chip Set-up to complete.
At this time some stations are still
developing this signal, in those cases
the V-CHIP SET (DTV) will not function.
select
2
Press or to display the
password entering mode. Use
number buttons (0-9) to enter your
password, then press ENTER. The
LOCKS menu appears.
3
Press or to select “V-CHIP
SET”, then press
SET menu appears.
4
Press or to select “TV RATING”.
Then press
desired rating.
OFF : TV RATING is not set
TV-Y : All children
TV-Y7 : 7 years old and above
TV-G : General audience
TV-PG : Parental guidance
TV-14 : 14 years old and above
TV-MA : 17 years old and above
• When you select TV-Y7, TV-PG, TV-14 or TV-MA, press -/DISPLAY
5
Press
RATING”, then press
RATING SET menu appears.
Press or to select a rating,
6
then press
OFF for each rating.
OFF : MOVIE RATING is not set
G:All ages
PG : Parental guidance
PG-13 : Parental guidance less
R:Under 17 years old Parental
NC-17 : 17 years old and above
X:Adult only
Press MENU twice to return to the
7
LOCKS menu, then press
to select “V-CHIP”.
Press
8
Your settings are now set into memory.
Press EXIT to return to the normal screen.
9
(LOCKS) menu.
. The V-CHIP
or to display the
or
to explain the rating. Press
want.
Press or to select the setting “ON” or “OFF”.
or
to select “MOVIE
to select the
. The
or to select ON or
than 13 years old
guidance suggested
or
or to select “ON”.
LOCKS
V-CHIP SET
LOCK
FRONT PANEL LOCK
NEW PASSWORD
:SELECT :ADJUST
LOCKS
PASSWORD
[0-9] : SELECT ENTER : SET
LOCKS
V-CHIP OFF
V-CHIP SET
V-CHIP SET (DTV)
:SELECT :ADJUST
V-CHIP SET
TV RATING OFF
MOVIE RATING
:SELECT :ADJUST
EXIT : END
OFF/TV-Y /TV-Y7/ TV-G
TV-PG/TV-14 /TV-MA
desired rating you
RATING SET
G ON / OFF
PG OFF
PG-13 OFF
ROFF
NC-17 OFF
XOFF
:SELECT :ADJUST
LOCKS
V-CHIP ON / OFF
V-CHIP SET
V-CHIP SET (DTV)
:SELECT :ADJUST
LOCKS
V-CHIP ON / OFF
V-CHIP SET
V-CHIP SET (DTV)
:SELECT :ADJUST
ENGLISH
21
J3W41321A_En_P18-24 24/03/2006, 2:23 PM21
Page 22

LOCKS
NEW PASSWORD
[0-9] : SELECT ENTER : SET
EXIT : END
LOCKS
CONFIRM PASSWORD
[0-9] : SELECT ENTER : SET
EXIT : END
LOCKS
PASSWORD
[0-9] : SELECT ENTER : SET
EXIT : END
LOCKS
LOCK
CH LOCK
VIDEO LOCK OFF
FRONT PANEL LOCK OFF
NEW PASSWORD
:SELECT :ADJUST
Setting the V-Chip (continued)
LOCKS
V-CHIP SET
LOCK
FRONT PANEL LOCK
NEW PASSWORD
:SELECT :ADJUST
To change the password
Press MENU, then press
1
or to select
(LOCKS) menu.
2
Press or to display
the password entering
mode. Use the number
buttons (0-9) to enter your
password, then press
-/
ENTER. The LOCKS menu
appears.
3
Press or to select
“NEW PASSWORD”, then
press
or .
PICTURE
SIZE
4
Enter a new password
using the number buttons
(0-9), then press ENTER.
5
Enter the same password
again to confirm, then press
ENTER.
6
Press EXIT to return to the normal screen.
22
J3W41321A_En_P18-24 24/03/2006, 2:23 PM22
Page 23

Locking channels
With the CH LOCK feature, you
can lock specific channels. You
will not be able to tune locked
channels unless you clear the
setting. You can choose to lock
up to 12 TV channels.
-/
PICTURE
SIZE
Use the number buttons (0-9) to display the television channel
1
you wish to lock.
Press MENU, then press or to
2
display the
Press
3
(LOCKS) menu.
or
to display the
LOCKS
V-CHIP SET
LOCK
FRONT PANEL LOCK
NEW PASSWORD
:SELECT :ADJUST
password entering mode. Use the
number buttons (0-9) to enter
your password, then press ENTER.
LOCKS
PASSWORD
The LOCKS menu appears.
[0-9] : SELECT ENTER : SET
Press
4
LOCK and press
the CH LOCK menu.
Press or to select the
5
or
to highlight CH
or to display
LOCKS
LOCK
CH LOCK
VIDEO LOCK OFF
FRONT PANEL LOCK OFF
NEW PASSWORD
:SELECT :ADJUST
following:
• SET– to set the channel as one
to be locked. Then press
ENTER.
• CLEAR– to clear all channels
from the list of locked channels.
CH LOCK : CH 2
SET/CLEAR TV CABLE
0 0 0
0 0 0
0 0 0
0 0 0
LOCKS MENU
:SELECT : ADJUST
ENTER : SET EXIT : END
Then press ENTER.
ENGLISH
EXIT : END
NOTE:
After programming CH LOCK,
change the channel before
turning off the television. Failure
to do so will cancel the
programming for channels locked
using this procedure.
6
Repeat steps 1 through 5 to lock other channels. When you have
finished locking channels, press EXIT to return to normal viewing.
If you try to tune a locked channel, the TV will not display it, but
will display the nearest unlocked channel.
To unlock channels:
1
Press MENU, then press
2
Press or to display the password entering mode.
3
Use the number buttons (0-9) to enter your password,
then press ENTER. The LOCKS menu appears.
4
Press or to highlight CH LOCK and press or to display
the CH LOCK menu.
5
Press or to highlight CLEAR and clear all channels from the
list of locked channels. Press ENTER.
6
Press EXIT to return to normal viewing.
or to display the (LOCKS) menu.
23
J3W41321A_En_P18-24 24/03/2006, 2:23 PM23
Page 24

Locking the video inputs
LOCKS
PASSWORD
[0-9] : SELECT ENTER : SET
EXIT : END
LOCKS
V-CHIP SET
LOCK
FRONT PANEL LOCK
NEW PASSWORD
:SELECT :ADJUST
With the VIDEO LOCK feature,
you can lock out the input
sources (VIDEO1, VIDEO2,
COMPONENT) and channels 3
and 4. You will not be able to
select the input sources with the
TV/AV button or Channel buttons
unless you clear the setting.
-/
PICTURE
SIZE
To set up the video lock
Press MENU, then press
1
display the (LOCKS) menu.
2
Press or to display the
password entering mode.
or to
3 Use the number buttons (0-9) to
enter your password, then press
ENTER. The LOCKS menu
appears. Press
highlight VIDEO LOCK.
Press
4
• OFF: Unlocks all video input sources.
• VIDEO: Locks VIDEO1, VIDEO2, COMPONENT.
• VIDEO +: Locks VIDEO1, VIDEO2, COMPONENT, channel 3
or to select:
and channel 4. This option should be used if you use the
antenna terminal to play a video tape.
or
to
LOCKS
LOCK
CH LOCK
VIDEO LOCK OFF
OFF/VIDEO/VIDEO+
FRONT PANEL LOCK OFF
NEW PASSWORD
:SELECT :ADJUST
NOTE:
After programming VIDEO LOCK,
change the channel or press the
TV/AV Button before turning off
the television. Failure to do so will
cancel the programming for video
inputs locked using this
procedure.
24
5
Press EXIT to return to normal viewing.
To unlock the video inputs
1
Press MENU, then press
2
Press or to display the password entering mode.
3
Use the number buttons (0-9) to enter your password,
then press ENTER. The LOCKS menu appears.
4
Press
highlight OFF.
5
Press EXIT to return to normal viewing.
or
to highlight VIDEO LOCK and press or to
or to display the (LOCKS) menu.
J3W41321A_En_P18-24 24/03/2006, 2:23 PM24
Page 25

Setting the front panel lock
You can lock the front panel
buttons to prevent your settings
from being changed accidentally
(by children, for example). When
the front panel lock is ON, all
control buttons on the TV front
panel (except POWER) will not
operate.
-/
PICTURE
SIZE
To lock the front panel
Press MENU, then press or
1
to select (LOCKS) menu.
2
Press
or
to display the
password entering mode. Use
the number buttons (0-9) to
LOCKS
V-CHIP SET
LOCK
FRONT PANEL LOCK
NEW PASSWORD
:SELECT :ADJUST
LOCKS
PASSWORD
enter your password, then press
ENTER. The LOCKS menu
appears.
3
Press or to select
[0-9] : SELECT ENTER : SET
EXIT : END
“FRONT PANEL LOCK” and
press or to select “ON”.
If a button on the front panel is
pressed, the message “NOT
AVAILABLE” appears.
Press EXIT to return to the normal screen.
4
LOCKS
LOCK
CH LOCK
VIDEO LOCK OFF
FRONT PANEL LOCK ON/OFF
NEW PASSWORD
:SELECT :ADJUST
To unlock the front panel
Press and hold VOLUME on the front panel of TV for about 10
seconds until the message “FRONT PANEL LOCK:OFF” appears on
the screen.
You also can unlock the front panel using the menus
ENGLISH
Press MENU, then press or
1
to select (LOCKS) menu.
Press or to display the
2
password entering mode.
Use the number buttons (0-9)
to enter your password, then
press ENTER. The LOCKS
menu appears.
3
Press or to select
“FRONT PANEL LOCK”, then
press or to select “OFF”.
Press EXIT to return to the normal screen.
4
LOCKS
V-CHIP SET
LOCK
FRONT PANEL LOCK
NEW PASSWORD
:SELECT :ADJUST
LOCKS
PASSWORD
[0-9] : SELECT ENTER : SET
LOCKS
LOCK
CH LOCK
VIDEO LOCK OFF
FRONT PANEL LOCK ON/OFF
NEW PASSWORD
:SELECT :ADJUST
EXIT : END
25
J3W41321A_En_P25-30 24/03/2006, 2:24 PM25
Page 26

Labeling channels
SPACE
-
+
Channel labels appear over the
channel number display each time
you turn on the TV, select a
channel, or press -/DISPLAY.
You can choose any four characters to identify a channel.
-/
To create channel labels
Select a channel you want to label.
1
Press MENU, then press or
2
to select (OPTION) menu.
Press
LABEL”, then press
CH LABEL menu will appear.
Press
3
CLEAR”. Press
“SET”.
Press ENTER to select “LABEL”.
4
Then press
character in the first space. Press
the button repeatedly until the
character you want appears on
the screen.
or
to select “CH
or
to select “SET/
or to enter a
or . The
or to select
OPTION
ON/ OFF TIMER OFF
CH LABEL
:SELECT :ADJUST
CH LABEL : CH 23
SET/ CLEAR
LABEL ––––
OPTION MENU
:SELECT :ADJUST
ENT ER : SET EXIT : END
CH LABEL : CH 23
SET
LABEL A –––
OPTION MENU
:ADJUST ENTER : SET
EXIT : END
PICTURE
SIZE
NOTE:
To return from CH LABEL menu to
OPTION menu, select “OPTION
MENU”, then press
or .
The characters rotation
as follows:
If the character which you desire appears, press ENTER.
Repeat this step to enter the rest of the characters.
If you would like a blank space in the label name, you must
choose the empty space from the list of characters; otherwise, a
dash will appear in that space.
When you finish inputting the label name, press ENTER.
Press EXIT to return to the normal screen.
5
Repeat steps 1-5 for other channels. You can assign a label to each
6
channel.
To erase channel labels
Select a channel with a label which you want to erase.
1
2
Press MENU, then press or to select (OPTION) menu.
Press
display the CH LABEL menu.
Press or to select “SET/CLEAR”. Press or to select
3
“CLEAR”, then press ENTER.
Press EXIT to return to the normal screen.
4
or
to select “CH LABEL”, then press or to
Repeat steps 1-4 to erase other channel labels.
5
26
J3W41321A_En_P25-30 24/03/2006, 2:24 PM26
Page 27

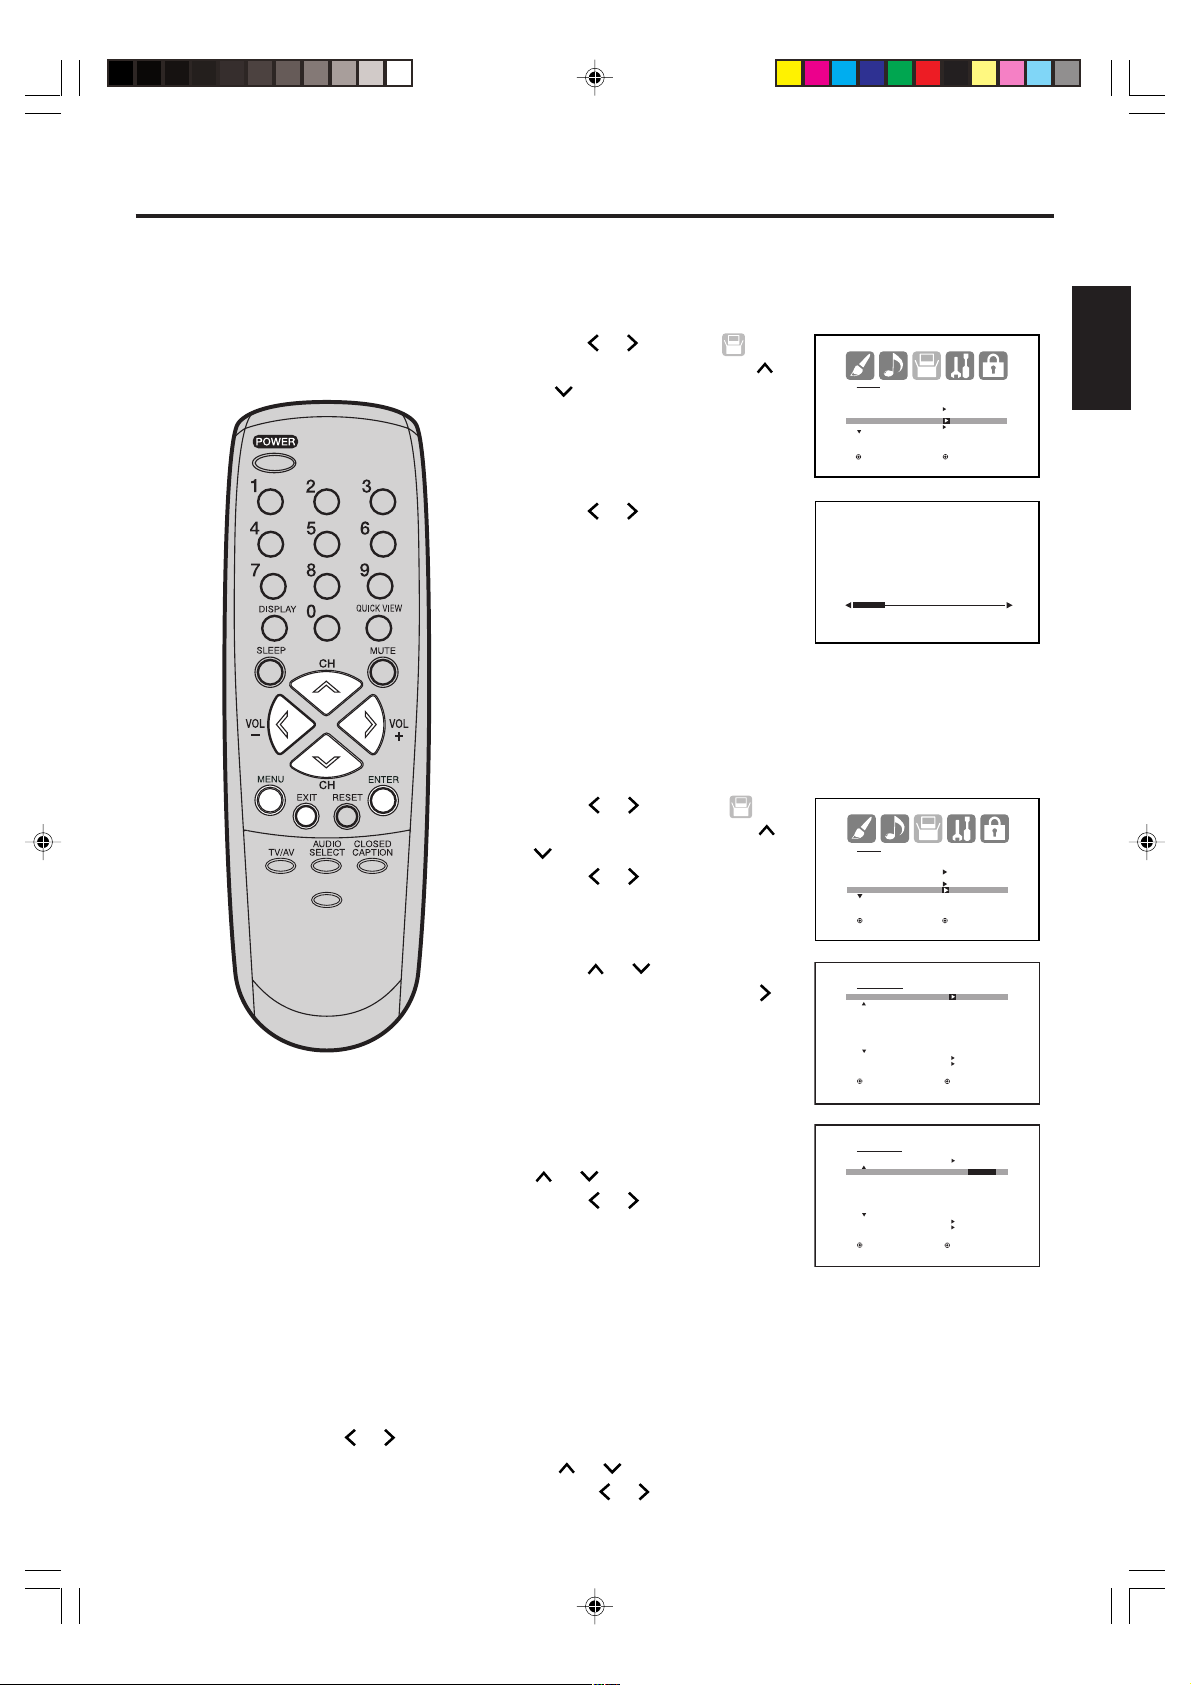
Setting the clock
SETUP
LANGUAGE ENGLISH
CLOCK SET
TV/CABLE CABLE
AUTO CH MEMORY
ADD/DELETE
:SELECT :ADJUST
SETUP
LANGUAGE ENGLISH
CLOCK SET
TV/CABLE CABLE
AUTO CH MEMORY
ADD/DELETE
:SELECT :ADJUST
CLOCK SET
MONTH 1
DAY 1 (SUN)
YEAR 2006
TIME 12:00AM
:SELECT :ADJUST
ENTER:SET EXIT:END
You must set the clock correctly for
the “ON/OFF TIMER” to activate at
the correct time.
-/
EXAMPLE: Setting the clock to “8:30 AM”, 28 th (SAT) October, 2006.
1
Press MENU, then
press
or to select
(SETUP) menu.
2
Press
or
to select
“CLOCK SET”. Then press
or. The CLOCK SET
menu will appear.
3
Press or to set the
MONTH, then press
.
ENGLISH
PICTURE
SIZE
NOTE:
After a power failure or disconnection
of the power, the clock settings will be
lost. In this case, reset the present
time.
Set the DAY, YEAR and TIME
4
as in step 3.
After setting the date and time,
the clock will begin functioning
automatically.
Press EXIT to return to the normal screen.
5
CLOCK SET
MONTH 10
DAY 28 (SAT)
YEAR 2006
TIME 8:30AM
:SELECT :ADJUST
ENTER:SET EXIT:END
J3W41321A_En_P25-30 24/03/2006, 2:24 PM27
27
Page 28
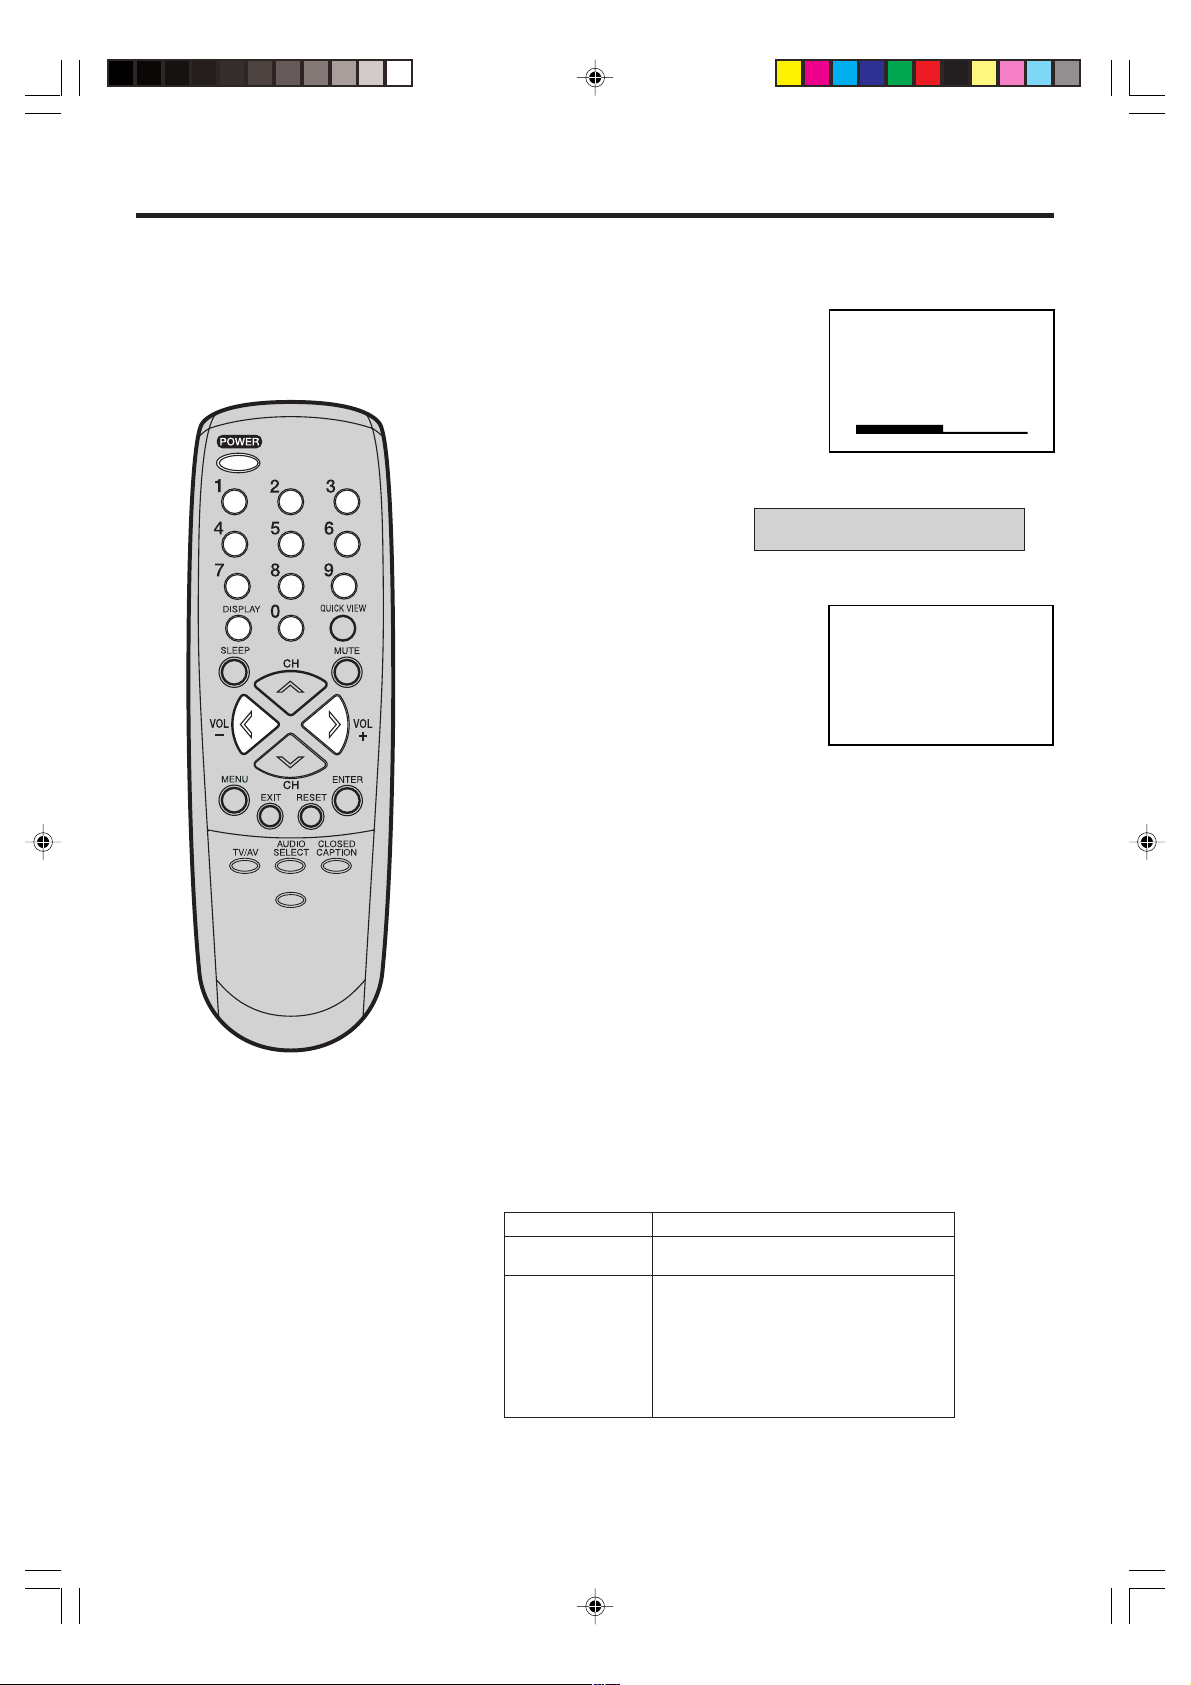
Setting the on timer
OPTION
ON/OFF TIMER ON/ OFF/ SET
CH LABEL
:SELECT :ADJUST
OPTION
ON/OFF TIMER ON/ OFF/ SET
CH LABEL
: SELECT : ADJUST
ENTER : SET
ON/OFF TIMER
ON TIMER
12:00AM CH 1
CLEAR
OFF TIMER
12:00AM
CLEAR
OPTION MENU
: SELECT : ADJUST
EXIT : END
ON/OFF TIMER
ON TIMER
7:00AM CH 1
CLEAR
OFF TIMER
12:00AM
CLEAR
OPTION MENU
: SELECT : ADJUST
EXIT : END
ON/OFF TIMER
ON TIMER
7:30AM CH 12
CLEAR
OFF TIMER
12:00AM
CLEAR
OPTION MENU
: SELECT : ADJUST
EXIT : END
ON/OFF TIMER
ON TIMER
7:30AM CH 12
ONCE/ DAILY/CLEAR
OFF TIMER
12:00AM
CLEAR
OPTION MENU
: ADJUST ENTER : SET
EXIT : END
This feature allows you to have the
TV automatically turn on at a
predetermined time. If you program
the ON TIMER to “DAILY”, the TV
will turn on everyday at the same
time to the same channel.
-/
EXAMPLE: Turning on the TV to channel 12 at 7:30 AM, daily.
Preparation:
Set the clock, if you have not already done so (see page 27).
Press MENU. Press
1
or
to select (OPTION)
menu. Press or to
select “ON/OFF TIMER”.
Press or to select
2
“SET”, then press ENTER.
The ON/OFF TIMER menu
appears.
3
Press or to select “ON
TIMER”, then press
to
enter the setting for the ON
TIMER.
PICTURE
SIZE
NOTES:
• The TV will automatically turn off
approximately 1 hour later after the
ON TIMER turns on if no OFF TIMER
has been set. To continue watching
the TV, press any button to cancel
the one hour automatic shut off.
• If a station being viewed stops
broadcasting, the TV will automatically
shut itself off after 15 minutes.
• To cancel ON TIMER, Select
“CLEAR” in step 6. Press EXIT to
return to normal screen.
• After a power failure or disconnection
of the power, the timer settings will be
lost.
• To return from ON/OFF TIMER menu
to OPTION menu, select “OPTION
MENU” then press
or .
Press
4
desired hour, then press
or
to set the
.
Please note if the hour is AM
or PM, and choose desired
setting.
Set the desired minutes and
5
start up channel, as in step 4.
6
Press
or to select
“DAILY”, then press ENTER.
Press EXIT to return to the normal screen.
7
28
J3W41321A_En_P25-30 24/03/2006, 2:24 PM28
Page 29
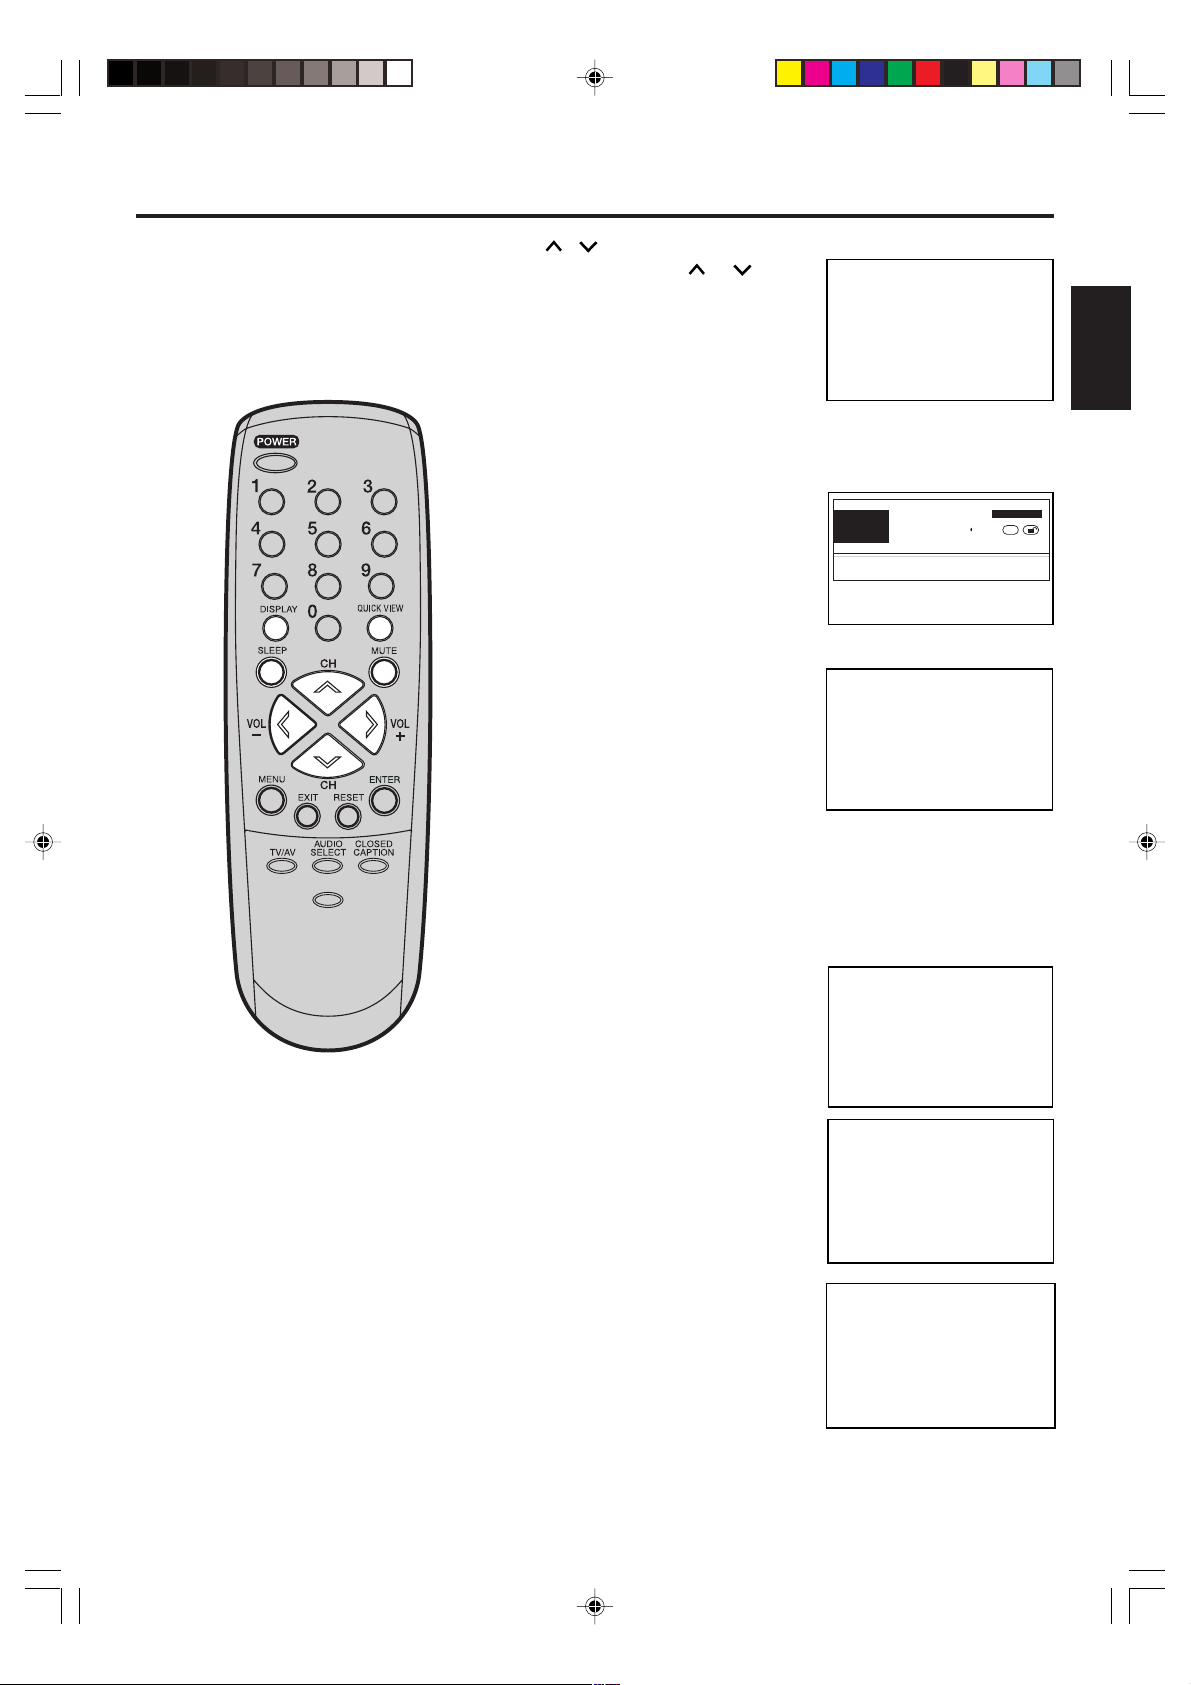
Setting the off timer
This feature allows you to have
the TV turn off automatically at a
predetermined time. If you program the OFF TIMER to “DAILY”,
the TV will turn off everyday at the
same time everyday.
-/
EXAMPLE: Turning off the TV at 11:30 PM, daily.
Preparation:
Set the clock, if you have not already done so (see page 27).
Press MENU. Press or
1
to select (OPTION)
menu. Press or to
select “ON/OFF TIMER”.
Press or to select
2
OPTION
ON/OFF TIMER ON/ OFF/SET
CH LABEL
:SELECT :ADJUST
“SET”, then press ENTER.
The ON/OFF TIMER menu
appears.
3
Press
or
to select
OPTION
ON/OFF TIMER ON/ OFF/SET
CH LABEL
: SELECT : ADJUST
ENTER : SET
“OFF TIMER”, then press
to enter the setting for the
OFF TIMER.
ON/OFF TIMER
ON TIMER
12:00AM CH 1
OFF TIMER
12:00AM
OPTION MENU
: SELECT : ADJUST
EXIT : END
CLEAR
CLEAR
ENGLISH
PICTURE
SIZE
NOTES:
• If a station being viewed stops
broadcasting, the TV will automatically shut itself off after 15 minutes.
• To confirm the ON/OFF TIMER:
Press -/DISPLAY to indicate the
program on the screen.
• To return from ON/OFF TIMER
menu to OPTION menu, select
“OPTION MENU” then
press
or .
Press or to set the
4
desired hour, then press
Please note if the hour is AM
or PM, and choose desired
setting.
Press
or
to set the
.
ON/OFF TIMER
ON TIMER
12:00AM CH 1
OFF TIMER
11:30PM
OPTION MENU
: SELECT : ADJUST
EXIT : END
desired minutes and
press or to select
“DAILY”, then press ENTER.
NOTE:
To cancel OFF TIMER, press
or to select “CLEAR” after this
step, then press ENTER.
Press EXIT to return to normal screen.
5
Enable or disable the ON/OFF TIMER function
Press MENU. Press or to
1
select
TIMER”.
Press or to select “ON” or
“OFF”.
ON: Timer setting is enabled.
OFF: Timer setting is disabled.
Press EXIT to return to the normal screen.
2
(OPTION) menu. Press
or
to select “ON/OFF
OPTION
ON/OFF TIMER ON/ OFF/SET
CH LABEL
:SELECT :ADJUST
CLEAR
CLEAR
J3W41321A_En_P25-30 24/03/2006, 2:24 PM29
29
Page 30

Setting the picture size
You can view 480i format
programs in three picture
sizes—4:3, 16:9 and ZOOM.
-/
Selecting the picture size
You can change the PICTURE SIZE by pressing the PICTURE
SIZE button on the remote control.
4:3
ZOOM
16:9
4:3 picture size
To fill the screen, the top and bottom edges are extended more
widely though the center of the picture remains near former ratio.
• If receiving a 4:3 format program, the image is displayed its
originally formatted proportion.
16:9 picture size
This image will display the size of standard 16:9 with black bars
at the top and bottom.
PICTURE
SIZE
• If receiving a 4:3 format program, the image is displayed with
black bars at the top and bottom and stretched wider.
NOTE:
If a fixed black bar remains on the screen for long periods of
time, the image can become permanently engrained in the
screen and cause subtle but permanent ghost images. Never
leave your TV on for long periods of time while it is displaying
the images.
ZOOM picture size (for 16:9 format programs)
The entire picture is uniformly enlarged—it is stretched the same
amount both wider and taller (retains its original proportion). The
right and left edges of the picture may be hidden.
30
J3W41321A_En_P25-30 24/03/2006, 2:24 PM30
Page 31

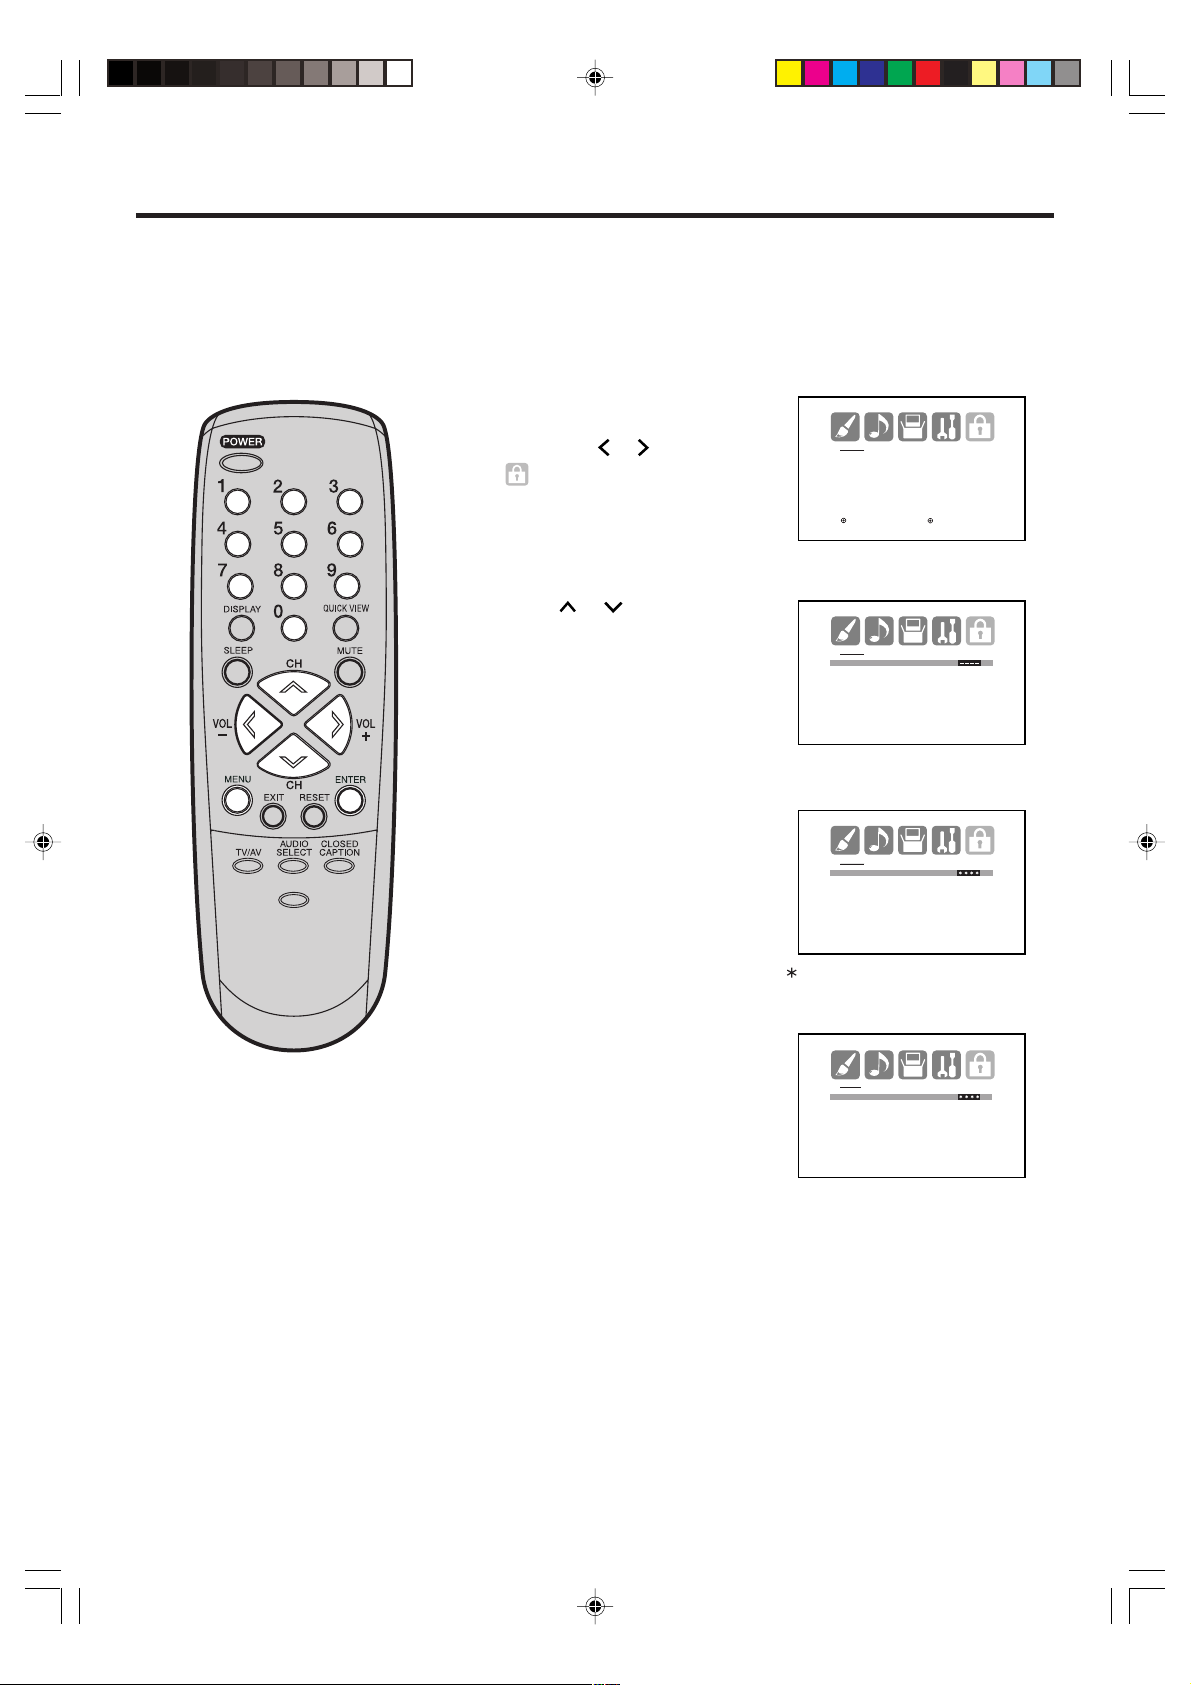
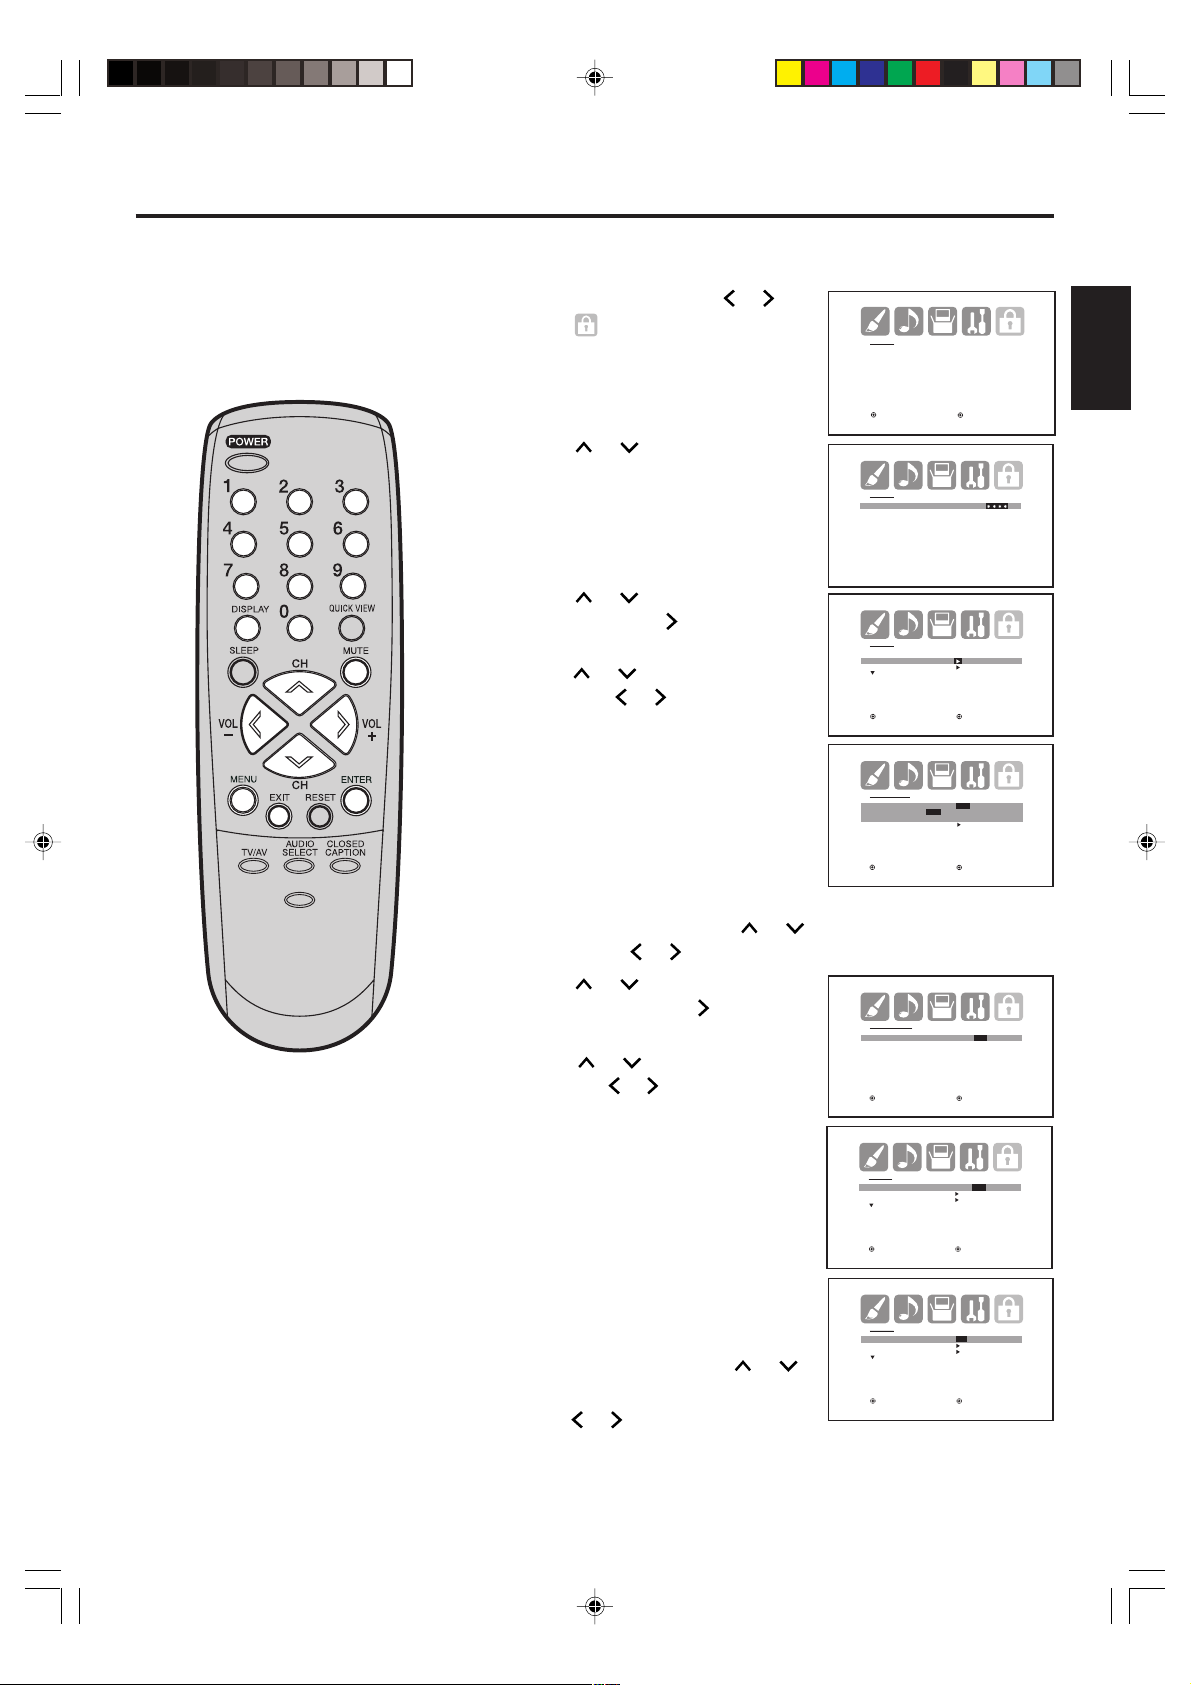
Picture control adjustment/Resetting your picture
adjustment
Picture control adjustment
Press MENU, then press or
1
to select (PICTURE) menu.
PICTURE
BRIGHTNESS 25
CONTRAST 50
COLOR 25
TINT 0
SHARPNESS 25
RESET
: SELECT : ADJUST
ENGLISH
2
Press
or
to select the item
you want to adjust.
Press or to adjust the setting.
-/
BRIGHTNESS
CONTRAST
COLOR
TINT
SHARPNESS
After your desired setting, press EXIT to return to normal screen.
3
decrease brightness
decrease contrast
paler color
reddish color tint
makes picture softer
PICTURE
BRIGHTNESS 25
CONTRAST 50
COLOR 25
TINT 0
SHARPNESS 25
RESET
: SELECT : ADJUST
increase brightness
increase contrast
brilliant color
greenish color tint
makes picture clearer
NOTE:
PICTURE
SIZE
The CONTRAST default setting is set to maximum at the factory.
Resetting your picture adjustment
The RESET function returns your picture quality adjustments to the
following factory settings:
BRIGHTNESS .............center (25) TINT .........................center (0)
CONTRAST ................... max (50) SHARPNESS .........center (25)
COLOR ....................... center (25)
J3W41321A_En_P31-34 24/03/2006, 2:24 PM31
Press MENU, then press
1
2
Press
or
to select
RESET, then press
or to select (PICTURE) menu.
.
PICTURE
BRIGHTNESS 25
CONTRAST 50
COLOR 25
TINT 0
SHARPNESS 25
RESET
: SELECT : ADJUST
NOTE:
When you press RESET in the PICTURE menu, the picture
adjustments return to the factory preset levels.
31
Page 32

Closed Caption
SETUP
CLOSED CAPTION OFF
C1 / C2 /T1 / T2 / OFF
CC ADVANCED
SIGNAL METER
: SELECT : ADJUST
WHAT IS CLOSED CAPTIONING?
This television has the capability to decode and display Closed Captioned television programs. Closed Captioning
will display text on the screen for hearing impaired viewers or it will translate and display text in another language.
Captions: This Closed Caption Mode will display text on the screen
in English or another language. Generally, Closed Captions in
English are transmitted on C1 and Closed Captions in other
languages are transmitted on C2.
Text: The Text Closed Caption Mode will usually fill 1/2 of the screen
with a programming schedule or other information.
Tune the TV to the desired program.
1
Press MENU, then press or to display the (SETUP) menu.
2
Press or to select “CLOSED CAPTION”.
3
-/
When an Analog signal is
received, you can choose C1,
C2, T1, T2 and OFF.
When a Digital signal is received,
PICTURE
SIZE
you can choose from CS1, CS2,
CS3, CS4, CS5, CS6, C1, C2,
C3, C4, T1, T2, T3, T4 and OFF.
NOTES:
SETUP
CLOSED CAPTION OFF
CS1/CS2/CS3/CS4/CS5/CS6
C1/C2/C3/C4/T1/T2/T3/T4/OFF
CC ADVANCED
SIGNAL METER
: SELECT : ADJUST
• Depending on the broadcast
signal, some Analog Captions will function with a Digital
broadcast signal.
• This screen can be displayed by pressing CLOSED CAPTION.
Press or to select the desired Closed Caption mode.
4
NOTE:
To turn the Closed Caption feature off, select “OFF”.
Press EXIT to return to the normal screen.
5
NOTES:
• If the program or video you selected is not closed-captioned, no captions will display on-screen.
• If text is not available in your viewing area, a black rectangle may appear on-screen. If this happens, set the
Closed Caption feature to “OFF”.
• When selecting Closed Captions, the captioning will be delayed approx. 10 seconds.
• If no caption signal is received, no captions will appear, but the television will remain in the Caption Mode.
• Misspellings or unusual characters may occasionally appear during Closed Captioning. This is normal with
Closed Captioning, especially with live programs. This is because during live programs, captions are also
entered live. These transmissions do not allow time for editing.
• When Captions are being displayed, on-screen displays, such as volume and mute may be seen but may
interfere with Closed Captions.
• Some Cable TV systems and copy protection systems may interfere with the Closed Captioned signal.
• If using an indoor antenna or if TV reception is very poor, the Closed Caption Decoder may not appear or may
appear with strange characters or misspelled words. In this case, adjust the antenna for better reception or use
an outdoor antenna.
32
J3W41321A_En_P31-34 24/03/2006, 2:24 PM32
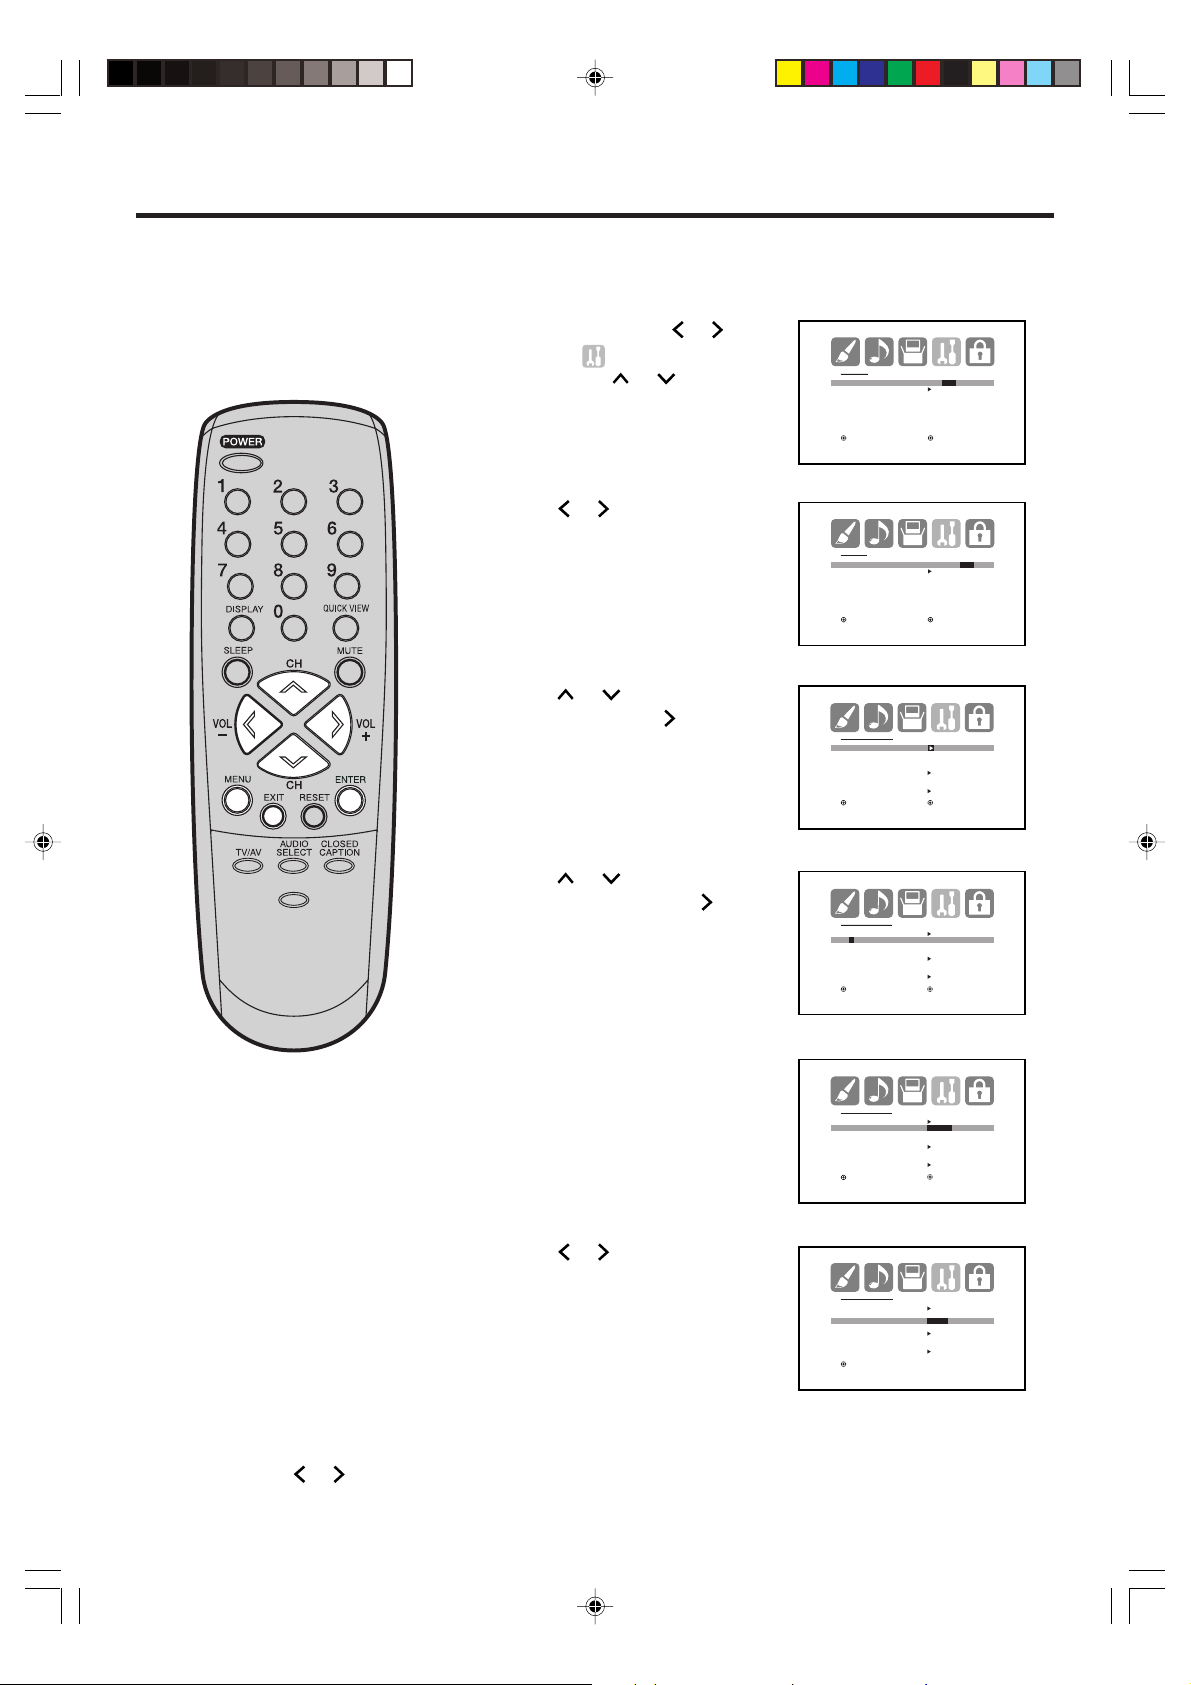
Page 33

CC advanced
SETUP
LANGUAGE ENGLISH
CLOCK SET
TV/CABLE CABLE
AUTO CH MEMORY
ADD/DELETE
:SELECT :ADJUST
Closed Captions are factory
preset however you can adjust
them individually as follows:
-/
This feature is designed to customize Digital Captions only.
Press MENU. The menu screen will appear.
1
2
Press
or to select
(SETUP) menu.
Press
3
ADVANCED”, then press
The CC ADVANCED menu
will appear.
Press or to select the
4
or
to select “CC
.
SETUP
CLOSED CAPTION OFF
CC ADVANCED
SIGNAL METER
: SELECT : ADJUST
item you want to adjust, then
press or .
CC ADVANCED
TEXT SIZE
TEXT TYPE
TEXT COLOR
TEXT EDGE
BACKGROUND COLOR
: SELECT : ADJUST
ENGLISH
PICTURE
SIZE
5
Press or to select
desired setting, then press
ENTER.
TEXT SIZE
AUTO
SMALL
STANDARD
LARGE
: SELECT : ADJUST
You can select from among the following items and parameters.
TEXT SIZE: AUTO, SMALL, STANDARD, LARGE
TEXT TYPE: AUTO, DEFAULT, MONO W. SERIF, PROP. W.
SERIF, MONO W/O SERIF, PROP. W/O SERIF,
CASUAL, CURSIVE, SMALL CAPITALS
TEXT COLOR: AUTO, BLACK, WHITE, RED, GREEN, BLUE,
YELLOW, MAGENTA, CYAN
TEXT EDGE:
AUTO, NONE, RAISED, DEPRESSED, UNIFORM,
LEFT DROP SHADOW, RIGHT DROP SHADOW
BACKGROUND COLOR: AUTO, BLACK, WHITE, RED, GREEN,
BLUE, YELLOW, MAGENTA, CYAN
Press EXIT to return to the normal screen.
6
J3W41321A_En_P31-34 24/03/2006, 2:24 PM33
33
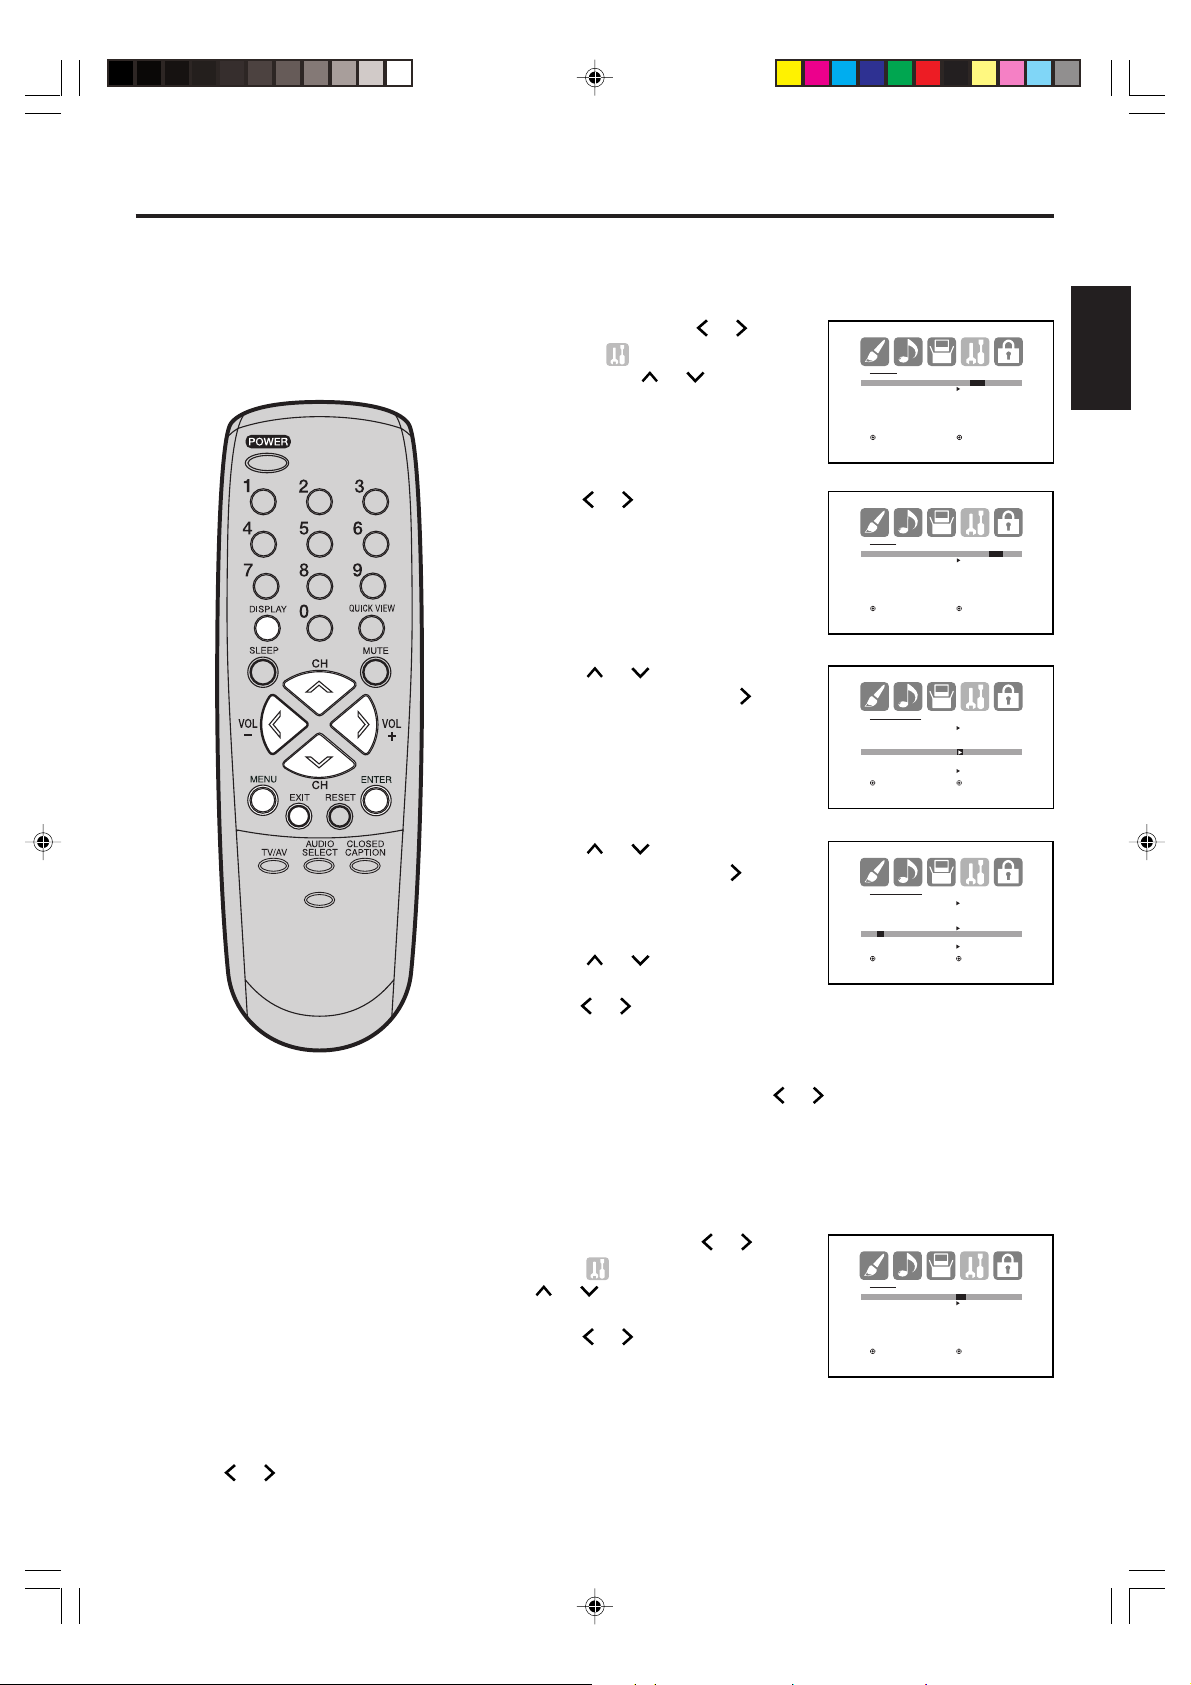
Page 34

Selecting Stereo/Second Audio Program (SAP)/
AUDIO
MTS STR/SAP/MONO
AUDIO LANGUAGE
DIGITAL OUTPUT PCM
RESET
: SELECT : ADJUST
AUDIO
MTS STEREO
AUDIO LANGUAGE
DIGITAL OUTPUT PCM
PCM /DOLBY DIGITAL
RESET
: SELECT : ADJUST
Selecting the digital output
Selecting Stereo/Second Audio Program (SAP)
The multi-channel TV sound (MTS) feature provides high-fidelity
stereo sound. MTS also can transmit a second audio program
(SAP) containing a second language or other audio information.
When the TV receives a stereo or SAP broadcast, the word “
STEREO” or “SAP” displays on-screen every time you turn the
TV on, change the channel, or press -/DISPLAY.
Press MENU, then press
1
to select (AUDIO) menu.
Press
Press or to select “STR
2
-/
(Stereo)”.
NOTES:
• Generally, you can leave your TV in stereo mode because the TV
automatically outputs the type of sound being broadcast (stereo or
mono).
• If the stereo sound is noisy, select MONO to reduce the noise.
Press
3
or
to select “MTS”.
EXIT to return to the normal screen.
or
To listen to a second audio program (SAP)
PICTURE
SIZE
Press or to select “SAP” in step 2 above. The TV speakers will
output the second audio program instead of normal audio.
Selecting the digital output
You can choose the format of the digital audio output signal.
34
J3W41321A_En_P31-34 24/03/2006, 2:25 PM34
1
Press MENU, then press
or to select
(AUDIO).
Press
“DIGITAL OUTPUT”.
2
Press
Press
3
or
to select
or to select “PCM” or “DOLBY DIGITAL”.
EXIT to return to the normal screen.
Page 35

Selecting the audio language/Resetting your audio adjustments
Selecting the audio language
When two or more audio languages are included in a digital signal,
you can select one of the audio language.
Press MENU, then
1
press
(AUDIO) menu.
or to select
AUDIO
MTS STEREO
AUDIO LANGUAGE
DIGITAL OUTPUT PCM
RESET
: SELECT : ADJUST
ENGLISH
2
Press or
to select
“AUDIO LANGUAGE”.
Then press or to display
-/
the AUDIO LANGUAGE
menu.
3
Press
or
to select
your desired language, then
press ENTER.
PICTURE
SIZE
Press EXIT to return to the normal screen.
4
AUDIO
MTS STEREO
AUDIO LANGUAGE
DIGITAL OUTPUT PCM
RESET
: SELECT : ADJUST
AUDIO LANGUAGE
0. ENGLISH 1
1. ENGLISH 2
2. FRENCH
3. SPANISH
4. NO INFO
5. NO INFO
6. NO INFO
7. NO INFO
/ 0-7 : SELECT
ENTER : SET
Resetting your audio adjustments
The RESET function returns the audio adjustments to the following
factory settings:
MTS........................... STEREO
DIGITAL OUTPUT ............PCM
J3W41321A_En_P35-39 24/03/2006, 2:25 PM35
1
Press MENU, then press
2
Press or to select
“RESET”, then press
or to select (AUDIO) menu.
.
AUDIO
MTS STEREO
AUDIO LANGUAGE
DIGITAL OUTPUT PCM
RESET
: SELECT : ADJUST
NOTE:
When you press RESET in the AUDIO menu, the audio adjustments
return to the factory preset levels.
35
Page 36

Checking the Digital-signal strength
SETUP
LANGUAGE ENGLISH
CLOCK SET
TV/CABLE CABLE
AUTO CH MEMORY
ADD/DELETE
:SELECT :ADJUST
SIGNAL METER
CHANNEL (DIGITAL) 123-045
80%
This unit will allow you to view
the digital signal meter for
digital channels.
-/
PICTURE
SIZE
1
Press MENU, then
press or to select
(SETUP) menu.
2
Press
or
to select
“SIGNAL METER”.
Press or to check the
3
Digital-signal strength.
Press EXIT to return to the normal screen.
4
SETUP
CLOSED CAPTION OFF
CC ADVANCED
SIGNAL METER
: SELECT : ADJUST
NOTES:
• Signal meter feature is not
available for analog channels.
• After 240 seconds, SIGNAL
METER screen will return to
normal TV-operation automatically.
36
J3W41321A_En_P35-39 24/03/2006, 2:25 PM36
Page 37

Troubleshooting
Use the following check list for troubleshooting when you have problems with your TV. Consult your local dealer or
service outlet if problems persist. Be sure all connections are properly made when using with other units.
SYMPTOMS POSSIBLE SOLUTIONS
• Make sure the power cord is plugged in.
TV does not
operate.
Poor sound
or no sound.
Poor picture
or no picture.
Poor
reception on
some
channels.
Poor color or
no color.
Picture
wobbles or
drifts.
Digital
broadcasting screen
problem.
• Try another AC outlet.
• Power is off, check fuse or circuit breaker.
• Unplug unit for an hour, then plug it back in.
• Station or CABLE experiencing problems,
tune to another station.
• Check sound adjustments (Volume and Mute).
• Check for sources of possible interference.
• Station or CABLE experiencing problems,
tune to another station.
• Make sure channels are set into memory.
• Check antenna or CABLE connections,
adjust antenna.
• Check for sources of possible interference.
• Check picture control adjustments.
• Station or CABLE experiencing problems,
tune to another station.
• Make sure channels are set into memory.
• Station is weak, adjust antenna to receive
desired station.
• Check for sources of possible interference.
• Station or CABLE experiencing problems,
tune to another station.
• Make sure channels are set into memory.
• Check picture control adjustments.
• Check antenna or CABLE connections,
adjust antenna.
• Check for sources of possible interference.
• Station or CABLE experiencing problems,
tune to another station.
• Make sure channels are set into memory.
• CABLE company is scrambling signal.
• Adjust antenna.
• Check digital signal strength.
SYMPTOMS POSSIBLE SOLUTIONS
• Check all CABLE connections.
•
Set TV/
CABLE
No CATV
reception.
Horizontal or
diagonal bars
on screen.
No reception
above
channel 13.
No Remote
operation.
TV shuts off.
Closed Caption is
not activated.
Display is not
shown in your
language.
mode.
• Station or CABLE system problems, try
another station.
• Check antenna connections, adjust or
re-direct antenna.
• Check for sources of possible interference.
• Make sure TV/CABLE menu option is in the
appropriate mode.
• If using antenna, check UHF antenna
connections.
• Batteries are weak, dead or inserted incorrectly.
• Remote is out of range, move closer to TV
(within 15 feet).
• Make sure Remote is aimed at sensor.
• Confirm there are no obstructions between
the Remote and the TV.
• Make sure the power cord is plugged in.
• No broadcast on station tuned.
• Sleep Timer is set.
• Power interrupted.
• TV station experiencing problems or program
tuned is not closed captioned. Try another
channel.
• Check CABLE connection or VHF/UHF
antenna, reposition or rotate antenna.
• Set closed caption decoder in the menu.
• Select proper language in the menu options.
menu option to the CABLE
ENGLISH
J3W41321A_En_P35-39 24/03/2006, 2:25 PM37
37
Page 38

SPECIFICATIONS
Power supply: AC 120V, 60Hz
Power Consumption: Operation : 110 Watts
Weight: 80.5 lbs (36.5 kg)
Dimensions: Width: 25-9/16 inches (650 mm)
Inputs: VIDEO: 1 V (p-p)/75 ohms
AUDIO: –8 dBm/50k ohms
S-VIDEO: Y: 1 V (p-p), 75 ohms
COMPONENT: Y: 1 V (p-p), 75 ohms
Output: DIGITAL AUDIO: 0.5 V (p-p), 75 ohms
Antenna input: VHF/UHF/CABLE In 75 ohm coaxial
Picture Tube: 27 inches (676.0 mm diagonal)
Tuner Type: Quartz PLL Frequency
Stand by : 3 W
Height: 22-1/2 inches (571.5 mm)
Depth: 19-11/16 inches (500.5 mm)
C: 0.286 V (p-p), 75 ohms
R: 0.7 V (p-p), 75 ohms
P
B: 0.7 V (p-p), 75 ohms
P
Receiving Channels: VHF 2-13
Speakers: 2 inches (50.8 mm) x 3-1/2 inches (88.9 mm), 8 ohm x 2
Sound output power: 1.0 W + 1.0 W
ACCESSORY: Remote Control
UHF 14-69
CABLE TV 14-36 (A)-(W)
37-59 (AA)-(WW)
60-85 (AAA)-(ZZZ)
86-94 (86)-(94)
95-99 (A-5)-(A-1)
100-125 (100)-(125)
01 (5A)
Design and specifications are subject to change without notice.
38
J3W41321A_En_P35-39 24/03/2006, 2:25 PM38
Page 39

Your Zenith Direct View TV Warranty
Direct-View Color TV Welcome to the Zenith family! We believe that you will be pleased with your new Zenith TV. Please read this warranty carefully, it is a “LIMITED WARRA NTY”
as defined under Federal Law. This warranty gives you specific legal rights, and you may also have other rights that vary from state to state
within the U.S.A.
ZENITH’S RESPONSIBILITY
Service Labor During a period of one year from effective warranty date, Zenith will provide service labor by a Zenith authorized service center when needed, as
Parts New or remanufactured replacements for factory-defective parts will be supplied by a Zenith authorized service center for one year from effective
Warranty Service Warranty service is provided in the institution in most cases. (Some repairs may require the unit to be taken by the servicer to the repair facility and
Not Covered This warranty covers manufacturing defects and does not cover installation, adjustment of customer controls, installation or repair of antenna systems,
determined by the Zenith service center, as a result of manufacturing defects.
warranty date (color picture tube — two years). Such replacement parts are warranted for the remaining portion of the original warranty period.
returned, at no additional charge.) Call 1-888-865-3026 for further information.
cable converters or cable company-supplied equipment; it also does not cover damage due to misuse, abuse, negligence, acts of God or other causes
beyond the control of Zenith. Any alteration of the product after manufacture voids this warranty in its entirety.
THIS WARRANT Y IS IN LIEU OF ANY OTH ER WARRANTY, EXPRESS O R IMPLIED, I NCLUDIN G WITHOUT LIMITATION, ANY WARRANTY
OF MER CHANTABI LITY OR FITNESS F OR A PARTIC ULAR PURPO SE, AND ZENITH S HALL NOT BE LIABLE FOR ANY CON SEQUENTIAL,
INDI RECT, OR INCI DENTAL DAMAGES OF ANY KI ND, INCLUDI NG LOST REVE NUES OR PROFITS I N CONN ECTION WITH TH IS
PRODUCT. SOME STATES DO NOT ALLOW LIMITATION S ON HOW LONG AN I MPLI ED WARRANTY LASTS OR THE EXCLUS ION OR
LIMITATION OF INCI DENTAL OR CONSEQU ENTIAL DAMAGES, SO THE AB OVE LIMITATION S OR EXCLUSION S MAY NOT APPLY TO YOU.
OWNER’S RESPONSIB ILITY
Effective Warranty Date Warranty begins on the date of installation of the Commercial Products Direct-View Television Receiver.
Operating Guide Read your Operating Guide carefully so that you will understand the operation of the TV and how to adjust the controls.
Antenna Reception problems caused by inadequate antenna or faulty antenna connections are the owner’s responsibility.
Important Product Registration—Please fill out and mail the Product Registration Card. It is imperative that Zenith know how to reach you promptly if we should
Warranty Service For warranty service information, call 1-888-865-3026. Parts and service labor that are Zenith’s responsibility (see above) will be provided without
For your convenience, keep the dealer’s dated bill of sale or delivery ticket as evidence of the purchase date.
discover a safety problem that could affect you.
charge. Other service is at the owner’s expense. If you have any problem in obtaining satisfactory warranty service, call 1-88 8-865-3026.
You must provide the model number, serial number and date of purchase or date of original installation.
Before you ask for warranty service, read “Maintenance and Troubleshooting” in the operating guide. You might avoid a service call.
For Customer Support/Service
Please call:
1-888-865-3026
www.zenith.com
J3W41321A_En_P35-39 24/03/2006, 2:25 PM39
© Copyright 2003, Zenith Electronics Corporation
206-3923
Issue *
Page 40

ESPAÑOL
AVISO:
PARA REDUCIR EL RIESGO DE DESCARGA
ELÉCTRICA, NO RETIRE LA CUBIERTA (O SECCIÓN
POSTERIOR). EN EL INTERIOR DEL APARATO NO
HAY COMPONENTES QUE REQUIERAN SERVICIO
DE MANTENIMIENTO POR EL USUARIO. SOLICITE
CUALQUIER OPERACIÓN DE MANTENIMIENTO A
PERSONAL DE SERVICIO CALIFICADO.
El símbolo del rayo dentro de un triángulo equilátero tiene por
finalidad alertar al usuario de la presencia de tensión peligrosa
(sin aislamiento) en el interior del producto, que puede tener la
intensidad suficiente como para constituir un riesgo de descarga
eléctrica.
El signo de exclamación dentro de un triángulo equilátero tiene por
finalidad alertar al usuario de importantes instrucciones de
operación y mantenimiento (servicio) en la literatura que acompaña
a este aparato.
PRECAUCIÓN: El usuario corre el riesgo de perder la autorización para hacer funcionar este equipo en caso de que
ejecute un cambio o modificación no aprobado por la parte responsable para la conformidad con las
Reglas FCC.
AVISO:
PARA REDUCIR EL RIESGO DE INCENDIO O DESCARGA ELÉCTRICA, NO EXPONGA ESTA UNIDAD
A LA LLUVIA NI A LA HUMEDAD
.
PARA SU SEGURIDAD
1. LEA LAS INSTRUCCIONES - Antes de usar la unidad, lea detenidamente todas las instrucciones de seguridad y operación.
2. CONSERVE ESTE MANUAL DE INSTRUCCIONES -
3. RESPETE LAS ADVERTENCIAS - Observe estrictamente todas las advertencias impresas en la unidad y las incluidas en
el manual de instrucciones.
4. SIGA LAS INSTRUCCIONES - Siga todas las instrucciones de operación y uso.
5. LIMPIEZA - Antes de limpiar esta unidad, desconéctela del tomacorriente. No use limpiadores líquidos ni aerosol.
Limpie la unidad con un paño húmedo.
6. ENCHUFES - El fabricante de esta unidad no hace ninguna recomendación de accesorios ya que pueden ser peligrosos.
7. AGUA Y HUMEDAD - No use esta unidad cerca del agua -- por ejemplo, cerca de una bañera o lavamanos, cerca del
fregadero de la cocina o lavandería, en un piso mojado, o cerca de una piscina.
8. ACCESORIOS - No instale esta unidad en un carro, soporte, trípode o mesa inestables.
La unidad podría caerse, causando serios daños a la unidad.
8A. La combinación de aparato y carro deberá ser movida con cuidado.
Las paradas bruscas, la fuerza excesiva y las superficies disparejas podrán hacer
que el aparato y el carro se de vuelta.
9. VENTILACIÓN - Las ranuras y aberturas en la parte trasera o inferior del mueble son para
ventilación y permiten un funcionamiento fiable de la unidad, protegiendo contra calentamiento excesivo. Estas aberturas
no deberán ser bloqueadas ni cubiertas. Para evitar bloquear las aberturas, nunca sitúe la unidad encima de una cama,
sofá, alfombra u otra superficie similar. Tampoco instale la unidad cerca o encima de un radiador o calefactor. La unidad no
deberá ser instalada en un mueble empotrado, como ser una repisa para libros o bastidor, a menos que se pueda garantizar
una ventilación adecuada, o cuando las instrucciones del fabricante así lo especifiquen.
10. FUENTES DE ALIMENTACIÓN - Esta unidad sólo deberá ser operada mediante el tipo de fuente de alimentación
especificado en la etiqueta indicadora. Si no está seguro del tipo de fuente de alimentación que tiene en su casa, consulte a
su distribuidor o a la compañía de electricidad local. En el caso de unidades diseñadas para funcionar a pilas o con otras
fuentes de alimentación, consulte el manual de instrucciones respectivo.
11. CONEXIÓN A TIERRA O POLARIZACIÓN - Esta unidad está equipada con una clavija polarizada de corriente alterna (una
clavija que tiene una espiga más ancha que la otra). Esta clavija solamente puede ser insertada en el tomacorriente en una
sola dirección. Esta es una medida de seguridad. Si no pudiera insertar completamente la clavija en el tomacorriente, vuelva
a intentarlo invirtiendo la clavija. Si aún no fuera posible insertar la clavija, pongase en contacto con un electricista para que
reemplace su tomacorriente obsoleto. Si su unidad está equipada con una clavija de conexión a tierra de 3 alambres (una
clavija con una tercera espiga de conexión a tierra), no modifique las características de seguridad de la clavija polarizada.
Este tipo de clavija sólo puede ser insertado en un tomacorriente con contacto a tierra. Esto también es una medida de
seguridad. Si no pudiera insertar la clavija en el tomacorriente, pongase en contacto con un electricista para que reemplace
su tomacorriente obsoleto. No modifique las características de seguridad de la clavija de conexión a tierra.
12. PROTECCIÓN DEL CABLE DE ALIMENTACIÓN - Los cables de alimentación deberán ser tendidos de manera tal que
la probabilidad de que sean pisados o aplastados por otros objetos sea mínima. Preste especial atención a las clavijas de
los cables, a los receptáculos, y al punto por donde salen del aparato.
Conserve las instrucciones de seguridad y operación para consultas futuras.
AVISO PARA CARRO PORTATIL
(símbolo provisto por RETAC)
S3126A
2
J3W41321A_SP_P02-09 24/03/2006, 2:26 PM2
Page 41

13. TORMENTAS ELÉCTRICAS - Como medida de protección durante tormentas eléctricas, o cuando la unidad permanezca
sin uso durante períodos prolongados de tiempo, desconéctela del tomacorriente mural y desconecte la antena o sistema de
cable. Esto evitará que la unidad resulte dañada por tormentas eléctricas o sobretensiones en la línea de alimentación.
14. LINEAS DE ALIMENTACIÓN - Una antena exterior no deberá ser instalada en la cercanía de líneas de alimentación aéreas
ni de otros circuitos de iluminación eléctrica o potencia, o donde pueda caerse y hacer contacto con tales líneas o circuitos.
Al instalar un sistema de antena exterior, tenga mucho cuidado de no tocar tales líneas o circuitos de alimentación, ya que
el contacto con ellos podría ser fatal.
15. SOBRECARGA - No sobrecargue los tomacorrientes murales ni los cables de extensión, ya que esto podría causar
incendios o descargas eléctricas.
16. ENTRADA DE OBJETOS Y LÍQUIDOS - Nunca introduzca objetos de ningún tipo por las aberturas de la unidad, ya que
podría tocar peligrosos puntos de alta tensión o piezas de cortocircuito, provocando incendios o descargas eléctricas.
Nunca derrame ni rocíe ningún tipo de líquido sobre la unidad.
17. CONEXIÓN A TIERRA DE LA ANTENA EXTERIOR - Si se conecta una antena externa o sistema de cable a la unidad,
cerciórese de que el sistema de antena o cable está conectado a tierra para darle protección contra sobretensión y
acumulación de carga estática. La Sección 810 del Código Nacional de Electricidad, ANSI/NFPA 70, entrega información
acerca de la manera correcta de conectar a tierra el mástil y la estructura de soporte, puesta a tierra del alambre de entrada
a una unidad de descarga de antena, tamaño de los conductores de puesta a tierra, ubicación de la unidad de descarga de
la antena, conexión a los electrodos de tierra, y requisitos para el electrodo de tierra.
ESPAÑOL
EJEMPLO DE CONEXIÓN A TIERRA DE LA ANTENA SEGÚN
EL CÓDIGO NACIONAL DE ELECTRICIDAD
ALAMBRE DE ENTRADA DE
LA ANTENA
ABRAZADERA DE
TIERRA
EQUIPO DE
SERVICIO
ELÉCTRICO
NEC - CÓDIGO NACIONAL DE
ELECTRICIDAD
S2898A
UNIDAD DE DESCARGA
DE LA ANTENA
(NEC, SECCIÓN 810-20)
CONDUCTORES DE CONEXIÓN A
TIERRA (NEC, SECCIÓN 810-21)
ABRAZADERAS DE TIERRA
SISTEMA ELECTRODO DE PUESTA
A TIERRA (NEC ART 250, PARTE H)
18. SERVICIO - No intente reparar la unidad usted mismo; al abrir o retirar las cubiertas usted se expondrá a alta tensión y a
otros peligros. Solicite todo servicio a personal calificado.
19. DAÑOS QUE REQUIERAN REPARACIÓN - En los siguientes casos, desconecte la unidad del tomacorriente mural y llame
a un técnico de servicio calificado:
a. Cuando el cable de alimentación o la clavija estén dañados.
b. Si se ha derramado líquido sobre la unidad, o si algún objeto ha caído dentro de la unidad.
c. Si la unidad ha sido expuesta a la lluvia o al agua.
d. Cuando a pesar de haber seguido las instrucciones de operación, la unidad no funcione normalmente. Ajuste
solamente los controles indicados en el manual de instrucciones; el ajuste incorrecto de otros controles podrá causar
daños a la unidad, la que por lo general requerirá de un prolongado trabajo de reparación (por un técnico calificado)
para que sus condiciones normales de operación puedan ser restablecidas.
e. Si la unidad se ha caído o si el gabinete se ha dañado.
f. Cuando la unidad muestre un cambio notorio en su rendimiento.
20. PIEZAS DE REPUESTO - Cuando sea necesario reemplazar piezas, asegúrese de que el técnico de servicio emplee las
piezas de repuesto especificadas por el fabricante, o piezas que tengan las mismas características que las piezas
originales. Los cambios no autorizados podrán causar incendios, descargas eléctricas y otros problemas.
21. REVISIÓN DE SEGURIDAD - Al finalizar cualquier servicio de mantenimiento o reparación de esta unidad, solicítele al
técnico que efectúe pruebas de seguridad para determinar si la unidad se encuentra o no en condiciones óptimas de
operación.
22. CALOR - El producto debe ser situado lejos de fuentes de calor como radiadores, reguladores de calefacción, estufas u
otros productos (incluyendo amplificadores) que producen calor.
23. NOTA PARA LA PERSONA QUE INSTALE EL SISTEMA CATV - Se ha incluido este recordatorio para llamar la atención
de quien instale el sistema CATV, con respecto al Artículo 820-40 de la NEC, que entrega directivas de guía para realizar
una conexión adecuada a tierra y, en particular, especifica que el cable de puesta a tierra debe ser conectado al sistema de
conexión a tierra del edificio, lo más cerca del punto de entrada del cable como sea posible.
J3W41321A_SP_P02-09 27/03/2006, 9:22 AM3
3
Page 42

Índice
ANTES DE UTILIZAR SU APARATO
PARA SU SEGURIDAD ............................................................... 2
Índice............................................................................................ 4
Características ............................................................................. 5
Fuente de alimentación ................................................................ 5
Partes y sus funciones ................................................................. 6
CONTROL REMOTO ................................................................... 7
Conexiones de la antena ............................................................. 8
Conexiones de TV cable .............................................................. 9
Conexiones a otros equipos....................................................... 10
Configuración inicial ................................................................... 14
Selección de idioma ................................................................... 15
Memorización de canales .......................................................... 16
OPERACIÓN
Operación del TV ....................................................................... 18
Ajuste del Chip-V ....................................................................... 20
Bloqueando los canales ............................................................. 23
Bloqueando la entrada de video ................................................ 24
Configuración del bloqueo del panel frontal ............................... 25
Para asignar etiquetas a los canales ......................................... 26
Ajuste del reloj............................................................................ 27
Para ajustar el temporizador de conexión.................................. 28
Para ajustar el temporizador de desconexión ............................ 29
Configuración del tamaño de la imagen..................................... 30
Ajustes de control de imagen ..................................................... 31
Cómo restablecer los ajustes de imagen ................................... 31
Subtítulos ................................................................................... 32
Subtítulos avanzados ................................................................. 33
Cómo seleccionar estéreo/
Programa de Audio Secundario (SAP) ...................................... 34
Cómo seleccionar la salida digital .............................................. 34
Selección del idioma del audio................................................... 35
Cómo restablecer los ajustes de audio ...................................... 35
Cómo comprobar la potencia de la señal digital ........................ 36
OTROS
Solución de problemas............................................................... 37
Especificaciones .................................................. Cubierta trasera
4
J3W41321A_SP_P02-09 24/03/2006, 3:07 PM4
Page 43

Características
Imagen de alta calidad con una resolución horizontal de más de 500 líneas. Tiene una resolución superior
a Súper VHS (400 líneas) y al Laser Disc (430 líneas).
Compatible con una gran gama de salidas de audio digital - Toma de audio digital - Cuando se conecta un
equipo con un decodificador Dolby Digital integrado, los sonidos en Dolby Digital pueden producir el efecto de
estar en un cine ó en una sala de conciertos.
• Sintonizador digital integrado - Podrá disfrutar de transmisiones digitales sin necesidad de utilizar un
decodificador de TV digital.
• Decodificador de subtîtulos con modo de texto completo - Muestra los subtîtulos o el texto del programa
en pantalla completa para las personas con problemas de audición.
• Ajustes de imagen utilizando el control remoto - La indicación en pantalla permite el ajuste preciso de
BRIGHTNESS (brillo), COLOR, CONTRAST (contraste), TINT (tinte) y SHARPNESS (nitidez), con el
controlador remoto.
• Temporizador de desconexión automática de TV - Puede ser operado con el control remoto y el TV puede
ser programadohasta en 120 minutos para que se apague automáticamente.
• Chip V - La función de prohibición para menores con Chip V puede leer la clasificación de un programa de
TV opelícula, si el programa tiene codificada esta información. El Chip V permite seleccionar el nivel de
prohibición.
• Recepción estéreo/SAP - Este TV fue diseñado para recibir programas estéreo y de programa de audio
secundario (SAP).
• Jacks S-Vídeo / Vídeo componente - Se puede conectar un VCR, reproductor de DVD, receptor de satélite
o cualquier otro componente de audio/vídeo a esta unidad.
• Jacks de entrada de vídeo - Esta unidad está equipada con 3 tipos de jacks de entrada de vídeo. El jack de
entrada de vídeo componente y el jack de entrada de S-Vídeo permiten ver el reproductor de DVD o los
dispositivos de vídeo con una imagen de alta calidad.
• Indicación en pantalla de 3 idiomas - Usted puede seleccionar una de 3 idiomas, inglés, español ó francés
por programación en pantalla.
ESPAÑOL
* Fabricado bajo licencia de Dolby Laboratories. “Dolby” y el símbolo de la doble D son marcas registradas por
Dolby Laboratories.
Fuente de alimentación
Tomacorriente de CA
Orificio y hoja
más anchos
Cable de corriente alterna polarizado
(una pata es más ancha que la otra.)
PARA UTILIZAR CORRIENTE ALTERNA (CA)
Utilice el cable de CA polarizado sumistrado para CA operación.
Conecte el enchufe pequeño en el extremo del cable al conector
de entrada de CA en el parte trasera del aparato, luego inserte el
enchufe más ancho de cable de CA en un tomacorriente de CA de
120 V, 60 Hz polarizado.
NOTAS:
Nunca conecte el enchufe del cordón de CA a otro voltaje que no
•
sea el especificado (120 V 60 Hz).
Utilice solamente el cordón eléctrico suministrado.
Si el cordón de CA polarizado no se puede insertar en un
•
tomacorriente de CA sin polaridad, no intente limar o cortar las
clavijas.
Es responsabilidad de usuario hacer que un electricista reemplace
el tomacorriente inadecuado.
Si usted causa una descarga estática cuando toca la unidad y
•
este falla, simplemente desenchufe la unidad del tomacorriente,
espere algunos minutos y enchufela otra vez. La unidad deberá
funcionar normalmente.
J3W41321A_SP_P02-09 24/03/2006, 2:26 PM5
5
Page 44

Partes y sus funciones
Vista frontal
Interruptor de alimentación (POWER)
Sensor de control remoto
*Botones selectores de canal (CHANNEL ▲/▼)
* Para mostrar la pantalla del menú.
Pulse los botones VOLUME ▲/▼ al mismo tiempo para que aparezca la pantalla del menú.
Los botones CHANNEL ▲/▼ y VOLUME ▲/▼ se pueden utilizar para seleccionar los valores deseados en
las operaciones disponibles en la pantalla del menú.
Tomas AUDIO (L/R)/VIDEO IN (VIDEO2)
*
Botones de volumen (VOLUME
▲/▼)
Vista posterior
Jack de la antena de VHF/UHF
Toma S-VIDEO IN
Cable de CA
Tomas AUDIO (L/R)/VIDEO
IN (VIDEO1)
Toma de salida COAXIAL
DIGITAL AUDIO OUT
Tomas COMPONENT IN
6
J3W41321A_SP_P02-09 24/03/2006, 2:26 PM6
Page 45

8
CONTROL REMOTO
4.
Botón SLEEP - Para hacer que el televisor se apague
después de un período de tiempo prefijado, presione el
1
2
3
–/
4
5
6
7
PICTURE
SIZE
9
10
11
12
13
14
15
16
1. Interruptor de alimentación - Para encender y apagar
el televisor.
2. Botones de selección directa de canal (0-9) - Le
permiten acceder directamente a cualquier canal.
3. Botón
–
/DISPLAY - Si el televisor recibe una señal
analógica, al pulsar este botón aparecerá la información
actual en pantalla. Si el televisor recibe una señal
digital, pulse este botón para consultar la información
digital. Si pulsa dos veces, aparecerá la información
analógica. Para ocultar la información, vuelva a pulsar
el botón. Este botón también es el botón “-
para seleccionar canales digitales.
“ utilizado
Antes de usar la de control remoto deben ser instaladas las pilas.
COMO INSTALAR LAS PILAS
1. Abra la tapa del compartimiento de pilas.
2. Instale dos pilas “AAA” (no suministradas).
3. Recoloque la tapa del compartimiento.
botón SLEEP del unidad de control remoto. El reloj hará una
cuenta regresiva de 10 minutos cada vez que el botón sea
presionado (en el orden de 0h00m, 0h10m,...1h50m, 2h00m.).
Una vez programado el tiempo de desactivación automática,
la indicación desaparecerá de la pantalla, después de lo cual
volverá a aparecer momentáneamente cada diez minutos
para recordarle que la función de desactivación automática
está activada. Para confirmar el tiempo de desactivación
automática, presione el botón SLEEP una vez; el tiempo
restante será momentáneamente exhibido. Para cancelar la
función de desactivación automática, presione repetidamente el botón SLEEP hasta que la indicación sea 0h00m.
5. Botones de + / – de volumen - Presione el botón + para
aumentar el nivel de volumen, y el botón – para disminuirlo.
Se utiliza para seleccionar el valor deseado en las
operaciones disponibles en la pantalla del menú.
6. Botón MENU - Presione este botón para mostrar el menú
de función en la pantalla.
7.
Botón EXIT - Pulse este botón para salir del menú en pantalla.
8. Botón TV/AV - Pulse este botón para ver el menú SOURCE
SELECTION (selección de fuente), para seleccionar la
fuente de entrada de vídeo.
9. Botón de visión rápida - Esta función le permite retornar al
canal previamente seleccionado; simplemente presione el
botón QUICK VIEW. Para retornar al canal que estaba
viendo, vuelva a presionar este botón.
10. Botón de silenciamiento - Para cortar el sonido, presione
este botón una vez. El televisor será silenciado y la
indicación “MUTE” aparecerá en la pantalla. Para desactivar
la función de silenciamiento, vuelva a presionar el botón de
silenciamiento (MUTE) o presione el botón de aumento o
disminución de volumen (VOL + o –).
Botones selectores de canal
11.
ascenso
la memoria. Presione el botón de descenso
un canal más bajo. Se utiliza para seleccionar el valor deseado
en las operaciones disponibles en la pantalla del menú.
12.
Botón ENTER - Presiónelo para introducir o seleccionar la información
de las operaciones en pantalla, dentro del menú de ajustes.
13. Botón de reinicialización (RESET) - Pulse para
reinicializar la imagen en pantalla y los ajustes de sonido a
los valores de fábrica, dentro del menú de ajustes.
14. Botón de CLOSED CAPTION - Pulse este botón para ver el
menú CLOSED CAPTION (teletexto).
15. Botón de AUDIO SELECT - Pulse este botón para ver el
menú AUDIO.
16. Botón PICTURE SIZE (tamaño imagen) - Pulse este botón
para cambiar de tamaño imagen.
Utilice pilas de tamaño “AAA” (no suministradas) para la unidad
control remoto. Las pilas duran aproximadamente un año,
dependiendo de cuanto se utilice el control remoto. Para su mejor
funcionamiento se recomienda que las pilas se reemplacen en
forma anual, o cuando el funcionamiento del control remoto sea
errático. No mezcle pilas nuevas y viejas.
para cambiar a un canal más alto almacenado en
/
- Presione el botón de
para cambiar a
PRECAUCIONES PARA LAS PILAS
Se deben tomar las siguientes precauciones cuando se usan las
pilas para el control remoto.
•
Utilice solo el tipo y tamaño de pila especificado.
•
Asegúrese de colocar correctamente la polaridad como está
señalado en el compartimiento para pilas. Las pilas invertidas
pueden causar daño al control.
•
No mezcle diferentes tipos de pilas (por ejemplo: alcalinas, zinccarbón), o pilas viejas con pilas nuevas.
•
Si Ud. no utiliza el control por un largo período de tiempo, saque
las pilas para prevenir daños por posible fuga de electrólito.
•
No trate de recargar las pilas que no son recargables; pueden
sobrecalentarse y reventar (Siga las instrucciones del fabricante
de pilas).
7
ESPAÑOL
J3W41321A_SP_P02-09 24/03/2006, 2:26 PM7
Page 46

Conexiones de la antena
Si usted está utilizando una antena para interiores ó exteriores, siga las instrucciones de abajo que
correspondan a su sistema de antena. Si está utilizando el servicio de TV cable (CABLE), vea la página
9 para las conexiones de TV cable.
Antena combinada de VHF/UHF (Cable único de 75 ohmios ó cable con doble
conductor de 300 ohmios)
Conecte el cable de 75 ohmios de la antena
combinada de VHF/UHF en el jack de la antena.
Jack de
antena
Cable coaxial
de 75 ohmios
Transformador de
adaptacion de
300-75 ohmios
Antena combinada de VHF/UHF (Cables separados para VHF y UHF de dos
conductores de 300 ohmios)
Jack de
antena
Transformador de
adaptacion de
300-75 ohmios
Jack de
antena
Si su antena combinada de VHF/UHF posee un
cable de dos conductores de 300 ohmios, es
posible que sea necesario utilizar un
transformador de adaptación de 300-75 ohmios.
Conecte el cable de dos conductores de 300
ohmios de UHF en el combinador (no
suministrado). Conecte el cable de dos
conductores de 300 ohmios de VHF en el
transformador de adaptación de 300-75 ohmios.
Conecte el transformador al combinador, y luego
conecte el combinador al jack de la antena.
Combinador
UHF 300 ohmios
VHF 300 ohmios
Antenas independientes de VHF/UHF (cable de VHF de 75 ohmios y cables de dos
conductores UHF de 300 ohmios)
Conecte el cable de 75 ohmios de VHF y el cable
Jack de
antena
VHF 75 ohmios
Combinador
UHF 300 ohmios
de dos conductores de 300 ohmios de UHF al
combinador (no suministrado). Conecte el
combinador en el jack de la antena.
8
J3W41321A_SP_P02-09 24/03/2006, 2:26 PM8
Page 47
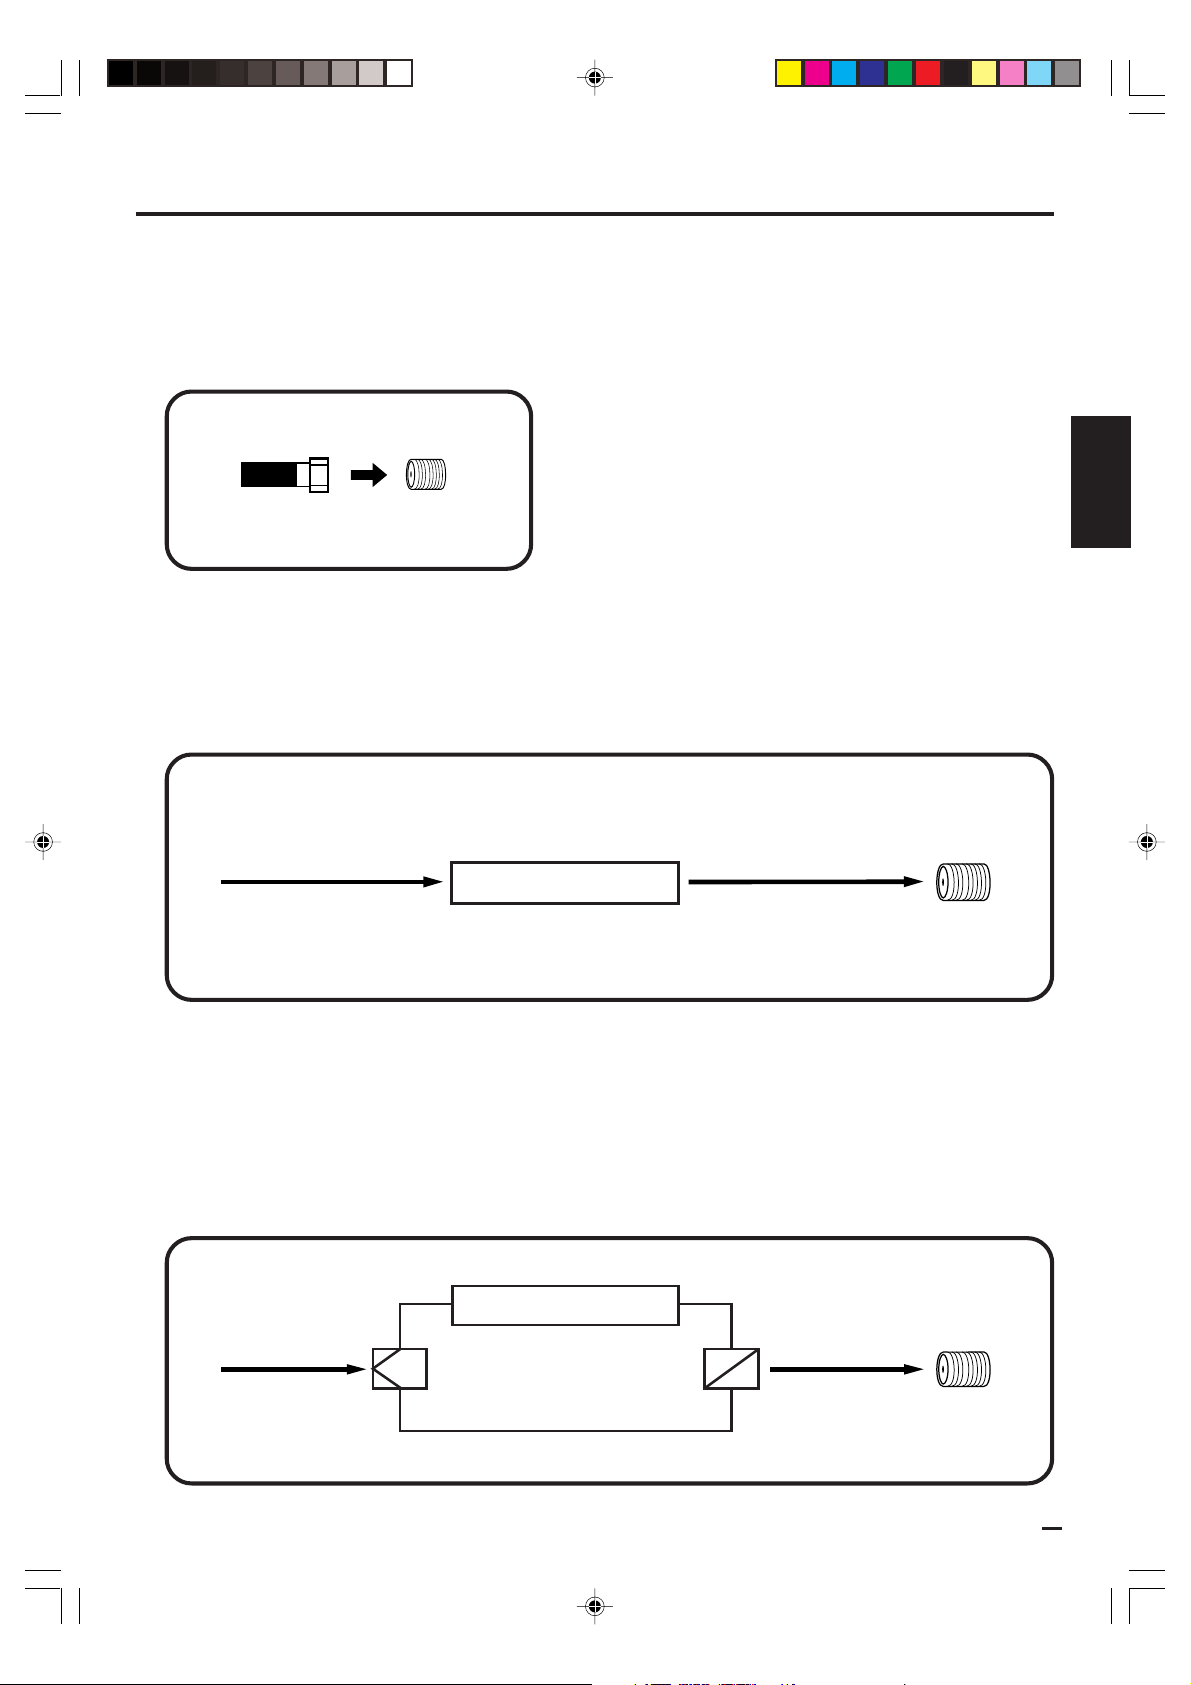
Conexiones de TV cable
Este aparato posee un amplio rango de sintonización y puede ser sintonizado a la mayoría de los
canales de cable sin utilizar una caja convertidora de TV cable. Algunas de las compañías de TV cable
ofrecen “canales pagados premiados” en los cuales la señal ha sido codificada. La decodificación de
estas señales para la recepción normal requiere el uso de un dispositivo decodificador que lo
suministra generalmente la compañía de cable.
PARA ABONADOS AL SERVICIO BÁSICO DE TV CABLE
Jack de
antena
Cable coaxial de
75 ohmios
Para el servicio básico de cable y cuando no es necesario un
convertidor/caja decodificadora, conecte el cable coaxial de 75
ohmios al jack de la antena en la parte posterior del aparato.
PARA ABONADOS AL SERVICIO CODIFICADO DE TV CABLE
Si usted es abonado a un servicio de TV cable que requiere el uso de un convertidor/caja decodificadora,
conecte el cable coaxial entrante de 75 ohmios al convertidor/caja decodificadora. Utilizando otro cable coaxial
de 75 ohmios conecte el jack de salida del convertidor/caja decodificadora al jack de la antena del aparato.
Vea las conexiones mostradas abajo. Sintonice el aparato al canal de salida del convertidor/caja decodificadora
(generalmente canal 3 ó 4), y utilice el convertidor/caja decodificadora para seleccionar los canales.
Cable entrante
de 75 ohmios
de TV CABLE
Cable de 75
ohmios al aparato
Convertidor/Decodificador
Jack de
antena
ESPAÑOL
PARA ABONADOS AL SERVICIO DE TV CABLE BÁSICO NO CODIFICADO CON CANALES PREMIUM CODIFICADOS
Si usted está abonado a un servicio de TV cable en el cual los canales básicos no están codificados y los
canales premium requieren el uso de un convertidor/caja decodificadora, puede desear utilizar un divisor de
señales y una caja de conmutación A/B (disponible en las compañías de cable o en las tiendas de artículos
electrónicos). Vea las conexiones mostradas a continuación. Con el conmutador en la posición “B”, usted
puede sintonizar directamente cualquiera de los canales no codificados en su aparato. Con el conmutador en
la posición “A”, sintonice su aparato a la salida del convertidor/caja decodificadora (generalmente canal 3 ó 4),
y utilice el convertidor/caja decodificadora para sintonizar los canales codificados.
Cable entrante
de 75 ohmios
de TV CABLE
J3W41321A_SP_P02-09 24/03/2006, 2:26 PM9
Convertidor/Decodificador
Divisor
Conmutador A/B
Cable de 75
ohmios al aparato
A
B
Jack de
antena
9
Page 48

Conexiones a otros equipos
La instalación exacta a utilizar para hacer las conexiones de los distintos componentes de vídeo y audio en el TV
depende del modelo y funciones de cada componente. Confirme en el manual de instrucciones de cada
componente la posición de las entradas y salidas de vídeo y de audio.
Los diagramas de conexión a continuación son sugerencias. Puede ser necesario modificarlos según los equipos
que posee. Los diagramas muestran sólo las conexiones de componentes de vídeo y audio.
Selección de la fuente de entrada de vídeo
Presione TV/AV para ver la señal de otro dispositivo conectado al televisor,
como un VCR o un reproductor de DVD. Puede seleccionar ANT, VIDEO1,
VIDEO2 (en el panel frontal), COMPONENT según los jacks de entrada que
haya utilizado para conectar los dispositivos.
SOURCE SELECTION
0. ANT
1. VIDEO1
2. VIDEO2
3. COMPONENT
Al pulsar TV/AV en el control remoto aparece la fuente de señal actual
/0-3 : SELECT
(pulse TV/AV de nuevo o 0-3 para cambiar).
Para conectar el TV a una videograbadora
A salida de Audio/Vídeo
Cable de Audio/Vídeo (no suministrado)
A entrada de AUDIO/
VIDEO
Atrás del TV
Para conectar el TV a un VCR con una toma S-VIDEO
Si conecta un VCR con una toma S-vídeo a la toma S-VIDEO de la parte posterior del TV, también debe conectar los
cables de audio a las tomas AUDIO IN de la parte posterior del TV. El cable S-vídeo sólo transporta la señal de vídeo.
La señal de audio es independiente.
A salida de S-Vídeo A salida de Audio
A entrada de
AUDIO
Cable de Audio (no suministrado)
Cable de S-Vídeo (no suministrado)
A entrada de
NOTA:
Cuando el cable S-vídeo y el cable de vídeo estándar se conectan al mismo tiempo, el cable S-vídeo toma preferencia.
S-VIDEO
Atrás del TV
10
J3W41321A_SP_P10-13 24/03/2006, 2:27 PM10
Page 49

Conexiones a otros equipos (continuación)
Para conectar el televisor a un reproductor de DVD/receptor de satélite
Si su reproductor de DVD o receptor de satélite dispone de un jack de salida de S-Vídeo, conecte los cables como se muestra.
A salida de
S-Vídeo
Cable de S-Vídeo (no suministrado)
A salida de
Audio
A entrada de
Cable de Audio (no suministrado)
AUDIO
A entrada de
S-VIDEO
Atrás del TV
Para conectar el televisor a un reproductor de DVD con un cable de vídeo componente
Si su reproductor de DVD tiene jacks de salida de vídeo componente, conecte el televisor al reproductor de DVD
mediante el cable de vídeo componente. La calidad de imagen y el rendimiento pueden mejorar considerablemente.
A salida de
Audio
YPBP
Cable de Vídeo (no suministrado)
Cable de Audio (no suministrado)
A salida de Vídeo de
R
Componente
ESPAÑOL
A entrada de
COMPONENT
NOTA:
Esta unidad puede mostrar una señal entrelazada de 480i solamente cuando se conecta al dispositivo digital con las
entradas de video por componentes. Si ingresa una señal de 480p, 720p ó 1080i a las entradas de video por componentes,
se desplegará “COMPONENT” en la pantalla negra. En este caso, ajuste la salida del dispositivo digital a 480i.
Atrás del TV
Para conectar un televisor a un receptor de DTV / decodificador
Si conecta un receptor de DTV / decodificador, conecte el TV al receptor de DTV / descodificador mediante un
cable de vídeo componente.
A salida de
Audio
YPBP
Cable de Vídeo (no suministrado)
Cable de Audio (no suministrado)
A salida de Vídeo de
R
Componente
A entrada de
COMPONENT
Atrás del TV
11
J3W41321A_SP_P10-13 24/03/2006, 2:27 PM11
Page 50

Conexiones a otros equipos (continuación)
Cómo utilizar un Amplificador AV con sonido digital integrado
Si utiliza un amplificador con sonido envolvente digital integrado como el que aparece a continuación, puede
disfrutar de los distintos sistemas de audio, incluyendo el audio con Dolby Surround que hasta ahora sólo se podía
disfrutar en los cines.
A continuación se muestra cómo conectar un amplificador AV con decodificador Digital Dolby integrado, etc.
Atrás del TV
Salida de audio digital
coaxial
Cable digital coaxial
(no suministrado)
A la entrada de
audio digital coaxial
Amplificador AV con decodificador de
surround digital integrado como aparece
arriba enlistado.
Altavoz
delantero
(izquierdo)
TV
Altavoz central
Altavoz envolvente
(izquierdo)
Altavoz de
graves
Altavoz
delantero
(derecho)
Altavoz
envolvente
(derecho)
NOTAS:
• Cuando hace la conexión anterior, en el amplificador AV, no ajuste DOLBY DIGITAL a DOLBY DIGITAL “ON”.
Si lo hace, los altavoces emitirán un sonido muy alto que podría causarle daños de audición o averiar los
propios altavoces.
• Esta unidad no es compatible con salida de audio DTS. No tendrá salida de sonido si se conecta a un
amplificador AV con decodificador DTS incorporado.
12
J3W41321A_SP_P10-13 24/03/2006, 2:27 PM12
Page 51

Conexiones a otros equipos (continuación)
Para conectar la unidad a la videocámara
Para reproducir de la videocámara, conecte la videocámara en el TV tal como se indica.
Frente del aparato
A salida de Audio/Vídeo
Cable de Audio/Vídeo (no suministrado)
Para conectar el televisor a un sistema de juegos de vídeo
El aparato puede utilizarse también como pantalla para muchos juegos de vídeo. Sin embargo, debido a que
existe una gran variedad de señales generadas por estos aparatos y diferentes requisitos de conexión
correspondientes, no se han incluido todas las posibilidades posibles en los diagramas de conexión sugeridos.
Para más detalles, deberá consultar el manual de instrucciones de cada componente.
ESPAÑOL
JUDGO DE
VÍDEO
Frente del aparato
A salida de Audio/Vídeo
Cable de Audio/Vídeo (no suministrado)
J3W41321A_SP_P10-13 24/03/2006, 2:27 PM13
13
Page 52

:SELECT ENTER : SET
LANGUAGE / LANGUE / IDIOMA
ENGLISH
FRANÇAIS
ESPAÑOL
:SELECT ENTER : SET
CHANNEL PLAN
TV
CABLE
:SELECT ENTER : SET
AUTO SETUP
START
CANCEL
Configuración inicial
El menú STARTING SETUP
(configuración inicial) aparece al
encender el televisor por primera
vez y le ayuda a seleccionar el
idioma de los menús, a
especificar la configuración de
TV/CABLE y a programar los
canales automáticamente.
-/
PICTURE
SIZE
IMPORTANTE: ¡asegúrese de conectar la antena o el sistema de
TV por cable!
1
Presione POWER. Comienza la
función de configuración inicial y
aparece en pantalla el menú
Language setup (configuración
de idioma).
Presione o
para
seleccionar el idioma que desee y,
a continuación, presione ENTER.
2
Presione
o
para
seleccionar “TV” o “CABLE”,
luego presione ENTER.
Presione o para
3
seleccionar “START” y a
continuación, presione ENTER.
Si selecciona “CANCEL” y
presione ENTER, se detiene la
configuración inicial y aparece la
pantalla de televisión normal.
Comienza entonces el “AUTO SETUP” (configuración
4
automática). Una vez finalizada la configuración inicial, aparece
en televisión el canal de televisión.
14
J3W41321A_SP_P14-17 24/03/2006, 2:27 PM14
• Dependiendo de las condiciones de recepción, los canales
digitales de cable pueden tardar hasta 10 minutos en
memorizarse. Por favor, sea paciente.
NOTA:
Si presione EXIT durante “AUTO SETUP”, se detiene la STARTING
SETUP y aparece la pantalla normal.
Al seleccionar una opción de menú los cambios se aplican de
•
inmediato. No es necesario que presione EXIT para ver los
cambios.
•
Cuando termine de programar los distintos menús, presione EXIT.
Page 53

SETUP
LANGUAGE ENGLISH
CLOCK SET
TV/CABLE CABLE
AUTO CH MEMORY
ADD/DELETE
:SELECT :ADJUST
SETUP
LANGUAGE ENGLISH
ENGLISH/ FRANÇAIS /ESPAÑOL
CLOCK SET
TV/CABLE CABLE
AUTO CH MEMORY
ADD/DELETE
:SELECT :ADJUST
Selección de idioma
Puede escoger entre tres idiomas
diferentes (inglés, francés y español)
para los despliegues en pantalla.
-/
Presione MENU. Aparece la pantalla del menú.
1
Presione o para seleccionar
2
menú de
Presione
3
(SETUP).
o
para
seleccionar “LANGUAGE”.
Presione
4
(ENGLISH), francés (FRANÇAIS) o español (ESPAÑOL).
Presione EXIT para volver a la imagen normal.
5
o para seleccionar el idioma deseado: inglés
ESPAÑOL
PICTURE
SIZE
NOTA:
Si no se presiona ningún botón dentro
de 15 segundos, la pantalla MENU
volverá automáticamente a su función
normal de TV.
J3W41321A_SP_P14-17 24/03/2006, 2:27 PM15
15
Page 54

Memorización de canales
Este aparato está equipado con una función de memorización de canales que permite avanzar ó retroceder al
siguiente canal almacenado en la memoria, pasando por alto los canales no deseados. Antes de seleccionar
canales, éstos deberán ser programados en la memoria del aparato. Este televisor tiene capacidad para recibir
hasta 250 canales de VHF/UHF y 500 canales de TV por cable. Para usar el aparato con una antena, ajuste la
opción de aparato al modo “TV”. Al salir la unidad de fábrica, la opción de menú de TV/CABLE se ajusta al modo
de “CABLE”.
Selección de TV/CABLE
Presione MENU. Aparece la pantalla del menú.
1
Presione
2
menú de
-/
Presione
3
o para seleccionar
(SETUP).
o
para
SETUP
LANGUAGE ENGLISH
CLOCK SET
TV/CABLE CABLE
AUTO CH MEMORY
ADD/DELETE
:SELECT :ADJUST
seleccionar “TV/CABLE”.
SETUP
LANGUAGE ENGLISH
CLOCK SET
TV/CABLE TV/CABLE
AUTO CH MEMORY
ADD/DELETE
:SELECT :ADJUST
PICTURE
SIZE
Presione o para
4
seleccionar “TV” o “CABLE”.
SETUP
TV - Canales de VHF/UHF
CABLE - Canales de TV CABLE
LANGUAGE ENGLISH
CLOCK SET
TV/CABLE TV/CABLE
AUTO CH MEMORY
ADD/DELETE
:SELECT :ADJUST
16
J3W41321A_SP_P14-17 24/03/2006, 2:27 PM16
5
Presione EXIT para volver a la imagen normal.
CANALES POR CABLE
El cuadro abajo muestra el sistema típico de la localización de los canales
por cable.
Números en este TV
Canal de CABLE correspondientes
Page 55

Memorización de canales (continuación)
Sintonizacion de memoria automática de canal
Presione MENU. Aparece la pantalla del menú.
1
Presione
2
menú de
presione o para
seleccionar “AUTO CH
MEMORY”.
Presione o . El TV comenzará
3
a memorizar todos los canales
disponibles en su área.
-/
• Dependiendo de las condiciones
de recepción, los canales
o para seleccionar
(SETUP), luego
SETUP
LANGUAGE ENGLISH
CLOCK SET
TV/CABLE CABLE
AUTO CH MEMORY
ADD/DELETE
:SELECT :ADJUST
AUTO CH MEMORY
EXIT : CANCEL
PROGRAMMING NOW
PLEASE WAIT
ESPAÑOL
digitales de cable pueden tardar
hasta 10 minutos en memorizarse.
Por favor, sea paciente.
Para agregar/borrar canales.
Presione MENU. Aparece la pantalla del menú.
1
o para seleccionar
(SETUP), luego
SETUP
LANGUAGE ENGLISH
CLOCK SET
TV/CABLE CABLE
AUTO CH MEMORY
ADD/DELETE
:SELECT :ADJUST
PICTURE
SIZE
Presione
2
menú de
presione o para seleccionar
“ADD/DELETE”.
Presione o , aparece la
pantalla del menú de ADD/
DELETE.
NOTAS:
• Pueden aparecer nuevos canales.
Por tanto, se recomienda realizar el
“AUTO CH MEMORY”
(memorización automática de
canales) con frecuencia.
• Para volver del menú ADD/DELETE
al menú SETUP, seleccione
“SETUP MENU”, y presione
o .
Presione o para
3
seleccionar “ADD/DELETE”,
luego presione .
Seleccione los canales deseados a
4
agregar o borrar mediante o .
Presione
“ADD” (añadir) o “DELETE” (borrar),
dependiendo de la función que
quiera realizar.
Repita el paso 4 para añadir o eliminar más canales y, a
5
o para seleccionar
ADD/ DELETE
ADD/ DELETE
CH SIGNAL
1 ANALOG DELETE
2 ANALOG ADD
3 ANALOG DELETE
4 ANALOG DELETE
5 ANALOG ADD
5-001 DIGITAL ADD
5-002 DIGITAL ADD
CLEAR ALL
SETUP MENU
:SELECT :ADJUST
ADD/DELETE
ADD/DELETE
CH SIGNAL
1 ANALOG ADD/DELETE
2 ANALOG ADD
3 ANALOG DELETE
4 ANALOG DELETE
5 ANALOG ADD
5-001 DIGITAL ADD
5-002 DIGITAL ADD
CLEAR ALL
SETUP MENU
:SELECT :ADJUST
continuación, presione ENTER.
Presione EXIT para volver a la imagen normal.
6
CLEAR ALL (BORRAR TODO)
Se eliminan todos los canales de la memoria.
Presione
anterior y, a continuación, presione o .
o
para seleccionar “CLEAR ALL” en el paso 3
17
J3W41321A_SP_P14-17 24/03/2006, 2:27 PM17
Page 56

Operación del TV
-/
Para encender el aparato, presione POWER.
1
Ajuste el nivel de volumen
2
presionando VOL + o VOL –. El nivel
de volumen será indicado en la
pantalla por medio de barras verdes.
A medida que el volumen aumenta, se
incrementan el número de barras. Si
se reduce el volumen, el número de
barras verdes.
Ajuste el modo TV/CABLE a
3
la posición apropiada (Vea
página 16).
Presione el botón de selección
4
directa de canal.
TV - Canales de VHF/UHF
CABLE - Canales de TV CABLE
VOLUME 32
PICTURE
SIZE
NOTAS:
• Si se ha seleccionado un canal sin
emisión, el sonido se silenciará
automáticamente.
• Si una estación que estaba viendo
deja de transmitir, el televisor se
desconectará automáticamente
después de 15 minutos.
PARA SELECCIONAR CANALES
ANALÓGICOS
1-9: Presione 0 dos veces y, a
continuación, los botones 1-9
según proceda. Por ejemplo, para seleccionar el canal
2, presione 0 0 2.
10-99: Presione 0 y después los otros 2 dígitos. Por ejemplo,
para seleccionar el canal 12, presione 0 1 2.
100-125: Presione los 3 dígitos en orden. Por ejemplo, para
seleccionar el canal 120, presione 1 2 0.
PARA SELECCIONAR CANALES DIGITALES
Presione los tres primeros dígitos y, a continuación, presione
“–/DISPLAY” seguido por los otros 3 dígitos.
Por ejemplo, para seleccionar el canal 015-001, presione 015 – 001.
•
Si un canal sólo tiene contenido de audio seleccionado, se
visualizará “AUDIO ONLY” en la pantalla.
• Cuando aparezca seleccionada una señal digital débil, se
visualizará “DIGITAL CHANNEL SIGNAL STRENGTH IS LOW”
en la pantalla.
• Cuando aparezca un canal al cual no se ha suscrito, se
visualizará “DIGITAL CHANNEL IS SCRAMBLED” en la
pantalla.
CANALES DE VHF/UHF/CABLE
TV CABLE
VHF
2-13
UHF
14-69
VHF
2-13
STD/HRC/IRC
14-36 (A) (W)
37-59 (AA) (WW)
60-85 (AAA) (ZZZ)
86-94 (86) (94)
95-99 (A-5) (A-1)
100-125 (100) (125)
01 (5A)
ABCD
ANT
12
18
J3W41321A_SP_P18-24 24/03/2006, 2:28 PM18
Page 57

STEREO
SAP
TV-PG L V
ON TIMER 8:30AM
OFF TIMER 11:30PM
SLEEP TIMER 2h00m
ANT
ABCD
CABLE
7
CLOCK12:00AM MON
4:3
Operación del TV (continuación)
/
CH
Presione y libere el botón CH o . La
unidad se detendrá automáticamente en el
siguiente canal almacenado en la memoria.
-/
PICTURE
SIZE
NOTA:
Si el televisor recibe una señal
analógica, la función –/DISPLAY
muestra únicamente la información
analógica.
Antes de seleccionar canales, éstos
deberán ser almacenados en la memoria
del televisor. Consulte la sección “Memorización
de canales” en las páginas 16 y 17
.
DISPLAY
Presione –/DISPLAY para ver en pantalla la información actual.
Si el televisor recibe una señal digital,
presione este botón para consultar la
información digital.
• Nombre de la emisión
• Nombre
de la emisora
15-1
Monoscope_4801_1
Remaining Time 0:20
CH-1
TV-14
No program information is available.
• Tiempo restante
• Idioma del sonido •
•
CLASIFICACIÓN V-CHIP
•
Marca subtítulos cerrados
Nombre del programa
•
Marca V-Chip
Presione –/DISPLAY de nuevo para ver la
información analógica.
• Reloj
• Número de canal o modo VIDEO
seleccionado
• Etiqueta del canal (si está memorizada)
• Estado del sonido Stereo (estéreo) o SAP
(programa de audio secundario)
• Clasificación del contenido
• On timer, Off timer, Sleep time (temporizador encendido/apagado,
tiempo hasta el apagado automático, sí se ha activado)
• Tamaño de la imagen
Presione –/DISPLAY de nuevo para volver a la imagen del televisor.
VISIÓN RAPIDA (QUICK VIEW)
Este botón le permite retroceder hasta el
último canal sintonizado al presionar el
botón QUICK VIEW. Presione QUICK
VIEW otra vez para regresar al último
canal que estaba mirando.
SILENCIAMIENTO (MUTE)
Presione MUTE botón para silenciar el
sonido. El sonido del aparato será
silenciado y aparecerá brevemente en
pantalla la indicación “MUTE”. El sonido
puede ser devuelto a su nivel original
presionando otra vez este botón ó uno
de los botones VOL + o VOL –.
Desconexión automática (SLEEP)
Para programar el aparato para que se
apague después de cierto tiempo
programado, presione el botón SLEEP
del control remoto. El reloj entrará en
cuenta regresiva, 10 minutos por cada
presión del botón SLEEP (0h00m,
0h10m,...1h50m, 2h00m,). Después que
el tiempo de apagado está programado,
aparecerá una indicación brevemente cada diez minutos para
recordarle que la función de apagado automático está activada. Para
confirmar el tiempo del temporizador de apagado, presione el botón
SLEEP y el tiempo restante aparecerá brevemente.
Para cancelar el temporizador de apagado, presione el botón SLEEP
varias veces hasta que la indicación muestre 0h00m.
English
CC
SLEEP
2h00m
ABCD
12:00 PM
ABCD
MUTE
ANT
12
ANT
7
19
ESPAÑOL
J3W41321A_SP_P18-24 24/03/2006, 2:28 PM19
Page 58

Ajuste del Chip-V
Se puede establecer un límite de edad para evitar que los niños vean o escuchen escenas violentas o
aquellas imágenes que decida excluir. La restricción se aplica “TV RATING” (clasificación TV) y “MOVIE
RATING” (clasificación películas), si se transmiten dichos datos. Puede configurar estas restricciones por
separado. Para utilizar la función de Chip-V, registre primero una contraseña.
Para registre contraseña
Presione MENU. Aparece la
1
pantalla del menú.
Presione
o para
seleccionar menú de
(LOCKS).
LOCKS
V-CHIP SET
LOCK
FRONT PANEL LOCK
NEW PASSWORD
:SELECT :ADJUST
-/
PICTURE
SIZE
NOTAS:
• Si olvida su contraseña, hable con la
tienda donde compró este aparato.
• Para no olvidar la contraseña,
escríbala y guárdela en un lugar
seguro.
Presione o para ver
2
el modo de entrada de
contraseña.
Seleccione y entre la
3
contraseña (4 cifras) con
los botones numéricos
(0 a 9) y presione ENTER.
Entre nuevamente la misma
4
contraseña para la seguridad
y presione ENTER.
La contraseña queda
registrada y aparece en
pantalla el menú V-Chip.
LOCKS
NEW PASSWORD
[0-9] : SELECT ENTER : SET
LOCKS
NEW PASSWORD
[0-9] : SELECT ENTER : SET
EXIT : END
EXIT : END
Aparece “ ” en lugar del número.
LOCKS
CONFIRM PASSWORD
[0-9] : SELECT ENTER : SET
EXIT : END
20
J3W41321A_SP_P18-24 24/03/2006, 2:28 PM20
Page 59

Ajuste del Chip-V (continuación)
Para ajustar el Chip-V
Presione MENU, luego presione
1
-/
PICTURE
SIZE
Para utilizar el televisor después de
proteger el TV.
Cuando se reciba un programa al que se
aplica el ajuste del Chip-V, presione MUTE
y introduzca la contraseña y, a continuación,
presione ENTER. Cuando la contraseña es
correctamente registrada la protección será
temporalmente omitida. Si el televisor está
apagado, o el canal está cambiado, la
restricción del Chip-V será reactivada.
NOTAS:
• La función Chip-V se activa sólo en
los programas y cintas que tienen
señal de prohibición.
• El V-CHIP SET (DTV) sólo se podrá
seleccionar cuando la unidad reciba
una emisión digital usando el nuevo
sistema de clasificación. Puede que
la configuración del V-Chip inicial
tarde algunos minutos a completarse.
En este momento algunas cadenas
aún utilizan esta señal, en estos casos
el V-CHIP SET (DTV) no funcionará.
o para seleccionar menú de
(LOCKS).
2
Presione
o
para ver el modo
de entrada de contraseña. Utilice
los botones numéricos (0-9) para
introducir la contraseña y, a
continuación, presione ENTER.
Aparece el menú LOCKS.
Presione o para seleccionar
3
“V-CHIP SET”, luego presione .
Aparece la pantalla del menú de
V-CHIP SET.
4
Presione o para seleccionar
“TV RATING”, luego presione
o
para que aparezca el ajuste deseado.
OFF : Las clasificaciones de TV
no estan activas
TV-Y : Todos los niños
TV-Y7 : 7 años o mayor
TV-G : Audiencia general
TV-PG :
Con autorizacción de los padres
TV-14 : 14 años o mayor
TV-MA : 17 años o mayor
• Cuando seleccione TV-Y7, TV-PG,
TV-14 or TV-MA, presione-/DISPLAY para mostrar el nivel de
prohibición. Presione
deseada. Presione
Presione o para seleccionar
5
o
para seleccionar la clasificación
o para seleccionar el ajuste “ON” o “OFF”.
“MOVIE RATING”, luego presione
. Aparece la pantalla del menú
de RATING SET.
Pulse o para seleccionar
6
una clasificación, luego pulse
para seleccionar ON o
o
OFF para cada clasificación.
OFF : Los clasificaciones de
peliculas no estan activas
G : Todas las edades
PG : Con autorización de padres
PG-13 : Con autorización de padres
para menores de 13 años
R:Menores de 17 años con la
autorización de los padres
NC-17 : 17 años o mayor
X:Sólo para adultos
Presione MENU dos veces para
7
volver a la menú de LOCKS, luego
presione
o para seleccionar
“V-CHIP”.
Presione
8
o para seleccionar “ON”. La configuración
se registra en la memoria.
Presione EXIT para volver a la imagen normal.
9
LOCKS
V-CHIP SET
LOCK
FRONT PANEL LOCK
NEW PASSWORD
:SELECT :ADJUST
LOCKS
PASSWORD
[0-9] : SELECT ENTER : SET
LOCKS
V-CHIP OFF
V-CHIP SET
V-CHIP SET (DTV)
:SELECT :ADJUST
V-CHIP SET
TV RATING OFF
MOVIE RATING
:SELECT :ADJUST
RATING SET
G ON / OFF
PG OFF
PG-13 OFF
ROFF
NC-17 OFF
XOFF
:SELECT :ADJUST
LOCKS
V-CHIP ON / OFF
V-CHIP SET
V-CHIP SET (DTV)
:SELECT :ADJUST
LOCKS
V-CHIP ON / OFF
V-CHIP SET
V-CHIP SET (DTV)
:SELECT :ADJUST
EXIT : END
OFF/TV-Y /TV-Y7/ TV-G
TV-PG/TV-14 /TV-MA
21
ESPAÑOL
J3W41321A_SP_P18-24 24/03/2006, 2:28 PM21
Page 60

LOCKS
NEW PASSWORD
[0-9] : SELECT ENTER : SET
EXIT : END
LOCKS
CONFIRM PASSWORD
[0-9] : SELECT ENTER : SET
EXIT : END
LOCKS
PASSWORD
[0-9] : SELECT ENTER : SET
EXIT : END
LOCKS
LOCK
CH LOCK
VIDEO LOCK OFF
FRONT PANEL LOCK OFF
NEW PASSWORD
:SELECT :ADJUST
LOCKS
V-CHIP SET
LOCK
FRONT PANEL LOCK
NEW PASSWORD
:SELECT :ADJUST
Ajuste del Chip-V (continuación)
Para cambiar la contraseña
Presione MENU, luego
1
presione
seleccionar menú de
(LOCKS).
2
Presione o para ver el
modo de entrada de
contraseña.
Utilice los botones numéricos
(0-9) para introducir la
-/
contraseña y, a continuación,
presione ENTER. Aparece el
menú LOCKS.
3
Presione o para
seleccionar “NEW PASSWORD”, luego presione o .
o para
PICTURE
SIZE
4
Entre la contraseña nueva
con los botones
numéricos (0 a 9) y
presione ENTER.
5
Registre nuevamente la
contraseña para confirmar,
luego presione ENTER.
6
Presione EXIT para volver a la imagen normal.
22
J3W41321A_SP_P18-24 24/03/2006, 2:28 PM22
Page 61

Bloqueando los canales
Con la función CH LOCK, puede
bloquear el acceso a ciertos
canales. No podrá sintonizar los
canales bloqueados a no ser que
borre el ajuste. Puede bloquear
hasta doce canales de TV.
-/
PICTURE
SIZE
Use los botones de number (del 0 al 9) para desplegar el canal
1
que desea bloquear.
Presione MENU, luego presione
2
o para desplegar el menú de
(LOCKS).
Presione
3
o
para desplegar
LOCKS
V-CHIP SET
LOCK
FRONT PANEL LOCK
NEW PASSWORD
:SELECT :ADJUST
el modo que entra de la
contraseña. Use los botones de
Channel Number (del 0 al 9) para
LOCKS
PASSWORD
ingresar su contraseña, luego
presione ENTER. Aparecerá el
menú deLOCKS.
Presione
4
LOCK y presione
o
para resaltar CH
o para
desplegar el menú de CH LOCK.
Presione o para seleccionar
5
[0-9] : SELECT ENTER : SET
LOCKS
LOCK
CH LOCK
VIDEO LOCK OFF
FRONT PANEL LOCK OFF
NEW PASSWORD
:SELECT :ADJUST
EXIT : END
lo siguiente:
• SET - para fijar el canal
como uno para bloquearse.
Luego presione ENTER.
• CLEAR - para limpiar todos
los canales de la lista de los
CH LOCK : CH 2
SET/CLEAR TV CABLE
0 0 0
0 0 0
0 0 0
0 0 0
LOCKS MENU
:SELECT : ADJUST
ENTER : SET EXIT : END
canales bloqueados. Luego
presione ENTER.
ESPAÑOL
NOTA:
Después de programar CH LOCK,
cambie los canales antes de
apagar la televisión. De no
hacerlo así, cancelará la
programación de los canales
bloqueados, usando este
procedimiento.
6
Repita los pasos del 1 al 5 para bloquear los otros canales.
Cuando termine de bloquear los canales, presione EXIT para
regresar a la vista normal.
Si intenta sintonizar un canal bloqueado, el televisor no lo
desplegará, pero desplegará el canal no bloqueado más cercano.
Para desbloquear los canales:
Presione MENU, luego presione
1
(LOCKS).
de
2
Presione o para desplegar el modo que entra de la
contraseña.
3
Use los botones de Channel Number (del 0 al 9) para ingresar su
contraseña, luego presione ENTER. Aparecerá el menú de LOCKS.
4
Presione o para resaltar CH LOCK y presione o para
desplegar el menú de CH LOCK.
5
Presione o para resaltar CLEAR y limpiar todos los canales
de la lista de los canales bloqueados. Presione ENTER.
6
Presione EXIT para volver a la imagen normal.
o para desplegar el menú
23
J3W41321A_SP_P18-24 24/03/2006, 2:28 PM23
Page 62

Bloqueando la entrada de video
LOCKS
PASSWORD
[0-9] : SELECT ENTER : SET
EXIT : END
LOCKS
V-CHIP SET
LOCK
FRONT PANEL LOCK
NEW PASSWORD
:SELECT :ADJUST
Con la función de VIDEO LOCK,
podrá bloquear las fuentes de
entrada (VIDEO1, VIDEO2,
COMPONENT) y los canales 3 y 4.
No podrá seleccionar las fuentes
de entrada con el botón de TV/
VIDEO o los botones de Channel
a menos que limpie la
configuración.
-/
Para configurar el bloqueo de video haga lo siguiente
Presione MENU, luego presione
1
o para desplegar el menú de
(LOCKS).
2
Presione o para desplegar
el modo que entra de la
contraseña.
3 Use los botones de Channel
Number (del 0 al 9) para ingresar
su contraseña, luego presione
ENTER. Aparecerá el menú de
LOCKS. Presione
resaltar VIDEO LOCK.
Presione
4
• OFF: Desbloquea todas las fuentes de entrada de video.
• VIDEO: Bloquea VIDEO1, VIDEO2, COMPONENT.
• VIDEO +: Bloquea VIDEO1, VIDEO2, COMPONENT, canal
3 y canal 4. Esta opción deberá usarse si usa la terminal de la
antena para reproducir una videocinta.
o para seleccionar lo siguiente:
o
para
LOCKS
LOCK
CH LOCK
VIDEO LOCK OFF
OFF/VIDEO/VIDEO+
FRONT PANEL LOCK OFF
NEW PASSWORD
:SELECT :ADJUST
PICTURE
SIZE
NOTA:
Después de programar VIDEO
LOCK, cambie los canales o
active la tecla de TV/AV antes de
apagar la televisión. De no
hacerlo así, cancelará la
programación de las entradas de
video bloqueadas, usando este
procedimiento.
5
Presione EXIT para volver a la imagen normal.
Para desbloquear la entrada de video
Presione MENU, luego presione
1
de
(LOCKS).
2
Presione o para desplegar el modo que entra de la
contraseña.
3
Use los botones de Channel Number (del 0 al 9) para ingresar
su contraseña, luego presione ENTER. Aparecerá el menú de
LOCKS.
4
Presione
para resaltar OFF.
5
Presione EXIT para volver a la imagen normal.
o
para resaltar VIDEO LOCK y presione o
o para desplegar el menú
24
J3W41321A_SP_P18-24 24/03/2006, 2:28 PM24
Page 63

Configuración del bloqueo del panel frontal
Puede bloquear los botones del
panel frontal para evitar que se
modifique la configuración de
forma accidental (por ejemplo, si
los niños tocan los botones). Al
poner en ON el bloqueo del panel
frontal, dejarán de funcionar
todos los botones de control del
panel frontal del televisor,
(excepto POWER).
-/
Para bloquear el panel frontal
Presione MENU, luego presione
1
o para seleccionar menú
de
(LOCKS).
Presione
2
modo de entrada de contraseña.
Utilice los botones numéricos
(0-9) para introducir la
contraseña y, a continuación,
presione ENTER. Aparece el
menú LOCKS.
3
Presione
seleccionar “FRONT PANEL
LOCK”, luego presione o
para seleccionar “ON”.
Si se presiona un botón del
panel frontal, aparece el mensaje
“NOT AVAILABLE” (no disponible).
4
Presione EXIT para volver a la imagen normal.
o
o
para ver el
para
LOCKS
V-CHIP SET
LOCK
FRONT PANEL LOCK
NEW PASSWORD
:SELECT :ADJUST
LOCKS
PASSWORD
[0-9] : SELECT ENTER : SET
LOCKS
LOCK
CH LOCK
VIDEO LOCK OFF
FRONT PANEL LOCK ON/OFF
NEW PASSWORD
:SELECT :ADJUST
EXIT : END
ESPAÑOL
PICTURE
SIZE
Para desbloquear el panel frontal
Presione y mantenga pulsado el botón VOLUME del panel
frontal durante unos 10 segundos, hasta que aparezca el mensaje
“FRONT PANEL LOCK:OFF” en la pantalla.
Puede desbloquear el panel frontal mediante los menús.
Presione MENU, luego presione
1
o para seleccionar menú
de
(LOCKS).
Presione o para ver el
2
modo de entrada de contraseña.
Utilice los botones numéricos
(0-9) para introducir la
contraseña y, a continuación,
presione ENTER. Aparece el
menú LOCKS.
3
Presione o para
seleccionar “FRONT PANEL
LOCK”, luego presione
para seleccionar “OFF”.
o
LOCKS
V-CHIP SET
LOCK
FRONT PANEL LOCK
NEW PASSWORD
:SELECT :ADJUST
LOCKS
PASSWORD
[0-9] : SELECT ENTER : SET
LOCKS
LOCK
CH LOCK
VIDEO LOCK OFF
FRONT PANEL LOCK ON/OFF
NEW PASSWORD
:SELECT :ADJUST
EXIT : END
J3W41321A_SP_P25-30 24/03/2006, 2:28 PM25
4
Presione EXIT para volver a la imagen normal.
25
Page 64
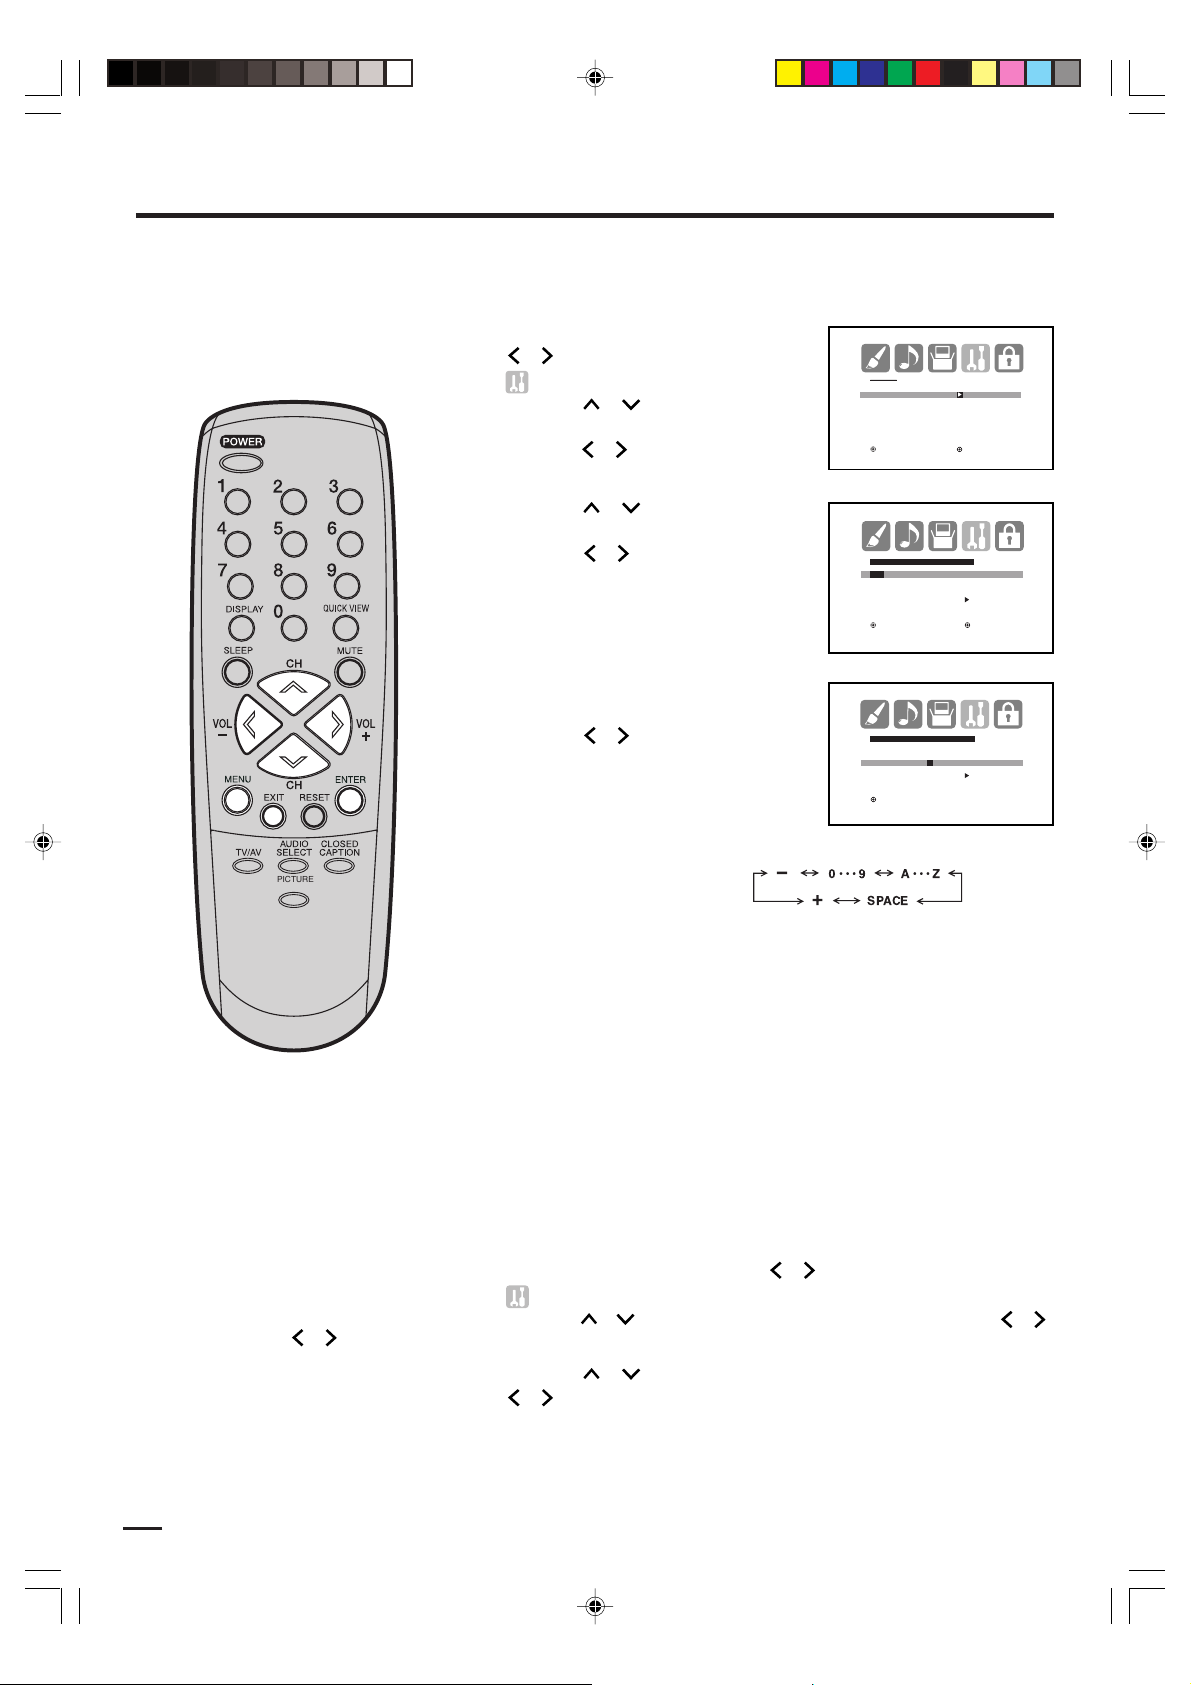
Para asignar etiquetas a los canales
Las etiquetas de canal aparecen
por encima del número de canal
cada vez que enciende el
televisor, cambia de canal o pulsa
el botón –/DISPLAY.
Puede utilizar cuatro caracteres
cualquiera para identificar un
canal.
-/
Para crear etiquetas de canal
Seleccione el canal que desea etiquetar.
1
Presione MENU, luego presione
2
o para seleccionar menú de
(OPTION).
Presione
seleccionar “CH LABEL”, luego
presione o . Aparece la
pantalla del menú de CH LABEL.
Presione o para
3
seleccionar “SET/CLEAR”.
Presione o para
seleccionar “SET”.
4
Presione ENTER para
seleccionar “LABEL” (etiqueta).
Presione o para introducir
un carácter en el primer espacio.
Presione el botón repetidamente
hasta que aparezca en pantalla
el carácter que desee utilizar.
o
para
OPTION
ON/ OFF TIMER OFF
CH LABEL
:SELECT :ADJUST
CH LABEL : CH 23
SET/ CLEAR
LABEL ––––
OPTION MENU
:SELECT :ADJUST
ENT ER : SET EXIT : END
CH LABEL : CH 23
SET
LABEL A –––
OPTION MENU
:ADJUST ENTER : SET
EXIT : END
PICTURE
SIZE
NOTA:
Para volver del menú CH LABEL al
menú OPTION, seleccione “OPTION
MENU”, y presione
o .
El orden de rotación de
caracteres es el siguiente:
Cuando aparezca el carácter que desea utilizar, presione ENTER.
Repita este paso con el resto de caracteres.
Si desea dejar un espacio en blanco, seleccione el carácter de espacio en
blanco; de lo contrario, aparecerá un guión en dicho espacio.
Cuando termine de escribir el nombre de la etiqueta, presione ENTER.
5
Presione EXIT para volver a la imagen normal.
Repita los pasos 1-5 para el resto de canales. Puede asignar
6
una etiqueta a cada canal.
-
SPACE
+
Para borrar las etiquetas de canal
Seleccione el canal cuya etiqueta desee eliminar.
1
Presione MENU, luego presione o para seleccionar menú de
2
(OPTION).
Presione
Aparece la pantalla del menú de CH LABEL.
Presione o para seleccionar “SET/CLEAR”. Presione
3
o para seleccionar “CLEAR”, luego presione ENTER.
Presione EXIT para volver a la imagen normal.
4
o
para seleccionar “CH LABEL”, luego presione o .
26
J3W41321A_SP_P25-30 24/03/2006, 2:28 PM26
Repita los pasos 1-4 para borrar otras etiquetas de canal.
5
Page 65

SETUP
LANGUAGE ENGLISH
CLOCK SET
TV/CABLE CABLE
AUTO CH MEMORY
ADD/DELETE
:SELECT :ADJUST
SETUP
LANGUAGE ENGLISH
CLOCK SET
TV/CABLE CABLE
AUTO CH MEMORY
ADD/DELETE
:SELECT :ADJUST
CLOCK SET
MONTH 1
DAY 1 (SUN)
YEAR 2006
TIME 12:00AM
:SELECT :ADJUST
ENTER:SET EXIT:END
Ajuste del reloj
Es importante que el reloj esté
ajustado correctamente para que la
función “ON/OFF TIMER” se active
en el momento adecuado.
-/
EJEMPLO: Ajustando el reloj a “8:30 AM”, Sábado 28 de Octubre de
2006.
1
Presione MENU, luego
presione
o para
seleccionar el menú de
(SETUP).
Presione
2
o
para
seleccionar “CLOCK SET”.
Luego presione o .
El menú de CLOCK SET
aparecerá.
3
Presione o para fijar el
MONTH (MES), luego
presione .
ESPAÑOL
PICTURE
SIZE
NOTA:
Tras un fallo en el suministro de
alimentación ó desconexión del
enchufe de alimentación. En este
caso, reajuste la hora actual.
4
Fije el DAY (DÍA), el YEAR
(AÑO) y la TIME (HORA)
como en el paso 3.
Después de programar la
fecha y el tiempo, el reloj
comenzará a funcionar
automáticamente.
Presione EXIT para volver a la imagen normal.
5
CLOCK SET
MONTH 10
DAY 28 (SAT)
YEAR 2006
TIME 8:30AM
:SELECT :ADJUST
ENTER:SET EXIT:END
J3W41321A_SP_P25-30 24/03/2006, 2:28 PM27
27
Page 66

OPTION
ON/OFF TIMER ON /OFF /SET
CH LABEL
:SELECT :ADJUST
OPTION
ON/OFF TIMER ON /OFF /SET
CH LABEL
: SELECT : ADJUST
ENTER : SET
ON/OFF TIMER
ON TIMER
12:00AM CH 1
CLEAR
OFF TIMER
12:00AM
CLEAR
OPTION MENU
: SELECT : ADJUST
EXIT : END
ON/OFF TIMER
ON TIMER
7:00AM CH 1
CLEAR
OFF TIMER
12:00AM
CLEAR
OPTION MENU
: SELECT : ADJUST
EXIT : END
ON/OFF TIMER
ON TIMER
7:30AM CH 12
CLEAR
OFF TIMER
12:00AM
CLEAR
OPTION MENU
: SELECT : ADJUST
EXIT : END
ON/OFF TIMER
ON TIMER
7:30AM CH 12
ONCE/ DAILY/CLEAR
OFF TIMER
12:00AM
CLEAR
OPTION MENU
: ADJUST ENTER : SET
EXIT : END
Para ajustar el temporizador de conexión
Esta función permite encender
automáticamente el televisor a
cualquier hora predeterminada.
Si programa el temporizador (ON
TIMER) para que se active una vez
al día, el televisor se encenderá
todos los días a la misma hora en
el mismo canal.
-/
EJEMPLO: Encender la televisión en el canal 12 a las 7:30 AM,
todos los días.
Preparación:
Ajuste el reloj si todavía no lo ha hecho (véase página 27).
1
Presione MENU, luego
presione
o para
seleccionar menú de
(OPTION).
o
Presione
para
seleccionar “ON/OFF TIMER”.
Presione
2
o para
seleccionar “SET”, luego
presione ENTER.
Aparece la pantalla del menú
de ON/OFF TIMER.
3
Presione o para
seleccionar “ON TIMER” y, a
continuación, presione
para acceder a las opciones
de configuración de ON
TIMER.
PICTURE
SIZE
NOTAS:
El TV se apagarà automàticamente
•
con el temporizador de encendido si
no se ha establecido el temporizador
de apagado.
Para continuar vierdo TV, presione
cualquier botón par a cancelar el
apagado automático de una hora.
•
Si una estación que estaba viendo
deja de transmitir, el televisor se
desconectará automáticamente
después de 15 minutos.
•
Para cancelar la función ON TIMER,
seleccione “CLEAR” en el paso 6. Presione
EXIT para volver a la pantalla normal.
•
Si se produce un corte de energía o se
desconecta la unidad de la alimentación,
las opciones programadas del
temporizador se perderán.
•
Para volver del menú ON/OFF TIMER
(Temporizador ON/OFF) al menú
OPTION (Opciones), seleccione
“OPTION MENU” y presione
o
.
Presione
4
o
para
seleccionar la hora deseada
y presione .
Observe si ha elegido AM
(mañana) o PM (tarde), y
elija la hora.
Seleccione los minutos y el
5
canal que se activará, como
en el paso 4.
Presione
6
o para
seleccionar “DAILY”
(diariamente) y, a continuación,
presione ENTER.
Presione EXIT para volver a la imagen normal.
7
28
J3W41321A_SP_P25-30 24/03/2006, 2:29 PM28
Page 67

Para ajustar el temporizador de desconexión
Esta función permite desconectar
el TV automáticamente a una hora
predeterminada. Si se programa
una vez el OFF TIMER, el TV se
desconectará diariamente,
automáticamente a la misma hora.
-/
EJEMPLO: Desconexión del TV a las 11:30 PM, diariamente.
Preparación:
Ajuste el reloj si todavía no lo ha hecho (véase página 27).
Presione MENU, luego presione
1
o para seleccionar menú
(OPTION).
de
Presione o para
seleccionar “ON/OFF TIMER”.
Presione o para
2
seleccionar “SET”, luego
presione ENTER.
Aparece la pantalla del
menú de ON/OFF TIMER.
3
Presione
o
para
seleccionar “OFF TIMER” y,
a continuación, presione
para acceder a las opciones
de configuración de OFF
TIMER.
OPTION
ON/OFF TIMER ON /OFF /SET
CH LABEL
:SELECT :ADJUST
OPTION
ON/OFF TIMER ON /OFF /SET
CH LABEL
: SELECT : ADJUST
ENTER : SET
ON/OFF TIMER
ON TIMER
12:00AM CH 1
OFF TIMER
12:00AM
OPTION MENU
: SELECT : ADJUST
EXIT : END
CLEAR
CLEAR
ESPAÑOL
PICTURE
SIZE
NOTAS:
• Si una estación que estaba viendo
deja de transmitir, el televisor se
desconectará automáticamente
después de 15 minutos.
• Para confirmar el ON/OFF TIMER:
Presione –/DISPLAY para
indicar los programas en la pantalla.
•
Para volver del menú ON/OFF TIMER
(Temporizador ON/OFF) al menú
OPTION (Opciones), seleccione
“OPTION MENU” y presione o .
4
Presione
la hora y presione
Observe si ha elegido AM (mañana)
o PM (tarde), y elija la hora.
Presione
minutos y presione
o
para establecer
o
para elegir los
.
o para
ON/OFF TIMER
ON TIMER
12:00AM CH 1
OFF TIMER
11:30PM
OPTION MENU
: SELECT : ADJUST
EXIT : END
CLEAR
CLEAR
seleccionar “DAILY” (diariamente)
y, a continuación, presione ENTER.
NOTA:
Para cancelar la función OFF TIMER, presione o para
seleccionar “CLEAR” después de este paso y presione ENTER.
Presione EXIT para volver a la imagen normal.
5
Para activar o desactivar la función ON/OFF TIMER
Presione MENU, luego presione
1
o para seleccionar menú de
(OPTION).
Presione
o
para
seleccionar
“ON/OFF TIMER”.
Presione
o para seleccionar
“ON” o “OFF”.
ON: temporizador activado.
OFF: temporizador desactivado.
Presione EXIT para volver a la imagen normal.
2
OPTION
ON/OFF TIMER ON /OFF /SET
CH LABEL
:SELECT :ADJUST
J3W41321A_SP_P25-30 24/03/2006, 2:29 PM29
29
Page 68

Configuración del tamaño de la imagen
Podrá ver programas en
formato de 480i en tres
tamaños—4:3, 16:9 y ZOOM.
-/
Seleccionando el tamaño de la imagen
Usted puede cambiar el TAMAÑO DE LA IMAGEN por
presionando el botón PICTURE SIZE (TAMAÑO IMAGEN) en el
mando a distancia.
4:3
ZOOM
16:9
Tamaño 4:3 de la imagen
Para ampliar la pantalla, los bordes inferiores y superiores y a lo
ancho aunque el centro de la imagen permanezca cerca de la
antigua proporción.
• Si recibe un programa de formato 4:3, la imagen se verá la
proporción formateada originalmente.
Tamaño 16:9 de la imagen
Esta imagen mostrará el tamaño estándar 16:9 con barras
negras en la parte superior e inferior.
PICTURE
SIZE
• Si recibe un programa de formato 4:3, la imagen se verá con
barras negras en la parte superior e inferior y estirado a lo ancho.
NOTA:
Si una barra fija negra permanece sobre la pantalla durante
períodos largos de tiempo, la imagen puede hacerse
permanentemente en la pantalla y causar halos sutiles pero
permanentes. Nunca deje su televisor durante períodos largos
de tiempo si muestra estas imágenes.
Tamaño ZOOM de la imagen (para programas con formato 16:9)
La imagen entera es ampliada uniformemente – tanto en lo alto
como en lo ancho (conserva su proporción original). Los bordes
derechos e izquierdos de la imagen pueden ser ocultados.
30
J3W41321A_SP_P25-30 24/03/2006, 2:29 PM30
Page 69

Ajustes de control de imagen/Cómo restablecer los
ajustes de imagen
Ajustes de control de imagen
Presione MENU, luego presione
1
o para seleccionar menú de
(PICTURE).
o
Presione
2
para seleccionar
el punto que desea ajustar.
Presione
o dos veces para
hacer el ajuste.
-/
PICTURE
BRIGHTNESS 25
CONTRAST 50
COLOR 25
TINT 0
SHARPNESS 25
RESET
: SELECT : ADJUST
PICTURE
BRIGHTNESS 25
CONTRAST 50
COLOR 25
TINT 0
SHARPNESS 25
RESET
: SELECT : ADJUST
ESPAÑOL
PICTURE
SIZE
BRIGHTNESS
(BRILLO)
CONTRAST
(CONTRASTE)
COLOR
(COLOR)
TINT
(TINTE)
SHARPNESS
(NITIDEZ)
Después de encontrar el ajuste deseado, presione EXIT para
3
disminuye el brillo
disminuye el contraste
tiene un color pálido
color rojizo
le imagen es más suave
aumenta el brillo
aumenta el contraste
color brillante
color hacia el verde
le imagen es más nítida
volver a la imagen normal.
NOTA:
La función contraste se prejusta en fábrica máximo nivel.
Cómo restablecer los ajustes de imagen
La función RESET restablece los ajustes de calidad de imagen
configurados de fábrica:
BRIGHTNESS ............. centro (25) TINT....................... centro (0)
CONTRAST .............. máximo (50) SHARPNESS ...... centro (25)
COLOR ....................... centro (25)
Presione MENU, luego presione o para seleccionar menú
1
de
(PICTURE).
Presione o para
2
seleccionar “RESET”, luego
presione .
NOTA:
Al presionar RESET (Restablecer) en el menú PICTURE (Imagen),
se restablecen los ajustes de imagen de fábrica.
PICTURE
BRIGHTNESS 25
CONTRAST 50
COLOR 25
TINT 0
SHARPNESS 25
RESET
: SELECT : ADJUST
J3W41321A_SP_P31-34 24/03/2006, 2:29 PM31
31
Page 70

SETUP
CLOSED CAPTION OFF
C1 / C2 /T1 / T2 / OFF
CC ADVANCED
SIGNAL METER
: SELECT : ADJUST
Subtítulos
¿QUE ES LA RECEPCIÓN DE TEXTO?
Este televisor tiene capacidad para decodificar y mostrar los programas de televisión con emisión de texto.
Esta función mostrará el texto en pantalla para los usuarios con problemas de audición ó traducirá y mostrará
el texto que se encuentre en otra lengua.
Leyendas: Este modo de recepción de texto mostrará el texto en
pantalla en inglés u otra idioma. Generalmente las emisiones de
textos en inglés son recibidas en el C 1 y los
son recibidos en el C 2.
Texto: El modo Text Closed Caption (teletexto) suele llenar la mitad de
la pantalla con la horario de programación y demás información.
Encienda el televisor en el programa que desee.1
Presione MENU, luego presione o para seleccionar menú
2
de
(SETUP).
Presione
-/
3
o
para seleccionar “CLOSED CAPTION”.
Si se recibe una señal
analógica puede elegir entre
C1, C2, T1, T2 y OFF.
textos en otras
idiomas
Si se recibe una señal digital
puede elegir entre CS1, CS2,
SETUP
CLOSED CAPTION OFF
CS1/CS2/CS3/CS4/CS5/CS6
C1/C2/C3/C4/T1/T2/T3/T4/OFF
CC ADVANCED
SIGNAL METER
: SELECT : ADJUST
PICTURE
SIZE
CS3, CS4, CS5, CS6, C1, C2,
C3, C4, T1, T2, T3, T4 y OFF.
NOTAS:
• Según la señal de emisión,
algunos textos analógicos sólo
funcionarán con una señal de emisión digital.
• Para mostrar esta pantalla presione CLOSED CAPTION.
Presione o para seleccionar el modo de teletexto que desee utilizar.
4
NOTA:
Para desactivar la función de teletexto, seleccione “OFF”.
Presione EXIT para volver a la imagen normal.
5
NOTAS:
• Si el programa o el vídeo seleccionado no dispone de teletexto, no aparecerá texto en la pantalla.
• Si no hay texto disponible en su área, tal vez aparezca un rectángulo negro en pantalla. De ser así, ponga la
función de teletexto en “OFF”.
• Cuando seleccione la recepción de texto, las leyendas aparecerán durante 10 segundos aproximadamente.
• Si no se recibe la señal de emisión de texto, no aparecerán leyendas, pero el televisor permanecerá en el
modo de recepción de texto.
• Ocasionalmente podrán aparecer faltas de ortografía ó caracteres extraños durante la recepción de texto.
Esto es normal en este modo, especialmente con los programas en vivo. Esto se debe a que durante los
programas en vivo, los textos son ingresados sin edición, ya que no hay tiempo para la misma.
• Cuando las leyendas estén en pantalla puede ser que las indicaciones de funciones como volumen y
silenciamiento no aparezcan ya que interferirían con las leyendas.
• Algunos sistemas de TV cable y sistemas de protección contra copias pueden interferir con la señal de
emisión de texto.
• Si utiliza una antena interior ó si la recepción del TV es muy insuficiente, el texto de las emisiones puede no
aparecer ó mostrar caracteres extraños y errores de ortografía. En tal caso, ajuste la antena para mejorar la
recepción ó utilice una antena externa.
32
J3W41321A_SP_P31-34 24/03/2006, 2:29 PM32
Page 71

SETUP
LANGUAGE ENGLISH
CLOCK SET
TV/CABLE CABLE
AUTO CH MEMORY
ADD/DELETE
:SELECT :ADJUST
Subtítulos avanzados
La función de teletexto viene
configurada de fábrica, pero
puede ajustarla como sigue:
-/
Esta función está diseñada para personalizar únicamente el
teletexto digital.
Presione MENU. Aparece la pantalla del menú.
1
Presione o para seleccionar
2
menú de (SETUP).
Presione o para
3
seleccionar “CC ADVANCED”,
luego presione .
Aparece la pantalla del menú
de CC ADVANCED.
Presione o para
4
SETUP
CLOSED CAPTION OFF
CC ADVANCED
SIGNAL METER
: SELECT : ADJUST
seleccionar el elemento que
desea ajustar y, a
continuación, presione
o
.
CC ADVANCED
TEXT SIZE
TEXT TYPE
TEXT COLOR
TEXT EDGE
BACKGROUND COLOR
ESPAÑOL
PICTURE
SIZE
: SELECT : ADJUST
5
Presione
seleccionar la configuración
que desee y, a continuación,
presione ENTER.
o
para
TEXT SIZE
AUTO
SMALL
STANDARD
LARGE
: SELECT : ADJUST
Puede seleccionar los siguientes elementos y opciones de
configuración.
TEXT SIZE: AUTO, SMALL, STANDARD, LARGE
TEXT TYPE: AUTO, DEFAULT, MONO W. SERIF, PROP. W.
SERIF, MONO W/O SERIF, PROP. W/O SERIF,
CASUAL, CURSIVE, SMALL CAPITALS
TEXT COLOR: AUTO, BLACK, WHITE, RED, GREEN, BLUE,
YELLOW, MAGENTA, CYAN
TEXT EDGE: AUTO, NONE, RAISED, DEPRESSED,
UNIFORM, LEFT DROP SHADOW, RIGHT
DROP SHADOW
BACKGROUND COLOR: AUTO, BLACK, WHITE, RED,
GREEN, BLUE, YELLOW, MAGENTA,
CYAN
J3W41321A_SP_P31-34 24/03/2006, 2:29 PM33
Presione EXIT para volver a la imagen normal.
6
33
Page 72

Cómo seleccionar estéreo/Programa de Audio Secundario (SAP)/
AUDIO
MTS STR/SAP/MONO
AUDIO LANGUAGE
DIGITAL OUTPUT PCM
RESET
: SELECT : ADJUST
AUDIO
MTS STEREO
AUDIO LANGUAGE
DIGITAL OUTPUT PCM
PCM /DOLBY DIGITAL
RESET
: SELECT : ADJUST
Cómo seleccionar la salida digital
Cómo seleccionar estéreo/
Secundario
La función de sonido de televisión multicanal (MTS) ofrece un sonido
estéreo de alta fidelidad. MTS también puede transmitir un Programa
de Audio Secundario (SAP) con un segundo idioma o información de
audio adicional.
Si el televisor recibe una emisión estéreo o SAP, en pantalla aparece la
palabra “STEREO” o “SAP” cada vez que se enciende el televisor, al
cambiar de canal o pulsar el botón
Presione MENU, luego
1
presione
seleccionar menú de
(AUDIO)
-/
Presione
seleccionar “MTS”.
Presione o para seleccionar “STR (Estéreo)”.
2
NOTAS:
• En general, puede dejar el televisor en el modo estéreo, ya que el
aparato emite automáticamente el tipo de sonido que se esté
emitiendo (mono o estéreo).
• Si el sonido estéreo presenta ruidos, seleccione MONO para
reducir el ruido.
.
(SAP)
o
para
o
para
Programa de Audio
–
/DISPLAY.
PICTURE
SIZE
Presione EXIT para volver a la imagen normal.
3
Para escuchar un Programa de Audio Secundario (SAP)
Presione o para seleccionar “SAP” en el paso 2 anterior. Los
altavoces del televisor emitirán el segundo programa de audio en
lugar del audio normal.
Cómo seleccionar la salida digital
Puede elegir el formato de la señal de salida de audio digital.
1
Presione MENU, luego
presione
seleccionar menú de
(AUDIO).
Presione
seleccionar “DIGITAL
OUTPUT”.
2
Presione
Presione EXIT para volver a la imagen normal.
3
o para
o
para
o
para seleccionar “PCM” o “DOLBY DIGITAL”.
34
J3W41321A_SP_P31-34 24/03/2006, 2:29 PM34
Page 73

Selección del idioma del audio/
Cómo restablecer los ajustes de audio
Selección del idioma del audio
Si una señal digital incluye dos o más idiomas de audio, puede
seleccionar cuál desea escuchar.
Presione MENU, luego
1
presione o para
seleccionar menú de
(AUDIO).
AUDIO
MTS STEREO
AUDIO LANGUAGE
DIGITAL OUTPUT PCM
RESET
: SELECT : ADJUST
2
Presione
seleccionar “AUDIO
LANGUAGE”, luego presione
-/
o para visualizar del
menú de AUDIO LANGUAGE.
3
Presione
seleccionar el idioma
deseada, luego presione
ENTER.
PICTURE
SIZE
Presione EXIT para volver a la imagen normal.
4
o
o
para
para
AUDIO
MTS STEREO
AUDIO LANGUAGE
DIGITAL OUTPUT PCM
RESET
: SELECT : ADJUST
AUDIO LANGUAGE
0. ENGLISH 1
1. ENGLISH 2
2. FRENCH
3. SPANISH
4. NO INFO
5. NO INFO
6. NO INFO
7. NO INFO
/ 0-7 : SELECT
ENTER : SET
ESPAÑOL
Cómo restablecer los ajustes de audio
La función RESET restablece los ajustes de audio configurados de
fábrica:
MTS........................... STEREO
DIGITAL OUTPUT ............PCM
J3W41321A_SP_P35-38 24/03/2006, 2:30 PM35
Presione MENU, luego presione
1
de
(AUDIO).
2
Presione
o
para
seleccionar “RESET”, luego
presione
.
o para seleccionar menú
AUDIO
MTS STEREO
AUDIO LANGUAGE
DIGITAL OUTPUT PCM
RESET
: SELECT : ADJUST
NOTA:
Al presionar RESET (Restablecer) en el menú AUDIO, se
restablecen los ajustes de audio de fábrica.
35
Page 74

SETUP
LANGUAGE ENGLISH
CLOCK SET
TV/CABLE CABLE
AUTO CH MEMORY
ADD/DELETE
:SELECT :ADJUST
SIGNAL METER
CHANNEL (DIGITAL) 123-045
80%
Cómo comprobar la potencia de la señal digital
Puede ver el indicador de señal
digital.
-/
PICTURE
SIZE
1
Presione MENU, luego
presione o para
seleccionar menú de
(SETUP).
2
Presione o para
seleccionar “SIGNAL
METER”.
Presione o para
3
verificar la potencia de la
señal digital.
Presione EXIT para volver a la imagen normal.
4
SETUP
CLOSED CAPTION OFF
CC ADVANCED
SIGNAL METER
: SELECT : ADJUST
NOTAS:
• La función del indicador de señal
no está disponible en el caso de
los canales analógicos.
• Después de 240 segundos, la
pantalla SIGNAL METER
(Indicador de señal) vuelve
automáticamente al modo de TV
normal.
36
J3W41321A_SP_P35-38 24/03/2006, 2:30 PM36
Page 75

Solución de problemas
Utilice la siguiente lista de verificación de localización de averías cuando tiene problemas con este TV. Consulte
con su concesionario local ó tienda de servicio si continúan los problemas.
Compruebe que se han hecho correctamente todas las conexiones cuando utilice con otros aparatos.
SÍNTOMA
El televisor no
funciona.
Sonido de
baja calidad o
ausencia de
sonido.
Imagen de
baja calidad
o ausencia
de imagen.
Mala
recepción en
algunos
canales.
Mala
definición de
los colores o
ausencia de
color.
La imagen
presenta
oscilación o
desplazamiento.
Problemas
con la pantalla
en emisiones
digitales.
• Verifique que el cable de alimentación esté
POSIBLE SOLUCIÓN
conectado.
• Pruebe con otro tomacorriente de CA.
• La alimentación está desconectada; revise el
fusible o el interruptor automático.
• Desconecte la unidad, y vuelva a conectarla al
cabo de una hora.
• La estación o el servicio de TV cable están con
problemas; sintonice otra estación.
• Verifique los ajustes de sonido (volumen y
silenciamiento).
• Determine si hay posibles fuentes de
interferencia.
• La estación o el servicio de TV cable están con
problemas; sintonice otra estación.
• Verifique que haya canales almacenados en la
memoria.
• Revise las conexiones de la antena o sistema TV
cable; reoriente la antena.
• Determine si hay posibles fuentes de interferencia.
• Verifique los ajustes de los controles de imagen.
• La estación o el servicio de TV cable están con
problemas; sintonice otra estación.
• Verifique que haya canales almacenados en la
memoria.
• La señal de la estación es débil; reoriente la antena.
• Determine si hay posibles fuentes de
interferencia.
• La estación o el servicio de TV cable están con
problemas; sintonice otra estación.
• Verifique que haya canales almacenados en la
memoria.
• Verifique los ajustes de los controles de imagen.
• Revise las conexiones de la antena o sistema
TV cable; reoriente la antena.
• Determine si hay posibles fuentes de interferencia.
• La estación o el servicio de TV cable están con
problemas; sintonice otra estación.
• Verifique que haya canales almacenados en la
memoria.
• El servicio TV cable está transmitiendo una
señal codificada.
• Reoriente la antena.
• Compruebe la potencia de la señal digital.
SÍNTOMA POSIBLE SOLUCIÓN
•
La recepción TV
cable no es
posible.
Aparecen barras
horizontales o
verticales en la
pantalla.
La recepción no
es posible más
allá del canal 13.
El televisor no
puede ser
operado a
control remoto.
El televisor se
apaga.
La función de
subtítulos no es
activada.
El idioma
deseada no
se muestra.
Revise todas las conexiones del sistema TV cable.
• Ajuste la opción de menú de TV/CABLE al
modo CABLE (TV cable).
• La estación o el servicio de TV cable están
con problemas; pruebe con otra estación.
• Revise las conexiones de la antena y
reoriente la antena.
•
Determine si hay posibles fuentes de
interferencia.
• Asegúrese de que la opción de menú TV/
CABLE está ajustado a la posición apropiada
en la selección de menú de la pantalla.
• Si está usando una antena, revise las
conexiones de la antena de UHF.
• Las pilas están débiles o agotadas, o han sido
insertadas en forma incorrecta.
• El remoto está fuera de rango, acérquese al
TV (dentro del entorno de 15 pies).
• Asegúrese de apuntar la unidad de control
remoto hacia el sensor de control remoto.
• Verifique que no haya obstáculos entre la
unidad de control remoto y el televisor.
• Asegúrese de que el cable de alimentación
esté conectado.
• La estación sintonizada no está transmitiendo.
• El temporizador de desactivación automática
ha sido activado.
• El suministro de energía se ha interrumpido.
• Estación de TV está experimentando
problemas o programa sintonizado no es en
modo de subtítulo cerrado. Pruebe en otro
canal.
• Asegúrese de conexión de TV cable o antena
VHF/UHF, reposición o gire antena.
•
Ajuste el decodificador de teletexto en el menú.
• Seleccione el idioma apropiado en las
selecciones de menú.
ESPAÑOL
J3W41321A_SP_P35-38 24/03/2006, 2:30 PM37
37
Page 76

Especificaciones
Alimentación de CA: 120 V CA, 60 Hz
Consumo de energía: En operación: 110 Vatios
Peso: 80,5 lbs (36,5 kg)
Dimensiones: Ancho: 25-9/16 pulgadas (650 mm)
Stand by: 3 Vatios
Alto: 22-1/2 pulgadas (571,5 mm)
Fondo: 19-11/16 pulgadas (500,5 mm)
Entradas: Vídeo: 1 V (p-p)/75 ohmios
Audio: –8 dBm/50k ohmios
S-VIDEO: Y: 1 V (p-p), 75 ohmios
C: 0,286 V (p-p), 75 ohmios
COMPONENT: Y: 1 V (p-p), 75 ohmios
R: 0,7 V (p-p), 75 ohmios
P
B: 0,7 V (p-p), 75 ohmios
P
Salidas: DIGITAL AUDIO: 0,5 V (p-p), 75 ohms
Impedancia de
entrada de antena: Entrada coaxial de 75 ohmios (VHF/UHF/CABLE)
Tubo de imagen: 27 pulgadas (676,0 mm diagonalmente)
Tipo de sintonizador: Cuarzo PLL frecuencia sintetizada
Canales de recepción: VHF 2-13
UHF 14-69
CABLE TV 14-36 (A)-(W)
37-59 (AA)-(WW)
60-85 (AAA)-(ZZZ)
86-94 (86)-(94)
95-99 (A-5)-(A-1)
100-125 (100)-(125)
01 (5A)
Altavoz: 2 pulgadas (50,8 mm) x 3-1/2 pulgadas (88,9 mm), 8 ohmios x 2
Potencia nominal de
salida de audio: 1,0 W + 1,0 W
ACCESORIO: Control remoto
El diseño y las especificaciones están sujetas a cambio sin aviso.
J3W41321A SH 06/04 N
Printed in Thailand
Impreso en Tailandia
J3W41321A_SP_P35-38 24/03/2006, 2:30 PM38
 Loading...