

machine numbers i IQB27B44 I IQB32B44 I IQB36B44
glossary
4
operating guide / warranty
WARNING:
RECORDYOURMODELNUMBER |
(Now,while you can seeit)
The model andserial numberofyour newlV am Located
onthe backof the TVcabinet.Foryourfutureconvenience,
wesuggestthat your recordthesenumbershere:
MODEL NO.
i SERIALNO.
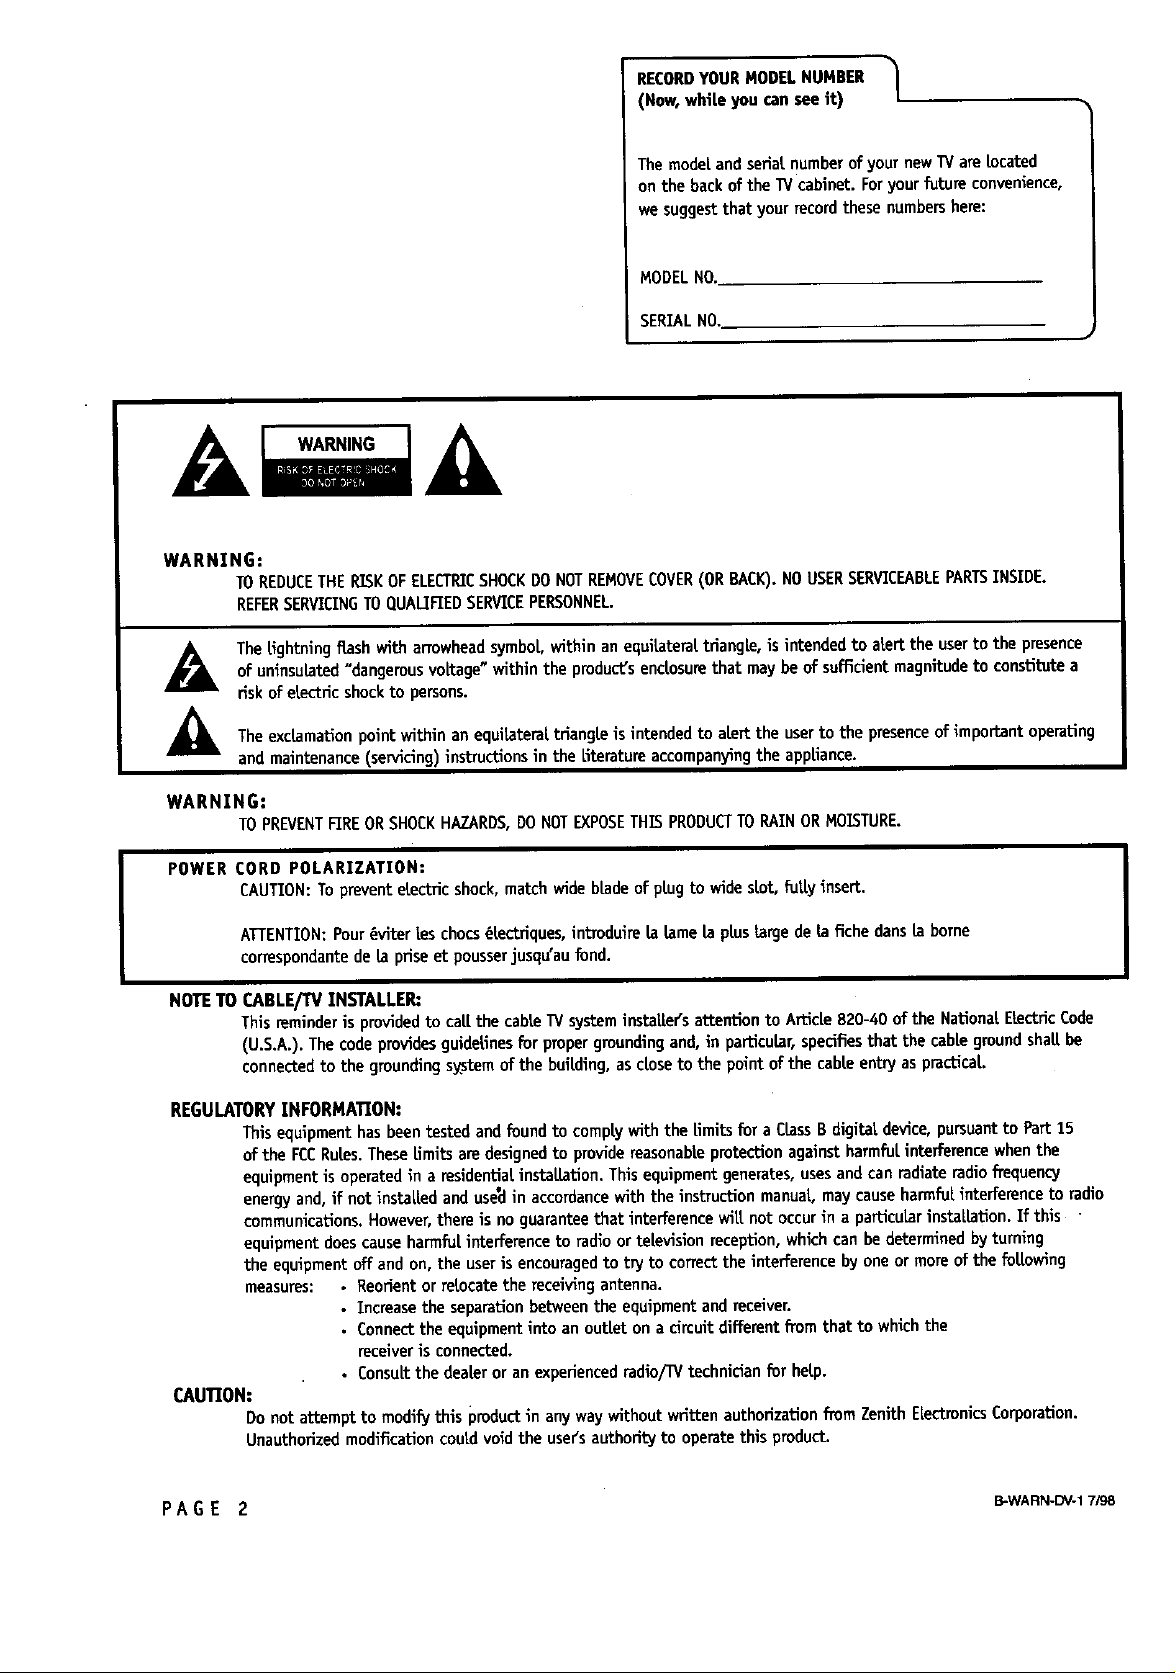
TO REDUCETHE RISKOFELECTRICSHOCK DO NOT REMOVE COVER(OR BACK).NO USER SERVICEABLEPARTSINSIDE.
REFERSERVICINGTO QUALIFIEDSERVICEPERSONNEL.
TheLightning flashwith arrowheadsymbol within an equilateraltriangle,is intended to alert the userto the presence
of uninsulated"dangerousvoRage"within the product'senclosurethat maybeof sufficientmagnitudeto constitutea
risk of electricshockto persons.
/
The exclamationpoint within an equilatera[triangle is intendedto alert the userto the presenceof important operating
and maintenance (servicing)instructions in the Literatureaccompanyingthe appliance.
WARNING:
TOPREVENTFIREORSHOCKHAZARDS,DO NOTEXPOSETHISPRODUCTTO RAINOR MOISTURE.
POWER CORD POLARIZATION:
CAUTION:To prevent electric shock,match wide blade of plug to wide slot, fut[y insert.
ATTENTION:Pour_viter Leschocs_tectriques,introduire la lamela pluslarge de la fichedens la borne
correspondantede la priseet pousser]usqu'aufond.
NOTE TO CABLE/TV INSTALLER:
Thisreminder is providedto caU.the cableW systeminstallersattention to ArticLe820-40 of the NationalELectricCode
(U.S.A.). Thecodeprovidesguidelinesfor propergroundingand,in particular,specifiesthat the cablegroundshaLLbe
connectedto the grounding s_tem of the building, asdose to the pointof the cable entry aspracticaL.
REGULATORYINFORMATION:
Thisequipment hasbeentested and found to complywith the limits fur a ClassB digital device,pursuantto Part15
of the FCCRuLes.Theselimitsaredesignedto providereasonableprotectionagainstharmfulinterferencewhenthe
equipmentis operatedin a residentialinstallation. Thisequipmentgenerates,usesand canradiateradio frequency
energyand,if not instaL[edandusedin accordancewith the instruction manuaL,maycauseharmfulinterference to radio
communications.However,thereis no guaranteethat interference wiLLnot occurin a particularinstaLLation.If this •
equipmentdoescauseharmfuLinterferenceto radio or televisionreception,whichcan be determinedbyturning
the equipmentoff and on, the useris encouragedto try to correctthe interferencebyoneormore ofthe foLLowing
measures: • Reorient or relocate the receiving antenna.
• Increasethe separation between the equipmentandreceiver.
• Connectthe equipmentinto an outlet on a circuitdifferentfromthat to whichthe
receiveris connected.
• ConsuLtthe dealeror an experiencedradio/IV technician fur help.
CAUTION:
Donot attempt to modif'j this productin any waywithout written authorization fTomZenith ELectronicsCorporation.
Unauthorized modification could void the user'sauthorityto operatethis product.
PAG E 2 B-WARN-DV-17/98
Important safeguards for you and your new product
Your product has been manufactured and tested with your safety in mind. However, improper use can result in potential
electffca[ shock or fire hazards. To avoid defeating the safeguards that have been built into your new product, please read
and observe the following safety points when installing and using your new product, and save them for future reference.
Observing the simple precautions discussed in this operating guide can help you get many years of enjoyment and safe
operation that are built into your new product.
This product compUes with all applicable U.S. Federal safety requirements, and those of the Canadian Standards Association.
1. Read Instructions
ALLthe safety and operating instructions should be read
before the product is operated.
2. Fo[|ow Instructions
ALLoperating and useinstructions should be foLLowed.
3. Retain Instructions
The safety and operating instructions shouldbe retained
for future reference.
4. Heed Warnings
ALLwarningson the product and in the operatinginstruc-
tions shouldbeadhered to.
5. Cleaning
Unplugthisprodu_ fromthewalloutletbeforecleaning.
Do notuseLiquidcleanersoraerosolcleaners.Usea damp
clothforcleaning.
6. Water and Moisture
Do not use this product near water for example, near a
bath tub, wash bowl, kitchen sink, or Laundrytub, in a
wet basement, or near a swimming pool.
7. Accessories
Donot place this product on an unstablecart,stand,
tripod, bracket,or table. The productmayfall, causing
seriousinjury to a child or adult, andseriousdamageto
the product.Use only with a cart, stand, tripod, bracket,
or table recommendedby the manufacturer, or sold with
the product.Any mounting of the productshouldfollow
themanufacturersinstructions,and should usea
mountingaccessoryrecommendedbythemanufacturer.
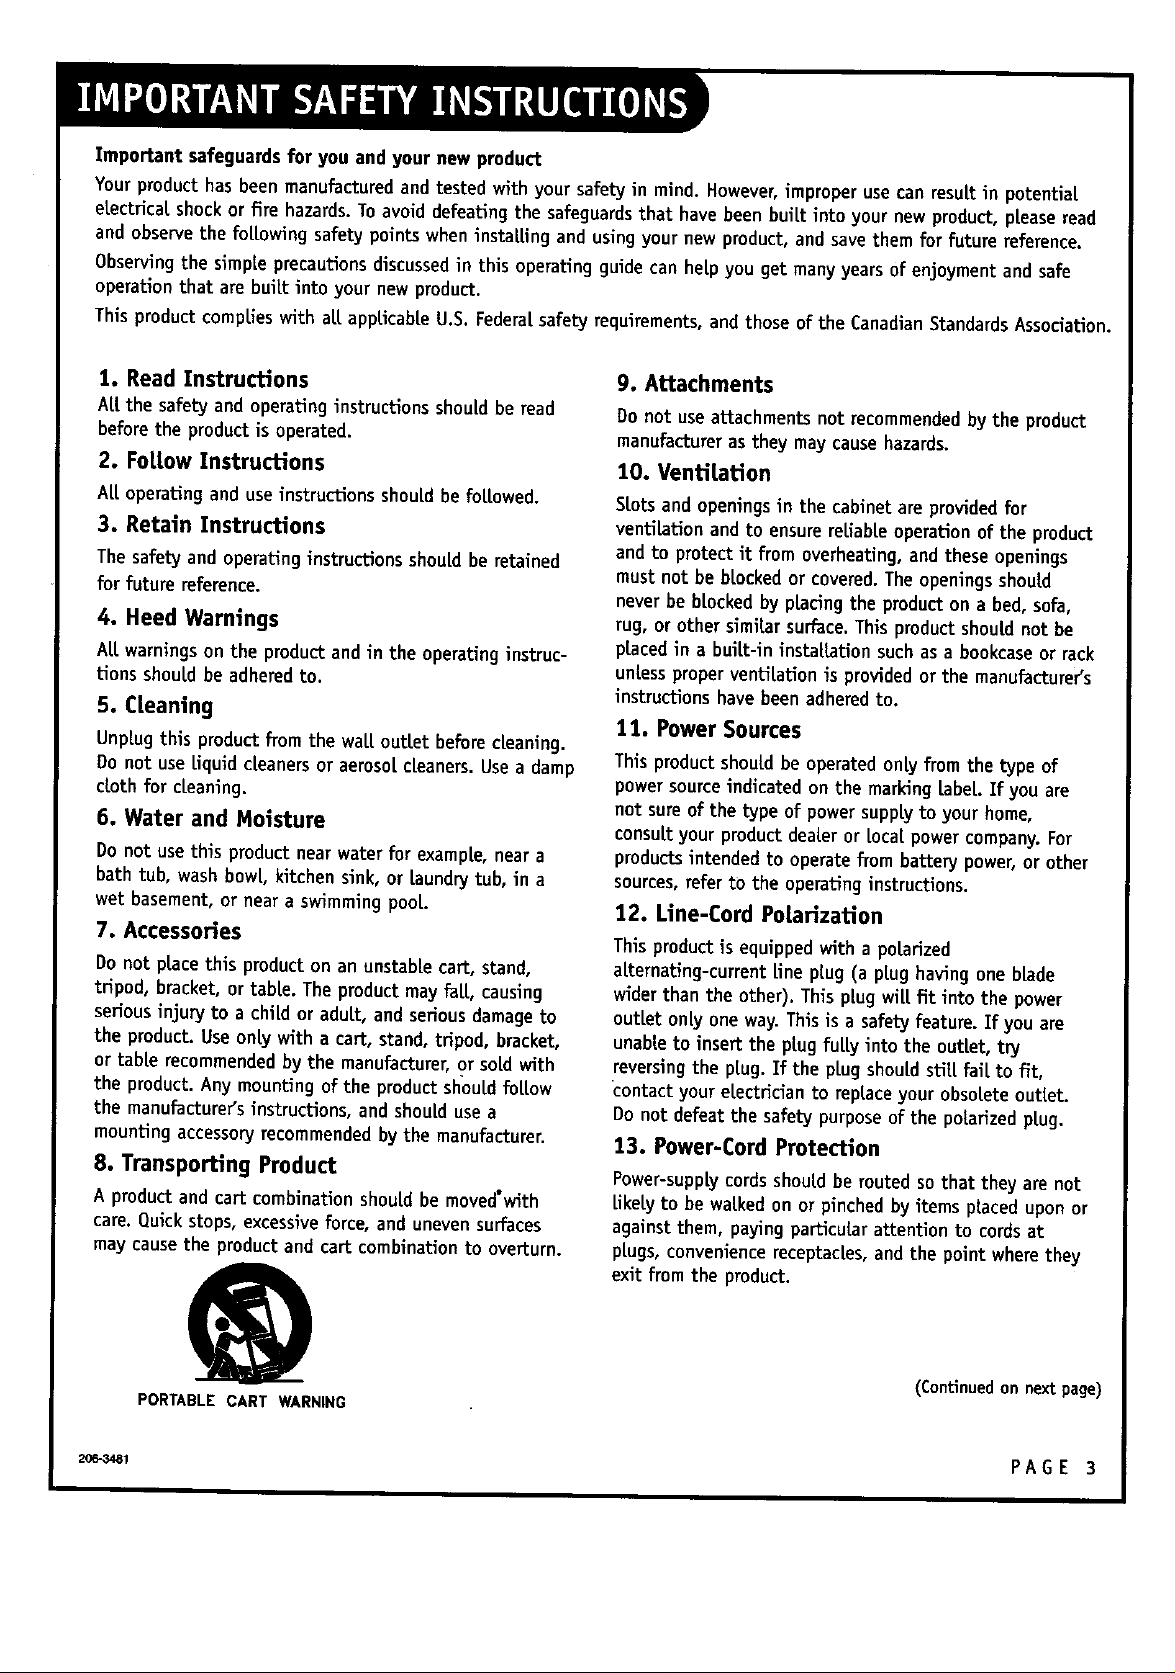
8. Transporting Product
A product and cart combinationshould be moved'with
care. Quick stops, excessiveforce, and uneven surfaces
may cause the product and cart combination to overturn.
9. Attachments
Do notuseattachmentsnotrecommendedby theproduct
manufacturerastheymay causehazards.
10. Ventilation
Slots and openings in the cabinetare providedfor
ventilation andto ensurereliableoperationof the product
and to protectit from overheating,andthese openings
mustnot be blockedor covered.Theopeningsshou|d
neverbe blockedby placingthe producton a bed, sofa,
rug, or other similarsurface.This productshouldnot be
placedin a built-in installation suchas a bookcaseor rack
unlessproperventilation is providedor the manufacturer's
instructionshavebeenadheredto.
11. Power Sources
Thisproduct should be operated only from the type of
power source indicated on the marking [abe[. If you are
not sureofthe type of powersupplyto your home,
consultyour productdealeror Localpower company.For
productsintendedto operate from battery power,or other
sources,referto the operatinginstructions.
12. Line-Cord PotarizaUon
Thisproductisequippedwithapolarized
a[ternating-current[inepiug(aplughavingoneblade
widerthantheother).Thisplugwillfitintothepower
outletonlyoneway.Thisisa safetyfeature,Ifyou are
unabletoinserttheplugfullyintotheoutlet,try
reversingtheplug.Iftheplugshouldstillfailtofit,
contactyourelectriciantoreplaceyourobsoleteoutlet.
Do notdefeatthesafetypurposeofthepolarizedplug.
13. Power-Cord Protection
Power-supplycords should be routed so that they arenot
Likelyto be walked on or pinched by items placed upon or
against them, paying particular attention to cords at
plugs, convenience receptacles, and the point wherethey
exitfrom the product.
(Continuedon nextpage)
PORTABLE CART WARNING
_,ml PAGE 3
(Continuedfrompreviouspage)
14. Outdoor Antenna Grounding
Ifan outsideantennaorcablesystemisconnectedtothe
product,besuretheantennaorcablesystemisgrounded
soastoprovidesome protectionagainstvoltagesurges
and built-upstaticcharges.Article810oftheNational
ElectricalCode(U.S.A.),ANSI/NFPA 70 provides
informationwithregardto propergroundingofthemast
and supportingstructure,groundingof thelead-inwireto
an antennadischargeunit,sizeofgroundingconductors,
locationofantenna-dischargeunit,connectionto
groundingelectrodes,and requirementsforthegrounding
electrode.
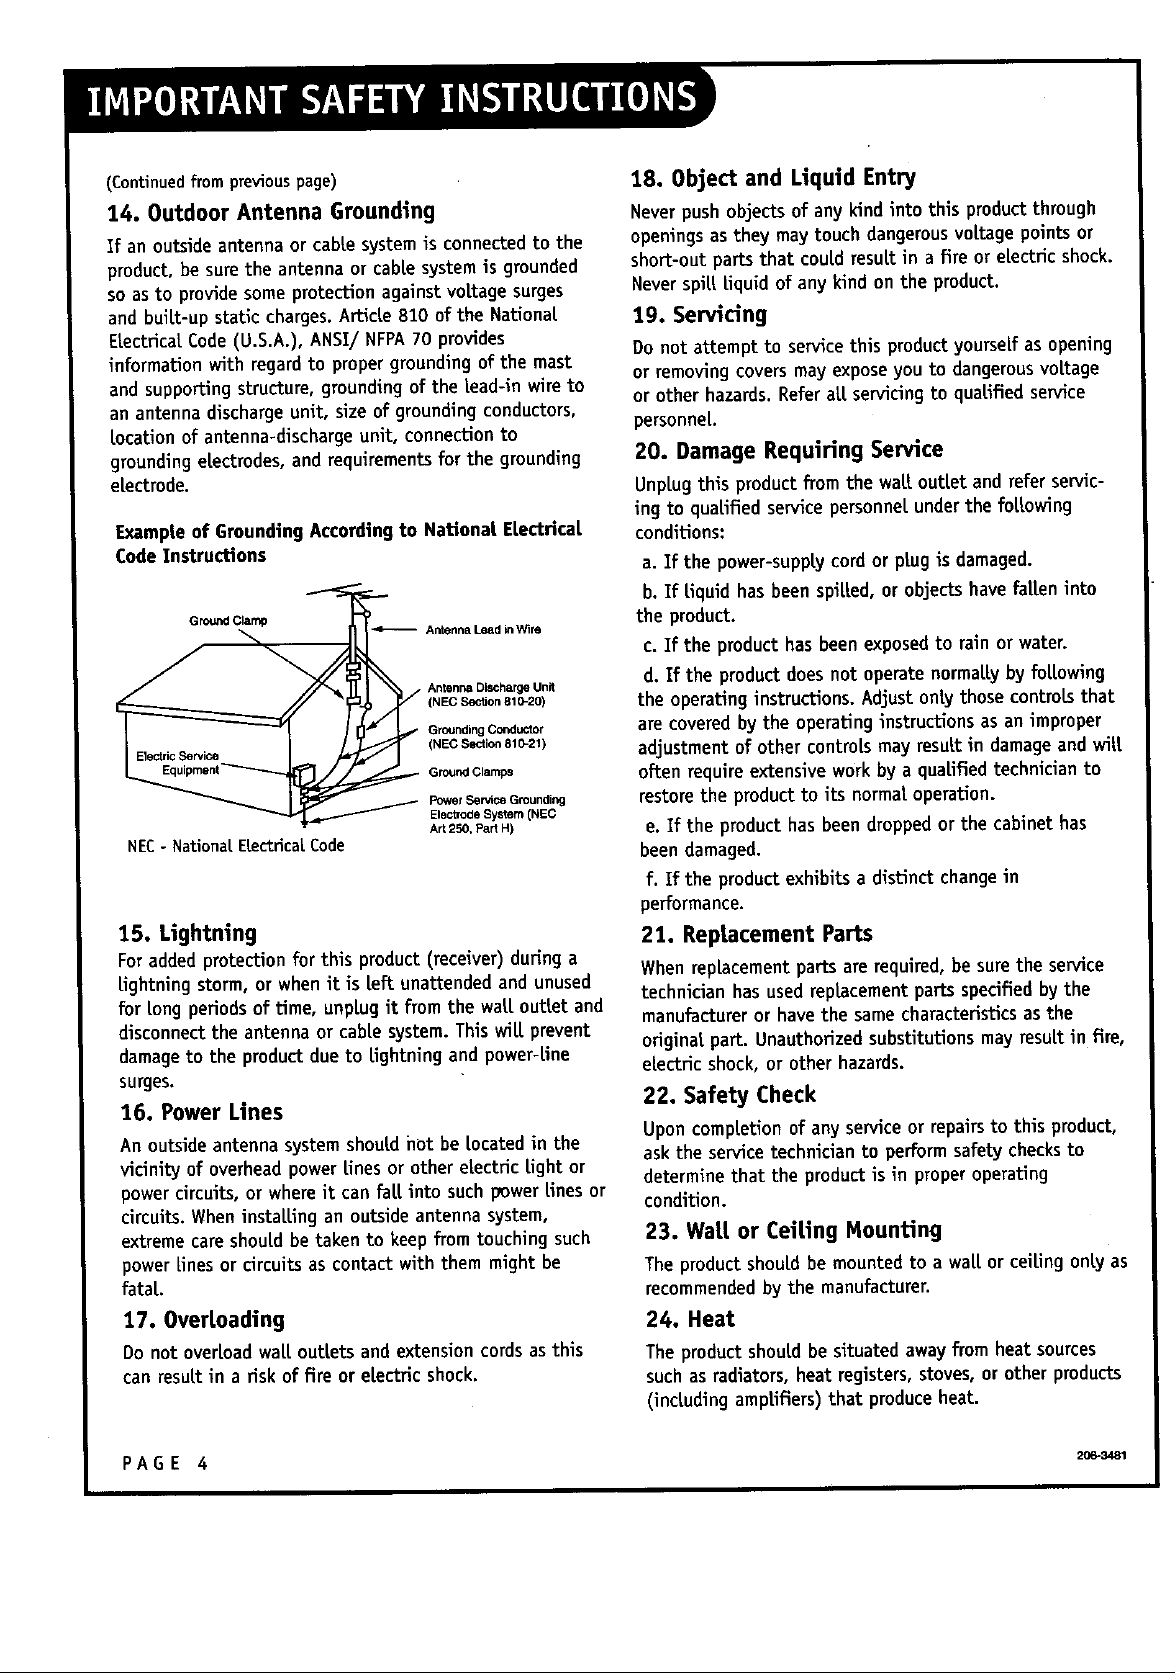
Example of GroundingAccordingto National Electrical
CodeInstrucUons
Antenna Lead in Wire
Antenna Discharge Unit
(NEC Section 810-20)
Grounding Conductor
(NEC Sectinn 810-21)
GroundClamps
Power Service Grounding
EleCtrode System (NEC
NEC-NationalElectricalCode
15. Lightning
Foradded protectionfor this product(receiver)duringa
Lightning storm, or whenit is [eft unattendedand unused
for tong periodsof time, unplugit from the waltoutlet and
disconnectthe antenna or cable system. This wit[ prevent
damageto the productdueto tlghtningandpower-line
surges.
16. Power Lines
An outside antenna systemshouldhot be located in the
vicinity of overheadpowertines or other electrictight or
power circuits, or whereit can fatt into suchpowertines or
circuits.Wheninstalling an outsideantenna system,
extremecare shouldbe taken to keep fromtouching such
power Linesor circuitsas contactwith them might be
fatal.
17. Overloading
Do not overloadwattoutlets and extensioncords as this
can resultin a riskof fire or electricshock.
A_ 250, Pa_ H)
18. Object and Liquid Entry
Neverpushobjectsof any kindinto this productthrough
openingsasthey maytouch dangerousvoltage pointsor
short-out partsthat couldresult in a fire or electricshock.
Neverspilt Liquid of any kind on the product.
19. Servicing
Do not attempt to service this productyourselfasopening
or removing covers may expose youto dangerousvoltage
or other hazards. Refer at[ servicing to qualified service
personnel.
20. Damage Requiring Service
Unplugthis productfrom the wattoutlet and refer servic-
ing to qualified service personnelunderthe fol!owing
conditions:
a.Ifthepower-supplycordorplugisdamaged.
b.Ifliquidhasbeenspilled,orobjectshavefalleninto
theproduct.
c.Iftheproducthasbeenexposedto rainorwater.
d.Iftheproductdoesnotoperatenormallybyfollowing
theoperatinginstructions.Adjustonlythosecontrolsthat
arecoveredbytheoperatinginstructionsasan improper
adjustmentofothercontrolsmay resultindamage andwill
oftenrequireextensiveworkby a qualifiedtechnicianto
restoretheproductto itsnormaloperation.
e.Iftheproducthasbeendroppedorthecabinethas
beendamaged.
f.Iftheproductexhibitsa distinctchangein
performance.
21. Replacement Parts
Whenreplacementpartsare required,besure the service
technician has usedreplacementpartsspecified by the
manufacturer or havethe samecharacteristics asthe
originalpart. Unauthorizedsubstitutions mayresultin fire,
electric shock, or other hazards.
22. Safety Check
Upon completionofanyserviceorrepairstothisproduct,
asktheservicetechnicianto performsafetychecksto
determinethattheproductisinproperoperating
condition.
23. Watt or Ceiling Mounting
The productshould be mountedto a watt or ceiling only as
recommendedbythe manufacturer.
24. Heat
The product shouldbe situatedawayfrom heatsources
such as radiators,heat registers,stoves,orother products
(includingamplifiers)that produceheat.
PAGE 4 2o_aI
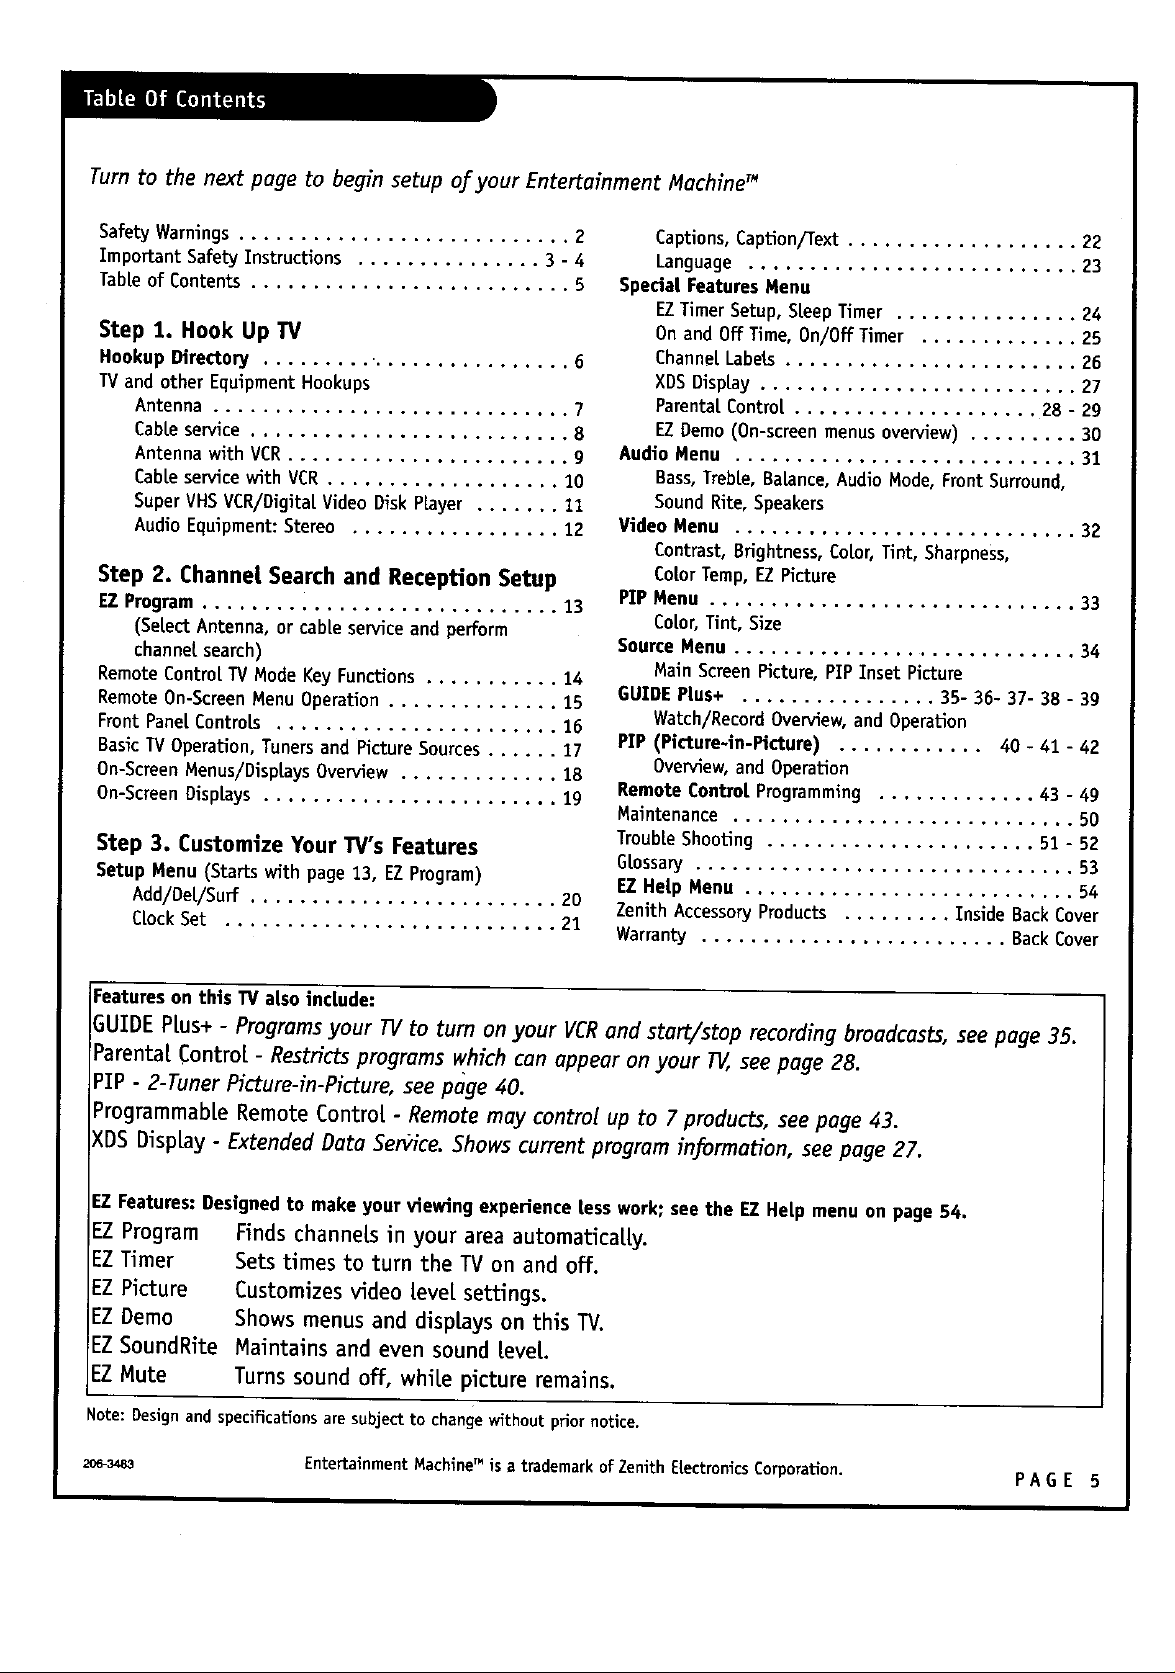
Turn to the next page to begin setup oJ=your Entertainment Machine TM
Safety Warnings........................... 2
Important Safety Instructions ............... 3 - 4
Tableof Contents.......................... 5
Step 1. Hook Up IV
Hookup Directory ......... ................ 6
TVand other EquipmentHookups
Antenna ............................. 7
Cableservice .......................... 8
Antenna with VCR....................... 9
Cableservicewith VCR................... 10
SuperVHSVCR/Digital Video DiskPlayer ....... 11
Audio Equipment: Stereo ................. lZ
Step 2. Channel Search and Reception Setup
EZProgram ............................. 13
(Select Antenna, or cableservice and perform
channelsearch)
Remote Control TV ModeKeyFunctions........... 14
RemoteOn-ScreenMenu Operation .............. 15
Front Pane[Controls ....................... 16
Basic"IVOperation, Tunersand Picture Sources...... 17
On-ScreenMenus/DisplaysOverview ............. 18
On-ScreenDisp[ays ........................ 19
Step 3. Customize Your TV's Features
Setup Menu (Starts with page 13, EZ Program)
Add/Oe[/Surf ......................... 20
CLockSet ........................... 21
Captions,Caption/Text................... 22
Language ........................... Z3
Spedal Features Menu
EZTimerSetup, Sleep Timer ............... 24
Onand Off Time, On/Off Timer ............. 25
Channel Labels ........................ Z6
XDSDisplay .......................... 27
Parental Control .................... 28 - 29
EZOemo(On-screenmenusoverview) ......... 30
Audio Menu ............................ 31
Bass,Treble, Balance, AudioMode,Front Surround,
Sound Rite, Speakers
Video Menu ............................ 32
Contrast,Brightness,Color,Tint, Sharpness,
ColorTemp,EZPicture
PIP Menu .............................. 33
Color, Tint,Size
SourceMenu ............................ 34
MainScreenPicture,PIPInsetPicture
GUIDE Plus+ ................ 35-36-37-38 - 3g
Watch/RecordOverview,and Operation
PIP (Ptcture-ln-Picture) ............ 40 - 41 - 42
Overview,and Operation
Remote Control Programming ............. 43 - 49
Maintenance ............................ 50
TroubleShooting ...................... 51 - 52
Glossary ............................... 53
EZ Help Menu ........................... 54
Zenith AccessoryProducts ......... Inside Back Cover
Warranty ......................... Back Cover
FeaturesonthisTValsoinclude:
GUIDE PLus+- Programs your TVto turn on your VCRand start/stop recording broadcasts, see page 35.
Parental Control - Restricts programs which can appear on your T_, see page 28.
PIP - 2-Tuner Picture-in-Picture, see page 40.
Programmable Remote Control - Remote may control up to 7 products, see page 43.
KDSDisplay - Extended Data Se_ice. Shows current program information, see page 27.
EZFeatures:Designed to make your viewing experience lesswork; see the EZHelp menu on page 54.
EZ Program Finds channels in _/our area automatically.
EZTimer Sets times to turn the TV on and off.
EZ Picture Customizesvideolevelsettings.
EZ Oemo Shows menus and displayson this13/.
EZ SoundRite Maintainsand evensound Level.
EZ Mute Turnssound off,whilepictureremains.
Note:Oesignandspecificationsayesubjectto changewithout prior notice.
a_s-34eo EntertainmentMachine"isatrademarkofZenithElectronicsCorporation. P A G E 5
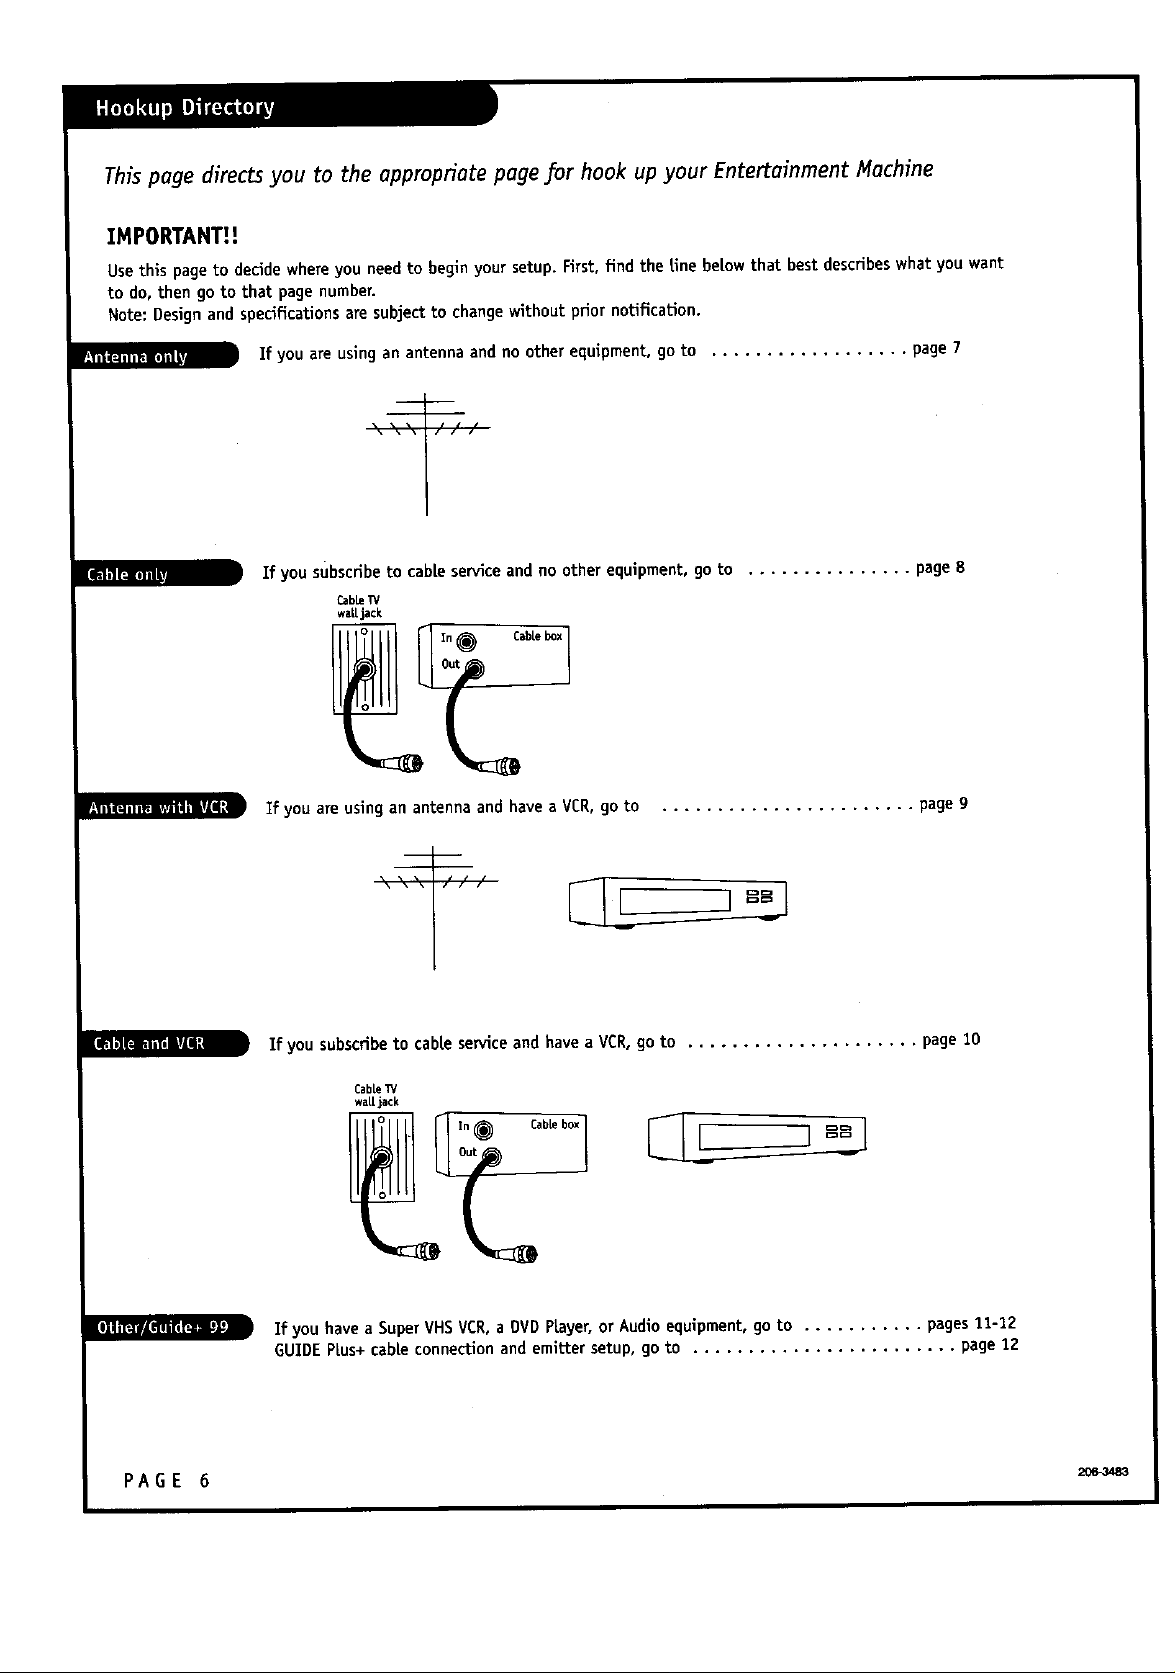
Thispage directs you to the appropriate page for hook up your Entertainment Machine
IMPORTANTU
Usethis pageto decidewhereyou needto beginyour setup.First, find the [ine be{owthat best describeswhat you want
to do, then 9o to that page number.
Note: Designand specificationsare subjectto changewithout prior notification.
If you are using an antenna and no other equipment, go to .................. page 7
If you subscribe to cable sendce andno other equipment, go to ............... page8_m_e-m
Czb_T¢
waiLjack
If you are usingan antenna and havea VCR,go to ....................... page 9
If you subscribe to cable sewice and have a VCR,go to ..................... page 10
CaMe _/
waLLjack
If you have a Super VHSVCR,a DVDPLayer,or Audioequipment,go to ........... pages11-12
GUIDE PLus+cableconnection and emitter setup, goto ........................ page12
PAGE 6
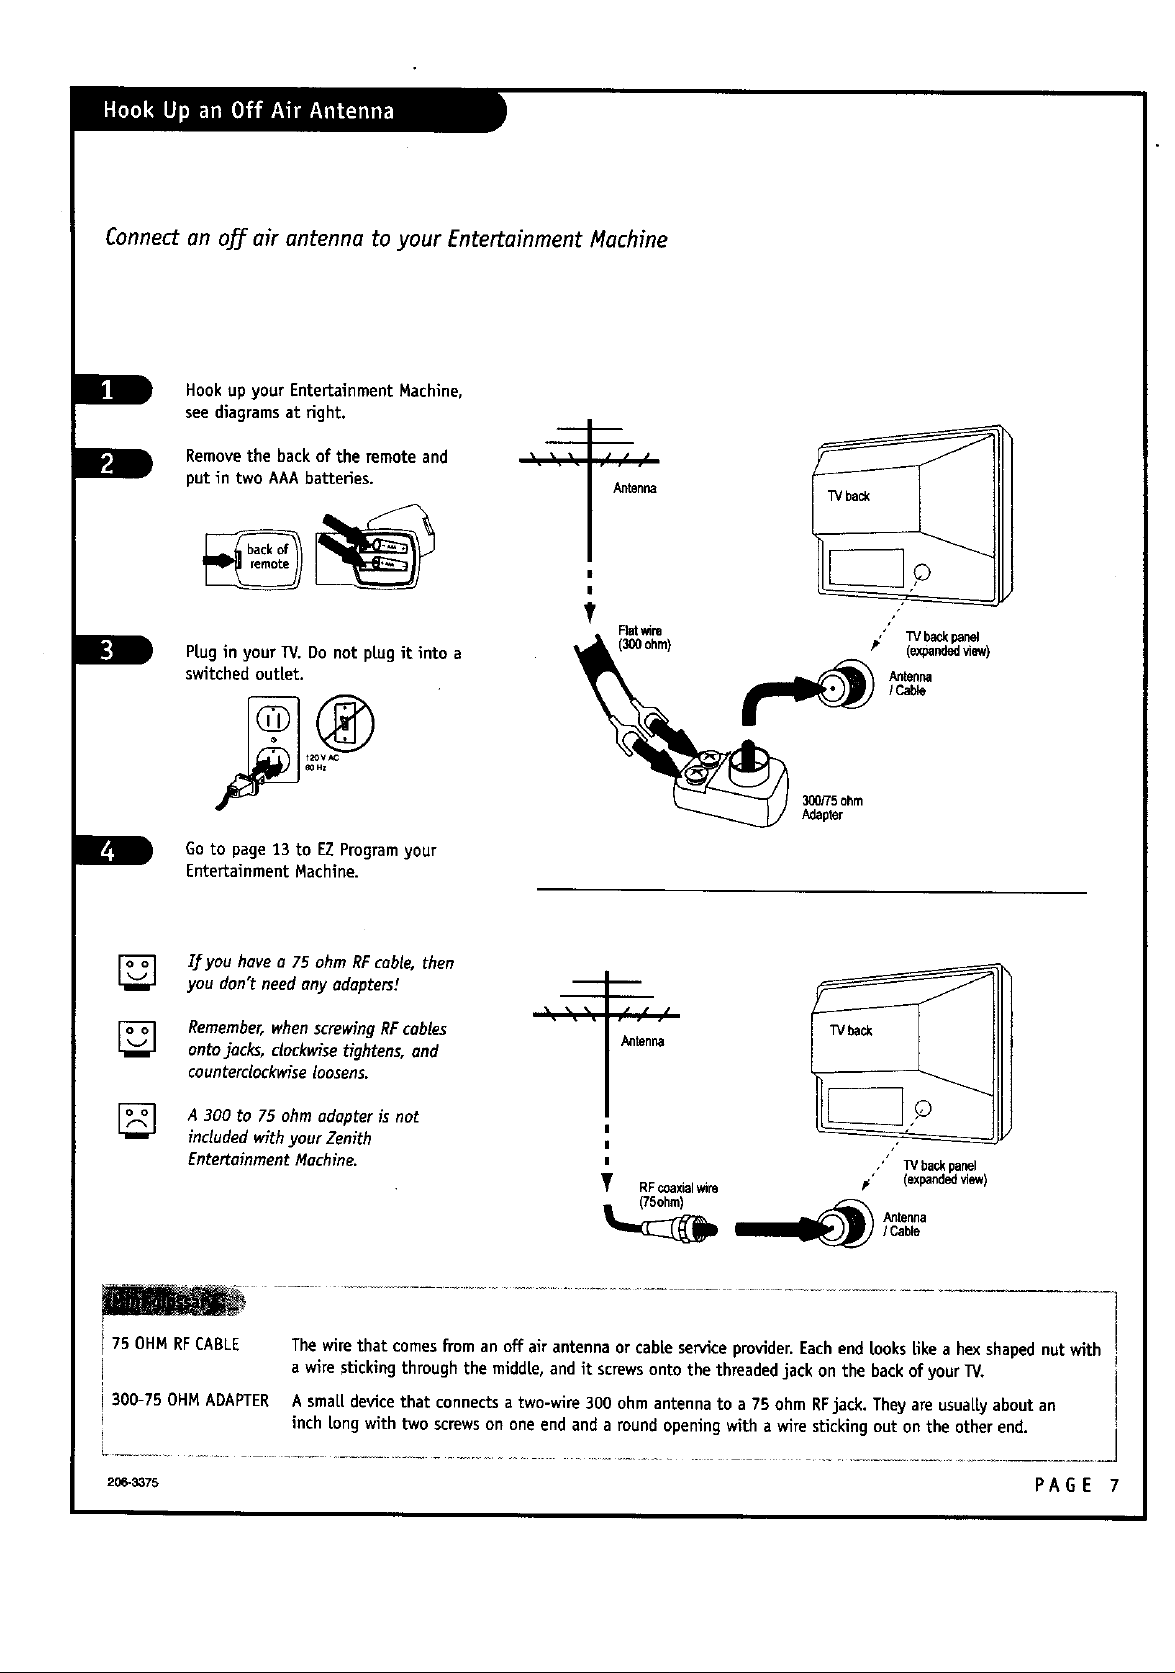
Connectan oN airantenna toyourEntertainmentMachine
Hook up yourEntertainmentMachine,
seediagramsatfight.
Removethebackoftheremoteand
putintwo AAA batteries.
Ptugin your TV. Do not ptugit into a
switched outlet.
Antenna
Rat _re "" TV
(3_) ohm) • (expandedview)
Go to page13 to EZProgramyour
EntertainmentMachine.
If you have a 75 ohm RFcable, then
you don't needany adapters!
Remember,whenscrewing RFcables
ontojacks, clockwisetightens, and
counterclockwiseloosens.
[] A 300 to75ohm adapterisnot
includedwithyourZenith
EntertainmentMachine.
75 OHM RFCABLE
I
1
i300-75OHM ADAPTER
The wire that comesfrom an offair antenna or cable serviceprovider.Eachend [oakslike a hexshapednutwith
a wire sucking through the middte, andit screwsonto the threadedjack on the backof yourTV.
A smaL[devicethat connectsa two-wire 300ohm antennato a 75 ohm RFjack.TheyareusuaLlyaboutan
inch tongwith two screwsononeend and a round openingwith a wire stickingout on the otherend.
_ Adapter
300/75 ohm
.P ( .(
Antenna
,' TV back panel
F (expandedview)
Antenna
/ Cable
2o_75 PAGE 7
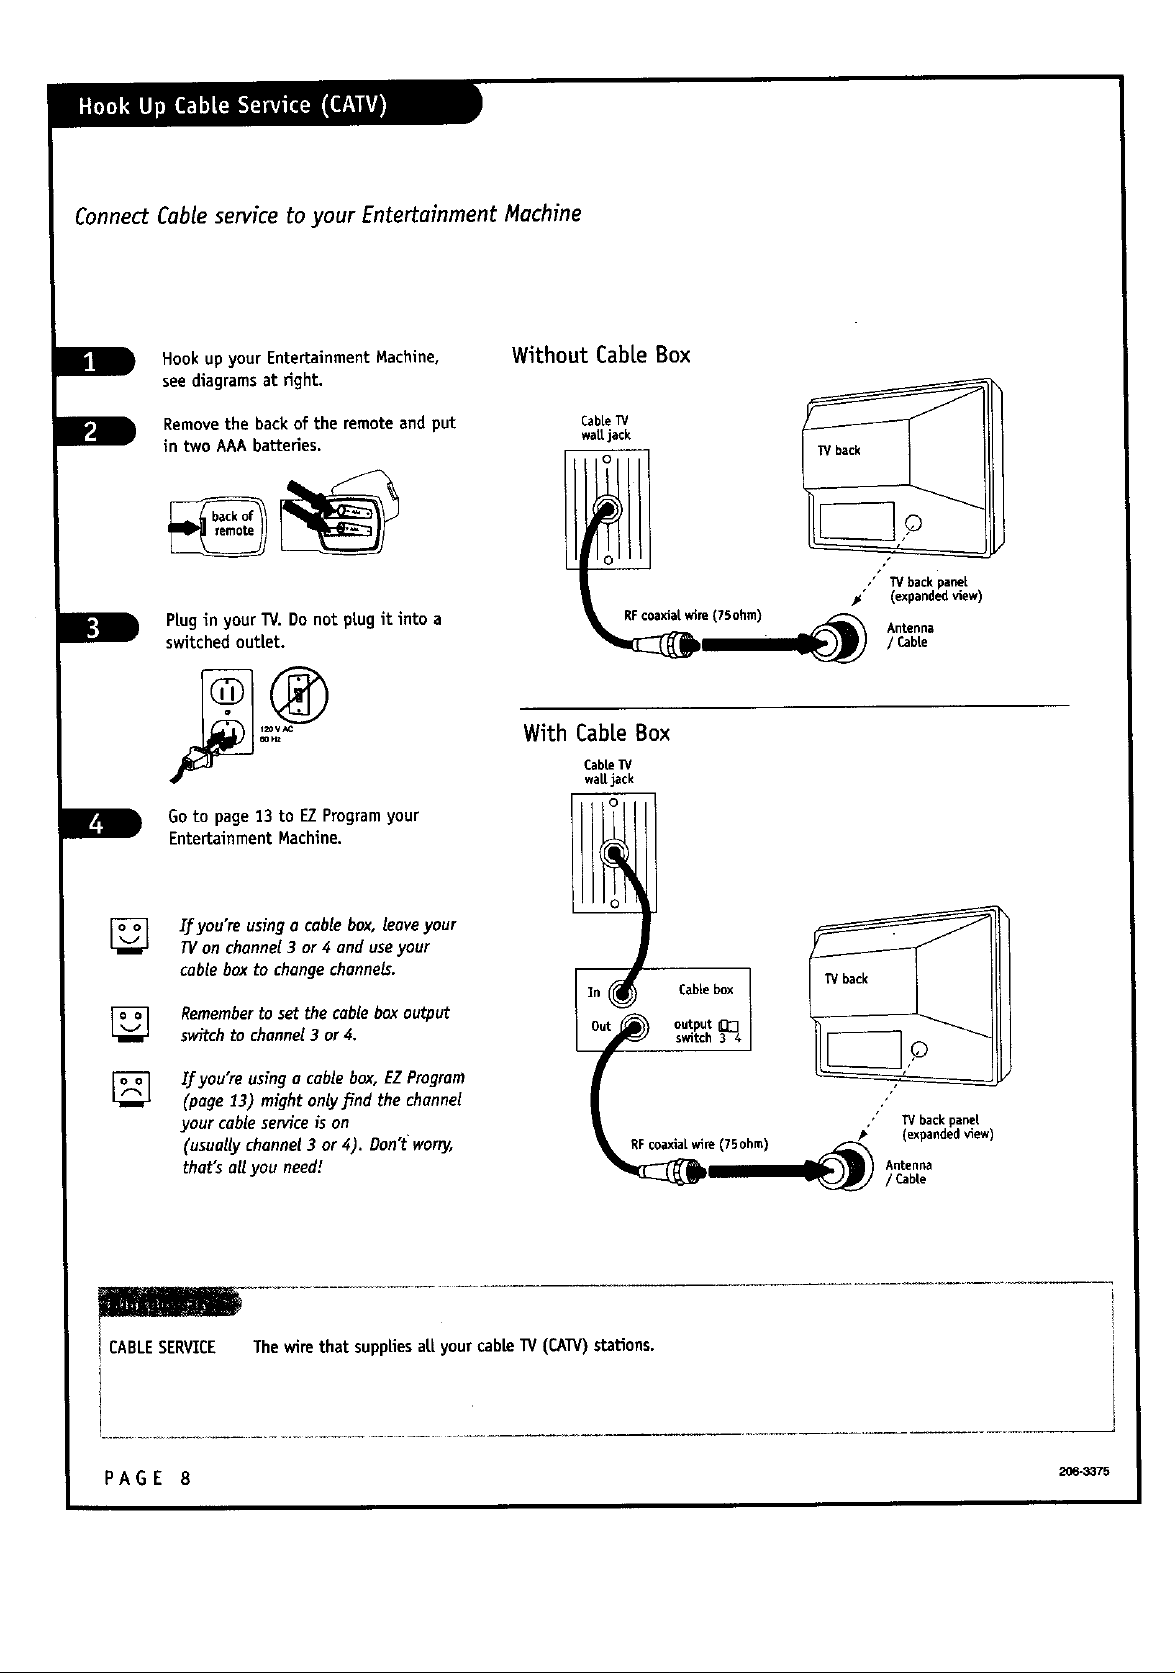
Connect Cable service to your Entertainment Machine
Hook up your EntertainmentMachine,
see diagramsat fight.
Removethe backof the remoteand put
in two AAAbatteries.
Ptugin your W. Donot ptug it into a
switchedoutlet.
Goto page13 to EZProgramyour
EntertainmentMachine.
Ifyou'_using a cable box, leaveyour
lV an channel 3 or 4 and use your
cable box to changechannel.
Rememberto set the cableboxoutput
switchto channel3 or 4,
Without CabLeBox
CabLeTV
wattjack
With CabLeBox
CableW
walljack
In _1_ Cable box
v
Out _ output_
switch 3 4
," TV back panel
_' (expandedview)
Antenna
/ Cable
If you're usinga cablebox, EZProgram
(page 13) might only_nd the channel
your cable service is on
(usually channel 3 or 4). Don't"worry,
that's all you need!
CABLESERVICE
PAGE 8
_lre175ohm )
The wirethat suppLiesat[ yourcabteW (CAW) stations.
,,' W back panel
(expanded view)
Antenna
/ Cable
J
206-3375
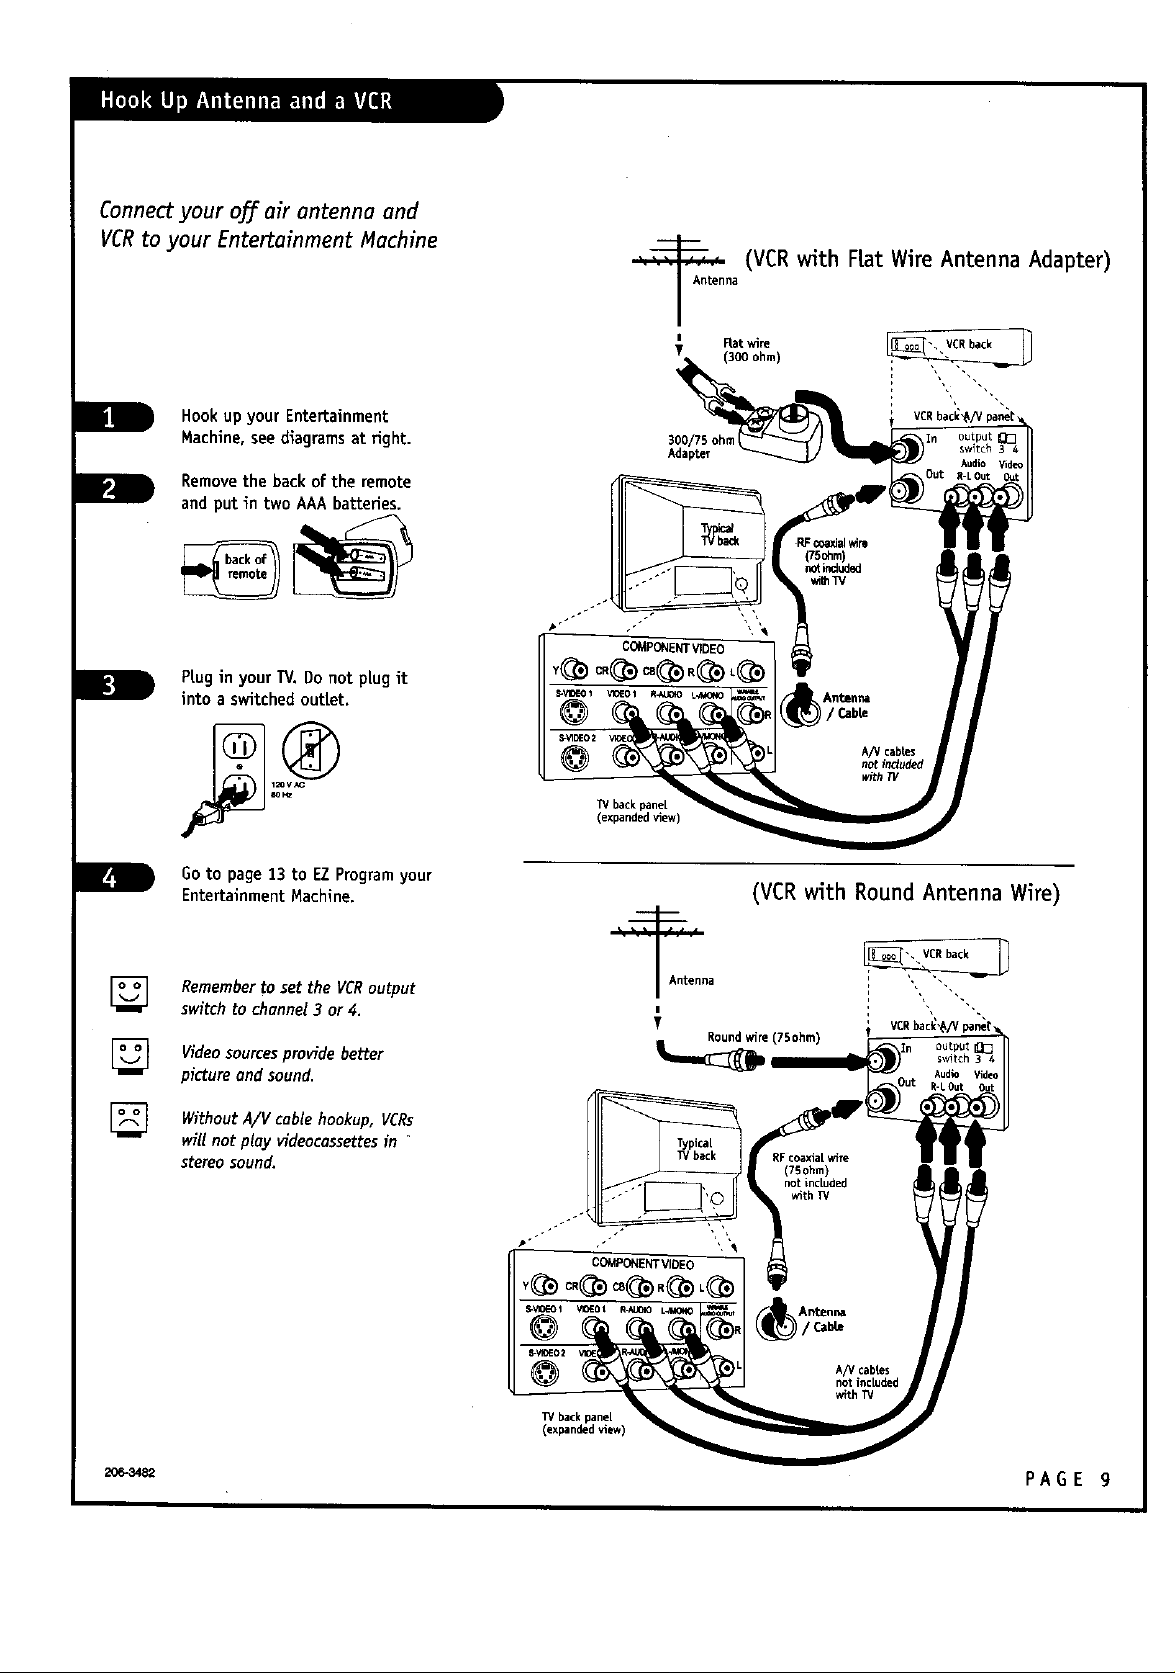
Connectyour offairantennaand
VCR toyourEntertainmentMachine
Hookup yourEntertainment
Machine,seediagramsat right.
Removethe back of the remote
and put in two AAAbatteries.
PtuginyourTV.Do notplugit
intoa switchedoutLet.
na
(VCRwith Rat Wire Antenna Adapter)
output_
switch 3 4
[]
[]
eOh_
Goto page13 to EZ Programyour
EntertainmentMachine.
Remember tosettheVCRoutput
switchtochannel3 or4.
Videosourcesprovidebetter
pictureendsound.
WithoutA/V cablehookup,VCRs
willnotplayvideocossettesin "
stereosound.
TVbackpane[
(expandedview)
_Antenna
(VCRwith Round Antenna Wire)
Roundwire (75ohm)
output l[l_
switch 3 4
W back pane[
(expanded view)
PAGE 9
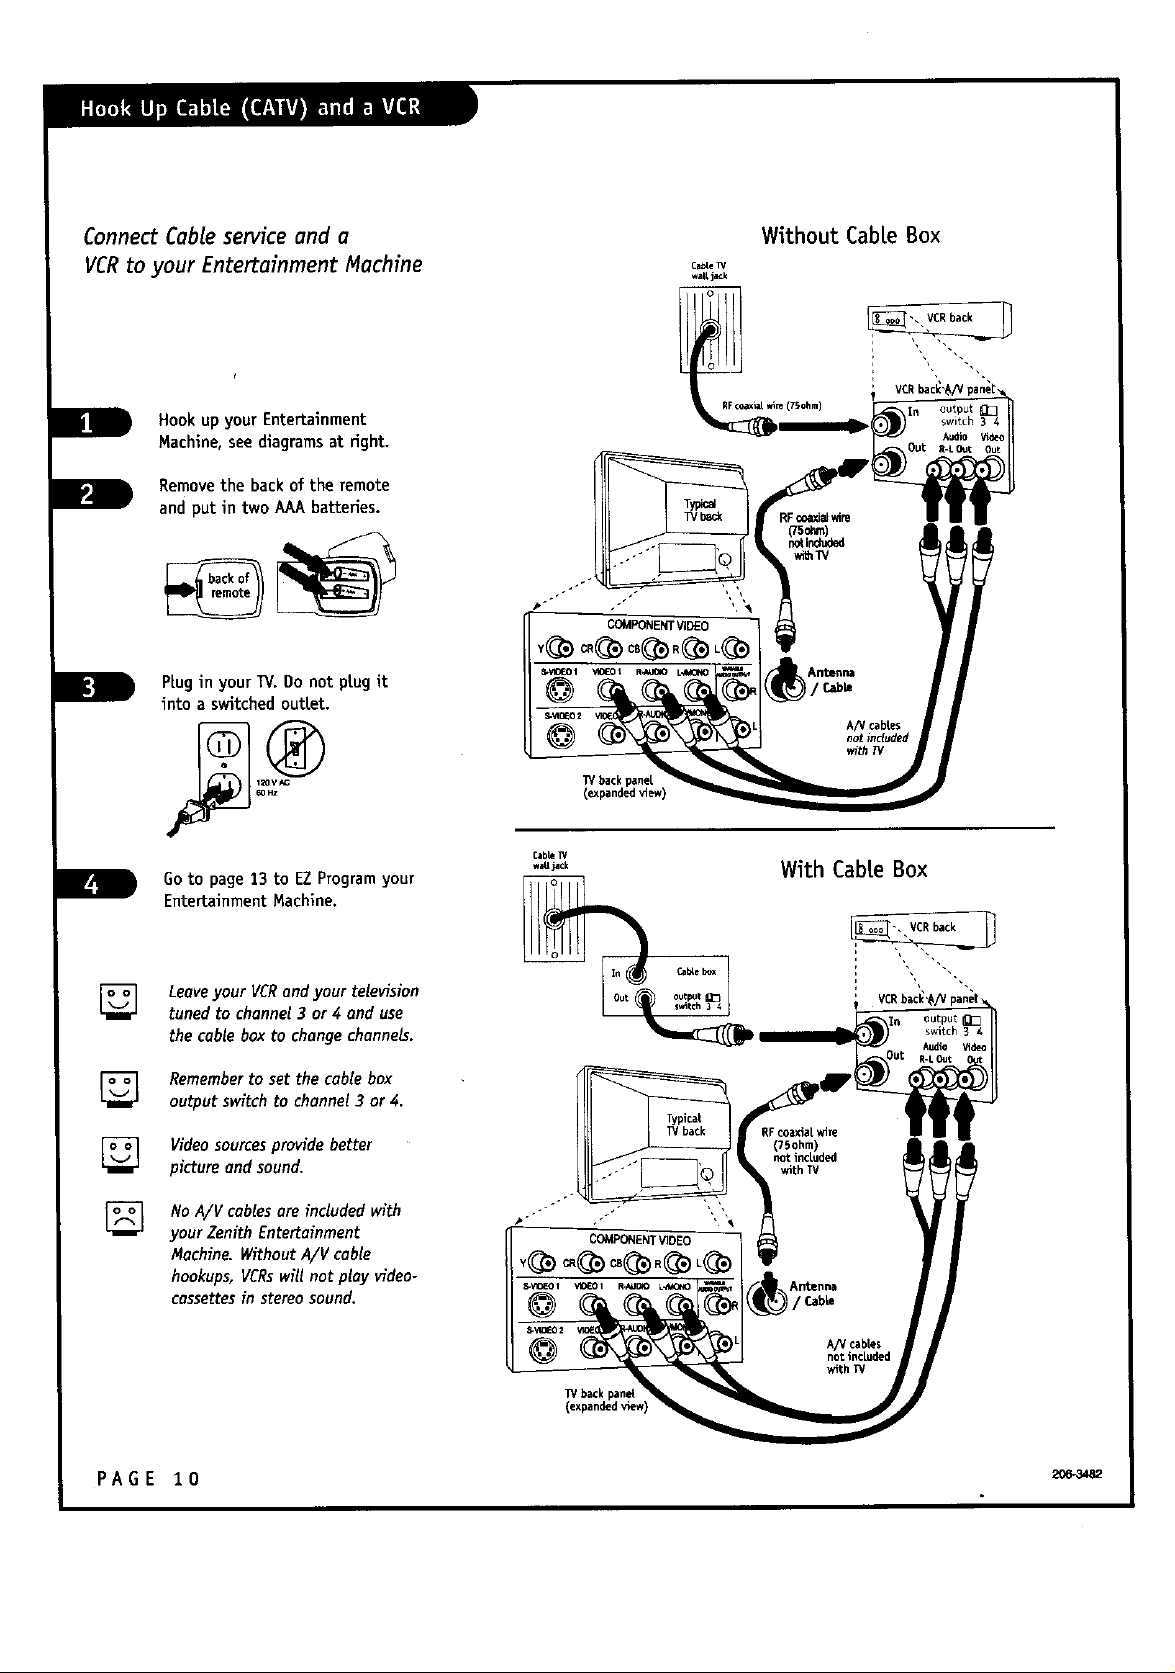
Connect Cable service and a
VCR to your Entertainment Machine
Hook up your Entertainment
Machine, see diagramsat right.
Removethe backof the remote
and put in two AAAbatteries.
PluginyourW. Do notplugit
intoa s_tched outtet.
Without Cab!.eBox
Goto page13 to EZ Program your
EntertainmentMachine.
Leaveyour VCRand your television
tuned to channel3 or4 and use
the cablebox to changechannels.
Remember to set the cable box
output switch to channel 3 or 4.
Videosourcesprovidebetter
pictureand sound.
No A/V cables are included with
your Zenith Entertainment
Machine. Without A/V cable
hookups, VCRswill not play video-
cassettesin stereo sound.
Cable IV
w_ jack
@
Out out:l_t _
W backpanel
(expanded v_ewI
With Cable Box
A/V cables
notinduded
with W
output ll_
switch 3 4
A_ilo
R-LOUt
PAGE 10
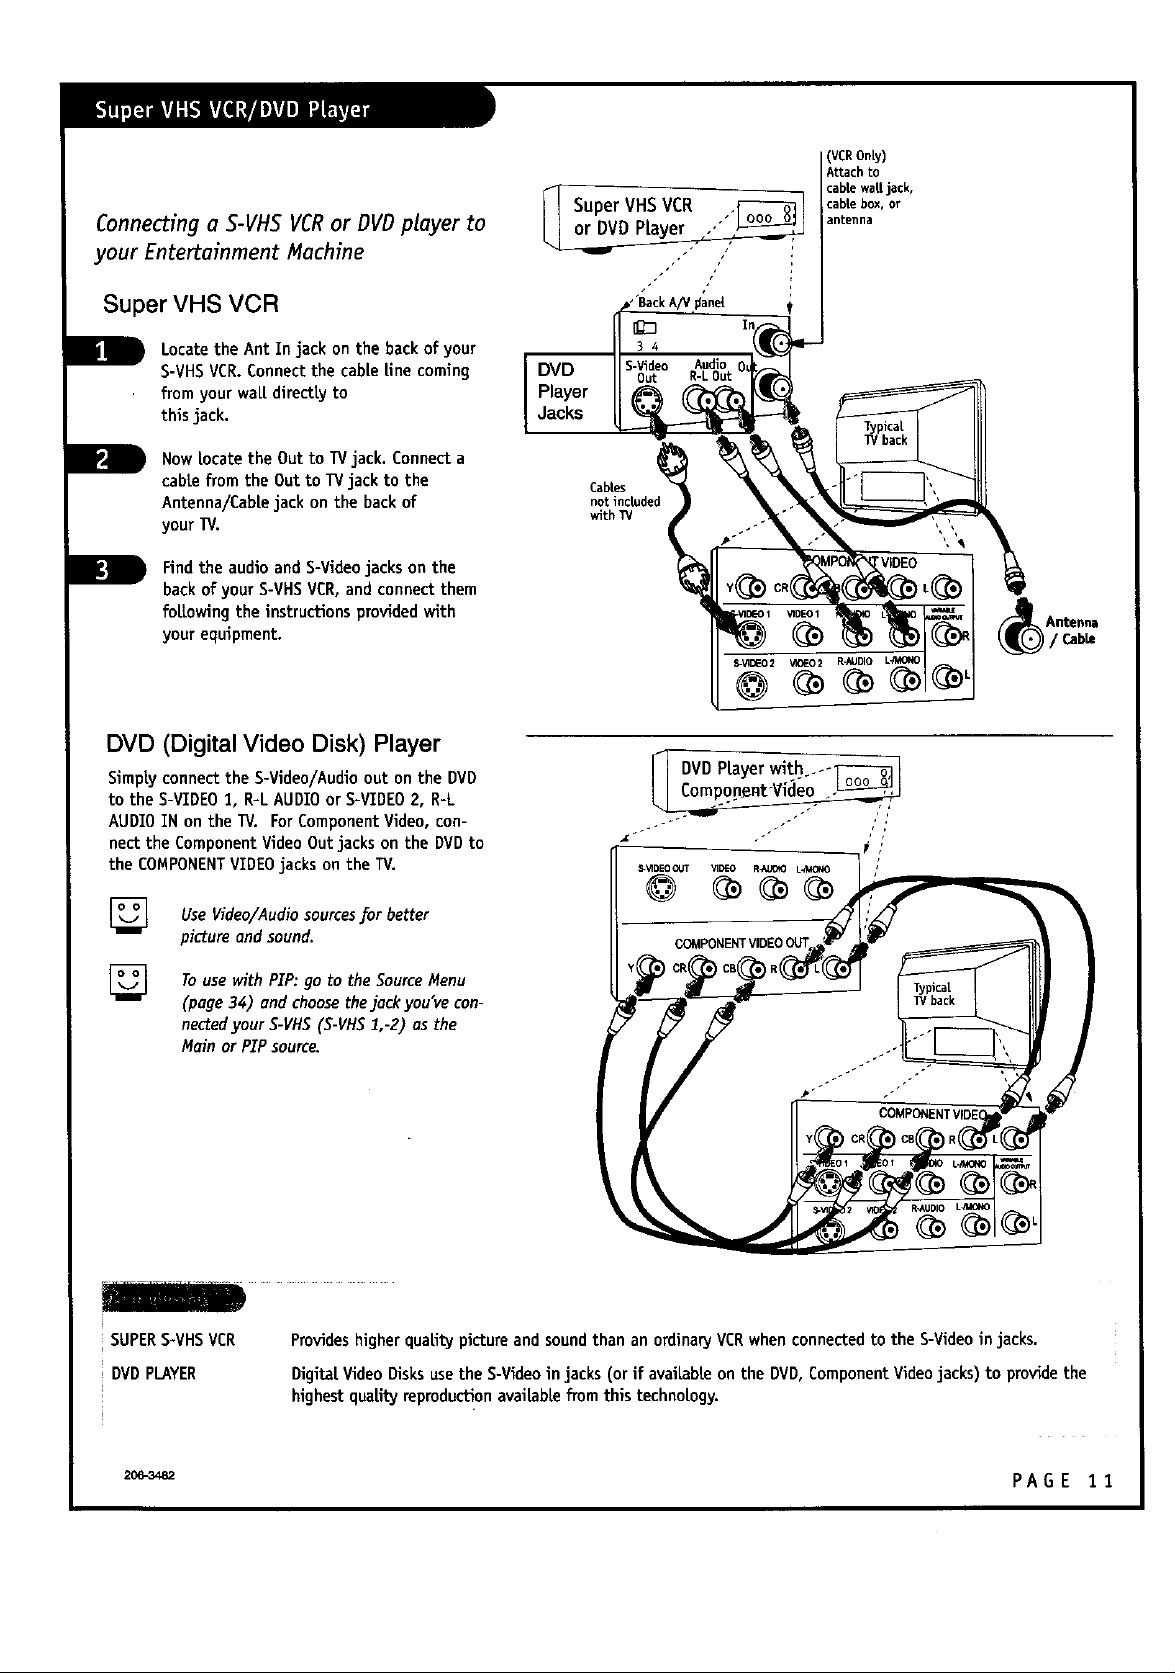
Connectinga S-VHS VCR orDVD playerto
your EntertainmentMachine
Super VHS VCR
(VCROnLy)
Attach to
cable waUjack,
cable box, or
antenna
mmm
D
B
Locatethe Ant In jack on the back of your
S-VHSVCR.Connectthe cable Unecoming
from your waLLdirecttyto
this jack.
Now locatetheOut toIVjack.Connecta
cabtefrom theOutto l_/jackto the
Antenna/Cablejackon thebackof
your_.
Findtheaudioand S-Videojackson the
backofyourS-VHSVCR,andconnectthem
fo[towingtheinstructionsprovidedwith
yourequipment.
DVD (Digital Video Disk) Player
SimplyconnecttheS-Video/Audioouton the DVD
totheS-VIDEO1,R-LAUDIO orS-VIDEO2, R-L
AUDIO IN on theTV. ForComponentVideo,con-
necttheComponentVideoOutjackson theDVD to
theCOMPONENT VIDEOjackson theTV.
[]
Use Video/Audiosourcesforbetter
pictureandsound.
DVD
Player
Jacks
Cables
notinc_ded
wlth_
VIDEO
DVD PLayerwidth---_ 1
©
SUPERS-VHSVCR
DVD PLAYER
Touse with PIP:go to the Source Menu
(page 34) and choosethejack you've con-
nectedyour S-VHS(5-VHS1,-2) as the
Main or PIP source.
Provideshigherqualitypictureandsoundthan an ordinary VCRwhen connectedto the S-Videoin jacks.
Digital.Video Disks usethe S-Videoin jacks (or if available on the DMD,ComponentVideojacks) to provide the
highest quaLityreproduction avaiLabLefrom this techno[ogy.
2_ PAGE 11
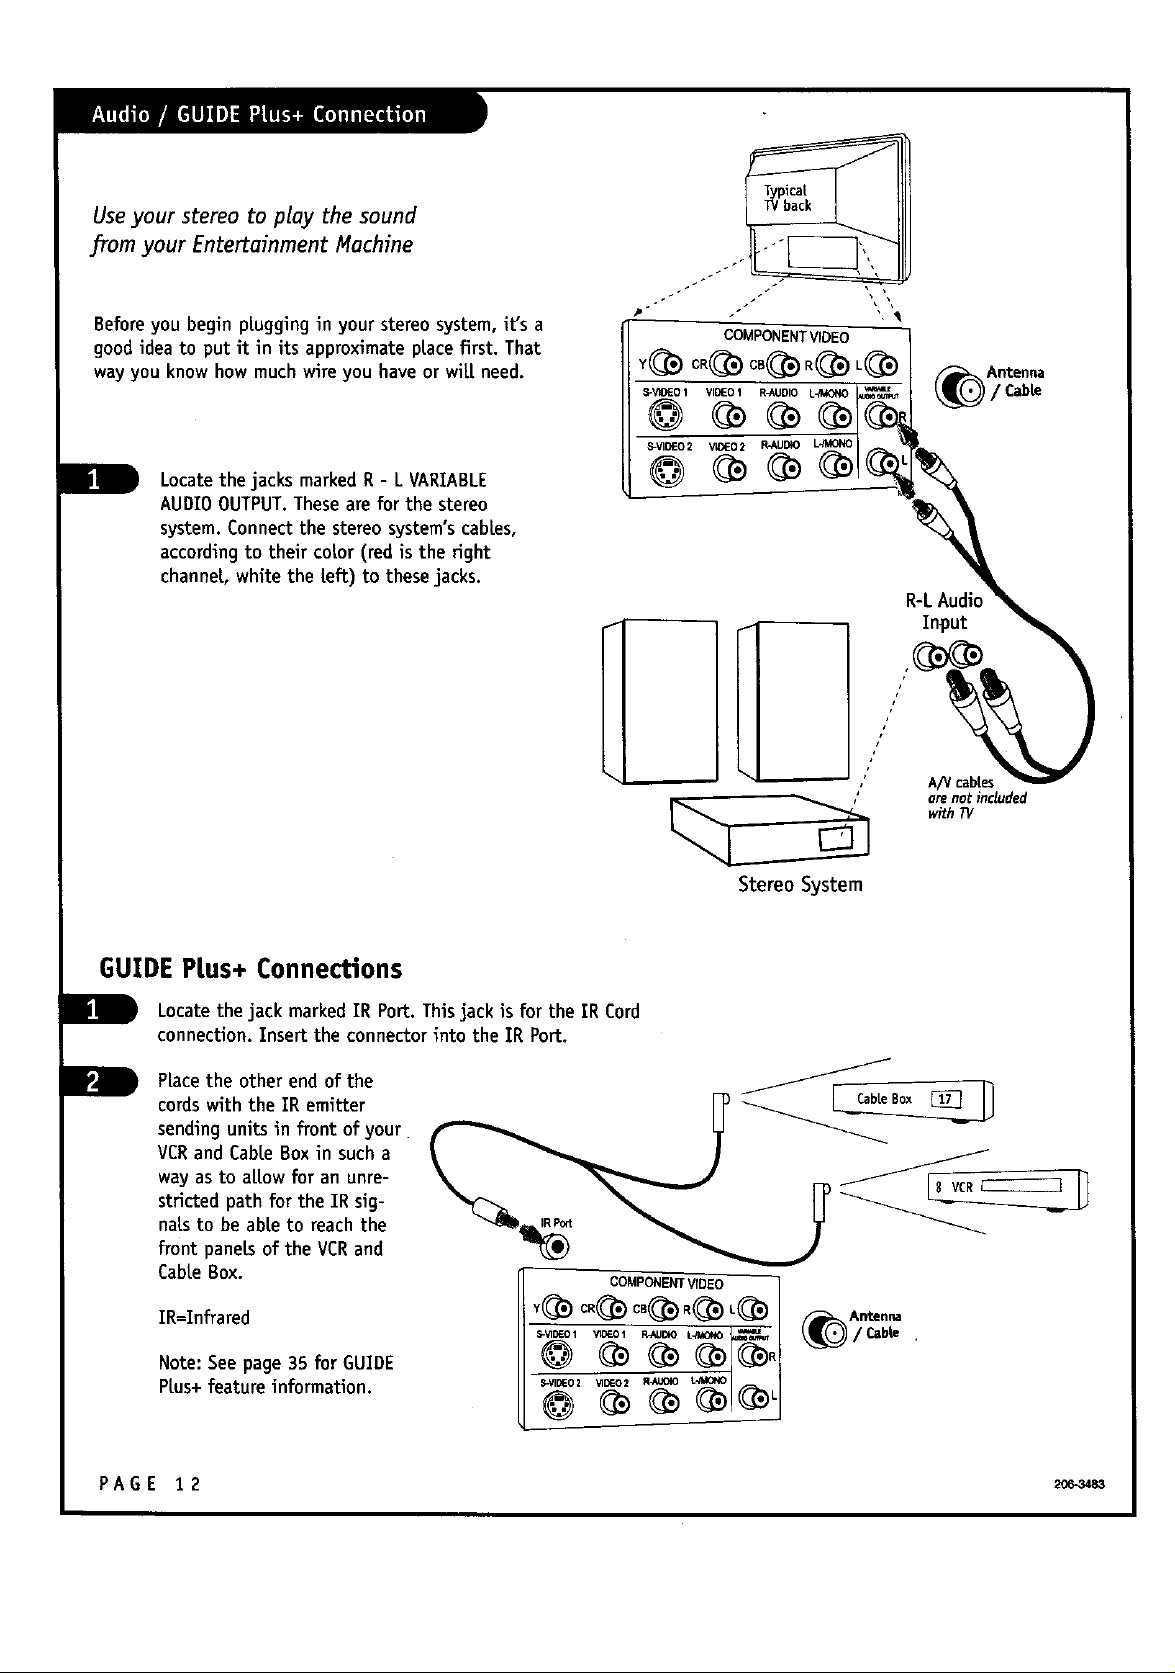
Useyourstereotoplaythesound
from your EntertainmentMachine
Beforeyou beginplugginginyourstereosystem,it'sa
goodideatoputitinitsapproximateptacefirst.That
way you know how much wireyou haveorwit[need.
LocatethejacksmarkedR -L VARIABLE
AUDIO OUTPUT.Theseareforthestereo
system.Connectthestereosystem'scables,
accordingtotheircolor(redisthefight
channel.,whitethe!eft)tothesejacks.
COMPONENTVIDEO
S-V_EO 1 VIDEO1 R-NJDIO L_,_3HO
S-VI_EO2 VIDEO2 R-AUDIO L41_ONO
StereoSystem
R-LAudio
Input
A/V cabtes
orenot included
with 1!/
AntenBa
/ CaMe
GUIDE Ptus+ Connections
Locate the jack markedIR Port. Thisjack is for the IR Cord
connection.Insert the connectorinto the IR Port.
Placetheotherend ofthe
cordswiththeIRemitter
sendingunitsinfrontofyour
VCRand Cabl.eBoxin sucha
wayasto a[towfor an unre-
strictedpath for the TRsig-
naLsto be abl.eto reachthe
front panelsof the VCRand
CabteBox.
IR=Infrared
Note:Seepage35 forGUIDE
Ptus+featureinformation.
PAGE 12
COMPONENTVIDEO
Antenna
S-VIE_O2 _1[_O2 R_UOIO
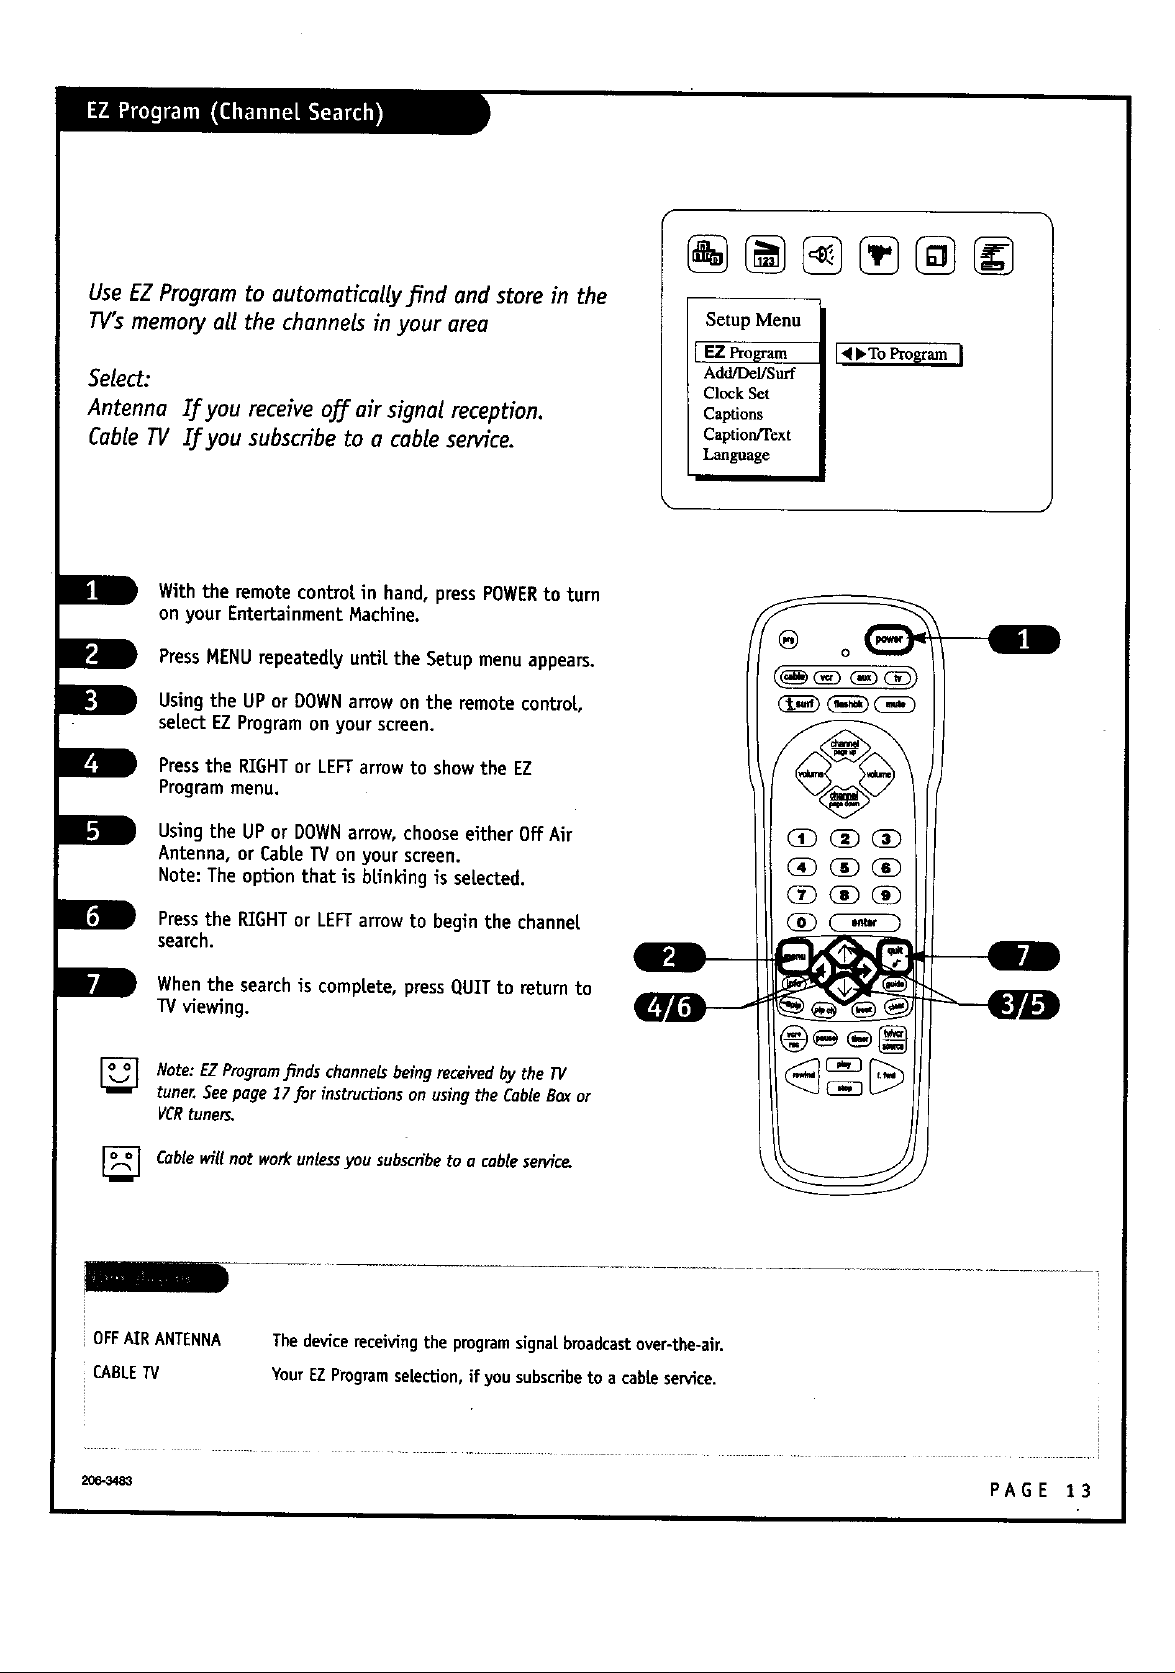
Use EZ Program to automaffcally fi'nd and store in the
11/'smemory all the channels in your area
Select:
Antenna If you receive 037 air signal reception.
Cable 11/ If you subscribe to a cable service.
With the remotecontrol in hand, pressPOWERto turn
on your EntertainmentMachine.
PressHENUrepeatedlyunfitthe Setupmenuappears.
Usingthe UP or DOWNarrowon the remotecontroL,
selectEZProgramon your screen.
Pressthe RIGHTor LEFTarrow to showthe EZ
Programmenu.
Usingthe UP or DOWNarrow,chooseeither Off Air
Antenna,or CabLeTVon your screen.
Note:Theoption that is bunking is selected.
Setup Menu
I F-ZProgram I<_'T°Pr°_ am I
Add/Del/Surf
Clock Set
Captions
Caption/Text
Language
@
0
Pressthe RIGHTor LEFTarrowto beginthe channel
search.
Whenthe search is comptete,pressQUIT to return to
W viewing.
Note:EZProgmmJ_ndschanneb being receivedby the 11/
tuner. Seepage 17for instructionson using the CableBoxor
VCRtuners.
Cable wiUnot workunlessyou subscribeto a cable service
[]
OFFAIRANTENNA
CABLETV
Thedevice receivingthe programsignalbroadcastover-the-air.
YourEZProgramselection,if you subscribeto a cableservice.
PAGE 13
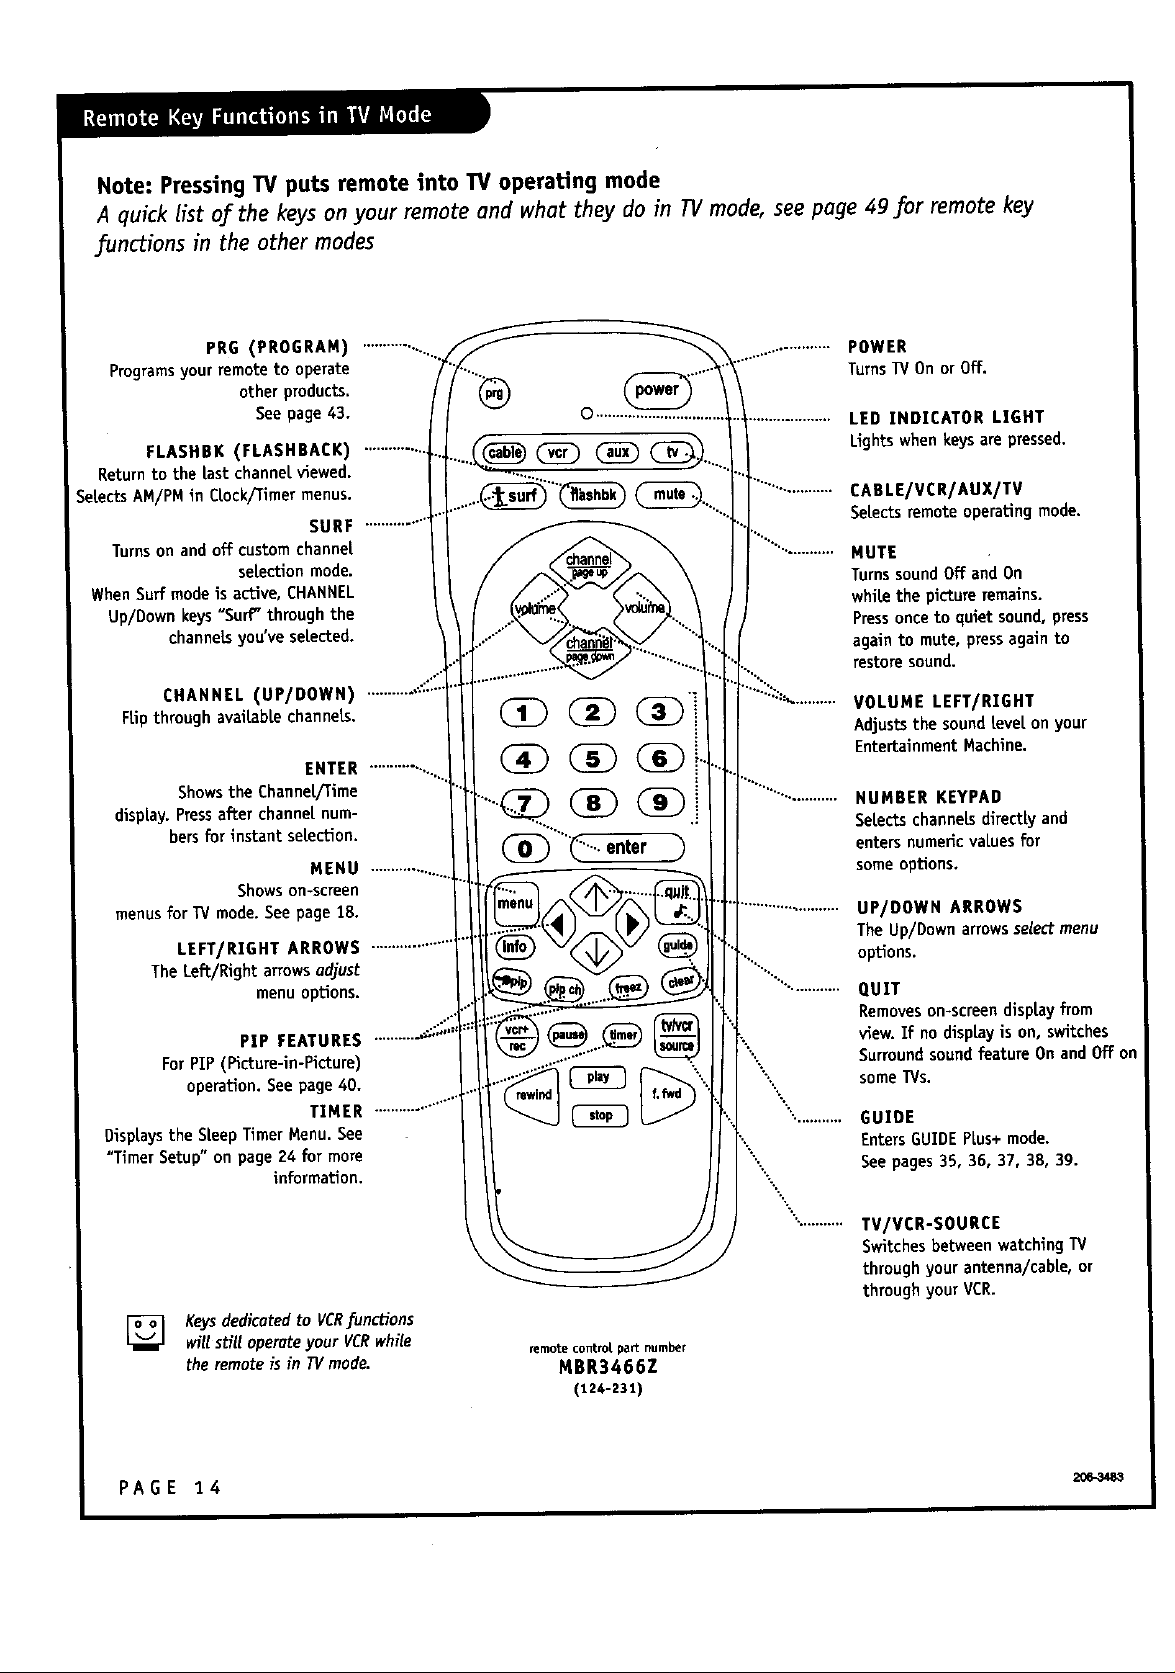
Note: Pressing TV puts remote into W operating mode
A quick list of the keyson your remote and what they do in TVmode, see page 49 for remote key
/unctions in the other modes
PRG (PROGRAM)
Programsyour remoteto operate
other products.
See page 43.
FLASHBK (FLASHBACK)
Return to the Lastchannelviewed.
SeLectsAM/PMin Clock/Timermenus.
SURF
Turnson and off customchannel
selection mode.
WhenSurf modeis active, CHANNEL
Up/Down keys "Surf" through the
channelsyou've selected.
CHANNEL (UP/DOWN)
FLipthrough avaiLabLechannels.
ENTER
Shows the Channel/Time
dlsp[ay. Press after channel num-
bers for instant selection.
MENU
Showson-screen
menusfor TVmode. Seepage 18.
LEFT/RIGHT ARROWS
The Left/Right arrows adjust
menuopUons.
PIP FEATURES
ForPIP (F_cture-in-Picture)
operation.Seepage40.
TIMER
DispLaysthe SleepTimerMenu. See
"Timer Setup" on page24 for more
informa_on.
enter
........................ POWER
TurnsW Onor Off.
................... LED INDICATOR L]GHT
Lights when keys are pressed.
CABLE/VCR/AUX/TV
SeLectsremoteoperatingmode.
MUTE
TurnssoundOff and On
whitethe picture remains.
Pressonceto quiet sound, press
again to mute,pressagain to
restore sound.
i:::.::::_...........
''"'*-..... ..........
VOLUME LEFT/RIGHT
Adjusts the sound [eve[ on your
Entertainment Machine.
NUMBER KEYPAD
Se_ctschannels di_ and
ente_ nume_cvaLuesfor
someopUons.
UP/DOWN ARROWS
The Up/Down arrows select menu
options.
QUIT
Removeson-screendisptayfrom
view.If no displayis on, switches
Surroundsoundfeature On andOff on
someTVs.
GUIDE
EntersGUIDEPLus+mode.
See pages35, 36, 37, 38, 39.
Keysdedicatedto VCRJ:unctions
wit[still operateyour VCRwhile
the remoteis in TVmode.
PAGE 14
TV/VCR-SOURCE
SwitchesbetweenwatchingTV
through yourantenna/cabLe,or
through your VCR.
remote control pa_cnumber
MBR3466Z
(124-231)
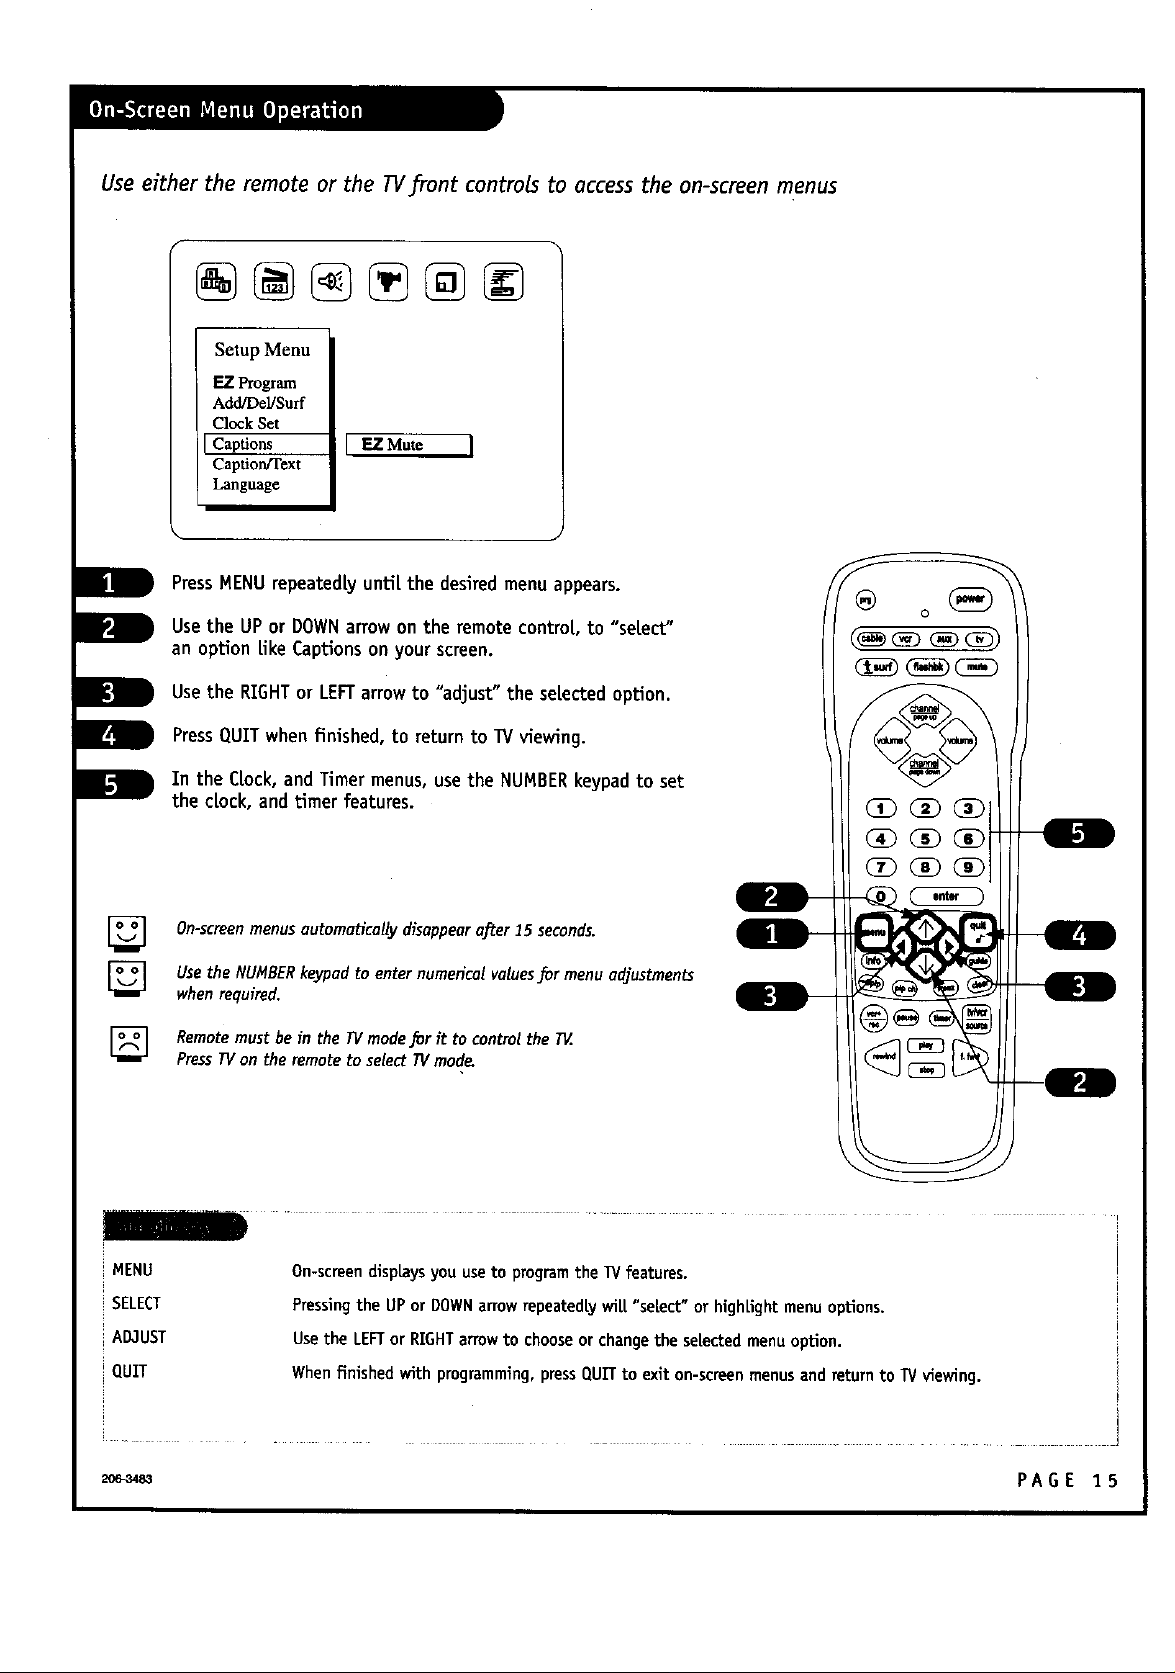
Use either the remote or the TVfront controls to access the on-screenmenus
Setup Menu
EZ f_o_n
Add/Del/Surf
Clock Set
Captions [ EZ Mute I
Caption/Text
Language
PressMENUrepeatedty unti[ the desiredmenuappears.
Usethe UPor DOWNarrowon the remote control to "select"
an option like Captionson your screen.
D Usethe RIGHTor LEFTarrowto "adjust" the selectedoption.
D PressQUITwhen finished,to return to W viewing.
D In the Crock,and Timer menus,usethe NUMBERkeypad to set
[] On-screenmenus automaticallydisappear after 15 seconds,
the dock, and timer features.
Usethe NUMBERkeypadto enter numerical valuesfor menu adjustments
whenrequited.
[] Remotemust be in the TVmodefor it to control the TV.
SELECT
PressTVon the remoteto select TVmod_
HENU
ADJUST Usethe LEFTor RIGHTarrowto chooseor changethe selectedmenuoption.
QUIT
On-screendispLaysyou use to program the IV features.
Pressingthe UP or DOWNaffow repeatedlywi[["select" or highLightmenuoptions.
Whenfinishedwith programming,pressQUUto exit on-screenmenusandreturnto TVviewing.
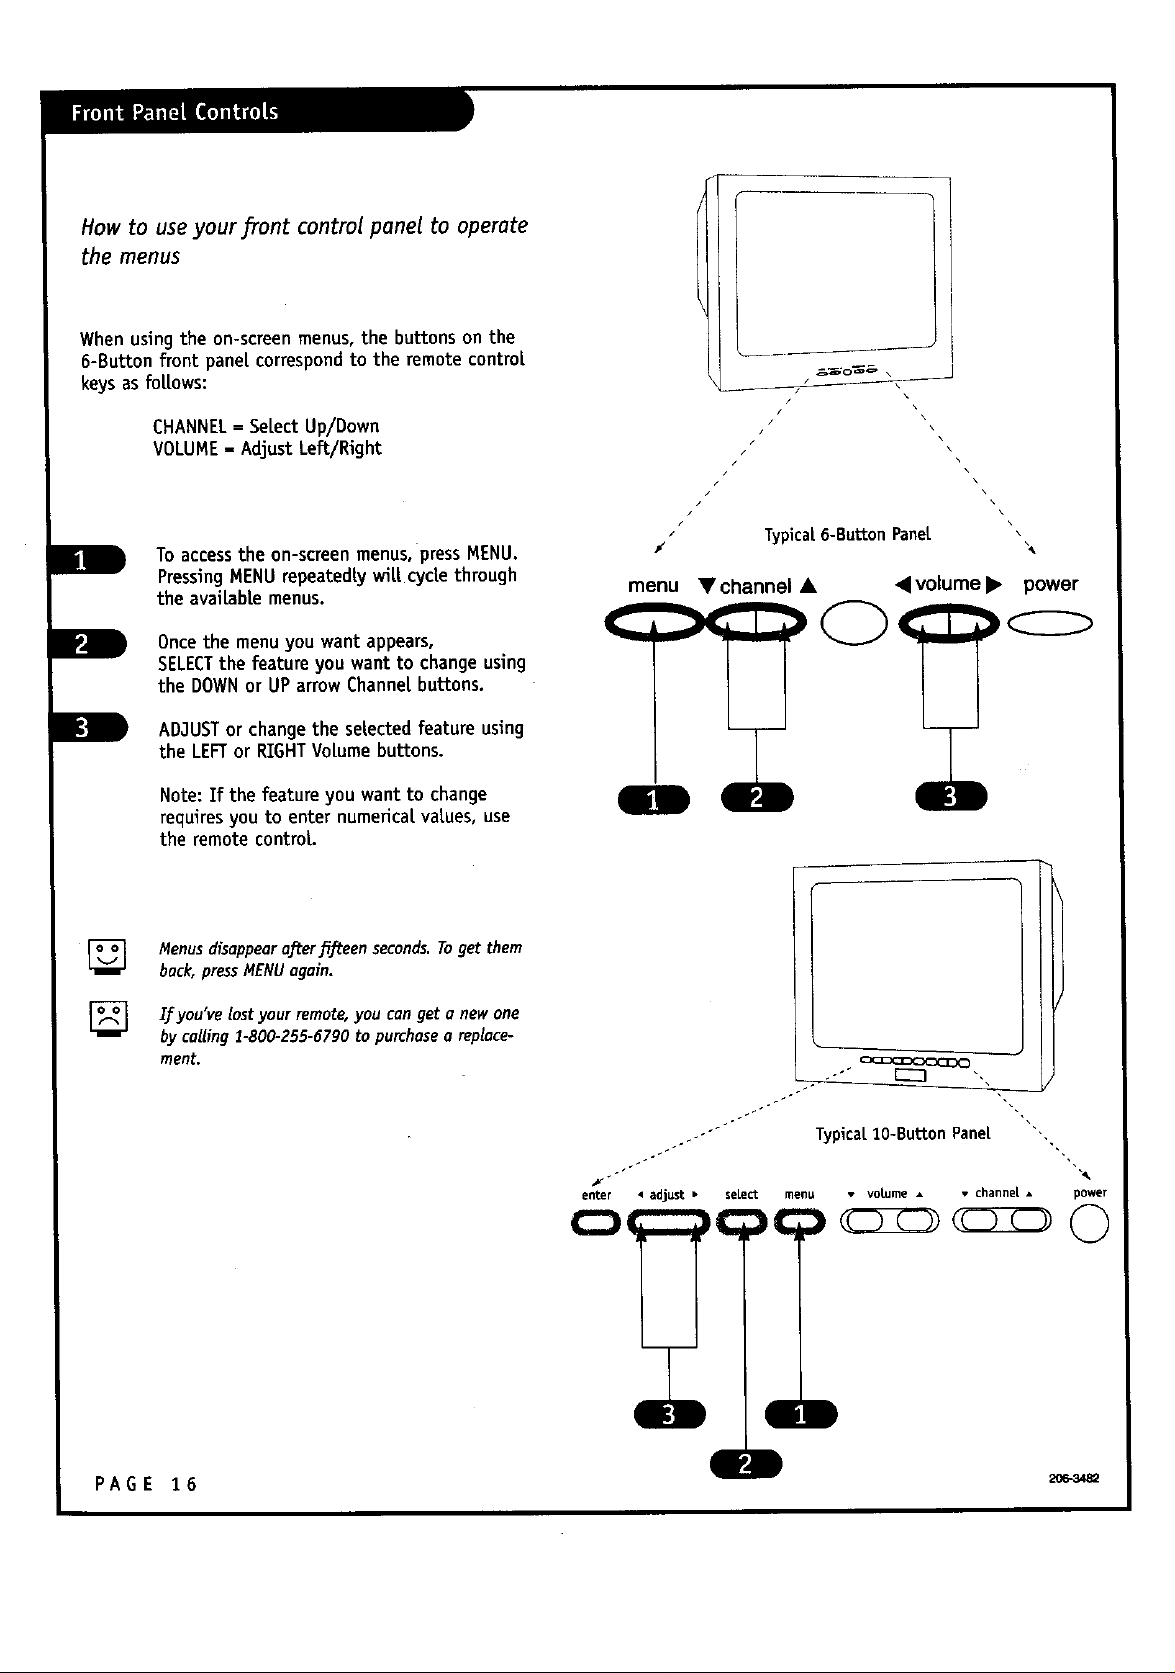
How to useyour _ront control panel to operate
the menus
Whenusing the on-screenmenus,the buttonson the
6-Button front pane[ correspondto the remote control
keysas fo[[ows:
CHANNEl.= Select Up/Down
VOLUME- AdjustLeft/Right
To accessthe on-screenmenus,pressMENU.
PressingHENUrepeatedlywit[ cycle through
the avaitabte menus.
Oncethe menuyou want appears,
SELECTthe feature you want to changeusing
the DOWNor UP arrowChannel buttons.
L
AD3USTor changethe se[ected feature using
the LEFTor RIGHTVotume buttons.
Note: If the feature you wantto change
requiresyou to enter numerfca[ values, use
the remote control..
/
/
/
/
/
/
//
_ Typical6-ButtonPanet
menu
• channel • • volume • power
I
L
\
\
Menusdisappearaflerfifteen seconds.Toget them
back, pressMENUagain.
If you'velost yourremote,you canget o new one
by calling 1-800-255-6790 to purchasea replace-
ment.
PAGE 16
o"" Typical lO-Button Pane[ ",
J
enter • adjust • se[ect menu • volume • • channel • power
fil!
Basicoperatinginformationand usingyour EntertainmentMachinewithotherequipment
Turnonthe TVand other equipment.
Sel,ectyour picture and sound source. Seeinformation ontunersand picture sources bel,ow.
Adjustcontrolsfor picture(Video) and sound(Audio). Seeshortdescriptionsof the on-screenmenus/displ,ays
beginningonpage 18 and 19; usethese to personal,izethe features of your EntertainmentMachine.
There are a number of waysyou canchooseto integrate your EntertainmentMachinewith the restofyour audio/video
equipment. ChanneLscan be changedusingthe tel,evision, the VCR,orthe cablebox, with advantagesto each.
USING THE TELEVISION AS THE TUNER preservesal,l,your channel.[abels(not avail,abl,eon somemodeLs).It also
reducesthe number of keysonthe remotecontrol,youneedto wonyabout.(Onedevice,oneremoteto l,earn.)
USING THE VCR AS THE TUNER hasthe advantage of simpl,ifying the recording process. If the VCRis tunedto chan-
nel,seven,then the VCRwil,l,recordchannel,seven.
USING THE CABLE BOX (ifyou haveone)tochangethestationssometimeshasan advantage,too,especial,l,yifyour
cabl,eproviderrequiresyouto usetheircabl.eboxto descrambl,etheirstations.
The source key (TV/VCRSource) on the remote,switchesbetweenVideoinput and Antenna/Cabl,einput. The
Channel,/Timedisplaywil,l,read"Video" in pl,aceof a channel,number if A/V inputs aresel,ectedasthe picturesource.
Antenna/Cabl,eInput: This setting a!U,owsyou to changecableor antenna channelsandto view videocassettes on chan-
nel 3 (or 4) in mono sound.
VideoInput: This settingal,l,owsstereo pl,aybackof videocassettes. Thetel,evisioncannotchangechannelsin the Video
mode,butthe VCRcan.
[] To view the current input source,press ENTER,onyour remote,The£honne_/Timedisplayshouldappearin the upper fight-hand
comerofthescreen.IfthedisplayreadsI/ideo,"thenthepictureandsoundsourceisconnectedtoonesetoftheAudio/Video
inputjacks.Ifthedisplayreadsa channelnumber,thenthepictureandsoundsourceistheAntenna/Cablejack.
TUNER Thete|evision, VCR,or cable box that you chooseto changechannelswith.
SOURCE Connection on the 13fs backjack connectionpanel,providingpictureand soundto the TV.
PAGE 17
 Loading...