

Page 1

Installation and Operating Guide
Machine Number
| F-185 (Main Unit : FFH-185A, Speakers : FE-185E) |
MICRO AUDIO COMPONENT
Page 2
2
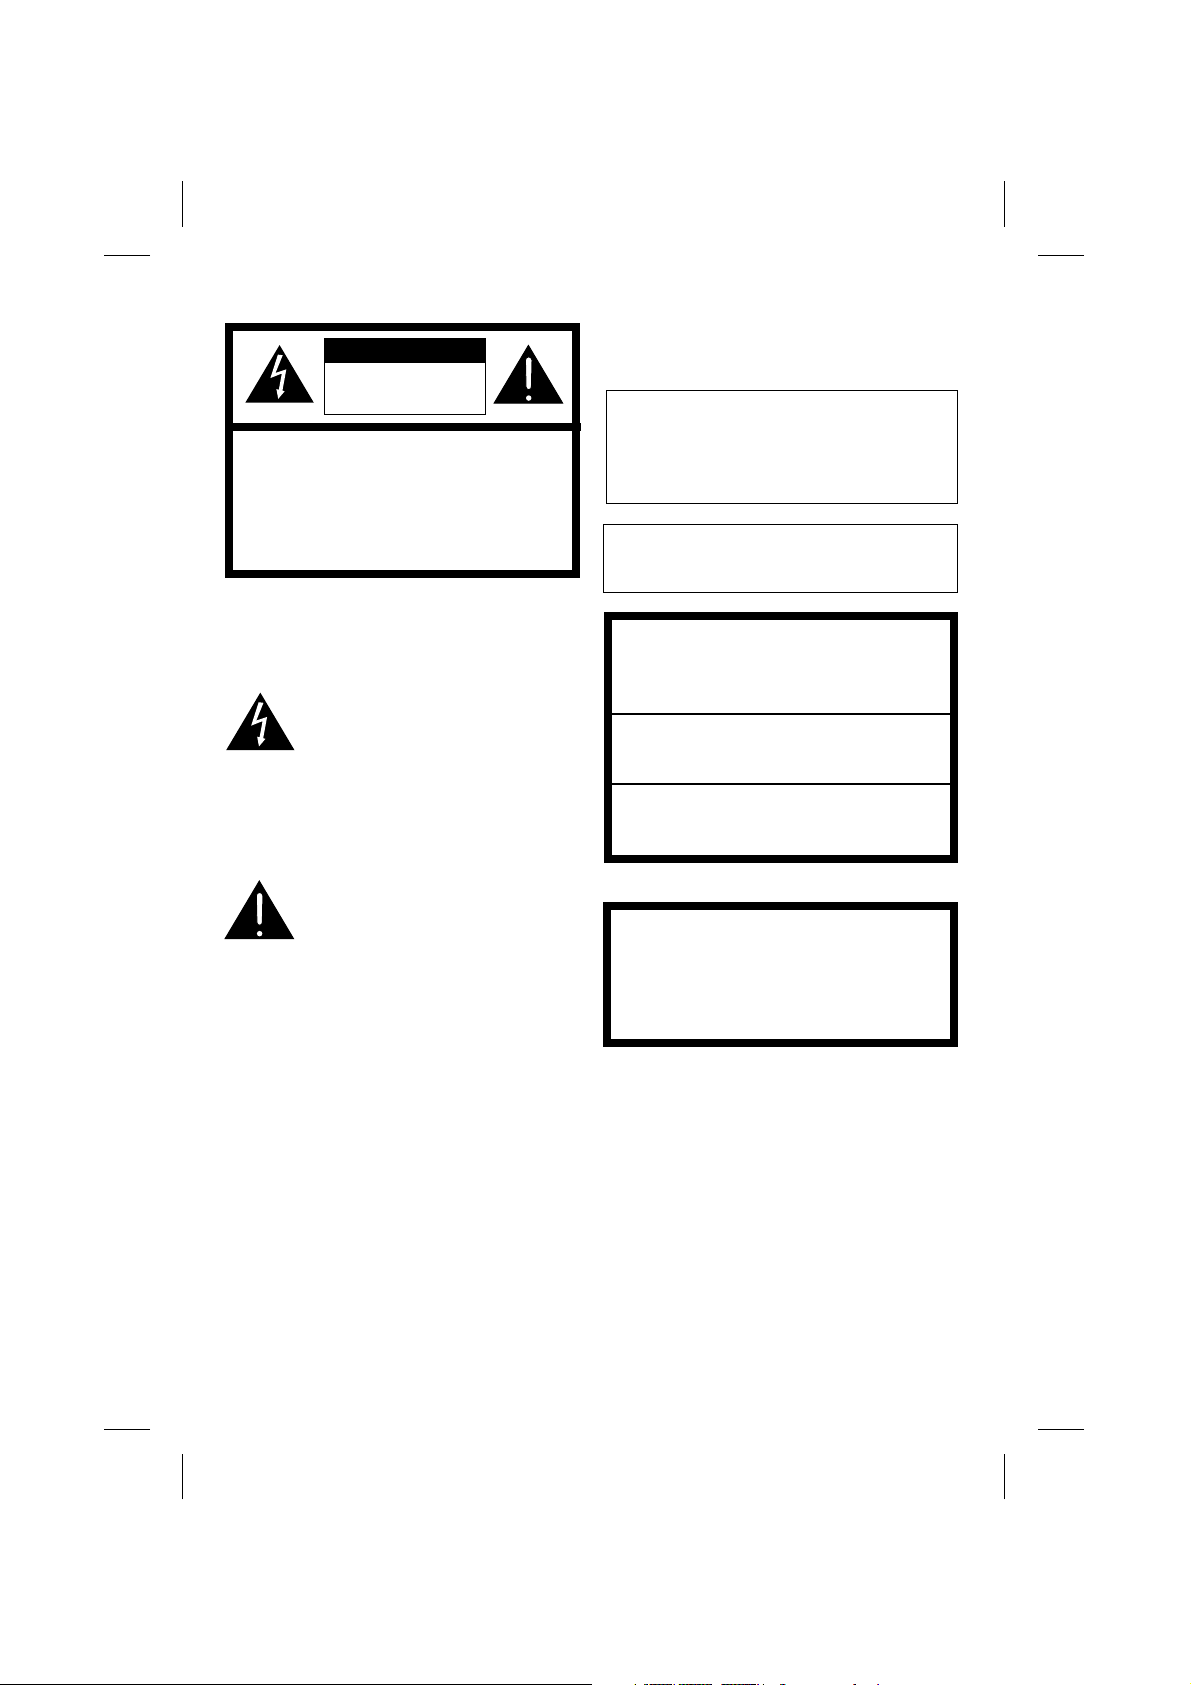
Explanation Graphical Symbols:
The lightning flash with arrowhead symbol, within an equilateral triangle is intended to alert the
user to the presence of uninsulated dangerous voltage within the
product’s enclosure that may be
of sufficient magnitude to constitute a risk of electric shock to
persons.
The exclamation point within an
equilateral triangle is intended to
alert the user to the presence of
important operating and maintenance(servicing) instructions in
the literature accompanying the
appliance.
WARNING
TO REDUCE THE RISK OF FIRE OF
ELECTRIC SHOCK, DO NOT EXPOSE
THIS APPLIANCE TO RAIN OR MOISTURE.
To avoid electrical shock, do not open the
cabinet, Refer servicing to qualified personnel only.
The apparatus shall not be exposed to
dripping or splashing and that no
objects filled with liquids, such as
vases, shall be placed on the apparatus.
Warning:
Do not install this equipment in a confined
space such a book case or similar unit.
This label is located on the interior.
This Compact Disc player is classified as a
CLASS 1 LASER product.
The CLASS 1 LASER PRODUCT label is
located on the exterior.
CAUTION
Use of controls or adjustments or
performance of procedures other than
those specified herein may result in
hazardous radiation exposure.
Laser component in this product is capable of emitting radiation exceeding the
limit for Class 1.
CAUTION:INVISIBLE LASER RADIATION WHEN OPEN AND INTERLOCKS
DEFEATED. AVOID EXPOSURE TO
BEAM.
VARNING:OSYNLIG
LASERSTRÅLNING NÄR DENNA DEL
ÄR ÖPPNAD STRÅLEN ÄR FARLIG.
Attention:Quand l'appareil est ouvert, ne
pas s'exposer aux radiations invisibles du
faisceau laser.
CLASS 1 LASER PRODUCT
KLASSE 1 LASER PRODUKT
LUOKAN 1 LASER LAITE
KLASS 1 LASER APPARAT
CLASSE 1 PRODUIT LASER
CAUTION
CAUTION:TO REDUCE THE RISK OF
ELECTRIC SHOCK DO NOT REMOVE
COVER(OR BACK) NO USER SERVICEABLE PARTS INSIDE. REFER
SERVICING TO QUALIFIED SERVICE
PERSONNEL.
RISK OF ELECTRIC
SHOCK DO NOT OPEN
Page 3

3
IMPORTANT SAFETY INSTRUCTIONS
1. Read these instructions.
-
All these safety and operating instructions
should be read before the product is
operated.
2. Keep these instructions.
- The safety, operating and use
Instructions should be retained for
future reference.
3. Heed all Warnings.
- All warnings of the product and in the
operating instructions should be
adhered to.
4. Follow all instructions.
- All operating and use instructions
should be followed.
5. Do not use this apparatus near water.
- For example: near a bath tub, wash
bowl, kitchen sink, laundry tub, in a
wet basement; or near a swimming
pool; and like.
6. Clean only with dry cloth.
- Unplug this product from the wall
outlet before cleaning. Do not use
liquid cleanera.
7. Do not block any ventilation openings.
Install in accordance with the
manufacturer’s Instructions.
- Slots and openings in the cabinet are
provided for ventilation and to ensure
reliable operation of he product and to
protect it from over- heating. The
openings should never be blocked by
placing the product on a bed, sofa, rug
or other similar surgace. This product
should not be placed in a built-in
installation such as a bookcase or
rack unless proper ventilation is
provided or the manufacturer’s
instructions have been adhered to.
8. Do not install near any heat sources
such as radiators, heat registers’
stoves, or other apparatus (including
amplifiers) that produce heat.
9. Do not defeat the safety purpose of the
polarized or grounding-type plug. A
polarized plug has two blades with one
wider than the other. A grounding type
plug has two blades and a third
prounding prong. The wide blade or the
third prong are provided for your safety.
If the provided plug does not fit into
your outlet, consult an electrician for
replacement of the obsolete outlet.
10. Protect the power cord from belong
walked on or pinched particularly at
plugs, convenience receptacles, and the
point where they exit from the
apparatus.
11. Only use attachments/ accessories
specified by the manufacturer.
12. Use only with the cart, stand, tripod,
bracket, or table specified by the
manufacturer, or sold with apparatus.
When a cart is used, use caution when
moving the cart/apparatus combination
to avoid injury from tip-over.
13. Unplug this apparatus during lighting
storms or when unused for long periods
of time.
14. Refer all servicing to qualified service
personnel. Servicing is required when
the apparatus has been damaged in
any way, such as powersupply cord or
plug is damaged, liquid has been spilled
or objects have fallen into the apparatus,
the apparatus has been exposed to rain
or moisture, does not operate
normally, or has been dropped.
Page 4
4
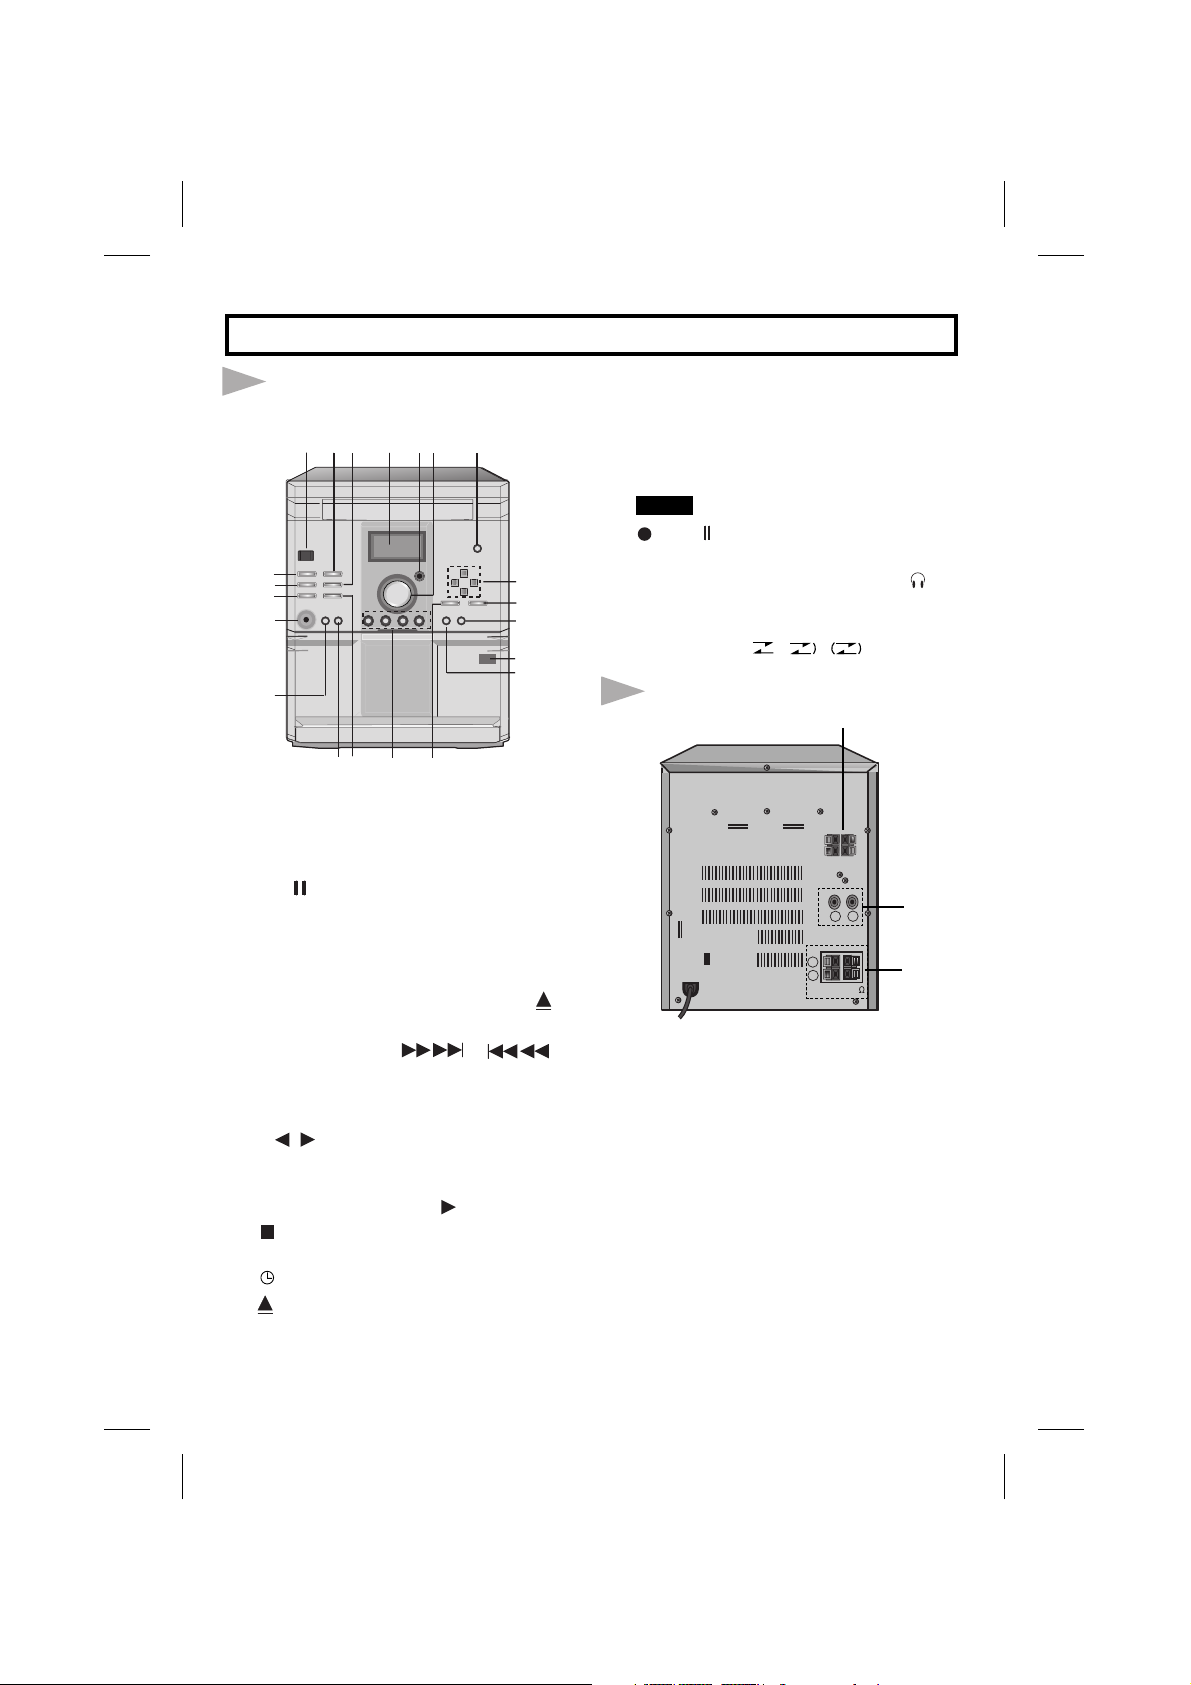
CONTROL LOCATIONS
Front view
1. STANDBY/ON BUTTON
2. •CD /•COUNTER BUTTON
3. MODE/RIF BUTTON
4. DISPLAY
5. REMOTE SENSOR
6. VOLUME
+/-
7. CD DOOR EJECT (OPEN/CLOSE )
BUTTON
8. • TUNING (+)/(-)(
/ )
BUTTONS (RADIO)
• SKIP/SEARCH BUTTONS(CD)
• REWIND/FAST BUTTONS (TAPE)
• /=TAPE PLAY DIRECTION
BUTTONS
• PRESET (+)/(-) BUTTONS (RADIO)
• CD PLAY BUTTON ( )
9. STOP/CLEAR BUTTON (CD),
STOP BUTTON (TAPE)
10. TIMER BUTTON
11. PUSH EJECT POSITION
12. CLOCK BUTTON
13. SET BUTTON
14. FUNCTION SELECTION BUTTON
(TUNER/BAND, CD, TAPE, AUX)
15. PROG./MEMO. BUTTON
16. BUTTON
17. REC/ :RECORD/RECORD PAUSE
BUTTON (TAPE)
18. HEADPHONE SOCKET (3.5mm)( )
19. REPEAT BUTTON
20. CD SYNC. BUTTON
21. PLAY MODE(
,
,
) BUTTON
Back View
1.ANTENNA (AERIAL AM) CONNECTION TERMINALS
2.AUXILIARY INPUT SOCKETS
Connect the audio output RCA (phono)
type left/right plugs from your stereo TV
or VCR or another Tape deck to the
AUX sockets on the back of the unit.
3. SPEAKER CONNECTION
TERMINALS
Front View
Back View
3
2
1
MDSS
56
13
7
8
9
10
11
12
34
12
21
20
19
18
17
15
16
14
A
U
R
X
L
R
SPEAKERS(6 )
L
Page 5
5
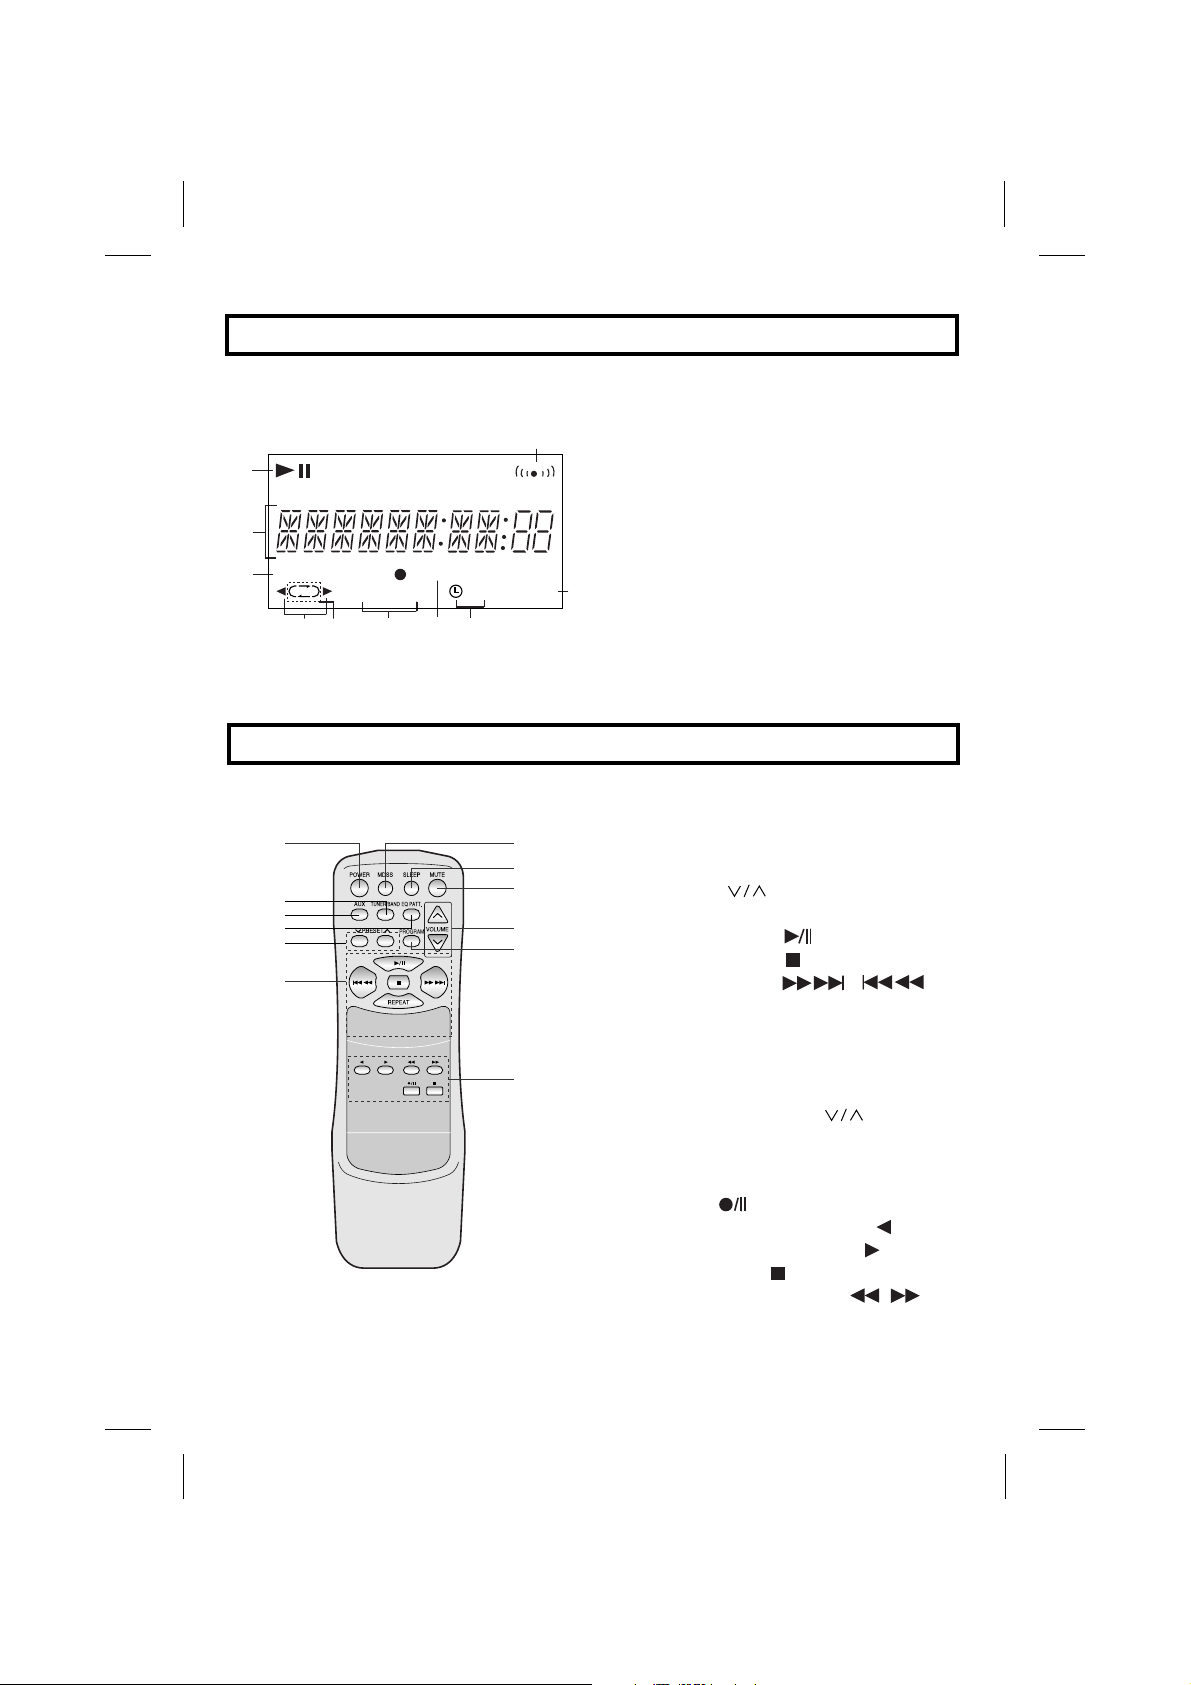
DISPLAY
REMOTE CONTROL
1.PLAY/PAUSE indicator
2.FUNCTION, VOLUME LEVEL,CLOCK,
FREQUENCY, TAPE COUNTER, CD
PLAYING TIME, MDSS, EQ PATTERN
display
3.PROGRAM indicator
4.PLAY DIRECTION indicator
5.PLAY MODE indicator
6.CD REPEAT indicator
7.RECORD indicator
8.TIMER indicator
9.SLEEP indicator
10. FM STEREO indicator
1.POWER button
2.TUNER/BAND button
3.AUX button
4.EQ PATTERN button
5.PRESET (
)
button
6.CD FUNCTION buttons
•PLAY/ PAUSE ( ) button
•STOP/ CLEAR ( ) button
•SKIP / SEARCH (
/
)
button
•REPEAT button
7.MDSS button
8.SLEEP button
9.MUTE button
10. VOLUME CONTROL ( ) button
11. PROGRAM button
12. TAPE FUNCTION buttons
• RECORD / RECORD PAUSE
button ( )
• BACKWARD PLAY button ( )
• FORWARD PLAY button ( )
• STOP button ( )
• REWIND /FAST button (
/
)
1
2
3
45 6
11
10
987
1
2
3
RPT
4 5 6
RECPROG.
1 ALL
REC
87
10
STEREO
kHz
MHz
SLEEP
9
1
7
8
2
3
4
5
9
10
11
6
12
Page 6

6
REMOTE CONTROL
Approx. 7m
Range
The remote control device is designed for
the range shown in the illustration above.
NOTE:
Strong light or obstacles between the
remote control device and the stereo
system may interfere with the functioning
of the remote control.
Notes on Batteries
•Your remote control comes with batteries.
Use two “AAA (UM-4, IEC R03)” type
high quality batteries.
• When the remote control fails to operate
accurately at maximum distance from the
unit, replace the worn out batteries with
new ones.
• Install two “AAA” type batteries,
observing correct battery polarity (
and ).
•Do not use different types of batteries
together, or an old one with a new one.
• When you are not going to use the unit
for a long time, remove the batteries to
prevent possible electrolyte leakage.
Installation Batteries
P
O
W
E
R
M
D
S
S
S
L
E
A
E
U
P
X
T
U
M
N
U
E
T
R
E
/
B
A
N
D
E
Q
P
A
P
T
R
T
E
.
S
E
T
P
R
O
G
R
A
M
V
O
L
U
M
E
E
T
U
M
P
E
E
L
S
S
S
D
M
.
T
T
R
A
P
E
E
Q
W
E
M
O
D
U
P
L
N
A
O
B
/
V
R
E
M
N
A
U
R
T
G
O
X
R
U
P
A
T
E
S
E
R
P
Page 7

7
CONNECTING THE SPEAKER
1. Press the “CLOCK” button. (If the clock
is already set, press and hold the
“CLOCK” button for more than 2
seconds.) - The hours begin to blink.
2. Select a 24 hour cycle or 12 hour cycle
by using the “PRESET (+)/(-)” buttons.
3. Press the “SET” button to confirm the
selected hour cycle.
4. Use the “PRESET (+)/(-)” buttons to set
the correct hours.
5. Press the “SET” button.
6. Use the “PRESET (+)/(-)” buttons to set
the correct minutes.
7. Press the “SET” and the correct time is
shown on the display.
8. Press the “CLOCK” button at any time
to display the time for about 3 seconds.
1.Insert the red wire of the right/left hand
speaker into the red terminal marked(+)
at the back of the unit.
2.Insert the black wire into the black terminal marked(-).
NOTE:
This speaker system is designed for
magnetic shielding, but the video image of
a nearby television may be distorted.
In this case, move the affected television
above 50 cm from the speaker system.
(12HR) or
(24HR)
SETTING THE CLOCK
ANTENNA CONNECTIONS
BLACK WIRE
RIGHT SPEAKER
RED WIRE
RED WIRE
L
BLACK WIRE
R
LEFT SPEAKER
AM loop antenna (aerial)
(Supplied)
FM external
antenna (aerial)
(not supplied)
FM indoor antenna (aerial)
Position it for
the best reception
300 ohms
coaxial
cable
AM
FM
Page 8

8
AUDIO ADJUSTMENT
Volume Adjustment
•Turn “VOLUME” clockwise to increase the
sound level, or counterclockwise to
decrease it.
• Press “VOLUME ”button to increase
the sound level, or press “VOLUME
”
button to decrease it on the remote
control.
To activate stereo sound
You can choose between 4 fixed sound
impressions:
select a desired sound mode by using
the “EQ PATT.” button on the remote
control.
FLAT : linear frequency response
ROCK : more bass, more treble
POP : less bass, less treble
CLASSIC : for orchestral music
Headphone Socket.
Connect a stereo headphone plug
(3.5mm) into the headphone socket.
The speakers are automatically disconnected when you plug in the headphones
(not supplied).
Press this button to mute your unit.
You can mute your unit in order, for example,
to answer the telephone.
the “MUTE” indicator blinks on the display.
Press the “MDSS” button to reinforce
treble(Hi-Tone), bass(UBB: Ultra Bass
Booster) and surround effect.
The “MDSS ON” or “MDSS OFF” indicator
lights up.
To cancel it press the “MDSS” button again.
Sound Quality Adjustment
MUTE button (on remote control)
MDSS(Multi Dynamic Sound System)
1.Connect an auxiliary device i.e. TV or
VCR, via the rear mounted AUX phono
sockets.
2.Press the “AUX” function button.
NOTE:
You can also record from the auxiliary input
source, see Cassette Deck Function
Section.
AUXILIARY FUNCTION
Page 9

9
TUNER FUNCTIONS
To listen to the Radio
1.Press the “TUNER/BAND” button
repeatedly to choose either AM or FM
radio.
2.To tune to the desired station with
automatic tuning, keep “TUNING (+)/(-) ,
(
or
)” button
depressed for more than 1 second.
To tune to the desired station with manual tuning, press the “TUNING (+)/(-) ,
(
or
)” button within 1
second repeatedly.
3.When listening to FM stations press the
“MODE/RIF” button for FM stereo
reception. The “STEREO” will appear in
the display.When a weak FM station is
being received-press the “MODE/RIF”
button so that ”STEREO” is cleared
from the display.
NOTE: Use “MODE/RIF” (Radio
Interference Filter) button to switch to
mono reception if stereo reception is distorted by noise.
When recording the MW(AM) or LW broadcast, beat noises occur. If it does, press
this button once.
Presetting the stations
1.To clear any programm previously stored
in any memory.
(1) Press the “PROG./MEMO.” button for
2 seconds in TUNER mode so that
“RESET” flashes in the display.
(2) Press the “ STOP/CLEAR” button
while “RESET” is flashing in the
display.
2. To memorize the stations in order
(1) Press the “TUNER/BAND” button to
select a desired wave band.
(2) Press the “TUNING (+)/(-) (
or
)” button to select a
desired station.
(3) Press the “PROG./MEMO.” button on
the unit and preset number flashes.
(4) Press the “PROG./MEMO.” button
again on the unit while preset number
is flashing.
(5) Repeat step (2) to (4) to memorized
up to 30 stations.
3.To memorize in selection channel
number.
(1)Select a desired station.
(2)Press the “PROG./MEMO.” button on
the unit.
(3)Select a desired channel number by
pressing the “PRESET (+)/(-) or
PRESET ” button, while the
preset number flashes.
(4)Press the “PROG./MEMO” button on
the unit ,while the preset number
flashes.
4.To memorize and add channel number.
(1)Select a desired station.
(2)Press the “PROG./MEMO.” button on
the unit.
(3)Press the “PROG./MEMO.” button
again on the unit while the channel
number is flashing.
5.To recall presets
Press and hold the “PRESET (+)/(-) or
PRESET ” button until the desired
preset number appears or press it
repeatedly.
Page 10

10
CD FUNCTIONS
To play a CD
1. Press the “CD” button.
“CD” appears on the display.
•If no disc is entered in the disc drawer, the
“No DISC” indicator is displayed.
2.Load a disc by using the “ EJECT ” button.
3.To start play back
•Press the “PLAY( )” button on the system or
“PLAY/PAUSE ” button on the remote
control.
To pause the play
•Press the “CD /COUNTER” button on the
system or “PLAY/PAUSE ” button on the
remote control.
To resume the play
•Press the “PLAY ( )” button, “CD
/COUNTER” button on the system or
“PLAY/PAUSE )” button on the remote
control.
To stop playback
•Press the “ STOP/CLEAR” button or “ ”
button on the remote control.
To specify a track to play
•Press the “ or ” button
repeatedly during stop or play until your
desired track number appears- Play will start
from that track number.
To play a desired location on CD
•Hold down the or button during play
or pause.
•When the button is held down, there will be
continuous change (of position on the CD).
To repeat play
•Press the “REPEAT” button.
•Once, one track will repeat( RPT 1).
•Two times, all tracks will repeat( RPT ALL).
•Three times, “REPEAT” mode is cancelled.
Programme play (this cannot be set during
playback)
•A maximum of 20 tracks can be programmed.
(1)Press the “PROG./MEMO.”or “PROGRAM”
button in stop status.
(2)Specify a track to play with the
or
button.
(3)Press the “PROG./MEMO.” or “PROGRAM”
button to store this track.
(4)Repeat step (1) to (3).
The programmed tracks will be played repeatedly.
(5) Press the “PLAY( )” button to play the
tracks.
(6) To check a programme sequence.
During programmed play press the “
STOP/CLEAR” button, and then press the
“PROG./MEMO.” or “PROGRAM” button
repeatedly.
(7) To change an existing programme.
a)During stop mode press the “PROG.
/MEMO.” or “PROGRAM” button until the
desired program position appears in the
display.
b)Select a new track using the
or button.
c)Press the “PROG./MEMO.”or “PROGRAM”
button to put the new track in position.
(8)To add a programme
If less than 20 programme positions are in
memory, additional tracks may be added by
following this procedure.
a) During stop mode press the “PROG. /
MEMO.” or “PROGRAM” button until “00”
appears in the track number position on
the display.
While the track number “00” is flashing
press the “PROG./MEMO.” or
“PROGRAM” button again,this is changed
to the CD normal play mode.
b)Select the track to be added by using the
or button.
c)Press the “PROG./MEMO.” or
“PROGRAM” button two times.
d)Repeat step b) to c).
e)After the last track has been entered,
press the “PROG./MEMO.” or
“PROGRAM” button once only.
(9)To erase a programme sequence
•In the stop mode press the “PROG.
/MEMO.” or “PROGRAM” button, and then
press the “ STOP/CLEAR” button.
•It is also erased if the CD drawer is opened.
(10)If you press the “ STOP/CLEAR” button
during programmed play, the “PROGRAM”
indicator goes out in the display and the
programmed playback is cancelled.
At that time, if you wish to resume the
programmed playback press the
“PROG./MEMO.” or “PROGRAM” button
and press the PLAY( ) button.
Page 11

11
CASSETTE DECK FUNCTION
1.Tape play
(1)Press the “TAPE” button.
“TAPE” appears on the display.
(2)Press the “ PUSH EJECT”, position to
open the cassette door.
(3)Insert a recorded cassette with the
exposed tape side down.
(4)Press the “PLAY”or “PLAY”button
to begin tape playback.
(5)To manually change the tape play
directions, press the opposite PLAY
button from the direction the tape is
currently playing.
(6)To stop playback at any time, press the
“ STOP/CLEAR”
button.
2. To select a play mode (reverse mode)
Press the “PLAY MODE(TAPE)” button
during tape function or recording from
another function.
= forward or backward play once
only
= forward and backward play once
only
= forward and backward play for
six times.
3.Tape counter reset function.
During tape stop or play press the “CD
/COUNTER” button.
4.Recording from Radio, CD or auxiliary
source.
NOTE : Use only normal tapes.
(1) Insert a blank tape into deck.
(2) Press the “TUNER/BAND”,“CD”,TAPE”
or “AUX” button. (And press the “CD
/ COUNTER” button to reset the tape
counter)
(3) Select a play mode by pressing the
PLAY MODE (TAPE) button.
•If you want to record forward or backward
only set to .
•If you want to record from forward to
backward set to or .
(4) Select a function that you want to
record and play.
(5) Press the “ REC ” button again.
“ REC” blinks on the display.
(6) Press the “ REC ” button again to
begin recording to the direction of PLAY
( or ) indicator or press the or
button to begin recording to the
selected play direction.
5. CD to tape synchronized recording.
NOTE : Use only normal tapes.
(1) Load a disc.
(2) Insert a blank tape into deck.
(3) Select a play mode by pressing the
PLAY MODE(TAPE) button repeatedly.
In mode you can record forward
() only and in or mode
you can record from forward( ) to
backward ( ).
(4) Press the “CD” button.
‘CD’ appears on the display.
Stop the CD if the CD is playing.
(5) Press the “CD SYNC.” button to start
recording.
The CD synchronized recording
begins and stops automatically at the
end.
When the tape is set to auto reverse
backward( ), the CD will restart the
current track from the beginning.
• If you want to record certain titles only,
programme these before commencing
CD synchronized recording.
• If you want to record from the desired
track, select the desired track with the
“
or
” button before
commencing CD synchronized recording.
Page 12

12
TIMER FUNCTION
With the TIMER function you can have the
radio reception and recording, CD play,
tape play or auxiliary source play and
recording turned on and off at the time
desired.
1.Check the current time.
2.Press the “ TIMER” button to enter the
timer setting mode. (If you want to
correct the previous memorized TIMER,
press and hold the “ TIMER” button
more than 2 seconds.)
The previous memorized timer on time
and the “ ” appears in the display. Each
function : TUNER-CD-TAPE flashes in
the display in turn.
3.Press the “SET” button when the desired
function is flashing.
4.If you select the TUNER or AUX:
“REC” and “PLAY” flash in the display
alternately for about 3 seconds.
Press the “SET” button to confirm the
desired operating mode.
REC: TUNER or AUX recording and play
PLAY: TUNER or AUX play only
•If you have selected the CD or TAPE,
ignore step 4.
5.When you have selected the TUNER;
Select the previous memorized preset
number with the “TUNING (+)/(-)” buttons
and press the “SET” button. The hour
with ON display flashes.
6.Set the hour to switch on by pressing the
“PRESET (+)/(-)” buttons.
7.Press the “SET” button to confirm the
hour to switch on. The minute with “ON”
display flashes.
8.Set the minute to switch on by pressing
the “PRESET (+)/(-)” buttons.
9.Press the “SET” button to confirm the
minute to switch on. The hour with
“OFF” now flashes in the display.
10. Set the hour to switch off by pressing
the “PRESET (+)/(-)” buttons.
11. Press the “SET” button.
12. Set the minute to switch off by pressing
the “PRESET (+)/(-)” buttons.
13. Press the “SET” button.
14. Adjust the volume level by pressing
the “PRESET (+)/(-)” buttons.
15. Press the “SET” button. “ ” appears
and the timer setting has been
completed.
16. Switch the system off.
The selected function is automatically
switched on and off at the time set.
17. To cancel or check the timer.
Each time the “ TIMER” button is
pressed you can select the timer set or
cancel. You can also check the timer
setting status.
To activate or check the timer, press the
“ TIMER” button so that “ ” lights
up in the display.
To cancel the TIMER, press the timer
button so that “ ” in the display
disappears.
Page 13

13
SLEEP FUNCTION
AMP
Output Power(6Ω, 2ch,T.H.D 10%):
20W+20W
Frequency Response: 42~25,000Hz
FM
Tuning Range:
87.5~108 MHz
S/N Ratio(98.1 MHz)
64/55dB(Mono/Stereo)
AM(MW)
Tuning Range:
530-1720kHz
Usable Sensitivity: 55dB
DECK
S/N Ratio: 43dB
Channel Separation: 50dB
CD
Frequency Response: 40~18,000Hz
S/N Ratio: 70dB
T.H.D: 0.2%
Dimensions(WxHxD):180x248x241mm
Weight(net): 4.7 kg
Power Requirements:
Refer to the back panel of the unit.
Speaker System
Impedance: 6Ω
Rated Input Power: 20W
Max Input Power: 40W
Frequency Response: 70~18,000 Hz
Dimensions(net):
160(W)x248(H)x175(D)mm
Weight(net): 2.02 kg
NOTE:
Designs and specifications are subject to
change without notice for improvement.
When the sleep timer is used, the power is
automatically turned off after the specified
time has elapsed.
1.To select the time to turn off:
Press the “SLEEP” button. (remote
control only)In the display. you can see
for about 5 seconds. This
means that the system turns off
automatically after 90 minutes.
Each time the button is pressed the time
interval before it tums off is reduced by
10 minutes. i.e. 80...70... etc.
Select the desired time to turns off.
2.To check the time to turn off:
While the sleep function is active press
the “SLEEP” button briefly. The time
remaining until it turns off is displayed for
about 5 seconds.
NOTE:
If you press the “SLEEP” button while the
sleep time is displayed, the SLEEP time is
reset.
3.To turn off the sleep function:
If you wish to stop the function press the
“SLEEP” button repeatedly until 10
appears, and then press the “SLEEP”
button once again while 10 is displayed.
SPECIFICATION
Page 14

P/NO : 3828R-A040H
 Loading...