

Zenitel Vingtor Stentofon 1008015000, Vingtor Stentofon 1008007000, Vingtor Stentofon 1008000000, Vingtor Stentofon 1008031000, Vingtor Stentofon 1008001000 Configuration Manual

Configuration Manual
SIP Master Stations
TECHNICAL MANUAL
A100K11211

About this Document
Document Scope
This document describes the conguration of the STENTOFON SIP Master
Stations.
Publication Log
Rev. Date Author Status
1.0 19.1.2012 HKL published
1.1 9.6.2017 HKL VS format, SIP server
Related Documentation
For further information, refer to the following documentation:
Doc. no. Documentation
A100K10788 IP Master Station Installation & Conguration
A100K10935 IP Master Station Getting Started
A100K10812 SIP Substation Installation & Conguration

Contents
1 Introduction ..................................................................................................................... 4
1.1 IP Desktop Master Station ........................................................................................4
1.2 IP OR Master Station ................................................................................................5
1.3 IP Flush Master Station .............................................................................................5
1.4 IP Dual Display Station .............................................................................................5
2 SIPConguration ...........................................................................................................6
2.1 Conguration Via Station Keypad .............................................................................6
2.2 SIP Station Web Interface ........................................................................................7
2.3 Station Main Settings ...............................................................................................8
2.4 SIP Settings ..............................................................................................................8
2.5 Audio Settings ......................................................................................................... 11
2.6 Direct Access Key Settings ..................................................................................... 12
2.7 SNMP Settings ........................................................................................................13
2.8 Automatic Conguration using TFTP ....................................................................15
2.9 Advanced Conguration Options ............................................................................16
2.9.1 VLAN ..............................................................................................................16
2.9.2 Network Access Control ................................................................................. 18
3 Software Upgrade ......................................................................................................... 20
3.1 TFTP Server Program .............................................................................................20
3.2 Manual Software Upgrade ......................................................................................20
3.3 Automatic Software Upgrade .................................................................................21
4 Station Board Connections .........................................................................................23
5 Station Indication LEDs ...............................................................................................26
5.1 Station LED ............................................................................................................. 26
5.2 Status LED .............................................................................................................. 26
5.3 Power LED .............................................................................................................. 26
5.4 LAN LEDs ...............................................................................................................27
6 Restoring Factory Defaults .......................................................................................... 28
7 CongurationFileParameters ....................................................................................29
7.1 Remote Provisioning using TFTP ..........................................................................29
7.2 General Parameters ...............................................................................................29
7.3 SIP Parameters ......................................................................................................30
7.4 Call Parameters .....................................................................................................31
7.5 SNMP Parameters .................................................................................................33
7.6 Example Conguration Files ...................................................................................35
7.6.1 Device Specic Conguration File .................................................................35
7.6.2 Global Conguration File ...............................................................................36
Figures
A100K11211
Figure 1 SIP System Conguration ..................................................................................................... 4
Figure 2 RJ45 Ports at Rear of IP Desktop Master Station ................................................................ 7
Figure 3 RJ45 Port at Bottom of IP Dual Display Station .................................................................... 7
Figure 4 RJ45 Ports on IP Flush/OR Master Stations ........................................................................ 7
Figure 5 Station Board Connections ................................................................................................. 22
SIP Master Stations Conguration
3
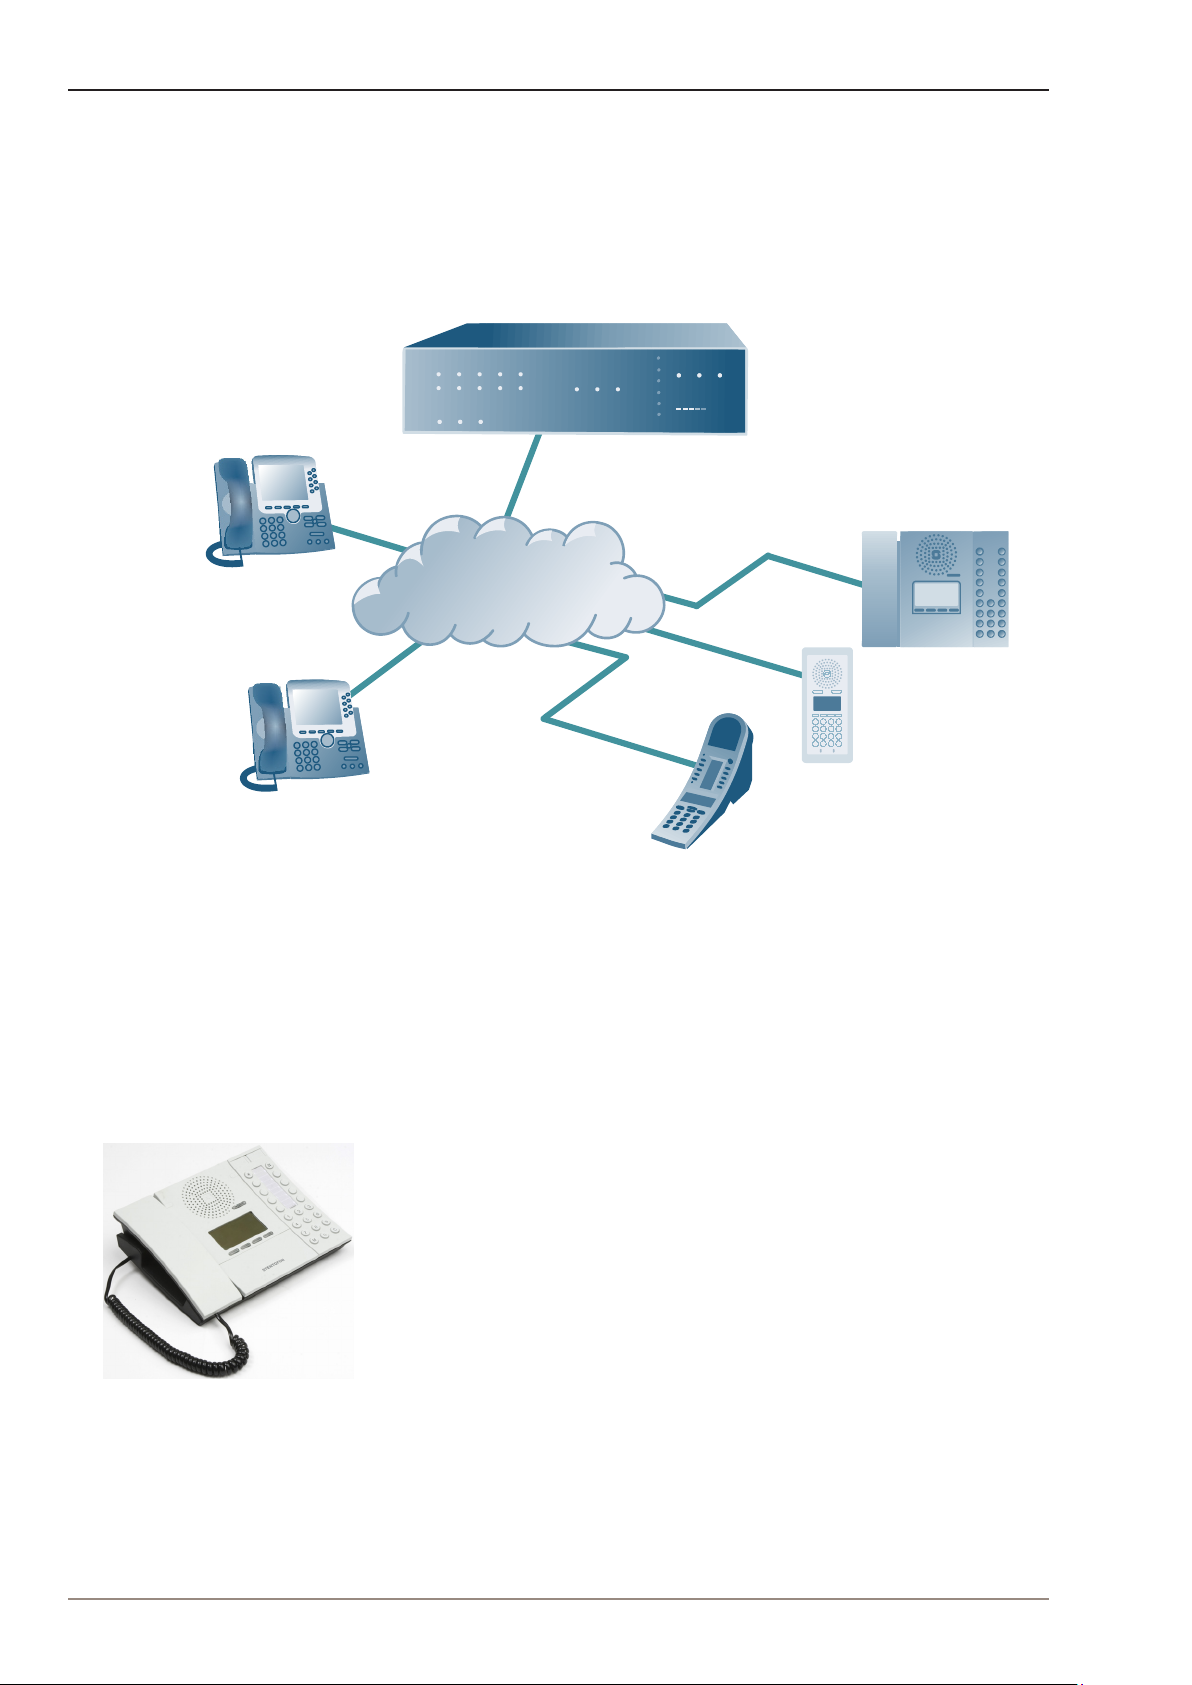
1 Introduction
IP Network
SIP Dual Display
SIP OR Master
SIP Desk Master
iPBX (SIP domain)
SIP phone
SIP phone
SIP (Session Initiation Protocol) is the de facto standard for IP telephony.
The STENTOFON SIP intercom stations are specially built for easy
integration with any iPBX system.
The STENTOFON SIP Stations are custom-made IP intercom stations
that can integrate with any iPBX system.
1.1 IP Desktop Master Station
Figure 1 SIP System Conguration
● item nos. 1008001000 (with handset), 1008000000 (without handset)
The IP Desktop Master is a general purpose intercom station featuring
a large high contrast display with backlight showing crystal clear
information. Ten direct access keys (DAK) provide single-touch access to
other stations, group calls, audio monitoring, public address zones, radio
channels and/or the opening of doors and gates.
The station connects directly to the IP network, making it easy to deploy
anywhere at any distance. The built-in web server allows monitoring,
conguration and software updates over the IP network for easy
maintenance of remote stations.
4
SIP Master Stations Conguration
A100K11211

1.2 IP OR Master Station
● item no. 1008015000
The IP Operating Room (OR) Master Station is an advanced intercom
station intended for use in operating theatres and clean rooms. The
chemical resistant and anti-bacterial front plate is completely at and
sealed to minimize bacteria accumulation. The station has an excellent
audio quality. With a large backlit display and STENTOFON audio
technology, the station allows users to read caller ID, listen and talk at a
distance.
1.3 IP Flush Master Station
● item no. 1008031000
The IP Flush Master is intended for use in control and guard rooms.
The station features a large high contrast display with backlight and up
to 8 lines with 20 characters. The IP station has advanced call handling
features such as call queuing. The call queue is presented to the user
according to priority and time of arrival. The user can select which call to
answer by scrolling through the queue. Four direct access keys (DAK)
provide single-touch access to stations, group calls, audio monitoring,
public address zones, radio channels, and opening of doors and gates.
Each DAK key has a red and green LED to show the status.
1.4 IP Dual Display Station
● item no. 1008007000
The IP Dual Display Station is designed for desktop installation in
banking/nancial and oce environments. It is also well suited as a
control room station. The physical size makes it easy to place on desks
with limited space. An optional noise cancelling gooseneck microphone
module can be mounted in noisy environments. The dual backlit easyto-read displays and navigation buttons provide single-touch access
to stations, group calls, audio monitoring, public address zones, radio
channels, opening of doors and gates as well as other functions. The
direct access keys are easily programmed from the station and can be
changed at any time.
A100K11211
SIP Master Stations Conguration
5
2 SIPConguration
Not Registered
Setup
State:
Back
Sel
*
Sel
Esc
- Main menu Station info --
>
IP settings --
>
Station mode --
>
Load defaults -->
Restart -->
SIP settings -->
Back
Sel
There are two ways of conguring the IP Master Station for SIP:
● Using the station keypad
● Using a web browser
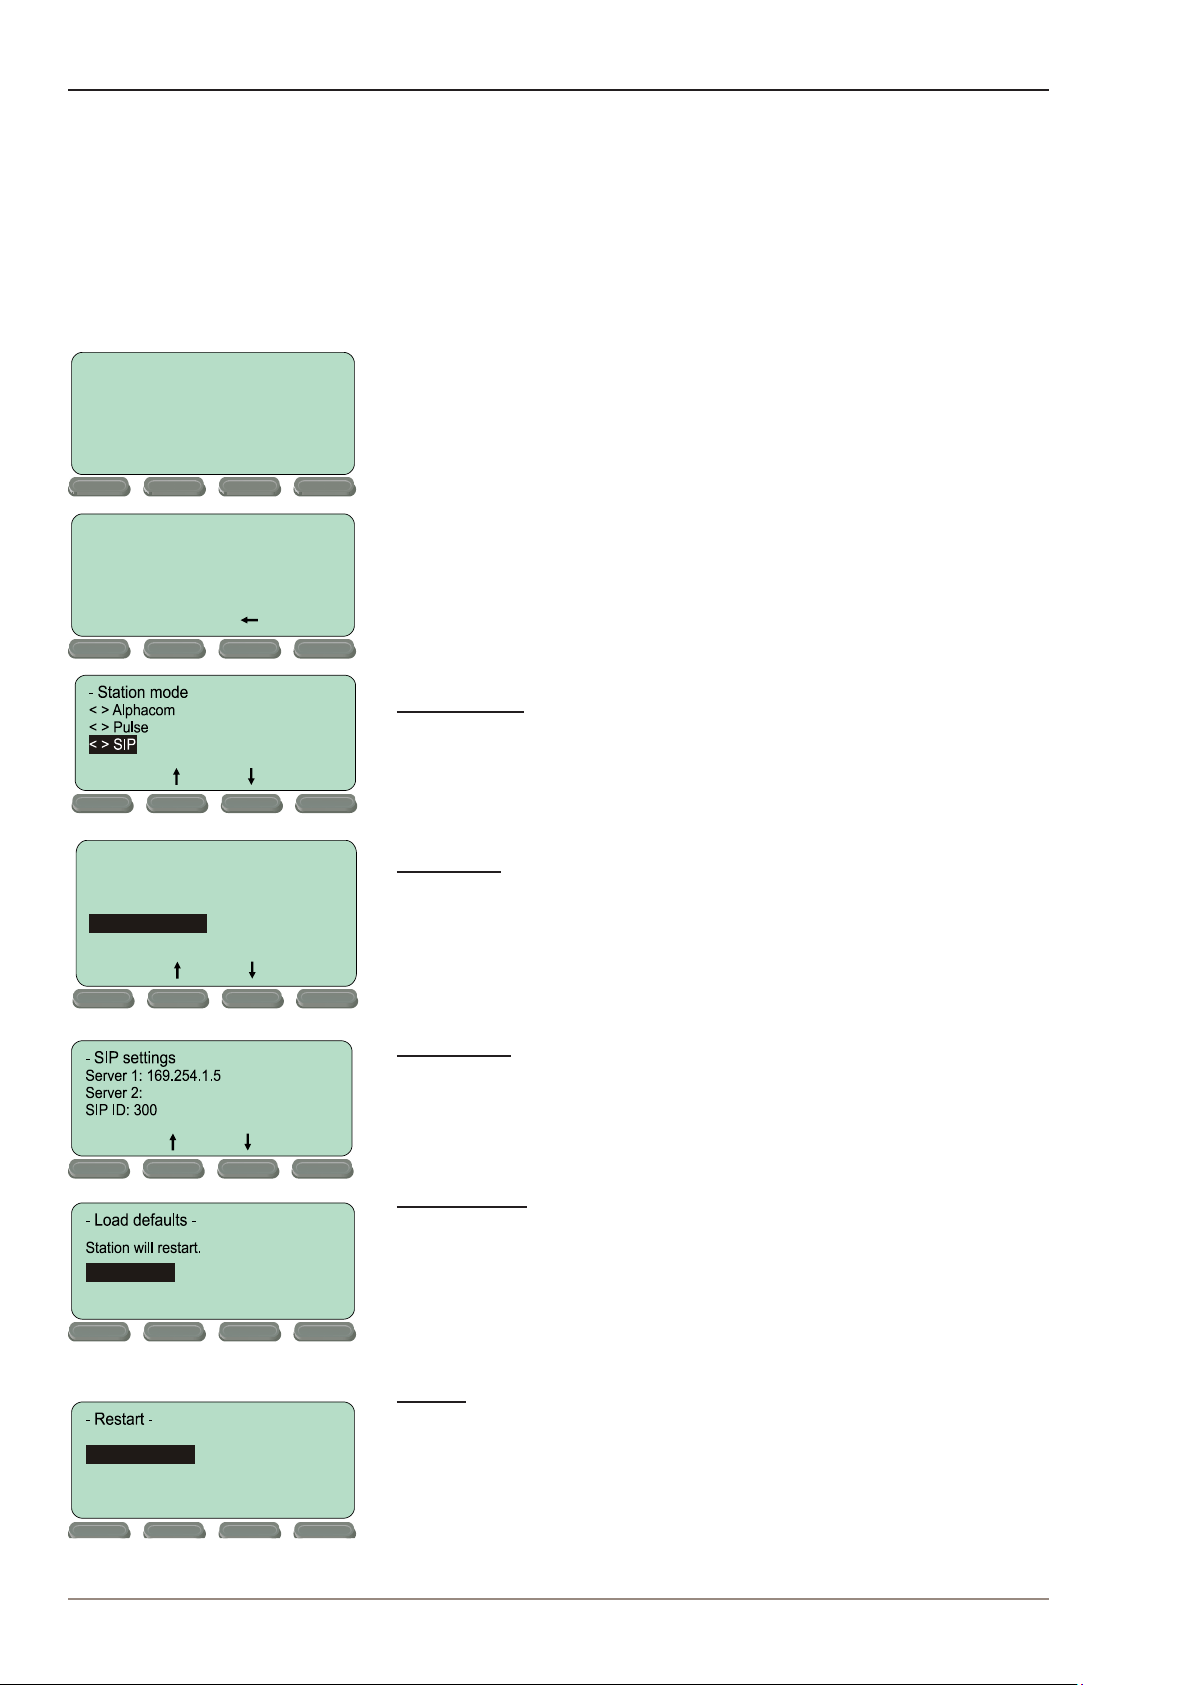
2.1 CongurationViaStationKeypad
When the IP Master Station is not registered with the SIP server, an
oine menu is displayed. The oine menu can be used to congure the
station and is navigated with the 4 buttons below the display. The button
on the left is used as a Select or Ok button as shown in the display, while
the button on the right is used as a Back button. The two buttons in the
middle are used to navigate up or down according to the arrows. When
conguring IP settings, the M key is used to insert a “.” (dot) and the
right-middle button is used to delete a character.
- Enter password
1851
Ok
Esc
To enter the setup menu:
1. Press the Setup button on the left
2. Enter the password 1851
3. Press the Ok button
Station mode
If SIP settings is not listed as a main menu option, select Station mode
to set the station to SIP mode.
Main menu
Use the two arrow buttons in the middle to navigate to SIP settings and
press the Sel button on the left. When entering data, the left-arrow is
used for deleting characters.
SIP settings
● Enter the IP address of Server 1 (SIP server) that the station shall
connect to, and the SIP ID (directory number) of the station.
Press to set.
Sel
Press to restart
Sel
6
Load defaults
This will load the factory default settings.
Back
● Press the Sel button to load the default settings.
Restart
This will restart the station.
Back
● Press the Sel button to restart the station.
Restart the station to apply new settings.
SIP Master Stations Conguration
A100K11211
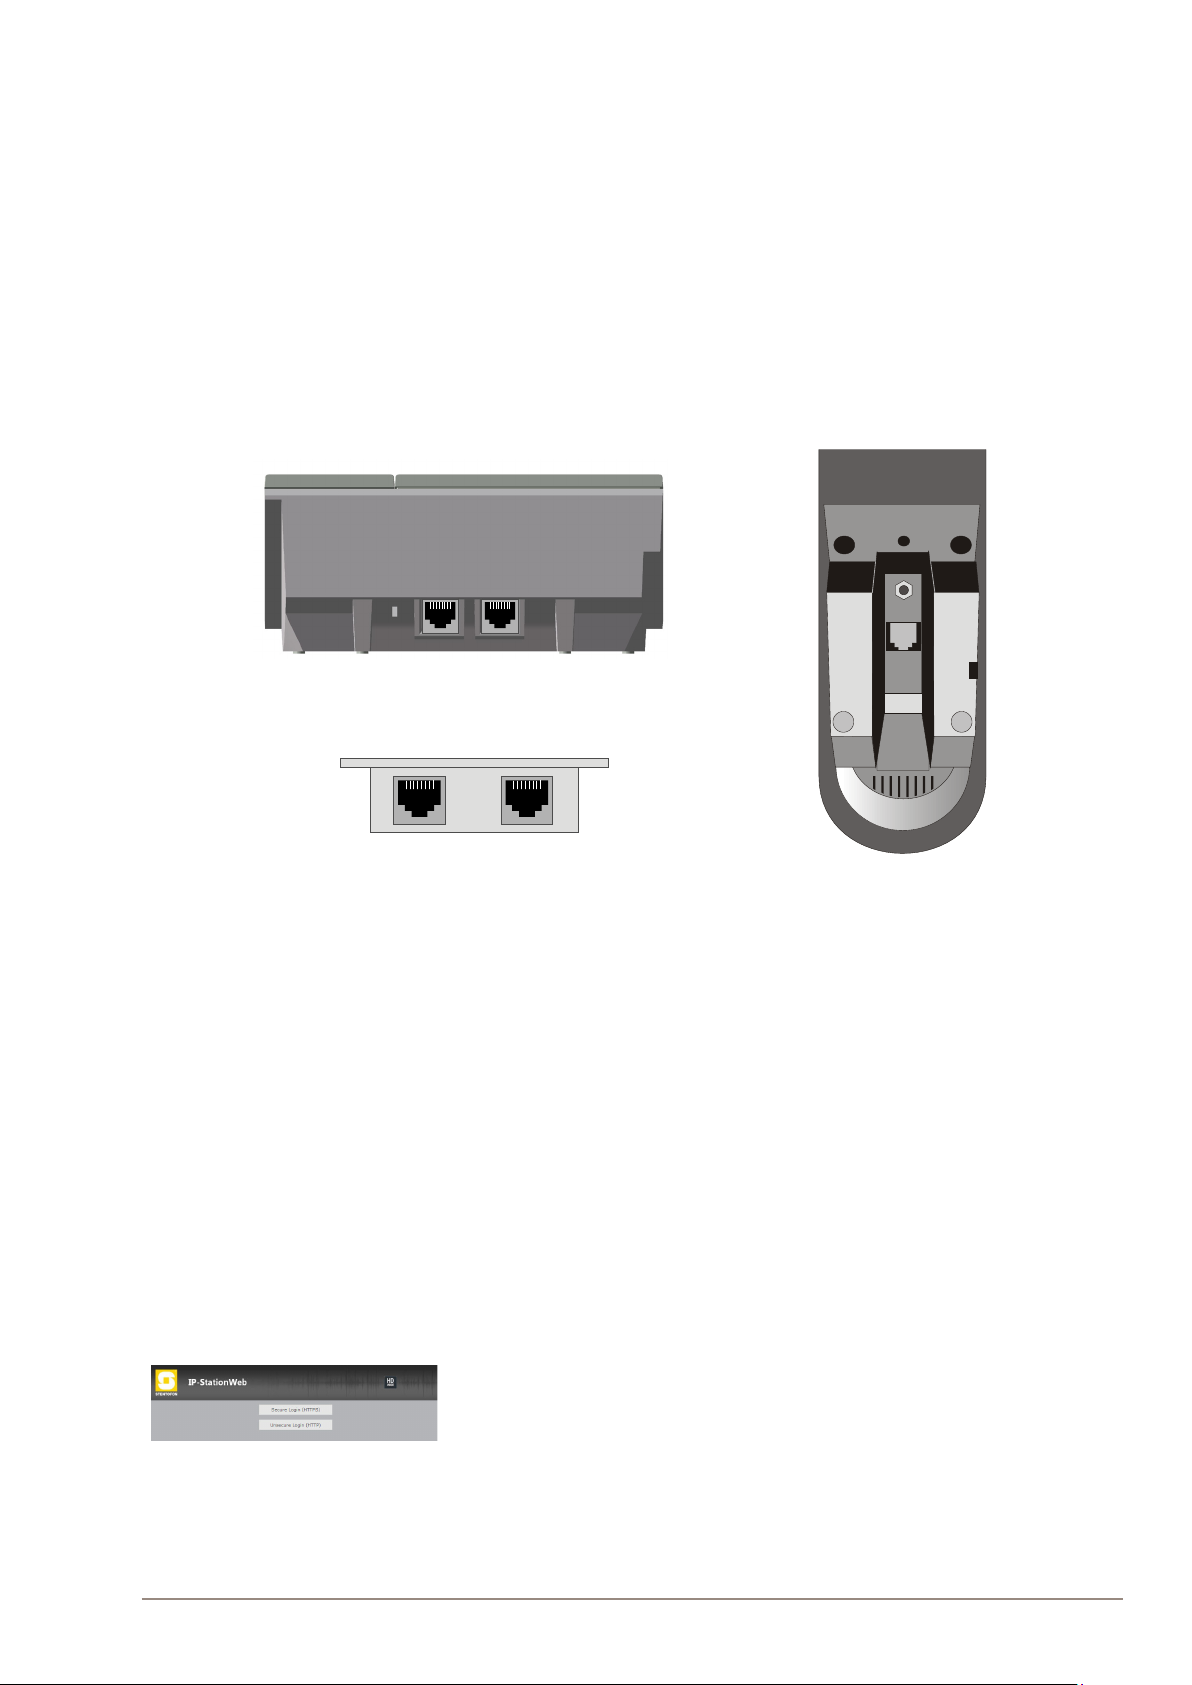
2.2 SIP Station Web Interface
RJ45
LAN
AUX
LAN
AUX
The SIP Station features an embedded web server, which allows users to
log in via a standard web browser.
At commissioning, the SIP Station needs to be congured to make it
possible for the SIP Station to register in the iPBX system.
To do this, your PC and the IP station have to be connected together via
a PoE switch using network cables:
● Connect the PC to the PoE switch
● Connect the LAN port on the SIP station to the PoE switch
There is one RJ45 port located at the bottom of the IP Dual Display
station that is used as the LAN port.
Figure 2 RJ45 Ports at Rear of IP Desktop
Master Station
Figure 4 RJ45 Ports on IP Flush/OR Master
Stations
The factory default IP address of the station is 169.254.1.100. In order
for your PC to communicate with the station it is necessary to change
its Internet Protocol Properties to use an IP address that is in the
same range as 169.254.1.100, e.g. 169.254.1.1 with subnet mask
255.255.255.0.
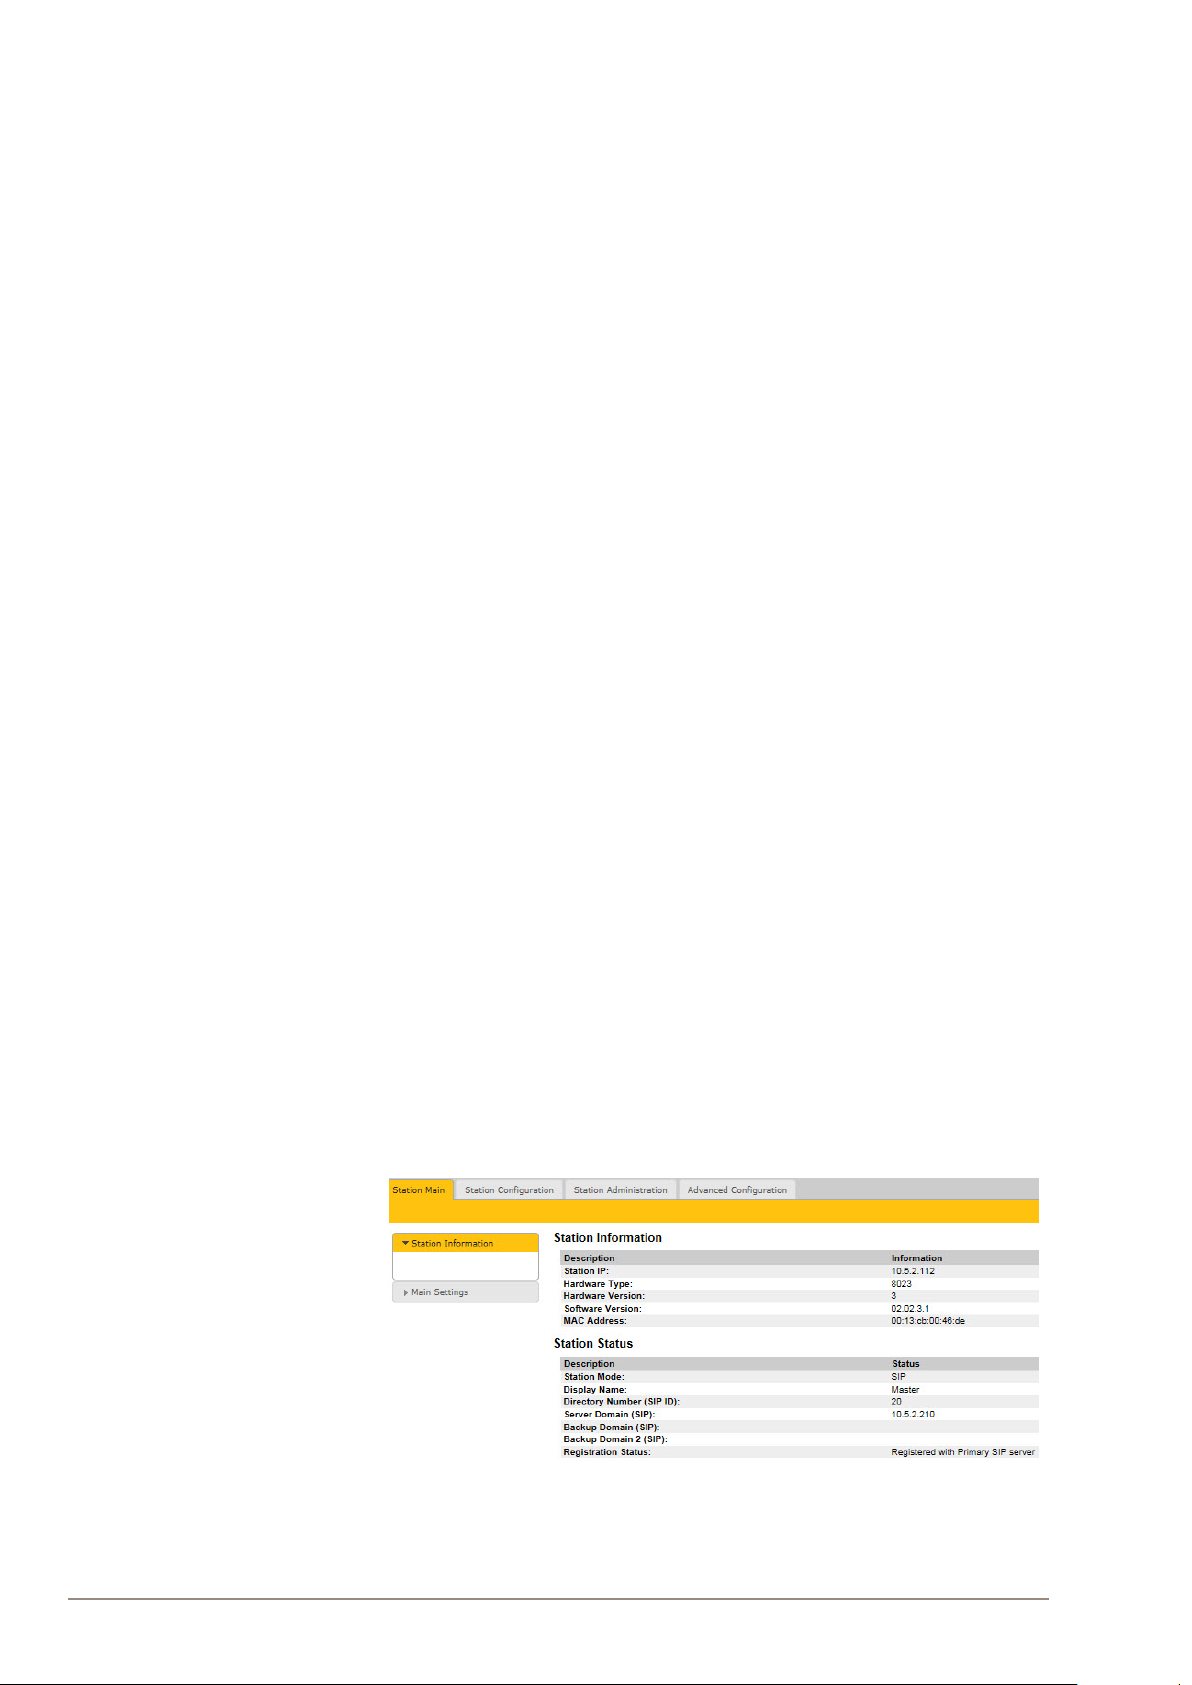
After the IP properties have been changed, access the station by logging
into the web interface using a standard web browser:
1. Open a web browser
2. In the browser’s Address bar, type http://169.254.1.100, and press
the ENTER key
- The station Login page is displayed.
Figure 3 RJ45 Port at Bottom of IP Dual
Display Station
A100K11211
To log into the station:
1. Click Login
2. Enter the default User name: admin
3. Enter the default password: alphaadmin
The main page will now be displayed, showing the Station settings
including the MAC address.
Use the menu bar at the top of each page to browse through the dierent
pages.
SIP Master Stations Conguration
7

2.3 Station Main Settings
● Click Station Main > Main Settings to access the page for
conguring station mode and IP parameters.
Station Mode
● Select the Use SIP radio-button
IP Settings
● DHCP – Use this option if the SIP Station shall receive IP Settings
from a DHCP server.
● Static IP – Use this option if the SIP Station shall use a static
IP address. Enter the IP address, Subnet mask and Gateway
address.
● Click Save followed by Apply to apply the new conguration
settings.
2.4 SIP Settings
● Click StationConguration > SIP Settings to access the page for
conguring SIP parameters.
8
SIP Master Stations Conguration
A100K11211

Account Settings
Display Name
- Enter a name that will be shown on the display at the remote party.
Directory Number (SIP ID)
- This is the identication of the station in the SIP domain, i.e. the
phone number for the station. This parameter is mandatory. Enter
the SIP ID in integers according to the SIP account on the SIP
domain server.
Server Domain (SIP)
- This parameter is mandatory and species the primary domain for
the station and is the IP address for the SIP server (e.g. Asterisk or
Cisco Call Manager). Enter the IP address in regular dot notation,
e.g. 10.5.2.138.
Backup Domain (SIP)
- This is the secondary (or fallback) domain. If the station loses
connection to the primary SIP domain, it will switch over to the
secondary one. Enter the IP address in regular dot notation.
Backup Domain 2 (SIP)
- This is the tertiary backup domain.
Authentication User Name
- This is the authentication user name used to register the station
to the SIP server. This is required only if the SIP server requires
authentication and is normally the same as the SIP ID.
Authentication Password
- The authentication user password used to register the station
to the SIP server. This is required only if the SIP server requires
authentication
Register interval
- This parameter species how often the station will register, and
reregister in the SIP domain. This parameter will aect the time it
takes to detect that a connection to a SIP domain is lost.
- Enter the values in number of seconds from 60 to 999999. The
default interval is 600 seconds.
Outbound Proxy [optional]
- Enter the IP address of the outbound proxy server in regular dot
notation, e.g. 10.5.2.100
A100K11211
Port
- Enter the port number used for SIP on the outbound proxy server.
The default port number is 5060.
Call Settings
Enable Auto Answer
- This is not required. Enables automatic answer after a set number
of seconds.
SIP Master Stations Conguration
9
- Check the checkbox to enable this function and enter the delay
in seconds in the eld for Auto Answer Delay. The default delay
setting is 0 and the maximum is 30 seconds.
Disable Disconnect By Button
- This disables disconnect with the speed dial during and when
setting up a conversation. Check the checkbox to enable this
function.
Overlap dialing
- This will lead to the phone starting to dial each time a digit is
entered and the SIP proxy replying with ‘Number incomplete’ until
such time as the number has been entered and the call can be
initiated successfully without the enter key having to be pressed.
DTMF method
- Choose between SIP INFO or RFC 2833 to select DTMF signalling
method.
Activate relay on event
- When enabled, the station will activate the relay when receiving
the specied DTMF character in the RTP stream. Select from the
dropdown menu. Options are OFF, 1-9, *, In call or Ringing. The
default setting is OFF.
- Select the number of seconds to keep the relay open in the range 1
to 240 from the dropdown menu. The default setting is 60 seconds.
- Options are: 1 - 240 seconds, during call, during ringing, until
DTMF # or 0.
RTP Timeout value
- This cancels a call if the station does not receive RTP packets from
the remote party. Enter values in the range 0-9999 seconds. The
default setting is 0 which means RTP timeout is disabled.
After entering all the desired values, click Save and then click Reboot to
enable the SIP settings.
After completing the SIP conguration, click Station Main > Station
Information and the main page may look like the following:
10
L The IP Properties on your PC has to be changed to the same IP domain as that
of the SIP station.
SIP Master Stations Conguration
A100K11211

2.5 Audio Settings
Click StationConguration > Audio Settings
SpeakerVolume
- Select the volume level in the range 0 to 7 from the dropdown
menu. The default setting is 5.
Noise Reduction Level
- Level 0 means that the function is disabled
- Level 1 gives a maximum noise reduction of 0.2 dB
- Level 2 gives a maximum noise reduction of 6.2 dB
- Level 3 gives a maximum noise reduction of 12.2 dB
- Level 4 gives a maximum noise reduction of 18.3 dB
- Level 5 gives a maximum noise reduction of 24.3 dB
- Level 6 gives a maximum noise reduction of 30.3 dB
- Level 7 gives a maximum noise reduction of 36.3 dB
Microphone Sensitivity
- Select the sensitivity level in the range 0 to 7 from the dropdown
menu. The default setting is 5.
RemoteControlledVolumeOverrideMode
- This acts as simplex mode. This feature is activated after the rst
DTMF * or # is received from the remote station. Send DTMF * to
talk and # to listen. Check the checkbox to enable this function.
MessageControlledVolumeOverrideMode
Check the box to enable the following messages:
- SIP MESSAGE ”Audio_receive_only”: Turns the microphone o
and loudspeaker on
- SIP MESSAGE ”Audio_send_only”: Turns microphone on and
loudspeaker o
- SIP MESSAGE ”Audio_send_receive”: Turns both microphone and
loudspeaker on
Default Speaking Mode
- Select between Open Duplex or Push-To-Talk
A100K11211
After entering all the desired values, click Save to enable the audio
settings.
SIP Master Stations Conguration
11
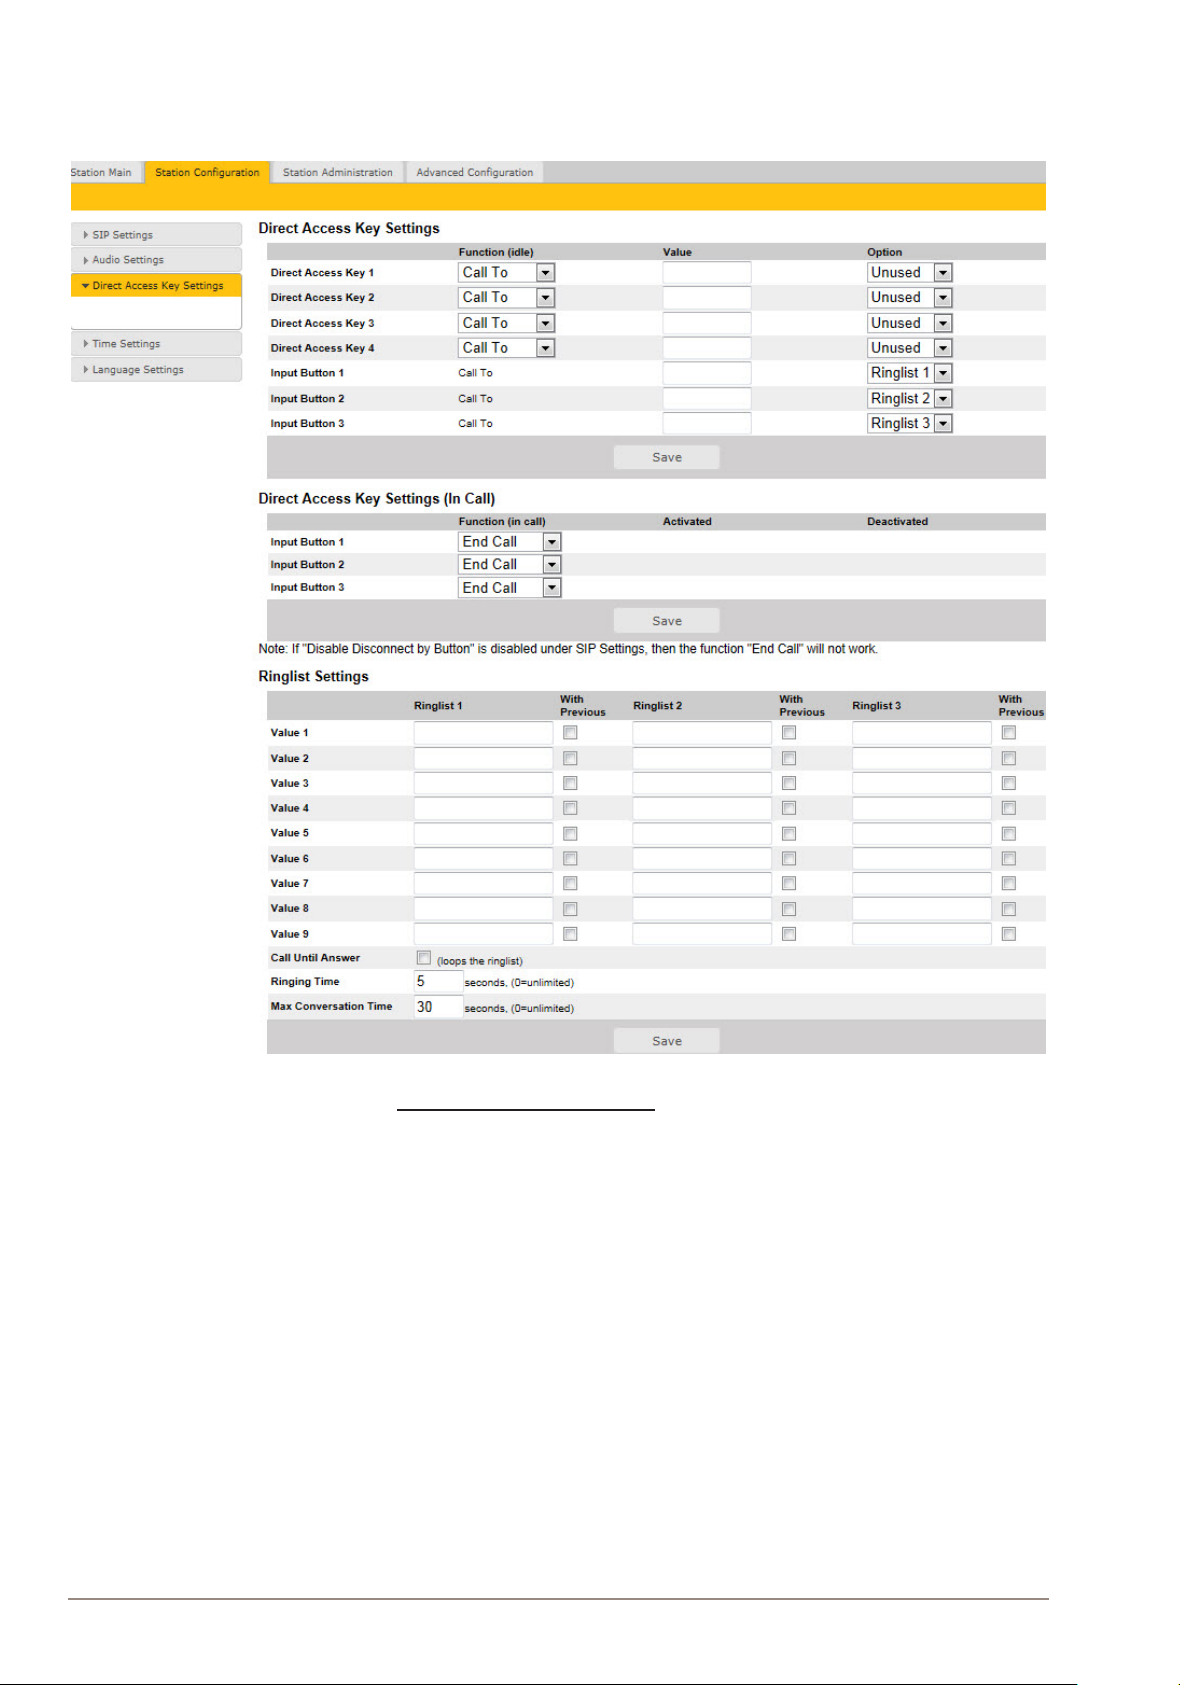
2.6 DirectAccessKeySettings
● Click StationConguration > DirectAccessKeySettings to
access the page for conguring DAKs.
12
DirectAccessKeySettings
DirectAccessKey1-DirectAccessKey4
Enter the numbers to call in the Value eld.
L The Desktop and Dual Display master stations have 10 Direct Access Keys and
do not have the 3 Input Buttons described below.
Input Button 1
This is the SIP ID for the extension to be called when call button no. 1 is
pressed, i.e. the SIP ID number of the receiving party.
Input Button 2
This is the SIP ID for the extension to be called when call button no. 2 is
pressed, i.e. the SIP ID number of the receiving party.
Input Button 3
This is the SIP ID for the extension to be called when call button no. 3 is
pressed, i.e. the SIP ID number of the receiving party.
SIP Master Stations Conguration
A100K11211
 Loading...