

ZEHNDER DX 2000 CI, DX 2000 SL User Manual
English
-1-
User’s Guide in English
DX 2000 SL
DX 2000 SLDX 2000 SL
DX 2000 SL
DX 2000 CI
DX 2000 CIDX 2000 CI
DX 2000 CI
DX 2000 SL
DX 2000 SLDX 2000 SL
DX 2000 SL
DX 2000 CI
DX 2000 CIDX 2000 CI
DX 2000 CI

English
-2-
DX 2000
- Digital Satellite Receiver
GENERAL INFORAMTION
Main Feature of
DX 2000 SL/CI
For your Safety
Unpacking
General Operation of
DX 2000
Remote Control
Front Panel
Rear Panel
INSTALLATION of
DX 2000
DX 2000DX 2000
DX 2000
Connecting to Antenna & TV
Connecting to TV&VCR using SCART
Connecting to another SVR
Connecting to Digital Audio
FIRST TIME INSTALLATON
Select Antenna Number
Select Switch
Select Satellite
Select LNB
Enter the LNB frequency
Test Signal Level
Confirmation Setup
Channel Searching
Complete Installation
COMMO N INTERFACE
Preparing
Check Manager
GENERAL VIEWING FUNCTION
Select Channel
Pause the Frame
Previous Channel Recall
TV&Radio mode
TV&VCR mode
Channel Information
Volume&Audio Control
CHANNEL MANAGER
Main Page
Channel Manager
Favorite Channel
Move Channel
Lock Channel
Rename Channel
Delete Channel
Sort Channel
Fast Edit mode
GO TO FUNCTION
EPG (Electronic Program Guide)
TIMER
USER’S INSTALLATION
Channel Search
System Setting
Antenna Set Up
Antenna Positioning Help
Parental Lock
Easy Install
Factory Default
RECEIVER INFORMATION
FRONT PANEL DISPLAY
HOW TO UPGRADE DX 2000
TROUBLE SHOOTING
TECHNICAL SPECIFICATION
CONTENTS
Page
Page
3
3
4
4
4
5
6
6
7
7
7
8
8
9
10
10
10
11
11
11
12
12
12
14
14
15
15
15
15
16
16
17
17
17
18
19
19
19
20
20
21
21
22
23
24
24
27
28
29
30
31
32
32
32
33
36
13
13
13
38

English
-3-
GENERAL INFORMATION
A Digital Satellite Receiver is a convenient product that allows you t o view a variety of
programs provided through satellite. This user’s guide covers the installation of the
DX 2000
and the necessary steps to implement various features. This also explains
special features available only in this receiver in detail, which will allow you to make
full of these f eature.
Main Feature of
DX 2000 SL/CI
- High quality Digital Video & Audio, fully MPEG2, DVB compliant
- Stores up to 2000 channels
- Comfortably preprogrammed for more than 8 satellites: ASTRA, HOTBIRD, ......
- Through loop tuner with output for second satellite receiver
- 2 Scart sockets (TV, VCR)
- 2 Slots Common Interface for Viaccess, Irdeto, CryptoWorks, Conax,
Nagravision and more (only available in model
DX 2000 CI
)
- Provide friendly and easy-to-use menu system
- Wizard install system in the earliest of t he world
- Various channel editing function (favorite, moving, locking, renaming, deleting
and sorting)
- User programmable vari ous Satellite & Transpo nder info rmation
Automatic search for newly added transponder (Network Auto Search)
- Easy and speedy software u pgrade through RS-232 port
- Plug-and-play data transfer system (DSR to DSR)
- Automatic each channel volume savin g function
-Timer function, automatic turns On/Off (daily, weekly, monthly)
- Digital Audio Output (Cinch)
- Provide Electronic Program Guide (EPG)
- Teletext function support
- Antenna Positioning Help feature
- Selectable Video output - CVBS, RGB
- Provide vari ous switch types, LNB types and NTSC/P AL monitor type
- SCPC/MCPC Receivable from C/Ku Band Satellite
- Multi LNB control by DiSEqC 1.0
- multi lingual On-Screen-Display (German, English, Italian, French, Span., Turk.)
- PAL/NTSC Auto Conversion
- Last channel Auto savin g

English
-4-
For Your Safety
•
Allow clear space around the
DX 2000
for
sufficient ventilation
• Do not cover the
DX 2000
or place it on a
unit that emits heat
• Use a soft cloth and a mild solution of washing
up liquid to clean the casing
•
Do not remove the cover
• Do not allow the unit to be exposed to hot,
cold or humid conditions
• Never allow liquids, spray or other materials
to come into contact with the inside of the
DX 2000
• Do not connect or modify cables when the
DX 2000
is plugged in.
Unpacking
After purchasing the
DX 2000
, unpack it and check to make sure that all of the following items
are included in the packaging.
•1 x Remot e Control Unit (RCU)
•1 x Preprogramming table
•1 x User’s Guide
•2 x AAA batteries
•1 x
DX 2000
General Operation of
DX 2000
Throughout this manual you will notice that the everyday operation of your
DX 2000
is
based on a series of user friendly on screen display and menus. These menus will help you
get the most from your
DX 2000
, guiding you through installation, channel organizing,
viewing and many other functions.
All function can be carried out using the buttons on the remote control, and some of the
function can also be carried out using the buttons on the front panel.
If at any time when you using the menus you want to return to the normal TV mode, press
the EXIT button.
The
DX 2000
is easy to use, always at your command and adaptable for future advances.
It is comfortably preprogrammed for nearly all channels of European satellites (see attached
default channel table) so that normally you do not need to go through FIRST TIME
INSTALLATION procedure on page 9. Based on standard one or two satellite antenna
systems (ASTRA, HOTBIRD) you easily can watch channels just after connecting antenna
signal and TV.
Should you experience and difficulties with the operation of your
DX 2000
, please consult
the relevant section of this manual, includi ng the Problem Shooting, or alternati vely call your
dealer or a customer service adviser.
English
-5-
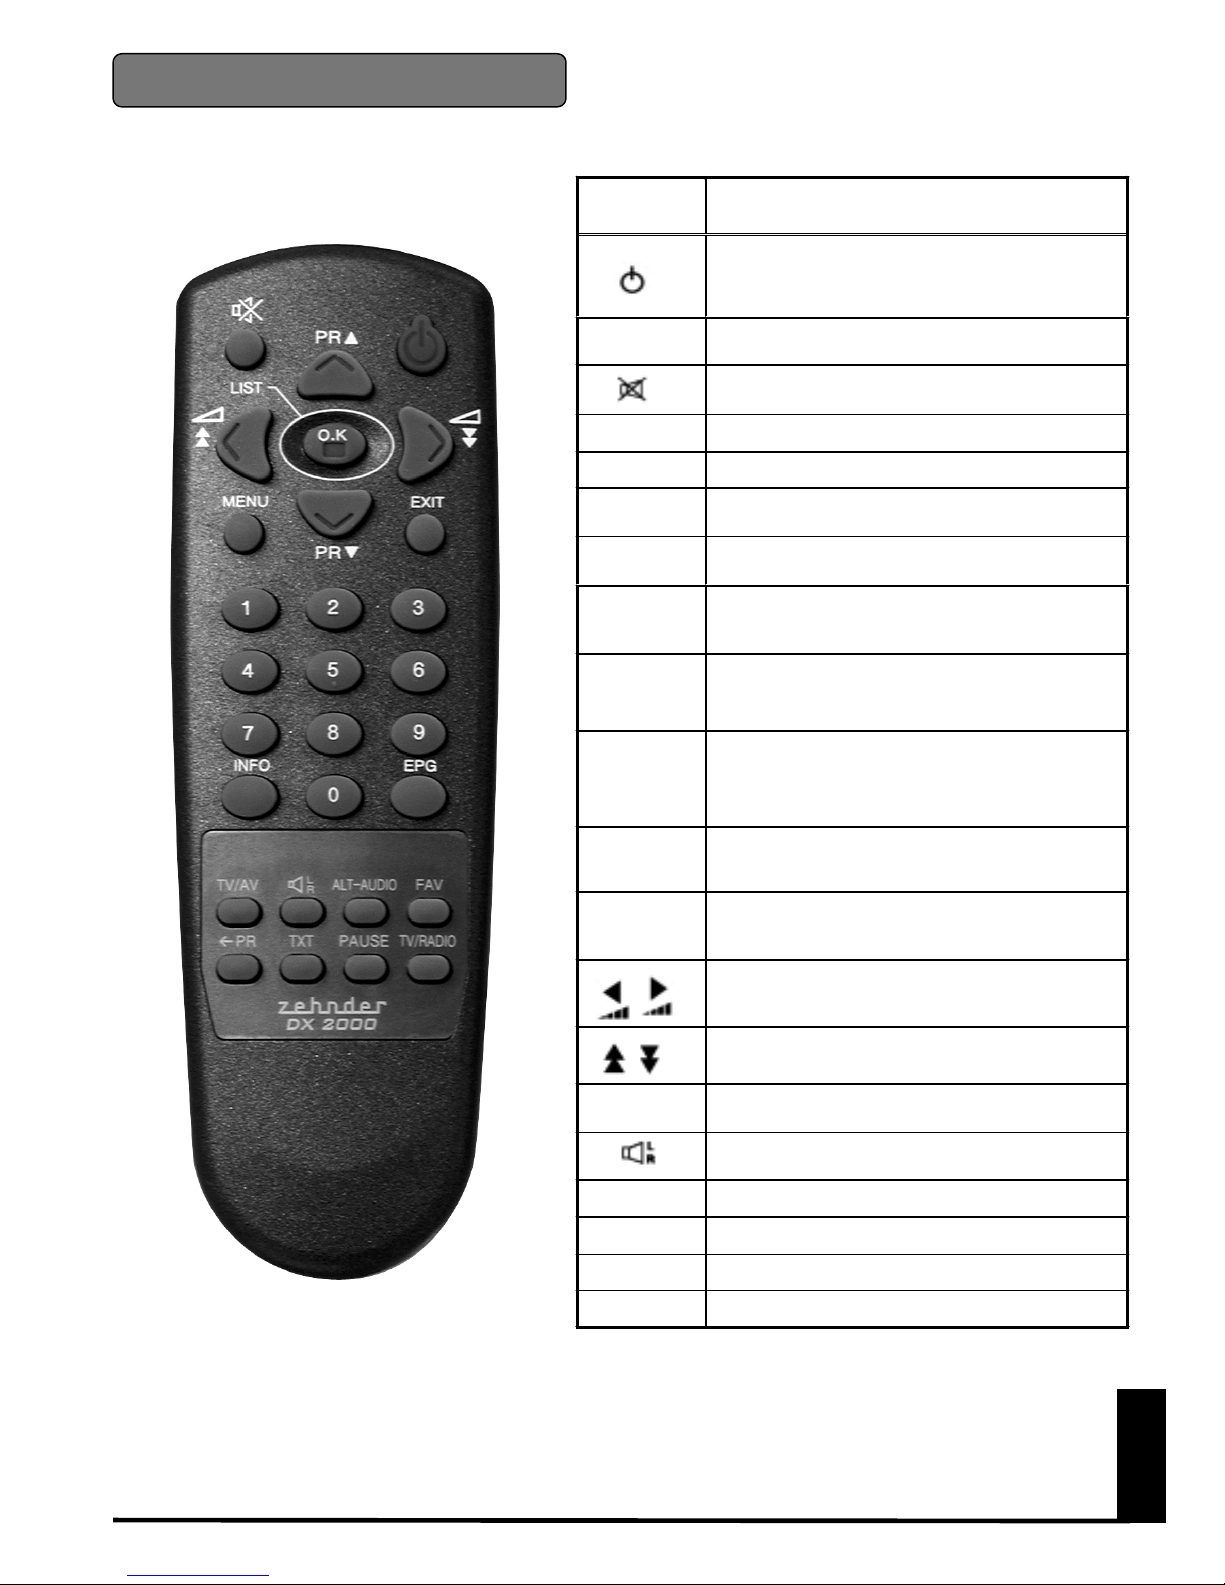
Key Function
Turns power ON/OFF of the DSR(Green
lamp lights up when ON
TV/RADIO Switches between TV and Radio mode
When watching a channel, mutes the sound.
!
!!
!PR Switches back to prev ious channel
INFO Shows information of the current channel
MENU
Press this key one time to run menu on
screen, and call command box
EXIT
Returns to the previous menu on the menu
screen
ALT-
AUDIO
When watching a channel, switches the
audio langu age s
EPG
Calls up the EPG
(Electronic Program Guide)
OK/LIST
Shows the All Programm Channel List,
executes the selected item in the menu
screen, or enters the desired value in any
input mode.
0 – 9
Enter number of the required menu item or
select a channel number to watch.
PR
▲▲▲▲▼▼▼▼
When watching, change channels, or moves
to the next higher or lower item in the menu.
When watching, adjust the volume, or move
to the left or rig ht item in menu.
Moves up / down a page in the channel list
PAUSE
Press once to pause the screen picture.
Press once again, go to the normal mode
Selects the different audio models
TXT Switches off/on the Teletext mode.
FAV Enters the Favorite Channel List
TV/AV Switches between TV or AV mode.
Remote Control
English
-6-
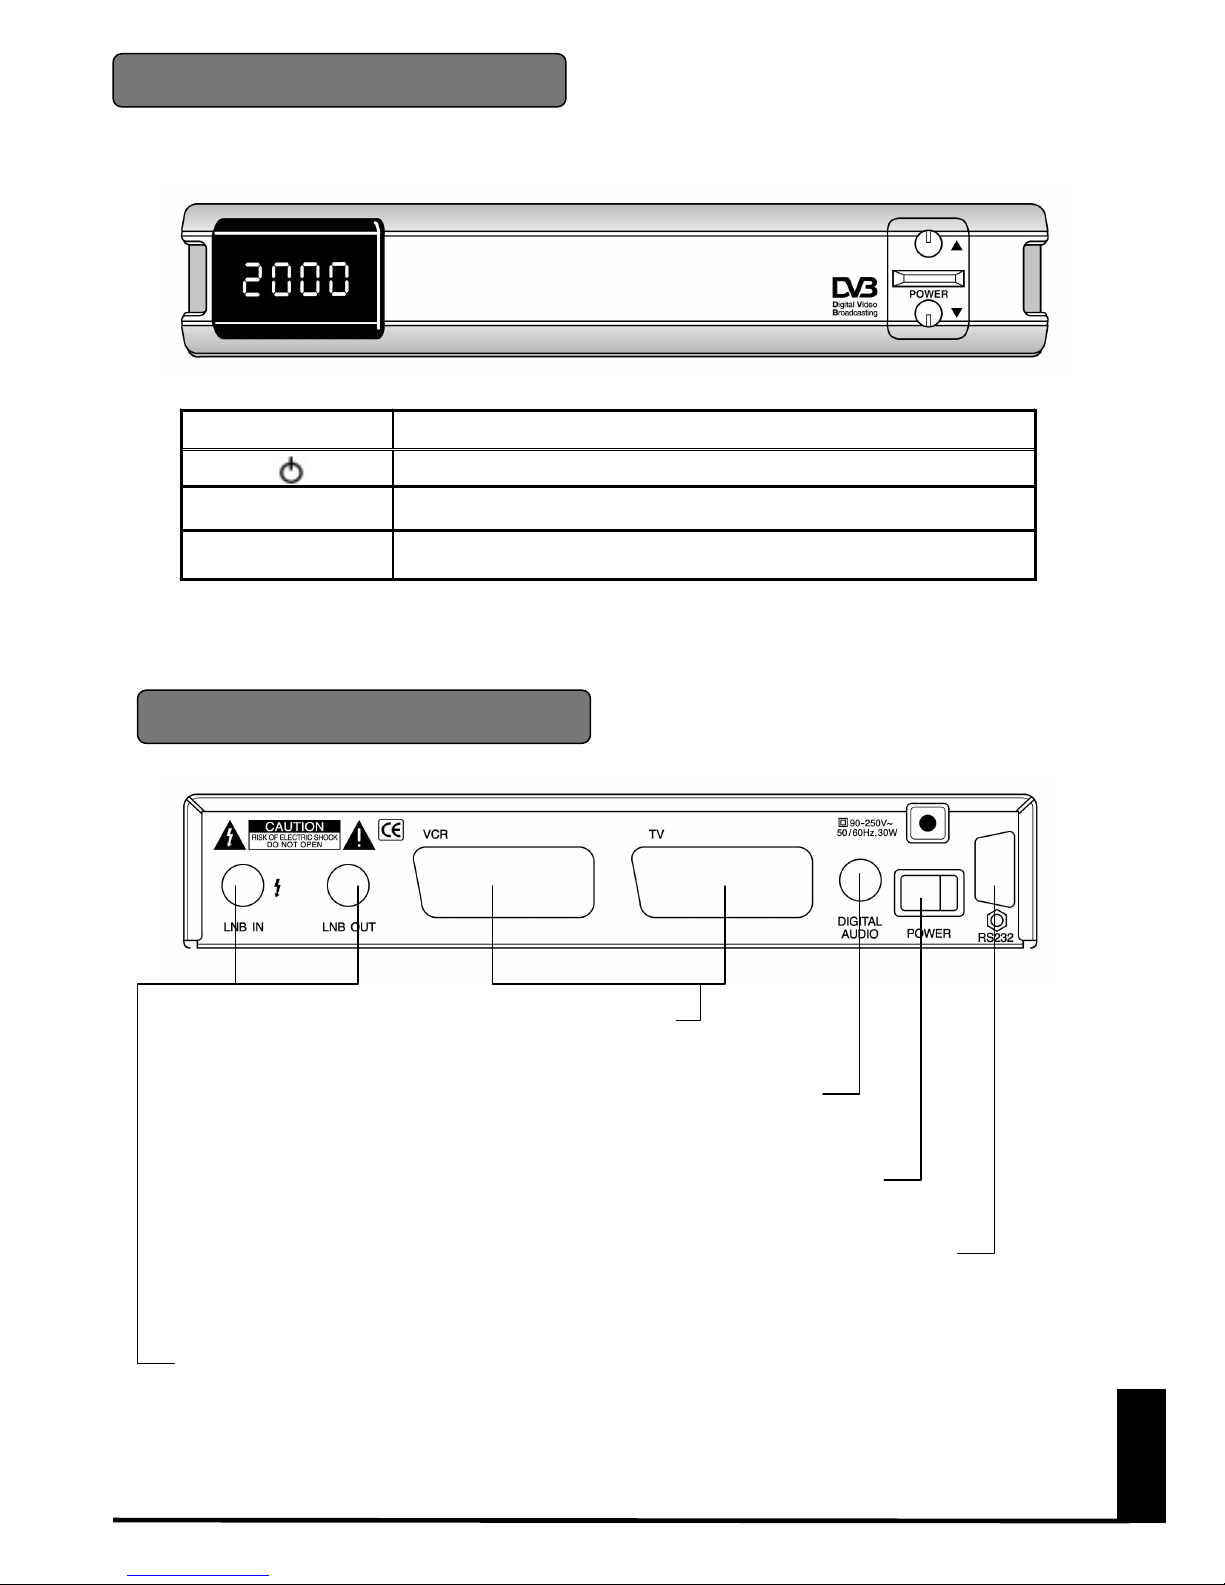
KEY FUNCTION
Turns on and off the power of the receiver
PR
▲▲▲▲▼▼▼▼
When watching, changing to the previous and next channel, or in the menu
(RESET)
(behind the front door in model DX 2000 CI) Returns all data to factory
default settings.
Front Panel
Rear Panel
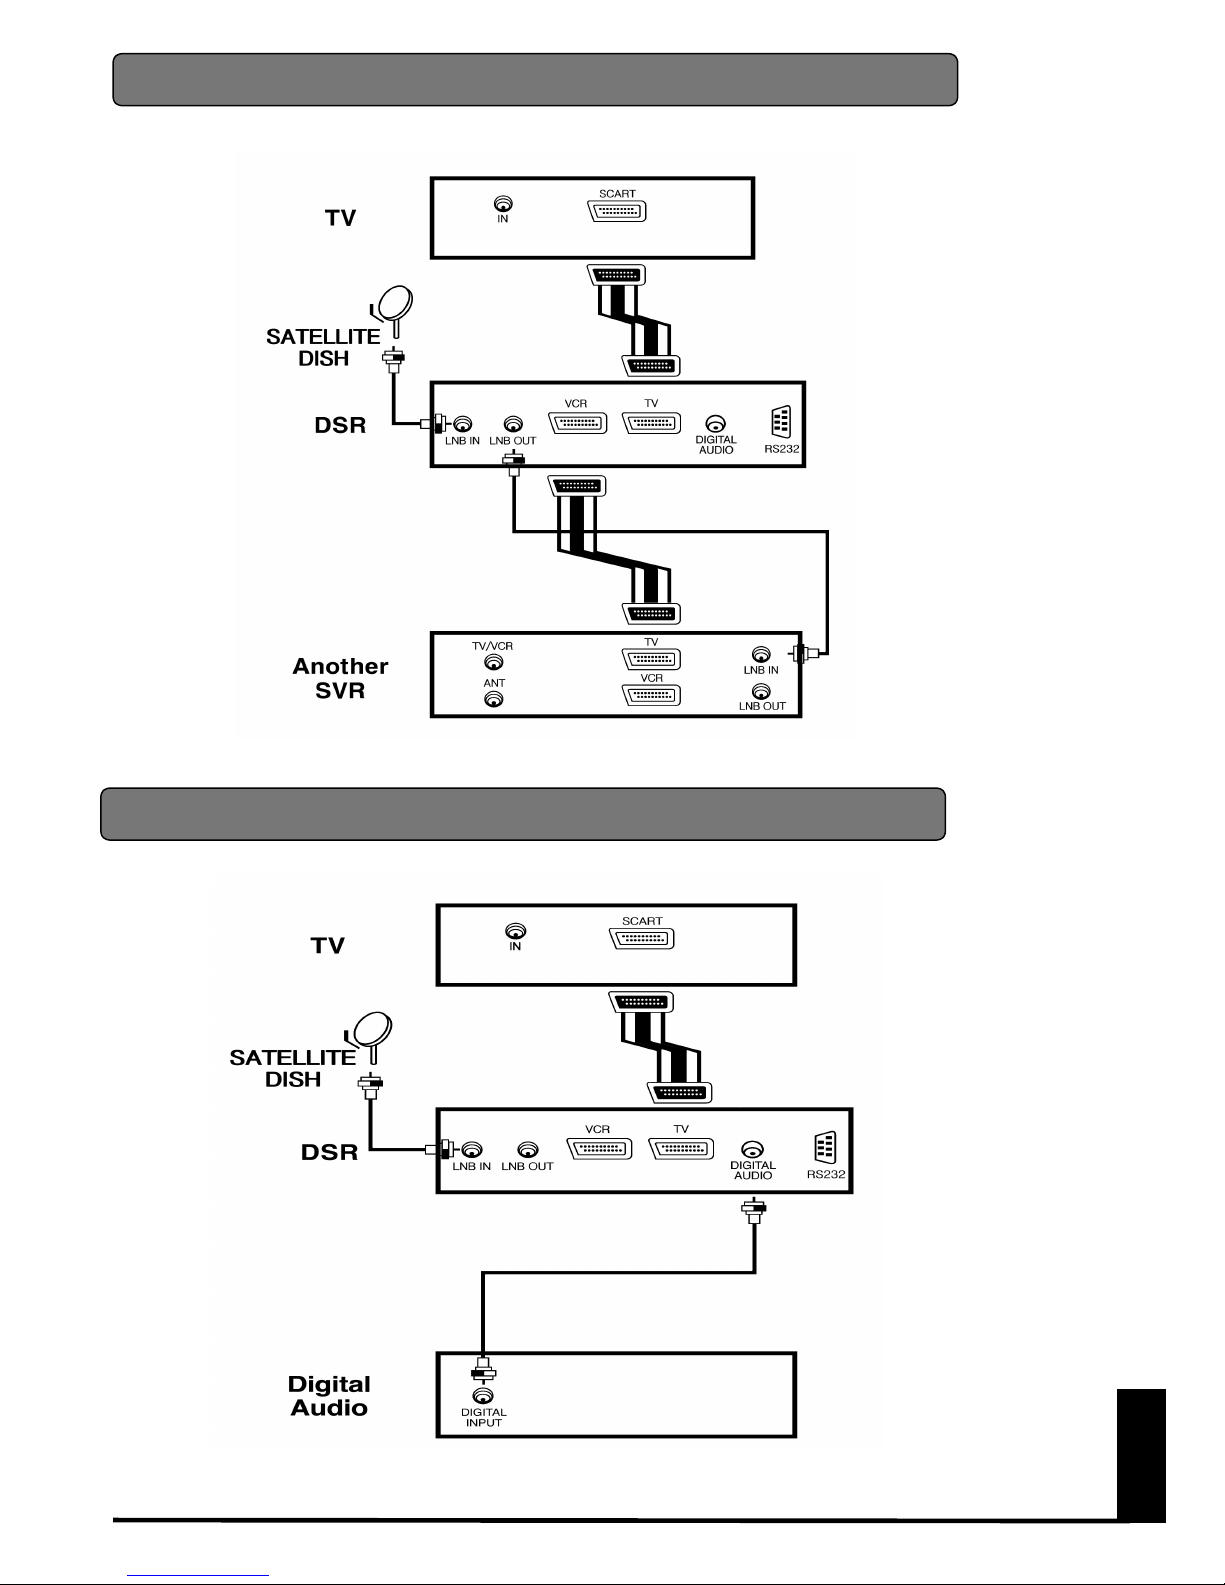
CONNECT TO TV AND VCR USING SCART CABLE
CONNECT TO DIGITAL AUDIO
POWER ON/OFF
RS232 : CONNECT TO PC FOR S/W UPGRADE
LNB IN : CONNECT TO SATELLITE ANTENNA
LNB OUT : CONNECT TO THE OTHER RECEIVER
English
-7-
INSTALLATION OF
DX 2000
This section explains the installation of
DX 2000
. Refer to the manuals supplied with
the equipment fo r the installati on of outdoor equipment such as the dis h antenna. When
adding new equipment, be sure to refer to the related parts of the manual for the
installation.
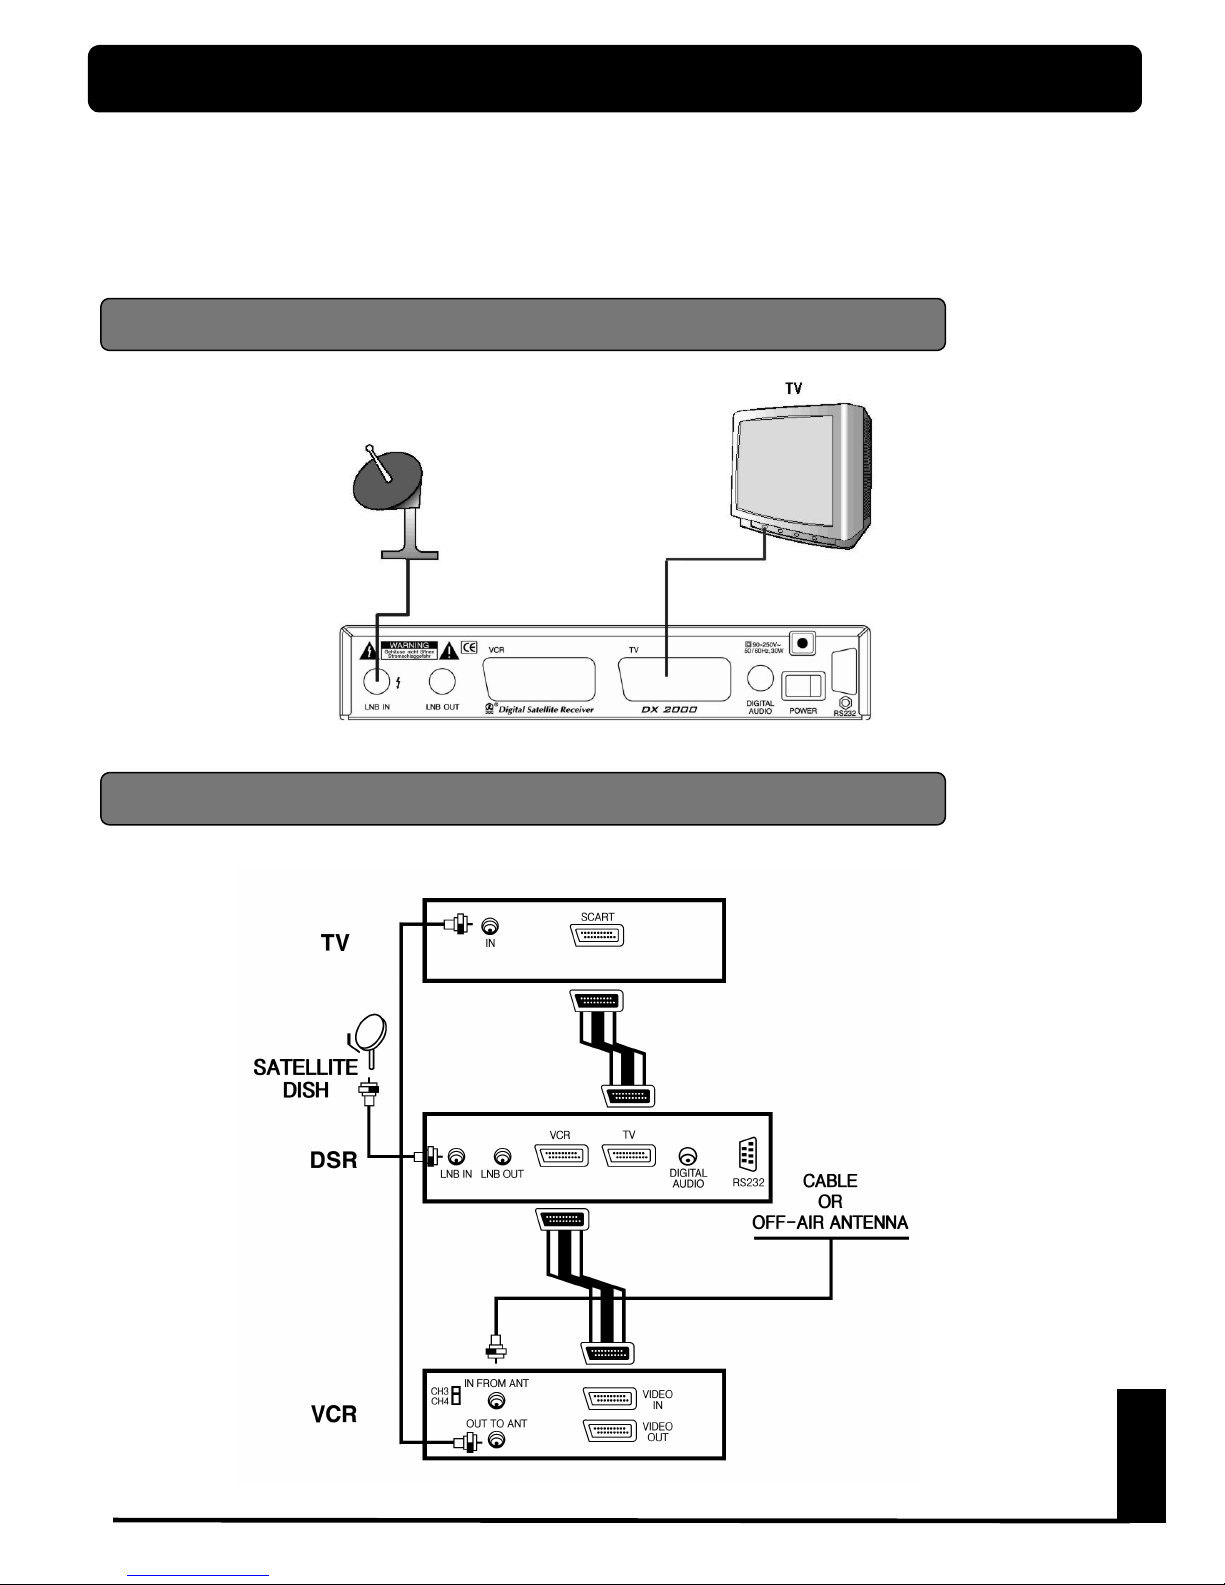
Connecting to TV&VCR using SCART support
Connecting to ANTENNA & TV
English
-8-
Connecting to another Satellite Receiver
Connecting to Digital Audio
English
-9-
FIRST TIME INSTALLATION
DX2000
has “Easy Installation” system which
allows users to set up the receiver setting only
minimum configuration for viewing channels.
Once you have correctly connected the
DX 2000
, you also have to per f orm a “ EA S Y
INSTALLATION”. During this procedure,
helpful menu information is displayed.
This “EASY INSTALLATION” menu is similar
to other application of MS WINDOWS 95/98
and designed for users to install without
difficulties.
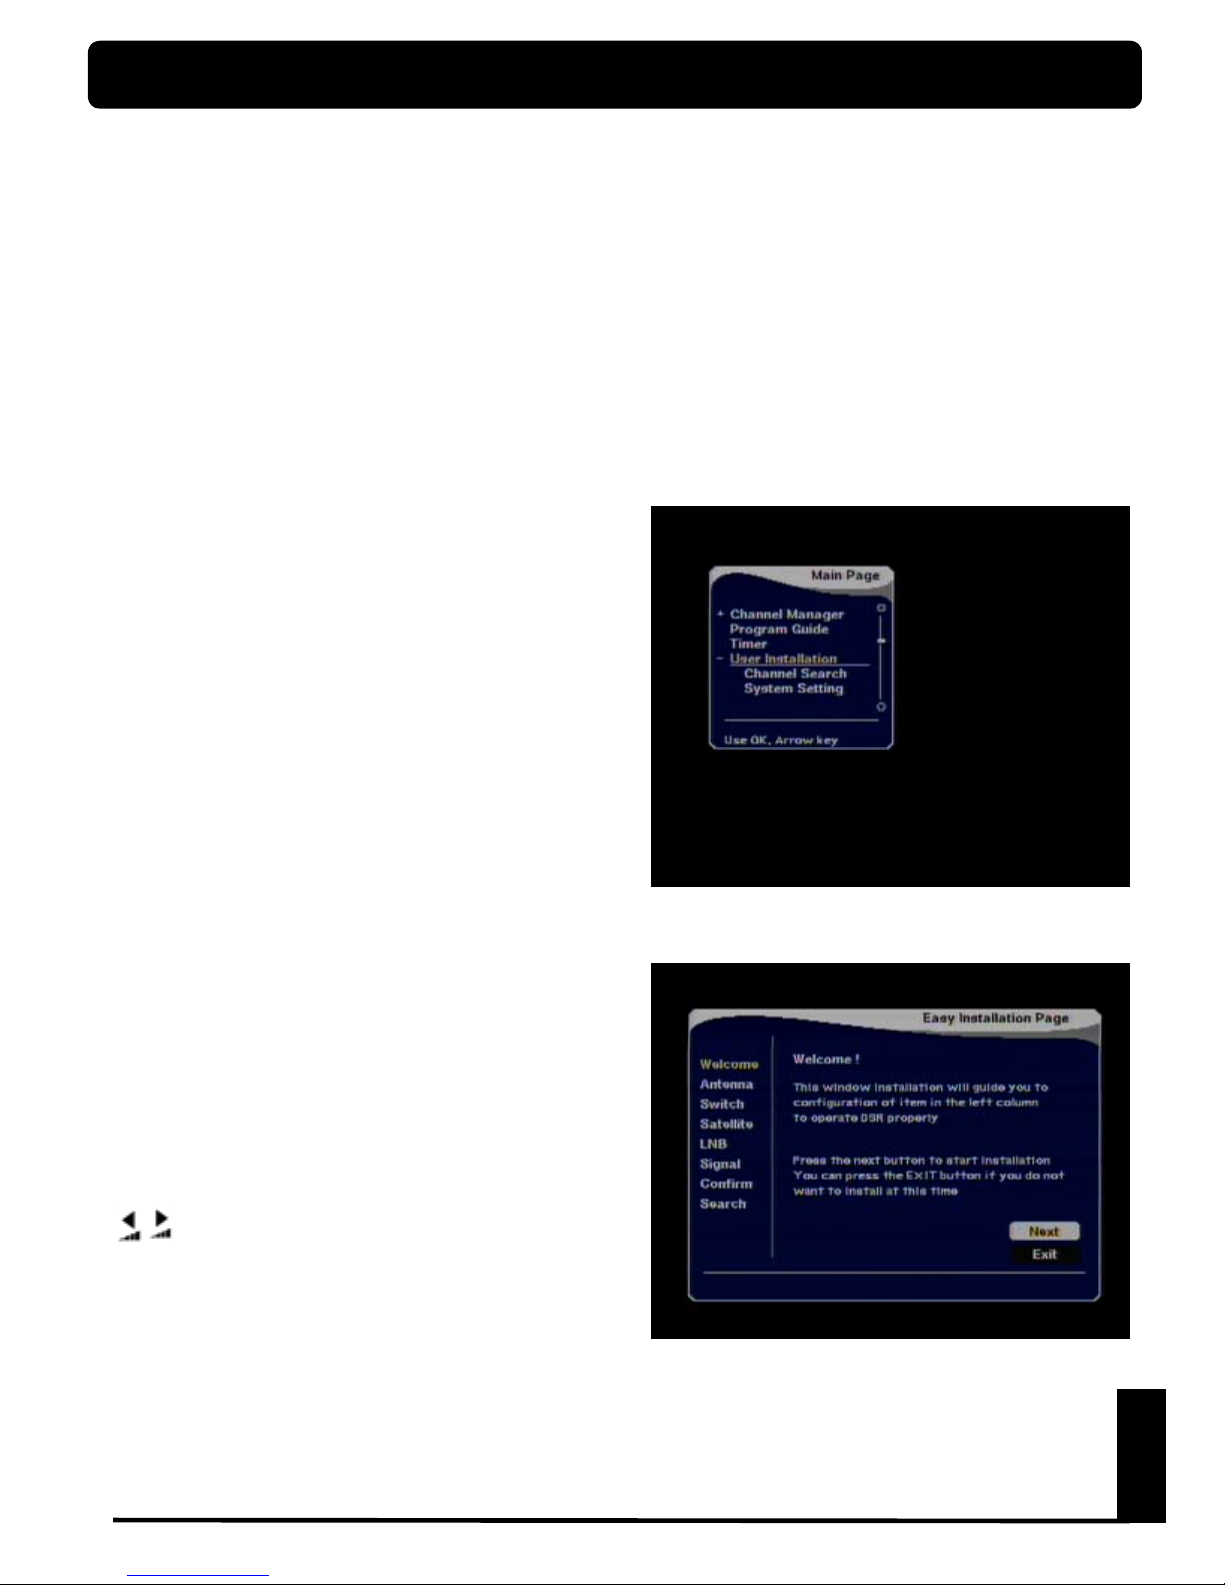
Turn on the
DX 2000
, then press MENU key
on the remote contr ol, the Main Page box will
be displayed on the upper left side of the
screen. Select by using the PR DOWN button
the menu “User Installation” and press OK,
suddenly the submenu appears.
After moving with same buttons to the “Easy
Installation” line the Welcom e picture of “Easy
Installation Page” will be displayed and this
picture indicates that you have started the
installation procedur e.
During the installation the OK button always
confirms a selection within these menus.
Selecting NEXT on screen menu and pressing
OK button will take you to the ne xt step in the
installation process.
You can always go b ack to the previous m enu
by selecting BACK and pressing OK button.
Use the
PR ▲▼
▲▼▲▼
▲▼
buttons to move upwards and
downwards form one line t o another line. Use
to change settings or press OK button
then Down List Box will be appeared. You can
also use the numeric buttons on the remote
control to select a line a menu and to enter
numeric value.
If you want to start installation procedure
select NEXT a nd press OK button.
If you do not want, selec t EXIT and press OK
button.
NOTE : If you are operating a
standard
one or two satellite antenna system (ASTRA,
HOTBIRD) you easily can watch channels
just after connecting antenna signal and TV.
DX 2000
is comfortably preprogrammed
for nearly all channels of European satellites
so that normally you do not need to go
through this FIRST TIME INSTALLATION
procedure.

English
-10-
Select Switch
Select the switches with which you want to
configure the antenna.
These switches relating to the antenna selection
and you can select maximum 16 antennas with
the combination of these switches.
For example, if you have 4 antennas, you can
assign Antenna 1 for 14 volt and 0 K Hz, Antenna
2 for 14 volt and 22 KHz, Antenna 3 for 18 volt
and 0 KHz and Antenna 4 for 18 volt and 22 KHz.
If you have only one antenna, select all of the
switches as None.
Select Satellite
Select satellite name among the preprogrammed list. You have to select proper
satellite considering installed antenna
direction and switch selection.
Note :
DX 2000
can store maximum 31
satellites
Select Antenna Number
Select the antenna number to which you w ant to
place your desired satellite.
These number is relating to the stored antenna
selection table and you can select one of 16
antenna numbers to which your satellite will be
assigned.
Most important antennas have been predefined in
ANTENNA SETUP menu.

English
-11-
Test Signal Level
Enter the LNB frequency
Select the type of your LNB. If you have
Universal L NB, select YES. Otherwise select NO.
Select LNB
In this menu you can see the signal level for all TP
in your sele c ted Satellite.
If you entered correct value, “Signal Locked”
message will be displayed and the beep sound will
be fast.
If “Signal unlocked” message continue, please
adjust your Antenna direction and check all of the
value which entered in previous menus is correct
or not.
If you completed this page, select NEXT pr essing
OK key
Enter the proper LNB frequency referring to
your LNB using numeric key on the Remote
control. Or use KEY PAD displayed by OK key
pressing.
If you have a dual LNB, enter the proper value
in the both of value box. Otherwise do not
concern to the second frequency entering box.
If you completed this page, select NEXT
pressing OK key

English
-12-
Complete Installation
Channel Searching
This message shows that you have completed
the setting of one antenna. Then place the
cursor on
NO
and select
NEXT
pressing OK key.
If you have other antenna which you want to
configure, select
YES
, then place the cursor on
the
NEXT
pressing OK button. Then it will bring
you the Antenna Select menu.
Confirmation Setup
Now you completed the INSTALL WIZARD, and if
you press OK key,
DX 2000
shows the channel
list on the right side screen.
Chose your desired channel using
PR ▲▼
▲▼▲▼
▲▼
key on
the remote control or Front panel and press OK
key to view the channel.
Note : If you move your favorite channel, use
channel list pressing OK button on your remote
control.
DX 2000
will automatically search the
channel for TV and RADIO and during this
procedure you can see the already searched
channels in the Searched List Box on screen.
If completed searching channel, cursor will be
placed on
COMPLETE automatically
, then
press OK key.
 Loading...