

ZEGO ELECTRONIC 4TX User Manual
BC
We hope you enjoy your Vektor Drone from
RadioShack. Please read this user’s guide before
setting up and using your drone.
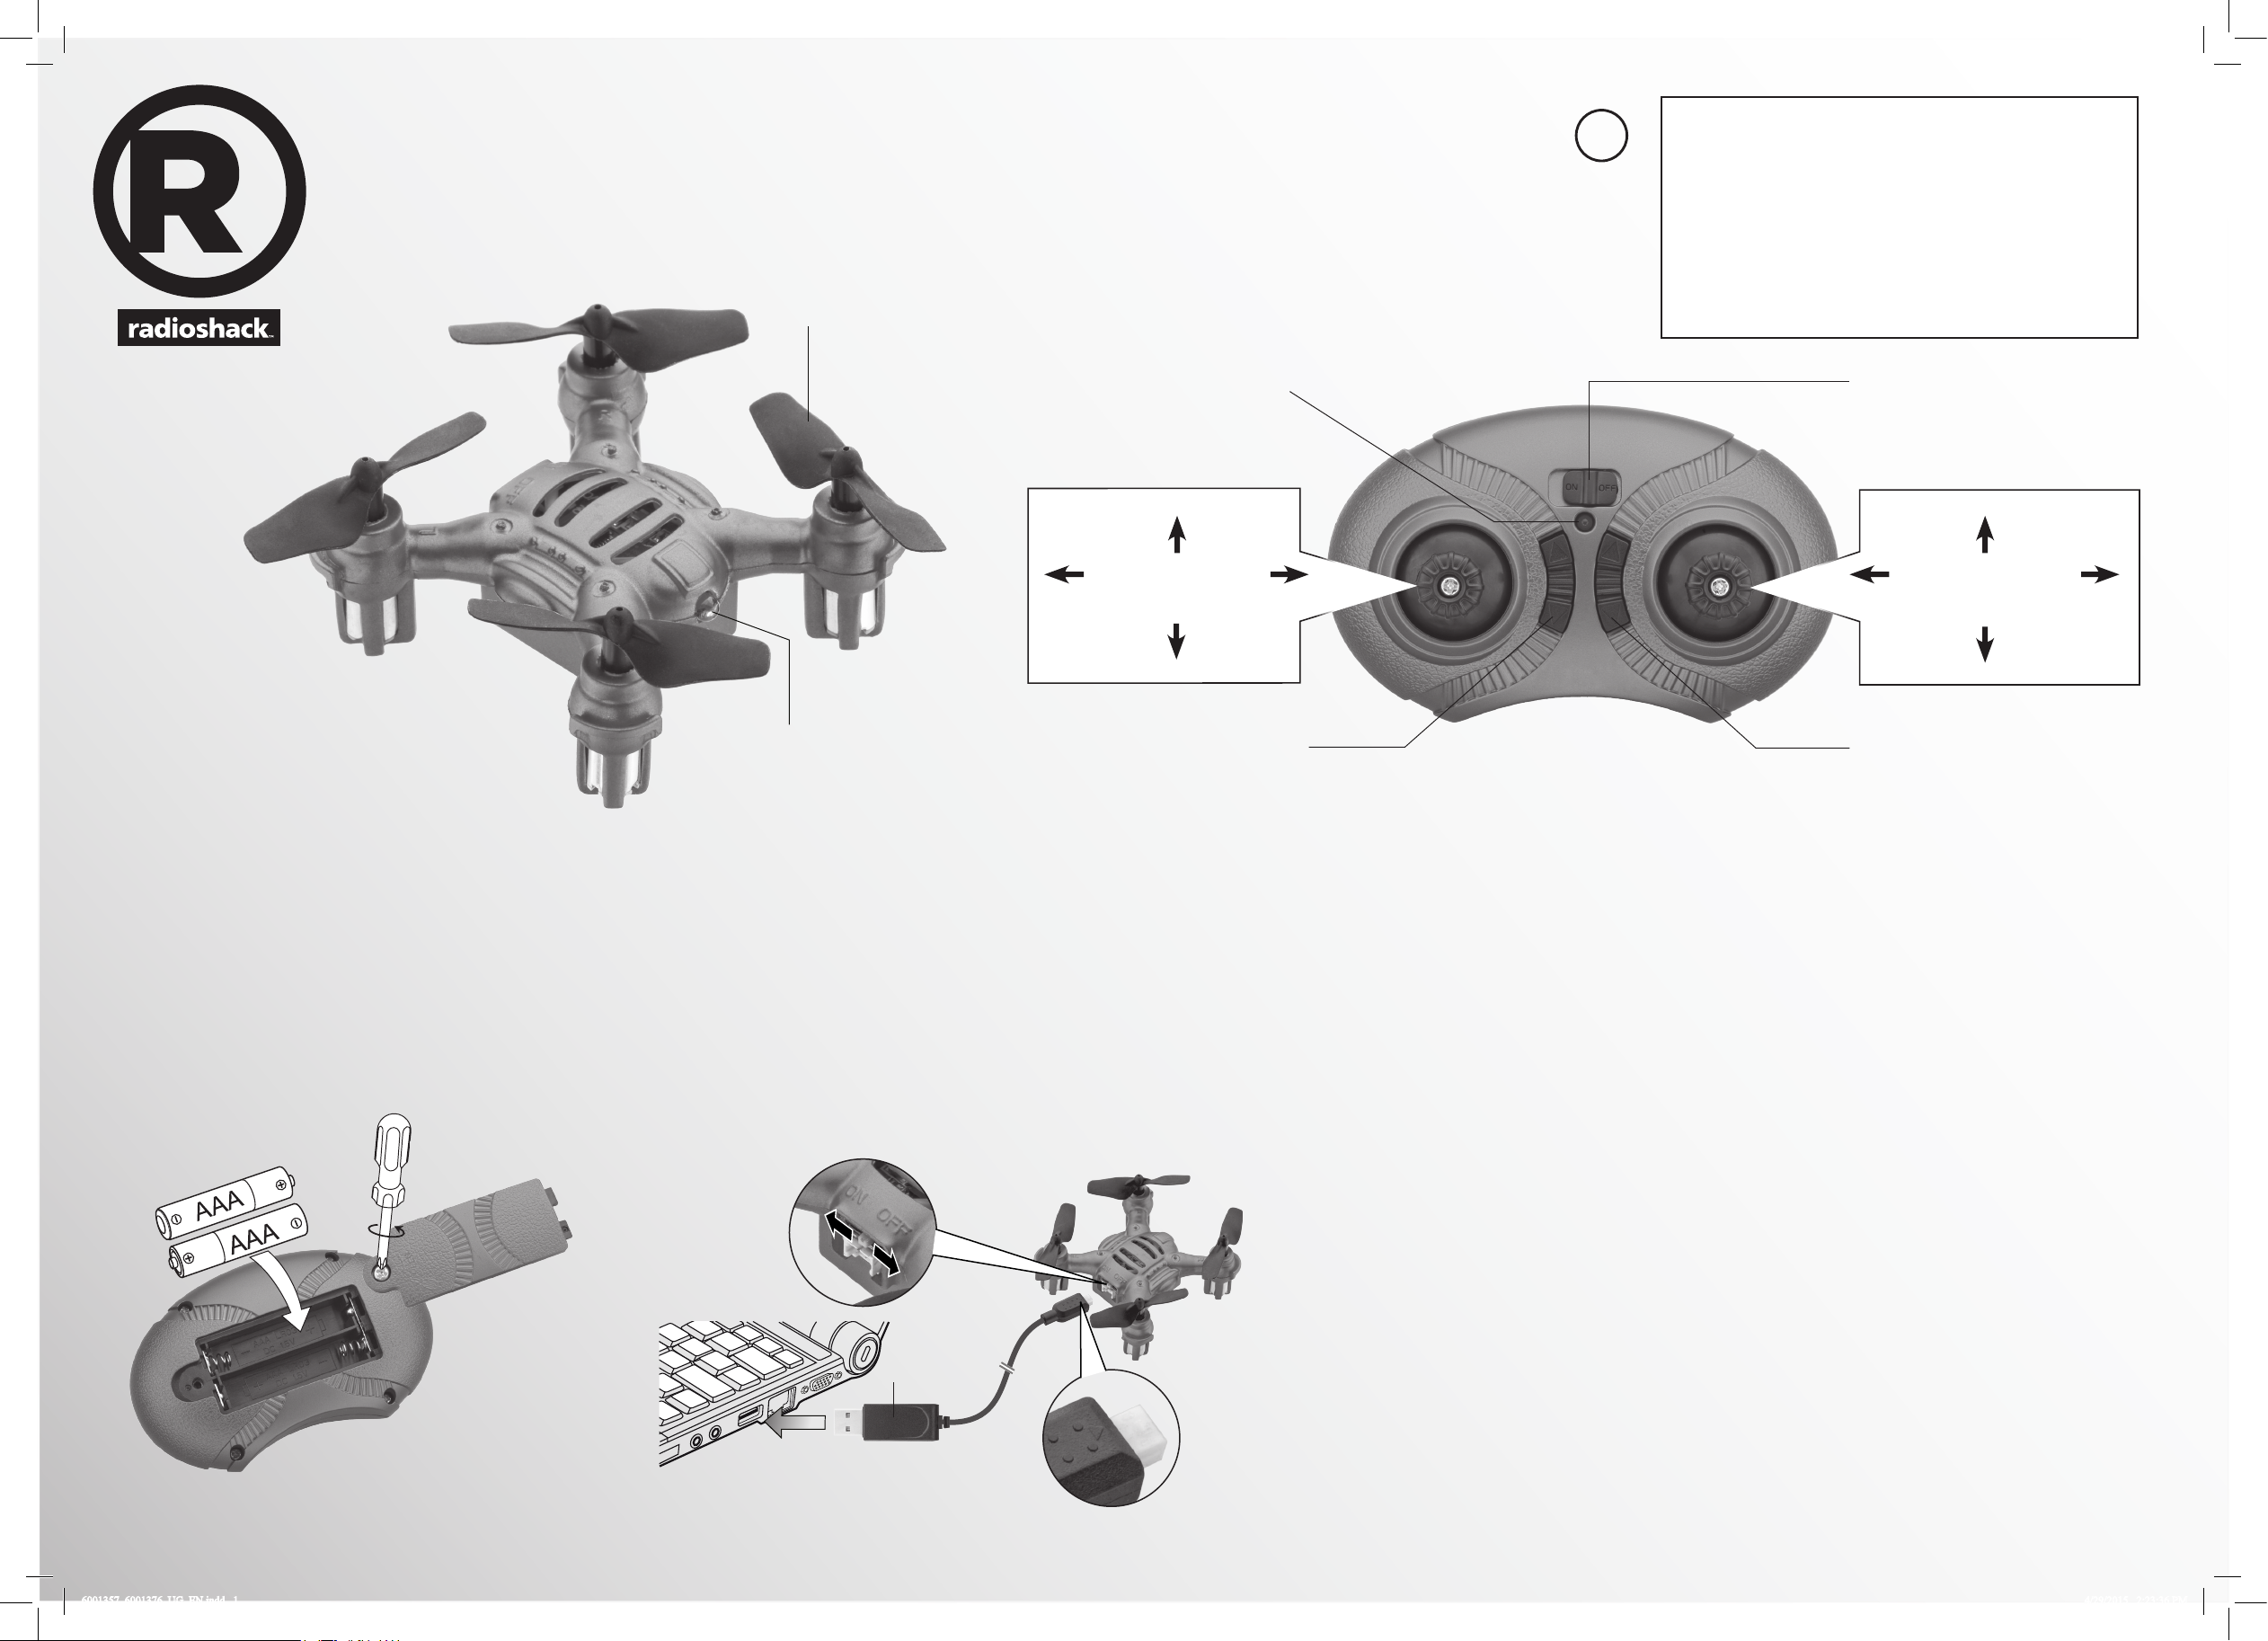
Vektor Drone
Rotor Blades (4)
(Stunt mode)
What’s Included
• Vektor Drone • Remote Control
Age 12+
LED ON/OFF
Throttle Steering
Ascend
Push
Descend
• USB Charging Cable • Spare Blades (4)
• 3.7V Drone Battery • User’s Guide
Forward
Push
(High/low
speed)
Backward
Slide rightTurn right Slide leftTurn left
Install Batteries in the Remote
Control
1.
On the remote control, set the ON/OFF switch to OFF.
2.
Use a screwdriver to open the battery compartment.
3.
Insert two AAA batteries (not included), matching
the polarities (+ and –) marked inside. Use alkaline
batteries for optimal performance. Replace the cover.
Note: If the remote control’s LED ashes during use, the
batteries are low and should be replaced.
LED
Forward/Reverse Movement Trim
Charge the Drone
Your drone uses a built-in lithium polymer battery for power.
1.
Use the USB charging cable to connect the battery to a USB power
source (such as a laptop). The LED on the USB connector lights red
during charging, and turns o when charging is complete.
A full charge takes about 35 minutes. A fully charged battery
provides up to 4 minutes of ight time.
2. After charging, unplug the USB charging cable. Do not attempt to
overcharge the battery.
Caution: Use only the included USB charging cable to charge the
drone's battery. Using any other cable may damage the drone.
ON/OFF
Left/Right Slide Trim
Get Ready to Fly
1. Turn on the drone. The LED ashes green.
2. Place the drone on level ground.
3.
Turn on the remote control. The remote control's LED ashes.
4.
Move the throttle all the way up and then down to pair the remote control with the drone.
The drone’s blades remain still during pairing. When paired, the LEDs on both the remote
control and drone light steadily.
Note:
If pairing fails, turn o the drone and remote control and repeat the steps above, or change
locations to avoid electrical interference.
Fly Your Drone
1. After pairing, push the steering control in to switch between high speed (double beep) and low
speed (single beep).
2. With the drone on the ground, move the throttle forward to ascend. To avoid ground air
turbulence, y the drone at least 1 ft. (30cm) o the ground.
For advanced users: Hold the remote control with one hand, resting your thumb on the throttle.
LED
Arrow
side up
© 2015 RadioShack Corporation.
All rights reserved. RadioShack is a registered trademark used by RadioShack Corporation.
6001357, 6001376_UG_EN.indd 1 4/29/2015 2:23:36 PM
Throw the drone about 9 ft. (3m) away from you, and move the throttle forward to y. The drone
adjusts itself automatically and ies smoothly.
IMPORTANT: If your drone crashes upside down, pull the throttle down and switch o the remote
control rst. Never touch the drone when blades are still moving.
6001357, 6001376
Printed
in China
04A15
Trim Your Drone
Move the throttle forward and see how the drone
reacts.
Forward/Reverse Movement Trim: If the drone
tends to move forward, press 6; if it tends to
move backward, press 5.
Left/Right Slide Trim: If the drone tends to slide
right, press 5; if it tends to slide left, press 6.
Note: The remote control beeps when you press
a trim control but stops beeping when you reach
maximum trim adjustment.
Land Your Drone
1. Slowly move the throttle backward to descend.
Avoid moving the throttle too quickly, as it can
stop the blades instantly and cause the drone to
crash.
2. When you nish ying, turn o the remote control
and drone.
Perform Stunts
1. Push the throttle control in so that the remote
control beeps repeatedly, indicating the drone is in
stunt mode.
2. Use the steering control to perform stunts:
• Frontip: Move steering forward
• Backip: Move steering backward
• Barrel roll: Move steering right or left
3. The drone automatically exits stunt mode after
performing a stunt, or you can push in the throttle
control again to exit immediately.
IMPORTANT: Make sure there is enough space for the
drone to perform stunts without crashing into objects
or people.
Calibrate the Drone
If controlling the drone becomes dicult, use
the following steps to calibrate the drone.
1. Select an open location without strong
magnetic interference and place the drone
on level ground.
2. Turn on the drone and the remote control,
then pair the remote control with the
drone.
3. With the throttle all the way down, move
the steering control all the way up until the
drone's LED ashes rapidly.
4. When the drone's LED lights steadily, your
drone is calibrated and should y smoothly.
Replace Damaged Blades
The left and right blades of the drone are dierent (see A and B
markings on the drone and blades). Make sure you insert the correct
blade in the correct location to y properly. If you need additional blades,
visit your local RadioShack store for help.
To replace a damaged blade, remove the old one and press the new
one onto the blade axle. If you cannot remove the old blade by hand,
use pliers.
WARNING:
• To avoid injury and damage, inspect the blades for nicks and breaks
and make sure they are securely attached before and after each
ight. Replace nicked, chipped, cracked or broken blades.
• Use only the supplied blades. Do not alter, modify, or customize the
blades.
B
Fly Safely
• When ying outdoors, keep the drone away
from power lines, trees, weeds, and water.
• When ying indoors, keep the drone away
from walls, air conditioning, air vents, fans,
breakable objec ts, and other obstacles.
• Do not y the drone near or at other people
or animals.
• Keep eyes, hands, hair, and loose clothing
away from moving blades.
• Adult supervision is recommended at all
times.
CHOKING HAZARD! Small parts. Not for
children under 3 years.
Specications
Power ..............................................................................
Drone .........................................................................
........... 3.7V 100 mAh lithium polymer battery
Remote Control ....................2 × AAA batteries
Remote Control ........................ 4 channel, 2.4GHz
Control Distance ................................... 65 ft. (20m)
Speci cations are subjec t to change and
improvement wit hout notice. Ac tual produc t may
vary f rom the images found in t his document .
Troubleshooting
Drone does not respond
• Make sure the drone and remote control are
switched on and paired. When paired, the
LEDs of the drone and remote control light
steadily.
• The drone battery may be low. Fully charge
the battery. See “Charge the Drone.“
• Remote control batteries may be low.
Replace the batteries.
• Make sure the drone is within the control
range (65 ft./20m) and in line of sight.
Dronediculttocontrol
• The blades may be deformed due to a
crash. Adjust deformed blades by hand. If
you cannot adjust them, replace with the
spare blades.
• The throttle control is very sensitive. Use
small, ne movements to control.
• If you are a beginner, set to low speed mode.
See “Fly Your Drone.“
Battery Notes
• Always let the drone battery cool before
recharging.
• Dispose of old batteries promptly and
properly. Do not burn or bury them. Use
only fresh batteries of the required size and
recommended type.
• Do not mix old and new batteries, dierent
types of batteries (standard, alkaline, or
rechargeable), or rechargeable bat teries of
dierent capacities.
• If you do not plan to use the drone for a
long period, remove the batteries from the
remote control. Batteries can leak chemicals
that can damage electronic parts.
Lithium Battery Notes
• Do not puncture or crush. Do not disassemble.
• Do not dispose of lithium batteries in the trash.
• If the electrolyte in the cells should get on
your skin, thoroughly wash with soap and
water. If in the eyes, rinse thoroughly with cool
water. Immediately seek medical attention.
• Follow the manufacturer’s instructions
for charging the drone and do not charge
longer than recommended. Unplug the
charging cable when the drone is charged.
• Do not attempt to charge or operate
damaged toys.
FCC Information
This eq uipment has be en tested and fou nd to
comply with th e limits for a Cl ass B digital device,
pursua nt to Part 15 of the FCC Ru les. These limits a re
designed to provi de reasonable p rotection aga inst
harmf ul interfere nce in a residenti al installation. This
equip ment generat es, uses, and ca n radiate radi o
frequency en ergy and, if not in stalled an d used in
accordan ce with the ins truction s, may cause har mful
inter ference to radio co mmunicati ons. However,
there is n o guarantee th at interferen ce will not occur
in a par ticular ins tallation . If this equi pment does
cause ha rmful inter ference to radio or television
recepti on, which can b e determined by t urning the
equip ment o and on, t he user is encour aged to try
to correc t the interfe rence by one or more of t he
follow ing measures:
• Reori ent or relocate the receiv ing antenna.
• Increase the sep aration between the equip ment
and recei ver.
• Conne ct the equip ment into an out let on a
circuit d ierent from th at to which the rece iver is
connec ted.
• Consul t your local Rad ioShack store or a n
exper ienced radio/ TV techni cian for help.
If you can not eliminat e the interfe rence, the FCC
require s that you stop using your eq uipment.
Chang es or modica tions not expres sly approved by
the par ty responsi ble for compliance coul d void the
user’s au thority to operate t he equipmen t.
This dev ice complies w ith Part 15 of the FCC Rules.
Opera tion is subjec t to the followi ng two condit ions:
(1) this device m ay not cause harmful inte rference,
and (2) this device must accept a ny interferen ce
receive d, includin g interferen ce that may cause
undesired ope ration.
A
Limited Warranty
RadioS hack warrant s this produc t against defe cts
in mater ials and work manship unde r normal use
by the origina l purchaser for ni nety (90) days a fter
the date of purchase from a Radi oShack-owned
store or an a uthorized RadioShack franchisee or
deale r. RADI OSHACK MAKES NO OTH ER EXPRESS
WARRAN TIES.
This wa rranty does not cover: (a) dama ge or failure
caused b y or attribut able to abuse, misuse, f ailure
to follow i nstructi ons, imprope r installat ion or
mainte nance, alteration, a ccident, Act s of God (such
as ood s or lightnin g), or excess voltag e or current;
(b) improp er or incorrectly per formed repai rs by
person s who are not a RadioS hack Author ized Ser vice
Facilit y; (c) consumable s such as fuses or bat teries;
(d) ordinary wear a nd tear or cosmeti c damage; (e)
transport ation, ship ping or insurance cost s; (f) costs
of produc t removal, ins tallation , set-up ser vice,
adjus tment or reinst allation; a nd (g) claims by persons
other than the o riginal purc haser.
Shoul d a problem occur t hat is covered by this
warra nty, take the product and t he RadioShac k sales
receipt as p roof of purchase date to any Radio Shack
store in the U.S. R adioShack wi ll, at its opti on, unless
other wise provided b y law (a) replace the pro duct with
the sam e or a comparabl e product, or (b) ref und the
purchas e price. All repl aced product s, and produc ts
on whic h a refund is made, b ecome the prope rty of
RadioS hack.
RADI OSHACK EXPRE SSLY DISCL AIMS ALL
WARRAN TIES AND CONDITIO NS NOT STATED
IN THIS LIMIT ED WARRANT Y. ANY IMPL IED
WARRAN TIES THAT MAY BE IMPOSED BY
LAW, INCLU DING THE IMPLIED WARR ANTY
OF MERCH ANTABI LITY AND, IF A PPLICABLE,
THE IM PLIED WARRANT Y OF FITNES S FOR A
A
B
PARTICUL AR PURPOSE, SHALL E XPIRE ON THE
EXPI RATION O F THE STATED WARRAN TY PERIOD.
EXCEPT A S DESCRIBED A BOVE, RADIOSHACK
SHALL H AVE NO LI ABILITY O R RESPONSIB ILITY
TO THE PURCHASER O F THE PRODUCT OR ANY
OTHER PERSO N OR ENTITY W ITH RESPECT TO ANY
LIABILIT Y, LOSS OR DAMAGE CAUSED DI RECTLY
OR IND IRECTLY BY USE OR PERFORMA NCE
OF THE PRO DUCT OR ARIS ING OUT OF ANY
BREAC H OF THIS WARRAN TY, INCLUDIN G, BUT
NOT LIMI TED TO, ANY DAMAGES RESULTING
FROM IN CONVENIENC E AND ANY LOSS OF
TIME, DATA, PROPERT Y, REVE NUE, OR PROFIT
AND AN Y INDIRECT, SPECIAL, IN CIDENTAL,
OR CONSEQU ENTIAL DAMAGES, EV EN IF
RADI OSHACK HAS BEEN A DVISED OF THE
POSSIB ILITY OF SU CH DAMAGES.
Some st ates do not allow l imitatio ns on how long an
implied war ranty lasts o r the exclusion o r limitatio n of
incid ental or conseq uential dam ages, so the ab ove
limit ations or exclu sions may not apply to you. This
warra nty gives you spe cic legal r ights, and yo u may
also have ot her rights w hich vary fro m state to state.
You may contac t RadioShack at :
RadioS hack Customer Re lations
300 Rad ioShack Circl e
Fort Wor th, TX 76102 02/14
ww w.rad ioshack.com
Compl ies with the E uropean
Union’s “ Restric tion of
Hazardo us Substan ces
Direc tive,” which prot ects the
enviro nment by restr icting
speci c hazardous m aterials
and prod ucts.
6001357, 6001376_UG_EN.indd 2 4/29/2015 2:23:37 PM
 Loading...