

ZEGO ELECTRONIC 3TX, 3RX User Manual
TM
6001352
Zeraxa Drone with Camera
User’s Guide
6001352_UG_EN_030315.indd 1 3/3/2015 2:52:37 PM
We hope you enjoy your Zeraxa Drone with Camera from RadioShack.
Please read this user’s guide before setting up and using your drone.
CHOKING HAZARD! Small parts. Not for children under 3 years.
Package Contents
• Zeraxa Drone with Camera • Remote Control
• USB Charging Cable • Spare Blades (2)
• 3.7V Drone Battery • User’s Guide
Specifications
Power .......................................................................................................................
Drone ...........................................................3.7V lithium polymer battery
Remote control ................................................................4 × AA batteries
Lens Resolution .................................................................................640 × 480
Control Distance ...................................................................200 f t. (60.96m)
Specif ications are subject to change and improvement without
notice. Actual product may vary from the images found in this
document.
Fly Safely
• When ying outdoors, keep the drone away from power lines,
trees, weeds, and water.
• When ying indoors, keep the drone away from walls, air
conditioning, air vents, fans, breakable objects, and other obstacles.
• Do not y the drone near or at other people or animals.
• Keep eyes, hands, hair, and loose clothing away from moving blades.
• If the drone crashes, the SD card may fall out and be lost.
• Adult supervision is recommended at all times.
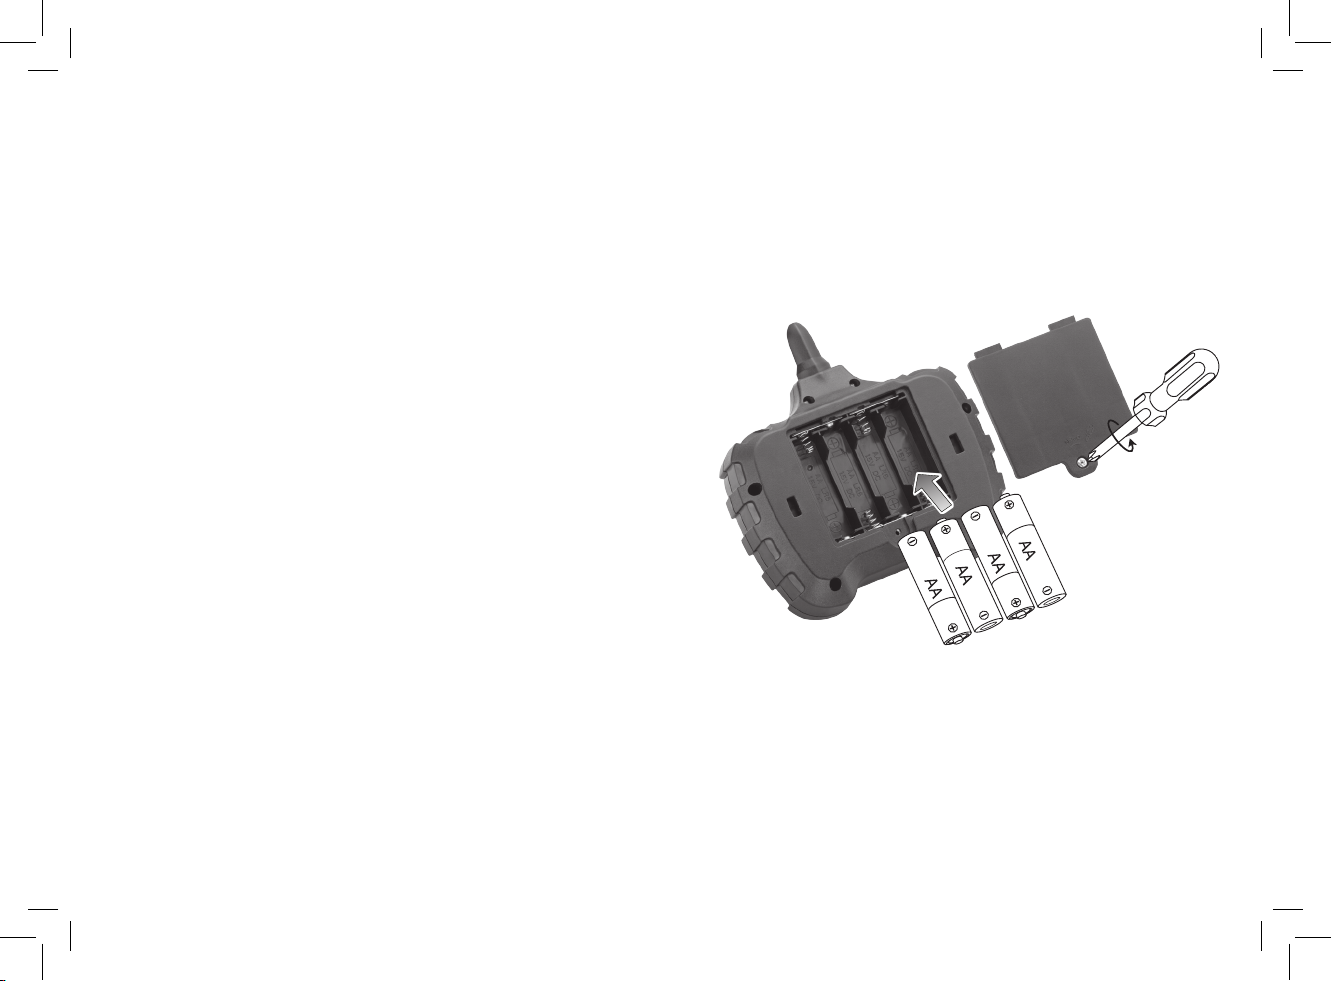
Install Batteries in the Remote Control
1. On the remote control, set the ON/OFF/Special switch to OFF.
2. Use a screwdriver to open the battery compartment.
3. Insert four AA batteries (not included), matching the polarities
(+ and –) marked inside. Use alkaline batteries for optimal
performance. Replace the cover.
Note: If the remote control’s LED ashes during use, the batteries are
low and should be replaced.
2 3
6001352_UG_EN_030315.indd 2-3 3/3/2015 2:52:37 PM
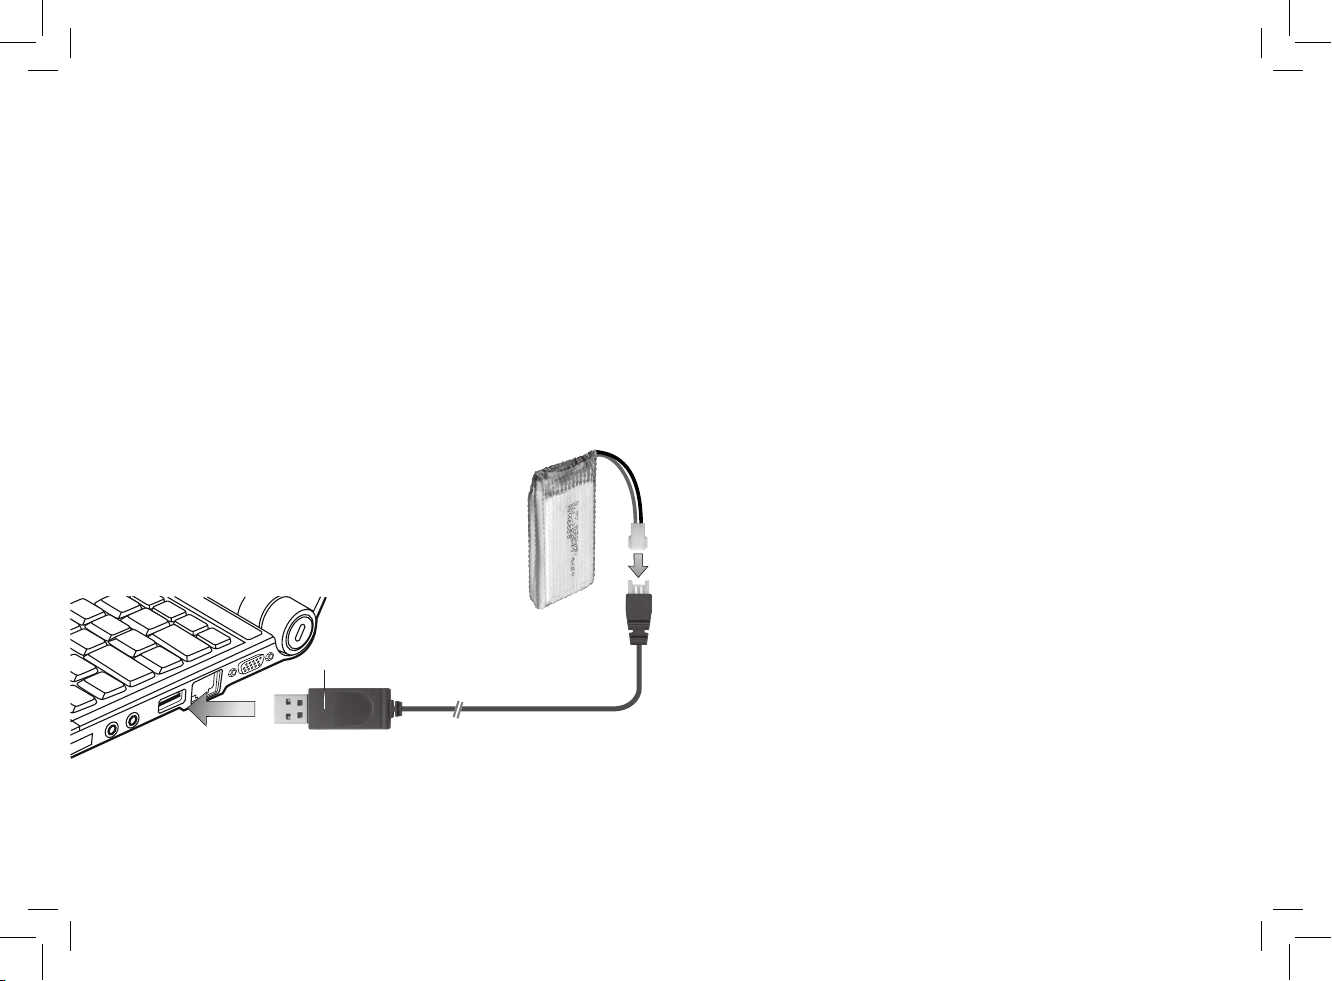
Charge the Drone Battery
Your drone uses a lithium polymer battery for power.
1. Use a screwdriver to open the drone batter y compartment door.
2. Take out the battery. Holding the battery connector (NOT the
cable), carefully unplug the battery from the drone.
3. Use the USB charging cable to connect the battery to a USB
power source, such as a laptop. The LED on the USB connector
lights red during charging, and turns o when charging is
complete.
A full charge takes about 100 minutes. A fully charged battery
provides up to 5 minutes y time with camera function.
4. After charging, unplug the USB charging cable. Do not attempt
to overcharge the battery.
Caution: Use and charge only the supplied lithium battery with the
included USB charging cable. Using any other battery and cable may
damage the drone.
LED
Battery Notes
• Always let the drone battery cool before recharging.
• Dispose of old batteries promptly and properly. Do not burn
or bury them. Use only fresh batteries of the required size and
recommended type.
• Do not mix old and new batteries, dierent types of batteries
(standard, alkaline, or rechargeable), or rechargeable batteries of
dierent capacities.
• If you do not plan to use the drone for a long period, remove the
batteries from the remote control. Batteries can leak chemicals
that can damage electronic parts.
Lithium Battery Notes
• Do not puncture or crush. Do not disassemble.
• Do not dispose of lithium batteries in the trash.
• If the electrolyte in the cells should get on your skin, thoroughly wash
with soap and water. If in the eyes, rinse thoroughly with cool water.
Immediately seek medical attention.
• Follow the manufacturer’s instructions for charging the drone and
do not charge longer than recommended. Unplug the charging
cable when the drone is charged.
• Do not attempt to charge or operate damaged toys.
4 5
6001352_UG_EN_030315.indd 4-5 3/3/2015 2:52:38 PM

Rotor Blades (4)
Back LEDs (green)
ON/OFF
Body LEDs (red)
Front LEDs (white)
Camera Lens
6 7
6001352_UG_EN_030315.indd 6-7 3/3/2015 2:52:38 PM
 Loading...