

Page 1
APPLICATION NOTE
Using ZvSTB Control
for Set Top Boxes
About ZvSTB Control
The ZvSTB Control functionality allows for simple control of H25 DirecTV receivers
(also called set top box) through Maestro.
To use ZvSTB Control, rst you congure the set top box and then you congure
Maestro to manage the box.
Conguring the H25 DirecTV receiver
You must congure every DirecTV box with a static IP
address to ensure reliable access to the ZeeVee device.
1. Connect the H25 DirecTV receiver to a television
and power on both the receiver and the television.
Ensure the H25 is connected to a satellite feed.
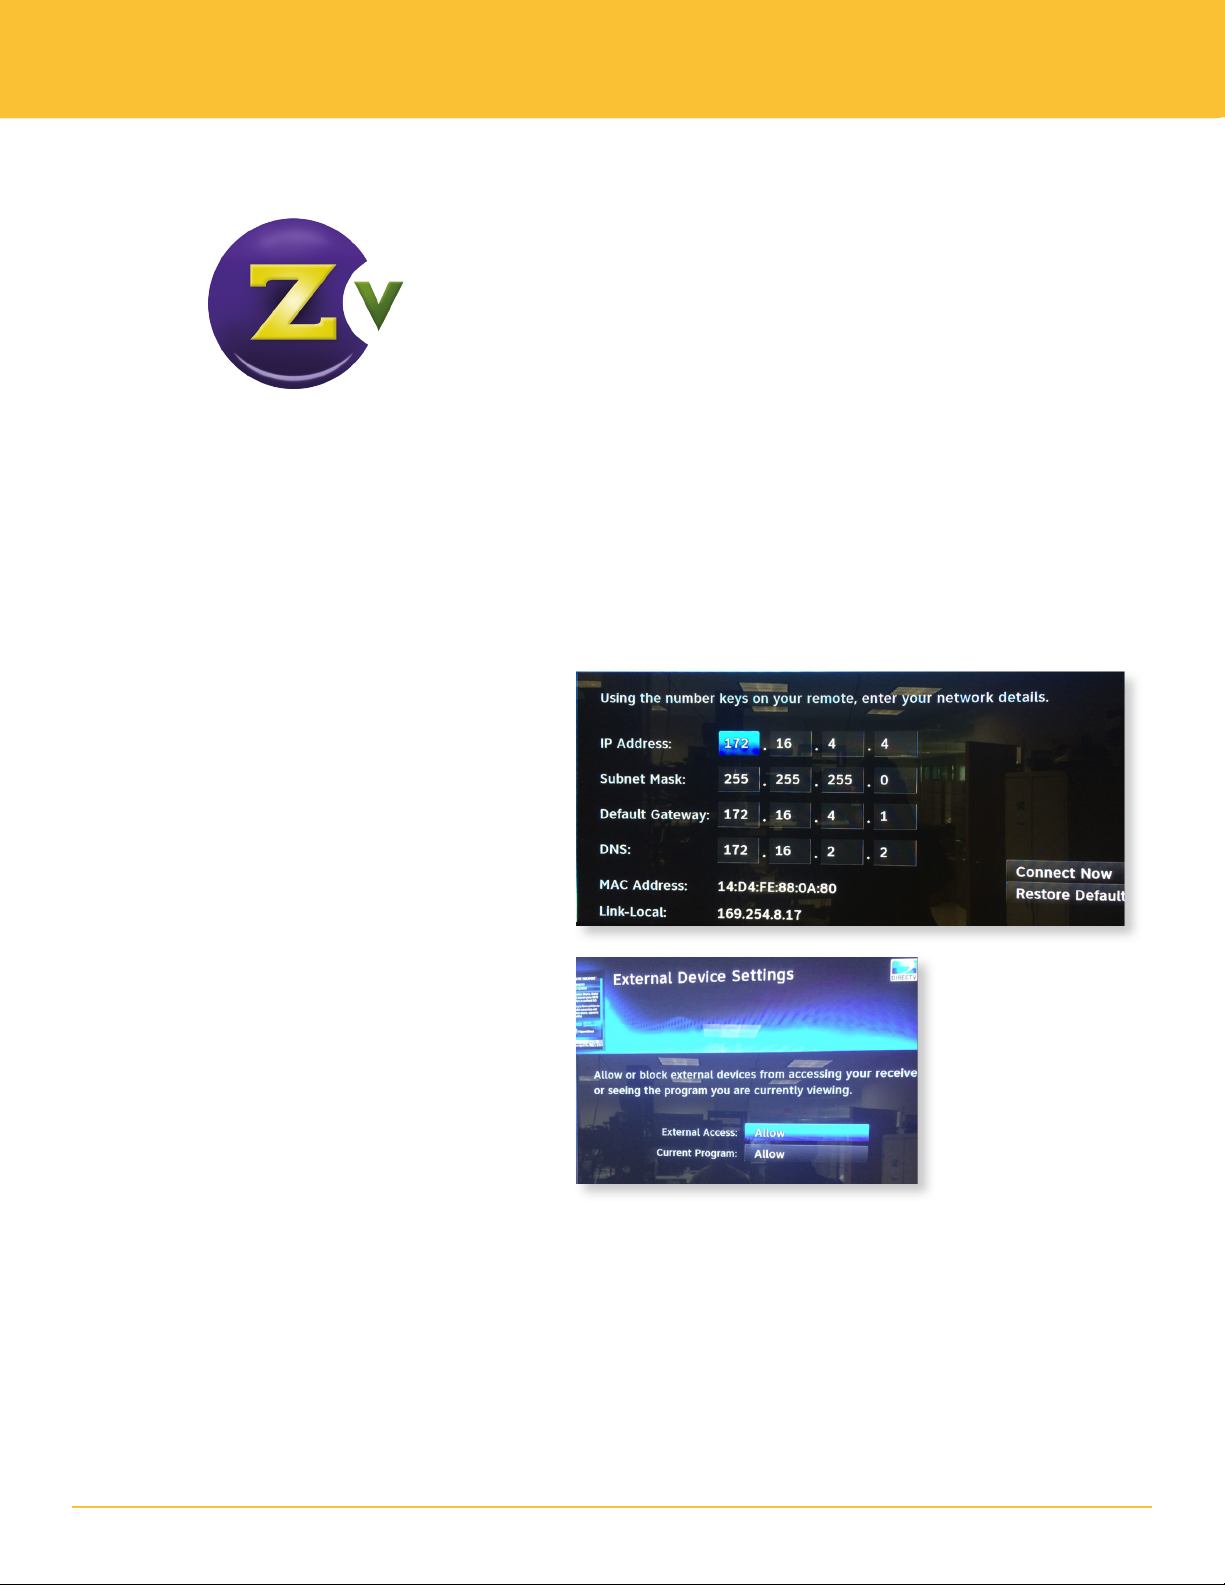
2. Navigate through the settings to the Network
Conguration Page and take the following steps:
a. Assign a unique IP address to the H25 unit. Note
the IP address for easy reference later.
b. Set a default gateway
c. Set a DNS server (optional)
3. Navigate to the Whole-Home page and take the
following steps:
a. Set External Access to Allow
b. Set Current Program to Allow
4. Navigate to the Video Settings Page and set allowed
resolutions according ZeeVee product specications:
• If connected to an HDb 2500 unit, set 720p
• If connected to an HDb 2600 unit, set 1080i
(or 720p)
Note: Setting the allowed resolutions is important for the
HDb2500 units to ensure that the STB does not auto select
1080i (beyond the supported resolution of the HDb2500).
Setting the allowed resolutions for the HDb2600 products is
optional, as the output will follow the input.
1www.zeevee.com
Page 2
USING Zv STB CONTROL FOR SET TOP BOXES
Conguring Maestro for set top box management
After conguring the set top box, use Maestro to specify options for managing the units.
1. Connect to Maestro by entering the IP address in the browser.
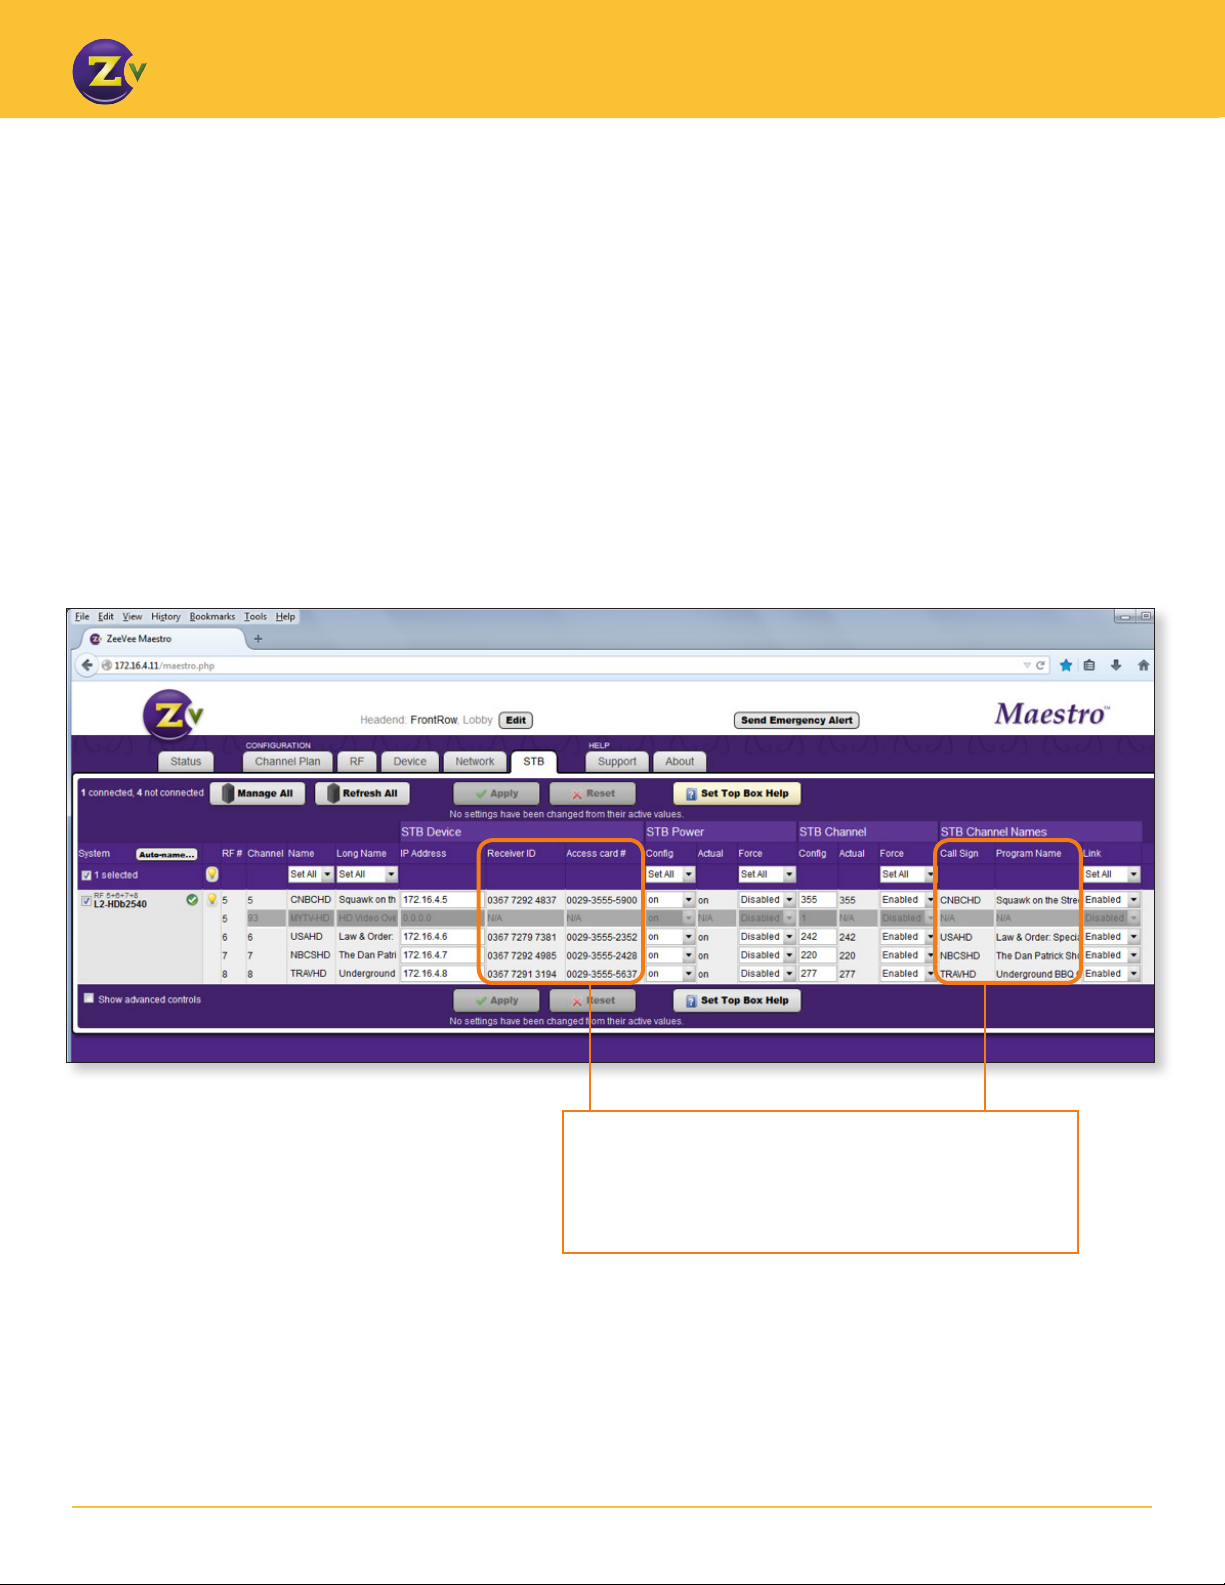
2. Click the STB tab to navigate to the set top box conguration and control page.
3. Set the IP address of the given set top box in the IP Address eld of the STB Device
section. Once entered, click Apply and the page refreshes with the appropriate data from
the set top box (for example, Receiver ID and status information). To view and manage
individual set top box units, you need to enter the proper IP address for the given box in
its associated input eld.
If an IP address is not present in the STB IP Address eld for a given input, the ZeeVee unit does
not enable remote management operations.
The elds on the STB tab
page all contain values that
live on the ZeeVee unit.
The Call Sign Name, Program Name, Receiver ID, and
Access Card values are all updated and displayed at
regular intervals. These are informational and helpful
to determine which STB is connected.
2www.zeevee.com
Page 3

USING Zv STB CONTROL FOR SET TOP BOXES
Managing the set top box
Once you have programmed the IP addresses of the connected set top boxes through the boxes themselves and through Maestro,
information from each managed unit such as power status (on/off), current channel, and program information is pulled into the STB
tab. This information updates approximately every 5-10 seconds.
You can now control the following options on the STP page:
Force mode
When enabled, the associated
STB participates in periodic
and automatic queries that set
the unit to the conguration
specied in Maestro. The
cycling occurs approximately
every 5-10 seconds, on a freerunning basis with no user
intervention required.
STB power
In the STB Power section, you can
power individual units on or off. The
“on” or “off” text in the Actual eld
indicates the current state of the set
top box for the specied input port
(on the ZeeVee unit).
In the STP power section:
1. Click in the Cong eld and
choose on or off.
2. (optional) Click in the Force
eld to enable (or disable), the
associated set top box to “force”
the setting you specify. With Force
enabled, Maestro will query the
box automatically and periodically
and set the command to your
conguration. For example, if the
set top box is turned off, yet it’s
congured in Maestro as “on,” an
enabled Force sends a command
to set the power on to match the
Maestro setting.
3. Click Apply to save.
The entire block of set top box units
under management can be controlled
simultaneously by clicking Set All
option at the top of the column.
STB Channel Number
In the STB Channel Number section, you can set the
desired channel number to be sent to the set top box.
The number in the Actual eld indicates the current
channel set to the STB for the specied input port (on the
ZeeVee unit).
To set STP channel numbers:
1. Click in the Cong eld and enter the desired channel
number for the STB.
2. (optional) Click in the Force eld to enable (or disable),
the associated set top box to “force” the setting you
specify. With Force enabled, Maestro will query
the box automatically and periodically and set the
command to your conguration. For example, if
“242” appears in the Actual eld, yet it’s congured in
Maestro as “142,” an enabled Force sends a command
to set the channel to 142 to match the Maestro setting.
3. Click Apply to save.
The currently active channel number the STB uses may
vary from the congured value because of events at the
STB (reconguration, STB rmware download, etc.). If
“Force” is enabled, that condition corrects at the next
automatic interval. If not in Force mode and there is a
mismatch, the STB channel number can be manually
resent to be corrected.
If Maestro detects a mismatch between the congured
channel and the actual active channel at the STB, a
triangular warning ag will be displayed next to that value.
STB Channel Names
You can assign the Call
Sign and Program Name
to a ZeeVee channel using
the Link option in the STB
Channel Names section.
These elds populate
automatically as do all the
elds from a ZeeVee unit
when the set top box is
assigned to it.
If you enable the Link
function, the Call Sign (for
example, CNBCHD) will be
used for the ZeeVee Channel
Name eld and Program
Name (for example, Closing
Bell) will be used for the Long
Channel Name eld. You
cannot edit these elds when
the Link option is enabled.
To link STB Channel Names
with program information:
1. Click in the Link eld
and choose enabled or
disabled.
2. Click Apply to save.
3www.zeevee.com
 Loading...