

Page 1
APPLICATION NOTE
Generating EAS Alerts
About the Emergency Alert System (EAS)
ZeeVee devices now support the Emergency Alert System (EAS) by integrating with the Monroe
R189 EAS Encoder/Decoder. Using EAS, you can tie systems into national (Federal, FEMA, etc.)
or local (city, county, state) alert systems. ZeeVee processes alerts sent with either EAS-NET™ or
MPEG streaming Monroe functionality.
When an alert is active, all current audio and video will be interrupted and replaced with the alert.
The text of the alert displays in white font on a blue background. The front panel display also
shows a ashing message indicating that an EAS alert is in progress. The status tab in Maestro
will also display a warning.
When using EAS-NET,™ it is important to ensure that both the R189 and ZeeVee modulator
have synchronized system clocks. When using MPEG streaming, the alert will be processed
immediately which eliminates the need for synchronized system clocks.
To congure your system for EAS generated alerts, you need to:
• Choose to use either EAS-NET or EAS-MPEG Streaming
• Congure Maestro on the ZeeVee unit according to EAS choice
• Congure Monroe EAS R189
EAS FUNCTIONALITY REQUIREMENTS AND PREREQUISITES
This document assumes the reader
has an understanding of the basics
behind conguring both the ZeeVee
device and the Monroe R189 EAS
Encoder/Decoder. For more detailed
instructions, please refer to the user
manuals for the appropriate device.
To set up the EAS within the ZeeVee
system, the following system
functionality and requirements need
to be in place.
Needed for EAS-Net
• Any ZvPro or HDbridge2 device
running 1.9.0 or higher rmware
• Monroe R189 EAS Encoder/Decoder
with additional EAS-Net license
• IPv4 network connectivity between
the ZeeVee devices and the R189
• Connectivity to a Network Time
Protocol (NTP) server
Each ZeeVee system requires use of either EAS-Net or EAS-MPEG Streaming.
Needed for EAS-MPEG Streaming
• Any ZvPro or HDbridge2 device
running 1.9.2 or higher rmware
• Monroe R189 EAS Encoder/Decoder
with additional Stream MPEG 1/2
license
• IPv4 network connectivity between
the ZeeVee devices and the R189
www.zeevee.com
1
Page 2
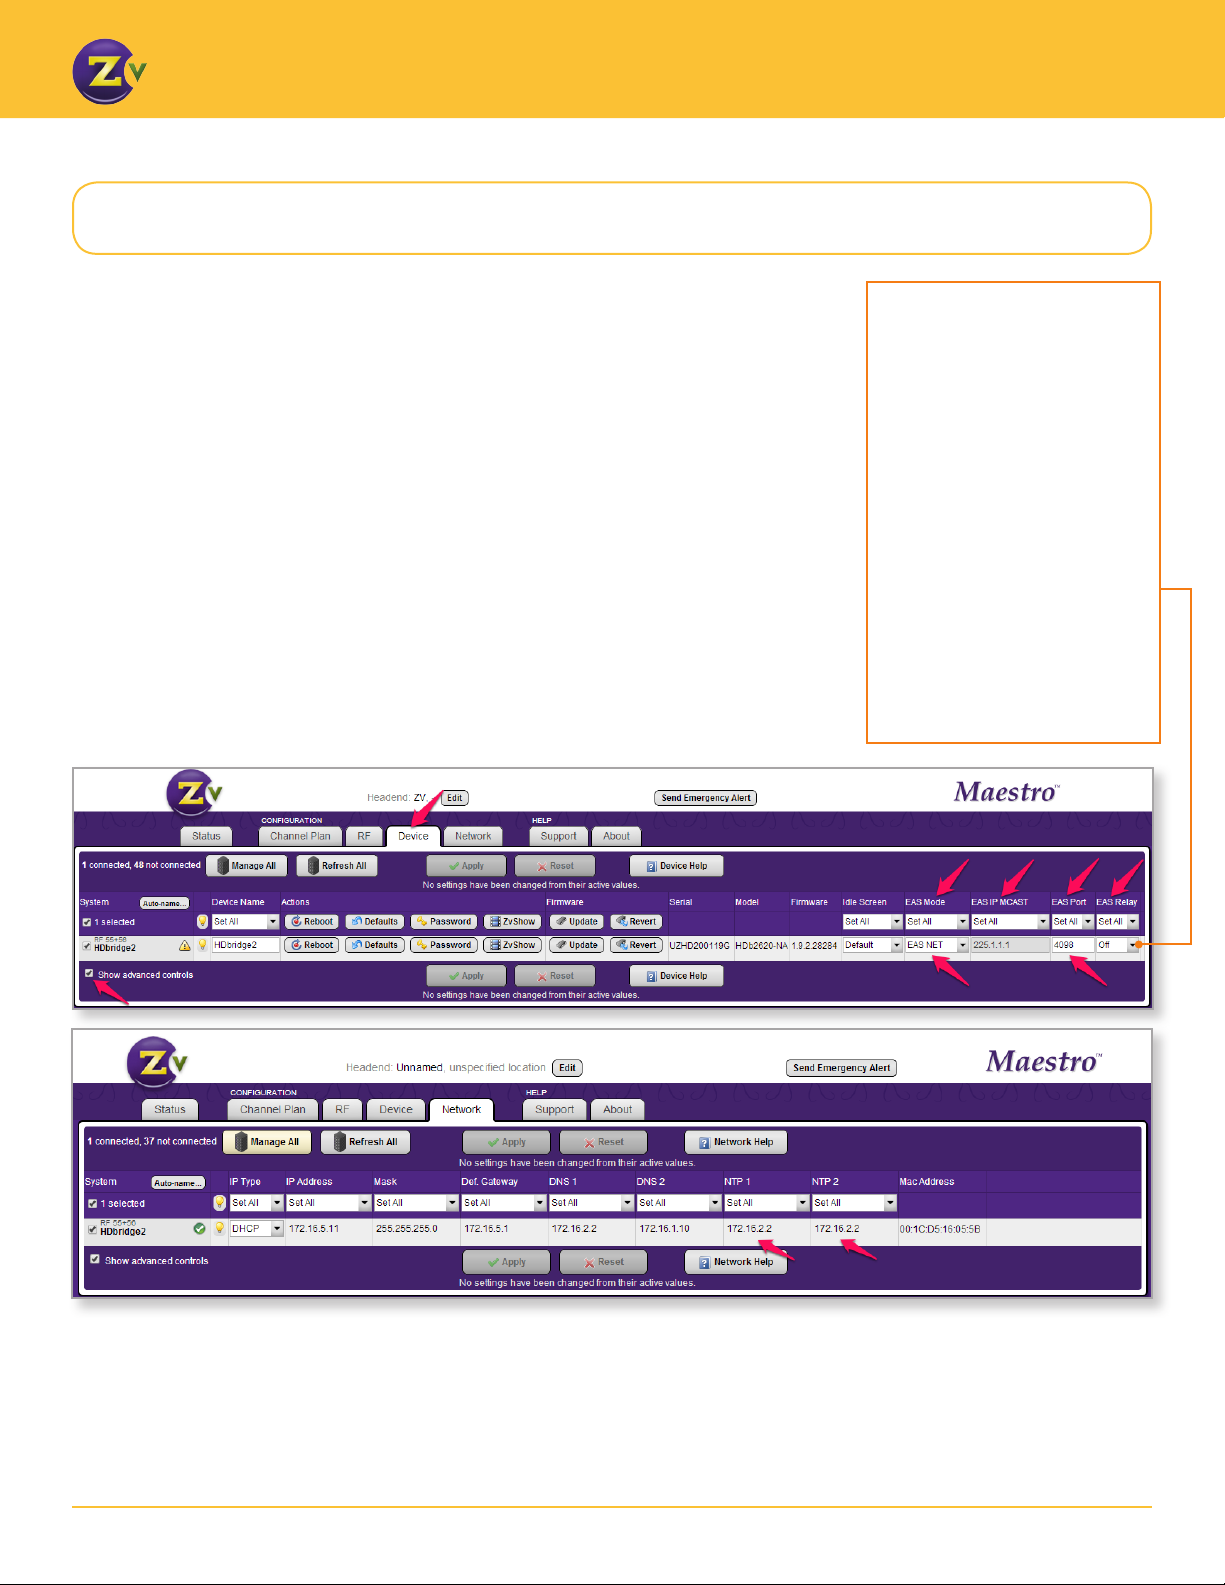
Conguring Maestro for EAS-NET
For EAS-NET, congure using Maestro as follows:
1. Open Maestro.
2. Click on the Device tab and enable Show advanced controls.
3. Change the “Disabled” status below the EAS Mode eld to specify the type of EAS mode
(EAS Net).
4. Specify a port value in the EAS Port eld. EAS Port has an allowable range of 0-65534. Note
that port values between 1 and 1023 are well known ports and should be avoided. ZeeVee
recommends using a port value of 4096 or greater. In the case that a port value is specied
that results in a system conict (e.g. 80), Maestro will display an error once the conguration
is applied. The EAS port should be identical on all devices in a multi-unit deployment.
5. (Optional — For use of EAS Relay only) Change the EAS Relay to “On”. The EAS Relay
conguration is required only for installations where more than eight EAS-Net devices are
installed. Monroe R189 allows only eight devices to be congured, so the relay feature
provides a way to use more than eight devices. This number includes both ZeeVee and
non-ZeeVee devices.
Only one ZeeVee unit should be set up as a relay per installation or headend.
GENERATING EAS ALERTS
By default the EAS Relay is
off. When the EAS Relay is
set to “On”, the system will
forward the alert sent by the
Monroe R189 to all other known
ZeeVee devices. The alert is
forwarded sequentially so a large
installation might see a delay
before all modulators begin
processing the alert.
The ZeeVee EAS Relay feature
allows you to congure one
ZeeVee unit in the Monroe R189.
That one device communicates
with the Monroe box and its
information cascades down to
the other ZeeVee units.
6. Connect ZeeVee units to one or more NTP servers. This connection ensures that all
system clocks are in sync so when the Monroe sends an alert to the ZeeVee device, the
alert processes at the appropriate time.
To connect, click on the Device tab and enable Show advanced controls. Then ll in the
fully qualied domain name as appropriate in the NTP server elds.
2www.zeevee.com
Page 3
GENERATING EAS ALERTS
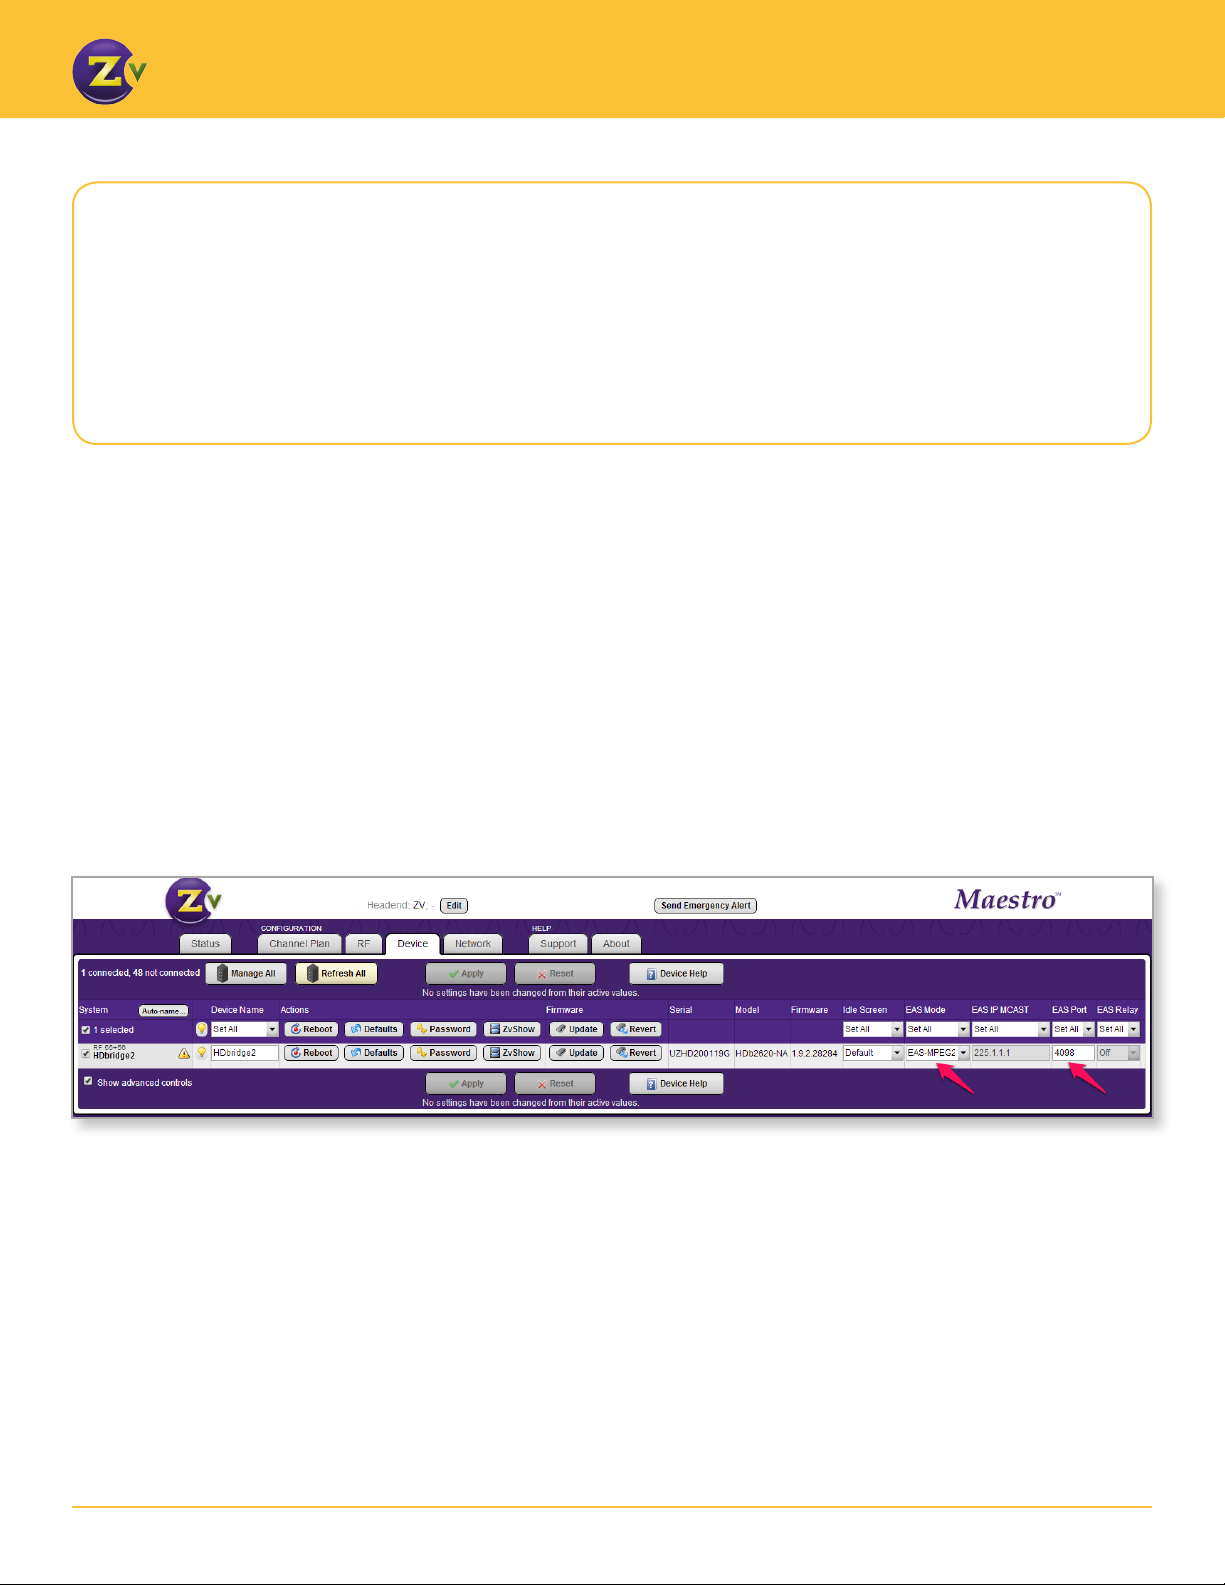
Conguring Maestro for EAS-MPEG2
If using EAS-MPEG, you need to choose between EAS-MPEG2 and EAS-MPE2G-MCAST.
The EAS-MPEG2 conguration option is for those MPEG streaming installations using unicast IP addresses.
When selecting this option, the EAS IP MCAST and EAS Relay elds will become disabled.
For EAS-MPEG2, congure using Maestro as follows:
1. Open Maestro.
2. Click on the Device tab and enable Show advanced controls.
3. Change the “Disabled” status below the EAS Mode eld to specify the type of EAS mode
(EAS MPEG2).
4. Specify a port value in the EAS Port eld. EAS Port has an allowable range of 0-65534.
Note that port values between 1 and 1023 are well known ports and should be avoided.
ZeeVee recommends using a port value of 4096 or greater. In the case that a port value is
specied that results in a system conict (e.g. 80), Maestro will display an error once the
conguration is applied. The EAS port should be identical on all devices in a multi-unit
deployment
3www.zeevee.com
Page 4

GENERATING EAS ALERTS
Conguring Maestro for EAS-MPEG2-MCAST
If using EAS-MPEG, you need to choose between EAS-MPEG2 and EAS-MPE2G-MCAST.
The EAS-MPEG2-MCAST conguration option is for those installations using MPEG streaming to multiple
devices using a multicast IP address. When selecting this option the EAS Relay eld will become disabled.
For EAS-MPEG2-MCAST, congure using Maestro as follows:
1. Open Maestro.
2. Click on the Device tab and enable Show advanced controls.
3. Change the “Disabled” status below the EAS Mode eld to specify the type of EAS mode
(EAS-MPEG2-MCAST).
4. Enter the multicast address where the ZeeVee device receives EAS MPEG2 multicast
streams in the EAS IPMCAST eld. Valid multicast IPs are between 224.0.0.0 and
239.255.255.255.
5. Specify a port value in the EAS Port eld. EAS Port has an allowable range of 0-65534.
Note that port values between 1 and 1023 are well known ports and should be avoided.
ZeeVee recommends using a port value of 4096 or greater. In the case that a port value is
specied that results in a system conict (e.g. 80), Maestro will display an error once the
conguration is applied. The EAS port should be identical on all devices in a multi-unit
deployment.
ZeeVee devices do not implement IGMP. Therefore, it is important to note that both the R189 and
ZeeVee modulators should be connected to the same LAN segment.
4www.zeevee.com
Page 5

GENERATING EAS ALERTS
Monroe R189 Conguration
After conguring the ZeeVee unit for EAS, congure Monroe R189 in the Setup tab on the web administration page.
Conguring Network and Time
In the Setup section:
1. Click on Time and enter the NTP
conguration location (name or
IP address) on the R189. This
location should match the server
congured on the ZeeVee device.
2. Click on Audio and then the Audio
Output Levels/Tests tab.
3. Select 48000 samples per second.
ZeeVee devices require audio
that has been sampled at 48000
samples per second.
5www.zeevee.com
Page 6

Conguring EAS Net Alerts
Once the network and time conguration have been
veried, the next step is to congure EAS NET.
If the ZeeVee EAS Relay feature is being used then only the
device congured as the relay needs to be congured.
In the Setup section:
1. Click on Net Alerts and then click on the EAS Net tab.
2. Ensure that the Streamed Audio Output Sample Rate
is set to 48000 samples per second.
3. Ensure that the Alert Forwarding and Enable Client
Interface options are enabled.
GENERATING EAS ALERTS
4. Congure the following options (see grayed area in
image) for each ZeeVee device that receives alerts
from the Monroe R189:
• Ensure client is enabled (ENABLE Client Interface).
• Ensure remote host address matches the ZeeVee
device (Remote EAS NET Host IP Address).
• Set EAS_NET Event Transfer Protocol to “TCP
Event Notication.”
• Ensure the Remote EAS NET Host Port matches the
value congured on the ZeeVee device.
• Ensure the Remote EAS NET Host Data Port
matches the remote host port value.
• Ensure the Send Composite EAS Audio le option
is enabled.
6www.zeevee.com
Page 7

GENERATING EAS ALERTS
Conguring EAS MPEG Streaming Alerts
Once the network and time conguration have been veried the next step is to congure EAS MPEG.
In the Setup section:
1. Click on Net Alerts, and click on the
Stream Mpeg tab.
2. Congure the following for each
ZeeVee device that receives alerts
from the Monroe R189:
• Ensure MPEG 1/2 Video Format is
set to MPEG2:D1-720
• Ensure MPEG Audio Format is set to
VLC A52(AC3)
• Ensure MPEG Audio Bitrate is set to
192Kbits/sec
• Ensure MPEG Audio Sample rate is
set to 48K samples/sec
• Ensure remote host address
matches the ZeeVee device (Remote
Host Unicast or Multicast IP Address)
• Ensure the Remote Host Port
matches the remote host port value
The image shows settings needed for the ZeeVee modulator to process the alerts
from the R189.
7www.zeevee.com
Page 8

Testing the Conguration
The Monroe R189 can generate an alert on demand
to test the system operation.
1. Click on the Encoder section/General Alerts tab.
2. Click Send Alert.
3. Select the following for your alert:
• Desired alert code
• Duration
• Start time
• FIPS.
Alert codes and FIPS are congurable but instruction is
outside the scope of this document.
GENERATING EAS ALERTS
4. Congure the pre and post alert audio once you
have set the alert details.
Both default or custom announcements must have a
sampling rate of 48000. The announcement section
shows both the duration and sampling rate as
conrmation.
5. Click Send Alert.
8www.zeevee.com
Page 9

Generating local alerts
ZeeVee provides a means to generate simple alerts directly from Maestro.
1. Click the Send Emergency Alert button located at the top of Maestro.
GENERATING EAS ALERTS
2. Supply the desired text,
properly encoded audio
le (audio is optional),
and duration of the alert.
This information will
be sent to all currently
managed devices.
3. Click Send Alert.
9www.zeevee.com
 Loading...