


GA90
Modual Gateway
User’s Manual
Manual Part Number 96-00559-00
Zed-3
501 Valley Way
Milpitas CA 95035
USA
+1-408-587-9333
http://www.zed-3.com

Notice
The information contained in this document is subject to change without notice.
Zed-3 makes no warranty of any kind with regard to this material, including, but not limited
to, the implied warranties of merchantability and fitness for a particular purpose. Zed-3 shall
not be liable for errors contained herein or for incidental or consequential damages in
connection with the furnishing, performance, or use of this material.
Zed-3 assumes no responsibility for the use or reliability of interconnected equipment that is
not furnished by Zed-3.
This document contains proprietary information which is protected by copyright. The
contents of this manual and the associated software are the property of Zed-3, and all rights
are reserved. No part of this document may be photocopied, reproduced, stored in any
computer format, translated to another language, or publicly displayed without the prior
written consent of Zed-3.
The information contained herein has been prepared by Zed-3 solely for use by Zed-3’ss
employees, agents, and customers. Dissemination or use of the information or concepts
contained herein to or by other parties is prohibited without prior written consent from Zed-3.
Zed-3, the Zed-3 logo, the Zed-3 mark,GA90 , CN2x2, CN2x4, SE150, SE150P, SE150+, SE150,
SE500, and SEME are trademarks of Zed-3 and may be registered trademarks in certain
countries. All other names may be trademarks or registered trademarks of their respective
owners.
Revision History
Manual Release Firmware Vision Release Date
1.0 0.8.11.0 23 February 2009

Contents
Product Introduction . . . . . . . . . . . . . . . . . . . . . . . . . . . . . . . . . . . . . . . . . . 1
1.1 Product Introduction . . . . . . . . . . . . . . . . . . . . . . . . . . . . . . . . . . . . . . . . . . . 1
1.2 Technical Specifications. . . . . . . . . . . . . . . . . . . . . . . . . . . . . . . . . . . . . . . . . 1
1.3 Basic Features . . . . . . . . . . . . . . . . . . . . . . . . . . . . . . . . . . . . . . . . . . . . . . . . . 2
1.4 Profile . . . . . . . . . . . . . . . . . . . . . . . . . . . . . . . . . . . . . . . . . . . . . . . . . . . . . . . . 3
Device Installation . . . . . . . . . . . . . . . . . . . . . . . . . . . . . . . . . . . . . . . . . . . . 5
2.1 Installation Requirements . . . . . . . . . . . . . . . . . . . . . . . . . . . . . . . . . . . . . . . 5
2.2 Preparations. . . . . . . . . . . . . . . . . . . . . . . . . . . . . . . . . . . . . . . . . . . . . . . . . . . 7
2.3 Installation Procedures . . . . . . . . . . . . . . . . . . . . . . . . . . . . . . . . . . . . . . . . . 7
Web Management System . . . . . . . . . . . . . . . . . . . . . . . . . . . . . . . . . . . . . . 9
3.1 Login . . . . . . . . . . . . . . . . . . . . . . . . . . . . . . . . . . . . . . . . . . . . . . . . . . . . . . . . . 9
3.2 Web Management System Main Interface . . . . . . . . . . . . . . . . . . . . . . . . 11
3.3 Menu Structure . . . . . . . . . . . . . . . . . . . . . . . . . . . . . . . . . . . . . . . . . . . . . . . 12
Monitor . . . . . . . . . . . . . . . . . . . . . . . . . . . . . . . . . . . . . . . . . . . . . . . . . . . . 13
4.1 System Info . . . . . . . . . . . . . . . . . . . . . . . . . . . . . . . . . . . . . . . . . . . . . . . . . . 13
4.2 Line Status . . . . . . . . . . . . . . . . . . . . . . . . . . . . . . . . . . . . . . . . . . . . . . . . . . . 14
4.3 Active Calls. . . . . . . . . . . . . . . . . . . . . . . . . . . . . . . . . . . . . . . . . . . . . . . . . . . 15
4.4 Call Records . . . . . . . . . . . . . . . . . . . . . . . . . . . . . . . . . . . . . . . . . . . . . . . . . . 16
4.5 T1/E1 State . . . . . . . . . . . . . . . . . . . . . . . . . . . . . . . . . . . . . . . . . . . . . . . . . . . 17
Line Settings. . . . . . . . . . . . . . . . . . . . . . . . . . . . . . . . . . . . . . . . . . . . . . . . 19
5.1 IP Line. . . . . . . . . . . . . . . . . . . . . . . . . . . . . . . . . . . . . . . . . . . . . . . . . . . . . . . 19
5.2 FXS Line . . . . . . . . . . . . . . . . . . . . . . . . . . . . . . . . . . . . . . . . . . . . . . . . . . . . . 22
5.3 FXO Line . . . . . . . . . . . . . . . . . . . . . . . . . . . . . . . . . . . . . . . . . . . . . . . . . . . . 24
5.4 T1/E1 Settings . . . . . . . . . . . . . . . . . . . . . . . . . . . . . . . . . . . . . . . . . . . . . . . . 25
Call Settings . . . . . . . . . . . . . . . . . . . . . . . . . . . . . . . . . . . . . . . . . . . . . . . . 28
6.1 Matching Rules . . . . . . . . . . . . . . . . . . . . . . . . . . . . . . . . . . . . . . . . . . . . . . . 28
6.2 Routing Matching Rules . . . . . . . . . . . . . . . . . . . . . . . . . . . . . . . . . . . . . . . 29
6.3 Route. . . . . . . . . . . . . . . . . . . . . . . . . . . . . . . . . . . . . . . . . . . . . . . . . . . . . . . . 29
6.4 Alter. . . . . . . . . . . . . . . . . . . . . . . . . . . . . . . . . . . . . . . . . . . . . . . . . . . . . . . . . 31
6.5 Filter . . . . . . . . . . . . . . . . . . . . . . . . . . . . . . . . . . . . . . . . . . . . . . . . . . . . . . . . 35
6.6 Schedule . . . . . . . . . . . . . . . . . . . . . . . . . . . . . . . . . . . . . . . . . . . . . . . . . . . . . 37
6.7 System. . . . . . . . . . . . . . . . . . . . . . . . . . . . . . . . . . . . . . . . . . . . . . . . . . . . . . . 39
Administration . . . . . . . . . . . . . . . . . . . . . . . . . . . . . . . . . . . . . . . . . . . . . . 43
7.1 Change Password . . . . . . . . . . . . . . . . . . . . . . . . . . . . . . . . . . . . . . . . . . . . . 43
GA90 Modular Gateway User’s Manual 1

Contents
7.2 Network Setting . . . . . . . . . . . . . . . . . . . . . . . . . . . . . . . . . . . . . . . . . . . . . . 44
7.3 Time Setting. . . . . . . . . . . . . . . . . . . . . . . . . . . . . . . . . . . . . . . . . . . . . . . . . . 45
Maintenance . . . . . . . . . . . . . . . . . . . . . . . . . . . . . . . . . . . . . . . . . . . . . . . . 47
8.1 System Reboot. . . . . . . . . . . . . . . . . . . . . . . . . . . . . . . . . . . . . . . . . . . . . . . . 47
8.2 Reset to Default. . . . . . . . . . . . . . . . . . . . . . . . . . . . . . . . . . . . . . . . . . . . . . . 47
8.3 Config Management . . . . . . . . . . . . . . . . . . . . . . . . . . . . . . . . . . . . . . . . . . 48
8.4 Auto Attendant . . . . . . . . . . . . . . . . . . . . . . . . . . . . . . . . . . . . . . . . . . . . . . . 48
8.5 Upgrade Firmware . . . . . . . . . . . . . . . . . . . . . . . . . . . . . . . . . . . . . . . . . . . . 49
8.6 Diagnostic Tools . . . . . . . . . . . . . . . . . . . . . . . . . . . . . . . . . . . . . . . . . . . . . . 50
Glossary . . . . . . . . . . . . . . . . . . . . . . . . . . . . . . . . . . . . . . . . . . . . . . . . . . . 51
2 GA90 Modular Gateway User’s Manual

Product Introduction
1.1 Product Introduction
Zed-3 GA90 is a Modular Gateway which has prefect performance, rich interfaces, and supports
interface cards plug. GA90 supports multitype interface cards, such as FXO, FXS, IP, T1/E1 card,
can be connected to VoIP and PSTN network, allows calls freely transfer between these
interfaces, fully meeds the various requirements of communication and business extension for
enterprises. GA90 permits flexible call routing and call restricting to provide users calling strategy
based on their own requirements. The web-based management platform dramatically reduces
complication of users' operations.
1. Product Introduction
Chapter 1
GA90 are compatible with most SIP-based IP-PBX and traditional telephony system. When there
is no PBX, it can be deployed alone or in a group. This product can connect to local PSTN network
directly for its support of most countries and areas' telephone agreements. Zed-3 sells GA90 and
privides technical support across the world.
1.2 Technical Specifications
1

GA90 Modular Gateway User’s Manual
Specifications Description
• Up to 8 FXSx4 ports
• Up to 8 FXO4 ports(loop start)
System capacity
Hardware
specification
Interface card
capacity
Network interface
Voice capacity
• Up to 1 T1/E1 x4 port
• Any combination of interface cards
• 90 simultaneous calls
• 1 LCD screen
• 1 reset button
• 4 extended slots
• 4 extended slots
• Available interface card types:
- 8 ports FXO interface card
- 8 ports FXS interface card
- 1 port E1/T1 interface card
• 1 10/100M LAN port
• 1 10/100M WAN port
• Codec: G.711 A-Law/U-Law, G.729, G.723.1
• Comfortable noise, silence supclickion, echo cancellation,
delay jitter/ lost-packet compensation
• DTMF Relay: In-band DTMF Relay, RFC-2833, SIP INFO
• Dimesion: 1.5U 19# rack
Physical
characteristics
Operating
environment
1.3 Basic Features
• Support SIP, meet RFC3261 standard, be compatible with most SIP-based IP-PBXs.
• Support flexible SIP calling, support interconnection with other SIP devices like IP-PBX by
register or Unregister ways.
2
• Weight: 5.3kg
• Power: AC-DC power adapter
- Input: ATX PS, AC 100 ~ 240 V @ 47 ~ 63 Hz
- Output: DC-5V
• power consumption: Max.80 Watt
• Operating temperature: 10 ~ 40 °C(50 °F ~ 104 °F)
• Storage temperature: 0 ~ 50 °C(32 °F ~ 122 °F)
• Humidity: 5 ~ 85 %

1. Product Introduction
• Modular interface, including FXS, FXO and T1/E1 interface cards.
• support mix-plug of interface cards
• Support flexible secondary dialing and DID function
• Support flexible call routing, freewill transfer between any two interfaces.
• Flexible call restriction.
• Support caller ID transfer
• Powerful number transform includes head-trim, tail-trim, replacement, and number segment
ways.
• General calling strategy management: you may set call schedules based on different time
segments.
• Cascade and extend capacity in a Unregister way
• Plenty system monitor: line status, current call, CDR, system status etc.
• Easy-use of web configuration and management system
• Powerful safety management: upload/download configurations, fireware update, disaster
recovery etc.
1.4 Profile
1.4.1 Appearance
Figure 1-1 GA90 appearance
1.4.2 Front View
3

GA90 Modular Gateway User’s Manual
Figure 1-2 GA90 front panel
• LCD indicator on the front panel of GA90 for system status.
• 4 extended slots which can hold 8FXO cards , 8FXS card and E1/T1 interface cards.
Each 8FXO and 8FXS interface card has eight anolog voice channels, each channel has
corresponding LCD indicator-for channecl's status. After startup, indicator is on when that
channel is used after off-hook. light is off when the channel is idle.
1.4.3 Back View
Figure 1-3 GA90 back panel
All ports are on the back panel of GA90, the interface type and descriptions are:
• WAN port: connect to IP network via this port.
• LAN port: connect to PC or other devices via this port.
• Reset button: reset the configuration to factory defaults (includes network configuration).
click it for 6 seconds when system is running
• Power Port: connect to power adapter.
4

Device Installation
Unpack the unit and verify shipment content with the packing list :
• One GA90 equipment.
• One power cable.
2. Device Installation
Chapter 2
• One Ethernet cable.
• One electronic mannual CD.
• Accessories package: 2 GA90 fixers, 8 M3 screws for fixing on GA90, 6 M6 screws for fixing
on 19# rack.
Note: If there is any missing or damage, contact the seller or Zed-3 sales immediately and save
all packages for the repackaging if need.
2.1 Installation Requirements
2.1.1 Power Requirements
• Power-off before installation, dismantlement or movement.
• The electric outlet shall be installed near the equitment and shall be easily accessible in case
of emergency.
2.1.2 Anti-static Requirements
• If the device's power line need to be put outside, take necessary anti-static action please.
• Anti-static Requirements
- Static will damage the circuit or the whole machine seriously if static exceed the limitation,
so make sure the ground bus well enough.
5

GA90 Modular Gateway User’s Manual
- Static inside body will result in damage too, so please wear anti-static wristband if you
have.
2.1.3 Environment Requirements
2.1.3.1 Basic Conditions
Keep the GA90 equipment in a room which has proper control of temperature and humidity, watch
out the conductivity of the shelf. Too high or too low humidity will cause short circuit or fire. At the
same time, the conductive property of rack is also considerable.
Place the equipment on a rack (if possible) which is near stable and liable power in an anti-fire,
anti-humidity, anti-dust, and anti-thief room.
2.1.3.2 Temperature, Humidity, and Illumination
Suggestions:
• Temperature: 0 ~ 40
• Relative humidity: 5~ 95RH without coagulation
• Illumination: light, 500 ~750 lx, light enough for operations.
High humidity will affect the insulating efficiency of insulating materials and also cause the rust of
metals. Low humidity will make insulating gasket shrink, loose the fixed bolts, and scrape up
static. Long period of high temperature will accelerate components' aging, lower the reliability and
reduce the useful time dramatically.
2.1.3.3 Air Quality
The air particulate may enter the equipment through ventholes. Too much dust will cause
short-circuit, so the suggestion is less than 180mg/m3. In machinery room, printer and
Photocopiers shall be placed away from the power provider in case of floating particulate. Please
put it in the diagonal corner.
Keep the room clean, for the dust will cause static and bad connections between little
components
2.1.3.4 Ventilation Requirements
There are thermal discharge holes in the back and side side, so keep more than 100mm from
other stuffs for thermal discharging.
2.1.3.5 Safety
There must be some safety precautions like securities or other effective anti-thief actions. The
lightning rod is well connected to the ground, the ground bus' diameter must be more than 5mm.
For seismal zones, there must be anti-earthquake measurements, like fixed balustrade for the
rack.
6

2.2 Preparations
2.2.1 Network Resources
GA90 shall be connected with intra-company network or Internet for different usages. Test your
network connectivity and provide a port for this equipment. It is usually connected to a switch or
a router.
2.2.2 IP Address
Get an IP address for your GA90 . the setting of IP address, see 3.1.1set GA90 's IP address.
Note: Static IP address is recommended, no matter public or private address. (except DDNS).
2.2.3 Ethernet Cable
Get a standard RJ-45 cable for GA90 .
2. Device Installation
2.2.4 External Line
8FXO card is necessary if you want to call PSTN phones from GA90, connect its FXO port with
PSTN with a cable.
2.2.5 Other Soft-switch Accounts
Ask for soft switch accounts and register information like phone number, password, register proxy
address, proxy address, register port, outbound proxy address, register expiration etc. if your
GA90 need to connect to other softswitchs.
2.2.6 Network Topology
Build your network topology based on GA90 's location and connectivities.
2.2.7 Line Adjustment
Extend the external lines and cables to reach GA90 's ports, if they are too far from the equipment.
2.3 Installation Procedures
GA90 equipment shall be placed on a table or a rack, install it as below steps.
Note: Do not put any heavy thing on the equipment to avoid any damage of the base.
7

GA90 Modular Gateway User’s Manual
2.3.1 Network Connection
Connect the cable with Ethernet LAN port on the back side.
2.3.2 Connect external Line
• Connect analog line with the port of 2FXO card on GA90
• Connect FXS port with analog telephones.
Prepare a 2-core telecommunication cable, plug one end into FXS port of GA90, and another end
into a phone, a fax or a PBX's trunk line port.
2.3.3 Power Connection
1. Connect the power line with the power port on the back side.
2. Connect the other end with outlet nearby.
2.3.4 Power On
After all these steps, power on.
All LED indicators are off at the beginning, then the power indicator is green after start-up.
8

Web Management System
3.1 Login
Login to GA90 Web Server with IE browser (1024*768 recommended) and make configurations
like this:
3. Web Management System
Chapter 3
1. Open IE browser and enter IP address in the address field.
GA90 has a default address: 192.168.0.100. If the default address has been changed, gain
it like below: ( if you can not login, see 3.1.1 change GA90 's IP address)
• Dail “***” and input password "23646" when you hear the dialing tone of AA after calling
in through FXO port of GA90 , and the equipment will show you the IP address. The
SpreeCode and password used here are default, you may change them on the page of
AA at Call Settings-System Settings after loging into the web management system.
• Or click Reset button for 6 seconds and reset the configurations to the factory default
(including the IP address recovered to default 192.168.0.100).
Note: The Reset button will reset all configurations, not only the IP address.
2. Input user name and password in the pop-up window. ( see figure 3-1)
9

GA90 Modular Gateway User’s Manual
Figure 3-1 Login window
• Administrator: the default user name and password is "admin".
Change administrator's password in the Adminstration > Change Password menu after login.
3.1.1 Change GA90 's IP Addresss
Any operation (including initialization) on configurations shall be made in the GA90's web
management system. You can not login to the system if your PC's IP address does not belong to
the same network segment as the equipment's. So the simplest way is to change your PC's IP
address to set GA90's configurations.
As below:
1. Change your PC's IP address to the same network segment (for example: 192.168.0.120).
2. Login to GA90: visit the default "192.168.0.100" with IE browser and login with "admin".
3. Click and enter Administration> Network Setting menu, change the IP Address, Net
mask, Default gateway and DNS based on your real situation.
10

Figure 3-2 Change GA90 's IP address
3. Web Management System
4. After setting, click [Set] button to make it work and roll your PC's IP address back.
5. Login to the web management system with the new IP address.
3.2 Web Management System Main Interface
There are six main menus on the top of the web management system's main page, they are
Monitor, Line Settings, Call settings, Administration,and Maintenance.
Click each main menu to show its sub-menu, click the sub-menu to see the setting pages.
11

GA90 Modular Gateway User’s Manual
Figure 3-3 Web Management System main interface
The system supports Chinese and English. Here is the English version.
3.3 Menu Structure
12
Figure 3-4 Menu Structure

Monitor
The Monitor menu in Web Management System provides System Info, Line Status, Active
CAlls, Call Records, T1/E1State etc..
4.1 System Info
4. Monitor
Chapter 4
Login to Web Management System or on the page of Monitor > System Info,there is system
information about product model, firmware version, resource usage, system time and network
information etc.
The parameters are:
• Basic
- Model: GA90 .
- Product ID: the unique number of GA90 equipment.
- Firmware version: the current version of the equipment, like 1.0.6.7.
• Performance
- CPU Usage: the current usage of CPU.
- Memory Usage: the current usage of memory.
• Time
- System Time: the current system time.
- System Uptime: the duration from last start-up.
- Latest Upgrade Time: the lastest time of upgrade.
• Network
- IP Address: the current IP address of the GA90 equipment.
- Net Mask: the netmask now used.
- Default Gateway: the IP address of the default gateway now used.
- Primary DNS: the IP address of primary DNS now used.
13

GA90 Modular Gateway User’s Manual
Figure 4-1 System Monitor - System Info page
- Secondary DNS: the IP address of secondary DNS now used.
4.2 Line Status
Trunk lines are very important basic resources for GA90 system. You can call external lines only
when trunk lines set on GA90. The system will monitor all these lines' status automatically once
these trunk lines have been set, and provides monitor information to the administrator for
management.
Monitor > Line Status menu monitors all trunk lines, and classifies them into IP, PSTN and digit
trunk lines as figure 4-2.
14

4. Monitor
Figure 4-2 Monitor - Line Status page
• Type : the line type, includes: IP, FXO , FXS, T1/E1.
• ID: the sequence number of the line ( for example: "slot1-2" means the 1st card's 2
• Phone Number: the phone number assigned to this line.
• Status: the status of the line, including: Avaialbe, Invalid, Register Fails etc.
4.3 Active Calls
Active Calls means the calls are in conversations. The system provides real-time monitor of
current calls. It's an important way of monitoring system for administrator.
Visit Monitor > Active Calls to see:
nd
port).
Figure 4-3 Monitor -- ActiveCalls page
15

GA90 Modular Gateway User’s Manual
The fields are:
• Caller: the caller ID.
• Callee: the callee ID.
• Callin Line: the line type and port number of the caller in conversation, for example:
"FXO/slot1-1" means the 1
• Callout Line: the line type of the callee.
• Status: the current status of the call.
• Start Time : the format is "YYYY_MM_DD HH:MM:SS".
Administrator may operate these active calls, like download or remove these records.
4.4 Call Records
The system generates a detailed record (CDR) for every call. The CDR file will be saved
automatically every day. The system will keep the newest 500 records when the data reached
30KB (about 700 records) limitation. Users can download CDR termly and clear them.
st
port of the FXO card on the 1st port.
16
Figure 4-4 Monitor-Call Records Setting page
• Caller: the caller's phone number.
• Callee: the callee's phone number.
• Callin Line: the line type and port number of the caller in conversation, for example:
"FXO/slot3-2" means the 2
nd
port of the FXO card which is in 3
rd
slot.
• Callout Line: the output trunk line type and port number of the callee.

• Status: current status of the call, like in AA, no reply, connected etc.
• Start Time: the start time of the conversation.
• Duration: the duration of the conversation, count in second.
4.5 T1/E1 State
This page shows the sequence number, physical connectivity of each T1/E1 interface card and
D channel's status automatically when GA90 has T1/E1 interface card. For example: slot2 means
the card in the second slot is T1/E1 card.
• PhysicalLineState: shows "normal connection" if the connection of T1/E1 interface card is
okay.
• DlinkState: shows "normal connection" if T1/E1's transfer channel is okay. Failure reason
may be link failure on both ends or wrong configuration on both sides.
4. Monitor
Figure 4-5 Monitor - T1/E1State page
17

5. Line Settings
Chapter 5
Line Settings
GA90 equipment supports four types of interface cards: FXS, FXO, IP and T1/E1. On the page
of Line Settings page, you can define the common properties of all kinds of lines in this
equipment.
5.1 IP Line
Here supports two ways of IP Line Settings: register and Unregister.
For register-type IP Line, you need to set proxy's address and port, register server's address and
port, user name and password, register expiration, NAT-traverse, home domain, maximum
connections and AA switch etc.
For Unregister-type (P2P) IP Line, you need to set the counterpart's address and port, the
maximum amount of calls, NAT-traverse, and AA switch etc.
5.1.1 IP Line List
• ID: the serial number of IP line, begins from 1.
Note: This number may not be the largest since it may belong to the one deleted before.
• Description: the description of this line. (for backup configuration, this item is the same as the
primary).
• Phone Number: the user name used when register.
• Register: enable or disable register server.
• Proxy: the IP address and port of the proxy.
• AA: enable or disable AA service.
19

GA90 Modular Gateway User’s Manual
Figure 5-1 Line Settings page
5.1.2 Parameters Descriptions
5.1.2.1 Register IP Line
You need to set these when Register is"Enable":
• Proxy: the IP address and port of the proxy.
Note: The default port is 5060 if you set only IP address.
- Register Server: the IP address and port of register server.
Note: The default port is 5060 if you set only IP address
20

5. Line Settings
• Phone Number: the phone number of this line.
• Username : the user name for register.
• Password: the password for register.
• Register Expiration: timeout after these seconds.
• Home Domain: domain's IP address.
• NAT Traversal Mode: three modes:
- None: no mode.
- Port Forwarding: port forwarding mode:
* Pubilc Address: set public IP address or domain and port, the IP and port are
separated by ":".
- Outbound: the IP address and port of the Outbound proxy which is typically used in an
environment with a firewall/NAT for signals and media stream traverse firewall/NAT.
* Outbound Proxy: set IP address or domain and port for outbound proxy, the IP and
port are separated by ":".
Note: The default port is 5060 if you set only IP address.
• Max Connections: maximal simultaneous call number supported.
• Enable AA: if enter AA (Auto Attendant) when dial in via this line.
5.1.2.2 Unregister IP Line
Set these paramters when Register is"Disable":
• Proxy: the same as 5.1.2.1 Register IP Line
• Phone Number: the same as 5.1.2.1 Register IP Line
• Username: the same as 5.1.2.1 Register IP Line
• Passward: the same as 5.1.2.1 Register IP Line
• Ping Interval: for Unregister IP Line, you may set Ping Interval to let system Ping it
periodically for its status. When the value is 0, the system does not Ping it and think it available
for ever.
• NAT Traversal Mode: the same as 5.1.2.1 Register IP Line
• Max Connections: the same as 5.1.2.1 Register IP Line
• Enable AA: the same as 5.1.2.1 Register IP Line
Note: If there is no callerID when call out via unregister IP Line, the default Caller ID is 1111.
21

GA90 Modular Gateway User’s Manual
5.1.3 Backup Settings
Set parameters for backup proxy for registered IP Line. All items are the same as the primary.
Figure 5-2 Line Settings - Backup Setting page
5.1.4 Add IP Line
1. Filling the blanks in the edit area, or check Enalbe backup settings to use the backup
configuration.
2. click [Add] ands the new record will appear on the list.
5.1.5 Edit IP Line
1. Click a record on the list.
2. Modify the parameters in the edit area, or modify the backup configuration.
3. click [Modify] and save it. The list is updated immediately.
5.1.6 Remove IP Line
1. Select a record on the list.
2. click [Remove] and save it.
5.2 FXS Line
If the IP-PBX has FXS module, the web management system will show your FXS line setting page
at Line Settings.
22
Here supports two types of FXS Line: register and Unregister
For register-type IP Line, you need to set user name, password, extension number, and proxy's
address and port, register server's address and port, register expiration, NAT-traverse, home
domain etc. see 6.7 System Settings.

5. Line Settings
For Unregister-type (P2P) IP Line, you do not need to set the proxy and register proxy, FXS is
only used for internal extensions, you should config route to make call between each other. See
chapter 6 Call Settings.
Figure 5-3 Line Settings - FXS Line Setting page
5.2.1 FXS line List
• ID: the real position of FXS interface card on GA90, like "slot1-1" which means the 1st FXS
interface card on the 1st slot is FXSmodule.
• Phone Number: the phone number of this line
Note: Unset FXS module is only shown FXS module's interface number in this list. You should
set phone number for corresponding ports when using them.
5.2.2 Parameters Descriptions
• Phone Number: the phone number of this line which is same as user number and password
usually.
• Username*: you need to set this username when FXS is register-type.
• Password*: you need to set this username when FXS is register-type.
23
GA90 Modular Gateway User’s Manual
• Polarity Reversal: if enable Polarity Reversal function.
If enable, the program has the same process when detect Polarity Reversal and busy prompt.
5.2.3 Change settings
Unset FXS module only shows the interface number of FXS module in this list. You should set
phone number for corresponding ports when using them.
1. Choose one line in FXS line list.
2. set phone number for this line.
3. click [Modify] to save it.
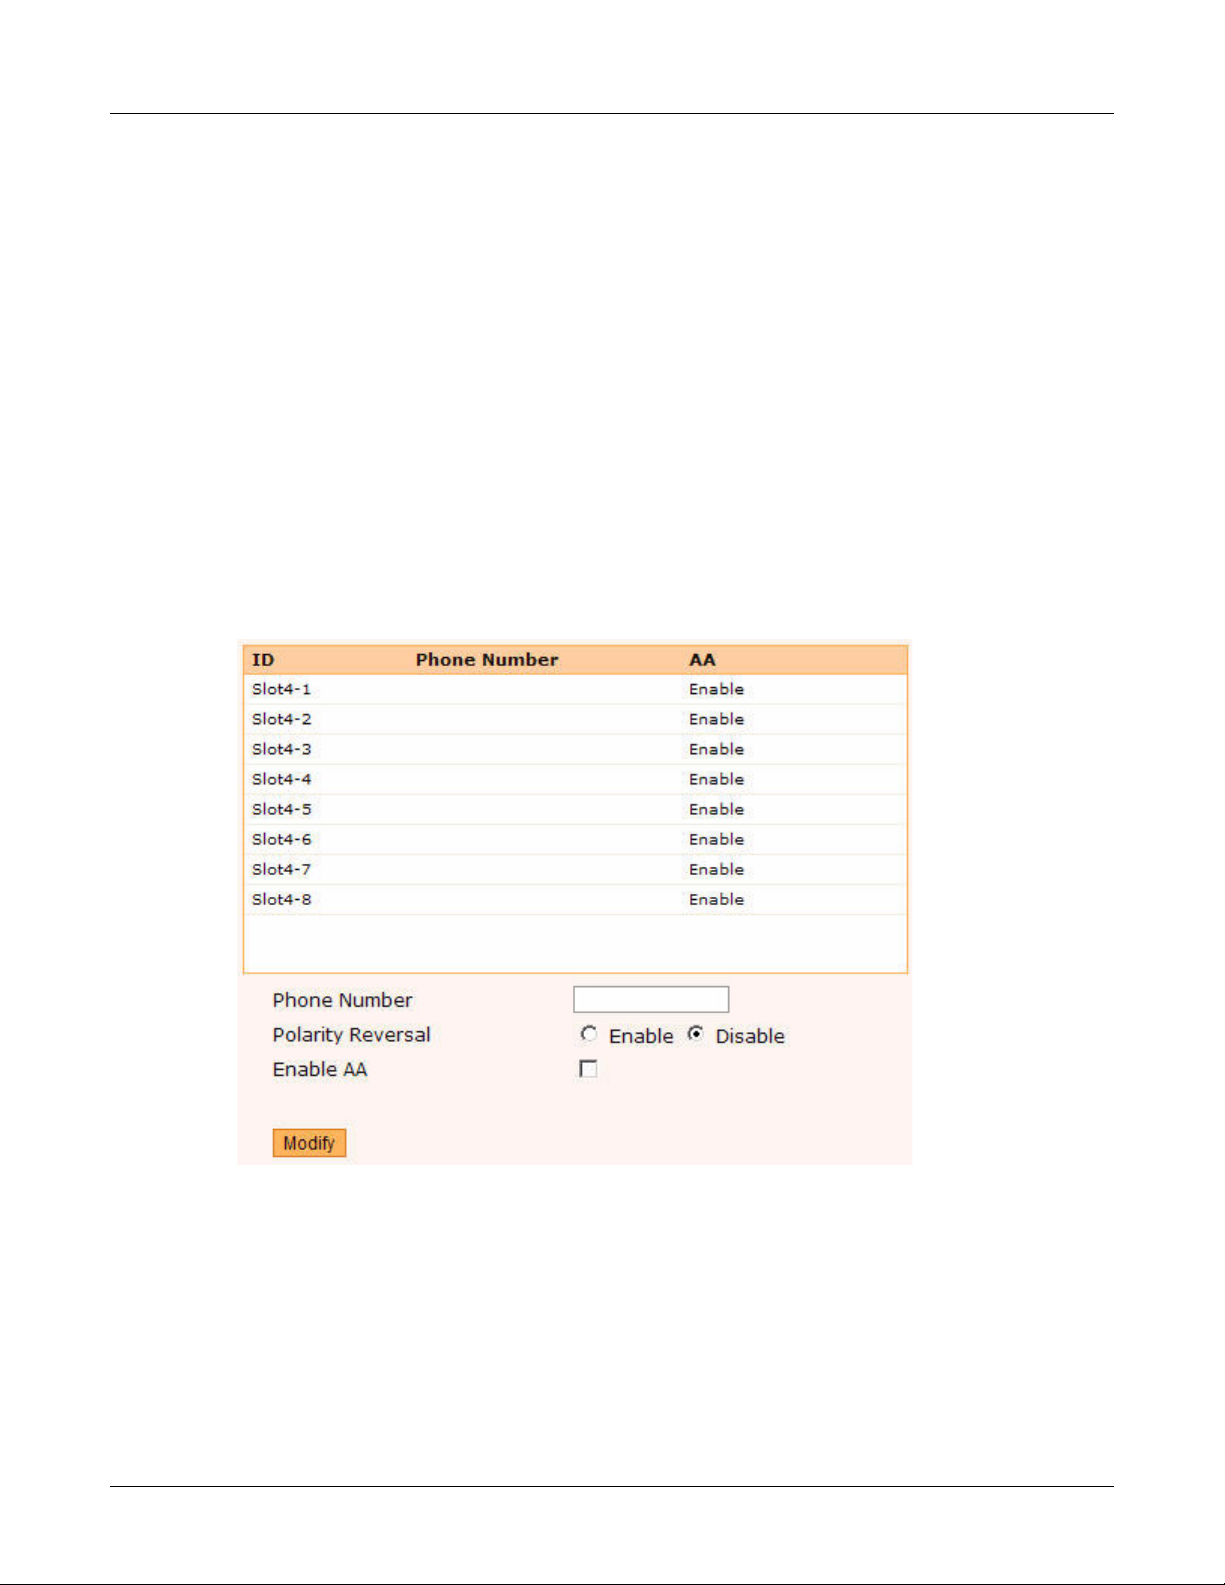
5.3 FXO Line
If GA90 has FXO card, the web management system will show your FXO line setting page.
Figure 5-4 Line Settings - FXO Line Setting page
5.3.1 FXO line List
• ID: the real position of FXO interface card on GA90, like "slot1-2".
• Phone Number: the phone number of this line.
• AA: the status of AA, enable or disable.
24

5.3.2 Parameters Descriptions
• Phone Number: The phone number of this line.
• Polarity Reversal: If enable Polarity Reversal function.
If enable, the program has the same process when detect Polarity Reversal and busy prompt.
• Enable AA: If enter AA (Auto Attendant) when dialing in via this line.
5.4 T1/E1 Settings
GA90 supports up to 4 T1/E1 interface cards. So T1/E1 setting page defaultly shows slot1~slot4
four setting items. But only available T1/E1 card is configurable, otherwise is gray unconfigurable.
Note: Click [Set] after setting on this page, the system will prompt you to reboot the system
(run Reboot System on the page of Maintenance > System Reboot) to make your
settings work.
• General: physical protocol standards for all T1/E1 module on GA90. T1 is North-America
standard and E1 is European standard.
5. Line Settings
• Slot1~n:
- Active: if the T1/E1 card is available on this slot. You need to set these if available:
Note: Pay attension to the cooperation on both sides of the line, one master and one slaver--
can not be the same setting when you set Protocol and Clock Source.
- Protocol: GA90 supports the interconnection with PSTN, you may set signal protocol for
GA90 here: PRI User Side (ISDN user side) ?PRI Network Side (ISDN network side) or
R2(Chinese No.2) .
- Clock Source: the clock mode of this line : Master or Slave clock.
- Line Code
* In T1 mode: B8ZS or AMI is available.
* In E1 mode: HDB3 or AMI is available.
- Impedance
* In T1 mode: only 100 ohm is available.
* In E1 mode: can be 120 ohm or 75 ohm
- Frame
* Sf: super frame
1
: the codec mode of the line:
*
: impedance value of the line:
*
: you need to set this in T1 mode:
* Esf: extended super frame
1. This parameter is different based on GA90's work mode (T1 or E1).
25

GA90 Modular Gateway User’s Manual
- Lbo*: set it in T1 mode: compensable value may be 0, -7.5, -15, -22.5 db
- Cable Length
1
: set it in T1 mode: suitable line length is 133, 266, 399, 533, 635 feet
- CRC: if signal CRC(cyclic redundancy check or code) is enabled.
- Tx Gain: the value of signal's Tx Gain: -31~+31db
- Rx Gain: the value of signal's Rx Gain: -31~+31db
- Echo Cancellation: if enable echo cancellation and set range for echo cancellation, count
in second.
- RxCode Max Length: combined with RxCode Time Out. The maximal reveived digit
length within valid receiving period.
- RxCode Time Out: combined with RxCode Max Length. The maximal time range of
receiving digits, count in second.
- AA State: if enable AA for this line.
Note: If enabled, the dialed number after calling-in is invalid, user should operate as AA's
prompts.
- Phone Number Begin: combined with Phone Number End. it's for replacing caller
number which displayed on the counterpart's screen. The begin number and end number
compose a continuous number segment. For example: config 30 number in E1 mode, so
the beginning number is 82341001, and the last number is 82341030.
- Phone Number End: combined with Phone Number Begin. it's for replacing caller
number which displayed on the counterpart's screen. The begin number and end number
compose a continuous number segment. For example: config 30 number in E1 mode, so
the beginning number is 82341001, and the last number is 82341030.
1. This parameter is different based on GA90's work mode (T1 or E1).
26

5. Line Settings
Figure 5-5 Line Settings - T1/E1 Line Setting page
27

GA90 Modular Gateway User’s Manual
Call Settings
The Call Setings menu of Web Management System provides configurations of call routing,
number transform, call filtration, schedule group, and system configuration. Among them, number
transform, call routing and call filtration co-exist and supplement each other. Call routing is the
core, plus number transform, call filtration, numbering plan and schedule setting, all of them are
combined to provide flexible control of coming and going calls via GA90 modular gateway.
Chapter 6
6.1 Matching Rules
Matching rules of numbers are one base of call routing, number transform and call filtration. So
let's begin with these matching rules. The definition of these rules which we used refers to Digit
Map (refers to RFC3435). 18 characters are valid: 0, 1, 2, 3, 4, 5, 6, 7, 8, 9, X(or x), [,] , ",", -, ".",
#, *,as below.
Pattern Description
0, 1, 2, 3, 4, 5, 6, 7, 8, 9, 0, *, #One button on the phone panel
[m-n] It's a scope. m<=n. if m=n, it's [m], means one number m. If m or n is
[0-2,5,7-9] More than one scope separated with comma composes a union. Every
X A digit from 0 to 9, like 0x58 or 0x78. 'X' is case-unsensible.
. One or more-than-one digit from 0 to 9, like 0x2
invalid, the system replaces m-n with a 'X' means a digit from 0 to 9.
single scope's explanation is like above. If some scopes have
cross-cutting areas, take the final union area.
28

Examples:
Input Output
6. Call Settings
• 1234X
• 1234[1,5-9]
• 1234.
• 1234[1,5-9].
• [1,3,6,8-9]
• ##
• *xx
Matching principle:
Please pay attenstion to the way of matching, all number rules should be completely matched.
For example, the rule '800' will only match the number of 800, but not 8008108888. If what you
want is 8008108888, the rule should be '800XXXXXXX' or '800.'.
The first four digits are 1234, the fifth is a digit from 0 to 9, five digits totally.
The first four digits are 1234, the fifth is 1 or a digit from 5 to 9, five digits totally.
Any number begins with 1234.
The first four digits are 1234, the fifth is a digit from 0 to 9, the sixth is 1 or a digit from 5
to 9, followed by any number of any length.
A digit which is 1, 3, 6, or a digit from 8 to 9.
Special character #.
Start with * and followed by two-digit number.
6.2 Routing Matching Rules
Note: Number transform and Call filtration follows the same rules:
1. Compare Source Line first, matching Line ALL (like: P/ALL, T1/E1/ALL, FXO/ALL etc.) is
basic matching (with low level) . Specific Line is perfect matching (with high level, like IP/1,
T1/E1/Slot2, FXO/Slot1-5) , and choose a line with the highest level..
2. compare Caller Pattern if there are more than 1 lines with the same level, rules are:
a. Matching callerID and Caller Pattern of this route digit by digit.
b. if the same-postioned digit is matched, match value add to 1.
c. "."means matching one digit from this and following digits.
d. match one digit if Caller Pattern is empty. choose a higher level route in the results.
3. compare Callee Pattern if there are more than 1 routes after 2, the rules are the same as 2
4. choose the top postion one if there are more than 1 routes after 3.
6.3 Route
Call Settings > Route lists trunks available and decides which record to use and how to control
the calls based on source device, caller id, callee id and call time etc.
Call Settings page is separated into two areas: the list area and the edit area:
29

GA90 Modular Gateway User’s Manual
• The list area: show the created route list.
• The edit area: configue routes here.
Note: For register FXS line, you do not need to set calling route etc, that means in the setting
page of Source Line, Destination Line configuration, the system will not show you FXS
lines.
Figure 6-1 Call Settings - Route page
6.3.1 Call Routing List
The list shows a group of configured routes based on the creation time. The system will match
the route table with current call information until the system find the proper route.
• Description: the description of this route.
• Source: the type of the source device and ports available.
30

Note: The principle of routing we used here is Per fe ct Matching, which is searching the
most matched route based on source line. For example, there are two routes, the Sources of
route A are IP1 and IP2, the Source of route B is IP1, so when a call is from IP1, no matter which
route is on the first positon, the system will choose route B.
• Destination: the type of the destination device and ports available.
• Caller Pattern: caller number needs to be matched for this call. default 'ALL' means all caller
numbers are valid.
• Callee Pattern: callee number needs to be matched for this call. default 'ALL' means all caller
numbers are valid.
• Schedule: the valid time segment, the default is 'NULL' means no time segment limitation.
Choose one route and click [Move Down] or [Move Up] buttons to reorder the sequence. Click
[Modify] or [Remove] button to edit or delete routes.
6.3.2 Parameters Descriptions
Enter necessary parameters in edit area when you create a new route, click [Add] and save it.
6. Call Settings
Note: You can not make any call if there is no route.
• Description: the decription of this route.
• Source Line: the type of source device (includes FXO, FXS, T1/E1, IP) and ports available
(multi-chosen) . For example, 'Slot1-2' means the 2
• Caller Pattern: the number pattern of caller number (see 6.1 Matching Rules) , default setting
is all patterns are valid.
• Callee Pattern: the number pattern of callee number (see 6.1 Matching Rules) , default
setting is all patterns are valid.
• Schedule: the valid time segment of this route. default 'NULL' means no time limitation. The
schedule is set in Schedule menu ( see 6.6 Schedule )
• Destination Line: the type of destination device (includes FXO, FXS, T1/E1, IP) and ports
available(multi-chosen ) , default 'ALL' means all ports of this card can be used.
6.4 Alter
Alter is the translation of call numbers based on defferent strategies. For example, strip ahead
or behind, add ahead or behind, part-replace or all-replace. There are created alter rules based
on created time in the list. In process, the system will match this rule list with current call
information until find the perfect one.
nd
port of the 1st card.
The list area and the edit area of this page:
• The list area: show established list of number transform.
• The edit area: the edit area of settings.
31

GA90 Modular Gateway User’s Manual
Note: For register FXS line, you do not need to set alter strategy for numbers, which means
the system will not show your FXS line in the items of Source Line, Destination Line
settting.
Figure 6-2 Call Settings - Alter page
6.4.1 Alter Strategies List
Alter strategies list shows you a group of created strategies. GA90 supports transforming
multi-number based on one matching mode.
• Description: the description of this transform strategy.
• Type: the execute mode of this strategy: pre-routing or post-routing.
• Source: the type of source device and ports available.
• Destination: the type of destination device and ports available.
• Caller Pattern: caller number need to be matched for this call. Default 'ALL' means all caller
numbers are valid.
• Callee Pattern: callee number need to be matched for this call. Default 'ALL' means all caller
numbers are valid
32

• Schedule: the valid time segment of this strategy, default 'ALL' means no time limitation.
Choose one strategy and click [Move Down] or [Move Up] buttons to reorder the sequence. click
[Modify] or [Remove] buttons to edit or delete this strategy.
6.4.2 Parameters Descriptions
Enter necessary parameters in edit area when you create a new strategy, click [Add] button to
save it.
• Description: the description of this strategy.
• Type: the execute mode of this strategy,Pre-routing or Post-routing.
Number transform can be done in two periods: before routing (pre-routing) and after routing
(post-routing). Pre-routing will effect on the determination of call routing. post-routing alter
numbers after routing, which will not affect the progress of routing, but will affect the way of
call filtration, because post-routing call filtration is always behind number transformation.
Note: If you select 'post-routing', please set 'Destination line'.
6. Call Settings
• Source Line: the type of source device (includes FXO, GSM, IP) and ports available ( can be
multi-chosen) , for example, 'Slot1-2' means the 2
nd
port of the 1st card.
• Caller Pattern: the number pattern of caller (see 6.1 Matching Rules). No setting means all
patterns are valid.
• Callee Pattern: the number pattern of callee (see 6.1 Matching Rules). No setting means all
patterns are valid.
• Alter Strategy: set specific alter rules, refer to 6.4.3 Alter Rules.
Note: In Alter Strategy Settings, it's composed of several sub-strategies (up to eight
sub-strategies), and these sub-strategies are order-sensitive, please be careful about it.
- Alter Objective: caller or callee number
- Alter actions: includes Strip, Add, Keep, Replace, Calculate.
- Alter position: head or tail
- Alter parameter: digit number or specific number or string etc. press [OK] to save it and exit.
• Schedule:the valid time segment of this rule, default 'NULL' means no time limitation.
Schedules are set in Call Settings > Schedule menu (see 6.5 Schedule).
• Destination Line: the type of destination device (includes FXO, FXS, T1E1, IP) and ports
available (can be multi-chosen), for example, 'ALL' means all ports are available.
Note: When the Ty p e is ‘Post-routing’, you need to set this destination line.
33

GA90 Modular Gateway User’s Manual
Figure 6-3 Call Settings - Alter Strategy Settings page
6.4.3 Alter Rules
The rules are:
• Strip caller or callee number from head: strip N digits from the head of caller or callee
number. N must be equal to or more than 1 (N>=1). If N is more than the length of the caller
or callee number, give up this operation. For example: strip 3 digits from the head,
01082356031becomes 82356031.
• Strip caller or callee number from tail: strip N digits from the tail of caller or callee number.
N must be equal to or more than 1 (N>=1). If N is more then the length of the caller or callee
number, give up this operation. For example: strip 3 digits from the tail, 95588123 becomes
95588. But this function is seldom used.
• Add a prefix to caller or callee number: add a N digits prefix on the head of caller or callee
number and make a new number. N must be equal to or more than 1. For example: pre-pend
'17909' to '02088786688', so the final number is '1790902088786688'.
• Add a postfix to caller or callee number: add a N digits postfix on the tail of caller or callee
number and make a new number. N must be equal to or more than 1. For example: append
'.7788' to '02088786688', so the final number is '02088786688,7788'.
• Keep N digits from the head of caller or callee number: keep N digits from the head of
caller or callee number. N must be equal to or more than 1. If N is more than the length of
number, keep it completely. For example: keep 5 digits from the head of
'9558823423453451311', it should be '95588'
• Keep N digits from the tail of caller or callee number: keep N digits from the tail of caller
or callee number. N must be equal to or more than 1. If N is more than the length of number,
keep it completely. For example: keep 4 digits from the tail of '010887866887007', it should be
'7007'.
34
• Replace caller or callee number: replace caller or callee number with a completely defferent
number. For example: replace 10086' with '10088'.

6. Call Settings
• Replace N digits from the head of caller or callee number: replace N (N>=1) digits from
the head of caller or callee number with another number. If N is more than the length of caller
or callee number, replace the number with another defferent number completely. For example:
replace 3 digits from the head of '10086' with '200', it should be '20086'.
• Replace N digits from the tail of caller or callee number: replace N (N>=1) digits from the
tail of caller or callee number with another number. If N is more than the length of caller or
callee number, replace the number with another defferent number completely. For example:
replace 2 digits from the tail of '10086' with '68', it should be '10068'.
• Calculate the last N digits of caller or callee number with an integer I: add an integer I to
the last N digits of caller or callee number and gain a new number. I should be equal to or more
than negative 9999, and be equal to or less than 9999 (-9999<=I<=9999). This action only
works on the last 4 digits of the phone number and does not care the carry. For example: the
old extension numbers are from 7001 to 7050, another system has a segment from 2301 to
2350, you may execute I=-4700 to reflect these two segments.
For example:
1. Redirect all the calls from Slot 1-1(FXO) port to 7777 of IP-PBX 192.168.11.22, the others to
8888 (Redirect calls to IP-PBX is routing, 8888 is the result of number transform).
2. 2.Redirect the caller '13910122334' from Slot 1-4(FXO) port to 8888 of IP-PBX
192.168.11.22. (redirect to IP PBX 192.168.11.2 is routing, 8888 is the result of number
transform).
3. 3.Redirect all calls from Slot2(T1/E1) line during off-work time to 9999 of IP PBX (redirect to
IP PBX is routing, 9999 is the result of number transform).
6.5 Filter
Call filtration determines what kind of calls is allowed to get through the gateway based on various
parameters and rules. It looks like some intelligent black and white lists.
The page has two areas: the list area and the edit area:
• The list area: show the call filtration list.
• The edit area: set the parameters of call filtration record.
Note: For register FXS line, you do not need to set alter strategy for numbers, which means
the system will not show your FXS line in the items of Source Line, Destination Line
settting.
35

GA90 Modular Gateway User’s Manual
Figure 6-4 Call Settings - Call Filtration Setting page
6.5.1 Filter List
Call filtration matching strategy is similar with route matching strategy. From up to down, get the
first matched strategy no matter how many strategies left are matched too. Then determine
whether let this call via the gateway based on this strategy's filtration action.
• Description: the description of this filter strategy.
• Type: the execution type of this filter strategy: pre-routing or post-routing.
• Source: the type of source device and ports available.
• Destination: the type of destination device and ports available.
• Caller Pattern: caller number needs to be matched for this call. Default 'ALL' means all caller
numbers are valid.
• Callee Pattern: callee number needs to be matched for this call. Default 'ALL' means all caller
numbers are valid.
• Strategy: the action of this strategy.
• Schedule: the valid time segment of this strategy. The default is no limitation. The schedule
is set in Schedule ( see 6.5 Schedule Group).
Choose one strategy on the list, click [Move Down] or [Move Up] button to reorder the sequence.
click [Modify] or [Remove] button to edit or delete this strategy.
36

6.5.2 Parameters Description
Set parameters in edit area when you create a new strategy. click [Add] button to save it.
• Description: the description of this strategy.
• Type: the execute mode of this strategy: pre-routing or post-routing.
Call filtration can be used in two locations: before number transforming before routing
(pre-routing) and after number transforming after routing (post-routing). Pre-routing mode
stops some calls before they are transformed before routing. post-routing mode stops some
calls after they are transformed after routing. For most stoped calls, they are stoped before
routing, and post-routing mode is an extended feature.
Note: If you choose 'post-routing' mode, please set 'Destination line list' first.
6. Call Settings
• Source Line: the type of source devices (includes FXO, FXS, T1E1, IP) and ports
available(may be multi-chosen).For example: 'Slot1-2' means the 2
• Caller Pattern: the pattern of caller number (pattern's rule, see 6.1 Matching Rules). Blank
means all patterns are valid.
• Callee Pattern: the pattern of callee number (pattern's rule, see 6.1 Matching Rules). Blank
means all patterns are valid.
• Strategy: the action of this strategy, Accept or Drop.
Note: There are two default strategies you can choose. They are 'accept all calls' and 'drop all
calls'.
• Schedule: the valid time segment of this strategy. 'NULL' means no limitation.
• Destination Line: the type of destination devices (includes FXO, FXS, T1E1, IP) and ports
available (may be multi-chosen). For example: 'ALL' means all ports of this card are available.
You need to set it if you select 'post-routing' mode.
6.6 Schedule
Schedules, all time segments used in Call Settings are managed here. In this menu, you can add,
edit or delete schedules.
nd
port of the 1st card.
Note: Create a group before you add a schedule, and set specific time after group creation.
6.6.1 Schedule list
• Shedule Group: the group to which a schedule belongs.
• Properties: all properties of schedules in current group.
• Description: the description of this schedule
37

GA90 Modular Gateway User’s Manual
Figure 6-5 Call Settings - Schedule page
• Time Range: ‘hhmm - hhmm’
• Info: time range, the first digit is the cycle type, the number from the second digit is specific
time value.
For example:
W1147 means cycle in weeks of a month, it's Sunday of the fouth week of Nov.
- 0110000 is cycled by week, means Monday and Tuesday per week.
- D0306 is cycled by day, means Mar. 6.
• Action: the actions may be taken by administrator, including modify and remove.
6.6.2 Add a Schedule
There is no record in time segment list here when you first set it. click 'Add …' to create a
schedule and specify details of the schedule.
Note: Create a group before you add a schedule, and set specific time after group creation.
6.6.2.1 Add a Group
1. Click 'Add a new schedule in new group' under the Schedule Group to enter the page.
Figure 6-6 Call Settings -Schedule group page
Parameters here:
• Description: the description of this schedule.
• Date Range Type: the range type of date: by day, by week, by month, by year, work day or
every day.
• Time range: the specific time range.
38
2. Click [Add] to save it.

Figure 6-7 Call Settings - Add Schedule Group Settings page
6.6.2.2 Add a Schedule
1. click 'Add …' under a Group in the list to enter the new setting page.
6. Call Settings
Figure 6-8 Call Settings - Add Schedule Setting page
The parameters are:
• Description: the description of this schedule
• Date Range Type: the range type of date: by day, by week, by month, by year, work day or
every day.
• Time range: the specific time range.
2. Click [Add] to save it.
6.6.3 Schedule Management
Use 'Modify' , 'Remove' to change or delete existing schedule in the list.
6.7 System
Configurations about VoIP services are set in System menu.
39

GA90 Modular Gateway User’s Manual
Figure 6-9 Call Settings?add a new schedule setting page
6.7.1 SIP
• SIP Port: SIP listening UDP port.
• RTP Port : RTP UDP ports range.
• DTMF Mode: RFC2833, SIP INFO message, or in-bound mode.
• Telephone Event: the payload type of telephone event code.
• Codecs: codecs supported, g723, g729, ulaw, alaw. The default sequence is g711u, g711a,
6.7.2 AA
• Dial Mode: dial mode, includes Dial End String, Dial Timeout or Both.
g729, g723 seperated by comma.
- Dial End String: the default is #.
- Dial Timeout: expiration time of dialing, count in second.
- Query IP: how to get GA90 's IP address, composed by 12 keys : 0-9, *, #, the default is
"***", see 3.1 Login.
- Auth Enable: if need authentication information when querying GA90 's IP address. If yes,
you should set Auth Passward also.
6.7.3 Timer
• Timer for Ringing: how long wait for ringback after dialing out.
• Timer for No Answer: how long wait for the answer after dialing out and receiving ringback.
40

6. Call Settings
Figure 6-10 Call Setings - System Settings page
41

GA90 Modular Gateway User’s Manual
6.7.4 DSP
• Tone Zone: ring character of local country or area (different countries and areas have various
ring with different frequency, duration and interval). Our device supports up to 36 countries and
areas' solutions for your choice.
6.7.5 FXO
• CID TYPE: coming call display type of FXO line: FSK, ETSI DTMF, India DTMF, Brazil DTMF.
You need to ensure the both CID TYPE are the same mode when GA90 's FXO connects to
the peer. The receiving of CID caller number will be affected if not.
6.7.6 FXS
You may set FXS line register-type or unregister-type. If it's register-type, you should set IP
address and port for proxy and register proxy, plus register expiration, IP address and port of
outbound proxy, Home Domain, and maximal call number etc.
Note: If it's register type FXS line, you do not need to set call routing for it. If it's register-type,
you should set User name and Pa ssw ord for that enabled FXS line in Line Settings >
FXSLine.
• Proxy: IP address and port of proxy.
• Registrar Server: IP address and port of Registrar Server.
• Register Expiration: maximal timeout value, count in second.
• NAT Traversal Mode: three ways:
- None: no forwarding.
- Port Forwarding: port forwarding mode:
* Pubilc Address: set public IP address or domain and port, the IP and port are
separated by ":".
- Outbound Proxy: the IP address and port of the Outbound proxy which is typically used
in an environment with a firewall/NAT for signals and media stream traverse firewall/NAT.
* Outbound Proxy: set IP address or domain and port for outbound proxy, the IP and
port are separated by ":".
Note: The default port is 5060 if you set only IP address for Outbound Proxy.
• Home Domain: domain's IP address.
42

Administration
You may use this menu to change administrator password, and manage system time and network
settings.
7.1 Change Password
7. Administration
Chapter 7
Change the administrator's password here, (other users' passwords are set in Administration >
Change Password)
• Current Password: the password now used.
• New Password: the new password.
• New Password (confirmed): input the new password again.
Figure 7-1 Administration - Change Password Settings page
Note: Input the new password twice to confirm it.
43

GA90 Modular Gateway User’s Manual
7.2 Network Setting
Click Network Setting on the left task bar to set the work mode of WAN, IP address, netmask,
default gateway, DNS server, and you may enable or disable VLAN and open VLAN tag for it.
Figure 7-2 Administration - Network Settings page
• Work Mode: two work modes: static or DHCP.
- DHCP:DHCP mode.
- In Static mode, you need to set these parameters:
* IP Address: the local IP address.
* Net Mask: the netmask of subnet.
* Default Gateway: the default gateway of subnet.
* Primary / Secondary DNS: the IP address of primary or secondary DNS server.
* VLAN: enable or disable VLAN.
You need to set GA90 's VLAN tag if you enabled VLAN, GA90 will send IP package
with VLAN tag.
The configuration refers to 3.1.1 change GA90 's IP Address.
Note: click [Set] button to save your settings.
44

7.3 Time Setting
In Administration > Time Setting menu, you can set the way of time acquiring: via NTP server
or set it by yourself.
If you use NTP server, please set right time zone and NTP server (with domain or IP address) to
get the correct time.
Set it by yourself, be careful about the format: YYYY-MM-DD HH:MM:SS.
7.3.1 Enable Time Server
Set NTP server to synchronize the system time of the equipment (set NTP Enable to use this
function). It also provides time zone function.
Note: If the equipment synchronizes time with NTP server, please set right time zone and
NTP server (with domain or IP address) to get correct time.
7. Administration
Figure 7-3 Administration - Time Settings page
• NTP Server: the IP address of system time server, the default is pool.ntp.org, update every
day.
• Update Interval: set frequency of synchronization of system time.
• Time Zone: click drop-down button to choose a time zone for GA90.
7.3.2 Disable Time Server
Select GA90 equipment's time zone in the drop-down list.
Note: Time zone is necessary if you use NTP service.
45

GA90 Modular Gateway User’s Manual
7.3.3 Change Time
Set time by yourself. The format is YYYY-MM-DD HH:MM:SS.
Note: Be carefule about the format.
Figure 7-4 Administration - Time Settings - Time Setting page
46

Maintenance
In Maintenance menu, administrators can maintain the system via backup, recovery, up-grade
etc. operations.
8.1 System Reboot
8. Maintenance
Chapter 8
Figure 8-1 System Reboot page
• Restart VoIP: restart VoIP service, the device will close all callings before restart service.
• Reboot System: reboot the operating system of the equipment which will cut off all calls, then
start the OS of the server and reload all datas again.
8.2 Reset to Default
It's for recovery to factory configuration for GA90.
Note: The system will keep network information like IP address when recovering.
47

GA90 Modular Gateway User’s Manual
Maintenance - Reset to Default page
8.3 Config Management
Config management provides you the configuration's download and recovery.
Figure 8-2 Maintenance - Config Management page
• Upload: click [Upload] button to upload the backup configuration file to GA90 equipment and
overwrite GA90's configuration.
• Download: click [Download] button to download system configuration as ga90_config.tgz file
to local machine.
8.4 Auto Attendant
GA90 provides voice file uploading function. on the page of Maintenance > Auto Attendants,
you may set language of prompts, and upload new voice file or recovery them to the defaults.
48
Figure 8-3 Maintenance - Auto Attendants setting page

8.4.1 Language setting
You may set language for voice prompts at Voice Prompts Language. GA90 supports English
and Chinese now.
8.4.2 Upload prompts
Upload AA prompts (Greeting Message) files at Upload Greeting Message menu and define
voice codec type for uploaded files.
1. Voice Prompts File: press [View] to choose a voice file.
2. Encode Type: define codec type for uploading file.
3. Press [Upload] to upload the file.
8.4.3 Recovery to default prompts
Click [Reset] on the page of Reset all voice prompts to default to recovery prompts to the
defaults, which means clear all files uploaded by users and use the default prompts.
8. Maintenance
8.5 Upgrade Firmware
Note: Keep the power on during upgrading.
Upgrade as these:
1. Keep the new file in local machine.
2. login to Web Management System, visit Maintenance > Upgrade Firmware setting page:
Figure 8-4 Upgrade Firmware page
3. click [View] button to select the .img file.
4. click [Upgrade] button to upgrade.
49

GA90 Modular Gateway User’s Manual
Note: If GA90 can not work because of the exception appeared during upgrade progress,
please use 'GA90 Disaster Recovery System' to restart and upgrade GA90 again.
8.6 Diagnostic Tools
Click Diagnostic Tools on the left task bar to enter this page, like figure 8-5.
This page provides Ping, Traceroute and DNS Lookup diagnostic tools.
Figure 8-5 Maintenance - Diagnostic Tools page
• Ping: verify the connection with remote machine.
a. Input IP address and domain in address filed.
b. click [Ping] button and show this:
• Traceroute: Confirm the route to objective machine by tracking a message from source
machine to objective machine.
a. Input domain name in the address filed.
b. click [Traceoute] button and get the result of tracking.
• DNS Lookup: Parsing domain name to IP address.
a. Input domain name in address filed.
b. click [DNSLookup] button and get the result of parsing.
Note: You need to set DNS server before you use DNSLookup tool.
50

A. Glossary
Appendix A
Glossary
10BaseT. A physical media specified by the IEEE 802.3 standard for supporting Ethernet with a
maximum transmission rate of 10 Mb/s. 10BaseT consists of copper twisted-pair cable normally
used for wiring ordinary telephones. Ethernet is a common technology used for connecting
computers into a local area network (LAN).
100BaseT. A local area network transmission standard that supports a data rate of 100 Mb/s. Also
known as Fast Ethernet. similar in function to 10BaseT.
Address Resolution Protocol (ARP). Defines the process of mapping an Internet Protocol address
(IP address) to a physical machine address recognized in the local network. An ARP table
maintains the correlation between each MAC address and its corresponding IP address within a
network. ARP provides the protocol rules for defining this correlation and converting addresses
in both directions. ARP is described by RFC 826.
Advanced Intelligent Network (AIN). A telephone network architecture that separates service
logic from switching equipment. AIN encourages competition among service providers by
allowing the addition of new services without requiring the re-design of existing switches.
Authentication. The process of ensuring that digital data transmissions are delivered to the
intended receiver. Authentication also assures the receiver of the integrity of the message content
and source. The simplest authentication method requires a user name and password to gain
access to a specified account. Authentication protocols can be based on secret-key encryption or
on public-key systems using digital signatures.
Authorization. The process of verifying the identity of a person or device. Authentication is
commonly performed through logon passwords. knowledge of the password is assumed to
guarantee that the user authenticity. Internet business and many other transactions may require
a more stringent authentication process, such as the use of digital certificates issued and verified
by a Certificate Authority as part of a public key infrastructure. Logically, authentication precedes
authorization, although they may often seem to be combined.
Bridge. A device that connects network segments that use the same protocol, such as Ethernet. A
bridge forwards traffic between network segments on the basis of data link layer information.
these segments would require a common network layer address.
Called Party. The person or device that receives a phone call or data transmission.
Calling Party. The person or device that initiates a phone call or data transmission.
Contact. A device where a user can be reached.
51

GA90 Modular Gateway User’s Manual
Decryption. Decryption is the process of converting encrypted data to its original form. See
Encryption.
De-Militarized Zone (DMZ). A computer host or small network placed between a company’s
private network and the outside public network to prevent outside users from gaining direct
access to a server that contains company data. The term is derived from the geographic area
between two opponents where fighting is prohibited. A DMZ is an optional, more secure
approach to a firewall and effectively acts as a proxy server as well.
Direct Inward Dialling (DID). DID is a service that allows users that are connected to a common
server (such as a media exchange or a PBX) to receive calls from sources external to the server
without the intervention of an auto attendant or operator. Under DID, each user is assigned a
unique telephone number, as opposed to the typical PBX setup that assigns extensions that are
based on a common telephone number.
Domain Name System (DNS). Defines the manner that the Internet translates names of network
nodes into addresses. SIP uses DNS to resolve the host names of endpoints to IP addresses.
Dynamic Host Configuration Protocol (DHCP). A communication protocol that defines a method
where network administrators manage and automate Internet Protocol (IP) address assignment
within an enterprise network. DHCP allows you to move network devices from one subnet to
another without administrative attention. If using DHCP, you can connect IP phones to the
network and become operational without having to manually assign an IP address and additional
network parameters. The ZIP 4x4 phone complies with the DHCP specifications documented in
RFC 2131 and are DHCP-enabled by default.
Advanced Encryption Standard (AES). Also known as Rijndael, this is a block cipher adopted as an
encryption standard by the U.S. gover nment and developed by two Belgian cryptographers, Joan
Daemen and Vincent Rijmen. It has been analyzed extensively and is now used widely
worldwide as a replacement for its predecessors the Data Encryption Standard (DES) and the
triple DES (3DES). AES was announced by the NIST on 26 November 2001 after a 5-year
standardization process and became a standard on 26 May 2002. It is one of the most popular
algorithms used in symmetric key cryptography and is acceptable by the US government for
classified information up to Top Secret.
Encryption. The process of converting data into a form that can be read only by the intended
receiver. Decryption is the process of converting encrypted data to its original form. Traditional
encryption schemes utilize the same key to encrypt and decrypt data. Public-key encryption
schemes require two keys: a public key, which anyone may use, and a corresponding private key,
which is possessed only by the person who created it. With this method, anyone may send a
message encrypted with the owner's public key, but only the owner has the private key necessary
to decrypt it. PGP (Pretty Good Privacy) and DES (Data Encryption Standard) are two of the most
popular public-key encryption schemes.
Ethernet. The most widely-installed local area network (LAN) technology. Originally developed
at the Xerox Corporation Palo Alto Research Center, Ethernet is specified in the IEEE 802.3
standard. Ethernet is a best-effort delivery system that uses CSMA/CD technology. Ethernet can
be run over a variety of physical media, including coaxial, twisted pair, and fiber optics.
Firewall. A device, located at a network gateway server, that protects the resources of a private
network from external entities. Typically comprises a set of related programs or a dedicated
computer equipped with such security features as logging, reporting, alarms, and a control
mechanism.
52

A. Glossary
File Transfer Protocol (FTP). An application layer standard Internet protocol that uses the TCP/IP
protocols to exchange files between computers on the internet. Commonly used to transfer web
page files from the creator to a server or to download programs and other files from a computer
to other servers. Described by RFC 959.
Foreign Exchange Office (FXO). An analog interface that connects to the Public Switched
Telephone Network (PSTN) central office and is the interface offered on a standard telephone.
Foreign Exchange Station (FXS). An analog interface that connects directly to a standard
telephone and supplies ring, voltage, and dial tone.
FTP Account. An SE system identifier that points to an FTP address.
Fully Qualified Domain Name (FQDN). The portion of an Internet URL that identifies the server
program that an Internet request addresses. The FQDN includes the second-level domain name
(such as Zed-3.com) and any other levels (such as www.Zed-3.com).
Gateway. A network point that serves as an entrance to another network. Computers that control
traffic within an enterprise’s network or at the local Internet Service Provider (ISP) are gateways.
IP datagrams are transferred from network to network through gateways until it reaches its final
destination. See Router.
Hub. A hub network topology consists of a backbone (main circuit) to which a number of
outgoing lines can be attached, each providing at least one connection port for attaching devices.
As a network product, a hub may include a group of modem cards for dial-in users, a gateway
card for connections to a local area network, and a line connection.
Hypertext Transfer Protocol (HTTP). An application layer protocol that defines a set of rules for
exchanging files (text, images, sound, video, and other multimedia files) on the Internet.
Described by RFC 2068.
Incoming call. A call originated by a source that is external to the enterprise.
Internet. A worldwide computer network system in which users at any one computer can, with
permission, exchange information from any other computer and sometimes talk directly to users
at other computers. also known as the “Net.” Originally designed by the Advanced Research
Projects Agency (ARPA) of the U.S. Defense Department in 1969 so that a communication signal
could withstand a nuclear war and serve military institutions worldwide. First known as the
ARPAnet, the internet has evolved into public, cooperative, and self-sustaining facility accessible
to billions of people worldwide.
Internet Control Message Protocol (ICMP). A message control and error-reporting protocol
between a host server and an Internet gateway that enables hosts to send error or control
messages to other hosts. ICMP is an integral part of IP and must be implemented by every IP
module. Instances for sending an ICMP message include datagram processing errors, the
datagram cannot reach its destination, or when the gateway has insufficient buffering capacity to
forward a datagram. The ZIP 4x4 phone supports ICMP as documented in RFC 792.
Internet Engineering Task Force (IETF). The organization that defines standard Internet operating
protocols such as TCP/IP. The IETF is supervised by the Internet Society Internet Architecture
Board (IAB). IETF members are drawn from the Internet Society's individual and organization
membership. Standards are exclicked in the form of Requests for Comments (RFCs).
Internet Key Exchange (IKE). The method for exchanging encryption and authentication keys
over an unsecured medium, such as the Internet.
53

GA90 Modular Gateway User’s Manual
Internet Protocol (IP). A network layer protocol that sends datagram packets between Internet
nodes. IP is a connection-less protocol, implying that there is no continuing connection between
communicating endpoints. IP provides addressing, type-of-service (ToS) specification, security,
fragmentation and reassembly features. The most widely used IP version is Internet Protocol
Version 4 (IPv4). The ZIP 4x4 phone supports IP as defined in RFC 791.
Internet Protocol Version 6 (IPv6). The latest level of the IP that is included in many projects,
including the major computer operating systems. The most obvious improvement in IPv6 over
IPv4 is the lengthening of IP addresses from 32 bits to 128 bits. All servers that support IPv6 will
also support Internet Protocol Version 4.
Intranet. A restricted-access network that works like the Web, but isn’t on it. Usually owned and
managed by a corporation, an intranet enables a company to share its resources with its
employees without making available confidential information to everyone with Internet access.
IP Address (version 4). A 32-bit number that identifies each sender or receiver of information sent
across the internet. An IP address has two parts: the network identifier and the identifier of a
specific device on the network. On the Internet itself – between the router that moves packets
between points along the route – only the network part of the address is examined.
IP Security (IPSec). Security standard produced by the Internet Engineering Task Force (IETF). a
protocol suite that provides all necessary elements for secure communications-authentication,
integrity, and confidentiality-and makes key exchange practical even in larger networks.
Jitter. Jitter is the deviation in some aspect of the pulses in a high-frequency digital signal or the
period frequency displacement of the signal from its ideal location. The SE system utilizes Jitter
Buffers to compensate for jitter.
Key Management. The management and handling private keys used for signing or encryption.
The only reasonable way to protect the integrity and privacy of information is to rely upon the
secure use of these keys, including the activities of selection, exchange, storage, certification,
expiration, revocation, changing, and transmission. Most of the work in managing information
security systems lies in the key management.
Lightweight Directory Access Protocol (LDAP). A software protocol that enables anyone to locate
organizations, individuals, and other resources such as files and devices in a network, whether
on the public Internet or on a corporate intranet. LDAP is a “lightweight” (smaller amount of
code) version of Directory Access Protocol (DAP), which is part of X.500, a standard for directory
services in a network. LDAP is lighter because, in its initial version, it did not include security
features. Described by RFC 2251.
Load balancing. The mapping (or re-mapping) of work to processors, with the intent of
improving the efficiency of a concurrent computation.
Local Area Network (LAN). A group of computers and associated devices that share a common
communications line and the resources of a single processor or server within a limited geographic
area, such as an office building. 10BaseT Ethernet is the most commonly used form of LAN. A
hardware device called a hub serves as the common wiring point, enabling data to be sent from
one machine to another over the network. LANs are typically limited to distances of less than 500
meters and provide low-cost, high-bandwidth networking capabilities within a small
geographical area.
54
Media Access Control (MAC) Address. A hardware number that uniquely identifies a computer or
other device. Within an Ethernet configuration, the MAC address is a 6-octet address assigned to
the network interface card. When your computer is connected to the Internet, a correspondence

A. Glossary
table relates your IP address to your computer's physical (MAC) address on the LAN. The MAC
address is used by the Media Access Control sublayer of the Datalink Control (DLC) protocol
layer. Each physical device type has a different MAC sublayer.
Network Address Translation (NAT). A standard for translating a secure IP address used within
one network to a different IP address known from another network. In addition to providing
Internet access for trusted networks with privately assigned IP addresses, NAT conserves on the
number of global IP addresses required by a network because each machine in a network does
not require a registered IP address.
Network Interface Card (NIC). A circuit board or card that is installed in a computer for the
purpose of connecting the computer to a network. Personal computers on a LAN usually contain
a NIC designed for a specific LAN transmission technology, such as Ethernet.
Network Time Protocol (NTP). A protocol that synchronizes computer clocks on an IP network.
Described by RFC 1305.
Per-Ho p Behav ior. The differential treatment an individual packet receives while being routed
through a network, as implemented by queue service or queue management disciplines. These
per-hop behaviors are useful and required in network nodes to deliver differentiated treatment
of packets regardless of end-to-end construction or intra-domain services. Per-Hop behavior is
discussed in RFC 2474 and Per-Hop Identification codes are defined in RFC 3140.
Point-to-Point Protocol (PPP). A protocol that defines a communication method between two
computers using a serial interface. Typically used to connect a personal computer to a server
through a phone line.
Proxy Server. A server that acts as an intermediary between a workstation and the Internet to
provide a caching service and ensure security and administrative control for the enterprise. The
proxy server is invisible to the workstation. all Internet requests and returned responses
involving the workstation appear to be directly with the addressed Internet server.
Public Switched Telephone Network (PSTN). The world-wide collection of voice-oriented public
telephone networks. Also referred to as plain old telephone service (POTS).
Quality of Service (QoS). The concept that transmission rates, error rate, and other characteristics
over a network or the Internet can be quantified, improved, and guaranteed (to a certain extent)
in advance. QoS is particularly concerned with the continuous transmission of high-bandwidth
video and multimedia data.
Real-Time Transport Control Protocol (RTCP). The protocol companion to RTP that provides
error, session control, and identification data about a transport session. Described by RFC 1889.
Real-Time Transport Protocol (RTP). An Internet protocol standard that specifies a method for
programs to manage the real-time transmission of multimedia data over unicast or multicast
network services. RTP combines its data transport with an control protocol (RTCP), which makes
it possible to monitor data delivery for large multicast networks. The ZIP 4x4 phone supports RTP
as a media channel for voice and video applications as described in RFC 1889.
Repeater. A device that receives a digital signal on a transmission medium and regenerates the
signal for the next leg of the medium. Repeaters overcome attenuation losses caused by free-space
electromagnetic-field divergence or cable loss over electromagnetic media. A series of repeaters
facilitates the extension of a signal over long distances.
Request for Comments (RFC). A formal document issued by the Internet Engineering Task Force.
Some RFCs are informational in natural while others become Internet standards. RFCs are the
result of committee drafting and subsequent review by interested parties. No further comments
55

GA90 Modular Gateway User’s Manual
or changes to an RFC are permitted once it becomes an Internet standard. changes to internet
standards are enacted through subsequent RFCs that supersede or elaborate on all or parts of
existing RFCs.
Reverse Address Resolution Protocol (RARP). A protocol by which a physical machine in a local
area network can request its IP address from a gateway server’s Address Resolution Protocol table
or cache. RARP is described in RFC 903.
RJ-45. A single-line digital transmission interface. Resembling a standard phone connector, an
RJ-45 connector is twice as wide (with eight wires) and is used for connecting computers to local
area networks (LANs) or phones with multiple lines.
Router. A device that determines the next network point to which a data packet should be sent on
the to its final destination. Routers also act as traffic cops, allowing only authorized machines to
transmit data into the local network so that private information can remain secure. In addition to
supporting these dial-in and leased connections, routers also handle errors, maintain network
usage statistics, and handle security issues.
Routing Information Protocol (RIP). A widely used protocol for managing router information
within a self-contained network, such as a corporate LAN. A gateway host sends its entire routing
table to it closest neighbor every 30 seconds, which in turn passes the table to its neighbor. this
process is repeated until all hosts in the network have the same information. RIP is described by
RFC 1058.
Server. A computer program or device that provides services to other computers.
Session Description Protocol (SDP). An ASCII-based protocol that describes multimedia sessions
and their related scheduling information, including information transport session participant
port numbers and contact addresses. The ZIP 4x4 phone uses SDP for session descriptions as
documented in RFC 2327.
Session Initiated Protocol (SIP). An Internet standard protocol that defines a method of initiating
an interactive user session involving multimedia elements, such as voice, chat, gaming, video,
and virtual reality. SIP is a request-response protocol that deals with requests from clients and
responses from servers through any transport protocol, such as UDP or TCP. Described by RFC
3261, SIP can establish, modify, or terminate multimedia sessions or Internet telephony calls.
Simple Network Management Protocol (SNMP). The protocol that governs network management
and the monitoring of network devices and their functions. SNMP is described formally in RFC
1157 and in a number of related RFCs.
Simple Network Time Protocol (SNTP). A protocol that synchronizes computer clocks on an IP
network. Similar to NTP with fewer features. Some IP phones use SNTP for their date and time
synchronization functions. Described by RFC 2030.
SIP Endpoint. An internet host that understands the SIP protocol.
SIP Registrar. A SIP Registrar is a UAS that responds to REGISTER requests and maintains a list
of bindings that are accessible to proxy servers and redirect servers within its administrative
domain.
SIP Server. A network device that performs special functions at the request of SIP endpoints.
Servers typically act in response to SIP endpoint requests, but can also initiate functions on their
own. RFC 3261 defines three types of SIP servers: SIP Proxy servers, Redirect servers, and
Registrar servers.
56

A. Glossary
Subnet Mask. A number that, when applied to an IP address, can identify the subnetwork where
the address resides. For example, within a class B network, a subnet mask of 255.255.255.0
specifies that the first two portions of the decimal dot format are the network number, while the
third portion is a subnet number. The fourth portion is the host number. A subnet mask of
255.255.0.0 species a class B network that does not have a subnet.
Switch. A network device that selects a path or circuit for sending a unit of data to its next
destination. A switch may also include the function of the router. A switch is generally a simpler
and faster mechanism than a router, which requires knowledge about the network and how to
determine the route. A switch is usually associated with layer 2 of the OSI communications
model.
Transmission Control Protocol (TCP). A set of communications protocols that, when used with
Internet Protocol (IP), support peer-to-peer connectivity functions for both local and wide area
networks. TCP/IP is a communications protocol which allows computers with different operating
systems to communicate with each other and controls how data is transferred between
computers on the Internet.While IP handles the actual delivery of data, TCP tracks the data
packets into which a message is divided for efficient routing through the internet. The ZIP 4x4
phone supports TCP as described by RFC 793.
Trivial File Transfer Protocol (TFTP). An Internet software utility for transferring files that, while
simpler to use than FTP, provides fewer features. TFTP is used where user authentication and
directory visibility are not required. The ZIP 4x4 phone uses TFTP to download configuration files
and software updates from the TFTP Server, as described in RFC 1350.
Tr unk Po rt. A device that allows a switch to bundle traffic from several VLANs through a single
physical port, sorting the various packets by the VLAN identifier (VID) in their frame headers.
Tr ust ed N et w or k. Networks inside your network security perimeter. Only known and approved
sources are allowed access to a trusted network.
Tunnelling. The transmission of data intended for use only within a private network through a
public network in such a way that the routing nodes in the public network are unaware that the
transmission is part of a private network. Tunneling is generally done by encapsulating the
private network data and protocol information within the public network transmission units so
that the private network protocol information appears to the public network as data. Tunneling
allows the use of the Internet, which is a public network, to convey data on behalf of a private
network.
Universal Resource Locator (URL). A standard method of specifying the location of an internet
resource. Also referred to as a location or address, URLs specify the location of files on servers. A
general URL has the syntax protocol://address. For example, http://www.Zed-3.com/index.htm
specifies that the protocol is http and the address is www.Zed-3.com/ index.htm.
Unshielded Twisted Pair (UTP). Also known as 10BaseT. This is the standard cabling used for
telephone lines. It is also used for Ethernet connections.
Untrusted Network. Networks that are outside of your security perimeter. Private and shared
networks over which you have no control over the administration or security policies. Firewalls
deal with the problem of communicating with these networks while protecting your trusted
network.
User Agent. A SIP logical entity that can act as both a user agent client (UAC) and user agent server
(UAS). The role of UAC and UAS, as well as proxy and redirect servers, are defined on a
transaction-by-transaction basis. For example, the user agent initiating a call acts as a UAC when
57

GA90 Modular Gateway User’s Manual
sending the initial INVITE request and as a UAS when receiving a BYE request from the calling
station. Similarly, the same software can act as a proxy server for one request and as a redirect
server for the next request.
User Agent Client. A SIP logical entity that creates a new request, and then uses the client
transaction state machinery to send it. The role of UAC lasts only for the duration of that
transaction. if a piece of software initiates a request, it acts as a UAC for the duration of that
transaction. If it receives a request at a later time, it assumes the role of a user agent server to
process that transaction.
User Agent Server. A SIP logical entity that generates a response to a SIP request. The response
accepts, rejects, or redirects the request. This role lasts only for the duration of that transaction. if
a piece of software responds to a request, it acts as a UAS for the duration of that transaction. If it
generates a request later, it assumes the role of a user agent client to process that transaction.
User Datagram Protocol (UDP). A communications protocol that offers a limited amount of
service when messages are exchanged between computers in a network that uses IP. An
alternative to TCP, UDP uses the IP to transfer a data unit between computers without dividing it
into packets and reassembling it at the other end. Because UDP does not provide the sequencing
of packets, the application program that uses UDP must be able to verify that the entire message
has arrived in the proper order. UDP is in the Transport Layer (or Layer 4) of the OSI
communication model. The ZIP 4x4 phone supports UDP as defined in RFC 768 for SIP signalling.
Virtual Local Area Network (VLAN). A Local Area Network that maps workstations on a logical
basis (such as department or primary application) rather than by physical location. VLAN
members are not identified by their location on a physical subnetwork but through the use of tags
in the frame headers of their transmitted data. VLANs are described in the IEEE 802.1Q standard.
Virtual Private Network (VPN). A method of using the Internet to provide remote offices or
individual users with secure access to their organization's network. A virtual private network can
be contrasted with an expensive system of owned or leased lines that can only be used by one
organization. The goal of a VPN is to provide an organization with the same capabilities, but at a
much lower cost. VPNs are possible because of technologies and standards such as tunneling,
screening, encryption, and IPSec.
Wide Area Network (WAN). A geographically dispersed telecom network. Although a WAN may
be privately owned, the term usually implies the inclusion of public networks.
58
 Loading...