

Page 1
980541-001 Rev. A
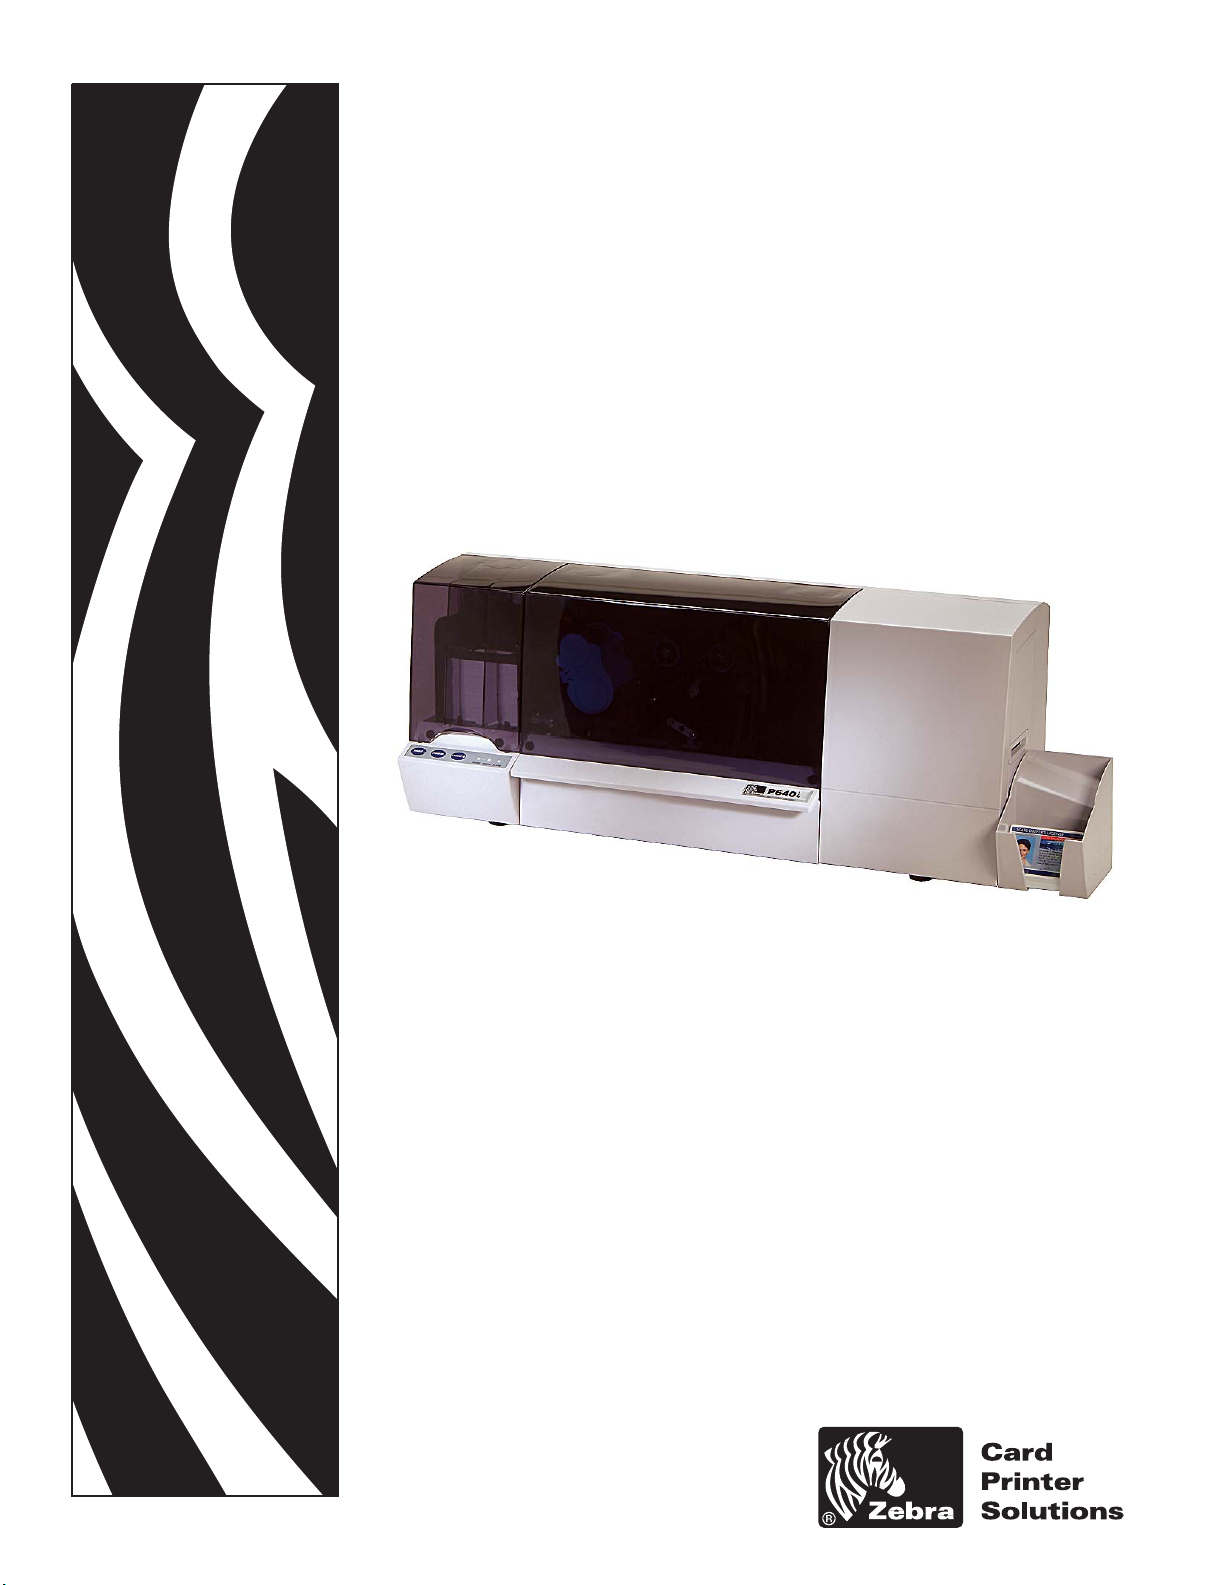
Zebra® P640i Card Printer
Card Printer
User Guide
Page 2
© 2004 ZIH Corp.
The copyrights in this guide and the printers described therein are owned by Zebra Technologies Corporation. Unauthorized reproduction of this manual or the software in the label print engine may result in imprisonment of up
to one year and fines of up to $10,000 (17 U.S.C.506). Copyright violators may be subject to civil liability.
Printer Software © ZIH Corp. All rights reserved worldwide.
Windows is a registered trademark of Microsoft Corporation. All other brand names, product names, or trademarks
belong to their respective holders.
Customer Order # 980541-001
Manufacturer Part # 980541-001 Rev. A
Caution labels on P640i Printers
Pinch Hazard • Keep fingers away from printer cover hinges and back of cleaning
cassette
Hot surfaces • Danger of skin burns near laminator components
Advisories used in this Guide
Important • Advises you of important information
Caution• Failure to follow instructions to the letter can cause malfunction, dam-
age to the printer, or personal injury.
ii P640i Card Printer User Guide 980541-001 Rev. A
Page 3
P640i Card Printer User Guide
Caution • The separate Quick Start Guide shows how to
set up the printer using the standard USB interface. If your
printer was configured for the optional Parallel or Ethernet
connections, refer to Technical Note 9 in Section 4 of this
Guide for instructions on driver installation.
980541-001 Rev. A P640i Card Printer User Guide iii
Page 4

WARRANTY INFORMATION
Printers
All Zebra Card Printers are warranted against defects in material or workmanship for twelve (12)
months from the purchase date.
Proof of purchase or shipment date is required to validate the warranty period. The warranty becomes
void if the equipment is modified, improperly installed or used, damaged by accident or neglect, or if
any parts are improperly installed or replaced by the user.
Note: Products must be packaged in the original or comparable packaging and shipping container. In
the event equipment is not so packaged, or if shipping damage is evident, it will not be accepted for
service under warranty. Surface transportation charges for return to customers in the continental United States is paid by Zebra. Otherwise, Zebra pays CPT (carriage paid to) nearest airport, customer
pays customs, duties, taxes and freight from airport to destination. If Zebra determines that the product returned for warranty service or replacement is not defective as herein defined, the customer will
pay all handling and transportation costs.
Printheads
Since printhead wear is part of normal operation, the original printhead is covered by a twelve (12)
month warranty. Warranty period begins on purchase date.
To qualify for this warranty, the printhead must be returned to the factory or to an authorized service
center. Customers are not required to purchase Zebra supplies (media and/or ribbons) for warranty
qualification. However, if it is determined that the use of other manufacturer supplies has caused any
defect in the printhead for which a warranty claim is made, the user is responsible for Zebraís labor
and material charges required to repair the defect. The warranty becomes void if the printhead is
physically worn or damaged; also if it is determined that failure to follow the preventative maintenance
schedule listed in the Userís Guide has caused defect in the thermal printhead for which warranty
claim is made.
Software
Software is warranted to be free of defects in material and workmanship for 30 days from the date of
purchase. In the event of notification within the warranty period of defects, Zebra will replace the defective CD or documentation.
Supplies
Supplies are warranted to be free from defect in material and workmanship for a period of six (6)
months for media and twelve (12) months for ribbon from the date of shipment by Zebra. This is provided the user has complied with storage guidelines, handling, and usage of the supplies in Zebra
printers.
Zebraís sole obligation under these warranties is to furnish parts and labor for the repair or possible
replacement of products found to be defective in material or workmanship during the warranty period.
Zebra may in its discretion issue a credit for any such defective products in such amount as it deems
reasonable.
Spare Parts
All parts, maintenance kits, options kits, and accessories are warranted to be free of defects in material and workmanship for 90 days (except where otherwise denoted) from date of purchase. This warranty becomes void if the item is modified, improperly installed or used, or damaged by accident or
neglect.
iv P640i Card Printer User Guide 980541-001 Rev. A
Page 5

Warranty Exclusions and Conditions
The warranties provided above are the only warranties applicable. No other warranties, expressed or
implied, are given. Zebra does not make any IMPLIED WARRANTY OF MERCHANTABILITY OR
FITNESS FOR A PAR TICULAR PURPOSE in connection with its sale of products or services. While
Zebraís desire is to be responsive to specific needs and questions, Zebra does not assume responsibility for any specific application to which any products are applied including, but not limited to, compatibility with other equipment. All statements, technical information or recommendations relating to
Zebra products are based upon tests believed to be reliable yet do not constitute a guaranty or warranty.
Zebraís maximum liability for warranty claims is limited to the invoice price of the product claimed defective. Zebra does not assume responsibility for delays or replacement or repair of products. Zebra
shall not under any circumstances whatsoever be liable to any party for loss of profits, lost data, diminution of good will, or any other special or consequential damages whatsoever with respect to any
claim made under agreement with Zebra. Specifically for software, Zebra is not liable for any incidental or consequential damages caused by abuse or misapplication of the software or by its use in violation of the U.S. copyright law or international treaty.
980541-001 Rev. A P640i Card Printer User Guide v
Page 6

AGENCY APPROVALS
Product Disposal
Do not dispose of this product in unsorted municipal waste. This product is recyclable.
Please recycle according to your local standards. For more information, please see our
web site at: http://www.zebra.com/recycle
CONTACT INFORMATION
Zebra Technologies • Card Printer Solutions
North America
1001 Flynn Road
Camarillo, CA 93012-8706 USA
Telephone: +1(805) 579 1800
Fax: +1(805) 579 1808
Toll free in the US: 800 452 4056
e-mail: cards@zebra.com
Europe, Middle East and Africa
The Valley Centre, Gordon Road
High Wycombe
Buckinghamshire HP13 6EQ, UK
Telephone: +44 870 241 1527
Fax: +44 870 241 0765
www.zebracard.com
Asia Pacific
16 New Industrial Road
#05-03 Hudson TechnoCentre
Singapore 536204
Telephone: +65 6858 0722
Fax: +65 6885 0836
e-mail: asiasales@zebra.com
Latin America
9800 NW 41St Street, Suite 220
Doral, FL 33178
Telephone: +1(305) 558 3100
Fax: +1(805) 558 8485
vi P640i Card Printer User Guide 980541-001 Rev. A
Page 7

Table of Contents
Table of Contents . . . . . . . . . . . . . . . . . . . . . . . . . . . . . . . . . . . . . . . . . . . . . . . . . vii
1 • Introduction . . . . . . . . . . . . . . . . . . . . . . . . . . . . . . . . . . . . . . . . . . . . . . . . . . . . 1
Overview . . . . . . . . . . . . . . . . . . . . . . . . . . . . . . . . . . . . . . . . . . . . . . . . . . . . . . . . . . . . . . 2
Photo ID card printing . . . . . . . . . . . . . . . . . . . . . . . . . . . . . . . . . . . . . . . . . . . . . . . . . . . 2
Printing basics . . . . . . . . . . . . . . . . . . . . . . . . . . . . . . . . . . . . . . . . . . . . . . . . . . . . . . . . . 3
What makes the P640i a different kind of printer . . . . . . . . . . . . . . . . . . . . . . . . . . . . . 3
What to expect when you turn on the power . . . . . . . . . . . . . . . . . . . . . . . . . . . . . . . . 4
Test card. . . . . . . . . . . . . . . . . . . . . . . . . . . . . . . . . . . . . . . . . . . . . . . . . . . . . . . . . . . . 5
Push buttons and Indicator lights. . . . . . . . . . . . . . . . . . . . . . . . . . . . . . . . . . . . . . . . . . 5
PRINT button . . . . . . . . . . . . . . . . . . . . . . . . . . . . . . . . . . . . . . . . . . . . . . . . . . . . . . . . 5
RIBBON button. . . . . . . . . . . . . . . . . . . . . . . . . . . . . . . . . . . . . . . . . . . . . . . . . . . . . . . 6
LAMINATE button. . . . . . . . . . . . . . . . . . . . . . . . . . . . . . . . . . . . . . . . . . . . . . . . . . . . . 6
INDICATOR LIGHT SUMMARY. . . . . . . . . . . . . . . . . . . . . . . . . . . . . . . . . . . . . . . . . . . . . 7
A typical card production sequence . . . . . . . . . . . . . . . . . . . . . . . . . . . . . . . . . . . . . . . 8
2 • Media Handling . . . . . . . . . . . . . . . . . . . . . . . . . . . . . . . . . . . . . . . . . . . . . . . . 11
Loading cards . . . . . . . . . . . . . . . . . . . . . . . . . . . . . . . . . . . . . . . . . . . . . . . . . . . . . . . . . .11
Hot Loading . . . . . . . . . . . . . . . . . . . . . . . . . . . . . . . . . . . . . . . . . . . . . . . . . . . . . . . . 12
Loading the cleaning cassette. . . . . . . . . . . . . . . . . . . . . . . . . . . . . . . . . . . . . . . . . . . . 12
Why 10 cards is the normal clean frequency . . . . . . . . . . . . . . . . . . . . . . . . . . . . . . . 13
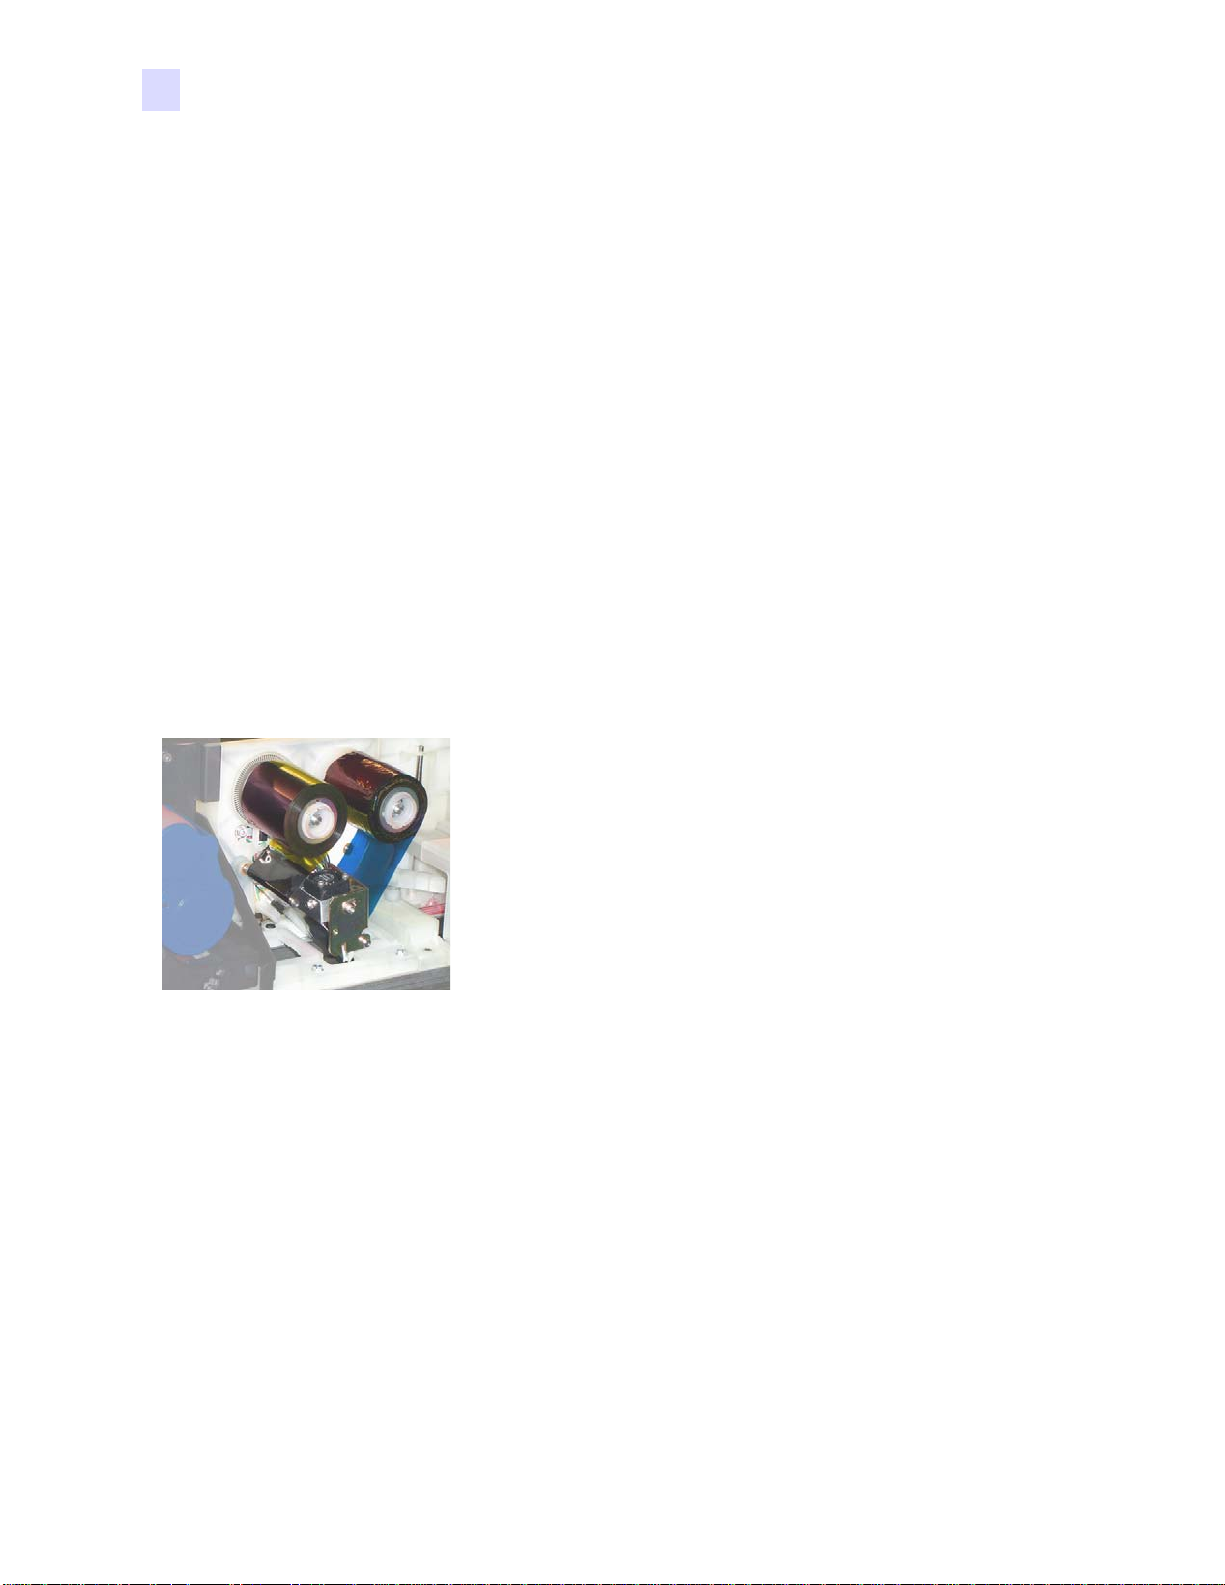
Loading the color ribbon . . . . . . . . . . . . . . . . . . . . . . . . . . . . . . . . . . . . . . . . . . . . . . . . 13
Laminating Station . . . . . . . . . . . . . . . . . . . . . . . . . . . . . . . . . . . . . . . . . . . . . . . . . . . . . 15
Laminate Cassettes . . . . . . . . . . . . . . . . . . . . . . . . . . . . . . . . . . . . . . . . . . . . . . . . . . 15
Main components of the laminating system . . . . . . . . . . . . . . . . . . . . . . . . . . . . . . . . 16
Removing the cassettes . . . . . . . . . . . . . . . . . . . . . . . . . . . . . . . . . . . . . . . . . . . . . . . 16
Loading the cassettes. . . . . . . . . . . . . . . . . . . . . . . . . . . . . . . . . . . . . . . . . . . . . . . . . 17
Installing the cassettes . . . . . . . . . . . . . . . . . . . . . . . . . . . . . . . . . . . . . . . . . . . . . . . . 18
Clearing the Laminate Channels . . . . . . . . . . . . . . . . . . . . . . . . . . . . . . . . . . . . . . . . 19
Laminating smart cards . . . . . . . . . . . . . . . . . . . . . . . . . . . . . . . . . . . . . . . . . . . . . . . 20
980541-001 Rev. A P640i Card Printer User Guide vii
Page 8

Table of Contents
3 • Troubleshooting . . . . . . . . . . . . . . . . . . . . . . . . . . . . . . . . . . . . . . . . . . . . . . . 21
Image Adjustment. . . . . . . . . . . . . . . . . . . . . . . . . . . . . . . . . . . . . . . . . . . . . . . . . . . . . . 21
Troubleshooting quality problems . . . . . . . . . . . . . . . . . . . . . . . . . . . . . . . . . . . . . . . . 22
Poor color registration. . . . . . . . . . . . . . . . . . . . . . . . . . . . . . . . . . . . . . . . . . . . . . . . . 22
Examples of color mis-registration . . . . . . . . . . . . . . . . . . . . . . . . . . . . . . . . . . . . . . . 22
Poor color rendering. . . . . . . . . . . . . . . . . . . . . . . . . . . . . . . . . . . . . . . . . . . . . . . . . . 22
Faint, non-uniform image . . . . . . . . . . . . . . . . . . . . . . . . . . . . . . . . . . . . . . . . . . . . . . 22
Gaps in image at edges and corners . . . . . . . . . . . . . . . . . . . . . . . . . . . . . . . . . . . . . 22
Continuous white or black stripes on card’s longer dimension. . . . . . . . . . . . . . . . . . 23
Random occurences of white (unprinted) spots . . . . . . . . . . . . . . . . . . . . . . . . . . . . . 23
Image not centered on card . . . . . . . . . . . . . . . . . . . . . . . . . . . . . . . . . . . . . . . . . . . . 23
Image missing at top or bottom of card . . . . . . . . . . . . . . . . . . . . . . . . . . . . . . . . . . . 23
Consistent image defects, card after card . . . . . . . . . . . . . . . . . . . . . . . . . . . . . . . . . 24
Random colored patterns on image . . . . . . . . . . . . . . . . . . . . . . . . . . . . . . . . . . . . . . 24
Scratches/dings on long edges of card. . . . . . . . . . . . . . . . . . . . . . . . . . . . . . . . . . . . 24
Laminate not centered on card. . . . . . . . . . . . . . . . . . . . . . . . . . . . . . . . . . . . . . . . . . 24
Laminate not parallel with card edges . . . . . . . . . . . . . . . . . . . . . . . . . . . . . . . . . . . . 25
Laminate wrinkling . . . . . . . . . . . . . . . . . . . . . . . . . . . . . . . . . . . . . . . . . . . . . . . . . . . 25
Unusual Printer/Lmainator Events . . . . . . . . . . . . . . . . . . . . . . . . . . . . . . . . . . . . . . . . 25
Color ribbon runs for longer than 2 or 3 seconds when cover is closed (MEDIA
light stays on) . . . . . . . . . . . . . . . . . . . . . . . . . . . . . . . . . . . . . . . . . . . . . . . . . . . . 25
ALARM light stays ON after error condition is cleared . . . . . . . . . . . . . . . . . . . . . . . . 25
Card has both front and back images printed on same side . . . . . . . . . . . . . . . . . . . 25
MEDIA light ON steady, but no obvious visual problem . . . . . . . . . . . . . . . . . . . . . . . 25
Completely unexpected print results. . . . . . . . . . . . . . . . . . . . . . . . . . . . . . . . . . . . . . 26
YMC color panels stick to card. . . . . . . . . . . . . . . . . . . . . . . . . . . . . . . . . . . . . . . . . . 26
K (Black) panel sticks to card. . . . . . . . . . . . . . . . . . . . . . . . . . . . . . . . . . . . . . . . . . . 26
Loud rattling/screeching from card transport . . . . . . . . . . . . . . . . . . . . . . . . . . . . . . . 26
Brief rattling noise before every print job . . . . . . . . . . . . . . . . . . . . . . . . . . . . . . . . . . 26
Rattling noise every 10 cards . . . . . . . . . . . . . . . . . . . . . . . . . . . . . . . . . . . . . . . . . . . 26
Unusual events. . . . . . . . . . . . . . . . . . . . . . . . . . . . . . . . . . . . . . . . . . . . . . . . . . . . . . 27
Laminator spot check . . . . . . . . . . . . . . . . . . . . . . . . . . . . . . . . . . . . . . . . . . . . . . . . . 27
Additional help . . . . . . . . . . . . . . . . . . . . . . . . . . . . . . . . . . . . . . . . . . . . . . . . . . . . . . 27
Error messages. . . . . . . . . . . . . . . . . . . . . . . . . . . . . . . . . . . . . . . . . . . . . . . . . . . . . . . . 27
viii P640i Card Printer User Guide 980541-001 Rev. A 10/15/2004
Page 9

Table of Contents
4 • Technical Notes . . . . . . . . . . . . . . . . . . . . . . . . . . . . . . . . . . . . . . . . . . . . . . . . 31
Technical Note 1 - General Information . . . . . . . . . . . . . . . . . . . . . . . . . . . . . . . . . . . . 32
P640i Specifications . . . . . . . . . . . . . . . . . . . . . . . . . . . . . . . . . . . . . . . . . . . . . . . . . 32
ID/Key . . . . . . . . . . . . . . . . . . . . . . . . . . . . . . . . . . . . . . . . . . . . . . . . . . . . . . . . . . . . 33
Printer Parameters in the Drivers . . . . . . . . . . . . . . . . . . . . . . . . . . . . . . . . . . . . . . . . 33
Password Protection . . . . . . . . . . . . . . . . . . . . . . . . . . . . . . . . . . . . . . . . . . . . . . . . . 34
Technical Note 2 - Card Transport . . . . . . . . . . . . . . . . . . . . . . . . . . . . . . . . . . . . . . . . 37
No-slip card transport . . . . . . . . . . . . . . . . . . . . . . . . . . . . . . . . . . . . . . . . . . . . . . . . 37
Card transport knob . . . . . . . . . . . . . . . . . . . . . . . . . . . . . . . . . . . . . . . . . . . . . . . . . . 37
Take care of the platen. . . . . . . . . . . . . . . . . . . . . . . . . . . . . . . . . . . . . . . . . . . . . . . . 37
Removing the platen. . . . . . . . . . . . . . . . . . . . . . . . . . . . . . . . . . . . . . . . . . . . . . . . . . 37
Truck interlock (arrowed) . . . . . . . . . . . . . . . . . . . . . . . . . . . . . . . . . . . . . . . . . . . . . . 38
Truck home sensor . . . . . . . . . . . . . . . . . . . . . . . . . . . . . . . . . . . . . . . . . . . . . . . . . . 38
Card presence sensor . . . . . . . . . . . . . . . . . . . . . . . . . . . . . . . . . . . . . . . . . . . . . . . . 38
Cleaning cassette . . . . . . . . . . . . . . . . . . . . . . . . . . . . . . . . . . . . . . . . . . . . . . . . . . . 39
Underside of hopper base molding . . . . . . . . . . . . . . . . . . . . . . . . . . . . . . . . . . . . . . 39
Transport Parameters in the Driver . . . . . . . . . . . . . . . . . . . . . . . . . . . . . . . . . . . . . . 39
Avoid These Problems . . . . . . . . . . . . . . . . . . . . . . . . . . . . . . . . . . . . . . . . . . . . . . . . 40
TEchnical Note 3 - Magnetic Stripe Encoder . . . . . . . . . . . . . . . . . . . . . . . . . . . . . . . . 41
Mag encoder installation . . . . . . . . . . . . . . . . . . . . . . . . . . . . . . . . . . . . . . . . . . . . . . 41
Mag encoder components . . . . . . . . . . . . . . . . . . . . . . . . . . . . . . . . . . . . . . . . . . . . . 41
Cleaning the read/write head . . . . . . . . . . . . . . . . . . . . . . . . . . . . . . . . . . . . . . . . . . . 41
Replacing the read/write head . . . . . . . . . . . . . . . . . . . . . . . . . . . . . . . . . . . . . . . . . . 41
Magnetic Encoding Functions in the Driver . . . . . . . . . . . . . . . . . . . . . . . . . . . . . . . . 41
Magnetic Encoding Preferences. . . . . . . . . . . . . . . . . . . . . . . . . . . . . . . . . . . . . . . . . 43
Techncial Note 4 - Print Station. . . . . . . . . . . . . . . . . . . . . . . . . . . . . . . . . . . . . . . . . . . 44
Examples of printhead problems . . . . . . . . . . . . . . . . . . . . . . . . . . . . . . . . . . . . . . . . 44
Cleaning the print head . . . . . . . . . . . . . . . . . . . . . . . . . . . . . . . . . . . . . . . . . . . . . . . 44
Print head attachment hardware . . . . . . . . . . . . . . . . . . . . . . . . . . . . . . . . . . . . . . . . 45
Replacing the print head . . . . . . . . . . . . . . . . . . . . . . . . . . . . . . . . . . . . . . . . . . . . . . 45
Print quality tests and adjustments . . . . . . . . . . . . . . . . . . . . . . . . . . . . . . . . . . . . . . 45
Print Stati on Parameters in the Driver . . . . . . . . . . . . . . . . . . . . . . . . . . . . . . . . . . . . 46
K (Black) Panel Printing . . . . . . . . . . . . . . . . . . . . . . . . . . . . . . . . . . . . . . . . . . . . . . . 47
Technical Note 5 - Flip Station . . . . . . . . . . . . . . . . . . . . . . . . . . . . . . . . . . . . . . . . . . . 50
How the flip station works. . . . . . . . . . . . . . . . . . . . . . . . . . . . . . . . . . . . . . . . . . . . 50
Flip station adjustment procedure . . . . . . . . . . . . . . . . . . . . . . . . . . . . . . . . . . . . . . . 51
Flip Station Routines in the Driver . . . . . . . . . . . . . . . . . . . . . . . . . . . . . . . . . . . . . . . 52
Carrier Motion. . . . . . . . . . . . . . . . . . . . . . . . . . . . . . . . . . . . . . . . . . . . . . . . . . . . . . . 53
980541-001 Rev. A 10/15/2004 P640i Card Printer User Guide ix
Page 10

Table of Contents
Techncial Note 6 - Laminator . . . . . . . . . . . . . . . . . . . . . . . . . . . . . . . . . . . . . . . . . . . . 55
Laminate position adjustments . . . . . . . . . . . . . . . . . . . . . . . . . . . . . . . . . . . . . . . . . 56
Laminator Parameters in the Driver . . . . . . . . . . . . . . . . . . . . . . . . . . . . . . . . . . . . . . 58
Correcting Laminator Problems . . . . . . . . . . . . . . . . . . . . . . . . . . . . . . . . . . . . . . . . . 59
Technical Note 7 - ID/Log . . . . . . . . . . . . . . . . . . . . . . . . . . . . . . . . . . . . . . . . . . . . . . . 61
Technical Note 8 - Using the Windows Printer Driver . . . . . . . . . . . . . . . . . . . . . . . . 62
Operator screens . . . . . . . . . . . . . . . . . . . . . . . . . . . . . . . . . . . . . . . . . . . . . . . . . . . . . . . . . . . . . . . . . . . . . . . . . . . . . . 62
Printing Preferences . . . . . . . . . . . . . . . . . . . . . . . . . . . . . . . . . . . . . . . . . . . . . . . . . 62
What is black extraction? . . . . . . . . . . . . . . . . . . . . . . . . . . . . . . . . . . . . . . . . . . . . . . 63
Printer Properties . . . . . . . . . . . . . . . . . . . . . . . . . . . . . . . . . . . . . . . . . . . . . . . . . . . . 64
IDPrint Lite . . . . . . . . . . . . . . . . . . . . . . . . . . . . . . . . . . . . . . . . . . . . . . . . . . . . . . . . . 70
Card Setup . . . . . . . . . . . . . . . . . . . . . . . . . . . . . . . . . . . . . . . . . . . . . . . . . . . . . . . . . 72
Technical Note 9 - Installing the Windows Printer Driver . . . . . . . . . . . . . . . . . . . . . . 73
First things first . . . . . . . . . . . . . . . . . . . . . . . . . . . . . . . . . . . . . . . . . . . . . . . . . . . . . . 73
Driver CD . . . . . . . . . . . . . . . . . . . . . . . . . . . . . . . . . . . . . . . . . . . . . . . . . . . . . . . . . . 73
Download . . . . . . . . . . . . . . . . . . . . . . . . . . . . . . . . . . . . . . . . . . . . . . . . . . . . . . . . . . 73
Uninstalling the printer driver . . . . . . . . . . . . . . . . . . . . . . . . . . . . . . . . . . . . . . . . . . . 73
Windows file missing . . . . . . . . . . . . . . . . . . . . . . . . . . . . . . . . . . . . . . . . . . . . . . . . . 73
Installing the printer driver . . . . . . . . . . . . . . . . . . . . . . . . . . . . . . . . . . . . . . . . . . . . . 74
New Hardware Found Wizard. . . . . . . . . . . . . . . . . . . . . . . . . . . . . . . . . . . . . . . . . . . 74
Install using Zebra’s Printer Setup screen . . . . . . . . . . . . . . . . . . . . . . . . . . . . . . . . . 75
Install using “Add a Printer” . . . . . . . . . . . . . . . . . . . . . . . . . . . . . . . . . . . . . . . . . . . . 78
Firewall issues . . . . . . . . . . . . . . . . . . . . . . . . . . . . . . . . . . . . . . . . . . . . . . . . . . . . . . 79
Configuring the Ethernet option . . . . . . . . . . . . . . . . . . . . . . . . . . . . . . . . . . . . . . . . . 79
Technical Note 10 - Printer Pooling . . . . . . . . . . . . . . . . . . . . . . . . . . . . . . . . . . . . . . . 83
Set up the Printers individually . . . . . . . . . . . . . . . . . . . . . . . . . . . . . . . . . . . . . . . . . 83
x P640i Card Printer User Guide 980541-001 Rev. A 10/15/2004
Page 11
1
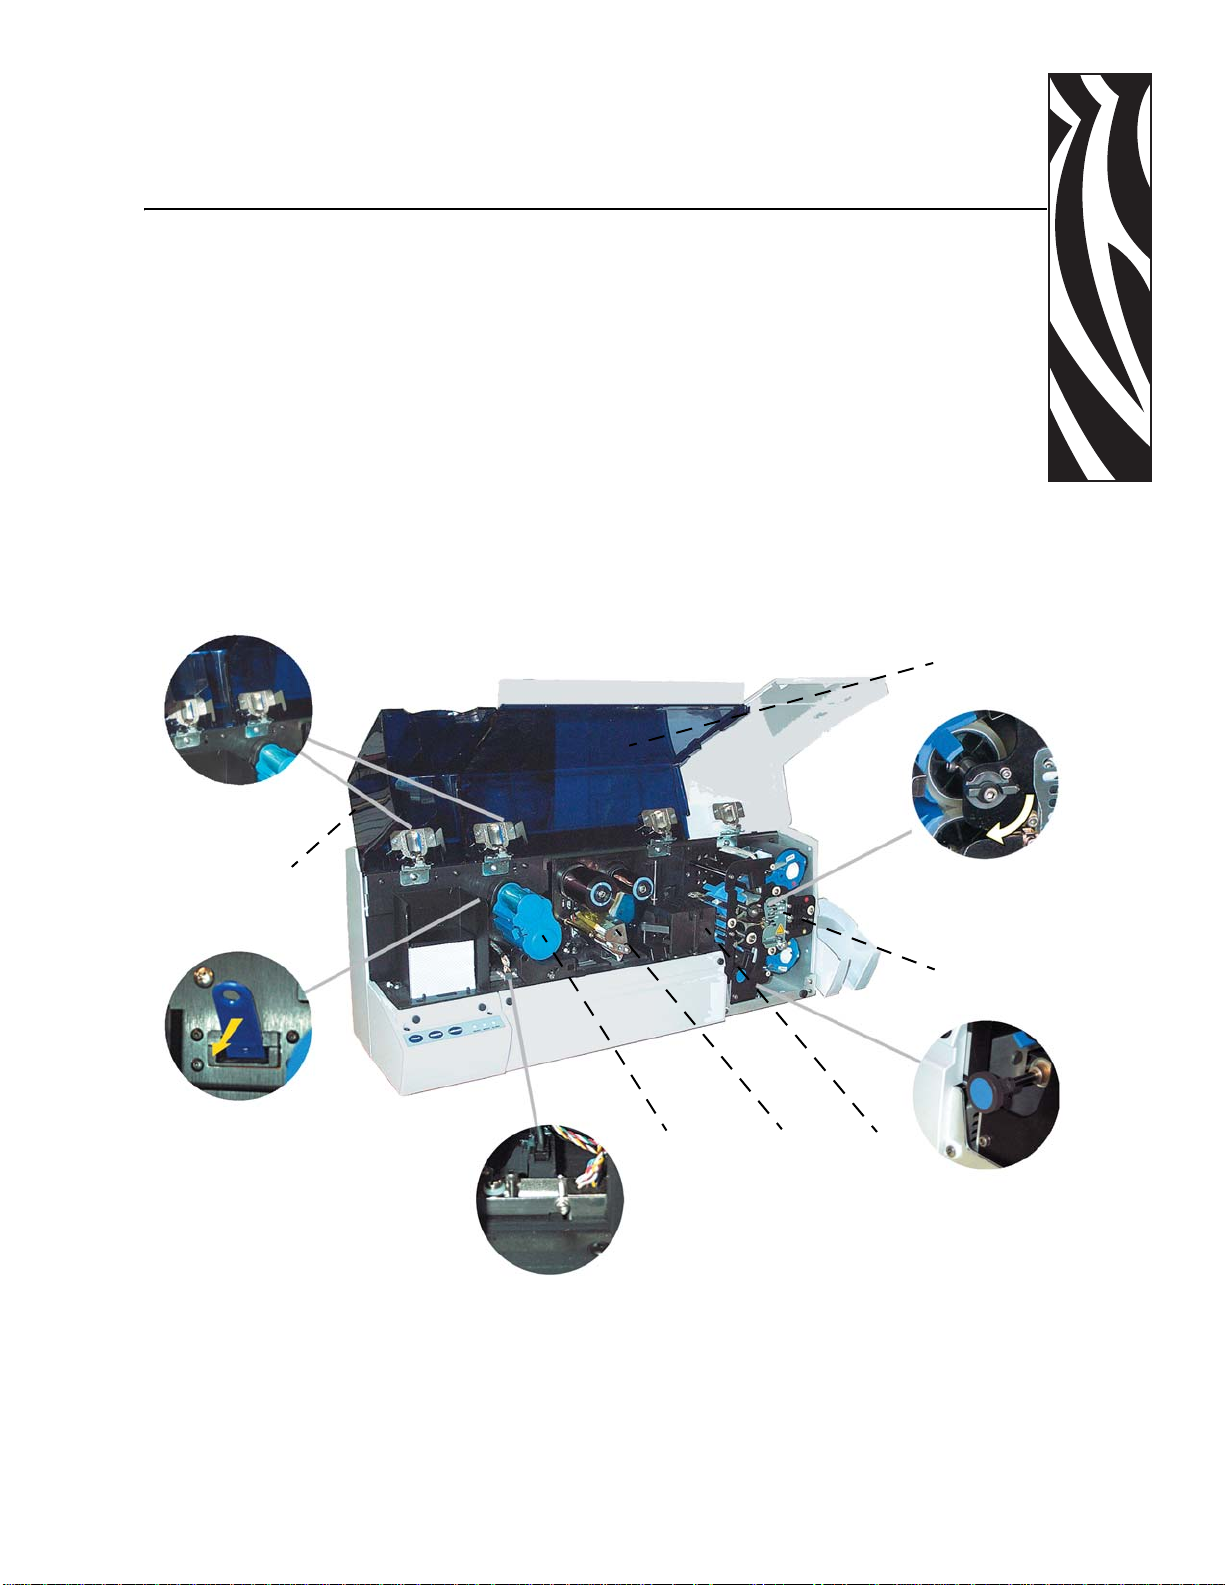
Introduction
Main cover
Interlock actua-
Card hopper
cover
ID/Key (option-
Card
Hopper
Push
buttons
Indicator
Mag encoder (optional)
Cleaning
station
Print
station
Flip
station
Transfer toggle
Rotate clockwise
to separate trans-
Laminating
station
Card transport
knob
For manual repo-
980541-001 Rev. A P640i Card Printer User Guide 1
Page 12
Introduction
Overview
Overview
The P640i Printer is a complete, fully automatic photo ID card fabricator. It comprises six
functional elements:
• Card hopper
• Magnetic (“mag”) encoder - optional feature
• Cleaning station
• Print station
•Flip station
• Laminator
Because the P640i Printer is fully automa tic, it requires no attention from the ope r ator other
than media loading and an occasional vacuuming.
Although you don’t need a detailed knowledge of the printer to use the printer effectively, an
overall understanding of what goes on can help you troubleshoot effectively.
How you load the cards, color ribbon and laminate is important - see Section 2. Careful
attention to media handling takes care of most problems!
Photo ID card printing
between the print head and the card being printed is the color ribbon, usually a series of
process-color dye panels (Y, M and C) for dye sub, plus a panel of black resin (K) for mass
transfer.
The process used in the P640i Printer is kn own as digital thermal
transfer, a means of printing clean, durable images directly onto the
PVC surface of photo ID cards.
There are two different thermal transfer technologies, both used in the
P640i Printer: dye sublimation (“dye sub”), which uses the three
process colors Yellow/Magenta/Cyan for photos and graphics, and
mass transfer for machine-readable black text and bar codes.
Both types of printing are done with a single print head comprising a
row of tiny heating elements, 300 to the inch, each driven
independently by the printer controller. Sandwiched by spring pressure
2 P640i Card Printer User Guide 980541-001 Rev. A
Page 13
Printing basics
This is the usual pattern for a P640i Printer
ribbon. Y, M and C are the three “dye sub”
process colors. The K panel is for infraredreadable bar codes and other data, usually on
the back of the card. A second K panel
(YMCKK) is sometimes provided to allow
black resin printing on both sides of the card.
Introduction
Printing basics
C
Cyan
Dye
Magen-
ta Dye
Y
Yellow
Dye
M
K
Black
Resin
As the ID card is driven through the print
station, the color ribbon is metered out from
the supply roll at the same speed. Each color
reqires a separate “pass” of the card. The black
dots at the bottom edge of the print head depict
the heating elements - in practice, at 300 to the
inch, they are too small to be seen with the
Card
naked eye.
Color migrates from the dye ribbon onto the ID card,
the spread of the dye depending on the amount of heat
applied by the print head element. Each time it comes to
a dye panel boundary, the print head lifts to allow the
card to back up, then lowers again to print the next
color.
Print
head
Card
Print
head
Print
head
Color
ribbon
The K (black) panel is a resin that “mass transfers”
onto the surface of the card, instead of migrating into
it. With mass transfer the printer has lit tle control over
a pixel’s size or density - it’s either there or it isn’t. K
printing is used for bar codes because it is machine
readable, whereas YMC dyes ar e not.
Card
What makes the P640i a different kind of printer
The print station in the P640i has no pinch rollers that need cleaning to maintain accuracy
980541-001 Rev. A P640i Card Printer User Guide 3
Page 14
Introduction
Printing basics
In the P640i the card is transported on a belt-driven truck that maintains precise registration
Toothed blet
Platen
3. After a few minutes (3 to 5), the READY light will show steady green, indicat in g t hat th e
through the entire process of picking, cleaning, and
multi-pass printing. This means perfect color-to-color
Transport
motor
registration time after time - no slippage, no
deterioration in print quality over time.
What to expect when you turn
Card truck
Card transport
knob
the fan running , and a clicking sound inside the printer (the flip station resetting itself).
Finally;
printer is ready to print.
on the power
1. Nothing happens for two or three seconds, then;
2. The READY light flashes yellow (indicating that
the laminator is warming up), and you will hear
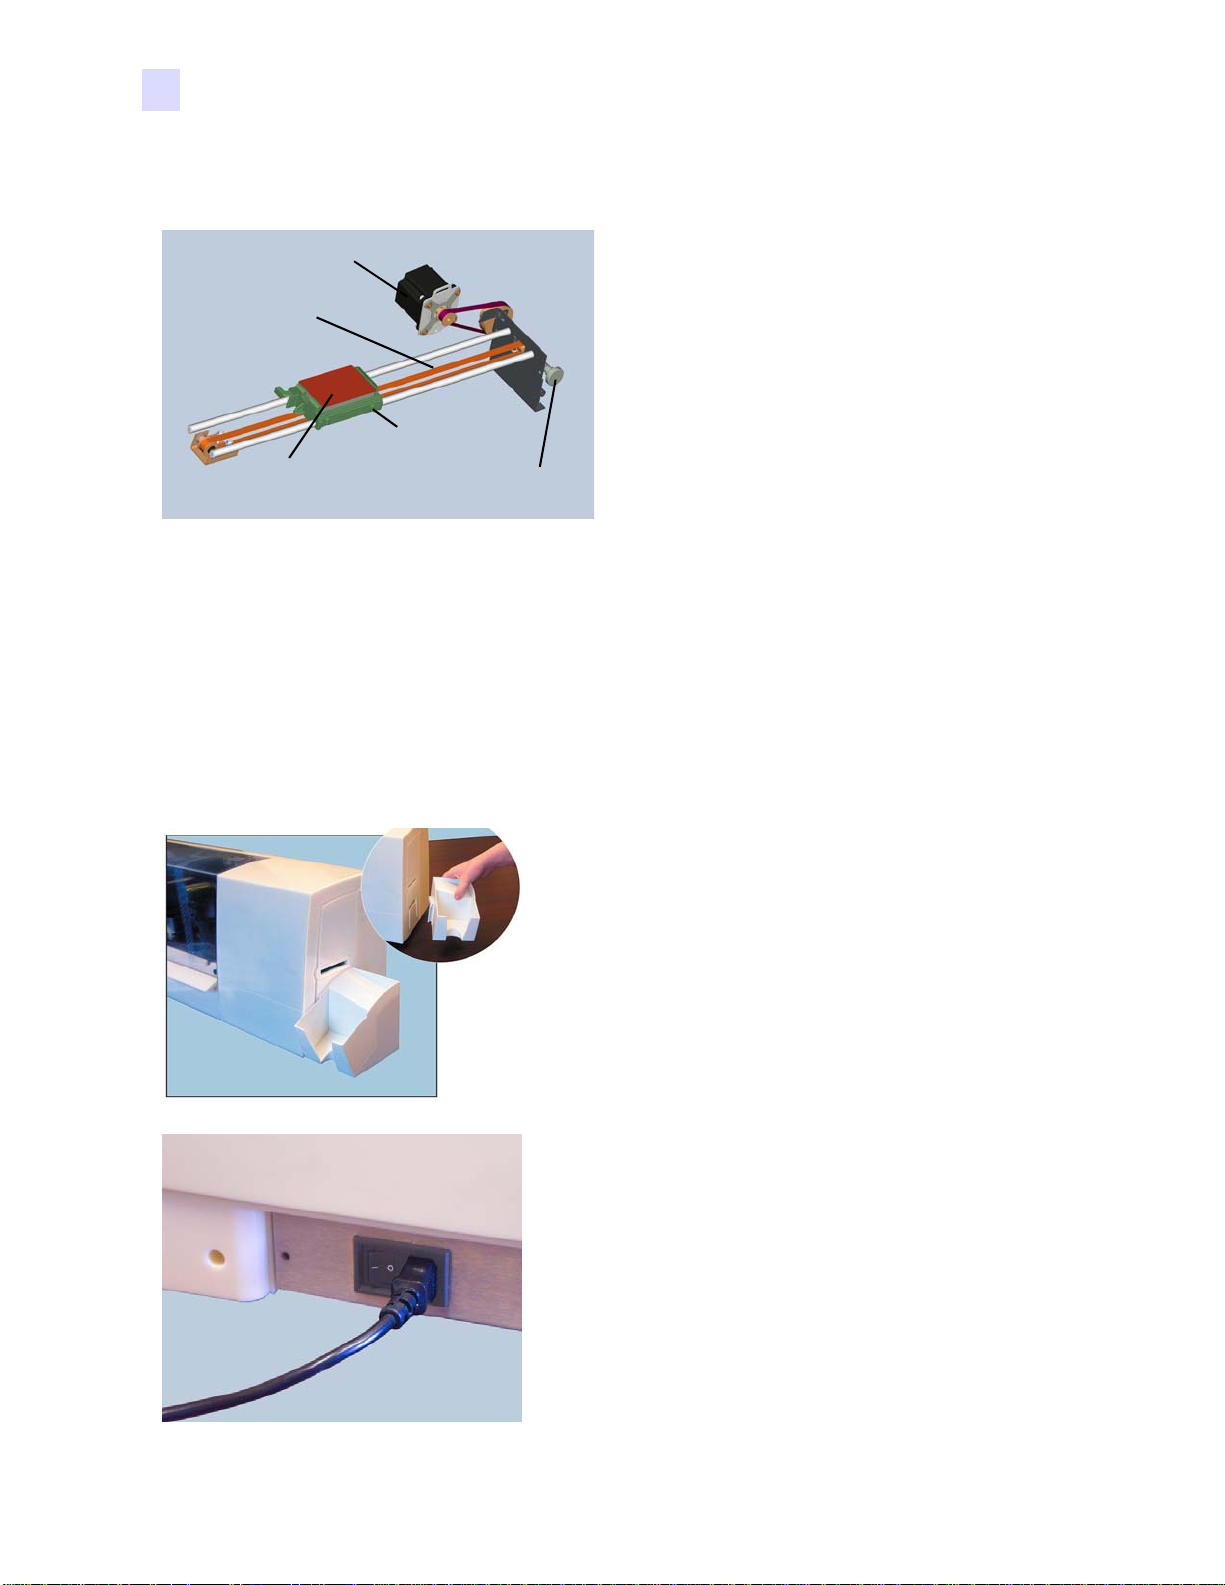
The receiving tray for printed ID cards hooks onto the right side pan el .
Power cord entry and ON-OFF switch are located on the rear
panel.
4 P640i Card Printer User Guide 980541-001 Rev. A
Page 15
Test card
Introduction
Push buttons and Indicator lights
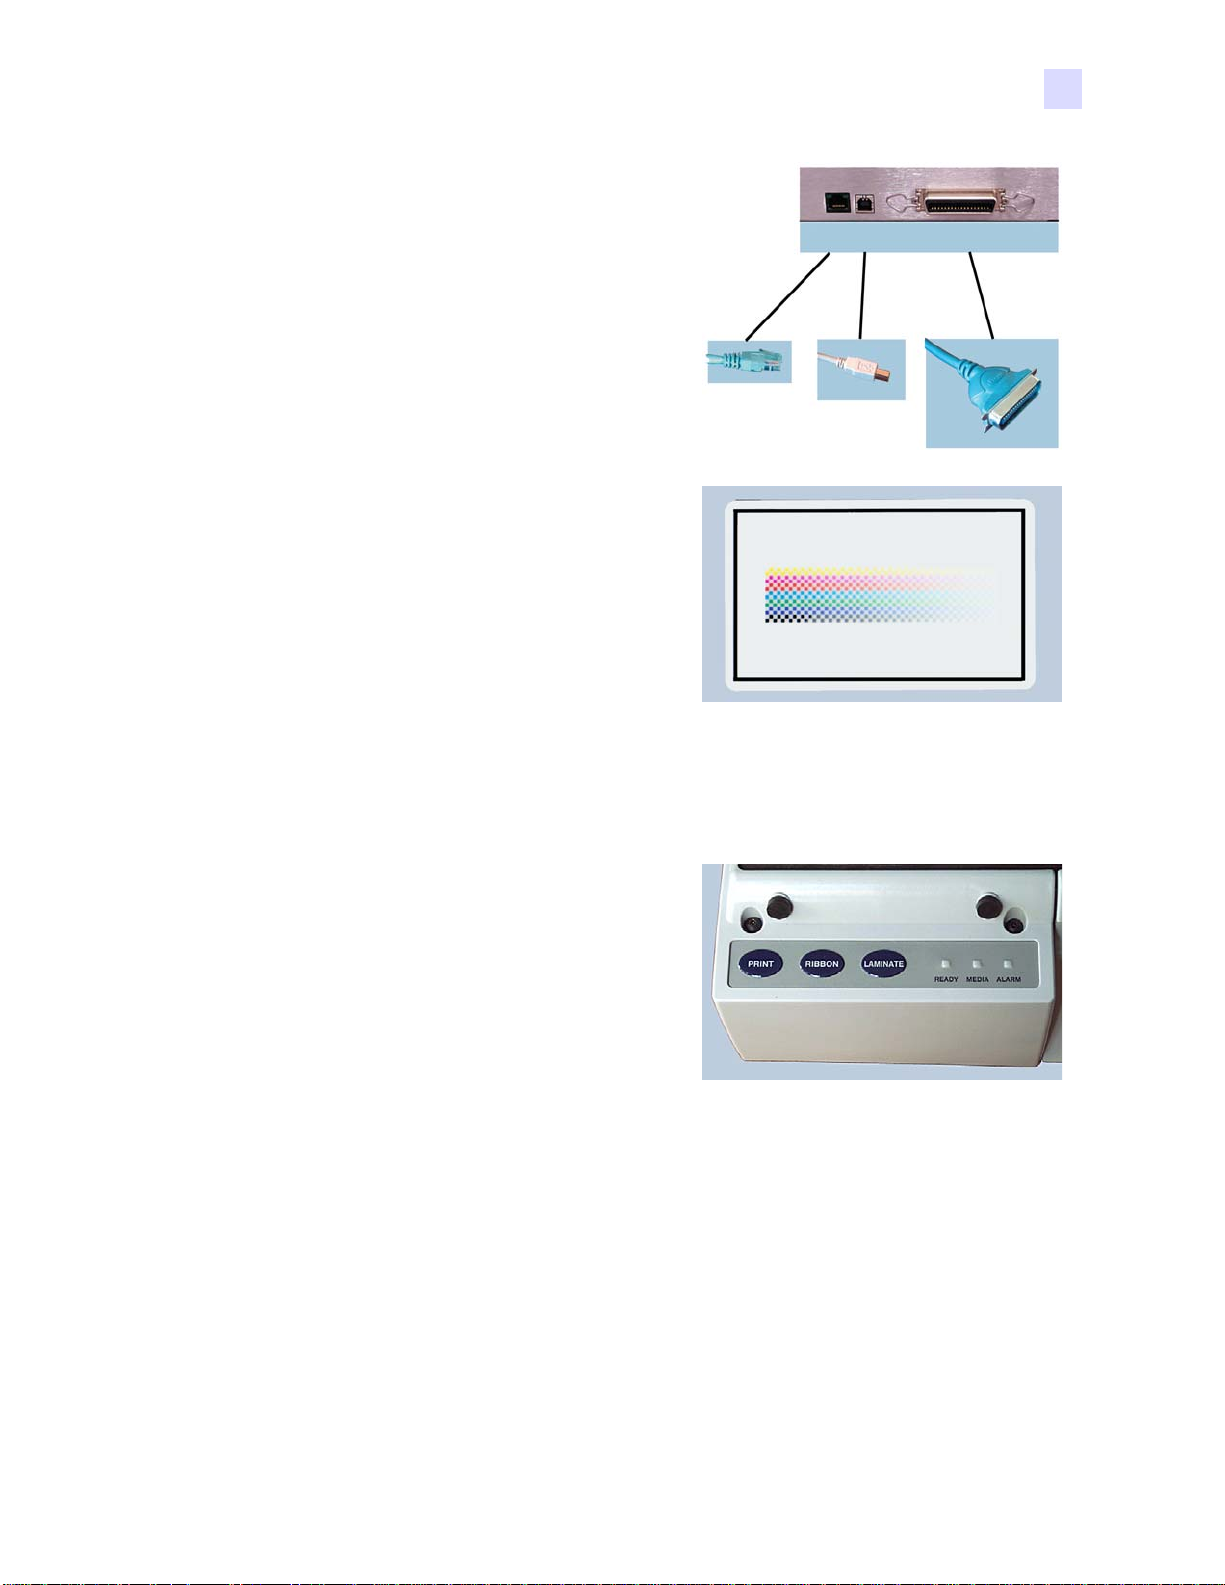
The P640i printer receives data through one
of three types of connector: Ethernet
(optional feature), USB (standard feature) or
Parallel (Centronics type, optional feature).
You may sometimes be asked to print a test
card. This is the pattern stored in the printer’s
memory (it has nothing to do with the
computer). If the printer is functioning
properly, it will be printed when the PRINT
button on the front panel is pressed following
power-up.
Push buttons and Indicator lights
PRINT button
Press the PRINT button to print the image
stored in the printer’s memory. When the
printer is powered up, the memory is loaded
with a checkerboard test pattern, above.
In regular on-line use, the PRINT button
reprints the last image downloaded from the
computer to the buffer memory.
If you press and hold the PRINT button for
more than two seconds, the printer will
continuously reprint the image in the buffer. Stop this action by pressing the button
momentarily while printing is in process.
Note that pressing the PRINT button will have no effect if any of the following applies: 1. An
error condition exists; 2. You have set up the print driver to print color on both sides of the
card, or; 3. The optional hardware lockout key, ID/Key, is missing (but this does not disable
the checkerboard printout available after power-up).
980541-001 Rev. A P640i Card Printer User Guide 5
Page 16

Introduction
Push buttons and Indicator lights
RIBBON button
Figure 1 • Standard YMCK color ribbon
LAMINATE button
If either (or both) of the laminate transfer rollers is not loaded with a laminate patch, then
pressing the LAMINATE button will correct the condition, provided the cassette(s) is not out
of laminate. If both rollers are already loaded, the LAMINATE button has no effect.
This button is used to synchronize the ribbon – in other words,
to position it correctly under the print head.
In typical applications, the ribbon type is YM CK, and th e back
of the card is printed first. In such cases, pressing the RIBBON
button will advance the color ribbon to bring the leading edge
of the next black panel under the print head.
If back side printing is not enabled, the printer will
synchronize on the next yellow panel when the RIBBON
button is pressed.
A typical use of the LAMINATE button is in reloading a transfer rolle r after removin g the first
hand-cut patch of laminate following installation of a fresh roll.
6 P640i Card Printer User Guide 980541-001 Rev. A
Page 17
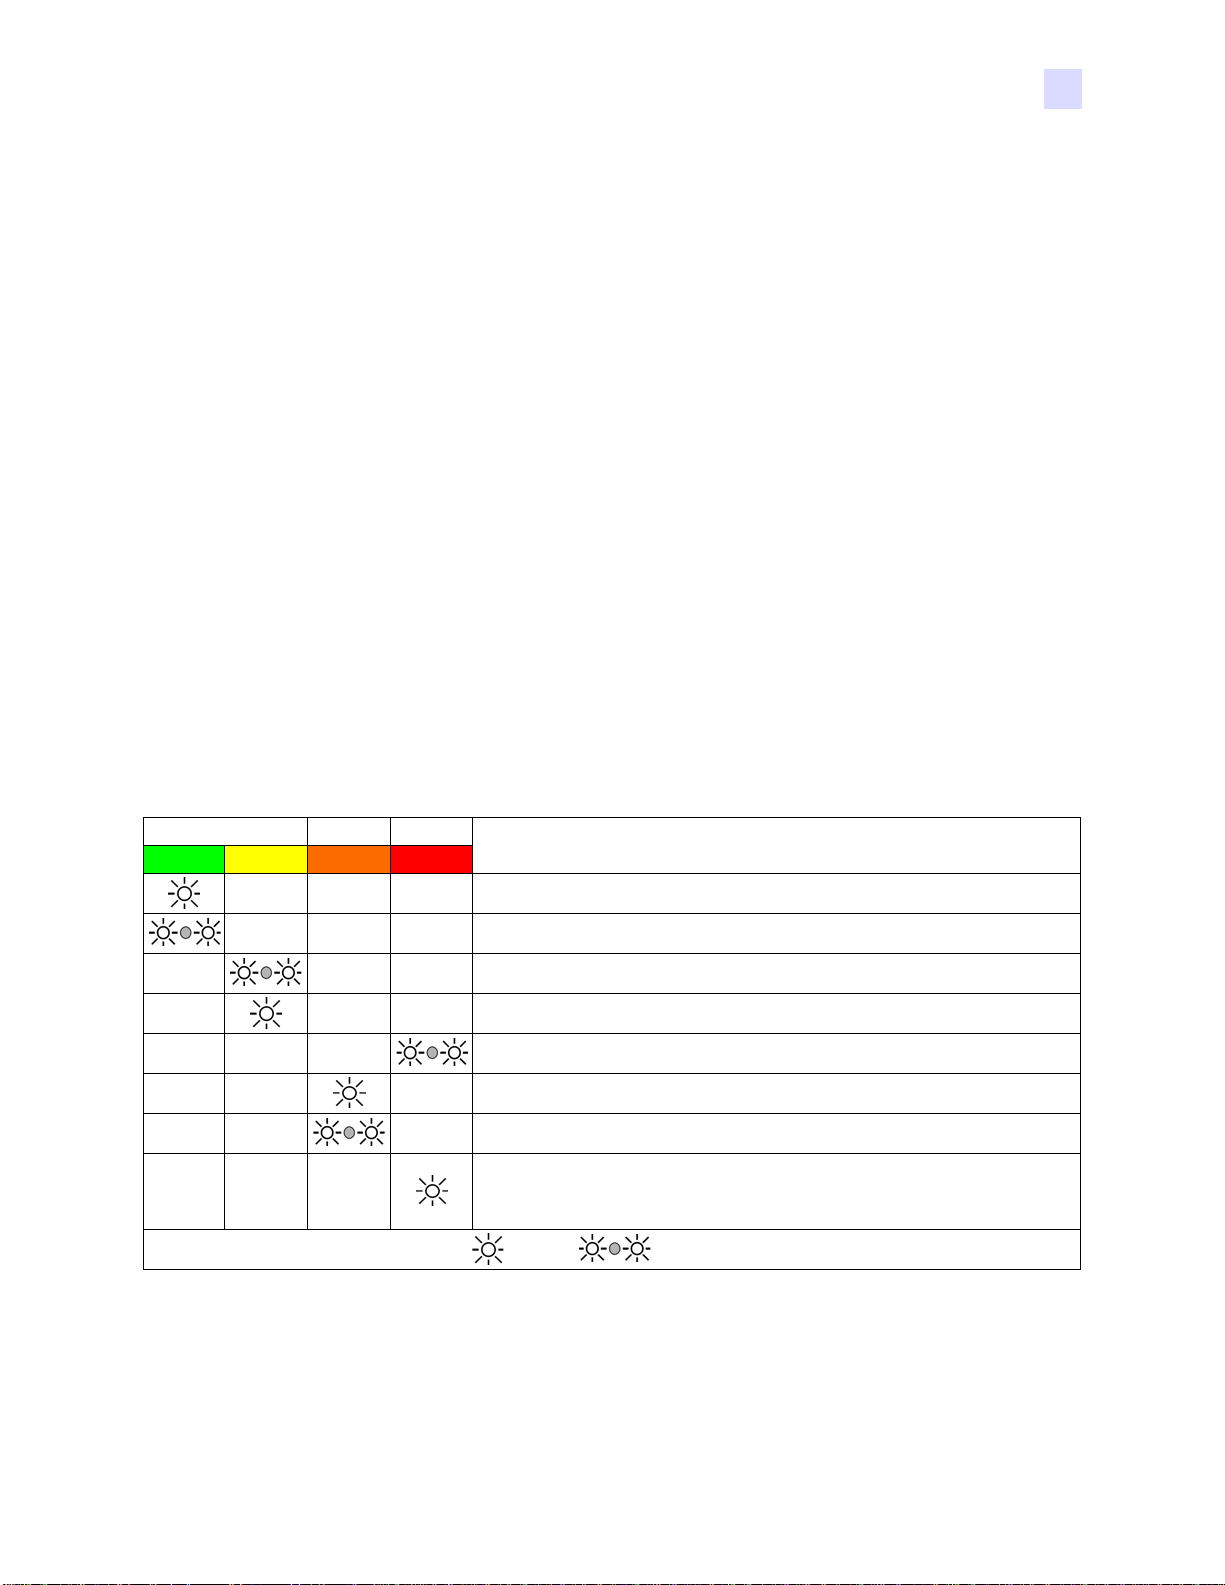
INDICATOR LIGHT SUMMARY
Depending on the condition they are reporti ng, the three indicator l ights, READY, MEDIA and
ALARM, can be in one of three states: Off, On (steady), or Flashing.
The READY indicator is bi-colored. Its two color channels, green and yellow, function
independently.
READY indicator
Green = Ready to print, or printer busy.
Yellow = Laminator not at operating temperature.
MEDIA indicator
Normally Off.
On = Any media outage.
Introduction
INDICATOR LIGHT SUMMARY
ALARM indicator
Normally Off.
READY MEDIA ALARM
GREEN YELLOW ORANGE RED
What the Indicator Lights Tell You
Printer Status
Ready to print
Printer busy
Laminator heating up, but not yet at operating temperature
Laminator heaters in sleep mode (when not in use, the heaters cool at 1oF per minute)
Printhead temperature error.
No cards in magazine, color ribbon out, cleaning tape out, laminator cassette(s) out.
Mag encoding write failure
Serious error conditions, including: MAIN COVER OPEN, Laminator too hot, card
transport stalled, card not seated properly, mag encoding verification error, head lift
failure, ribbon jam, card jam (any location), card missing (any location), no gap between laminator patches.
= light on = light flashing
980541-001 Rev. A P640i Card Printer User Guide 7
Page 18
Introduction
INDICATOR LIGHT SUMMARY
A typical card production sequence
Several variations are possible, such as multi-pass color printing on the back surface (instead
of the black-only printing shown here).
1. Blank cards are loaded face down in the hop-
per, with the mag stripe (if any) toward the
front.
2. The carriage pushes the bottom card out of
the deck, carrying it under the mag encoder.
3. After passing under the encoder, the card sur-
face is cleaned by a tacky roller (which is
itself decontaminated periodically by adhesive tape in the cleaning cassette).
4. The carriage drives the card under the print
head, which transfers black characters and/or
bar code from the K panel onto the back surface of the card.
5. The carriage pushes the back-printed card
into the flip station, which elevates the card
then flips it through 180o.
6. The card, now face up, is returned to the car-
riage, which is then reversed into position for
a second cleaning operation.
7. After its face cleaning the card is driven
under the print head again, this time to p rint a
yellow (Y) dye image - the first of three color
passes.
8 P640i Card Printer User Guide 980541-001 Rev. A
Page 19
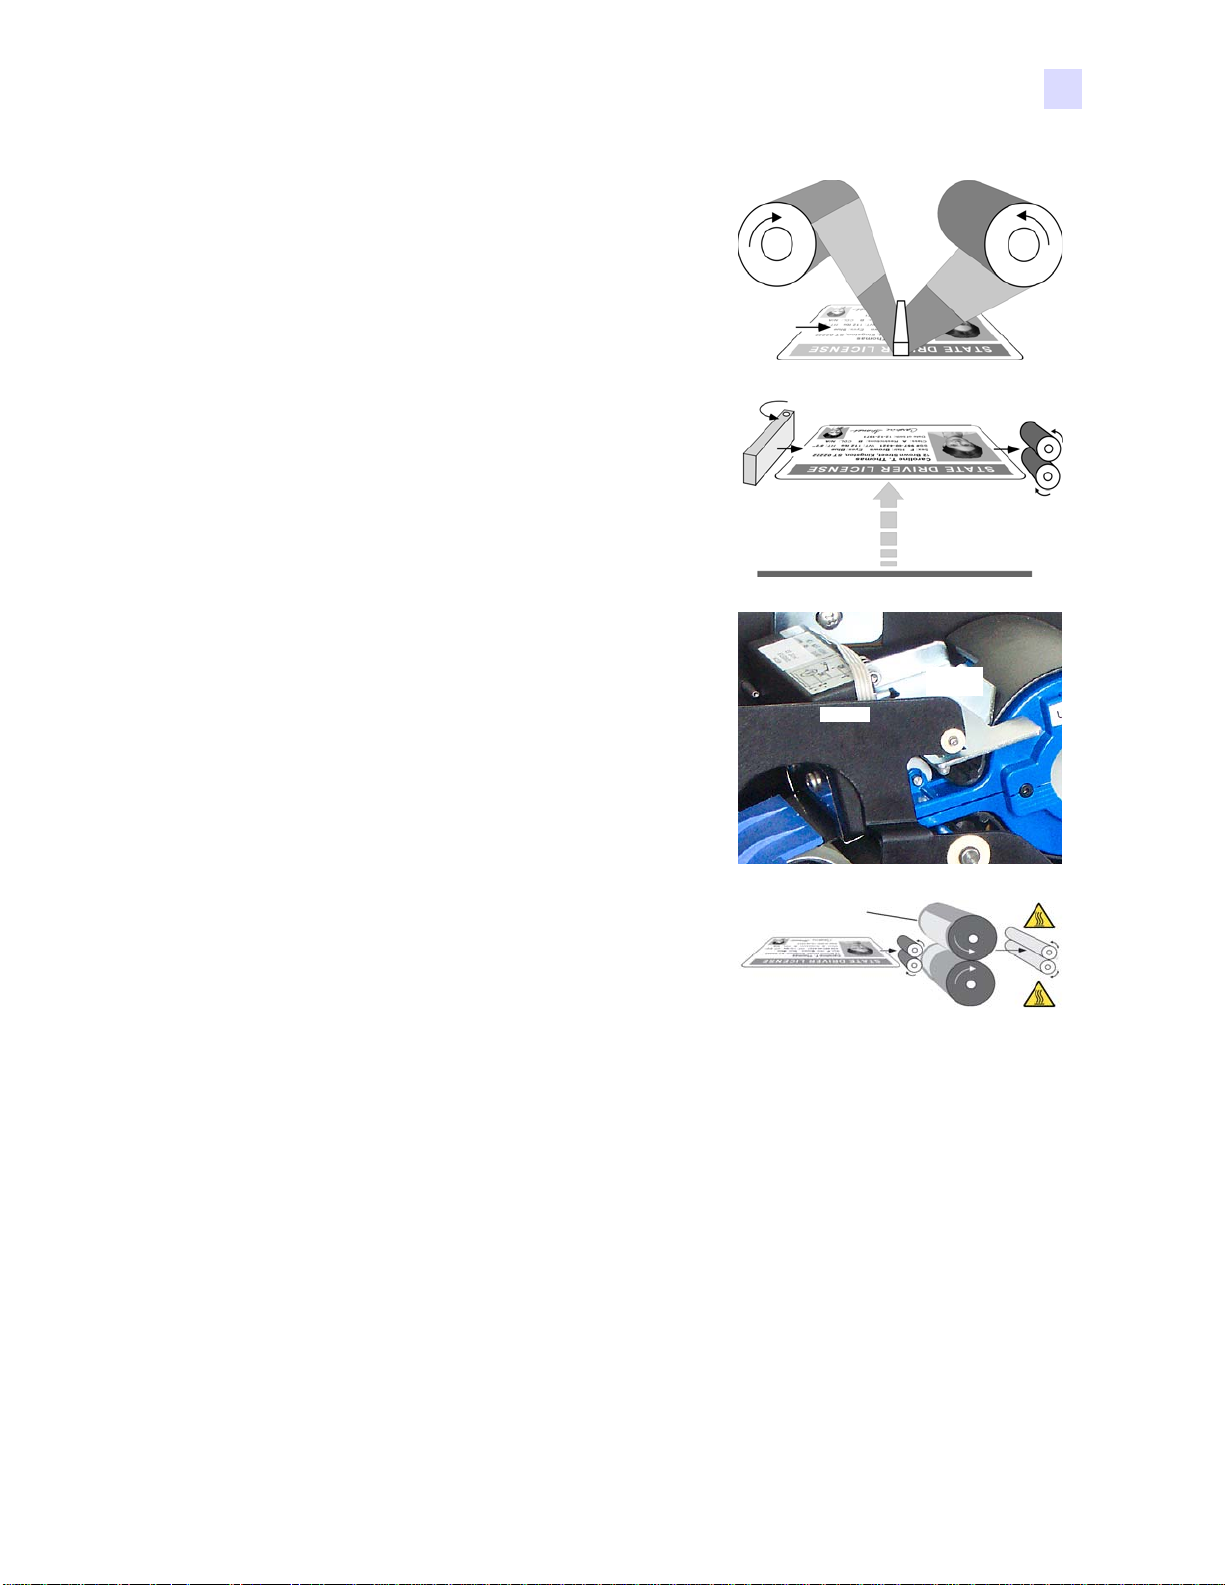
8. The carriage reverses the card into position
for the second color pass, magenta (M), followed by another reverse-and-print cycle for
the third color pass, cyan (C).
9. Now fully printed, the card re-enters the flip
station, which this time acts only as an elevator (no flipping) to bring the card up to the
laminator level.
10. An ejector arm propels the card into the laminator infeed rollers, which in turn drive the
card between the two white transfer rollers,
step 11.
Introduction
INDICATOR LIGHT SUMMARY
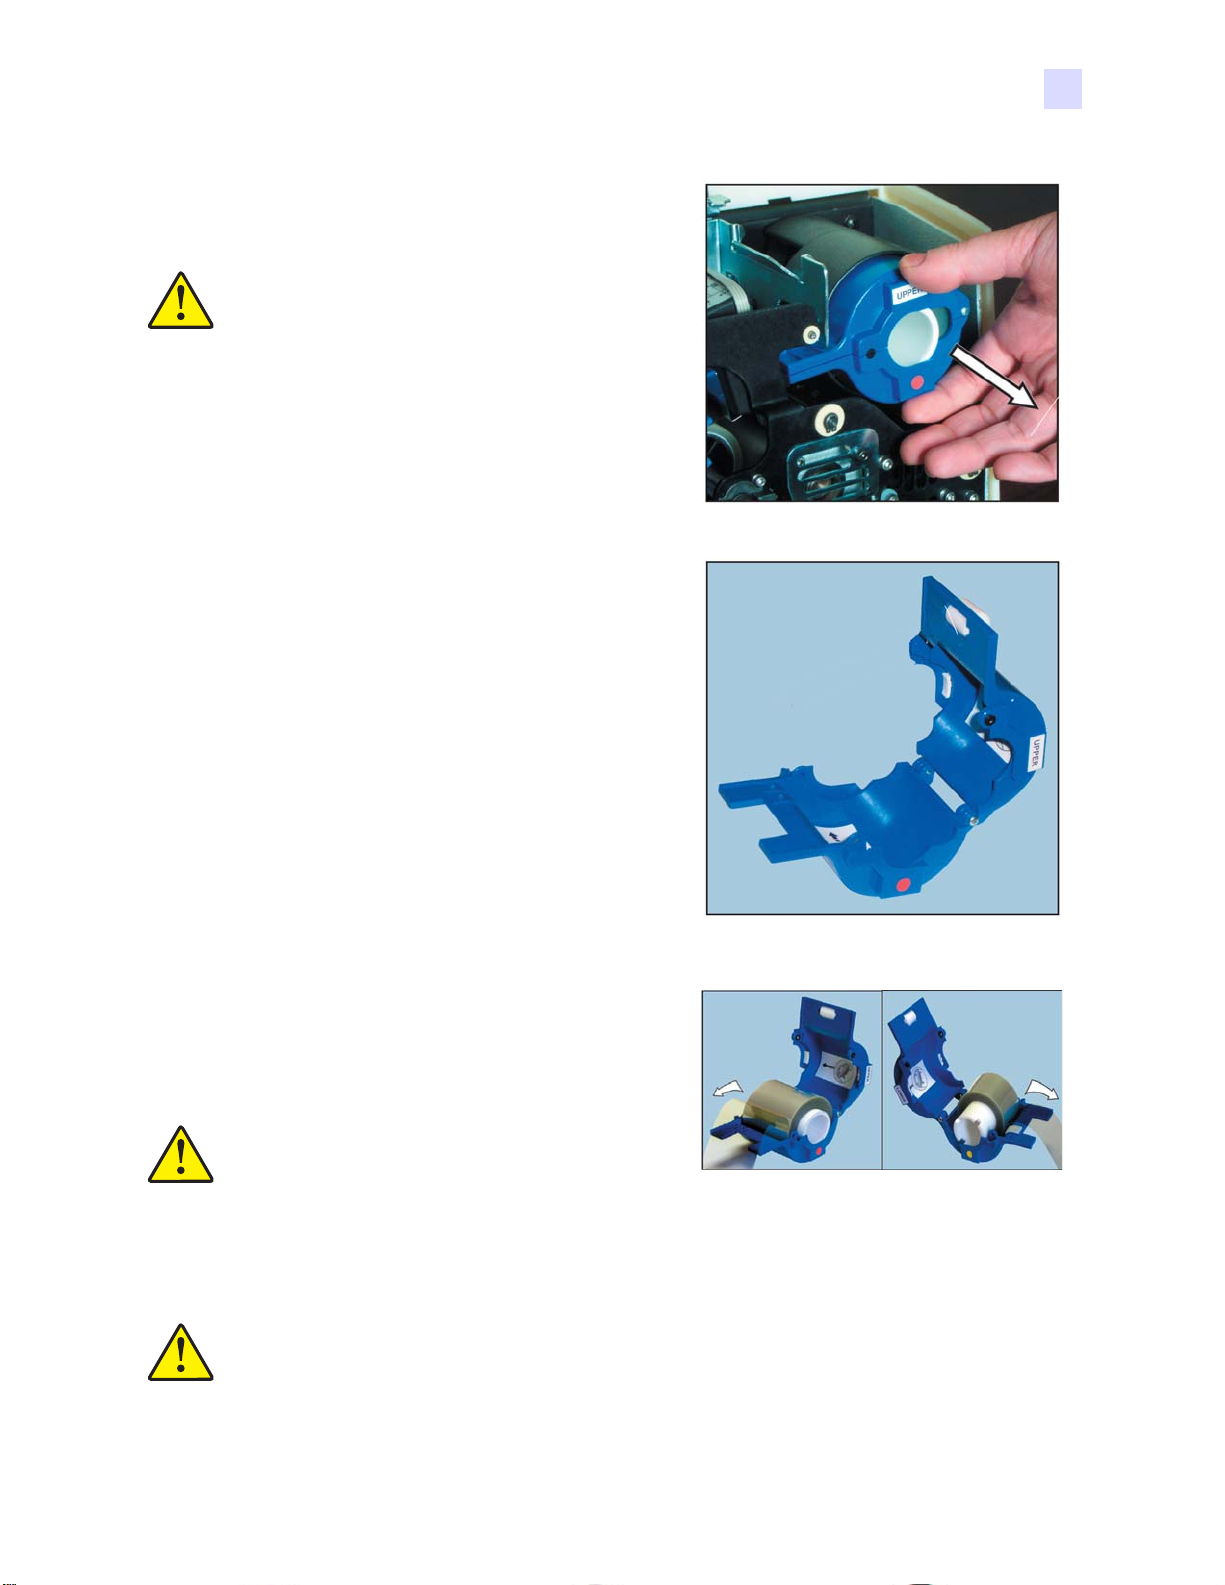
Upper
cassette
Cutter
11. Each transfer roller is “loaded” with a patch
of laminate, cut from the top and bottom cassettes shortly after the previous card passed
through the laminator.
12. As the card passes between the transfer rollers the laminate patches are rolled into place. They are then permanently bonded to the card by a pair of heated rollers applying pressure to the top and bottom surfaces.
980541-001 Rev. A P640i Card Printer User Guide 9
Page 20

Page 21
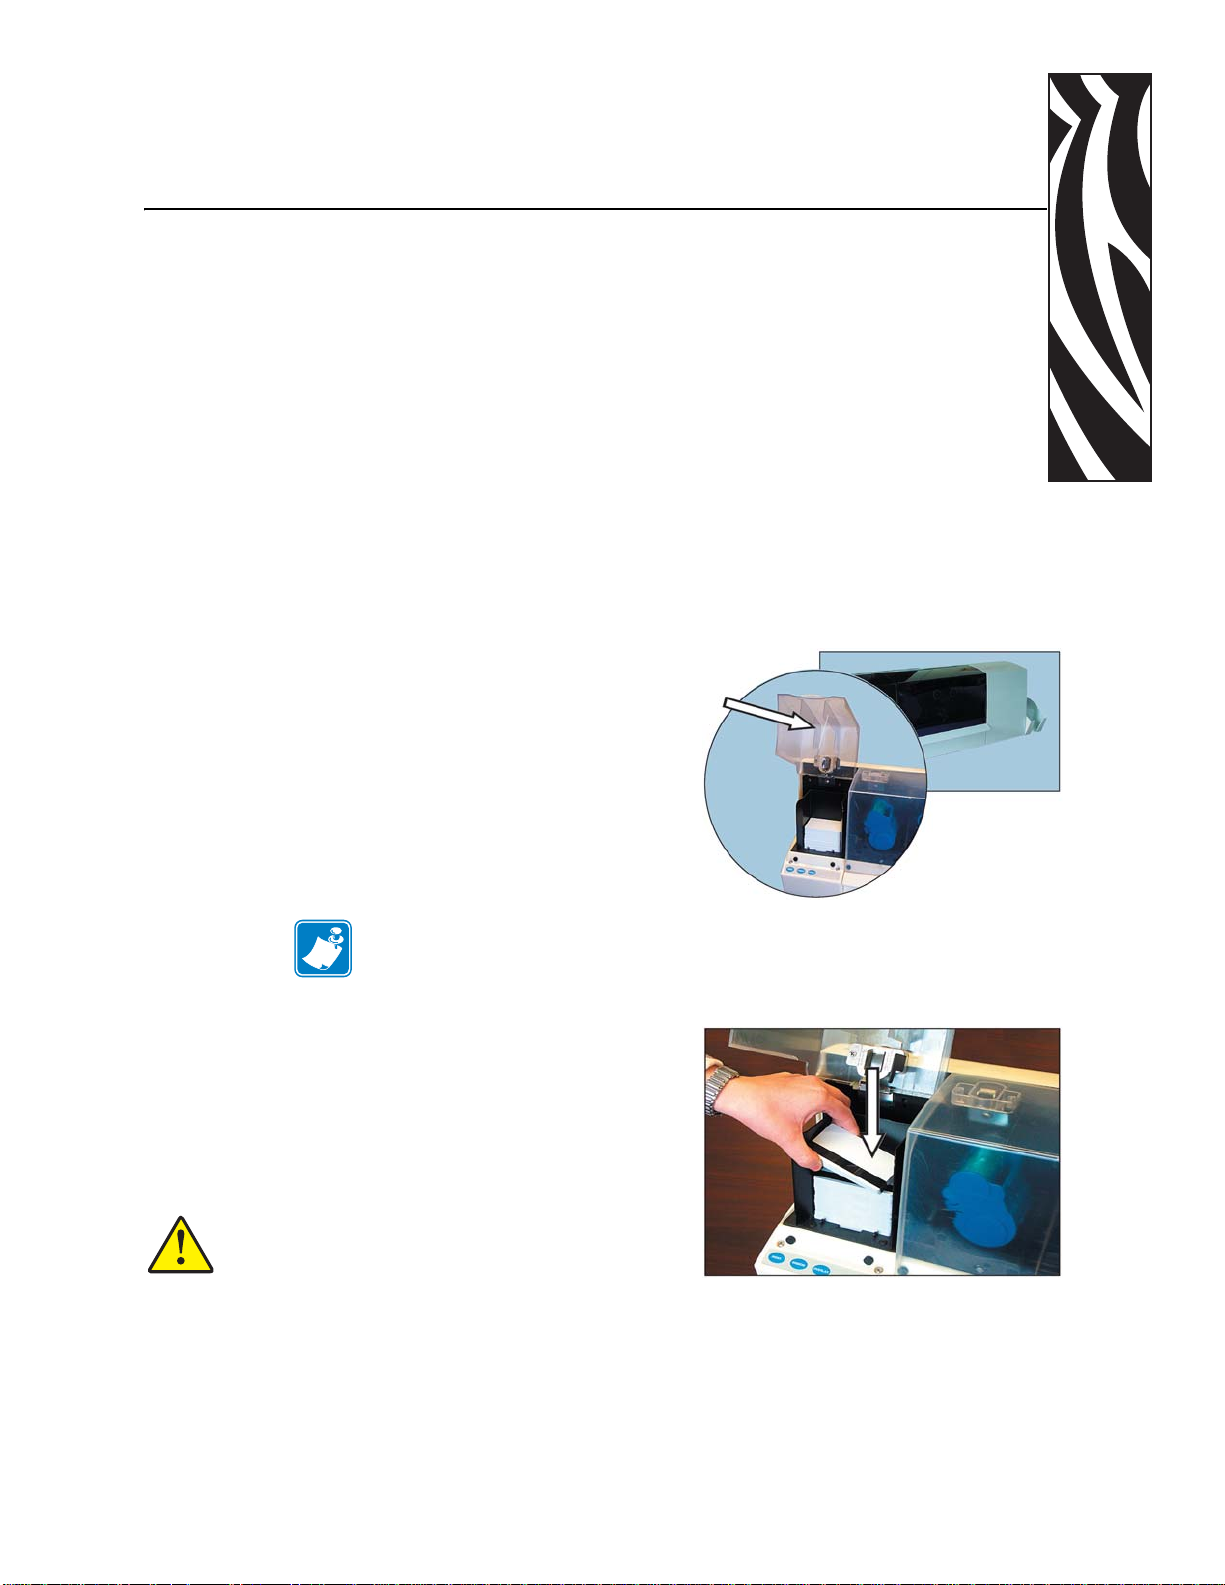
Loading cards
When loading cards, open ONLY the hopper
cover, left. (If you open the main cover, the
interlock switch disables the printer , resu lting
in a start-up delay after the cover is closed.)
2
Media Handling
1. Card orientation in the hopper: the back
side of the card faces up, and the mag
stripe of the card is to the front of the
printer.
Note • If there is no mag stripe, and if th ere is
pre-printed information on the card, your system
administrator will tell you which edge of the
card goes to the front.
2. Load the magazine a few cards at a time, holding the cards by the edges as shown. Don’t try to load an entire pack at one time, because that would mean handling the upper and lower surfaces - see STOP, above right.
Caution • Plastic cards attract dust and dirt.
Keep them clean! Handle them by the edges
and avoid touching the surfaces. Do not use
cards that are dirty or have been dropped on
the floor.
3. Place the weight on top of the card stack.
980541-001 Rev. A P640i Card Printer User Guide 11
Page 22
Media Handling
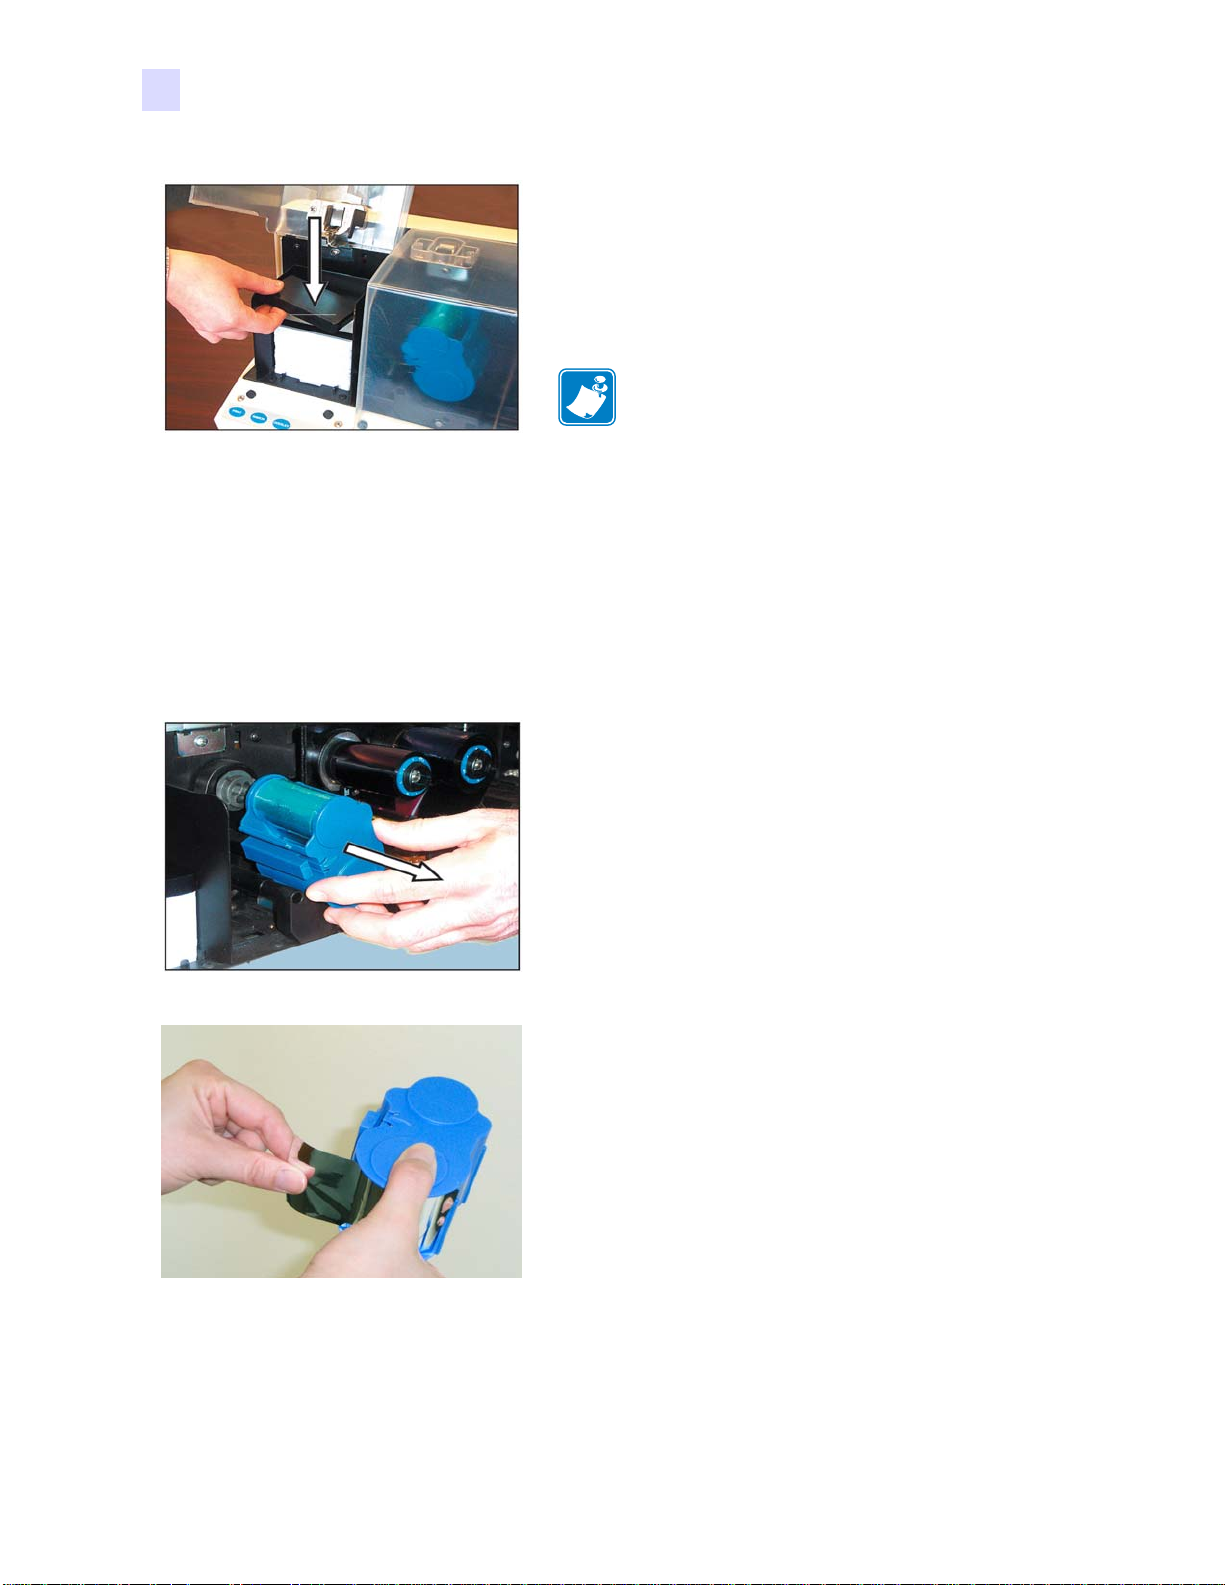
Loading the cleaning cassette
Hot Loading
You can load cards while the printer is powered up and
operating. If there are no cards left in the hopper, close the
hopper cover then wait until the printer hascompleted its
current print job and returned the truck to its home positon
under the hopper.
Loading the cleaning cassette
Before being printed, each surface of the card is cleaned by a soft tacky roller that is itself
cleaned periodically by adhesive tape in the cleaning cassette. Typically, the roller is cleaned
every 10 cards. The printer driver software allows the card count to be modified.
When the cleaning cassette is exhausted, a warning message appears on the monitor, and the
MEDIA light on the printer turns on.
Note • When the hopper cover is open, the truck
can not drive to its home position.
1. Open the main cover of the printer , then remove the spent cleaning cassette by pulling it toward you.
2. Remove the protective foil from the replacement cleaning cassette.
12 P640i Card Printer User Guide 980541-001 Rev. A
Page 23
3. Install a fresh cleaning cassette by locating the rectangular pin on the cleaning
mechanism in the receptacle on the cassette. Push the cassette gently home,
ensuring that the internal grooves on the
upper spool engage the teeth on the
takeup drive
.
Why 10 cards is the normal clean frequency
If the cleaning system is activated every 10 cards, the cleaning cassette contains suf ficient tape
for 3,000 cards. This matches the other components of the standard Zebra med ia pack (3,000
cards, 3,000 color ribbon images).
Media Handling
Loading the color ribbon
Takeup
drive
Note • In dusty environments, clean the roller more frequently. The driver
allows you to select any frequency from 1 card to 20 cards.
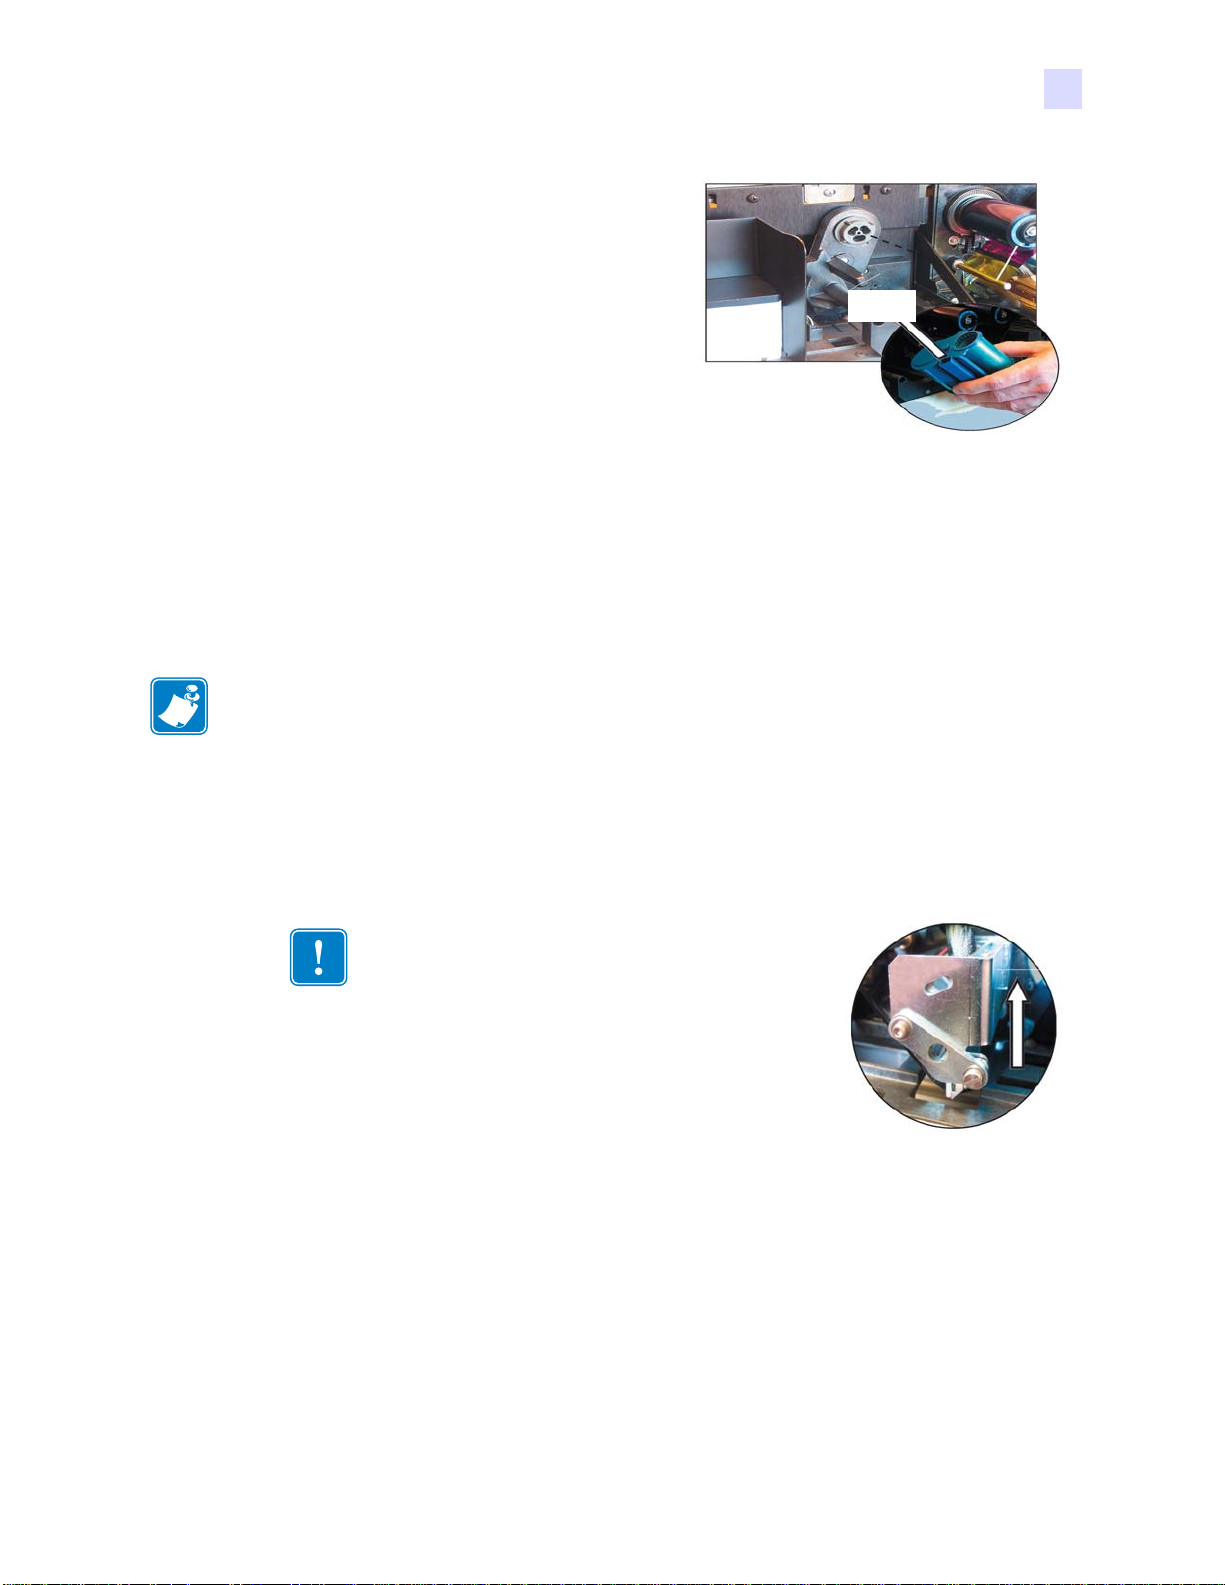
Loading the color ribbon
When the color ribbon is exhausted, a warning message appears on the monitor, and the
MEDIA light on the printer turns on.
Important • Opening of the main cover elevates the printhead
for easy ribbon loading..
980541-001 Rev. A P640i Card Printer User Guide 13
Page 24
Media Handling
Loading the color ribbon
Supply
arbor
Takeup
arbor
P640i color ribbon, left, and empty core, right. The flange end with
internal grooves goes to the back.
Important • Are both the new ribbon and takeup cores
fully home on the arbors, as far back as they will go? You
should hear a click.
Color
ribbon
Empty
core
1. Install an empty ribbon core on the right (takeup) arbor. Push the core back as far as it will go, making sure the internal grooves on the core engage the teeth on the takeup arbor.
2. Pull out more ribbon, then bring the free end of the ribbon u p to the right of the takeup core.
3. With the ribbon centered on t he takeup core, att ach its free end to core with Scotch tape or the adhesive label that came with the fresh roll. Take up slack by reversing the supply roll (don’ t try to rotate the takeup arbor).
Caution • Make sure the ribbon is between the
arms of the ribbon sensor left of the printhead.
14 P640i Card Printer User Guide 980541-001 Rev. A
Page 25

4. Close the printer cover, then press the RIBBON button to initialize the color ribbon. If the MEDIA light fails to go out, check the ribbon sensor.
Caution • Color ribbon wrinkling and “fold-over”
can seriously affect print quality. Unless you are
sure the ribbon is installed properly, proceed to
Step 6
5. Re-open the printer cover to inspect the ribbon path for wrinkles and folds. Correct if necessary, then close the cover.
Laminating Station
Important • When loading or unloading
laminate cassettes, stay away fr om nearby
heated rollers.
When either of the laminate cassettes is empty , a warning message appear s on the monitor, and
the MEDIA light on the printer turns on.
Media Handling
Laminating Station
Overlay laminates come in three widths:
• F or the front (UPPER) of the card,
full width, plain or with special
graphics. Full width
• For the back (LOWER) of the card,
partial width if there is a writable
signature panel or mag stripe,
otherwise full width. Usually, there
are no graphics on lower laminate:
Partial width
(42 mm)
Partial width
Laminate Cassettes
The upper and lower cassettes are mirror
images, almost identical twins. This can be
confusing if you don’t follow the procedure
outlined in this guide. The cassettes are
differentiated by color-coded dots:Red =
UPPER Yellow = LOWER
= 2” (51 mm)
, signature panel = 1.66”
, mag stripe = 1.3” (33 mm)
980541-001 Rev. A P640i Card Printer User Guide 15
Page 26
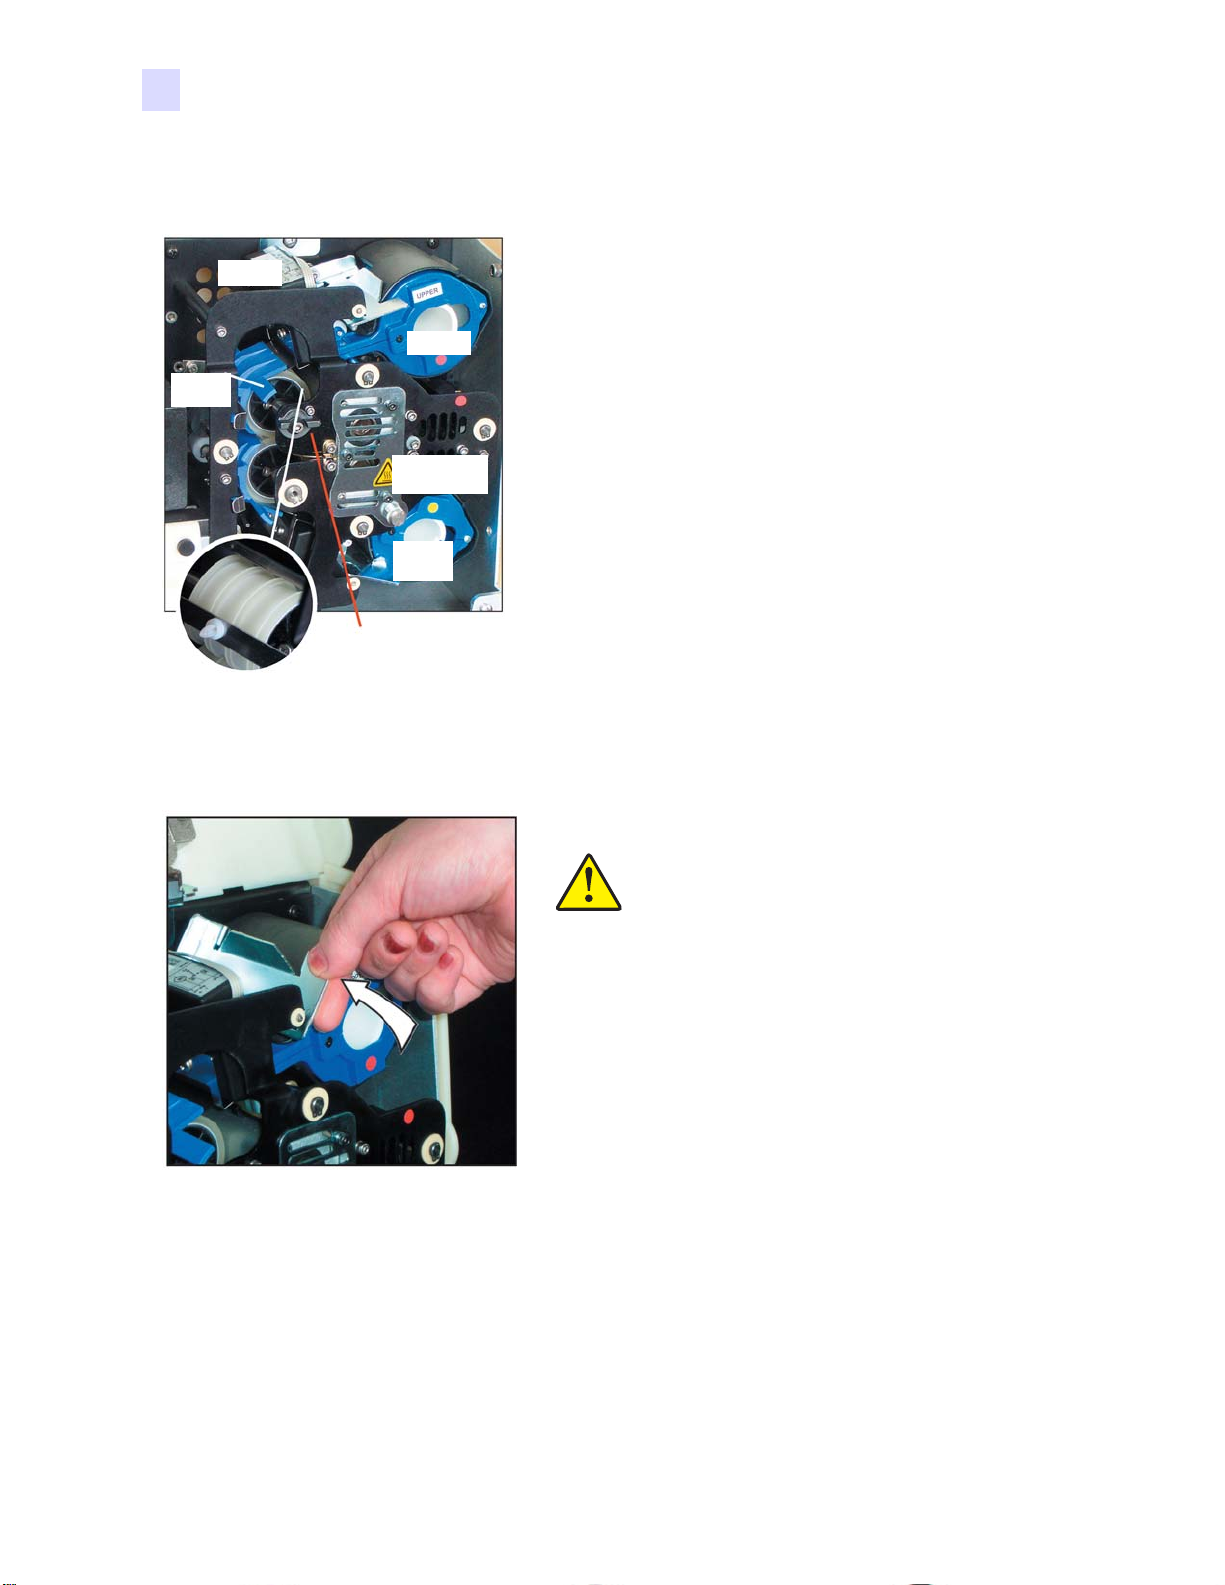
Media Handling
Laminating Station
Main components of the laminating system
The laminating system comprises two separate independent
units, one for the front of the card, one for the back.
Laminate
cutter
Upper
Transfer
guide
Heater
compartment
Lower
cassette
Transfer toggle Must be set to
RUN (horizontal) for normal oper-
Transfer
roller
ation. Rotate the toggle to open
the rollers for jam clearance.
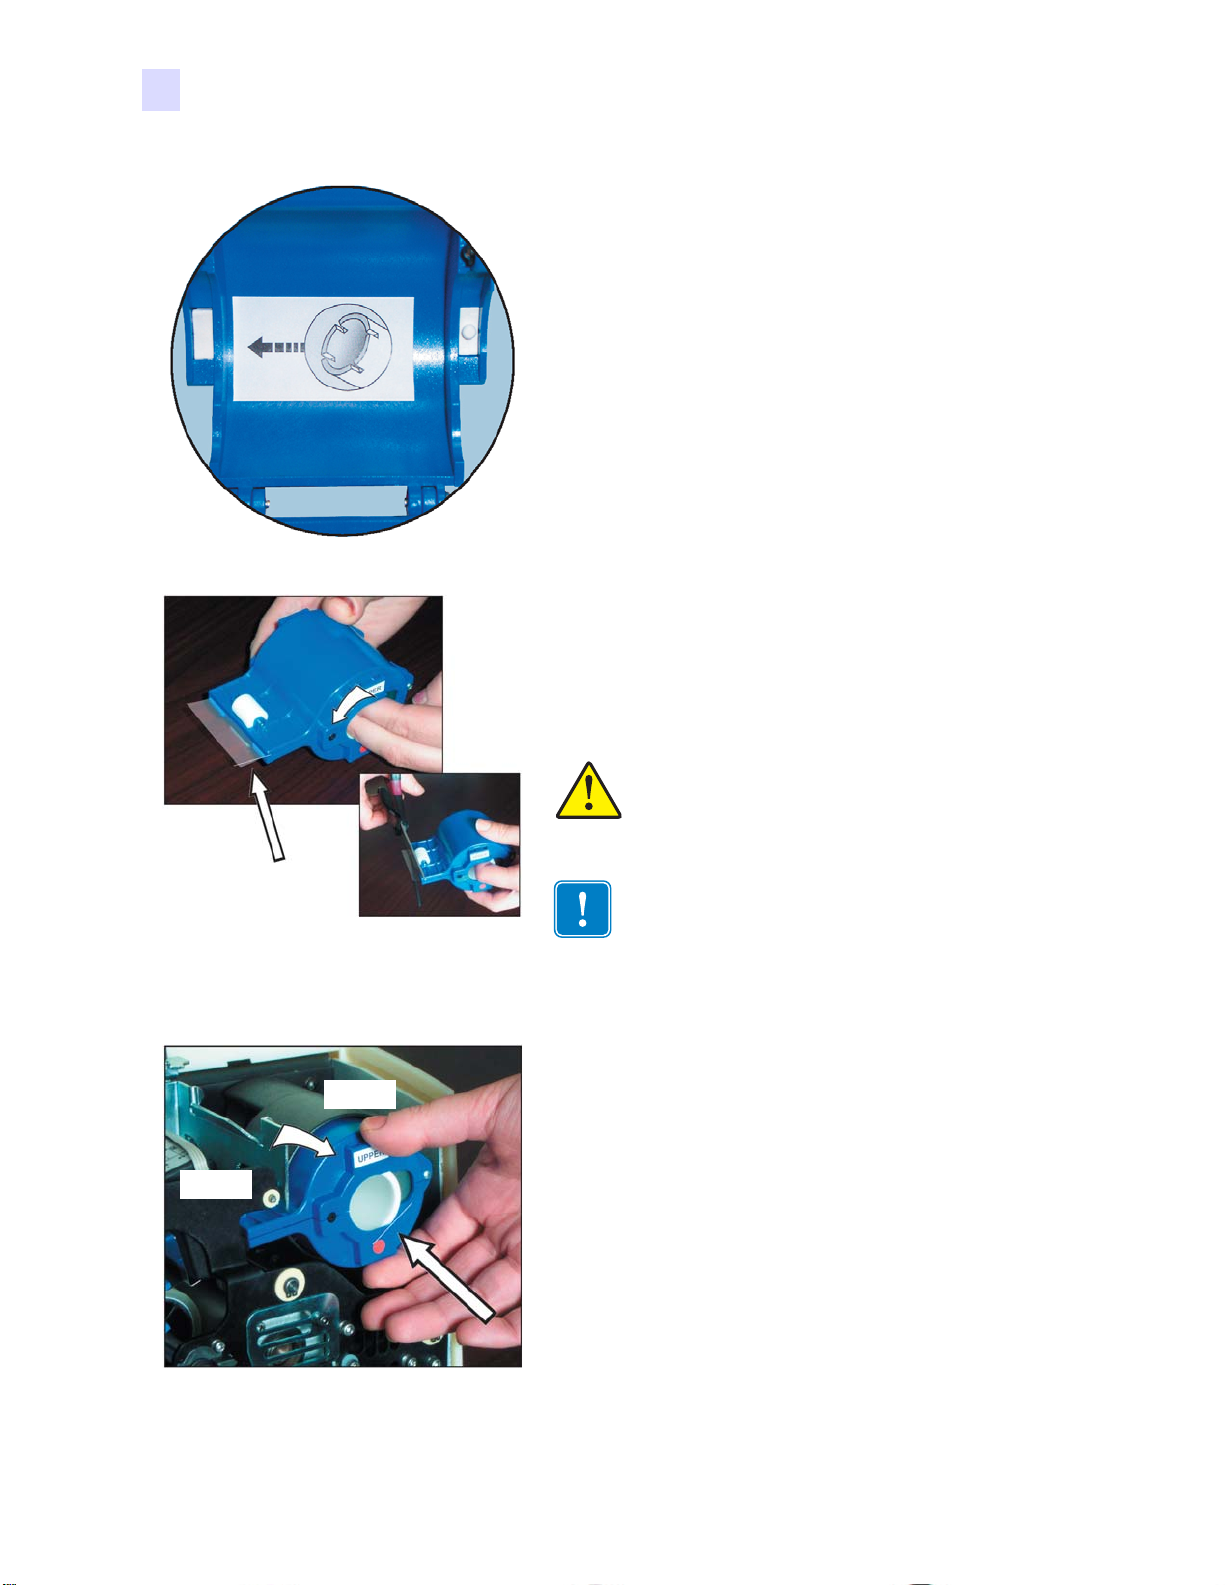
Removing the cassettes
1.Open the latch plate by flipping it to the full vertical position, until you feel some resistance. Turn the UPPER latch
counterclockwise, the LOWER clockwise.
Caution • If either of the latch plates is
opened, even unintentionally, the cassette
affected must be removed and the laminate
reeled in, see page 2-6.
16 P640i Card Printer User Guide 980541-001 Rev. A
Page 27
2. Grasp the cassette and pull it straight toward you, clear of the printer.
Caution • If you feel resistance when
removing the cassette, the laminate has likely
run out, leaving one end attached to the core
and the other end under the cutter. Keep
tugging on cassette, which will come free with
a short tail of laminate.
Caution • Remove the transfer guide to be
sure there are no scraps of laminate
remaining.
3. Open the cassette, like a clam shell, by separating its two halves. Grasp the two halves firmly with the fingers, then pull. Do NOT use tools to pry it apart.
Media Handling
Laminating Station
Loading the cassettes
1. Discard the spent core. Hold the open cassette with its cavities toward you, white idler wheel to the top.
Caution • You need partial width laminate for
the LOWER cassette if there is a mag stripe
or signature stripe on the card
2. Place a roll of laminate in the cassette so that it feeds from the bottom of the roll, UP and OUT to the front. Pull out an inch or two of laminate.
Caution • If the lower cassette is intended for
partial width laminate, it will have an edge
guide to keep the laminate on track. Make
sure it is in the correct position for the partial
width laminate you are using.
980541-001 Rev. A P640i Card Printer User Guide 17
Page 28
Media Handling
Laminating Station
3. Close the cassette, then pull out a little more laminate. If it
suddenly stops, resisting further pulling, a spring detent on
the cassette, photo below, has snagged a notch on the end
of the core. This means that the core was installed the
wrong way round. If you follow the installation diagram
on the inside of the cassette this won’t happen!
4. With the white roller up and pointing to your left, rotate
the core counter clockwise to reel in the laminate. Stop
when the end of the laminate is even with the lips of the
cassette - no overhang, but make sure it is not clear of the
white roller (otherwise it won’t feed).
Installing the cassettes
Cassette
pocket
Cassette
latch
Caution • If the end of the laminate is crinkled
or uneven, cut it as square as you can with
scissors, then reel it in.
Important • Check for overhang any time th e
cassette latch is opened, or the cassette isremoved.
1. Make sure the laminate is even with the lips of the cassette.
2. Insert the cassette into its black molded pocket, then close
the cassette latch (clockwise for the UPER, counterclockwise for the LOWER).
3. Close the main cover. If there was a laminate error before
you replaced the cassette, laminate will automatically fee d
from the just-loaded cassette, followed by a cutting action
to free a “patch” of laminate onto the transfer roller. If
laminate does not feed automatically, press the LAMINATE button.
18 P640i Card Printer User Guide 980541-001 Rev. A
Page 29

Clearing the Laminate Channels
If your scissor cuts were neat enough to pass for machine-made cuts, continue printing cards in
the usual way. If not, don’t waste a print cycle. Instead, remove the hand-cut patch(es) from
the transfer roller(s) as follows.
Media Handling
Laminating Station
Important • Clearing procedures for the
upper and lower channels are similar. The
upper channel is shown here.
Removal of the Transfer Guide gives access
to the transfer roller.
1. Pull back the retaining spring, at the same time pulling the Transfer Guide straight out toward you.
2. Remove and discard the laminate patch on the transfer roller. Never re-use!
3. Re-install the Transfer Gu ide with its top
edge above the laminate cutter guide.
Laminate cutter guide
It’s easier if you pull back the retaining
spring while re-inserting the guide, then
release the spring as you push the guide
into position (it will click into place, with
its far leg against the back plate of the
laminator). Press the LAMINATE button
to load the transfer roller(s).
980541-001 Rev. A P640i Card Printer User Guide 19
Page 30

Media Handling
Laminating Station
The special laminate for the top cassette is punched with a repeated pattern.
Caution • Improper replacement of the transfer
guide will cause laminate skewing and
misfeeding. Be sure the transfer toggleis set to
RUN. Take care not to damage the transfer
roller ribs when replacing the transfer guide.
Laminating smart cards
The laminating patch on the top surface of a smart card has a
rectangular aperture to expose the card’ s electrical contacts. In
all other respects the laminating process for smart cards is the
same as for ordinary cards.
Cut line in
center of in-
dex hole
Index hole
The smaller hole is an index marker that tells the printer where
to cut the laminate, exactly splitting the inde x hole (t he printer
driver allows adjustment of the cut location).
cutcut
cut
Loading procedure for smart card laminate is exactly the same
as for standard laminate.
20 P640i Card Printer User Guide 980541-001 Rev. A
Page 31

Image Adjustment
Start > Printers (or Printers and Faxes) > Right click Zebra P640i > Printing Preferences >
Image Adjustment
3
Troubleshooting
Brightness
printed image as do similar controls on typical office color printers. Click Reset
default conditions.
Contrast 50
Brightness 25
and Contrast controls on the image Adjustment screen have same effect on the
Contrast 0
Brightness 50
Contrast 25
Brightness 50
Contrast 50
Brightness 75
to restore
Contrast 75
Brightness 50
980541-001 Rev. A P640i Card Printer User Guide 21
Contrast 75
Brightness 50
Contrast 100
Brightness 50
Page 32

Troubleshooting
Troubleshooting quality pr oblems
Troubleshooting quality problems
Poor color registration
• Minor mis-registration of Y, M and C color passes may be due to printhead angle adjust
screw not in firm contact with printhead frame. Reference Technical Note 4
• For gross mis-registration of Y, M and C suspect card not firmly against left hand pick
edge of truck on one or more passes. Spring at left end of platen may be missing or bound
up. Reference Technical Note 2
• C heck printed card for damage on corners or edges. Example: the card may be scraping
along the underside of the hopper base molding. Reference Technical Note 2
• Printhead pressure too light. Reference Technical Note 4
• Printhead may be running hot. Will occur if head resistance incorrectly ente re d in driv er
software. Reference Technical Note 4
• Toothed transport belt pulley may be slipping on drive shaft. Tighten set screws (make
sure the screws bear on flats on the shafts).
Examples of color mis-registration
Left is the test card in the printer’s firmware. Right is an enlargement showing fringing on
process black text generated from Y, M and C.
Adjust in Properties > Device Settings > Color Calibration. Reference Technical Note 4
Faint, non-uniform image
• Printhead pressure too low. Adjust downward. Reference Technical Note 4
• Printhead not pivoting freely. Reference Technical Note 4
Poor color rendering
• Possible source issues - poor quality photos or
graphics, card layout application settings. Isolate
the problem by printing a known image, such as
Portraits.bmp, through IDPrint Lite. Reference
Technical Note 8
• Vary brightness and contrast controls in
Preferences > Image Adjustment (preceding
page). Fine tune if necessary using Contrast
Gaps in image at edges and corners
• Possible de-lamination/wear of platen’s rubber surface.
Try cleaning platen. If unsuccessful, replace platen.
Reference Technical Note 2
• Possible non-uniformity of card thickness, or card surface
defects.
22 P640i Card Printer User Guide 980541-001 Rev. A
Page 33

Troubleshooting
Troubleshooting quality problems
Continuous white or black stripes on card’s longer dimension
• White stripe means blown pixel (nonfunctioning heating element). One or two
blown pixels in isolation may be
acceptable to some. Otherwise replace
printhead. Reference Technical Note 4
• Black stripe means non-functioning
circuit(s) on printhead. If so, replace
printhead, Reference Technical Note 4,
but first check that it is not the result of
an image size change not followed by
power cycling the printer.
• T hese are indep en dent problems, not
necessarily co-located.
Random occurences of white (unprinted) spots
• Possible card quality problem. Run
IDPrint Lite with graytone.bmp on cards
from a different batch. Check platen
surface for specks of debris.
• White spots like these may be caused by
card surface imperfections.
Image not centered on card
• Properties > Device Settings > Printer
Adjustment > Horizontal/Vertical Offset.
• Correct this by increasing horizontal (X)
offset, decreasing vertical (Y) offset.
Image missing at top or bottom of card
• Ribbon folded over at edge. Slacken ribbon by pulling more out of supp ly roll, unfold
edge then press RIBBON button to re-sync. Reference Technical Note 4
• Bottom edge and/or right hand edge of image missing could be card layout application
sending wrong image size (should be 952 x 578 pixels). Select appropriate image size (if
available) in Preferences, or modify layout application.
• Could be on either edge. Almost certainly due to ribbon fold-over, but could be a head
non-pivoting problem, or an image size problem.
980541-001 Rev. A P640i Card Printer User Guide 23
Page 34

Troubleshooting
Troubleshooting quality pr oblems
Consistent image defects, card after card
• Debris on platen, or platen surface not
flat. Clean platen, or replace if
necessary. Reference Technical Note 2
• This gross image artifact was caused
by a tiny scrap of card less than 0.01”
(0.25 mm) thick.
Random colored patterns on image
• Ribbon wrinkling. Reduce takeup torque.
Check printhead pressure. Reference
Technical Note 4
• Too much heat being applied to YMC
panels. Try reducing gain,offset and
preheat separately for each color in the
driver Device Settings > Color
Calibration, Reference Technical Note 4
and Technical Note 5. Typically , the set
of values should be the same for each
color.
• Printhead running too hot. Can happen
after head replacement if head resistance
incorrectly entered through printer
driver. Reference Technical Note 4, Printer Adjustment
• Probably resulting from excessive takeup torque.
Scratches/dings on long edges of card
Look for a narrow band of abrasion up to about 0.1” (2.5 mm) in from either or both of the
long edges.
• Card hopper base set too low. Reference Technical Note 2
Laminate not centered on card
• Vertical offset adjust (mechanical
adjustment). Reference Technical Note 6
• Horizontal
Settings > Printer Adjustment >
Laminate Station Adjust. Reference
Technical Note 6
24 P640i Card Printer User Guide 980541-001 Rev. A
offset: Properties > Device
Page 35

Laminate not parallel with card edges
•Skew adjust (mechanical adjustment). Reference Technical Note 6
• If using partial width laminate, edge guide not properly installed (one of two positons).
Section 2
• Transfer guide not p roperly installed. Section 2
• Laminate patch wrapped around heated roller. Page 3-3
Laminate wrinkling
• Can occur at end of roll. Remove
cassette. If nearly out, discard. Install
fresh roll.
• If not end-of-roll problem, suspect
obstructions in laminate feed path.
Unusual Printer/Lmainator Events
Color ribbon runs for longer than 2 or 3 seconds when cover is closed (MEDIA light stays on)
Troubleshooting
Unusual Printer/Lmainator Events
• Color ribbon not in ribbon sensor. Section 2
• Both ribbon cores not fully engaged on arbors. Section 2
• Ribbon not secured to takeup core. Section 2
• No ribbon type or wrong ribbon type specified in Printer Properties. Reference Technical
Note 8
ALARM light stays ON after error condition is cleared
Note • There is a delay after closing the cover before the ALAR M
light goes out.
• Mai n cover interlock switch may not have actuated when cover closed. Reference
Technical Note 1
• Alarm condition(s) not corrected.
Card has both front and back images printed on same side
• Check selections made in Printing Preferences > Card Setup. Reference Technical Note 8
• Card failed to flip. Run Flip Test 3 to check flip action. Reference Technical Note 5
MEDIA light ON steady, but no obvious visual problem
• Color ribbon not in ribbon sensor. Section 2
• Color ribbon supply and/or takeup cores not engaging properly on arbo rs. Section 2
• Cleaning cassette not engaging properly on the takeup drive. Section 2
• See Laminator sp ot check, page 3-3
980541-001 Rev. A P640i Card Printer User Guide 25
Page 36

Troubleshooting
Unusual Printer/Lmainator Events
Completely unexpected print results
• Color ribbon out, or nearly out. Replace ribbon. Section 2
• Main cover opened during a print job. Open and close main cover, then press RIBBON to
re-sync ribbon. Reprint last job.
• Color ribbon panels out of sync, see previous action.
• Color ribbon not advancing consistently. Color ribbon supply and/or takeup cores not
engaging properly on arbors. Section 2
• Front (color side) of card printed with black. Open and close main cover, then press
RIBBON to re-sync ribbon.
• Inconsistent color, very faint printing. Printhead not pressing on ribbon. Reference
Technical Note 4
• Color ribbon torn, or jamming intermitte ntly. Clear jam. Pull out more from supply roll
and reattach to takeup roll. Section 2
YMC color panels stick to card
• Printhead running too hot. Can happen after head replacement if head resistance
incorrectly entered through printer driver. Reference Technical Note 4, Printer Adjustment
• Check ribbon takeup and supply torques. Reference Technical Note 4
K (Black) panel sticks to card
• Printhead running too hot. Can happen after head replacement if head resistance
incorrectly entered through printer driver. Reference Technical Note 4, Printer Adjustment
• B lack panel density and/or preheat set too high. Reference Technical Note 4, Color
Calibration
• Check ribbon takeup and supply torques. Reference Technical Note 4
Loud rattling/screeching from card transport
• Card(s) has fallen onto truck drive belt, and is jammed at some point. Open cover, remove
all cards from hopper. Remove jammed card if accessible. Look for card(s) in the
transport bed. Using card transport knob, hand-crank truck to push card into one of two
areas for easy removal - under hopper, or under flip station (lift carrier for access, then
push it down again).
Brief rattling noise before every print job
• Make flip station rest position adjust parameter less positive. (But be sure the carrier still
descends to its physical end-stop, otherwise it may fail to pick card off platen.) Reference
Technical Note 5, Flip Station Adjustment
Rattling noise every 10 cards
• Cleaning cassette not firmly engaged. Reference Technical Note 2
26 P640i Card Printer User Guide 980541-001 Rev. A
Page 37

Unusual events
In all of the following cases, and all other unusual events, try power cycling first, then
investigate specific issues:
• Printhead descends before card arrives. Check horizontal offset. Reference Technical Note
4
• Printhead stays down after card has gone away. Check card presence sensor. Reference
Technical Note 2
• Laminate cutter(s) fails to operate. see below, and reference Technical Note 6
• Unusual media light indications.
Laminator spot check
• Make sure the transfer roller toggle is in the operating position, pointing right.
• Up per or lower laminate feed problems: remove, then replace transfer guides, discarding
laminate patches on transfer rollers. Check for laminate where it shouldn’t be. Remove
both laminate cassettes. If out, or nearly out, load fresh laminate. W ind la minate back in to
eliminate overhang. Reinstall cassettes, latching securely. Visually check path from
cassette(s) through feed roller, cutter and transfer guide.
• Check for misfeeding of laminate due to poor engagement of white plastic idler on
cassette with drive roller. Mark the upper core to check that i t rotates (no nee d to mark the
lower core - watch the notches on the laminate core). Feed laminate by pressing the
LAMINATE button.
• Laminate patch may be wrapped around the heated roller, causing card feed problems
and/or poor lamination. Turn printer OFF, allow 10 minutes for cooling, then remove
heated rollers - careful, they will still be HOT. Remove the rogue patch. Do NOT use a
metal knife or any tool that might damage the heated rollers.
• Check upper and lower laminate sensor readings, Reference Technical Note 6, with and
without laminate present (< 20 if present, > 180 if absent - numbers valid only if transfer
guides installed).
Troubleshooting
Error messages
Additional help
For more information on specific printer functions (print station, flip station, laminator, etc.)
refer to the appropriate Tech Note in the separate Tech Note Supplement to this Operator’s
Guide.
Error messages
Most P640i error conditions are identified by the printer itself, and are reported by the
computer as error messages with corrective actions. Error messages are not further described
in this section of the manual, which deals only with fault conditions that are not reported
automatically. On this page are five examples of error messages:
Important • Most problems can be prevented by careful handling of
the media (cards, color ribbon and laminate), see Section 2, Media
Handling.
There is almost no preventative maintenance to do. Dust and debris should be vacuumed out
every 12 months, or more frequently in adverse environments.
980541-001 Rev. A P640i Card Printer User Guide 27
Page 38

Troubleshooting
Error messages
Most of the problems described in the following pages are correctable by the user, but please
note there is the potential for unexpected results if the procedures are not followed carefully. If
in doubt, call for service assistance.
Before calling for technician help, do the following:
• Check all cable connections, including power.
• Check that the power switch is ON.
• Unless you hear noises suggesting a card jam condition, try power
cycling: switch OFF, wait 15 seconds, then switch ON.
• Open the main cover, then look for obvious problems, such as a
card where it shouldn’t be, media outages or misfeeds (color ribbon, laminate, cleaning cassette).
• Check this section, referring if necessary to the relevant T ech Note.
28 P640i Card Printer User Guide 980541-001 Rev. A
Page 39

READY MEDIA ALARM
GREEN YELLOW ORANGE RED
Troubleshooting
Error messages
What the Indicator Lights Tell You
Printer Status
Ready to print
Printer busy
Laminator heating up, but not yet at operating temperature
Laminator heaters in sleep mode (when not in use, the heaters cool at 1oF per minute)
Printhead temperature error.
No cards in magazine, color ribbon out, cleaning tape out, laminator cassette(s) out.
Mag encoding write failure
Serious error conditions, including: MAIN COVER OPEN, Laminator too hot, card
transport stalled, card not seated properly, mag encoding verification error, head lift
failure, ribbon jam, card jam (any location), card missing (any location), no gap between laminator patches.
= light on = light flashing
980541-001 Rev. A P640i Card Printer User Guide 29
Page 40

Page 41

4
Technical Notes
Restore printer configuration
You can return the printer to its previous backup configuration be pressing the
PRINT, RIBBON and LAMINATE buttons on the front panel at the same time as
the printer is powered up. But first, remove the color ribbon! This is termed a
“three button reset,” page TN1-4
Flip station
Any time you open the main cover, for whatever reason, be sure that the flip
station is fully down before the cover is closed. Do this by gently pushing down
at the back of the flip carrier.
Correction to this User Guide
Most fasteners used in the P640i have U.S. standard threads. Printers manufactured after
October 2004 use Torx® socket head screws in locations other than set screws on pulleys and
gears. In addition to a standard set of small hex drivers, you will need the following Torx drivers:
T10, T15, T20 and T25.
Other useful facts
ID/Key is an optional hardware key encoded with a serial number that is compared prior to every
print job with a number in the printer’s NVRAM. If there is a mismatch, the printer is disabled.
ID/Code is a field-alterable password stored by both the printer dirver and the printer itself. It pre-
vents use of the printer with a PC not having the same
to function, and everything else looks fine. Reference Technical Note 8.
Password protection blocks access to some of the lower level printer adjustment screens. Not to be
confused with ID/Code. Reference Technical Note 8.
Interlock “cheating” is not something the operator should do, but as a technician you will need to run
the P640i with the main cover open. Cut a narrow strip of plastic from a used CR-80 card, fold it,
then push it into the interlock slot in the center wall. When the ALARM light goes out, the interlock
switch is closed.
ID/Code. Check the ID/ Code if the printer fails
980541-001 Rev. A P640i Card Printer User Guide 31
Page 42

Technical Note 1 - General Information
Model P640i with card receiver The cover at left gives access only to the card hopper, which
may be “hot loaded” while the printer is powered up and operating (unlike the main cover,
right, opening the card hopper cover does not disable the printer).
Dimensions in inches and (italicized) millimeters
P640i Specifications
Card size: ISO CR-80 (2.125" x 3.385"), 30 mil thick
Card hopper: 150 cards
Throughput: 120 cards/hour (YMC on front, K on back)
Print system: Single printhead, with flip station for front and
back printing. Dye sublimination for YMC colors, and thermal
mass transfer for K and Uv panels (K = opaque black resin,
Uv = clear ultraviole t-visible resin).
Printhead resolution: 300 dpi
Image size (typical): 952 pixels (3.17") x 578 pix els (1.93")
Magnetic stripe encoder (option): Hi-Co type. 3-track,
ISO and AAMVA compatible. Custom formattable through
Windows printer driver.
Cleaning system: Both card faces cleaned by high-tack
roller. Roller is refr eshed a u tom atically by transfer tape at
selectable intervals (typically 10 cards).
Laminating system : Waste-free design with built-in
cutters. Continuous1 mil (0.025 mm) thick polyester film in
reloadable cassettes.
Controls
Print, Ribbon advance, Laminate advance
Indicators : Ready to print, Media outage, Alarm
Data interface : USB, Parallel (option), Ethernet (option)
Windows drivers: Plug-and-Play 2000, XP
Security features ID/Key (option): a hardware lockout
and a printer-to-PC password lockout
Compliances: FCC Class A, UL/IEC/EN 60950-1, CSA
C22.2
Power requirement:
105-125Vac, 60Hz, 3A
190-260Vac, 50Hz, 1.5A
32 P640i Card Printer User Gu ide 980541-001 Rev. A
Page 43

Environment:
Operating: 50° to 95°F (10° to 35°C), 20 to 80% RH non-condensing
Storage: -4° to 158°F (-20° to 70°C), 5 to 90% RH non-condensing
Dimensions : see above drawing
Net weight 35 lb (15.9 kg) net. Shipping weight 43 lb (19.5 kg).
Sensors and interlock switches in the P640i
Y ou cane learn a lot abou t how the P640i functions by spending
a few minutes thinking about its various sensors and interlocks.
These are of several different types, but they have one thing in
common - they tell the printer’s control logic what’s happening
and where, enabling it to continue with the process or, if a
malfunction occurs, to light the appropriate indicator light and
report a specific error condition on the host computer screen.
Printer Parameters in the Drivers
See Tech Note 8 Windows Printer Driver for more information.
ID/Key
Theoptional ID/Key is a hardware “dongle” that is tied to a
specific P640i printer. It is intended to prevent unauthorized
use of the printer.
Like a camera
battery in
appearance, the
ID/Key
alterable memory
containing a
unique 64-bit
serial number that
is compared prior
to each print job
with a serial
number stored in
the printer’s
nonvolatile RAM.
If the serial
numbers fail to
match, or if no
ID/Key is removed during a card printing session, the
the
printer will cease to operate after the current batch of cards is
printed.)
ID/Key is carried in a 2” x ¾” plastic fob that plugs into a
The
receptacle to the right of the card hopper. Typically, at the end
of each work session the
and stored in a secure location such as the key safe.
ID/Key is detected, the printer is disabled. (If
ID/Key is removed from the printer
has a non-
Refer also to other Tech Notes specific to the functional
element in question - Card Transport, Mag Encoder, Print
Station, etc.
Start > Printers (or Printers and Faxes) > Right click Zebra
P640i > Properties > Device Settings > Control > Advanced
Utilites
ID/Code :
Sends an ID/Code (password of your choice) to the printer,
synchronizing the driver-to-printer ID/Code. This prevents use
of the printer with a PC not having the same ID/Code.
Update Backup Config :
Most of the parameters affecting operation of the printer, e.g.,
laminate station adjustments, are set up using the printer driver,
and are then saved in the printer’s flash memory as “current
configuration”. The original factory configuration also resides
in a separate “backup” memory, allowing you to recover the asshipped settings. Update Backup Config
replace the factory configuration with the current
configuration, but DO NOT DO THIS CASUALLY. On the
same lines as System Restore in Windows XP, you can revert to
the backup config as follows: 1. Power OFF; 2.
color ribbon
LAMINATE buttons at the same time as you switch on the
power; 4. Release the three buttons when you see activity in the
printer.
; 3. Press and hold the PRINT, RIBBON and
instructs the printer to
Remove the
Replacing a lost ID/Key:
The recovery procedure requires a special computer file
obtainable only from Zebra product support. This file is
downloaded to the printer , following which the replacement ID/
Key is inserted. The printer is then power cycled, off the n on, at
which point the key’s serial number is recorded in NVRAM.
980541-001 Rev. A P640i Card Printer User Guide 33
Page 44

Password Protection
Not the same as ID/Code. Password Protection blocks access to
various low level printer adjustment screens (including this
one). Check Use Password, then enter a password of your
choice.
Start > Printers (or Printers and Faxes) > Right click Zebra
P640i > Properties > Device Settings > Control > Advanced
Utilites >
Show Sensor data
Sensor Data
Printer Properties
Start
> Printers (or Printers and Faxes) > Right click Zebra
P640i > Properties > General
Table 1: General
Ribbon Panel Detect:
ribbon sensor.
The current reading of the color
Panel Threshold: The current value of the detection
threshold for the color ribbon. Above this value is termed
“black,” below this value is termed “not black.”
Laminate Sensors: Reflective sensor that detect the
presence of laminate on the transfer rollers: below threshold =
laminate present, above threshold = laminate absent.
Card presence Sensor: The reflective sensor to the right
of the card hopper: High = no card, Low = card present
Printhead Voltage: Should be about 24V.
AC Frequency: 50 or 60 Hz
Assumed AC Voltage: 110V assumed for 60 Hz. If
frequency and voltage are not correct, see Laminate Station
Adjust, TN6-5
Printhead Temperatue: Temperature ceiling 70°C (above
that temperature, printing is stopped until the head cools).
Printing Preferences brings up the preferences screen, see Tech
Note 8, Windows Printer Driver.
Print Test Page
Printer Properties
prints the standard Windows test page, cropped as shown here.
Table 1: Color
Management
Start > Printers (or Printers and Faxes) > Right click Zebra
P640i > Properties > Color Management
Controller Board Temperature: Should be about 5°
above ambient.
Heater Temperature: Temperatures at the top and bottom
laminate heater cores.
Not currently supported
Logic States: Summarizes all two-state interlocks and
photosensors - a very useful diagnostic tool.
34 P640i Card Printer User Guide 980541-001 Rev. A
Page 45

Printer Properties
Start > Printers (or Printers and Faxes) > Right click Zebra
P640i > Properties > Sharing
Table 1: Sharing
Printer Properties
Start > Printers (or Printers and Faxes) > Right click Zebra
P640i > Properties > Ports
Table 1: Ports
This is sharing according to the Microsoft Windows definition.
In a network environment, it allows other computers to send
jobs to the printer that’s connected to your computer.
Printer Properties
Start > Printers (or Printers and Faxes) > Right click Zebra
P640i > Properties >
Security
Table 1: Security
Specifies the computer port to which the P640i is connected.
This will have been established at the initial installation of the
printer, and will not normally require attention.
An exception to this is if you wish to use “printer pooling”, the
ability to distribute print jobs to multiple printers. To enable
printer pooling, check the “Enable Printer Pooling” box, then
check multiple ports. Each port should have a single Zebra
printer installed on it, and all printers should be configured
identically (for example: all with YMC front, K back). Now,
when you print to the “main printer” (that is, whichever printer
you right-clicked in Printers and Faxes to get to this screen),
this printer will get print jobs until it has buffered as many jobs
as it can take. Remaining jobs will then “spill over” to other
printers until all printers in the pool are busy.
For more information, see Tech Note TN10.
This is the standard Windows security screen, showing user
access to various printer control options. Both Print and
Manage printers
P640i.
980541-001 Rev. A P640i Card Printer User Guide 35
must be checked for full functionality of the
Page 46

Printer Properties
Start > Printers (or Printers and Faxes) > Right click Zebra
P640i > Properties > Advanced
Determines the spooling (queuing) of print jobs, and how
spooled jobs are handled relative to the most recent job.
Printing Defaults allows the system administrator to establish
default settings such as print quality.
Table 1: Advanced
Print Processor
and Separator Page should be left alone.
36 P640i Card Printer User Guide 980541-001 Rev. A
Page 47

Technical Note 2 - Card Transport
Stepper
Platen
Transport belt
Tru ck
No-slip card transport
The P640 does not rely on friction rollers to drive the
card through the print station. Instead, the entire pick
The platen plays an important part in the printing
process, providing a rigid supporting surface for the
card as it passes under the print head. Because
is important, the platen is surface ground to close
tolerances. Any irregularities in the surface due to
abrasion, dings, or even seemingly unimportant
particles of debris can noticeably degrade printing
performance, see page TN2-3. Regular cleaning of the
platen helps maintain performance.
flatness
and print process is precisely controlled by a belt
driven truck riding on parallel rails.
Card transport knob
Allows you to move the truck to left or right by hand.
When the printer cover is lifted, there is no power
applied to the transport stepper motor.
Take care of the platen
980541-001 Rev. A P640i Card Printer User Guide 37
Removing the platen
Using the card transport knob move the truck back to
its home position, stopping when the right hand edge
of the platen is even with the right hand inner sufrace
of the hopper.
Push the platen to the left against its spring, then pry
the platen out using a CR-80 card.
Page 48

Truck home sensor
Determines the truck’ s end st op position. Activa ted by
a vertical flag on the left edge of the truck, photo
above.
Home sensor flag
Home sensor
Do not lose the spring! It holds the platen tight against
the right hand end of the truck, and is essential for
good print registration.
Truck interlock (arrowed)
If there are no cards present in the hopper, and a hot
load is attempted while the truck is elsewhere, the
cavity under the hopper is exposed and potentially
Card presence sensor
Located behind the mag encoder.
Ta ke -u p
Cassette
motion
Supply
dangerous. Active when the hopper cover is open, the
truck interlock prevents the truck from driving to its
home position.
38 P640i Card Printer User Guide 980541-001 Rev. A
Page 49

Cleaning cassette
TOP: As the drive motor begins to turn, the drag
caused by stickiness of the cleaning tape on the supply
roll creates a clockwise turning force, bringing the
cleaning tape into contact with the cleaning roller. The
motor continues to rotate for a second or two, pulling
fresh tape out of the supply roll. This in turn rotates
the cleaning roller, at the same time removing debris
from its surface.
BOTTOM: Feedback on motor rotation is provided by the encoder disk and sensor behind the cleaning mechanism.
Mag
encoder
aperture
HOPPER
APERTURE
Underside of hopper base molding
The base molding is secured to the aluminum
transport by buttonhead screws through the six standoff springs seen here. The molding is NOT screwed
hard down. It floats on the springs, and is adjusted up
and down by the buttonheads to set the “card gate”
height relative to the platen at just over the thickness
of a single card. If the base molding is set too high, the
truck will attempt to make off with more than one
card: if too low, it will leave the hopper area without a
card.
Caution • Do not tighten down the
bottonhead screws. These are
precisely set in a manufacture to
control the card gate.
Card gate
Transport Parameters in the Driver
Run Clean Cycle
Run Clean Cycle Decontaminates the card cleaning roller
by activating the cleaning cassette. One clean cycle
per click.
980541-001 Rev. A P640i Card Printer User Guide 39
Page 50

Start > Printers (or Printers and Faxes) > Right click
Zebra P640i > Properties > Device Settings > Control
Run Clean Cycle
>
Card Presence Sensor
Start > Printers (or Printers and Faxes) > Right click
Zebra P640i > Properties > Device Settings > Control
> Advanced Utilites > Show Sensor Data >
Presence Sensor
Card
Pick Position Adjust (Pixels)
Start > Printers (or Printers and Faxes) > Right click
Zebra Defects at top left and on the bottom edge were
P640i > Properties > Device Settings > Printer
Adjustment > caused by lack of support under the
card. Card Hopper >
Pick Position Adjust (Pixels)
Clean Frequency
[Also available through the Status screen (Device
Settings > Status >
Card presence sensor values: High (around 250) = card
Advanced )]
absent, low (around 10) = card present.
Move Carriage
Move Carriage moves the carriage to the position
specified in the drop down menu on the Advanced
Utilities window. Select a destination, then click
Move.
Start > Printers (or Printers and Faxes) > Right click
Zebra P640i > Properties > Device Settings > Control
> Advanced Utilities >
Move Carriage
Clean Frequency adjusts how often the card cleaning
roller is itself cleaned by contact with sticky tape in
the cleaning cassette. Acceptable values: 1 card to 20
cards; default 10 cards.
Start > Printers (or Printers and Faxes) > Right click
Zebra P640i > Properties > Device Settings > Printer
Adjustment > Cleaning Station >
Clean Frequency
Avoid These Problems
The truck platen is an important contributor to print
quality. To provide adequate support for the card, the
platen’s neoprene surface must be clean and intact.
Look for signs of delamination, especially at th e edges
of the platen, and be sure to keep the surface free of
debris.
Delaminated platen
Pick Position Adjust fine tunes the extent of truck
motion relative to the home sensor located left of the
card hopper. Modify this value only if the printer has
repeated difficulty in card picking.
Dirt on platen
These image defects were caused by a “foreign
object” under the card - a tiny piece of card, less than
0.01" (0.25 mm) thick .
980541-001 Rev. A P640i Card Printer User Guide 40
Page 51

Technical Note 3 - Magnetic Stripe Encoder
The “mag encoder” is a factory option for the P640i.
Replacing the read/write head
As shipped, the replacement read/write head is a
complete assembly comprising mounting bracket and
clamp hardware. Other screws and springs are not
included.
Remove, setting aside for re-use, the shoulder screws
and adjustment screw from the defective assembly,
together with springs and washers. Install the
adjustment screw in the replacement bracket, bringing
its tip flush with the bottom surface of the bracket.
Check how the head sits in the bracket. Look for
symmetry, with the upper rim of the head
(surrounding the “potted” wires),
bracket, just a hair below. Install the encoder
assembly, taking care that the shoulder screws do not
clamp either end of the bracket or the washer at the
right hand end. Check that the assembly is
up and down
at both ends.
almost even with the
free to move
Mag encoder installation
Replacement read/write heads are shipped preassembled to the bracket shown here. Check the
location of the yellow wire. This must be in the lower
right corner.
Shoulder
screw
head
Adjustomg
screw (3/32"
Spring
CardRead/Write
Nylon
Washer
Clamp
Screws
Steel
Washer
Spring
Mag encoder components
Shoulder screws at the two ends of the bracket allow
vertical float. Springs hold the read/write head firmly
in contact with the card’s mag stripe.
Cleaning the read/write head
Adjust the mag encoder using Mag Amplitude Adjust
and Mag Position Adjust utilities in the Windows
printer driver, see below.
Magnetic Encoding Functions in the Driver
Mag Position and Amplitude
For this procedure you will need to cut a feeler gauge
about ¼" wide (6 mm) from a standard CR-80 card
(which should be 0.03”/0.75 mm thick).
Start > Printers (or Printers and Faxes) > Right click
Zebra P640i > Properties > Device Setting s > Con trol
The head needs to be cleaned only if encoding
becomes troublesome. (This will show up as extra
passes of the card under the head if the Mag Verify
function is enabled - recommended - in Printing
Preferences.) To clean the head, turn power OFF and
remove all cards from the hopper. Drive the truck to
> Advanced Utilities > Calibration
the right, clear of the mag encoding station, by
rotating the card transport knob left of the laminator.
Reaching down through the floor of the hopper, clean
the head with a Q-Tip dipped in isopropyl alcohol.
Allow several minutes drying time before runnin g the
1. If you have not already done so (see Replacing
the read/ write head, above) back off the adjustment screw (counterclockwise) until the head
bracket is fully down.
printer.
980541-001 Rev. A P640i Card Printer User Guide 41
Page 52

Adjustomg screw
(3/32" hex wrench)
Shim
5. Click Mag Amplitude Adjust. The printer will then:
e. Pick a card from the hopper
f. Mag encode it
The “shim” is a narrow strip of CR-80 card.
It must be removed before running the printer.
2. Using the manual card transport knob, drive a
card under the head and leave it there. With the
card under the head - make sure it’s there - turn
the adjustment screw to elevate the left end of the
head bracket to the point where your CR-80 feeler
gauge just slides under the bracket. Test the
mechanical setup by running the card back to the
hopper, then slowly out again. There should be a
barely perceptible upward movement of the
bracket as it rides up over the tapered pick edge of
the truck, see diagram on preceding page.
3. Load a few cards with magnetic stripe.
4. Click Mag Position Adjust
. The printer will then:
a. Pick a card from the hopper
b. Mag encode it
c. Back up, then run it under the read/write head
again to determine the position at which the
mag encoding begins
d. Eject the card through the laminator. The
starting position is stored in firmware and is
used for all subsequent mag operations
g. Back up, then run it under the read/write head
again to measure average maximum
amplitudes of the recorded data displayed on
the Mag Data Monitor below
h. Pause for a few seconds to allow adjustment
i. Back up again, and repeat the read cycle
continuously until the PRINT button is
pressed, after which the card is ejected
through the laminator
6. Turn the adjusting screw first clockwise then
counterclockwise in quarter-turn increments
while observing the data monitor. With the
bracket setup described in Step 2 above, it is possible that there will little change in amplitude
even with a full turn or two of the screw in either
direction.
• If there is no appreciable change, press the
PRINT button to end the test, then rest ore the
default setup of Step 2 using the CR-80 card
shim.
• •If the amplitude varies as you turn the screw,
tune for maximum values.
All three tracks should read at least 130. If there are
track-to-track differences greater than 10, the hea d
may be defective, or skewed in the bracket. If skewing
is the problem, loosen the lock nuts on the clamp
screws (diagram, preceding page), back out the screws
a turn or two, then carefully free the head (which may
have a light adhesive film on the surfaces mating wi th
the bracket). Position the head with its rim a hair
below the edges of the bracket, then retighten the
clamp screws and lock nuts.
7. Complete the procedure by re-running Mag Posi tion Adjust as in Step 4 above.
42 P640i Card Printer User Guide 980541-001 Rev. A
Page 53

Horizontal Offset
Override Defaults: This is to prevent accidental
modification of the offset number, which should not
need attention in regular use.
Horizontal (X) Offset (Pixels: Adjusts where the
printer starts looking for a mag stripe. It is a manual
fine tuning of the value determined by the Mag
Position Adjust routine. It is intended only for testing
and diagnosis.
Start > Printers (or Printers and Faxes) > Right click
Zebra P640i > Properties > Device Settings > Printer
Adjustment > Advanced Adjust
Encoding choices and track layout
Track
* Not including start sentinel, end sentinel, or LRC characters
Density
(bits/inch)
210 Characters 76 Characters 79
1
2
3
75 Numerals 37 Numerals 37
210 Numerals 104 Characters 79
ISO format AAMVA format
Data Type Length* Data Type Length*
Mag Encoder Verify On
Magnetic Encoding Preferences
Start > Printers > Right click Zebra P640i > Printing
Preferences > Magnetic Encoding
If this box is checked, every card is run twice under
the read/write head. The first pass writes the code, and
second reads it to check for accuracy and readability.
Any card not passing this test is ejected through the
laminator without printing. Verification adds only 3
seconds to the processing time per card, and is
recommended for all applications not calling for the
highest possible throughput.
Bit by Bit Encoding
This is used only in applications calling for a custom
designed encoding format. Call Zebra tech support for
more information.
Enable EIN Reedback
Applicable only in applications using cards with pre-
en-coded (“embedded”) inventory numbers.
980541-001 Rev. A P640i Card Printer User Guide 43
Page 54

Techncial Note 4 - Print Station
The print head is a precisely machined slice of
ceramic, on the bottom edge of which is a row of tiny
heating elements (resistors), 300 to the inch. A thin
glaze coating protects the heating elements. Under
normal operating conditions the head is capable of
printing many thousands of images.
Damage to the head, meaning a permanent failure of
one or more heating elements (“pixels”), can be
caused by solid particles on the card surface, even
though the color ribbon affords some degree of
protection. The automatic card cleaning system in the
P640 takes care of most issues, but the operator should
keep the inside of the printer clean by occasional
vacuuming. Also bear in mind that it is not a good
idea to run the printer with the cover open (by
cheating the interlock switch), except for test
purposes.
Electric Shock Caution • Make sure
power is disconnected before working
on the print head. Also note that the
head will likely be destroyed if power is
reapplied while you are in porcess of
reconnecting the cable, or if the plug
is not seated properly.
Cleaning the print head
Do this only if print quality has deteriorated and all
other corrective actions have failed.
1. Open the main cover (this wi ll raise the print head).
2. Remove the color ribbon.
Missing, or “blown” heating elements show up as a
white unprinted line. This calls for a replacement print
head. Less seriously, a faint line may be due to debris
or contamination, which can sometimes be corrected
by cleaning the print head. (A faint line may also
indicate a heating element on the verge of failure, or a
small piece of torn ribbon stuck under the head.)
Examples of printhead problems
The white line in the center of the black stripe
suggests a number of blown pixels. The wide black
stripe means that a large number of pixels are fully on
(hot) all the time. Either of these problems may call
for a replacement printhead (but the black stripe may
be caused instead by image handling issues between
printer driver and the applica tion that created the card
layout).
Caution • Do not touch the bottom
edge of the print head. Grease or
other contaminants from the hands
can attract particles that may in time
dameage the head.
3. Wipe the bottom edge of the print head a few times using a Q-Tip moistened with Isopropyl alcohol.
4. Dry off with the lint free cloth, taking care not to touch the active edge.
Important • The angle of the print head
relative to the surface of the card is set by
this #4-40 button head screw and lock n ut
(5/64" hex wrench, 5/16" open end
wrench). Replacement heads are shipped
with theis screw preset, but some fine
tuning may be required.
#4-40 skt hd
3
cap screw
Not Used
Access for
head
angle
2
#4-40 shoulder screws
(5/64" hex
Yaw ad j u s t
(technician
only)
1
44 P640i Card Printer User Guide 980541-001 Rev. A
Page 55

Print head attachment hardware
7. Pivot the head assembly forward to bring the
angle adjust button head in contact with the print
head frame, then tighten screw
3.
Connector
Head
angle
Do NOT
tighten these
adjust
Prin t
head
pivot
Print head assembly : Replacement print heads
are shipped pre-assembled to the mounting bracket
shown here. To ensure uniform contact pressure
across its width, the head is free to rotate ± 2° about its
center pivot. It is secured to the bracket by four bu tton
head screws, tightened to allow a sliding fit.
Electric Shock Caution • Make sure
power is disconnected before working
on the print head. Also note that the
head will likely be destroyed if power is
reapplied while you are in porcess of
reconnecting the cable, or if the plug
is not seated properly.
Replacing the print head
1. Open the main cover, then power OFF.
8. Make sure the cable is no t inhibi ting
free r o tat ion of
the print head about its pivot.
9. Power ON, then check print quality as follows.
10. Enter the printhead resistance in the driver Properties “Print Station Adjustment” screen, page TN4-4.
Print quality tests and adjustments
The objective in the following is to find the best
compromise between image quality and ribbon
wrinkling. In the printer driver go to Printing Preferences
> Image Adjustment
Contrast to 50 (default condition).
1. Run
IDPrint Lite, Tech Note 8, then select
Graytone.bmp as Image 1.
2. Print two or three cards with the graytone image.
3. If you are satisfied with the overall appearance and uniformity of the image, you might wish to leave well alone. If you feel some improvement could be achieved, proceed to Step 4.
4. Referring to the photo on the preceding page, mark the head-angle-adjust button head with a fiber tip pen to serve as a reference. Loosen screw #3 just enough to allow sliding movement of the printhead bracket.
, then set both Brightness and
2. Remove the color ribbon.
5. Unlock the angle adjust button head screw, turn it
a quarter-turn counterclockwise, then re-lock it.
3. Unplug the cable from the print head.
This will have the effect of rotating the head
counterclockwise a fraction of a degree when you
4. Remove only the fasteners
on the preceding page, then lift the print head
1, 2, and 3 in the photo
snug the button head against the printhead frame.
Tighten screw #3.
clear.
6. Print another graytone card for comparison. If
5. Make a note of the resistance entered on the
replacement printhead’s label (should be between
there is a noticeable improvement, try another
quarter-turn adjustment, then print again.
2400 and 3600 Ù.
7. If the print quality is seen to deteriorate rather
6. Connect the cable to the replacement printhead,
making sure it is seated properly, see “STOP”
above. Install the print head, securing it with
shoulder bolts
loosely with socket head cap screw
1 and 2, fully tightened, then
3 (with plain
than improve, return to the as-shipped setting of
the head angle screw, then try rotating it
clockwise in quarter-turn increments.
washer) through the slot in the bracket.
980541-001 Rev. A P640i Card Printer User Guide 45
Page 56

8. When you are satisfied with the graytone image
quality, print one or two cards with
Wedge_1.bmp
to test for ribbon wrinkling. This image is the
densest possible process black, meaning that on
all three passes (Y, M and C) one end of the
printhead is fully “on”, while the other end is
“off”, a sure way to induce wrinkling if there is
the slightest tendency. Wrinkling may
be a head
angle issue (more clockwise than it should be),
but it may equally result from too high a ribbon
torque, page TN4-x.
.
the head
Check the torque before readjusting
9. When you are satisfied that ribbon wrinkling is
under control, print one or two cards with
Wedge_2. bmp, this being the same triangle flipped
so that its black area starts full width.
10. As a final test, run Portraits.bmp to test for skin tone realism, etc.
Print Station Parameters in the Driver
Ribbon Encoder Count: The pulse count from the
motion sensor (following page) from start to finish of
the most recent YMCK panel set paid out from the
ribbon supply roll.
Printhead Voltage: Should be about 24V.
Printhead Temperature: Temperature ceiling
70°C (above that temperature, print ing is stopped until
the head cools)
Printhead Lift (logic states): 0 = head raised, 1 =
head down (see photos on following page)
Start > Printers (or Printers and Faxes) > Right click
Zebra P640i > Properties > Device Settings > Printer
Adjustment
Horizontal (X) Offset (Pixels): Moves the image
along the length of the card. Used to center the image
on the card.
Vertical (Y) Offset (Pixels): Moves the image up
and down. Used to center the image on the card.
Start > Printers (or Printers and Faxes) > Right click
Zebra P640i > Properties > Device Sett ings > S tatus >
Advanced (Information)
See also: Start > Printers (or Printers and Faxes) >
Right click Zebra P640i > Properties > Device
Settings > Control > Advanced Utilities > Show Sensor
Data
Ribbon Panel Detect: The current reading of the
color ribbon sensor (High = black, Low = not black).
Panel Threshold: The current value of the
detection threshold for the color ribbon. Above this
value is termed “black”, below this value is termed
“not black”.
Black Panel - Speed : The printer was
characterized in manufacture at a specific speed.
Changing this speed will force the printer to use
estimated energy values, and is not recommended.
46 P640i Card Printer User Guide 980541-001 Rev. A
Page 57

K (Black) Panel Printing
Black Panel - Compensation:
Overlay Panel - Compensation: Mainly used
with Uv ribbon to optimize the appe arance of ultraviolet-visible text.
Unlike YMC color printing, which is required only
to deliver realistic portraits and pleasing graphics,
the K panel serves a more quantifiable purpose,
namely machine readability. In practically all
instances of K panel usage, there is a requirement
both for bar codes and well defined text - and
sometimes for signatures, which can be ìspideryî in
appearance unless compensated for. Unfortunately,
these requirements are in opposite corners.
The P640i provides three controls for K panel
printing: these are:
1. Black panel compensation (Adjustment
screen, this page TN4 - x) If a line of blac k dots
is printed along the card motion axis, the
heating element (pixel) in question doesn’t
cool down completely between adjacent dots.
Without compensation, the steadily increasing
residual heat would cause the printed dot to
increase noticeably in size (“bloo m”), below
left. Properly compensated, the dot size is
reasonably constant, below right.
Ribbon - Position (mm): This has to do with
positioning the color ribbon relative to the print head
such that when the head descends it lands solidly
within
the panel, not too early, not too late. Keep in mind the
following:
• While the head is down and printing, ribbon
motion is controlled by the card itself, not by
the ribbon takeup (which at this time serves
only to peel the ribbon cleanly off the card).
• The color panels are about ½" (12 mm)
longer than the image printed on the card.
This means that between one color printing
pass and the next, when the head briefly lifts,
the takeup drive has to shift the ribbon
rapidly to bring the next color panel under the
head.
Without compensation With compensation
2. Black panel density (Color Calibration screen,
page TN4 - x) This control the amount of heat
energy applied to any pixel required to be
“black”. A higher value gives darker printing,
but can cause undesirable blooming (indefinite
edges).
3. Black panel preheat (Color Calibration
screen, page TN4 - x) Think of this as a
temperature offset applied across the entire
head, specifically for K panel printing. A higher
value results in better resin transfer on the
leading edge of graphics and text than you
would get with a “cold start”, but it may lead to
undesirable blooming (indefinite edges)
overall.
The following default values deliver a good
compromise between barcode re adability and the
appearance of text and signatures: Compensation
55, Density 117, Preheat 15
Overlay - Panel Speed: Speed at which the “OP”
overlay panel, if any, is printed (rarely used in printers
with laminating capability). If a Uv ribbon is selected,
the text changes to say “Uv Panel Speed”.
Ribbon sensor Motion sensor
Supply
arbor
Ta ke up
arbor
• The transition from one panel to the next in
the color ribbon is marked by a black stripe
which activates the ribbon sensor below the
supply roll. It is used, together with a count of
pulses from the motion sensor, to determine
ribbon position.
980541-001 Rev. A P640i Card Printer User Guide 47
Page 58

Adjusting the ribbon position drives the leading edge
of the panels forward or backward relative to the
printhead, the aim being to ensure that each swipe of
the head is centered in its color panel (this you can
easily check by inspecting image negatives from on
the takeup roll). The photos below show the effect of
incorrect ribbon positioning.
Ribbon positioning problems:
direction of card movement. In the example at left, the ribbon
has advanced too far, with the result that the head swipes a
few millimeters of the following panel - see inside the circle.
Reduce the ribbon position parameter to correct this. The
example at right is the exact opposite - ribbon not advancing far
enough, so increase the position parameter to correct.
The arrows show the
Ribbon - Torque Adjust (%): Adjusts the current
applied to the ribbon take-up motor (more current =
more torque), thus controlling the ribbon tension
between print head and take-up. Lowering the value,
default = 100%, can help reduce ribbon wrinklin g (but
note that there are other factors, see Ribbon
Wrinkling, inset below).
Keep in mind the following:
• The amount of ribbon drag exerted by the supply arbor is con-
trolled by a friction clutch. This is set for a torque of approximately 5 oz-ins (36 mN.m), and should not be adjusted unless you
have a torque gauge.
• Ribbon drag exerted by the takeup arbor is controlled by varying
the current applied to the motor.
Ribbon wrinkling can be caused by one or more of
the following factors (but always try adjusting
ribbon torque first):
• Takeup torque too high
• Supply torque (drag) too high
• Too much preheat - ribbon sticking
• Dense patches with sharp transitions (text, graphic elements) on a
dark image
• Card thickness not uniform
• Printhead too hot because resistance value in flash memory higher
than actual head resistance
• Printhead angle adjust s crewed down too far
• Printhead not pivoting freely
• Printhead rattling in frame
• Printhead not right-angled relative to card motion (yaw adjust)
Wrinkle control is essentially a balancing act of
several variables - especially the balance between
takeup and supply torques.
The downside of reducing the ribbon torque is an
untidy, loosely wrapped takeup roll. That isn’t
important, except aesthetically, but low torque does
matter if the ribbon fails to advance when it should,
see Ribbon Position, left.
Printhead Position - Adjust: Adjusts the
downward motion of the printhead. The higher the
number, the greater the amount of overrun following
sensor activation. Ribbon Wrinkling
Printhead - Resistance (Ohms): This value
should match what is written on the printhead. Enter a
new value if the printhead is changed. If you enter a
lower number than what is printed on the head itself,
the printed image will be lighter than expected, and
vice versa.
The printhead drive train comprises a stepper motor, a
gear quadrant, and a crank arm directly coupled to the
printhead bracket, photos below. In the down position,
the printhead spring is slightly compressed, with the
crank arm extended (which means that the torque
demand on the motor is at its lowest).
Increasing the printhead position parameter does not
result in a mesurable increase in head pressure, which
is more or less binary - it is either under spring
pressure, firmly in contact with the card, or not in
contact at all.
Example of ribbon wrinkling
Note the random curved, colored lines. The cure
in this case was reduction of takeup torque.
Adjustment procedure : If the printhead doesn’t press
firmly on the card during the printing “swipe”, there is
nothing to stop uncontrolled advancement of the
ribbon due to the takeup drive. To correct this,
increase the adjust parameter to the point where the
ribbon ceases to advance freely, then add 40 more to
the number.
48 P640i Card Printer User Guide 980541-001 Rev. A
Page 59

Motor
shaft
Quadrant
Head raised : Print head bracket clear of
Printhead
Prin th ead sp ring
sensor, arrowed. The quad rant is driven by
a pinion on the print head stepper motor
shaft.
Color rendering in the P640i can be describ ed in terms
of a curve, which determines how much power is put
into the printhead for a given shade. The Y, M and C
“color curves” can be separately modified by the Gain
and Offset parameters shown here.
Note: Typically,
the set of values should be the same for each color.
Click Restore Defaults
if you are not satisfied with
adjustments made.
Offset: Shifts the color curve up (darker) and down
(lighter).
Gain: Adjusts steepness of the curve. Lighter shades
will remain unchanged, but darker shades will get
darker or lighter as the number is increased or
decreased.
Prehea : Adjusts how much the head is preheated
before each print line (every three hundredths of an
inch). A larger value darkens (sharpens) the leading
edges of colored areas. A lower value may result in
“feathering” - starting light, then darkening over the
following few pixels as the head heats up.
Black Panel Density, Black Panel Preheat: See
K (Black) Panel Printing, above.
Head lowered: Print head bracket activates
sensor. Motor continues to drive a few
more steps (see Printhead Position
Adjust), compressing the spring to deliver
Color Calibration
Start > Printers (or Printers and Faxes) > Right click
Zebra P640i > Properties > Device Settings > Color
Calibration
Contrast Adjust: A subtle color printing control,
allows the user to shape the printer’ s “lightness curve”
(roughly speaking the “
L*a*b*). In practical terms this means the ability to
L” in the color space called
control how the P640i resolves, or differentiates, the
lighter and darker shades. Between contrast settings of
0 and 100, the lightness curve transitions from linear
to sinusoidal. Linear (0%) tends to result in a low
contrast, muddy looking image. Sinusoidal (100%)
gives mostly good results, but tends to sacrifice the
lightest and darkest shades. For most purposes, select
50% and leave it there.
980541-001 Rev. A P640i Card Printer User Guide 49
Page 60

Technical Note 5 - Flip Station
The flip station performs two independent functions:
1. It lifts the card in process clear of the carriage, flips
it upside down, then returns it to the carriage so that
its other side may be printed; 2. It lifts the fully
printed card clear of the carriage, raising it to the point
where it lines up with the laminator’s infeed path. An
ejector arm then propels the card into the laminator
infeed rollers.
Note that the flip action alternates in consecutive
cycles between clockwise and counterclockwise.
How the flip station works
As the motor driven carrier rises, taking with it the flip
arms and card, the cam is forced to rotate by the
projection on the right side of the flip stop. The
actuators do nothing at this time.
The cam
is driven
over
center by
the flip
stop, at
which
point the
flip
spring
takes
over,
fully
inverting
the card.
Shown
here at
its upper limit of travel, the carrier is about t o descend.
As the carrier descends, the cam deflects Actuator A,
which in turn drives the flip stop to the right. Now,
when the next flip is called for, the cam strikes the left
projection of the flip stop, flipping the card in the
opposite direction. Actuator B, moving in parallel
with A, is then set to return the flip stop to the left
when the carrier heads downward on completion of
the flip action.
One end of the flip spring locates in a cavity in the
rear flipper arm, the other in a hole in the rear
surface of the carrier molding.
Spring
Carrier
50 P640i Card Printer User Guide 980541-001 Rev. A
Front Rear
Collar
Cam
Slide
bearing
Rack
Azimuth
adjust
Spring
locating
hole
Page 61

Flip station components: Upside down views of
the carrier,
drive
component
s omitted.
Flip
station
motor: Viewed from the back of the printer. A
pinion on the motor shaft engages the rack at
the rear of the carrier, above.
Flip
station
viewed
from
above:
Points to
note:
1. The
stop
pin
(integr
al with
the rear
flipper
arm) rests on the bottom edge of the carrier,
alternating from one side to the other in
consecutive flip cycles
2. Azimuth adjust rotates the entire assembly to bring the flipper arms parallel to the carriage - a very sensitive adjustment
3. The arms must move freely, without end float. Over tightening of the screws will lock the arms.
Card held by flip arms : As the carriage moves
into the flip station, the card sli des int o g r oo ves in the
flip arms. The entire flip assembly is then elevated
clear of the platen.
Caution • Cards thicker than 0.033"
(0.84 mm) may jam in the flipper arms.
Flip station adjustm ent procedu re
The flip
station
requires no
routine
maintenance
other than
occasional
vacuuming
out of debris.
Typically, there should be no need to alter the factory
settings.
If the flip station ceases to function, or functions
erratically, the technician should perform the
following tests before replacing components.
1. Power OFF.
close the hopper cover. Disable the main cover
interlock so that the printer will func tion with the
cover open. Power ON.
2. On the host computer follow this sequence:
Start > Printers (or Printers and Faxes) > Right
click Zebra P640i > Pr op erties > Device Setting s
> Control >
3. Click Move Truck to Flip Station
4. With the flip arms horizontal, click
Flip) a few times, noting what happ ens as the
carrier begins to elevate at the start of the flip
cycle.
This is a test for clearance between flip arms and
platen. If the arms touch the platen, even lightly, there
will be tendency for one or both of them to rotate a
little as the carrier rises. The arms must be parallel to
the platen, with a few thousandths of an inch clearance
each side. Using a flashlight, check the gap by
inserting a 0.004" (0.01 mm) feeler gauge between
each arm and the platen. (A narrow strip of regular
copier paper can be used instead, but a long metal
feeler gauge is better.)
Remove all cards from the hopper, then
Advanced Utilites
.
Flip Test 3 (No
980541-001 Rev. A P640i Card Printer User Guide 51
Page 62

If you detect that either of the arms catches at one end
of the platen, but is free at the other, the carrier needs
Azimuth adjustment, see below. Always correct for
azimuth error before adjusting the gap between arms
and platen.
If there is no azimuth error, but insufficient clearance
between arms and platen, see
Gap adjustment below.
Because it is easily accessible, and doesn’t require
removal of the rear cover, try to correct the problem
with the front flipper adjustment.
Note • Inserting a CR-80 card into the
flipper arms to check for grip is easier if
you remove the color ribbon.
Azimuth adjustment: The flip station carrier is
held in alignment with the platen by a U-shape
molding that rides along a fixed rail in the motor
housing behind the carrier. Using a fiber tip pen mark
the screw for reference, then adjust it in very small
increments, such as 1/8 of a turn. A full turn of the
screw moves the U-shape molding about 0.08" (2
mm), rotating the carrier almost 3º.
To fine tune the azimuth adjustment, run Flip Test 3
with flip
selected. If the gap between the rear flipper
arm and the platen is to spec (0.004") at the arm’s
mid-point, and if neither end of the arm snags after
repeated flip cycles, you can be sure the azimuth
adjustment is good.
Flip carrier sensor tabs: This view is from left to
right, along the center wall of the printer ockwise
rotation of the azimuth adjust screw causes clockwise
rotation of the carrier assembly, viewed from above.
Example: if the platen tugs down the right hand end of
front flipper arm as the carrier elevates, the carrier
needs clockwise rotation.
Gap adjustment: The flipper arms must be
separated so that they clear the platen, but not so far
that they
lose their
grip on
the card.
There is
a fine
line
between
too tight
(grabbin
g the
platen)
and too
loose
(failing
to hold
the card
securely)
.
Mark the bushing for reference with a fiber tip pen.
Using a ¼" open end wrench, adjust in
increments
, such as 1/8 of a turn. A full clockwise turn
very small
of the screw moves the bushing in by about 0.03” (¾
mm).
If you are starting from scratch, set the nose of
bushing about 0.02" (½ mm) proud of the inner
surface of the carrier. You can estimate this by
comparison with a CR-80 card, which is 0.03" thick.
After adjusting the gap: Check operation of the
flip station by running
Flip Test 3 with Flip, both with
and without a card in the flipper arms.
The rear flipper arm is different: You need to
remove the rear cover for access. Also, it’s not
possible to adjust the bushing without first removing
the cam.
Flip Station Routines in the Driver
Start > Printers (or Printers and Faxes) > Right click
Zebra P640i > Properties > Device Settings > Control
> Advanced Utilites
Flip Test 1: Picks up a card, runs it to the flip
station, flips it, raises it to the laminator infee d, then
ejects it through the laminator . T he sequence repeats
until the PRINT button is pressed and released.
Flip Test 2: Picks up a card, runs it to the flip
station, flips it, returns it to the platen, then backs it
out to the card sensor (by the mag head). The
sequence repeats until the PRINT button is pressed
and released.
Flip Test 3: See Flip Station Adjustment
Procedure, preceding page. Exercises the flip station
by raising and lowering the flip station carrier, one
cycle per click. The radio buttons select Flip
Flip cycles.
Eject Card: Picks up a card, runs it to the flip
station, raises it to the laminator infeed, then ejects
it through the laminator. Like Flip Test 1
once only, and without flipping.
or No
, but done
Flip/Pause: Picks up a card, runs it to the flip
station, raises it to the laminator infe ed, then holds this
position (termed the Insertion Height
in the flip
station dialog) until the user presses the PRINT button
(at which point the flip carrier descends, and the truck
returns the card to the hopper).
52 P640i Card Printer User Guide 980541-001 Rev. A
Page 63

Flip station calibration: This routine determines
the number of motor steps it takes for the carrier to
descend from the “rest position datum” (Edge A in the
diagram) to the “real” rest position, that being the
carrier’s physical end stop.This stored number is used
to drive the carrier down to the rest position before
each and every flip station action.
Calibraton is a one-time setup routine, but is also
a useful starting point when diagnosing flip
station problems.
Power OFF. Lift the cover, then push the carrier
down to its physical end stop. Push at the back of
the carrier, near the guide shaft. Do
Click Flip Station Calibration
NOT force!
. This elevates the
carrier until Edge A just clears the photo sensor, at
which point the motor stops, and the step coun t is
saved in flash memory. The motor then drives the
carrier back down to the rest position.
Card Position Adjust (Pixels): Adjusts how far
the truck drives into the flip station. Should be set so
that the card is centered in the flip arms (if it isn’t
centered, the truck may have difficulty removing the
card after the flipping action). If the card position is
incorrect, the truck can depart, leaving the card in the
flip arms,
or it may
drag the
card an
inch or two
toward the
print
station,
then jam.
Start >
Printers (or
Printers and Faxes) > Right click
Zebra P640i >
Properties > Device Settings > Control > Advanced
Utilites > Move Tr uck (to Flip Station)
Carrier Motion
Vertical motion of the carrier is detected by a single
photo sensor, activated by two tabs at the back of the
carrier molding. The carrier is positioned by counting
a specific number of motor steps from the instant
the sensor’s optical path is opened or closed by
edges A, B and C.
Flip station components
The two halves of the sensor (arrow) are
contained in cavities in the molded back wall of the
flip station. The sensor tabs are integral with the
carrier molding. Edge C is hidden by the card ejector
arm.
Flip Station Parameters in the Driver
Start > Printers (or Printers and Faxes) > Right
click Zebra P640i > Properties > Device Settings
> Printer Adjustment > Flip Station Adjust
In
1, the card should drive smoothly to rest almost
touching
the right hand edge of the flip station base
molding. It must not rebound off the edge. To move
the card further to the right, increase (make less
negative) the Card Adjust parameter, and vice versa.
Now click
Flip Test 3
with Flip
enabled.
Truck
Card
Platen
The card
should
land as 2, with a gap of between 0.04" and 0.1" (1 to
2.5 mm). The exact gap isn’t critical, but it has to be
visibly there.
Rest
Position
Adjust:
Adjusts
how far
down the
carrier
drives.
This
parameter
is the
number of
motor
steps,
more or
less,
relative to
the Edge
event at
the photo
sensor
(diagram
A
980541-001 Rev. A P640i Card Printer User Guide 53
Page 64

on preceding page). If the truck fails to pull the card
out of the flip station after the flipping action, chances
are: 1. The card position is wrong, see above, or; 2.
The carrier is not coming down all the way (repeat the
Flip Station Calibration routine in Advance Utilities,
preceding page).
Another test for this: power down the printer, then
power up, listening for the flip station reset action.
Open the main cover, then push gently down on the
carrier (at the back
, close to the guide shaft). If there is
any downward travel, increase the parameter (make it
less negative) - but don’t overdo it, because this will
increase the reset noise and potentially damage the
carrier drive.
Insertion Height Adjust : “Insertion height” is the
intermediate (non flipping) elevation to which the
card is driven for insertion into the laminator. The
Insertion Height Adjust
parameter is the number of
motor steps, more or less, relative to the Edge B event
at the photo sensor (diagram on preceding page).
Adjust the parameter if the ejector arm misses the
card. Raise the insertion height by increasing the
parameter (making it less negative), and vice versa.
Flip Station Max Height Adjust
hand to activate the flip. If it doesn’t flip, the
mechanism itself is defective, so adjusting the height
parameter will have no effect.
If you overdo the height adjustment - sending the
carrier too high - the U-shaped azimuth adjust
molding may be driven off the end of its track. This
causes the carrier to wobble as the “U” re-engages on
the way down.
The card carrier needs to move high enough to actuate
the flipping mechanism, but should not over-travel
excessively.
The Max Height Adjust
parameter is the number of
motor steps, more more or less, relative to the Edge C
event at the photo sensor (diagram on preceding
page). Increase this parameter (make it less negative)
only if there is an occasional failure to flip.
Reduce this value if the carrier hits the upper bracket
holding the guide shaft. If the flip station is not
flipping
reliably,
be sure it
is a
travel
issue
rather
than
anything
else by
opening
the
printer
cover,
then
moving
the flip
station
up by
Insertion height adjustment
54 P640i Card Printer User Guide 980541-001 Rev. A
Page 65

Techncial Note 6 - Laminator
Accurate positioning of the laminate “patch” is
important for practical and aesthetic reasons. The
patch must cover the entire image as printed by the
P640 at the time of issuance, thus protecting critical
data with a tamper-deterrent film. Additionally,
because even the smallest amount of overhang can
compromise the card’s integrity, the patch should be
symmetrically positioned on the card.
Skew and vertical offset are adjusted by screws in
the cassette pocket (7/64" hex wrench for skew,
flat blade screwdriver for vertical offset, see
diagram on next page).
Caution • Before adjusting for skew or
vertical offset, remember that there is
significant interaction between the latch
and the adjusting screws in the pocket,
see diagram on next page.
Correctly
positioned top
(front) and
bottom (back)
laminate
patches
If there is no
magnetic stripe
on the
underside, a
full width patch
should be used.
Positioning of the patch is affected by three variables:
1.
Skew (rotation)
2. Horizontal offset (left-right)
3. Vertical offset (up-down).
Latch adjust
Latch ears
Important • Always adjust the latch after
adjusting either of the screws in the pocket.
Do not adjust
Skew
adjust
Verticle offset
adjust
Laminate
cutter
Upper
cassette
Heater
compart-
Lower
cassette
Horizontal offset is a
software adjustment, see Section 5.
Skew and vertical offset are corrected by the
Transfer
guide
following mechanical adjustments. The cassette is
held in place by two ears on the cassette latch. Using a
piece of 1 mil laminate as a feeler gauge, set the front
ear close to, but not touching, the cassette. A hex head
screw (arrowed) sets front-back position of the latch.
Adjust the latch position using a 7/64" hex wrench.
980541-001 Rev. A P640i Card Printer User Guide 55
Transfer
roller
P640i dual-side laminator
Transfer toggle Must be set
to RUN (horizontal) for normal
operation. Rotate the toggle
to open the rollers for jam
Page 66

Laminate position adjustments
Making sense of the skew adjustment
Skew is caused by misalignment of the laminate
cassette relative to the left-right axis of the printer,
looking down on the printer from above. The skew
adjust screw causes the pocket to rotate rela tiv e to the
left-right axis. The vertical offset adjust screw
controls the depth of the cassette in the pocket. Note
that the front ear of the latch must be in close contact
with the cassette, without changing its position.
Reset the cassette pocket
If the pocket has been replaced, or if the laminate is
grossly misaligned. Back off the vertical offset adjust
screw, skew adjust screw, and cassette latch adjust
screws. Using three CR-80 cards [total thickness
0.090" (2.3 mm)] as a feeler gauge in the gap between
the pocket and back plate, adjust for skew and vertical
offset until the gap is an even 0.090" across the width
of the pocket.
With a cassette in the pocket, adjust the latch screw so
that the latch’s front ear is snug to the cassette, but
doesn’t shift it out of position (see page 6-1). The
pocket is now in its default position - as assembled in
production before adjustments in final test.
Turning the skew adjust screw clockwise rotates the
cassette itself clockwise, looking down on the printer.
On the face of it, that Laminate patch should worsen
the condition motion shown in diagram A. It doesn’t
do so, because the laminate patch is reversed in the
transfer process.
Laminate
patch motion
Card
motion
Transfer
roller
Upper cassette skew adjustment procedure
The following procedure assumes that the horizontal
offset has been software corrected as described in
Section 5.
1. Check the action of the cassette latch. If necessary adjust its fore-aft position so that its ears smoothly engage the cassette without nudging the cassette.
2. Print and laminate a few test cards in the usual way, noting the direction of skew. Don’t worry about vertical offset at this stage unless the laminate overhangs grossly, in which case proceed to the Vertical offset adjustment procedure, below.
56 P640i Card Printer User Guide 980541-001 Rev. A
Page 67

3. Referring to Section 2, Media Handling, unlatch
and remove the upper cassette from its pocket.
Rotate the laminate core counterclockwise,
reeling in the laminate to bring it even with the
lips of the cassette - VERY IMPORTANT! Set
the cassette aside.
4. Remove the upper transfer guide, then discard the laminate patch on the upper transfer roller. (If you don’t do this, the next patch to be applied will not reflect the skew adjustment you are about to make.)
5. Using a fibertip pen mark the skew adjust screw head for reference.
Note • One full turn of the screw de-
skews the laminate by approximately 1°,
equivalent to 0.03".
6. Using a 7/64" hex wrench turn the skew adjust
screw in ¼ turn increments as directed in the
diagram
below.
7. After each movement of th e skew adjust screw d o
the following three
actions:
a. Adjust the cassette latch screw in the same
direction, by the same amount.
After each movement of the lower cassette skew
adjust screw, perform exactly the
same three actions
described in step 7 of the upper laminator.
b. If you have not already done so, remove and
discard the laminate patch on the upper
transfer roller, close the printer cover, then
press the LAMINATE button to run out a
fresh patch from the upper cassette.
c. Print a test card and inspect for skew.
8. Re-install the cassette.
Lower cassette skew adjustment procedure
Once the front surface skew is consistently
acceptable, inspect the back surface patches of the last
few cards to pass through the laminator. Note the
direction of skew on the back surface. (Don’t worry
about vertical offset at this stage unless the laminate
overhangs grossly, in which case proceed to the
Vertical offset adjustment procedure, below.) When
flipping the cards for inspection, keep the mag stripe
(if present) toward you.
Flip the cards left to right (not front to
back)
Upper cassette vertical offset adjustment
The following procedure assumes that the horizontal
offset has been software-corrected and that skew has
been adjusted as outlined above.
1. Check the action of the cassette lat ch. If necessary adjust its fore-aft position so that its ears smoothly engage the cassette without nudging the cassette.
2. Print and laminate a few test cards in the usual way , no ting the vertical offset (front-to-back position) of the laminate patch on the front of the card.
3. Unlatch and remove the upper cassette from its pocket. Rotate the laminate core counterclockwise, reeling in the laminat e to bring it even with the lips of the cassette. Set the cassette aside.
4. Remove the upper transfer guide, then disc ard the laminate patch on the upper transfer roller . (If you don’t do this, the next patch to be applied will not reflect the vertical offset adjustment you are about to make.)
5. Using a fibertip pen mark the vertical offset adjust screw head for reference.
Correct for skew in the lower laminator using the
same procedure as the upper cassette, but note that the
“reel in” direction will be clockwise for the lower
cassette as it sits in the printer.
980541-001 Rev. A P640i Card Printer User Guide 57
Note • One full counterclockwise turn of
the screw pushes out the cassette, and
therefore the laminate patch, by
approximately 0.03" (just under 1 mm)
Page 68

6. Using a flat blade screwdriver turn the vertical
offset adjust screw in ¼ turn increments
Heater Temperatures
Temperatures measured by thermocouples in the top
and bottom laminator heater cores.
7. Re-install the cassette.
Lower cassette vertical offset adjustment
Once the front surface offset is consistently
acceptable, inspect the back surface patches of the last
few cards to pass through the laminator. Note the
offset on the back surface. When flipping the cards for
inspection, keep the mag stripe (if present) toward
you.
Flip the cards left to right (not front to
back)
Correct for vertical offset in the lower laminator using
the same procedure as in upper cassette vertical
offset adjustment.
Laminator Parameters in the Driver
Start > Printers (or Printers and Faxes) > Right click
Zebra P640i > Properties > Device Settings > Control
> Advanced Utilities > Show Sensor Data
Laminate Sensors
Reflective sensors that detect the presence of laminate
on the transfer rollers. The threshold numbers are:
Below 124 = laminate present
Above 140 = laminate absent.
The threshold numbers are not adjustable.
Caution • Accurate positioning of the
laminate sensors is essential! If they do
not detect laminate reliably,
performance of the entire printer is
compromised.
Sensor Data
Device Settings > Status > Advanced (Information).
58 P640i Card Printer User Guide 980541-001 Rev. A
is also available by this route:
Page 69

It is possible to
get a false
“good” reading
if the sensors
are too close to
the feed rollers.
Functional test of the sensors From each of the
laminators, upper and lower, remove the transfer
guide and the laminate patch, if any, beneath it. The
sensor should read high, around 250. Replace the
guide, and the sensor should read no lower than 180. If
lower than 180, move the sensor board away from the
transfer rollers, to the left, diagram below.
Heater Temperature : This is the set point
temperature desired - not the actual temperature. For
actuals, see Sensor Data, preceding page. NOTE:
Temperatures are monitored by thermocouples at the
core of the heated rollers. Surface temperatures may
differ significantly.
Caution • Do not set the temperature ABOVE
180°C, or BELOW room temperature
Line Voltage: If Auto is selected, the printer guesses
line voltage based on line frequency, assuming that
110V will be @ 60Hz , and 230 V @ 50Hz. If t his isn’ t
the case in your locality, the printer will guess wrong,
and you should set the voltage manually.
Note • Running the printer at 220V,
60Hz in Auto mode may cause premature
failure ofthe heaters. Running the printer
at 110V, 50Hz in Auto mode may cause
abnormally long heat-up time and poor
temperature control.
This setting has nothing to do with the printer power
supply. Like the laminator heaters, the power supply
can handle any voltage from 110V to 230V, so an
incorrect setting here will cause no immediatedamage.
Correcting Laminator Problems
Complete the test by running laminate ont o the rollers
(press the LAMINATE button). The sensor should
read below 20. Adjust sensor board to correct.
Caution • The sensor board must be
symmetrically positioned relative to the
transfer rollers. with its attachement
screws central in their slots.
Laminate Station Adjust
Start > Printers (or Printers and Faxes) > Right click
Zebra P640i > Properties > Device Settings > Printer
Adjustment > Laminate Station Adjust
Length Adjust (mils): This is the length of the
laminate “patch”. If the patch is too long, decrease this
number, and vice versa.
Horizontal Offset (mils): Adjusts laminate
placement on the card.
Problem
Laminate bunches up outside the cutter assembly,
having missed the feed slot. This can happen to either
upper or lower laminates. It is probably a cassette
installation problem, such as:
1. Failing to latch the cassette
2. Out-of-square scissor cut on the leading edge of the
laminate
3. Leading edge of laminate not reeled in even with
the lips of the cassette. Reference Section 2, Media
Handling.
980541-001 Rev. A P640i Card Printer User Guide 59
Page 70

Cutter feed slot
Cutter
Corrective action
Unlatch the cassette, then gently wiggle the cassette
out of its pocket. You can make this easier by cutting
the laminate above the latch. Remove all laminate
scraps. Cut the leading edge of the fresh laminate as
square as you can with scissors, then reel it in as
described in Section 2, Media Handling. Re-install
and latch the cassette.
If necessary, turn the transfer
roller toggle to separate the
transfer rollers and relieve pressure on the card.
Corrective action
Turn off the printer, then allow it to cool for about 10
minutes. Unscrew the heater assembly fastener, arrowed, then partially withdraw the assembly together
with the card. Pull the card out of the heater, inspect
the rollers for laminate scraps and other foreign
matter, then re-insta ll the assembly. Do NOT use metal
TOOLS to clean the rollers.
Even after allowing cooling time, the assembly will
be HOT, so hold it only ny its outer cover.
Important • Any time you unlatch a cassette, it’s
a good idea to check that the laminate is even with
the lips of the cassette before re-latching.
Problem
Card jammed in laminator. This can be caused by any
of the following:
1. Dings or rough edges on the card (depending on vendor, card quality can vary, even from batch to batch).
2. Either of the cutters fails to cut, so the card is stopped dead by a “tail” of laminate, now firmly held by the laminate feed roller, which can not be rotated by tugging on the laminate.
Important • All rollers in the main drive
train of the laminator (not the cassette
outfeeds) are connected by toothed belts.
If any of them fails to rotate, suspect loose
set screws on the toothed pulleys
3. Heated rollers not rotating.
4. Infeed rollers not rotating
5. Outfeed rollers not rotating.
60 P640i Card Printer User Guide 980541-001 Rev. A
Page 71

Technical Note 7 - ID/Log
ID/Log is a driver utility that builds a database of card
transactions in the printer’s host computer.
ID/Log records data encoded on the card’s magnetic
stripe, together with date, time, and the p rinter’ s serial
number. The data set can be uploaded at any time to a
central archive, thus providing a means for security
officers to validate the card by comparing it wi th
tamper-proof “real data”.
To access the
driver, follow this sequence:
Start > Printers (or Printers and Faxes) > Right click
Zebra P640i > Printing Preferences > ID/Log
ID/Log screen in the Windows printer
Time: Logs the time a which the card was sent to the
printer in the HH:MM:SS format. The 24-hour clock
is used, so 13:00 = 1:00 pm, and 05:00 = 5:00 am.
Date: Logs the date on which the card was sent to the
printer in the MM/DD/YYYY format.
Printer Serial Number: Logs the serial number of
the printer which printed the card.
Static Text: Adds to the record text in the box at
right. Enter no more than 16 characters.
IP address: Logs the IP address of the PC which
sent the card to the printer.
Magnetic Track 1, 2, 3 Data: Logs the data sent to
the printer to be encoded on the card’s magnetic
stripe.
EIN Data from Mag Track 2: Logs the Embedded
Inventory Number pre-encoded on Track 2. Note that
EIN Readback must be enabled for this action, see
Tech Note 3, Magnetic Encoder.
Application will send data with “L=xxx” TextOut
Enable Logging: When checked, logging is active.
Create New Log File Each Day: Check the File
box, then type in a directory path to a folder of your
choosing. (If a non-valid path is entered, a default path
will be created.) The file generated by
type
MMDDYYYY.log.
File: This is either a
folder into which all daily files
ID/Log is of the
will be sent (“Create New Each Day”), or a single file
that will accumulate data day after day.
Separator Character: By default the pipe character
( | ) is used to separate data, resulting in lines looking
like this:
Allows third party applications to send data to be
logged in much the same way as they would send
magnetic data.
Spooler Job Number: Logs the number which the
card print job was assigned in the Windows print
spooler.
User Name: Logs the username
of the person
submitting the card print job.
07/06/3004|10:14:05|0312040||||||||||2|jsmith|
If this is not to your liking, a different separator may
be specified.
980541-001 Rev. A P630i/P640i User Guide 61
Page 72

Technical Note 8 - Using the Windows Printer Driver
The P640i printer driver includes setup and diagnostic
tools in two distinct groups. These are Printing
Preferences and Properties.
Generally speaking, Properties screens are intended
for use only by the trained technician. This is because
they can cause unexpected results if modified without
the necessary experience. The same applies to two of
the Printing Preferences screens, Magnetic Encoding
and ID/Log.
Some of the Preferences screens the operator may be
asked to refer to and/or modify.
Operator screens
Printing Preferences - Card Setup
Printing Preferences - Image Adjustment
Printing Preferences - YMC (Color) Printing
Printing Preferences - K (Black) Panel
Technician-only screens:
Printer Properties - All screens
Printing Preferences - Magnetic Encoding
Printing Preferences - ID/Log
Orientation: Allows you to set up the fron t and back
images, independently*, for “driver license”
(landscape) or “badge” (portrait) configurations. By
checking the Rotate
image upside down.
* The following combination is not available: Front landscape, Back
box, you can also flip either
portrait.
To access the driver screens, follow this sequence:
Start > Printers (or Printers and Faxes) > Right click
Zebra P640i > Printing Preferences or Properties
Printing Preferences
Printing Preferences
Image Size: Sets the image area for both front and
back of the card (1 inch = 300 pixels).
Cards: Specifies the type of card loaded in the
hopper - typically a PVC/polyester/PVC composite
card for applications where durability is important.
Ribbon: This is the color ribbon installed in the
printer . Choice of two for most appl ications: YMCK =
3 color panels + 1 black panel, and YMCKK = 3 color
panels + 2 black panels. For secure applications a
third type of ribbon is available: YMCUvK (“Uv” is a
panel of ultraviolet responsive resin).
Front/Back: Allows you to apply color or black, or
both, to either side of the card. For example, with a 4panel YMCK ribbon the usual arrangement is YMC
(Color) on the front, K (Black) on the back. If you
check
both YMC and K on one side, this sets up a
special condition known as black extraction, page TN8-
2.
Card Setup
Printing Preferences
YMC (Color)
Printing
The P640i accepts 24-bit color images, meaning that
each of the colors (Y, M and C) is represented by 8
bits per pixel. In High Quality
24 bits are processed. In Low Quality the printer
driver transmits a smaller amount of color
information, the effect being a slight degradation of
the printed image. The advantage of low quality is
increased transmission speed, which can be helpful if
the connection is through a conventional parallel port.
With a USB connection, there will be no noticeable
difference.
Printing Preferences
, the default setting, all
Image Adjustment
Laminate: Allows you to choose whether laminate
will be applied to the front side, to both sides, or to
neither side.
62 P640i Card Printer User Gu ide 980541-001 Rev. A
Page 73

The Brightness and Contrast controls here have same
effect on the printed image as do similar controls on
typical office color printers. Click Reset to restore
default conditions.
Printing Preferences
K (Black) Panel
When the Card Setup screen (page TN8-1) is set for
YMC (Color)
and K (Black) on the same side of a card, a
process called “Black Extraction” is enabled (see inset
panel, right). The K (Black) Panel screen, below,
displays available options for Black Extraction.
Before you make any modifications to the K
(Black) Panel display take a few minutes to understand what Black Extraction does. Although quite
subtle in concept it can have a dramatic effect on
image quality and machine readability.
What is black extraction?
Black extraction has to do with the way the printer
driver handles the K (black) panel. It applies only to
surfaces of the card on which both YMC (color) and K
(black) are to be printed.
Contrast 0Brightness 50
Contrast 25Brightness 50
Contrast 50Brightness 25 Contrast 50Brightness 75
Contrast 100Brightness 50
Contrast 50Brightness 50
Contrast 75Brightness 50
Equal amounts of Y, M and C dyes, at maximum
intensity, deliver a near-black image, but one which is
not machine readable. For example, a bar code printed
from YMC (color) will be visible to the eye, but will
not be detectable by most bar code readers. The
remedy for this is to “extract the black”; in other
words to print the same bar code, using the K (black)
panel, on top of the YMC bar code. (You can also
choose to print only in K, omitting YMC from that
region.) The K (black) panel is not a dye. It is more of
a paint containing carbon black, which is highly
visible to infrared-type readers.
980541-001 Rev. A P640i Card Printer User Guide 63
Page 74

Depending on the application used to create the card
layout, elements of the design may be identified in
different ways to the printer driver. This printer driver
recognizes, and rasterizes, five types of elements: text,
lines and pixels, area fills, monochrome bitmaps, and
color bit maps:
• Text is text which is sent explicitly as such to the
printer driver.
• Lines and pixels are lines and dots (pixels) sent as
such to the printer driver.
• Area fills are color-filled geometric shapes.
• Monochrome bitmaps are 1-bit bitmaps (every
pixel either black or white).
• Color bitmaps are full color uncompressed pixel
maps.
The above elements may not always be sent to the
driver as expected. For example, a bar code may be
sent as text, a series of area fills, or a monochrome
bitmap. Results will vary by a pplication us ed to create
the card design. Another variable, again controlled by
the card layout application, is the precedence
(stacking order) of the various element types in the
event that one or more of them overlap.
Any of the above five elements may be selected for
black extraction when the ribbon is set up to apply
YMC (color) and K (black) to the same surface of the
card. In this condition, the driver generates an
extracted K image by looking for “true-black”
features in the selected element types, that is,
instances where all three YMC values are at the
maximum (full intensity). Each such true-black
instance generates a corresponding cluster of black
pixels in the extracted image, which will be printed
with the K (black) panel either on top of the YMC
image, or replacing it entirely – your choice.
Printing Preferences
Reference Technical Note 3, Magnetic Encoder
Printing Preferences
Reference Technical Note 7, ID/Log
Magnetic Encoding
ID/Log
64 P640i Card Printer User Gu ide 980541-001 Rev. A
Page 75

Printer Properties
Navigate to Properties by following this sequence:
Start > Printers (or Printers and Faxes) > Right click
Zebra P640i > Properties
Most of the tabs on the Properties screen (General,
Sharing, etc.) are of the “set and forget” variety, page
TN8-8. We start here with
for all driver-controlled adjustments and displays.
Caution • Some of the sub menus under
Device Settings are specific to the Print
station, Mag encoder, and Laminator.
Refer to the relevant Tech Notes section.
Device Settings, the location
Start > Printers (or Printers and Faxes) > Right click
Zebra P640i > Properties > Device Settings > Status
Print Jobs
The number of the print job that is currently being
processed. Next
not being driven by a PC. If the printer is bein g driven
by a PC, the PC sets the job number to be the same as
the PC-assigned spooler job number before sending to
the printer.
is meaningful only when the printer is
Device Settings
Start > Printers (or Printers and Faxes) > Right click
Status
Zebra P640i > Properties > Device Settings > Status
Navigate to Properties by following this sequence:
Start > Printers (or Printers and Faxes) > Right click
Zebra P640i > Properties
Most of the tabs on the Properties screen (General,
Sharing, etc.) are of the “set and forget” variety, page
TN8-8. We start here with
Device Settings, the location
for all driver-controlled adjustments and displays.
Error Conditions: Normally, this displays “No
Error”.
Images Left: The exact number of YMCK sets
remaining on the color ribbon, as reported by the color
ribbon core.
Enabled Features:
Uv Printing is enabled in manufacture, or by field
technician.
ID/Code
ID/Key
displays “Yes” once the printer has locked itself to the
key, not just because it has the key installed.
(the user password) is enabled by the user.
requires installation of a physical key. This
Advanced: Click the Advanced button to display
Sensor Data, below.
(Another way to display this screen is through this
sequence, see page TN8-5:
Start > Printers (or Printers
and Faxes) > Right click Zebra P640i > Properties >
Device Settings > Control > Advanced Utilities > Show
Sensor Data)
Caution • Some of the sub menus under
Device Settings are specific to the Print
station, Mag encoder, and Laminator.
Refer to the relevant Tech Notes section.
Device Settings
980541-001 Rev. A P640i Card Printer User Guide 65
Status
Page 76

Sensor Data
Ribbon sensors: see Tech Note TN4 Print
Station
Laminate sensors: see Tech Note TN6
Laminator
Card presence sensor: see Tech Note TN2
Card Transport
Run Clean Cycle: Decontaminates the card
cleaning roller by activating t he cleaning cassette. One
clean cycle per click.
Clear Error: This clears error reporting on the screen
(but note that the underlying cause of the error may
still be present).
Reprint Last Card: This reprints the last card
printed, as many times as specified in the Copies
box.
Zero Buffer Count: Click Receive or Print as
desired to set the related buffer to zero (if no job is in
process, the buffer values will already be zero).
Start > Printers (or Printers and Faxes) > Right click
Zebra P640i > Properties > Device Settings > Control
> Advanced Utilities
Printhead temperature: see Tech Note TN4
Print Station
AC frequency, Assumed AC voltage: see
Tech Note TN6 Laminator (Laminate Station
Adjust)
Temperatures: see page TN8-5
Logic states : see page TN8-5
Device Settings
Start > Printers (or Printers and Faxes) > Right click
Control
Zebra P640i > Properties > Device Settings > Control
These buttons
mimic the front
panel buttons
Prints a data summary card, below,
generated by the
driver (this is not the
test card printed
Flip Test 1: see Tech Notes TN5 Flip Station
Flip Test 2: see Tech Notes TN5 Flip Station
Flip Test 3: see Tech Notes TN5 Flip Station
Eject Card: see Tech Notes TN5 Flip Station
Flip/Pause: see Tech Notes TN5 Flip Station
Move Truck: see Tech Notes TN2 Card Transport
Mag Position Adjust: see Tech Notes TN3
Magnetic Encoder
Mag Amplitude Adjust: see T ech Notes TN3
Magnetic Encoder
Flip Station Calibration: see Tech Notes TN5 Flip
Station
Show Sensor Data: Click to display Sensor Data,
below
Also available through the Status screen (Device
Settings > Status >
Advanced )
66 P640i Card Printer User Gu ide 980541-001 Rev. A
Page 77

Sensor Data
Ribbon Panel Detect: The current reading of the
color ribbon sensor.
Back to Advanced Utilites
Start > Printers (or Printers and Faxes) > Right click
Zebra P640i > Properties > Device Setting s > Con trol
> Advanced Utilities
Panel Threshold : The current value of the
detection threshold for the color ribbon. Above this
value is termed “black”, below this value is termed
“not black”.
Ribbon Encoder Count: The number of encoder
pulses counted in one complete cycle of the color
ribbon currently installed in the printer.
Laminate Sensors: Reflective sensors that detect
the presence of laminate on the transfer rollers:
below threshold = laminate present, above threshold
= laminate absent.
Card Presence Sensor: The reflective sensor to
the right of the card hopper: High = no card, Low =
card present.
Printhead Voltage: Should be about 24V.
AC Frequency: 50 or 60 Hz
Sensor Data
Assumed AC Voltage: 110V assumed for 60 Hz.
If frequency and voltage are not correct, see
Laminate Station Adjust, TN6-5.
Printhead Temperature: Temperature ceiling
70°C (above that temperature, printing is stopped
until the head cools).
Controller Board Temperature: Should be
about 5° above ambient.
Heater Temperatures: Temperatures at the top
and bottom laminate heater cores.
Logic States: Summarizes all two-state interlocks
and photosensors - a very useful diagnostic tool.
Mag Position Adjust: see Tech Notes TN3
Magnetic Encoder
Mag Amplitude Adjust: see Tech Notes TN3
Magnetic Encoder
Flip Station Calibration: see Tech Notes TN5 Flip
Station
Update Backup Config
Most of the parameters affecting operation of the
printer, e.g., laminate station adjustments, are set up
using the printer driver, and are then saved in the
printer’s flash memory as “current configuration”.
The original factory configuration also resides in a
separate “backup” memory, allowing you to recover
the as-shipped settings. Update Backup Config
instructs the printer to replace the factory
configuration with the current configuration, but DO
NOT DO THIS CASUALLY
Restore in Windows XP, you can re-install the backup
config by pressing PRINT, RIBBON and LAMINA TE
buttons at the same time.
Upgrade Firmware: Upgrades printer’s flash
memory with replacement printer firmware
downloadable from the Zebra website.
Send Features File: The “features file” is special
software used to enable/disable UV (ultraviole t)
printing, clear passwords, and other items of a
security-sensitive nature. Contact Zebra support for
more information.
Password Protection: Not the same as ID/Code.
Password Protection blocks access to various low
level printer adjustment screens (including this one).
Check Use Password
choice.
. On the same lines as System
, then enter a password of your
980541-001 Rev. A P640i Card Printer User Guide 67
Page 78

Set ID/Code: Sends an ID/Code (password of your
choice) to the printer , synchro nizing th e driver-printer
ID/Code. This is a security lock out, linking a specific
printer to a specific computer. In other words, it
prevents use of the printer with a PC not having the
same ID/Code.
Number of Times to Retry
Determines how many retries the driver will execute
in the event of a communications failure. The default
is 3 retries. A higher number may be desirable if
“Communications Failure” messages occur
frequently.
Disable Printer’s Print Button
In regular on-line use, the PRINT button reprints the
last image downloaded from the computer to the
printer’s buffer memory. If Disable is checked, the
PRINT button has no effect, except after power
cycling (when power is restored, but only until the
first print job is received from the computer, the
printer will print a checkerboard test card each time
the PRINT button is pressed).
Disable Printer’s Other Buttons
If Disable is checked, the RIBBON and LAMINATE
buttons have no effect after the first downloa ded job
from the computer.
Status Polling Frequency
Determines how often the PC polls the printer for
status:
•Normal
Polls the printer for errors for as long as it is busy
printing cards.
• Reduced
printer for errors, sends a print job, polls twice
more, then disconnects. This allows computers to
connect to the printer and print a card while the
previous card is printing, desirable in a network
environment.
•None
option.
(Default mode for Parallel and USB).
(Default mode for Ethernet). Polls the
No error polling. Not a recommended
Device Settings
Start > Printers (or Printers and Faxes) > Right click
Zebra P640i > Properties > Device Settings > Printer
Adjustment
Print Station Adjust: see Tech Notes TN4 Print
Station
Laminate Station Adjust: see Tech Notes TN6
Laminator
Flip Station Adjust: see Tech Notes TN5 Flip
Station
Pick Position Adjust (Pixels): see Tech Notes
TN2 Card Transport
Clean Frequency: see T e ch Notes TN2 Card
Transport
Advanced Adjust: see Tech Notes TN3 Magnetic
Encoder
Printer Adjustment
68 P640i Card Printer User Gu ide 980541-001 Rev. A
Page 79

Device Settings
Color Calibration
Printer Properties
Color Management
Start > Printers (or Printers and Faxes) > Right click
Zebra P640i > Properties > Device Settings > Color
Calibration
See Tech Notes TN4 Print Station.
Start > Printers (or Printers and Faxes) > Right click
Zebra P640i > Properties > Color Management
See Te ch Notes TN1 General Information
Printer Properties
Start > Printers (or Printers and Faxes) > Right click
General
Zebra P640i > Properties > General
See Tech Notes TN1 General Information.
Start > Printers (or Printers and Faxes) > Right click
Printer Properties
Sharing
Zebra P640i > Properties > Sharing
See Te ch Notes TN1 General Information
980541-001 Rev. A P640i Card Printer User Guide 69
Page 80

Printer Properties
Security
Printer Properties
Advanced
Start > Printers (or Printers and Faxes) > Right click
Zebra P640i > Properties > Security
See Tech Notes TN1 General Information
Start > Printers (or Printers and Faxes) > Right click
Zebra P640i > Properties > Advanced
See Tech Notes TN1 General Information
Printer Properties
Start > Printers (or Printers and Faxes) > Right click
Ports
Zebra P640i > Properties > Ports
See Tech Notes TN1 General Information
IDPrint Lite
IDPrint Lite is a simple utility designed for funct ional
testing only. It is not intended for ID card production.
IDPrint Lite allows you to send bitmap (
the ID card printer driver. Unlike most applications
used for page composing, such as Microsoft Word or
Adobe PageMaker, IDPrint Lite can send up to four
separate image files
to the printer in a single transaction,
two for the front of the card, two for the back.IDPrint
Lite has no page composing capability. It is a means
only of delivering to the printer driver previously
composed image files, samples of which are on the
driver CD, see below (these image files also come
with the P640i driver when downloaded from the
Web).
Test for alignment of lamin-Test for ribbon wrinkling
ate, If you wish to use your own images instead of the
samples, compose them using any application that can
save them in .bmp format. The standard image size for
the P640i is
952 x 578 pixels.
IDPrint Lite can also be used for mag stripe encoding
in two formats,
Standardization) and
ISO (International Organization for
AAMVA (American Association
of Motor Vehicle Administrators).
.bmp) files to
70 P640i Card Printer User Gu ide 980541-001 Rev. A
Page 81

Using IDPrint Lite
Assuming IDPrint Lite is stored in its default location,
launch it by going to the Windows Start menu, then
All Programs, then to Zebra T echnolog ies followed by
ID Print Lite.
Demo badge #1
(portrait format)
EuroTravel_Front.bmp
EuroTravel_Back.bmp
Demo driver license
(landscape format)
Driver_License_Front.bmp
Driver_License_Back.bmp
Print test #1
Portraits.bmp
Test for realistic skin tones,
YMC registration in small text,
etc.
Demo badge #2
(portrait format)
Airport_Front.bmp
Airport_Back.bmp
Demo exhibitor badge
(landscape format)
Flower_Show_Front.bmp
Flower_Show_Back.bmp
Print test #2
Graytone.bmp
Test for unif ormity, blown
pixels, card flatness, etc.
Typically, Image 1 is for the front of the card, and
Image 2 the back.
If a five panel ribbon is used, such as YMCKK or
YMCUvK, Image 2 is typically printed on the front of
the card with the K or Uv panel following C, and
Image 3 is printed on the back of the card with the
final K panel.
Image 4 is not used at this time.
To assign a file to Image 1, click the little square box
to the right of “Image 1”, then click the dotted button
at right of the Image 1 window. The Select Image File
screen (below) displays the samp le files inclu ded with
IDPrint Lite. Highlight the file you want to be Image
1, then click Open. If you wish to use a file of your
own instead of the samples, navigate to the lo cation in
which you saved the file (click and hold the down
arrow to display your computer’s various file
locations).
Print test #3
Color_Gradients.bmp
Test for alignment of laminate,
light tone print quality
Print test #4
Wedge_1.bmp
Test for ribbon wrinkling
How Images 1, 2 and 3 are applied to the front and/or
back of the card, and the way in which they are
Print test #5
Wedge_2.bmp
Test for ribbon wrinkling
980541-001 Rev. A P640i Card Printer User Guide 71
processed, is determined by two selections that
made in the Printing Preferences Card Setup screen: 1.
must be
Page 82

The type of color ribbon installed (YMCK, YMCKK,
or YMCUvK) and; 2. The assignment of YMC
(Color), Uv (ultraviolet) and K (Black) to front and
back.
T o bring up the
Start > Printers (or Printers and Faxes) > Right click
Card Setup screen follow this sequence:
Zebra P640 > Printing Preferences > Card Setup
Card Setup
Ribbons, image numbers and front/back assignments
YMCK
RIBBON
YMC on front,
K on back
YMC and K
(black
extracted) on
front
YMC and K
(black
extracted) on
both front and
back
YMCKK
RIBBON
YMC and K
(black
extracted) on
front, K on
back
Front
Back £
Front Image 1
Back £ £ ¢
Front
Back
Front
Back £
YMC
(Color)
5
Image 1 £ ¢
5
Image 1
5
Image 2
5
Image 1
K (Black) uV
5
Image 2 ¢
5
¢
5
¢
5
¢
5
¢
5
Image 2 ¢
YMCUvK
RIBBON
5
YMC and K
(black
extracted) on
front, K on
back
Front
Back £
Image 1 £
5
Image 3 ¢
5
Image 2
IDPrint Lite can also be used to write to the magnetic
stripe, if applicable. Before entering data in the
“Track” windows, you must first select the format,
AAMVA or ISO, in the
Magnetic Encoding screen found
in Printing Preferences.
Note: The Save function (disk symbol) on the IDPrint
Lite tool bar applies only to magnetic stripe data, not
to the image assignments. Image assignments are
stored automatically when the IDPrint Lite program is
closed.
72 P640i Card Printer User Gu ide 980541-001 Rev. A
Page 83

Technical Note 9 - Installing the Windows Printer Driver
First things first
For any of the operations described in this section you
need the P640i Driver Software. This is on the Driver
CD. It may also be downloaded from the Zebra
Support Web page.
Driver CD
If you have the CD, place it in the computer’s CDROM drive. This will display the Zebra Printer Setup
screen. Follow the screen instructions to Un install or
Install, referring where necessary to the additional
information in this section.
Download
Downloaded software comes to you as a selfexecuting application, available from zebracard.com/
atlantek. Before you download, make a note of the fi le
name, and where it will be saved on the computer’s
hard drive:
1. Click Download, then choose somewhere to store the file temporarily (the Desktop is a convenient location).
4. Navigate to c:\zebra\driver, or to the alternate location you specified, then double click setup.exe. This displays the Zebra Printer Setup screen. You are now at the same stage as if you had inserted the Driver CD.
Important • If the computer you are
working on has ever run a Zebra Atlantek
printer, unin stal l a ll previous versions of the
driver before installing the new one. You can
NOT uninstall a printer driver using the
Add/Re-move Programs procedure in
Windows, or by deleting a printer icon from
the list of Printers and Faxes.
Uninstalling the printer driver
Go to the Zebra Printer Setup screen from the Driver
CD or from the downloaded software, see above.
2. Navigate to that location, then launch the Printer Installer by double clicking the downloaded file.
3. Click OK. This brings up the WinZip SelfExtractor, which will put the unzipped
(decompressed) files in their default location
(c:\zebra\driver), unless you choose a different
location. Click Unzip. The Self-Extractor will
then announce that it has successfully unzipped a
number of files.
1. Click Uninstall Printers and Drivers.
2. In the next window to appear, click Uninstall
Printer Drivers. Complete the process by restarting the computer.
Important • Windows 2000 and Windows
XP install printer drivers in different ways.
Although the overall process is similar, the
dialog boxes are not identical. The screen
shots in this section are for Windows XP.
Windows file missing
Caution • If the computer you are
configuring for a USB connection to the
P640i has at some time run an Eltron
C-Series printer, a Windows file
necessary for the P640i installation will
be missing.
Recover the missing Windows file as follows:
1. Navigate to c:\windows\inf (Windows XP) or c:\winnt\inf (Windows 2000).
2. Find the file named usbprint.in, then rename it to usbprint.inf.
980541-001 Rev. A P640i Card Printer User Guide 73
Page 84

3. If the computer continues to display “new
hardware found” messages, disable them by
choosing Install the software automatically
, then
waiting for Windows to respond with Cannot
install this hardware.
4. Select Don’t prompt me again to install this hardware, then click Finish.
Installing the printer driver
Note • Only USB and Parallel versions
are described here. The optional internal
Ethernet port is configured in a different
way, and may require technician help,
see page TN9-6. For more information,
contact Zebra tech support.
This section outlines the three ways of installing the
P640i driver: 1) Direct from the Zebra Printer Setup
screen (page TN9-3, which comes up automatically
from the Driver CD, or from downloaded software,
see Download on this page; 2) Using the Add a Printer
procedure (page TN9-5), and; 3) Using the New
Hardware Found Wizard procedure (page TN9-2). No
matter which way you select, or allow Windows to
select for you, have the Driver CD or downloaded
software on hand before you start.
h
g
u
d
o
r
n
h
u
t
o
n
F
o
e
i
t
r
a
a
l
l
a
t
d
r
s
a
n
I
H
g
w
e
e
B
N
e
r
w
e
h
s
n
i
1. Select Install from a list or specific location, then click Next.
Note • If you are using the parallel port to
connect to your computer, make sure the
computer is set to ECP mode before
installing the driver. To do this you need to
check the computer’s BIOS. For help, refer
to your computer manual or consult your
technician. You do
mode if you are using the
not need to select ECP
USB port.
New Hardware Found Wizard
Note • The New Hardware Found message
appears only if the P640i printer has never
been installed on the computer to which it is
now connected.
If you plan to connect the P640i Printer to the
computer’s parallel port, shut down the computer, then
make the connection. USB, which can be connected
“hot”, has a faster data transfer rate, and is the
preferred port.
Power up the printer and start the computer. If you do
not see the following screen, install the driver from
Zebra’s Printer Setup screen, or use the Add a Printer
procedure .
2. If you have the Driver CD, place it in the CDROM drive. If you are working instead with
downloaded software (or if you think the
download may be more recent), check Include
this location in the search, then type in (or browse
to) the download’s default location,
c:\zebra\driver, unless you sent the unzipped files
somewhere else. Click Next.
3. Following Step 2 the computer searches for a file named Atlprint.inf. If the search is successful, the following screen appears.
This screen warns that installation of the driver
software may destabilize your system. The P640i
driver software has been exhaustively tested in many
installations, and has caused no problems of which
Zebra is aware.
4. Click Continue Anyway, then Accept the License
Agreement. If you are using a USB connection,
the Browse Printers screen, right, displays the
USB-connected printers. Highlight the pr inter
serial number you are working on (even if there is
only one listed), then click OK.
74 P640i Card Printer User Guide 980541-001 Rev. A
Page 85

5. Click OK to accept the timeout defaults on whichever Configure screen appears, USB or Parallel.
Note • Compatibility Mode shold be
enabled only if the P640i printer is
connected to the computer’s parallel port
through a third party “dongle” (a hardware
security device).
Install using Zebra’ s Printer Setup screen
1. Referring to “First things first”, page TN9-1, place the Driver CD in the CD-ROM drive, or double-click setup.exe in the file folder containing the unzipped downloaded driver.
e
h
t
h
g
n
u
e
o
e
r
r
h
c
t
S
n
p
o
i
t
a
e
l
l
S
a
t
r
s
e
t
n
I
n
G
i
r
E
P
B
2. This is the Zebra Printer Setup screen. From here
you can install or uninstall the print driver on yo ur
computer. Additionally , yo u can instal l IDPrint
Lite, a simple card printing application for
functional testing. The two View/Print buttons
provide information for the technician.
e
u
r
t
e
h
S
N
I
6. Click Finish to complete the installation.
h
g
u
d
o
r
n
h
u
t
o
n
F
o
e
i
t
r
a
a
l
l
a
t
d
r
s
a
n
I
H
w
N
e
E
N
e
r
w
e
h
S
D
3. Click Install a Printer and Driver. This brings up the Zebra Add Printer Port screen.
4. Unless you are conecting to a network through the
optional Ethernet port, select either Parallel Port
or USB Port (depending on your choice of cable
connection between computer and printer), then
click Next. For information on the Ethernet
option, see page TN9-6. Contact Zebra support if
necessary.
Parallel Port: If you selected Parallel Port, the next
screen displays Zebra Enhanced LPT1. This is the
default (recommended) port. Click OK to accept.
Important • Zebra Enhanced LPT1 is
called PHID1 in the Add Printer Wizard
980541-001 Rev. A P640i Card Printer User Guide 75
Page 86

Important • Compatibility Mode should
be enabled only if the P640i printer is
connected to the computer’s parallel port
through a third party “dongle” (a
hardware security device)
Note • PHID1 is the alias for “Zebra
Enhanced LPT1”.
Click OK to accept the timeout defaults on the
Configure USB Port screen.
.Make a note of the port designation. If you OK the
above screen, the Add Printer Wizard will complete
the installation semi-automatically, see Step 6 and
following.
Important • From this point on, the
screens for Parallel and USB are similar,
the only difference being the port
description.
Only USB screens are shown.
Make a note of the port designation. If you OK the
above screen, the Add Printer Wi zard will comple te
the installation semi-automatically.
USB Port: If you selected USB Port, the Browse
Printers screen displays the USB-connected printers.
Highlight the printer serial number you are working
on (even if there is only one listed), then click OK.
5. On the next screen select the default, Local printer, with the “Auto Plug and Play” box unchecked, then click Next.
6. “Local printer” is the default selection.Click Next.
Important • Compatibility Mode should
be enabled only if the P640i printer is
connected to the computer’s parallel port
through a third party “dongle” (a
hardware security device)
The P640i is always a Local Printer even if it is
connected by Ethernet to a network of several
computers. In such an installation the P640i
printer driver would be separately installed on each
of the connected computers, so the P640i would
not be a network printer as defined by Microsoft
76 P640i Card Printer User Guide 980541-001 Rev. A
Page 87

7. On the following screen click on the drop down arrow to view the options. Select (typically) ATLUSB001 for USB or PHID1 for Parallel, then click Next.
8. The next screen is a list of all printer drivers that
came with the Windows operating system. The
P640i is not one of them, so click Have Disk
(even if you will be working with a downloaded
driver instead of a disk). This tells the system it
has to look elsewhere for the driver.
After selecting the P640i go to Step 11.
10. If you don’t have the CD, Browse to the location (folder) containing the unzipped downloaded driver files (default location is c:\zebra\driver). If necessary, double click the file named AtlPrint.inf.
9. On the next screen press the down arrow, select
the CD-ROM drive containing the Driver CD,
then press OK. This brings up a screen that offers
another choice of printers, this time only from
Zebra. Select Zebra Technologies
and Zebra
P640i. If you don’t have the CD, go to Step 10.
11. On the following screen type in a name for the
printer. This can be anything you like, such as
“Printer A”. Typically, check No, don’t make this
the default printer. If asked, you do
share the printer.
NOT want to
12. If you select Yes, Print Test Page, the printer will do just that when the installation is completed, and the various media are loaded. The test page is a clipping from the top left corner of the standard Microsoft Printer Driver report.
980541-001 Rev. A P640i Card Printer User Guide 77
Page 88

13. Click Next to bring up the Completing the Add Printer Wizard screen.
Install using “Add a Printer”
The third way to install the printer driver is through
the standard Windows Add-a-Printer proc edure. Go to
the Windows Start menu, select Printers or Printers
and Faxes, then click Add a Printer. Click Next on the
welcome screen, and you are at the same stage as
adding a parallel port or USB port..
From this point on the only difference relative to the
Zebra Printer Setup is that in Add a Printer you now
have to select a port. In the Printer Setup procedure,
port configuration is the first thing you do.
14. The next screen warns that installation of the
driver software may destabilize your system. The
P640i driver software has been exhaustively
tested in many installations, and has caused no
problems of which Zebra is aware. Click
Continue Anyway to complete the printer driver
installation.
e
h
t
e
h
r
g
e
u
h
o
r
S
h
t
D
N
n
E
o
i
t
p
a
u
l
l
t
a
e
t
S
s
r
n
I
e
t
n
i
r
P
h
g
u
o
r
h
t
r
e
n
t
o
n
i
i
t
r
a
l
l
a
a
t
-
s
d
n
d
I
A
G
E
B
e
r
P
-
e
h
S
N
I
Select Parallel port LPT1 or USB port USB001. You
do not have to use these default numbers, but note that
the Parallel port number relates to a specific physical
port (USB does not). Note that you are not offered
here the Zebra PHID1 parallel or ATLUSB001 ports
as you were previously. These are custom port
designations that will be made automatically as you
proceed.
78 P640i Card Printer User Guide 980541-001 Rev. A
Page 89

Firewall issues
Firewalls restrict data transferred over the network
only to those items specifically approved by the
network administrator. This can have the effect of
making a network connected printer such as the Ze bra
P640i unavailable to network users.
If a personal firewall is installed on the PC you are
using to set up the P640i Ethernet option:
1. Probing for the printer will fail if the firewall does not allow broadcast UDP (User Datagram Protocol) requests.
2. Probing for the printer will fail if the firewall does not accept responses from UDP probes (often because the firewall does not properly register the outgoing UDP port as valid for response traffic).
2. Using either downloaded software or the provided CD, display the Zebra printer setup screen, then click Install a Printer and Driver:
3. Probing for the printer will fail if the firewall disallows packets destined for UDP port 9099.
4. Printing and printer communications wi ll fa il if the firewall disallows packets destined for TCP (Transmission Control Protocol) port 9100.
The above caveats apply equally to a firewall installe d
in a network router, the difference being that such a
firewall affects ALL traffic across it, not just traf fic to
and from a lone PC.
If probing fails, you could in theory enter manually
the IP address for the printer in the appropriate driver
setup screen. However, because the IP address is not
known until the printer is configured, this is a Catch
22 situation.
Configuring the Ethernet option
Installing any device via Ethernet can be challenging,
even to the experienced technician. There is no
universal formula for success. If you do not achieve
satisfactory results after following the directions gi ven
here, contact Zebra support for further advice.
Hardware setup
Make sure the computer on which you are installing
the P640i is connected to the network.
3. Select Ethernet (Internal), then click Next.
4. Click Browse, and allow the computer to search for the printer’s default IP address.
Switch on the printer, then test for functionality by
printing a test card (press the PRINT button).
Connect the Ethernet port (RJ45 receptacle) on the
P640i printer to the network through a hub, switch or
router. Use only a pass-through cable (also known as
straight-through).
Software setup
1. Obtain from your network administrator the following three sets of numbers: Static IP address, Netmask (a.k.a. Subnet mask), Gateway (optional).
980541-001 Rev. A P640i Card Printer User Guide 79
5. Note the serial number of the P640i printer you are installing, then look for that number on the Browse screen (which may list more than one printer). Click that number to highlight it, then click OK.
Page 90

6. When the Configure Ethernet Port screen reappears, click Configure Printer.
8. Check the Static IP address reported on the Configure Ethernet Port screen. If correct, click OK. If not, click Configure Printer again to repeat the process.
Note • The IP address shown below is for
illustration only.
7. Leave DHCP set to OFF. Type in the IP address, Netmask and Gateway codes provided by your network administrator, then click OK.
9. This screen reminds you to select the correct port when it is asked for by the Printer Wizard.
10. From this point on the Add Printer Wizard will complete the installation semi-automatically. Check each screen to be sure the checked items are correct before moving on to the next.
11. Select Local printer.
80 P640i Card Printer User Guide 980541-001 Rev. A
Page 91

The P640i is always a local printer even if it is
connected by Ethernet to a network of several
computers. In such an installation the P640i printer
driver would be
separately installed on each of the
connected computers, so the P640i would not be a
“network printer” as defined by Microsoft.
12. Click the drop down arrow to view the port options, then select , then select (typically) ENET001.
14. On the following screen type in a name for the printer. This can be anything you like, such as “Printer A”. Typically, check No, don’t make this the default printer.
15. Typically, you do NOT want to share the printer.
16. You can print a test page if y ou wish.
13. Select Zebra Technologies
and P640i then click
Next.
980541-001 Rev. A P640i Card Printer User Guide 81
Page 92

17. Click Next to bring up the Completing the Add Printer Wizard screen.
18. The next screen warns that installation of the
driver software may destabilize your system. The
P640i driver software has been exhaustively
tested in many installations, and has caused no
problems of which Zebra is aware. Click
Continue Anyway to complete the printer driver
installation.
19. The Ethernet port is now configured. If the printer
does not function as expected, refer to page 9-1.
Uninstall, then reinstall the printer driver using
the Zebra Printer Setup screen. You can NOT
uninstall the driver by deleting its icon from the
list of Printers and Faxes, or by using the Add/
Remove Programs procedure in Windows. If the
second attempt at re-configuration is
unsuccessful, please contact your reseller for
technical support.
82 P640i Card Printer User Guide 980541-001 Rev. A
Page 93

Technical Note 10 - Printer Pooling
Important • n the P640i, many of the
configuration variables are stored in the
printer itself, unlike the typical printer as
defined by Microsoft. All pooled P640i
printers must be set up similarly.
Set up the Printers individually
For illustration, we will establish a pool of three
printers. Install and setup the printers as outlined in
T ech Note 9. The printers can have any names of your
choosing: here we will name them Zebra P640i 1,
Zebra P640i 2, Zebra P640i 3, and we will assume
they are attached to ports ATLUSB001, A TLUSB002,
ATLUSB003, respectively.
In Printers and Faxes, there should now be a printer
called Pool, or whatever you named it.
11. Right click on Pool
12. Click the Ports
13. Check the Enable Printer Pooling
14. In the list of ports, select the other ports that have printers connected to them (remember that only one port was selected on the initial install). For this illustration, check the ATLUSB002 and ATLUSB003 ports, then click OK.
The setup now is three printers (Zebra P640i 1, Zebra
P640i 2, and Zebra P640i 3), and one “pool”, which is
all of them.
, then click Properties.
tab.
box.
Using the printer pool
Before proceeding to pool the printers, test them
individually, and be sure they are configured
similarly. Specifically, check the following:
• Ribbon panel configuration (ribbon type, and
what prints on which side of the card)
• Mag encoding configuration
• Black extraction configuration (if applicable)
Create the pool
1. Go to Start > Printers and Faxes > Add a Printer
2. Click Next
screen.
3. Select Local Printer
Automatically Detect My Plug and Play Printer
unchecked, then click Next
4. Select Use the following port
that the first printer is on. In th is illustration, this
will be ATLU SB001
5. In the printer list, choose Zebra Technologies
the manufacturer, then choose (for this
illustration) Zebra P640i
on the Add Printer Wizard welcome
. Make sure that
.
, and choose the port
.
. Click Next.
as
Send print jobs to the pool, not to an individual
printer. When the first printer has taken as many jobs
as it can handle (that being two jobs - one to be printed
immediately, the other waiting), the following jobs
“spill over“ to the second printer, and then to the third
printer.
Notice that if you are only printing two jobs, they
would both go to the first printer. Pooling is a spillover methodology. It does not balance printer usage.
Once the pool has been set up, maintenance and
configuration changes should be done through the
menus for each individual printer (e.g., Zebra P640i
1), not through the pool (which can produce
undesirable results).
is
Note • The effect of any maintenance or
changes can (and should) be tested by
sending print jobs separately to each
printer, not to the pool.
6. On the next screen, choose Keep Existing Driver
then click Next
7. Choose something meaningful for the printer
name -Pool, for example. Decide whether or not
this is to be the default printer, then click Next
8. Decide whether or not the pool is to be shared,
then click Next
networked computers will be able to send jobs to
the pool.)
9. Choose no test page, then click Next
10. Click Finish
980541-001 Rev. A P640i Card Printer User Guide 83
.
. (“Shared” means that other
.
.
,
.
 Loading...