


Workstation
Connect
Administrator’s Guide
MN-004291-06EN Rev. A

ZEBRA and the stylized Zebra head are trademarks of Zebra Technologies Corporation, registered in
many jurisdictions worldwide. All other trademarks are the property of their respective owners.
© 2022 Zebra Technologies Corporation and/or its affiliates. All rights reserved.
Information in this document is subject to change without notice. The software described in this document
is furnished under a license agreement or nondisclosure agreement. The software may be used or copied
only in accordance with the terms of those agreements.
For further information regarding legal and proprietary statements, please go to:
SOFTWARE:zebra.com/linkoslegal
COPYRIGHTS:zebra.com/copyright
WARRANTY:zebra.com/warranty
END USER LICENSE AGREEMENT: zebra.com/eula
Terms of Use
Proprietary Statement
This manual contains proprietary information of Zebra Technologies Corporation and its subsidiaries
(“Zebra Technologies”). It is intended solely for the information and use of parties operating and
maintaining the equipment described herein. Such proprietary information may not be used, reproduced,
or disclosed to any other parties for any other purpose without the express, written permission of Zebra
Technologies.
Product Improvements
Continuous improvement of products is a policy of Zebra Technologies. All specifications and designs are
subject to change without notice.
Liability Disclaimer
Zebra Technologies takes steps to ensure that its published Engineering specifications and manuals are
correct; however, errors do occur. Zebra Technologies reserves the right to correct any such errors and
disclaims liability resulting therefrom.
Limitation of Liability
In no event shall Zebra Technologies or anyone else involved in the creation, production, or delivery of the
accompanying product (including hardware and software) be liable for any damages whatsoever
(including, without limitation, consequential damages including loss of business profits, business
interruption, or loss of business information) arising out of the use of, the results of use of, or inability to
use such product, even if Zebra Technologies has been advised of the possibility of such damages. Some
jurisdictions do not allow the exclusion or limitation of incidental or consequential damages, so the above
limitation or exclusion may not apply to you.
i

About This Document
Introduction
This guide provides information about developing applications for Zebra Workstation Connect.
IMPORTANT: If you have a problem with your equipment, contact Zebra Global Customer Support for
your region. Contact information is available at: zebra.com/support
Configurations
This guide covers the following configurations:
.
1

About This Document
Configuration Description Device Compatibility
CRD-EC5X-1SWS-01 Workstation Docking Cradle Kit with Standard Cup,
HDMI, Ethernet, and multiple USB Ports.
Included in kit:
• Cradle
• (CRD-EC5X-1SWS-02),
• Power Supply
(i.e. PWRBGA12V50W0WW)
• DC Cable
(i.e. CBL-DC-388A1-01)
Country specific AC line cord sold separately.
CRD-TC5X-1SWS-01 Workstation Docking Cradle Kit with Standard Cup,
HDMI, Ethernet, and multiple USB Ports.
Included in kit:
• Cradle
(CRD-TC5X-1SWS1-01),
• Power Supply
(i.e. PWRBGA12V50W0WW)
• DC Cable
(i.e. CBL-DC-388A1-01)
Country specific AC line cord sold
separately.
CRD-ET5X-1SWS-01 Workstation Docking Cradle Kit with Standard Cup,
HDMI, Ethernet, and multiple USB Ports.
Included in kit:
• Cradle with Rugged I/O Adaptor
(CRD-ET5X-1SCOM2R)
• Cradle
(CRD-ET5X-1SCOM1)
• Power Supply
(i.e. PWRBGA12V50W0WW)
• DC Cable
(i.e. CBL-DC-388A1-01)
Country specific AC line cord sold
separately.
EC50 and EC55 Mobile
Computers
TC52, TC52x, TC57, TC57x,
TC52ax, TC52x-HC and
TC52ax-HC Mobile
Computers
ET56 Mobile Computers
Supported Peripherals
Peripherals supported by the Zebra Workstation Cradle include:
• External touch and non-touch HDMI monitor
• USB-A Keyboard
• USB-A Mouse
• USB-A Headsets and Headphones
• Zebra External Scanners (connected via USB-A):
2

• DS9308, DS9908, DS8108, DS4608, DS2208, DS2278, DS3678-SR, DS3608-SR, and
DS9308-SR.
NOTE: For ET5X tablets, headsets can be connected via the USB-C port on the tablet. USB-A headsets or
headphones connected to the USB-A ports of the communication cradle are not supported.
Revision History
Changes to the original guide are listed below:
Change Date Description
-06 Rev A 8/22 Feature updates in this version include:
-05 Rev A 5/22 Feature updates in this version include:
About This Document
• New Scanner Support
• Configuration Reset Enable/Disable
• Custom Shortcut Icons Enable/Disable
• Troubleshooting
• Desktop UI Elements
• Freeform Windows
• Desktop SIP Configuration
• Application Behavior Persistence
-04 Rev A 3/22 Feature updates in this version include:
• System Configurations
• Remote Control
-03 Rev A 12/21 Feature updates in this version include:
• Screen Sharing / Remote Control
• EMM Lockdown
• Audio Settings
• Screen Density
• Screen Capture
• Restrict Mobile Application Taskbar Access at Package Level
• Screen Dimming
3

About This Document
Change Date Description
-02 Rev A 10/21 Feature updates in this version include:
• Advanced application permissions on desktop home screen
• Enable or disable the All Apps button on desktop taskbar
• Enable or disable mobile device running applications icons on desktop
taskbar
• Access to device settings from the taskbar status icons
• Soft Input Panel (SIP) taskbar icon
• Configuration of the external keyboard layout
• DS9308 USB scanner support (ET56 Only)
-01 Rev A 8/21 Initial Release
4

Service Information
If you have a problem with your equipment, contact Zebra Global Customer Support for your region.
Contact information is available at zebra.com/support
When contacting support, please have the following information available:
• Serial number of the unit
• Model number or product name
• Software/firmware type or version number
Zebra responds to calls by email, telephone or fax within the time limits set forth in support agreements.
If your problem cannot be solved by Zebra Customer Support, you may need to return your equipment for
servicing and will be given specific directions. Zebra is not responsible for any damages incurred during
shipment if the approved shipping container is not used. Shipping the units improperly can possibly void
the warranty.
If you purchased your Zebra business product from a Zebra business partner, contact that business
partner for support.
About This Document
.
5

Contents
About This Document
Introduction ............................................................................................................................ 1
Configurations ....................................................................................................................... 1
Supported Peripherals ........................................................................................................... 2
Revision History .................................................................................................................... 3
Service Information ............................................................................................................... 5
Workstation Connect Administrator Configurations
EMM Support for the Remote Configuration of Zebra Workstation Connect ........................ 9
Configuring External Monitor Orientation ............................................................................ 9
Configuring External Monitor Resolution .......................................................................... 10
Configuring the Monitor Size ............................................................................................. 11
Desktop UI Elements ........................................................................................................ 11
Configuring Freeform Windows ........................................................................................ 12
Configuring the Visibility of Status Icons on the Taskbar .................................................. 13
Sorting Desktop Shortcuts ................................................................................................ 13
Replacing the Current Set of Desktop Home Screen Shortcuts ................................. 14
Creating a File Path for the Shortcut ........................................................................... 15
Exporting Custom Icons .............................................................................................. 15
Configuring the Desktop Home Screen Wallpaper ........................................................... 16
Configuring Application Behaviors .................................................................................... 16
Configuring Device-User Access ...................................................................................... 19
Configuring Screen Capture Permissions ......................................................................... 23
Configuring the Desktop SIP ............................................................................................. 23
Enabling or Disabling the All Applications Icon on the Taskbar ........................................ 24
Controlling the Visibility of Active Mobile Applications on the Taskbar ....................... 24
Configuring Device Behaviors (Screen Dimming) ............................................................. 25
Persistence of Workstation Connect Configurations ......................................................... 26
Resetting the Current Configuration ................................................................................. 27
System Configuration Features ........................................................................................... 28
Disable USB Storage ........................................................................................................ 28
Restricting User Access to Settings .................................................................................. 28
Restricting User Access to Launch Applications ............................................................... 28
Enable or Disable Applications on the Mobile Device ....................................................... 29
Preventing Automatic Application Updates ....................................................................... 29
6

Using UI Manager with Zebra Workstation Connect ........................................................... 31
Configuring the Audio UI ..................................................................................................... 31
Strategies to Optimize User Access to Applications ........................................................... 32
Best Practices for Kiosk Application Behavior .................................................................... 34
Troubleshooting
Contents
Install/Uninstall Applications on the Mobile Device ........................................................... 29
Keyboard Configuration .................................................................................................... 30
USB Scanner Configuration .............................................................................................. 30
Screen Sharing and Remote Control ................................................................................ 30
Supporting Enterprise Applications ................................................................................... 31
Best Available Audio Output Paths ................................................................................... 31
7

Workstation Connect Administrator Configurations
Zebra Workstation Connect allows administrators to customize several of its features to control and tailor
the environment presented to the end user on the desktop home screen and the interactions that the user
can perform in this environment.
For a full list of Zebra Workstation Connect versions and BSP compatibilities, refer to Workstation Connect
download section on the Zebra support site: zebra.com/us/en/support-downloads
Configurable settings include:
• External monitor orientation, resolution, and size to adjust the pixel output of the application
• The appearance of status icons presented on the taskbar.
• Access to settings via status icons presented on the taskbar.
• The order and visibility of desktop home screen shortcuts.
• The desktop home screen wallpaper.
• The behavior of applications when the device is docked or undocked.
• Advanced application permissions for desktop home screen.
• Use of screen capture of the external monitor.
• The Soft Input Panel (SIP) used in desktop mode.
• Use of the All Applications icon on the taskbar.
• Use of mobile device applications icons on the taskbar.
• Use of screen dimming of the mobile device screen while the device is docked.
• The persistence of application behaviors upon an Enterprise Reset.
Additionally, specific System Configurations applied to the device can be leveraged when utilizing
Workstation Connect, these configurations can be applied through Staging (using StageNow) or via an
Enterprise Mobility Management tool.
Configurable settings include:
• Disable USB Storage
• Restricting User Access to Settings
• Restricting User Access to Launch Applications
• Enable or Disable Applications on the Mobile Device
• Install/Uninstall Applications on the Mobile Device
• Keyboard Configuration
• USB Scanners Configuration
8

Workstation Connect Administrator Configurations
• Best Available Audio Output Paths
• Configure USB external keyboard
• Remote Control
NOTE: Depending on the method used to configure administrator settings, changes become visible on the
desktop UI at different times. Settings applied to Zebra Workstation Connect through managed
configurations do not alter desktop behavior until the next docking event. A docking event could result from
undocking and docking the device, rebooting, or power cycling the cradle. System settings applied via
OemConfig take effect immediately, and application behavior changes immediately.
EMM Support for the Remote Configuration of Zebra Workstation Connect
The Zebra Workstation Connect Desktop Launcher APK is available through the Google Play Store and
supports full production deployment, configuration, and activation using standard (EMM) tools. EMM tools
can configure Zebra Workstation Connect using Android Managed Configurations. The configurations and
the steps to implement them are described in this section.
NOTE: The UI described in this section from a tool developed and maintained internally by Zebra. EMMs
may provide similar functionalities. However, the visual elements of the interface would be specific to the
EMM being used and would likely differ.
Figure 1 Zebra EMM Tool
Configuring External Monitor Orientation
Zebra Workstation Connect offers a method for the administrator to control the orientation on the external
monitor. This setting should be configured to match the physical orientation that the display is it intended to
be used in to ensure that the content presented is properly oriented for viewing.
9

Workstation Connect Administrator Configurations
Figure 2 Administrator Configurable Settings
Configurable options include:
• Landscape (no rotation)
• Portrait (90° left)
• Landscape Inverted (180°)
• Portrait Inverted (270°)
Configuring External Monitor Resolution
Zebra Workstation Connect offers a method for the administrator to control the resolution on a secondary
screen (external monitor) by selecting a specific resolution from the dropdown menu. Different monitors
support a variety of resolutions, the resolution settings for the external monitor being used with the
application should be chosen from amongst those supported based on the intended use case.
NOTE: In Mirror Mode, the supported resolutions may be limited to the resolutions supported by the
mobile device, since both must be set to match. Supported resolutions may also be limited by the
capabilities of the external monitor.
10
Workstation Connect Administrator Configurations
Figure 3 Configure Desktop Resolution
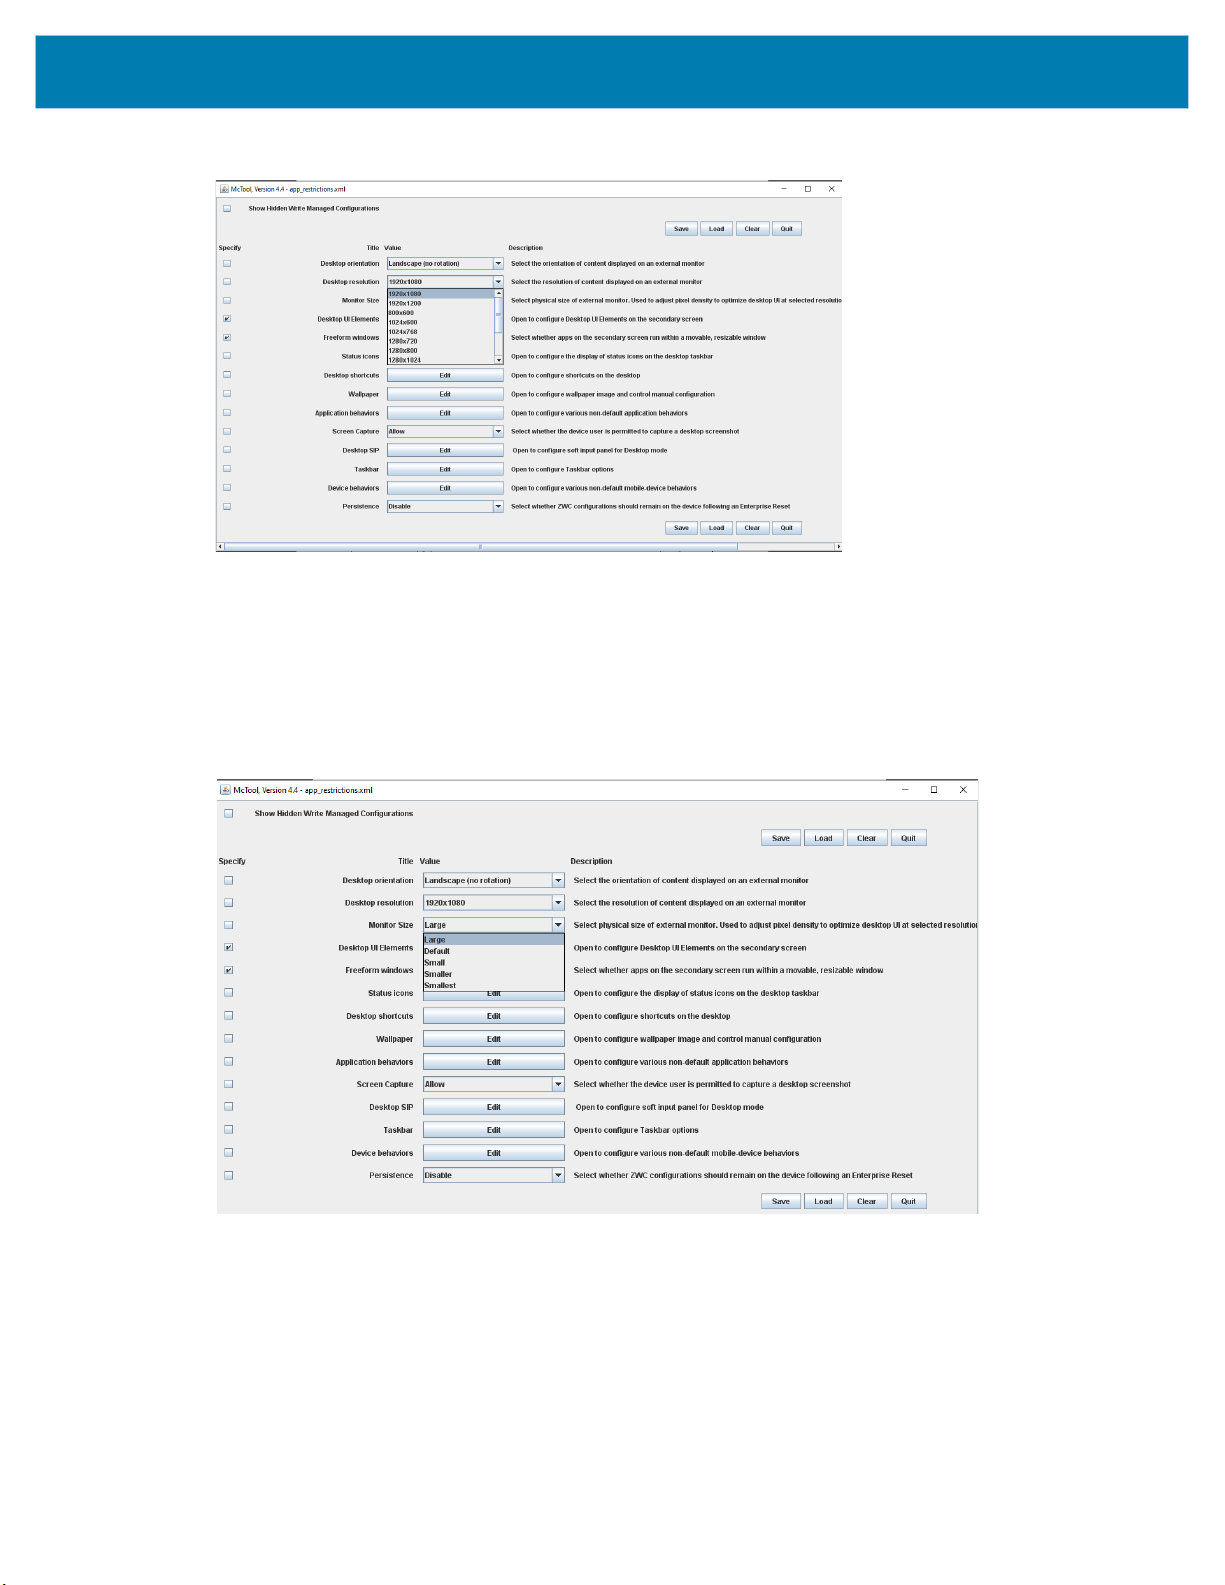
Configuring the Monitor Size
Administrators can select the size of the external monitor to inform the application of how to optimize its
pixel density from the dropdown. Setting this value helps the application understand the native resolution
of the external monitor and calibrate its output for the screen being used.
Figure 4 Configure Desktop Resolution
Desktop UI Elements
Configurable UI elements on the desktop include shortcuts, desktop wallpaper, contextual menu, the
notification panel, and the taskbar. When all of the UI elements are set to Hide, users can view only a
single application or a black screen (when no application is running on the desktop)
11

Workstation Connect Administrator Configurations
Figure 5 Desktop UI Elements
Configuring Freeform Windows
Administrators can enable or disable freeform windows to determine whether the application displays in a
movable and resizable window. When enabled (default), the application window runs minimized,
maximized, or restored.
When running maximized or restored the application has a window control bar containing back, minimize,
and maximize/restore buttons. When disabled, the application launches with the window maximized and
does not provide a control bar. For use cases that require kiosk behavior, it may be preferable to disable
free form windows.
Figure 6 Freeform Windows
12

Workstation Connect Administrator Configurations
Configuring the Visibility of Status Icons on the Taskbar
Zebra Workstation Connect allows for the administrator to configure which icons are presented to the user
on the status area of the taskbar. By default, the following status icons are displayed on the taskbar:
Battery, Bluetooth, Cellular, Ethernet, VPN, and Wi-Fi. Users can choose to launch the corresponding
device settings fragment when clicking on a specific status icon as well as launch the audio settings when
clicking the See More option on the audio panel if this action is enabled by the administrator when
configuring the Settings UI from icons and Audio Settings from panel as shown in the figure below.
Figure 7 Edit Status Icons
Sorting Desktop Shortcuts
Sort the shortcuts on the desktop home screen alphabetically or by the time or date added by selecting the
preferred arrangement from the dropdown menu.
When an array of shortcuts is processed, the shortcuts are created in the order specified in the array. As a
result, the icons appear on the desktop home screen in the order they were arranged in the array when
sorting by time or date is used.
When a set of shortcuts is created on a device and exported to a file, the file is exported in an order based
on how the shortcuts are sorted on the desktop. When that file is later imported, the shortcuts are created
in the order they were displayed on the desktop when they were exported.
After importing, if sorting by date added is selected, the shortcuts appear in the same order they did when
they were exported. If sorting alphabetically is selected, the order may be changed if the shortcuts were
not sorted alphabetically when they were initially exported.
13

Workstation Connect Administrator Configurations
Figure 8 Sorting Application Shortcuts
Replacing the Current Set of Desktop Home Screen Shortcuts
To replace all currently defined shortcuts with an administrator defined set of application shortcuts, select
the edit application shortcut option from the dropdown menu as displayed in the figure below.
While this method of replacing shortcuts is still operable, the shortcut import file is the recommended
method because it provides more functionality.
Figure 9 Configure Application Shortcuts
Next, enter the package name and an activity name for each shortcut. If the activity name is left blank, the
shortcut defaults to the application’s main activity. An administrator has a choice of whether to specify an
array of shortcuts or not within a set of managed configurations being sent to Workstation Connect.
If no array is specified, no change is made by the application to the shortcuts shown on the desktop. This
option is preferable if the administrator does not want to change the desktop shortcuts or if the user is
permitted to define their own shortcuts.
If an array is specified, that array indicates the exact set of shortcuts that should be on the desktop and are
applied each time the device docks and replaces any shortcuts on the desktop when it is applied. If the
administrator has previously declared an array and intends to change the shortcuts, the array must be
re-defined in its entirety to include all elements intended to be included in the new array. The application
creates the shortcuts on the desktop to match the specifications of the array.
14

Workstation Connect Administrator Configurations
Figure 10 Creating an Application Shortcut
Creating a File Path for the Shortcut
To create a new application shortcut, select the edit application shortcut option from the App Shortcuts
dropdown menu as displayed in the figure below. In the Shortcut import file field, enter the device path
and filename of a shortcut file previously exported from a Zebra Workstation Connect application to load
specific shortcuts onto a user’s device. When a shortcut import file is specified, this replaces all default
shortcuts.
NOTE: Shortcuts are saved in /enterprise/usr/zwc/ after they are exported.
Figure 11 Configure Application Shortcuts
NOTE: While there are two options to generate shortcuts (by providing package names directly into
the form field in the tool, or importing using the shortcut import file) it is recommended that only one
method is used consistently, and does not use both methods simultaneously.
Exporting Custom Icons
Custom icons are converted to string format (byte array) and exported along with the shortcuts for mass
deployment. As a result, the administrator is not required to deploy custom icon images separately.
15

Workstation Connect Administrator Configurations
NOTE: Some EMMs may impose a limit on the size of the images selected to be used as the icon.
Configuring the Desktop Home Screen Wallpaper
The administrator can change the default desktop home screen wallpaper to supported image files stored
on the device and written to a location that is generally writable and readable by all applications, including
images downloaded to the device by the administrator. This can be configured by using the device path
and file name of the image file to set as the desktop home screen wallpaper.
The file must be deployed to the device at the path and name specified before the managed configuration
is applied. If this does not occur, the file is not processed. Changing the file after it has been processed
does not cause the file to be reprocessed until the next time the managed configuration is applied.
NOTE: The maximum background resolution is 4000 x 2500.
NOTE: For optimal performance, use an image with a resolution that matches the resolution of the display
being used. If a smaller image is used, the display is scaled up to fit the screen and could produce a
sub-optimal image. If a larger image is used, the display is scaled down to fit the screen and may take up
more room and be less efficient than using a better fitting image.
For use cases where the administrator does not want the user to change the wallpaper set by the
administrator, select Allow or Disallow from the User Control dropdown.
Figure 12 Wallpaper Configuration
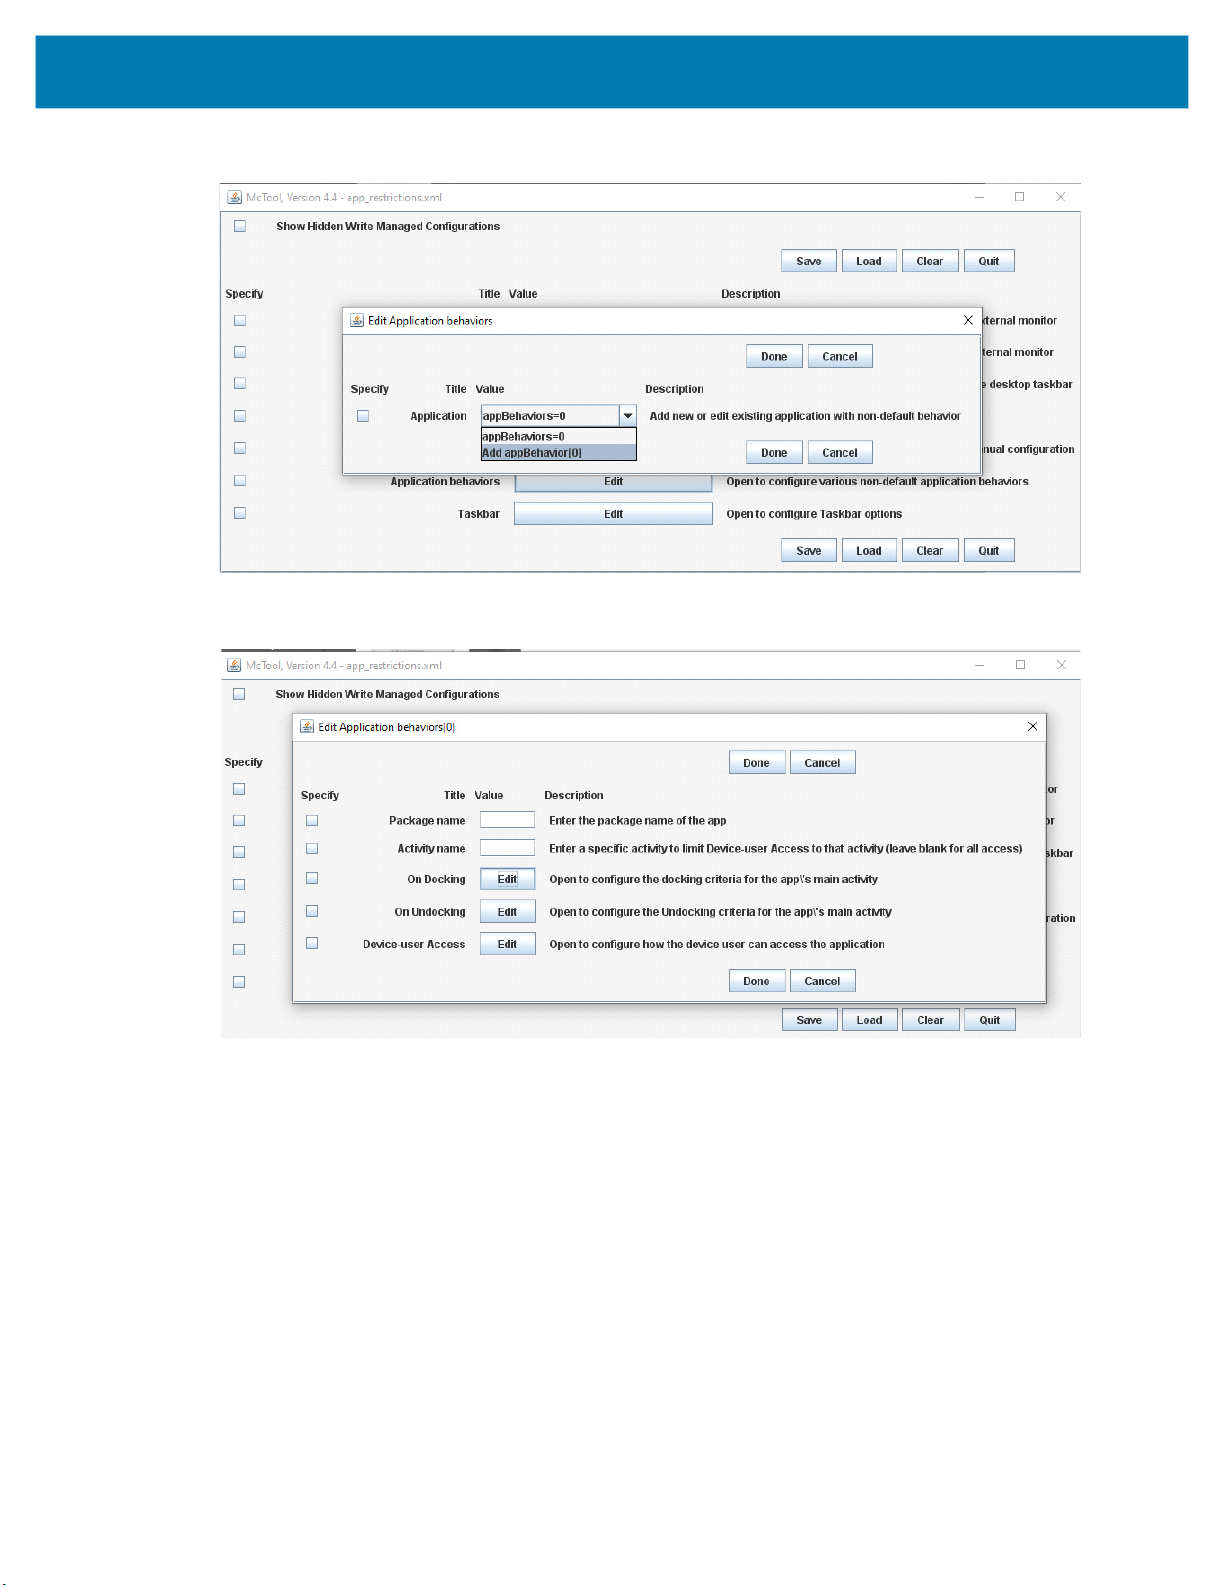
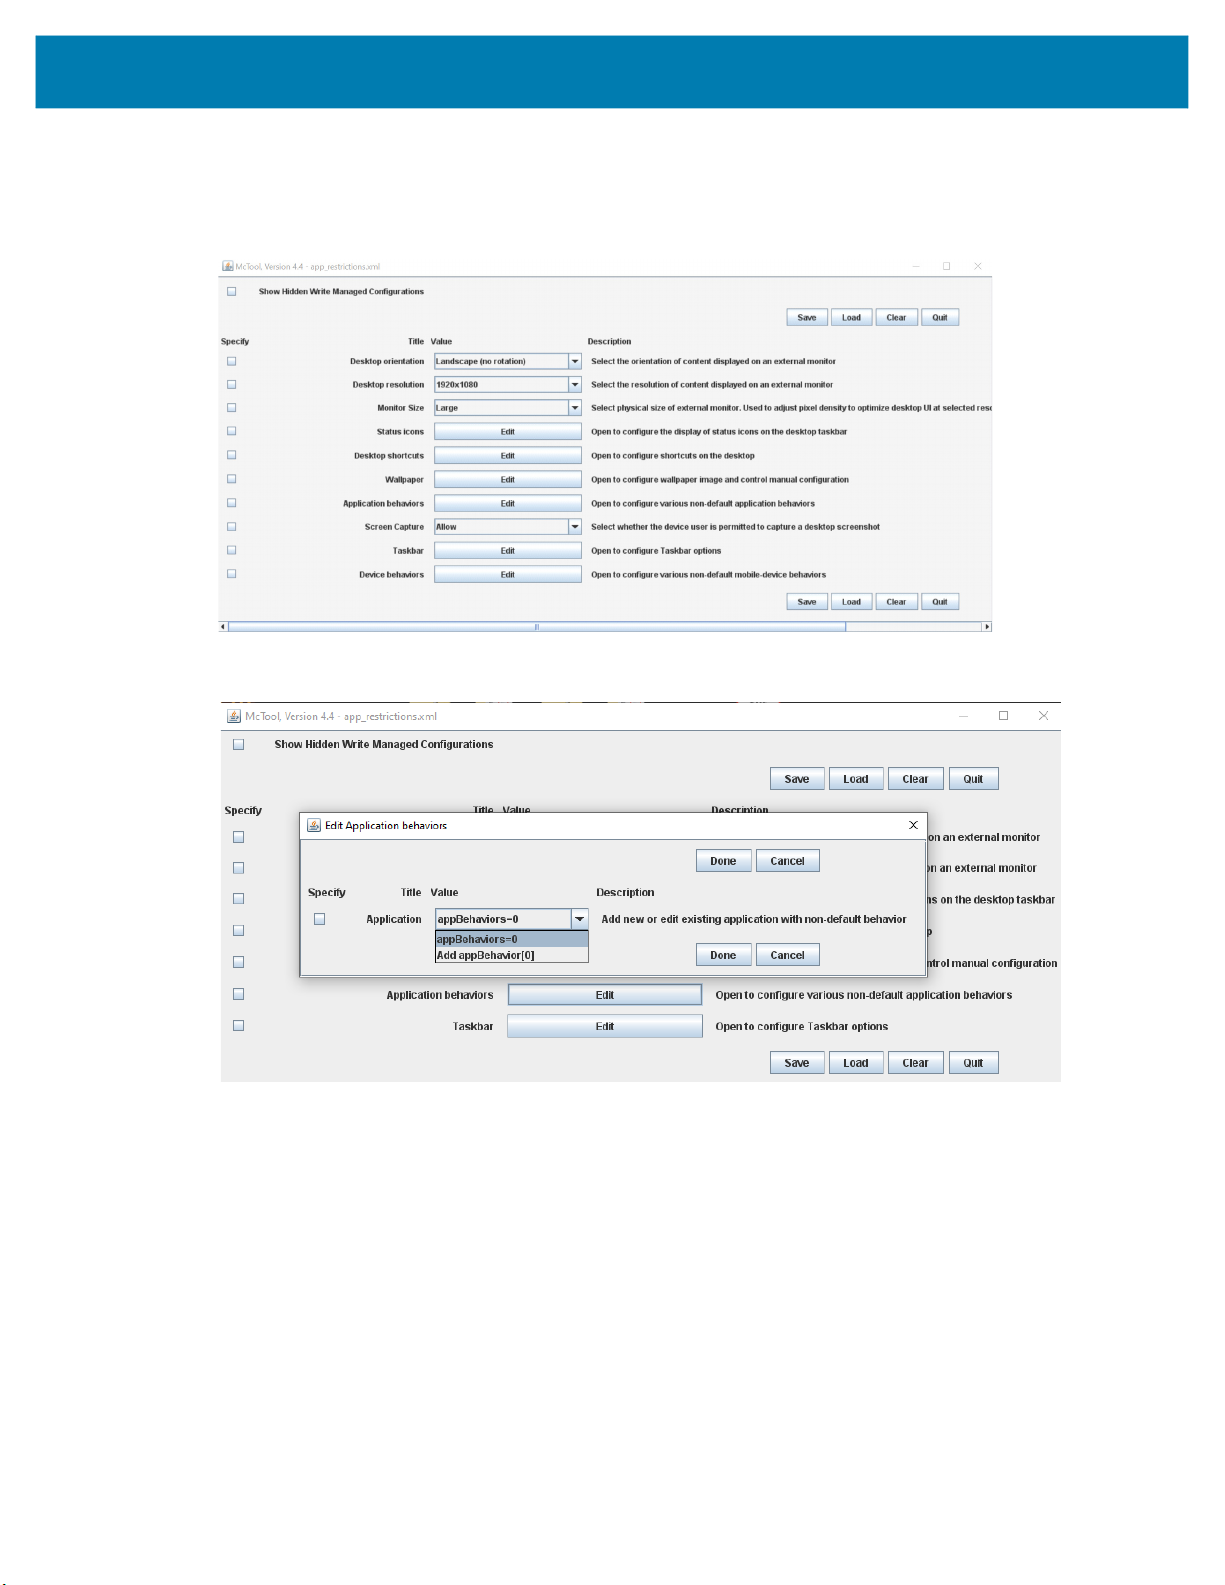
Configuring Application Behaviors
Zebra Workstation Connect allows administrators to configure the criteria that is used to determine the
automatic handling of applications when the device is docked or undocked from a supported Workstation
Cradle or dock.
16
Workstation Connect Administrator Configurations
Figure 13 Add an Application Behavior
Figure 14 Add an Application Behavior
a. Specify the application package name and activity name, if the activity name is left blank this field
defaults to all application activities.
17

Workstation Connect Administrator Configurations
Figure 15 Edit Docking Behavior
b. Specify the docking criteria that defines the behavior that should be automatically performed for the
application each time the device is docked by selecting the Action and the Window State from the
drop-down menu. The available actions are:
• Stop - indicates that the application should be exited automatically if it is running on the mobile
device at the time it is docked. This is useful if the application has no relevance in desktop mode
and uses resources that should be freed up on docking to make them available for use by
applications that are used in desktop mode.
• Launch - indicates that the application should be automatically launched on the desktop home
screen at the time the mobile device is docked. This would make the application available for use
by the user without the need to launch it manually.
• Move - indicates that the application should be automatically moved from the mobile device to
the desktop home screen if it is running on the mobile device at the time it is docked. This is
useful if the application is relevant and commonly used in both mobile and desktop modes and in
use cases where ongoing use of the application in desktop mode is feasible without the need to
move it manually.
NOTE: When setting the configuration to move an application upon a docking event, only one application
should be configured to move at maximum screensize.
a. Configure how the application is displayed when launched or moved on the desktop home screen by
selecting its Window State. This setting only applies to Launch and Move actions and allows the
administrator to determine whether the application is automatically maximized (shown full size) or
restored (in default size or last used size).
NOTE: If the docking criteria is not specified by the administrator, the default docking behavior for all
applications keeps the application running on the mobile device (either foreground or minimized) and
presents the corresponding icons on the taskbar.
b. Set the undocking criteria that defines the behavior that should be automatically performed for the
application each time the device is undocked by specifying the Action. The available actions for
undocking criteria are stop, launch, and move.
18

Workstation Connect Administrator Configurations
• Stop - indicates that the application should be exited automatically if it is running on the desktop
home screen at the time the device is undocked. This is useful if the application has no relevance
in mobile mode and demands resources that should be freed up on undocking to make them
available for use by applications in mobile mode.
• Launch - indicates that the application should be automatically launched on the mobile device at
the time the device is undocked. This makes the application available for use by the user without
the need to launch it manually.
• Move - indicates that the application should be automatically moved from the desktop home
screen to the mobile device if it is running on the desktop at the time the device is undocked. This
might be appropriate if the application is commonly used in both mobile and desktop modes and
where ongoing use of the application in mobile mode is desirable without the need for the user to
move it manually.
NOTE: For undocking, if you are moving an application and have a preference for which one appears in
the foreground; only specify the rule for that specific application intended to be viewed in the foreground.
Only one application should be configured to open in the foreground at once.
NOTE: There is no option provided for Window State upon undocking because the default behavior is to
move the application from the desktop to the mobile device with the application window minimized. The
only other option is to move it as the foreground application. As a result, choosing to launch or move upon
undocking automatically makes the application run in the foreground.
NOTE: Since only one application can run in the foreground at a time on the mobile device, the ability to
provide multiple launch/move undocking behaviors is not feasible. In the even that is done, the last
application launched/moved becomes the foreground application and the rest are minimized accessed
from the Recents panel.
Figure 16 Undocking Criteria
Configuring Device-User Access
This feature allows the administrator to control which applications can be launched by the user from the UI
presented on the Workstation Connect desktop home screen. Once the administrator configuration is
applied, the Workstation Connect desktop UI is restricted to prevent the user from accessing the disabled
methods(s) to launch the restricted applications or settings on the external monitor.
NOTE: The UI described in this section from a tool developed and maintained internally by Zebra.
EMMs may provide similar functionalities, however, the visual elements of the interface would be
specific to the EMM being used and would likely differ.
19
Workstation Connect Administrator Configurations
Restrictions include the ability to individually or collectively prevent the following methods from being used
to launch restricted applications or settings.
Figure 17 Advanced Application Permissions Included Under Application Behaviors
Figure 18 Add an Application Behavior
20
Workstation Connect Administrator Configurations
Figure 19 Edit Application Behaviors
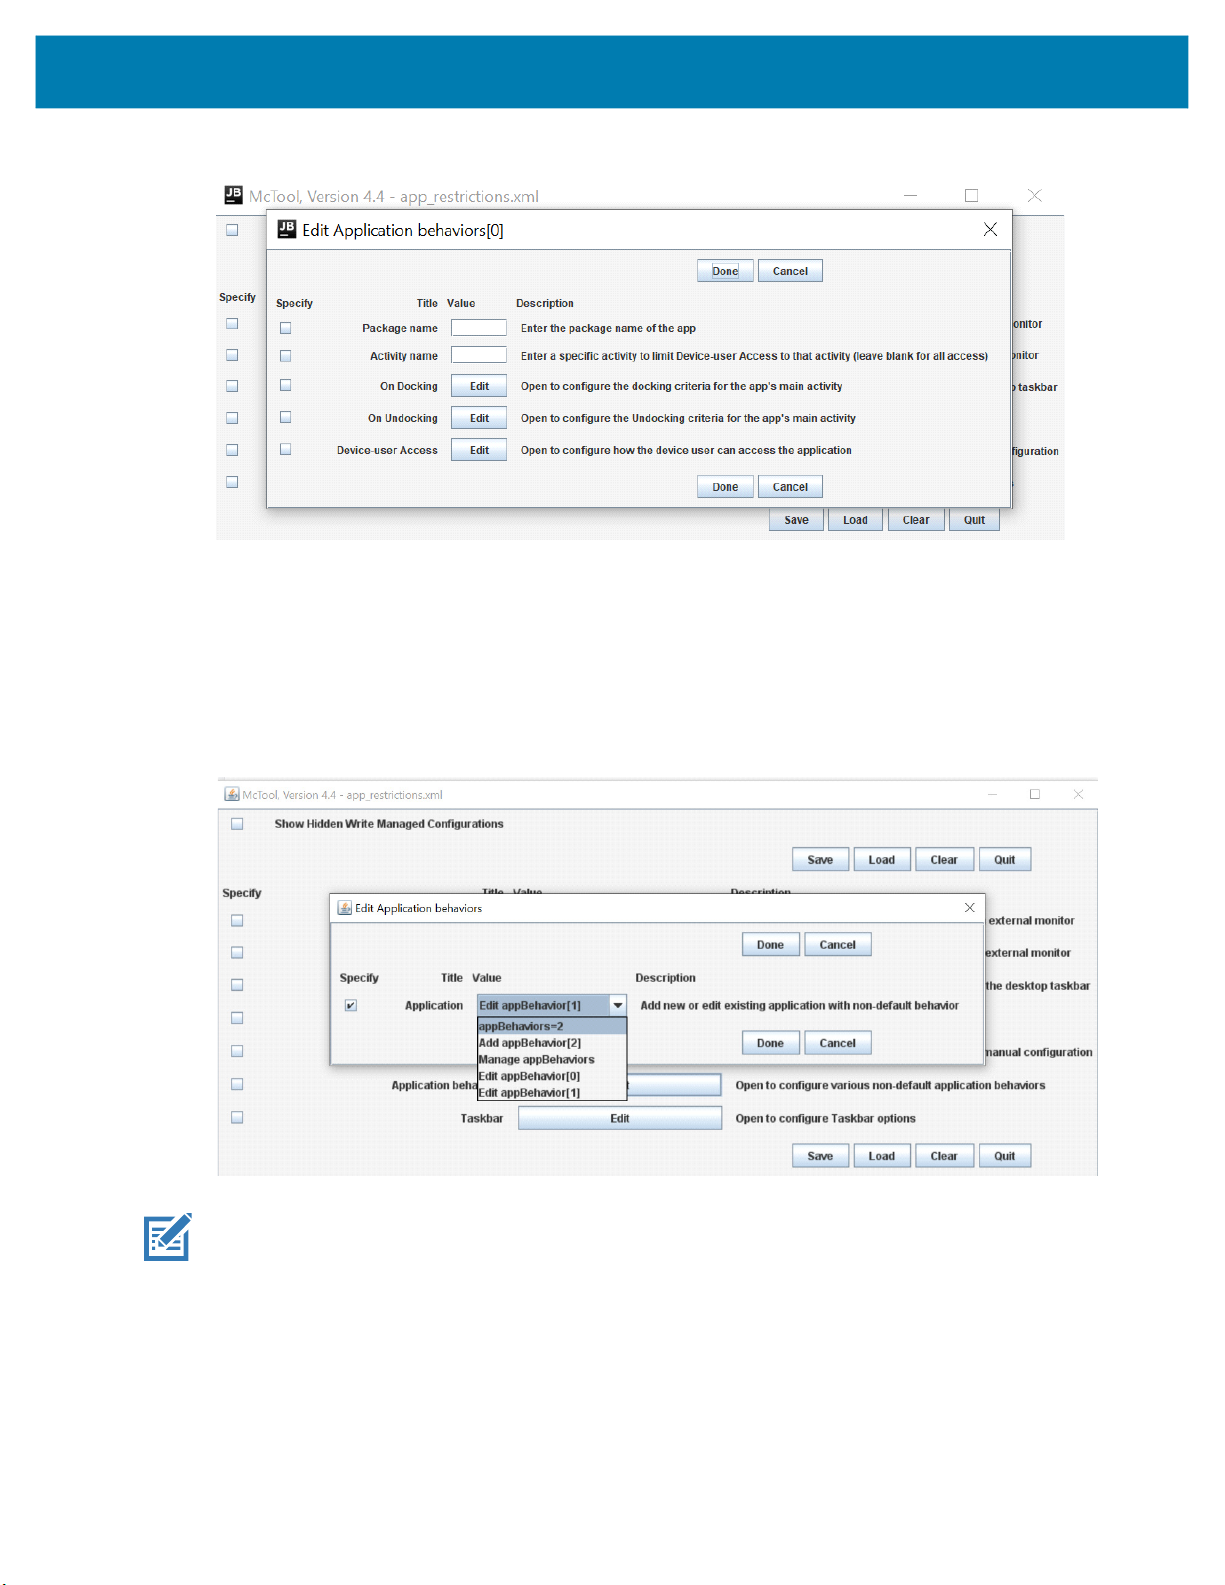
The Package name (mandatory) and Activity name (optional) are utilized to identify an application. When
the Activity name is not specified or intentionally kept blank, Workstation Connect allows or disallows all
the activities under the given Package name as well as in the Main Activity.
When creating a new application behavior, the application under the specified package name is stored as
one component within an array, this array is generated into a managed configuration set and applied to
Workstation Connect.
Figure 20 Managing the Array of Application Behaviors
NOTE: Any time an array is applied via managed configurations, it replaces any prior array entirely.
When a new array is applied that is different from the array previously applied on a device, the old array is
discarded, and the new array takes its place. Any previous behaviors specified in the old array that are not
present in the new array are removed. Any behaviors that are modified in the new array replace the
behaviors defined by the old array, and any behaviors added to the new array are now in effect.
To edit a set of managed configurations that was previously created, add, remove, or modify elements in
the array to get to a new array. Each element of an array is identified by the package name.
21

Workstation Connect Administrator Configurations
To understand the changes that occur from replacing an old array with a new one, compare the elements
of the two arrays based on package name.
Based on the changes proposed by the new array, the following can occur:
• If an element is identical in both the old and the new array, the behaviors of that application do not
change.
• If an element is not identical to an element in the new array with the same package name, the
application behaviors change from the old set of non-default behaviors to the new set of non-default
behaviors.
• If an element in the old array has no element in the new array with the same package name, the
non-default behaviors of that application are replaced by default behaviors.
• If an element in the new array has no matching package name in the old array, that application will
change from the default behaviors to the specified non-default behaviors.
NOTE: It is not possible to declare an empty array. If the use case necessitates that all applications
return to their default behaviors, ensure that no application has an element in the array. An array must
have at least one element and that element must have an empty package name. Elements with empty
package names are ignored, and considered to be equivalent to an empty array Since the array
specified no non-default behaviors for any package, all packages have default behaviors.
Figure 21 Configure User Access to the Device
Users can allow or disable specific configurable options by selecting from the dropdown menu.
Configurable options include:
• Enabling or blocking a user from launching an application from the Desktop All Apps Panel.
• Enabling or blocking a user from accessing all or specified activity for the application to be added as a
shortcut.
• Enabling or blocking a user from launching an application and its specified activities from an existing
desktop shortcut.
• Enabling or blocking a user from launching all activities for the application from a notification in the
notification panel.
• Enabling or blocking a user from moving all or specified activity for an application from the mobile
computer to the desktop using the taskbar.
• Enabling or blocking a user from moving all or specified activity for an application from the desktop to
the mobile computer from the taskbar.
22
Workstation Connect Administrator Configurations
• Enabling or blocking the visibility of specific application icons from displaying in the taskbar.
NOTE: If the intended use case does not require the device user to launch an application to the
desktop, set all of the parameters mentioned above to Disallow.
Configuring Screen Capture Permissions
Administrators have the capability to permit or restrict a user’s ability to generate a screen capture by on
the secondary display by selecting Allow or Disallow from the associated dropdown menu. For some use
cases, administrators might want to Disallow screen capture to protect sensitive data being displayed in
an application on the desktop by preventing screen captures that could allow that data to be extracted from
the device and shared without permission.
Figure 22 Screen Capture
Configuring the Desktop SIP
Administrators can allow a different SIP to be used when a device is docked for use cases where the SIP
being used on the primary display on a mobile device is not useful on a external monitor
NOTE: If an administrator configuration is set on docking, Zebra Workstation Connect saves the
current SIP and then overrides it and sets it to the administrator’s set value. The configuration is then
restored back to what it was previously. To enable this change to take effect, undock and dock the
device.
.
23
Workstation Connect Administrator Configurations
Figure 23 Editing the Desktop SIP
Enabling or Disabling the All Applications Icon on the Taskbar
This setting allows the administrator to prevent users from accessing applications on the desktop home
screen from the All Applications button on the taskbar. When the All Applications button is disabled, the
user maintains the ability to access or launch applications from the shortcuts displayed on the desktop
home screen unless prohibited by the administrator.
Figure 24 Configure the All Applications Panel
Controlling the Visibility of Active Mobile Applications on the Taskbar
This setting prevents users from viewing and moving mobile applications running on the mobile device
screen to the desktop home screen by hiding these icons on the taskbar. Enabling this setting offers
additional space and resources on the taskbar for applications running on the desktop home screen and
prevents mobile device launchers or mobile device lock screen applications to be moved to the desktop
home screen.
24

Workstation Connect Administrator Configurations
Figure 25 Configure Mobile Application Icons
Configuring Device Behaviors (Screen Dimming)
Administrators can configure whether the mobile device screen is dimmed upon docking by turning this
option on or off from the dropdown menu. This setting is helpful for use cases where work is being done
exclusively on the external monitor and the administrator does not want to distract the user with content
that could be displayed on the device screen or the administrator seeks to protect potentially sensitive data
from being displayed on the device screen from being viewable by others.
Wake up the device from the dim setting by pressing the power button on the device.
Figure 26 Configuring Device Behaviors
25

Workstation Connect Administrator Configurations
Persistence of Workstation Connect Configurations
Persistence is defined as the ability for applications, data, or configuration to survive an Enterprise Reset.
The operating state of a device is defined by the applications, data, and configuration that are stored in
transient storage. An Enterprise Reset is a reset of the device that wipes all transient storage and hence
returns the device to an operating state that is comparable to the out-of-the box operating state produced
by a Factory Reset. These methods differ in that an Enterprise Reset preserves certain content that is
intentionally stored persistently, whereas a Factory Reset does not. As a result, a Factory Reset returns a
device to a Factory-defined default operating state, while an Enterprise Reset returns a device to an
enterprise-defined operating state.
To define an enterprise-defined state to which a device should return following an Enterprise Reset,
selected applications, data, or configurations must be intentionally and explicitly stored persistently.
Anything stored in transient storage that is not also stored persistently is lost on an Enterprise Reset.
Therefore, it is necessary, but not sufficient, to store a copy of applications, data, or configurations
persistently. Since the operating state of a device is defined by the contents of transient storage, it is
necessary to restore content stored persistently into transient storage to produce an operating state based
on that content.
The Zebra Workstation Connect application is not built-into the device and must be post-installed into
transient storage before it can be used. For Zebra Workstation Connect to be part of an enterprise-defined
operating state, to which the device will return to following an Enterprise Reset, the APK file for installing it
must be stored persistently, The APK file must also be re-installed into transient storage.
Additionally, other system configurations (for example: desktop mode or permissions) that are performed
during the initial setup of Workstation Connect also need to be stored persistently and re-applied following
an Enterprise Reset to enable Zebra Workstation Connect to be fully functional following an Enterprise
Reset. Finally, any configuration of Workstation Connect performed through Managed Configurations
must also be stored persistently and reapplied once Workstation Connect is operational to return
Workstation Connect to its prior state as part of the enterprise-defined operating state.
Applications such as Zebra Workstation Connect can be stored persistently and re-installed. System
configurations can be stored persistently and re-applied using the Zebra PersistMgr feature
(techdocs.zebra.com/stagenow/5-5/csp/persistence/
(techdocs.zebra.com/stagenow/5-5/about/
Zebra Workstation Connect configurations applied via Managed Configurations can be stored persistently
and re-applied by using the Zebra Workstation Connect Persist Managed Configuration option.
All Zebra Workstation Connect configurations applied via Managed Configurations are automatically
stored persistently if the Persist Managed Configuration option was turned on when the Managed
Configurations were applied. Once Zebra Workstation Connect becomes fully operational following an
Enterprise Reset, any Workstation Connect configurations that were stored persistently prior to the
Enterprise Reset are automatically re-applied by Workstation Connect. This returns the configuration of
Zebra Workstation Connect to an operational state comparable to the operational state prior to the
Enterprise Reset.
Specific behaviors can be configured to persist following an Enterprise Reset.
However, if changes are made to the configuration, these behaviors must be explicitly stated by using the
checkbox next to the Persist option during the installation phase.
) or by using the persistence feature of an EMM.
) of the Zebra StageNow tool
Any time new Managed Configurations are applied to Workstation Connect the new configuration replaces
any prior configuration. When applying new Managed Configurations, the resulting new configuration is
saved persistently if the checkbox is enabbled. If it is not enabled, new configurations are not saved
persistently and any prior configuration that was saved persistently is removed from persistent storage.
Enable persistence to configure specific behaviors to persist following an Enterprise Reset.
26
Workstation Connect Administrator Configurations
To configure the persistence of the ZWC apk, use StageNow (techdocs.zebra.com/stagenow/5-5/about/)
or OEMConfig (techdocs.zebra.com/oemconfig
) tools.
For additional information, refer to the Persist Manager (techdocs.zebra.com/mx/persistmgr/
documentation.
Figure 27 Enable or Disable Persistence
)
Resetting the Current Configuration
Administrators can choose to enable or disable the device user’s ability to reset the ZWC configuration to
it’s default state. This option is most useful for an Administrator to test configurations. Enabling this option
allows the administrator to easily abandon prior configurations and start over with a new configuration.
Figure 28 Configuration Reset
27

Workstation Connect Administrator Configurations
System Configuration Features
The following sections describe tools that enable the administrator to apply system configurations on the
mobile device including the ability to disable USB storage, configure user access to settings, install or
uninstall applications, launch, enable or configure applications, configure keyboard layout, configure USB
scanners and screen sharing.
Administrators can implement system configurations through Staging (using StageNow) or through an
EMM. Depending on the EMM being used, configurations can be implemented directly through the EMM,
via OEMConfig or via MX (if supported by the EMM being used).
Disable USB Storage
The mobile computer supports the ability to block USB external storage through StageNow. The
administrator can choose to restrict external storage from USB, which is not permitted to connect to the
device. This action blocks USB storage without interfering with other types of USB peripherals such as a
keyboard, mouse, or headset. This option is presented on the figure below.
For additional information on configuring this option using MX, refer to techdocs.zebra.com/mx/usbmgr/.
For additional information on configuring this option using OEMConfig, refer to
techdocs.zebra.com/oemconfig/11-2/mc/#steps.step.settingsStep
Restricting User Access to Settings
To limit user access to the device Settings application, choose to allow or disallow the use of certain
subsets of Settings. Limitations imposed by the administrator on user access to settings are enforced
whenever the user opens the application on the device or from Zebra Workstation Connect on the external
monitor.
For additional information on configuring this option using MX, refer to
techdocs.zebra.com/mx/accessmgr/.
For additional information on configuring this option using OEMConfig, refer to
techdocs.zebra.com/oemconfig/11-2/mc/#steps.step.settingsStep
Restricting User Access to Launch Applications
The mobile computer supports the ability to use AccessMgr settings to control which applications are
allowed to be installed and launched. When this control is used, it is global. Only allowed applications are
permitted to launch on the mobile device or on the external monitor.
NOTE: This applies to user applications only; it has no effect on system applications that come
pre-installed on the device.
For additional information on configuring this option using MX, refer to
techdocs.zebra.com/mx/accessmgr/.
For additional information on configuring this option using OEMConfig, refer to
techdocs.zebra.com/oemconfig/11-2/mc/#steps.step
Allow List is used to control whether a user is permitted to install an application, but it cannot control
whether an application can be installed using AppMgr. Allow List can also be used to control whether an
application can be launched once it is installed. These changes are pushed directly onto the mobile device
or from Zebra Workstation Connect to the external monitor.
For additional information, refer to techdocs.zebra.com/mx/accessmgr/
28
Workstation Connect Administrator Configurations
Enable or Disable Applications on the Mobile Device
Zebra Workstation Connect uses AppMgr settings to prevent selected applications from being launched.
These settings are pushed directly onto the mobile device from Zebra Workstation Connect to the external
monitor.
NOTE: This applies to system applications. Since such applications cannot be uninstalled, this allows their
use to be blocked.
For additional information, refer to techdocs.zebra.com/mx/appmgr/.
For additional information on configuring this option using OEMConfig, refer to
techdocs.zebra.com/oemconfig/11-2/mc/#steps.step
Preventing Automatic Application Updates
When using an EMM to deploy Zebra Workstation Connect from the Playstore, the APK is automatically
updated to the latest version. The BSP is not automatically updated, causing the potential for a mismatch
in version between the BSP and APK.
If an administrator decides to defer updating to a new BSP, and a new version of Zebra Workstation
Connect has been posted to Playstore, it is not recommended to allow Playstore or an EMM to
automatically update Workstation Connect to the newest version available because this can cause a
version mismatch.
To protect against a version mismatch, use AppMgr settings to prevent the APK from automatically
updating by blocking specific applications from automatically updating by package name. When this
function is enabled, only the tool can update applications. To allow applications to update automatically,
disable the tool.
For additional information, refer to techdocs.zebra.com/mx/appmgr/
Install/Uninstall Applications on the Mobile Device
The mobile computer supports the ability to create a StageNow barcode using AppMgr settings with the
option to install or uninstall applications on the mobile device. From the application action option with the
application package name, generate and scan the barcode using the StageNow client on the device to
observe that the specific application is installed.
NOTE: In this scenario, the APK should be copied or previously installed on the mobile device. Use the
FileMgr settings to bring the APK onto the device by connecting to a network and using AppMgr to install
the APK.
For additional information on FileMgr, refer to techdocs.zebra.com/mx/filemgr/
Additionally, the mobile computer supports the ability to create a StageNow barcode using AppMgr
settings with the ability to uninstall an application from the Application Action options. Using the
application package name, generate and scan the barcode using the StageNow client on the device to
ensure that the application is uninstalled. These changes are enabled directly on the mobile device or from
the Zebra Workstation Connect to the external monitor.
For additional information on installing and uninstalling applications on the mobile device, refer to
techdocs.zebra.com/mx/appmgr/
.
29

Workstation Connect Administrator Configurations
Keyboard Configuration
Workstation Connect supports configuration by the administrator of one or more keyboard name/layout
name mappings when there is no physical keyboard connected to the cradle. The application automatically
detects when a keyboard is connected and uses the mapped layout or default layout based on whether a
mapping exists for the detected keyboard. This feature is helpful for use cases when there are multiple
keyboard language layouts.
The following functions are supported for managing keyboard mappings:
1. Add/Replace - Add a new mapping for a named keyboard or replace any existing mapping for a named
keyboard (will cause any keyboard with a matching name to subsequently use that layout)
2. Remove - Remove an existing mapping for a named keyboard (will cause any keyboard with a
matching name to subsequently use the default layout)
3. Remove All - Remove all existing mappings for all keyboard (will cause all keyboards to subsequently
use default layouts
For additional information on compatible keyboard mappings and configuration, refer to:
techdocs.zebra.com/mx/uimgr/#external-keyboard-action
For additional information on configuring this option using OEMConfig, refer to:
techdocs.zebra.com/oemconfig/11-2/mc/#steps.step.uiStep.uiExternalKeyboardConfig
USB Scanner Configuration
Workstation Connect supports using a a scanner that is configured via appropriate system configuration.
Administrators can also configure specific barcode input options within a Datawedge profile for use when
scanning.
NOTE: Barcode scanners connected to the cradle must be set-up in SSI mode to function correctly with
Workstation Connect.
Refer to the product specific Programmer's Reference Guide at: zebra.com/support
switching modes.
For additional information, refer to:
techdocs.zebra.com/datawedge/11-2/guide/input/barcode/#scannerselection
Screen Sharing and Remote Control
Administrators can choose which screen is used to view standard collaboration tools. This feature is
helpful for use cases where the user seeks to share information on the external monitor with a colleague or
customer.
Some Remote Control tools and/or collaboration tools may offer an integrated facility to select which
screen to view/control or even the ability to view/control both screens at once. When a given tool does not
support this, Zebra provides a means to do so from outside such tools.
For additional information, refer to techdocs.zebra.com/oemconfig/11-2/mc/#steps.step.displayStep.
for information about
Administrators have the ability to connect to the device, view, and control the screen of that device for use
cases that require remote assistance. This capability is helpful for use cases in which a used must
relinquish control of the application to allow for a different user to complete a specific task.
For additional information, refer to techdocs.zebra.com/mx/displaymgr/.
NOTE: Remote viewing and remote control with device screen rotation is not supported on ET5x devices.
30

Workstation Connect Administrator Configurations
Supporting Enterprise Applications
Enterprise Browser and Enterprise Keyboard provide additional user experience enhancements when
utilized with Zebra Workstation Connect. These applications are designed to integrate seamlessly with
ZWC, whereas third-party applications may necessitate additional steps for full customization. For
example, Enterprise Browser can be used as an industrial browser that provides the tools to rapidly build
device applications for barcode scanning, signature capture, payment processing, and printing on all
Zebra supported devices.
For additional information on Enterprise Browser, refer to
techdocs.zebra.com/enterprise-browser/3-2/guide/about/
For additional information on Enterprise Keyboard, refer to
techdocs.zebra.com/mx/enterprisekeyboardmgr/
Using UI Manager with Zebra Workstation Connect
UI Manager provides the ability to control various UI configuration settings. When used with Zebra
Workstation connect, this tool allows users to set a specific browser as the default.
For additional information on using UI Manager, refer to techdocs.zebra.com/mx/uimgr/
Depending on the Administrators configuration Zebra Workstation Connect may allow users to create web
shortcuts on the desktop that launch the shortcut in the default browser. If you wish to change the browser
from Chrome to another browser, use UI manager to determine a new default.
Configuring the Audio UI
Audio settings can be configured using the AudioVolUIMgr CSP. For additional information about using the
AudioVolUIMgr, refer to techdocs.zebra.com/stagenow/5-4/csp/audiomgr/
administrators can set a minimum and maximum volume setting that the user cannot go below or exceed.
For additional information on configuring this option using OEMConfig, refer to:
techdocs.zebra.com/oemconfig/11-2/mc/#steps.step.audioStep
The audio output of the application is based on best path routing. For additional information on best path
configuration, refer to the Audio Manager CSP techdocs.zebra.com/stagenow/5-4/csp/audio/.
If the administrator does not configure a specified audio configuration, the default Android audio settings
are enabled.
Review the pathway outlined below to understand how the application prioritizes audio outputs.
Best Available Audio Output Paths
If there are certain audio paths that the administrator believes are not going to be commonly used, the best
path can be configured so that specific paths are not available to the user. This could reduce frustration for
the device user who might have to override the “wrong” choice over and over.
. Using this method,
The user can change the audio path from the Desktop Audio Panel. However, the user’s choice may be
overridden upon a dock or undock event depending upon the administrator configuration.
NOTE: Preventing an audio path from being chosen as best does not prevent the user from choosing
to override to that audio path, it merely prevents the system from selecting it automatically.
NOTE: Each time the set of audio devices changes (including on docking and undocking) the best path
routing recalibrates and overrides any previous setting implemented by the user.
31

Workstation Connect Administrator Configurations
Android has its own default best path routing that is automatically applied if the administrator does not
make a change to the default configuration.
1. Cradle/Dock (USB is unavailable upon docking the device)
a. Headset
b. Headphones/speaker
2. Mobile Device Analog (3.5mm - treaded as a USB headset)
a. Headset
b. Headphones
3. Bluetooth Connected Device
a. Headset
b. Headphones/speaker
4. Monitor (HDMI is unavailable upon docking)
a. Headphones/speaker (USB or 3.5mm)
b. Integrated Speaker
5. Mobile Device Headset (Unavailable upon docking)
a. Integrated Microphone
b. Integrated Speaker
6. Mobile Device Speakerphone
Strategies to Optimize User Access to Applications
The tables below outline common access points to applications and ways that EMMs enable or disable
their visibility to users, as well as strategies to use Zebra Workstation Connect to leverage them based on
common use cases for specific applications by administrator configuration settings.
The configuration strategies outlined in this section are based on the administrator configurations outlined
in Configuring Application Behaviors.
Table 1 Administrator Configuration Settings
Configuration
Number
1 Disable Application behaviors > Taskbar Move to Device
2 Disable Application behaviors > Taskbar Move to Desktop
3 Disable Application behaviors > Taskbar Icon
4 Disable Application behaviors > All Apps
5 Disable Application behaviors > Create Shortcut
6 Disable Application behaviors > Launch Shortcut
7 Disable Application behaviors > Notification
8 Disable Application behaviors > On Undocking > Stop
Administrator Configuration Setting
32

Workstation Connect Administrator Configurations
Table 2 Application Settings Strategy
Category Description Administrator Configuration Strategy
A Applications intended to run on both
primary and secondary screens.
B Applications intended to run only on
the secondary monitor.
C Applications intended to run on
mobile only.
D Applications not intended to run on
primary or secondary screens.
E Applications intended to always run
in the background without any
interaction with the end user.
Additional optional administrator configurations
may support the use case.
Administrator configuration 1 or 3
Administrator Configuration #8
Block the application on the primary launcher
based on the primary launcher settings.
Administrator configuration #2 or #3
Administrator configuration #4
Administrator configuration #5
Administrator configuration #6
Administrator configuration #7
Do not create a shortcut for the application by
default.
Do not create a rule to move the application to the
secondary screen when docking.
Administrator configuration #3
Administrator configuration #4
Administrator configuration #5
Administrator configuration #6
Administrator configuration #7
Do not create a shortcut for the application by
default.
Block the application on the primary launcher
based on the primary launcher settings.
Do not create a rule to launch the application to
the primary or secondary screen when docking or
undocking.
33

Workstation Connect Administrator Configurations
Table 2 Application Settings Strategy
Category Description Administrator Configuration Strategy
F Primary launchers that utilize Lock
Task Mode (for example, Airwatch
Launcher)
Use the EMM to allow the ZWC and DisplayLink
applications.
Use the EMM to allow every application that is in
application category A, B, or C.
Administrator configuration #3
Administrator configuration #4
Administrator configuration #5
Administrator configuration #6
Administrator configuration #7
Do not create a shortcut for the application by
default.
Do not create a rule to move the application to the
secondary screen when docking.
Best Practices for Kiosk Application Behavior
In some cases, it is desirable to use Zebra Workstation Connect to implement kiosk-like application
behavior. Consider a use case where the UI presented by Zebra Workstation Connect is exposed to the
public, such as in a physical kiosk located within a retail establishment where customers walk up and
interact on their own with the UI to perform some targeted function(s). For example, the user might browse
deals, print coupons, search for items in stock, check item prices, etc.
In this case, it is desirable to limit the options for customer interaction with the UI to prevent mistakes or
malicious actions. For example, an administrator might want to lock the user into a task-specific application
and prevent the user from exiting that application or launching any other applications. To achieve such a
result, the administrator might do the following:
1. Turn freeform windows off by forcing an application to run maximized without a window control bar.
This would make more screen real-estate available for displaying application content and would also
ensure that the user could not close or minimize the application because the buttons to do so are on the
window control bar, which is not shown. This would also ensure that the user could not resize the
application and thereby expose the desktop or other applications. To exit such an application the user
would normally need to complete the task(s) of that application to its satisfaction, at which point the
application could elect to exit, exposing the desktop behind it, or launch another application to take its
place.
2. Turn the taskbar off by preventing the user from seeing what applications are running and from using
the icons on the taskbar to close, reset, or switch between those applications.
3. Control which shortcuts are displayed on the desktop and disable the user’s ability to create and modify
shortcuts. This allows the user to launch applications that are approved for his use but prevent the user
from launching any applications that are not approved for his use.
Zebra Workstation Connect has a collection of configurations that can be used to limit its UI in various
ways. Together, these configurations could be used to limit the UI sufficiently to safely implement a
stand-alone kiosk. An administrator may choose to apply some or all available configurations. If users
require additional access, it may make sense to relax the restrictions to better suit their needs.
The following set of configurations could be used collectively to achieve full kiosk lockdown or in subsets to
satisfy other less extreme use cases.
34

Workstation Connect Administrator Configurations
Table 3 Kiosk Application Behavior Configurations
Administrator Configuration Guidelines for Use
Edit Desktop UI Elements > Hide Shortcuts
Edit Desktop UI Elements > Hide Wallpaper
Edit Desktop UI Elements > Hide Launcher Context
Menu
Edit Desktop UI Elements > Hide Notification Panel
Edit Desktop UI Elements > Hide Taskbar
Disable Freeform Windows
Disable Application behaviors > Taskbar Move to
Device
Disable Application behaviors > Taskbar Move to
Desktop
Disable Application behaviors > Taskbar Icon
Disable Application behaviors > All Apps
Disable Application behaviors > Create Shortcut
Disable Application behaviors > Launch Shortcut
Disable Application behaviors > Notification
Disable Application behaviors > On Undocking > Stop
Taskbar > All Apps Button > Disable
Taskbar > Mobile App Icons > Hide
Select whether shortcuts are displayed on the
secondary screen
Select whether a wallpaper is displayed on the
secondary screen
Select whether to display a Context Menu when
right-clicking on the desktop
Select whether the Notification Panel is
displayed on the secondary screen
Select whether a Taskbar is displayed on the
secondary screen
Select whether applications on the secondary
screen can run within a movable, resizable
window.
Select whether a device user can move all or
specified activity for the application from the
desktop to the device
Select whether a device user can move all or
specified activity for the application from the
device to the desktop
Select whether a taskbar icon is shown for the
application when it is running
Select whether a device user can launch all or
specified activity for the application from the
desktop all apps panel
Select whether a device user can access all or
specified activity for the application to be added
as a shortcut
Select whether a device user can launch all or
specified activity for the application to be added
as a shortcut
Select whether a device user can move all or
activities for the application from a notification in
the notification panel
Select whether a device user can move all or
specified activity upon an undocking event
Select whether clicking the All Apps button
displays the All Apps panel.
Select whether icons of running mobile
applications are displayed.
NOTE: Any time a physical keyboard is connected, keyboard shortcuts initiated from the keyboard will
perform their normal functions. In many cases, this could provide the user with inappropriate
functionality. In such cases, it may be best to avoid providing access to the keyboard to the user. For
example, a touch monitor might be used instead of a keyboard to limit user access to functions
provided on-screen by an application.
35

Workstation Connect Administrator Configurations
NOTE: The Alt + F4 keyboard shortcut can be used to close the application.
NOTE: The Printscreen keyboard shortcut can be used to capture a screenshot, however, no toast
notification displays.
NOTE: When applications are running with this specific behavior, users are still able to bring up the
contextual menu by right-clicking on the desktop shortcuts or on the applications running on the
taskbar.
For use cases that do not require full kiosk behavior, it may be optimal to block selected items from the
Launcher Context Menu (such as Shortcut, or Wallpaper) rather than to block access to the entire
Launcher Context Menu. Other items on the Launcher Context Menu (such as Suspend and Lock device)
can be helpful for users to have access to in case slight adjustments are needed that do not necessitate
intervention from the administrator.
36

Troubleshooting
This section describes potential issues that could arise while using Zebra Workstation Connect and solutions
that could correct the problem such as undocking and docking the device or performing a reboot.
Table 4 Troubleshooting the Device
Source Problem Cause Solution
Device
(Workstation Cradle with
Mobile Computer or
Tablet)
External Monitor not
detected.
Display does not
change orientation
quickly.
Peripheral not detected. Display setting not set
The device is
powered off when
placed in the cradle
and then turns on.
It takes a little time for
the device to
recognize the
monitor.
Device not detecting
monitor.
properly
Bad cable
connection.
Remove the device
from the cradle and
re-insert. The device
will then detect the
monitor
Wait for screen to
re-orientate.
Remove the device
from the cradle and
re-insert.
Go to Settings >
Display > When
device detects
external monitor.
Ensure Rotate screen
orientation is
selected.
Remove cable and
re-connect.
37

zebra.com
 Loading...