


WORKABOUT PRO4
HAND-HELD
COMPUTER
(Windows Embedded CE 6.0)
USER GUIDE


WORKABOUT PRO4 HAND-HELD
COMPUTER
USER GUIDE
8000290-003
December 2020
i

ii Workabout Pro4 User Manual
This user manual supports the model number 7528X which contains the approved radio module 21-148603-0B. The applicable FCC ID and Industry Canada numbers are as follows:
• FCC ID: UZ7211486030B
• IC: 109AN-211486030B'
Copyright
No part of this publication may be reproduced or used in any form, or by any electrical or mechanical means,
without permission in writing from us. This includes electronic or mechanical means, such as photocopying,
recording, or information storage and retrieval systems. The material in this manual is subject to change
without notice.
The software is provided strictly on an “as is” basis. All software, including firmware, furnished to the user is on
a licensed basis. We grant to the user a non-transferable and non-exclusive license to use each software or
firmware program delivered hereunder (licensed program). Except as noted below, such license may not be
assigned, sublicensed, or otherwise transferred by the user without our prior written consent. No right to copy a
licensed program in whole or in part is granted, except as permitted under copyright law. The user shall not
modify, merge, or incorporate any form or portion of a licensed program with other program material, create a
derivative work from a licensed program, or use a licensed program in a network without written permission
from us. The user agrees to maintain our copyright notice on the licensed programs delivered hereunder, and
to include the same on any authorized copies it makes, in whole or in part. The user agrees not to decompile,
disassemble, decode, or reverse engineer any licensed program delivered to the user or any portion thereof.
We reserve the right to make changes to any software or product to improve reliability, function, or design.
We do not assume any product liability arising out of, or in connection with, the application or use of any
product, circuit, or application described herein.
No license is granted, either expressly or by implication, estoppel, or otherwise under any of our intellectual
property rights. An implied license only exists for equipment, circuits, and subsystems contained in our
products.
Disclaimer
Every effort has been made to make this material complete, accurate, and up-to-date. In addition, changes are
periodically incorporated into new editions of the publication.
We reserve the right to make improvements and/or changes in the product(s) and/or the program(s) described
in this document without notice, and shall not be responsible for any damages including, but not limited to,
consequential damages, caused by reliance on the material presented.
Zebra and the Zebra head graphic, Workabout Pro4 and the names of other products and services provided by
us are trademarks of Zebra.
Windows® and the Windows Logo are trademarks or registered trademarks of Microsoft Corporation in the
United States and/or other countries.
The Bluetooth® word mark and logos are owned by Bluetooth SIG, Inc. and any use of such marks by us is
under license.
All trademarks used herein are the property of their respective owners.

iii


TABLE OF CONTENTS
About This Guide
About This Manual.......................................................................................................................... xiii
Text Conventions ............................................................................................................................ xiv
Overview of the Workabout Pro4 Hand-Held Computer ................................................................. xiv
Regulatory Labels........................................................................................................................... xvi
SE655 LED Device – Class 1 ........................................................................................................ xvi
SE965, SE4500 and SE1524 Lasers – Class 2 ............................................................................ xvii
Chapter 1: Basic Operation
Workabout Pro4 Features............................................................................................................... 1-1
Workabout Pro4 Modules Available ................................................................................................ 1-2
Documents Available ..................................................................................................................... 1-2
Preparing the Workabout Pro4 for Operation ................................................................................. 1-2
The Battery ............................................................................................................................... 1-2
Switching the Workabout Pro4 On and Off..................................................................................... 1-3
Resetting the Workabout Pro4........................................................................................................ 1-4
Performing a Warm Reset..............................................................................................................1-4
Performing a Cold Reset................................................................................................................1-4
Performing a Clean Start................................................................................................................1-5
Boot to BooSt .................................................................................................................................1-5
Attaching Carrying Accessories ...................................................................................................... 1-5
Calibrating the Touchscreen ........................................................................................................... 1-5
Imager and Scanner Options.......................................................................................................... 1-5
Connectivity .................................................................................................................................... 1-5
Data Transfer ................................................................................................................................. 1-6
Voice Communication ..................................................................................................................... 1-6
Chapter 2: Getting to Know the Workabout Pro4
Operating System ........................................................................................................................... 2-1
Battery Details................................................................................................................................. 2-1
Battery Swap Time .........................................................................................................................2-1
Charging the Battery ......................................................................................................................2-2

vi Workabout Pro4 (Windows Embedded CE 6.0) User Manual
The Keyboard ................................................................................................................................. 2-2
Regular Keys..................................................................................................................................2-2
The [Power] Button ............................................................................................................. 2-2
Standard Keys .................................................................................................................... 2-3
Modifier Keys..................................................................................................................................2-4
Activating Modifier Keys...................................................................................................... 2-4
Locking Modifier Keys......................................................................................................... 2-4
Function Keys and Macro Keys .....................................................................................................2-4
Function Keys ..................................................................................................................... 2-4
Macro Keys (Workabout Pro4 Long only) ........................................................................... 2-5
Numeric Keyboards — Accessing Alpha Keys ..............................................................................2-5
The Keypad Backlight ....................................................................................................................2-6
The Display..................................................................................................................................... 2-6
Adjusting the Display Backlight ......................................................................................................2-6
Calibrating the Touchscreen...........................................................................................................2-7
Indicators ........................................................................................................................................ 2-7
LED.................................................................................................................................................2-7
Onscreen Indicators .......................................................................................................................2-7
Audio Indicators..............................................................................................................................2-9
Inserting the microSD Card and SIM Card ..................................................................................... 2-9
Inserting and Removing the Cards.................................................................................................2-9
Scanners and Imagers.................................................................................................................... 2-10
Basic Scanner Operations..............................................................................................................2-10
Scanning Techniques .....................................................................................................................2-10
Troubleshooting ..............................................................................................................................2-10
Operating 1D Internal Laser Scanners...........................................................................................2-11
Operating Internal 2D Imagers.......................................................................................................2-11
Windows Embedded CE 6.0........................................................................................................... 2-12
Navigating in Windows Embedded CE and Applications...............................................................2-12
Navigating Using a Touchscreen......................................................................................... 2-12
Navigating Using the Keyboard .......................................................................................... 2-12
The Windows Classic Shell Startup Desktop.................................................................................2-13
The Taskbar ........................................................................................................................ 2-14
The Start Menu ................................................................................................................... 2-15
The Kiosk Desktop Shell................................................................................................................. 2-20
Restoring the Windows Classic Shell.............................................................................................2-22
General Maintenance ..................................................................................................................... 2-22
Caring for the Touchscreen ............................................................................................................2-22
Cleaning the Workabout Pro4 ........................................................................................................2-23
Chapter 3: Configuration
Overview of Software...................................................................................................................... 3-1
Software Advantage .......................................................................................................................3-1
Microsoft Software..........................................................................................................................3-1
The Control Panel........................................................................................................................... 3-2
Control Panel Applications .............................................................................................................3-2

Table of Contents vii
App Launch Keys............................................................................................................................ 3-5
®
Bluetooth
Setup.......................................................................................................................... 3-7
Paired ............................................................................................................................................3-8
Device ............................................................................................................................................3-9
Discovering and Removing Devices ................................................................................... 3-9
Filtering By Class of Device (COD)..................................................................................... 3-9
Device Pop-up Menu........................................................................................................... 3-10
Pairing a Device.................................................................................................................. 3-10
Servers ..........................................................................................................................................3-12
Mode ..............................................................................................................................................3-12
About .............................................................................................................................................3-13
The Bluetooth GPRS WAN Connection .......................................................................................3-13
Certificates...................................................................................................................................... 3-16
Data Transfer between Workabout Pro4 and a PC ........................................................................ 3-17
Using Microsoft ActiveSync ............................................................................................................3-17
Using Windows Mobile Device Center...........................................................................................3-18
Using Windows Mobile Device Center...........................................................................................3-18
DataWedge..................................................................................................................................... 3-18
Scanner Services........................................................................................................................... 3-19
Display Properties........................................................................................................................... 3-19
Background ...................................................................................................................................3-19
Appearance ...................................................................................................................................3-20
Backlight ........................................................................................................................................3-20
Dr. Debug ....................................................................................................................................... 3-21
Status..............................................................................................................................................3-21
Utilities ............................................................................................................................................3-22
Settings...........................................................................................................................................3-22
Error Reporting ............................................................................................................................... 3-22
GPS (Global Positioning System) Settings..................................................................................... 3-23
Input Panel...................................................................................................................................... 3-25
Keyboard Properties ...................................................................................................................... 3-26
Key Repeat.....................................................................................................................................3-26
Keyboard Backlight ........................................................................................................................3-27
Keyboard One Shot Modes............................................................................................................3-27
Macro Keys.....................................................................................................................................3-29
Unicode Mapping ...........................................................................................................................3-30
Scancode Remapping....................................................................................................................3-31
Lock Sequence...............................................................................................................................3-33
Manage Triggers ............................................................................................................................. 3-34
Trigger Mappings............................................................................................................................3-34
Add and Edit Trigger Mapping........................................................................................................3-35
Microphone .................................................................................................................................... 3-36
TekTerm Client ................................................................................................................................ 3-37
PartnerUp........................................................................................................................................ 3-37
Power Properties ............................................................................................................................ 3-37
Battery Capacity .............................................................................................................................3-37
Power Saving Suspend..................................................................................................................3-38

viii Workabout Pro4 (Windows Embedded CE 6.0) User Manual
Suspend Threshold and Estimated Battery Backup ......................................................................3-38
Advanced .......................................................................................................................................3-39
Wakeup Sources ............................................................................................................................3-40
Battery Health.................................................................................................................................3-40
Kiosk Access................................................................................................................................... 3-41
Administrator Password .................................................................................................................3-42
Shell Settings..................................................................................................................................3-43
Restrictions ....................................................................................................................................3-45
Control Panel Settings....................................................................................................................3-45
Import/Export to File .......................................................................................................................3-46
Remote Desktop Connection ......................................................................................................... 3-47
Storage Manager ............................................................................................................................ 3-47
Formatting a Memory Card ............................................................................................................3-47
Creating Partitions ..........................................................................................................................3-48
Partition Management ....................................................................................................................3-49
Stylus Properties............................................................................................................................. 3-51
Double-Tap .....................................................................................................................................3-51
Calibration.......................................................................................................................................3-51
Touch ..............................................................................................................................................3-52
System Properties .......................................................................................................................... 3-52
Total Recall ..................................................................................................................................... 3-53
Creating a Backup..........................................................................................................................3-53
Creating a Clone.............................................................................................................................3-54
Managing Profiles...........................................................................................................................3-55
Viewing a Profile ................................................................................................................. 3-55
Profile Options .................................................................................................................... 3-55
Deleting a Profile ............................................................................................................................3-57
TweakIt ........................................................................................................................................... 3-57
Advanced........................................................................................................................................3-58
Advanced CE Services Settings ......................................................................................... 3-58
Advanced Interface and Network Settings.......................................................................... 3-58
Advanced Services Settings ............................................................................................... 3-59
Registry Editor ................................................................................................................................3-59
Voice – Using the WWAN Phone Dialer ......................................................................................... 3-59
Dialing a Number............................................................................................................................3-60
Receiving an Incoming Call............................................................................................................3-61
Voice Menu.....................................................................................................................................3-61
Call Management................................................................................................................ 3-61
Call Lists ............................................................................................................................. 3-62
Services .............................................................................................................................. 3-63
File Menu – Phonebook Management ...........................................................................................3-63
Volume & Sounds Properties.......................................................................................................... 3-64
Volume Adjustments.......................................................................................................................3-65
Sound Adjustments ........................................................................................................................3-65
Fusion Wireless Companion - Setting Up the 802.11a/b/g/n .......................................................... 3-65
Creating a New Profile....................................................................................................................3-67
Launching an Existing Profile.........................................................................................................3-69

Table of Contents ix
Resetting the Radio to Default Factory Settings............................................................................3-69
Monitoring the Network Connection...............................................................................................3-69
Chapter 4: Peripheral Devices & Accessories
Carrying Accessories ...................................................................................................................... 4-1
Attaching the Hand Strap................................................................................................................ 4-2
Attaching the Pistol Grip ................................................................................................................. 4-2
The Trigger Back Plate Kit with Flush Mount Pistol Grip ................................................................ 4-3
Protective Carrying Case................................................................................................................ 4-7
Soft Shell Holster ............................................................................................................................ 4-7
The Battery ..................................................................................................................................... 4-8
Adaptor Cable Options.................................................................................................................... 4-9
Chargers and Cradles..................................................................................................................... 4-9
Installation – Chargers and Cradles...............................................................................................4-9
Power Consumption Considerations..............................................................................................4-9
Operator Controls...........................................................................................................................4-10
Important Charger Safety Instructions ...........................................................................................4-10
Single Bay USB Cradle................................................................................................................... 4-10
Charging a Battery Installed in the Workabout Pro4......................................................................4-12
Charging a Spare Battery...............................................................................................................4-12
Battery Charge Duration.................................................................................................................4-12
Charger LED Indicators..................................................................................................................4-12
Troubleshooting the Charging Operation of the Cradle .................................................................. 4-12
Linking a Workabout Pro4 to a PC.................................................................................................. 4-13
Linking a Workabout Pro4 to an Ethernet Network......................................................................... 4-13
Network Access..............................................................................................................................4-13
Troubleshooting the Single Bay USB Cradle Operations ............................................................... 4-13
AC Wall Adaptor – Model #PS1050-G1.......................................................................................... 4-14
Four Bay Ethernet Cradle – WA4204-G2 & WA4304-G2 ............................................................... 4-14
Four Bay Ethernet Cradle Setup....................................................................................................4-15
Four Bay Ethernet Cradle Indicators..............................................................................................4-15
Inserting a Workabout Pro4 in the Four Bay Ethernet Cradle .......................................................4-15
Network Access..............................................................................................................................4-15
Network Addressing ............................................................................................................ 4-15
Battery Charging – LED Behaviour................................................................................................4-15
Troubleshooting..............................................................................................................................4-16
Network Link Unsuccessful................................................................................................. 4-16
Hand-Held LED does not Light when Docked..................................................................... 4-16
Four Slot Battery Charger............................................................................................................... 4-16
Charging the Battery ......................................................................................................................4-16
Battery Charge Duration.................................................................................................................4-16
Charge Indicators – The LEDs.......................................................................................................4-17
Troubleshooting..............................................................................................................................4-17
The Vehicle Cradle.......................................................................................................................... 4-17
Vehicle Cradle Mounting Recommendations.................................................................................4-18
Mounting Template.......................................................................................................................... 4-18
Wiring Guidelines............................................................................................................................ 4-18

x Workabout Pro4 (Windows Embedded CE 6.0) User Manual
Using the Vehicle Cradle ................................................................................................................ 4-19
Maintaining the Vehicle Cradle ....................................................................................................... 4-19
Powered Cradle Installation in High Voltage Vehicles .................................................................... 4-19
Powered Vehicle Cradle Installation ............................................................................................... 4-19
Wiring Vehicle Power to the Cradle................................................................................................4-20
The Port Replicator......................................................................................................................... 4-20
Scanners and Imagers.................................................................................................................... 4-20
Scanning Techniques .....................................................................................................................4-21
Troubleshooting ..............................................................................................................................4-21
Operating One Dimensional (1D) Laser Scanners ........................................................................4-21
Operating Two Dimensional (2D) Imagers.....................................................................................4-21
Bluetooth Peripherals ........................................................................................................................ 4-22
Appendix A: Port Pinouts
LIF (Low Insertion Force) Pinout .................................................................................................... A-1
Tether Port Pinout ........................................................................................................................... A-1
Battery Contact Pinout.................................................................................................................... A-2
Positive Female Battery Connector ................................................................................................ A-3
Appendix B: DataWedge
DataWedge..................................................................................................................................... B-1
Where to Find More Information ............................................................................................... B-1
Appendix C: Scanner Settings
Scanner Services............................................................................................................................ C-1
Barcodes................................................................................................................................... C-2
Restoring Default Settings .................................................................................................. C-2
Decoded (Zebra EMDK) .......................................................................................................... C-3
Barcodes Tab ...................................................................................................................... C-3
Options................................................................................................................................ C-3
Advanced Options............................................................................................................... C-3
Barcode Symbologies ......................................................................................................... C-4
Options ..................................................................................................................................... C-5
Double Click Parameters .................................................................................................... C-5
Display Parameters............................................................................................................. C-6
Data Handling ..................................................................................................................... C-7
Translations ............................................................................................................................. C-7
Case Rules ......................................................................................................................... C-8
Ports ......................................................................................................................................... C-9
Port Replicator Port A (COM5) and Port B (COM6) ............................................................ C-9
Appendix D: Internal Imager & Scanner Specifications
SE965 Scanner............................................................................................................................... D-1
SE965 Decode Zones............................................................................................................... D-2
SE655 Scanner............................................................................................................................... D-3
SE655 Decode Ranges ............................................................................................................ D-4

Table of Contents xi
SE1524ER – Extended Range Scanner......................................................................................... D-4
SE1524ER Decode Zones........................................................................................................ D-5
SE4500SR – Standard Range Imager............................................................................................ D-6
SE4500SR Decode Zone.......................................................................................................... D-8
Appendix E: Workabout Pro4 Specifications
The Workabout Pro4 Hand-Held Computer (7528 Long and 7528 Short)...................................... E-1
Hardware .................................................................................................................................. E-1
Regulatory Approvals................................................................................................................ E-2
Battery Specifications .................................................................................................................... E-2
Rechargeable Lithium-ion Battery............................................................................................. E-2
Wireless Radios.............................................................................................................................. E-3
802.11a/b/g/n Radio.................................................................................................................. E-3
Cinterion PHS8-P GSM/GPRS/EDGE/UMTS/HSPA+ Radio.................................................... E-5
Bluetooth Radio ....................................................................................................................... E-7
Appendix F: Wireless Wide Area Network (WWAN) Settings
Wireless WAN................................................................................................................................. F-1
Taskbar Icons............................................................................................................................ F-1
Establishing a Packet Data Connection.................................................................................... F-2
Disconnecting From a Network........................................................................................... F-3
Shutting Down the Wireless WAN User Interface ............................................................... F-3
Advanced Information ............................................................................................................... F-4
Entering a PIN Number....................................................................................................... F-4
Error States ......................................................................................................................... F-4
Tools Menu................................................................................................................................ F-5
WWAN Data Configuration ................................................................................................. F-5
Security Configuration......................................................................................................... F-8
Network Configuration......................................................................................................... F-9
Driver Mode Configuration ................................................................................................. F-10
Modem Information ............................................................................................................. F-11
User Interface...................................................................................................................... F-12
AT Terminal ......................................................................................................................... F-13
SMS Menu ............................................................................................................................... F-14
New ..................................................................................................................................... F-14
Inbox ................................................................................................................................... F-14
Outbox................................................................................................................................. F-14
SMS Configuration.............................................................................................................. F-15
Voice ......................................................................................................................................... F-15
Power Mode.................................................................................................................................... F-15
Appendix G: Wireless Zero Config Settings
Wireless Information ....................................................................................................................... G-1
Wireless Information Tab........................................................................................................... G-2
Wireless Properties............................................................................................................. G-3
Assigning an IP Address ................................................................................................................. G-4
Name Servers Tab .................................................................................................................... G-5
Advanced Features......................................................................................................................... G-6

xii Workabout Pro4 (Windows Embedded CE 6.0) User Manual
Rearranging Preferred Networks .............................................................................................. G-6
Deleting a Preferred Network.................................................................................................... G-6
Changing Network Properties................................................................................................... G-6
Index... . .. .. .. .. .. .. .. .. .. .. .. .. .. .. .. .. .. .. .. .. .. .. .. .. .. .. .. .. .. .. .... . .. .. .. .. .. .. .. .. .. .. .. .. .. .. .. .. .. .. .. . I

ABOUT THIS GUIDE
ABOUT THIS GUIDE
About This Manual
This user manual describes the configuration, operation, and maintenance of the Workabout Pro4
Hand-Held Computer.
Chapter : About This Guide.
Chapter 1: Basic Operation.
Chapter 2: Getting to Know the Workabout Pro4.
charge and maintain the battery, the keyboard features, the display, using the internal scanner,
etc. This chapter also describes the Microsoft
change the appearance and actions of the desktop from Windows Classic Shell to the Kiosk Shell.
Chapter 3: Configuration.
the Desktop Start Menu: Programs and Settings>Control Panel. The software includes both Zebra
Software Advantage and Microsoft programs, and details how to use them to configure the Workabout Pro4, along with scanners/imagers, Bluetooth, etc. This chapter also details the Kiosk
program, which enables you to customize your computer settings.
Chapter 4: Peripheral Devices & Accessories.
Workabout Pro4 computer.
Appendix A: Port Pinouts.
Appendix B: Imager & Camera Settings.
Appendix C: Scanner Settings.
Appendix D: Internal Imager & Scanner Specifications.
scanners and imagers.
Appendix E: Workabout Pro4 Specifications.
radios, and battery.
provides a basic overview of the Workabout Pro4.
describes the steps required to get the Workabout Pro4 ready for operation.
describes Workabout Pro4 features, including how to
describes the programs and applications accessed through two main areas from
describes the peripherals and accessories available for your
describes the Workabout Pro4 and accessories pinouts.
describes in detail your imager settings.
details your barcode options.
lists the specifications for your Workabout Pro4 computer,
®
Windows® Embedded CE 6.0 desktop, and how to
lists the specifications for the Workabout Pro4
Appendix F: Wireless Wide Area Network (WWAN) Settings.
Appendix G: Wireless Zero Config Settings.
Zero Config.
describes how to configure the Workabout Pro4 using Wireless
describes WWAN configuration information.
xiv Workabout Pro4 (Windows Embedded CE 6.0) User Manual
Text Conventions
NOTE Notes highlight additional helpful information.
IMPORTANT These statements provide particularly important instructions or additional information that
is critical to the operation of the equipment.
WARNING! These statements provide critical information that may prevent physical injury,
equipment damage or data loss.
Overview of the Workabout Pro4 Hand-Held Computer
The Workabout Pro4 is a modular, industrial hand-held computer available in two form factors: Long and Short.
Several options are available to suit applications in courier/delivery, field service, meter reading, asset
management, warehousing and logistics, manufacturing and other specialized data capture applications.
NOTE The Workabout Pro4 Hand-Held Computer is a body-worn device. To maintain compliance with
the FCC RF exposure guidelines, use a Zebra approved carrying case. Use of non-approved
accessories may violate FCC RF exposure guidelines.
NOTE For product specifications, refer to Chapter E: Workabout Pro4 Specifications
Model
- 7528X, 7528XP, 7528XLF, 7528XHF, 7528XPLF, 7528XPHF, 7528XUHFE, 7528XPUHFE, 7528XU-
HFN & 7528XPUHFN
Platform (standard)
• CPU: Sitara™ AM37x ARM Cortex™-A8 processor
• Memory: 512 MB RAM/4GB Flash
Operating System
• Microsoft Windows
Bundled Applications
• Internet Explorer
• Wordpad
• ActiveSync®®
®
®
Embedded CE 6.0
®
6
Terminal Emulation
• TekTerm Client Terminal Emulation
• Wavelink Terminal Emulation

About This Guide xv
Additional Software
• Kiosk
• MobiControl
• A.R.C.
• Total Recall/TweakIt/Dr. Debug
• Windows® Mobile Device Center
Wireless Data and Voice Communications
Standard
• Bluetooth® - Integrated Bluetooth® V2 + EDR
• WLAN - 802.11a/b/g/n WiFi. Optional diversity antenna module available.
NOTE Optional diversity antenna module available (model number RA3052).
Optional
• WWAN - UMTS/HSPA+ WAN radio with GPS receiver (supports AGPS, GLONASS and SBAS)
NOTE Data only. In the Americas the Workabout Pro4 is not approved to be used with any VoIP appli-
cation using Wide Area Network (WAN) or Wireless Local Area Network (WLAN).
• GPS within the Options below -- option 1 or 2
Option 1: GPS receiver with SBAS support
Option 2: GPS receiver with GLONASS support (only available with WWAN option)
NOTE 802.11a/b/g/n and Bluetooth are available simultaneously.
Barcode Scanners (optional)
• SE9651D Laser
• SE655 1D Imager
• SE1524 1D Laser
• SE4500 1D/2D Imager
NOTE All scan engines are available factory configured or user installable as either an end-cap or
slim pod.
RFID Modules
• LF Module
- Frequency: 125 kHz
- Protocols supported: EM 4x02; EM 4x05; EM 4x50; EM 4200; Q5; Hitag 1 & 2; Hitag S
• UHF Module
- Frequency: 868 MHz or 915 MHz
- Protocols supported: EPC Class 1 Gen 2; ISO 18000-6C
• HF Module
- Frequency: 13.56 MHz

xvi Workabout Pro4 (Windows Embedded CE 6.0) User Manual
- Protocols supported: ISO14443 type A, B and C, ISO 15693; NFC “Reader to Tag” Mode; full
Mifare support
- Data encryption: 2 SAM slots; ID1 SAM format; Class A, B and C
User Interface
• Display
- Transflective colour/touch display 9.4 cm (3.7 in) VGA/QVGA (640 x 480)
- Sunlight visibility with 240 cd/m
• Keyboards
- Alphanumeric (7528 Long)
- QWERTY or Numeric (7528 Short)
- High reliability keypad with ultra-white backlight
• Voice & Audio
- Push-to-Talk – VoIP (In the Americas the Workabout Pro4 is not approved to be used with any VoIP
application using Wide Area Network (WAN) or Wireless Local Area Network (WLAN).)
- Standard integrated microphone and receiver.
2
brightness
- Standard high volume 86 dBA beeper (95 dBA beeper with extended ranger laser).
- Optional speech module, certified with Vocollect and Wavelink Speakeasy clients.
Power Management
• 4400 mAh Lithium-ion battery – Model No. WA3010
• 2850 mAh Lithium-ion battery – Model No. WA3025
• 4680 mAh Lithium-ion battery – Model No.WA3026
• Super capacitor power backup
Regulatory Labels
Each scanner has a laser warning label accompanied by a protective housing and certificate label.
WARNING! Using controls or adjustments or performing procedures other than those specified
herein may result in hazardous radiation exposure.
SE655 LED Device – Class 1
LED Compliance Statement
Classified as “EXEMPT RISK GROUP” according to IEC 62471:2006 and EN 62471:2008

About This Guide xvii
Figure 1
Figure 2
SE655 End-Cap LED Warning Label - Class 1
SE655 Slim Pod Laser Window Warning Label
SE965, SE4500 and SE1524 Lasers – Class 2
Figure 3
SE965 End-Cap Laser Warning Label

xviii Workabout Pro4 (Windows Embedded CE 6.0) User Manual
Figure 4
Figure 5
SE965 Slim Pod Laser Window Warning Label
SE965 Protective Housing and Certificate Label
Figure 6
SE4500 End-Cap Laser/LED Warning Label

About This Guide xix
Figure 7
Figure 8
SE4500 Slim Pod Laser Window Warning Label
SE4500 Protective Housing and Certificate Label
Figure 9
SE1524 Laser Warning Label


CHAPTER 1BASIC OPERATION
BASIC OPERATION 1
Workabout Pro4 Features
Figure 1-1
Front View of the Workabout Pro4 7528 Long Alphanumeric Keyboard
Speaker
Microphone
LED
(Light Emitting Diode)

1 - 2 Workabout Pro4 (Windows Embedded CE 6.0) User Manual
Figure 1-2
Front View of Workabout Pro4 7528 Short Numeric Keyboard (QWERTY keyboard also available)
Workabout Pro4 Modules Available
To see a current list of Workabout Pro4 accessories and modules, go to the website a
http://www.zebra.com/US-EN/Product+Lines/Psion/?WT.mc_id=psion_us_p_handheld
Documents Available
To see a current list of documents and download what you need, go to the Knowledge Base on the
IngenuityWorking community website:
http://www.ingenuityworking.com/knowledge/w/knowledgebase/product-manuals.aspx
Preparing the Workabout Pro4 for Operation
The Battery
The Workabout Pro4 can be powered by the following Lithium-ion battery packs:
• 4400 mAh – WA3010
• 2850 mAh – WA3025
• 4680 mAh – WA3026
IMPORTANT Before charging the battery, it is critical that you review the battery safety guidelines in the
Workabout Pro4 Hand-Held Computer Regulatory & Warranty Guide (PN 8000296).
Battery packs shipped from the factory are charged to approximately 40% and must be fully charged prior to
use. Batteries can be charged using a variety of chargers and cradles. For detailed information, see Battery
Details on page 2-1.

Basic Operation 1 - 3
Replacing the Battery Pack
IMPORTANT Always switch the unit off before changing the battery. However, assuming the default
power saving parameters and battery reserve level have not been altered, battery swap
time is a minimum of minutes — you will not lose data if the battery is replaced within this
time frame.
NOTE If you are using a cradle or an external power supply, you can insert an uncharged battery and use
the device while the battery charges.
Assuming the default power saving parameters and battery reserve level have not been altered, a battery can
be removed for up to 4 minutes without losing data. Beyond 4 minutes, the hand-held may reboot.
Removing the Battery Pack
1. If your unit is equipped with a hand strap, unhook it from the base of the battery.
2. Turn the latches at the bottom of the battery to unlock the battery cover. Remove the battery.
Installing the Battery Pack
1. Insert the charged battery into the unit making certain that the contacts on the battery match those on the
hand-held. Replace the battery cover and lock both latches to secure the battery in place.
2. If your computer is equipped with a hand strap, re-attach the clip to the slot at the base of the battery.
3. Switch the unit on (see Switching the Workabout Pro4 On and Off on page 1-3).
Switching the Workabout Pro4 On and Off
Follow the instructions below for your Workabout Pro4.
Switching the Workabout Pro4 On
• Press and hold the [Power] button down for at least one second.
When the unit is turned off, it automatically enters a power-saving “suspend” state. When the Workabout Pro4
is switched on from the suspend state, operation resumes within a few seconds in the screen in which you
were working prior to turning the computer off.
IMPORTANT If your Workabout Pro4 fails to power up, consider the following troubleshooting options:
The battery may be overheated (>60C°), a non-Zebra battery may be installed, or the
battery may have fallen below the configured Suspend Threshold. See Suspend
Threshold and Estimated Battery Backup for details.
To switch on the hand-held, you will need to replace the overheated battery.
However, if you supply AC power to the Workabout Pro4 with a battery that falls below
the configured Suspend Threshold, the unit will
switch on.
Switching the Workabout Pro4 Off
• To switch off the Workabout Pro4, press the [Power] button. The Workabout Pro4 will automatically enter
the Suspend state.
1 - 4 Workabout Pro4 (Windows Embedded CE 6.0) User Manual
IMPORTANT Turning off the hand-held does not result in a complete shutdown; rather, the unit enters a
power-saving, “suspend” state. When the Workabout Pro4 is turned on from suspend
state, operation resumes within a few seconds.
To shut down the unit, press and hold down the [Power] button until the Power Option
screen is displayed where you can choose the Power off option.
Resetting the Workabout Pro4
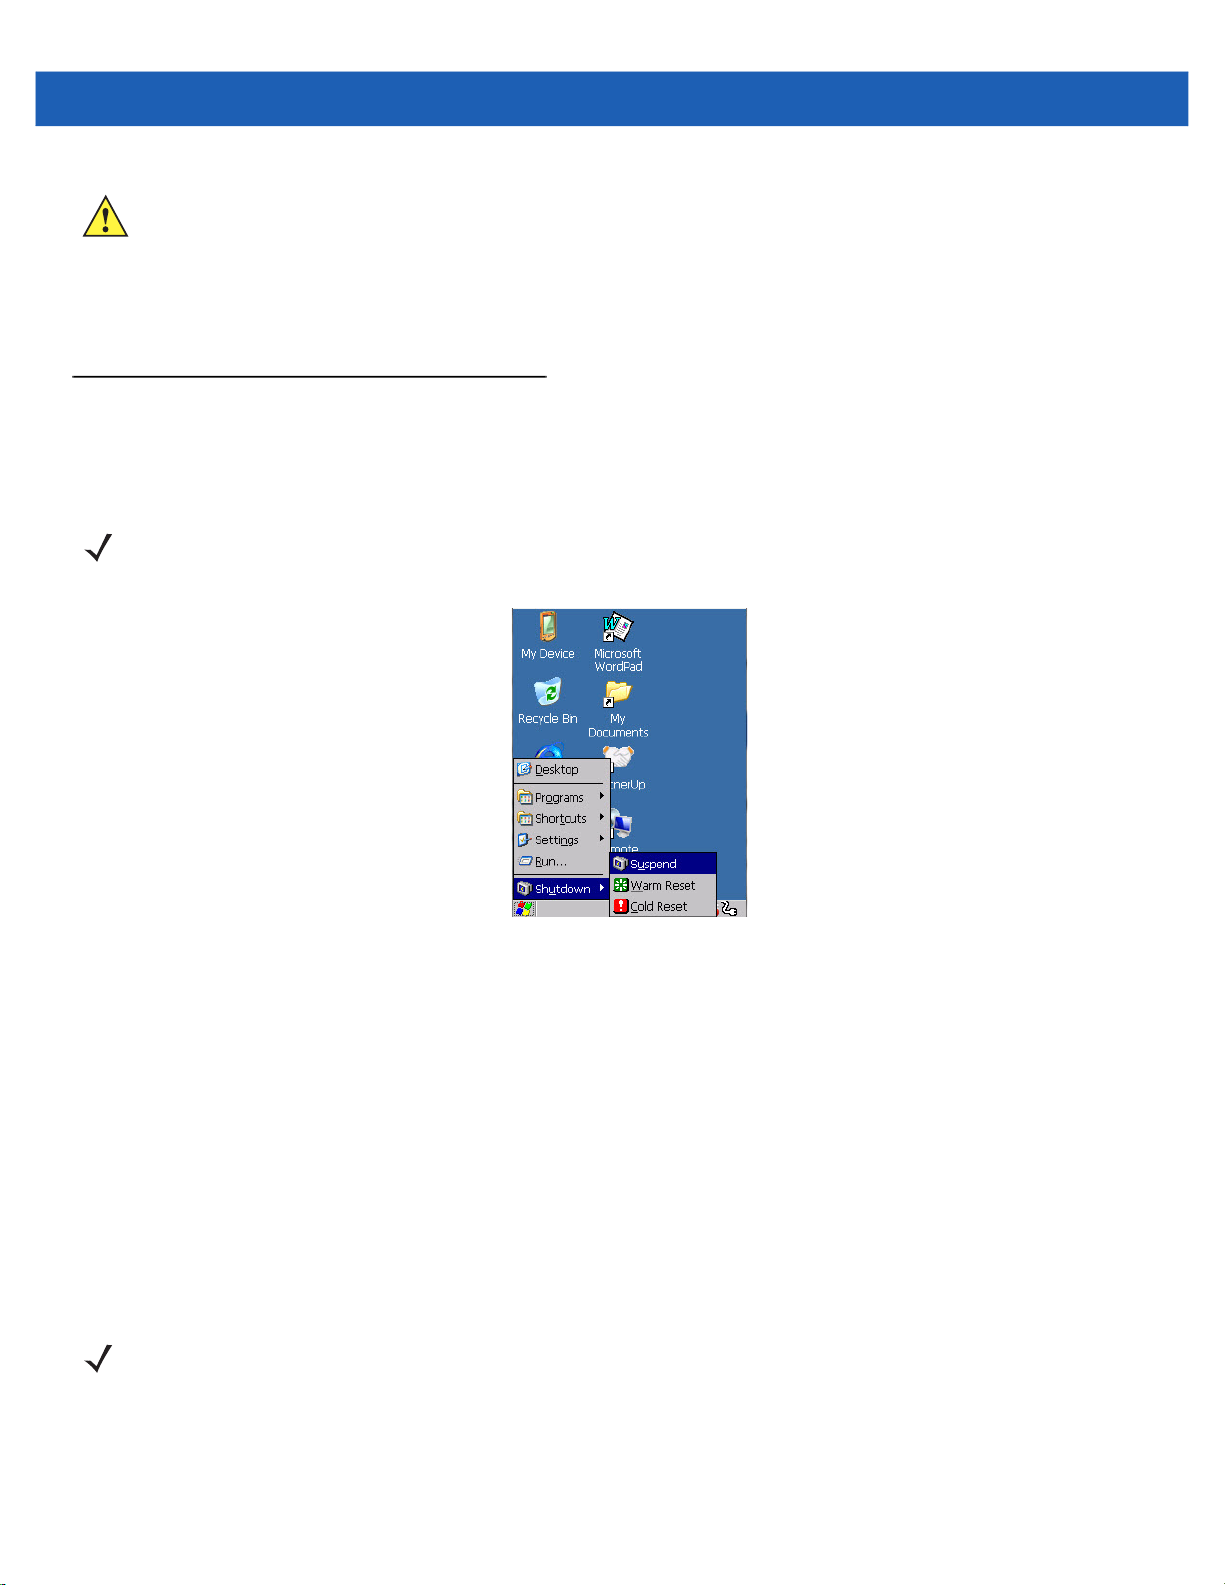
To perform a warm or cold reset, you can access the menu by going to Start>Shutdown. Alternatively you can
use the keyboard shortcuts described below.
NOTE If your Desktop is switched to the Kiosk Shell (refer to The Kiosk Desktop Shell on page 2-20),
resetting the unit is done solely by use of the keyboard shortcuts.
Performing a Warm Reset
During a warm reset, running programs are halted. The contents of the file system, RAM Disk, Flash Disk, and
the registry are preserved.
• Press and hold down the [FN/BLUE] key and the [Power] key simultaneously for a minimum of
four seconds.
Performing a Cold Reset
A cold reset reinitializes all hardware. All RAM including the RAM Disk is erased. Non-volatile storage such as
the Flash Disk is preserved, as is the file system.
To execute a cold reset:
• Press and hold down the [FN/ORANGE] key, the [FN/BLUE] key, and the [Power] key, simultaneously
for a minimum of four seconds.
NOTE As part of the normal Windows Embedded CE cold boot process, the screen may go blank for a
few seconds after the splash screen loading bar reaches the end. The desktop is displayed after
a few moments.

Basic Operation 1 - 5
Performing a Clean Start
A clean start returns the Workabout Pro4 to factory settings, flushes the registry keys, and deletes volatile
storage and the file system. The Flash Disk is preserved.
• Press and hold down the [FN/BLUE] key, the [Power] button and the [Front SCAN] key simultaneously
for a minimum of six seconds.
The Workabout Pro4 displays the Boot to BooSt menu.
• On an alpha keyboard, type .clean.
• On a numeric keyboard, type .25326.
Boot to BooSt
If you choose Boot to BooSt, the BooSt menu is loaded.
1. Press and hold down the [FN/BLUE] key, the [Power] button and the [Front SCAN] key for a minimum of
four seconds.
2. Press [1] to launch the OS.
Attaching Carrying Accessories
Zebra recommends that a carrying accessory — a hand strap — be installed on the Workabout Pro4 before
use. For detailed information, please see Attaching the Hand Strap on page 4-2.
Calibrating the Touchscreen
NOTE The touchscreen function can be turned off (see Touch on page 3-52).
The Workabout Pro4 touchscreen feature is factory-calibrated and ready-to-go; however, over time the touchscreen operating parameters may change, and it may need to be recalibrated for correct operation. Refer to
Calibrating the Touchscreen on page 2-7 for details.
Imager and Scanner Options
Appendix D: Internal Imager & Scanner Specifications lists the current model numbers, descriptions,
and specifications.
Connectivity
For information on connecting the Workabout Pro4 to a PC, please refer to “Data Transfer between Workabout
Pro4 and a PC” on page 17

1 - 6 Workabout Pro4 (Windows Embedded CE 6.0) User Manual
The Workabout Pro4 contains an 802.11a/b/g/n radio module. The Fusion Wireless Companion software
contains applications to create wireless profiles. To configure the radio, follow the steps outlined under the
heading Fusion Wireless Companion - Setting Up the 802.11a/b/g/n Radio on page 4-31.
To configure your Bluetooth settings, go to Bluetooth
If you have a GPS (Global Positioning System) module, see GPS (Global Positioning System) Settings on
page 3-23.
To see the radio specifications, please go to Appendix E: Workabout Pro4 Specifications.
® Setup on page 3-7
Data Transfer
.
Data transfer options vary slightly depending on the type of operating system installed in your PC. Various
options exist depending on whether you are using Windows XP or earlier, Windows Vista
For connection details, please refer to Data Transfer between Workabout Pro4 and a PC on page 3-17.
Voice Communication
If the Cinterion PHS8-P HSPA+ radio modem is installed and enabled, the Phone icon and the GSM signal
strength icon will appear when you tap on the navigation bar at the top of the screen. The keyboards are
equipped with [Talk] and [End] phone keys. For details on using your Voice options, please refer to Voice –
Using the WWAN Phone Dialer on page 3-59.
®
, Windows 7 or later.

CHAPTER 2GETTING TO KNOW THE
WORKABOUT PRO4
GETTING TO KNOW THE WORKABOUT PRO4 2
Operating System
• Microsoft® Windows® Embedded CE 6.0
Battery Details
Workabout Pro4 Hand-Held Computer is available with the following Lithium-ion battery pack options:
• 4400 mAh battery – Model Number WA3010
• 2850 mAh battery pack – Model Number WA3025
• 4680 mAh battery pack – Model Number WA3026
• Super capacitor power backup
For details battery specifications, refer to Appendix E: Workabout Pro4 Specifications
Battery Swap Time
Assuming the default power saving parameters and battery reserve level have not been altered, battery swap
time is a minimum of 4 minutes — you will not lose data if the battery is replaced within this time frame.
To protect data, the safest place to store data is on a microSD memory card or externally on a USB memory
stick or on a PC. You can also save data in the “Application” (Flash Disk) partition of the file system.
Refer to Suspend Threshold and Estimated Battery Backup on page 3-38 for details about reserving battery
power for data backup purposes.
The Suspend Threshold adjustment in the Power Properties tab allows you to determine the battery capacity at
which the Workabout Pro4 will be shut down. If left at the default value, Maximum Operating Time, the unit will
run until the battery is completely empty; the RAM is only backed up for a short period of time. If you choose
Maximum Backup Time, the Workabout Pro4 shuts off with more energy left in the battery so RAM can be
backed up for a longer period of time.

2 - 2 Workabout Pro4 (Windows Embedded CE 6.0) User Manual
IMPORTANT If your Workabout Pro4 fails to power up, consider the following troubleshooting options:
The battery may be overheated (>60C°), a non-Zebra battery may be installed, or the
battery may have fallen below the configured Suspend Threshold. See Suspend Thresh-
old and Estimated Battery Backup on page 3-38 for details.
To switch on the hand-held, you will need to replace the overheated battery.
However, if you supply AC power to the Workabout Pro4 with a battery that falls below the configured Suspend Threshold, the unit will
switch on.
Charging the Battery
IMPORTANT RISK OF EXPLOSION IF BATTERY IS REPLACED BY AN INCORRECT TYPE.
DISPOSE OF USED BATTERIES ACCORDING TO INSTRUCTIONS.
Batteries shipped from the factory are charged to approximately 40% of capacity. Lithium-ion battery packs
must be fully charged before use. These batteries can be charged with a variety of chargers and cradles. For
detailed information about these accessories, please see Chapter 4: Peripheral Devices & Accessories.
Normally it takes 3 to 4 hours to charge a battery.
IMPORTANT To avoid damaging the battery, chargers will not begin the charge process until the
The Keyboard
Keyboard options varied depending on the Workabout Pro4 model
Workabout Pro4 Variants Keyboard Type Available
Workabout Pro4 Long Alphanumeric only
Workabout Pro4 Short Numeric or QWERTY
This hand-held is equipped with a [Power] button in the lower left corner of the keyboard.
The [FN/BLUE] modifier key provides access to additional keys and system functions. These functions are
colour coded in blue print above the keyboard keys.
NOTE Almost all keys can be reprogrammed to suit your requirements.
battery temperature is between 0°C to 45°C (32°F to 113°F).
Regular Keys
The [Power] Button
The [Power] button in the lower left corner of the keyboard switches the unit on and off.
 Loading...