

Zebra MotionWorks Proximity Solution 1.2 MotionWorks Proximity Solution 1.2 User Guide (en)
Page 1

MotionWorks
Proximity
Solution
User Guide
MN-003976-02EN Rev. A
Page 2

ZEBRA and the stylized Zebra head are trademarks of Zebra Technologies Corporation, registered in
many jurisdictions worldwide. All other trademarks are the property of their respective owners.
© 2020 Zebra Technologies Corporation and/or its affiliates. All rights reserved.
Information in this document is subject to change without notice. The software described in this document
is furnished under a license agreement or nondisclosure agreement. The software may be used or copied
only in accordance with the terms of those agreements.
For further information regarding legal and proprietary statements, please go to:
SOFTWARE:zebra.com/linkoslegal
COPYRIGHTS:zebra.com/copyright
WARRANTY:zebra.com/warranty
END USER LICENSE AGREEMENT: zebra.com/eula
Terms of Use
Proprietary Statement
This manual contains proprietary information of Zebra Technologies Corporation and its subsidiaries
(“Zebra Technologies”). It is intended solely for the information and use of parties operating and
maintaining the equipment described herein. Such proprietary information may not be used, reproduced,
or disclosed to any other parties for any other purpose without the express, written permission of Zebra
Technologies.
Product Improvements
Continuous improvement of products is a policy of Zebra Technologies. All specifications and designs are
subject to change without notice.
Liability Disclaimer
Zebra Technologies takes steps to ensure that its published Engineering specifications and manuals are
correct; however, errors do occur. Zebra Technologies reserves the right to correct any such errors and
disclaims liability resulting therefrom.
Limitation of Liability
In no event shall Zebra Technologies or anyone else involved in the creation, production, or delivery of the
accompanying product (including hardware and software) be liable for any damages whatsoever
(including, without limitation, consequential damages including loss of business profits, business
interruption, or loss of business information) arising out of the use of, the results of use of, or inability to
use such product, even if Zebra Technologies has been advised of the possibility of such damages. Some
jurisdictions do not allow the exclusion or limitation of incidental or consequential damages, so the above
limitation or exclusion may not apply to you.
Publication Date
November 24, 2020
2
Page 3

Contents
About This Document ........................................................................................................................ 6
Introduction ...................................................................................................................... 6
Chapter Descriptions........................................................................................................ 6
Notational Conventions.................................................................................................... 6
Icon Conventions ............................................................................................................. 7
Related Documents and Software ................................................................................... 7
Service Information .......................................................................................................... 7
Introduction......................................................................................................................................... 8
Proximity Events .............................................................................................................. 9
Contact Tracing ........................................................................................................ 9
Proximity Alerts....................................................................................................... 10
Disinfecting Devices....................................................................................................... 11
Customer Admin Tool ...................................................................................................................... 12
Initial Access .................................................................................................................. 12
Customer Administrator Tool ......................................................................................... 13
Viewing Contact Details.......................................................................................... 16
Editing a Contact .................................................................................................... 16
Searching for a Contact.......................................................................................... 17
Logging Out.................................................................................................................... 17
MWP Badge Printing ........................................................................................................................ 18
Printing a PDF Wearer Badge from the MWP Portal ..................................................... 18
Printing a Zebra Printer Badge using the MWP Portal................................................... 19
Printer Requirements ....................................................................................... 19
Media Requirements ........................................................................................ 19
Software Requirements.................................................................................... 19
Printing Label ................................................................................................... 20
Creating a Custom Wearer Badge................................................................................ 21
3
Page 4

Contents
MB6000 with CC6000........................................................................................................................ 22
Requirements ......................................................................................................... 22
Site Setup....................................................................................................................... 22
Hanging the Posters......................................................................................... 23
Setting Up the MB6000 Cradle ........................................................................ 23
Charging the MB6000 Devices ........................................................................ 23
CC6000 Setup ........................................................................................................ 24
Mounting the CC6000 ...................................................................................... 24
Accessing the MWP Portal............................................................................................. 24
MB6000 Workflow.......................................................................................................... 24
Start of Shift ..................................................................................................... 24
End of Shift....................................................................................................... 27
MB6000 LED Indications............................................................................................... 29
CC6000 Error Messages............................................................................................... 30
Mobile Computers ............................................................................................................................ 32
Supported Devices......................................................................................................... 32
Requirements................................................................................................................. 32
Client Software Installation............................................................................................. 33
Site Setup....................................................................................................................... 33
Setting Up the Staging Area ................................................................................... 33
Hanging the Posters......................................................................................... 33
Setting Up the Charging Cradle.............................................................................. 34
Charging the Mobile Computer............................................................................... 34
Accessing the MWP Portal............................................................................................. 34
Workflow ........................................................................................................................ 34
Start of Shift ..................................................................................................... 34
End of Shift....................................................................................................... 37
Low Battery Indication...................................................................................... 38
Proximity Alert Notifications.................................................................................... 41
Cleaning............................................................................................................................................. 42
MB6000 Cleaning Instructions ....................................................................................... 42
Cleaning the MB6000 ............................................................................................. 42
Cleaning the MB6000 Charging Cradle.................................................................. 42
Mobile Computer Cleaning Instructions ......................................................................... 43
Harmful Ingredients ................................................................................................ 43
Device Cleaning Instructions .................................................................................. 43
Special Cleaning Notes .......................................................................................... 44
Cleaning Materials Required .................................................................................. 44
Cleaning the Device ............................................................................................... 44
4
Page 5

Contents
Housing ............................................................................................................ 44
Display.................................................................................................................... 44
Exit Window ..................................................................................................... 44
Cleaning Cradle Connectors ............................................................................ 44
5
Page 6

About This Document
Introduction
This guide provides information about using the MotionWorks Proximity (MWP) solution.
IMPORTANT: If you have a problem with your equipment, contact Zebra Global Customer Support for
your region. Contact information is available at: zebra.com/support
Chapter Descriptions
Topics covered in this guide are as follows:
• Introduction provides overview of the MWP solution.
• Customer Admin Tool provides information on creating user accounts.
• MWP Badge Printing provides instructions for printing Wearer badges.
• MB6000 with CC6000 provides information on using the solution with MB6000 beacons and a CC6000
Kiosk.
.
• Mobile Computers provides information on the solution with Zebra mobile computers.
• Cleaning provides information for cleaning the devices and cradles.
Notational Conventions
The following conventions are used in this document:
• Bold text is used to highlight the following:
• Dialog box, window and screen names
• Drop-down list and list box names
• Check box and radio button names
• Icons on a screen
• Key names on a keypad
• Button names on a screen.
• Bullets (•) indicate:
• Action items
• Lists of alternatives
6
Page 7

• Lists of required steps that are not necessarily sequential.
• Sequential lists (such as those that describe step-by-step procedures) appear as numbered lists.
Icon Conventions
The documentation set is designed to give the reader more visual clues. The following graphic icons are
used throughout the documentation set. These icons and their associated meanings are described below.
NOTE: The text here indicates information that is supplemental for the user to know and that is not
required to complete a task.
IMPORTANT: The text here indicates information that is important for the user to know.
CAUTION: If the precaution is not heeded, the user could receive minor or moderate injury.
WARNING: If danger is not avoided, the user CAN be seriously injured or killed.
About This Document
Related Documents and Software
The following documents provide more information about the MWP solution.
• MotionWorks Proximity Portal User Guide.
• MotionWorks Proximity Client User Guide.
For the latest version of this guide and all guides, go to zebra.com/support
Service Information
If you have a problem with your equipment, contact Zebra Global Customer Support for your region.
Contact information is available at zebra.com/support
When contacting support, please have the following information available:
• Serial number of the unit
• Model number or product name
• Software/firmware type or version number
Zebra responds to calls by email, telephone or fax within the time limits set forth in support agreements.
If your problem cannot be solved by Zebra Customer Support, you may need to return your equipment for
servicing and will be given specific directions. Zebra is not responsible for any damages incurred during
shipment if the approved shipping container is not used. Shipping the units improperly can possibly void
the warranty.
.
.
If you purchased your Zebra business product from a Zebra business partner, contact that business
partner for support.
7
Page 8

Introduction
Zebra MotionWorks® Proximity (MWP) solution enables worker proximity sensing and logging, providing a
suite of reports and dashboards on proximity trend events. Accurate and efficient employee contact tracing
helps employers to respond quickly and accurately by enabling them to identify the right individuals in the
event of a COVID-19 exposure in the workplace, so that the appropriate measures can be taken.
A MWP enabled device sends and listens for BLE beacons to sense the presence of a nearby MWP
device. If a nearby device is detected, it’s wearer ID and device ID are continuously logged and
timestamped. The device sends that sensing data over the enterprise Wi-Fi to the MWP Portal where
analytics software converts it into proximity data based on five minute rolling windows. This data is then
made available for viewing through MWP Portal dashboards and reports enabling operation managers and
HR/facilities leaders with the tools they need to enforce social distancing guidelines and contact trace
within their existing work-flows.
Proximity
Database
Wi-Fi
Proximity
Events
There are four components within the MWP solution that help customers implement a comprehensive
return to work strategy.
• Proximity Events - When workers are too close together for too long, a proximity event is logged in the
portal. Reports of these events allow customers to see how well their operation is following social
distancing rules.
• Contact Tracing - if a worker is suspected of or has tested positive for COVID-19, contact tracing
reports make it quick and easy to identify everyone at risk of having been infected.
8
Page 9

• Proximity Alerts - to help reduce the risk of becoming infected or spreading the virus, alerts from the
devices inform the workers wearing them when they need to move away from each other which will
prevents logging of a Proximity Event.
• Device Disinfecting - device disinfection ensures workers do not spread the virus through contaminated
equipment.
Proximity Events
As workers with Zebra devices walk throughout a building, the software on the device captures proximity
sensing data, including duration and identification of workers involved, and sends the data to Zebra-based
application through the enterprise’s internet connection. The system analytics generate Proximity Event
data when workers are in close proximity over a period of five minutes.
Introduction
Event
(Logged)
Proximity Event reports and dashboards provide insight to enable coaching and feedback on observed
social distancing behaviors. If the workers remain outside the proximity distance, or only briefly pass by
each other, no event is logged.
If the worker moves into an area without Wi-Fi coverage, the device continues to collect data as proximity
sensing is performed by Bluetooth. Proximity data collected by the device is buffered for several hours and
is uploaded to the cloud once back in Wi-Fi coverage. This ensures the all data is collected to maintain the
integrity of cloud based reports.
Logged Proximity Event Data displays on dashboards and reports that give company leaders the
information they need to manage social distancing compliance, identify patterns that might indicate
bottlenecks in their physical spaces, and to make adjustments to policies and procedures if necessary.
Contact Tracing
The MWP solutions allows organizations to avoid the potential errors of relying on slow, manual processes
and people's memories of whom they were near in the past two weeks.
Instead, should a worker test positive, MWP provides an instant, graphical display that shows not only
whom the worker was near, but also everyone those workers were near. Following this contact tracing tree
makes it fast and easy to identify who needs to be notified, and to begin prevention measures such as
testing, quarantine, and deep cleaning of workspaces.
Non-Event
(Not Logged)
IMPORTANT: The MWP solution does not store any health care data about workers and no record is kept
on workers that test positive.
9
Page 10

Proximity Alerts
Introduction
NOTE: Not available on MB6000 devices.
Proximity alerts are audio and/or vibration alerts that assist workers in preventing proximity events before
they occur. If two or more workers are in close proximity for a minute, the device triggers an audio and/or
vibration alert. Every consecutive minute thereafter, the device issues another alert.
Three proximity alerts in a five minute period will result in the generation of a Proximity Event in the Portal.
These events will appear on the Dashboard as long as the workers are in close proximity. If they then
separate for a minimum of 1 minute, the event will be marked closed in the solution and be removed from
the dashboard. These events, open and closed, can also be viewed in reports that show the date, time and
length of social distancing violations.
But rather than logging events and tracing contacts, the best option is to reduce risk by avoiding potential
exposure and transmission scenarios in the first place. Therefore, another key component of MotionWorks
Proximity is alerts.
10
Page 11

Disinfecting Devices
Regularly cleaning and disinfecting the devices workers are handling is especially necessary when devices
are used by different workers from one shift to the next. Device disinfection is part of the recommended
procedures, and customers are reminded to do it. When a workers checks in his or her device at the end of
the shift, the device's screen indicates that it requires cleaning. As long as that screen is present, the
device cannot be associated with an employee for use on the next shift.
Introduction
Detailed instructions can be found on connect.zebra.com/DeviceDisinfection_us
computer.
for each Zebra mobile
11
Page 12

Customer Admin Tool
Initial Access
Once an account is set up in SalesForce, SalesForce sends the following email to the user:
1. When the user receives the email from Zebra, click the EULA Page link.
2. Read the EULA and click I Accept.
3. Click Save. The Success message displays.
12
Page 13

Customer Admin Tool
SalesForce on-boards the user in Savanna and send the email below.
4.
5. The email has two links:
• Link to MWP Portal, proximity.zebra.com.
• Link to the Customer Administrator Tool to maintain the users against the tenant/Account.
6. Click the Customer Administration Tool link.
7. Enter your username and password.
8. For the first time, follow prompts to create a new password.
Customer Administrator Tool
Use the Customer Administrator Tool to create new accounts, on-board new accounts to the MWP, modify
existing accounts, and assign user roles.
1. Click on the link in the email. The Zebra Single Sign On (SSO) screen appears.
2. Enter username and password and then click OK. The Customer Administrator Tool screen appears.
13
Page 14

Customer Admin Tool
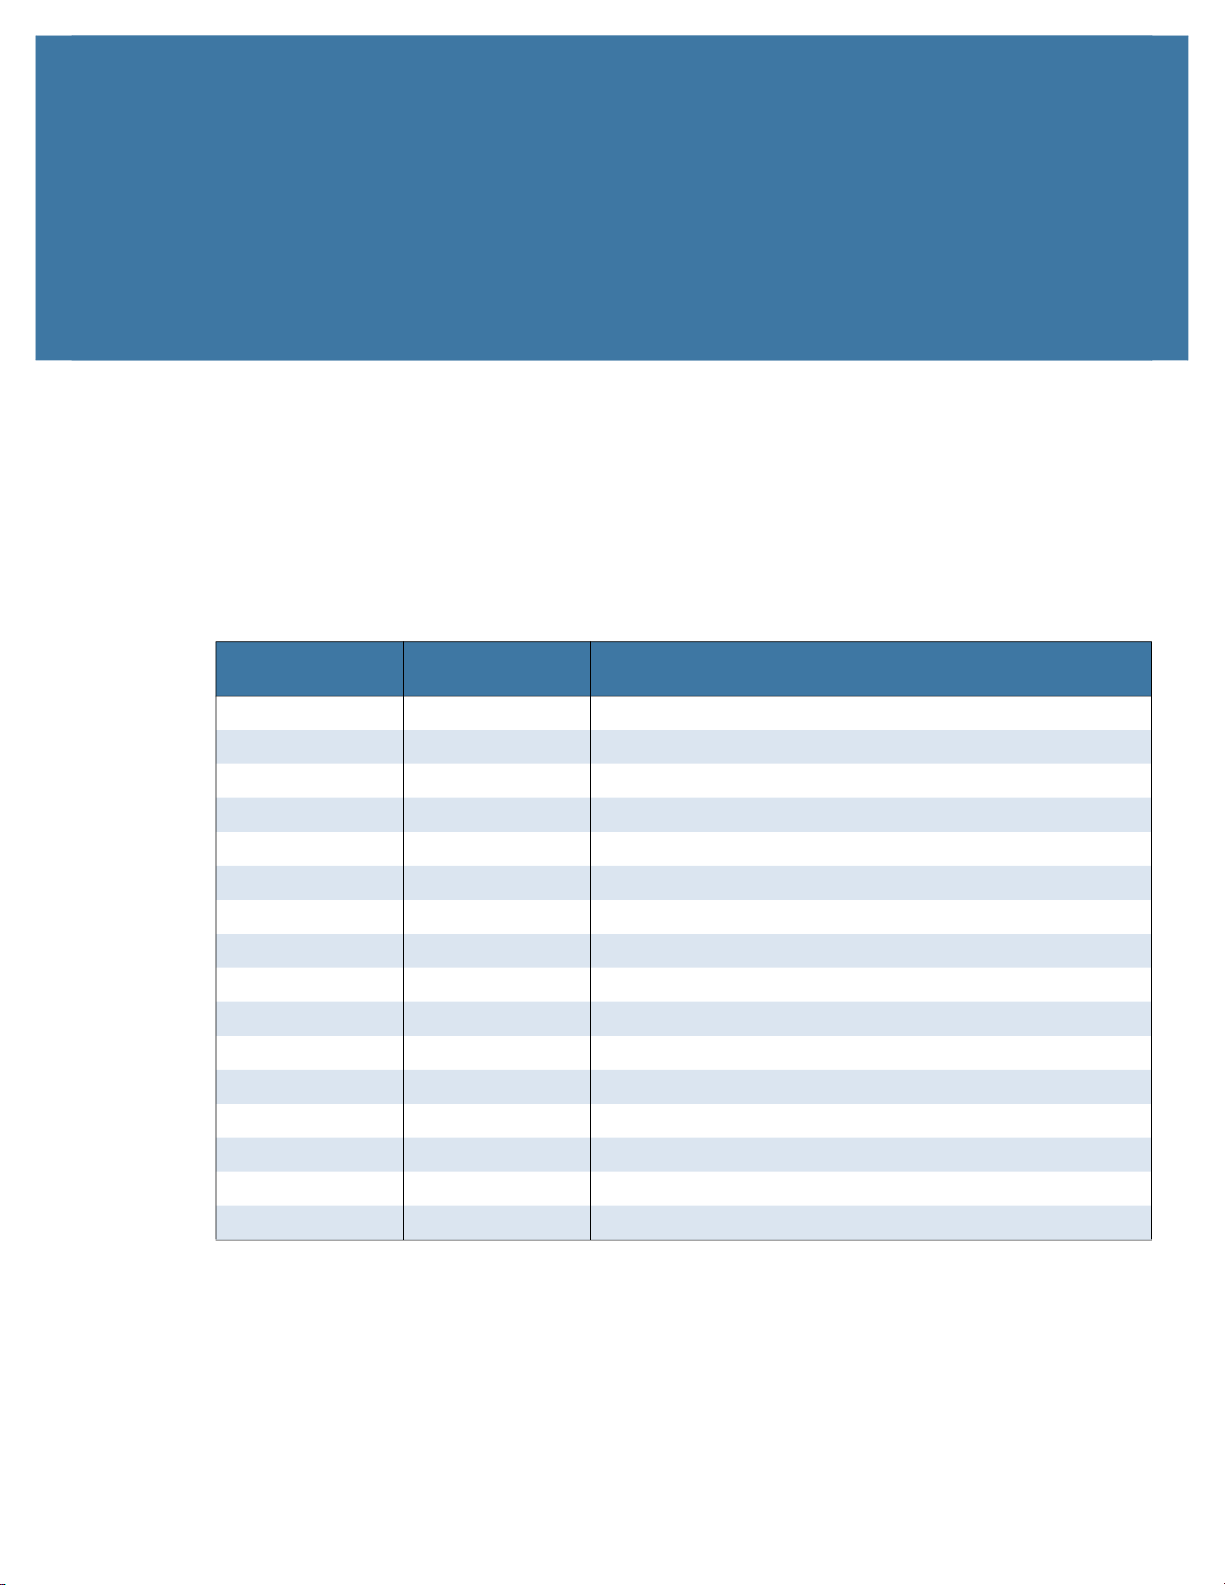
Click Contact Management. A list of contacts appear.
3.
If this is the first time access, only the superuser displays in the list.
Column Description
View Click to view contact information.
Action Click to open the Edit dialog box.
Contact Name Lists first and last name of the contact.
Email Lists the email address for the contact.
Phone Lists the phone number for the contact.
Application Access Lists the assigned access level for the Portal.
• MWP - Admin
• MWP - HR
• MWP - IT
14
Page 15

Adding a New Contact
To add a new contact:
1. Click New Contact. The Contact Details - New dialog box appears.
Customer Admin Tool
2. In the General Information section, add the contact information. Last Name and Email are required.
NOTE: If neither of the radio buttons are selected when creating the contact, the account is not created
and an email is not sent to the user.
3. In the Zebra’s Application Access section, assign the access for the contact.
• Check the Provide Admin access to the user in the portal radio button to give access to the IT
and Admin dashboards of the portal. This contact is identified as MWP Admin Role in the Portal.
• Check the Provide HR access to the user in the portal radio button to give access to the
Proximity dashboards of the portal. This contact is identified as MWP HR Role in the Portal.
• Check the Provide IT access to the user in the portal radio button to give access to the IT and
Admin dashboards of the portal. This contact is identified as MWP IT Role in the Portal.
4. Click Save. The Customer Administrator Tool immediately creates the new user in the SSO and
Savanna.
15
Page 16

Customer Admin Tool
The new user receives a Welcome email to access the MWP Portal.
5.
Viewing Contact Details
To view a contact:
1. Click next to the Contact Name. The Contact Details - View dialog box appears.
Click Edit to edit the contact or click Cancel to close the dialog box.
Editing a Contact
To edit a contact:
16
Page 17

Customer Admin Tool
1.
Click next to the Contact Name. The Contact Details - Edit dialog box appears.
2. In the General Information section, edit only the First Name, Last Name, and Phone fields.
Searching for a Contact
To search for a contact by name or email address:
1. Click Search. A text box appears.
2. Enter the search criteria. The list filters as the user types in the search box.
3. Click Search to exit search.
Logging Out
After adding contacts, log out of the Customer Administrator Tool.
1. In the upper right hand corner, select the drop-down list next to the user name.
2. Select Logout.
17
Page 18

MWP Badge Printing
The MWP solution uses Wearer badges to associate a worker to a device. The worker name is not
captured by the solution but is recorded by the company Human Resource employee to be used if contact
tracing is required.
IMPORTANT: Although the solution does not store personal information in the cloud, the user's name will
appear on the badge and displays in the sensing screen of the MWP Client application.
NOTE: Each worker must be assigned a badge. Wearer badges are not used when the solution is only
using MB6000 devices.
There are three printing options:
• Printing a PDF badge using the MWP Portal
• Printing a Zebra printer badge using the MWP Portal
• Customer design and print using ZPL.
Printing a PDF Wearer Badge from the MWP Portal
To print a Wearer badge to a pdf file using the MWP Portal:
1. Login to the MWP Portal.
2. Click Admin > Add Wearer.
3. Search for a wearer.
4. Click to print a wearer badge.
5. In the Name field, enter the name should appears on the badge.
6. Click Print PDF to print a page. A badge page appears.
18
Page 19
MWP Badge Printing
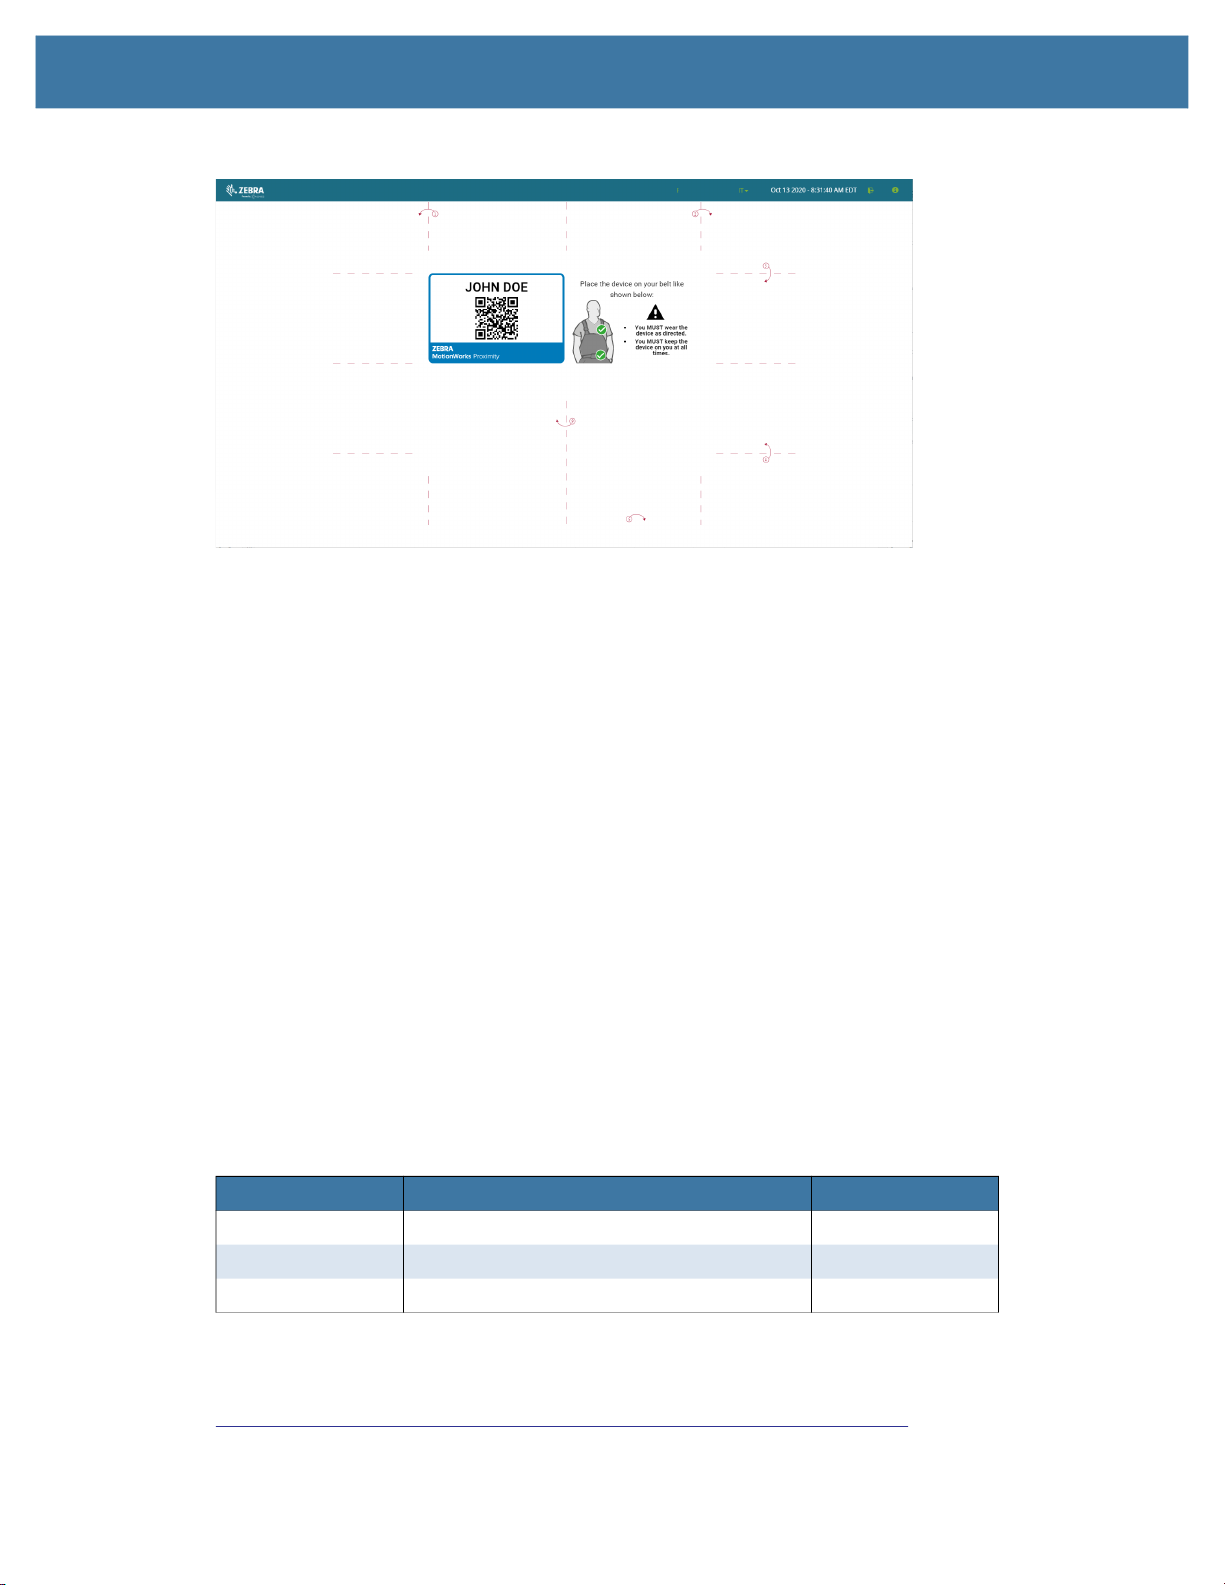
Figure 1 PDF Wearer Badge Sample
7. Type Ctrl-P to print to a local or network printer.
8. Click the browser back button to return to the previous page.
9. Fold paper along dashed lines as shown.
10. Place badge in badge holder.
Printing a Zebra Printer Badge using the MWP Portal
To print a Wearer badge to a Zebra printer using the MWP Portal:
Printer Requirements
• Zebra ZD420c Printer
• Thermal transfer print technology
• DPI 203 dpi
Media Requirements
• Chemistry: Polypropylene or polyester
• Print Technology: Thermal Transfer
• Ribbon: CR80
Type Description SKU
Label Z-Ultimate 3000T White 76 mm x 51 mm 880255-080D
Label Z-Ultimate 3000T White 3” x 2” 10011703
Resin Resin Ribbon, 110mmx74m, 5095 05095CT11007
Software Requirements
Installation of Browser Print software is required prior to printing to a Zebra printer. Go to
zebra.com/us/en/support-downloads/printer-software/by-request-software.html
installation file and installation instructions.
to obtain the Browser Print
19
Page 20

Each domain that uses the Browser Print software needs to have its domain added to Browser Print's allow
list. When the user selects Print Zebra Printer for the first time, a dialog box displays. To enable Zebra
printing, click Yes to confirm the domain matches the domain in your address bar.
Printing Label
To print a Wearer Badge to a label using the MWP Portal:
1. Login to the MWP Portal.
2. Click Admin > Add Wearer.
3. Click to print an existing wearer badge.
4. In the Name field, enter the name should appears on the badge.
5. Click Print Zebra Printer to print to a supported Zebra printer.
Figure 2 Printing to Zebra Printer
MWP Badge Printing
6. In the Select Printer drop-down list, select the connected Zebra printer.
7. In the second drop-down list, select Portrait or Landscape for printing orientation.
8. Click Print badges.
9. Remove label from printer.
Figure 3 Zebra Printed Wearer Badge Sample
20
Page 21

MWP Badge Printing
Creating a Custom Wearer Badge
The customer can create a Wearer Badge manually and print using any Zebra printer using ZPL or other
printing language.
The CC6000 and Zebra mobile devices require a QR code with any error correction level.
QR Barcode format:
zmwprox1://{id:"Employee Id”, un:"Wearers Name"}
where:
• Employee Id - the wearer’s identification in the MWP Portal.
• Wearers Name - Name that appears on the badge. If the barcode is to be attached to another badge
that already has the employee name, Wearer Name can be excluded.
21
Page 22

MB6000 with CC6000
Requirements
NOTE: For small installations, a CC6000 Kiosk may not be required to associate wearers and devices.
Refer to the MotionWorks Proximity Portal User Guide for information on manually associating MB6000
devices.
• MB6000 devices
• MB6000 10-Slot Charge Only Cradle(s) with power supply and AC line cord.
• CC6000 Kiosk Kit
• Wall Mount Kiosk Kit
• North America - MWPROX-MB-NAKIOSKWL
• EMEA - MWPROX-MB-NAKIOSKWL (AC line cord sold separately)
• Pole Mount Kit
• North America - MWPROX-MB-NAKIOSKPL
Site Setup
• EMEA - MWPROX-MB-EMKIOSKPL (AC line cord sold separately)
• MotionWorks Proximity Solution User Guide
• MotionWorks Proximity Portal User Guide
• MotionWorks Proximity posters.
The customer:
• Obtains alcohol wipes for cleaning. See MB6000 LED Indications on page 29 for information on
cleaning the MB6000 devices and cradle.
• Sets up a staging area.
• Provides devices to workers to wear during the shift.
22
Page 23

Setting Up the Staging Area
NOTE: These are only recommended procedures. It is the responsibility of the customer to design the
proper staging area for their facility.
A staging area should be set up that acts as the main location for distribution and return of devices. Ideally
the staging area should be near an exit so that as workers enter the building, they are provided a device for
the day. At the end of the day, the worker returns to the staging area, returns the device and immediately
leaves the building.
The staging area should contain a table for:
• Laptop/computer with internet connection to access the MWP Portal
• 10-Slot Charging Cradle(s) with devices.
• CC6000 Kiosk
• Cleaning supplies.
• Used device bin.
• Facility map with locations marked of each worker wearing MB6000 devices.
A queue should be created so that workers remain 6 feet (2 m) apart while waiting for their device.
MB6000 with CC6000
Hanging the Posters
The MWP posters illustrate user and proper wearing instructions. The customer should hang the poster in
an area visible to the workers at the entrances and throughout the facility.
Setting Up the MB6000 Cradle
To setup the cradle:
1. Place the cradle on a table in the staging area.
2. Plug the power supply plug into the back of the cradle.
3. Plug the AC line cord into the power supply.
4. Plug the AC line cord into an AC outlet.
Charging the MB6000 Devices
To charge the MB6000:
1. Place the device into a cradle slot.
2. The MB6000 begins charging. The green LED blinks.
3. When the MB6000 is fully charged (approximately 2.5 hours), the LED lights green.
23
Page 24
MB6000 with CC6000
Figure 4 MB6000 Charging LED
Orange
LED
Green
LED
Red
LED
Yellow
LED
CC6000 Setup
Mounting the CC6000
Refer to the CC6000 Installation Guide for information on mounting g the CC6000. Go to
zebra.com/us/en/support-downloads/interactive-kiosks/cc600-cc6000.html
Accessing the MWP Portal
NOTE: Refer to the MotionWorks Proximity Portal User Guide for detailed information on using the portal.
for the latest guide.
Zebra will provide a URL and credentials for accessing the Zebra MWP Portal.
Enter the URL into a browser. The login screen appears.
Enter credentials and click OK. The Portal opens to the Proximity Event Dashboard screen.
NOTE: If the CC6000 is not working, wearers can be associated manually by the IT Admin in the MWP
Portal.
MB6000 Workflow
All devices must be in the cradle and fully charged at the beginning of each shift.
Start of Shift
1. Workers report to the staging area at the start of the shift.
2. Shift Lead removes a clean MB6000 from the charging cradle.
3. Shift Lead cleans the MB6000.
4. Shift Lead places MB6000 on the table.
5. Worker takes MB6000 off the table.
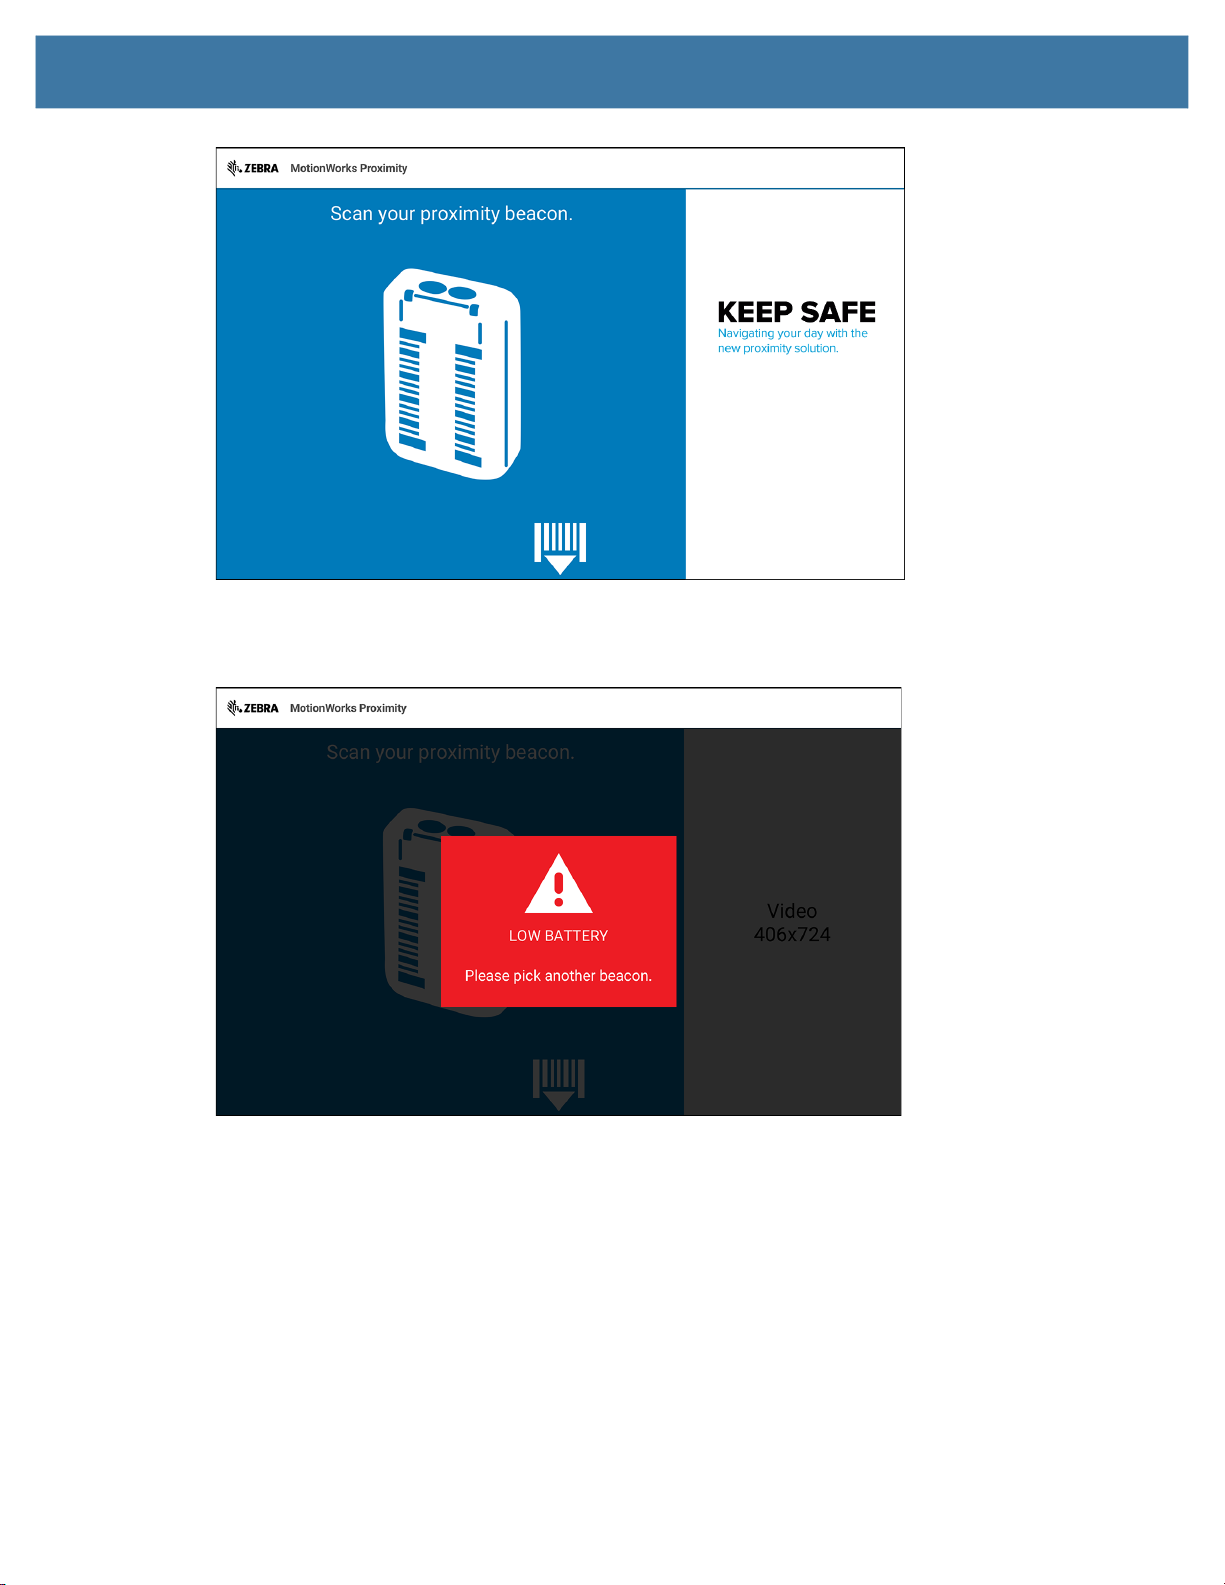
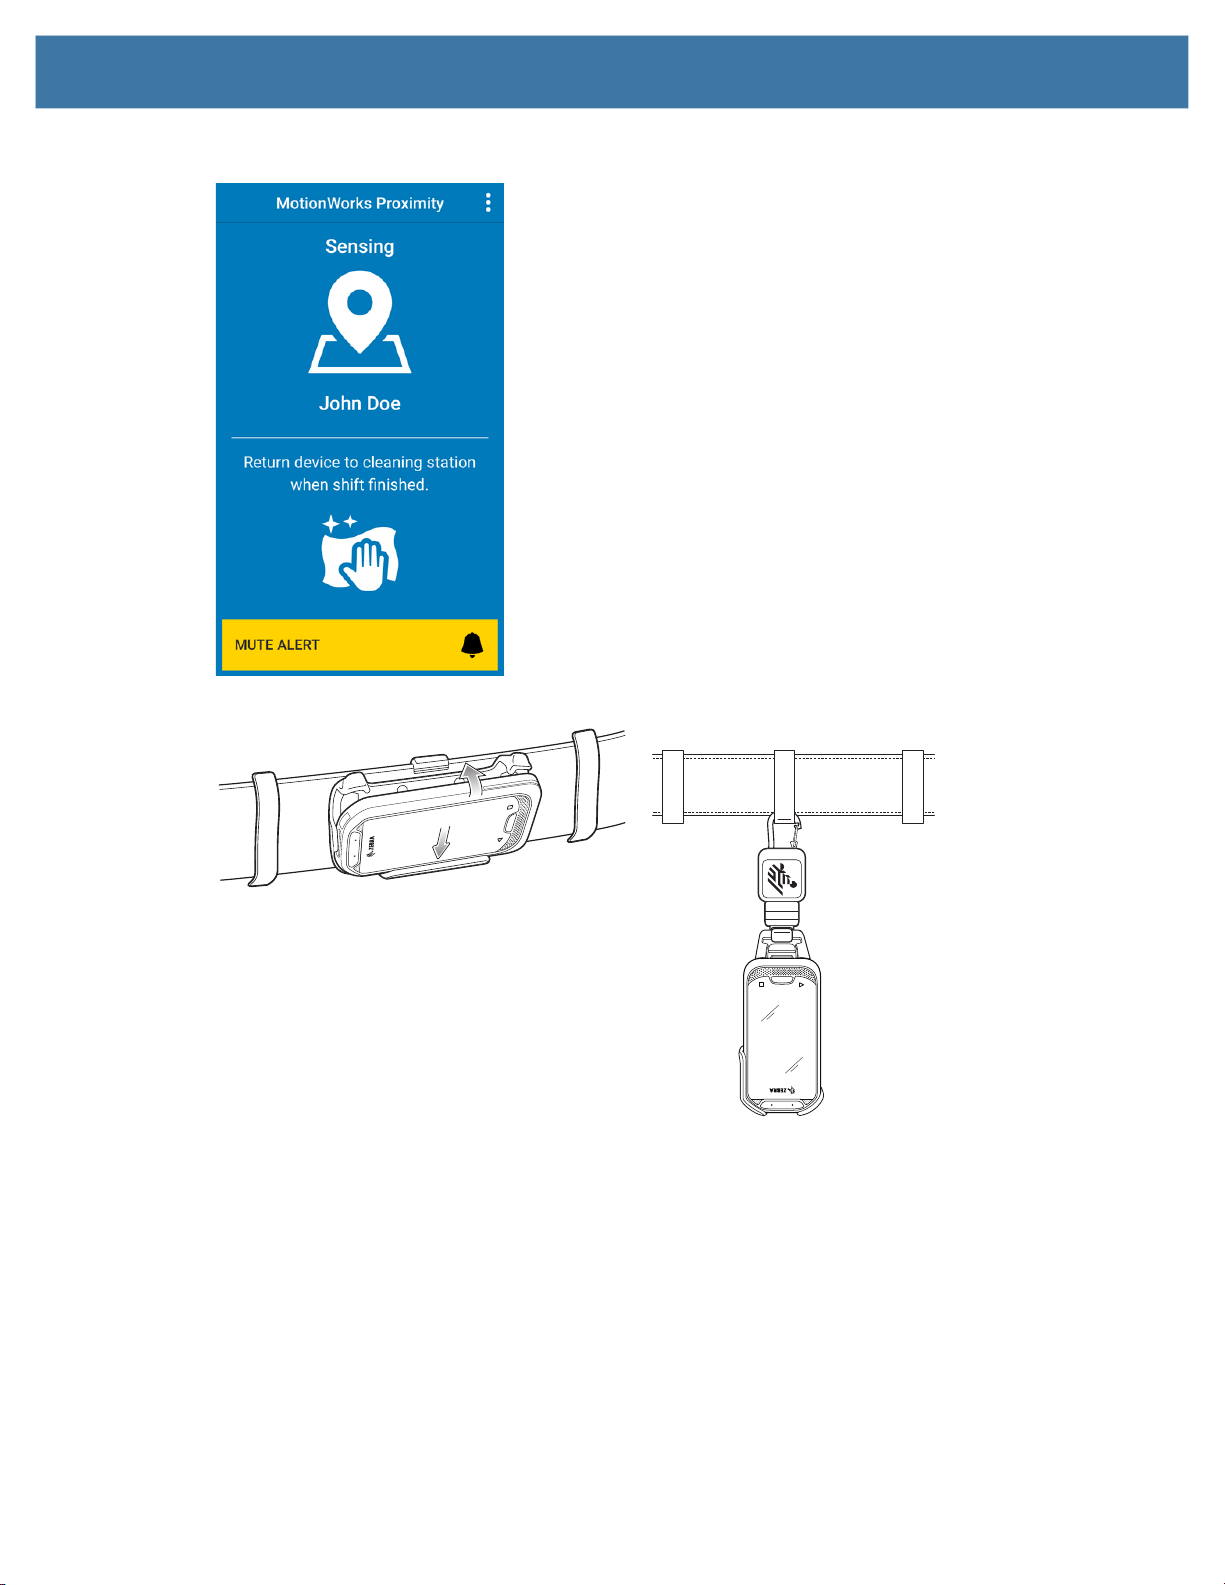
6. The worker goes to the CC6000. The screen displays:
24
Page 25
MB6000 with CC6000
7.
The worker places the MB6000 under the CC6000 to scan the MB6000 barcode on the back of the
device.
a. If the MB6000 battery charge is too low, the CC6000 displays:
25
Page 26

MB6000 with CC6000
If the MB6000 battery charge is good, the CC6000 displays:
b.
8. After a short period of time, the screen displays:
9. The worker scans their wearer badge.
26
Page 27

MB6000 with CC6000
Upon successful wearer badge reading, the CC6000 displays:
10.
IMPORTANT: Do not place device in a pocket.
Ensure that the device clip is facing the body not away from the body.
11. Worker places the MB6000 on belt on front of body.
12. Worker performs daily work activities.
End of Shift
1. Worker returns to Staging Area. The CC6000 displays:
27
Page 28

MB6000 with CC6000
The worker places the MB6000 under the CC6000 to scan the MB6000 barcode on the back of the
2.
device. The CC6000 displays:
3. Worker placed the device in a Used bin.
4. Site Lead immediately cleansMB6000according to sanitizing procedures.
5. Site Lead returns the clean MB6000to the 10-slot charging cradle.
28
Page 29

MB6000 LED Indications
Orange Green Red Yellow Description
Continuous
blinking
MB6000 with CC6000
5 blinks Indicates Gateway connectivity failure.
Battery charging in progress. LED blinking
stopped when charging is complete.
On Charging error.
Blinks every
30 seconds
5 fast blinks 5 fast blinks 5 fast blinks 5 fast blinks Indicates that battery voltage is too low and
On Indicates the device is in the charger and
2 fast blinks Button 1 is pressed.
2 fast blinks Button 2 is pressed.
2 fast blinks Button 2 held down for more than 10
2 fast blinks Button 2 held down for between 10 and 20
5 fast blinks 5 fast blinks 5 fast blinks 5 fast blinks Button 2 held down for between 20 and 30
5 fast blinks Button 2 held down between 30 and 40
2 fast blinks Button 2 held down for more than 40
Low battery.
device turns off.
Indicates the device is not in charger and if
battery temperature is not in range. Device
turns off.
fully charged.
seconds.
seconds. Device restarted.
seconds. Device powers off.
seconds. Wi-Fi configuration is erased and
device reboots.
seconds.
29
Page 30

CC6000 Error Messages
Table 1 lists error messages that might appear on the CC6000.
Table 1 CC6000 Error Messages
Error Message Description
Setup Screen
Cannot connect to
DataWedge
Cannot connect to the
internet. Please check the
internet connection
MB6000 with CC6000
CC6000 tried to start DataWedge and install the Proximity profile but failed.
CC6000 could not connect to the MWP Portal indicating the internet
connection is non-existent.
Please scan your setup
authentication barcode
provided
Authentication error.
Please scan a working
token
Barcode error. Please
scan your setup barcode
Home Screen
Incorrect barcode
scanned. Please scan the
barcode on the rear of a
beacon to continue
Invalid device ID. Please
try again.
Low Battery. Please pick
another beacon
Authentication Error.
Token invalid. Please
setup new authentication
token
No authentication token is found on the CC6000 and cannot connect to the
WMWP Portal.
A token was found on the CC6000, but does not work. This could be due to
an invalid or expired token.
A barcode was scanned that is not an authentication barcode.
Authentication barcodes can only be Code128 and contain correct data.
A barcode was scanned that is either not Code128 or does not match the
data format for a MAC address.
The barcode scanned was Code128 and matched the correct data format
but was not found on the MWP Portal. The MB6000 might not be set up
properly on the MWP Portal.
The MWP Portal returned successful value, but the battery level of the
MB6000 is less than 50% and cannot be assigned to the wearer.
On the most recent connection to the MWP Portal, an authentication error
occurred. The authentication token is invalid or expired. The CC6000
startup process will have to be performed.
Placement Screen
Incorrect barcode
scanned. Please scan the
barcode on your badge to
continue
Wrong type of barcode
scanned. Please contact
your supervisor for help
Authentication Error.
Token invalid. Please
setup new authentication
token
A barcode was scanned that was either not a QR code or does not match
the data format for a wearer ID badge.
An incorrect barcode has been scanned three times in a row.
On the most recent connection to the MWP Portal, an authentication error
occurred. The authentication token is invalid or expired. The CC6000
startup process will have to be performed.
30
Page 31

MB6000 with CC6000
Table 1 CC6000 Error Messages (Continued)
Error Message Description
This beacon has already
been assigned. Please try
another beacon
Low battery. Please pick
another beacon.
The wearer has tried to assign a beacon that is already assigned by
another wearer. This should rarely occur, as this check is done on the
previous screen, and could only happen if whilst the wearer is using the
kiosk, the beacon is assigned to a user with another kiosk, or assigned
using the MWP Portal.
The MB6000 can not be assigned to the wearer because the battery
charge level is below 50%. This should rarely happen as this check is
performed on the previous screen, but could happen if it is 50% when
removed from the charging cradle, and then the MB6000 is used, causing
the battery charge level to drop below 50%.
Invalid User ID. Please try
again, or contact your
supervisor.
The Wearer badge scanned matches the data format for a user ID, but it is
not valid on the MWP Portal. This could occur if a badge is scanned that is
not linked to the same instance of MWP as the CC6000.
31
Page 32
Mobile Computers
Supported Devices
The table below lists the supported Zebra devices. When using the solution, only use the same device
types. Do not mix different types of Zebra devices.
Table 2 Current Supported Devices
Device
EC30 Android ™ Oreo 01-23-18.00-OG-U15-STD
MC3300 Android Oreo 02-23-15.00-OG-U20-STD
MC3300 Android Nougat 01-01-49.00-NG-U20-STD
MC9300 Android Oreo 01-30-04.00-OG-U06-STD
TC21 Android 10 10-12-13.00-QG-U17-STD-HEL-04
TC26 Android 10 10-12-13.00-QG-U17-STD-HEL-04
TC51 Android Nougat 01-01-49.00-NG-U20-STD
TC51 Android Oreo 02-32-04-00-OG-U02-STD
TC52 Android Oreo 01-30-04.00-OG-U06-STD
TC56 Android Oreo 02-23-15.00-OG-U20-STD
TC57 Android Oreo 01-23-18.00-OG-U15-STD
TC70x Android Oreo 02-23-15.00-OG-U20-STD
TC70x Android Nougat 01-01-49.00-NG-U20-STD
TC72 Android Oreo 01-23-18.00-OG-U15-STD
TC77 Android Oreo 01-23-18.00-OG-U15-STD
TC8300 Android Oreo 01-30-04.00-OG-U13-STD
Operating
System
Supported BSP
Requirements
• Zebra mobile computers
• Charging Cradles with power supply, DC line cord, and AC Line cord.
• Accessories for hold devices, such as, belt clips, holsters, or lanyards.
• Pre-printed badges with wearer ID barcodes
32
Page 33

• MotionWorks Proximity Solution User Guide
• MotionWorks Proximity Portal User Guide
• MotionWorks Proximity Posters.
Client Software Installation
Refer to the MWP Client Application User Guide for instructions on installing and configuring the
application on each device.
Site Setup
The customer:
• Obtains required cleaning materials. See Cleaning on page 42 for information on cleaning the devices
and cradle.
• Sets up a staging area.
• Provides devices to workers to wear during the shift.
• Reviews contact tracing if a worker becomes ill.
Mobile Computers
Setting Up the Staging Area
NOTE: These are only recommended procedures. It is the responsibility of the customer to design the
proper staging area for their facility.
A staging area should be set up that acts as the main location for distribution and return of devices. Ideally
the staging area should be near an exit so that as workers enter the building, they are provided a device for
the day. At the end of the day, the worker returns to the staging area, returns the device and leaves the
building.
The staging area should contain a table for:
• Laptop/computer with internet connection to access the MWP Portal
• Charging cradle(s) with mobile computers
• Cleaning supplies
• Used device bin
• Clean Accessory bin
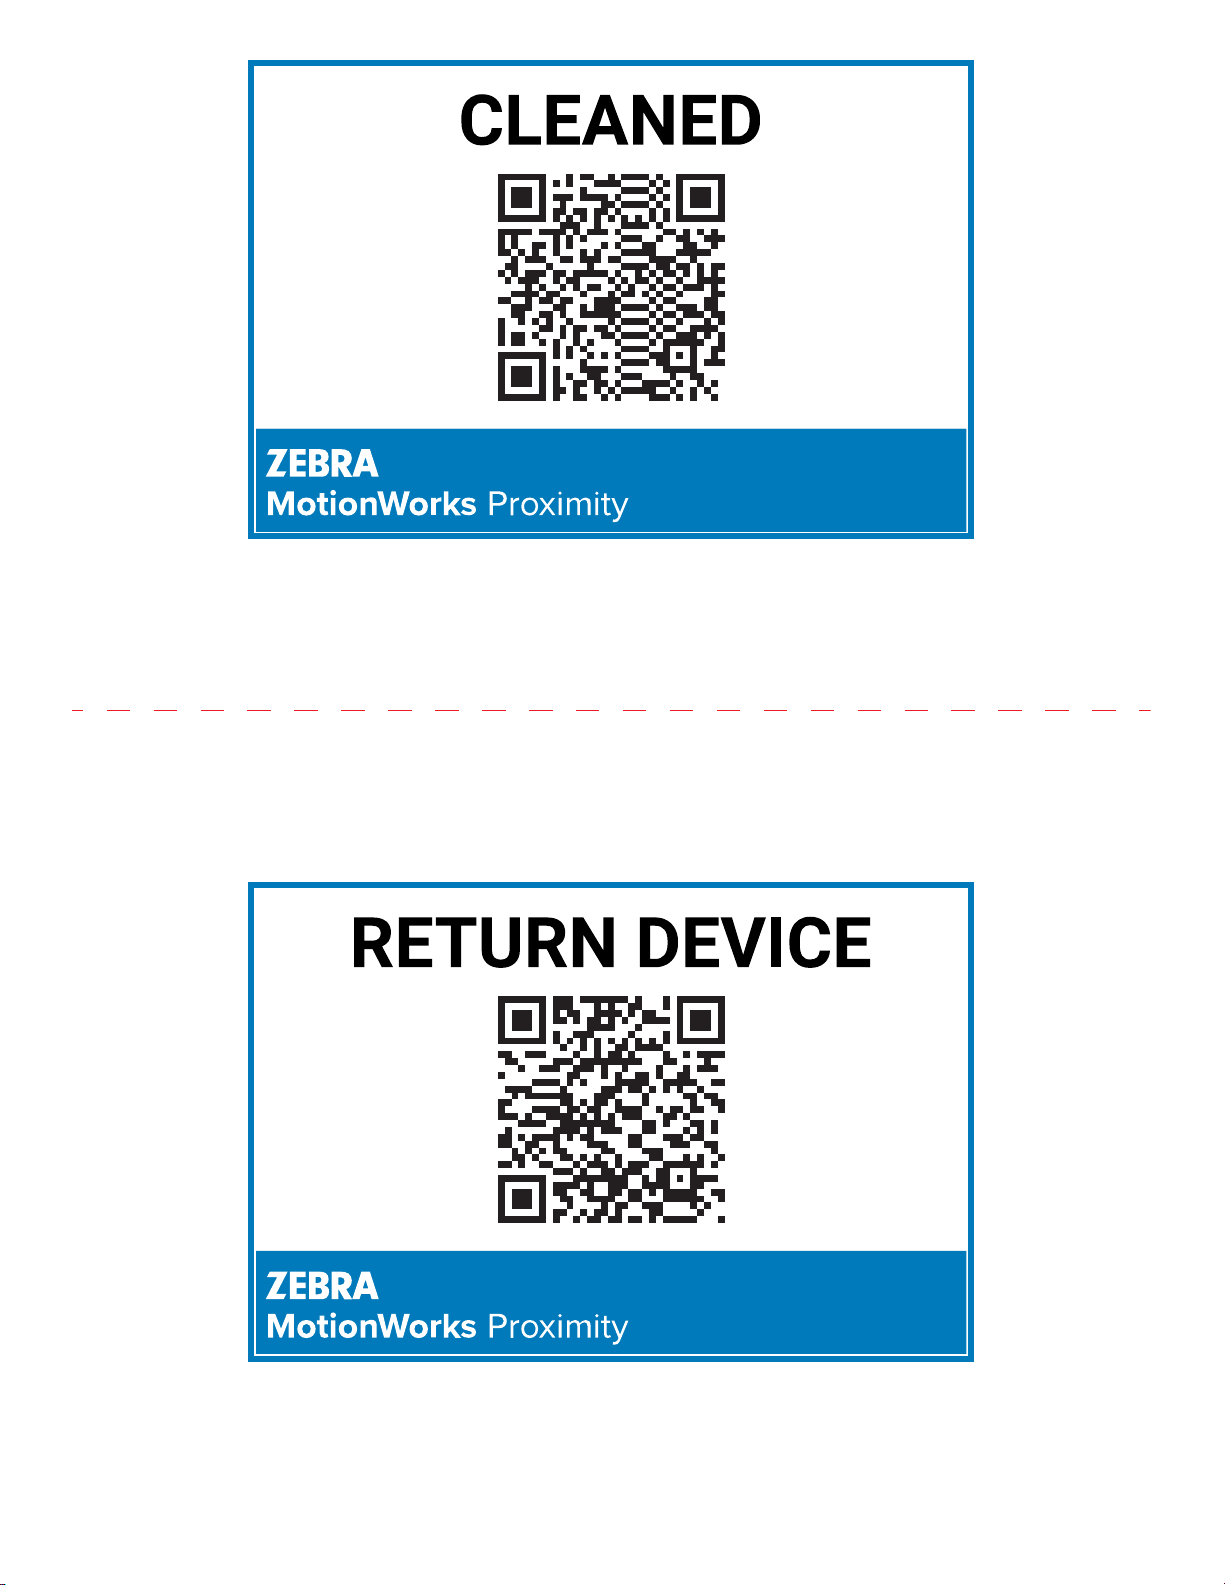
• CLEANED and RETURN DEVICE barcode sheets. See page 48 to print sheets.
• Wearer Assignment Log sheet for recording worker assignments to Wearer IDs. See page 46 to print
sheet.
• Facility map with locations marked of each worker wearing devices.
A queue should be created so that workers remain 6 feet (2 m) apart while waiting for their device.
Hanging the Posters
Zebra provides posters that illustrates work flow, and proper wearing instructions. The customer should
hang the poster in an area visible to the workers near the entrance and throughout the facility.
33
Page 34

Setting Up the Charging Cradle
To setup the cradle:
1. Place the cradle on a table in the staging area.
2. Plug the power supply plug into the back of the cradle.
3. Plug the AC line cord into the power supply.
4. Plug the AC line cord into an AC outlet.
5. Tape or place the CLEANED barcode sheet near the charging cradles.
6. Tape or place the RETURN DEVICE barcode sheet near the device return bin.
Charging the Mobile Computer
Refer to the mobile computer User Guide for specific information about the device.
To charge the mobile computer:
1. Place the device into a cradle slot.
Mobile Computers
2. The device begins charging. The Notification LED blinks.
3. When the device is fully charged, the Notification LED lights green.
Accessing the MWP Portal
NOTE: Refer to the MotionWorks Proximity Portal User Guide for detailed information on using the portal.
Zebra will provide a URL for accessing the Zebra MWP Portal.
Enter the URL into a browser. The login screen appears.
Enter credentials and click OK. The portal opens to the Proximity Event Dashboard screen.
Workflow
All devices should be in the cradle and fully charged at the beginning of each shift.
NOTE: The MWP Client application can be configured to only produce a proximity alert when two devices
come in close contact, and not send any data to the MWP Portal.
Start of Shift
1. The worker reports to the staging area at the start of the shift for a device.
2. Shift Lead removes a mobile computer from the charging cradle and an accessory (either a belt clip,
holster, or lanyard) from the Clean Accessory bin. The device displays:
34
Page 35

Mobile Computers
Shift Lead cleans the device and the accessory according to cleaning procedures. See Cleaning on
3.
page 42.
4. Shift Lead scans the CLEANED barcode. The device displays:
5. Shift Lead places the device and accessory on the table.
6. Shift Lead places the MWP Wearer badge on the table. This step is only required for the first time the
worker is assigned a MWP Wearer badge.
7. The worker takes the device, accessory, and MWP Wearer badge.
35
Page 36
Mobile Computers
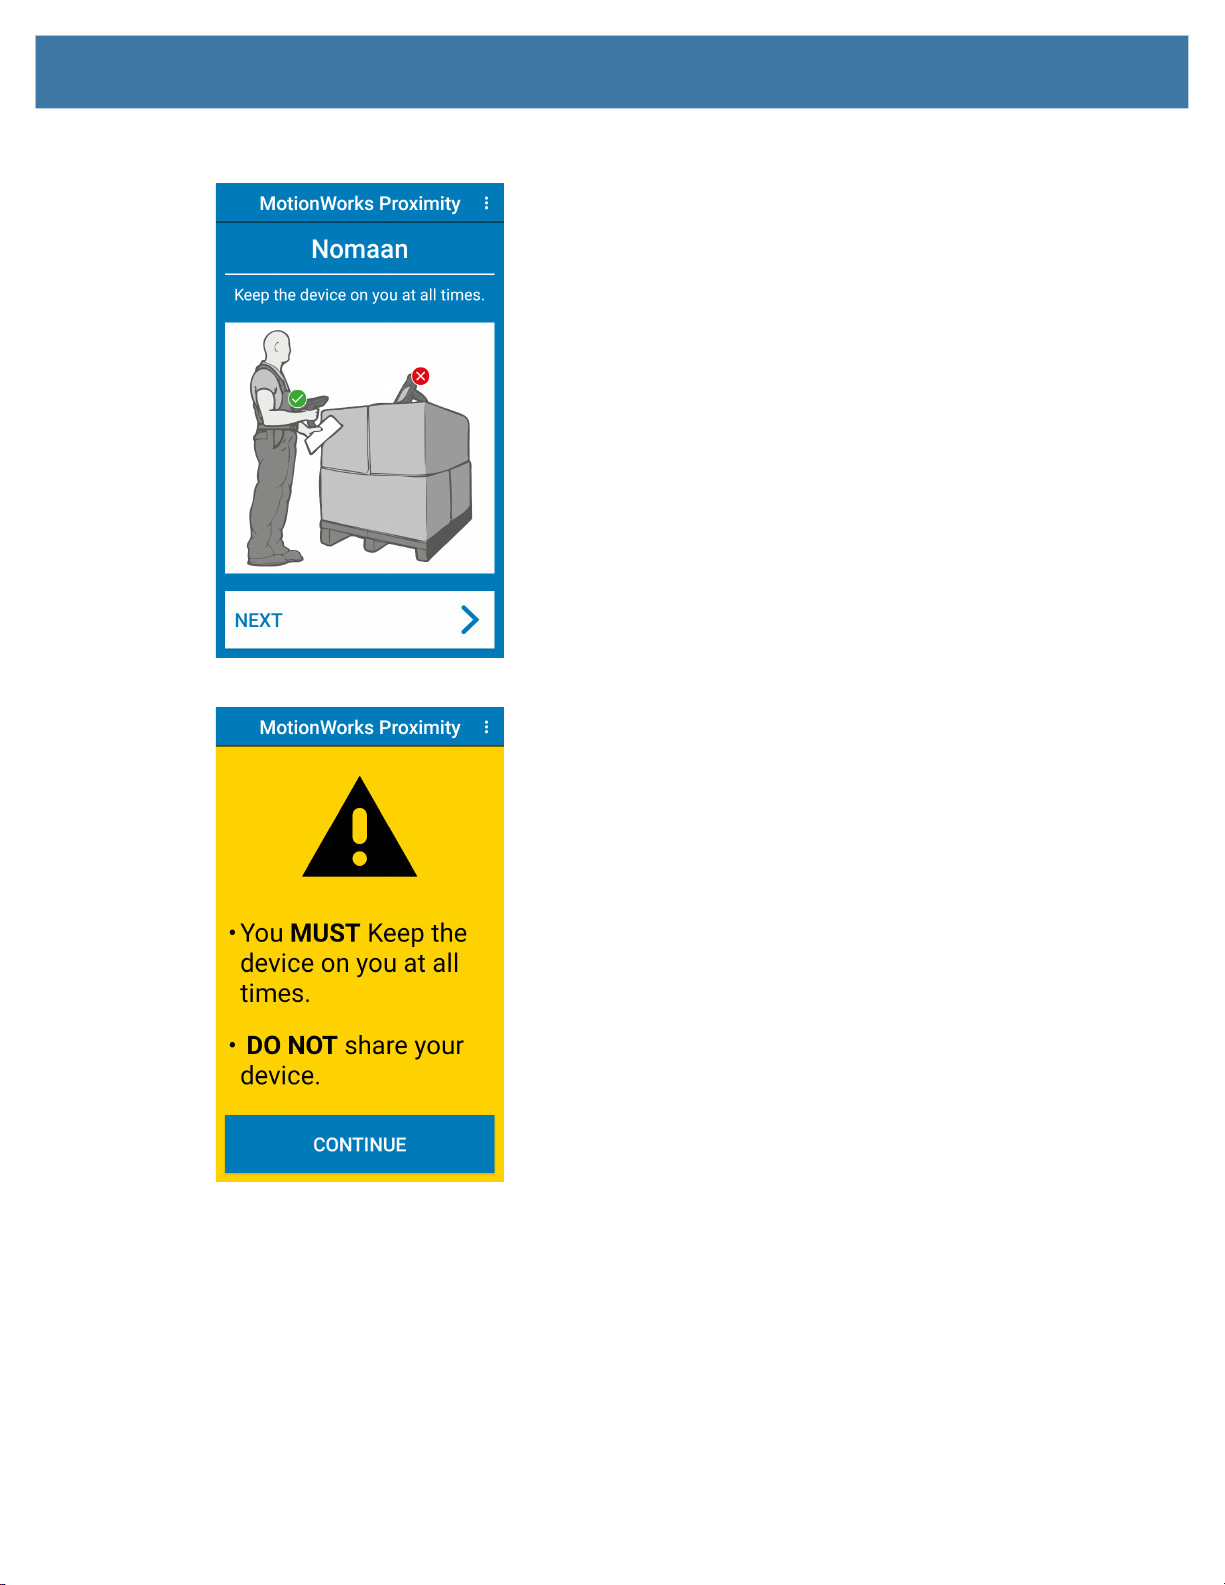
The worker scans the MWP Wearer badge barcode.The device displays:
8.
9. The worker reads the blue wearing instructions on the device. and touches Next. The device displays:
36
Page 37
Mobile Computers
The worker reads the yellow compliance screen. The device displays:
10.
11. The worker inserts the device into the accessory and places it on the proper position on their body.
EC30 and accessories shown as example.
12. The worker performs daily work activities.
If configured, the user can touch the Mute Alert button to stop audio alerts. A dialog box appears
indicating the amount of time that the alert will be muted. Touch OK to enable muting.
37
Page 38
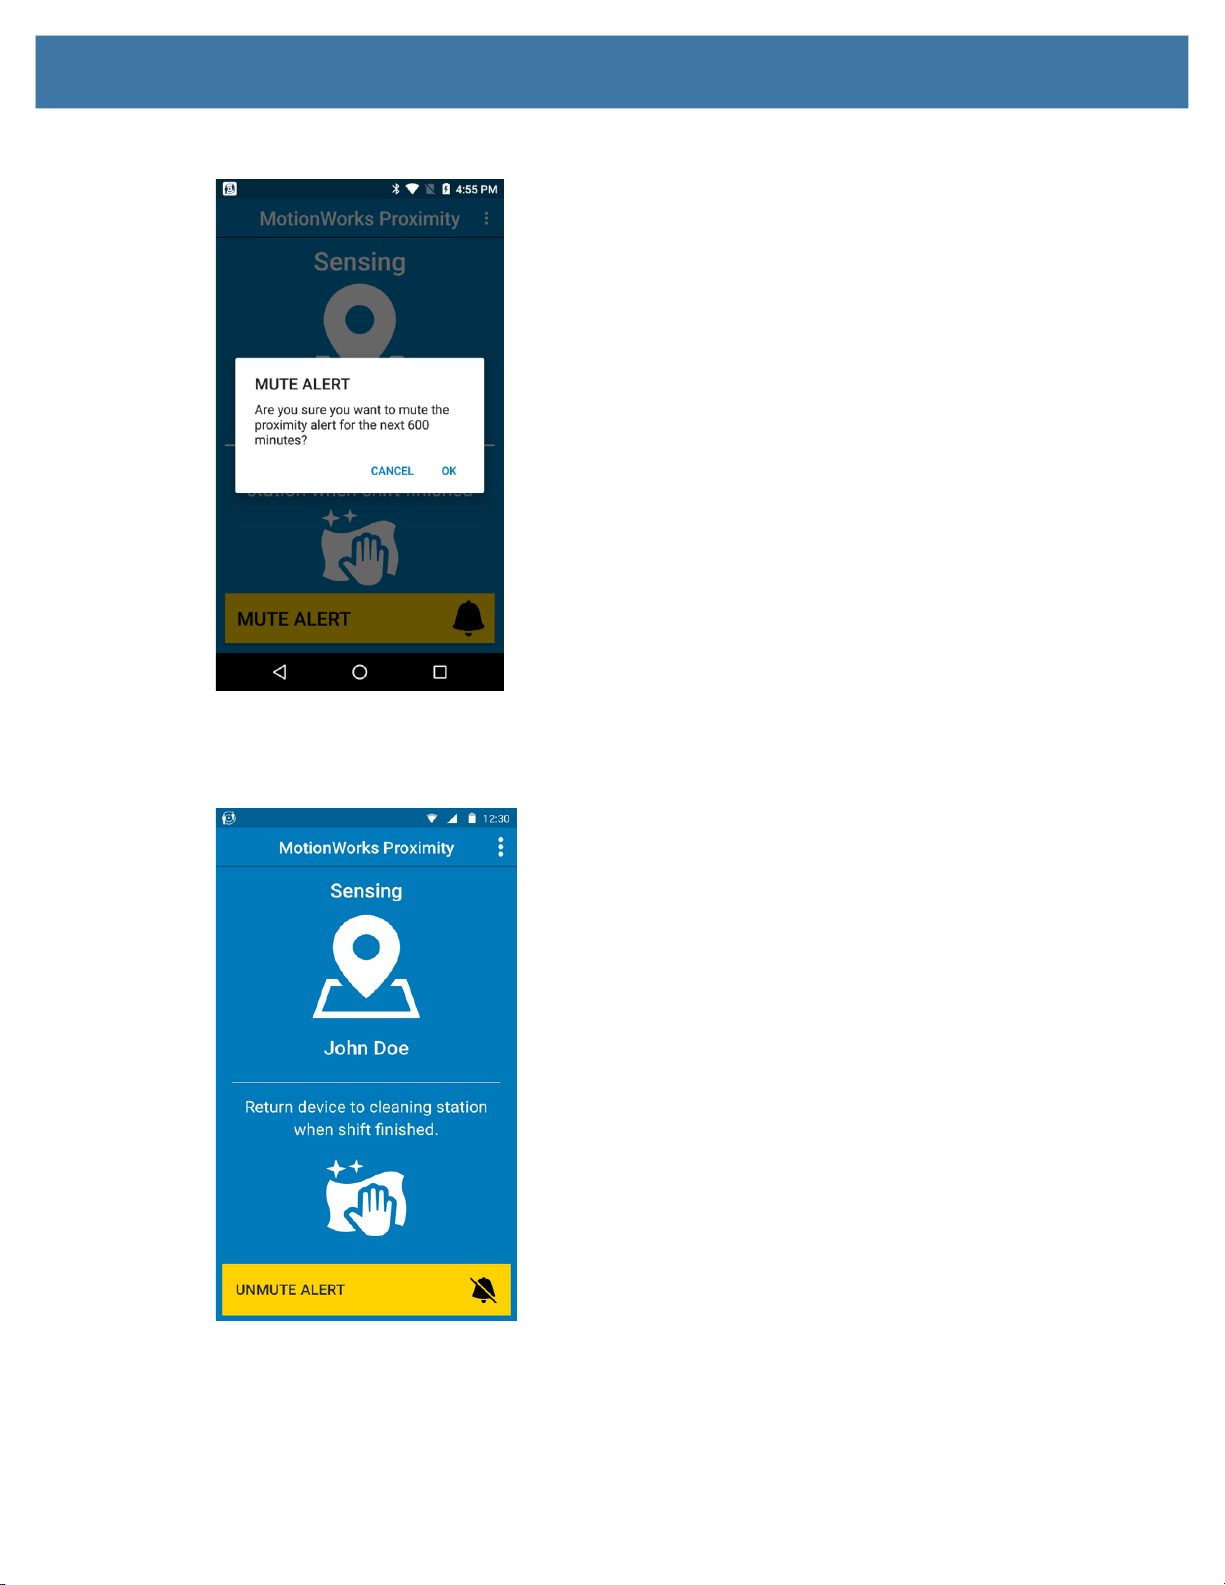
Figure 5 Mute Alert Dialog Box
Mobile Computers
The user can touch the UNMUTE ALERT button to re-enable the audible and/or haptic alert when in
proximity of another device.
Figure 6 Main Screen with Unmute Alert
The mute time appears in the notification bar. The user can also touch UNMUTE to disable muting from
the notification bar.
38
Page 39

Figure 7 Mute Alert Notification Bar
The proximity alert does not produce an audio or haptic alert when in proximity of a contact. After the mute
time period elapses, the audio alert is automatically re-enabled and the user has the option to tap the
button again to continue disabling audio alerts for the set time period.
End of Shift
At the end of the worker’s shift:
1. The worker returns to Staging Area.
Mobile Computers
2. The worker scans the RETURN DEVICE barcode.
3. The worker places the device, and accessory in a Device Return bin and leaves the building.
4. The Site Lead immediately cleans the device and accessory according to cleaning procedures. See
Cleaning on page 42.
5. The Site Lead returns the cleaned device to a charging cradle.
6. The Site Lead returns the accessory to the Clean Accessory bin.
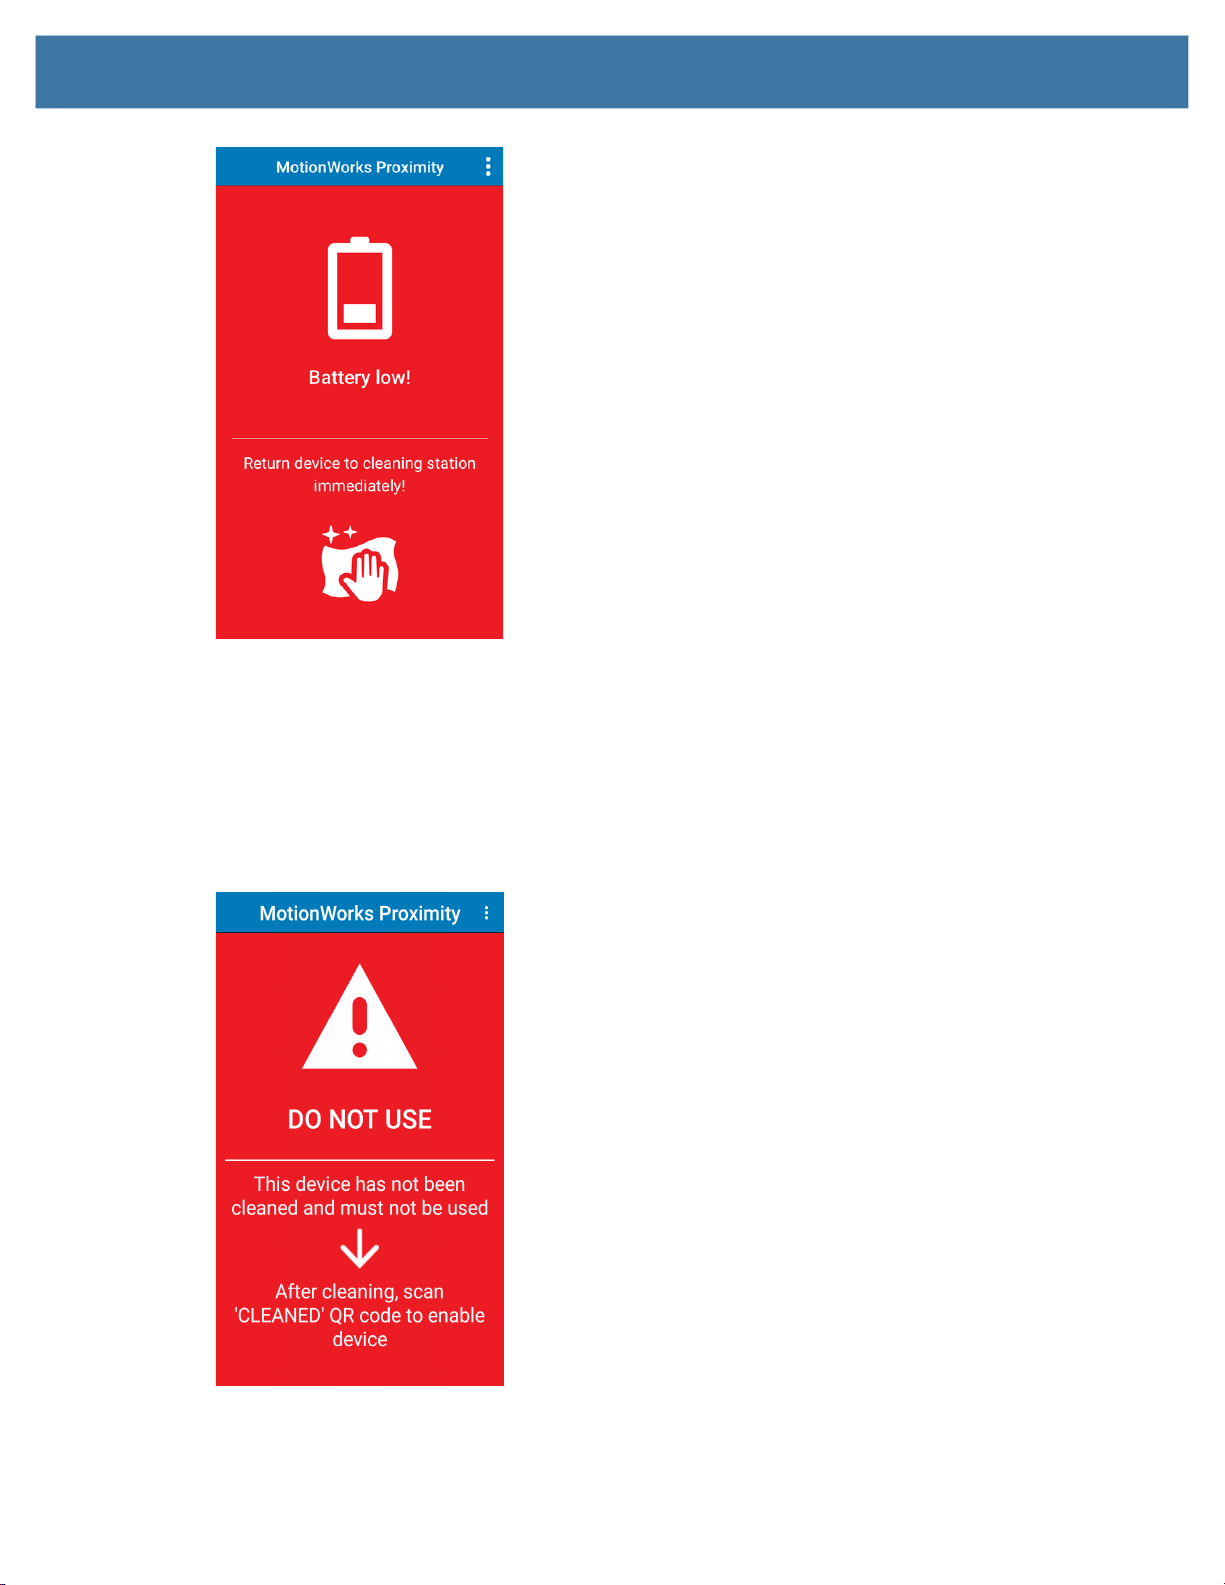
Low Battery Indication
NOTE: Low battery audio notification is configurable and will not sound if not configured.
During the work shift, if the device battery drops below 10%, an audio beep sounds and a notification
appears on the screen indicating that the device should be returned and exchanged for another device.
1. When the device battery drops below 10%, the device displays:
39
Page 40
Mobile Computers
2.
The worker returns to Staging Area.
3. The worker scans the RETURN DEVICE barcode.
4. The worker places the device in the Device Return bin.
5. The Site Lead immediately cleans the device according to cleaning procedures. See Cleaning on
page 42.
6. The Site Lead returns cleaned device to the charging cradle.
7. The Shift Lead removes a new mobile computer from the cradle. The device displays:
8. The Shift Lead cleans the device according to cleaning procedures. See Cleaning on page 42.
9. The Shift Lead scans the CLEAN barcode. The device displays:
40
Page 41

Mobile Computers
10.
The Shift Lead places the device on the table.
11. The worker takes the device.
12. The worker scans the MWP Wearer badge barcode.The device displays:
41
Page 42

Mobile Computers
The worker reads the blue wearing instructions on the device and touches Next. The device displays:
13.
14. The worker reads the yellow compliance screen. The device displays:
15. The worker inserts the device into an accessory and places it on the proper position on their body.
16. The worker performs daily work activities.
Proximity Alert Notifications
NOTE: Proximity Alert notification is configurable and is disabled by default.
42
Page 43

Mobile Computers
When a device detects another device within the approximate proximity range and remains in that range
for more than one minute, the MWP Client app records this as a contact. The device generates proximity
alert audio beeps to notify the worker to enforce safe social distancing. The beeps repeat each minute
while the device remains in proximity of the other device. If multiple devices are in contact, it is possible to
have two audio sounds played each minute depending on the timing of when the devices are contacted.
The MWP Client app can be configured to temporarily disable the proximity alert notifications. If
configured, a MUTE ALERT button appears at the bottom of the display. The worker touches the MUTE
ALERT button to disable alerts for a specific period of time (default - 60 minutes). This is useful in cases
where the worker may be in a meeting, in a quiet environment, or assigned to a close proximity workflow.
The app still sends contact information to the portal for reporting proximity events and tracing. After this
time period ends, the proximity alert is re-enabled. The worker has the option to continue the proximity
alerts at any time when in the disabled state. The worker can also re-enable the proximity alerts after
leaving a meeting. Touch the UNMUTE ALERTS button on the device.
NOTE: If configured, when a user disables the Proximity Alert feature, the device is still logging and
sending proximity data to the portal in support of Proximity Event dashboards and reports.
43
Page 44

Cleaning
MB6000 Cleaning Instructions
Cleaning the MB6000
Use alcohol to clean the device. When using sodium hypochlorite (bleach) based disinfectants to clean the
product, always follow the manufacturers recommended instructions regarding the use of gloves during
application and to remove the residue afterwards with a damp cloth to avoid prolonged skin contact while
handling the device. Please note that due to the powerful oxidizing nature of sodium hypochlorite the metal
surfaces on the product are prone to oxidation (corrosion) when exposed to this disinfectant in the liquid
form and should be removed promptly after cleaning with a damp cloth.
NOTE: Use pre-moistened wipes to clean the device. Do not allow liquid cleaners to pool or remain on the
device.
• The Clorox Company - 409 Glass and Surface Cleaner
• Steris - Coverage Plus Germicidal Surface Wipes
• PDI Super Sani Cloth
• Isopropyl alcohol (70%)
• Diversey - Virex II 256.
• Clorox® Bleach
• Metrex - CaviWipes (Prolonged exposure to Metrex CaviWipes will degrade the material used in the
device and should not be used as a cleaning agent for those products.)
• Diversey - Dimension 256 Neutral Disinfectant Cleaner
• Clorox Healthcare Bleach Germicidal Wipes
• Clorox - Dispatch with Bleach
• Sani Professional Sani-Wipes
• PDI Sani-Hands
• SC Johnson - Windex Original Glass Cleaner
• Hydrogen peroxide
• Mild dish soap.
Cleaning the MB6000 Charging Cradle
The following materials are required to clean the charging cradle:
42
Page 45

Cleaning
• Alcohol wipes
• Cotton tipped applicators
• Can of compressed air.
Use pre-moistened wipes to clean the cradle. Do not allow liquid cleaners to pool or remain on the cradle.
Mobile Computer Cleaning Instructions
CAUTION: Always wear eye protection.
Read warning label on alcohol product before using.
If you have to use any other solution for medical reasons please contact the Global Customer Support
Center for more information.
WARNING: Avoid exposing this product to contact with hot oil or other flammable liquids. If such exposure
occurs, unplug the device and clean the product immediately in accordance with these guidelines.
Approved Cleanser Active Ingredients
100% of the active ingredients in any cleaner must consist of one or some combination of the following:
isopropyl alcohol, bleach/sodium hypochlorite
soap.
1 (see important note below)
, hydrogen peroxide, or mild dish
IMPORTANT: Use pre-moistened wipes and do not allow liquid cleaner to pool.
1
When using sodium hypochlorite (bleach) based products, always follow the manufacturer’s
recommended instructions: use gloves during application and remove the residue afterwards with a damp
alcohol cloth or a cotton swab to avoid prolonged skin contact while handling the device.
Due to the powerful oxidizing nature of sodium hypochlorite, the metal surfaces on the device are prone to
oxidation (corrosion) when exposed to this chemical in the liquid form (including wipes).
these type of disinfectants come in contact with metal on the device, prompt removal with an
alcohol-dampened cloth or cotton swab after the cleaning step is critical.
Harmful Ingredients
The following chemicals are known to damage the plastics on the device and should not come in contact
with the device: acetone; ketones; ethers; aromatic and chlorinated hydrocarbons; aqueous or alcoholic
alkaline solutions; ethanolamine; toluene; trichloroethylene; benzene; carbolic acid and TB-lysoform.
Many vinyl gloves contain phthalate additives, which are often not recommended for medical use and are
known to be harmful to the housing of the device.
Device Cleaning Instructions
Do not apply liquid directly to the device. Dampen a soft cloth or use pre-moistened wipes. Do not wrap the
device in the cloth or wipe, instead gently wipe the unit. Be careful not to let liquid pool around the display
window or other places. Before use, allow the unit to air dry.
In the event that
Detailed instructions can be found on connect.zebra.com/DeviceDisinfection_us
computer.
NOTE: For thorough cleaning, it is recommended to first remove all accessory attachments, such as hand
straps or cradle cups, from the mobile device and to clean them separately.
43
for each Zebra mobile
Page 46

Special Cleaning Notes
The device should not be handled while wearing vinyl gloves containing phthalates, or before hands are
washed to remove contaminant residue after gloves are removed.
If products containing any of the harmful ingredients listed above are used prior to handling the device,
such as hand sanitizer that contain ethanolamine, hands must be completely dry before handling the
device to prevent damage to the device.
IMPORTANT: If the battery connectors are exposed to cleaning agents, thoroughly wipe off as much of the
chemical as possible and clean with an alcohol wipe. It is also recommended to install the battery in the
terminal prior to cleaning and disinfecting the device to help minimize buildup on the connectors.
When using cleaning/disinfectant agents on the device, it is important to follow the directions prescribed by
the cleaning/disinfectant agent manufacturer.
Cleaning Materials Required
• Alcohol wipes
• Lens tissue
Cleaning
• Cotton-tipped applicators
• Isopropyl alcohol
• Can of compressed air with a tube.
Cleaning the Device
Housing
Thoroughly wipe the housing, including all buttons and triggers, using an approved alcohol wipe.
Display
The display can be wiped down with an approved alcohol wipe, but care should be taken not to allow any
pooling of liquid around the edges of the display. Immediately dry the display with a soft, non-abrasive
cloth to prevent streaking.
Exit Window
Wipe the exit window periodically with a lens tissue or other material suitable for cleaning optical material
such as eyeglasses.
Cleaning Cradle Connectors
1. Remove the DC power cable from the cradle.
2. Dip the cotton portion of the cotton-tipped applicator in isopropyl alcohol.
3. Rub the cotton portion of the cotton-tipped applicator along the pins of the connector. Slowly move the
applicator back-and-forth from one side of the connector to the other. Do not leave any cotton residue
on the connector.
4. All sides of the connector should also be rubbed with the cotton-tipped applicator.
5. Remove any lint left by the cotton-tipped applicator.
44
Page 47

Cleaning
If grease and other dirt can be found on other areas of the cradle, use a lint-free cloth and alcohol to
6.
remove.
7. Allow at least 10 to 30 minutes (depending on ambient temperature and humidity) for the alcohol to air
dry before applying power to cradle.
If the temperature is low and humidity is high, longer drying time is required. Warm temperature and low
humidity requires less drying time.
CAUTION: After cleaning the cradle connectors with bleach-based chemicals, follow the Cleaning Cradle
Connectors instructions to remove bleach from the connectors.
45
Page 48
MotionWorks Proximity
Wearer Assignment Log Sheet
Wearer Name Employee Name
MWP Wearer 1 John Doe
ZEBRA and the stylized Zebra head are trademarks of Zebra Technologies Corp., registered in many jurisdictions
worldwide. All other trademarks are the property of their respective owners. © 2020 Zebra Technologies Corp. and/or
its affiliates. All rights reserved. | www.zebra.com
Page 49
MotionWorks Proximity
Wearer Assignment Log Sheet
Wearer Name Employee Name
Page 50
.
Cut
Page 51

zebra.com
 Loading...