

Page 1

MotionWorks
Proximity
Portal
User Guide
MN-003975-02EN Rev. A
Page 2

ZEBRA and the stylized Zebra head are trademarks of Zebra Technologies Corporation, registered in
many jurisdictions worldwide. All other trademarks are the property of their respective owners.
© 2020 Zebra Technologies Corporation and/or its affiliates. All rights reserved.
Information in this document is subject to change without notice. The software described in this document
is furnished under a license agreement or nondisclosure agreement. The software may be used or copied
only in accordance with the terms of those agreements.
For further information regarding legal and proprietary statements, please go to:
SOFTWARE:www.zebra.com/linkoslegal
COPYRIGHTS:www.zebra.com/copyright
WARRANTY:www.zebra.com/warranty
END USER LICENSE AGREEMENT: www.zebra.com/eula
Terms of Use
Proprietary Statement
This manual contains proprietary information of Zebra Technologies Corporation and its subsidiaries
(“Zebra Technologies”). It is intended solely for the information and use of parties operating and
maintaining the equipment described herein. Such proprietary information may not be used, reproduced,
or disclosed to any other parties for any other purpose without the express, written permission of Zebra
Technologies.
Product Improvements
Continuous improvement of products is a policy of Zebra Technologies. All specifications and designs are
subject to change without notice.
Liability Disclaimer
Zebra Technologies takes steps to ensure that its published Engineering specifications and manuals are
correct; however, errors do occur. Zebra Technologies reserves the right to correct any such errors and
disclaims liability resulting therefrom.
Limitation of Liability
In no event shall Zebra Technologies or anyone else involved in the creation, production, or delivery of the
accompanying product (including hardware and software) be liable for any damages whatsoever
(including, without limitation, consequential damages including loss of business profits, business
interruption, or loss of business information) arising out of the use of, the results of use of, or inability to
use such product, even if Zebra Technologies has been advised of the possibility of such damages. Some
jurisdictions do not allow the exclusion or limitation of incidental or consequential damages, so the above
limitation or exclusion may not apply to you.
Publication Date
August 21, 2020
(1.2.11.20200717)
2
Page 3

Introduction
Zebra MotionWorks® Proximity (MWP) solution enables work proximity sensing and logging, providing a
suite of reports and dashboards on proximity trend events. Accurate and efficient employee contact tracing
helps employers to respond quickly and accurately by enabling them to identify the right individuals in the
event of a COVID-19 exposure in the workplace, so that the appropriate measures can be taken.
A MWP enabled device sends and listens for BLE beacons to sense the presence of a nearby MWP
device. If a nearby device is detected, it’s wearer ID and device ID are continuously logged and
timestamped. The device sends that sensing data over the enterprise Wi-Fi to the MWP Portal where
analytics software converts it into proximity data based on five minute rolling windows. This data is then
made available for viewing through dashboards and reports enabling operation managers and HR/facilities
leaders with the tools they need to enforce social distancing guidelines and contact trace within their
existing work-flows. Data is only kept for 60 days and then automatically purged from the Portal.
MWP Roles
There are three roles that a user can be assigned:
• MWP User (mwpuser) - User is a HR or facilities leader and can access the Proximity dashboards.
• MWP IT (mwpit) - User is an IT leader and can access the Admin dashboards.
• MWP Participant (mwpp) - User has access to the MWP Portal but has no access to the Proximity or
Admin dashboards.
• MWP Superuser - User can create MWP User and MWP IT roles.
Logging In
1. Enter the MWP Portal URL in a Google Chrome™ (version 83 and above) and Microsoft Edge
Figure 1 Login Screen
(version 81 and above) web browser and press Enter. The Login Screen appears.
®
2. Enter username and password.
3. Click Remember me checkbox to save user credentials.
4. Click Login. The Proximity Event Dashboard screen appears.
3
Page 4
Proximity Monitoring
The following dashboards are only available for monitoring by the MWP User role:
• Proximity Event Dashboard
• Proximity Contact Tracing
• Proximity Event Report.
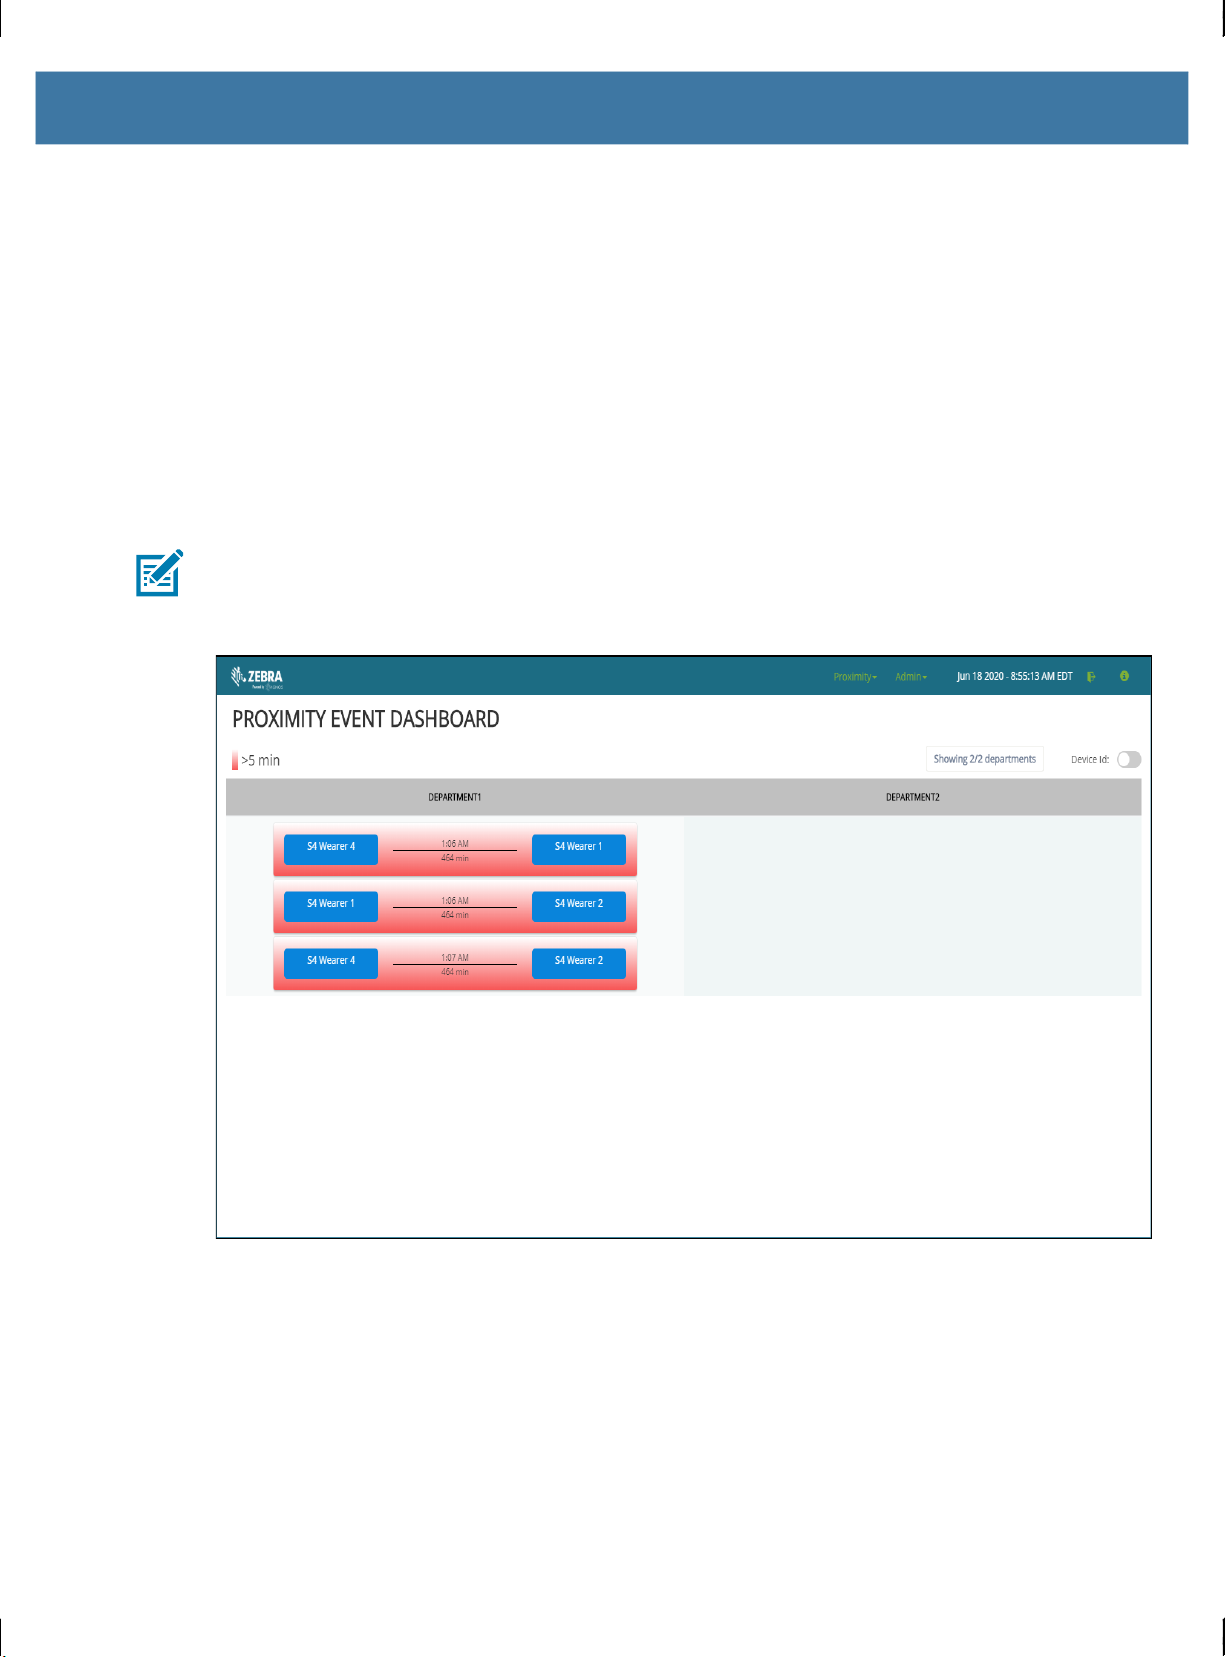
Proximity Event Dashboard
Use Proximity Event Dashboard screen to view proximity violations that are occurring in each defined
department. A violation is defined as two workers coming in close contact for more that five minutes. When
proximity events occur, a manager can use this data to enforce social distancing rules.
NOTE: The MWP devices send data to the Portal every five minutes. Proximity events do not appears in
this dashboard until the data is sent from the device.
Figure 2 Proximity Event Dashboard
Each violation appears with the following information:
• Wearer IDs
• Time of incident
• Duration of incident
• Device ID.
4
Page 5
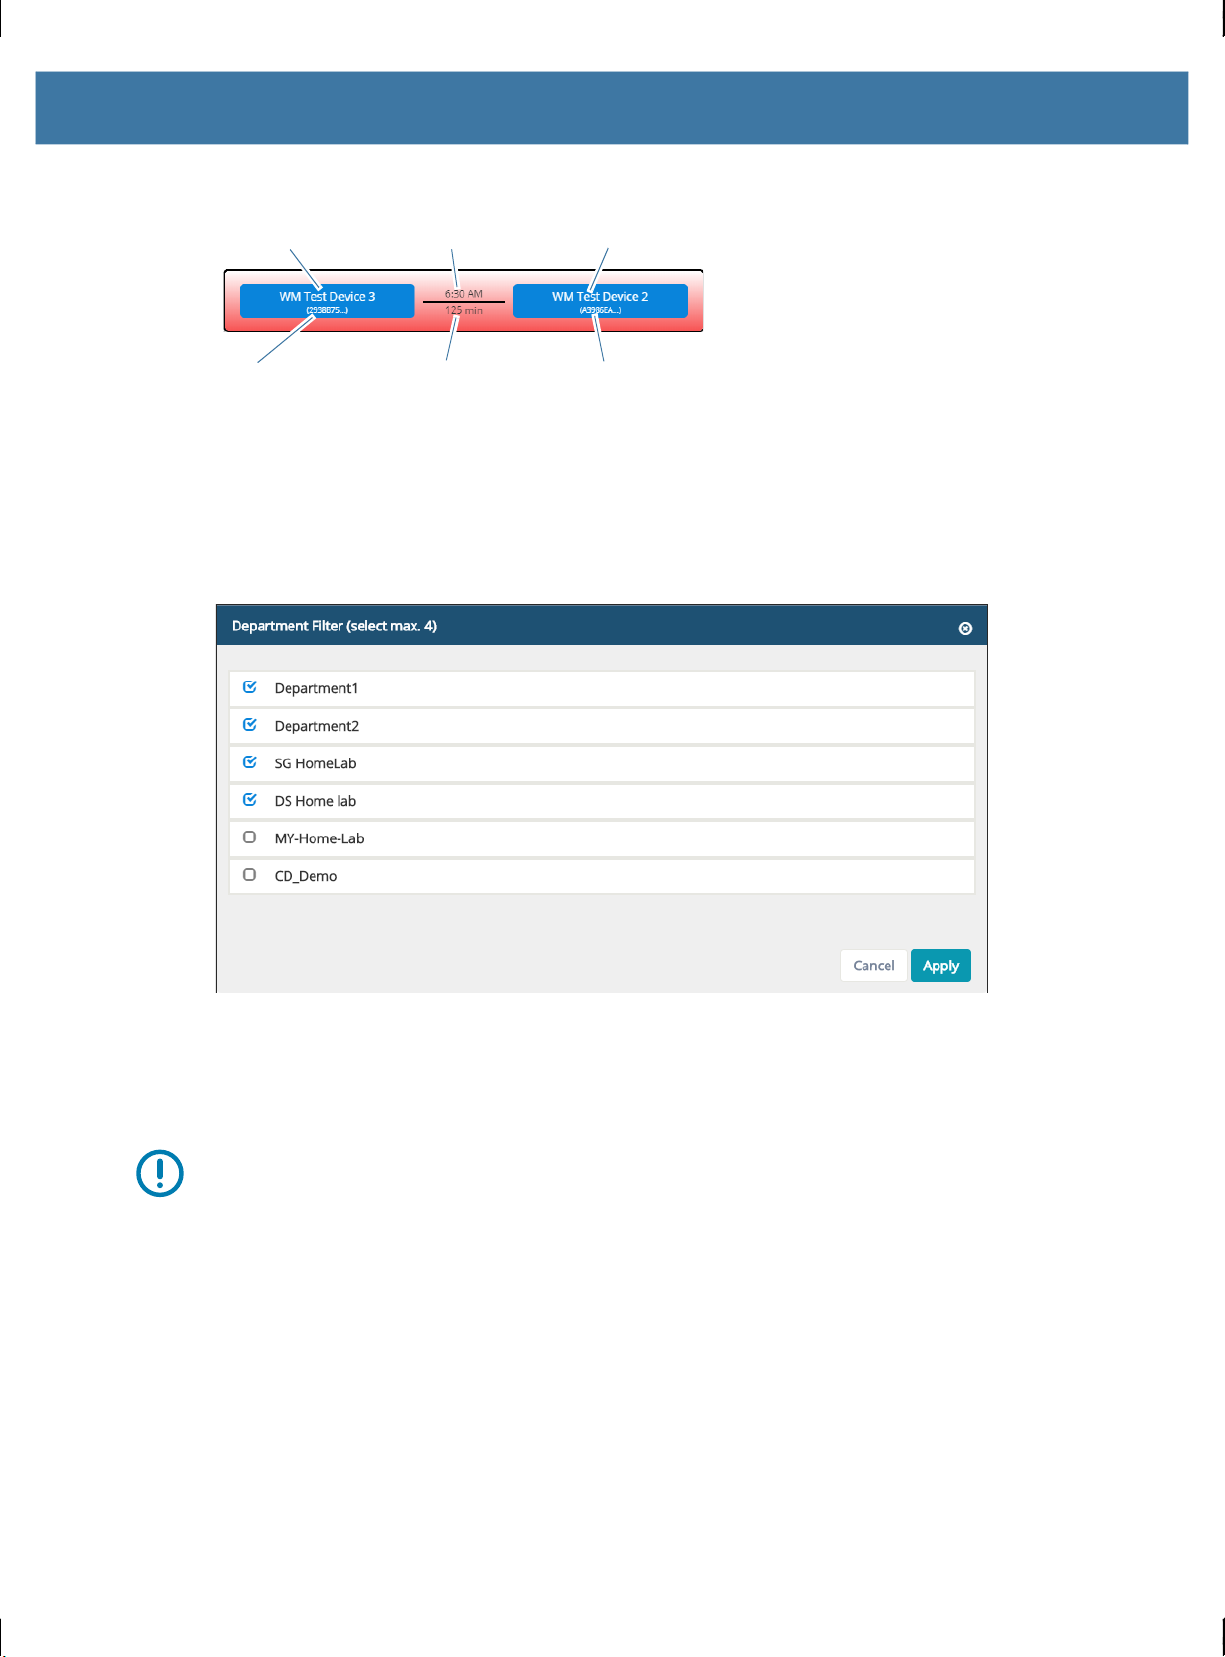
Figure 3 Incident Data
First Wearer Second WearerTime of Incident
Device ID Duration of Incident Device ID
Once the wearers move away from each other (and the devices sends the last portion of that events
sensing data) the violation disappears from this screen.
Click Show Device Id switch to toggle display of the Device ID information.
The number of department columns that display is configurable (maximum four) depending upon the
number of departments created. To select the departments to display:
1. Click Showing x/x departments. The Department Filter window displays.
2. Select up to four check boxes next to a department name.
3. Click Apply. The selected departments appear on the screen.
Proximity Contact Tracing
IMPORTANT: For data privacy compliance it is recommended that only HR/Case Management staff be
assigned access the Proximity reports and dashboards.
Use Proximity Contact Tracing screen to view proximity events between two wearers. If a worker has
been ill, the Human Resource employee uses this dashboard to view all workers that came in contact with
the ill worker. The company Human Resource employee uses this data for contact tracing.
To view all wearers who came in contact with a specific wearer:
1. In the Wearer field, enter a specific wearer name.
2. In the Start Date field, select the start date to view.
3. In the End Date, select the end date to view.
4. Click Trace.
5
Page 6

Figure 4 Proximity Contact Tracing Screen
The dashboard displays the selected worker (Wearer ID) and all the other workers that come in contact. It
also displays the amount of time of the first contact (duration) and the time of the incident for the selected
date range. Blue wearer boxes indicate that additional contacts occurred. Click on a blue box to expand or
collapse contacts. Click Expand All or Collapse All to expand or collapse all contacts.
Table 1 Proximity Contact Tracing Column Descriptions
Column Description
Contact Displays the selected wearer and all the other wearers that they have come
in contact with during the selected date range.
Duration Lists the amount of time that the two wearers have been in contact during
the selected date range.
Time Lists the time of the first incident for the selected date range.
Interactions Lists the total number of contacts between the two wearers.
Total Duration Lists the total amount of time that the two wearers have been in contact.
To view details on the proximity events between two wearers, click on the link in the Interactions column.
The Interactions dialog box displays.
Figure 5 Interactions List
6
Page 7

Exporting Contact Tracing Data
To export the contact tracing data:
1. In the Wearer field, enter a specific wearer name.
2. In the Start Date field, select the start date to view.
3. In the End Date, select the end date to view.
4. Click Export. A Microsoft Excel file is created and downloaded to the computer.
5. Open the Excel file to view the data.
Figure 6 Exported Contact Trace Data Example
6. Use Excel filter to filter a specific wearer.
Figure 7 Filtered Contact Trace Data Example
7
Page 8

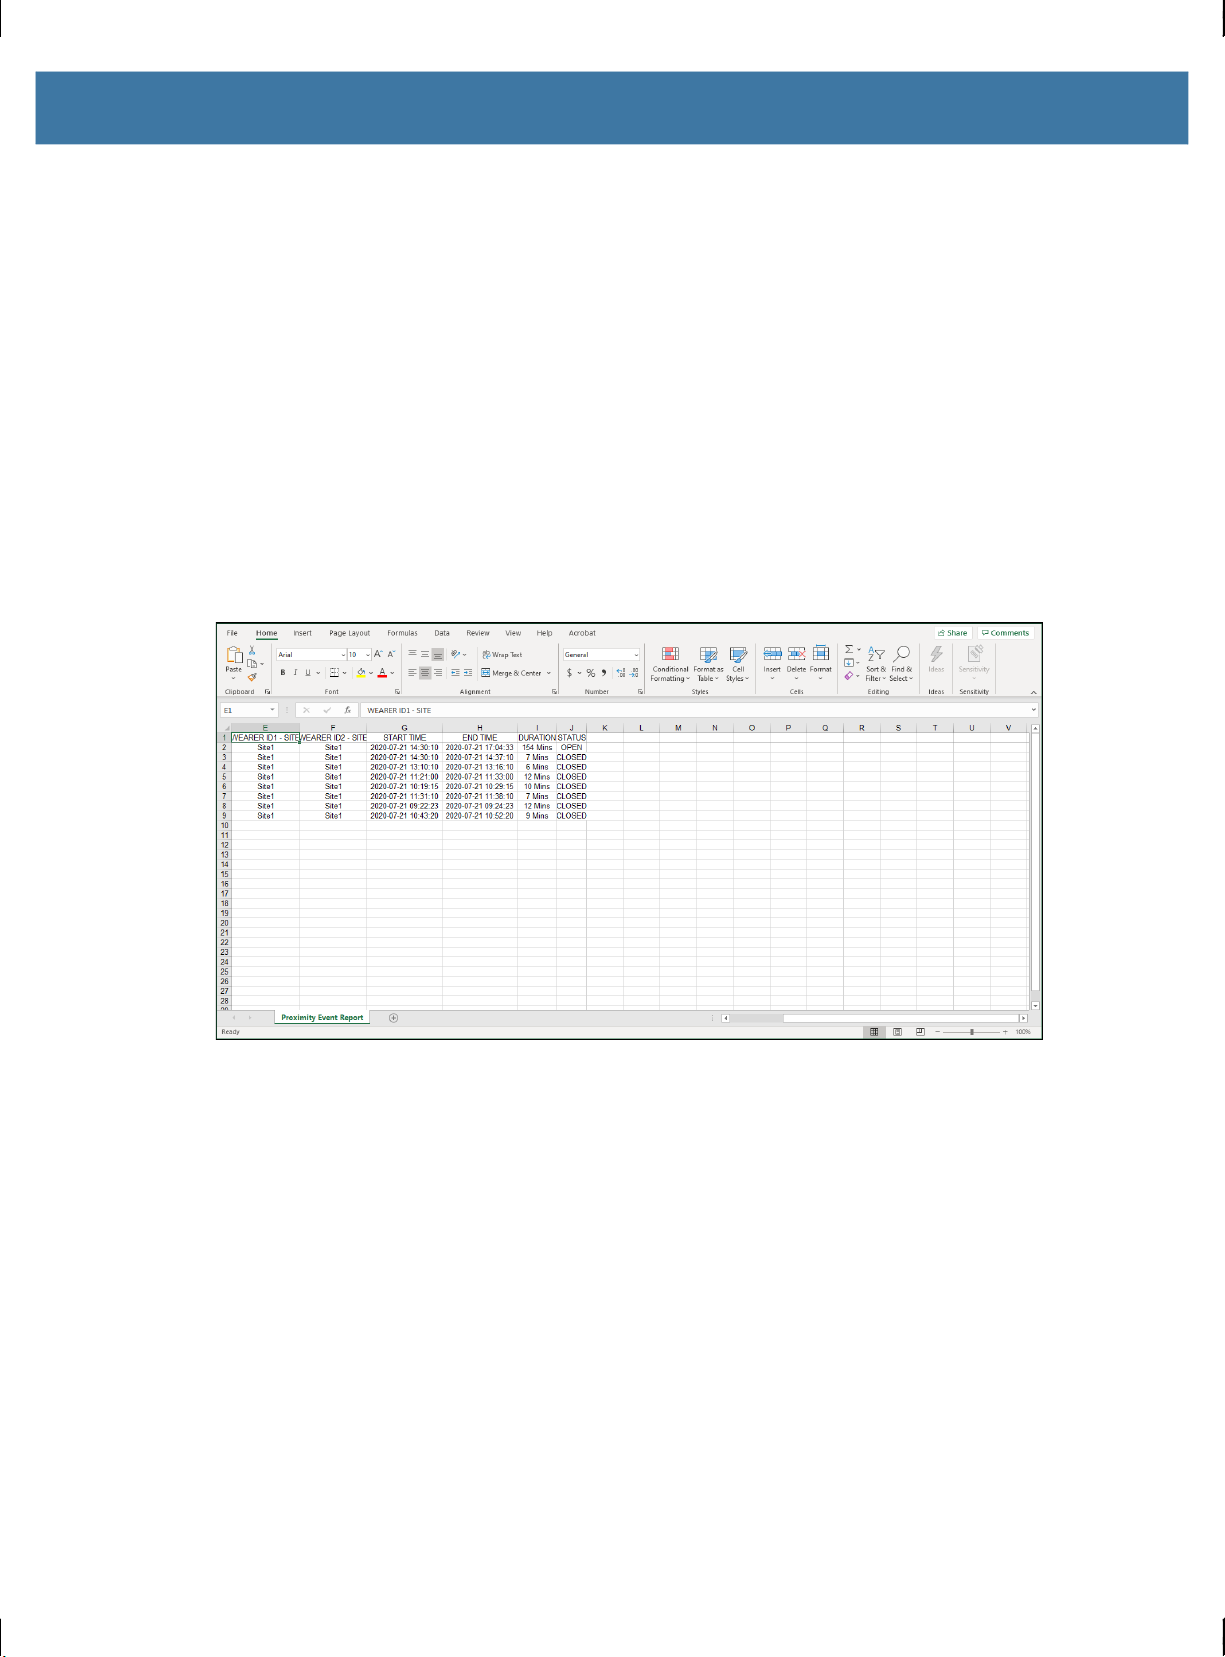
Proximity Event Report
Use the Proximity Event Report screen to view all recent proximity violations.
Figure 8 Proximity Event Report Screen
Table 2 Proximity Event Report Column Descriptions
Column Description
WEARER 1D1 Lists the first wearer in violation.
WEARER ID2 Lists the second wearer in violation.
WEARER ID1 - DEPT Lists the first wearer department.
WEARER ID2 - DEPT Lists the second wearer department.
WEARER ID1 - SITE Lists the first wearer site.
WEARER ID2 - SITE Lists the second wearer site.
START TIME Lists the time when violation started.
END TIME Lists the time when violation ended.
DURATION Lists the duration of the violation.
STATUS Lists the current status of the violation.
• Open - event is occurring.
• Closed - event has ended.
1. In the Site drop-down list, select a site.
2. In the Wearer field, enter a specific wearer name.
3. In the Start Date field, select the start date to view.
4. In the End Date, select the end date to view.
5. Click Generate. This display lists 15 events at a time. Use the navigation buttons to view additional
events.
NOTE: Click on the column title to sort all data in ascending or descending order.
8
Page 9
Click Reset to clear the search filters.
1.
2. Click on a Wearer ID in the WEARER ID1 or WEARER ID2 columns to filter for a specific wearer.
Exporting Proximity Event Data
To export the proximity event data:
1. In the Site field, select a site location.
2. In the Wearer field, enter a specific wearer name.
3. In the Start Date field, select the start date to view.
4. In the End Date, select the end date to view.
5. Click Export. A Microsoft Excel file is created and downloaded to the computer.
6. Open the Excel file to view the data.
Figure 9 Exported Contact Trace Data Example
7. Use Excel filter to filter a specific wearer.
9
Page 10

Figure 10 Filtered Contact Trace Data Example
8. To export the results to an Excel file, click Export.
10
Page 11

Administration
The following dashboards are only available for administration by the MWP IT role:
• Device Assignment
• Device Health Check Dashboard
• Add Wearer
• Add Department
• Add Site
• User List View.
Device Assignment
NOTE: Use for assigning MB6000 devices only.
Use the Device Assignment screen to:
• View devices assigned to a wearer
• Assign or edit the device ID for a wearer.
Figure 11 Device Assignment Screen
NOTE: Click on the column title to sort all data in ascending or descending order.
11
Page 12

Table 3 Device Assignment Screen
Column Description
Wearer Lists the name associated with a wearer.
Model Lists the device model number.
Department Lists the department name of the wearer.
Site Lists the site where the wearer is located.
Device Lists the identification number of the device.
Action
Click to edit the device assignment.
Filtering
The administrator can filter the list by wearer, department, or site.
To filter by wearer, in the Wearer field, enter a specific wearer name. Typing a few letters will then provide
a related drop-down list to choose from. The list displays the device assigned to the selected wearer.
To filter by department, in the Department drop-down, select a department name. The list displays all
wearers in that department.
To filter by site, in the Site drop-down, select a site name. The list displays all wearers in that site.
Changing a Device Assignment
NOTE: For MB6000 devices only.
To change the device assignment:
1. In the Wearer field, enter any text to search for a wearer.
2. In the Department drop-down, select a department.
3. In the Site drop-down, select a site.
4. Click Generate.
5. Click next to a wearer. The Edit Device dialog box appears.
6. In the Device drop-down, select the device identification number.
7. Click Save. The new device is assigned to the wearer.
12
Page 13

Device Health Check Dashboard
Use the Device Health Check Dashboard to view device, battery, and charging status.
Figure 12 Device Health Check Dashboard
NOTE: Click on the column title to sort all data in ascending or descending order.
Table 4 Device Health Check Dashboard Screen
Device ID Lists the identification number of the device.
Wearer Name Lists the name of the wearer.
Device Model Lists the model number of the device.
Last Reported Timestamp Lists the time the device last sent data to the server.
Battery Status Indicates in percentage the current battery charge level.
Charging Indicates if the device is currently charging.
Site Indicates the site that the device is assigned to.
Use the drop-down menus in the upper-right to filter the results. After making the adjustments, click
Generate to narrow down the list based on the criteria or Reset to clear the filters and list all results.
Add Wearer
Use the Add Wearer screen to view a list of current wearers and allows the administrator to add new
wearers to the portal.
Item Description
13
Page 14

Figure 13 Add Wearer Screen
Table 5 Add Wearer Screen Descriptions
Column Description
Wearer Lists the name of the wearer.
Department Lists the department assigned to the wearer.
Site Lists the site assigned to the wearer.
User Defined Lists the user defined information.
Adding a New Wearer
INOTE: The IT administrator must first create a site and a department before adding a new wearer.
To add a new wearer:
1. Click +Add WEARER. The Add Wearer dialog box appears.
IMPORTANT: First Name is only used for badge printing and is not stored in the portal. The company HR
employee will keep a record of worker assignments to wearer IDs.
2. In the Login User field, enter the wearer name (required).
3. In the First Name field, enter the wearer name (required for badge printing only).
4. In the User Defined field, enter any additional information for the wearer.
5. In the Site drop-down list, select the site to assign to the wearer (required).
6. In the Department drop-down list, select a department to assign to the new wearer (required).
14
Page 15

Click Save to save the wearer information. The new wearer appears in the list.
7.
or
Click Save and Print to print a badge for the new wearer to PDF or a Zebra printer.
Editing a Wearer
IMPORTANT: First Name is only used for badge printing and is not stored in the portal. The company HR
employee will keep a record of worker assignments to wearer ID.
1. Click to edit an existing wearer in the list.
2. In the Login User field, edit the wearer name (required).
3. In the User Defined field, enter any additional information for the wearer.
4. In the Site field, select a site to assign to the wearer (required).
5. In the Department drop-down list, select a department to assign to the new wearer (required).
6. Click Update.
Printing a Wearer Badge to PDF
1. Click to print a wearer badge.
2. In the Name field, enter the name should appears on the badge.
3. Click Print PDF to print a page. A badge page appears.
Figure 14 PDF Badge Sample
4. Type Ctrl-P to print to a local or network printer.
Ensure that printing background graphics is enabled.
5. Click the browser back button to return to the previous page.
6. Fold paper along dashed lines as shown.
7. Place badge in badge holder.
15
Page 16
Printing a Wearer Badge to a Zebra Printer
NOTE: Installation of Browser Print software is required prior to printing to a Zebra printer. Go to
www.zebra.com/us/en/support-downloads/printer-software/by-request-software.html
Print installation file and installation instructions.
Each domain that uses the Browser Print software needs to have its domain added to Browser Print's allow
list. When the user selects Print Zebra Printer for the first time, a dialog box appears. To enable Zebra
printing, click Yes to confirm the domain matches the domain in your address bar.
1. Click to print an existing wearer badge.
2. In the Name field, enter the name should appears on the badge.
3. Click Print Zebra Printer to print to a supported Zebra printer.
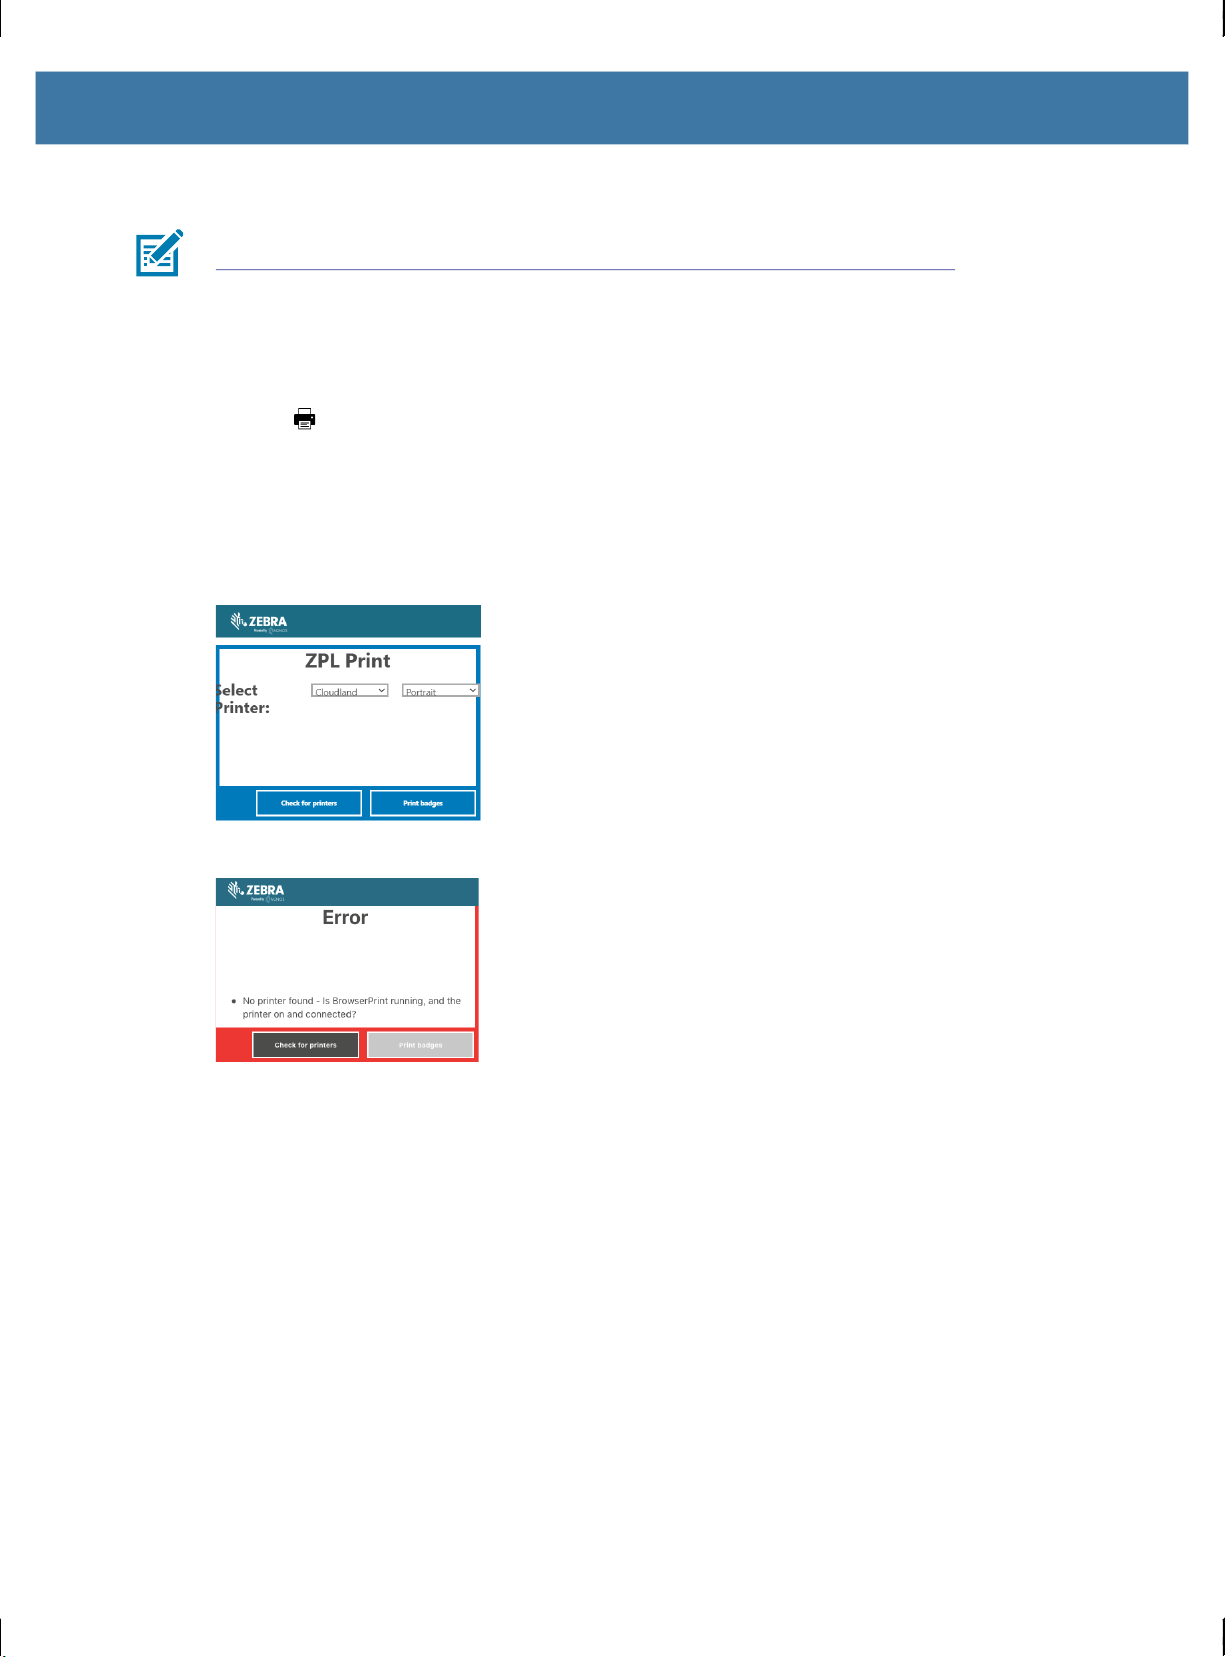
If the Browser Print software is not installed, an error message appears.
Figure 15 Printing to Zebra Printer
to obtain the Browser
Figure 16 Printing Error Message
4. In the Select Printer drop-down list, select the connected Zebra printer.
5. In the second drop-down list, select Portrait or Landscape for printing orientation.
6. Click Print badges.
7. Remove label from printer.
16
Page 17

Figure 17 Zebra Printer Badge Sample
Uploading Wearer List
INOTE: The IT administrator must first create a site and a department before adding a new wearer.
The IT administrator can upload a group of wearers to the Portal:
IMPORTANT: Do not enter actual worker names. The company HR employee will keep a record of worker
assignments to wearer ID.
1. Create an Excel file with the following columns.
• Login Name - wearer ID
• First Name - wearer ID
• Last Name - wearer ID
• Department - department name. The department name must already exist in the Portal. If not, an error
will occur during upload.
• Site - site name. The site name must already exist in the Portal. If not, an error will occur during upload.
• UserDefined - any additional information for the wearer.
2. Enter all information for each wearer.
Figure 18 Wearer Excel File Example
3. Save the Excel file.
4. Click Choose File.
5. Navigate to the Excel file and click Open.
17
Page 18

Click Upload Users.
6.
7. A dialog box appears indicating if the upload was successful or not successful.
8. The first cell is green if data was successfully updated, and red if unsuccessful. The new wearers are
added to the portal.
If first cell is red, correct the data in the Excel file and upload again.
9. Click Print PDF or Print ZPL to print badges for each new wearer.
18
Page 19

Add Site
Use the Add Site screen to add a new site name to the Portal or edit an existing site name.
Figure 19 Add Site Screen
Adding a Site Name
1. Click +Add Site button. The Add Site dialog box appears.
2. In the Site Name field, enter the name for the new site.
3. Click Save.
Editing a Site Name
1. Click next to the site to edit. The Edit Site dialog box appears.
2. In the Site Name field, select a new department name.
3. Click Update.
Add Department
INOTE: The IT administrator must first create a site before adding a department.
19
Page 20
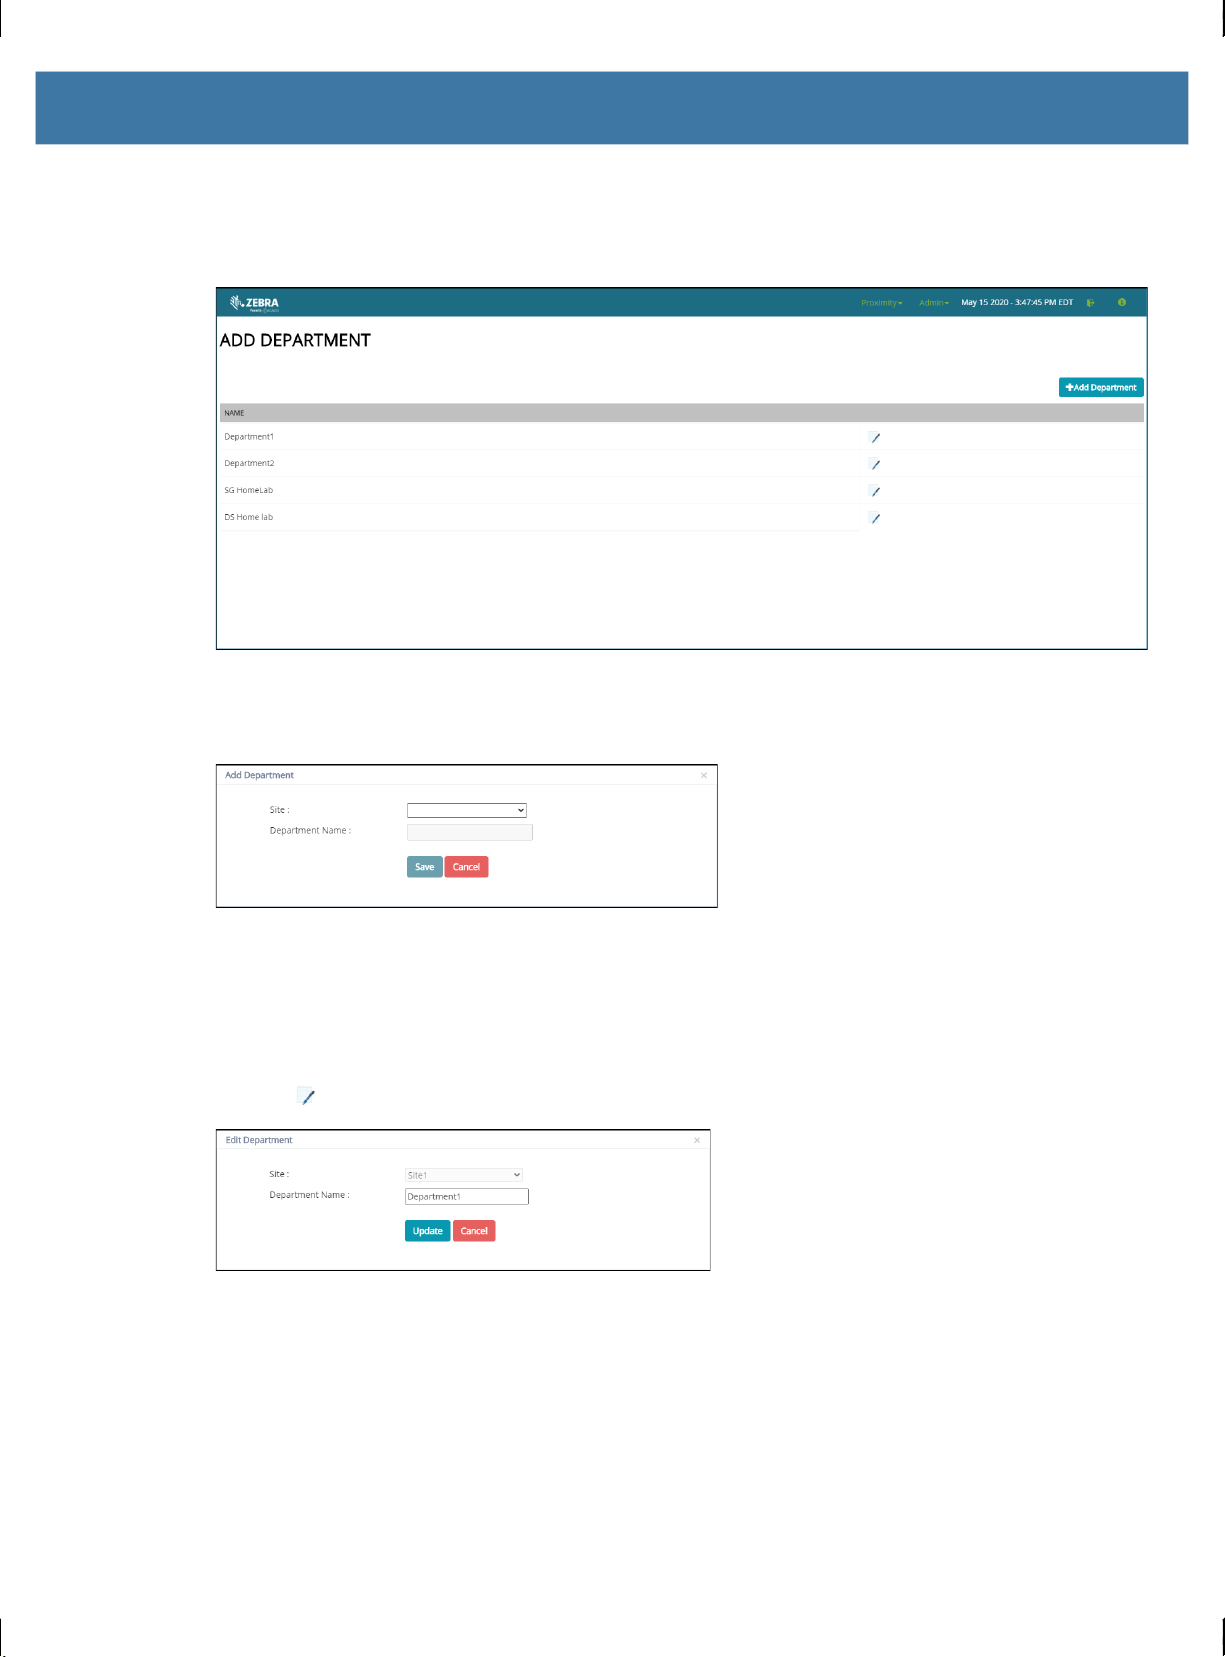
Use the Add Department screen to add a new department name to the dashboard or edit an existing
department name.
Figure 20 Add Department Screen
Adding a Department Name
1. Click +Add Department button. The Add Department dialog box appears.
2. In the Site drop-down list, select a site location.
3. In the Department Name field, enter the name for the new department.
4. Click Save.
Editing a Department Name
1. Click next to the department to edit. The Edit Department dialog box appears.
2. In the Department Name field, select a new department name.
3. Click Update.
User List View
Use the User List View screen to view and edit a list of users, assign sites and roles to the users.
20
Page 21
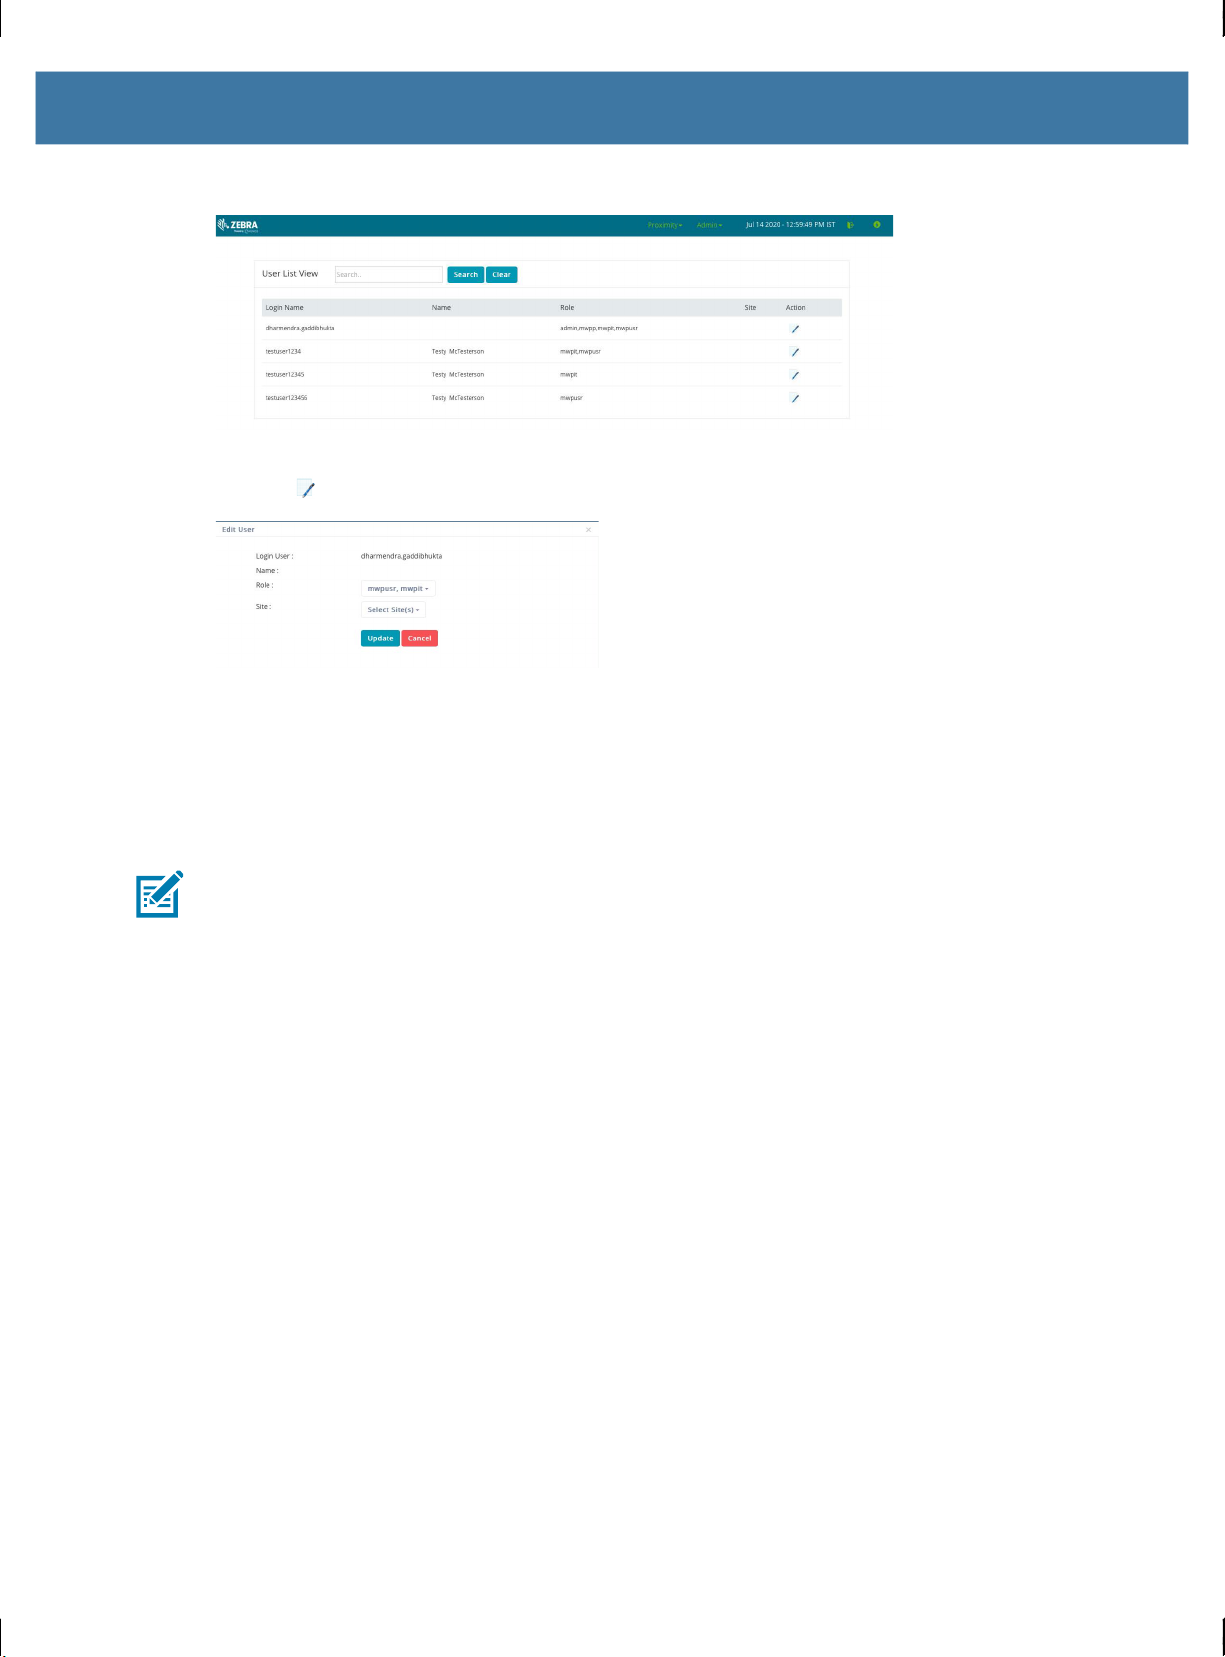
Figure 21 User List View Screen
1. Find the user in the list or search using the text search bar.
2. Click next to the user to edit. The Edit User dialog box appears.
3. In the Role drop-down list, select a role for the user.
• mwpit - User is an IT leader and can access the Admin dashboards.
• mwpuser - User is a HR or facilities leader and can access the Proximity dashboards.
4. In the Site drop-down list, select one or more sites for the user.
5. Click Update.
NOTE: If a user with the MWP User role has been assigned to only a limited number of sites, the user is
able to view proximity data only for the assigned sites.
Logging Out
To log out of the dashboard, click the log out icon in the top right of the screen.
21
Page 22

www.zebra.com
 Loading...