

Page 1
Part # UMAN-CM2-3-007 Rev. A
User Guide
Septembert, 2006
Page 2

Page 3

Contents
Proprietary Statement .................................................................. iv
Document Conventions ................................................................ vi
Introduction ................................................................................ O-8
Controls ....................................................................................... O-9
Keypad Functions .................................................................................... O-9
Self Test .................................................................................................... O-9
Batteries and Charging .............................................................O-10
Conditioning Bat ter y Packs ...................................................................O-10
Model UCN 72 Battery Charger .............................................................O-10
Removing and Replacing Cameo 2 Battery Packs ...............................O-11
Removing and Replacing Cameo 3 Bat tery Packs ..............................O-12
Low Bat ter y Shutdown ..........................................................................O-12
Safety Warnings .....................................................................................O-12
Installation of Media .................................................................O-13
Magnetic Card Reader ..............................................................O-15
Maintenance ...............................................................................O-16
Cleaning the printhead ...........................................................................O-16
Cleaning the platen (print roller) ...........................................................O-16
Cleaning the Media Sensor ...................................................................O-16
Linerless Media Printers ........................................................................O-18
Troubleshooting ........................................................................O-19
Self Test: .................................................................................................O-19
Troubleshooting Guide ..........................................................................O-19
Communicating with the Printer ............................................ O-21
Cable Communications ......................................................................... O-22
IR Communications ............................................................................... O-22
Bluetooth Networking Overview ......................................................... O-23
WLAN Over view .................................................................................... O-23
Radio Regulatory Information ................................................ O-24
Bluetooth Radio for Cameo 2 and Cameo 3 ........................................ O-24
Zebra Value Radio, 802.11b for Cameo 3 ............................................. O-25
Printer Specifications ............................................................... O-27
Physical .................................................................................................. O-27
Environmental ....................................................................................... O-27
Printing Characteristics ......................................................................... O-27
Communications Specifications .......................................................... O-27
Communications Port ........................................................................... O-30
Power ...................................................................................................... O-30
Media Specifications ............................................................................. O-31
Media Width Settings ........................................................................... O-31
Media Type ............................................................................................. O-31
Resident Hardware/Memory Features ................................................ O-31
Software Features ................................................................................. O-32
Accessories and Options ...................................................................... O-32
Appendix A - Interface Cables ....................................................A-33
Appendix B - Media Supplies ......................................................A-35
Appendix C - Maintenance Supplies ............................................A-35
Appendix D .................................................................................A-36
Product Support .................................................................................... A-36
Product Support Contacts .................................................................... A-37
Appendix E .................................................................................A-38
Battery Disposal .................................................................................... A-38
Product Disposal ................................................................................... A-38
Patent Information ....................................................................A-39
iii
Page 4

Proprietary Statement
This manual contains proprietar y information of Zebra Technologies Corporation. It is
intended solely for the information and use of parties operating and maintaining the equipment described herein. Such proprietary information may not be used, reproduced, or disclosed to any other parties for any other purpose without the expressed writ ten permission
of Zebra Technologies Corporation.
Product Improvements
Since continuous product improvement is a policy of Zebra Technologies Corporation, all
specification s and signs are subje ct to change without notice.
FCC Compliance Statement
Class B digital device. Tested to comply w ith FCC standards for home or of fice use.
WARNING: Exposure to Radio Frequency radiation. To conform to FCC RF exposure requirement s this device shall be used in accordance with the operating conditions and instructions lis ted in this manual. Note that there are several radio options available with this
printer. Additional regulatory information is cont ained in later sec tion s devoted to each
radio individually.
NOTE: This uni t was te sted with shielded cables on the peripheral device s. Shielded
cables mus t be used with the unit to insure compliance.
Changes or modific ations to this unit not expressly approved by Zebra Technologies Corporation could void the user’s authority to operate this equipment.
Canadian Compliance Statement
This Class B digital apparatus complies with C anadian ICES-003.
Cet appareil numérique de la classe B est con forme á la norme NMB -003 du Canada.
“IC:” before the equipment certi fication number signifies that the Indus try Canada technical specifi cations were met. It doe s not guarantee that the certified product will operate to
the user’s sa tisfaction.
Agency Approvals and Regulatory Information
• FCC part 15 • Canadian STD RSS-210
• NOM/NYCE ( Mexico) • EN60950: 200 0 Safety Standard
• C-Tick (Australia) • EN55022:1998 Class B European
Electromagnetic Radiation Standard
Liability Disclaimer
Inasmuch as every e ffort has been made to supply accurate information in this manual,
Zebra Technologies Corporation is not liable for any erroneous information or omissions.
Zebra Technologies Corporation reserve s the right to correct any such errors and disclaims
liabilit y resulting therefrom.
No Liability for Consequential Damage
In no event shall Zebra Technologies Corporation or anyone else involved in the creation,
production, or deliver y of the accompanying product ( including hardware and software)
be liable for any damages whatsoever (including, without limitation, damages for loss of
business profit s, business interruption, loss of business information, or other pe cuniary
loss) arising out of the use of or the results of use of or inability to use such product, even
if Zebra Technologies Corporation has been advised of the possibility of such damages.
Because some states do not allow the exclusion of liability for consequential or incident al
damages, the above limitation may not apply to you.
Copyrights
The copyrights in this manual and the label print engine described therein are owned by
Zebra Technologies Corporation. Unauthorized reproduction of this manual or the sof tware
in the label print engine may result in imprisonment of up to one year and fines of up to
$10,000 (17 U.S.C.506). Copyright violators may be subject to civil liability.
This produc t may contain ZPL®, ZPL II®, and ZebraLinktm programs; Element Energy Equalizer® Circuit; E3®; and AGFA fonts. Software © ZIH Corp. All rights reserved worldwide.
ZebraLink and all produc t name s and numbers are trademarks, and Zebra, the Zebra logo,
ZPL, ZPL II, Element Energy Equalizer Circuit, and E3 Circuit are registered trademarks of
ZIH Corp. All right s reserved worldwide.
Monot ype®, Intellifont® and UFST® are trademarks of Monot ype Imaging, Inc. registered in
the Uni ted St ates Patent and Trademark O ffice and may be registered in certain jurisdictions.
AndyTM , CG PalacioTM, CG Century SchoolbookTM, CG TriumvirateTM, CG TimesTM, Monot ype
KaiTM, Monot ype MinchoTM and Monotype SungTM are trademarks of Monot ype Imaging,
Inc. and may be registered in some jurisdictions.
iv
Page 5

HY Gothic HangulTM is a trademark of Hanyang Systems, Inc.
AngsanaTM is a trademark of Unity Progress Company (UPC) Limited.
Andale®, Arial®, Book Antiqua®, Corsiva®, Gill Sans®, Sorts® and Times New Roman® are
trademarks of The Monot ype Corporation registered in the United St ates Patent and Trade mark O ffice and may be registered in certain jurisdictions.
Century Gothic™, Bookman Old StyleTM and Centur y SchoolbookTM are trademarks of The
Monot ype Corporation and may be registered in certain jurisdictions.
HGPGothicB is a trademark of the Ricoh company, Ltd. and may be registered in some ju risdictions.
UniversTM is a trademark of Heidelberger Druckmaschinen AG, which may b e registered in
certain jurisdictions, exclusively licensed through Linot ype Library GmbH, a wholly owned
subsidiar y of Heidelberger Druckma schinen AG.
Futura® is a trademark of Bauer Types SA registered in the United States Patent and Trademark O ffice and may be registered in some jurisdictions.
TrueType® is a trademark of Apple Computer, Inc. registered in the United States Patent and
Trademark Of fice and may be regis tered in cer tan jurisdictions .
All other brand names, product names, or trademarks belong to their respective holders.
©
2006 ZIH Corp.
v
Page 6
Document Conventions
The following conventions are used throughout this docu-
ment to convey certain information:
If you are viewing this guide online, click the underlined text
to jump to a related Web site. Click on italic text (not underlined) to jump to that location in this manual..
Cautions, Important, and Note
Caution • Warns you of the potential for electrostatic discharge.
Caution • Warns you of a potential electric shock situation.
Caution • Warns you of a situation where excessive heat could cause a
burn
Caution • Advises you that failure to take or avoid a specific action
could result in physical harm to you.
Caution • Advises you that failure to take or avoid a specific action
could result in physical harm to the hardware.
Important • Advises you of information that is essential to complete a
task.
Note • Indicates neutral or positive information that emphasizes or
supplements important points of the main text.
vi
Page 7

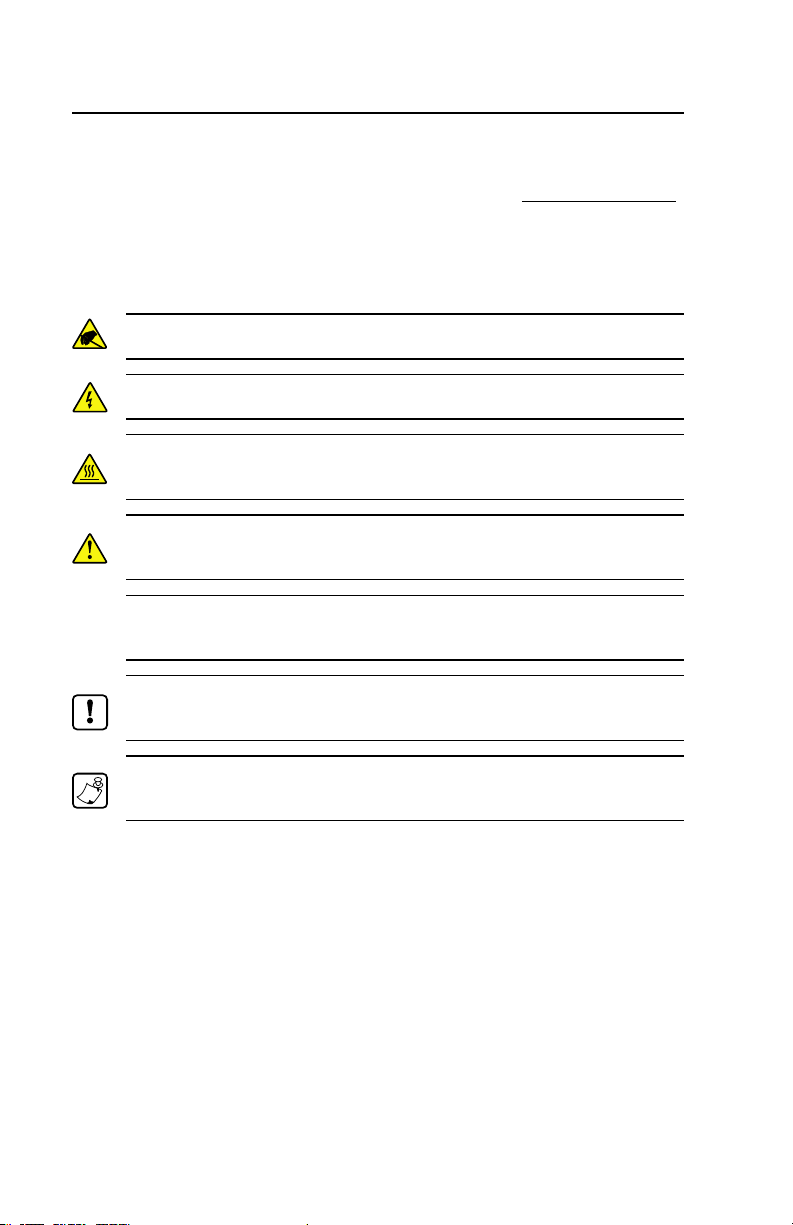
Cameo Series Overview
9
8
7
1
2
3
4
6
5
11
1. Magnetic Stripe Reader
(MSR) Slot
2. Printhead
3. Gap Sensor
4. Media Edge Guide
5. Platen Roller
10
6. Media Cover
7. Battery Charging Receptacle
8. Communications Port
9. Control Panel
10. Belt Clip
11. Battery
Page 8
Introduction
Mode l
Medi a
Widt h
Mag Card
Reader
IrDA1Bluetooth
1
802.11b
WLAN
1
The Cameo® Series of Mobile Printers utilize the latest in direct thermal printing technology. These products are designed for mobile printing applications. Their compact size
and rugged construction is ideally suited to print receipts and
for many other situations where on-site printing is required.
The Cameo Series offers optional features such as
Bluetooth® or infrared (IrDA) communications and an integrated magnetic card reader (MCR). Cameo 3 printers can be ordered with an optional 802.11b compliant WLAN radio. Refer
to the table below. Note that only one wireless communication option (IrDA, Bluetooth or WLAN)may be installed on a
printer.
Cameo 2 2” opt.
Cameo 3 3” opt.
opt. opt. N/A
opt. opt. opt.
This manual should be read in its entirety before attempting operation of this product. Further information regarding
this printer series’ features and operation can be found in the
Mobile Printing Systems CPCL Programming Manual, available
on our Web site at: http://www.zebra.com.
Cameo Models Illustrated
Cameo 2 with optional Magnetic
Card Reader and IR interface.
Cameo 3
O-8
Cameo 2/3 Series User Guide
Page 9
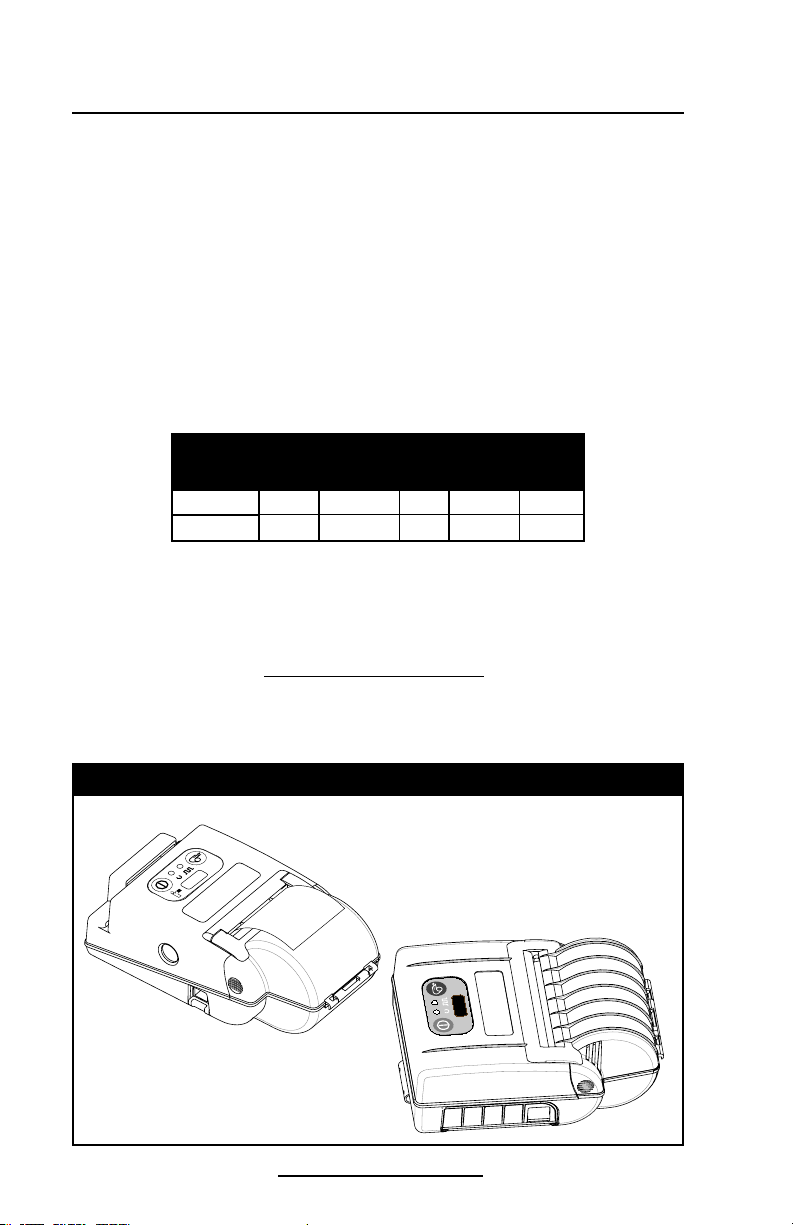
Controls
Keypad Functions
On Switch:
Momentary action turns
on unit
Power Light:
Refer to table below
for Power Light
Feed Switch:
Advances media when
held down.
indications
Units with IR option only: Must be
IR Window:
aligned with corresponding window on
Status Light:
Refer to table below for Status Light
indications
host for IR communications to occur.
Power Light (grn) Status Light (yellow)
Off On Blink Off On Blink
Cameo 2/3
(cable)
Cameo 2/3
(Ir or BT )
Cameo 3
(WLA N)
Power Off Power On
Power Off Power On
Power On
Power Off
Radio
connected to
WLAN*
Low Battery
Warning
Low battery
Warning
Low Battery
Warning
and/ or
Radio not
connected to
WLAN
Normal
Normal
Normal
Latch op en
or out of
media
Latch op en
or out of
media
Latch op en
or out of
media
MCR ready
for card
swipe
MCR ready
for card
swipe
Random
blinking
indicates
data
transmission
MCR ready
for card
swipe
* Connection to a WLAN does not guarantee that communications are enabled. Passwords and/or other
network settings must also be correct.
Self Test
Cameos can perform a self test which verifies proper operation of the printhead and then prints a report on software
loaded in the printer. Refer to the Troubleshooting section for
complete details on performing and interpreting the self-test.
O-9
Cameo 2/3 Series User Guide
Page 10
Batteries and Charging
Conditioning Battery Packs
Important • Cameo batteries must be cycled several times before
maximum capacity is realized. A battery is ”cycled” by fully charging
it, then fully discharging it through normal use.
Model UCN 72 Battery Charger
The Model UCN 72 Charger is a wall mounted single
charger with a universal 110 to 240, 50-60 Hz. VAC input.
Multiple plug configurations comply with most international standards. Consult the factory or your Zebra autorized re-seller for appropriate part numbers.
Using the UCN 72 Charger
Plug the UCN 72 into the appropriate A.C. wall receptacle,
then insert the charge cable into the battery pack charger
jack.
The charger LED will indicate the status of the charger as
follows:
• A steady light indicates the battery pack is undergoing
a fast charge.
• A slow blinking light indicates the charger is in maintenance mode. The battery pack is ready for use.
• A rapidly blinking light indicates a problem with the battery pack. The battery may have an internal short, or its
charge monitoring circuitry may be malfunctioning. The
battery pack should not be used any further.
Caution • Do not attempt to charge batteries with the UCN 72 Charger
while printing. Attempting to print while charging batteries can result
in unreliable charging.
Important • Use of a charger not approved by Zebra for use with Cameo
series NiMH batteries could damage the battery pack or the printer and
will void the warranty.
Required Regulatory Text for Argentina
Only certified adaptors with the following electrical characteristics
shall be used. The use of different adaptors could damage the device,
present hazards to the user and declare the correspondent guaranty
void.
UCN 72: Input ratings: 100-240 VAC 50/60Hz 200mA., Class 2
Output ratings: 10 VDC, 800 mA
O-10
Cameo 2/3 Series User Guide
Page 11
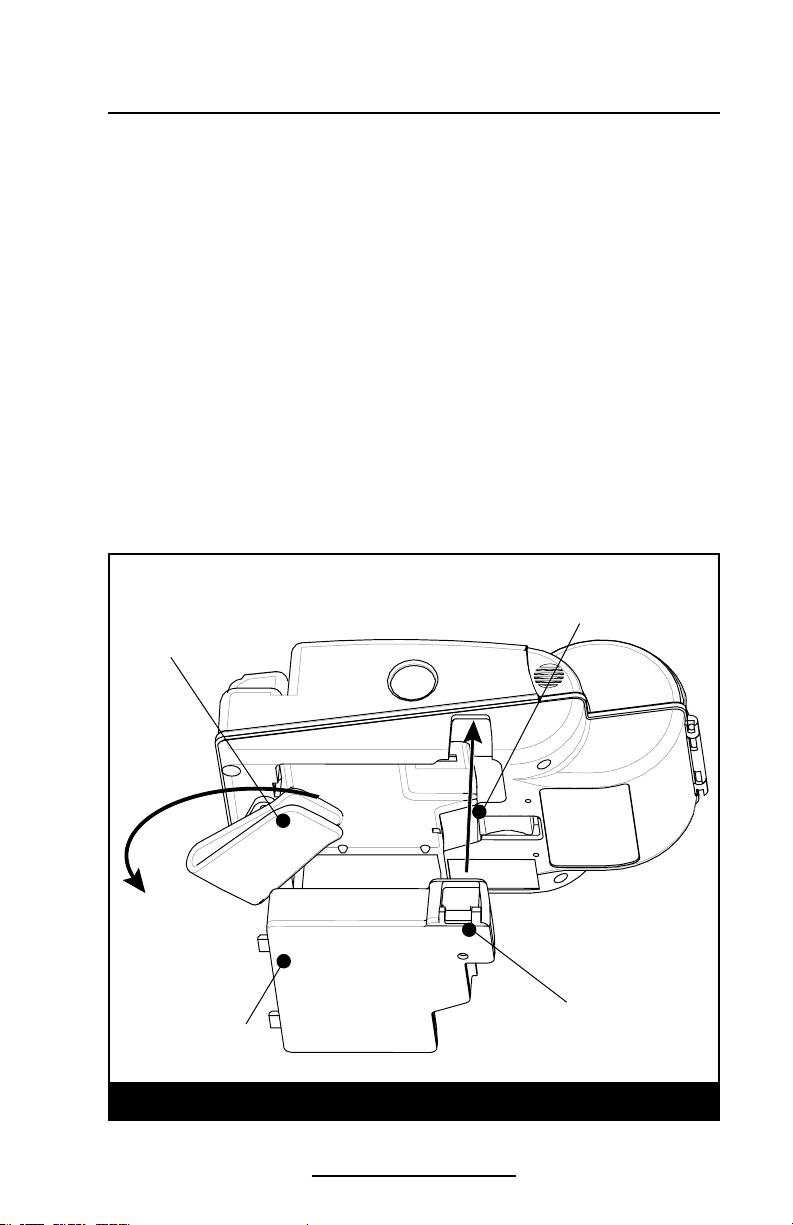
Removing and Replacing Cameo 2 Battery Packs
To remove the battery pack from the Cameo 2:
1. Push the battery release button on the bottom of the
printer towards the media compartment.
2. Rotate the belt clip as shown while,
3. Allowing the battery pack to slide out.
Battery Packs are replaced by the following procedure:
1. Rotate the Belt Clip to clear the battery
2. Align the battery pack to the bottom of the printer. The
side of the battery with the contacts will face into the well
for the battery.
3. Slide the pack completely into the printer until it locks in
place. The battery will engage with a distinct “click”.
4. Rotate the Belt Clip back into position.
Push Release Latch to
remove battery pack.
Belt Clip
Charger Jack
Battery Pack
Removing and Replacing Cameo 2 Series Battery Packs
O-11
Cameo 2/3 Series User Guide
Page 12
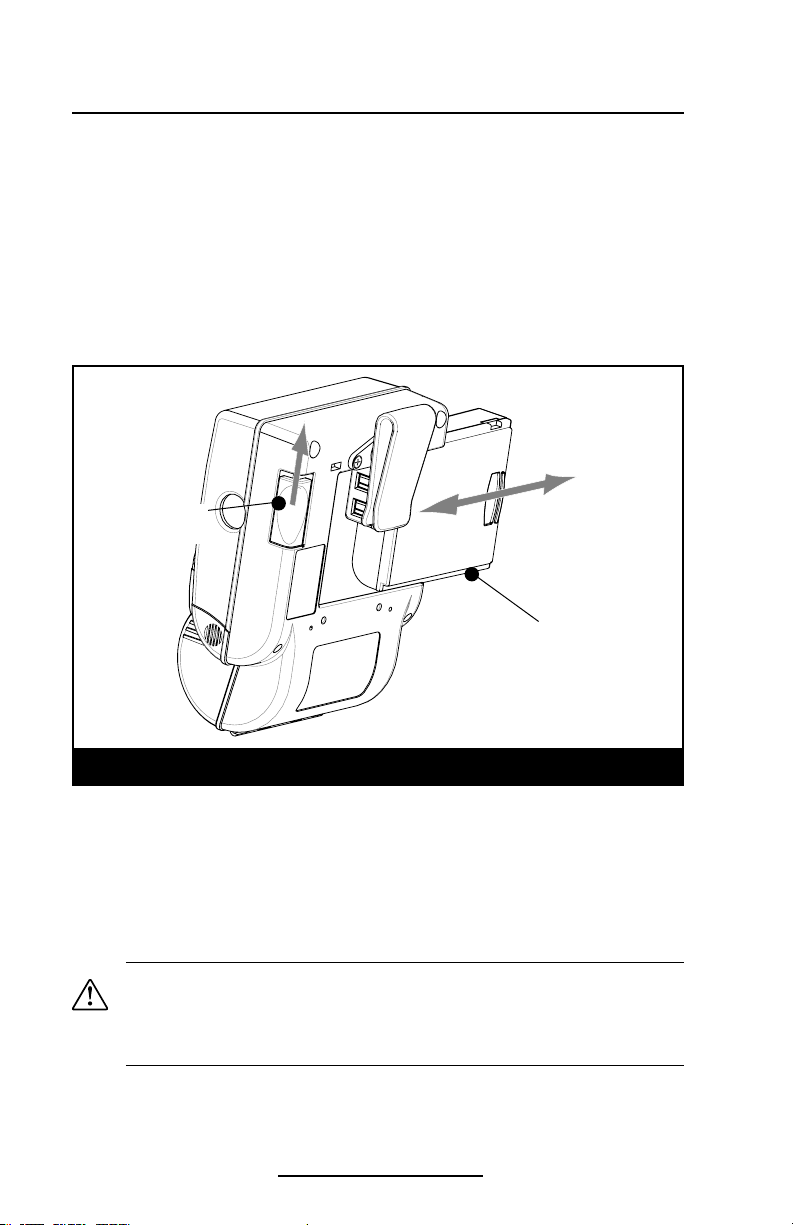
Removing and Replacing Cameo 3 Battery Packs
To remove the battery pack from the Cameo 3:
Slide the Battery Latch button in the direction shown in the
top illustration below, and slide the battery out.
To replace the battery, insert the end with the contacts into
the battery well and slide the battery into the printer until in
clicks into place. Always dispose of battery packs properly.
Refer to Appendix D for more information on battery pack disposal.
Battery Latch
Button
Battery Pack
Removing and Replacing Cameo 3 Battery Packs
Low Battery Shutdown
As the battery charge level in becomes depleted the Power
LED will flash. At this time the printer should be shut off and
the battery pack recharged or replaced. Cameos will automatically shut off if the batteries become severely discharged.
Safety Warnings
Caution • Battery terminals are recessed to prevent short circuiting of
the battery. Allowing these terminals to contact conductive material
will create a short circuit which could cause burns, other injuries or
start a fire.
O-12
Cameo 2/3 Series User Guide
Page 13

Installation of Media
The following details media installation:
Cameo Media Installation
Adjust edge guide to desired
position and snap into place.
Media must spin freely.
Feed media in this direction
Edge Guide
Media must fit between
the edge guide and the
printer frame as shown.
Squeeze finger grips
here on both sides to
open cover
Cameo 2 is illustrated. Loading procedure is identical for all Cameo
Series printers
1. Turn unit off.
2. Squeeze the two finger grips on either side of the media
compartment cover. Rotate the top back to reveal the paper compartment.
3. If necessary, adjust the edge guide as shown for the media to be used.
The edge guide should be set into the nearest slot in the
O-13
Cameo 2/3 Series User Guide
continued
Page 14

printer body that will allow the media roll to spin freely
yet prevent it from wandering from side to side so much
that print quality is affected.
Important • The media roll must sit between the right hand surface of
the edge guide and the printer frame as shown in the illustration.
4. Drop a new roll of paper into the compartment. Media
should feed from the top of the roll and the roll should fit
between the edge guide and the right hand wall.
The inner core of the media roll should be Ø.75” [19 mm] or larger to
prevent the media at the end of the roll from jamming in the printer
mechanism.
5. Close the cover while holding the free end of the media
roll.
6. Ensure the cover is securely latched before beginning to
print.
Caution •When printing, there must be a wait time of one second
between labels to remain within the optimal performance specifications
for this product.
O-14
Cameo 2/3 Series User Guide
Page 15

Detail "A"- Top view of printer
Magnetic Card Reader
The optional magnetic card reader (MCR) is used as follows:
1. A flashing status light indicates the printer is available to
scan. Place the card into the reader slot as shown. The
magnetic stripe must face the top of the printer, and into
the body of the printer as shown in Detail “A” below.
2. Slide the card through the slot. The card will be read
if slid in either direction. Depending on the application
software, the receiving terminal will sound a beep on a
successful scan.
3. If the card did not read, slide it back through the slot in
the opposite direction.
Note • Cameo 2 uses a two-track MCR, and can read either or both
tracks.
Cameo 3 uses a three-track MCR. New Cameo 3 Printers with a
Product Configuration Code (PCC) beginning with “C3C” can read any
or all tracks in any combination. Refer to Appendix “D” for location of
the PCC label.
Older Cameo 3 Printers can read: Track 1, Track 2 or Track 3. They can
read two tracks as follows: Tracks 1 and 2 or Tracks 2 and 3.
Cameo with MCR option
O-15
Cameo 2/3 Series User Guide
Flashing status light
means O.K. to scan card
Page 16

Maintenance
Cameo printers will provide years of reliable service provided a few simple guidelines are followed. The printer should
be cleaned approximately every two weeks, or more often
depending on usage and the type of media being employed.
Components of the printer that require periodic maintenance
are the printhead, print roller (platen), and the media sensor.
When cleaning, please use only isopropyl alcohol, the same
type included in the Cleaning Kit. Always use Zebra label or
ticket stock for maximum print quality and extended printer
life.
Caution • Always turn the printer off prior to any cleaning operation.
Caution • Never use any sharp objects on the printer mechanism as it
could damage the printhead and platen. Use only the supplied cleaning
pen or a cotton swab saturated with alcohol for cleaning.
Cleaning the printhead
• Always turn the printer off prior to any cleaning operation.
• Open the printer by squeezing the finger grips on either
side of the media compartment cover.
• Swing the media compartment cover open.
• Use the cleaning pen supplied with the printer and/or alcohol and cotton swabs to clean the surface of the printhead, the platen, and the sensor.
Cleaning the platen (print roller)
Note • Applies to printers configured for linered media only
• Open the printer by squeezing the finger grips on either
side of the media compartment cover and swinging it
open.
• Gently clean the platen with the cleaning pen supplied
with the printer and/or alcohol and a cotton swab while
rotating the platen.
Cleaning the Media Sensor
The Media sensor is located inside the media compartment
under the printhead. Blow out any dust deposits carefully,
then finish cleaning with the cleaning pen supplied with the
O-16
Cameo 2/3 Series User Guide
continued on page 18
Page 17

NOTE: Do not use
alcohol on the surface
of linerless platens!
Cleaning the Cameo 2
Printhead
Media Sensor
Platen
Printhead
Media Sensor
NOTE: Do not use
alcohol on the surface
of linerless platens!
Cleaning the Cameo 3
Platen
O-17
Cameo 2/3 Series User Guide
Page 18

printer and/or alcohol and cotton swabs.
Linerless Media Printers
Printers using linerless media require more frequent cleaning. Linerless media deposits adhesive which must be removed for optimum performance. Linerless printers can be
identified by a platen which is not black, or by reading the
unit’s fifteen digit Product Configuration Code (PCC) label on
the back of the printer. PCC digit “8” will be “B”, “”D”, “F”, or
“H” for linerless printers.
Note • It is not necessary to clean the platen on linerless units.
The platen material is self cleaning and will not require constant
maintenance.
Caution • Never use any sharp objects on the printer mechanism as it
could damage the printhead. Use only isopropyl alcohol, the supplied
cleaning pen and /or a cotton swab for cleaning the printer.
• Open the printer by squeezing the finger grips on either
side of the media compartment cover.
• Surfaces inside the media compartment that come
in contact with the linerless media adhesive should be
cleaned, along with:
• The print mechanism area around the Sensor
• The printhead
• The inside surface of the edge guide
Allow printer to dry before resuming printing.
O-18
Cameo 2/3 Series User Guide
Page 19

Troubleshooting
Self Test:
The self test is activated by the following key sequence:
Refer to the Controls section for more information on keypad functions.
1. Press the “FEED” key
2. While still holding down the “FEED” key, turn on
the printer by pressing and releasing the “ON” key.
3. Continue pressing the “FEED” key until self test starts.
The Cameo will perform the self test and remain on.
The unit should print a line of interlocking “x” characters to
insure all elements of the printhead are working, print out the
version of software loaded in the printer and then print two reports. The first report indicates model, ROM version, serial
number, baud rate, etc. The second report contains application information. If no second report appears, there is no application loaded.
Troubleshooting Guide
No power
• Check battery, recharge or replace as necessary.
Media does not feed:
• Be sure media compartment cover is closed and latched.
Poor or faded print:
• Clean printhead.
• Check/replace battery. Refer to Appendix D for information
on proper disposal of batteries.
• Check quality of media.
Partial/missing print:
• Check media alignment.
• Clean printhead.
• Verify media compartment cover is closed and latched.
Prints illegible characters:
• Check baud rate.
No print:
• Check baud rate.
• Replace battery. Refer to Appendix D for information on
proper disposal of batteries.
• Check cable connection to terminal.
• Wireless units: verify communication link between printer
and terminal.
O-19
Cameo 2/3 Series User Guide
continued
Page 20

• Wireless printers associated with a LAN: refer to the RF
LAN Information section of the Self Test printout to verify
the printer’s SSID and IP addresses are correct, and that
the printer is “associated” with the wireless LAN.
• Invalid label format or command structure — use
Hex Dump Mode for troubleshooting. Refer to the
Programming Manual for more information.
Reduced battery charge life:
• Recondition (cycle) battery.
• Damaged battery-replace. Refer to Appendix D for
information on proper disposal of batteries.
• Check battery date code: if one to two years old, short
charge life may be due to normal aging.
Status light flashing and beeper chimes:
• No application: reload program.
Status light flashing
• If using IrDA or Bluetooth wireless communications:
normal indication data is being processed.
• If equipped with Magnetic Card Reader (MCR): indicates
reader is ready for a card swipe.
Status light always on:
• Check media is loaded and media compartment cover is
closed and latched.
Power Light Flashing
• Low battery warning
• Cameo 3 WLAN units: Printer‘s radio is not associated with
a WLAN access point.
Communication Error:
• Check media is loaded, media compartment cover is closed
and latched, and error light is off.
• Check baud rate.
• Replace cable to terminal.
Caution • Never use any sharp objects on the printer mechanism as it
could damage the printhead. Use only isopropyl alcohol, the supplied
cleaning pen and /or a cotton swab for cleaning the printer.
O-20
Cameo 2/3 Series User Guide
Page 21

Communicating with the Printer
The printer must establish communications with a host ter-
minal which sends the data to be printed. Communications
occur in three basic ways:
• By a cable between the printer and its host terminal
• Infrared (usually by means of the industry standard IrDA
protocol) Units with the IrDA option can be identified by
the “IR” logo on the unit’s keypad.
IR
Communications
Window
The IrDA logo or the
Bluetooth logo will appear
here if those options are
installed.
Serial
Communications
(Cable) Por t
(Cameo 2 shown
Cameo Communications
Communications
Cameo 3 Communications Port
Serial
(Cable) Por t
• Using Bluetooth wireless communications. Cameos with
the Bluetooth option will have a Bluetooth logo on the
lower left corner of the keypad.
• By means of a wireless LAN (Local Area Network)
Cameo printers with the WLAN option are identified by
O-21
Cameo 2/3 Series User Guide
Page 22

the text “Wireless Network Printer” on the product identification label.
Cable Communications
All Cameo printers can communicate by cable; the specific cable supplied with your printer will vary with the host terminal. The 8-pin circular connector on your communications
cable plugs into the serial communications port on the side of
the Cameo printer. (Refer to the Specifications Section of this
manual for communications port pin assignments.)
The connector is keyed to assure correct alignment; do not
try to force it if it does not plug in. The other end of the cable
must be plugged into the host terminal. Communications between the terminal and the printer is controlled by the applications running on the terminal and the printer.
IR Communications
Printers equipped for infrared (IR) communications are
identified by a small “IR” logo on the unit’s keypad. IR allows
wireless communications between the printer and the host
terminal. IR units can also communicate with a cable as detailed above, however, IR functions are disabled when the
cable is plugged in. Cameo units with the IR option can be
configured to conform to the standard IrDA communications
protocol
Linking a Printer to an IrDA Host
IrDA compliant terminals will automatically initiate communications to the printer. First insure that there is a direct line
of sight between the printer and the terminal that will be sending data. The IR window on the front of the Cameo must face
the corresponding window on the terminal to properly send
and receive signals. An IrDA compliant terminal will seek out
any linkable devices and establish communications between
them, even turning the printer on if necessary.
O-22
Cameo 2/3 Series User Guide
Page 23

Bluetooth Networking Overview
In order to exchange data, two Bluetooth enabled devices must establish a connection. Bluetooth software is always
running in the background, ready to respond to connection
requests. One device (known as the master) must request a
connection with another. The second device (the slave) then
accepts or rejects the connection. Bluetooth enabled Cameo
printers act as a slaves. The resulting small network of up to
seven Bluetooth enabled devices is sometimes referred to as
a “piconet”.
Each Bluetooth enabled Cameo printer has a unique
Bluetooth Device Address (BDA) loaded into its radio module
when manufactured. For the most part, communications using the Bluetooth protocol are initiated and processed without
any operator intervention, much like the IrDA system described previously.
WLAN Overview
Cameo printers, when equipped with the 802.11b WLAN radio option, allow wireless communication as a node within a
local area network (LAN). This option allows communication
from any point within the LAN’s perimeter. Methods of establishing communications to the printer will vary with each LAN
application.
More detailed information on establishing WLAN communications can be found in either the ”CPCL Programmers
Manual” or the “Quick Start Guide for Mobile Wireless
Printers” both available on-line at www.zebra.com.
More information and LAN configuration utilities may also
be found in Zebra’s Label Vista™ program (version 2.8 and later). Label Vista may be downloaded from the Zebra Web site.
O-23
Cameo 2/3 Series User Guide
Page 24

Radio Regulatory Information
Bluetooth Radio for Cameo 2 and Cameo 3
The following section only applies when the Bluetooth ZBR3 Module is installed in the Cameo 2 or Cameo
3 printers. Cameo 2 printers with the Bluetooth radio have an FCC ID: I28MD-BTC2TY2. Cameo 3 printers
with the Bluetooth Radio could have an FCC ID: I28MD-BTC2TY5 or I28MD-BTC2TY2. Note that only one of
the radio options can be installed in the printer at one time.
“Bluetooth” is a worldwide standard for the exchange of
data between two devices via radio frequencies. Bluetooth
radios are relatively low powered to help prevent interference with other devices running at similar radio frequencies.
This limits the range of a Bluetooth device to about 10 meters
(about 32 feet).
Both the printer and the device it communicates with must
follow the Bluetooth standard.
Caution • Exposure to Radio Frequency Radiation. The radiated output
power of this internal Bluetooth radio is far below the FCC radio
frequency exposure limits. Nevertheless, this Bluetooth radio must
be used in such a manner that the antenna is 2.5 cm or further from
the human body. The radio and antenna are mounted internally in this
printer such that when the printer is worn with the back of the printer
against the body and the front of the printer (where paper exits) away
from the body, then the 2.5 cm distance between the antenna and
the users body will be met. Do not use the printer in an unauthorized
manner. The internal Bluetooth radio operates within guidelines found
in radio frequency safety standards and recommendations. The level of
energy emitted is far less than the electromagnetic energy emitted by
other wireless devices such as mobile phones.
European Regulatory Information for the ZBR3 Bluetooth Radio
This device is intended for use in all EU and EFTA member states.
Europe – EU Declaration of Conformity
This device complies with the essential requirements of the R&T TE Directive
1999/5/ EC. The following test methods have been applied in order to prove
presumption of compliance wi th the R &TTE Directive 1999/5/EC:
• EN 60950: 2000
Safety of Information Technology Equipment
• EN 300 328-2 V1.4.1 (2003-04)
Technic al requirements for spread-spectrum radio equipment
• EN 301 489-1/-17 V1.4.1/1.2.1 (2002-08 )
EMC requirements for spread-spectrum radio equipment.
This device is a 2.4 GHz wireless LAN transceiver, intended for indoor home and
office use in all EU and EFTA member st ates.
Impor tant Notice:
0336
Cameo 2/3 Series User Guide
This de vice is a port able RF print er intended
for comm ercial and in dustrial us e in all EU
and EFTA me mber state s.
O-24
Page 25

Zebra Value Radio, 802.11b for Cameo 3
The following section only applies when the Zebra Value Radio, 802.11b (with FCC ID: I28MD-ZLAN11B)
is installed in a Cameo 3 printer. The FCC ID number is on the serial number label on the back of the printer
and can be read with the module installed. Note that only one of the radio options can be installed in the
printer at one time and the antenna used for these transmitters must not be co-located or must not operate
in conjunction with any other antenna.
Caution • The radiated output power of this internal 802.11b radio is far
below the FCC radio frequency exposure limits. Nevertheless, this radio
must be used in such a manner that the antenna is 2.5 cm. or further
from the human body. The radio and antenna are mounted internally
in this printer such that when the printer is worn with the back of the
printer against the body and the front of the printer (where paper exits)
away from the body, then the 2.5 cm distance between the antenna and
the users body will be met. Do not use the printer in an unauthorized
manner.
European Regulatory Information for this Radio
AT BE CY CZ DK
EE FI FR DE GR
HU IE IT LV LT
LU MT NL PL PT
SK SI ES SE GB
Note: - Member st ates in the EU with re strictive use for this device are
crossed out!
This device is also authorized for use in all EFTA member s tates (CH, IS, LI, NO)
Impor tant Notice:
This de vice is a port able RF print er intended
0336
Cameo 2/3 Series User Guide
for comm ercial and in dustr ial use in all EU an d
EFTA memb er states exc ept in France w here
rest rictive use a pplies.
O-25
continued
Page 26

Europe – EU Declaration of Conformity
This device complies with the essential requirements of the R&T TE Directive
1999/5/ EC. The following test methods have been applied in order to prove
presumption of compliance wi th the R &TTE Directive 1999/5/EC:
• EN 60950: 20 00
Safety of Information Technology Equipment
• EN 300 328-2 V1.2.1 (2001-12)
Technical requirements for spread- spectrum radio equipment
• EN 301 489-17 V1.2.1 (2002- 08)
EMC requirements for spread-spectrum radio equipment.
This device is a 2.4 GHz wireless LAN transceiver, intended for indoor home and
office use in all EU and EFTA member st ates, except in France where res trictive
use applies.
The use of this frequency band in France is subject to restrictions. You may only
use channel s 10 and 11 (2457 and 2462 MHz) on French terri tory, except in those
French departments a s listed in the table below where channels 1-13 (24122472 MHz) may be used. For more in formation see ht tp://w ww.anfr.fr/ and /or
http://ww w.ar t-telecom.fr
01 Ain 36 Indre 69 Rhone
02 Aisne 37 Indre et Loire 70 Haute Saone
03 Allier 39 Jura 71 Saone et Loire
05 Hautes Alpes 41 Loir et Cher 72 Sarthe
08 Ardennes 42 Loire 75 Paris
09 Ariege 45 Loiret 77 Seine et Marne
10 Aube 50 Manche 78 Yvelines
11 Aude 54 Meur the et Moselle 79 Deux Siev res
12 Aveyron 55 Meuse 82 Tarn et Garonne
16 Charente 57 Moselle 84 Vaucluse
19 Correze 5 8 Nievre 86 Vienne
2A Cor se Sud 59 Nord 88 Vosges
2B Haute Corse 60 Oise 89 Yonne
21 Cote d’Or 61 Orne 90 Territoire de Belfort
24 Dordogne 63 Puy de Dome 91 Essonne
25 Doubs 64 Pyrenees Atlantique 92 Hauts de Seine
26 D rome 6 5 Hautes P yrenees 93 Seine St Denis
27 Eure 66 Pyrenees Orientales 94 Val de Marne
32 Gers 67 Bas Rhin
35 Ille et V ilaine 68 Haute Rhin
O-26
Cameo 2/3 Series User Guide
Page 27

Printer Specifications
Physical
Cameo 2 Cameo 3
Weight* 1.15 lbs. (.5 kg) 1.4 lbs. (.64 kg) (CM3)
* Weight is with bat tery, no media loaded 1.6 lbs (.73 kg) (CM3w/ MCR)
Environmental
Operating temperature: 14° to 122°F (-10° to 50°C)
Storage temperature: 5° to 140C °F (-15° to 60°C)
Relative humidity 10%-90% non-condensing
Intrusion Protection Rating (IP) 34*
* IP rating with optional protective boot installed
Cameo electronics automatically compensate for head temperature when printing. Protection circuitry
prevents damage due to excessive printhead temperatures.
When printing, there must be a wait time of one second between labels to remain within the optimal performance specifications for this product.
Printing Characteristics
Cameo 2 Cameo 3
Printhead Width: 1.9” (48 mm) 2.83” (72 mm)
Number of Dots: 384 574
Printhead Life (Est.) 1,950,000” (50 Km nominal)
Technology Direct Thermal
Print Speed up to 3 IPS (76.2 mm/sec.)
Printhead Density 203 DPI (8 dots/mm)
Communications Specifications
Standard Built-in RS-232 port for one or two-way
Communications cable communication to terminal or other
host up to 38.4K BPS.
Programmable RTS/CTS (hardware) and
XON/XOFF protocols are supported.
Default communications parameters are:
Handshaking = RTS/CTS, Baud Rate = 19,200
Parity = None; Data Bits = 8; Stop Bits = 1
Optional Wireless Optional infrared communications via IrDA
Communications specifications.
Optional Bluetooth radio
Cameo 3 only:
Optional wireless LAN via 802.11b protocol
O-27
Cameo 2/3 Series User Guide
Page 28

167.7 mm
185.9 mm
94.7 mm
86.1 mm
65.8 mm
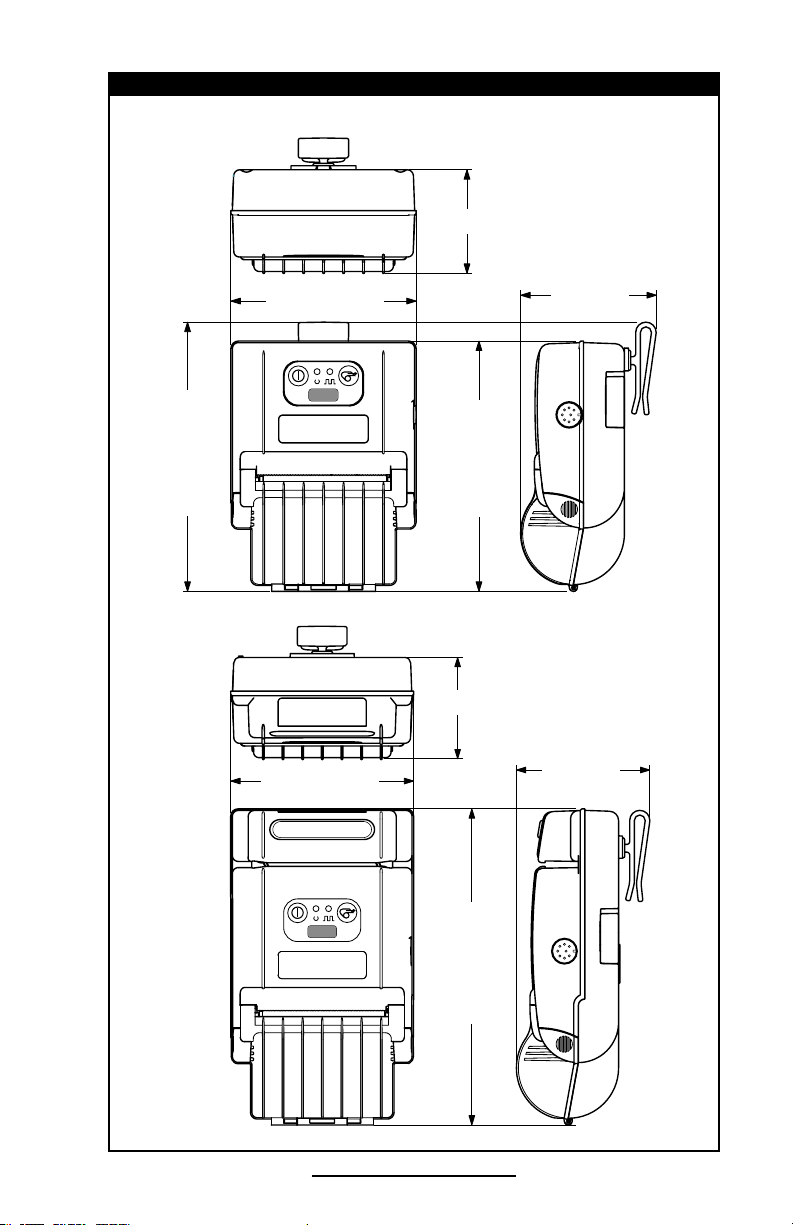
Cameo 2 Physical Dimensions
3.7” (94 mm)
2.6” (66 mm)
3.4”
(86.1 mm)
7.3” (185.9 mm)
6.6” (168 mm)
CAMEO 2
O-28
Cameo 2/3 Series User Guide
Page 29
171.4 mm
159.4 mm
86.1 mm
66.0 mm
117.6 mm
Cameo 3 Physical Dimensions
86.1 mm
66.0 mm
117.6 mm
204.4 mm
4.6” (117 mm)
2.6” (66 mm)
3.4”
(86 mm)
CAMEO 3
6.8” (171 mm)
4.6” (117 mm)
6.2” (158 mm
2.6” (66 mm)
3.4”
(86 mm)
8.2” (208 mm)
CAMEO 3
W/MCR
O-29
Cameo 2/3 Series User Guide
Page 30

8
7
6
4
2
1
5
3
Communications Port
Pin Pin Signal Signal
Number Name Type Description
1 RXD input Receive Data
2 TXD output Transmit Data
3 CTS input Clear To Send from host
4 RTS output Request To Send
set high when printer is
ready to accept command/
data
5 GND Ground
6 NC No Connect
7 DSR input Data Set Ready: Low to high
transition turns printer on,
High to low transition turns
printer of f (if enabled)
8 DTR output Data Terminal Ready
high when printer is on (set at
battery voltage for “S” option)
Communications Port (8 pin Circular DIN)
Power
Cameos utilize removable NiMH battery packs. If not connected to a
terminal with DTR present, the Cameo will automatically power of f to
conserve battery life. The time-out value can be programmed from
the host terminal; the factory default time-out is two minutes.
Additional power features include:
• Low battery indicated by flashing LED and reported to terminal on demand
• Power On/Off controlled from terminal or keypad
Cameo 2/3 Series User Guide
O-30
Page 31

Media Specifications
Cameo 2 Cameo 3
Max. Print Width 1.9” (48.3 mm) 2.83” (71.9 mm)
Max. Roll O.D. 2.25” [57 mm]
Core Diameter .75” [19 mm] min.
Media Width Settings
(all dimensions ±.03” [±.76 mm]
Cameo 2 Cameo 3
0.72 [18.2 mm] 1.47 [37.3 mm]
0.84 [21.3 mm] 1.60 [40.64 mm]
0.97 [24.6 mm] 1.72 [43.7 mm]
1.09 [27.7 mm] 1.85 [47.0 mm]
1.22 [31.0 mm] 1.97 [50.0 mm]
1.34 [34.0 mm] 2.10 [53.3 mm]
1.47 [37.3 mm] 2.22 [ 56.4 mm]
1.59 [40.4 mm] 2.35 [59.7 mm]
1.72 [43.7 mm] 2.47 [62.7 mm]
1.84 [46.7 mm] 2.60 66.0 mm]
1.97 [50.0 mm] 2.72 [69.1 mm]
2.11 [53.6 mm]
1. This width available only with edge guide removed.
1
2.85 [72.4 mm]
2.97 [75.4 mm]
3.04 [77.2 mm]
1
Media Type
• Paper Journal
• Two-part thermal receipts
• Linerless labels (on linerless models only)
Resident Hardware/Memory Features
• 25 Resident fonts
• Optional international character fonts
• Flash memory for down-loadable programs, label formats, fonts and
graphics
• Fully scalable fonts
• Built-in graphics support
O-31
Cameo 2/3 Series User Guide
continued
Page 32

Software Features
• Vertical or horizontal printing
• Lef t, right, or center justification
• Scale to fit
• Concatenation
• Line print mode- ideal for receipt printing
• Programmable label odometer with on-demand terminal reporting
• Serial number reporting to terminal on demand
• Automatic printhead temperature compensation
• Programmable inactivity shut-off
• Out of paper/open cover error LED indicator
• Power On/Off from terminal or built-in keypad
Accessories and Options
• Single battery pack fast charger/conditioner
• Vehicle Charger
• Extra NiMH bat ter y pack
• Variety of interface cables
• IrDA Option
• Bluetooth wireless interface option
• Integrated Magnetic Card Reader (MCR) option
• 802.11b WL AN option (Cameo 3 only)
• Sof t carrying case
• Protective rubber boots for severe use
O-32
Cameo 2/3 Series User Guide
Page 33

Appendix A
Pin 1
Pin 9
DB-9 Pin
Female Plug
(to P.C.)
8 Pin
Male Plug
(to printer)
(TXD)
(RXD)
(RTS)
(CTS)
(GND)
(DTR)
(DSR)
Shield
(RXD)
(TXD)
(CTS)
(RTS)
(GND)
(DSR)
(DTR)
Shield
3
2
7
8
5
4
6
1
2
3
4
5
7
8
1
4
6
7
3
5
8
2
PC Signals Printer Signals
Interface Cables
Download Cables, for use with a personal computer:
• Part Number BL11757-000
8-Pin DIN to 9-Pin DB PC Cable
• Also available as a coiled cable as:
Part Number BL15063-1.
Cameo 2/3 Series User Guide
A-33
Page 34

Appendix A
MORE INTERFACE CABLES
Contact the Factory or your Zebra Sales Representative for more
information on interface cables to most major manufactur’s data
terminals.
You may also vist the Zebra Web site at http://www.zebra.com for a
listing of interface cables for all series of Zebra mobile printers
A-34
Cameo 2/3 Series User Guide
Page 35

Appendix B
Media Supplies
To insure maximum printer life and consistent print quality
and performance for your individual application, it is recommended that only media produced by Zebra be used. These
advantages include:
• Consistent quality and reliability of media products.
• Large range of stocked and standard formats.
• In-house custom format design service.
• Large production capacity which services the needs of
many large and small media consumers including major
retail chains world wide.
• Media products that meet or exceed industry standards.
For more information call Zebra Technologies Corporation at
+1.866.230.9495 (U.S., Canada and Mexico) and ask to speak
to a Media Sales Representative.
Appendix C
Maintenance Supplies
In addition to using quality media provided by Zebra, it is
recommended that the printhead be cleaned as prescribed in
the maintenance section. The following items are available for
this purpose:
• Cleaning Pen (10 pack), Reorder No. AN11209-1
• Cleaning Kit with Cleaning Pen, and Cotton Swabs,
Reorder No. AT702-1
A-35
Cameo 2/3 Series User Guide
Page 36

Appendix D
Product Support
When calling with a specific problem regarding your printer,
please have the following information on hand:
• Model number/type (e.g. Cameo 2)
• Unit serial number
• Product Configuration Code (PCC)
Serial
Number
Product
Configuration
Code (PCC) Label
Label
A-36
Cameo 2/3 Series User Guide
Page 37

Product Support Contacts
For on-line product support, contact Zebra Technologies at:
www.zebra.com, or refer to the table below
In the Americas contact
Regional Headquarters Technical Support Customer Service.
Zebra Tec hnologies
Internati onal,LLC
333 Co rpor ate Woo ds Par kway
Verno n Hills, Illi nois 60061.3109 U. S.A
T: +1 847 793 2600
Toll-f ree +1 800 42 3 0422
T: +1 847 913 2259
F: +1 847 913 2578
Hard ware :
hwt samerica @zebra.com
Software:
swt same rica @zebra.c om
In Europe, Africa, the Middle East, and India contact
Regional Headquarters Technical Support Internal Sales Dept.
Zebra Tec hnologies Europ e
Limited
Zebr a Hous e
The Valley Ce ntre, Gord on Road
High Wycomb e
Buckingha mshire HP13 6EQ, UK
T: +44 (0)149 4 472872
F: +44 (0 ) 1494 450103
T: +44 (0) 149 4 76829 8
F: +44 (0 ) 1494 768210
Germ any:
Tsgerm any@ zebr a.com
F: +44 (0 ) 1494 768244
E: mseurope @zebra.com
France:: Tsf rance@zebra.com
Spain /Portugal:
Tsspain @zebra.com
All ot her ar eas:
Tseurope@zebra.com
In the Asia Pacific region contact
Regional Headquarters Technical Support Customer Service
Zebra Tec hnologies Asia Pa cific,
LLC
16 New Industr ial Road
#05-03 Hudson TechnoCentr e
Singa pore 5 3620 4
T: +65 6858 0 722
F: +65 688 5 0838
T: +65 6858 0 722
F: +65 688 5 0838
E: tsa siapa cific@ze bra.com
For printers, parts, media ,
and ribbon, p leas e call your
dist ribu tor, or co ntac t us.
T: +1 866 230 9494
F: +1 847 913 8766
E: VHCustServ@ze bra. com
For printers, parts, media ,
and ribbon, p leas e call your
dist ribu tor, or co ntac t us.
T: +44 (0) 149 4 768316
F: +44 (0 ) 1494 768244
E: mseurope @zebra.com
For printers, parts, media ,
and ribbon, p leas e call your
dist ribu tor, or co ntac t us.
T: +65 6858 0 722
F: +65 688 5 0837
A-37
Cameo 2/3 Series User Guide
Page 38

Appendix E
Battery Disposal
The EPA certified RBRC® Battery Recycling
Seal on the Nickel-Metal Hydride (Ni-MH) battery supplied with your printer indicates Zebra
Technologies Corporation is voluntarily participating in an industry program to collect
and recycle these batteries at the end of their
useful life, when taken out of service in the United States or
Canada. The RBRC® program provides a convenient alternative to placing used Ni-MH batteries into the trash or the municipal waste stream, which may be illegal in your area.
Please call 1-800-8-BATTERY for information on Ni-MH bat-
tery recycling and disposal bans/restrictions in your area.
Important • When the battery is worn out, insulate the terminals with
tape before disposal
Zebra Technologies Corporation’s involvement in this program is part of our commitment to preserving our environment and conserving our natural resources.
Outside North America, please follow local battery recycling
guidelines.
Product Disposal
municipal waste. This product is recyclable.
Please recycle according to your local standards. For more information, please see our
web site at: http://www.zebra.com/recycle
Do not dispose of this product in unsorted
A-38
Cameo 2/3 Series User Guide
Page 39

D275,286
D347,021
D389,178
D430,199
D433,702
3,964,673
4,019,676
4,044,946
4,360,798
4,369,361
4,387,297
4,460,120
4,496,831
4,593,186
4,607,156
4,673,805
4,736,095
4,758,717
4,816,660
4,845,350
4,896,026
4,897,532
4,923,281
4,933,538
4,992,717
5,015,833
5,017,765
5,021,641
5,029,183
5,047,617
5,103,461
5,113,445
5,140,144
5,132,709
5,142,550
5,149,950
5,157,687
5,168,148
5,168,149
5,180,904
5,229,591
5,230,088
5,235,167
5,243,655
5,247,162
5,250,791
5,250,792
5,262,627
5,267,800
5,280,163
5,280,164
5,280,498
5,304,786
5,304,788
5,321,246
5,335,170
5,364,133
5,367,151
5,372,439
5,373,148
5,378,882
5,396,053
5,396,055
5,399,846
5,408,081
5,410,139
5,410,140
5,412,198
5,415,482
5,418,812
5,420,411
5,436,440
5,444,231
5,449,891
5,449,893
5,468,949
5,479,000
5,479,002
5,479,441
5,486,057
5,503,483
5,504,322
5,528,621
5,532,469
5,543,610
5,545,889
5,552,592
5,570,123
5,578,810
5,589,680
5,612,531
5,642,666
5,657,066
5,768,991
5,790,162
5,791,796
5,806,993
5,813,343
5,816,718
5,820,279
5,848,848
5,860,753
5,872,585
5,874,980
5,909,233
5,976,720
5,978,004
5,995,128
5,997,193
6,004,053
6,010,257
6,020,906
6,034,708
6,036,383
6,057,870
6,068,415
6,068,415
6,095,704
6,109,801
6,123,471
6,147,767
6,151,037
6,201,255 B1
6,231,253 B1
6,261,009
6,261,013
6,267,521
6,270,072 B1
6,285,845 B1
6,292,595
6,296,032
6,364,550
6,379,058 B1
6,409,401 B1
6,411,397 B1
6,428,227 B2
6,530,705
6,540,122
6,607,316
6,609,844
6,874,958
6,899,477Ł
This product and/or its use may be covered by one or more of the
following US patents and corresponding international patents
worldwide
Patent Information
Cameo 2/3 Series User Guide
A-39
Page 40

 Loading...