

Page 1

MC9500-NI
FOR UL CLASS I,
II, III / DIVISION 2, ATEX
ZONE 2 AND ZONE 22
USER GUIDE
Page 2

2 MC9500-NI
Zebra reserves the right to make changes to any product to improve reliability, function, or design.
Zebra does not assume any product liability arising out of, or in connection with, the application or use of any
product, circuit, or application described herein.
No license is granted, either expressly or by implication, estoppel, or otherwise under any patent right or patent,
covering or relating to any combination, system, apparatus, machine, material, method, or process in which
Zebra products might be used. An implied license exists only for equipment, circuits, and subsystems contained
in Zebra products.
Warranty
For the complete Zebra hardware product warranty statement, go to: http://www.zebra.com/warranty.
Service Information
If you have a problem using the equipment, contact your facility’s Technical or Systems Support. If there is a
problem with the equipment, they will contact the Zebra Support at: http://www.zebra.com/support.
For the latest version of this guide go to: http://www.zebra.com/support.
Software Support
Zebra wants to ensure that customers have the latest release of entitled software at the time of product
purchase.
To confirm that your Zebra device shipped with the latest release of entitled software, visit:
www.zebra.com/support. Check for the latest software from Software Downloads > Product Line/Product > Go.
If your device does not have the latest entitled software release as of your product purchase date, please e-mail
a request to Zebra at: entitlementservices@zebra.com.
You must include the following essential device information with your request:
• Model number
• Serial number
• Proof of purchase
• Title of the software download you are requesting.
If it is determined by Zebra that your device is entitled to the latest software release, you will receive an e-mail
containing a link directing you to a Zebra Web site to download the appropriate software.
Page 3
User Guide 3
Notes on This Guide
IMPORTANT Read carefully before putting the devices into operation.
The user guide is a constituent part of the product and must be kept in the direct vicinity of the device and
accessible at all times to installation, operating and maintenance personnel.
It contains important notes, safety instructions and test certificates which are necessary for perfect functioning
when the devices are being operated and handled. It is written for technically qualified personnel.
Familiarity with and the technically perfect implementation of the safety instructions and warnings described in
this guide are preconditions for safe installation and commissioning. The safety notes and warnings given in this
guide are given in a general way and only qualified personnel will have the necessary specialized know-how to
interpret and implement them correctly in specific cases.
Qualifications of the Personnel Working with the Devices
The user guide is written for all people who carry out assembly, installation, commissioning and service work on
the product, whereby the directives and standards 99/92/EC, EN 60079-17, EN 60079-19 for the gas area and
EN 61241-17 and EN 61241-19 for the dust area must be observed.
Handling the Product
The product described in this guide has been tested and left the factory in perfect condition in regard to meeting
safety requirements.
To maintain this condition and ensure that this product operates perfectly and safely, it may be used only in the
manner described by the manufacturer. Appropriate transportation, suitable storage and careful operation are
also essential for the perfect and safe operation of this product.
Use for the Intended Purpose
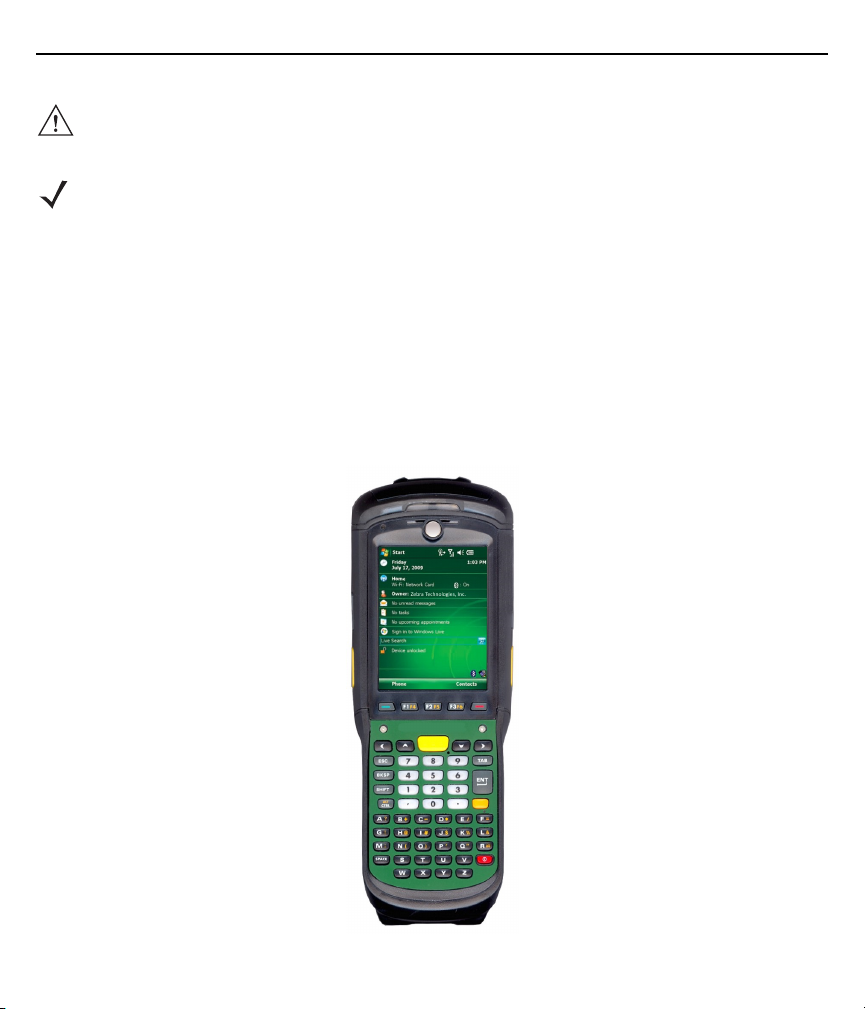
NOTE The versions, components, screens and windows illustrated in this guide are examples only and
can deviate from the actual display.
The information in this guide relates to the explosion protected version of the MC9500-NI Series.
This guide contains all important information concerning explosion protection. In addition, the
original user guides are also available and these contain information about handling and
commissioning. In the event of information overlap, the information in this guide supersedes other
guides.
Page 4

4 MC9500-NI
Documentation Set
The documentation set for the MC9500 provides information corresponding with the respective user
requirements and comprises:
• MC9500 Quick Start Guide - This user guide describes the operation of the mobile computer MC9500.
• MC9500 User Guide - This user guide describes the use of the MC9500 mobile computer series.
• MC9500 Integrator Guide - This user guide describes the setup of the MC9500 mobile computer,
including accessories.
• Microsoft® Applications for Windows Mobile® 6 User Guide for Enterprise Mobility Devices - This
user guide describes the use of Microsoft applications.
• Enterprise Mobility Application Guide - This user guide describes the use of example applications
developed with Enterprise Mobility.
• EMDK Help file (Enterprise Mobility Developer Kit) - This Help file comprises API information about
writing applications.
Safety Instructions
IMPORTANT Safety instructions and warnings are specially highlighted in this manual and marked by
symbols.
The safety instructions and warnings are assigned to the individual work steps. Careful
handling and consistent observation of the instructions will prevent accidents, personal
injuries and damage to property.
The adherence to all directions and safety instructions in this manual is a precondition for
safe working and the correct handling of the device.
The graphic representations in these instructions serve to show the information being
described and are not necessarily true to scale and they may deviate slightly from the actual
construction of the device.
Marking
Particularly important points in these instructions are marked with a symbol:
WARNING
CAUTION Warning of damage to property and financial and penal disadvantages (e.g. loss of guarantee
! Non-observance leads to death or serious physical injury.
The necessary safety measures must be taken.
rights, liability etc.).
Page 5
User Guide 5
ATTENTION Important instructions and information on preventing disadvantageous behavior.
NOTE Important instructions and information on effective, economical and environmentally compatible
handling.
Product Description
Definition
The MC9500-NI is a 3.5G Worldwide device and has been specifically modified for use in hazardous areas:
• ATEX Zone 2 and Zone 22 or
• Class I, II, III Division 2.
This means that even in the hazardous area the user can avail of the extensive communication options that are
already standard in other areas.
Page 6

6 MC9500-NI
Its ergonomic design and easy operation make it an ideal support for fast data availability in enterprise
processes. A keyboard is available in different versions for manual data capture.
The integrated 1D or 1D/2D scan engine for capturing bar codes and optionally a 3-megapixels camera is
available as another data capture option. The ergonomically mounted scan triggers on the MC9500-NI allow data
to be captured easily in one-hand operation.
Several technologies are available for data communication with other systems:
• Wireless 3.5G WAN (WWAN)
• Wireless LAN (WLAN)
• Wireless PAN (WPAN) (Bluetooth)
• IrDA connection.
These modules, which are integrated in the device, allow seamless transmission of voice and data with easy
integration into the company's network.
Other advantages in its use are the rugged construction, easy-to-read 3.7" VGA color display with touch
technology and high-performance lithium-ion battery.
Fast process execution is ensured by the Intel PXA320@ processor with 806 MHz, which is integrated in the
MC9500-NI, and an easy development of applications is facilitated by the Microsoft® Windows Mobile® 6.5
operating system in conjunction with the Enterprise Mobility Developer Kits (EMDK) from Zebra.
256 MB RAM and 1 GB flash drive integrated in the device are available for storing user defined applications and
data. For larger applications and volumes of data, Zebra offers SD memory cards.
Use
The MC9500-NI is a hand-guided piece of electric equipment. It serves the mobile capture, processing and
wireless transmission of data in hazardous areas.
It is used exclusively in combination with operating devices which satisfy the requirements for overvoltage
category I.
The MC9500-NI, series has been modified for use in the hazardous area of:
• ATEX Zone 2 and Zone 22
• UL Class I Division 2 Groups A, B, C and D
• UL Class II Division 2 Groups F and G
• UL Class III
• Non hazardous area.
The MC9500-NI may not be used in locations of:
• ATEX Zone 0
• ATEX Zone 1 and Zone 21
Page 7
User Guide 7
• UL Class I, II Division 1
• UL Class I, II Division 1
• UL Class II Division 2, Groups E.
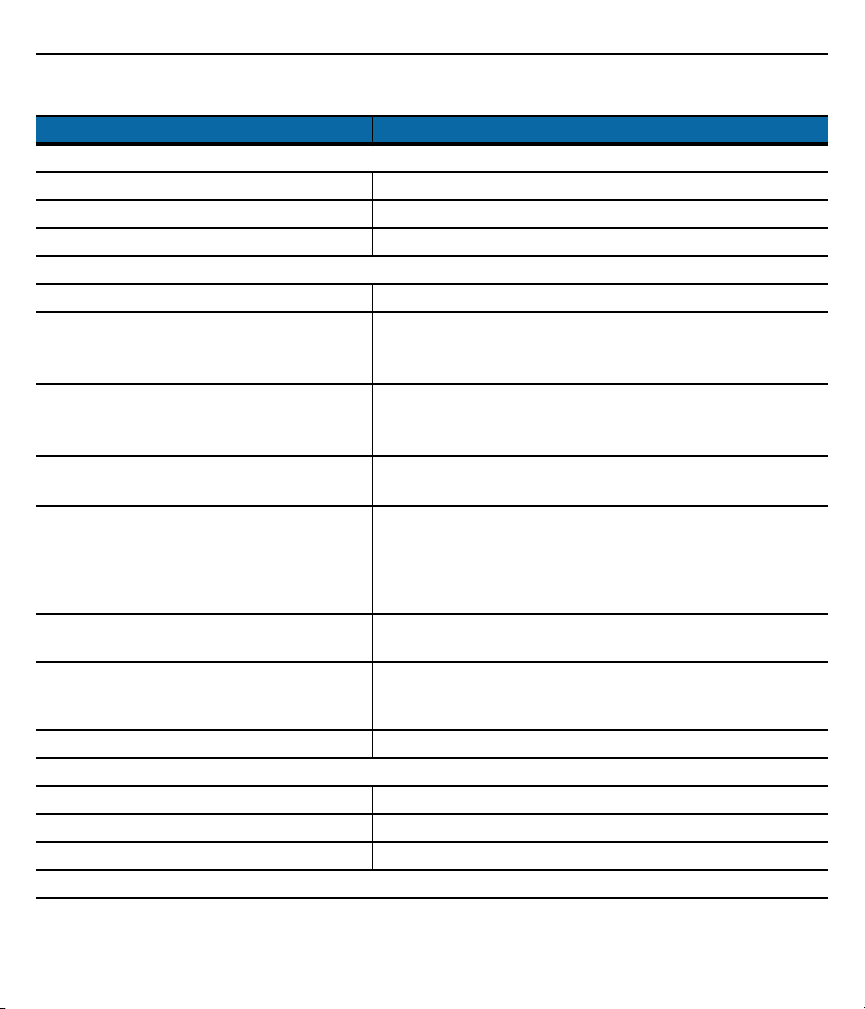
Technical Data
Table 1
Explosion Protection ATEX Zone 2 and Zone 22
Ex protection II 3G Ex ic IIC T6
Ambient temperature -20 °C ≤ Ta ≤ +50 °C
Temperature Code T6
Standards EN 60079-0:2009 EN 60079-11:2007
Explosion Protection UL Division 2
Ex protection type Class I Division 2 Groups A, B, C and D
Ambient temperature -20 °C ≤ Ta ≤ +50 °C
Temperature Code T6
Standards ISA12.12.01 1st Edition
Characteristics
Dimensions (height x width x depth) approx. 23.36 cm x 8.89 cm x 5.08 cm (9.2 inch x 3.5 inch x 2.0
Weight including battery approx. 623 g (22 oz) depending on the version and
Display Transflective 3.7 inch color TFT-LCD display
Touchscreen Glass analog resistive touchscreen
Technical Data
Type Description
II 3D tD A22 IP64 T90°C
EN 61241-0:2006 EN 61241-11:2007
Class II Division 2 Groups F and G
Class III
UL 60950-1 1st Edition
C22.2 No. 213-M1987
C22.2 No. 60950-1-03 1st Edition
inch)
configuration
LED backlight, 65K colors, 640 x 480 pixels
Page 8
8 MC9500-NI
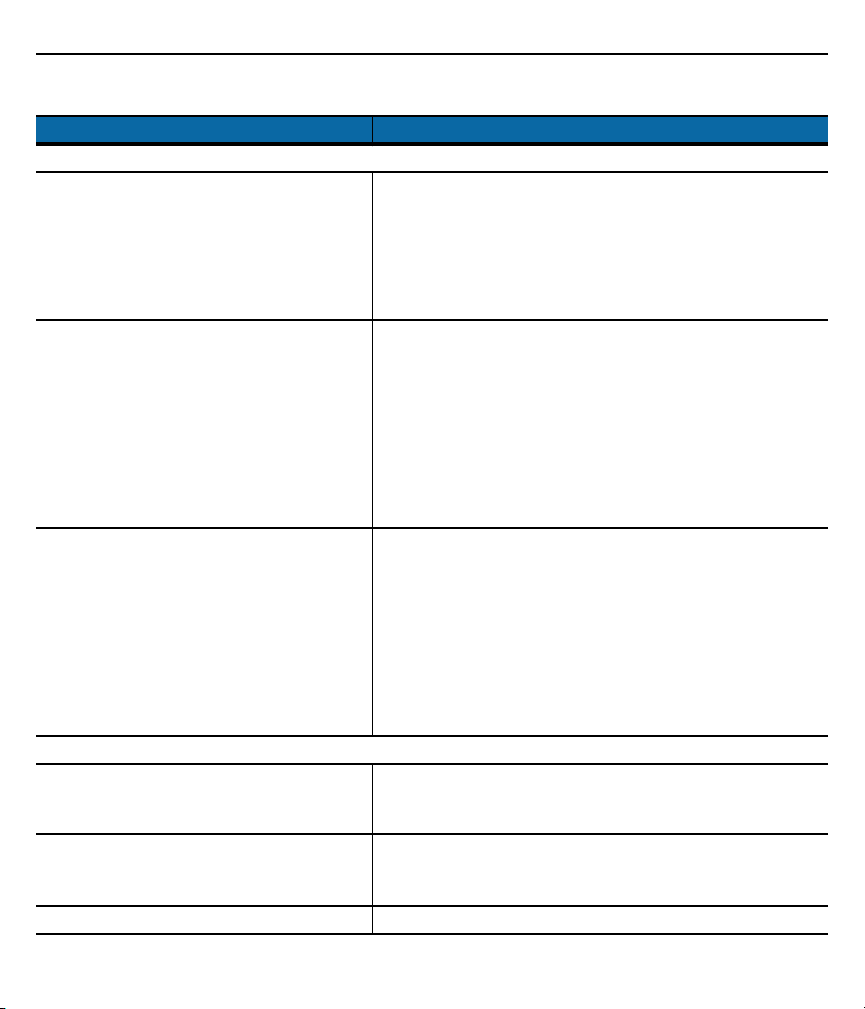
Table 1
Keyboard variants Alpha Primary, Alpha Numeric, Calculator Numeric, Telephony
Audio VoWWAN, VoWLAN, Team Express compliant, rugged audio
Network connections High-speed USB client, full-speed USB host, Ethernet (via
Interfaces RS232
Performance Features
Processor Marvel PXA320@ processor with 806 MHz
Operating system Windows Mobile 6.5
Memory 256 MB RAM/1 GB Flash
Expansion slot Micro SD slot / supports up to 16 GB
User Environment
Ambient temperature -20 °C to +50 °C (-4 °F to 122 °F)
Ambient temperature when charging 0 °C to +40 °C (32 °F to 104 °F)
Storage temperature (without battery) -40 °C to +70 °C (-40 °F to 158 °F)
Air humidity 5% to 95% (non-condensing)
Protection class (EN 60529) IP 64
Application Development
EMDK (Enterprise Mobility Developer Kit) Available for: C, Java and .Net
More tools are available from Zebra for the
devices.
Technical Data (continued)
Type Description
Numeric
connector, high quality speakerphone, headset (wired or
Bluetooth) and handset and speaker phone modes
cradle), Bluetooth
USB 2.0 Client / USB 1.1 host
outside the hazardous area
Rem Capture for processing registry files.
Application Launcher for dividing applications into categories and
access regulation to the individual applications or operating
system.
Data Wedge allows data reading by applications that do not
support any scanner.
App Center is an end-user application access control engine that
restricts activity to a set of authorized applications on mobile
devices.
Page 9
User Guide 9
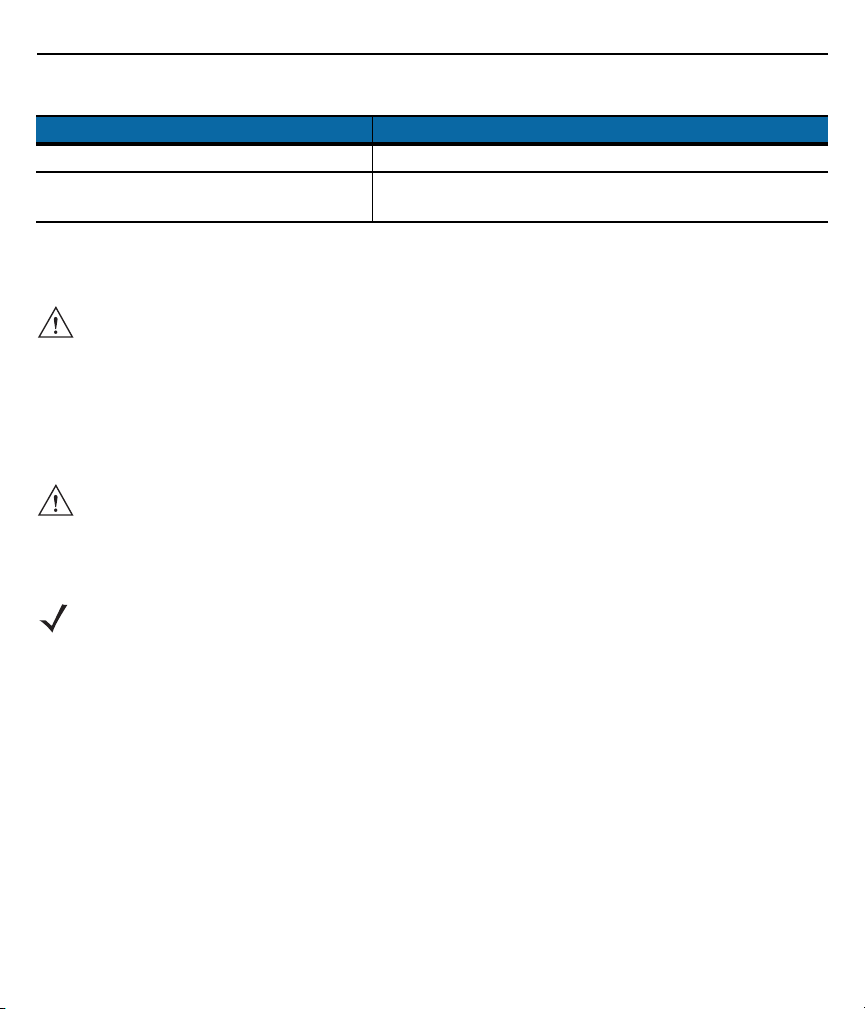
Table 1
Voice and Data Transmission Wireless WAN
GSM GPRS/HSDPA (850, 900, 1800, 1900 and 2100 MHz)
CDMA EVDO Rev. A (850 and 1900 MHz) (Verizon or Spirit)
Antenna Integrated in the device
Voice and Data Transmission Wireless LAN
Wireless standard Tri Mode IEEE 802.11a/b/g
Data rate IEEE802.11a: up to 54 Mbit/sec.
Frequency range (country-dependent) IEEE802.11a: 5 GHz
Radio channels Channel 1 - 13 (2412 MHz - 2472 MHz)
Safety TKIP, AES, WPA (Personal Enterprise), WPA2 (Personal or
Spreading procedure Direct Sequence Spread Spectrum (DSSS) and Orthogonal
Voice communication Voice-over-IP ready (with P2P, PBX, PTT clients), WI-FiTM
Antenna integrated in the device
Voice and Data Transmission Wireless PAN
Bluetooth Class 2. Version 2.1 with EDR
Maximum data rate Up to 2.1 Mbit/s
Antenna Integrated in the device
Options for Data Capture
Technical Data (continued)
Type Description
IEEE802.11b: up to 11 Mbit/sec.
IEEE802.11g: up to 54 Mbit/sec.
IEEE802.11b: 2.4 GHz
IEEE802.11g: 2.4 GHz
Channel 14 (2484 MHz) Japan only
Enterprise), 802.1x, EAP-TLS, TTLS (CHAP, MS-CHAP,
MS-CHAPv2, PAP or MD5), PEAP (TLS,
MSCHAPv2,EAP-GTC), LEAP, EAP-Fast (TLS, MS-CHAPv2,
EAPGTC), CCXv4 certified, support for IPv6, FIPS140-2 certified
Frequency Multiplexing Process (OFDM)
certified, IEEE 802.11 a/b/g Direct Sequence Wireless LAN,
WI-FI Multimedia (WMM), Zebra Voice Quality manager (VQM)
Page 10

10 MC9500-NI
Table 1
Four possible configurations SE950 1D Standard Range Scan Engine
Color Camera
Resolution 3.0 megapixels
Exposure user controllable flash
Objective Auto focus
SE950 1D Standard Range Scan Engine
Reading range approx. 10 cm to 120 cm (3.9 in. to 47 in.)
Resolution 4 mil minimum element width
Roll ± 35° from the vertical
Pitch angle ± 65° from normal
Skew tolerance ± 50° from normal
Ambient light immunity 107,640 lux
Scan rate 104 (± 12) scans/sec. (bi-directional)
Scan angle 47° ± 3 ° standard
SE4500 1D/2D Imager Engine
Reading range approx. 6 cm to 50 cm (2.3 inc. to 19 in.)
Resolution 752 x 480 pixels HxV (grey tone)
Roll 360°
Pitch angle ± 60° from normal
Skew tolerance ± 60° from normal
Ambient light Absolute darkness to 96,000 lux
Aiming element (VLD) 655 Nm ± 10 Nm
Illumination element (LED) 625 Nm ± 5 Nm
Field of view Horizontal 40°
Technical Data (continued)
Type Description
SE4500 1D/2D Imager Engine
SE950 1D Standard Range Scan Engine and camera
SE4500 1D/2D Imager Engine and camera
35° ± 3° reduces
Vertical 25°
Page 11
User Guide 11
Table 1
Decodable Bar Code Types
Laser Decode Capability MC9500-NI with
SE950 1D-Standard Range Scan Engine
Imaging Decode Capability MC9500-NI with
SE4500 1D/2D Imager Engine
Camera Decode Capability Code 39 Code 128 Code 93, Codabar, Code 11, Discrete 2 of 5,
Technical Data Battery
Battery
82-111636-05 for UL Full NI
82-111636-04 for UL Full NI
Operating temperature
During charging
During discharging
Storage temperature -20 °C to +50 °C (-4 °F to 122 °F)
Technical Data (continued)
Type Description
Code 39, Code 128, Code 93, Codabar, Code 11, Discrete 2 of 5,
Interleaved 2 of 5, EAN-8, EAN-13, MSI, UPCA, UPCE,
UPC/EAN supplementals, Coupon code, Trioptic 39, Web code,
Chinese 2 of 5, GS1 DataBar, GS1 DataBar Truncated, GS1
DataBar Limited, GS1 DataBar Stacked, GS1 DataBar
Expanded, GS1 DataBar Expanded Stacked, GS1 DataBar
Expanded Stacked Omni
Code 39, Code 128, Code 93, Codabar, Code 11, Discrete 2 of 5,
Interleaved 2 of 5, EAN-8, EAN-13, MSI, UPCA, UPCE,
UPC/EAN supplementals, Coupon code, Trioptic 39, Web code,
Chinese 2 of 5, GS1 DataBar, GS1 DataBar Truncated, GS1
DataBar Limited, GS1 DataBar Stacked, TLC39, Composite AB,
Composite C, Micro PDF-417, Macro PDF-417, (Macro) Micro
PDF-417, QR Code, Data Matrix, microQR, Maxi Code,
PDF-417, US Postnet, US Planet, UK 4-state, Australian 4-state,
Canadian 4-state, Japanese 4-state, USPS 4-state (US4CB),
Aztec
(rechargeable only in the safe area)
Lithium ions 3.7 V/4800 mAh
Lithium ions 3.7 V/7020 mAh
0 °C to +40 °C (32 °F to 104 °F)
-20 °C to +50 °C (-4 °F to 122 °F)
Page 12
12 MC9500-NI
Table 1
Relative air humidity 20% - 95% (non-condensing)
Backup battery Ni-MH battery (rechargeable) 2.4 V/15 mAh, rechargeable
Technical Data (continued)
Type Description
Integrated in the device and replaceable only in the factory.
Technical Data External Interface
CAUTION Operating of the 10-pin data interface is only permissible outside the hazardous area and only
with devices specified by the manufacturer!
Operating of the headset port is only permissible outside the hazardous area and only with
devices specified by the manufacturer!
Safety Instructions
Warnings for the MC9500-NI
CAUTION The device may not be opened by the user outside the hazardous area. The user may not
make any alterations to the device.
Do not exchange or replace components and do not retrofit any components on internal plug
connectors or slots.
NOTE Exception: microSD card, SIM card, battery and screen protector.
Page 13

User Guide 13
CAUTION If components other than those specified are used, the protection against explosions can no
longer be assured.
Substitution of any components may impair suitability for Class I, II, III Division 2 as well as for
ATEX Zone 2 and Zone 22.
To prevent ignition of flammable or combustible atmospheres disconnect power before
servicing.
Do not open or charge the device in the hazardous area.
Operating of the 10-pin data interface (see Technical Data External Interface on page 12) is
only permissible outside the hazardous area and only with devices specified by the
manufacturer.
Operating of the headset port is only permissible outside the hazardous area and only with
devices specified by the manufacturer.
Protect the device from impact effects. Do not expose the operating equipment to any
caustic/aggressive liquids, vapors or mist! In the event of malfunctioning or damage to the
enclosure, take the equipment out of the potentially explosive atmosphere immediately, bring it
into a safe area and decommission it by removing the battery.
CAUTION If on account of adverse effects or conditions (e.g. penetration of water, fluids, exposure to
temperatures outside the specified range etc.) there is a danger of not being able to operate the
equipment safely, switch off the equipment instantly and remove the battery.
Avoid the influence of heat that is higher or lower than the specified temperature range (see
Technical Data on page 7). Do not place the devices anywhere near sources of heat, such as
for example heaters, air exit openings in air conditioners, or near cookers or other devices
(including amplifiers) that radiate heat.
Avoid the effects of moisture.
Do not put any objects into the device, into the enclosure or other openings in the Mobile
Computer. Openings in the device may not be blocked, obstructed or covered.
Use of controls or adjustments or performance of procedures other than those specified herein
may result in hazardous radiation exposure.
Page 14

14 MC9500-NI
ATTENTION Equipment that is damaged in any way or that does not function properly must instantly be
removed from the hazardous area and sent in for inspection/repair.
Take the device out of the hazardous areas before wiping it with a dry cloth or cleaning it.
General statutory regulations or directives on safety at work; accident prevention regulations
and environmental protection legislation must be complied with, e.g.
Ordinance on industrial health and safety (BetrSichV) or the national ordinances.
Ensure safe handling of the equipment during operation by making sure the device in a
steady position and the user has sufficient space to move.
When transporting the equipment in vehicles, it must be placed in appropriate compartments
or fittings so that it cans neither fall off during the drive nor be exposed to extreme vibrations.
The rules for hazardous areas (see NEC Article NFPA 70) must be observed. In particular,
appropriate clothing and footwear should be worn in view of the risk of dangerous
electrostatic charges. Do not wear rubber gloves or suchlike during operation.
Warnings for Battery
CAUTION The battery may only be charged and changed outside the hazardous area.
It must be ensured that only original batteries of the following type/s are used in safety-oriented
operation. 82-111636-05 with 3.7 V/4800 mAh. 82-111636-04 with 3.7V/7020 mAh.
The use of imitation batteries or batteries from other manufacturers will render the type of
ignition protection ineffective and there will then be a risk of fire or explosion.
Keep away from children.
The battery may explode if disposed of in fire.
DO NOT short circuit or disassemble battery.
The battery may only be used for the purposes stated in the user manual and is only suitable
for use in the MC9500-NI.
If used incorrectly, there is a risk of burning. The battery should not be disassembled over a
temperature higher than +50 °C (122 °F). If the battery is damaged, battery acid can escape
from the cells and cause corrosion. For that reason, extreme care must be taken in handling
and disposing of a damaged or leaking Li-ion battery.
Defective batteries must be disposed of immediately, whereby the battery disposal regulations
that apply to the respective region must be observed.
Page 15

User Guide 15
Laser Devices Warnings
CAUTION Laser-equipped devices from Zebra conform to Directive 21CFR1040.10 and 1040.11. (with the
exception of the deviations listed in Laser Notice no. 50 of 24 June 2007) as well as EN
60825-1:2007 and IEC 60825-1 (Ed. 2).
The classification of the laser apparatus is specified on a sign affixed to the device.
Class 2 laser devices operate with a visible low-voltage light emitting diode. As with any bright
source of light, for example the sun, the user should avoid looking directly into the light beam.
However, there is no evidence of risks in momentary or brief exposure to a Class 2 laser.
The use of control elements, adaptations or the application of procedures which do not agree
with the instructions described here can lead to a hazardous exposure to radiation.
Laser Devices
Complies with 21CFR1040.10 and 1040.11 except for deviations pursuant to Laser Notice No. 50, dated June
24, 2007 and EN60825-1:2007 and IEC 60825-1 (Ed.2). The laser classification is marked on one of the labels
on the device.
CAUTION Use of controls, adjustments or performance of procedures other than those specified herein
may result in hazardous laser light exposure.
Class 2 laser scanners use a low power, visible light diode. As with any very bright light source, such as the sun,
the user should avoid staring directly into the light beam. Momentary exposure to a Class 2 laser is not known to
be harmful.
Health and Safety Recommendations
CAUTION Use only the accessories, batteries and battery chargers approved by Zebra. Do not attempt to
charge damp/wet MC9500-NI or batteries. All components must be dry before they are
connected to an external power supply.
Ergonomic Recommendations
CAUTION The following recommendations should be observed to avoid or minimise potential health
problems at the workplace. Contact your health and safety officer on site to ensure that you are
familiar with your company’s safety regulations, which serve to protect employees in the
workplace.
• Avoid unilateral repetitive movements.
• Posture should be as neutral as possible.
• Avoid using excessive force.
Page 16

16 MC9500-NI
• Keep objects that are used frequently within easy functional reach.
• Perform tasks at heights that suit the person and the type of work
• Place the objects in positions that will eliminate vibrations
• Avoid exerting direct pressure
• Provide adjustable tables and chairs.
• Ensure sufficient clearance for easy movement
• Provide a suitable working environment
• Optimize work procedures
• Alternate hands as often as possible when doing repetitive tasks.
Installation in Vehicles
RF signals can have a negative impact on electronic systems in vehicles (including safety systems) if they have
not been installed correctly or shielded adequately. If you have any questions about your vehicle, please get in
touch with the manufacturer or with a sales representative. You can find out from the manufacturer if any
additional equipment has been installed in the vehicle. An airbag inflates with great force. DO NOT PLACE ANY
objects, such as mounted or mobile wireless equipment in the area above the airbag or in the airbag deployment
area. If the wireless equipment in the vehicle was not installed properly, serious injuries can occur when the
airbag is deployed. Position the device within reach. Make sure you have access to the device without having to
take your eyes off the road.
NOTE Connection to an alert device that will cause a horn to sound or a light to flash on receipt of an
incoming call on public roads is not permissible.
Safety in Traffic
Do not make any notes or use the device while driving. Creating a “to do” list or flipping through the address book
while driving interferes with safe driving.
In road traffic you must first and foremost concentrate on your own safety and that of the other road users. Give
your full attention to the road. Check the legal regulations on the use of wireless devices in road traffic in the
respective region. Always observe them. If you use a wireless device while driving, rely on your common sense
and adhere to the following:
1. Familiarise yourself with the wireless device and its functions, such as speed dial and redial. These functions
may prove to be useful if you wish to make a call without taking your eyes off the road.
2. Use a hands-free telephone, if possible.
3. Inform the person you are speaking with that you are driving. If necessary, end the call if there is heavy traffic
or bad weather. Rain, sleet, snow, ice and even heavy traffic can be dangerous.
4. Dial numbers carefully and keep an eye on the traffic. Make your calls when you have stopped the car or
before you set off. Plan your calls so that you can make them when parked. If it is essential to make a call
Page 17

User Guide 17
when driving, dial only part of the number, check the road again and look in the rear mirror and then dial the
rest of the number.
5. Do not engage in stressful and emotional telephone calls which might take your attention away from the road.
Let the other person know that you are driving a car and do not get involved in any discussions that might
divert your attention from the road.
6. Use your mobile device to call for help if necessary. Dial emergency services (9-1-1 in the USA and 1-1-2 in
Europe) or other local emergency service numbers if there is a fire, an accident or a medical emergency.
These calls are free of charge on the wireless device! The call can be made independently of security codes
or networks and with or without a SIM card.
7. Use your mobile device to call for help for other people in emergency situations. If you witness a serious
accident, crime or other emergency, call the emergency service (9-1-1 in the USA and 1-1-2 in Europe) or
another local emergency service number. Remember you yourself might need help the next time.
8. Call the breakdown service or a special mobile radio number for support when problems occur on the road. If
you drive past a car with a breakdown which does not present any serious risk to traffic, a traffic light that is
not functioning, a traffic accident with minor damage and without injured people, or a possibly stolen car,
report it to the road patrol or another special mobile radio number for assistance.
“The wireless industry reminds you to use your device/phone safely when driving.”
Electromagnetic Fields
International
The device complies with internationally recognized standards relating to human exposure to electromagnetic
fields from radio devices.
Reducing RF Exposure - Use Properly
Only operate the device in accordance with the supplied instructions.
Portable Devices
This device was tested for typical body-worn operation. Use only Zebra tested and approved belt clips, holsters,
and similar accessories to ensure FCC Compliance. The use of third-party belt-clips, holsters, and similar
accessories may not comply with FCC RF exposure compliance requirements, and should be avoided.
NOTE The MC9500-NI must be switched off before it may be carried on the body.
Handheld Devices
To comply with FCC RF exposure requirements, this device must be operated in the hand with a minimum
separation distance of 20 cm or more from a person's body. Other operating configurations should be avoided.
Page 18

18 MC9500-NI
Warnings and Information about Wireless Devices
NOTE The use of wireless devices might be forbidden or restricted. This applies above all when you are
aboard aeroplanes, in hospitals, near explosives or in other dangerous conditions. If you are not
sure which regulations apply to the use of the device, ask for permission before switching it on.
Country-Specific Roaming
This device has the International Roaming Function (IEEE802.11D), which ensures that the device uses the
channels allocated to the respective country.
Ad-hoc Operation
Ad-hoc-operation is restricted to channels 36-48 (5150-5250 MHz). The use of this band is limited to indoor use
only; outdoor use is not permissible.
FCC Requirements to Protect Against Radio-frequency Interference
This device was tested and it complies with the limits for a class B digital device
according to part 15 of the FCC rules. These limit values were specified to ensure
adequate protection from interference when the device is used in a residential area.
This device generates and uses radio frequency energy and can radiate it. If the
device is not connected and used in accordance with the operating instructions, it can
interfere with other radio frequencies. It is not possible to guarantee that there will not be any interference during
a particular installation. If the device causes interference with radio or TV reception, which can be established by
switching the devices off and on, the interference should be eliminated by one or more of the following measures:
• reorientation or repositioning of the receiving antenna
• increase in the distance between device and receiver
• connection of the device to a socket other than that to which the receiver is connected
• advice from the dealer or a radio/television technician.
Radio Communication Apparatus (Part 15)
This device satisfies the requirements of part 15 of the FCC rules. The operation of the device is subject to the
following two conditions:
• the device must not cause harmful interference
• the device must accept all interference it receives, including interference which may cause undesired
operation.
Requirements for Protection from Radio-frequency Interference – Canada
This class B digital device complies with the guidelines in the Canadian standard ICES-003.
Cet appareil numérique de la classe B est conforme à la norme NMB-003 du Canada.
Page 19

User Guide 19
Radio Transmitters
This device complies with RSS 210 (Industry & Science Canada). The operation of the device is subject to the
following two conditions:
• The device must not cause harmful interference.
• The device must accept all received interference, including interference that may cause undesirable
operation.
Label marking: “IC:” in front of the wireless certification indicates compliance with Industry Canada technical
specifications.
Radio Transmitters for RLAN Devices
The use of 5 GHz RLAN’s, for use in Canada, have the following restrictions:
• Restricted Band 5.60 - 5.65 GHz
• This device complies with RSS 210 of Industry & Science Canada. Operation is subject to the following
two conditions:
(1) this device may not cause harmful interference and
(2) this device must accept any interference received, including interference that may cause undesired
operation.
Label Marking: The Term “IC:” before the radio certification only signifies that industry Canada technical
specifications were met.
Country-specific Approvals
Test marks are put on the device to indicate that the wireless modules are approved for use in the following
countries: USA, Canada and Europe1.
You will find detailed information on the test marks for other countries in the EC Declaration of Conformity.
• Note 1: For 2.4-GHz products: Europe covers Austria, Belgium, Bulgaria, Cyprus, Czech Republic,
Denmark, Estonia, Finland, France, Germany, Great Britain, Greece, Hungary, Iceland, Ireland, Italy,
Latvia, Liechtenstein, Lithuania, Luxembourg, Malta, Netherlands, Norway, Poland, Portugal, Romania,
Sweden, Slovakia, Slovenia, Spain and Switzerland.
European Economic Area
The operation of RLAN devices (2.4 GHz) is subject to the following restrictions in the European Economic Area
(EEA):
• The 2.4 GHz devices must not exceed a radiating power of 100 mW EIRP in the frequency range
between 2.400 and 2.4835 GHz.
• Outdoor usage in France is restricted to between 2.4 and 2.454 GHz.
Page 20

20 MC9500-NI
• In Italy a user licence is required for outdoor use.
The use of Bluetooth® Wireless Technology is subject to the following restrictions in the European Economic
Area (EEA):
• The 2.4-GHz devices may not exceed a radiated power of 100 mW EIRP and must adhere to the
frequency range between 2.400 and 2.4835 GHz.
• In France devices used outdoors are restricted to 10mW EIRP.
• In Italy a user licence is necessary for use outdoors.
Other Countries
• Mexico: devices must keep to the frequency range between 2.450 and 2.4835 GHz.
• Sri Lanka: devices must adhere to the frequency range between 2.400 and 2.430 GHz.
Warnings about the Use of Wireless Devices
Observe all warnings which refer to the use of wireless devices.
Safety in Aircraft
Switch off your wireless device whenever you are asked to do so by airport or airline staff. If your device offers a
flight mode or similar function, ask the flight crew about its proper use.
Safety in Hospitals
Wireless devices radiate radio frequencies and can cause interference in electrical medical devices. If you are in
a hospital, clinic or public health service, please turn off wireless devices if asked to do so. This is to prevent any
interference with sensitive medical equipment.
Cardiac Pacemakers
The manufacturer recommends a minimum distance of 15 cm between a portable handheld wireless device and
a Cardiac Pacemaker to avoid potential interference. This guideline is in accordance with independent research
results and recommendations from Wireless Technology Research.
• People with implanted pacemakers
• People with implanted cardiac pacemakers should keep the switched-on device at a distance of at least
15 cm away from themselves ALWAYS.
• If you have a pacemaker, do not put the device into your breast pocket.
• The device should be held at the ear furthest away from the cardiac pacemaker.
• If you have reason to suspect interference, SWITCH OFF your device immediately.
Page 21

User Guide 21
Hearing Aids
The wireless device can cause interference with hearing aids. If there is any interference, contact the hearing aid
manufacturer to ask about solutions.
• If you wear a hearing aid, do not put this device into your breast pocket.
• The device should be held at the ear furthest away from the cardiac pacemaker.
• If you have reason to suspect interference, SWITCH OFF your device immediately.
Other Medical Instruments
Consult your doctor or the manufacturer of the medical instrument to establish whether putting the wireless
product into operation might interfere with the medical instrument.
Bluetooth
Products with Bluetooth® Wireless Technology
This device is a Bluetooth®-approved product.
More information can be found at http://www.bluetooth.org/tpg/listings.cfm
Manufacturer: Zebra --- Product: MC95xx
Operation
Before assembling the device, make sure you have the following:
• one MC9500-NI
• one Lithium-ion battery
• Strap assembly
• one Protective overlay on the display window
• one Stylus
• one User Guide.
• Special tool for battery release (only for ATEX Zone 2 and Zone 22)
CAUTION The safety and accident prevention regulations relevant to the respective application must be
adhered to. The units must be completely assembled before they may be operated.
Getting Started
Perform the following steps before first use of the MC9500-NI:
Page 22

22 MC9500-NI
1. Install a microSD card (optional)
2. Install the SIM card (only MC9596-NI)
3. Insert the battery
4. Charge the MC9500-NI.
Recommended Position
The recommended position for the mobile computer when not in use.
In this position the device cannot be protected against damage.
The display can be damaged by objects lying on the supporting surface.
Page 23

User Guide 23
Parts of the MC9500-NI
Touch Screen with
Protective Overlay
Function Keys
Microphone
Volume Up/Down
Button
Scan Button
Modular Keypad
(Alpha Primary
Keypad Shown)
Power Button
Battery Release
Latch
Page 24

24 MC9500-NI
Camera (Optional)
Speaker
Camera Flash (Optional)
Interface Connector
Interface Pocket
Stylus
Interface Plate
Exit Window
Battery
Handstrap
Battery Release
Latch
Headset Connector
Scan Button
Programmable Button
IrDA Window
microSD card
CAUTION The micro SD card may only installed and replaced outside of the hazardous area.
Only micro SD cards tested by Zebra for that purpose may be used in the slot.
The microSD card slot provides secondary non-volatile storage. The slot is located under the battery. Refer to
the documentation provided with the card for more information, and follow the manufacturer's recommendations
for use.
CAUTION Follow proper ESD precautions to avoid damaging the micro SD card. Proper ESD precautions
include, but are not limited to, working on an ESD mat and ensuring that the operator is
properly grounded.
Installing a microSD Card
To install the microSD card:
1. Remove the SD card cover using the end of the stylus.
Page 25

User Guide 25
SD Card Cover
Stylus
2. Slide the microSD card holder door to the left to unlock.
3. Lift the microSD card holder door.
microSD Card Holder Door
4. Place the microSD card onto the contacts.
microSD card
11
2
5. Close the card holder door and slide to the right to lock into place.
6. Align the SD card cover over the access hole and press down until it snaps into place.
Page 26

26 MC9500-NI
Removing the SIM Card
To remove an SIM card:
CAUTION Suspend the MC9500-NI prior to removing the battery. Failure to properly remove the
battery may cause the MC9500-NI to cold boot and potential loss of data.
NOTE On devices with OEM version 01.19.11 and higher, a dialog box appears when pressing the
Power button. See Installing the Battery on page 30 for more information.
1. If the MC9500-NI is in suspend mode, press the red Power button to wake the device.
2. Press the red Power button to suspend the MC9500-NI.
3. Wait for red Decode LED to turn on and then turn off.
4. Unhook the handstrap.
5. Remove the battery.
6. Remove the SIM card cover using the end of the stylus.
7. Slide the SIM card holder door to the left to unlock.
8. Lift the SIM card holder door.
9. Remove SIM card from holder.
10.Close the SIM card holder door.
11. Slide the SIM card holder door to the right to lock into place.
12.Align the SIM card cover over the access hole and press down until it snaps into place.
13.Replace the battery.
SIM Card
ATTENTION Only install and replace the SIM card outside of the hazardous area.
GSM telephone services require a SIM card (Subscriber Identification Module) or Chip Card. You can get these
cards from your service provider. The card is inserted in the MC9500-NI and may contain the following
information:
• Mobile telephone account details of the service provider.
• Information about the service settings and service access.
• Contact information, which can be shifted to the MC9500-NI into the “Contacts” area.
• Any other services you have subscribed.
Page 27

User Guide 27
To install the SIM card:
1. Remove SIM card cover using the end of the stylus.
2. Slide the SIM card holder door to the left to unlock.
3. Lift the SIM card holder door.
Card Notch
4. Insert the SIM card into the holder door with the contacts facing down and the card notch facing up.
5. Close SIM card holder door and slide to the right to lock into place.
6. Align the SIM card cover over the access hole and press down until it snaps into place.
7. Install the battery.
8. After completing initial MC9596 setup or after replacing a SIM card:
a. Press the red Power button.
b. On the Today screen, tap Wireless Manager.
c. Ensure Phone is on.
d. Press the red Power button to suspend the MC9596.
e. Perform a warm boot. See Resetting the MC9500-NI on page 47.
f. Make a call to verify cellular connection.
Page 28

28 MC9500-NI
NOTE For detailed information about WWAN activation and settings, refer to the MC9500-K Mobile
Computer Integrator Guide.
Removing the SIM Card
To remove an SIM card:
CAUTION Suspend the MC9500-NI prior to removing the battery. Failure to properly remove the
battery may cause the MC9500-NI to cold boot and potential loss of data.
NOTE On devices with OEM version 01.19.11 and higher, a dialog box appears when pressing the
Power button. See Installing the Battery on page 30 for more information.
1. If the MC9500-NI is in suspend mode, press the red Power button to wake the device.
2. Press the red Power button to suspend the MC9500-NI.
3. Wait for red Decode LED to turn on and then turn off.
4. Unhook the handstrap.
5. Remove the battery.
6. Remove the SIM card cover using the end of the stylus.
7. Slide the SIM card holder door to the left to unlock.
8. Lift the SIM card holder door.
9. Remove SIM card from holder.
10.Close the SIM card holder door.
11. Slide the SIM card holder door to the right to lock into place.
12.Align the SIM card cover over the access hole and press down until it snaps into place.
13.Replace the battery.
Battery
This chapter provides information on battery functionality, battery status indications, charging the MC9500-NI
charging spare batteries and power saving techniques.
Page 29

User Guide 29
CAUTION The battery may only be charged and changed outside the hazardous area.
It must be ensured that only original batteries of the following type/s are used in safety oriented
operation. 82-111636-05 with 3.7 V/4800 mAh. 82-111636-04 with 3.7V/7020 mAh.
The use of imitation batteries or batteries from other manufacturers will render the type of
ignition protection ineffective and there will then be a risk of fire or explosion.
The temperature range for charging the battery is 0 °C to +40 °C. Please note that charging the
MC9500-NI is under intelligent control.
For this purpose, the charging procedure of the MC9500-NI is activated and deactivated at
short time intervals to keep the battery temperature within the permissible range. A LED on the
MC9500-NI indicates when the charging procedure was disabled because of excess
temperature.
Use only accessories approved by Zebra to charge the batteries.
How the Battery Works
The 4800 mAh battery type 82-111636-05 and the 7020 mAh battery type 82-111636-04 provide power to the
MC9500-NI and contains charging and status indications on the front of the battery. The indicators function
differently depending upon the battery mode and allow the user to determine the health of the battery.
Charging Status LED
Charge Level Indicator
Status Button
Charging Status LED indicates the charging status and health of the battery. The Charge Level Indicator
indicates an unhealthy battery and the charge level of the battery.
Battery Health
A battery becomes unhealthy when the Battery Usage Indication reach a predefined threshold (end of usable
life).
Page 30

30 MC9500-NI
The Battery Usage Threshold value can be changed. See the Zebra MC9500-K Mobile Computer Integrator
Guide for more information.
When the battery becomes unhealthy, a dialog box displays on the MC9500-NI. When this appears, tap Dismiss.
Replace the battery as soon as possible. The battery Charge Level indicator display an “X” when the battery
becomes unhealthy.
When charging an unhealthy battery in the MC9500-NI, the Battery Status LED blinks red.
Battery Status
The MC9500-NI battery provides status information on the front of the battery that allows the user to make
determination on what battery to use. The battery status indications vary depending upon the mode of the
battery:
• Installed in an MC9500-NI
• In a charger
• Stand-alone.
Installing the Battery
ATTENTION The battery may only be charged and changed outside the hazardous area.
It must be ensured that only original batteries of the following type/s are used in safety
oriented operation. 82-111636-05 with 3.7 V/4800 mAh. 82-111636-04 with 3.7V/7020 mAh.
The use of imitation batteries or batteries from other manufacturers will render the type of
ignition protection ineffective and there will then be a risk of fire or explosion.
To install the battery:
Page 31

User Guide 31
1. Insert the battery, top first, into the battery compartment.
2. Press the battery down into the battery compartment until the battery release latches snap into place.
Battery Release Latch
Battery Battery Release Latch
3. The MC9500-NI powers up automatically after inserting the battery, if the battery has been charged
previously.
Replace the Battery
CAUTION The battery may only be charged and changed outside the hazardous area.
It must be ensured that only original batteries of the following type/s are used in safety oriented
operation. 82-111636-05 with 3.7 V/4800 mAh. 82-111636-04 with 3.7V/7020 mAh.
The use of imitation batteries or batteries from other manufacturers will render the type of
ignition protection ineffective and there will then be a risk of fire or explosion.
ATTENTION Suspend the MC9500-NI prior to removing the battery. Failure to properly remove the
battery may cause the MC9500-NI to cold boot and potential loss of data.
To replace the battery on MC9500-NI UL Class I, II III Division 2 devices:
1. If the MC9500-NI is in suspend mode, press the red Power button to wake the device.
2. Press the red Power button to suspend the MC9500-NI.
3. Wait for red Decode LED to turn on and then turn off.
4. Unhook the handstrap.
5. Press the two battery release latches to release the battery. The battery ejects slightly.
Page 32

32 MC9500-NI
Battery Latch
6. Lift the battery from the MC9500-NI.
7. Insert the replacement battery, top first, into the battery compartment in the back of the MC9500-NI.
8. Press the battery down until the battery release latches snap into place. The MC9500-NI powers up after
inserting the battery.
To replace the battery on MC9500-NI ATEX Zone 2 and Zone 22 devices:
1. If the MC9500-NI is in suspend mode, press the red Power button to wake the device.
2. Press the red Power button to suspend the MC9500-NI.
3. Wait for red Decode LED to turn on and then turn off.
4. Unhook the handstrap.
5. Insert the battery removal tool in to the two holes to release the battery latches to release the battery. The
battery ejects slightly.
Latch Release Hole
Battery Release Tool
6. Lift the battery from the MC9500-NI.
7. Insert the replacement battery, top first, into the battery compartment in the back of the MC9500-NI.
8. Press the battery down until the battery release latches snap into place. The MC9500-NI powers up after
inserting the battery.
Page 33

User Guide 33
Powering On the MC9500-NI
After the MC9500-NI is connected to power the splash screen displays for about a minute as the MC9500-NI
initializes its flash file system, then the calibration window appears.
Calibrating the Screen
NOTE The Calibration screen can be accessed by pressing CTRL key - BKSP key or tapping Start >
Settings > Screen > Align Screen button.
To calibrate the screen so the cursor on the touch screen aligns with the tip of the stylus:
1. Remove the stylus from its holder on the side of the MC9500-NI.
2. Carefully press and briefly hold the tip of stylus on the center of each target that appears on the screen.
3. Repeat as the target moves around the screen, then tap the screen to continue.
Charging the Battery
CAUTION The battery may only be charged and changed outside the hazardous area.
NOTE
NOTE The temperature range for charging the battery is 0 °C to +40 °C. Please note that charging
the MC9500-NI is under intelligent control.
For this purpose, the charging procedure of the MC9500-NI is activated and deactivated at
short time intervals to keep the battery temperature within the permissible range. A LED on
the MC9500-NI indicates when the charging procedure was disabled because of excess
temperature.
Use only accessories approved by Zebra to charge the batteries.
Before using the MC9500-NI for the first time, charge the battery using either a charging cable or a cradle:
• USB Charging Cable
• Charge Only Cable
• Single Bay USB Cradle
• Four Bay Charge Only Cradle
• Four Bay Ethernet Cradle.
Page 34

34 MC9500-NI
Align and hook the MC9500-NI interface pocket onto the cradle’s or cable’s cleat. The battery automatically
begins charging. The 4800 mAh battery fully charges in less than six hours and the 7020 mAh battery fully
charges in less than nine hours.
Table 2
None
Charging Slow Blinking Amber
Fully Charged Solid Green Solid Red
Charging Error
Charging/Battery Status LED Indications
State
Off Off
• battery is not charging
• MC9500-NI is not connected
correctly to the cradle/cable or
not connected to a power
source.
• cradle/cable is not powered.
(1 blink every 2 seconds)
Fast Blinking Amber
• temperature is too low or too
high.
• charging has gone on too long
without completion (typically
eight hours for the 4800 mAh
battery).
(2 blinks/second)
Healthy Battery Unhealthy Battery
MC9500-NI LED Status MC9500-NI LED Status
Slow Blinking Red
(1 blink every 2 seconds)
Fast Blinking Amber
(2 blinks/second)
The MC9500-NI is equipped with a battery backup module, which is charged automatically when the main
battery is fully charged. When the MC9500-NI is taken into operation for the first time, the battery backup module
needs about 36 hours to be fully charged. This is also the case when the main battery was removed for several
hours, which discharges the backup module. The battery backup module ensures that the data in the working
memory are retained for at least 15 minutes after the main battery of the MC9500-NI was removed. When the
MC95-NI reaches a low charging state, the data in the working memory are retained for at least 36 hours due to
the combination of main battery and battery backup module. Use a charging station or charging cable to charge
Page 35

User Guide 35
the battery. You can find information on how to set up cables and charging stations, as well as about the charging
procedure in the Zebra documentation MC9500-NI User manual for integration of mobile computers.
Installed in an MC9500-NI
When the 4800 mAh battery, type 82-111636-05 or 7020 mAh battery, type 82-111636-04 is installed in the
MC9500-NI, the user can view the charge level (with Status button press) and health of the battery. The Battery
Status LED is disabled when the battery is installed in the MC9500-NI. If the battery is unhealthy, the Charge
Level indicator displays an “X”.
Battery Status LED
Charge Level Indicator
Status Button
Press the Status button to display the current battery charge level. It will display for five seconds and then turn
off. The table below lists the Charge Level indications when the Status button is pressed.
Page 36

36 MC9500-NI
Table 3
Charge Level Indicator
Charge
Level
Indicator
Indicates that the remaining charge is approximately between 0% and 20%.
Indicates that the remaining charge is approximately between 21% and 40%.
Indicates that the remaining charge is approximately between 41% and 60%.
Indicates that the remaining charge is approximately between 61% and 80%.
Indicates that the remaining charge is approximately between 81% and 100%.
NOTE The battery front panel is not visible when the MC9500-NI is charging in a cradle. The battery
front panel is visible when charging with a charging cable. The Charge Level indicator displays
a “charging in mobile computer” indication. (See Battery in MC9500-NI on page 36).
Description
Table 4
None Not Charging Off Off
Button Press Not Charging Off Off
Battery in MC9500-NI
Action State
Healthy Battery Unhealthy Battery
Battery
Status LED
Charge Level
Indicator
Battery
Status LED
Charge Level
Indicator
Page 37

User Guide 37
Table 4
None Charging in cradle or
Button Press Charging in cradle or
The health of the battery can also be viewed on the MC9500-NI Power applet. Tap Start > Settings > Power
icon > BatteryMgmt tab.
Battery in MC9500-NI
Action State
cable
cable
Healthy Battery Unhealthy Battery
Battery
Status LED
Off Off
Off Off
Charge Level
Indicator
Battery
Status LED
Charge Level
Indicator
Table 5
State of Health Indicates the current state of the battery (Healthy or Unhealthy).
Battery Usage Indicator Indicates the usage of the battery.
Battery Usage
Threshold
Battery Serial # Displays the serial number of the battery.
For information on changing the Battery Usage Threshold, refer to the MC9500-K Mobile Computer Integrator
Guide.
BatteryMgmt Window
Item Description
Indicates the usage indicator threshold.
Page 38

38 MC9500-NI
In a Charger
CAUTION The battery may only be charged and changed outside the hazardous area.
When the battery is in a Single Slot Battery Charger, Four Slot Battery Charger or Vehicle Battery Charger, the
battery charging status and health is indicated on the front of the battery. If the charger is not powered, the
battery acts as if it is in stand-alone mode. See Stand-alone on page 40 for more information.
Battery Status LED
Charge Level Indicator
The Battery Status LED displays the current state of charging as described in Table 6 on page 39. The Charge
Level indicator displays the charge level of a healthy battery as described in Table 3 on page 36.
With an unhealthy battery, an “X” appears on the display. To view the charge level, press the Status button. The
display indicates the level of charge. After five seconds the display reverts to the “X” indication.
Page 39

User Guide 39
Table 6
None (charger not powered) Off Off
Charging Slow Blinking
Fully Charged Solid Green Solid Red
Charging Error
Battery Status in Charger
State
• temperature is too low
or too high.
• charging has gone on
too long without
completion (typically
eight hours for the 4800
mAh battery).
Healthy Battery Unhealthy Battery
Battery Status
LED
Amber
(1 blink every 2
seconds)
Fast Blinking
Amber
(2
blinks/second)
Charge Level
Indicator
Battery Status
Slow Blinking
Red
(1 blink every 2
seconds)
Fast Blinking
Amber
(2
blinks/second)
LED
Charge Level
Indicator
Page 40

40 MC9500-NI
Stand-alone
When the battery is not installed in an MC9500-NI or a charger, the charge status and health of the battery
displays on the battery front panel. If the battery is unhealthy, an “X” appears in the Charge Level indicator. Press
the Status button to view the health and charge level of the battery. The Battery Status LED lights and the
Charge Level indicator display the charge level. After five seconds the LED turns off and the Charge Level
indicator reverts to the previous display. See Table 7 on page 40 for Battery Status LED and Charge Level
indicator descriptions.
Table 7
No Action Off Off
Button Press Solid Green Solid Red
Battery Status - Stand-alone
Action
Battery Status
LED
Healthy Battery Unhealthy Battery
Charge Level Indicator
Battery Status
Keypad
Replacing Keypad
The MC9500-NI has interchangeable modular keypads.
CAUTION The keypad may only be changed outside the hazardous area.
It must be ensured that only original keypads are used in safety-oriented operation.
The use of imitation keypads from other manufacturers will render the type of ignition protection
ineffective and there will then be a risk of fire or explosion.
LED
Charge Level Indicator
Page 41

User Guide 41
ATTENTION Power off the MC9500-NI before start of change parts.
Put the MC9500-NI into suspend mode before you remove the battery. Failure to properly
remove the battery may cause the MC9500-NI to cold boot and potential loss of data.
1. If the MC9500-NI is in suspend mode, press the Power button to wake the device. Wait for the MC9500-NI to
fully awake from suspend mode.
2. Press the Power button to suspend the MC9500-NI.
3. Wait for red Decode LED to turn on and then turn off.
4. Un-hook the handstrap.
5. Remove the battery.
6. Remove and discard two screws securing the keypad to the housing.
7. Slide the keypad down toward the bottom of the device and then lift.
8. Align the new keypad with the housing.
9. Press the keypad down and then slide the keypad up.
Page 42

42 MC9500-NI
1
2
10.Secure the keypad with two new screws provided with the keypad. Torque the screws to 2.5 kg-cm (0.18
ft-lbs.)
11. Replace the battery.
12.Press the power button for five seconds to perform a warm boot.
3
Screen Protector
CAUTION The screen protector may only be changed outside the hazardous area.
It must be ensured that only original screen protector used in safety-oriented operation.
Use only Zebra p/n KT-122010-01R.
The use of imitation screen protectors from other manufacturers will render the type of ignition
protection ineffective and there will then be a risk of fire or explosion.
Removing the Screen Protector
The MC9500-NI is provided with a screen protector. Zebra recommends using this to minimize wear and tear.
Screen protectors enhance the usability and durability of touch screen displays.
To remove the screen protector, lift the corner using a thin plastic card, such as a credit card, then carefully lift it
off the display.
Lift Screen
Protector Corner
Page 43

User Guide 43
ATTENTION Do not use a sharp object to remove the protector. Doing so can damage the display.
NOTE Not using a screen protector can affect warranty coverage. To purchase replacement
protectors, contact your local account manager or Zebra. These include screen protector
installation instructions. Part number: KT-122010-01R Screen Protector 3/pk.
Connection to the PC
The MC9500-NI series is delivered with a Microsoft Windows Mobile 6.5 operating system. Microsoft supplies
software free of charge to establish a connection to a PC for synchronization, installation and data exchange.
Active Sync
NOTE To be able to communicate with various host partners, it is recommendable to install Microsoft
ActiveSync (version 4.5 or higher) on the host computer. ActiveSync synchronizes the information
on the mobile computer with information on the host computer. Changes made on the mobile
computer or host computer remain in both partners after synchronisation.
The Microsoft ActiveSync program is used for synchronizing or installing software and data. ActiveSync is
available for downloading as freeware at www.microsoft.com.
Supported Operating Systems:
• Windows XP
For system requirements see the Microsoft home page under Active Sync version 4.5 or higher.
Further information on ActiveSync can be found in the Zebra integrator Guide or on the Microsoft home page.
Microsoft Mobile Device Center
NOTE To be able to communicate with various host partners installed on Windows Vista or Windows 7, it
is recommendable to install the Microsoft Device Center on the host computer. Device Center
synchronizes the information on the mobile computer with information on the host computer.
Changes made on the mobile computer or host computer remain on both partners after
synchronization.
The Microsoft Mobile Device Center program is used for synchronizing or installing software and data. Mobile
Device Center is available for downloading as freeware at www.microsoft.com
Supported Operating Systems:
• Windows Vista or Windows 7
Page 44

44 MC9500-NI
For system requirements see Device Center on the Microsoft home page.
Further information on Device Center can be found in the Zebra integrator Guide or on the Microsoft home page.
Operation
The operator of an electrical system in a hazardous environment must keep the operating equipment in an
orderly condition, operate it correctly, monitor it and do the required maintenance and repairs.
Before operating the MC9500-NI, check that all components and documents are there.
The following conditions must be met before operating the device:
• Check the MC9500-NI for damage to display, scanner window and the enclosure.
• Check that the used battery is a certified one.
• Make sure that the battery is changed and insert in the MC9500-NI.
• Close the battery.
• Check when use a screen protector that it is a certificated one.
Troubleshooting
CAUTION If you have any problems with the MC9500-NI, bring the device into a safe area first before you
try to remedy the fault.
Notes on Troubleshooting can be found in the MC9500-K Mobile Computer User Guide or MC9500-K Mobile
Computer Integrator Guide on Support Central.
If you have problems with your device, please contact Zebra.
Energy Saving Options
Observe the following battery saving tips:
• Leave the MC9500-NI connected to AC power at all times when not in use.
• Set the MC9500-NI to turn off after a short period of non-use.
• Set the backlight to turn off after a short period of non-use.
• Turn off all wireless activities when not in use.
Changing the Power Settings
To set the MC9500-NI to turn off after a short period of non-use:
1. Tap Start > Settings > System > Power icon > Advanced tab.
2. Select the On battery power: Turn off device if not used for check box and select a value from the
drop-down list.
Page 45

User Guide 45
3. Select ok.
Changing the Backlight Settings
To change the backlight settings in order to conserve more battery power:
1. Tap Start > Settings > System > Backlight icon > Battery Power tab.
2. Select the Disable backlight if device is not used for check box and select a value from the drop-down list.
3. Select the Brightness tab.
4. Tap the Disable backlight check box to turn off the display backlight, or use the slider to set a low value for
the backlight.
5. Select ok.
Changing the Keypad Backlight Settings
To change the keypad backlight settings in order to conserve more battery power:
1. Tap Start > Settings > System > Keylight icon > Battery Power tab.
2. Select the On battery power: Disable keylight if device if not used for check box and select a value from
the drop-down list.
3. Select the Advanced tab.
4. Tap the Disable backlight check box to turn off the keypad backlight.
5. Select ok.
Changing the Settings for the Display Backlight
This is how you change the settings for the display backlight to save battery power:
1. Tap on Start > Settings > System > Backlight > Battery Power.
2. Activate the control box Disable backlight if device is not used for, and select a value from the drop-down
list.
3. Select the Brightness tab.
4. Tap on the control box Disable backlight, to switch off the display backlight, or use the slider to set a lower
value for the display backlight.
5. Tap on ok.
Turning Off the Radios
Windows Mobile 6 devices include Wireless Manager, which provides a simple method of enabling, disabling,
and configuring all the device’s wireless capabilities in one place. To open Wireless Manager, tap the
Connectivity icon or tap Wireless Manager on the Today screen.
Page 46

46 MC9500-NI
NOTE Wireless connection options vary depending upon configurations.
1. To enable or disable a wireless connection, tap the specific button.
2. To enable or disable all wireless connections, tap and hold the All button.
3. To configure settings for a connection, tap Menu.
Resetting the MC9500-NI
There are two resetting functions: Warm boot and cold boot. In the case of a warm boot the MC9500-NI is
restarted by closing all executed programs. In the case of a cold boot, the MC9500-NI is also restarted and, in
addition, some drivers initialized. Data stored in a flash memory or on a memory card are not lost.
Carry out a warm boot first if the MC9500-NI does not function properly. If the MC9500-NI still doesn’t respond,
carry out a cold boot.
Page 47

User Guide 47
Warm boot
To perform a warm boot:
Press the red power switch (Power) for about five seconds. Release the power switch (Power) as soon as the
MC9500-NI begins with the start procedure.
Cold boot
To perform a cold boot:
To execute a cold boot keep the keys 1 and 9, as well as the red power switch (Power) pressed simultaneously.
Maintenance, Inspection, Repair
This chapter describes cleaning and storing the MC9500-NI, as well as possible procedures when problems
occur while using the MC9500-NI.
CAUTION When doing maintenance or servicing or when checking associated equipment, comply with
the applicable regulations in accordance with directives IEC 60079-19 and IEC 60079-17.
Installation/dismantling, operating and maintenance work may be carried out by trained
specialists only. Statutory regulations and other binding directives on workplace safety,
accident prevention and environmental protection must be adhered to.
You should heed the following tips when using the MC9500-NI to guarantee fault-free operation:
• Pay attention that the MC9500-NI display is not scratched. When working with the MC9500-NI use the
supplied input pen or pens with plastic tip which are designed for use with touch screens. Never use a
ballpoint pen, pencils or other pointed items on the MC9500-NI screen. Zebra recommends using a
screen protector, Part no. KT-122210-01R.
• The MC9500-NI touch screen is made of polycarbonate. Please make sure that the MC9500-NI is not
dropped or subjected to hard knocks.
• Protect the MC9500-NI against extreme temperatures. Do not leave it on the dashboard of the car on hot
days and keep it away from heat sources.
• Do not store the MC9500-NI in dusty, moist or wet environments.
• Use a soft spectacle cleaning cloth to clean the MC9500-NI. If the MC9500-NI display surface is dirty,
clean it with a soft spectacle cleaning cloth soaked in diluted window cleaner.
• Change the re-chargeable battery regularly to ensure maximum battery life and equipment performance.
Battery life depends on the individual usage pattern. The battery provides a state display to estimate the
remaining life. You can find further information in Battery on page 28.
• Pay attention that the scan window is not scratched. Clean the window regularly.
Page 48

48 MC9500-NI
• Dust, contaminants and scratches on the scan window can lead to visible spots on the pictures taken with
the scanner.
• The battery should be completely charged before it is used for the first time. Note that the maximum
capacity of the battery is not attained until after approx. 5-6 charging and discharging cycles.
• The MC9500-NI is equipped with a screen protector. Zebra recommends using this, to avoid wear marks.
A screen protector contributes to the user friendliness of the equipment and protects the touch screen.
The advantages at a glance:
• Protection against scratches and dents
• Resistant and non-slip writing and touch screen surface
• Protection against abrasion and chemicals
• Reflection reduction
• Equipment screen always looks brand new
• Simple and quick installation.
• As the battery power diminishes over the course of time, the batteries should be completely discharged
and recharged every now and then in order to retain the full capacity. For that purpose the devices are left
switched on until the devices switch off themselves. Then recharge the battery completely outside the Ex
area.
• Before a lengthy idle time it is essential to charge the battery completely and to recharge it regularly
(every 3 months).
Servicing
CAUTION In accordance with IEC 60079-19 and IEC 60079-17, the owner-operator of the electrical
installations in potentially explosive areas has an obligation to have these installations
checked by a qualified electrician to ensure that they are in a proper condition.
Inspection
CAUTION Repairs on explosion-protected operating equipment may be done only by authorised persons
using original spare parts and working in accordance with the latest developments of
technology. The relevant applicable regulations must be observed.
Please direct any questions you may have to Zebra.
Cleaning
WARNING
! Avoid exposing this product to contact with hot oil or other flammable liquids. If such exposure
occurs, unplug the device and clean the product immediately in accordance with these
guidelines.
Page 49

User Guide 49
CAUTION Always wear eye protection.
Read warning label on compressed air and alcohol product before using.
If you have to use any other solution for medical reasons please contact Zebra for more
information.
Take the device out of the hazardous area before cleaning.
Materials Required
• Alcohol wipes
• Lens tissue
• Cotton tipped applicators
• Isopropyl alcohol
• Can of compressed air with a tube.
Cleaning the MC9500-NI
Housing
Using the alcohol wipes, wipe the housing including keys and in-between keys.
Display
The display can be wiped down with the alcohol wipes, but care should be taken not to allow any pooling of liquid
around the edges of the display. Immediately dried the display with a soft, non-abrasive cloth to prevent
streaking.
Scanner Exit Window
Wipe the scanner exit window periodically with a lens tissue or other material suitable for cleaning optical
material such as eyeglasses.
Connector
1. Remove the main battery from mobile computer. See Replace the Battery on page 31.
2. Close battery door.
3. Dip the cotton portion of the cotton tipped applicator in isopropyl alcohol.
4. Rub the cotton portion of the cotton tipped applicator back-and-forth across the connector on the bottom of
the MC9500-NI. Do not leave any cotton residue on the connector.
5. Repeat at least three times.
6. Use the cotton tipped applicator dipped in alcohol to remove any grease and dirt near the connector area.
Page 50

50 MC9500-NI
7. Use a dry cotton tipped applicator and repeat steps 4 through 6.
CAUTION Do not point nozzle at yourself and others, ensure the nozzle or tube is away from your face.
8. Spray compressed air on the connector area by pointing the tube/nozzle about ½ inch away from the surface.
9. Inspect the area for any grease or dirt, repeat if required.
Battery Contacts
1. Remove the battery from the MC9500-NI. See Replace the Battery on page 31.
2. Dip the end of a cotton bud in Isopropyl.
3. Rub over the battery contacts on the rear of the battery several times with the tip of the cotton bud. Pay
attention that no cotton residue remains on the contacts.
4. Repeat this procedure at least three times.
5. Remove all grease and dirt deposits in the contact area with the help of the alcohol-soaked cleaning cotton
bud.
6. Then use a dry cotton bud and repeat steps 3 to 5.
7. Spray compressed air onto the plug-connector area and keep the hose about 15 mm above the surface.
CAUTION Do not point nozzle at yourself and others, ensure the nozzle or tube is away from your face.
8. Check the area for grease and dirt residue and repeat the cleaning procedure if necessary.
9. Insert the battery in the MC9500-NI.
Cleaning Cradle Connectors
To clean the connectors on a cradle:
1. Remove the DC power cable from the cradle.
2. Dip the cotton portion of the cotton tipped applicator in isopropyl alcohol.
3. Rub the cotton portion of the cotton tipped applicator along the pins of the connector. Slowly move the
applicator back-and-forth from one side of the connector to the other. Do not let any cotton residue on the
connector.
4. All sides of the connector should also be rubbed with the cotton tipped applicator.
CAUTION Do not point nozzle at yourself and others, ensure the nozzle or tube is away from your face.
5. Spray compressed air in the connector area by pointing the tube/nozzle about ½ inch away from the surface.
Page 51

User Guide 51
6. Ensure that there is no lint left by the cotton tipped applicator, remove lint if found.
7. If grease and other dirt can be found on other areas of the cradle, use lint free cloth and alcohol to remove.
8. Allow at least 10 to 30 minutes (depending on ambient temperature and humidity) for the alcohol to air dry
before applying power to cradle.
9. If the temperature is low and humidity is high, longer drying time is required. Warm temperature and dry
humidity requires less drying time.
Cleaning Frequency
The cleaning frequency is up to the customer’s discretion due to the varied environments in which the mobile
devices are used. They may be cleaned as frequently as required. However when used in dirty environments it
may be advisable to periodically clean the scanner exit window to ensure optimum scanning performance.
Service Information
If you have a problem with your equipment, contact Zebra support for your region. Contact information is
available at: http://www.zebra.com/support.
When contacting support, please have the following information available:
• Serial number of the unit (found on manufacturing label)
• Model number or product name (found on manufacturing label)
• Software type and version number.
P/N: XXXXXXXXXXXXXX
MODEL: XXXXXX
(S)S/N XXXXXXXXXXXXXX
Manufacturing Label
Zebra responds to calls by email, telephone or fax within the time limits set forth in support agreements.
If your problem cannot be solved by Zebra Support, you may need to return your equipment for servicing and will
be given specific directions. Zebra is not responsible for any damages incurred during shipment if the approved
shipping container is not used. Shipping the units improperly can possibly void the warranty.
If you purchased your business product from a Zebra business partner, contact that business partner for
support.
Page 52

52 MC9500-NI
Disposal
The component of the mobile computer contains metal, plastic parts and electronic components.
The statutory requirements for electrical scrap must be observed therefore (e.g. disposal by an approved
disposal company).
Dispatch and Packaging Instructions
Important information regarding transport and dispatch.
! Sensitive Devices!
It is absolutely necessary to deliver the equipment in
the original packaging in order to avoid damage to the
equipment.
Waste Electrical and Electronic Equipment (WEEE)
English: For EU Customers: All products at the end of their life must be returned to Zebra for recycling. For information on how
to return product, please go to: http://www.zebra.com/weee.
Français: Clients de l'Union Européenne: Tous les produits en fin de cycle de vie doivent être retournés à Zebra pour recyclage.
Pour de plus amples informations sur le retour de produits, consultez : http://www.zebra.com/weee.
Español: Para clientes en la Unión Europea: todos los productos deberán entregarse a Zebra al final de su ciclo de vida para
que sean reciclados. Si desea más información sobre cómo devolver un producto, visite: http://www.zebra.com/weee.
Bulgarish: За клиенти от ЕС: След края на полезния им живот всички продукти трябва да се връщат на Zebra за
рециклиране. За информация относно връщането на продукти, моля отидете на адрес: http://www.zebra.com/weee.
Deutsch: Für Kunden innerhalb der EU: Alle Produkte müssen am Ende ihrer Lebensdauer zum Recycling an Zebra
zurückgesandt werden. Informationen zur Rücksendung von Produkten finden Sie unter http://www.zebra.com/weee.
Italiano: per i clienti dell'UE: tutti i prodotti che sono giunti al termine del rispettivo ciclo di vita devono essere restituiti a Zebra al
fine di consentirne il riciclaggio. Per informazioni sulle modalità di restituzione, visitare il seguente sito Web:
http://www.zebra.com/weee.
Português: Para clientes da UE: todos os produtos no fim de vida devem ser devolvidos à Zebra para reciclagem. Para obter
informações sobre como devolver o produto, visite: http://www.zebra.com/weee.
Nederlands: Voor klanten in de EU: alle producten dienen aan het einde van hun levensduur naar Zebra te worden
teruggezonden voor recycling. Raadpleeg http://www.zebra.com/weee voor meer informatie over het terugzenden van
producten.
Polski: Klienci z obszaru Unii Europejskiej: Produkty wycofane z eksploatacji nale¿y zwróciæ do firmy Zebra w celu ich utylizacji.
Informacje na temat zwrotu produktów znajduj¹ siê na stronie internetowej http://www.zebra.com/weee.
Čeština: Pro zákazníky z EU: Všechny produkty je nutné po skonèení jejich životnosti vrátit spoleènosti Zebra k recyklaci.
Informace o zpùsobu vrácení produktu najdete na webové stránce: http://www.zebra.com/weee.
Eesti: EL klientidele: kõik tooted tuleb nende eluea lõppedes tagastada taaskasutamise eesmärgil Zebra'ile. Lisainformatsiooni
saamiseks toote tagastamise kohta külastage palun aadressi: http://www.zebra.com/weee.
Magyar: Az EU-ban vásárlóknak: Minden tönkrement terméket a Zebra vállalathoz kell eljuttatni újrahasznosítás céljából. A
termék visszajuttatásának módjával kapcsolatos tudnivalókért látogasson el a http://www.zebra.com/weee weboldalra.
Slovenski: Za kupce v EU: vsi izdelki se morajo po poteku življenjske dobe vrniti podjetju Zebra za reciklažo. Za informacije o
vraèilu izdelka obišèite: http://www.zebra.com/weee.
Svenska: För kunder inom EU: Alla produkter som uppnått sin livslängd måste returneras till Zebra för återvinning. Information om
hur du returnerar produkten finns på http://www.zebra.com/weee.
Page 53

User Guide 53
Suomi: Asiakkaat Euroopan unionin alueella: Kaikki tuotteet on palautettava kierrätettäväksi Zebra-yhtiöön, kun tuotetta ei enää
käytetä. Lisätietoja tuotteen palauttamisesta on osoitteessa http://www.zebra.com/weee.
Dansk: Til kunder i EU: Alle produkter skal returneres til Zebra til recirkulering, når de er udtjent. Læs oplysningerne om
returnering af produkter på: http://www.zebra.com/weee.
Ελληνικά: Για πελάτες στην Ε.Ε.: Όλα τα προϊόντα, στο τέλος της διάρκειας ζωής τους, πρέπει να επιστρέφονται στην Zebra για
ανακύκλωση. Για περισσότερες πληροφορίες σχετικά με την επιστροφή ενός προϊόντος, επισκεφθείτε τη διεύθυνση
http://www.zebra.com/weee στο Διαδίκτυο.
Malti: Għal klijenti fl-UE: il-prodotti kollha li jkunu waslu fl-aħħar tal-ħajja ta' l-użu tagħhom, iridu jiġu rritornati għand Zebra
għar-riċiklaġġ. G
ħal aktar tagħrif dwar kif għandek tirritorna l-prodott, jekk jogħġbok żur: http://www.zebra.com/weee.
Românesc: Pentru clienţii din UE: Toate produsele, la sfârşitul duratei lor de funcţionare, trebuie returnate la Zebra pentru
reciclare. Pentru informaţii despre returnarea produsului, accesaţi: http://www.zebra.com/weee.
Slovenski: Za kupce v EU: vsi izdelki se morajo po poteku življenjske dobe vrniti podjetju Zebra za reciklažo. Za informacije o
vračilu izdelka obiščite: http://www.zebra.com/weee.
Slovenčina: Pre zákazníkov z krajín EU: Všetky výrobky musia byť po uplynutí doby ich životnosti vrátené spoločnosti Zebra na
recykláciu. Bližšie informácie o vrátení výrobkov nájdete na: http://www.zebra.com/weee.
Lietuvių: ES vartotojams: visi gaminiai, pasibaigus jų eksploatacijos laikui, turi būti grąžinti utilizuoti į kompaniją „Zebra“.
Daugiau informacijos, kaip grąžinti gaminį, rasite: http://www.zebra.com/weee.
Latviešu: ES klientiem: visi produkti pēc to kalpošanas mūža beigām ir jānogādā atpakaļ Zebra otrreizējai pārstrādei. Lai iegūtu
informāciju par produktu nogādāšanu Zebra, lūdzu, skatiet: http://www.zebra.com/weee.
Türkçe: AB Müşterileri için: Kullanım süresi dolan tüm ürünler geri dönüştürme için Zebra'ya iade edilmelidir. Ürünlerin nasıl iade
edileceği hakkında bilgi için lütfen şu adresi ziyaret edin: http://www.zebra.com/weee.
TURKISH WEEE Statement of Compliance
EEE Yönetmeliğine Uygundur
END-USER LICENSE AGREEMENT
These license terms are an agreement between you and Symbol Technologies, Inc. (“Company”). Please read them. They apply to the
software included on this device. The software also includes any separate media on which you received the software.
The software on this device includes software licensed by Company from Microsoft Corporation or its affiliate.
The terms also apply to any:
• updates,
• supplements,
• Internet-based services, and
• support services
for this software, unless other terms accompany those items. If so, those terms apply.
As described below, using some features also operates as your consent to the transmission of certain standard computer information for
Internet-based services.
By using the software, including use on this device, you accept these terms. If you do not accept them, do not use the device or software.
Instead, contact Company to determine its return policy for a refund or credit.
WARNING: If the software contains voice operated technologies, then operating this software requires user attention. Diverting attention
away from the road while driving can possibly cause an accident or other serious consequence. Even occasional, short diversions of
attention can be dangerous if your attention is diverted away from your driving task at a critical time. Company and Microsoft make no
representations, warranties or other determinations that ANY use of this software is legal, safe, or in any manner recommended or
intended while driving or otherwise operating a motor vehicle.
If you comply with these license terms, you have the rights below.
1. USE RIGHTS.
You may use the software on the device with which you acquired the software.
2. ADDITIONAL LICENSING REQUIREMENTS AND/OR USE RIGHTS.
a. Specific Use. Company designed this device for a specific use. You may only use the software for that use.
Page 54

54 MC9500-NI
b. Included Microsoft Programs and Additional Required Licenses. Except as provided below, these license terms apply to all
Microsoft programs included with the software. If the license terms with any of those programs give you other rights that do not
expressly conflict with these license terms, you also have those rights.
i. This agreement does not grant you any rights with respect to the Windows Mobile Device Center, Microsoft ActiveSync or Microsoft
Outlook 2007 Trial which are subject to the licenses accompanying those items.
c. Speech Recognition. If the software includes speech recognition component(s), you understand that speech recognition is an
inherently statistical process and that recognition errors are inherent in the process. Neither Company nor Microsoft or their suppliers
shall be liable for any damages arising out of errors in the speech recognition process.
d. Phone Functionality. If the device software includes phone functionality, all or certain portions of the device software may be
inoperable if you do not have and maintain a service account with a wireless telecommunication carrier (“Mobile Operator”), or if the
Mobile Operator’s network is not operating or configured to operate with the device.
3. SCOPE OF LICENSE. The software is licensed, not sold. This agreement only gives you some rights to use the software. Company and
Microsoft reserve all other rights. Unless applicable law gives you more rights despite this limitation, you may use the software only as
expressly permitted in this agreement. In doing so, you must comply with any technical limitations in the software that allow you to use it
only in certain ways. You may not:
• work around any technical limitations in the software;
• reverse engineer, decompile or disassemble the software;
• make more copies of the software than specified in this agreement;
• publish the software for others to copy;
• rent, lease or lend the software; or
• use the software for commercial software hosting services.
Except as expressly provided in this agreement, rights to access the software on this device do not give you any right to implement
Microsoft patents or other Microsoft intellectual property in software or devices that access this device.
You may use remote access technologies in the software such as Remote Desktop Mobile to access the software remotely from a
computer or server. You are responsible for obtaining any licenses required for use of the protocols to access other software.
4. INTERNET-BASED SERVICES. Microsoft provides Internet-based services with the software. Microsoft may change or cancel them at
any time.
a. Consent for Internet-Based Services. The software features described below connect to Microsoft or service provider computer
systems over the Internet. In some cases, you will not receive a separate notice when they connect. You may switch off some of these
features or not use them. For more information about these features, visit http://go.microsoft.com/fwlink/?LinkId=81931.
By using these features, you consent to the transmission of this information. Microsoft does not use the information to identify or
contact you.
Device Information. The following features use Internet protocols, which send to the appropriate systems device information, such as
your Internet protocol address, the type of operating system, browser and name and version of the software you are using, and the
language code of the device where you installed the software. Microsoft uses this information to make the Internet-based services
available to you.
• Windows Mobile Update Feature. The Windows Mobile Update feature provides you the ability to obtain and install software
updates on your device if updates are available. You may choose not to use this feature. Company and/or your Mobile Operator may
not support this feature or an update for your device.
• Windows Media Digital Rights Management. Content owners use Windows Media digital rights management technology
(WMDRM) to protect their intellectual property, including copyrights. This software and third party software use WMDRM to play and
copy WMDRM-protected content. If the software fails to protect the content, content owners may ask Microsoft to revoke the
software’s ability to use WMDRM to play or copy protected content. Revocation does not affect other content. When you download
licenses for protected content, you agree that Microsoft may include a revocation list with the licenses. Content owners may require
you to upgrade WMDRM to access their content. Microsoft software that includes WMDRM will ask for your consent prior to the
upgrade. If you decline an upgrade, you will not be able to access content that requires the upgrade.
b. Misuse of Internet-based Services. You may not use these services in any way that could harm them or impair anyone else’s use of
them. You may not use the services to try to gain unauthorized access to any service, data, account or network by any means.
5. NOTICES ABOUT THE MPEG-4 VISUAL STANDARD. The software may include MPEG-4 visual decoding technology. This technology
is a format for data compression of video information. MPEG LA, L.L.C. requires this notice:
USE OF THIS PRODUCT IN ANY MANNER THAT COMPLIES WITH THE MPEG-4 VISUAL STANDARD IS PROHIBITED, EXCEPT
FOR USE DIRECTLY RELATED TO (A) DATA OR INFORMATION (i) GENERATED BY AND OBTAINED WITHOUT CHARGE FROM
A CONSUMER NOT THEREBY ENGAGED IN A BUSINESS ENTERPRISE, AND (ii) FOR PERSONAL USE ONLY; AND (B) OTHER
USES SPECIFICALLY AND SEPARATELY LICENSED BY MPEG LA, L.L.C.
If you have questions about the MPEG-4 visual standard, please contact MPEG LA, L.L.C., 250 Steele Street, Suite 300, Denver, CO
80206; www.mpegla.com.
6. DIGITAL CERTIFICATES. The software uses digital certificates in X.509 format. These digital certificates are used for authentication.
Page 55

User Guide 55
7. CONNECTIVITY SOFTWARE. Your device package may include Windows Mobile Device Center or Microsoft ActiveSync software. If it
is included, then you may install and use it in accordance with the license terms that are provided with it. If no license terms are provided,
then you may install and use only one (1) copy of the software on a single computer.
8. NETWORK ACCESS. If you are using a network, such as an employer network, the network administrator may limit features or
functionality on your device.
9. PRODUCT SUPPORT. Contact Company for support options. Refer to the support number provided with the device.
10. LINKS TO THIRD PARTY WEBSITES. If the software provides links to third party websites, those links are provided to you only as a
convenience, and the inclusion of any link does not imply an endorsement of the third party website by Microsoft.
11. BACKUP COPY. You may make one backup copy of the software. You may use it only to reinstall the software on the device.
12. PROOF OF LICENSE. If you acquired the software on the device, or on a disc or other media, a genuine Certificate of Authenticity label
with a genuine copy of the software identifies licensed software. To be valid, this label must be affixed to the device, or included on or in
Company’s software packaging. If you receive the label separately, it is not valid. You should keep the label on the device or packaging to
prove that you are licensed to use the software. To identify genuine Microsoft software, see http://www.howtotell.com.
13. TRANSFER TO A THIRD PARTY. You may transfer the software only with the device, the Certificate of Authenticity label, and these
license terms directly to a third party. Before the transfer, that party must agree that these license terms apply to the transfer and use of the
software. You may not retain any copies of the software including the backup copy.
14. NOT FAULT TOLERANT. The software is not fault tolerant. Company installed the software on the device and is responsible for how it
operates on the device.
15. RESTRICTED USE. The Microsoft software was designed for systems that do not require fail-safe performance. You may not use the
Microsoft software in any device or system in which a malfunction of the software would result in foreseeable risk of injury or death to any
person. This includes operation of nuclear facilities, aircraft navigation or communication systems and air traffic control.
16. NO WARRANTIES FOR THE SOFTWARE. The software is provided “as is”. You bear all risks of using it. Microsoft gives no express
warranties, guarantees or conditions. Any warranties you receive regarding the device or the software do not originate from, and are not
binding on, Microsoft or its affiliates. When allowed by your local laws, Company and Microsoft exclude implied warranties of
merchantability, fitness for a particular purpose and non-infringement.
17. LIABILITY LIMITATIONS. You can recover from Microsoft and its affiliates only direct damages up to fifty U.S. Dollars (U.S. $50.00), or
equivalent in local currency. You cannot recover any other damages, including consequential, lost profits, special, indirect or incidental
damages.
This limitation applies to:
• anything related to the software, services, content (including code) on third party internet sites, or third party programs, and
• claims for breach of contract, breach of warranty, guarantee or condition, strict liability, negligence, or other tort to the extent
permitted by applicable law.
It also applies even if Microsoft should have been aware of the possibility of the damages. The above limitation may not apply to you
because your country may not allow the exclusion or limitation of incidental, consequential or other damages.
18. EXPORT RESTRICTIONS. The software is subject to United States export laws and regulations. You must comply with all domestic
and international export laws and regulations that apply to the software. These laws include restrictions on destinations, end users and end
use. For additional information, see www.microsoft.com/exporting.
Page 56

Zebra Technologies Corporation
Lincolnshire, IL U.S.A.
http://www.zebra.com
Zebra and the Zebra head graphic are registered trademarks of ZIH Corp. The Symbol logo is a registered trademark
of Symbol Technologies, Inc., a Zebra Technologies company.
© 2015 Symbol Technologies, Inc.
72-148678-03 Revision A - February 2015
 Loading...