


LS 1004 Scanner
Product Reference Guide

LS 1004 Scanner Product Reference Guide
70-33806-01
Revision B — April 2001
2
Symbol Technologies, Inc. One Symbol Plaza, Holtsville N.Y. 11742-1300

LS 1004 Scanner
Product Reference Guide
70-33806-01
Revision B
April 2001

© 1998 - 2001 by Symbol Technologies, Inc. All rights reserved.
No part of this publication may be reproduced or used in any form, or by any electrical or
mechanical means, without permission in writing from Symbol. This includes electronic or
mechanical means, such as photocopying, recording, or information storage and retrieval
systems. The material in this manual is subject to change without notice.
The software is provided strictly on an “as is” basis. All software, including firmware,
furnished to the user is on a licensed basis. Symbol grants to the user a non-transferable and
non-exclusive license to use each software or firmware program delivered hereunder (licensed
program). Except as noted below, such license may not be assigned, sublicensed, or otherwise
transferred by the user without prior written consent of Symbol. No right to copy a licensed
program in whole or in part is granted, except as permitted under copyright law. The user
shall not modify, merge, or incorporate any form or portion of a licensed program with other
program material, create a derivative work from a licensed program, or use a licensed
program in a network without written permission from Symbol. The user agrees to maintain
Symbol’s copyright notice on the licensed programs delivered hereunder, and to include the
same on any authorized copies it makes, in whole or in part. The user agrees not to
decompile, disassemble, decode, or reverse engineer any licensed program delivered to the
user or any portion thereof.
Symbol reserves the right to make changes to any software or product to improve reliability,
function, or design.
Symbol does not assume any product liability arising out of, or in connection with, the
application or use of any product, circuit, or application described herein.
No license is granted, either expressly or by implication, estoppel, or otherwise under any
Symbol Technologies, Inc., intellectual property rights. An implied license only exists for
equipment, circuits, and subsystems contained in Symbol products.
Symbol, Spectrum One, and Spectrum24 are registered trademarks of Symbol Technologies,
Inc. Other product names mentioned in this manual may be trademarks or registered
trademarks of their respective companies and are hereby acknowledged.
Symbol Technologies, Inc.
One Symbol Plaza
Holtsville, New York 11742-1300
http://www.symbol.com
iv

Contents
About This Guide
Notational Conventions . . . . . . . . . . . . . . . . . . . . . . . . . . . . . . . . . . . . . . . . . . . . . . . . . . . . . . . . . . vii
Related Publications. . . . . . . . . . . . . . . . . . . . . . . . . . . . . . . . . . . . . . . . . . . . . . . . . . . . . . . . . . . . . vii
Service Information . . . . . . . . . . . . . . . . . . . . . . . . . . . . . . . . . . . . . . . . . . . . . . . . . . . . . . . . . . . . .viii
Symbol Support Center . . . . . . . . . . . . . . . . . . . . . . . . . . . . . . . . . . . . . . . . . . . . . . . . . . . . . . .viii
Warranty . . . . . . . . . . . . . . . . . . . . . . . . . . . . . . . . . . . . . . . . . . . . . . . . . . . . . . . . . . . . . . . . . . . . . . x
Warranty Coverage and Procedure . . . . . . . . . . . . . . . . . . . . . . . . . . . . . . . . . . . . . . . . . . . . . . . x
General . . . . . . . . . . . . . . . . . . . . . . . . . . . . . . . . . . . . . . . . . . . . . . . . . . . . . . . . . . . . . . . . . . . . x
Chapter 1. Introduction and Setup
Chapter Contents . . . . . . . . . . . . . . . . . . . . . . . . . . . . . . . . . . . . . . . . . . . . . . . . . . . . . . . . . . . . . . 1-1
Introduction 1-3
Audience. . . . . . . . . . . . . . . . . . . . . . . . . . . . . . . . . . . . . . . . . . . . . . . . . . . . . . . . . . . . . . . . . . . . . 1-3
Set-Up . . . . . . . . . . . . . . . . . . . . . . . . . . . . . . . . . . . . . . . . . . . . . . . . . . . . . . . . . . . . . . . . . . . . . . 1-3
Unpacking . . . . . . . . . . . . . . . . . . . . . . . . . . . . . . . . . . . . . . . . . . . . . . . . . . . . . . . . . . . . . . . 1-3
Installing the Cable . . . . . . . . . . . . . . . . . . . . . . . . . . . . . . . . . . . . . . . . . . . . . . . . . . . . . . . . . 1-4
Switching Cables. . . . . . . . . . . . . . . . . . . . . . . . . . . . . . . . . . . . . . . . . . . . . . . . . . . . . . . . . . . 1-5
Connecting to a Host . . . . . . . . . . . . . . . . . . . . . . . . . . . . . . . . . . . . . . . . . . . . . . . . . . . . . . . . . . . 1-5
RS-232C . . . . . . . . . . . . . . . . . . . . . . . . . . . . . . . . . . . . . . . . . . . . . . . . . . . . . . . . . . . . . . . . . 1-5
IBM 468X/9X. . . . . . . . . . . . . . . . . . . . . . . . . . . . . . . . . . . . . . . . . . . . . . . . . . . . . . . . . . . . . 1-8
Wand Emulation, IBM 468x, IBM 469x, OCIA, and OCR. . . . . . . . . . . . . . . . . . . . . . . . . . . 1-8
Chapter 2. Scanning
Chapter Contents . . . . . . . . . . . . . . . . . . . . . . . . . . . . . . . . . . . . . . . . . . . . . . . . . . . . . . . . . . . . . . 2-1
Introduction 2-3
Scanning with the LS 1004 . . . . . . . . . . . . . . . . . . . . . . . . . . . . . . . . . . . . . . . . . . . . . . . . . . . . . . . 2-3
Aiming . . . . . . . . . . . . . . . . . . . . . . . . . . . . . . . . . . . . . . . . . . . . . . . . . . . . . . . . . . . . . . . . . . . . . . 2-4
Scan the Entire Symbol . . . . . . . . . . . . . . . . . . . . . . . . . . . . . . . . . . . . . . . . . . . . . . . . . . . . . . 2-4
Hold at an Angle. . . . . . . . . . . . . . . . . . . . . . . . . . . . . . . . . . . . . . . . . . . . . . . . . . . . . . . . . . . 2-4
iii

LS 1004 Product Reference Guide
Chapter 3. Maintenance & Specifications
Chapter Contents. . . . . . . . . . . . . . . . . . . . . . . . . . . . . . . . . . . . . . . . . . . . . . . . . . . . . . . . . . . . . . . 3-1
Introduction 3-3
Maintaining the LS 1004 Scanner . . . . . . . . . . . . . . . . . . . . . . . . . . . . . . . . . . . . . . . . . . . . . . . . . . 3-3
Battery Box Operation . . . . . . . . . . . . . . . . . . . . . . . . . . . . . . . . . . . . . . . . . . . . . . . . . . . . . . . 3-3
Maintenance . . . . . . . . . . . . . . . . . . . . . . . . . . . . . . . . . . . . . . . . . . . . . . . . . . . . . . . . . . . . . . . . . . 3-4
Accessories. . . . . . . . . . . . . . . . . . . . . . . . . . . . . . . . . . . . . . . . . . . . . . . . . . . . . . . . . . . . . . . . . . . . 3-4
Required Accessories . . . . . . . . . . . . . . . . . . . . . . . . . . . . . . . . . . . . . . . . . . . . . . . . . . . . . . . .3-4
Optional Accessories . . . . . . . . . . . . . . . . . . . . . . . . . . . . . . . . . . . . . . . . . . . . . . . . . . . . . . . .3-4
What If... . . . . . . . . . . . . . . . . . . . . . . . . . . . . . . . . . . . . . . . . . . . . . . . . . . . . . . . . . . . . . . . . . . . . . 3-5
LS 1004 Technical Specifications. . . . . . . . . . . . . . . . . . . . . . . . . . . . . . . . . . . . . . . . . . . . . . . . . . . 3-6
LS 1004 Decode Zone . . . . . . . . . . . . . . . . . . . . . . . . . . . . . . . . . . . . . . . . . . . . . . . . . . . . . . .3-6
Chapter 4. Programming The LS 1004
Chapter Contents. . . . . . . . . . . . . . . . . . . . . . . . . . . . . . . . . . . . . . . . . . . . . . . . . . . . . . . . . . . . . . . 4-1
Introduction 4-3
RS-232 Host Type Defaults . . . . . . . . . . . . . . . . . . . . . . . . . . . . . . . . . . . . . . . . . . . . . . . . . . . . . . . 4-6
RS-232C Code ID Characters . . . . . . . . . . . . . . . . . . . . . . . . . . . . . . . . . . . . . . . . . . . . . . . . . . . . .4-7
Scanning Sequence . . . . . . . . . . . . . . . . . . . . . . . . . . . . . . . . . . . . . . . . . . . . . . . . . . . . . . . . . . . . . . 4-7
Scanning Sequence Example . . . . . . . . . . . . . . . . . . . . . . . . . . . . . . . . . . . . . . . . . . . . . . . . . . . 4-7
Errors While Scanning . . . . . . . . . . . . . . . . . . . . . . . . . . . . . . . . . . . . . . . . . . . . . . . . . . . . . . . 4-8
Parameter Menus. . . . . . . . . . . . . . . . . . . . . . . . . . . . . . . . . . . . . . . . . . . . . . . . . . . . . . . . . . . . . . . 4-9
Set Parameter Defaults . . . . . . . . . . . . . . . . . . . . . . . . . . . . . . . . . . . . . . . . . . . . . . . . . . . . . . . 4-9
Host Interface Select. . . . . . . . . . . . . . . . . . . . . . . . . . . . . . . . . . . . . . . . . . . . . . . . . . . . . . . . . 4-9
RS-232 Host Type . . . . . . . . . . . . . . . . . . . . . . . . . . . . . . . . . . . . . . . . . . . . . . . . . . . . . . . . .4-10
Power On Beep Enable/Disable. . . . . . . . . . . . . . . . . . . . . . . . . . . . . . . . . . . . . . . . . . . . . . . . 4-11
Beeper after Decode . . . . . . . . . . . . . . . . . . . . . . . . . . . . . . . . . . . . . . . . . . . . . . . . . . . . . . . . 4-11
Beeper Tone . . . . . . . . . . . . . . . . . . . . . . . . . . . . . . . . . . . . . . . . . . . . . . . . . . . . . . . . . . . . . .4-12
Beeper Volume . . . . . . . . . . . . . . . . . . . . . . . . . . . . . . . . . . . . . . . . . . . . . . . . . . . . . . . . . . . .4-12
Decode Attempt Time. . . . . . . . . . . . . . . . . . . . . . . . . . . . . . . . . . . . . . . . . . . . . . . . . . . . . . .4-13
Decode Attempt Time (cont’d) . . . . . . . . . . . . . . . . . . . . . . . . . . . . . . . . . . . . . . . . . . . . . . . . 4-14
Operating Mode. . . . . . . . . . . . . . . . . . . . . . . . . . . . . . . . . . . . . . . . . . . . . . . . . . . . . . . . . . . 4-14
Aggressive Scan Mode . . . . . . . . . . . . . . . . . . . . . . . . . . . . . . . . . . . . . . . . . . . . . . . . . . . . . .4-14
Transmit “No Decode” Message . . . . . . . . . . . . . . . . . . . . . . . . . . . . . . . . . . . . . . . . . . . . . .4-15
Decode Redundancy. . . . . . . . . . . . . . . . . . . . . . . . . . . . . . . . . . . . . . . . . . . . . . . . . . . . . . . .4-15
Code Types. . . . . . . . . . . . . . . . . . . . . . . . . . . . . . . . . . . . . . . . . . . . . . . . . . . . . . . . . . . . . . . 4-15
UPC/EAN. . . . . . . . . . . . . . . . . . . . . . . . . . . . . . . . . . . . . . . . . . . . . . . . . . . . . . . . . . . . . . . . 4-17
Code 128 . . . . . . . . . . . . . . . . . . . . . . . . . . . . . . . . . . . . . . . . . . . . . . . . . . . . . . . . . . . . . . . . 4-22
Code 39 . . . . . . . . . . . . . . . . . . . . . . . . . . . . . . . . . . . . . . . . . . . . . . . . . . . . . . . . . . . . . . . . . 4-23
Code 93 . . . . . . . . . . . . . . . . . . . . . . . . . . . . . . . . . . . . . . . . . . . . . . . . . . . . . . . . . . . . . . . . . 4-24
Interleaved 2 of 5 . . . . . . . . . . . . . . . . . . . . . . . . . . . . . . . . . . . . . . . . . . . . . . . . . . . . . . . . . . 4-24
Discrete 2 of 5 . . . . . . . . . . . . . . . . . . . . . . . . . . . . . . . . . . . . . . . . . . . . . . . . . . . . . . . . . . . . 4-27
Codabar . . . . . . . . . . . . . . . . . . . . . . . . . . . . . . . . . . . . . . . . . . . . . . . . . . . . . . . . . . . . . . . . . 4-29
iv

Contents
Data Options . . . . . . . . . . . . . . . . . . . . . . . . . . . . . . . . . . . . . . . . . . . . . . . . . . . . . . . . . . . . 4-30
RS-232C . . . . . . . . . . . . . . . . . . . . . . . . . . . . . . . . . . . . . . . . . . . . . . . . . . . . . . . . . . . . . . . . 4-34
Appendix A. ASCII Character Set
Glossary
Index
v

LS 1004 Product Reference Guide
vi

About This Guide
The LS 1004 Product Reference Guide provides general instructions for setup, programming,
operation, troubleshooting, and maintenance of the LS 1004 scanner.
Notational Conventions
The following conventions are used in this document:
!
Bullets (!) indicate:
"
action items
"
lists of alternatives
"
lists of required steps that are not necessarily sequential
!
Sequential lists (e.g., those that describe step-by-step procedures) appear as
numbered lists.
Related Publications
!
LS 1000 Series Quick Reference Guide p/n 70-17422-xx
!
LS 1000 Product Reference Guide p/n 70-17529-xx
vii

LS 1004 Product Reference Guide
Service Information
If you have a problem with your equipment, contact the Symbol Support Center for your
region. See page viii for contact information. Before calling, have the model number, serial
number, and several of your bar code symbols at hand.
Call the Support Center from a phone near the scanning equipment so that the service person
can try to talk you through your problem. If the equipment is found to be working properly
and the problem is symbol readability, the Support Center will request samples of your bar
codes for analysis at our plant.
If your problem cannot be solved over the phone, you may need to return your equipment for
servicing. If that is necessary, you will be given specific directions.
Note: Symbol Technologies is not responsible for any damages incurred
during shipment if the approved shipping container is not used.
Shipping the units improperly can possibly void the warranty. If the
original shipping container was not kept, contact Symbol to have
another sent to you.
Symbol Support Center
For service information, warranty information or technical assistance contact or call the Symbol Support Center in:
Symbol Technologies, Inc.
One Symbol Plaza
Holtsville, New York 11742-1300
1-800-653-5350
Symbol Technologies
Symbol Place
Winnersh Triangle, Berkshire RG41 5TP
United Kingdom
0800 328 2424 (Inside UK)
+44 208 945 7529 (Outside UK)
Symbol Technologies Pty. Ltd.
432 St. Kilda Road
Melbourne, Victoria 3004
1-800-672-906 (Inside Australia)
+61-3-9866-6044 (Outside Australia)
United States
United Kingdom
Australia
viii
Symbol Technologies Canada, Inc.
2540 Matheson Boulevard East
Mississauga, Ontario, Canada L4W 4Z2
905-629-7226
Symbol Technologies Asia, Inc.
230 Victoria Street #04-05
Bugis Junction Office Tower
Singapore 188024
337-6588 (Inside Singapore)
+65-337-6588 (Outside Singapore)
Symbol Technologies Austria GmbH
Prinz-Eugen Strasse 70
Suite 3
2.Haus, 5.Stock
1040 Vienna, Austria
1-505-5794 (Inside Austria)
+43-1-505-5794 (Outside Austria)
Canada
Asia/Pacific
Austria

About This Guide
Symbol Technologies AS
Gydevang 2,
DK-3450 Allerod, Denmark
7020-1718 (Inside Denmark)
+45-7020-1718 (Outside Denmark)
Oy Symbol Technologies
Kaupintie 8 A 6
FIN-00440 Helsinki, Finland
9 5407 580 (Inside Finland)
+358 9 5407 580 (Outside Finland)
Symbol Technologies GmbH
Waldstrasse 68
D-63128 Dietzenbach, Germany
6074-49020 (Inside Germany)
+49-6074-49020 (Outside Germany)
7900 Glades Road
Suite 340
Boca Raton, Florida 33434 USA
1-800-347-0178 (Inside United States)
+1-561-483-1275 (Outside United States)
Symbol Technologies
Kerkplein 2, 7051 CX
Postbus 24 7050 AA
Varsseveld, Netherlands
315-271700 (Inside Netherlands)
+31-315-271700 (Outside Netherlands)
Symbol Technologies Africa Inc.
Block B2
Rutherford Estate
1 Scott Street
Waverly 2090 Johannesburg
Republic of South Africa
11-4405668 (Inside South Africa)
+27-11-4405668 (Outside South Africa)
Symbol Technologies AB
Albygatan 109D
Solna
Sweden
84452900 (Inside Sweden)
+46 84452900 (Outside Sweden)
Denmark
Finland
Germany
Latin America Sales Support
Netherlands
South Africa
Sweden
Contact your local distributor or call
+44 208 945 7360
Symbol Technologies France
Centre d'Affaire d'Antony
3 Rue de la Renaissance
92184 Antony Cedex, France
01-40-96-52-21 (Inside France)
+33-1-40-96-52-50 (Outside France)
Symbol Technologies Italia S.R.L.
Via Cristoforo Columbo, 49
20090 Trezzano S/N Navigilo
Milano, Italy
2-484441 (Inside Italy)
+39-02-484441 (Outside Italy)
Symbol Technologies Mexico Ltd.
Torre Picasso
Boulevard Manuel Avila Camacho No 88
Lomas de Chapultepec CP 11000
Mexico City, DF, Mexico
5-520-1835 (Inside Mexico)
+52-5-520-1835 (Outside Mexico)
Symbol Technologies
Trollasveien 36
Postboks 72
1414 Trollasen, Norway
66810600 (Inside Norway)
+47-66810600 (Outside Norway)
Symbol Technologies S.A.
Edificioi la Piovera Azul
C. Peonias, No. 2 - Sexta Planta
28042 Madrid, Spain
9-1-320-39-09 (Inside Spain)
+34-9-1-320-39-09 (Outside Spain)
Europe/Mid-East Distributor Operations
France
Italy
Mexico
Norway
Spain
ix

LS 1004 Product Reference Guide
Warranty
Symbol Technologies, Inc (“Symbol”) manufactures its hardware products in accordance with industry-standard practices. Symbol
warrants that for a period of five (5) years from date of shipment, products will be free from defects in materials and workmanship.
This warranty is provided to the original owner only and is not transferable to any third party. It shall not apply to any product (i)
which has been repaired or altered unless done or approved by Symbol, (ii) which has not been maintained in accordance with any
operating or handling instructions supplied by Symbol, (iii) which has been subjected to unusual physical or electrical stress, misu se,
abuse, power shortage, negligence or accident or (iv) which has been used other than in accordance with the product operating and
handling instructions. Preventive maintenance is the responsibility of customer and is not covered under this warranty.
Wear items and accessories having a Symbol serial number, will carry a 90-day limited warranty. Non-serialized items will carry a
30-day limited warranty.
Warranty Coverage and Procedure
During the warranty period, Symbol will repair or replace defective products returned to Symbol’s manufacturing plant in the US.
For warranty service in North America, call the Symbol Support Center at 1-800-653-5350. International customers should contact
the local Symbol office or support center. If warranty service is required, Symbol will issue a Return Material Authorization Number.
Products must be shipped in the original or comparable packaging, shipping and insurance charges prepaid. Symbol will ship the
repaired or replacement product freight and insurance prepaid in North America. Shipments from the US or other locations will be
made F.O.B. Symbol’s manufacturing plant.
Symbol will use new or refurbished parts at its discretion and will own all parts removed from repaired products. Customer will pay
for the replacement product in case it does not return the replaced product to Symbol within 3 days of receipt of the replacement
product. The process for return and customer’s charges will be in accordance with Symbol’s Exchange Policy in effect at the time of
the exchange.
Customer accepts full responsibility for its software and data including the appropriate backup thereof.
Repair or replacement of a product during warranty will not extend the original warranty term.
Symbol’s Customer Service organization offers an array of service plans, such as on-site, depot, or phone support, that can be
implemented to meet customer’s special operational requirements and are available at a substantial discount during warranty period.
General
Except for the warranties stated above, Symbol disclaims all warranties, express or implied, on products furnished hereunder,
including without limitation implied warranties of merchantability and fitness for a particular purpose. The stated express warranties
are in lieu of all obligations or liabilities on part of Symbol for damages, including without limitation, special, indirect, or
consequential damages arising out of or in connection with the use or performance of the product.
Seller’s liability for damages to buyer or others resulting from the use of any product, shall in no way exceed the purchase price of
said product, except in instances of injury to persons or property.
Some states (or jurisdictions) do not allow the exclusion or limitation of incidental or consequential damages, so the proceedin g
exclusion or limitation may not apply to you.
x

Chapter 1
Introduction and Setup
Chapter Contents
Introduction . . . . . . . . . . . . . . . . . . . . . . . . . . . . . . . . . . . . . . . . . . . . . . . . . . . . . . . . . . . . . . . . . 1-3
Audience. . . . . . . . . . . . . . . . . . . . . . . . . . . . . . . . . . . . . . . . . . . . . . . . . . . . . . . . . . . . . . . . . . . . . 1-3
Set-Up . . . . . . . . . . . . . . . . . . . . . . . . . . . . . . . . . . . . . . . . . . . . . . . . . . . . . . . . . . . . . . . . . . . . . . 1-3
Unpacking . . . . . . . . . . . . . . . . . . . . . . . . . . . . . . . . . . . . . . . . . . . . . . . . . . . . . . . . . . . . . . . 1-3
Installing the Cable . . . . . . . . . . . . . . . . . . . . . . . . . . . . . . . . . . . . . . . . . . . . . . . . . . . . . . . . . 1-4
Switching Cables. . . . . . . . . . . . . . . . . . . . . . . . . . . . . . . . . . . . . . . . . . . . . . . . . . . . . . . . . . . 1-5
Connecting to a Host . . . . . . . . . . . . . . . . . . . . . . . . . . . . . . . . . . . . . . . . . . . . . . . . . . . . . . . . . . . 1-5
RS-232C . . . . . . . . . . . . . . . . . . . . . . . . . . . . . . . . . . . . . . . . . . . . . . . . . . . . . . . . . . . . . . . . . 1-5
IBM 468X/9X. . . . . . . . . . . . . . . . . . . . . . . . . . . . . . . . . . . . . . . . . . . . . . . . . . . . . . . . . . . . . 1-8
Wand Emulation, IBM 468x, IBM 469x, OCIA, and OCR. . . . . . . . . . . . . . . . . . . . . . . . . . . 1-8
1-1

LS 1004 Scanner Product Reference Guide
1-2

Introduction and Setup
Introduction
Symbol Technologies Inc., the world leader in hand-held laser scanning now offers 21st
century technology, while maintaining compatibility with today’s existing systems. The LS
1000 Series of hand-held laser scanners offers good performance in retail and light industrial
applications. The ergonomic design ensures comfortable use for extended periods of time.
The LS 1004 hand-held scanner is based on the Visible Laser Diode (VLD). This state of the
art technology gives the scanner a wider decode zone, greater depth of field, and a visible scan
beam. This model reads color bar codes and symbols printed on all substrates. See the LS
1004 Decode Zone on page 3-6.
The LS 1004 is compatible with:
!
RS 232C asynchronous terminals
!
SynapseTM “Smart Cables”, which allow you to connect to:
" Wand Emulation terminals
" IBM 4683/4, 4693/4 series of terminals
" All leading OCIA terminals, including NCR, Nixdorf, and ICL terminals.
" Dual RS-232 hosts
" Popular OCR terminals, such as Fujitsu and ICL.
The LS 1004 scans automatically at the rate of 36 scans per second. For decode capability,
see Technical Specifications beginning on page 3-6.
Audience
The intended audience for this manual is personnel performing installation/setup and
programming of LS 1004 scanners.
Set-Up
Unpacking
Remove the scanner from its packing and inspect it for damage. If the scanner was damaged
in transit, call the Symbol Support Center at one of the telephone numbers listed in the front
of this manual. KEEP THE PACKING. It is the approved shipping container and should be
used if you ever need to return your equipment for servicing.
1-3
LS 1004 Scanner Product Reference Guide
Installing the Cable
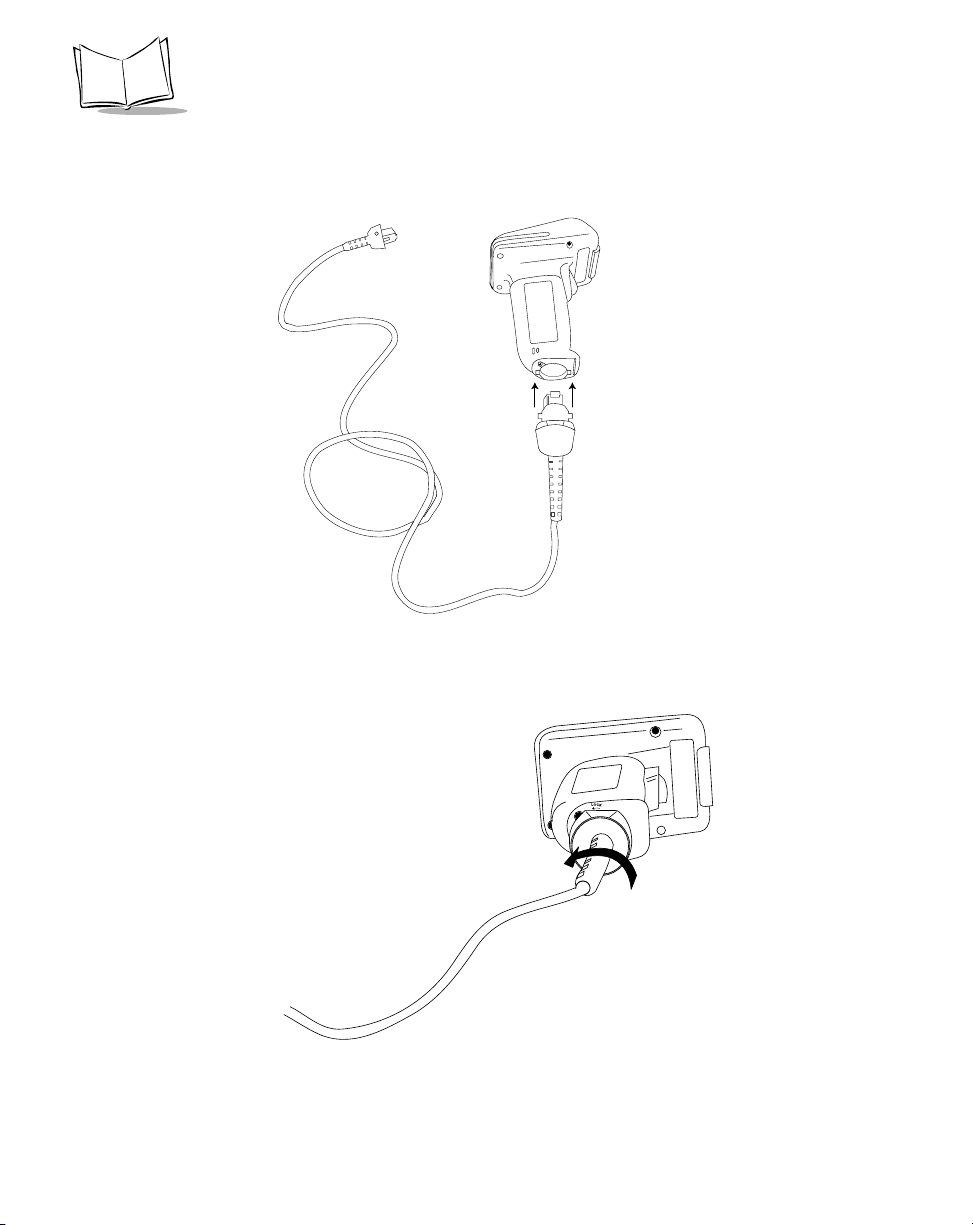
1. Insert the cable into the receptacle on the bottom of the scanner, as shown below:
Figure 1-1. Installing the Cable
2. Twist the cable to the left to lock in place, as shown below:
Figure 1-2. Installing the Cable: Twistlock Mechanism
1-4

Introduction and Setup
Switching Cables
Different cables are required for different hosts. To change the scanner cable:
1. “Unlock” the cable by twisting to the right.
2. Pull the cable out of the receptacle on the bottom of the scanner.
Figure 1-3. Removing the Cable
3. Insert a new cable in the receptacle.
4. Twist to the left to lock the new cable in place.
Connecting to a Host
With some terminal types, the LS 100x is unable to answer host terminal polls until the
appropriate host type is selected. This may result in an error message generated by the host.
To correct this situation, select proper parameter values and initialize the host terminal. See
Chapter 4 for more information.
RS-232C
For external power operation with Synapse “Smart Cable”
1. Plug the Synapse adapter cable into the scanner .
2. Connect the Synapse “Smart Cable” with the host connector.
3. If required, connect the power supply to the input receptacle located on the Synapse
cable.
1-5
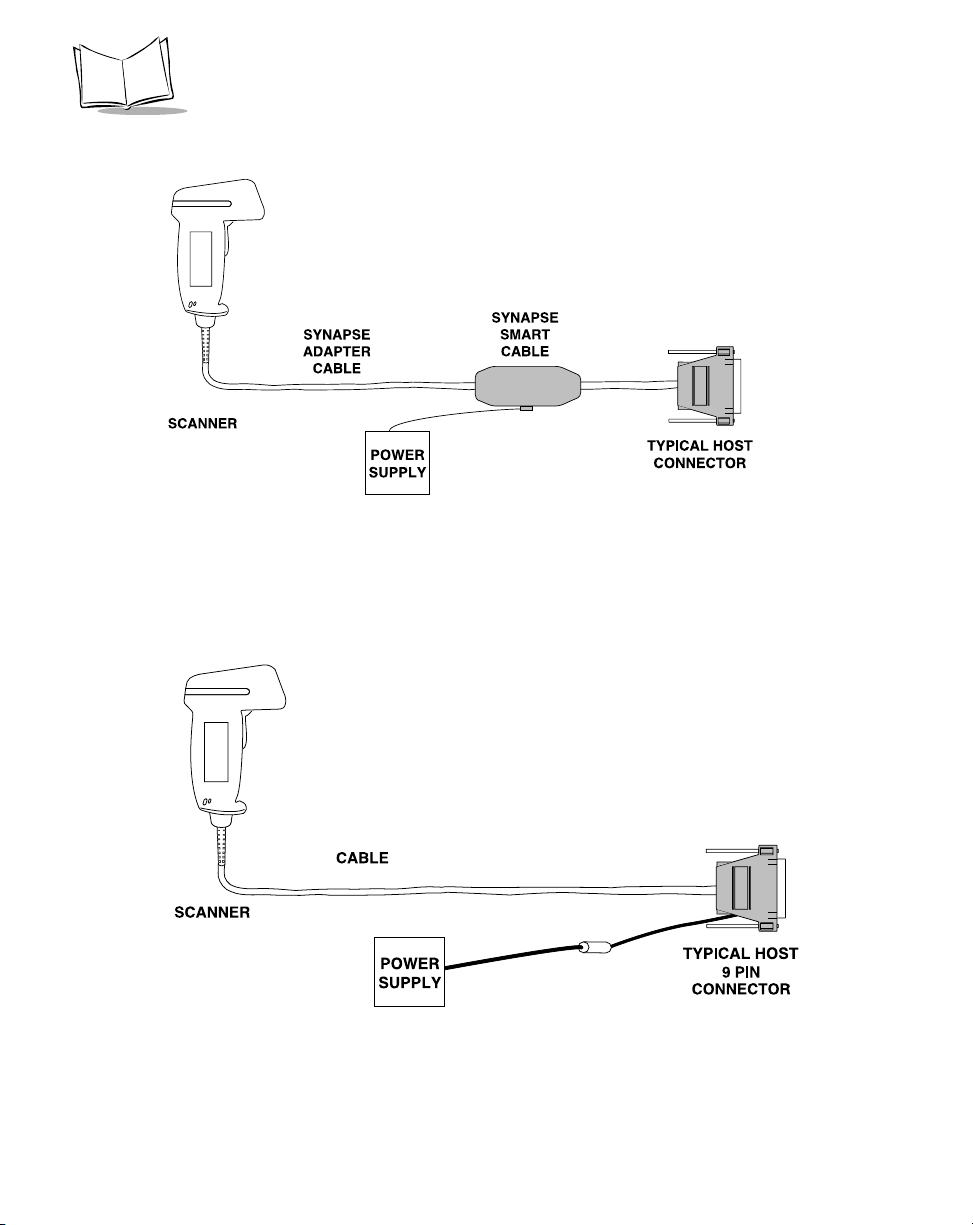
LS 1004 Scanner Product Reference Guide
Figure 1-4. External Power Connection using Synapse Cable
For RS-232C Operation External Power via Flying Lead Connector
1. Plug the cable into the scanner.
2. Plug the Power Supply into the receptacle on the Flying Lead connector.
Figure 1-5. RS-232C External Power Connection: Flying Lead Connector to a 9-pin
Host Connector
1-6

Introduction and Setup
For External Power Operation with 25-pin Host Connector
1. Plug the cable into the scanner.
2. Plug the Power Supply into the receptacle on the side of the 25-pin host connector.
Figure 1-6. RS-232C External Power Connection: 25-pin Host Connector
For Battery Operation:
1. Insert a 9-volt battery into the battery box. See the Battery Box Operation section
on page 3-3.
2. Plug the scanner's 9-pin connector at the end of the cord into one end of the battery
box.
3. An output cable from the battery box connects the LS 1004 to the RS-232C input
device. Connect one end of this cable to the battery box and the other to the
appropriate port on the host device.
1-7
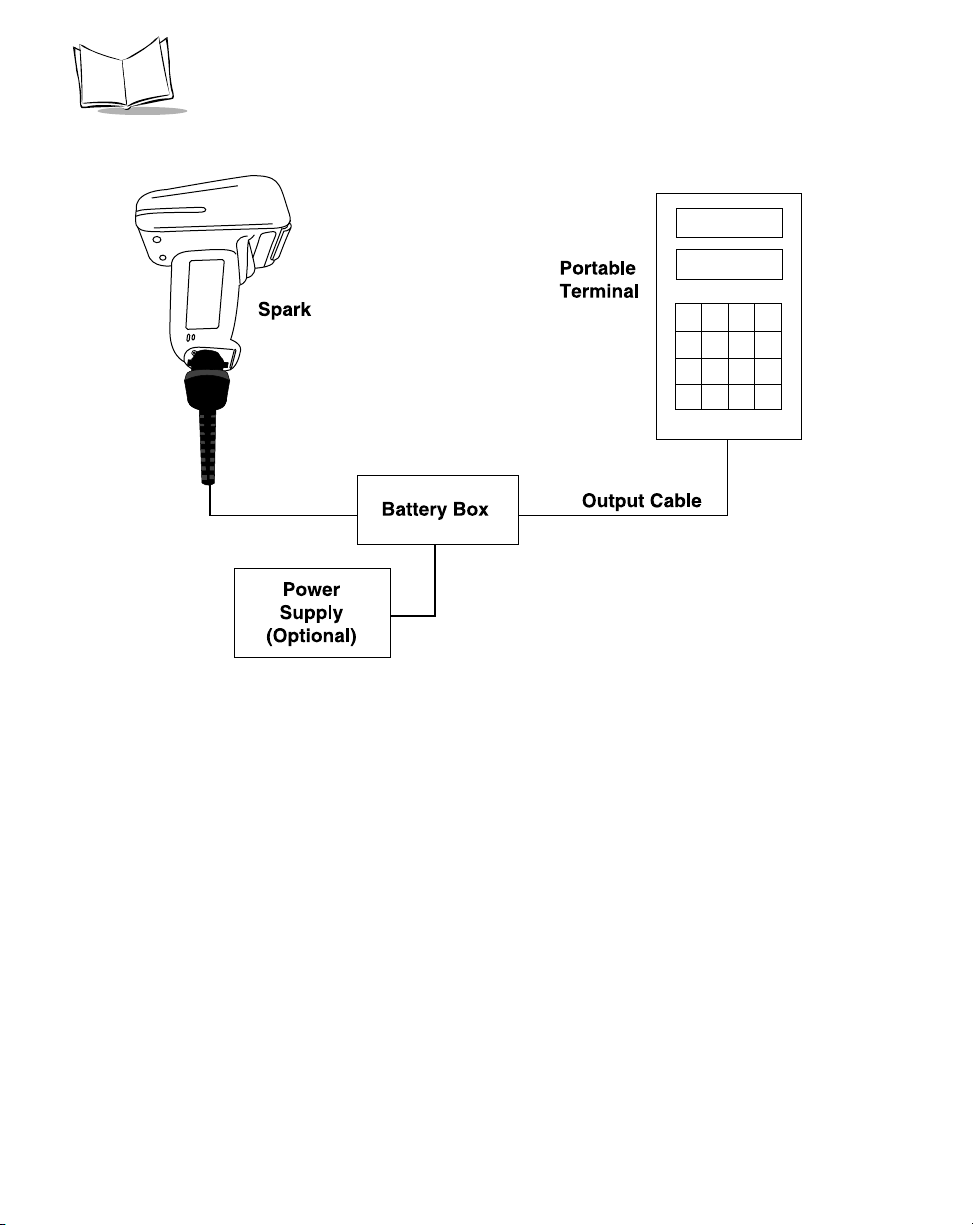
LS 1004 Scanner Product Reference Guide
Figure 1-7. RS-232C Operation
IBM 468X/9X
Plug the SDL modular connector at the end of the selected Synapse “Smart” cable into
the appropriate port (5B, 9B, 9C, 9E, or 17). Check that the connection is secure. To
install an LS 1004 on an IBM 468X/469X host:
1. Connect a synapse adapter cable to the scanner, using the procedure described in
“Installing the Cable” on page 1-4.
2. Plug the other end of the adaptor cable into the synapse cable’s female connector.
3. Scan the appropriate port address (see your Synapse Guide for details).
Wand Emulation, IBM 468x, IBM 469x, OCIA, and OCR
A Synapse Adapter Cable is required when connecting the LS 1004 to any of these hosts using
Synapse. See the instructions packed with the appropriate Synapse cable.
1-8

Chapter 2
Scanning
Chapter Contents
Introduction . . . . . . . . . . . . . . . . . . . . . . . . . . . . . . . . . . . . . . . . . . . . . . . . . . . . . . . . . . . . . . . . . 2-3
Scanning with the LS1004 . . . . . . . . . . . . . . . . . . . . . . . . . . . . . . . . . . . . . . . . . . . . . . . . . . . . . . . 2-3
Aiming . . . . . . . . . . . . . . . . . . . . . . . . . . . . . . . . . . . . . . . . . . . . . . . . . . . . . . . . . . . . . . . . . . . . . . 2-4
Scan the Entire Symbol . . . . . . . . . . . . . . . . . . . . . . . . . . . . . . . . . . . . . . . . . . . . . . . . . . . . . . 2-4
Hold at an Angle. . . . . . . . . . . . . . . . . . . . . . . . . . . . . . . . . . . . . . . . . . . . . . . . . . . . . . . . . . . 2-4
2-1

LS 1004 Product Reference Guide
2-2

Scanning
Introduction
This chapter covers the techniques involved in scanning bar codes. Included are specific
instructions on how to hold the scanner at the appropriate angle to ensure an accurate
decode.
Scanning with the LS 1004
1. Make sure all connections are secure.
2. Aim the scanner away from you and press the trigger. When you press the trigger, the
scanning beam is energized for approximately 1 second (default).
3. Make sure the symbol you want to scan is within the scanning range. See the LS 1004
Decode Zone diagram on page 3-6.
Aim and press the trigger. On the LS 1004, if you use the scanner in default Low
Power operating mode, the DECODE LED remains on until power down (maximum
of 1 second). If the unit is programmed for Continuous power operating mode, the
DECODE LED stays on until the next trigger pull.
The scanner has read the symbol when:
!
You hear a short, high tone beep (if the beeper is enabled).
!
The DECODE LED lights.
2-3
LS 1004 Product Reference Guide
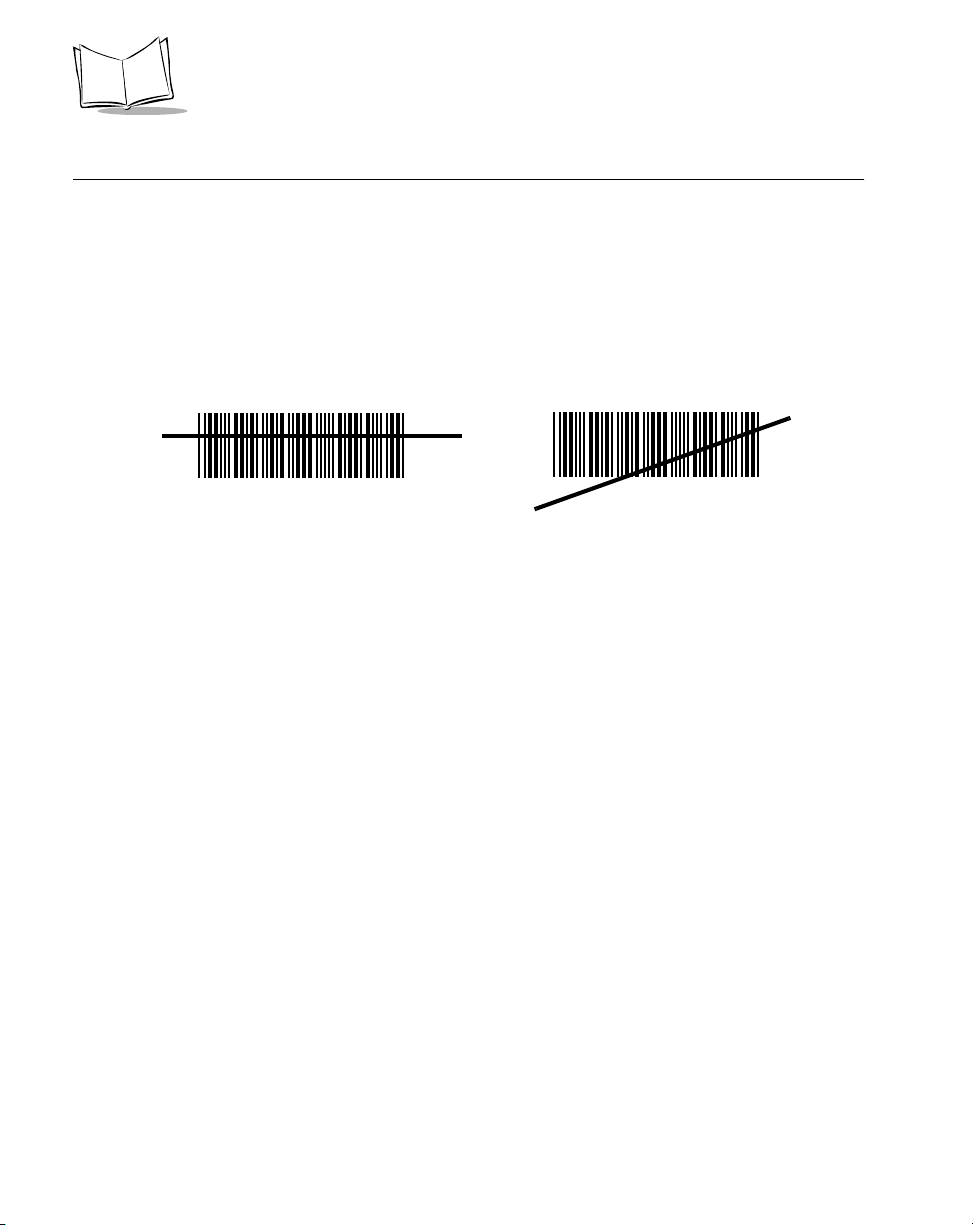
Aiming
Scan the Entire Symbol
!
Your scan beam must cross every bar and space on the symbol.
!
The larger the symbol, the farther away you should hold the scanner.
!
Hold the scanner closer for symbols with bars that are close together.
!
A short, high tone beep indicates a good decode.
RIGHT
012345
WRONG
012345
Hold at an Angle
Do not hold the scanner directly over the bar code. Laser light reflecting directly back into
the scanner from the bar code is known as specular reflection. This strong light can “blind”
the scanner and make decoding difficult. The area where specular reflection occurs is known
as a “dead zone”.
2-4
Scanning
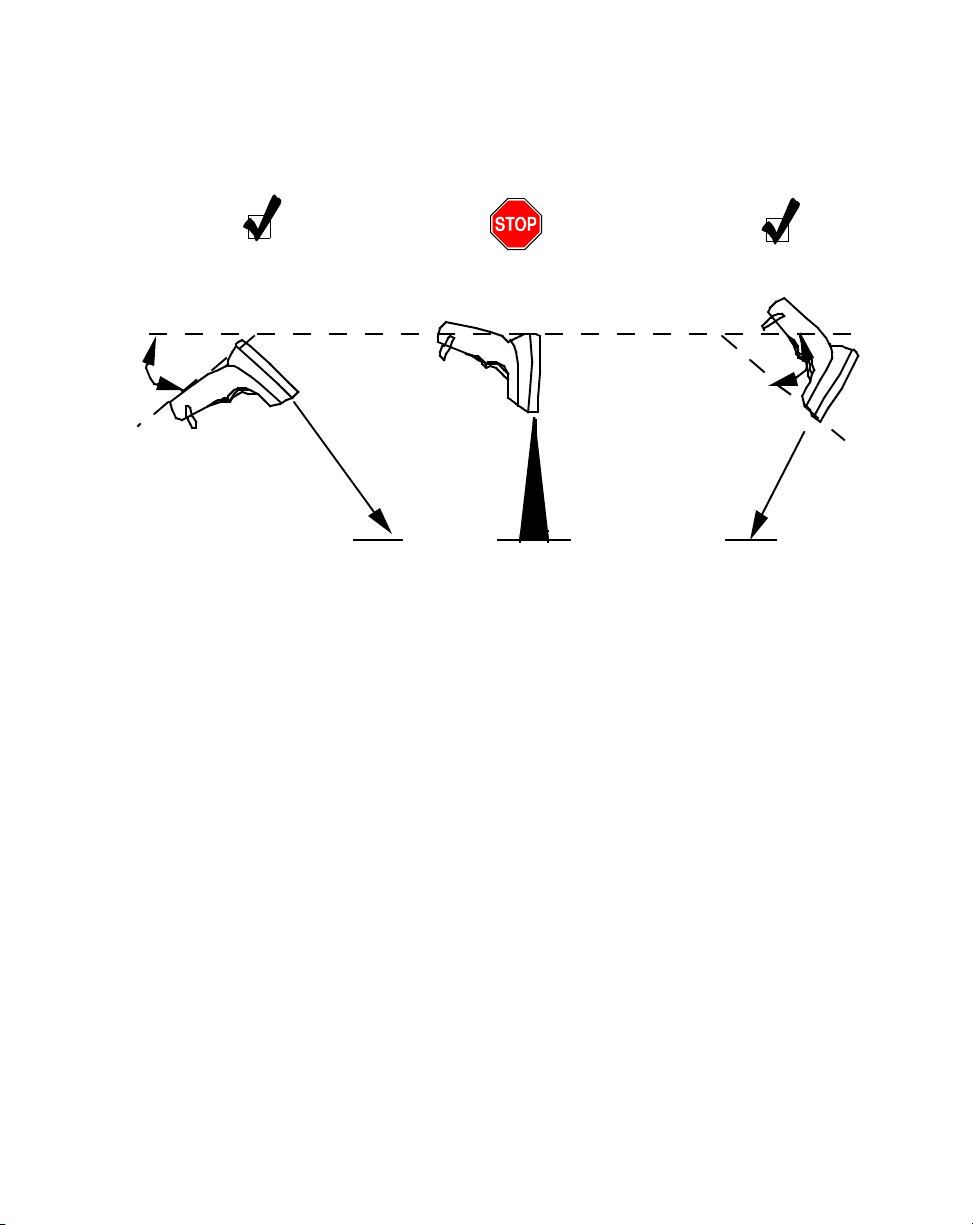
You can tilt the scanner up to 65° forward or back and achieve a successful decode. Simple
practice quickly shows what tolerances to work within.
1. Successful Scanning.
65° 65°
Scan
Beam
2. Possible Specular Reflection.
Bar Code
Shaded area represents
dead zone (±2°)
Bar Code Bar Code
3. Successful Scanning.
Figure 2-1. Appropriate Angles for Scanning
Scan
Beam
2-5

LS 1004 Product Reference Guide
2-6

Chapter 3
Maintenance & Specifications
Chapter Contents
Introduction . . . . . . . . . . . . . . . . . . . . . . . . . . . . . . . . . . . . . . . . . . . . . . . . . . . . . . . . . . . . . . . . . 3-3
Maintaining the LS 1004 Scanner. . . . . . . . . . . . . . . . . . . . . . . . . . . . . . . . . . . . . . . . . . . . . . . . . . 3-3
Battery Box Operation . . . . . . . . . . . . . . . . . . . . . . . . . . . . . . . . . . . . . . . . . . . . . . . . . . . . . . 3-3
Maintenance. . . . . . . . . . . . . . . . . . . . . . . . . . . . . . . . . . . . . . . . . . . . . . . . . . . . . . . . . . . . . . . . . . 3-4
Accessories . . . . . . . . . . . . . . . . . . . . . . . . . . . . . . . . . . . . . . . . . . . . . . . . . . . . . . . . . . . . . . . . . . . 3-4
Required Accessories. . . . . . . . . . . . . . . . . . . . . . . . . . . . . . . . . . . . . . . . . . . . . . . . . . . . . . . . 3-4
Optional Accessories. . . . . . . . . . . . . . . . . . . . . . . . . . . . . . . . . . . . . . . . . . . . . . . . . . . . . . . . 3-4
What If... . . . . . . . . . . . . . . . . . . . . . . . . . . . . . . . . . . . . . . . . . . . . . . . . . . . . . . . . . . . . . . . . . . . . 3-5
LS 1004 Technical Specifications . . . . . . . . . . . . . . . . . . . . . . . . . . . . . . . . . . . . . . . . . . . . . . . . . . 3-6
LS 1004 Decode Zone. . . . . . . . . . . . . . . . . . . . . . . . . . . . . . . . . . . . . . . . . . . . . . . . . . . . . . . 3-6
3-1

LS 1004 Product Reference Guide
3-2

Maintenance and Specifications
Introduction
This chapter covers the suggested maintenance of the LS 1004 scanner, as well as the technical
specifications, available accessories, pinouts, and beeper definitions.
Maintaining the LS 1004 Scanner
Battery Box Operation
When using the LS 1000 Series with a battery box, you can use either an alkaline battery
(recommended), or a nickel-cadmium rechargeable battery. Low power is signalled by 4
short, high-tone beeps, coupled with scanning interruptions. If this occurs, change or
recharge the battery as soon as possible. For battery box operation:
1. Insert a 9-volt battery into the battery box.
2. Plug the scanner’s 9-pin connector at the end of the coil cord into the end of the
battery box.
3. An output cable from the battery box connects the LS 1004 to the host device.
Connect one end of this cable to the battery box and the other to the appropriate
port on the host device.
Note: Not all applications require a power supply or battery box. The
output cable depends on the wand being replaced.
Changing the Battery
1. Disconnect the battery box.
2. To open the battery box, push up on the flanges at one end of the pack.
3. Remove the old battery.
4. Insert the new or recharged 9-volt battery into the battery box. Match the
positive (+) and negative (-) terminals on the battery with the corresponding
terminals in the battery box.
3-3
 Loading...