


ZebraNet
®
Wireless Print Server
User Guide
for firmware versions V50.14 and earlier
and V60.14 and earlier

© 2006 ZIH Corp.
The copyrights in this manual and the label print engine described therein are
owned by Zebra Technologies Corporation. Unauthorized reproduction of this
manual or the software in the label print engine may result in imprisonment of
up to one year and fines of up to $10,000 (17 U.S.C.506). Copyright violators
may be subject to civil liability.
This product may contain ZPL®, ZPL II®, and ZebraLink™ programs;
Element Energy Equalizer® Circuit; E3®; and AGFA fonts. Software © ZIH
Corp. All rights reserved worldwide.
ZebraLink and all product names and numbers are trademarks, and Zebra, the
Zebra logo, ZPL, ZPL II, Element Energy Equalizer Circuit, and E3 Circuit are
registered trademarks of ZIH Corp. All rights reserved worldwide.
CG Triumvirate is a trademark of AGFA Monotype Corporation. All rights
reserved worldwide. CG Triumvirate™ font © AGFA Monotype Corporation.
Intellifont® portion © AGFA Monotype Corporation. All rights reserved
worldwide. UFST is a registered trademark of AGFA Monotype Corporation.
All rights reserved worldwide.
All other brand names, product names, or trademarks belong to their respective
holders.
Part Number: 13422L-003 Rev. A

Contents
Preface . . . . . . . . . . . . . . . . . . . . . . . . . . . . . . . . . . . . . . . . . . . . . . . . . . . . . . . . . . vii
Contacts . . . . . . . . . . . . . . . . . . . . . . . . . . . . . . . . . . . . . . . . . . . . . . . . . . . . . . . . . . . . . . viii
Web Site. . . . . . . . . . . . . . . . . . . . . . . . . . . . . . . . . . . . . . . . . . . . . . . . . . . . . . . . . . . viii
The Americas . . . . . . . . . . . . . . . . . . . . . . . . . . . . . . . . . . . . . . . . . . . . . . . . . . . . . . . viii
Europe, Africa, Middle East, and India . . . . . . . . . . . . . . . . . . . . . . . . . . . . . . . . . . . . viii
Asia Pacific. . . . . . . . . . . . . . . . . . . . . . . . . . . . . . . . . . . . . . . . . . . . . . . . . . . . . . . . . viii
Document Conventions. . . . . . . . . . . . . . . . . . . . . . . . . . . . . . . . . . . . . . . . . . . . . . . . . . . . ix
1 • Introduction . . . . . . . . . . . . . . . . . . . . . . . . . . . . . . . . . . . . . . . . . . . . . . . . . . . . 1
Printer Compatibility . . . . . . . . . . . . . . . . . . . . . . . . . . . . . . . . . . . . . . . . . . . . . . . . . . . . . . 2
Connecting to a Wireless Network . . . . . . . . . . . . . . . . . . . . . . . . . . . . . . . . . . . . . . . . . . . 2
Third-Party Components. . . . . . . . . . . . . . . . . . . . . . . . . . . . . . . . . . . . . . . . . . . . . . . . . . . 3
Supported Wireless Cards . . . . . . . . . . . . . . . . . . . . . . . . . . . . . . . . . . . . . . . . . . . . . . 3
Access Point. . . . . . . . . . . . . . . . . . . . . . . . . . . . . . . . . . . . . . . . . . . . . . . . . . . . . . . . . 4
Interaction between Wired and Wireless Print Servers. . . . . . . . . . . . . . . . . . . . . . . . . . . . 5
Check for Wired Print Server . . . . . . . . . . . . . . . . . . . . . . . . . . . . . . . . . . . . . . . . . . . . 5
IP Addresses . . . . . . . . . . . . . . . . . . . . . . . . . . . . . . . . . . . . . . . . . . . . . . . . . . . . . . . . 6
View Printer Web Pages. . . . . . . . . . . . . . . . . . . . . . . . . . . . . . . . . . . . . . . . . . . . . . . . 6
2 • Configuration . . . . . . . . . . . . . . . . . . . . . . . . . . . . . . . . . . . . . . . . . . . . . . . . . . . 7
Overview. . . . . . . . . . . . . . . . . . . . . . . . . . . . . . . . . . . . . . . . . . . . . . . . . . . . . . . . . . . . . . . 8
Configure Using the SetWLAN Utility . . . . . . . . . . . . . . . . . . . . . . . . . . . . . . . . . . . . . . . . . 9
Install a Wireless or Compact Flash Wireless Card . . . . . . . . . . . . . . . . . . . . . . . . . . . . . 15
Wireless Card. . . . . . . . . . . . . . . . . . . . . . . . . . . . . . . . . . . . . . . . . . . . . . . . . . . . . . . 15
Compact Flash Wireless Card . . . . . . . . . . . . . . . . . . . . . . . . . . . . . . . . . . . . . . . . . . 17
10/24/06 Wireless Print Server User Guide 13422L-003 Rev. A

Contents
iv
3 • Wireless Status and Settings . . . . . . . . . . . . . . . . . . . . . . . . . . . . . . . . . . . . . 19
Overview. . . . . . . . . . . . . . . . . . . . . . . . . . . . . . . . . . . . . . . . . . . . . . . . . . . . . . . . . . . . . . 20
View Wireless Status through the Control Panel . . . . . . . . . . . . . . . . . . . . . . . . . . . . . . . 20
Link Status Indicator . . . . . . . . . . . . . . . . . . . . . . . . . . . . . . . . . . . . . . . . . . . . . . . . . . 20
Wireless Signal Indicators . . . . . . . . . . . . . . . . . . . . . . . . . . . . . . . . . . . . . . . . . . . . . 21
Poor Signal Setting. . . . . . . . . . . . . . . . . . . . . . . . . . . . . . . . . . . . . . . . . . . . . . . . . . . 21
Print a Network Configuration Label. . . . . . . . . . . . . . . . . . . . . . . . . . . . . . . . . . . . . . . . . 22
View or Change Control Panel Parameters for the Wireless Print Server . . . . . . . . . . . . 23
Parameters for Zebra Printers Other Than the S4M. . . . . . . . . . . . . . . . . . . . . . . . . . 23
Parameters for the S4M Printer . . . . . . . . . . . . . . . . . . . . . . . . . . . . . . . . . . . . . . . . . 26
Printer Web Pages . . . . . . . . . . . . . . . . . . . . . . . . . . . . . . . . . . . . . . . . . . . . . . . . . . . . . . 28
Return Network Parameters to Defaults. . . . . . . . . . . . . . . . . . . . . . . . . . . . . . . . . . . . . . 34
4 • ZPL Commands for the Wireless Print Server . . . . . . . . . . . . . . . . . . . . . . . 35
^NB Search for Wired Print Server during Network Boot . . . . . . . . . . . . . . . . . . . . . . . . 36
^NN Set SNMP . . . . . . . . . . . . . . . . . . . . . . . . . . . . . . . . . . . . . . . . . . . . . . . . . . . . . . . 37
^NP Set Primary/Secondary Device . . . . . . . . . . . . . . . . . . . . . . . . . . . . . . . . . . . . . . . 38
^NS Change Wired Networking Settings . . . . . . . . . . . . . . . . . . . . . . . . . . . . . . . . . . . . 39
^NT Set SMTP . . . . . . . . . . . . . . . . . . . . . . . . . . . . . . . . . . . . . . . . . . . . . . . . . . . . . . . . 40
^NW Set Web Authentication Timeout Value . . . . . . . . . . . . . . . . . . . . . . . . . . . . . . . . . 41
^WA Set Antenna Parameters . . . . . . . . . . . . . . . . . . . . . . . . . . . . . . . . . . . . . . . . . . . . 42
^WE Set Wireless Encryption Values . . . . . . . . . . . . . . . . . . . . . . . . . . . . . . . . . . . . . . . 43
^WI Change Wireless Network Settings . . . . . . . . . . . . . . . . . . . . . . . . . . . . . . . . . . . . 45
^WL Set LEAP Parameters . . . . . . . . . . . . . . . . . . . . . . . . . . . . . . . . . . . . . . . . . . . . . . 46
~WL Print Network Configuration Label . . . . . . . . . . . . . . . . . . . . . . . . . . . . . . . . . . . . . 47
^WP Set Wireless Password . . . . . . . . . . . . . . . . . . . . . . . . . . . . . . . . . . . . . . . . . . . . . 48
^WR Set Transmit Rate . . . . . . . . . . . . . . . . . . . . . . . . . . . . . . . . . . . . . . . . . . . . . . . . . 49
~WR Reset Wireless Card . . . . . . . . . . . . . . . . . . . . . . . . . . . . . . . . . . . . . . . . . . . . . . . 50
^WS Set Wireless Card Values . . . . . . . . . . . . . . . . . . . . . . . . . . . . . . . . . . . . . . . . . . . 51
5 • Troubleshooting . . . . . . . . . . . . . . . . . . . . . . . . . . . . . . . . . . . . . . . . . . . . . . . 53
General Issues . . . . . . . . . . . . . . . . . . . . . . . . . . . . . . . . . . . . . . . . . . . . . . . . . . . . . . . . . 54
Encryption Issues . . . . . . . . . . . . . . . . . . . . . . . . . . . . . . . . . . . . . . . . . . . . . . . . . . . . . . . 55
IP Issues. . . . . . . . . . . . . . . . . . . . . . . . . . . . . . . . . . . . . . . . . . . . . . . . . . . . . . . . . . . . . . 56
13422L-003 Rev. A Wireless Print Server User Guide 10/24/06

Contents
A • WebView Web Pages . . . . . . . . . . . . . . . . . . . . . . . . . . . . . . . . . . . . . . . . . . . 57
Home Page. . . . . . . . . . . . . . . . . . . . . . . . . . . . . . . . . . . . . . . . . . . . . . . . . . . . . . . . . . . . 58
View Printer Configuration . . . . . . . . . . . . . . . . . . . . . . . . . . . . . . . . . . . . . . . . . . . . . . . . 60
View and Modify Printer Settings . . . . . . . . . . . . . . . . . . . . . . . . . . . . . . . . . . . . . . . . . . . 61
Network Configuration Screens . . . . . . . . . . . . . . . . . . . . . . . . . . . . . . . . . . . . . . . . . 67
Directory Listing . . . . . . . . . . . . . . . . . . . . . . . . . . . . . . . . . . . . . . . . . . . . . . . . . . . . . . . . 71
Alert Setup . . . . . . . . . . . . . . . . . . . . . . . . . . . . . . . . . . . . . . . . . . . . . . . . . . . . . . . . . . . . 75
Establishing E-Mail Alert Messaging . . . . . . . . . . . . . . . . . . . . . . . . . . . . . . . . . . . . . 76
Printer Controls. . . . . . . . . . . . . . . . . . . . . . . . . . . . . . . . . . . . . . . . . . . . . . . . . . . . . . . . . 78
Print Server Settings. . . . . . . . . . . . . . . . . . . . . . . . . . . . . . . . . . . . . . . . . . . . . . . . . . . . . 80
Proprietary Statement . . . . . . . . . . . . . . . . . . . . . . . . . . . . . . . . . . . . . . . . . . . . . . 81
Index . . . . . . . . . . . . . . . . . . . . . . . . . . . . . . . . . . . . . . . . . . . . . . . . . . . . . . . . . . . . 83
v
10/24/06 Wireless Print Server User Guide 13422L-003 Rev. A

vi
Contents
Notes • ___________________________________________________________________
__________________________________________________________________________
__________________________________________________________________________
__________________________________________________________________________
__________________________________________________________________________
__________________________________________________________________________
__________________________________________________________________________
__________________________________________________________________________
__________________________________________________________________________
__________________________________________________________________________
13422L-003 Rev. A Wireless Print Server User Guide 10/24/06

Preface
This section provides you with contact information, documen t struc ture and organization, and
additional reference documents.
Contents
Contacts. . . . . . . . . . . . . . . . . . . . . . . . . . . . . . . . . . . . . . . . . . . . . . . . . . . . . . . . . . . . . . viii
Web Site . . . . . . . . . . . . . . . . . . . . . . . . . . . . . . . . . . . . . . . . . . . . . . . . . . . . . . . . . . . viii
The Americas. . . . . . . . . . . . . . . . . . . . . . . . . . . . . . . . . . . . . . . . . . . . . . . . . . . . . . . . viii
Europe, Africa, Middle East, and India. . . . . . . . . . . . . . . . . . . . . . . . . . . . . . . . . . . . . viii
Asia Pacific . . . . . . . . . . . . . . . . . . . . . . . . . . . . . . . . . . . . . . . . . . . . . . . . . . . . . . . . . viii
Document Conventions . . . . . . . . . . . . . . . . . . . . . . . . . . . . . . . . . . . . . . . . . . . . . . . . . . . ix
10/24/06 Wireless Print Server User Guide 13422L-003 Rev. A

Preface
viii
Contacts
Contacts
You can contact Zebra Technologies at the following.
Web Site
http://www.zebra.com
The Americas
Regional Headquarters Technical Support Customer Service Dept.
Zebra Technologies International,
LLC
333 Corporate Woods Parkway
Vernon Hills, Illinois 60061.3109
U.S.A
T: +1 847 793 2600
Toll-f ree +1 800 423 0422
F: +1 847 913 8766
T: +1 847 913 2259
F: +1 847 913 2578
Hardware: hwtsamerica@zebra.com
Software: swtsamerica@zebra.com
For printers, parts, media, and ribbon,
please call your distributor, or
contact us.
T: +1 866 230 9494
E: VHCustServ@zebra.com
Europe, Africa, Middle East, and India
Regional Headquarters Technical Support Internal Sales Dept.
Zebra Technologies Europe Limited
Zebra House
The Valley Centre, Gordon Road
High Wycombe
Buckinghamshire HP13 6EQ, UK
T: +44 (0)1494 472872
F: +44 (0) 1494 450103
T: +44 (0) 1494 768298
F: +44 (0) 1494 768210
Germany: Tsgermany@zebra.com
France: Tsfrance@zebra.com
Spain/Portugal: Tsspain@zebra.com
All other areas: Tseurope@zebra.com
Asia Pacific
Regional Headquarters Technical Support Customer Service
Zebra Technologies Asia Pacific, LLC
16 New Industrial Road
#05-03 Hudson TechnoCentre
Singapore 536204
T: +65 6858 0722
F: +65 6885 0838
T: +65 6858 0722
F: +65 6885 0838
E: tsasiapacific@zebra.com
For printers, parts, media, and ribbon,
please call your distributor, or
contact us.
T: +44 (0) 1494 768316
F: +44 (0) 1494 768244
E: mseurope@zebra.com
For printers, parts, media, and ribbon,
please call your distributor, or
contact us.
T: +65 6858 0722
F: +65 6885 0837
13422L-003 Rev. A Wireless Print Server User Guide 10/24/06

Document Conventions
The following conventions may be used throughout this document to convey certain
information:
Alternate Color (online only) Cross-references contain hot links to other sections in this
guide. If you are viewing this guide online in
blue text) to jump directly to its location.
(
Command Line Examples All command line examples appear in Courier New font.
For example, you would type the following to get to the Post-Install scripts in the
directory:
Ztools
Files and Directories All file names and directories appear in Courier New font. For
example, the
Cautions, Important, Note, and Example
Zebra<version number>.tar file and the /root directory.
Preface
Document Conventions
.pdf format, you can click the cross-reference
bin
ix
Caution • Warns you of the potential for electrostatic discharge.
Caution • Warns you of a potential electric shock situation.
Caution • Warns you of a situation where excessive heat could cause a burn.
Caution • Advises you that failure to take or avoid a specific action could result in physical
harm to you.
Caution • (no icon) Advises you that failure to take or avoid a specific action could result in
physical harm to the hardware.
Important • Advises you of informatio n that is essential to complete a task.
Note • Indicates neutral or positive information that emphasizes or supplements important
points of the main text.
Example • Provides an example, often a scenario, to better clarify a section of text.
Tools • Tells you what tools you need to complete a given task.
10/24/06 Wireless Print Server User Guide 13422L-003 Rev. A
Preface
x
Document Conventions
Illustration Callouts Callouts are used when an illustration contains information that needs
to be labeled and described. A table that contains the labels and descriptions follows the
graphic. Figure 1 provides an example.
Figure 1 • Sample Graphic with Callouts
21
Wireless card
1
Notch
2
13422L-003 Rev. A Wireless Print Server User Guide 10/24/06

Introduction
This chapter provides an overview of the ZebraNet Wireless Print Server.
1
Contents
Printer Compatibility. . . . . . . . . . . . . . . . . . . . . . . . . . . . . . . . . . . . . . . . . . . . . . . . . . . . . . 2
Connecting to a Wireless Network. . . . . . . . . . . . . . . . . . . . . . . . . . . . . . . . . . . . . . . . . . . 2
Third-Party Components . . . . . . . . . . . . . . . . . . . . . . . . . . . . . . . . . . . . . . . . . . . . . . . . . . 3
Supported Wireless Cards. . . . . . . . . . . . . . . . . . . . . . . . . . . . . . . . . . . . . . . . . . . . . . . 3
Access Point . . . . . . . . . . . . . . . . . . . . . . . . . . . . . . . . . . . . . . . . . . . . . . . . . . . . . . . . . 4
Interaction between Wired and Wireless Print Servers . . . . . . . . . . . . . . . . . . . . . . . . . . . 5
Check for Wired Print Server. . . . . . . . . . . . . . . . . . . . . . . . . . . . . . . . . . . . . . . . . . . . . 5
IP Addresses . . . . . . . . . . . . . . . . . . . . . . . . . . . . . . . . . . . . . . . . . . . . . . . . . . . . . . . . . 6
View Printer Web Pages . . . . . . . . . . . . . . . . . . . . . . . . . . . . . . . . . . . . . . . . . . . . . . . . 6
10/24/06 Wireless Print Server User Guide 13422L-003 Rev. A
Introduction
2
Printer Compatibility
Printer Compatibility
This version of the ZebraNet Wireless Print Server is designed for the following
printers/print engines. Future releases will support additional Zebra printers.
• XiIIIPlus
•RXi
•105SL with serial number greater than 6400356
Important • Do not install the wireless PCMCIA board on a 105SL printer with a serial
number less than 6400357.
• Z4Mplus/Z6Mplus
• PAX4
• S4M operating in ZPL mode
A special Personal Computer Memory Card International Association (PCMCIA) board must
be installed inside the printer for the wireless feature to work. Contact your authorized Zebra
reseller for more information.
Connecting to a Wireless Network
The ZebraNet Wireless Print Server is an Ethernet c onnecti vity opt ion for you r printe r. Rather
than being connected to a wired Local Area Network (LAN) with physical wires, the printer
communicates with a wireless LAN (WLAN) through a wireless card.
Figure 2 shows the network architecture of a typical WLAN setup.
Figure 2 • WLAN Setup with ZebraNet Wireless Print Servers
Computer (stand-alone or laptop)
1
Access point
2
Printer configured for Wireless Print Server operation and equipped with
3
compatible wireless card
21 3
13422L-003 Rev. A Wireless Print Server User Guide 10/24/06

Third-Party Components
As shown in Figure 2, two critical WLAN components for ZebraNet Wireless Print Server
operation are a wireless card and an access point. These components are not provi ded with the
Wireless Print Server.
Supported Wireless Cards
A third-party PCMCIA wireless card is required for the printer to communicate with the
WLAN. After the ZebraNet Wireless Print Server PCMCIA board is installed, the wireless
card inserts into a slot in the back of the printer.
The following wireless cards are supported at the time of this release:
Cisco® Systems
• 802.11b Aironet AIR-PCMC340
• 802.11b Aironet AIR-PCMC341
• 802.11b Aironet AIR-PCMC342
Introduction
Third-Party Components
3
• 802.11b Aironet PCMC350
• 802.11b Aironet PCMC351
• 802.11b Aironet PCMC352
Symbol® Technologies
• Spectrum24® Compact Flash wireless radio card LA-4137-1020-WW (the card uses an
adapter and must have firmware version F3.91-69 or higher)
For instructions on how to install t his card and the adapter, see Install a Wireless or
Compact Flash Wireless Card on page 15.
• 802.11b Spectrum24 High Rate Direct Sequence PN:LA-4111-1000-US
• 802.11b Spectrum24 High Rate Direct Sequence PN:LA-4111-1010-US
• 802.11b Spectrum24 High Rate Direct Sequence PN:LA-4121-1000-US
• 802.11b Spectrum24 High Rate Direct Sequence PN:LA-4121-1020-US
• 802.11b Spectrum24 High Rate Direct Sequence PN:LA-4121-1120-US
Note • Check the operating conditions (such as temperature and humidity) for the wireless
card that you choose. If the card has more restrictions than the printer, this may limit the
conditions under which you can operate the printer with a wireless connection.
10/24/06 Wireless Print Server User Guide 13422L-003 Rev. A

Introduction
4
Third-Party Components
Access Point
A third-party access point forms a bridge between the WLAN and wired LAN. Select an
access point that is compatible with the supported wireless cards that you will use with the
ZebraNet Wireless Print Server.
Multiple access points can be used to extend the coverage of the wireless LAN. The
reassociation capabilities of the IEEE 802.11b standard enable clients to move throughout the
WLAN area and roam between access points. Reassociation can occur as long as the ZebraNet
Wireless Print Server is on the same network configurations and ESSID (network name) as the
access point to which it is trying to connect.
13422L-003 Rev. A Wireless Print Server User Guide 10/24/06

Interaction between Wired and Wireless Print Servers
Interaction between Wired and Wireless Print Servers
Your printer can have both a wired and a wireless print server installed. One functions as the
active print server, and the other is present as a backup in the event that the other loses
functionality.
Check for Wired Print Server
Note • Only one print server can be installed in the S4M at one time, so this check does not
occur.
By default, the printer skips the check for a wired print server during bootup, making the
Wireless Print Server the primary connection. To change this and allow the wired print server
to be the primary device when it is connected, use the ZPL command
check for a wired print server at boot time. For more information on this command, see ^NB
on page 36.
Table 1 shows which print server will be the primary connection under different conditions.
^NB to tell the printer to
Introduction
5
Table 1 • Results of Check for Wired Print Server
Wired Print
Server
Connected?
Yes Skip The printer skips the check for a wired print
Yes Check The printer checks for a wired print server. If the
No Skip The printer uses the Wireless Print Server as the
No Check During bootup, the printer tries for 70 seconds to
Check for Wired
Print Server?
Results
server. The wired print server is not
acknowledged, and the Wireless Print Server is
used as the primary print server.
wired print server is detected, it is used as the
primary print server. If it is not detected, the
Wireless Print Server is used as the primary print
server.
primary print server without taking the time to
check for a wired print server.
detect a wired print server. After finding that one
is not connected, the printer uses the Wireless
Print Server as the primary print server.
10/24/06 Wireless Print Server User Guide 13422L-003 Rev. A

Introduction
6
Interaction between Wired and Wireless Print Servers
IP Addresses
The wired and wireless print servers will have two different IP addresses. The printer’s control
panel will display the address of the active device. For more information, see View or Change
Control Panel Parameters for the Wireless Print Server on page 23.
View Printer Web Pages
When both a wired and wireless print server are installed on a printer, you can view the
printer’s web pages through the active device’s IP address. For more information, see Home
Page on page 58.
13422L-003 Rev. A Wireless Print Server User Guide 10/24/06

2
Configuration
Use the instructions in this chapter to configure the ZebraNet Wireless Print Server for
operation.
Contents
Overview . . . . . . . . . . . . . . . . . . . . . . . . . . . . . . . . . . . . . . . . . . . . . . . . . . . . . . . . . . . . . . 8
Configure Using the SetWLAN Utility. . . . . . . . . . . . . . . . . . . . . . . . . . . . . . . . . . . . . . . . . 9
Install a Wireless or Compact Flash Wireless Card. . . . . . . . . . . . . . . . . . . . . . . . . . . . . 15
10/24/06 Wireless Print Server User Guide 13422L-003 Rev. A

Configuration
8
Overview
Overview
Important • The ZebraNet Wireless Print Server PCMCIA board must be installed on your
printer before you can configure the printer to communicate using a wireless card. If this
board is not installed and active, the wireless portion of the network configuration label will
not print (see Print a Network Configuration Label on page 22).
For printers other than the S4M, check the bottom right corner of the control panel LCD for
the firmware version (all firmware versions used for the S4M support the Wireless Print
Server option). For printers other than the S4M, you need firmware version V60.13.X or
higher to operate the Wireless Print Server . If the firmware version number on your printer is
less than this, download the latest firmware from http://www.zebra.com/firmware or use the
version provided on the Connectivity CD that came with the kit (the version on the CD may
not be the latest available).
You may configure your printer for wireless operation in the following ways:
• Through the SetWLAN utility, which writes a ZPL script for you (see Configure Using
the SetWLAN Utility on page 9). On the last screen of the utility, you may choose to send
the command directly to your printer through the serial port, or you may choose to save
the ZPL script to a file. The saved ZPL file has several purposes:
• The file can be sent to the printer through the parallel port, a USB port, or a wired
print server.
• The file can be sent to the printer after the network settings have been restored to
factory defaults.
• The file can be sent to multiple printers that will use the same network settings.
• Through ZPL script that you write yourself (see ZPL Commands for the Wireless Print
Server on page 35)
13422L-003 Rev. A Wireless Print Server User Guide 10/24/06

Configure Using the SetWLAN Utility
The SetWLAN utility resides on the User CD for your printer and is available through
http://www.zebra.com. This software allows you to configure your printer easily for wireless
operation by writing the appropriate ZPL script for you. Use this utility when you are first
installing the Wireless Print Server or when you set the network options back to factory
defaults.
Configuration
Configure Using the SetWLAN Utility
9
Note • The SetWLAN utility requires Microsoft
®
Windows® 98 or higher.
To configure the Wireless Print Server using the SetWLAN utility, complete
these steps:
1. From the User CD or Connectivity CD, run the program SetWLAN.exe.
The IP Configuration window displays (Figure 3).
Figure 3 • IP Configuration Window
10/24/06 Wireless Print Server User Guide 13422L-003 Rev. A

Configuration
10
Configure Using the SetWLAN Utility
2. Do you wish to enter settings for an optional wired print server? (A wired print server is
not required for configuring or r unning the Wireless Print Server.)
If... Then...
No Continue with step 3.
Yes
a. Click Wired IP Config.
The Wired IP Configuration window displays (Figure 4).
Figure 4 • Wired IP Configuration Window
b. Select the desired method for obtaining an IP address for the wired print
server. If you select Static, enter the appropriate IP information.
c. Click OK.
3. Will you be using DHCP (dynamic) or static IP settings for the Wireless Print Server?
If you will be using... Complete the following steps...
DHCP (recommended) a. Click Next.
The Wireless Setting s window displays (Figure 5).
Static Complete the following steps:
a. Select Static.
The IP settings fields are activated.
b. Enter the IP Address, Default Gateway, and Subnet
Mask that you want the printer to use.
c. Click Next.
The Wireless Setting s window displays (Figure 5).
13422L-003 Rev. A Wireless Print Server User Guide 10/24/06

Configure Using the SetWLAN Utility
Figure 5 • Wireless Settings Window
Configuration
11
4. Enter the ESSID for your network.
5. If necessary, select a different Authentication Type.
6. If you will be using WEP encryption, enter the encryption mode, the storage method for
the encryption keys, and the current encryption key.
Note •
• The settings for step 4 through step 6 must match what is set on your access point.
• If you are using hex WEP keys, do not add a leading 0x to the encryption keys.
• If you are using multiple WEP encryption keys, enter encryption keys 2, 3, and 4 and
specify the current key by using the printer’s web pages. For instructions on accessing
and using the web pages, see Printer Web Pages on page 28.
7. To modify other wireless parameters, complete these steps:
a. On the Wireless Settings Window, click Advanced Options.
The Advanced Wireless window displays (Figure 6).
10/24/06 Wireless Print Server User Guide 13422L-003 Rev. A

Configuration
12
Configure Using the SetWLAN Utility
Figure 6 • Advanced Wireless Window
b. Modify the settings as necessary to match your network’s settings.
c. Click OK.
The program returns to the Wireless Settings Window.
8. Click Next.
The Review and Apply Changes Window displays (Figure 7).
Figure 7 • Review and Apply Changes Window
13422L-003 Rev. A Wireless Print Server User Guide 10/24/06

Configuration
Configure Using the SetWLAN Utility
9. Have any of the serial port settings been modified on your printer?
If... Then...
No Continue with step 10.
Yes You must match those serial port settings in the configuration program for
the computer and the printer to be able to communicate. To do this,
complete these steps:
a. Click Change Serial Port Settings.
The Serial Port Settings window displays (seeFigure 8).
Figure 8 • Serial Port Settings Window
13
b. To review the settings on your printer, enter Setup mode through the
printer’s control panel, the n scroll until you reach
PARITY.
and
c. If any of the values are different, change the settings on the Serial Port
BAUD, DATA BITS,
Settings window to match the settings stored in the printer.
d. Click OK.
The program returns to the Review and Apply Changes Window
(see Figure 7 on page 12).
10/24/06 Wireless Print Server User Guide 13422L-003 Rev. A

Configuration
14
Configure Using the SetWLAN Utility
10. To complete the configuration procedure, select one of the following:
To... Then...
Send the ZPL
script through the
serial port
Save the ZPL code
to a file
a. Connect your printer ’s serial port to the computer using a
null modem serial cable.
b. Turn On (I) the printer.
c. On the Review and Apply Changes Window, click Finish.
The printer sends the ZPL script to the printer through the
serial port (Figure 9).
Figure 9 • Configuration Complete Message
d. Click OK.
a. On the Review and Apply Changes Window, click Save
ZPL Script to a file.
The computer prompts you for a name and destination for
the file.
b. Enter the file name and destination.
c. Click Save.
d. Turn On (I) the printer.
e. Send the ZPL file to the printer through the connection of
your choice.
11. After the ZPL script has been sent to and received by the printer, turn Off (O) the printer.
13422L-003 Rev. A Wireless Print Server User Guide 10/24/06

Install a Wireless or Compact Flash Wireless Card
Install a Wireless or Compact Flash Wireless Card
Printers that have the wireless option board installed can use any of the wireless or Compact
Flash wireless cards listed in Supported Wireless Cards on page 3. This section provides
instructions for installing either type of card. All printers use a clear plastic RF cover over the
wireless or Compact Flash wireless card.
Wireless Card
This section applies to PCMCIA or CardBus wireless cards.
Note • The Z4Mplus and Z6Mplus printers do not support CardBus wireless cards.
To install a wireless card, complete these steps:
1. Turn off (O) the printer.
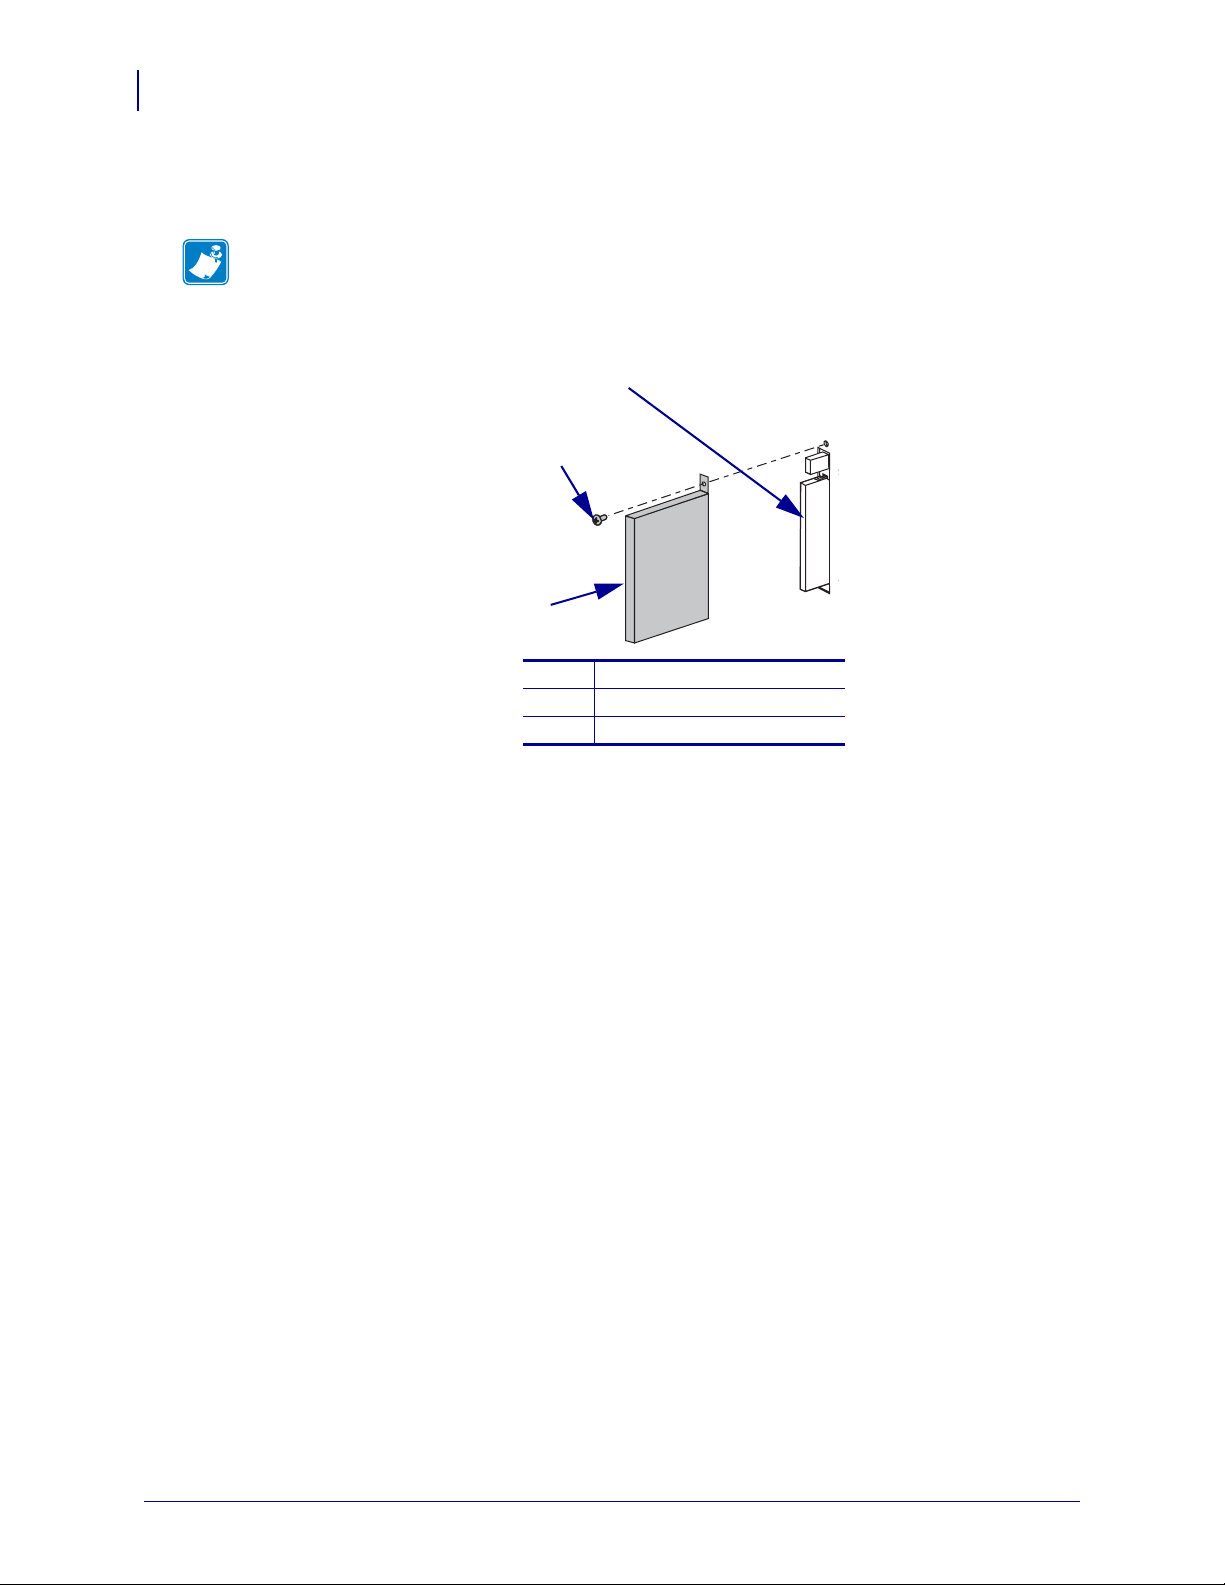
2. Remove and discard the metal cover that was shipped in place over the wireless option
card slot on the back of the printer.
Configuration
15
3. See Figure 10. Position the not ch on the wireless card on the top, leading edge. Insert the
wireless card into the wireless option card slot on the back of the printer until the cardeject button pops out.
Figure 10 • Installing a Wireless Card
4
2
1
Wireless card
1
Notch
2
Wireless option card slot
3
3
on back of printer
Card-eject button
4
10/24/06 Wireless Print Server User Guide 13422L-003 Rev. A
Configuration
16
Install a Wireless or Compact Flash Wireless Card
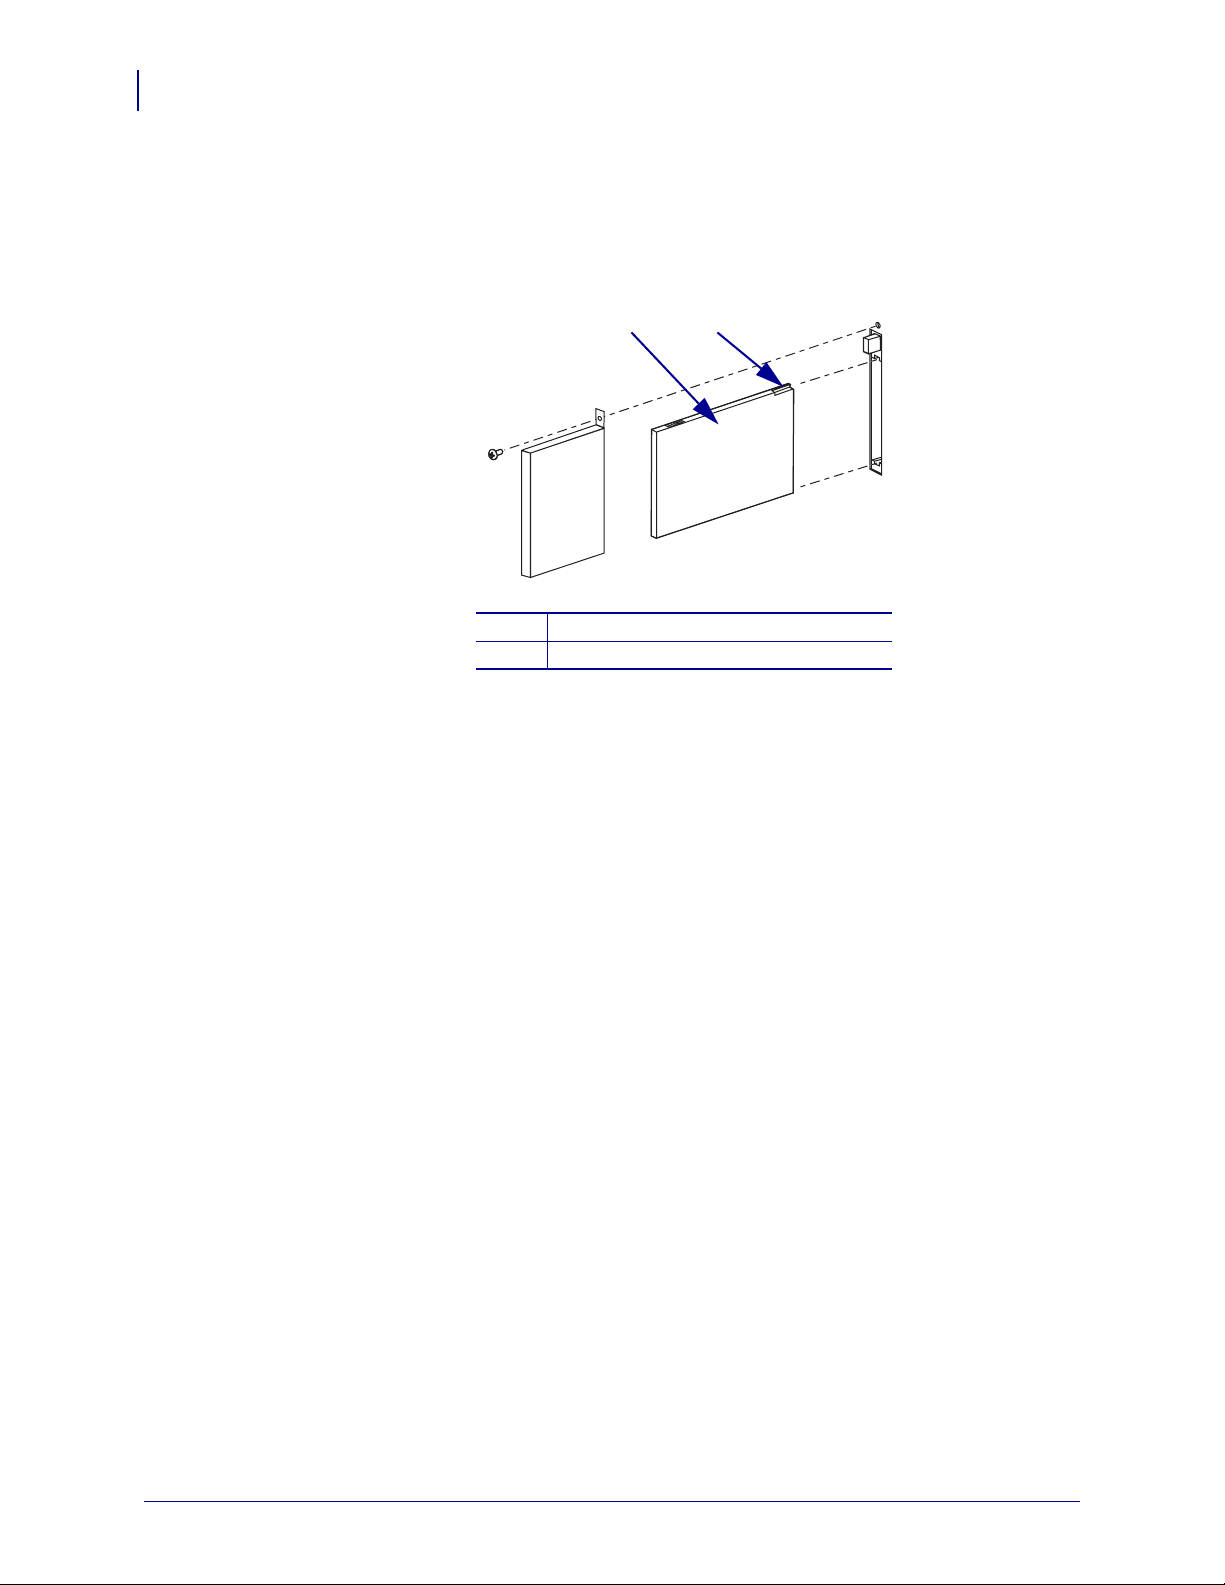
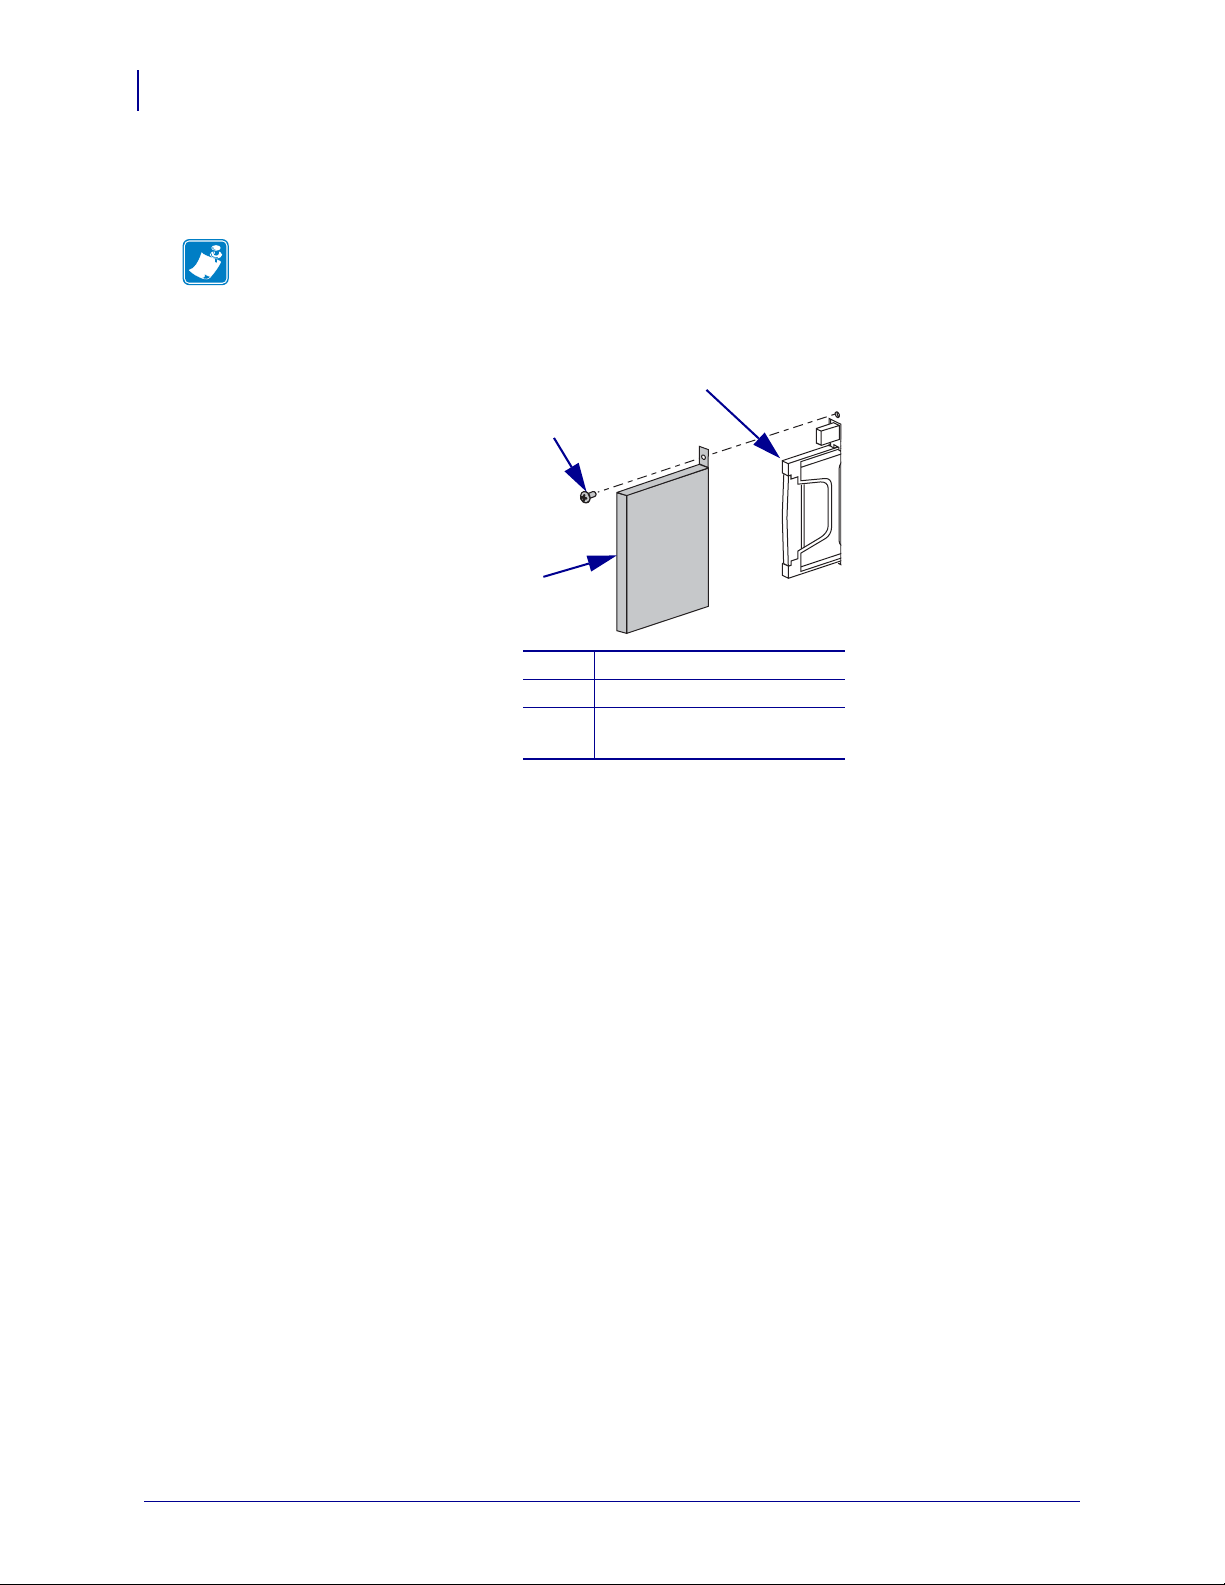
4. See Figure 11. Place the RF card cover over the wireless card, and secure it with a small
screw.
Note • The S4M does not use the plastic RF cover.
Figure 11 • Installing the RF Cover
3
2
1
Clear plastic RF card cover
1
Screw
2
Wireless card
3
5. Turn on (I) the printer.
The printer restarts and uses the wireless card to communicate with your WLAN. Allow
several minutes for the printer to connect to the network. For more information about
wireless status, refer to View Wireless Status through the Control Panel on page 20 or
Troubleshooting on page 53.
13422L-003 Rev. A Wireless Print Server User Guide 10/24/06
Compact Flash Wireless Card
This section applies to Compact Flash wireless ca rds, which require an adapter before they can
be used in the wireless option card slot.
To install a Compact Flash wireless card and adapter, complete these steps:
1. If you have not already done so, turn off (O) the printer.
2. Remove and discard the metal cover that was shipped in place over the wireless option
slot on the back of the printer.
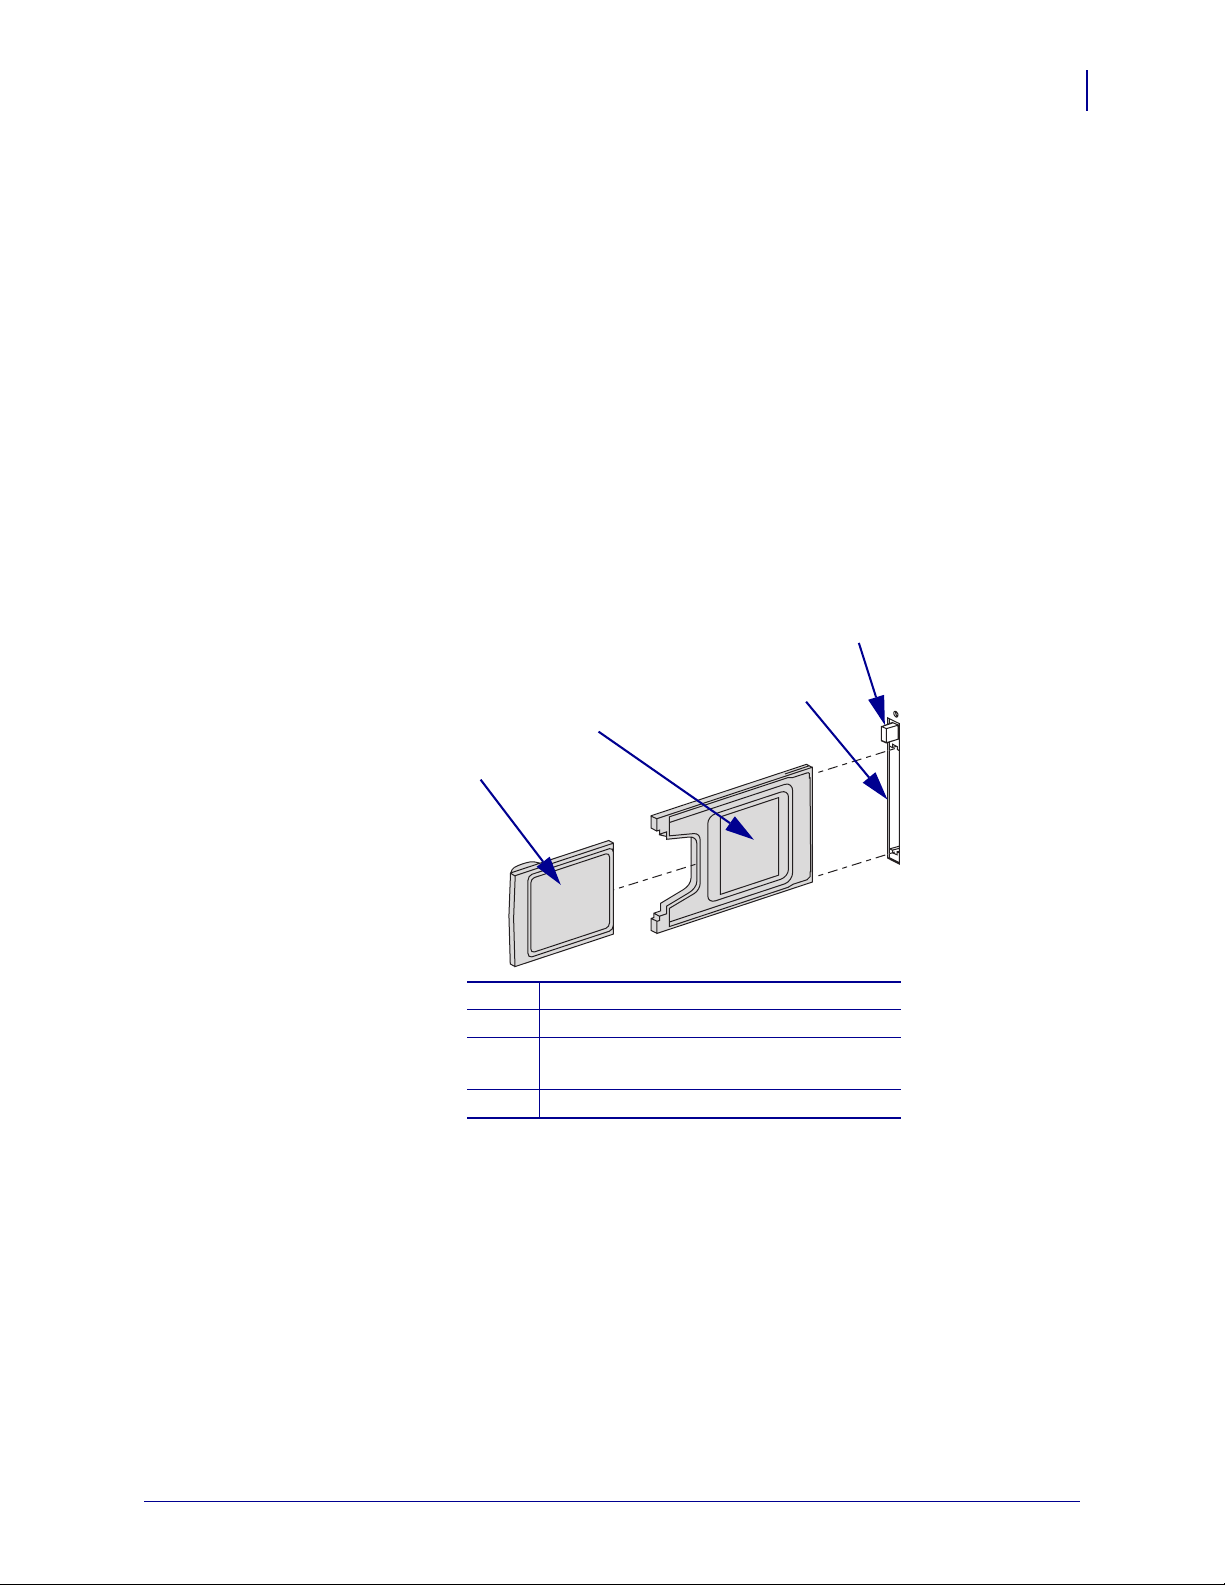
3. See Figure 12. Position the ad apter with the back facing as shown. Insert the adapter into
the wireless option card slot on the back of the printer until the card-eject button pops out.
4. See Figure 12. Insert the Compact Flash wireless card into the adapter.
Figure 12 • Installing a Compact Flash Wireless Card
Configuration
Install a Wireless or Compact Flash Wireless Card
4
17
3
2
1
Back of Compact Flash wireless card
1
Back of adapter
2
Wireless option card slot on back of
3
printer
Card-eject button
4
10/24/06 Wireless Print Server User Guide 13422L-003 Rev. A
Configuration
18
Install a Wireless or Compact Flash Wireless Card
5. See Figure 13. Place the RF card cover over the wireless card, and secure it with a small
screw.
Note • The S4M does not use the plastic RF cover.
Figure 13 • Installing the RF Cover
3
2
1
Clear plastic RF card cover
1
Screw
2
Compact Flash wireless
3
card and adapter
6. Turn on (I) the printer.
The printer restarts and uses the wireless card to communicate with your WLAN. Allow
several minutes for the printer to connect to the network. For more information about
wireless status, refer to View Wireless Status through the Control Panel on page 20 or
Troubleshooting on page 53.
13422L-003 Rev. A Wireless Print Server User Guide 10/24/06

3
Wireless Status
and Settings
This chapter presents options for viewing or modifying the wi reless status, signal strength, or
settings.
Contents
Overview . . . . . . . . . . . . . . . . . . . . . . . . . . . . . . . . . . . . . . . . . . . . . . . . . . . . . . . . . . . . . 20
View Wireless Status through the Control Panel . . . . . . . . . . . . . . . . . . . . . . . . . . . . . . . 20
Link Status Indicator. . . . . . . . . . . . . . . . . . . . . . . . . . . . . . . . . . . . . . . . . . . . . . . . . . . 20
Wireless Signal Indicators . . . . . . . . . . . . . . . . . . . . . . . . . . . . . . . . . . . . . . . . . . . . . . 21
Poor Signal Setting . . . . . . . . . . . . . . . . . . . . . . . . . . . . . . . . . . . . . . . . . . . . . . . . . . . 21
Print a Network Configuration Label . . . . . . . . . . . . . . . . . . . . . . . . . . . . . . . . . . . . . . . . 22
View or Change Control Panel Parameters for the Wireless Print Server. . . . . . . . . . . . 23
Printer Web Pages. . . . . . . . . . . . . . . . . . . . . . . . . . . . . . . . . . . . . . . . . . . . . . . . . . . . . . 28
Return Network Parameters to Defaults . . . . . . . . . . . . . . . . . . . . . . . . . . . . . . . . . . . . . 34
10/24/06 Wireless Print Server User Guide 13422L-003 Rev. A
Wireless Status and Settings
20
Overview
Overview
After you configure the Wireless Print Server, you may view the wireless status and signal
strength (see V iew Wireless S tat us thr ough the Contr ol Pan el on page 20). Y ou also may access
or modify wireless settings through the following:
• A network configuration label (see Print a Network Configuration Label on page 22)
• The control panel parameters (see View or Change Control Panel Parameters for the
Wireless Print Server on page 23)
• The WebView web pages for your printer (see Printer Web Pages on page 28)
• ZPL commands (see ZPL Commands for the W ireless Print Server on page 35)
View Wireless Status through the Control Panel
After the Wireless Print Server is configured , use the co ntro l panel to vi ew th e wireless statu s.
a
Note • Refer to the user guide for your printer for specific instructions on how to use the
control panel.
Link Status Indicator
Note • The S4M does not use the link status indicator.
The wireless link status indicator appears at the bottom left of the LCD on the control panel,
providing a real-time display of the printer’s network status (Table 2).
Table 2 • Link Status Indicators
Status Indicator Meaning
cycling through characters
.oO
underscore
_
blank
The wireless card is associated with the WLAN.
1. The wireless card is inserted but not associated with the network.
2. No wireless card is inserted.
1. The printer is checking for a wired print server.
2. The printer is running a wired print server.
3. The Wireless Print Server board is not installed or not installed
correctly.
13422L-003 Rev. A Wireless Print Server User Guide 10/24/06
 Loading...