


Zebra XML-Enabled
Printer
Reference Guide

Table of Contents
About This Document . . . . . . . . . . . . . . . . . . . . . . . . . . . . . . . . . . . . . . . . . . . . . . . 5
Who Should Use This Document . . . . . . . . . . . . . . . . . . . . . . . . . . . . . . . . . . . . . . . . . . . . 6
How This Document Is Organized . . . . . . . . . . . . . . . . . . . . . . . . . . . . . . . . . . . . . . . . . . . 6
Contacts . . . . . . . . . . . . . . . . . . . . . . . . . . . . . . . . . . . . . . . . . . . . . . . . . . . . . . . . . . . . . . . 7
Web Site . . . . . . . . . . . . . . . . . . . . . . . . . . . . . . . . . . . . . . . . . . . . . . . . . . . . . . . . . . . . 7
The Americas . . . . . . . . . . . . . . . . . . . . . . . . . . . . . . . . . . . . . . . . . . . . . . . . . . . . . . . . 7
Europe, Africa, Middle East, and India . . . . . . . . . . . . . . . . . . . . . . . . . . . . . . . . . . . . . 7
Asia Pacific . . . . . . . . . . . . . . . . . . . . . . . . . . . . . . . . . . . . . . . . . . . . . . . . . . . . . . . . . . 7
Document Conventions. . . . . . . . . . . . . . . . . . . . . . . . . . . . . . . . . . . . . . . . . . . . . . . . . . . . 8
Related Documents . . . . . . . . . . . . . . . . . . . . . . . . . . . . . . . . . . . . . . . . . . . . . . . . . . . . . 10
1 • Introduction . . . . . . . . . . . . . . . . . . . . . . . . . . . . . . . . . . . . . . . . . . . . . . . . . . . 11
Overview. . . . . . . . . . . . . . . . . . . . . . . . . . . . . . . . . . . . . . . . . . . . . . . . . . . . . . . . . . . . . . 12
Zebra XML Integrated Solutions. . . . . . . . . . . . . . . . . . . . . . . . . . . . . . . . . . . . . . . . . 12
Requirements . . . . . . . . . . . . . . . . . . . . . . . . . . . . . . . . . . . . . . . . . . . . . . . . . . . . . . . . . . 14
Document Type Definition. . . . . . . . . . . . . . . . . . . . . . . . . . . . . . . . . . . . . . . . . . . . . . . . . 15
Expected XML Data Stream . . . . . . . . . . . . . . . . . . . . . . . . . . . . . . . . . . . . . . . . . . . . . . . 16
Stored XML-Enabled ZPL Formats . . . . . . . . . . . . . . . . . . . . . . . . . . . . . . . . . . . . . . . . . . 17
Send Files to Printer . . . . . . . . . . . . . . . . . . . . . . . . . . . . . . . . . . . . . . . . . . . . . . . . . . 17
2 • ZebraDesigner for XML . . . . . . . . . . . . . . . . . . . . . . . . . . . . . . . . . . . . . . . . . . 21
Overview. . . . . . . . . . . . . . . . . . . . . . . . . . . . . . . . . . . . . . . . . . . . . . . . . . . . . . . . . . . . . . 22
System and Software Requirements . . . . . . . . . . . . . . . . . . . . . . . . . . . . . . . . . . . . . 22
Install Overview for ZebraDesigner for XML . . . . . . . . . . . . . . . . . . . . . . . . . . . . . . . . . . . 23
Close All Software Applications . . . . . . . . . . . . . . . . . . . . . . . . . . . . . . . . . . . . . . . . . 23
Design Labels . . . . . . . . . . . . . . . . . . . . . . . . . . . . . . . . . . . . . . . . . . . . . . . . . . . . . . . . . . 25
Create a Basic label . . . . . . . . . . . . . . . . . . . . . . . . . . . . . . . . . . . . . . . . . . . . . . . . . . 25
11/15/07 Zebra XML-Enabled Printer Reference Guide 13426L-003 Rev. A

Table of Contents
4
Add Variable Fields . . . . . . . . . . . . . . . . . . . . . . . . . . . . . . . . . . . . . . . . . . . . . . . . . . . . . . 31
Create Variable Fields linked to Variables . . . . . . . . . . . . . . . . . . . . . . . . . . . . . . . . . 31
Export to Printer . . . . . . . . . . . . . . . . . . . . . . . . . . . . . . . . . . . . . . . . . . . . . . . . . . . . . . . . 33
3 • Compliance Label Formats . . . . . . . . . . . . . . . . . . . . . . . . . . . . . . . . . . . . . . . 37
Overview. . . . . . . . . . . . . . . . . . . . . . . . . . . . . . . . . . . . . . . . . . . . . . . . . . . . . . . . . . . . . . 38
GM1724a Compliance Label . . . . . . . . . . . . . . . . . . . . . . . . . . . . . . . . . . . . . . . . . . . . . . 39
XML-Enabled GM1724A Format Code. . . . . . . . . . . . . . . . . . . . . . . . . . . . . . . . . . . . 40
GM1724A Format XML Data Stream . . . . . . . . . . . . . . . . . . . . . . . . . . . . . . . . . . . . . 42
IAEA Compliance Label . . . . . . . . . . . . . . . . . . . . . . . . . . . . . . . . . . . . . . . . . . . . . . . . . . 43
XML-Enabled IAEA Format Code . . . . . . . . . . . . . . . . . . . . . . . . . . . . . . . . . . . . . . . . . . . 44
IAEA Format XML Data Stream . . . . . . . . . . . . . . . . . . . . . . . . . . . . . . . . . . . . . . . . . 45
KMART Compliance . . . . . . . . . . . . . . . . . . . . . . . . . . . . . . . . . . . . . . . . . . . . . . . . . . . . . 46
XML-Enabled KMART Format Code. . . . . . . . . . . . . . . . . . . . . . . . . . . . . . . . . . . . . . . . . 47
KMART Format XML Data Stream . . . . . . . . . . . . . . . . . . . . . . . . . . . . . . . . . . . . . . . 48
KMART UCC Compliance. . . . . . . . . . . . . . . . . . . . . . . . . . . . . . . . . . . . . . . . . . . . . . . . . 49
XML-Enabled KMART UCC Format Code . . . . . . . . . . . . . . . . . . . . . . . . . . . . . . . . . . . . 50
KMART UCC Format XML Data Stream. . . . . . . . . . . . . . . . . . . . . . . . . . . . . . . . . . . 52
WALMART Compliance . . . . . . . . . . . . . . . . . . . . . . . . . . . . . . . . . . . . . . . . . . . . . . . . . . 53
XML-Enabled WALMART Format Code . . . . . . . . . . . . . . . . . . . . . . . . . . . . . . . . . . . . . . 54
WALMART Format XML Data Stream . . . . . . . . . . . . . . . . . . . . . . . . . . . . . . . . . . . . 55
Glossary . . . . . . . . . . . . . . . . . . . . . . . . . . . . . . . . . . . . . . . . . . . . . . . . . . . . . . . . . 57
Index . . . . . . . . . . . . . . . . . . . . . . . . . . . . . . . . . . . . . . . . . . . . . . . . . . . . . . . . . . . . 59
13426L-003 Rev. A Zebra XML-Enabled Printer Reference Guide 11/15/07

© 2007 ZIH Corp. The copyrights in this manual and the software and/or firmware in the label printer described
therein are owned by ZIH Corp. Unauthorized reproduction of this manual or the software and/or firmware in the
label printer may result in imprisonment of up to one year and fines of up to $10,000 (17 U.S.C.506). Copyright
violators may be subject to civil liability.
This product may contain ZPL
Monotype Imaging fonts. Software © ZIH Corp. All rights reserved worldwide.
®
, ZPL II®, and ZebraLink™ programs; Element Energy Equalizer® Circuit; E3®; and
ZebraLink and all product names and numbers are trademarks, and Zebra, the Zebra logo, ZPL, ZPL II, Element
Energy Equalizer Circuit, and E
All other brand names, product names, or trademarks belong to their respective holders. For additional trademark
information, please see “Trademarks” on the product CD.
3
Circuit are registered trademarks of ZIH Corp. All rights reserved worldwide.
Proprietary Statement This manual contains proprietary information of Zebra Technologies Corporation and its
subsidiaries (“Zebra Technologies”). It is intended solely for the information and use of parties operating and
maintaining the equipment described herein. Such proprietary information may not be used, reproduced, or disclosed
to any other parties for any other purpose without the express, written permission of Zebra Technologies.
Product Improvements Continuous improvement of products is a policy of Zebra Technologies. All
specifications and designs are subject to change without notice.
Liability Disclaimer Zebra Technologies takes steps to ensure that its published Engineering specifications and
manuals are correct; however, errors do occur. Zebra Technologies reserves the right to correct any such errors and
disclaims liability resulting therefrom.
Limitation of Liability In no event shall Zebra Technologies or anyone else involved in the creation, production,
or delivery of the accompanying product (including hardware and software) be liable for any damages whatsoever
(including, without limitation, consequential damages including loss of business profits, business interruption, or loss
of business information) arising out of the use of, the results of use of, or inability to use such product, even if Zebra
Technologies has been advised of the possibility of such damages. Some jurisdictions do not allow the exclusion or
limitation of incidental or consequential damages, so the above limitation or exclusion may not apply to you.
Part Number: 13426L-003 Rev. A

About This Document
This section provides you with contact information, document structure and organization, and
additional reference documents.
Contents
Who Should Use This Document . . . . . . . . . . . . . . . . . . . . . . . . . . . . . . . . . . . . . . . . . . . . 6
How This Document Is Organized . . . . . . . . . . . . . . . . . . . . . . . . . . . . . . . . . . . . . . . . . . . 6
Contacts. . . . . . . . . . . . . . . . . . . . . . . . . . . . . . . . . . . . . . . . . . . . . . . . . . . . . . . . . . . . . . . 7
Document Conventions . . . . . . . . . . . . . . . . . . . . . . . . . . . . . . . . . . . . . . . . . . . . . . . . . . . 8
Related Documents . . . . . . . . . . . . . . . . . . . . . . . . . . . . . . . . . . . . . . . . . . . . . . . . . . . . . 10
11/15/07 Zebra XML-Enabled Printer Reference Guide 13426L-003 Rev. A

About This Document
6
Who Should Use This Document
Who Should Use This Document
This Reference Guide is intended for use by any person who is going to use Zebra XMLEnabled printers.
How This Document Is Organized
The Zebra XML-Enabled Printer Reference Guide is set up as follows:
Section Description
Introduction This chapter provides a high level overview of
Zebra's XML-Enabled printer, along with detailed
information about what Zebra has enabled with
XML printing and how to use those capabilities to
print bar code labels.
ZebraDesigner for XML This chapter details how to create XML-Enabled
Compliance Label Formats This appendix provides a high-level overview of
Glossary This section contains a list of terms and their
®
label formats with ZebraDesigner for XML.
ZPL
the Zebra XML-Enabled Printer.
definitions for your reference.
13426L-003 Rev. A Zebra XML-Enabled Printer Reference Guide 11/15/07

Contacts
Web Site
The Americas
About This Document
Contacts
You can contact Zebra Technologies at the following:
http://www.zebra.com
Technical Support via the Internet is available 24 hours per day, 365 days per year. Go to
http://www.zebra.com/support.
Regional Headquarters Technical Support Customer Service Dept.
Zebra Technologies International,
LLC
333 Corporate Woods Parkway
Vernon Hills, Illinois 60061.3109
U.S.A
T: +1 847 793 2600
Toll-free +1 800 423 0422
F: +1 847 913 8766
T: +1 877 ASK ZEBRA (275 9327)
F: +1 847 913 2578
Hardware: ts1@zebra.com
Software: ts3@zebra.com
For printers, parts, media, and ribbon,
please call your distributor, or
contact us.
T: +1 877 ASK ZEBRA (275 9327)
E: clientcare@zebra.com
7
Europe, Africa, Middle East, and India
Regional Headquarters Technical Support Internal Sales Dept.
Zebra Technologies Europe Limited
Zebra House
The Valley Centre, Gordon Road
High Wycombe
Buckinghamshire, HP13 6EQ, UK
T: +44 (0)1494 472872
F: +44 (0) 1494 450103
T: +44 (0) 1494 768298
F: +44 (0) 1494 768210
Germany: Tsgermany@zebra.com
France: Tsfrance@zebra.com
Spain/Portugal: Tsspain@zebra.com
All other areas: Tseurope@zebra.com
Asia Pacific
Regional Headquarters Technical Support Customer Service
Zebra Technologies Asia Pacific, LLC
120 Robinson Road
#06-01 Parakou Building
Singapore 068913
T: +65 6858 0722
F: +65 6885 0838
T: +65 6858 0722
F: +65 6885 0838
E: China: tschina@zebra.com
All other areas:
tsasiapacific@zebra.com
For printers, parts, media, and ribbon,
please call your distributor, or
contact us.
T: +44 (0) 1494 768316
F: +44 (0) 1494 768244
E: cseurope@zebra.com
For printers, parts, media, and ribbon,
please call your distributor, or
contact us.
T: +65 6858 0722
F: +65 6885 0836
11/15/07 Zebra XML-Enabled Printer Reference Guide 13426L-003 Rev. A
About This Document
8
Document Conventions
Document Conventions
The following conventions are used throughout this document to convey certain information.
Alternate Color (online only) Cross-references contain hot links to other sections in this
guide. If you are viewing this guide online in .pdf format, you can click the cross-reference
(blue text) to jump directly to its location.
LCD Display Examples Text from a printer’s Liquid Crystal Display (LCD) appears in
Bubbledot ICG font.
Command Line Examples Command line examples appear in Courier New font. For
example, type
Files and Directories File names and directories appear in Courier New font. For
example, the
Icons Used
Identifies features that are available in printers with firmware version V60.15.x, V50.15.x, or
later.
ZTools to get to the Post-Install scripts in the bin directory.
Zebra<version number>.tar file and the /root directory.
Identifies features that are available in printers with firmware version v60.14, v50.14, or
later.
Important • Advises you of information that is essential to complete a task.
Note • Indicates neutral or positive information that emphasizes or supplements important
points of the main text.
Example • Provides an example, often a scenario, to better clarify a section of text.
Illustration Callouts Callouts are used when an illustration contains information that needs
to be labeled and described. A table that contains the labels and descriptions follows the
graphic. Figure 1 provides an example.
Figure 1 • Sample Figure with Callouts
! U1 setvar
1
“ip.addr” “value”
2
3
Command—always preceded with an exclamation point (!). A space resides
1
between the !and U1 and between U1 and the command (setvar or getvar).
Attribute—always in double quotes.
2
Chosen value—always in double quotes. Only applicable for setvar.
3
13426L-003 Rev. A Zebra XML-Enabled Printer Reference Guide 11/15/07

About This Document
Document Conventions
9
1
ZPL II CODE
^XA
^FO150,100^BY3
^B4N,20,A,A
^FD12345ABCDE^FS
^XZ
ZPL Code
1
Generated Label
2
2
CODE 49 BAR CODE
11/15/07 Zebra XML-Enabled Printer Reference Guide 13426L-003 Rev. A

About This Document
10
Related Documents
Related Documents
The following documents might be helpful references:
ZebraDesigner for XML User Guide
Applicable Zebra printer User Guide
Oracle Warehouse Management User’s Guide 11i (A86607-05)
Oracle Warehouse Management Implementation Guide Release 11i (A90844-03)
13426L-003 Rev. A Zebra XML-Enabled Printer Reference Guide 11/15/07

1
Introduction
This chapter provides a high level overview of Zebra's XML-Enabled printers, along with
information about the Document Type Definition (DTD) in the Zebra XML-Enabled printers.
It also reviews the XML data stream expected to print labels and the role of stored label
formats in the XML-Enabled printing solution.
Contents
Overview . . . . . . . . . . . . . . . . . . . . . . . . . . . . . . . . . . . . . . . . . . . . . . . . . . . . . . . . . . . . . 12
Zebra XML Integrated Solutions . . . . . . . . . . . . . . . . . . . . . . . . . . . . . . . . . . . . . . . . . 12
Requirements. . . . . . . . . . . . . . . . . . . . . . . . . . . . . . . . . . . . . . . . . . . . . . . . . . . . . . . . . . 14
Document Type Definition . . . . . . . . . . . . . . . . . . . . . . . . . . . . . . . . . . . . . . . . . . . . . . . . 15
Expected XML Data Stream. . . . . . . . . . . . . . . . . . . . . . . . . . . . . . . . . . . . . . . . . . . . . . . 16
Stored XML-Enabled ZPL Formats . . . . . . . . . . . . . . . . . . . . . . . . . . . . . . . . . . . . . . . . . 17
Send Files to Printer . . . . . . . . . . . . . . . . . . . . . . . . . . . . . . . . . . . . . . . . . . . . . . . . . . 17
11/15/07 Zebra XML-Enabled Printer Reference Guide 13426L-003 Rev. A
Introduction
12
Overview
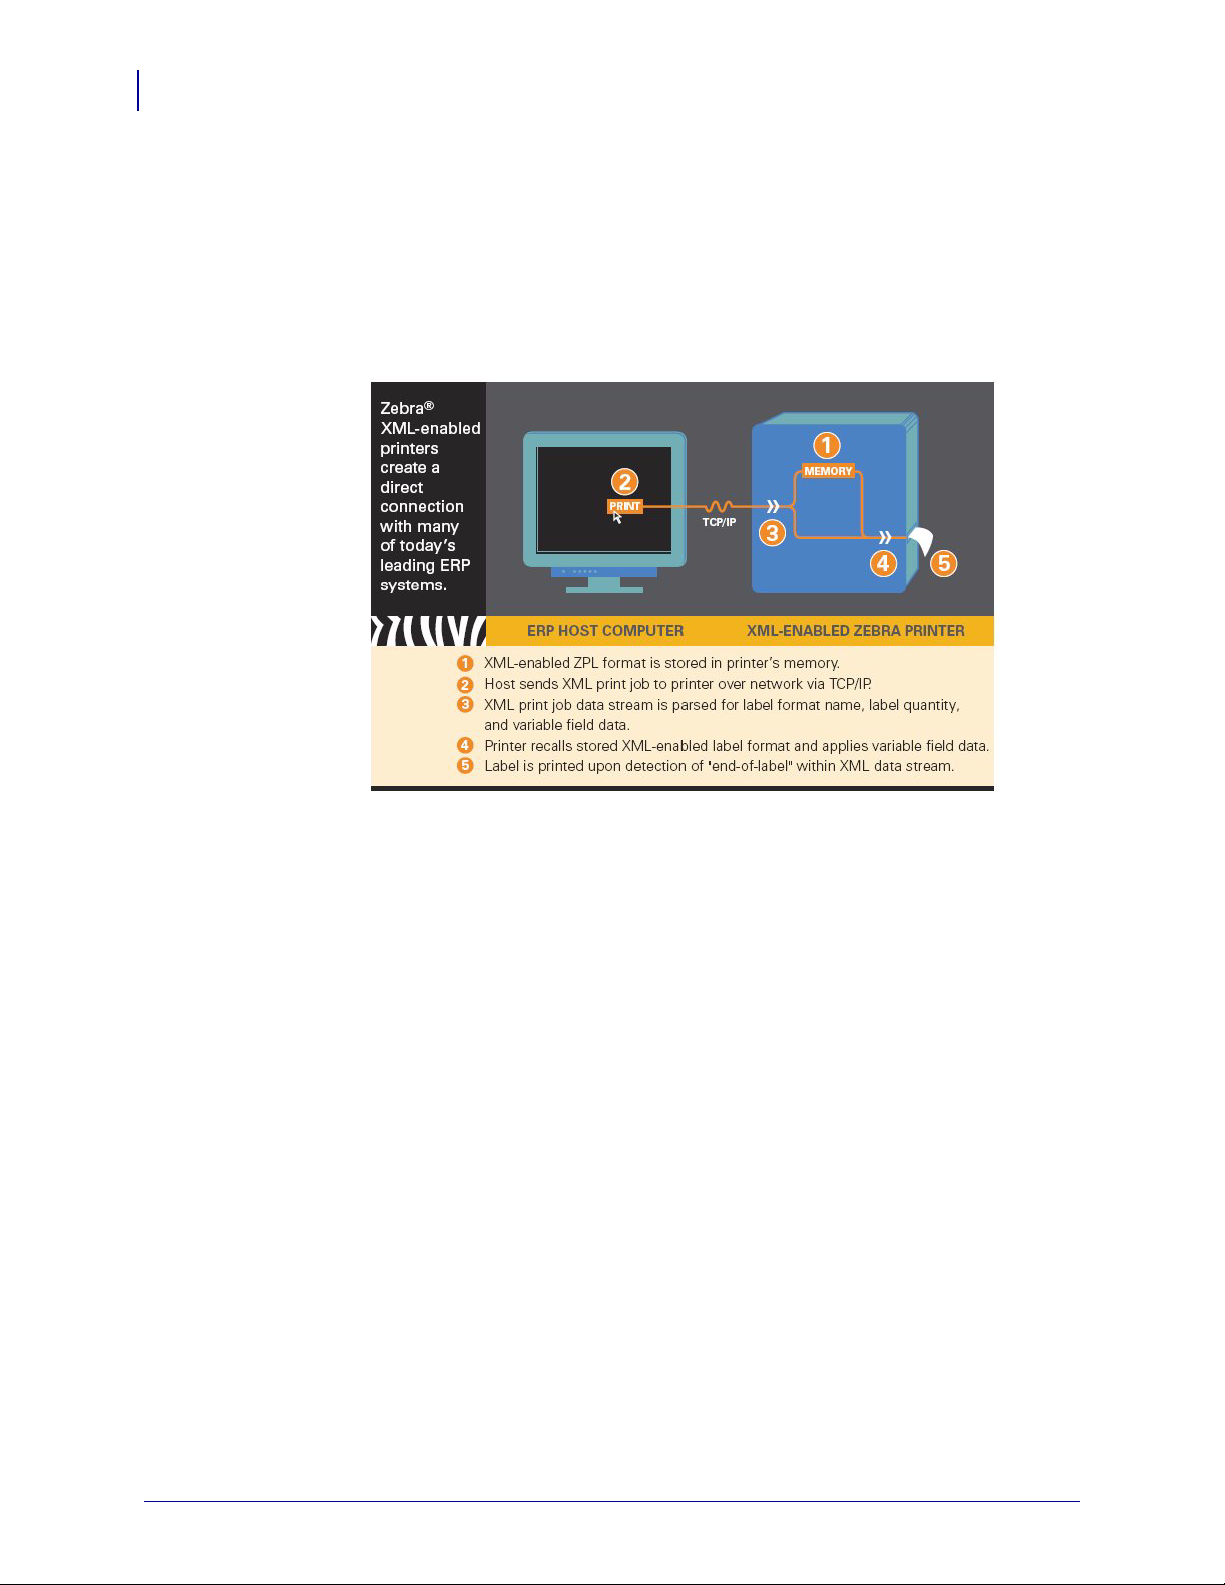
Overview
Zebra’s XML-Enabled printers provide a direct-connect solution for bar code label printing
into many of today’s leading supply chain management and manufacturing system
applications. This illustration shows you the direct-connect solution using XML.
Figure 2 • XML-Enabled Printer Pictorial Overview
Zebra XML Integrated Solutions
To simplify bar code label printing, the Zebra XML-Enabled and RFID printers and encoders
provide bar code output from these systems:
• Oracle
•SAP
•IBM
• Microsoft®
This gives you the ability to quickly and easily integrate complex printing solutions into your
enterprise systems.
For easy integration to the back end ERP systems, use Zebra Designer for XML to design your
labels.
13426L-003 Rev. A Zebra XML-Enabled Printer Reference Guide 11/15/07

For more details on available enterprise printing solutions, visit:
http://www.zebra.com/oracle
http://www.zebra.com/erp
http://www.zebra.com/ibm
http://www.zebra.com/xml
http://www.zebra.com/rfid
http://rfid.zebra.com/biztalk
Introduction
Overview
13
11/15/07 Zebra XML-Enabled Printer Reference Guide 13426L-003 Rev. A

Introduction
14
Requirements
Requirements
Printer and Firmware
These are the supported Zebra XML-Enabled printers and firmware versions:
Printer Firmware Version
105SL™ V60.15.8Z
110XilllPlus™ V60.15.8Z
140XilllPlus™ V60.15.8Z
170XilllPlus™ V60.15.8Z
220XilllPlus™ V60.15.8Z
QL Plus™ series SHSTH10z
R110Xi™ R60 - all firmware versions
R170Xi™ R60 - all firmware versions
R110PAX4™ R62 - all firmware versions, R63 - all firmware versions
R110Xi™ HF R65.15.8Z
R4Mplus™ SP994, SP999, SP1027, SP1056, SP1082 - all firmware versions
RW™ series SHSTH10z
S4M™ V53.15.8Z
Z4Mplus™ V60.15.8Z
Z6Mplus™ V60.15.8Z
ZM400™ V53.15.8Z
ZM600™ V53.15.8Z
13426L-003 Rev. A Zebra XML-Enabled Printer Reference Guide 11/15/07

Document Type Definition
An XML DTD defines the XML tags that are used in the XML file. The host system generates
XML files according to this DTD, and the Zebra XML-Enabled printer translates the XML
according to this DTD.
Example • This example shows the XML DTD that is used to form the XML understood by
the Zebra XML-Enabled printer. It defines the elements that are used in the XML data stream
and a list of their attributes and the next level elements.
Note • Following the example is a table that identifies the bold lines in the example:
<!ELEMENT labels (label)*>
<!ATTLIST labels _FORMAT CDATA #IMPLIED>
<!ATTLIST labels _JOBNAME CDATA #IMPLIED>
<!ATTLIST labels _QUANTITY CDATA #IMPLIED>
<!ATTLIST labels _DUPLICATES CDATA #IMPLIED>
<!ATTLIST labels _PAGES CDATA #IMPLIED>
<!ATTLIST labels _PRINTERNUMBER CDATA #IMPLIED>
<!ATTLIST labels _PRINTERNAME CDATA #IMPLIED>
Introduction
Document Type Definition
1
2
15
<!ELEMENT label (variable)*>
<!ATTLIST label _FORMAT CDATA #IMPLIED>
<!ATTLIST label _JOBNAME CDATA #IMPLIED>
<!ATTLIST label _QUANTITY CDATA #IMPLIED>
<!ATTLIST label _DUPLICATES CDATA #IMPLIED>
<!ATTLIST label _PAGES CDATA #IMPLIED>
<!ATTLIST label _PRINTERNUMBER CDATA #IMPLIED>
<!ATTLIST label _PRINTERNAME CDATA #IMPLIED>
<!ELEMENT variable (#PCDATA)>
<!ATTLIST variable name CDATA #IMPLIED>
If the XML stream follows the DTD semantics, it contains <labels> elements
1
that identify default attributes used by the printer to create the label. The
_FORMAT attribute identifies the appropriate stored label format.
Other attributes can be processed as well; for instance, the _QUANTITY attribute
2
can be used to set the print quantity of the label.
If the XML stream follows the DTD semantics, it contains <variable>
3
elements that have “name” attributes. The “name” attribute contains the variable
name that corresponds to the variable field in the label format. The
<variable> element text contains the data that is placed in the variable field in
the label format.
3
11/15/07 Zebra XML-Enabled Printer Reference Guide 13426L-003 Rev. A

Introduction
16
Expected XML Data Stream
Expected XML Data Stream
The content of the XML data stream lies between <labels> and </labels>, which
correspond to all labels to be printed. The content between <label> and
</label> has the information to print one label. Each <variable> and
</variable> pair gives the value of one variable on the label.
Note • In this example, notice the bold lines.
<?xml version="1.0" standalone="no"?>
<!DOCTYPE labels SYSTEM "label.dtd">
<labels _FORMAT="E:SERIAL.ZPL" _QUANTITY="1"
PRINTERNAME="Printer 1" _JOBNAME="LBL101">
<label>
<variable name="organization">611</variable>
<variable name="item">Nuts</variable>
<variable name="lot">1234</variable>
<variable name="serial_number">12345</variable>
<variable name="revision">V2</variable>
<variable name="lot_status">1234</variable>
<variable name="serial_number_status">Active</ variable>
</label>
</labels>
Example • The XML data stream contains the <labels> element that defines the format,
quantity, printer name, and job name. The Zebra XML-enabled printer uses the _FORMAT
element to recall the stored XML-Enabled ZPL format from memory, and also the
_QUANTITY element to determine the number of labels to be printed. Also, notice that the
serial_number is one of several defined variable data fields, and 12345 is the variable
data to be printed on the label.
13426L-003 Rev. A Zebra XML-Enabled Printer Reference Guide 11/15/07

Stored XML-Enabled ZPL Formats
To reduce the amount of customization required to implement enterprise printing, the Zebra
XML-Enabled printing solution uses stored XML-Enabled ZPL formats. The format is stored
in the printer’s memory and recalled by the XML data stream. Multiple formats may be stored
in printer memory, limited only to the size of the format and the amount of memory in the
printer. Graphic files are generally larger and take up more memory.
ZebraDesigner for XML is used to create the XML-Enabled ZPL formats.
Send Files to Printer
There are multiple ways to send XML files to the printer, such as:
• ZebraNet Bridge
•FTP
•Telnet
• hyper terminal
Introduction
Stored XML-Enabled ZPL Formats
17
Serial Label
Example • This is an example of a XML-Enabled ZPL format for a serial label. Following
this example is the XML-Enabled ZPL format for this serial label:
11/15/07 Zebra XML-Enabled Printer Reference Guide 13426L-003 Rev. A

Introduction
18
Stored XML-Enabled ZPL Formats
XML-Enabled ZPL Format for the Serial Label
The difference is that the ^FD (field data) statement following the standard ^FN (field name)
definition identifies the XML variable field to the printer. The printer then matches the
variable field name to the XML data. In this case, the serial_number variable field data is
matched to the format.
Note • As shown below, the ^FD statements and the information immediately following them
represent the names of the variable data fields in this format. During label printing, these
strings are replaced with the user’s variable data.
^XA
^DFE:SERIAL.ZPL^FS
^MCY
^LRN^FWN^CFD,24^LH0,0
^CI0^PR2^MNY^MTT^MMT^MD0^JJ0,0^PON^PMN
^LT0
^FO28,49^GB786,106,10^FS
^A0N,54,72^FO143,83^CI0^FDSerial Label^FS
^FO21,652^GB787,5,5^FS
^FO21,844^GB787,5,5^FS
^FO27,335^GB787,5,5^FS
^A0N,34,34^FO38,861^FR^CI0^FDLot Status:^FS
^A0N,34,34^FO38,1020^FR^CI0^FDSerial Status:^FS
^A0N,34,34^FO36,177^FR^CI0^FDItem:^FS
^A0N,34,34^FO36,355^FR^CI0^FDLot:^FS
^A0N,34,34^FO36,509^FR^CI0^FDSN:^FS
^FO24,495^GB787,5,5^FS
^A0N,34,34^FO38,683^FR^CI0^FDRev:^FS
^A0N,54,72^FO635,82^CI0^FN999^FDorganization^FS
^A0N,54,62^FO109,171^CI0^FN998^FDitem^FS
^BY2,2.7^FO108,223^B3N,N,95,N,N^FN998^FDitem^FS
^A0N,34,34^FO109,354^FR^CI0^FN997^FDlot^FS
^BY2,2.7^FO108,388^B3N,N,95,N,N^FN997^FDlot^FS
^A0N,34,34^FO107,510^FR^CI0^FN996^FDserial_number^FS
^BY2,2.7^FO108,549^B3N,N,95,N,N^FN996^FDserial_number^FS
^A0N,34,34^FO108,682^FR^CI0^FN995^FDrevision^FS
^BY2,2.7^FO108,724^B3N,N,95,N,N^FN995^FDrevision^FS
^A0N,40,40^FO36,918^FR^CI0^FN994^FDlot_status^FS
^A0N,40,40^FO40,1072^FR^CI0^FN993^FDserial_number_status^FS
^PQ1,0,1,Y
^XZ
13426L-003 Rev. A Zebra XML-Enabled Printer Reference Guide 11/15/07

XML Data Stream for the Serial Label
The XML data stream specifies the label format name and quantity to be printed. The printer
recalls the correct label format, based on that information. Then the XML data stream defines
the variable field data. The printer matches the variable field attributes and data to the
attributes defined in the stored XML-Enabled ZPL format. The data that follows the attribute
is then merged with the XML-Enabled format and printed.
<?xml version="1.0" standalone="no"?>
<!DOCTYPE labels SYSTEM "label.dtd">
<labels _FORMAT="E:SERIAL.ZPL" _QUANTITY="1" _PRINTERNAME="Printer 1"
_JOBNAME="LBL101">
<label>
<variable name="organization">611</variable>
<variable name="item">Nuts</variable>
<variable name="lot">1234</variable>
<variable name="serial_number">12345</variable>
<variable name="revision">V2</variable>
<variable name="lot_status">1234</variable>
<variable name="serial_number_status">Active</variable>
</label>
</labels>
Introduction
Stored XML-Enabled ZPL Formats
19
11/15/07 Zebra XML-Enabled Printer Reference Guide 13426L-003 Rev. A

Introduction
20
Stored XML-Enabled ZPL Formats
Notes • ___________________________________________________________________
__________________________________________________________________________
__________________________________________________________________________
__________________________________________________________________________
__________________________________________________________________________
__________________________________________________________________________
__________________________________________________________________________
__________________________________________________________________________
__________________________________________________________________________
__________________________________________________________________________
13426L-003 Rev. A Zebra XML-Enabled Printer Reference Guide 11/15/07

2
ZebraDesigner for XML
This section details how to create XML-Enabled ZPL label formats with ZebraDesigner for
XML.
Contents
Overview . . . . . . . . . . . . . . . . . . . . . . . . . . . . . . . . . . . . . . . . . . . . . . . . . . . . . . . . . . . . . 22
Install Overview for ZebraDesigner for XML . . . . . . . . . . . . . . . . . . . . . . . . . . . . . . . . . . 23
Design Labels . . . . . . . . . . . . . . . . . . . . . . . . . . . . . . . . . . . . . . . . . . . . . . . . . . . . . . . . . 25
Add Variable Fields . . . . . . . . . . . . . . . . . . . . . . . . . . . . . . . . . . . . . . . . . . . . . . . . . . . . . 31
Export to Printer . . . . . . . . . . . . . . . . . . . . . . . . . . . . . . . . . . . . . . . . . . . . . . . . . . . . . . . . 33
11/15/07 Zebra XML-Enabled Printer Reference Guide 13426L-003 Rev. A

ZebraDesigner for XML
22
Overview
Overview
System and Software Requirements
A demonstration copy of ZebraDesigner for XML is provided on the Zebra XML-Enabled
Printers CD included with each printer. The demonstration version can be fully enabled by
entering a serial number available with the purchase of the fee-based product, available from
your Zebra Authorized Reseller.
These are the minimum requirements needed to run ZebraDesigner for XML:
• Pentium®-based computer with at least 64 MB of RAM
• One of the 32-bit Windows operating system: Windows 98 SE, Windows NT 4.0,
Windows ME, Windows 2000, Windows XP, and Windows Server 2003
• Hard disk with 75 MB of free disk space
•CD-ROM drive
• Administrator rights to the local computer during installation
13426L-003 Rev. A Zebra XML-Enabled Printer Reference Guide 11/15/07

Install Overview for ZebraDesigner for XML
Install Overview for ZebraDesigner for XML
When you put the ZebraDesigner for XML CD in your CD-ROM drive, the
installation/demonstration program automatically starts. You can browse the directory of the
CD and look at the brochures, technical documentation, sample files, and other documents on
the CD.
Note • If you are using Windows NT, Windows 2000, Windows XP, or Windows Server
2003 you have to log on with Administrator rights to perform the installation.
Close All Software Applications
Before you start installing ZebraDesigner for XML, close all other software applications. This
ensures a complete installation of ZebraDesigner for XML.
Run Installation
ZebraDesigner for XML
23
To install ZebraDesigner for XML on your desktop PC, do the following:
1. Insert the ZebraDesigner for XML CD into your CD-ROM drive. The Setup Wizard dialog
box opens.
Note • If the Setup Wizard does not start automatically, go to the main CD directory of
your ZebraDesigner for XML CD and double-click START.EXE.
2. Click Next.
3. Follow the prompts and make your selections accordingly.
4. Click Install.
5. Click Finish.
11/15/07 Zebra XML-Enabled Printer Reference Guide 13426L-003 Rev. A

ZebraDesigner for XML
24
Install Overview for ZebraDesigner for XML
Define Setup Options
To continue the installation, do the following:
1. Click Next.
2. Specify the program group you want to use for ZebraDesigner for XML.
3. Specify if shortcuts to ZebraDesigner for XML should be created on the desktop or in the
Quick Launch area.
4. To finish the installation, click Install.
After installation you are asked to install a printer driver. You must install a
ZebraDesigner driver. If you do not install a printer driver while installing the software,
you are asked to install one the first time you run the program.
5. After the installation is complete, the Start menu in Windows shows a new program group
for ZebraDesigner for XML. The program group contains shortcuts for all ZebraDesigner
for XML applications.
Install Printer Driver
To install the ZebraDesigner printer driver on your computer, do the following:
1. Click Start > Programs > ZebraDesigner for XML.
2. In the group ZebraDesigner for XML, click the shortcut Add printer. The printer
installation wizard starts.
3. Follow the prompts.
13426L-003 Rev. A Zebra XML-Enabled Printer Reference Guide 11/15/07

Design Labels
This section shows you how to design a label file with fixed and variable objects. The variable
objects get values from several sources. You learn how to:
• Place objects on the label
• Link objects to the variables
• Preview the label on the screen
The label you create will look like this:
ZebraDesigner for XML
Design Labels
25
Create a Basic label
Each time you create a new label, the Label Setup Wizard starts to help you set up the label
and connect to the printer.
To create a basic label, do the following:
1. Open ZebraDesigner for XML.
2. In the Standard toolbar, click . The Label Setup Wizard dialog box opens.
Note • To exit the Label Setup Wizard dialog box, click Finish.
3. Select a Printer
11/15/07 Zebra XML-Enabled Printer Reference Guide 13426L-003 Rev. A
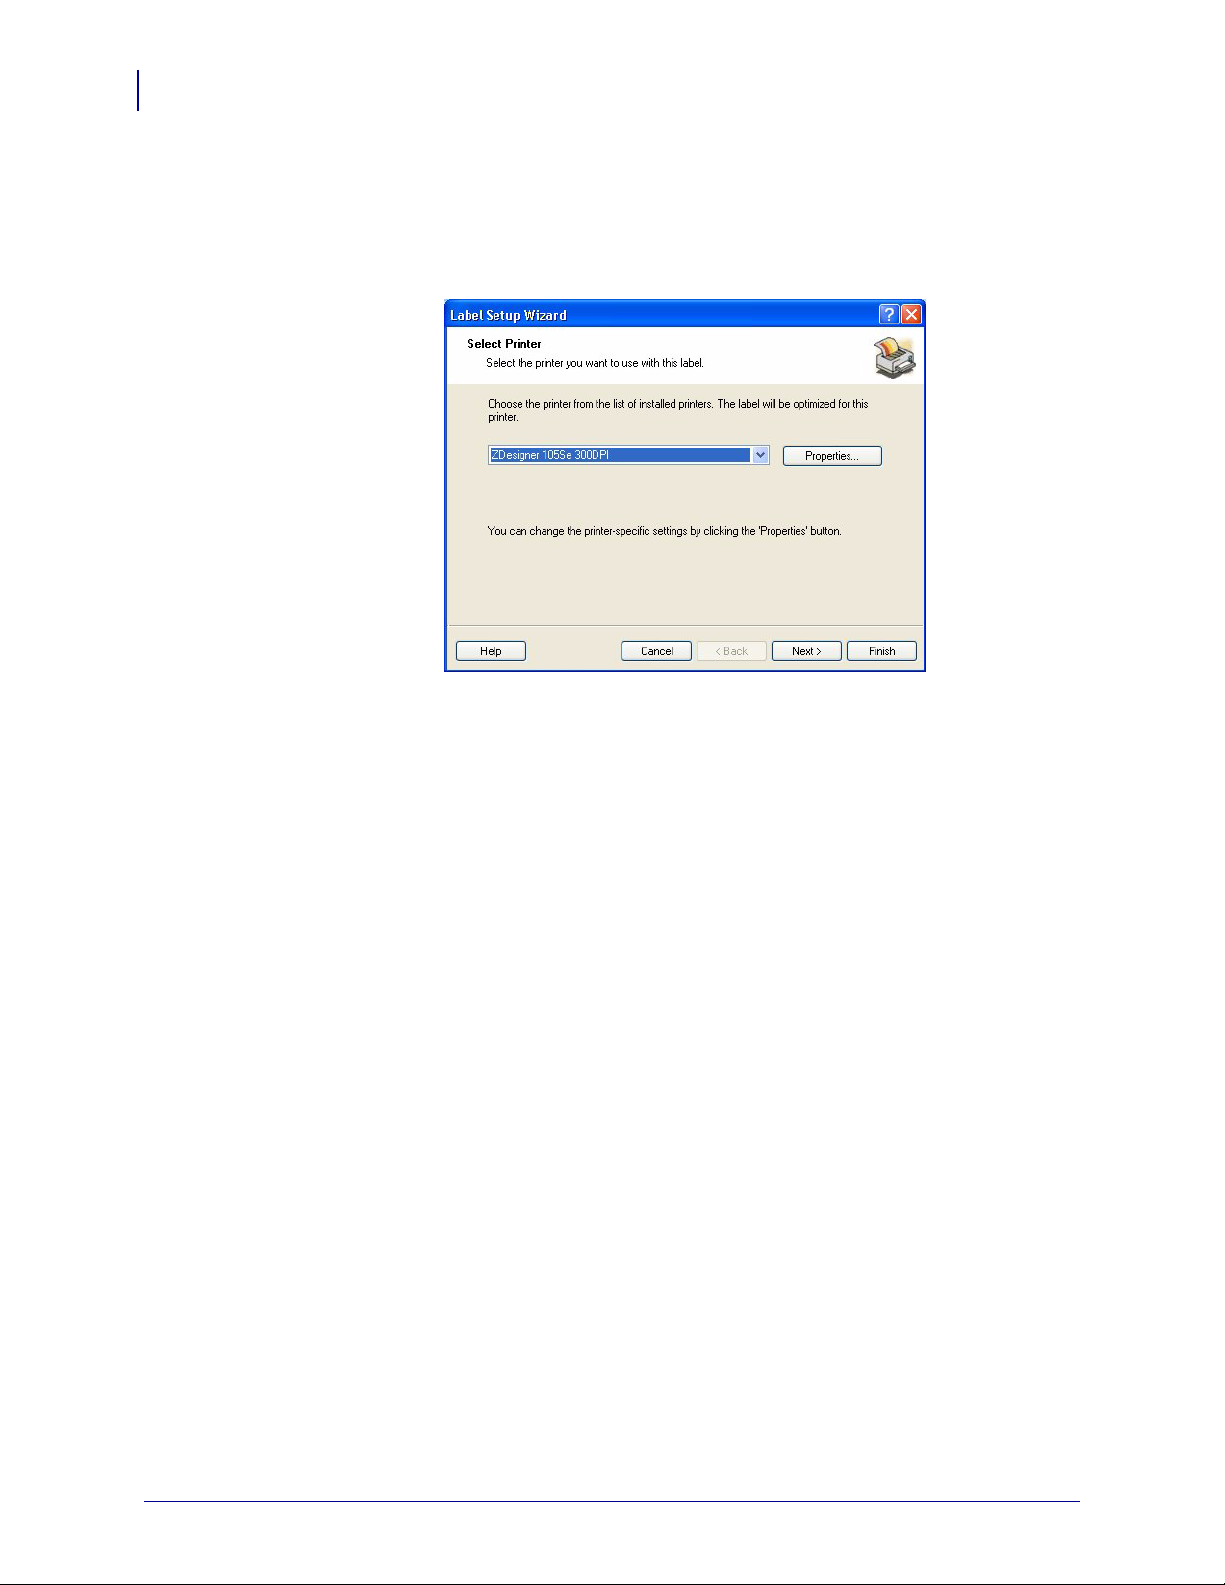
ZebraDesigner for XML
26
Design Labels
To select a printer, do the following:
4. From the menu, select File > Label Setup.
5. Select the printer you want to use for label printing.
6. Click Next.
13426L-003 Rev. A Zebra XML-Enabled Printer Reference Guide 11/15/07
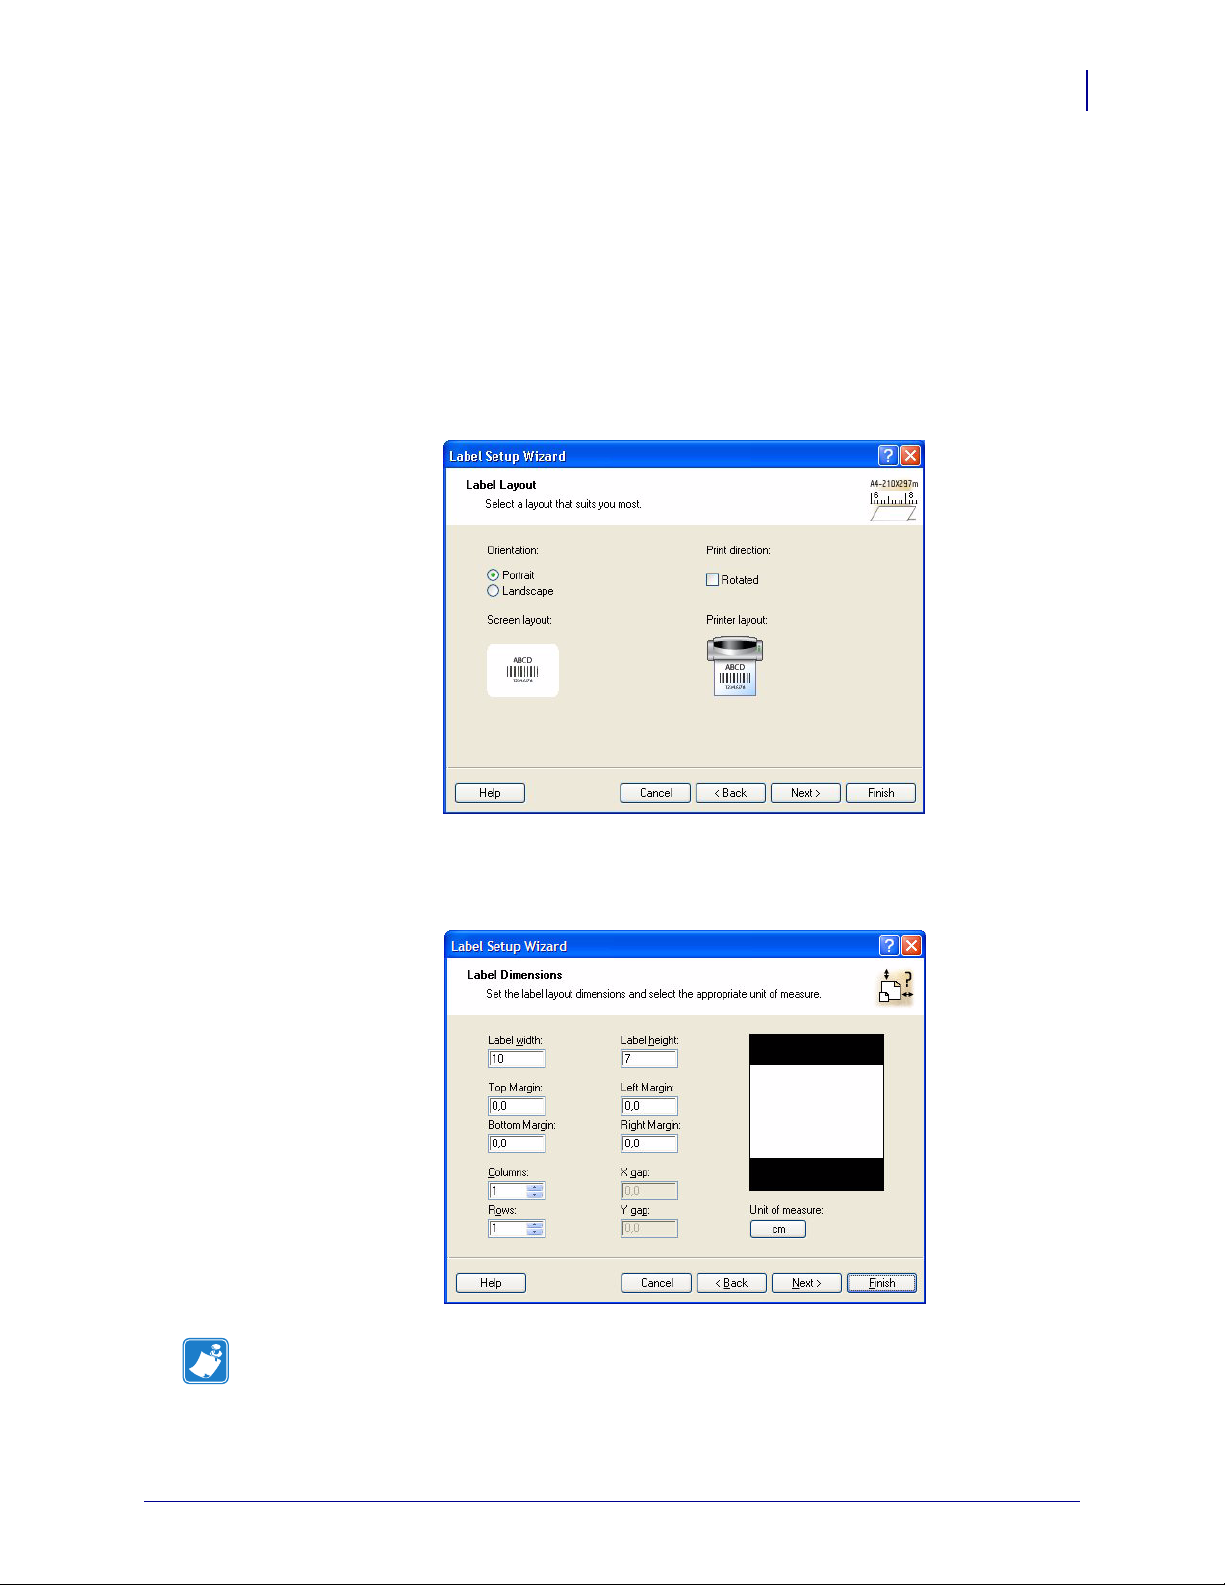
Define Label and Page Dimensions
To define the label dimensions, do the following:
1. If you want to use label stock, make your selections in the Select Stock dialog box.
2. Click Next. The Page Size dialog box opens to define the label dimensions.
3. Leave the Page size option at User defined default, and check Automatic Sizing.
4. Click Next. The Label Layout dialog box opens.
ZebraDesigner for XML
Design Labels
27
5. Select label orientation and print direction.
6. Click Next. The Label Dimensions dialog box opens.
Note • The Label Dimensions dialog box differs for thermal and office printers.
7. Enter 10 for label width and 7 for label height.
11/15/07 Zebra XML-Enabled Printer Reference Guide 13426L-003 Rev. A

ZebraDesigner for XML
28
Design Labels
Enter Fixed Text
Note • To change the unit of measure from centimeters to inches or other supported units,
click Unit of measure below the label preview.
8. Click Finish. A new empty label opens.
1. In the Toolbox, click . The text cursor appears on the screen.
2. Move the cursor to the location on the label where you want to place the text object, and
click the mouse button. The Tex t O bj ec t dialog box opens.
3. In the text box, type SAMPLE.
4. Click Finish.
5. To select the object, click it.
6. Using the Text toolbar, change the font for the text object. Choose Arial font, 28 point
size, and bold style.
7. To change the position and size of the text object, select the text object and drag it with
your mouse to the position you want.
13426L-003 Rev. A Zebra XML-Enabled Printer Reference Guide 11/15/07
The screen should show the following:
Insert Bar Codes
To add a non-changeable Code128 bar code on the label, do the following.
1. In the Toolbox, click .
2. Move the cursor to the desired position on the label and then click the mouse button. The
dialog box with object properties opens.
3. Enter the value 1234567890 for the bar code contents.
ZebraDesigner for XML
Design Labels
29
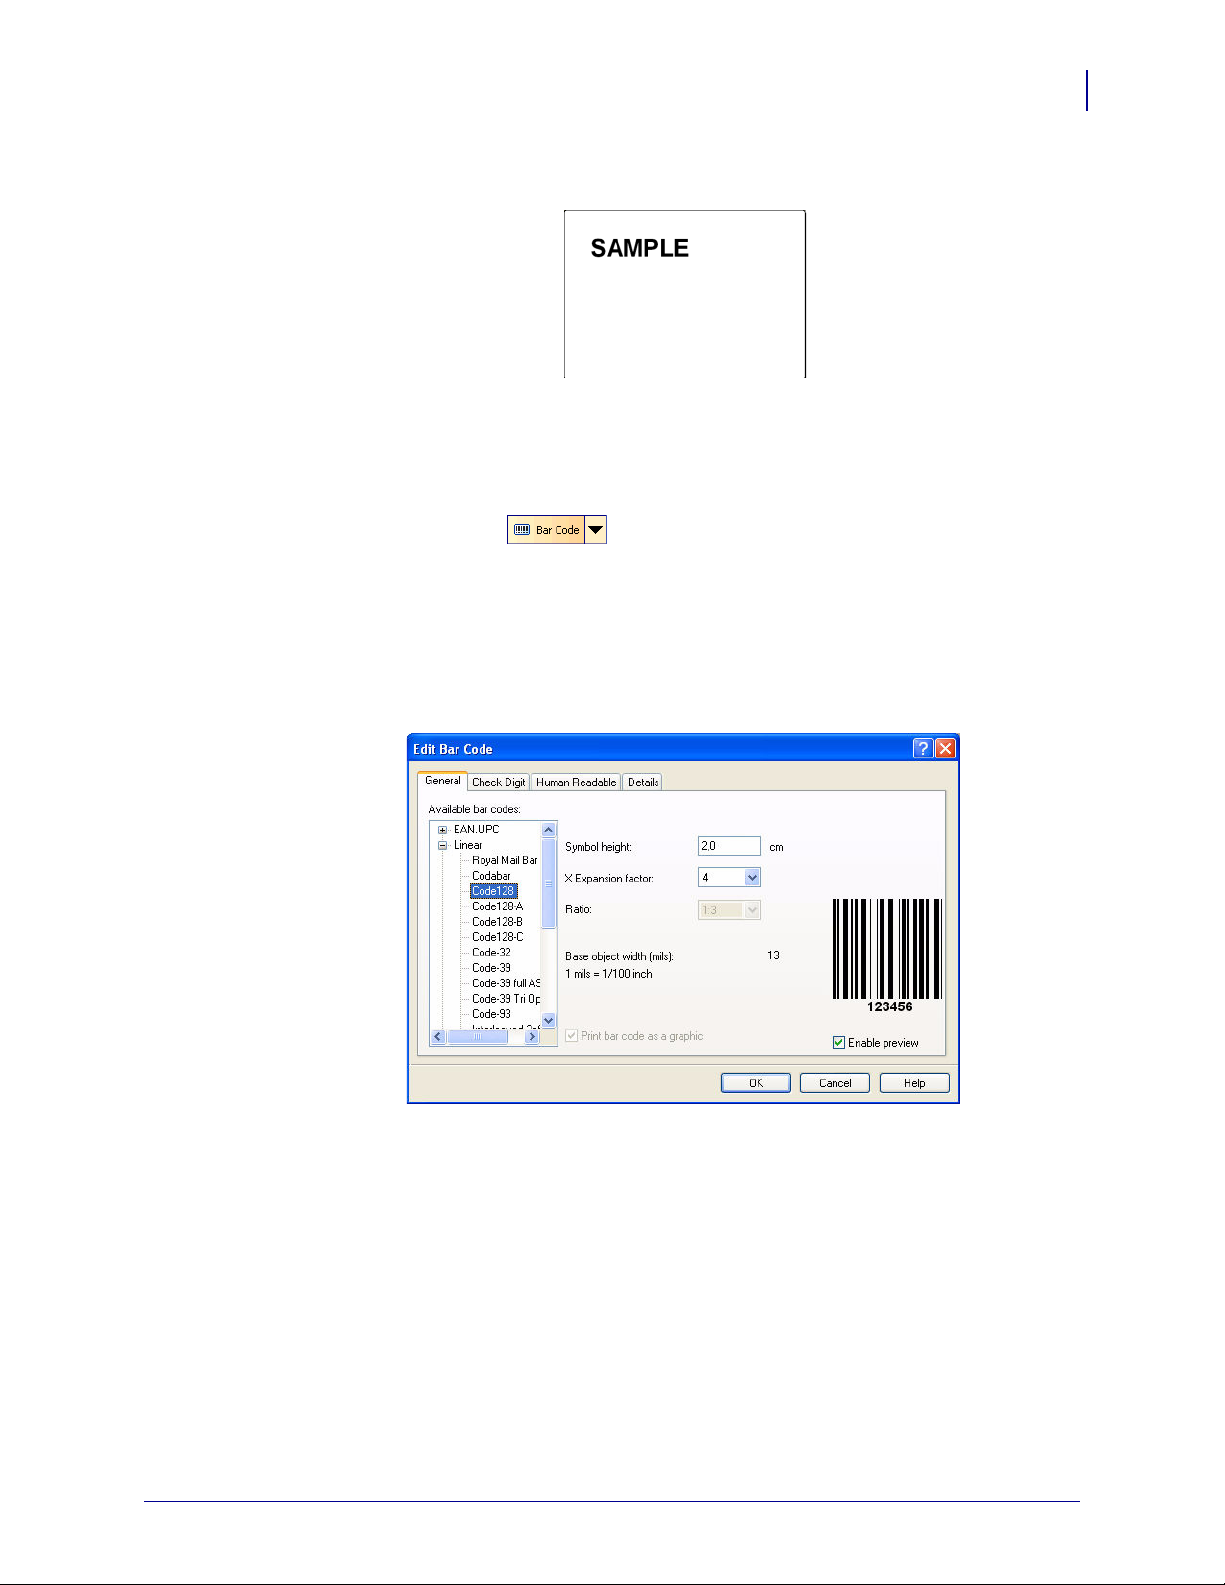
4. Click Define. The Edit Bar Code dialog box opens.
5. In the Available bar codes list, select bar code Code128 and then click OK.
6. To return to the label, click Finish.
7. To change the position of the bar code, select the bar code and drag it to the desired
position.
8. To change the object size, drag the object handles. The handles are small rectangles
surrounding the object when it is selected.
11/15/07 Zebra XML-Enabled Printer Reference Guide 13426L-003 Rev. A

ZebraDesigner for XML
30
Design Labels
The screen should show the following:
Save a Label
Always save your label during the design process.
To save a label, do the following:
1. In the Standard toolbar, click .
2. Type in the name of the label. For example, type label for the name of the label.
13426L-003 Rev. A Zebra XML-Enabled Printer Reference Guide 11/15/07
Add Variable Fields
If you want to print a label on which the data changes for each label, ZebraDesigner for XML
offers different variable fields (date/time fields, link to the variables) that you can use with
text, picture, and bar code objects.
For this example, a new label was created. The steps in the following topics explain how to
create a label that contains a variable field and date/time fields.
Create Variable Fields linked to Variables
The object on the label that is linked to the variable can have a different value for each printed
label.
To create a text object linked to the variable, do the following:
1. In the Toolbox, click .
2. Click the label where you want to place the text object. The Text Wizard dialog box opens.
ZebraDesigner for XML
Add Variable Fields
31
3. For the Contents, select Variable text.
4. Click Next.
5. Select Variable Field.
6. Click Next.
7. Select one of the existing variables in the list. If no variable is available in the list, you
must create some.
8. Click Finish. The text object is placed on the label and linked to the selected variable.
Note • This example shows how to create a text field linked to the variable. You can use the
same approach to create and link a variable to the bar code object.
11/15/07 Zebra XML-Enabled Printer Reference Guide 13426L-003 Rev. A

ZebraDesigner for XML
32
Add Variable Fields
Create Date and Time Variable Fields
Content of the variable field can be filled automatically with the date or time stamp from the
computer clock or printer clock (for supported printer models).
To place a date field on the label, do the following:
1. In the Toolbox, click the arrow .
2. From the list, select New Date Field.
3. Click on the label where you want to place the object. The Date dialog box opens.
4. Leave everything as default. The date is used on the label using the selected format.
5. Follow the prompts.
Use Prefix or Suffix Options
You can add a prefix and suffix to each variable field on the label. Both are added to the value
when you preview and print the label.
To add the prefix to the variable field on the label, do the following:
1. In the Toolbox, click the arrow .
2. From the list, select New Time Field.
3. On the label, click where you want to place the object. The Text Wizard dialog box opens.
4. Click Next.
5. Enter Time: for the Prefix option.
6. Click Finish. The text object is placed on the label and linked to the new variable. When
you print the label, the prefix Time: will be appended to the time value on the left side.
13426L-003 Rev. A Zebra XML-Enabled Printer Reference Guide 11/15/07

Export to Printer
During the label design make sure the label prints correctly. To verify the printout of your
label, from the menu, select
you can export the label to the printer. During the export process, ZebraDesigner for XML
runs the XML Format Generation Wizard and converts the label format to a supported Zebra
printer.
The generated file includes commands from the Zebra Programming Language (ZPL) and is
ready to be used in the printer for off-line printing.
Note • Off-line printing is a term that describes the type of label printing where the label
design application is not available at print time. Usually the label format is stored in the
memory of the printer and can be recalled. Off-line printing support is great for print
requirements where the PC computer cannot be included in the label printing process either
because of unacceptable working conditions or logistic issues.
Off-line printing also provides faster label printing because all variable objects on the label
use internal printer functionality.
To export the label to printer, do the following:
ZebraDesigner for XML
Export to Printer
File > Test Print. When you are satisfied with the designed label,
33
1. From the menu, select File > Export to Printer. The Stored Format Settings dialog box
opens.
11/15/07 Zebra XML-Enabled Printer Reference Guide 13426L-003 Rev. A

ZebraDesigner for XML
34
Export to Printer
2. Fill in the Printer Storage Location and Format Name fields, and then click Next. The Te st
XML File Settings dialog box opens.
3. Make your selections and then click Next. This confirmation dialog box opens: File(s)
created successfully.
4. Click OK. The Destination dialog box opens.
Your destination choices include:
• Use Current Location
• Send to IP Address
•Send to File
5. From the Destination dialog box, enable your desired destination and then click Next.
13426L-003 Rev. A Zebra XML-Enabled Printer Reference Guide 11/15/07

Use Current Location
If you chose Use Current Location, this confirmation dialog box opens: The format has been
transferred. The XML test file can now be sent.
To send the files to the printer using the port that the ZebraDesigner driver is using,
do the following:
1. To send, click Send File.
Send to File
If you chose Send to File, the File Destination dialog box opens.
To send a file to a specific destination, do the following:
1. From the File Destination dialog box, click Browse and navigate to the location you want
the file to go.
ZebraDesigner for XML
Export to Printer
35
2. Click Next. This confirmation dialog box opens: The Format has been saved.
3. Click OK.
11/15/07 Zebra XML-Enabled Printer Reference Guide 13426L-003 Rev. A

ZebraDesigner for XML
36
Export to Printer
File Destination
If you enable Send to File from the Destination dialog box, the File Destination dialog box
opens.
To choose a file destination, do the following:
1. Click Browse. The Browse for Folder dialog box opens.
2. Navigate to the path where you want the file sent.
3. Click OK.
The Browse for Folder dialog box closes and you return to the File Destination dialog box.
The Enter Destination Path text-box is populated with the destination you selected in the
Browse for Folder dialog box.
4. Click Next. The Format has been saved dialog box opens.
5. Click OK.
The Browse button in the File Destination dialog box allows you to navigate to the location
you want the file sent.
13426L-003 Rev. A Zebra XML-Enabled Printer Reference Guide 11/15/07

3
Compliance Label Formats
This section provides a high-level overview of the Zebra XML-enabled printer.
Contents
Overview . . . . . . . . . . . . . . . . . . . . . . . . . . . . . . . . . . . . . . . . . . . . . . . . . . . . . . . . . . . . . 38
GM1724a Compliance Label . . . . . . . . . . . . . . . . . . . . . . . . . . . . . . . . . . . . . . . . . . . . . . 39
IAEA Compliance Label . . . . . . . . . . . . . . . . . . . . . . . . . . . . . . . . . . . . . . . . . . . . . . . . . . 43
XML-Enabled IAEA Format Code . . . . . . . . . . . . . . . . . . . . . . . . . . . . . . . . . . . . . . . . . . 44
KMART Compliance. . . . . . . . . . . . . . . . . . . . . . . . . . . . . . . . . . . . . . . . . . . . . . . . . . . . . 46
XML-Enabled KMART Format Code . . . . . . . . . . . . . . . . . . . . . . . . . . . . . . . . . . . . . . . . 47
KMART UCC Compliance . . . . . . . . . . . . . . . . . . . . . . . . . . . . . . . . . . . . . . . . . . . . . . . . 49
XML-Enabled KMART UCC Format Code . . . . . . . . . . . . . . . . . . . . . . . . . . . . . . . . . . . . 50
WALMART Compliance . . . . . . . . . . . . . . . . . . . . . . . . . . . . . . . . . . . . . . . . . . . . . . . . . . 53
XML-Enabled WALMART Format Code. . . . . . . . . . . . . . . . . . . . . . . . . . . . . . . . . . . . . . 54
11/15/07 Zebra XML-Enabled Printer Reference Guide 13426L-003 Rev. A

Compliance Label Formats
38
Overview
Overview
These compliance label formats are included with the Zebra XML-enabled printer:
Table 1 • Compliance Label Formats
Label Type Zebra Format Name
GM1724a Compliance Labeling GM1724A.ZPL
IAEA Compliance Labeling IAEA.ZPL
KMART Compliance Labeling KMART.ZPL
KMART UCC Compliance Labeling KMARTUCC.ZPL
WALMART Compliance Labeling WALMART.ZPL
To assist in the implementation of compliance label printing applications, this appendix
provides detailed descriptions of each of the compliance label formats, the label format names,
examples of the label design, the default XML-enabled label format code, and sample XML
data to populate the label format.
13426L-003 Rev. A Zebra XML-Enabled Printer Reference Guide 11/15/07

GM1724a Compliance Label
2
This is an example of how the GM1724a compliance label looks:
Format File Name GM1724A.ZPL
Compliance Label Formats
GM1724a Compliance Label
39
Label Design
3
4
5
6
12
13
16
17
FROM_ ADDRESS_1
1
FROM_ ADDRESS_2
2
FROM_ ADDRESS_3
3
FROM_CITY_STATE_ZIP
4
From_Phone_No
5
ASY_IN_XXX
6
TO_ADDRESS_1
7
TO_ADDRESS_2
8
TO_ADDRESS_3
9
TO_CITY_STATE_ZIP
10
PLANT_DOCK
11
QUANTITY
12
MAT_HAND_CODE
13
7
1
24
25
REFERENCE
14
PART_NUMBER
15
LICENSE_PLATE
16
LICENSE_PLATE_HR
17
DATE
18
CONTAINER_TYPE
19
GROSS_WEIGHT
20
PCI_SEGMENT_13
21
PCI_SEGMENT_14
22
PCI_SEGMENT_15
23
PCI_SEGMENT_16
24
PCI_SEGMENT_17
25
8910
11
14
15
18
19
20
21
22
23
11/15/07 Zebra XML-Enabled Printer Reference Guide 13426L-003 Rev. A

Compliance Label Formats
40
GM1724a Compliance Label
XML-Enabled GM1724A Format Code
This is how the GM1724a compliance label format code looks:
^XA
^DFE:GM1724A.ZPL^FS
^MCY
^LRN^FWN^CFD,24^LH0,0
^CI0^PON^PMN
^LT0
^FO456,7^GB4,1204,4^FS
^FO356,12^GB3,1204,3^FS
^FO556,7^GB4,1204,4^FS
^FO456,413^GB100,4,4^FS
^FO557,360^GB248,4,4^FS
^FO185,885^GB170,4,4^FS
^FO457,721^GB4,493,4^FS
^FO556,933^GB248,4,4^FS
^FO454,818^GB100,4,4^FS
^FO186,8^GB3,1204,3^FS
^FO1,788^GB186,4,4^FS
^A0R,20,20^FO213,902^CI0^FDGROSS WEIGHT:^FS
^A0R,20,20^FO771,377^CI0^FDTO:^FS
^A0R,20,20^FO578,377^CI0^FDPLANT/DOCK:^FS
^A0R,20,20^FO518,19^CI0^FDQUANTITY:^FS
^A0R,20,20^FO520,427^CI0^FDMATERIAL HANDLING CODE:^FS
^A0R,20,20^FO518,836^CI0^FDREFERENCE:^FS
^A0R,20,20^FO422,19^CI0^FDPART^FS
^A0R,20,20^FO402,19^CI0^FDNUMBER^FS
^A0R,20,20^FO320,17^CI0^FDLICENSE PLATE (1J)^FS
^A0R,20,20^FO327,902^CI0^FDSHIPPMENT DATE:^FS
^A0R,20,20^FO274,900^CI0^FDCONTAINER TYPE:^FS
^A0R,20,20^FO768,33^CI0^FDFROM:^FS
^A0R,23,24^FO741,39^CI0^FN999^FDFROM_ADDRESS_1^FS
^A0R,23,24^FO702,40^CI0^FN998^FDFROM_ADDRESS_2^FS
^A0R,23,24^FO666,39^CI0^FN997^FDFROM_ADDRESS_3^FS
^A0R,23,24^FO631,40^CI0^FN996^FDFROM_CITY_STATE_ZIP^FS
^A0R,23,24^FO595,39^CI0^FN995^FDFrom_Phone_No^FS
^A0R,23,24^FO562,39^CI0^FN994^FDASY_IN_XXX^FS
^A0R,33,32^FO760,420^CI0^FN993^FDTO_ADDRESS_1^FS
^A0R,23,24^FO631,40^CI0^FN996^FDFROM_CITY_STATE_ZIP^FS
^A0R,23,24^FO595,39^CI0^FN995^FDFrom_Phone_No^FS
^A0R,23,24^FO562,39^CI0^FN994^FDASY_IN_XXX^FS
^A0R,33,32^FO760,420^CI0^FN993^FDTO_ADDRESS_1^FS
^A0R,35,32^FO719,420^CI0^FN992^FDTO_ADDRESS_2^FS
^A0R,35,32^FO674,423^CI0^FN991^FDTO_ADDRESS_3^FS
^A0R,35,32^FO629,420^CI0^FN990^FDTO_CITY_STATE_ZIP^FS
^A0R,57,58^FO556,509^CI0^FN989^FDPLANT_DOCK^FS
13426L-003 Rev. A Zebra XML-Enabled Printer Reference Guide 11/15/07

Continuation of the GM1724a Compliance Label on page 39.
^A0R,56,56^FO459,127^CI0^FN988^FDQUANTITY^FS
^A0R,56,56^FO461,493^CI0^FN987^FDMAT_HAND_CODE^FS
^A0R,56,56^FO461,919^CI0^FN986^FDREFERENCE^FS
^A0R,69,70^FO362,127^CI0^FN985^FDPART_NUMBER^FS
^BY3^FO234,52^BCR,83,N,N,N^FN984^FDLICENSE_PLATE^FS
^A0R,44,44^FO183,50^CI0^FN983^FDLICENSE_PLATE_HR^FS
^A0R,28,28^FO298,901^CI0^FN982^FDDATE^FS
^A0R,33,34^FO234,901^CI0^FN981^FDCONTAINER_TYPE^FS
^A0R,31,32^FO184,895^CI0^FN980^FDGROSS_WEIGHT^FS
^A0R,28,36^FO148,809^CI0^FN979^FDPCI_Segment_13^FS
^A0R,28,36^FO114,808^CI0^FN978^FDPCI_Segment_14^FS
^A0R,28,36^FO40,812^CI0^FN977^FDPCI_Segment_16^FS
^A0R,30,36^FO75,810^CI0^FN976^FDPCI_Segment_15^FS
^A0R,28,36^FO8,812^CI0^FN975^FDPCI_Segment_17^FS
^PQ1,0,1,Y
Compliance Label Formats
GM1724a Compliance Label
41
11/15/07 Zebra XML-Enabled Printer Reference Guide 13426L-003 Rev. A

Compliance Label Formats
42
GM1724a Compliance Label
GM1724A Format XML Data Stream
This is the expected XML data stream for the GM1724a compliance label:
<?xml version="1.0" standalone="no"?>
<!DOCTYPE labels SYSTEM "label.dtd">
<labels _FORMAT="GM1724A.ZPL" _QUANTITY="1" _PRINTERNAME="Printer 1"
_JOBNAME="LBL101">
<label>
<variable name="FROM_ADDRESS_1">Zebra Technologies</variable>
<variable name="FROM_ADDRESS_2">333 Corporate Woods</variable>
<variable name="FROM_ADDRESS_3"></variable>
<variable name="FROM_CITY_STATE_ZIP">Vernon Hills,
60061</variable>
<variable name="From_Phone_No">(847)793-2626</variable>
<variable name="ASY_IN_XXX">123</variable>
<variable name="TO_ADDRESS_1">Label Incorporated</variable>
<variable name="TO_ADDRESS_2">123 N.W. 132 ST</variable>
<variable name="TO_ADDRESS_3">Suite 1900</variable>
<variable name="TO_CITY_STATE_ZIP">Miami, FL 33183</variable>
<variable name="PLANT_DOCK">1234</variable>
<variable name="QUANTITY">10</variable>
<variable name="MAT_HAND_CODE">1234</variable>
<variable name="REFERENCE">123456</variable>
<variable name="PART_NUMBER">123456789</variable>
<variable name="LICENSE_PLATE">12345678989</variable>
<variable name="LICENSE_PLATE_HR">124450598585</variable>
<variable name="DATE">09FEB2004</variable>
<variable name="CONTAINER_TYPE">BOX</variable>
<variable name="GROSS_WEIGHT">100 LBS</variable>
<variable name="PCI_Segment_13">1233434535</variable>
<variable name="PCI_Segment_14">2332434534</variable>
<variable name="PCI_Segment_15">4565434534</variable>
<variable name="PCI_Segment_16">2343265244</variable>
<variable name="PCI_Segment_17">4534534534</variable>
</label>
</labels>
13426L-003 Rev. A Zebra XML-Enabled Printer Reference Guide 11/15/07
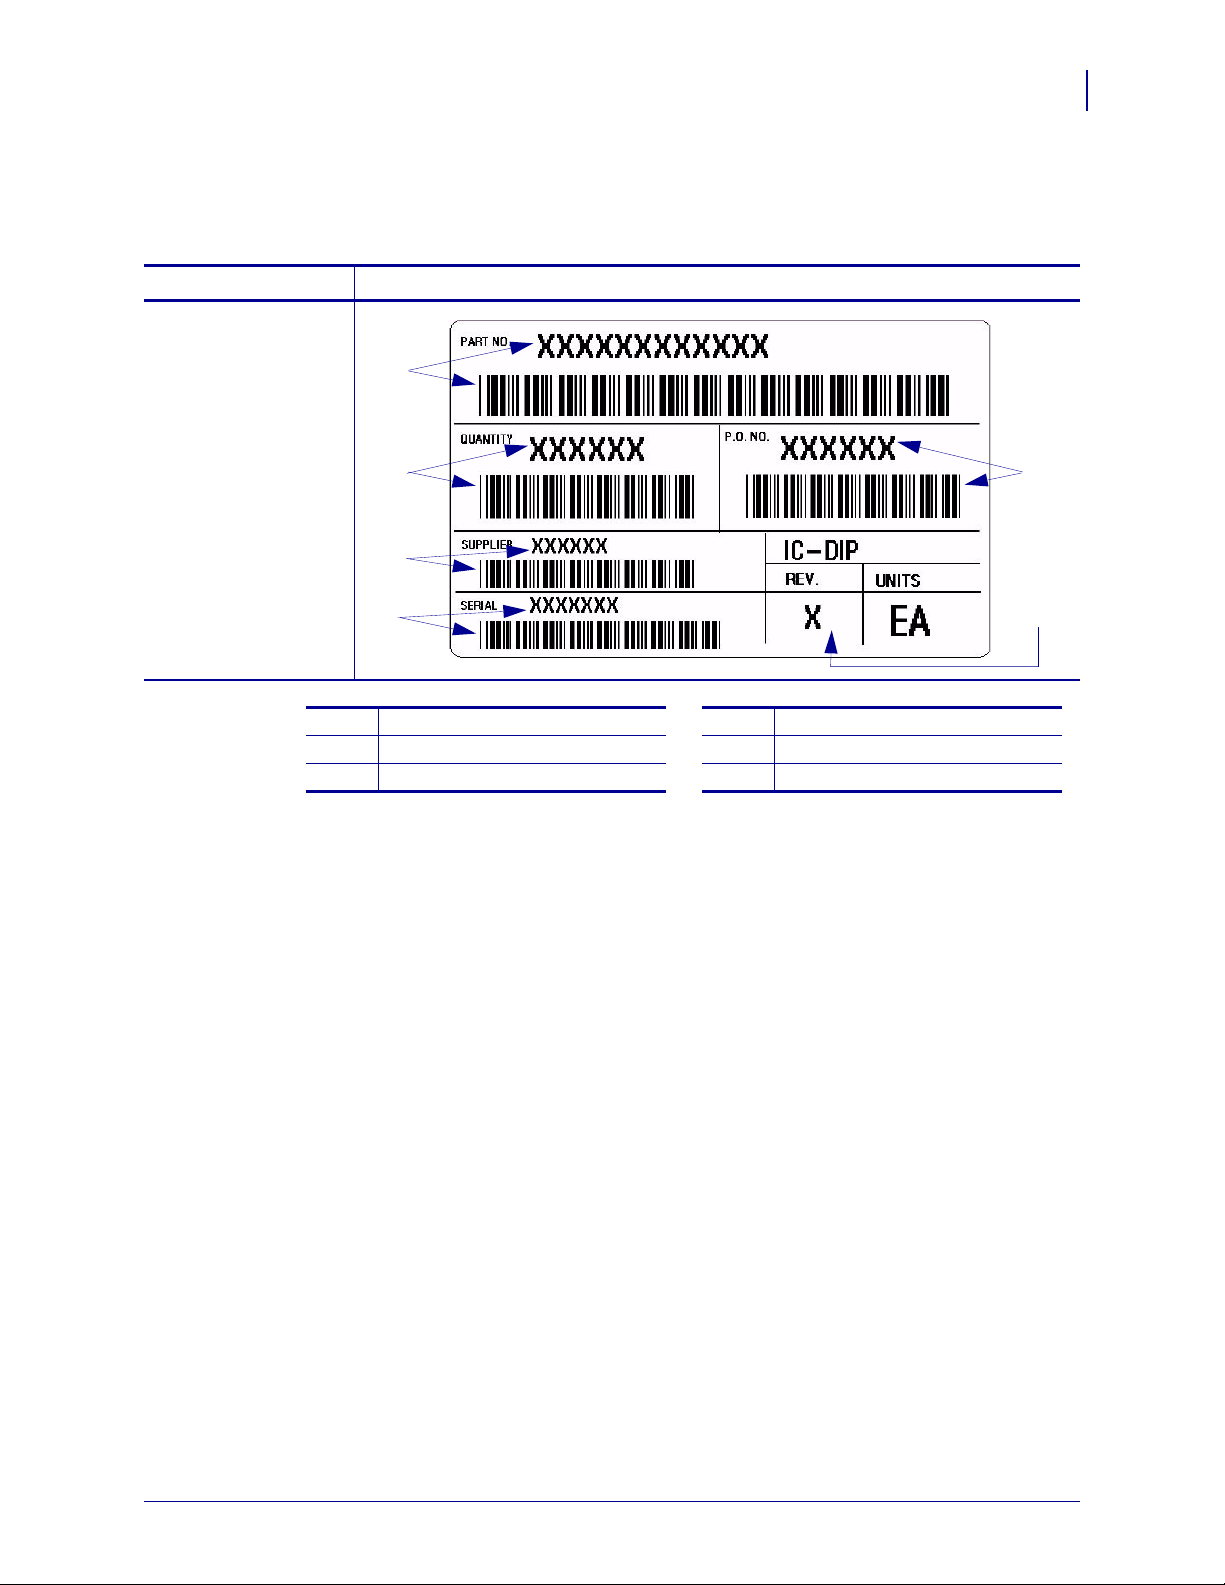
IAEA Compliance Label
This is an example of how the IAEA compliance label looks:
Format File Name IAEA.ZPL
Label Design
1
Compliance Label Formats
IAEA Compliance Label
43
1
2
3
2
4
5
PRTNUM
QUANTY
PONUMB
4
5
6
3
6
BAR008
SERIAL
REV
11/15/07 Zebra XML-Enabled Printer Reference Guide 13426L-003 Rev. A

Compliance Label Formats
44
XML-Enabled IAEA Format Code
XML-Enabled IAEA Format Code
This is how the IAEA compliance label format code looks:
^XA
^DFE:IAEA.ZPL^FS
^MCY
^LRN^FWN^CFD,24^LH0,0
^CI0^PON^PMN
^LT0
^FO301,7^GB4,1204,4^FS
^FO155,12^GB3,1204,3^FS
^FO559,7^GB4,1204,4^FS
^FO300,615^GB257,4,4^FS
^FO34,719^GB266,4,4^FS
^FO30,941^GB194,4,4^FS
^A0R,29,30^FO742,23^CI0^FDPART NO.^FS
^A0R,29,30^FO507,24^CI0^FDQUANTITY^FS
^A0R,29,30^FO514,627^CI0^FDP.O. NO.^FS
^A0R,29,30^FO254,24^CI0^FDSUPPLIER^FS
^A0R,29,30^FO107,24^CI0^FDSERIAL^FS
^A0R,64,56^FO218,761^CI0^FDIC-DIP^FS
^FO223,721^GB4,493,4^FS
^A0R,39,40^FO163,766^CI0^FDREV.^FS
^A0R,39,40^FO160,971^CI0^FDUNITS^FS
^A0R,99,86^FO28,1003^CI0^FDEA^FS
^A0R,79,80^FO699,198^CI0^FN999^FDPRTNUM^FS
^BY5,2.7^FO580,65^B3R,N,97,N,N^FN999^FDPRTNUM^FS
^A0R,79,80^FO451,181^CI0^FN998^FDQUANTY^FS
^BY4,2.7^FO333,67^B3R,N,104,N,N^FN998^FDQUANTY^FS
^A0R,79,80^FO453,753^CI0^FN997^FDPONUMB^FS
^BY4,2.7^FO335,677^B3R,N,104,N,N^FN997^FDPONUMB^FS
^A0R,51,52^FO236,186^CI0^FN996^FDBAR008^FS
^BY4,2.7^FO170,67^B3R,N,65,N,N^FN996^FDBAR008^FS
^A0R,51,52^FO95,183^CI0^FN995^FDSERIAL^FS
^BY4,2.7^FO22,66^B3R,N,67,N,N^FN995^FDSERIAL^FS
^A0R,79,80^FO48,806^CI0^FN994^FDREV^FS
^PQ1,0,1,Y
^XZ
13426L-003 Rev. A Zebra XML-Enabled Printer Reference Guide 11/15/07

IAEA Format XML Data Stream
This is the expected XML data stream for the IAEA compliance label format:
<?xml version="1.0" standalone="no"?>
<!DOCTYPE labels SYSTEM "label.dtd">
<labels _FORMAT="E:IAEA.ZPL" _QUANTITY="1" _PRINTERNAME="Printer 1"
_JOBNAME="LBL101">
<label>
<variable name="PRTNUM">611611123345</variable>
<variable name="QUANTY">000512</variable>
<variable name="PONUMB">100123</variable>
<variable name="BAR008">123456</variable>
<variable name="SERIAL">1010121</variable>
<variable name="REV">9</variable>
</label>
</labels>
Compliance Label Formats
XML-Enabled IAEA Format Code
45
11/15/07 Zebra XML-Enabled Printer Reference Guide 13426L-003 Rev. A

Compliance Label Formats
46
KMART Compliance
KMART Compliance
This is how the KMART compliance label looks:
Format File Name KMART.ZPL
Label Design
1
2
3
10
11
12
13
15
4
8
5
6
7
9
14
16
17
18
COMP_NAME
1
FROM_ADDRESS1
2
FROM_ ADDRESS2
3
FROM_CITY_STATE_ZIP
4
SHPTO1
5
SHPTO2
6
SHPTO3
7
SHPTO4
8
ZIPBAR
9
13426L-003 Rev. A Zebra XML-Enabled Printer Reference Guide 11/15/07
10
11
12
13
14
15
16
17
18
CARRYR
BILLAD
PRONUM
APPOIN
POTYPE
ITEM
CASQTY
CONCNT
BARCOD

XML-Enabled KMART Format Code
This is how the KMART compliance label format code looks:
^XA
^DFE:KMART.ZPL^FS
^MCY
^LRN^FWN^CFD,24^LH0,0
^CI0^PON^PMN
^LT0
^FO22,178^GB777,4,4^FS
^FO18,470^GB777,4,4^FS
^FO18,678^GB777,4,4^FS
^FO16,908^GB777,6,6^FS
^FO16,1004^GB777,4,4^FS
^FO456,468^GB2,212,2^FS
^A0N,29,36^FO36,33^CI0^FDFROM:^FS
^A0N,29,36^FO24,193^CI0^FDTO:^FS
^A0N,29,36^FO20,486^CI0^FDCARRIER:^FS
^A0N,29,36^FO20,827^CI0^FDITEM:^FS
^A0N,20,24^FO38,705^CI0^FDAPPOINTMENT^FS
^A0N,20,24^FO38,725^CI0^FDNUMBER:^FS
^A0N,20,24^FO490,707^CI0^FDORDER^FS
^A0N,20,24^FO490,727^CI0^FDTYPE:^FS
^A0N,20,24^FO24,574^CI0^FDB/L:^FS
^A0N,20,24^FO21,630^CI0^FDPRO:^FS
^A0N,30,36^FO180,30^CI0^FN999^FDCOMP_NAME^FS
^A0N,22,26^FO196,70^CI0^FN998^FDFROM_ADDRESS1^FS
^A0N,22,26^FO194,107^CI0^FN997^FDFROM_ADDRESS2^FS
^A0N,22,26^FO194,145^CI0^FN996^FDFROM_CITY_STATE_ZIP^FS
^A0N,33,36^FO99,191^CI0^FN995^FDSHPTO1^FS
^A0N,26,30^FO115,237^CI0^FN994^FDSHPTO2^FS
^A0N,26,30^FO115,279^CI0^FN993^FDSHPTO3^FS
^A0N,26,30^FO147,325^CI0^FN992^FDSHPTO4^FS
^BY3,2.7^FO249,349^B3N,N,107,N,N^FN991^FDZIPBAR^FS
^A0N,26,30^FO579,323^CI0^FN991^FDZIPBAR^FS
^A0N,26,30^FO24,523^CI0^FN990^FDCARRYR^FS
^A0N,26,30^FO97,572^CI0^FN989^FDBILLAD^FS
^A0N,26,30^FO97,626^CI0^FN988^FDPRONUM^FS
^A0N,37,30^FO196,709^CI0^FN987^FDAPPOIN^FS
^A0N,37,30^FO617,707^CI0^FN986^FDPOTYPE^FS
^A0N,52,42^FO137,816^CI0^FN985^FDITEM^FS
^A0N,52,42^FO539,816^CI0^FN984^FDCASQTY^FS
^A0N,52,38^FO42,934^CI0^FN983^FDCONCNT^FS
^BY4,2.7^FO167,1026^B2N,155,Y,N,N^FN982^FDBARCOD^FS
^PQ1,0,1,Y
^XZ
Compliance Label Formats
XML-Enabled KMART Format Code
47
11/15/07 Zebra XML-Enabled Printer Reference Guide 13426L-003 Rev. A
Compliance Label Formats
48
XML-Enabled KMART Format Code
KMART Format XML Data Stream
This is the expected XML data stream for the KMART compliance label:
<?xml version="1.0" standalone="no"?>
<!DOCTYPE labels SYSTEM "label.dtd">
<labels _FORMAT="KMART.ZPL" _QUANTITY="1" _PRINTERNAME="Printer 1"
_JOBNAME="LBL101">
<label>
<variable name="COMP_NAME">Zebra Technologies</variable>
<variable name="FROM_ADDRESS1">333 Corporate Woods
PKWY</variable>
<variable name="FROM_ADDRESS2">CTC Bldg</variable>
<variable name="FROM_CITY_STATE_ZIP">Vernon Hills, IL
60061</ variable>
<variable name="SHPTO1">Ink Corporation</variable>
<variable name="SHPTO2">South Street Plaza</variable>
<variable name="SHPTO3">Miami, FL</variable>
<variable name="SHPTO4">33183</variable>
<variable name="ZIPBAR">12345</variable>
<variable name="CARRYR">12345</variable>
<variable name="BILLAD">12345</variable>
<variable name="PRONUM">12C12</variable>
<variable name="APPOIN">12345679</variable>
<variable name="POTYPE">35346354</variable>
<variable name="ITEM">CAR REMOVERS</variable>
<variable name="CASQTY">12</variable>
<variable name="CONCNT">12</variable>
<variable name="BARCOD">1243543</variable>
</label>
</labels>
13426L-003 Rev. A Zebra XML-Enabled Printer Reference Guide 11/15/07

KMART UCC Compliance
This is how the KMART UCC compliance label looks:
Format File Name KMARTUCC.ZPL
Label Design
Compliance Label Formats
KMART UCC Compliance
49
1
2
3
4
10
11
12
5
6
7
8
9
13
14
15
16
FROM1
1
FROM2
2
FROM3
3
FROM4
4
CARRIER
5
PO_NUMBER
6
BLNUM
7
STORENUM
8
11/15/07 Zebra XML-Enabled Printer Reference Guide 13426L-003 Rev. A
SHIP_ZIP
9
TO_1
10
TO_2
11
POSTALCODE
12
PONUM
13
ORDERTYPE
14
DEPT
15
BARCODE
16

Compliance Label Formats
50
XML-Enabled KMART UCC Format Code
XML-Enabled KMART UCC Format Code
This is how the KMART UCC compliance label format code looks:
^XA
^DFE:KMARTUCC.ZPL^FS
^MCY
^LRN^FWN^CFD,24^LH0,0
^CI0^PON^PMN
^LT0
^FO0,337^GB805,4,4^FS
^FO4,594^GB805,4,4^FS
^FO0,754^GB805,4,4^FS
^FO0,943^GB805,4,4^FS
^FO402,8^GB4,331,4^FS
^A0N,26,26^FO34,25^CI0^FDFROM:^FS
^A0N,26,26^FO425,27^CI0^FDCARIIER:^FS
^A0N,26,26^FO421,128^CI0^FDPRO NUMBER:^FS
^A0N,26,26^FO423,220^CI0^FDB/L NUMBER:^FS
^A0N,26,26^FO36,360^CI0^FDTO:^FS
^A0N,22,20^FO19,611^CI0^FDSHIP TO POSTAL CODE:^FS
^A0N,69,70^FO97,358^CI0^FDKMART STORE^FS
^A0N,69,70^FO561,360^CI0^FD#^FS
^A0N,22,20^FO488,615^CI0^FDPO #:^FS
^A0N,22,20^FO488,666^CI0^FDORDER TYPE:^FS
^A0N,22,20^FO490,716^CI0^FDDEPT:^FS
^FO457,593^GD3,163,4,B,L^FS
^A0N,22,20^FO144,636^CI0^FD(400)^FS
^A0N,22,20^FO12,953^CI0^FDSERIAL SHIPPING CONTAINER^FS
^A0N,35,24^FO28,74^CI0^FN999^FDFROM1^FS
^A0N,35,24^FO30,133^CI0^FN998^FDFROM2^FS
^A0N,35,24^FO30,194^CI0^FN997^FDFROM3^FS
^A0N,35,24^FO30,256^CI0^FN996^FDFROM4^FS
^A0N,35,24^FO438,74^CI0^FN995^FDCARRIER^FS
^A0N,35,24^FO439,170^CI0^FN994^FDPO_NUMBER^FS
^A0N,35,24^FO438,267^CI0^FN993^FDBLNUM^FS
^A0N,62,62^FO634,363^CI0^FN992^FDSTORENUM^FS
^A0N,23,24^FO212,636^CI0^FN991^FDSHIP_ZIP^FS
^A0N,34,30^FO74,438^CI0^FN990^FDTO_1^FS
^A0N,32,30^FO68,495^CI0^FN989^FDTO_2^FS
13426L-003 Rev. A Zebra XML-Enabled Printer Reference Guide 11/15/07

Compliance Label Formats
XML-Enabled KMART UCC Format Code
Continuation of the XML-Enabled KMART UCC Format Code on page 50
^BY3^FO36,664^BCN,81,N,N,N^FN988^FDPOSTALCODE^FS
^A0N,40,30^FO567,607^CI0^FN987^FDPONUM^FS
^A0N,40,30^FO613,657^CI0^FN986^FDORDERTYPE^FS
^A0N,40,30^FO560,707^CI0^FN985^FDDEPT^FS
^BY3^FO45,1024^BCN,182,N,N,N^FN984^FDBARCODE^FS
^A0N,40,30^FO266,982^CI0^FN984^FDBARCODE^FS
^PQ1,0,1,Y
^XZ
51
11/15/07 Zebra XML-Enabled Printer Reference Guide 13426L-003 Rev. A

Compliance Label Formats
52
XML-Enabled KMART UCC Format Code
KMART UCC Format XML Data Stream
This is the expected XML data stream for the KMART UCC compliance label:
<?xml version="1.0" standalone="no"?>
<!DOCTYPE labels SYSTEM "label.dtd">
<labels _FORMAT="KMARTUCC.ZPL" _QUANTITY="1" _PRINTERNAME="Printer
1" _JOBNAME="LBL101">
<label>
</label>
</labels>
<variable name="FROM1">Zebra Technologies</variable>
<variable name="FROM2">333 Corporate Woods PKWY</variable>
<variable name="FROM3">Vernon Hills</variable>
<variable name="FROM4">IL, 60061</variable>
<variable name="CARRIER">MAX</variable>
<variable name="PO_NUMBER">123456</variable>
<variable name="BLNUM">12233</variable>
<variable name="STORENUM">1221</variable>
<variable name="SHIP_ZIP">33183</variable>
<variable name="TO_1">Kmart Plaza Salt Lake</variable>
<variable name="TO_2">Salt Lake, UT 33109</variable>
<variable name="POSTALCODE">33109</variable>
<variable name="PONUM">1232</variable>
<variable name="ORDERTYPE">231</variable>
<variable name="DEPT">12321</variable>
<variable name="BARCODE">(401) 234 432434</variable>
13426L-003 Rev. A Zebra XML-Enabled Printer Reference Guide 11/15/07

WALMART Compliance
This is how the WALMART compliance label looks:
Format File Name WALMART.ZPL
Label Design
Compliance Label Formats
WALMART Compliance
1
2
53
1
2
3
4
5
6
7
4
5
6
7
8
9
10
PRONUM
BILLAD
SMLBAR
SHIPT1
SHIPT2
SHIPT3
SHIPF1
8
9
10
11
12
13
3
11
12
13
SHIPF2
SHIPF3
CARRYR
POLINE
BIGBAR
INTERP
11/15/07 Zebra XML-Enabled Printer Reference Guide 13426L-003 Rev. A

Compliance Label Formats
54
XML-Enabled WALMART Format Code
XML-Enabled WALMART Format Code
This is how the WALMART compliance label format code looks:
^XA
^DFE:WALMART.ZPL^FS
^MCY
^LRN^FWN^CFD,24^LH0,0
^CI0^PR2^MNY^MTT^MMT^MD0^PON^PMN
^FO32,55^GB769,1177,4^FS
^FO596,55^GB5,1173,5^FS
^FO407,830^GB389,5,5^FS
^FO410,830^GB5,400,5^FS
^A0R,27,32^FO740,75^CI0^FDSHIP FROM:^FS
^A0R,24,26^FO716,300^CI0^FDZEBRA TECHNOLOGIES^FS
^A0R,24,26^FO623,302^CI0^FDVERNON HILLS, IL 60061^FS
^A0R,24,26^FO669,300^CI0^FD333 CORPORATE WOODS PARKWAY^FS
^A0R,27,32^FO542,78^CI0^FDSHIP TO:^FS
^A0R,27,32^FO369,74^CI0^FDSHIP FOR:^FS
^A0R,27,32^FO224,69^CI0^FDCARRIER:^FS
^A0R,23,24^FO213,751^CI0^FDPO/ LiNE^FS
^A0R,26,28^FO712,871^CI0^FN999^FDPRONUM^FS
^A0R,26,28^FO633,870^CI0^FN998^FDBILLAD^FS
^BY2^FO492,903^BCR,80,N,N,N^FN997^FDSMLBAR^FS
^A0R,26,28^FO448,969^CI0^FN997^FDSMLBAR^FS
^A0R,23,24^FO545,225^CI0^FN996^FDSHIPT1^FS
^A0R,28,28^FO483,225^CI0^FN995^FDSHIPT2^FS
^A0R,28,28^FO432,227^CI0^FN994^FDSHIPT3^FS
^A0R,27,32^FO370,227^CI0^FN993^FDSHIPF1^FS
^A0R,27,32^FO321,227^CI0^FN992^FDSHIPF2^FS
^A0R,27,32^FO272,229^CI0^FN991^FDSHIPF3^FS
^A0R,23,28^FO212,230^CI0^FN990^FDCARRYR^FS
^A0R,23,24^FO212,876^CI0^FN989^FDPOLINE^FS
^BY3^FO85,154^BCR,120,N,N,N^FN988^FDBIGBAR^FS
^A0R,23,24^FO48,354^CI0^FN987^FDINTERP^FS
^PQ1,0,1,Y
^XZ
13426L-003 Rev. A Zebra XML-Enabled Printer Reference Guide 11/15/07
WALMART Format XML Data Stream
This is the expected XML data stream for the WALMART compliance label:
<?xml version="1.0" standalone="no"?>
<!DOCTYPE labels SYSTEM "label.dtd">
<labels _FORMAT="E:WALMART.ZPL" _QUANTITY="1" _PRINTERNAME="Printer
1" _JOBNAME="LBL101">
<label>
<variable name="PRONUM">00000890753490812456</variable>
<variable name="BILLAD">10000123561276700000</variable>
<variable name="SMLBAR">1235ABCD0</variable>
<variable name="SHIPT1">Toy Corporation</variable>
<variable name="SHIPT2">900 Troy 32 ST</variable>
<variable name="SHIPT3">Bolton, IL 60501</variable>
<variable name="SHIPF1">ATTN: Anderson Jerry</variable>
<variable name="SHIPF2">100 units palstic models </variable>
<variable name="SHIPF3">Central Facility 1234</variable>
<variable name="CARRYR">Delivery Corp.</variable>
<variable name="POLINE">0000789767894567</variable>
<variable name="BIGBAR">30006123987612349876</variable>
<variable name="INTERP">000030006123987612349876</variable>
</label>
</labels>
Compliance Label Formats
XML-Enabled WALMART Format Code
55
11/15/07 Zebra XML-Enabled Printer Reference Guide 13426L-003 Rev. A

Compliance Label Formats
56
XML-Enabled WALMART Format Code
Notes • ___________________________________________________________________
__________________________________________________________________________
__________________________________________________________________________
__________________________________________________________________________
__________________________________________________________________________
__________________________________________________________________________
__________________________________________________________________________
__________________________________________________________________________
__________________________________________________________________________
__________________________________________________________________________
13426L-003 Rev. A Zebra XML-Enabled Printer Reference Guide 11/15/07

Glossary
API The acronym for Application Program Interface. API is a set of standards or
conventions by which programs call the specific operating system or network services.
Common Gateway Interface (CGI) A common gateway interface (CGI) is a standard
way for a Web server to pass a Web user's request to an application program and to receive
data back to forward to the user. When the user requests a Web page (for example, by clicking
on a highlighted word or entering a Web site address), the server sends back the requested
page.
data stream In data communications, this is a flow of undifferentiated data trasmitted byte
by byte.
DTD The acronym for Document Type Definition. A DTD is a specification that
accompanies a document and identifies what the markups are that separate paragraphs,
identify topic headings, and so forth and how each is to be processed.
firmware Software routines that are stored in ROM (Read Only Memory). This is typically
part of a device, such as a printer or
Flash memory A type of memory that allows read-and-write operations, and permanently
stores data when the power is turned off. Useful for storing firmware because it can be easily
updated by downloading new code.
parse The process of breaking down components into smaller pieces.
stored format A format that is stored in the printer’s memory. This format can be recalled
and used to print out a label.
TCP/IP Transmission Control Protocol/Internet Protocol, the de facto standard for Internet
communications and widely used on local area networks.
UNIX A general-purpose computer operating system used on many different kinds of
computers.
PSII.
11/15/07 Zebra XML-Enabled Printer Reference Guide 13426L-003 Rev. A

58
Glossary
XML The acronym for eXtensible Markup Language. XML is a language that creates markup
language regulated by the World Wide Web Consortium (W3C).
ZebraDesigner for XML A bar code design and printing software application.
ZebraNet PrintServer II An Ethernet connectivity solution.
®
ZebraLink
Allows you to connect and control your bar code printers anywhere and
anytime.
ZPL II Zebra Programming Language II is a powerful label-definition and printer-control
language.
13426L-003 Rev. A Zebra XML-Enabled Printer Reference Guide 11/15/07

Index
C
compliance label formats
GM1724a, 39
IAEA, 43
KMART, 46
KMART UCC, 49
overview, 38
WAL MA RT, 53
contacts, 7
customer service, 7
D
data stream
example, 19
IAEA compliance label, 45
KMART compliance label, 48
overview, 16
WALMART compliance label, 55
Document Type Definition (DTD), 15
F
format code
example, 18
GM1724a compliance label, 40
IAEA compliance label, 44
KMART compliance label, 47
KMART UCC compliance label, 50
WALMART compliance label, 54
I
IAEA compliance label format, 43
K
KMART compliance label format, 46
KMART UCC compliance label format, 49
L
label formats
compliance, 37
liability, 2
R
related documents, 10
S
sales, 7
T
technical support, 7
W
WALMART compliance label format, 53
X
XML-enabled ZPL formats, 17
G
GM1724a compliance label format, 39
11/15/07 Zebra XML-Enabled Printer Reference Guide 13426L-003 Rev. A

60
Index
Z
ZebraDesigner with XML extensions
overview, 22
13426L-003 Rev. A Zebra XML-Enabled Printer Reference Guide 11/15/07


Zebra Technologies Corporation
333 Corporate Woods Parkway
Vernon Hills, Illinois 60061.3109 U.S.A.
Telephone: +1 847 793 2600
Facsimile: +1 847 913 8766
Zebra Technologies Europe Limited
Zebra House
The Valley Centre, Gordon Road
High Wycombe
Buckinghamshire, HP13 6EQ, UK
Telephone: +44 (0) 1494 472872
Facsimile: +44 (0) 1494 450103
Zebra Technologies Asia Pacific, LLC
120 Robinson Road
#06-01 Parakou Building
Singapore 068913
Telephone: +65 6858 0722
Facsimile: +65 6885 0838
Part Number: 13426L-003 Rev. A
© 2007 ZIH Corp.
 Loading...