


ZebraNet
®
Wireless Print Server
User Guide
for firmware versions V50.14 and earlier
and V60.14 and earlier

© 2006 ZIH Corp.
The copyrights in this manual and the label print engine described therein are
owned by Zebra Technologies Corporation. Unauthorized reproduction of this
manual or the software in the label print engine may result in imprisonment of
up to one year and fines of up to $10,000 (17 U.S.C.506). Copyright violators
may be subject to civil liability.
This product may contain ZPL®, ZPL II®, and ZebraLink™ programs;
Element Energy Equalizer® Circuit; E3®; and AGFA fonts. Software © ZIH
Corp. All rights reserved worldwide.
ZebraLink and all product names and numbers are trademarks, and Zebra, the
Zebra logo, ZPL, ZPL II, Element Energy Equalizer Circuit, and E3 Circuit are
registered trademarks of ZIH Corp. All rights reserved worldwide.
CG Triumvirate is a trademark of AGFA Monotype Corporation. All rights
reserved worldwide. CG Triumvirate™ font © AGFA Monotype Corporation.
Intellifont® portion © AGFA Monotype Corporation. All rights reserved
worldwide. UFST is a registered trademark of AGFA Monotype Corporation.
All rights reserved worldwide.
All other brand names, product names, or trademarks belong to their respective
holders.
Part Number: 13422L-003 Rev. A

Contents
Preface . . . . . . . . . . . . . . . . . . . . . . . . . . . . . . . . . . . . . . . . . . . . . . . . . . . . . . . . . . vii
Contacts . . . . . . . . . . . . . . . . . . . . . . . . . . . . . . . . . . . . . . . . . . . . . . . . . . . . . . . . . . . . . . viii
Web Site. . . . . . . . . . . . . . . . . . . . . . . . . . . . . . . . . . . . . . . . . . . . . . . . . . . . . . . . . . . viii
The Americas . . . . . . . . . . . . . . . . . . . . . . . . . . . . . . . . . . . . . . . . . . . . . . . . . . . . . . . viii
Europe, Africa, Middle East, and India . . . . . . . . . . . . . . . . . . . . . . . . . . . . . . . . . . . . viii
Asia Pacific. . . . . . . . . . . . . . . . . . . . . . . . . . . . . . . . . . . . . . . . . . . . . . . . . . . . . . . . . viii
Document Conventions. . . . . . . . . . . . . . . . . . . . . . . . . . . . . . . . . . . . . . . . . . . . . . . . . . . . ix
1 • Introduction . . . . . . . . . . . . . . . . . . . . . . . . . . . . . . . . . . . . . . . . . . . . . . . . . . . . 1
Printer Compatibility . . . . . . . . . . . . . . . . . . . . . . . . . . . . . . . . . . . . . . . . . . . . . . . . . . . . . . 2
Connecting to a Wireless Network . . . . . . . . . . . . . . . . . . . . . . . . . . . . . . . . . . . . . . . . . . . 2
Third-Party Components. . . . . . . . . . . . . . . . . . . . . . . . . . . . . . . . . . . . . . . . . . . . . . . . . . . 3
Supported Wireless Cards . . . . . . . . . . . . . . . . . . . . . . . . . . . . . . . . . . . . . . . . . . . . . . 3
Access Point. . . . . . . . . . . . . . . . . . . . . . . . . . . . . . . . . . . . . . . . . . . . . . . . . . . . . . . . . 4
Interaction between Wired and Wireless Print Servers. . . . . . . . . . . . . . . . . . . . . . . . . . . . 5
Check for Wired Print Server . . . . . . . . . . . . . . . . . . . . . . . . . . . . . . . . . . . . . . . . . . . . 5
IP Addresses . . . . . . . . . . . . . . . . . . . . . . . . . . . . . . . . . . . . . . . . . . . . . . . . . . . . . . . . 6
View Printer Web Pages. . . . . . . . . . . . . . . . . . . . . . . . . . . . . . . . . . . . . . . . . . . . . . . . 6
2 • Configuration . . . . . . . . . . . . . . . . . . . . . . . . . . . . . . . . . . . . . . . . . . . . . . . . . . . 7
Overview. . . . . . . . . . . . . . . . . . . . . . . . . . . . . . . . . . . . . . . . . . . . . . . . . . . . . . . . . . . . . . . 8
Configure Using the SetWLAN Utility . . . . . . . . . . . . . . . . . . . . . . . . . . . . . . . . . . . . . . . . . 9
Install a Wireless or Compact Flash Wireless Card . . . . . . . . . . . . . . . . . . . . . . . . . . . . . 15
Wireless Card. . . . . . . . . . . . . . . . . . . . . . . . . . . . . . . . . . . . . . . . . . . . . . . . . . . . . . . 15
Compact Flash Wireless Card . . . . . . . . . . . . . . . . . . . . . . . . . . . . . . . . . . . . . . . . . . 17
10/24/06 Wireless Print Server User Guide 13422L-003 Rev. A

Contents
iv
3 • Wireless Status and Settings . . . . . . . . . . . . . . . . . . . . . . . . . . . . . . . . . . . . . 19
Overview. . . . . . . . . . . . . . . . . . . . . . . . . . . . . . . . . . . . . . . . . . . . . . . . . . . . . . . . . . . . . . 20
View Wireless Status through the Control Panel . . . . . . . . . . . . . . . . . . . . . . . . . . . . . . . 20
Link Status Indicator . . . . . . . . . . . . . . . . . . . . . . . . . . . . . . . . . . . . . . . . . . . . . . . . . . 20
Wireless Signal Indicators . . . . . . . . . . . . . . . . . . . . . . . . . . . . . . . . . . . . . . . . . . . . . 21
Poor Signal Setting. . . . . . . . . . . . . . . . . . . . . . . . . . . . . . . . . . . . . . . . . . . . . . . . . . . 21
Print a Network Configuration Label. . . . . . . . . . . . . . . . . . . . . . . . . . . . . . . . . . . . . . . . . 22
View or Change Control Panel Parameters for the Wireless Print Server . . . . . . . . . . . . 23
Parameters for Zebra Printers Other Than the S4M. . . . . . . . . . . . . . . . . . . . . . . . . . 23
Parameters for the S4M Printer . . . . . . . . . . . . . . . . . . . . . . . . . . . . . . . . . . . . . . . . . 26
Printer Web Pages . . . . . . . . . . . . . . . . . . . . . . . . . . . . . . . . . . . . . . . . . . . . . . . . . . . . . . 28
Return Network Parameters to Defaults. . . . . . . . . . . . . . . . . . . . . . . . . . . . . . . . . . . . . . 34
4 • ZPL Commands for the Wireless Print Server . . . . . . . . . . . . . . . . . . . . . . . 35
^NB Search for Wired Print Server during Network Boot . . . . . . . . . . . . . . . . . . . . . . . . 36
^NN Set SNMP . . . . . . . . . . . . . . . . . . . . . . . . . . . . . . . . . . . . . . . . . . . . . . . . . . . . . . . 37
^NP Set Primary/Secondary Device . . . . . . . . . . . . . . . . . . . . . . . . . . . . . . . . . . . . . . . 38
^NS Change Wired Networking Settings . . . . . . . . . . . . . . . . . . . . . . . . . . . . . . . . . . . . 39
^NT Set SMTP . . . . . . . . . . . . . . . . . . . . . . . . . . . . . . . . . . . . . . . . . . . . . . . . . . . . . . . . 40
^NW Set Web Authentication Timeout Value . . . . . . . . . . . . . . . . . . . . . . . . . . . . . . . . . 41
^WA Set Antenna Parameters . . . . . . . . . . . . . . . . . . . . . . . . . . . . . . . . . . . . . . . . . . . . 42
^WE Set Wireless Encryption Values . . . . . . . . . . . . . . . . . . . . . . . . . . . . . . . . . . . . . . . 43
^WI Change Wireless Network Settings . . . . . . . . . . . . . . . . . . . . . . . . . . . . . . . . . . . . 45
^WL Set LEAP Parameters . . . . . . . . . . . . . . . . . . . . . . . . . . . . . . . . . . . . . . . . . . . . . . 46
~WL Print Network Configuration Label . . . . . . . . . . . . . . . . . . . . . . . . . . . . . . . . . . . . . 47
^WP Set Wireless Password . . . . . . . . . . . . . . . . . . . . . . . . . . . . . . . . . . . . . . . . . . . . . 48
^WR Set Transmit Rate . . . . . . . . . . . . . . . . . . . . . . . . . . . . . . . . . . . . . . . . . . . . . . . . . 49
~WR Reset Wireless Card . . . . . . . . . . . . . . . . . . . . . . . . . . . . . . . . . . . . . . . . . . . . . . . 50
^WS Set Wireless Card Values . . . . . . . . . . . . . . . . . . . . . . . . . . . . . . . . . . . . . . . . . . . 51
5 • Troubleshooting . . . . . . . . . . . . . . . . . . . . . . . . . . . . . . . . . . . . . . . . . . . . . . . 53
General Issues . . . . . . . . . . . . . . . . . . . . . . . . . . . . . . . . . . . . . . . . . . . . . . . . . . . . . . . . . 54
Encryption Issues . . . . . . . . . . . . . . . . . . . . . . . . . . . . . . . . . . . . . . . . . . . . . . . . . . . . . . . 55
IP Issues. . . . . . . . . . . . . . . . . . . . . . . . . . . . . . . . . . . . . . . . . . . . . . . . . . . . . . . . . . . . . . 56
13422L-003 Rev. A Wireless Print Server User Guide 10/24/06

Contents
A • WebView Web Pages . . . . . . . . . . . . . . . . . . . . . . . . . . . . . . . . . . . . . . . . . . . 57
Home Page. . . . . . . . . . . . . . . . . . . . . . . . . . . . . . . . . . . . . . . . . . . . . . . . . . . . . . . . . . . . 58
View Printer Configuration . . . . . . . . . . . . . . . . . . . . . . . . . . . . . . . . . . . . . . . . . . . . . . . . 60
View and Modify Printer Settings . . . . . . . . . . . . . . . . . . . . . . . . . . . . . . . . . . . . . . . . . . . 61
Network Configuration Screens . . . . . . . . . . . . . . . . . . . . . . . . . . . . . . . . . . . . . . . . . 67
Directory Listing . . . . . . . . . . . . . . . . . . . . . . . . . . . . . . . . . . . . . . . . . . . . . . . . . . . . . . . . 71
Alert Setup . . . . . . . . . . . . . . . . . . . . . . . . . . . . . . . . . . . . . . . . . . . . . . . . . . . . . . . . . . . . 75
Establishing E-Mail Alert Messaging . . . . . . . . . . . . . . . . . . . . . . . . . . . . . . . . . . . . . 76
Printer Controls. . . . . . . . . . . . . . . . . . . . . . . . . . . . . . . . . . . . . . . . . . . . . . . . . . . . . . . . . 78
Print Server Settings. . . . . . . . . . . . . . . . . . . . . . . . . . . . . . . . . . . . . . . . . . . . . . . . . . . . . 80
Proprietary Statement . . . . . . . . . . . . . . . . . . . . . . . . . . . . . . . . . . . . . . . . . . . . . . 81
Index . . . . . . . . . . . . . . . . . . . . . . . . . . . . . . . . . . . . . . . . . . . . . . . . . . . . . . . . . . . . 83
v
10/24/06 Wireless Print Server User Guide 13422L-003 Rev. A

vi
Contents
Notes • ___________________________________________________________________
__________________________________________________________________________
__________________________________________________________________________
__________________________________________________________________________
__________________________________________________________________________
__________________________________________________________________________
__________________________________________________________________________
__________________________________________________________________________
__________________________________________________________________________
__________________________________________________________________________
13422L-003 Rev. A Wireless Print Server User Guide 10/24/06

Preface
This section provides you with contact information, documen t struc ture and organization, and
additional reference documents.
Contents
Contacts. . . . . . . . . . . . . . . . . . . . . . . . . . . . . . . . . . . . . . . . . . . . . . . . . . . . . . . . . . . . . . viii
Web Site . . . . . . . . . . . . . . . . . . . . . . . . . . . . . . . . . . . . . . . . . . . . . . . . . . . . . . . . . . . viii
The Americas. . . . . . . . . . . . . . . . . . . . . . . . . . . . . . . . . . . . . . . . . . . . . . . . . . . . . . . . viii
Europe, Africa, Middle East, and India. . . . . . . . . . . . . . . . . . . . . . . . . . . . . . . . . . . . . viii
Asia Pacific . . . . . . . . . . . . . . . . . . . . . . . . . . . . . . . . . . . . . . . . . . . . . . . . . . . . . . . . . viii
Document Conventions . . . . . . . . . . . . . . . . . . . . . . . . . . . . . . . . . . . . . . . . . . . . . . . . . . . ix
10/24/06 Wireless Print Server User Guide 13422L-003 Rev. A

Preface
viii
Contacts
Contacts
You can contact Zebra Technologies at the following.
Web Site
http://www.zebra.com
The Americas
Regional Headquarters Technical Support Customer Service Dept.
Zebra Technologies International,
LLC
333 Corporate Woods Parkway
Vernon Hills, Illinois 60061.3109
U.S.A
T: +1 847 793 2600
Toll-f ree +1 800 423 0422
F: +1 847 913 8766
T: +1 847 913 2259
F: +1 847 913 2578
Hardware: hwtsamerica@zebra.com
Software: swtsamerica@zebra.com
For printers, parts, media, and ribbon,
please call your distributor, or
contact us.
T: +1 866 230 9494
E: VHCustServ@zebra.com
Europe, Africa, Middle East, and India
Regional Headquarters Technical Support Internal Sales Dept.
Zebra Technologies Europe Limited
Zebra House
The Valley Centre, Gordon Road
High Wycombe
Buckinghamshire HP13 6EQ, UK
T: +44 (0)1494 472872
F: +44 (0) 1494 450103
T: +44 (0) 1494 768298
F: +44 (0) 1494 768210
Germany: Tsgermany@zebra.com
France: Tsfrance@zebra.com
Spain/Portugal: Tsspain@zebra.com
All other areas: Tseurope@zebra.com
Asia Pacific
Regional Headquarters Technical Support Customer Service
Zebra Technologies Asia Pacific, LLC
16 New Industrial Road
#05-03 Hudson TechnoCentre
Singapore 536204
T: +65 6858 0722
F: +65 6885 0838
T: +65 6858 0722
F: +65 6885 0838
E: tsasiapacific@zebra.com
For printers, parts, media, and ribbon,
please call your distributor, or
contact us.
T: +44 (0) 1494 768316
F: +44 (0) 1494 768244
E: mseurope@zebra.com
For printers, parts, media, and ribbon,
please call your distributor, or
contact us.
T: +65 6858 0722
F: +65 6885 0837
13422L-003 Rev. A Wireless Print Server User Guide 10/24/06

Document Conventions
The following conventions may be used throughout this document to convey certain
information:
Alternate Color (online only) Cross-references contain hot links to other sections in this
guide. If you are viewing this guide online in
blue text) to jump directly to its location.
(
Command Line Examples All command line examples appear in Courier New font.
For example, you would type the following to get to the Post-Install scripts in the
directory:
Ztools
Files and Directories All file names and directories appear in Courier New font. For
example, the
Cautions, Important, Note, and Example
Zebra<version number>.tar file and the /root directory.
Preface
Document Conventions
.pdf format, you can click the cross-reference
bin
ix
Caution • Warns you of the potential for electrostatic discharge.
Caution • Warns you of a potential electric shock situation.
Caution • Warns you of a situation where excessive heat could cause a burn.
Caution • Advises you that failure to take or avoid a specific action could result in physical
harm to you.
Caution • (no icon) Advises you that failure to take or avoid a specific action could result in
physical harm to the hardware.
Important • Advises you of informatio n that is essential to complete a task.
Note • Indicates neutral or positive information that emphasizes or supplements important
points of the main text.
Example • Provides an example, often a scenario, to better clarify a section of text.
Tools • Tells you what tools you need to complete a given task.
10/24/06 Wireless Print Server User Guide 13422L-003 Rev. A
Preface
x
Document Conventions
Illustration Callouts Callouts are used when an illustration contains information that needs
to be labeled and described. A table that contains the labels and descriptions follows the
graphic. Figure 1 provides an example.
Figure 1 • Sample Graphic with Callouts
21
Wireless card
1
Notch
2
13422L-003 Rev. A Wireless Print Server User Guide 10/24/06

Introduction
This chapter provides an overview of the ZebraNet Wireless Print Server.
1
Contents
Printer Compatibility. . . . . . . . . . . . . . . . . . . . . . . . . . . . . . . . . . . . . . . . . . . . . . . . . . . . . . 2
Connecting to a Wireless Network. . . . . . . . . . . . . . . . . . . . . . . . . . . . . . . . . . . . . . . . . . . 2
Third-Party Components . . . . . . . . . . . . . . . . . . . . . . . . . . . . . . . . . . . . . . . . . . . . . . . . . . 3
Supported Wireless Cards. . . . . . . . . . . . . . . . . . . . . . . . . . . . . . . . . . . . . . . . . . . . . . . 3
Access Point . . . . . . . . . . . . . . . . . . . . . . . . . . . . . . . . . . . . . . . . . . . . . . . . . . . . . . . . . 4
Interaction between Wired and Wireless Print Servers . . . . . . . . . . . . . . . . . . . . . . . . . . . 5
Check for Wired Print Server. . . . . . . . . . . . . . . . . . . . . . . . . . . . . . . . . . . . . . . . . . . . . 5
IP Addresses . . . . . . . . . . . . . . . . . . . . . . . . . . . . . . . . . . . . . . . . . . . . . . . . . . . . . . . . . 6
View Printer Web Pages . . . . . . . . . . . . . . . . . . . . . . . . . . . . . . . . . . . . . . . . . . . . . . . . 6
10/24/06 Wireless Print Server User Guide 13422L-003 Rev. A
Introduction
2
Printer Compatibility
Printer Compatibility
This version of the ZebraNet Wireless Print Server is designed for the following
printers/print engines. Future releases will support additional Zebra printers.
• XiIIIPlus
•RXi
•105SL with serial number greater than 6400356
Important • Do not install the wireless PCMCIA board on a 105SL printer with a serial
number less than 6400357.
• Z4Mplus/Z6Mplus
• PAX4
• S4M operating in ZPL mode
A special Personal Computer Memory Card International Association (PCMCIA) board must
be installed inside the printer for the wireless feature to work. Contact your authorized Zebra
reseller for more information.
Connecting to a Wireless Network
The ZebraNet Wireless Print Server is an Ethernet c onnecti vity opt ion for you r printe r. Rather
than being connected to a wired Local Area Network (LAN) with physical wires, the printer
communicates with a wireless LAN (WLAN) through a wireless card.
Figure 2 shows the network architecture of a typical WLAN setup.
Figure 2 • WLAN Setup with ZebraNet Wireless Print Servers
Computer (stand-alone or laptop)
1
Access point
2
Printer configured for Wireless Print Server operation and equipped with
3
compatible wireless card
21 3
13422L-003 Rev. A Wireless Print Server User Guide 10/24/06

Third-Party Components
As shown in Figure 2, two critical WLAN components for ZebraNet Wireless Print Server
operation are a wireless card and an access point. These components are not provi ded with the
Wireless Print Server.
Supported Wireless Cards
A third-party PCMCIA wireless card is required for the printer to communicate with the
WLAN. After the ZebraNet Wireless Print Server PCMCIA board is installed, the wireless
card inserts into a slot in the back of the printer.
The following wireless cards are supported at the time of this release:
Cisco® Systems
• 802.11b Aironet AIR-PCMC340
• 802.11b Aironet AIR-PCMC341
• 802.11b Aironet AIR-PCMC342
Introduction
Third-Party Components
3
• 802.11b Aironet PCMC350
• 802.11b Aironet PCMC351
• 802.11b Aironet PCMC352
Symbol® Technologies
• Spectrum24® Compact Flash wireless radio card LA-4137-1020-WW (the card uses an
adapter and must have firmware version F3.91-69 or higher)
For instructions on how to install t his card and the adapter, see Install a Wireless or
Compact Flash Wireless Card on page 15.
• 802.11b Spectrum24 High Rate Direct Sequence PN:LA-4111-1000-US
• 802.11b Spectrum24 High Rate Direct Sequence PN:LA-4111-1010-US
• 802.11b Spectrum24 High Rate Direct Sequence PN:LA-4121-1000-US
• 802.11b Spectrum24 High Rate Direct Sequence PN:LA-4121-1020-US
• 802.11b Spectrum24 High Rate Direct Sequence PN:LA-4121-1120-US
Note • Check the operating conditions (such as temperature and humidity) for the wireless
card that you choose. If the card has more restrictions than the printer, this may limit the
conditions under which you can operate the printer with a wireless connection.
10/24/06 Wireless Print Server User Guide 13422L-003 Rev. A

Introduction
4
Third-Party Components
Access Point
A third-party access point forms a bridge between the WLAN and wired LAN. Select an
access point that is compatible with the supported wireless cards that you will use with the
ZebraNet Wireless Print Server.
Multiple access points can be used to extend the coverage of the wireless LAN. The
reassociation capabilities of the IEEE 802.11b standard enable clients to move throughout the
WLAN area and roam between access points. Reassociation can occur as long as the ZebraNet
Wireless Print Server is on the same network configurations and ESSID (network name) as the
access point to which it is trying to connect.
13422L-003 Rev. A Wireless Print Server User Guide 10/24/06

Interaction between Wired and Wireless Print Servers
Interaction between Wired and Wireless Print Servers
Your printer can have both a wired and a wireless print server installed. One functions as the
active print server, and the other is present as a backup in the event that the other loses
functionality.
Check for Wired Print Server
Note • Only one print server can be installed in the S4M at one time, so this check does not
occur.
By default, the printer skips the check for a wired print server during bootup, making the
Wireless Print Server the primary connection. To change this and allow the wired print server
to be the primary device when it is connected, use the ZPL command
check for a wired print server at boot time. For more information on this command, see ^NB
on page 36.
Table 1 shows which print server will be the primary connection under different conditions.
^NB to tell the printer to
Introduction
5
Table 1 • Results of Check for Wired Print Server
Wired Print
Server
Connected?
Yes Skip The printer skips the check for a wired print
Yes Check The printer checks for a wired print server. If the
No Skip The printer uses the Wireless Print Server as the
No Check During bootup, the printer tries for 70 seconds to
Check for Wired
Print Server?
Results
server. The wired print server is not
acknowledged, and the Wireless Print Server is
used as the primary print server.
wired print server is detected, it is used as the
primary print server. If it is not detected, the
Wireless Print Server is used as the primary print
server.
primary print server without taking the time to
check for a wired print server.
detect a wired print server. After finding that one
is not connected, the printer uses the Wireless
Print Server as the primary print server.
10/24/06 Wireless Print Server User Guide 13422L-003 Rev. A

Introduction
6
Interaction between Wired and Wireless Print Servers
IP Addresses
The wired and wireless print servers will have two different IP addresses. The printer’s control
panel will display the address of the active device. For more information, see View or Change
Control Panel Parameters for the Wireless Print Server on page 23.
View Printer Web Pages
When both a wired and wireless print server are installed on a printer, you can view the
printer’s web pages through the active device’s IP address. For more information, see Home
Page on page 58.
13422L-003 Rev. A Wireless Print Server User Guide 10/24/06

2
Configuration
Use the instructions in this chapter to configure the ZebraNet Wireless Print Server for
operation.
Contents
Overview . . . . . . . . . . . . . . . . . . . . . . . . . . . . . . . . . . . . . . . . . . . . . . . . . . . . . . . . . . . . . . 8
Configure Using the SetWLAN Utility. . . . . . . . . . . . . . . . . . . . . . . . . . . . . . . . . . . . . . . . . 9
Install a Wireless or Compact Flash Wireless Card. . . . . . . . . . . . . . . . . . . . . . . . . . . . . 15
10/24/06 Wireless Print Server User Guide 13422L-003 Rev. A

Configuration
8
Overview
Overview
Important • The ZebraNet Wireless Print Server PCMCIA board must be installed on your
printer before you can configure the printer to communicate using a wireless card. If this
board is not installed and active, the wireless portion of the network configuration label will
not print (see Print a Network Configuration Label on page 22).
For printers other than the S4M, check the bottom right corner of the control panel LCD for
the firmware version (all firmware versions used for the S4M support the Wireless Print
Server option). For printers other than the S4M, you need firmware version V60.13.X or
higher to operate the Wireless Print Server . If the firmware version number on your printer is
less than this, download the latest firmware from http://www.zebra.com/firmware or use the
version provided on the Connectivity CD that came with the kit (the version on the CD may
not be the latest available).
You may configure your printer for wireless operation in the following ways:
• Through the SetWLAN utility, which writes a ZPL script for you (see Configure Using
the SetWLAN Utility on page 9). On the last screen of the utility, you may choose to send
the command directly to your printer through the serial port, or you may choose to save
the ZPL script to a file. The saved ZPL file has several purposes:
• The file can be sent to the printer through the parallel port, a USB port, or a wired
print server.
• The file can be sent to the printer after the network settings have been restored to
factory defaults.
• The file can be sent to multiple printers that will use the same network settings.
• Through ZPL script that you write yourself (see ZPL Commands for the Wireless Print
Server on page 35)
13422L-003 Rev. A Wireless Print Server User Guide 10/24/06

Configure Using the SetWLAN Utility
The SetWLAN utility resides on the User CD for your printer and is available through
http://www.zebra.com. This software allows you to configure your printer easily for wireless
operation by writing the appropriate ZPL script for you. Use this utility when you are first
installing the Wireless Print Server or when you set the network options back to factory
defaults.
Configuration
Configure Using the SetWLAN Utility
9
Note • The SetWLAN utility requires Microsoft
®
Windows® 98 or higher.
To configure the Wireless Print Server using the SetWLAN utility, complete
these steps:
1. From the User CD or Connectivity CD, run the program SetWLAN.exe.
The IP Configuration window displays (Figure 3).
Figure 3 • IP Configuration Window
10/24/06 Wireless Print Server User Guide 13422L-003 Rev. A

Configuration
10
Configure Using the SetWLAN Utility
2. Do you wish to enter settings for an optional wired print server? (A wired print server is
not required for configuring or r unning the Wireless Print Server.)
If... Then...
No Continue with step 3.
Yes
a. Click Wired IP Config.
The Wired IP Configuration window displays (Figure 4).
Figure 4 • Wired IP Configuration Window
b. Select the desired method for obtaining an IP address for the wired print
server. If you select Static, enter the appropriate IP information.
c. Click OK.
3. Will you be using DHCP (dynamic) or static IP settings for the Wireless Print Server?
If you will be using... Complete the following steps...
DHCP (recommended) a. Click Next.
The Wireless Setting s window displays (Figure 5).
Static Complete the following steps:
a. Select Static.
The IP settings fields are activated.
b. Enter the IP Address, Default Gateway, and Subnet
Mask that you want the printer to use.
c. Click Next.
The Wireless Setting s window displays (Figure 5).
13422L-003 Rev. A Wireless Print Server User Guide 10/24/06

Configure Using the SetWLAN Utility
Figure 5 • Wireless Settings Window
Configuration
11
4. Enter the ESSID for your network.
5. If necessary, select a different Authentication Type.
6. If you will be using WEP encryption, enter the encryption mode, the storage method for
the encryption keys, and the current encryption key.
Note •
• The settings for step 4 through step 6 must match what is set on your access point.
• If you are using hex WEP keys, do not add a leading 0x to the encryption keys.
• If you are using multiple WEP encryption keys, enter encryption keys 2, 3, and 4 and
specify the current key by using the printer’s web pages. For instructions on accessing
and using the web pages, see Printer Web Pages on page 28.
7. To modify other wireless parameters, complete these steps:
a. On the Wireless Settings Window, click Advanced Options.
The Advanced Wireless window displays (Figure 6).
10/24/06 Wireless Print Server User Guide 13422L-003 Rev. A

Configuration
12
Configure Using the SetWLAN Utility
Figure 6 • Advanced Wireless Window
b. Modify the settings as necessary to match your network’s settings.
c. Click OK.
The program returns to the Wireless Settings Window.
8. Click Next.
The Review and Apply Changes Window displays (Figure 7).
Figure 7 • Review and Apply Changes Window
13422L-003 Rev. A Wireless Print Server User Guide 10/24/06

Configuration
Configure Using the SetWLAN Utility
9. Have any of the serial port settings been modified on your printer?
If... Then...
No Continue with step 10.
Yes You must match those serial port settings in the configuration program for
the computer and the printer to be able to communicate. To do this,
complete these steps:
a. Click Change Serial Port Settings.
The Serial Port Settings window displays (seeFigure 8).
Figure 8 • Serial Port Settings Window
13
b. To review the settings on your printer, enter Setup mode through the
printer’s control panel, the n scroll until you reach
PARITY.
and
c. If any of the values are different, change the settings on the Serial Port
BAUD, DATA BITS,
Settings window to match the settings stored in the printer.
d. Click OK.
The program returns to the Review and Apply Changes Window
(see Figure 7 on page 12).
10/24/06 Wireless Print Server User Guide 13422L-003 Rev. A

Configuration
14
Configure Using the SetWLAN Utility
10. To complete the configuration procedure, select one of the following:
To... Then...
Send the ZPL
script through the
serial port
Save the ZPL code
to a file
a. Connect your printer ’s serial port to the computer using a
null modem serial cable.
b. Turn On (I) the printer.
c. On the Review and Apply Changes Window, click Finish.
The printer sends the ZPL script to the printer through the
serial port (Figure 9).
Figure 9 • Configuration Complete Message
d. Click OK.
a. On the Review and Apply Changes Window, click Save
ZPL Script to a file.
The computer prompts you for a name and destination for
the file.
b. Enter the file name and destination.
c. Click Save.
d. Turn On (I) the printer.
e. Send the ZPL file to the printer through the connection of
your choice.
11. After the ZPL script has been sent to and received by the printer, turn Off (O) the printer.
13422L-003 Rev. A Wireless Print Server User Guide 10/24/06

Install a Wireless or Compact Flash Wireless Card
Install a Wireless or Compact Flash Wireless Card
Printers that have the wireless option board installed can use any of the wireless or Compact
Flash wireless cards listed in Supported Wireless Cards on page 3. This section provides
instructions for installing either type of card. All printers use a clear plastic RF cover over the
wireless or Compact Flash wireless card.
Wireless Card
This section applies to PCMCIA or CardBus wireless cards.
Note • The Z4Mplus and Z6Mplus printers do not support CardBus wireless cards.
To install a wireless card, complete these steps:
1. Turn off (O) the printer.
2. Remove and discard the metal cover that was shipped in place over the wireless option
card slot on the back of the printer.
Configuration
15
3. See Figure 10. Position the not ch on the wireless card on the top, leading edge. Insert the
wireless card into the wireless option card slot on the back of the printer until the cardeject button pops out.
Figure 10 • Installing a Wireless Card
4
2
1
Wireless card
1
Notch
2
Wireless option card slot
3
3
on back of printer
Card-eject button
4
10/24/06 Wireless Print Server User Guide 13422L-003 Rev. A
Configuration
16
Install a Wireless or Compact Flash Wireless Card
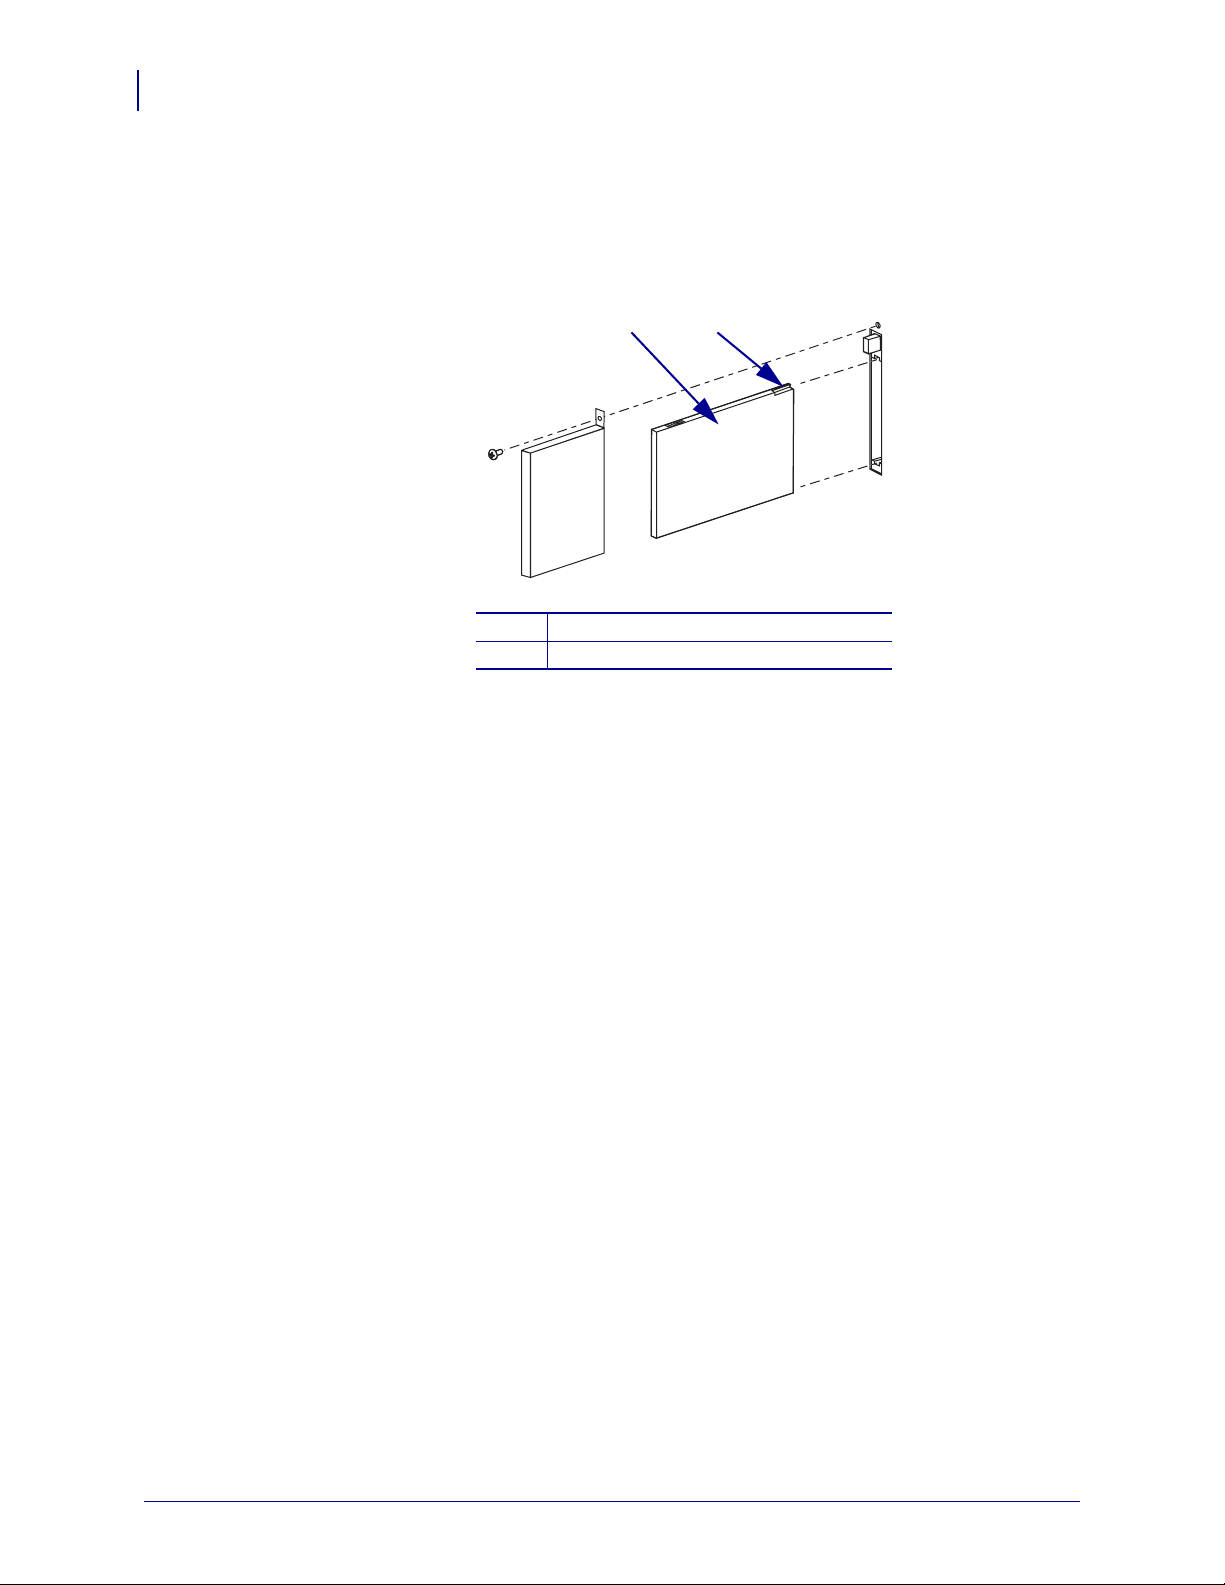
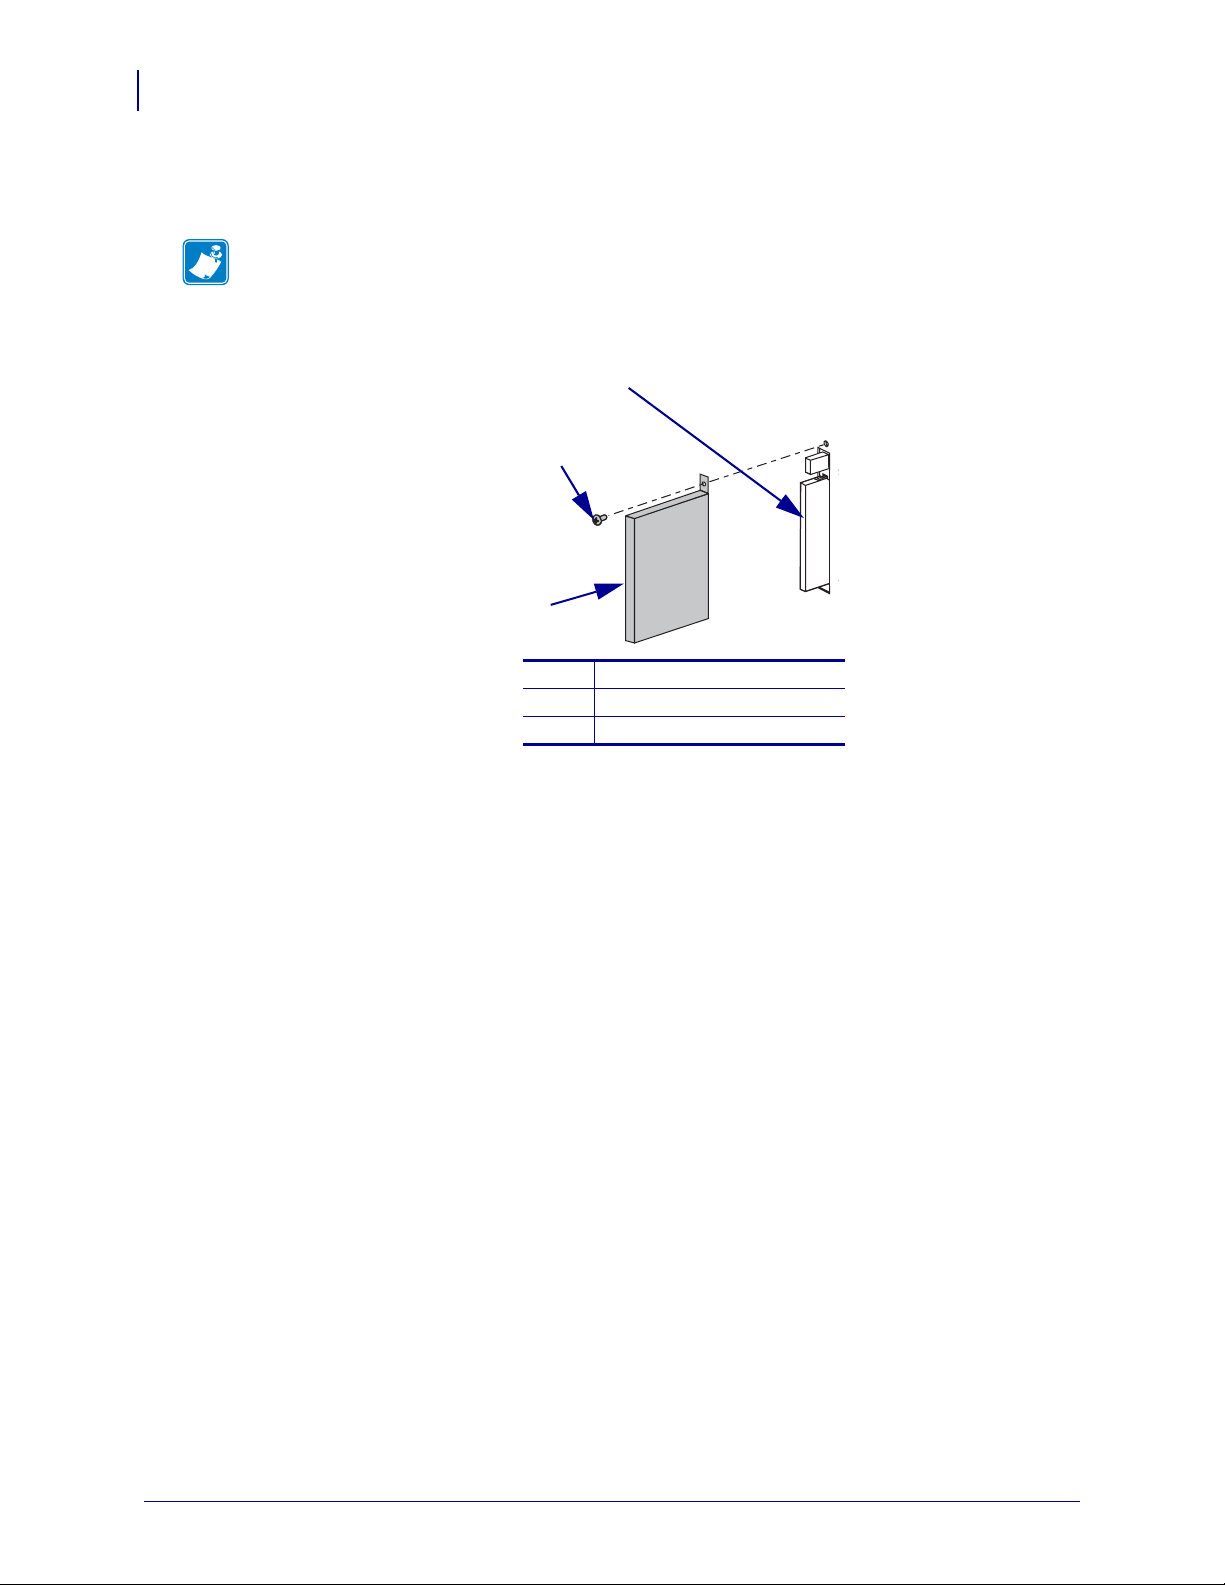
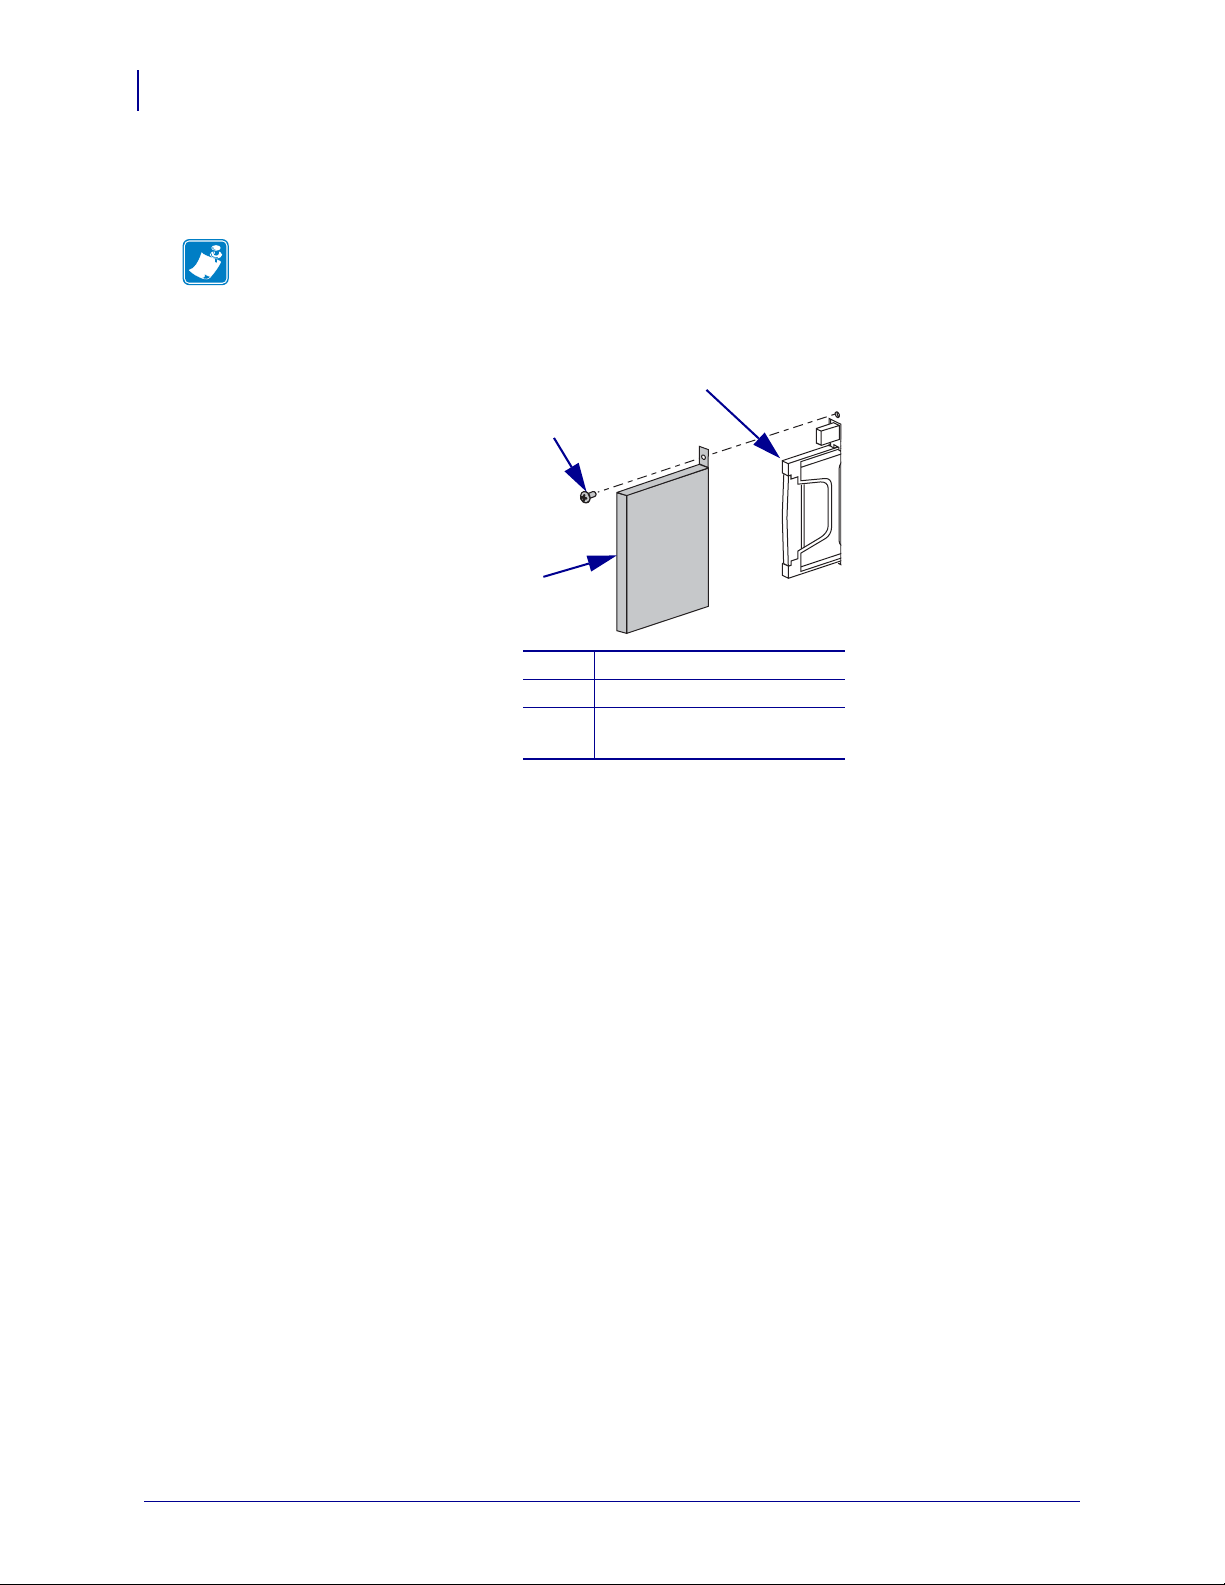
4. See Figure 11. Place the RF card cover over the wireless card, and secure it with a small
screw.
Note • The S4M does not use the plastic RF cover.
Figure 11 • Installing the RF Cover
3
2
1
Clear plastic RF card cover
1
Screw
2
Wireless card
3
5. Turn on (I) the printer.
The printer restarts and uses the wireless card to communicate with your WLAN. Allow
several minutes for the printer to connect to the network. For more information about
wireless status, refer to View Wireless Status through the Control Panel on page 20 or
Troubleshooting on page 53.
13422L-003 Rev. A Wireless Print Server User Guide 10/24/06
Compact Flash Wireless Card
This section applies to Compact Flash wireless ca rds, which require an adapter before they can
be used in the wireless option card slot.
To install a Compact Flash wireless card and adapter, complete these steps:
1. If you have not already done so, turn off (O) the printer.
2. Remove and discard the metal cover that was shipped in place over the wireless option
slot on the back of the printer.
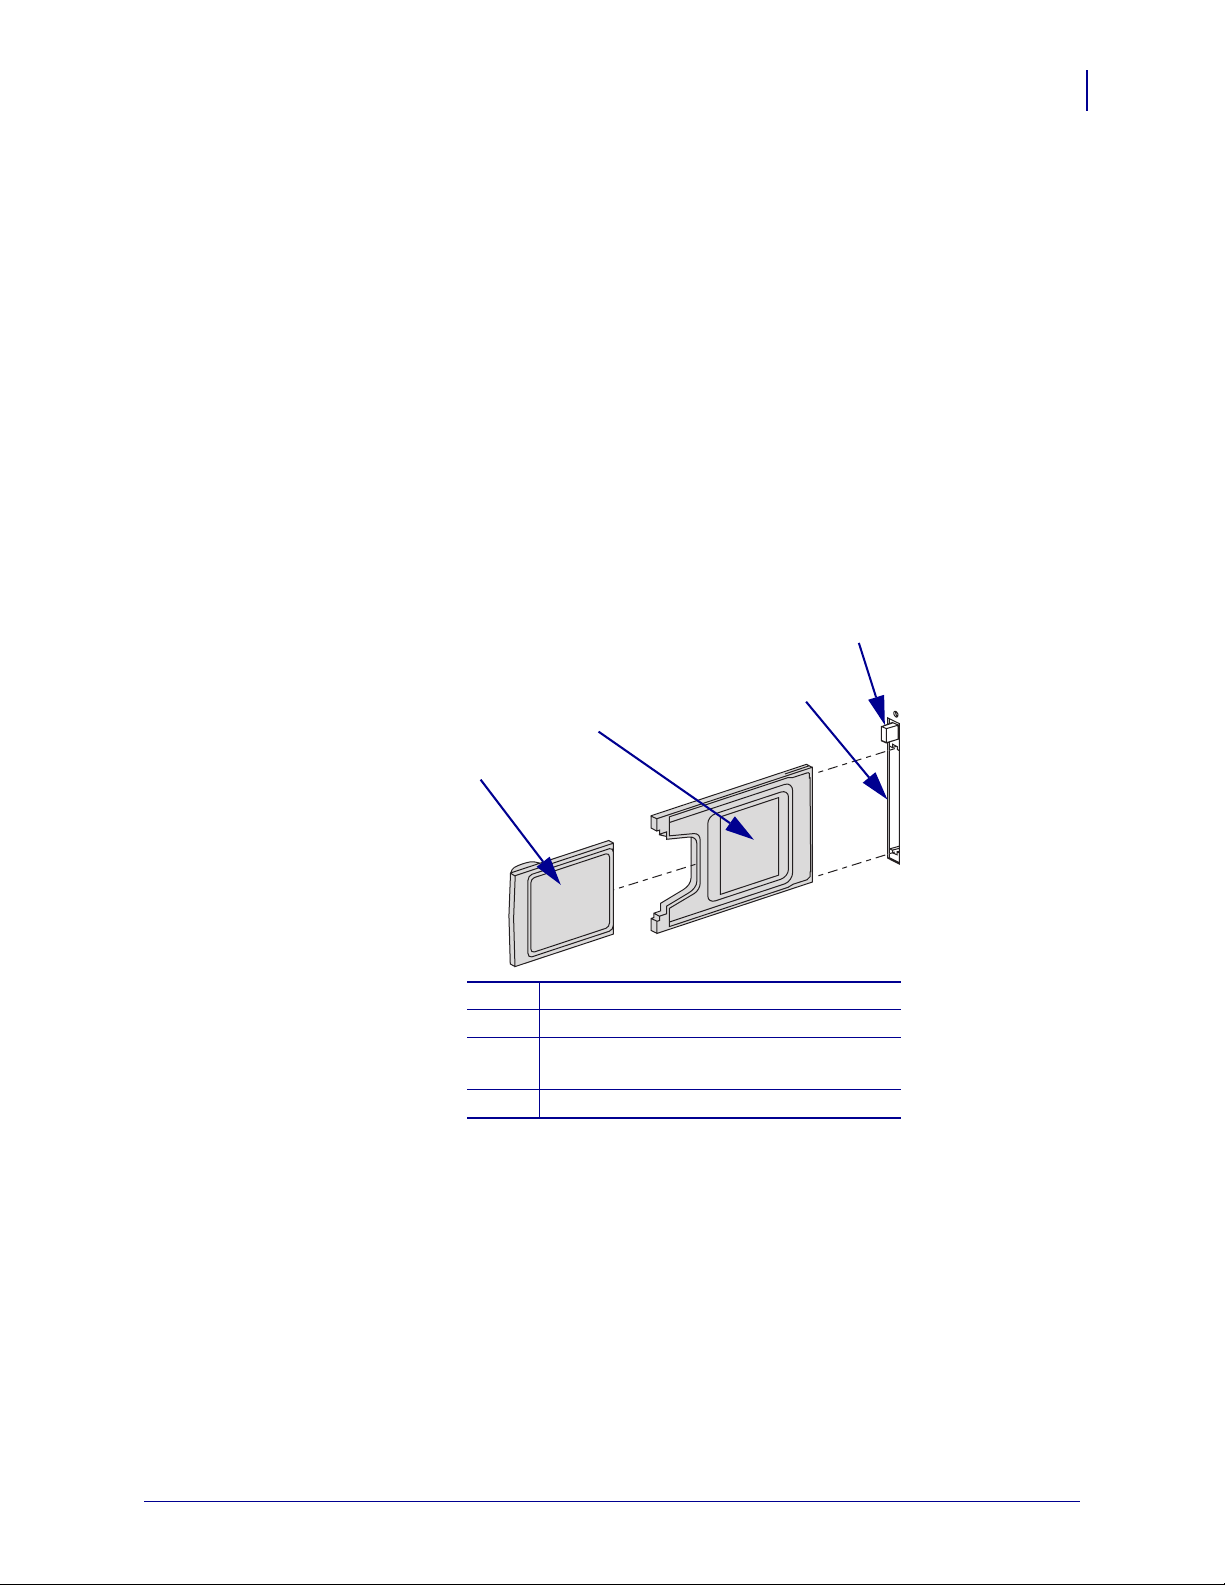
3. See Figure 12. Position the ad apter with the back facing as shown. Insert the adapter into
the wireless option card slot on the back of the printer until the card-eject button pops out.
4. See Figure 12. Insert the Compact Flash wireless card into the adapter.
Figure 12 • Installing a Compact Flash Wireless Card
Configuration
Install a Wireless or Compact Flash Wireless Card
4
17
3
2
1
Back of Compact Flash wireless card
1
Back of adapter
2
Wireless option card slot on back of
3
printer
Card-eject button
4
10/24/06 Wireless Print Server User Guide 13422L-003 Rev. A
Configuration
18
Install a Wireless or Compact Flash Wireless Card
5. See Figure 13. Place the RF card cover over the wireless card, and secure it with a small
screw.
Note • The S4M does not use the plastic RF cover.
Figure 13 • Installing the RF Cover
3
2
1
Clear plastic RF card cover
1
Screw
2
Compact Flash wireless
3
card and adapter
6. Turn on (I) the printer.
The printer restarts and uses the wireless card to communicate with your WLAN. Allow
several minutes for the printer to connect to the network. For more information about
wireless status, refer to View Wireless Status through the Control Panel on page 20 or
Troubleshooting on page 53.
13422L-003 Rev. A Wireless Print Server User Guide 10/24/06

3
Wireless Status
and Settings
This chapter presents options for viewing or modifying the wi reless status, signal strength, or
settings.
Contents
Overview . . . . . . . . . . . . . . . . . . . . . . . . . . . . . . . . . . . . . . . . . . . . . . . . . . . . . . . . . . . . . 20
View Wireless Status through the Control Panel . . . . . . . . . . . . . . . . . . . . . . . . . . . . . . . 20
Link Status Indicator. . . . . . . . . . . . . . . . . . . . . . . . . . . . . . . . . . . . . . . . . . . . . . . . . . . 20
Wireless Signal Indicators . . . . . . . . . . . . . . . . . . . . . . . . . . . . . . . . . . . . . . . . . . . . . . 21
Poor Signal Setting . . . . . . . . . . . . . . . . . . . . . . . . . . . . . . . . . . . . . . . . . . . . . . . . . . . 21
Print a Network Configuration Label . . . . . . . . . . . . . . . . . . . . . . . . . . . . . . . . . . . . . . . . 22
View or Change Control Panel Parameters for the Wireless Print Server. . . . . . . . . . . . 23
Printer Web Pages. . . . . . . . . . . . . . . . . . . . . . . . . . . . . . . . . . . . . . . . . . . . . . . . . . . . . . 28
Return Network Parameters to Defaults . . . . . . . . . . . . . . . . . . . . . . . . . . . . . . . . . . . . . 34
10/24/06 Wireless Print Server User Guide 13422L-003 Rev. A
Wireless Status and Settings
20
Overview
Overview
After you configure the Wireless Print Server, you may view the wireless status and signal
strength (see V iew Wireless S tat us thr ough the Contr ol Pan el on page 20). Y ou also may access
or modify wireless settings through the following:
• A network configuration label (see Print a Network Configuration Label on page 22)
• The control panel parameters (see View or Change Control Panel Parameters for the
Wireless Print Server on page 23)
• The WebView web pages for your printer (see Printer Web Pages on page 28)
• ZPL commands (see ZPL Commands for the W ireless Print Server on page 35)
View Wireless Status through the Control Panel
After the Wireless Print Server is configured , use the co ntro l panel to vi ew th e wireless statu s.
a
Note • Refer to the user guide for your printer for specific instructions on how to use the
control panel.
Link Status Indicator
Note • The S4M does not use the link status indicator.
The wireless link status indicator appears at the bottom left of the LCD on the control panel,
providing a real-time display of the printer’s network status (Table 2).
Table 2 • Link Status Indicators
Status Indicator Meaning
cycling through characters
.oO
underscore
_
blank
The wireless card is associated with the WLAN.
1. The wireless card is inserted but not associated with the network.
2. No wireless card is inserted.
1. The printer is checking for a wired print server.
2. The printer is running a wired print server.
3. The Wireless Print Server board is not installed or not installed
correctly.
13422L-003 Rev. A Wireless Print Server User Guide 10/24/06

Wireless Signal Indicators
The following control panel indicators and messages are associated with the wireless signal:
•
SIGNAL STRENGTH and SIGNAL QUALITY—When these indicators display
percentages, the wireless card is communicating with the network. The higher the number
is, the better the connection is between the printer and the network. If your printer
indicates a signal strength but you cannot communicate with the printer from your
computer, move the printer to a different location to try to get a higher signal strength or
signal quality. This situation could also indicate that the printer is associated with , b ut no t
authenticated with, your access point.
NOISE LEVEL—This number indicates any electrical interference with the wireless
•
signal. If your printer cannot communicate with the network and the noise level is high,
move the printer to a location that is free of interference.
NO CARD INSERTED—The wireless card is not inserted at all or is not fully seated.
•
•
NOT ASSOCIATED—The wireless card is present but cannot log on to the network.
a
Note • Depending on which printer/print engine you are using, press the following key to
access the wireless signal indicators:
Plus (+) for the Z4Mplus, Z6Mplus, and 105SL
•
• The up arrow for the S4M
• The right oval for the XiIIIPlus, the RXi, the PAX4, and the RPAX4
Wireless Status and Settings
View Wireless Status through the Control Panel
21
To view the Signal Strength, Noise Level, and Signal Quality of the wireless
signal, complete these steps:
1. When the control panel displays PRINTER READY, press Plus (+)/the up arrow/the right
oval to move to
2. Press Plus (+)/the up arrow/the right oval again to move to NOISE LEVEL.
3. Press Plus (+)/the up arrow/the right oval a third time to move to SIGNAL QUALITY.
4. Press Plus (+)/the up arrow/the right oval a fourth t ime to return to the PRINTER READY
message.
Poor Signal Setting
Through the Wireless Setup Page (see Figure 17 on page 31), you can enter a value for
POOR SIGNAL. If the wireless signal strength drops below this value, the printer’s control
panel will alternate between the idle display (
RADIO WARNING
POOR SIGNAL
Note • The poor signal setting affects when you see the POOR SIGNAL warning, but it does
not affect whether your printer will be able to associate with your network at a low signal
strength.
SIGNAL STRENGTH.
PRINTER IDLE) and the following message:
10/24/06 Wireless Print Server User Guide 13422L-003 Rev. A
Wireless Status and Settings
22
Print a Network Configuration Label
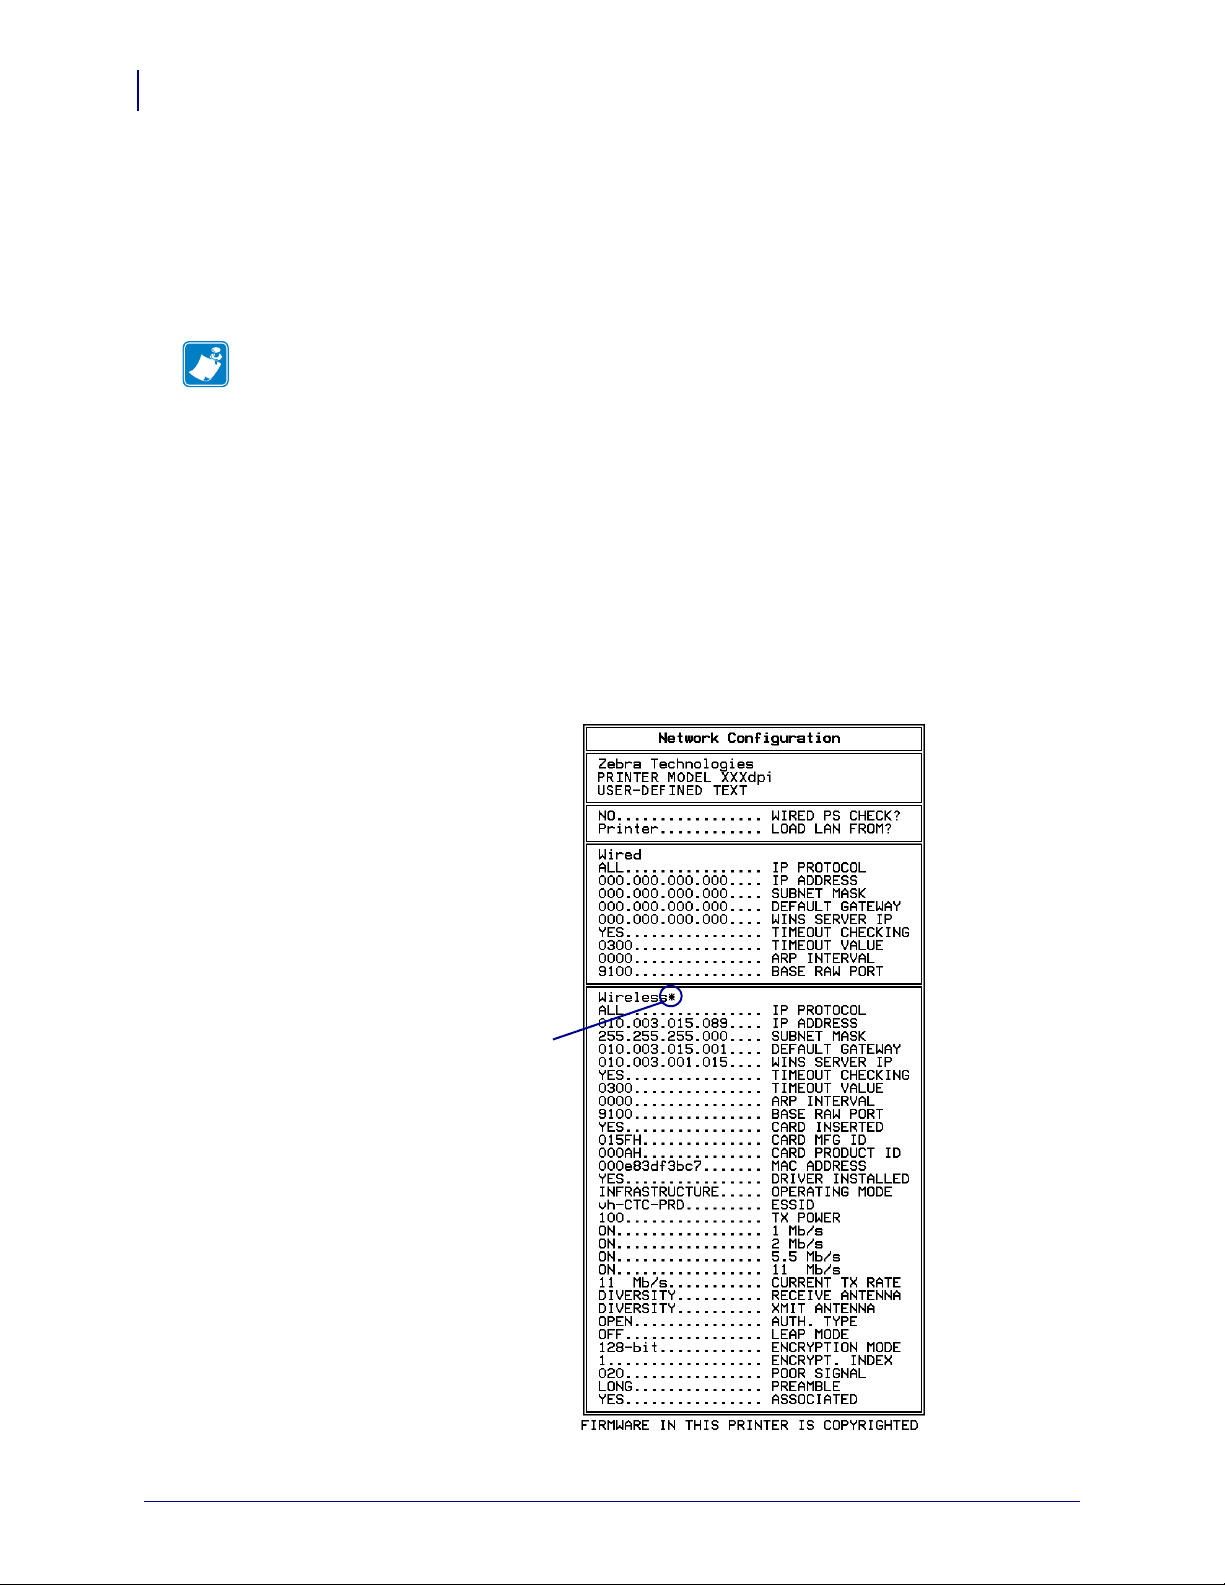
Print a Network Configuration Label
A network configuration label lists the settings for the print servers installed in your printer.
The active print server is indicated by an ast erisk. If a wire d print server is not in stalled, t he IP
information on the wired portion appears as all zeroes (000.000.000.000). If the W ireless
Print Server is not installed, the wireless portion of the label does not print.
Note • Refer to the user guide for your printer for specific instructions on how to use the
control panel.
To print a network configuration label, complete these steps:
1. From th e control panel, enter Setup mode.
2. Scroll through the parameters until you reach LIST NETWORK (level 3 parameter
PRINT OUT NETWORK on the S4M).
3. Confirm printing.
A network configuration label prints (Figure 14).
Figure 14 • Network Configuration Label
asterisk
indicating
the active
print server
13422L-003 Rev. A Wireless Print Server User Guide 10/24/06

Wireless Status and Settings
View or Change Control Panel Parameters for the Wireless Print Server
View or Change Control Panel Parameters for the
Wireless Print Server
The control panel parameters are somewhat different for the S4M printer as opposed to other
Zebra printers. For the S4M printer, see Parameters for the S4M Printer on page 26.
Parameters for Zebra Printers Other Than the S4M
Table 3 shows the wireless parameters that may be viewed or modified through the printer’s
control panel. Some of the parameters can be password-protected by a wireless password. By
default, the Wireless Print Server runs in an “unprotected” mode (password set to 0000), which
means that you do not need to enter a wireless password through the control panel to view or
modify wireless settings. To set a wireless password (not the same as the general printer
password), use the
Note • Refer to the user guide for your printer for specific instructions on how to use the
control panel controls.
^WP ZPL command.
23
Table 3 • Control Panel Parameters for the ZebraNet Wireless Print Server
(printers other than the S4M)
Parameter
Function
LIST NETWORK This selection is used to print a network configuration label (see Figure 14
on page 22).
LOAD LAN FROM?
WIRED PS CHECK?
1 These parameters appear after the system recognizes the existence of a ZebraNet print server (wired or wireless). After the
print server is recognized, all zeroes (000.000.000.000) will display until the printer obtains an IP address or defaults to
address 192.168.254.254.
2 Appears only when the ZebraNet Wireless Print Server is installed.
3 If a wireless password is set, you must enter the wireless password (not the printer password) to access this parameter.
4 This parameter appears 1) when no wireless card is inserted or 2) when the wireless card is associated to the WLAN and the
card supports LEAP.
2
This parameter, which serves the same function as the ^NP ZPL command,
specifies whether to use the printer’s or the print server’s IP settings at
bootup.
Accepted Values: PRINTER, PRINTSERVER
Default Value: PRINTER
2
Check for a Wired Print Server at Bootup
This parameter, which serves the same function as the
^NB ZPL
command, tells the printer whether to search for a wired print server at
bootup.
Accepted Values: YES, NO
Default Value: NO
10/24/06 Wireless Print Server User Guide 13422L-003 Rev. A

Wireless Status and Settings
24
View or Change Control Panel Parameters for the Wireless Print Server
Table 3 • Control Panel Parameters for the ZebraNet Wireless Print Server
(printers other than the S4M) (Continued)
Parameter
IP PROTOCOL
1
Function
Obtain an IP Address
This parameter allows either the user (permanent) or the server (dynamic)
to select the IP address. If a dynamic option is chosen, this selection
determines the method(s) by which the print server (wired or wireless)
receives the IP address from the server.
Accepted Values: ALL, GLEANING ONLY, RARP, BOOTP, DHCP,
DHCP AND BOOTP, PERMANENT
Default Value: All
Note • Use of GLEANING ONL Y is not recommended when the Wireless
Print Server is installed.
IP ADDRESS
1
View or Change the Printer’s IP Address
This parameter can be modified only when PERMANENT is selected for
IP PROTOCOL.
Selections: 0 to 255 for each field
Default Value: 0.0.0.0
SUBNET MASK
1
View or Change the Subnet
This parameter can be modified only when PERMANENT is selected for
IP PROTOCOL.
Selections: 0 to 255 for each field
Default Value: 0.0.0.0
DEFAULT GATEWAY
1
View or Change the Gateway
This parameter can be modified only when PERMANENT is selected for
IP PROTOCOL.
Selections: 0 to 255 for each field
Default Value: 0.0.0.0
MAC ADDRESS
2,3
View MAC Address
This parameter shows the MAC address of the current wireless card.
Default Value: 000000000000
ESSID
2,3
Set ESSID
Default Value: 125
AUTH. TYPE
2,3
Set Authentication Type
Accepted Values: OPEN, SHARED
Default Value: OPEN
1 These parameters appear after the system recognizes the existence of a ZebraNet print server (wired or wireless). After the
print server is recognized, all zeroes (000.000.000.000) will display until the printer obtains an IP address or defaults to
address 192.168.254.254.
2 Appears only when the ZebraNet Wireless Print Server is installed.
3 If a wireless password is set, you must enter the wireless password (not the printer password) to access this parameter.
4 This parameter appears 1) when no wireless card is inserted or 2) when the wireless card is associated to the WLAN and the
card supports LEAP.
13422L-003 Rev. A Wireless Print Server User Guide 10/24/06

Wireless Status and Settings
View or Change Control Panel Parameters for the Wireless Print Server
Table 3 • Control Panel Parameters for the ZebraNet Wireless Print Server
(printers other than the S4M) (Continued)
25
Parameter
LEAP MODE
3,4
Function
Enable LEAP Mode
An encryption method that is available with some wireless cards. Set the
LEAP user name and password through the printer web pages (see
WebView Web Pages on page 57) or by ZPL (see ^WL on page 46). By
default, LEAP user will be set to user, and LEAP password will be set to
password.
Accepted Values: ON, OFF
Default Value: OFF
ENCRYPTION MODE
2,3
Set Encryption Mode
Accepted Values: OFF, 40-BIT, 128-BIT
Default Value: OFF
ENCRYPT. INDEX
2,3
Select an Encryption Index
Accepted Values: 1, 2, 3, 4
Default Value: 1
RESET NETWORK
1,3
Reset the Wired or Wireless Network
Reinitializes the wired or wireless network. Also causes any wireless card
in the printer to reassociate to the wireless network. (Same function as
ZPL command ~WR on page 50.)
1 These parameters appear after the system recognizes the existence of a ZebraNet print server (wired or wireless). After the
print server is recognized, all zeroes (000.000.000.000) will display until the printer obtains an IP address or defaults to
address 192.168.254.254.
2 Appears only when the ZebraNet Wireless Print Server is installed.
3 If a wireless password is set, you must enter the wireless password (not the printer password) to access this parameter.
4 This parameter appears 1) when no wireless card is inserted or 2) when the wireless card is associated to the WLAN and the
card supports LEAP.
10/24/06 Wireless Print Server User Guide 13422L-003 Rev. A

Wireless Status and Settings
26
View or Change Control Panel Parameters for the Wireless Print Server
Parameters for the S4M Printer
Table 4 shows the wireless parameters that may be viewed or modified through the printer’s
control panel if you have the Wireless Print Server installed on an S4M and are operating in
ZPL or EPL mode. These parameters are considered part of the Level 3 password. To view
network parameters that are not available as selections through the control panel , print a
network configuration label.
Note • Refer to the S4M User Guide for specific instructions on how to use the control pan el.
Table 4 • Control Panel Parameters for
the ZebraNet Wireless Print Server (S4M only)
Parameter Explanation
PRINT OUT
NETWORK
OBTAIN IP ADDRESS
CHANGE IP ADDRESS
This selection is used to print a network configuration label (see Figure 14
on page 22).
Obtain an IP Address
Selects the method by which an IP address will be assigned to the printer.
If you choose
Change the IP Protocol on page 27).
Selections: AUTO SELECT (dynamic), PERMA NE NT (user-specified)
Default Value: AUTO SELECT
To modify this parameter:
• Press the up or down arrow to scroll through the selections.
View or Change the Printer’s IP Address
This parameter can be modified only when
AUTO SELECT, you may specify an IP protocol (see
PERMANENT is selected for
OBTAIN IP ADDRESS.
Selections: 0 to 255 for each field
Default Value: 0.0.0.0
Note • Leading zeroes are not shown in the address. If an IP
address contains more digits than can be displayed at one time, use
the left or right arrows to scroll through the digits.
To modify this parameter:
• To increase the value, press the up arrow.
• To decrease the value, press the down arrow.
13422L-003 Rev. A Wireless Print Server User Guide 10/24/06

View or Change Control Panel Parameters for the Wireless Print Server
Table 4 • Control Panel Parameters for
the ZebraNet Wireless Print Server (S4M only) (Continued)
Parameter Explanation
Wireless Status and Settings
27
CHANGE SUBNET
CHANGE GATEWAY
View or Change the Subnet
This parameter can be modified only when
PERMANENT is selected for
OBTAIN IP ADDRESS.
Selections: 0 to 255 for each field
Default Value: 0.0.0.0
Note • Leading zeroes are not shown in the address. If an IP
address contains more digits than can be displayed at one time, use
the left or right arrows to scroll through the digits.
To modify this parameter:
• To increase the value, press the up arrow.
• To decrease the value, press the down arrow.
View or Change the Gateway
This parameter can be modified only when PERMANENT is selected for
OBTAIN IP ADDRESS.
Selections: 0 to 255 for each field
Default Value: 0.0.0.0
Note • Leading zeroes are not shown in the address. If an IP
address contains more digits than can be displayed at one time, use
the left or right arrows to scroll through the digits.
To modify this parameter:
• To increase the value, press the up arrow.
• To decrease the value, press the down arrow.
CHANGE IP PROTOCOL
Change the IP Protocol
Determines the method(s) by which the print server (wired or wireless)
receives the IP address from the server.
This parameter can be modified only when
OBTAIN IP ADDRESS.
for
Selections: ALL, GLEANING ONLY, RARP, BOOTP, DHCP,
DHCPAND BOOT
Default Value: ALL
To modify this parameter:
• Press the up or down arrow to scroll through the selections.
AUTO SELECT is selected
10/24/06 Wireless Print Server User Guide 13422L-003 Rev. A

Wireless Status and Settings
28
Printer Web Pages
Printer Web Pages
You can use the printer’s ZebraLink WebView web pages to view and modify many of the
same parameters that appear on the printer’s control panel. Through the printer’s home page,
you can also enter additional WEP encryption keys and change parameters that are not
accessible in other ways.
For additional WebView options and functionality, see WebView Web Pages on page 57.
Note • Refer to the user guide for your printer for specific instructions on how to use the
control panel.
To view or modify settings through the printer’s web pages, complete
these steps:
1. From th e control panel, enter Setup mode.
2. Scroll through the parameters until you reach IP ADDRESS (level 3 parameter
CHANGE IP ADDRESS on the S4M).
3. Note th e IP Address (do not include any leading zeroes):
______________________________________________
4. Go to Internet Explorer.
5. In the address box, type the IP address for the printer (do not include www or any leading
zeroes).
6. Press Enter or click Go.
The printer’s home page displays.
7. Click View and Modify Printer Settings.
The printer prompts you for the printer password.
Note • The printer will prompt for the printer password only the first time that certain
screens are accessed until 1) the web authentication timeout value is reached (default
value is 5 minutes) or 2) the printer is reset. At that time, the printer will prompt for the
password again. For more information about setting t he web authen tication ti meout value,
see ^NW on page 41.
8. Enter the password for your printer. The default password is 1234.
9. Click Submit Ch anges.
The following statement appears:
Access Granted. This IP Address now has admin access to the restricted printer
pages. Please Click here to proceed
13422L-003 Rev. A Wireless Print Server User Guide 10/24/06
Wireless Status and Settings
10. Click on the statement.
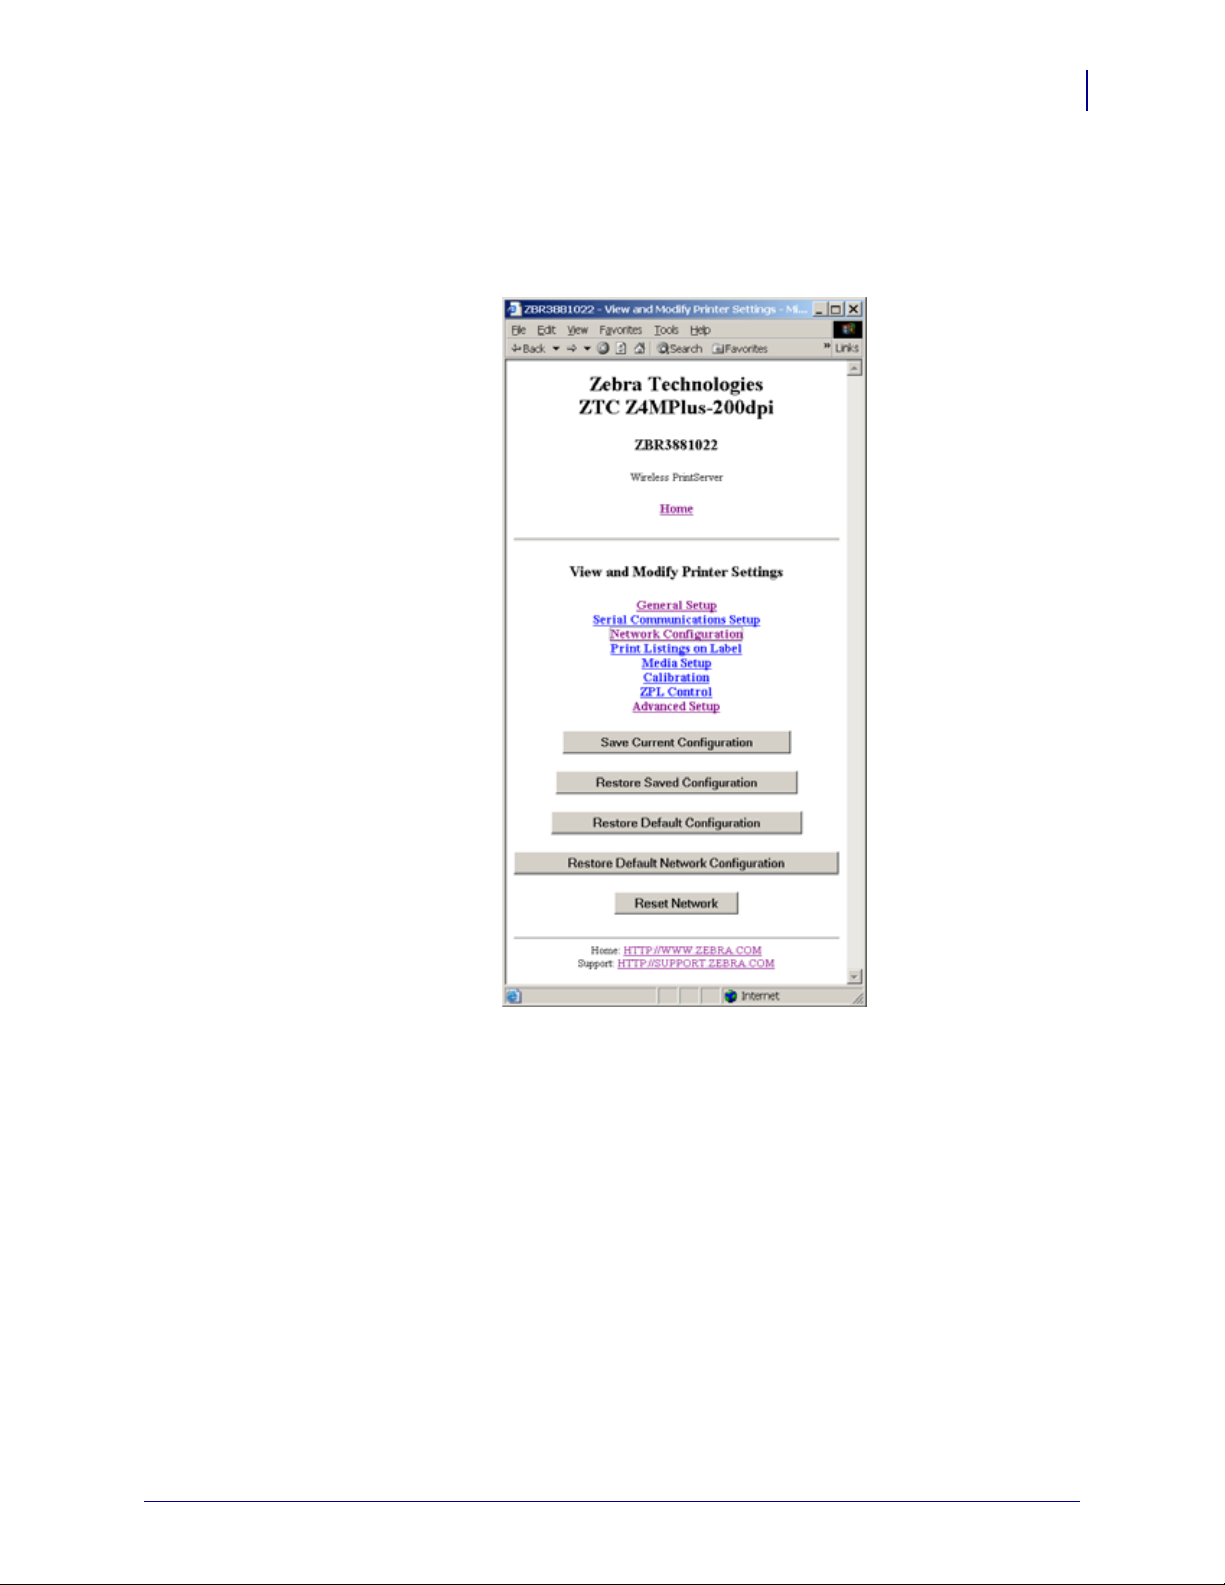
The View and Modify Printer Settings page for your printer displays (Figure 15).
Figure 15 • View and Modify Printer Settings Page
Printer Web Pages
29
10/24/06 Wireless Print Server User Guide 13422L-003 Rev. A

Wireless Status and Settings
30
Printer Web Pages
11. Click Network Configuration.
The Network Configuration page for you r printer displays (Figure 16).
Figure 16 • Network Configuration Page
13422L-003 Rev. A Wireless Print Server User Guide 10/24/06
12. Click Wireless Setup.
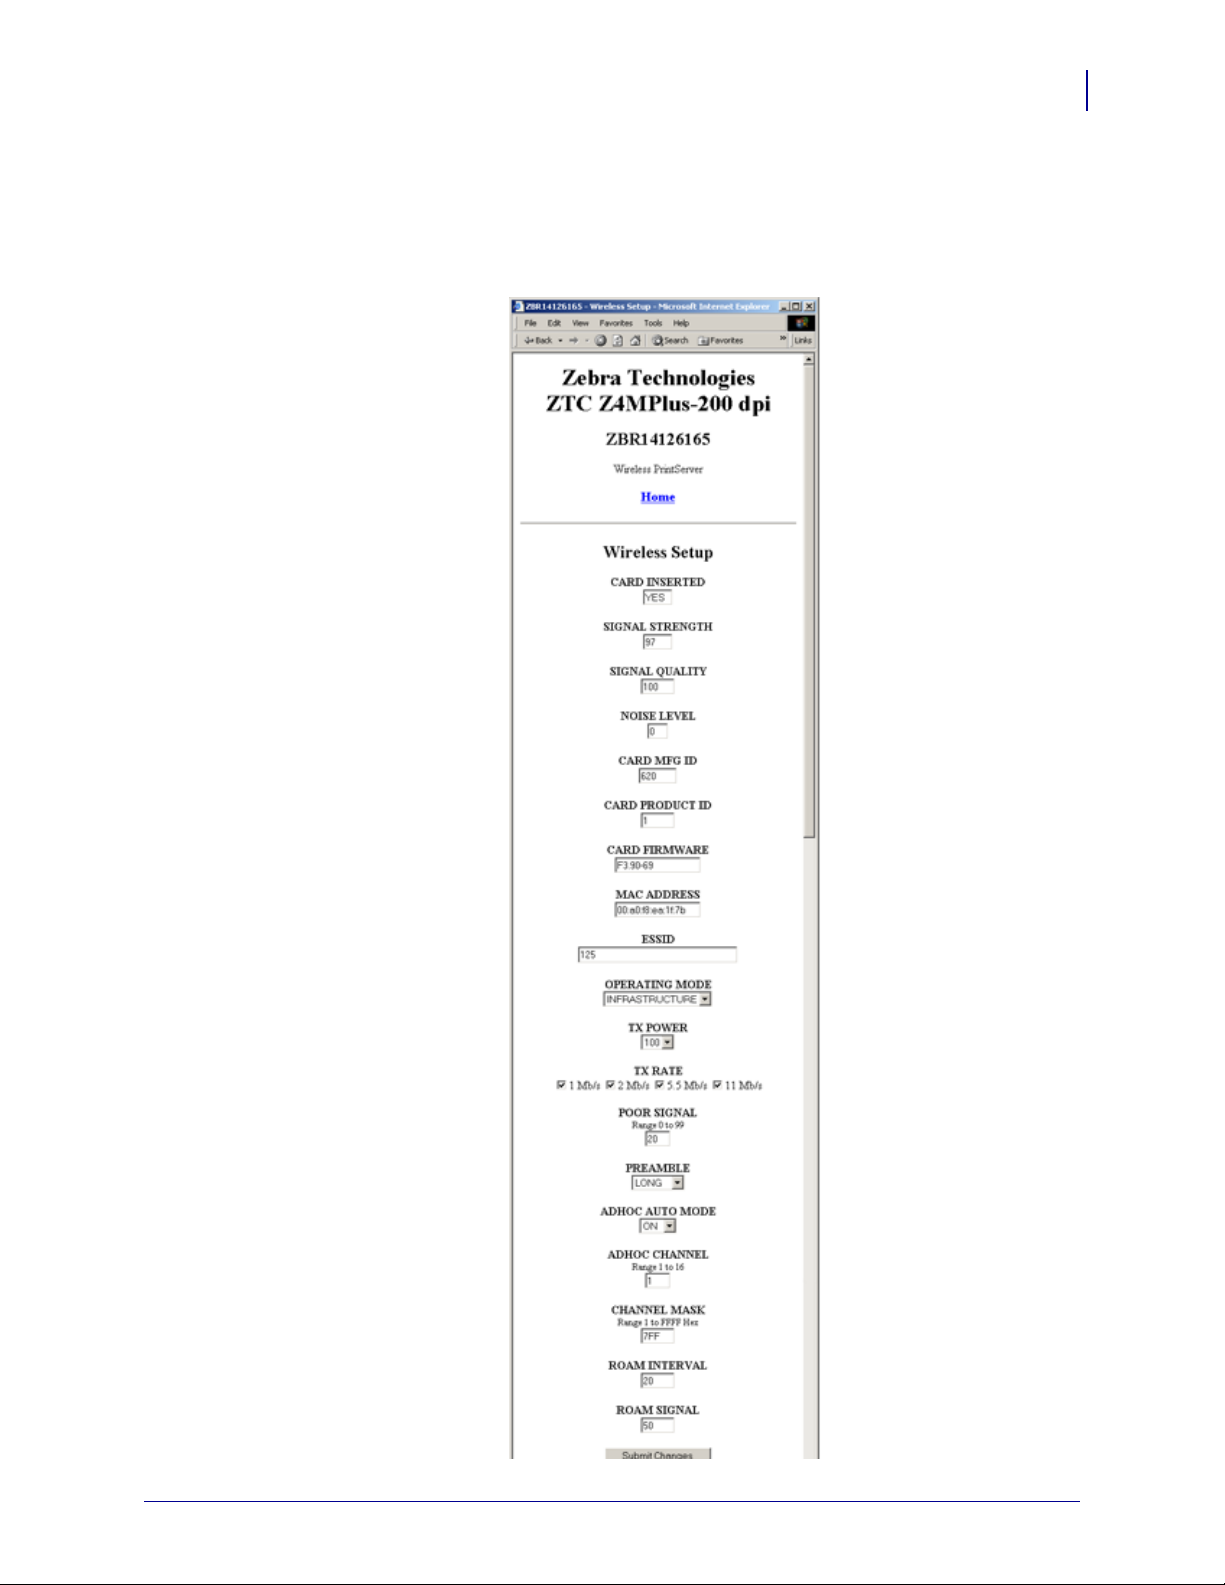
The Wireless Setup Page for your printer displays (Figure 17).
Figure 17 • Wireless Setup Page
Wireless Status and Settings
Printer Web Pages
31
10/24/06 Wireless Print Server User Guide 13422L-003 Rev. A

Wireless Status and Settings
32
Printer Web Pages
13. If desired, change the following settings:
14. Click Submit Ch anges.
15. Click View and Modify Printer Settings.
16. Does y our network use WEP encryption?
a. Enter the ESSID.
b. Select the Operating Mode and Preamble from the drop-down lists.
c. Change the Poor Signal setting.
The printer displays the following:
Wireless Setup
Changes were successfully saved (temporarily).
NOTE: Save permanent and reset network for changes to take effect.
The View and Modify Printer Settings page for your printer returns (see Figure 15
on page 29).
If... Then...
No Continue with step 17.
Yes
a. Click Network Configuration.
The Network Configuration page for your printer displays.
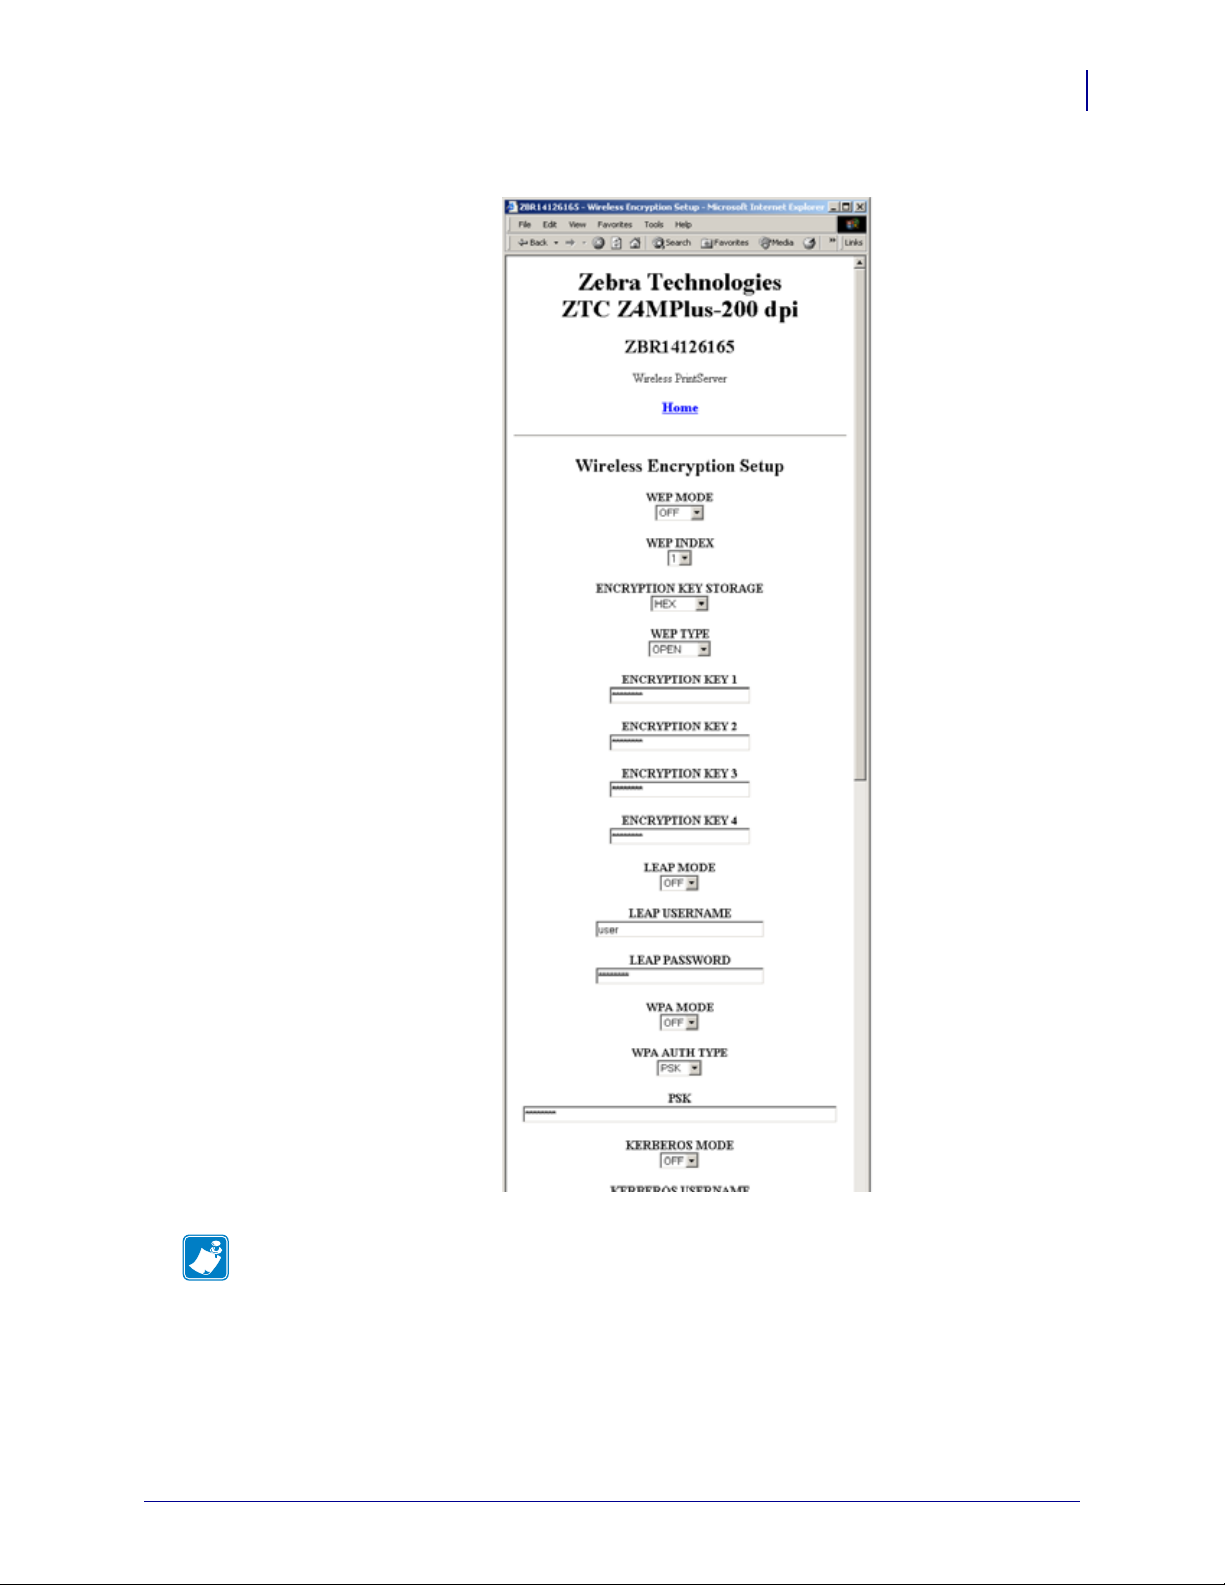
b. Click Wireless Encryption Setup.
The Wireless Encryption Setup page for your printer displays (see
Figure 18 on page 33).
c. Enter the encryption settings for your network. If using hex storage,
do not precede the encryption keys with 0x.
d. Click Submit Changes.
The printer displays the following:
Wireless Encryption Setup
Changes were successfully saved (temporarily).
NOTE: Save permanent and reset network for changes to take
effect.
e. Click View and Modify Printer Settings.
The View and Modify Printer Settings page for your printer returns
(see Figure 15 on page 29).
13422L-003 Rev. A Wireless Print Server User Guide 10/24/06
Wireless Status and Settings
Figure 18 • Wireless Encryption Setup Page
Printer Web Pages
33
Note • LEAP parameters appear on this screen only when the wireless card supports
LEAP.
17. On the View and Modify Printer Settings page, click Save Current Configuration.
The printer displays Current configuration saved.
10/24/06 Wireless Print Server User Guide 13422L-003 Rev. A

Wireless Status and Settings
34
Return Network Parameters to Defaults
Return Network Parameters to Defaults
You may need to return the network parameters to the factory defaults under the following
circumstances:
• If you download a different version of firmware to your printer
• If you need to reset the encryption keys (for instances where a key was entered incorrectly
or was forgotten)
After you return the parameters to the defaults, you will need to reconfigure your printer to use
the Wireless Print Server (see Configuration on page 7). If you saved the ZPL script generated
by the SetWLAN utility , simply send this file to the printer , then power cycle the printer . If you
were using a wireless password, you need to set it again (see ^WP on page 48).
You can set the network parameters back to the factory defaults in two ways:
• (All printers) The Restore Default Network Configuration button on the printer’s View
and Modify Printer Settings Page (see Figure 15 on page 29).
• (For printers other than the S4M) The
when you exit Setup mode. Refer to the user guide for your printer for specific
instructions on how to use the control panel.
Note • The LOAD DEFAULTS option and the Restore Default Configuration butto n on
the printer’s View and Modify Printer Settings Page reset all printer parameters other than
network settings back to factory defaults. The network settings will not change when these
options are selected.
DEFAULT NET option, which appea rs as an option
13422L-003 Rev. A Wireless Print Server User Guide 10/24/06

4
ZPL Commands for the
Wireless Print Server
This chapter contains new or modified ZPL commands for the Wireless Print Server.
Contents
Search for Wired Print Server during Network Boot. . . . . . . . . . . . . . . . . . . . . . . . 36
^NB
^NN Set SNMP . . . . . . . . . . . . . . . . . . . . . . . . . . . . . . . . . . . . . . . . . . . . . . . . . . . . . . . 37
^NP Set Primary/Secondary Device . . . . . . . . . . . . . . . . . . . . . . . . . . . . . . . . . . . . . . . 38
^NS Change Wired Networking Settings. . . . . . . . . . . . . . . . . . . . . . . . . . . . . . . . . . . . 39
^NT Set SMTP. . . . . . . . . . . . . . . . . . . . . . . . . . . . . . . . . . . . . . . . . . . . . . . . . . . . . . . . 40
^NW Set Web Authentication Timeout Value . . . . . . . . . . . . . . . . . . . . . . . . . . . . . . . . . 41
^WA Set Antenna Parameters . . . . . . . . . . . . . . . . . . . . . . . . . . . . . . . . . . . . . . . . . . . . 42
^WE Set WEP Mode. . . . . . . . . . . . . . . . . . . . . . . . . . . . . . . . . . . . . . . . . . . . . . . . . . . . 43
^WI Change Wireless Network Settings . . . . . . . . . . . . . . . . . . . . . . . . . . . . . . . . . . . . 45
^WL Set LEAP Parameters . . . . . . . . . . . . . . . . . . . . . . . . . . . . . . . . . . . . . . . . . . . . . . 46
~WL Print Network Configuration Label . . . . . . . . . . . . . . . . . . . . . . . . . . . . . . . . . . . . . 47
^WP Set Wireless Password . . . . . . . . . . . . . . . . . . . . . . . . . . . . . . . . . . . . . . . . . . . . . 48
^WR Set Transmit Rate . . . . . . . . . . . . . . . . . . . . . . . . . . . . . . . . . . . . . . . . . . . . . . . . . 49
~WR Reset Wireless Card . . . . . . . . . . . . . . . . . . . . . . . . . . . . . . . . . . . . . . . . . . . . . . . 50
^WS Set Wireless Card Values . . . . . . . . . . . . . . . . . . . . . . . . . . . . . . . . . . . . . . . . . . . 51
10/24/06 Wireless Print Server User Guide 13422L-003 Rev. A

ZPL Commands for the Wireless Print Server
36
^NB
^NB
Search for Wired Print Server during Network Boot
Description This command tells the printer whether to search for a wired print server at
bootup. Table 5 shows the results of this check.
Note • Only one print server can be installed in the S4M at one time, so this check does not
occur.
Table 5 • Results of Check for Wired Print Server
Wired Print
Server
Connected?
Format
Check for Wired
Print Server?
Yes Skip The printer skips the check for a wired print
Yes Check The printer checks for a wired print server. If the
No Skip The printer uses the Wireless Print Server as the
No Check During bootup, the printer tries for 70 seconds to
Results
server. The wired print server is not
acknowledged, and the Wireless Print Server is
used as the primary print server.
wired print server is detected, it is used as the
primary print server. If it is not detected, the
Wireless Print Server is used as the primary print
server.
primary print server without taking the time to
check for a wired print server.
detect a wired print server. After finding that one
is not connected, the printer uses the Wireless
Print Server as the primary print server.
^NBa
The following table identifies the parameters for this format.
Parameters Details
a = Check for Wired Print
Server at Boot Time
13422L-003 Rev. A Wireless Print Server User Guide 10/24/06
Accepted Values: C (CHECK), S (SKIP CHECK)
Default Value: S

^NN
Set SNMP
ZPL Commands for the Wireless Print Server
^NN
Description Use this command to set the Simple Network Management Protocol (SNMP)
parameters.
37
Format
The following table identifies the parameters for this format.
Parameters Details
a = System Name
b = System Contact
c = System Location
^NNa,b,c,d,e,f
Same as printer name.
Accepted Values: Up to 17 alphanumeric characters
Any contact information as desired (such as a name or phrase)
Accepted Values: Up to 50 alphanumeric characters
The printer’s model information.
Accepted Values: Up to 50 alphanumeric characters
d = Get Community Name Accepted Values: Up to 19 alphanumeric characters
Default Value: public
e = Set Community Name Accepted Values: Up to 19 alphanumeric characters
Default Value: public
f = Trap Community
Name
Accepted Values: Up to 20 alphanumeric characters
Default Value: public
10/24/06 Wireless Print Server User Guide 13422L-003 Rev. A

ZPL Commands for the Wireless Print Server
38
^NP
^NP
Set Primary/Secondary Device
Description This command specifies whether to use the printer’s or the print server’s
LAN/WLAN settings at boot time. The default is to use the printer’s settings.
When the printer is set as the primary device, you can set it up using ZPL commands or the
SetWLAN utility, and any wired print server inserted into the printer will get these settings.
The drawbacks to using the printer as primary are that any wired print server inserted into the
printer will lose its original settings if the printer is set to check for the wired print server (see
^NB on page 36) and that using GLEANING ONLY for IP PROT OCOL will no longer work.
Format
The following table identifies the parameters for this format.
Parameters Details
a = Device to Use as
Primary
^NPa
Accepted Values: P (PRINTER), M (MPS/PRINTSERVER)
13422L-003 Rev. A Wireless Print Server User Guide 10/24/06

^NS
Change Wired Networking Settings
Description Use this command to change the wired print server network settings.
Format ^NSa,b,c,d,e,f,g,h,i
The following table identifies the parameters for this format.
Parameters Details
a = IP Resolution Accepted Values:
A (ALL)
B (BOOTP)
C (DHCP AND BOOTP)
D (DHCP)
G (GLEANING ONLY)
R (RARP)
P (PERMANENT)
Note • Use of GLEANING ONLY is not recommended when the Wireless
Print Server is installed.
ZPL Commands for the Wireless Print Server
^NS
39
b = IP Address Accepted Values: Any properly formatted IP address in the xxx.xxx.xxx.xxx
format.
c = Subnet Mask Accepted Values: Any properly formatted subnet mask in the xxx.xxx.xxx.xxx
format.
d = Default Gateway Accepted Values: Any properly formatted gateway in the xxx.xxx.xxx.xxx
format.
e = WINS Server Address Accepted Values: Any properly format ted WINS server in the xxx.xx x.xxx.xxx
format.
f = Connection Timeout
Checking
g = Timeout Value
h = ARP Broadcast
Interval
i = Base Raw Port Number
Example •
^XA
^NSa,192.168.0.1,255.255.255.0,192.168.0.2
Accepted Values: Y (YES), N (NO)
Time, in seconds, before the connectio n time s out.
Accepted Values: 0 through 99 99
Time, in minutes, that the broadcast is sent to update the device’s ARP cache.
The port number that the printer should use for its RAW data.
Accepted Values: 0 through 99 999
Default Value: 9100
10/24/06 Wireless Print Server User Guide 13422L-003 Rev. A

ZPL Commands for the Wireless Print Server
40
^NT
^NT
Set SMTP
Description Use this command to set the Simple Mail Transfer Protocol (SMTP)
parameters. This allows you to set the e-mail settings for alerts.
Format
The following table identifies the parameters for this format.
Parameters Details
a = SMTP Server Address Accepted Values: Any properly formatted server address in the
b = Print Server Domain Accepted Va lues: Any properly formatted print server domain name. A domain
^NTa,b
xxx.xxx.xxx.xxx format
name is one or more labels separated by a period (“dot”), and a label consists of
letters, numbers, and hyphens. An example of a domain name is zebra.com.
13422L-003 Rev. A Wireless Print Server User Guide 10/24/06

^NW
Set Web Authentication Timeout Value
Description Use this command to set the timeout value for the printer home page. The
printer will prompt for the printer password only the first time that certain screens are accessed
until 1) the web authentication timeout value is reached (default value is 5 minutes) or
2) the printer is reset. At that time, the printer will prompt for the password again.
ZPL Commands for the Wireless Print Server
^NW
41
Format
The following table identifies the parameters for this format.
Parameters Details
a = Timeout Value
^NWa
The timeout value in minutes for an IP address to be authenticated to the printer
web pages.
Accepted Values: 0 (no secure pages can be accessed without entering the
printer password) to 255 minutes
Default Value: 5
10/24/06 Wireless Print Server User Guide 13422L-003 Rev. A

ZPL Commands for the Wireless Print Server
42
^WA
^WA
Set Antenna Parameters
Description This command sets the values for the receive and transmit antenna.
Format
The following table identifies the parameters for this format.
Parameters Details
a = receive antenna Accepted Values: D (Diversity), L (Left), R (Right)
b = transmit antenna Accepted Values: D (Diversity), L (Left), R (Right)
^WAa,b
Default Value: D
Default Value: D
13422L-003 Rev. A Wireless Print Server User Guide 10/24/06

^WE
Set WEP Mode
ZPL Commands for the Wireless Print Server
^WE
Description Use this command to enable the Wired Equivalent Privacy (WEP) mode and set
WEP values. WEP is a security protocol for wireless local area networks (WLANS).
43
Format
Important • Use care to include the exact number of commas required in this command
when setting encryption keys (parameters
command will cause the keys to be stored in the wrong slots and can disable the wireless
system.
The following table identifies the parameters for this format.
Parameters Details
^WEa,b,c,d,e,f,g,h
e through h). A missing or extra comma in this
a = Encryption Mode Accepted Values: OFF, 40 (40-bit encryption), 128 (128-bit encryption)
Default Value: OFF
b = Encryption Index
Tells the printer which encryption key to use.
Accepted Values: 1 (Key 1), 2 (Key 2), 3 (Key 3), 4 (Key 4)
Default Value: 1
c = Authentication Type Accepted Values: O (Open System), S (Shared Key)
Default Value: O
Note • If you enabled Shared Key authentication with Encryption
Mode set to OFF, this value resets to Open.
d = Encryption Key
Storage
Accepted Values: H (Hex key storage), S (string key storage)
Default Value: S
e, f, g, h = Encryption Keys
1 through 4
Example 1 •This example sets encryption to 40-bit, activates encryption key 1, and sets
encryption key 1 to the string
Accepted Values: The actual value for the encryption key
The encryption mode affects what can be entered for the encryption keys:
• For 40-bit, encryption keys can be set to any 5 hex pairs or any 10
alphanumeric characters.
• For 128-bit, encryption keys can be set to any 13 hex pairs or any 26
alphanumeric characters.
Note • When using hex storage, do not add a leading 0x on the
WEP key.
12345.
^WE40,,,,12345
In this example, the Encryption Index, Authentication Type, and Encryption Key Storage
parameters are left blank with commas as placeholders for the fields. The printer uses the
default values for these parameters.
10/24/06 Wireless Print Server User Guide 13422L-003 Rev. A

ZPL Commands for the Wireless Print Server
44
^WE
Example 2 •This example sets encryption to 128-bit, activates encryption key 2, and sets
encryption keys 1 and 2 to hex values.
^WE128,2,,H,12345678901234567890123456,98765432109876543
210987654
The value for encryption key 1 is stored and can be activated in the future by the following
command:
^WE128,1
Example 3 •This example sets encryption to 128-bit, activates encryption key 4, and sets
encryption key 4 to a hex value.
^WE128,4,,H,,,,98765432109876543210987654
Values are not requ ired for encryption key s 1 through 3 when sett ing encryption key 4 . In this
example, commas are used as placeholders for the fields for encryption keys 1 through 3.
Any previously stored values for these encryption keys do not change.
Important • Make sure that you include the exact number of c ommas required to get
to the slot for encryption key 4 (parameter
h).
13422L-003 Rev. A Wireless Print Server User Guide 10/24/06

^WI
Change Wireless Network Settings
Description Use this command to change the wireless network settings.
Format ^WIa,b,c,d,e,f,g,h,i
The following table identifies the parameters for this format.
Parameters Details
a = IP Resolution Accepted Values:
A (ALL)
B (BOOTP)
C (DHCP AND BOOTP)
D (DHCP)
G (GLEANING ONLY)
R (RARP)
P (PERMANENT)
Note • Use of GLEANING ONLY is not recommended when the Wireless
Print Server is installed.
ZPL Commands for the Wireless Print Server
^WI
45
b = IP Address Accepted Values: Any properly formatted IP address in the xxx.xxx.xxx.xxx
format.
c = Subnet Mask Accepted Values: Any properly formatted subnet mask in the xxx.xxx.xxx.xxx
format.
d = Default Gateway Accepted Values: Any properly formatted gateway in the xxx.xxx.xxx.xxx
format.
e = WINS Server Address Accepted Values: Any properly format ted WINS server in the xxx.xx x.xxx.xxx
format.
f = Connection Timeout
Checking
g = Timeout Value
h = ARP Broadcast
Interval
i = Base Raw Port Number
Accepted Values: Y (YES), N (NO)
Time, in seconds, before the connectio n time s out.
Accepted Values: 0 through 99 99
Time, in minutes, that the broadcast is sent to update devices ARP cache.
The port number that the printer should use for its RAW data.
Accepted Values: 0 through 99 999
Default Value: 9100
10/24/06 Wireless Print Server User Guide 13422L-003 Rev. A

ZPL Commands for the Wireless Print Server
46
^WL
^WL
Set LEAP Parameters
Description Use this command to enable Cisco® Lightweight Extensible Authentication
Protocol (LEAP) mode and set parameters. LEAP is a user authentication method that is
available with some wireless cards.
Note • LEAP is only available with some wireless cards.
Format ^WLa,b,c
The following table identifies the parameters for this format.
Parameters Details
a = Mode Accepted Values: OFF, ON
Default Value: OFF
b = User Name Accepted Values: Any 4 to 40 alphanumeric characters user
c = Password Accepted Values: Any 4 to 40 alphanumeric characters password
13422L-003 Rev. A Wireless Print Server User Guide 10/24/06

~WL
Print Network Configuration Label
Description Use the ~WL command to generate a network configuration label (Figure 19).
ZPL Commands for the Wireless Print Server
~WL
47
Format
~WL
Figure 19 • Network Configuration Label
10/24/06 Wireless Print Server User Guide 13422L-003 Rev. A

ZPL Commands for the Wireless Print Server
48
^WP
^WP
Set Wireless Password
Note • This command does not apply to the S4M.
Description This command sets the four-digit wireless password (not the same as the
general printer password). If the wireless password is 0000, the Wireless Print Server runs in
an “unprotected” mode, which means that you do not need to enter th e wireless password
through the control panel to view or modify wireless settings.
If a wireless password is set, the values for the following parameters will not appear through
the control panel until the wireless password is entered:
• MAC Address
• ESSID
• Auth Type
• Leap Mode (if applicable)
• Encryption Mode
• Encryption Index
•Reset Network
Format
The following table identifies the parameters for this format.
Parameters Details
a = old wireless password
b = new wireless password
^WPa,b
Accepted Values: 0000 through 9999
Default Value: 0000
Accepted Values: 0000 through 9999
Default Value: 0000
13422L-003 Rev. A Wireless Print Server User Guide 10/24/06

^WR
Set Transmit Rate
Description Use this command to change the transmission parameters.
Format ^WRa,b,c,d,e
The following table identifies the parameters for this format.
Parameters Details
ZPL Commands for the Wireless Print Server
^WR
49
a = rate 1
b = rate 2
c = rate 5.5
d = rate 11
e = transmit power
Sets the 1 Mb/s transmit rate.
Accepted Values: Y (On), N (Off)
Sets the 2 Mb/s transmit rate.
Accepted Values: Y (On), N (Off)
Sets the 5.5 Mb/s transmit rate.
Accepted Values: Y (On), N (Off)
Sets the 11 Mb/s transmit rate.
Accepted Values: Y (On), N (Off)
Accepted Values: 1, 5, 20, 30, 50, 100
10/24/06 Wireless Print Server User Guide 13422L-003 Rev. A

ZPL Commands for the Wireless Print Server
50
~WR
~WR
Reset Wireless Card
Description This command reinitializes the wireless card and the print server when the
Wireless Print Server is running. The command also causes any wireless card in the printer to
reassociate with the wireless network. Same function as the RESET NETWORK control panel
parameter.
Format
~WR
13422L-003 Rev. A Wireless Print Server User Guide 10/24/06

^WS
Set Wireless Card Values
Description This command sets the wireless card values for ESSID, Operating Mode, and
Card Preamble.
Format ^WSe,o,p
The following table identifies the parameters for this format.
Parameters Details
ZPL Commands for the Wireless Print Server
^WS
51
e = ESSID value
o = operating mode
p = wireless card preamble
Accepted Values: Any value up to 32 characters, including all ASCII and
Extended ASCII characters, including the space character. When this
parameter is left blank, the ESSID is not changed.
Default Value: 125
Accepted Values: I (Infrastructure), A (Adhoc)
Default Value: I
Accepted Values: L (Long), S (Short)
Default Value: L
10/24/06 Wireless Print Server User Guide 13422L-003 Rev. A

ZPL Commands for the Wireless Print Server
52
^WS
Notes • ___________________________________________________________________
__________________________________________________________________________
__________________________________________________________________________
__________________________________________________________________________
__________________________________________________________________________
__________________________________________________________________________
__________________________________________________________________________
__________________________________________________________________________
__________________________________________________________________________
__________________________________________________________________________
13422L-003 Rev. A Wireless Print Server User Guide 10/24/06

5
Troubleshooting
This chapter provides solutions to problems related specifically to the Wireless Print Server.
For print quality or other printer-specific problems, refer to the troubleshooting section in the
user guide for your printer. For problems with the wireless card or access point not addressed
here, refer to the appropriate third-party documentation.
Contents
General Issues. . . . . . . . . . . . . . . . . . . . . . . . . . . . . . . . . . . . . . . . . . . . . . . . . . . . . . . . . 54
Encryption Issues. . . . . . . . . . . . . . . . . . . . . . . . . . . . . . . . . . . . . . . . . . . . . . . . . . . . . . . 55
IP Issues . . . . . . . . . . . . . . . . . . . . . . . . . . . . . . . . . . . . . . . . . . . . . . . . . . . . . . . . . . . . . 56
10/24/06 Wireless Print Server User Guide 13422L-003 Rev. A

Troubleshooting
54
General Issues
General Issues
Table 6 • General Issues and Recommended Solutions
Issue Possible Cause Recommended Solution
The printer
acknowledges the
wireless card and
indicates a signal
strength, but the
printer does not appear
to connect to the
network.
The printer does not
acknowledge the
wireless card.
After a firmware
upgrade, the printer
will not connect to the
network.
The combination of signal strength
and signal quality at the pr inter
may not be good enough to
establish a connection to the
network.
The printer is associated with, but
not authenticated with, your access
point.
The card may not be inserted
correctly.
Your printer may not be equipped
for the ZebraNet Wireless Print
Server.
The card may not be supported for
use with the ZebraNet Wireless
Print Server.
Network settings need to be
updated.
Note • This does not apply
to the S4M.
Move the printer or the access point to
another location, or remove any
obstructions between the two. A direct line
of site between the printer and access point
provides the best results. Refer to the
third-party documentation for your access
point for additional recommendations and
limitations.
1. Check your encryption settings.
2. Verify that your MAC address is
approved for the access point.
Make sure that the wireless card is correctly
seated in the PCMCIA slot.
Contact your authorized Zebra
representative for information about
purchasing the ZebraNet Wireless Print
Server.
Make sure that you are using a compatible
wireless card (see Supported Wireless
Cards on page 3).
1. Through the printer’s control panel,
SETUP/EXIT to enter Setup
press
mode.
2. Press SETUP/EXIT again to access the
printer’s save and default options.
3. Scroll to DEFAULT NET.
4. Press SETUP/EXIT.
The network settings are returned to
factory defaults.
5. Reconfigure your printer to use the
Wireless Print Server (see
Configuration on page 7). If you saved
the ZPL script generated by the
SetWLAN utility, simply send this file
to the printer. If you were using a
wireless password, you need to set it
again (see ^WP on page 48).
6. Power cycle the printer for the settings
to take effect.
13422L-003 Rev. A Wireless Print Server User Guide 10/24/06

Table 6 • General Issues and Recommended Solutions (Continued)
Issue Possible Cause Recommended Solution
Troubleshooting
Encryption Issues
55
My wireless connection
is inconsistent. The
signal strengths change
back and forth between
high and low numbers.
An access point may be bad. The
card appears to be switching
affiliations between access points.
The wireless card is repeatedly
associating with two or more
access points because of varying
signal strengths.
Check the access points on your WLAN,
particularly the one closest to the printer.
Check the access points on your WLAN to
determine what is causing the signal
strengths to vary.
Encryption Issues
Table 7 • Encryption Issues and Recommended Solutions
Issue Possible Cause Recommended Solution
The entry field for
WEP keys on the
printer’s web page
does not display all 26
characters.
I set encryption keys
using the
command, and now my
wireless system does
not function.
^WE ZPL
The field accepts 26 characters, but
they may not be able to display all
at once because of your browser or
system settings.
The ZPL string that you sent to th e
printer may not have been correct.
The printer may be using the
wrong encryption key or looking
for one that is undefined.
Use the left and right arrow keys on your
keyboard to move the cursor in the WEP
key field and reveal characters that may not
display.
Resend the
on page 43). Make sure that all of the
required commas are in place in the
command. A missing or extra comma in
this command can disable the wireless
system.
^WE command (see ^WE
10/24/06 Wireless Print Server User Guide 13422L-003 Rev. A

Troubleshooting
56
IP Issues
IP Issues
Table 8 • IP Issues and Recommended Solutions
Issue Possible Cause Recommended Solution
The printer shows
IP address
192.168.254.254, which
does not appear to
work.
On my control panel,
the IP settings are
missing or show all
zeroes
(000.000.000.000).
IP address 192.168.254.254 is a
default address. The printer shows
this address after it times out while
trying to connect. The printer was
likely set to an incorrect static IP
address.
The DHCP server is not
functioning, so a dynamic IP
address is not being assigned. The
printer timed out and shows the
default IP address of
192.168.254.254.
Actual IP settings (IP Resolution,
IP Address, Subnet Mask, and
Default Gateway) will only appear
when the printer is associated to
and authenticated with the WLAN.
Until the time that the printer
recognizes the existence of a
ZebraNet print server, these
parameters will not show through
the control panel. After the print
server is recognized, all zeroes will
display until the printer obtains an
IP address or defaults to address
192.168.254.254.
Enter a valid static IP address.
OR
Set IP Protocol to All.
Check the DHCP server.
1. Allow more time for the printer to
complete its connection and obtain an
IP address.
2. If the printer does not connect, check
that there is an adequate signal between
the printer and the access point. If
necessary, move the printer or the
access point to another location, or
remove any obstructions between the
two. A direct line of site between the
printer and access point provides the
best results. Refer to the third-party
documentation for your access point for
recommendations and limitations.
3. Check the IP Protocol setting. If using a
static setting, the value entered might
not be valid.
When I select
GLEANING ONL Y for
IP PROTOCOL, the IP
address that I assign to
the printer is not set
permanently.
The IP address for my
wired print server does
not bring up the
printer home page.
Using GLEANING ONLY is not
recommended when the wireless
option is installed.
If both a wired and wireless print
server are installed on a printer at
the same time and the wireless
printer is the primary/active print
Use the SetWLAN utility or ZPL
commands to set a permanent IP address.
For more information, see Configure Using
the SetWLAN Utility on page 9 or ZPL
Commands for the Wireless Print Server
on page 35.
In your browser window, type in the IP
address of the wireless print server.
server, the printer web pages can
be accessed only through the
wireless print server’s IP address.
13422L-003 Rev. A Wireless Print Server User Guide 10/24/06

A
WebView Web Pages
This appendix provides details about the ZebraLink WebView web pages for a printer that is
running the Wireless Print Server.
WebView is a browser-based application that provides real-time configuration, control, and
monitoring capabilities for your printer. The web pages displayed by the printers are not static.
They contain real-time information about the printer’s present state of operation, including
printer status, error conditions, and all printing parameters.
Contents
Home Page . . . . . . . . . . . . . . . . . . . . . . . . . . . . . . . . . . . . . . . . . . . . . . . . . . . . . . . . . . . 58
View Printer Configuration . . . . . . . . . . . . . . . . . . . . . . . . . . . . . . . . . . . . . . . . . . . . . . . . 60
View and Modify Printer Settings. . . . . . . . . . . . . . . . . . . . . . . . . . . . . . . . . . . . . . . . . . . 61
Network Configuration Screens. . . . . . . . . . . . . . . . . . . . . . . . . . . . . . . . . . . . . . . . . . 67
Directory Listing . . . . . . . . . . . . . . . . . . . . . . . . . . . . . . . . . . . . . . . . . . . . . . . . . . . . . . . . 71
Alert Setup . . . . . . . . . . . . . . . . . . . . . . . . . . . . . . . . . . . . . . . . . . . . . . . . . . . . . . . . . . . . 75
Establishing E-Mail Alert Messaging . . . . . . . . . . . . . . . . . . . . . . . . . . . . . . . . . . . . . . 76
Printer Controls . . . . . . . . . . . . . . . . . . . . . . . . . . . . . . . . . . . . . . . . . . . . . . . . . . . . . . . . 78
Print Server Settings . . . . . . . . . . . . . . . . . . . . . . . . . . . . . . . . . . . . . . . . . . . . . . . . . . . . 80
10/24/06 Wireless Print Server User Guide 13422L-003 Rev. A

WebView Web Pages
58
Home Page
Home Page
To access the printer’s home page, you need the printer’s IP address. When the printer is
connected to your WLAN, you can find the IP address using the printer’s control panel.
Note • Refer to the user guide for your printer for specific instructions on how to use the
control panel.
The printer’s home page is the first web page that opens. This page includes a menu of
hyperlinks that allow you to make modifications to the printer, print server, and network
settings. Other changeable settings through the home page include:
• Network Status, Error, and Warning reports
• Directories of objects stored in Flash memory and RAM devices
• Objects, stored fonts, images, programs, and ZPL II formats
To access your printer’s home page, complete these steps:
1. From th e control panel, enter Setup mode.
2. Scroll through the parameters until you reach IP ADDRESS (level 3 parameter
CHANGE IP ADDRESS on the S4M).
3. Note th e IP Address (do not include any leading zeroes):
______________________________________________
4. Go to Internet Explorer.
5. In the address box, type the IP address for the printer (do not include www or any leading
zeroes), then press
Enter.
The printer’s home page displays (Figure 20).
13422L-003 Rev. A Wireless Print Server User Guide 10/24/06

Figure 20 • Printer Home Page
WebView Web Pages
Home Page
59
For more information about the options listed on the printer home page, see the following
sections:
• View Printer Configuration on page 60
• View and Modify Printer Settings on page 61
• Directory Listing on page 71
• Alert Setup on page 75
• Printer Controls on page 78
• Print Server Settings on page 80
10/24/06 Wireless Print Server User Guide 13422L-003 Rev. A

WebView Web Pages
60
View Printer Configuration
View Printer Configuration
The V iew Pri nter Co nfigurat ion menu optio n prov ides accurat e, up-to-the-min ute informa tion
on the printer’s current state. An administrator can conveniently find information on the
Virtual Configuration Label and also check on the status of printer ports.
To view the printer configuration through WebView, complete these steps:
1. From the printer home page, click View Printer Configuration.
WebView displays the configuration settings (Figure 21).
Figure 21 • View Printer Configuration
2. To receive updated printer information from this view, refresh the browser page.
13422L-003 Rev. A Wireless Print Server User Guide 10/24/06

View and Modify Printer Settings
This section provides you with steps for accessing and modifying printer settings with a
ZebraLink-enabled printer. It also provides illustrations of the various pages you can access.
To access the View and Modify Printer Settings, complete these steps:
1. From the printer home page, click View and Modify Printer Settings.
The printer prompts you for a password.
2. Enter the password for your printer. The default password is 1234.
3. Click Submit Ch anges.
The following statement appears:
Access Granted. This IP Address now has admin access to the restricted printer
pages. Please Click here to proceed
4. Click on the statement.
The View and Modify Printer Settings page displays (Figure 22). Table 9 on page 63
shows the screens that appear when you click on the menu items on this page.
WebView Web Pages
View and Modify Printer Settings
61
10/24/06 Wireless Print Server User Guide 13422L-003 Rev. A

WebView Web Pages
62
View and Modify Printer Settings
Figure 22 • View and Modify Printer Settings Page
13422L-003 Rev. A Wireless Print Server User Guide 10/24/06

View and Modify Printer Settings
Table 9 • Subscreens: View and Modify Printer Settings Screen
General Setup Serial Communications Setup
WebView Web Pages
63
10/24/06 Wireless Print Server User Guide 13422L-003 Rev. A
WebView Web Pages
64
View and Modify Printer Settings
Table 9 • Subscreens: View and Modify Printer Settings Screen (Continued)
Network Configuration Menu
(see Table 9 on page 63 for subscreens)
Print Listings on Label
13422L-003 Rev. A Wireless Print Server User Guide 10/24/06
Table 9 • Subscreens: View and Modify Printer Settings Screen (Continued)
Media Setup Calibration
WebView Web Pages
View and Modify Printer Settings
65
10/24/06 Wireless Print Server User Guide 13422L-003 Rev. A

WebView Web Pages
66
View and Modify Printer Settings
Table 9 • Subscreens: View and Modify Printer Settings Screen (Continued)
ZPL Control Advanced Setup
13422L-003 Rev. A Wireless Print Server User Guide 10/24/06
Network Configuration Screens
This section shows the shows the screens that appear when you click on the menu items on the
Network Configuration menu (Figure 23).
To access the Network Communications menu, complete these steps:
1. From the printer home page, click View and Modify Printer Settings.
The printer prompts you for a password.
2. Enter the password for your printer. The default password is 1234.
3. Click Submit Ch anges.
The following statement appears:
Access Granted. This IP Address now has admin access to the restricted printer
pages. Please Click here to proceed
4. Click on the statement.
The View and Modify Printer Settings page displays (see Figure 22 on page 62).
WebView Web Pages
View and Modify Printer Settings
67
5. Click Network Configuration.
The Network Configuration Menu displays (Figure 23). Table 10 shows the screens that
appear when you click on the menu items on this page.
Figure 23 • Network Configuration Menu
10/24/06 Wireless Print Server User Guide 13422L-003 Rev. A

WebView Web Pages
68
View and Modify Printer Settings
Table 10 • Subscreens: Network Communications Setup
Primary/Secondary Settings SNMP
13422L-003 Rev. A Wireless Print Server User Guide 10/24/06

Table 10 • Subscreens: Network Communications Setup (Continued)
SMTP TCP/IP
WebView Web Pages
View and Modify Printer Settings
69
10/24/06 Wireless Print Server User Guide 13422L-003 Rev. A

WebView Web Pages
70
View and Modify Printer Settings
Table 10 • Subscreens: Network Communications Setup (Continued)
Wireless Setup Wireless Encryption Setup
13422L-003 Rev. A Wireless Print Server User Guide 10/24/06

Directory Listing
The directory page provides a listing of all file system devices (E:, R:, Z:). The size, name, and
location of each stored object are displayed.
To view the Directory Listing, complete these steps:
1. From the printer home page, click Directory Listing.
The Directory Listing screen displays (Figure 24).
Figure 24 • Directory Listing Screen
WebView Web Pages
Directory Listing
71
To create a new item on the Directory Listing screen, complete these steps:
1. From the Directory Listing screen, click Create New Script.
The Create New Script screen displays (Figure 25).
10/24/06 Wireless Print Server User Guide 13422L-003 Rev. A

WebView Web Pages
72
Directory Listing
Figure 25 • Create New Script Screen
2. Select a device type fr om the drop-down menu.
3. Type a name for the file in the Name field.
4. Click Edit.
The Edit ZPL Script screen displays (Figure 26).
13422L-003 Rev. A Wireless Print Server User Guide 10/24/06

Figure 26 • Edit ZPL Script Screen
WebView Web Pages
Directory Listing
73
5. Enter the ZPL code in the text field.
10/24/06 Wireless Print Server User Guide 13422L-003 Rev. A

WebView Web Pages
74
Directory Listing
6. Clic k one of the available buttons:
Button Function/Operation
Preview Label Displays a graphic representation of the label that results from the
ZPL code.
Print Label Sends the ZPL code to the printer.
Reset Clears the text field
Save
Save As
a. Enter the printer password in the password fiel d.
b. Click Save.
If the correct password was entered, saves the label to the ZPL
file name entered on the Create New Script screen (see
Figure 25 on page 72).
a. Enter the printer password in the password fiel d.
b. Click Save As.
The Create New Script screen displays (Figure 26).
Figure 27 • Save ZPL Script Screen
c. Enter a file name in the Name field.
d. Click Save.
If the correct password was entered on the Edit ZPL Script
screen, the file is saved.
13422L-003 Rev. A Wireless Print Server User Guide 10/24/06

Alert Setup
For the printer to interact with ZebraNet Alert, SNMP settings must be established in these
areas:
The ZebraLink messaging system provides for more than SNMP notification. Alerts can be
routed to various destinations:
To view Alert Setup, complete these steps:
• the printer, via the WebView interface
• the Alert Printer Management Utility for logging SNMP traps
•TCP
•UDP
•e-mail
• serial port
• parallel port destinations
WebView Web Pages
Alert Setup
75
1. From the printer home page, click Alert Setup.
The Alert Messaging System screen displays (Figure 28).
Figure 28 • Alert Messaging System Screen
10/24/06 Wireless Print Server User Guide 13422L-003 Rev. A

WebView Web Pages
76
Alert Setup
Establishing E-Mail Alert Messaging
ZebraNet Alert allows printer errors to be sent directly to any v alid ema il addre ss. You can set
up multiple e-mail addresses for routing different error messag es or split notifications betwee n
e-mail and other network management tools.
To begin receiving e-mail notification of errors, complete these steps:
1. From the Alert Messaging System screen, click Add Alert Message.
The Add Alert Message screen displays (Figure 29).
Figure 29 • Add Alert Message Screen
2. From the drop-down menu, specify the condition to send over e-mail, such as
HEAD ELEMENT BAD or PAPER OUT.
3. Select a destination from the drop-down menu.
4. Enter a valid email address to which the messages will be sent. (The Port field can be
ignored for e-mail setup.)
5. Enter the printer password.
6. Click Add Alert Message.
7. Click Home to return to the printer’s home page.
13422L-003 Rev. A Wireless Print Server User Guide 10/24/06

WebView Web Pages
Alert Setup
8. From the printer’s home page, click View and Modify Printer Settings. (You may be
prompted for the printer’s password if it was not entered recently.)
The View and Modify Printer Settings screen displays.
9. Click Network Configuration.
The Network Configuration Menu displays.
10. Click SMTP.
The SMTP Setup screen displays (Figure 30).
Figure 30 • SMTP Setup Screen
77
11. Specify your SMTP server address and Print Server domain.
12. Click Submit Ch anges.
The printer displays the following:
Changes were successfully saved (temporarily).
13. Click View and Modify Printer Settings.
The View and Modify Printer Settings page for your printer returns (see Figure 22
on page 62).
14. Click Save Current Configuration.
The printer displays Current configuration saved.
10/24/06 Wireless Print Server User Guide 13422L-003 Rev. A

WebView Web Pages
78
Printer Controls
Printer Controls
To view Printer Controls, complete these steps:
This page offers control over basic printer functions.
1. From the printer home page, click Printer Controls.
The printer prompts you for a password.
2. Enter the password for your printer. The default password is 1234.
3. Click Submit Ch anges.
The following statement appears:
Access Granted. This IP Address now has admin access to the restricted printer
pages. Please Click here to proceed
4. Click on the statement.
This Printer Controls screen displays (Figure 31).
Figure 31 • Printer Controls Screen
13422L-003 Rev. A Wireless Print Server User Guide 10/24/06

WebView Web Pages
Printer Controls
5. Clic k one of the available buttons:
Button Function
Pause Toggles the pause option on the printer
Feed Causes printer to feed one label
Cancel One Format Cancels the currently printing format
Cancel All Formats Cancels all formats
Reset Printer Causes the printer to perform its standard reset without
cycling power
a. Click Reset Printer.
The printer prompts Are you sure you want to reset
the printer?
b. Click Reset.
The printer resets itself.
79
10/24/06 Wireless Print Server User Guide 13422L-003 Rev. A
WebView Web Pages
80
Print Server Settings
Print Server Settings
This section provides you with instructions for viewing the current print server settings.
Important • To apply changes made in this section, you need to use the default user ID and
password:
User ID: admin
Password: 1234
To view the print server menu, complete these steps:
• From the printer home page, click Print Server Settings.
The Print Server screen opens (Figure 32).
Figure 32 • Print Server Screen
13422L-003 Rev. A Wireless Print Server User Guide 10/24/06

Proprietary Statement
This manual contains proprietary information of Zebra Technologies Corporation and its
subsidiaries (“Zebra Technologies”). It is intended solely for the information and use of parties
operating and maintaining the equipment described herein. Such proprietary information may
not be used, reproduced, or disclosed to any other parties for any other purpose without the
expressed written permission of Zebra Technologies.
Product Improvements
Continuous improvement of products is a policy of Zebra Technologies. All specifications and
designs are subject to change without notice.
FCC Compliance Statement
This device complies with Part 15 rules. Operation is subject to the following two conditions:
1. This device may not cause harmful interference, and
2. This device must accept any interference received, including interference that may cause
undesired operation.
This equipment has been tested and found to comply with the limits for Class B Digital
Devices, pursuant to Part 15 of the FCC Rules. These limi ts are designed to provide reasona ble
protection against harmful interference when the equipment is operated in a residential
environment. This equipment generates, uses, and can radiate radio frequency energy and, if
not installed and used in accordance with the product manuals, may cause harmful in terference
to radio communications. However, there is no guarantee that interference will not occur in a
particular installation. If this equipment does cause harmful interference to radio or television
reception, the user is encouraged to do one or more of the following measures:
• Reorient or relocate the receiving antenna.
• Increase the separation between the equipment and receiver.
• Connect the equipment into an outle t o n a circu it di fferent from that to which the receiver
is connected.
10/24/06 Wireless Print Server User Guide 13422L-003 Rev. A

Proprietary Statement
82
FCC Radiation Exposure Statement
(for printers with RFID encoders)
Canadian DOC Compliance Statement
• Consult the dealer or an experienced radio/TV techni cia n fo r he lp.
The user is cautioned that any changes or modifications not expressly approved by Zebra
Technologies could void the user’s authority to operate the equipment. To ensure compliance,
this printer must be used with Shielded Communication Cables.
This equipment complies with FCC radiation exposure limits set forth for an uncontrolled
environment. This equipment should be instal led and operated with minimum distance 20cm
between the radiator and your body.
This transmitter must not be co-located or operating in conjunction with any other antenna or
transmitter.
This Class B digital apparatus complies with Canadian ICES-003.
Cet appareil numérique de la classe B est conforme à la norme NMB-003 du Canada.
Liability Disclaimer
Zebra Technologies takes steps to ensure that its published Engineering specifications and
manuals are correct; however, errors do occur. Zebra Technologies reserves the right to correct
any such errors and disclaims liability resulting therefrom.
Limitation of Liability
In no event shall Zebra Technologies or anyone else involved in the creation, production, or
delivery of the accompanying product (including hardware and software) be liable for any
damages whatsoever (including, without limitation, consequential damages including loss of
business profits, business interruption, or loss of business information) arisi ng out of the use
of, the results of use of, or inability to use such product, even if Zebra Technologies has been
advised of the possibility of such damages. Some jurisdictions do not allow the exclusion or
limitation of incidental or consequential damages, so the above limitation or exclusion may
not apply to you.
13422L-003 Rev. A Wireless Print Server User Guide 10/24/06

Index
A
access point
as part of a WLAN, 2
selection, 4
troubleshooting problems, 55
accessing printer home page, 58
adaptor for Compact Flash card, 17
alert setup, 75
antenna parameter setting via ZPL, 42
authentication timeout for printer home page, 41
authentication type
setting via ZPL command, 43
view or modify through control panel, 24
C
Canadian DOC compliance, 82
change wired network settings, 39
Compact Flash card insertion, 17
configuration
options, 8
SetWLAN utility, 9
using ZPL commands, 35
connecting to a wireless network, 2
contact information, viii
control panel
view wireless status, 20
Wireless Print Server parameters, 23
D
default gateway
other printers, 24
S4M, 27
E
e-mail alert messaging, 76
encryption
changing or entering settings, 32
control panel parameters, 23
LEAP mode, 25
set LEAP parameters, 46
set values via ZPL, 43
troubleshooting, 55
Wireless Encryption Setup page, 33
Wireless Encryption Setup screen, 70
ESSID
setting via ZPL, 51
view or modify through control panel, 24
F
FCC compliance, 81
FCC radiation exposure limits, 82
firmware
connection problems after upgrade, 54
versions required for wireless operation, 8
G
gleaning, 56
H
home page, 58
I
inserting wireless card
Compact Flash and adaptor, 17
standard, 15
10/24/06 Wireless Print Server User Guide 13422L-003 Rev. A

84
Index
interaction between wired and wireless, 5
IP address
192.168.254.254 showing, 56
all zeroes (000.000.000.000), 56
for wired and wireless print servers, 6
selecting method for obtaining
other printers, 24
S4M, 26
troubleshooting issues, 56
view or modify through control panel
other printers, 24
S4M, 26
L
LEAP mode
control panel option, 25
setting using ZPL, 46
liability, 82
link status indicator, 20
LIST NETWORK option, 22
LOAD DEFAULTS option, 34
M
MAC address, 24
primary/secondary device
setting via web pages, 68
setting via ZPL, 38
print network configuration label
via control panel
other printers, 23
S4M, 26
via ZPL command, 47
printer compatibility, 2
printer home page, 58
printer web pages
accessing home page, 58
alert message setting, 75
directory listing, 71
network configuration screens, 67
print server settings, 80
printer controls, 78
problems accessing with wired IP address, 56
set timeout value, 41
setting primary/secondary device, 68
view and modify printer settings, 61
view or modify settings, 28
view printer configuration, 60
product improvements, 81
proprietary statement, 81
N
^NB, network boot, 36
network boot command, 36
network configuration label
print through control panel, 22
print via ZPL, 47
network configuration screens, 67
network settings
change via control panel, 23
setting via ZPL, 45
^NN, set SNMP parameters, 37
NO CARD INSERTED message, 21
noise level indicator, 21
^NP, set primary/secondary device, 38
^NS, change wired network settings, 39
^NT, set SMTP, 40
^NW, set web authentication timeout value, 41
P
parallel port to configure Wireless Print Server, 8
password
affect of wireless password on control panel
parameters, 23
set wireless password, 48
poor signal setting, 21
R
radiation exposure limits, 82
RADIO WARNING POOR SIGNAL message, 21
RESET NETWORK option, 25
reset wireless card, 50
Restore Default Configuration button, 34
restore network to defaults
options for restoring, 34
reconfiguring using SetWLAN, 9
S
SetWLAN utility, 9
signal strength and quality indicators, 21
SMTP parameters
setting via web pages, 69
setting via ZPL, 40
SNMP parameters
setting via web pages, 68
setting via ZPL, 37
subnet
view or modify
S4M, 27
subnet mask
view or modify
other printers, 24
13422L-003 Rev. A Wireless Print Server User Guide 10/24/06

Index
85
supported printers, 2
supported wireless cards, 3
T
TCP/IP setting via web pages, 69
third-party components, 3
timeout value for printer home page, 41
transmit rate setting via ZPL, 49
troubleshooting
connection problems after firmware upgrade, 54
encryption issues, 55
general issues, 54
gleaning, 56
inconsistent wireless connection, 55
IP issues, 56
not connecting, 54
system disabled after encryption set, 55
WEP key field not large enough, 55
wireless card not acknowledged, 54
U
USB port to configure Wireless Print Server, 8
V
view printer configuration via web pages, 60
view wireless status through control panel, 20
W
^WA, set antenna parameters, 42
^WE, set wireless encryption values, 43
web authentication timeout value, 41
WebView web pages, 57
^WI, change wireless network settings, 45
wired print server
change network settings, 39
check for during bootup, 5
interaction with wireless print server, 5
^NB to set check for, 36
using to configure Wireless Print Server, 8
view or modify settings via web pages, 80
wireless card
inserting Compact Flash card and adaptor, 17
inserting standard card, 15
printer not acknowledging, 54
reset via ZPL, 50
setting values via ZPL, 51
supported cards, 3
wireless link status indicator, 20
wireless password
control panel parameters affected, 23
setting via ZPL, 48
Wireless Print Server
change network settings, 45
control panel parameters, 23
interaction with wired print server, 5
set up via web pages, 70
ZPL commands, 35
wireless signal indicators, 21
~WL, print network configuration label, 47
^WL, set LEAP parameters, 46
WLAN setup, 2
^WP, set wireless password, 48
~WR, reset wireless card, 50
^WR, set transmit rate, 49
~WS, set wireless card values, 51
Z
ZebraNet Alert, 75
ZPL commands
edit ZPL script via web pages, 73
Wireless Print Server commands, 35
10/24/06 Wireless Print Server User Guide 13422L-003 Rev. A

86
Index
13422L-003 Rev. A Wireless Print Server User Guide 10/24/06


Zebra Technologies Corporation
333 Corporate Woods Parkway
Vernon Hills, Illinois 60061.3109 U.S.A.
T elephone: +1 847.634.6700
Facsimile: +1 847.913.8766
Zebra Technologies Europe Limited
Zebra House
The Valley Centre, Gordon Road
High Wycombe
Buckinghamshire HP13 6EQ, UK
T elephone: +44 (0) 1494 472872
Facsimile: +44 (0) 1494 450103
Zebra Technologies Asia Pacific, LLC
16 New Industrial Road
#05-03 Hudson TechnoCentre
Singapore 536204
T elephone: +65 6858 0722
Facsimile: +65 6885 0838
Part Number: 13422L-003 Rev. A
© 2006 ZIH Corp.
 Loading...