

Page 1
ZMAX-8210 Series
(ZMAX-8210-I/ZMAX-8210-E)
User’s Manual
V2.0.6.0
Page 2

g
Copyright
This user’s manual and the software described in it are copyrighted with all rights reserved. No part of
this publication may be reproduced, transmitted, transcribed, stored in a retrieval system, or translated
into any language in any form by any means without the written permission of Z-Com Corporation.
About This Manual
This manual explains Z-Com outdoor ZMAX-8210 Customer Premise Equipment (CPE), how to build
the infrastructure centered on the ZMAX-8210 and proposals when using this CPE.
Note:
This indicates an important Note.
Cautions are given to prevent any damage to the ZMAX-8210, data lose or
Bold: Indicates the function, important words, and so on.
Warnin
badly-behaved operations.
:
- II -
Page 3

Content
Chapter 1 Introduction........................................................................................................ 1
NTRODUCTION ........................................................................................................................... 1
I
PPEARANCE ..............................................................................................................................1
A
EY FEATURES............................................................................................................................2
K
BUILD TYPICAL INFRASTRUCTURE .............................................................................................2
YPICAL CASE ............................................................................................................................4
T
Chapter 2 Basic Installation................................................................................................ 5
YSTEM REQUIREMENT ..............................................................................................................5
S
ACKAGE CONTENT .................................................................................................................... 5
P
ARDWARE INSTALLATION.........................................................................................................5
H
NTENNA INSTALLATION............................................................................................................7
A
Chapter 3 Basic Settings...................................................................................................... 8
EFAULT FACTORY SETTINGS .....................................................................................................8
D
HOW TO LOGIN YOUR ZMAX-8210 VI A WEB BROWSER...........................................................8
EVICE NAME...........................................................................................................................10
D
RIDGE AND ROUTER MODE.....................................................................................................11
B
ADDRESS...............................................................................................................................11
IP
IRELESS PARAMETERS...........................................................................................................12
W
REA TE A LINK BETWEEN THE ZMAX-8210 AND WIMAX BASE STATION .............................. 13
C
Chapter 4 Advanced Configuration................................................................................. 15
OUTER MODE..........................................................................................................................15
R
NY IP......................................................................................................................................16
A
SERVER..........................................................................................................................17
DHCP
IME SERVER............................................................................................................................17
T
REDIRECT.......................................................................................................................18
HTTP
Chapter 5 Management..................................................................................................... 20
IEW THE ZMAX-8210 BASIC INFORMATION .......................................................................... 20
V
IEW STATISTICS INFORMATION ............................................................................................... 20
V
PASSWORD ................................................................................................................................21
PGRADE FIRMWARE................................................................................................................21
U
ACKUP AND RETRIEVE............................................................................................................22
B
ESTORE FACTORY DEFAULT SETTINGS....................................................................................24
R
EBOOT ....................................................................................................................................24
R
SSH...........................................................................................................................................24
Chapter 6 Troubleshooting................................................................................................ 28
REQUENTLY ASKED QUESTION (FAQ) .................................................................................... 28
F
- III -
Page 4

Appendix A Specifications.................................................................................................31
Appendix B T echnical Terms............................................................................................ 37
Appendix C ASCII............................................................................................................. 39
Appendix D SSH Settings..................................................................................................41
- IV -
Page 5

Figure
Figure 1 ZMAX-8210.................................................................................................................1
Figure 2 ZMAX-8210 ports........................................................................................................2
Figure 3 Wireless Point-to-Point Outdoors.................................................................................3
Figure 4 Wireless Point-to-multipoint Outdoors........................................................................4
Figure 5 Safety Alert ..................................................................................................................9
Figure 6 Login............................................................................................................................9
Figure 7 ZMAX-8210 General Information.............................................................................10
Figure 8 ZMAX-8210 CPE Name............................................................................................10
Figure 9 Configure the ZMAX-8210 to Bridge........................................................................11
Figure 10 ZMAX-8210 Wireless Parameters...........................................................................12
Figure 11 Build the Infrastructure with WiMAX Base Station ................................................13
Figure 12 ZMAX-8210 Router Mode Settings.........................................................................15
Figure 13 Wireless Router Mode..............................................................................................16
Figure 14 Any IP...................................................................................................................... 16
Figure 15 DHCP server............................................................................................................17
Figure 16 Time Server..............................................................................................................17
Figure 17 Typical HTTP Redirect Case.................................................................................... 18
Figure 18 HTTP Redirect.........................................................................................................19
Figure 19 Basic Information.....................................................................................................20
Figure 20 ZMAX-8210 Statistics Information......................................................................... 21
Figure 21 Password Change.....................................................................................................21
Figure 22 Upgrade Firmware via web......................................................................................21
Figure 23 Retrieve and Backup Settings.................................................................................. 23
Figure 24 ZMAX-8210 Default Button....................................................................................24
Figure 25 Reboot......................................................................................................................24
Figure 26 Putty Settings....................................................................................................... .... 25
Figure 27 Putty settings 2.........................................................................................................26
Figure 28 SSH Settings 3 .........................................................................................................26
Figure 30 ZMAX-8210 Wireless Network Connection Properties ..........................................29
Figure 31 ZMAX-8210 Ping....................................................................................................30
- V -
Page 6

Table
Table 1 ZMAX-8210 Default Factory Settings..........................................................................8
Table 2 ZMAX-8210-I Spec.....................................................................................................31
Table 3 ZMAX-8210-E Spec....................................................................................................33
T able 4 Technical Terms...........................................................................................................37
Table 5 ASCII...........................................................................................................................39
Table 6 SSH Settings................................................................................................................41
- VI -
Page 7
Chapter 1 Introduction
Introduction
Thank you for choosing the ZMAX-8210 Series Customer Premise Equipment (hereafter called CPE).
Compliant with the innovative IEEE802.16-2004 and working at the licensed 3.5GHz with efficient
modulation, this outdoor CPE gives wireless ISP providers today’s fastest pathway to new markets and
revenue. whether well-established and looking to expand, or smaller and newly established – service
providers of all types can immediately and cost-effectively create wireless networks even in most
challenging environments or reach out from established network to capture new customers. Without the
delays and costs of leasing or building a wired infrastructure, ZMAX-8210 is capable of providing
secure and reliable access to high-speed data, voice and video services. ZMAX-8210-I build in 16dBi
gain antenna, ZMAX-8210-E with N-Female connector for external antenna. Typically, 802.11 s Mesh
implemented in this device will free physical limitation that a block stands in the way in the
infrastructure could lead to failure of communication), finding a key to “the last mile”.
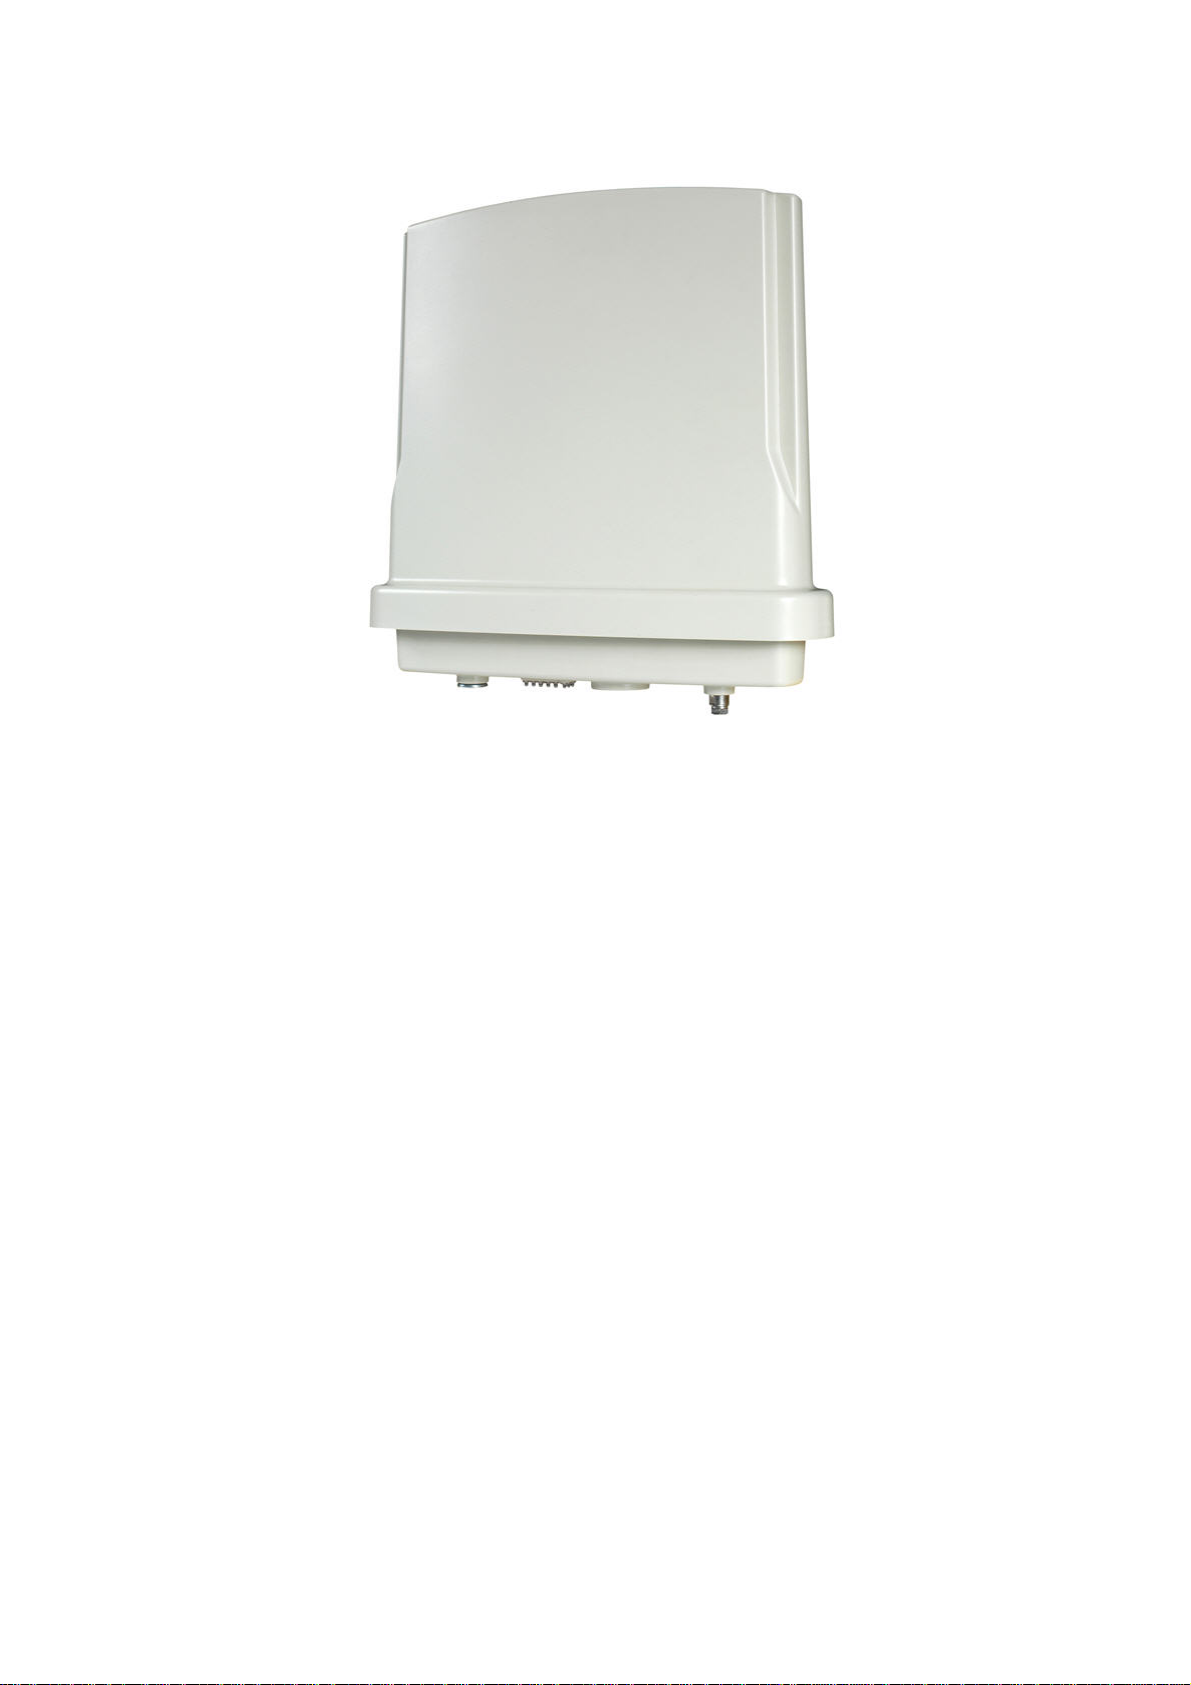
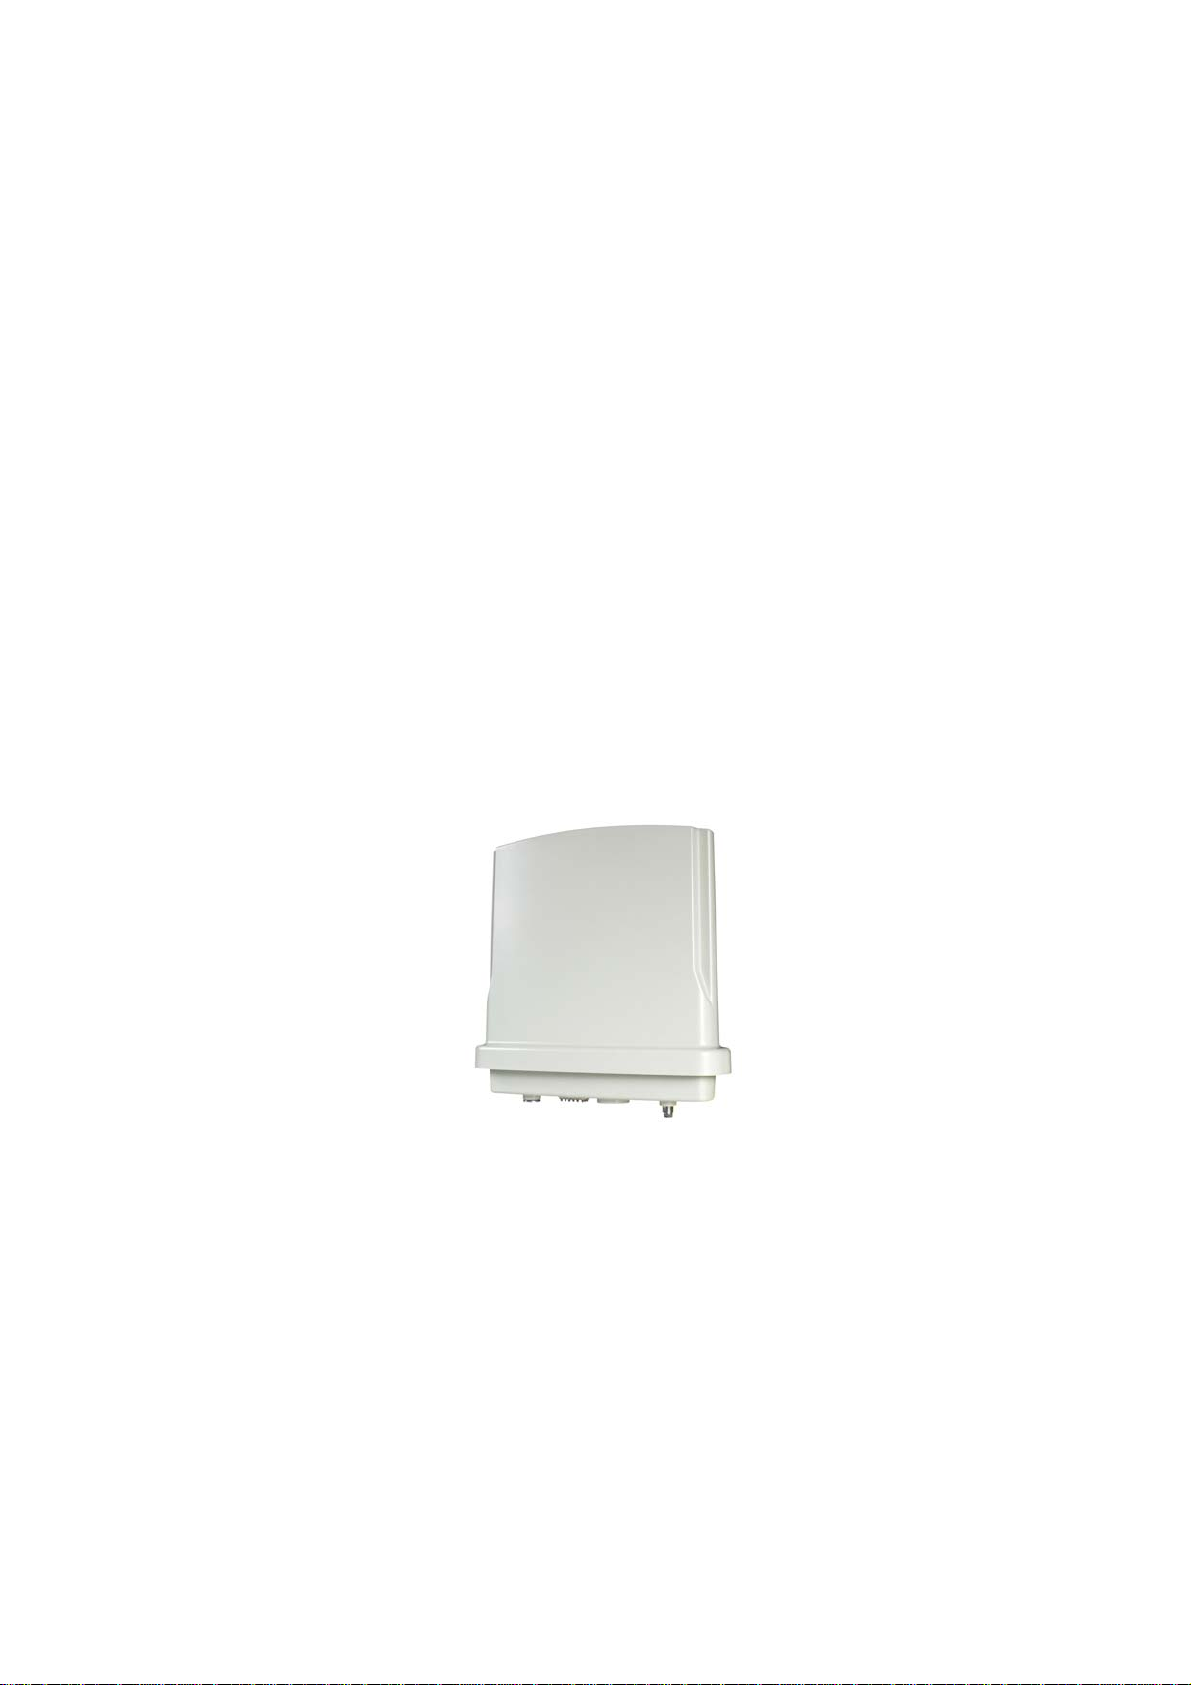
Appearance
Figure 1 ZMAX-8210
Chapter 1
Introduction
- 1 -
Page 8
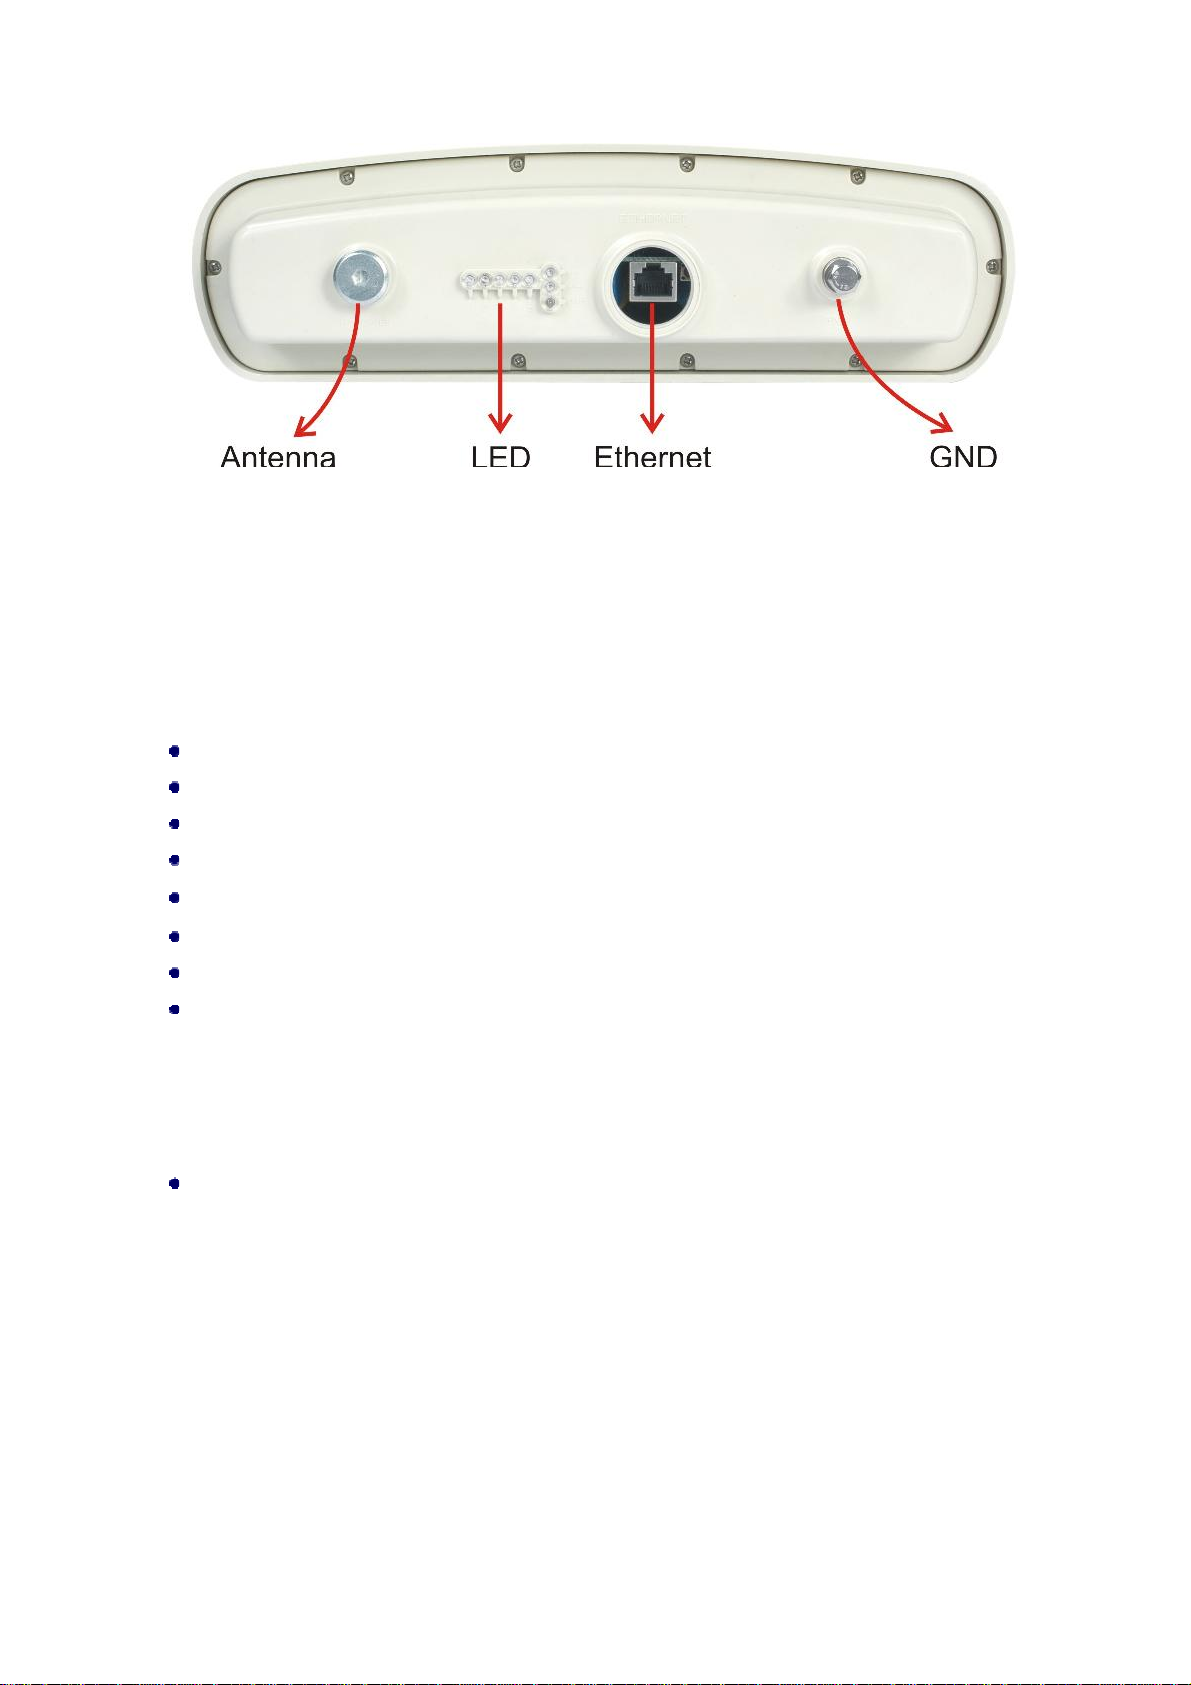
Figure 2 ZMAX-8210 ports
The ZMAX-8210 appearance is designed to be water-proof and dust-proof for most challenging
environments outdoors.
Key Features
The ZMAX-8210 provides you with the solid features.
Power supply via POE
Based on WiMAX together with compliant with 802.16d-2004
Work at 3.5GHz
Implement Orthogonal Frequency Division Multiplexing (OFDM) and Non-Line-of-Sight (NLOS)
Efficient Modulation
Water, dust-proof and built-in antenna for outdoor environments
User-friendly web-based management
Build Typical Infrastructure
The versatile ZMAX-8210 greatly livens up the internet for your various needs. Typically Point-to-Point,
Point-to-Multipoint modes are mostly recommended infrastructures.
Wireless Point-to-Point Outdoors
Chapter 1
Introduction - 2 -
Page 9
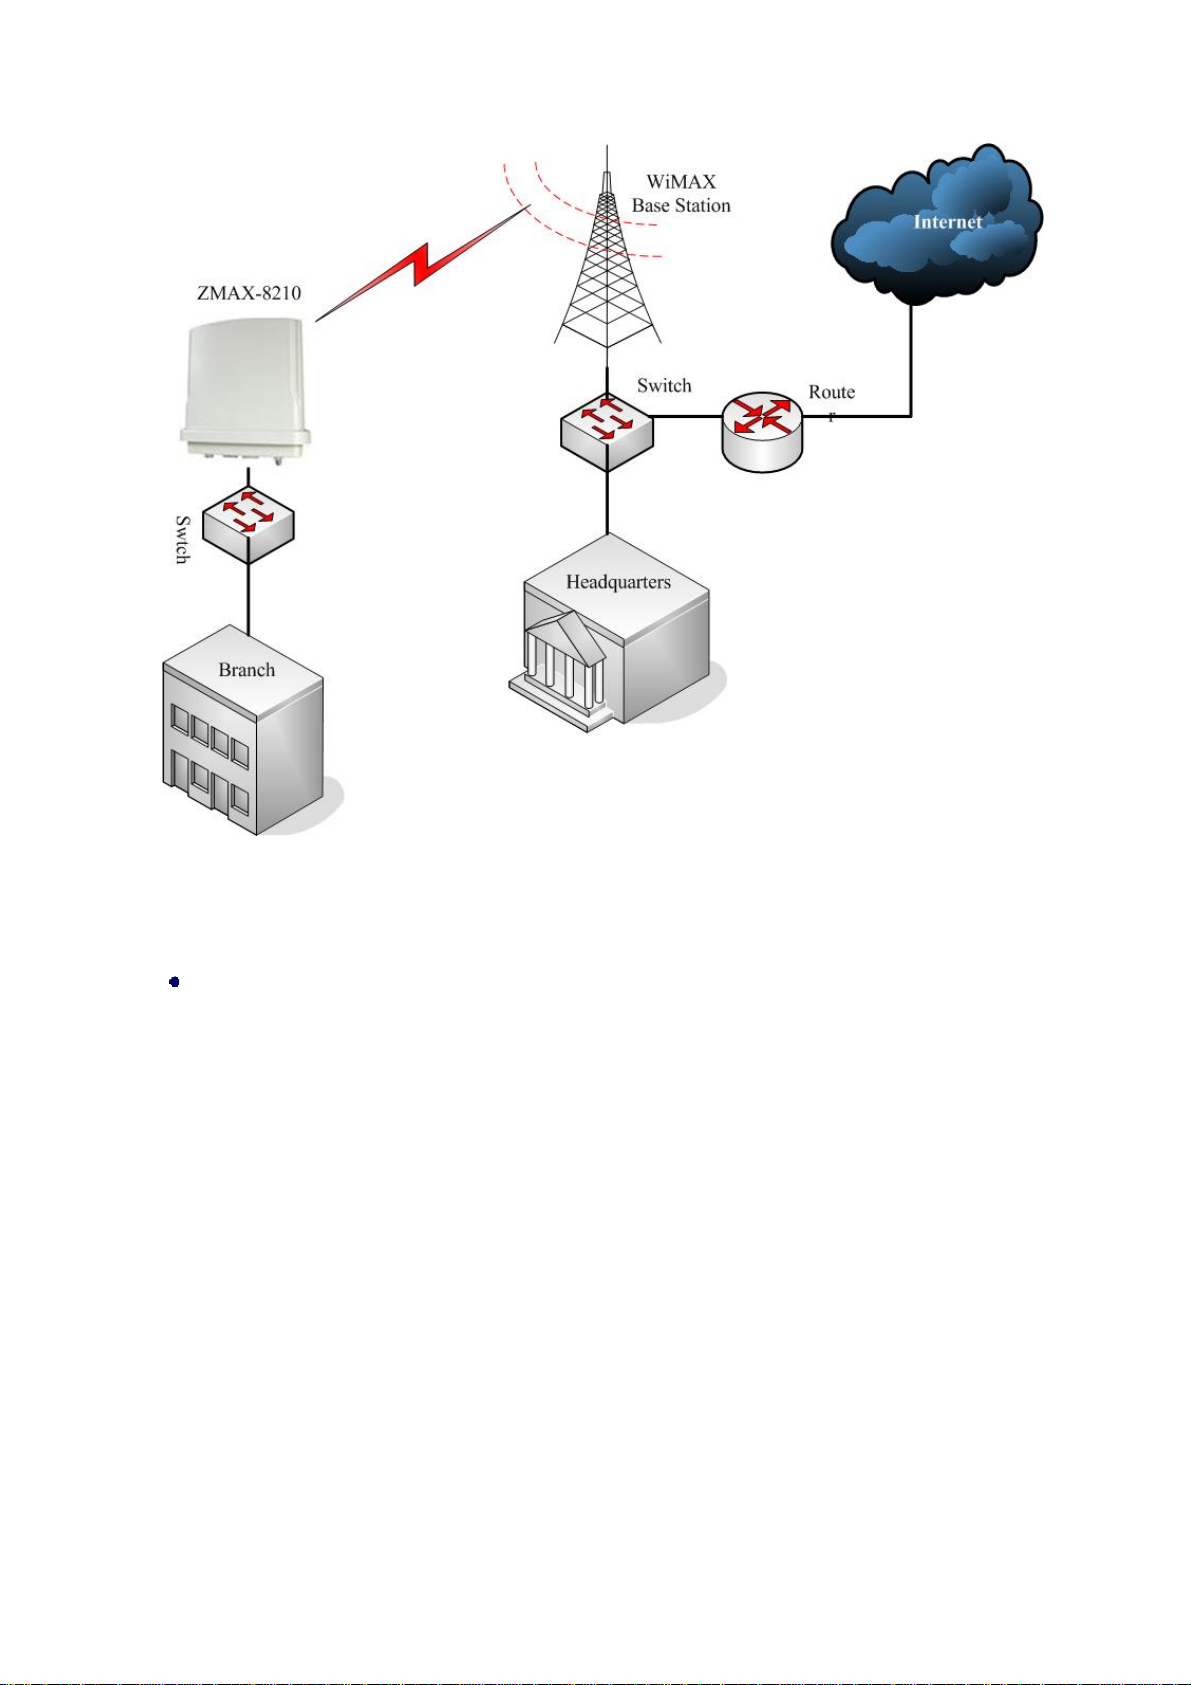
Figure 3 Wireless Point-to-Point Outdoors
Under this structure, the ZMAX-8210 acts as a customer premise equipment (CPE), connecting a
WiMAX Base Station.
Wireless Point-to-multipoint Outdoors
Under this structure, acting as a customer premise equipment, the ZMAX-8210 is connected to the
WiMAX Base Station, allowing ISP to cost-effectively build infrastructure in a matter of hours.
Chapter 1
Introduction - 3 -
Page 10
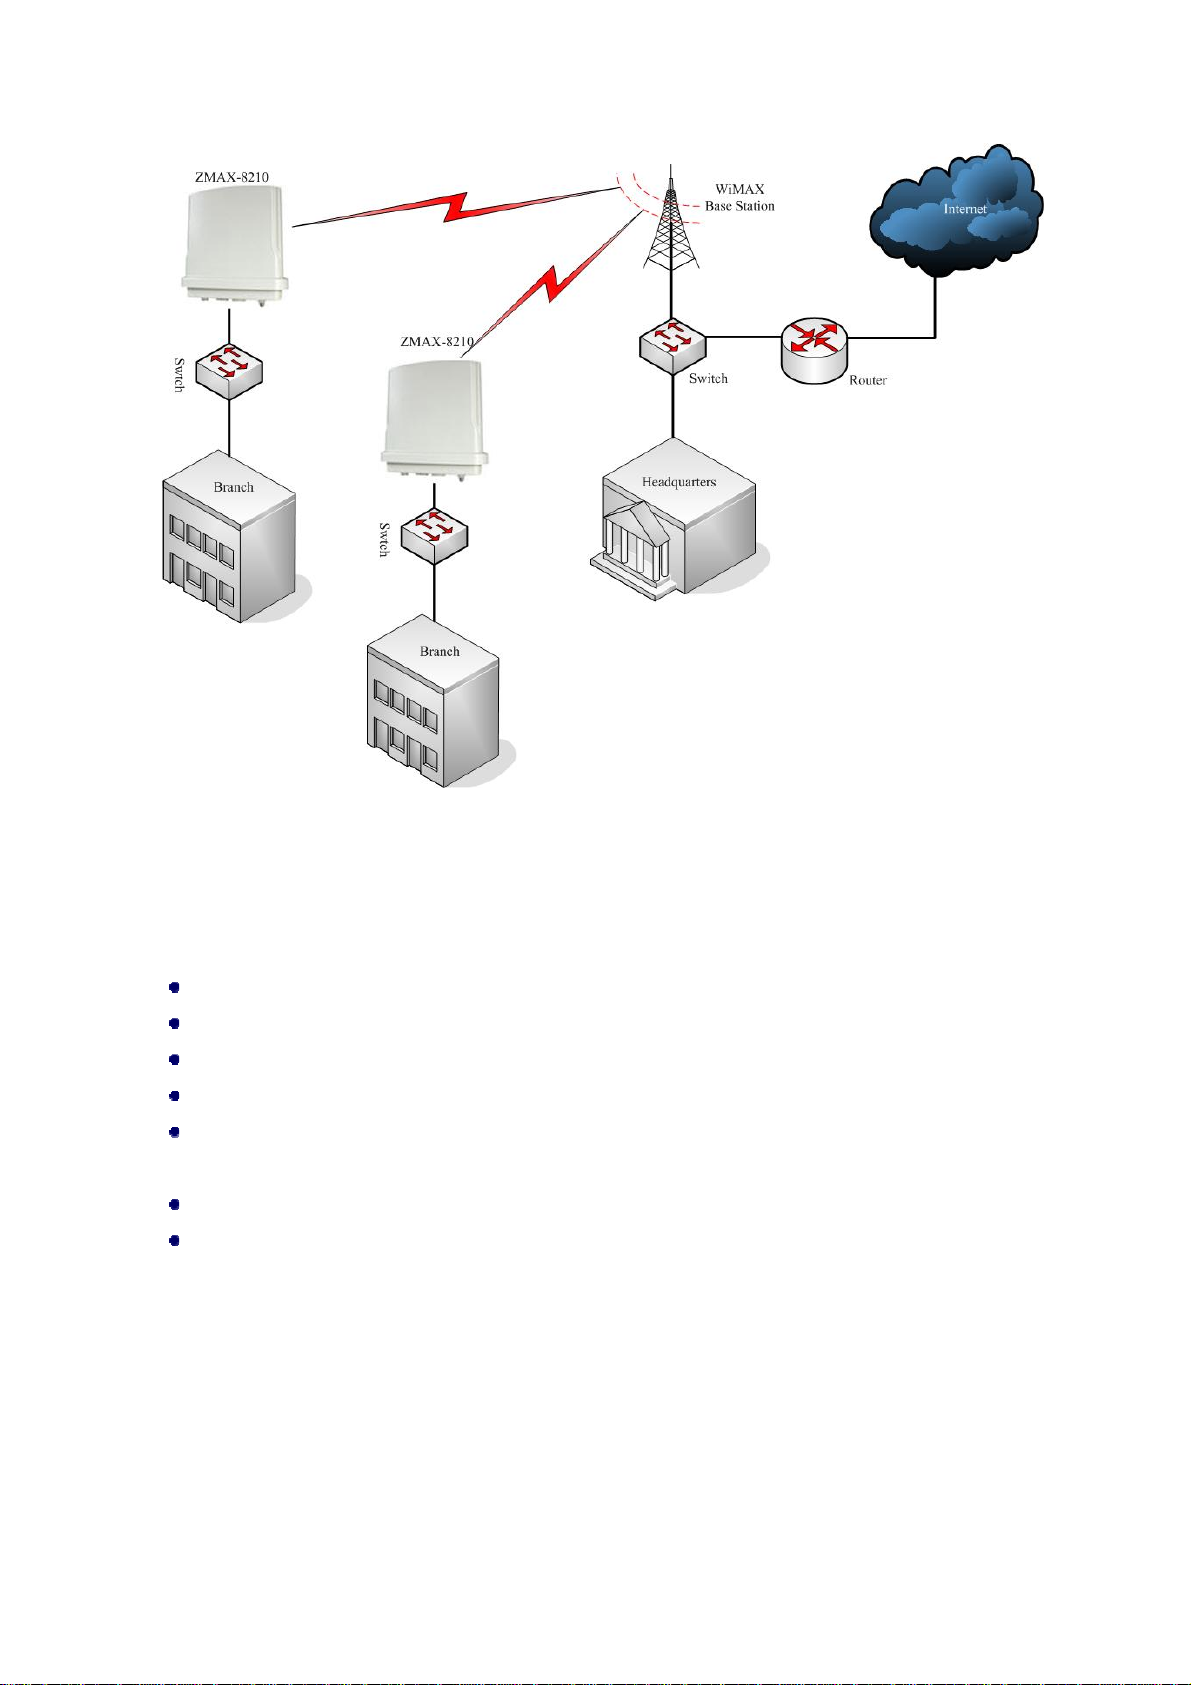
Figure 4 Wireless Point-to-multipoint Outdoors
Typical Case
The high-quality performance enables the ZMAX-8210 to gain widespread acknowledgements. It is able
to undertake tasks in various situations.
Create or expand well-created network via this CPE in enterprises or residential quarters
Provide an access to Metropolitan Area Network via WLAN
Act as a media connecting Base Station and sub-stations in mobile communicating network
Provide an access to hard-to-reach areas, like ancient sites
Cost-effectively build in most challenging environments, like remote mountain areas and rough
sites via this CPE
Build a makeshift network for a meeting
Link Backup or Emergency Communication
Chapter 1
Introduction - 4 -
Page 11

Chapter 2 Basic Installation
System Requirement
Before installing the ZMAX-8210 Customer Premise Equipment, make sure your system meets these
requirements
A PC coupled with 10/ 100Base-TX adapter
Configure the computer with a static IP address of 192.168.1.x (x cannot be 1) and 255.255.255.0
for the Subnet Mask
A Web browser for configuration such as Microsoft Internet Explorer 6.0 or above, or Netscape
Navigator 4.78 or above or Firefox
Package Content
If any missing or damaged, please contact your local seller.
Z-Com ZMAX-8210 Customer Premise Equipment
Power adapter and cord (48V,1A)
Accessories (For its full contents, please refer to accessory installation guide)
ZMAX-8210 Customer Premise Equipment Installation Guide
Hardware Installation
Follow the steps below to install your ZMAX-8210. (the different of hardware installation between
ZMAX-8210-I and ZMAX-8210-E is antenna)
Make sure all components linked to the ZMAX-8210 are on hand.
A brace fixed on the back of the ZMAX-8210 is tabled on a perfect area like well-sized desk.
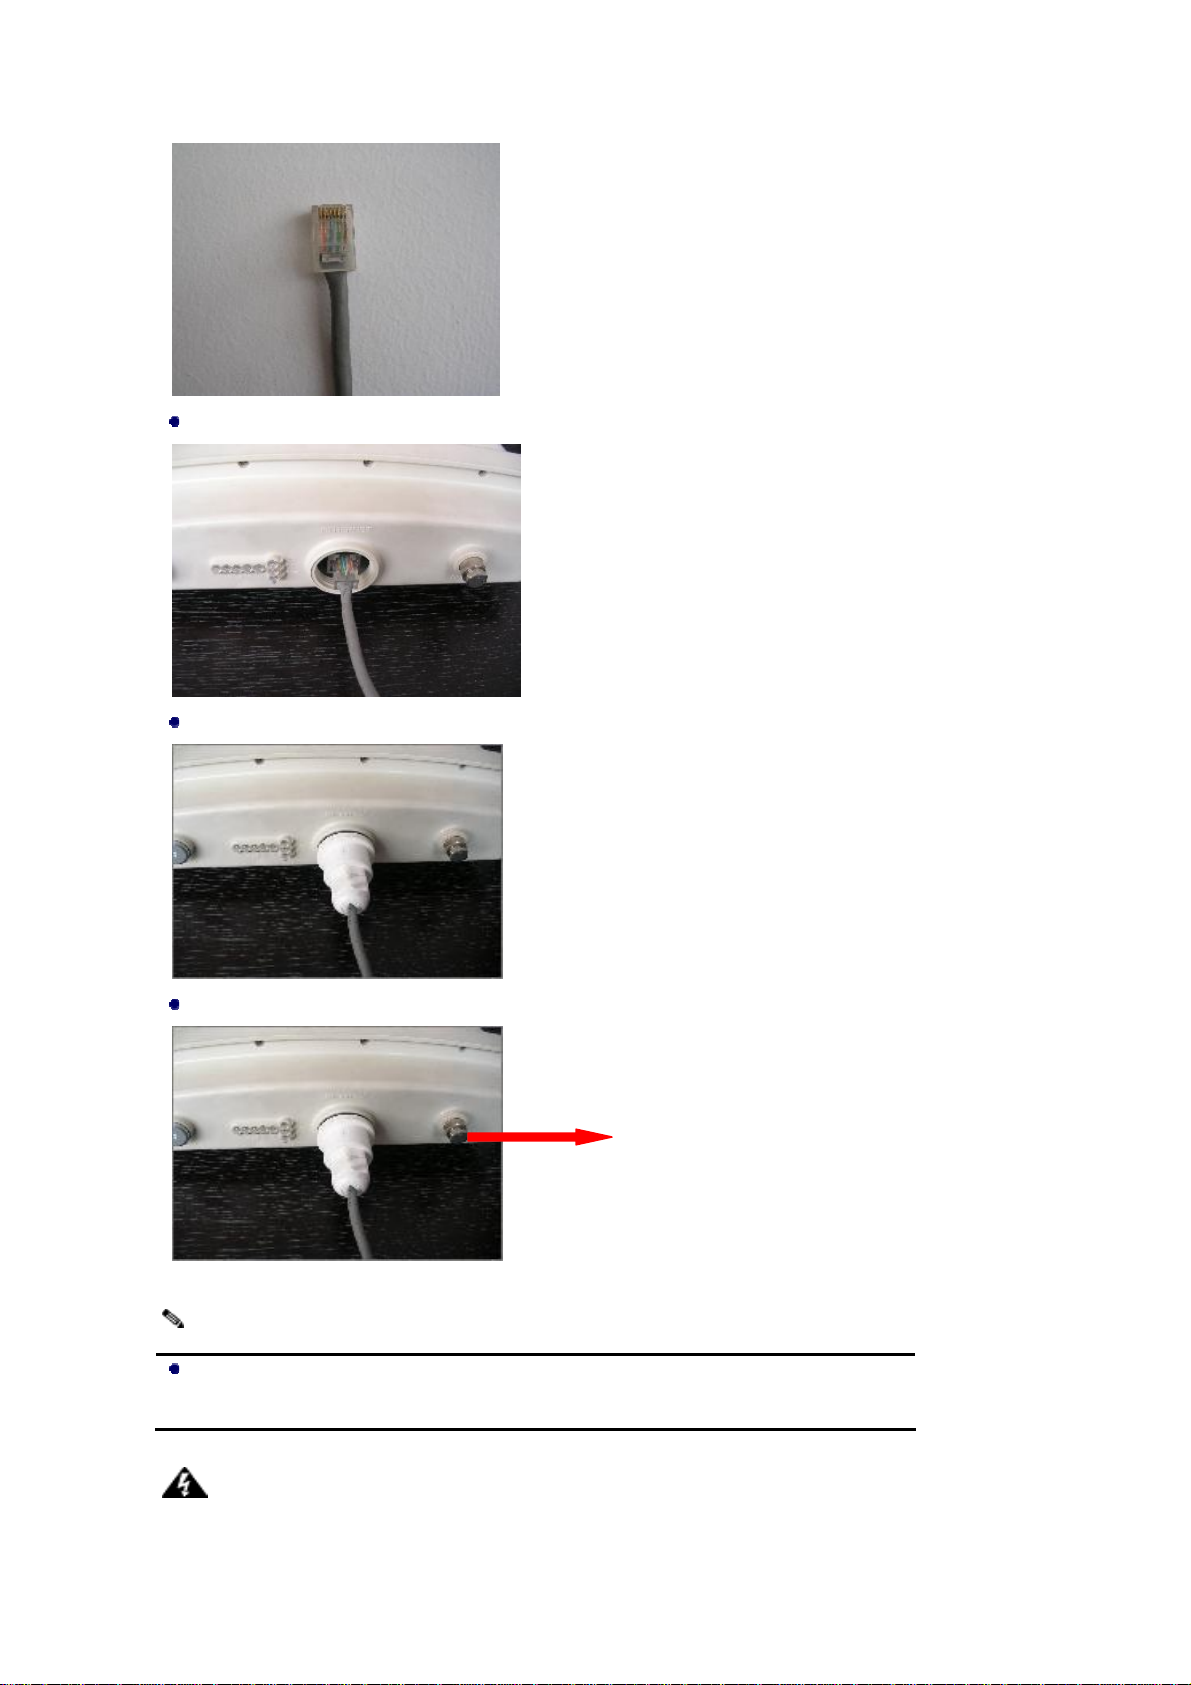
Attach one end of water-proof cable to a water-proof connector. Alternatively, you can make a
Category 5 UTP straight yourself.
Chapter 2
Introduction - 5 -
Page 12
g
Connect the other end of the Ethernet cable to the ZMAX-8210.
Tighten the water-proof connector.
A ground wire connects the ZMAX-8210.
Ground
Note:
To keep the ZMAX-8210 antenna intact, a plastic coat is over the antenna. Remove
the coat wile using it.
Warnin
Chapter 2
:
Introduction - 6 -
Page 13

g
Be sure to your ZMAX-8210 is connected the ground wire, preventing something
unexpected.
Antenna Installation
16dBi built-in antenna is placed in the ZMAX-8210, so you need not install antenna.
The ZMAX-8210-E needs an external antenna. You should choose your antenna as your need.
Warnin
Keep your ZMAX-8210 associated with the antenna away from power line, lamp,
electrified wire fence or anything others electrified.
Though a thunder-proof component is built in, it is recommended that additional
thunder-proof device is needed for ef fect iv ely protec ti ng y our ZMAX - 82 10.
:
Chapter 2
Introduction - 7 -
Page 14

Chapter 3 Basic Settings
Default Factory Settings
We’ll elaborate the ZMAX-8210 default factory settings. You can re-acquire these parameters by resort
button. If necessary, please refer to the “the way to restore default factory settings.
Table 1 ZMAX-8210 Default Factory Settings
Feature Factory Default Settings
User Name admin
Password password
Device Name
Spanning Tree Protocol Enable
IP Settings
HTTP Redirect Disable
Wireless Settings
Devicexxxxxx(xxxxxx represents the last 6 digits of
MAC address)
IP Type:STATIC
IP Address:192.168.1.1
Subnet Mask:255.255.255.0
Default Gateway:0.0.0.0
Primary/Second DNS Server:0.0.0.0
Base Station ID:01020304050D
Dual-Direction Voice:TDD
Bandwidth:7MHz
Encryption:Disable
IR Bit: 0
SSH Disable
SNMP:Enable
Trap Server:192.168.0.254
SNMP
Read Community:public
Write Community:private
How to Login Your ZMAX-8210 via WEB Browser
ZMAX -8210 provides you with user-friendly web-based management. Take the following steps
Enter the ZMAX-8210 via IE. When entering the IP address: http://192.168.1.1, you’ll see a popup
menu below:
Chapter 3
Basic Settings
- 8 -
Page 15
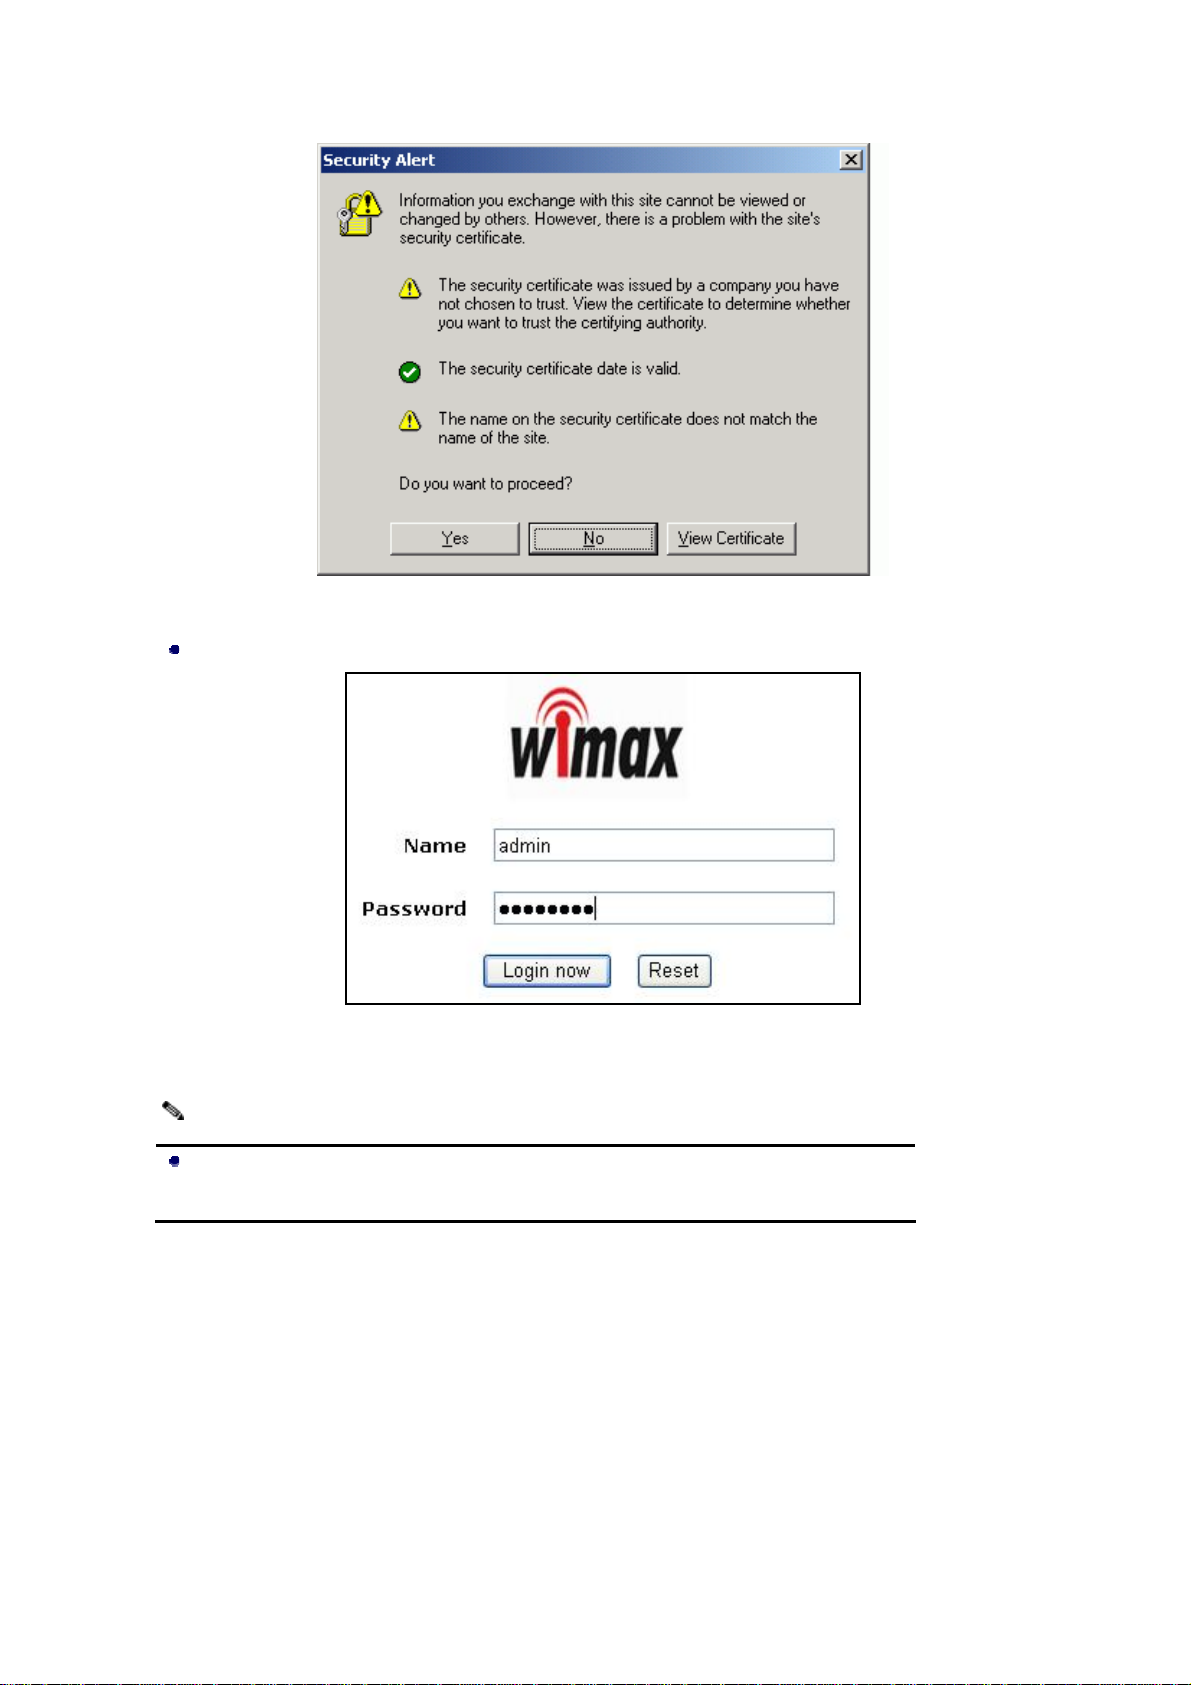
Clicking “Yes” ushers you into the login.
Figure 5 Safety Alert
Figure 6 Login
Note:
Make sure the PC IP address need to be matched the device. For instance, the
ZMAX-8210 is 192.168.1.1, and your PC IP should be 192.168.1. X.
Enter the default name “admin” in the username field and “password” in the password field。Clicking
“ Login now ” will usher you into the ZMAX-8210 management interface.
Chapter 3
Basic Settings - 9 -
Page 16

Figure 7 ZMAX-8210 General Information
Device Name
Clicking“Basic Settings”,you’ll see the ZMAX-8210Name. You may assign any device name to this
CPE. This name is only used by the CPE administrator for identification purposes. Unique, memorable
names are helpful, especially if you are employing multiple access points on the same network. This
name is composed of 15 characters with 0-9, A-Z, a-z or “-“.
Figure 8 ZMAX-8210 CPE Name
“WINS” enabled, you have the alternative of entering management page by entering the Device name
instead of painfully writing out IP Address. For example, you can specify the name as “device030201”.
So entering“device030201” will lead you to the management site. Also, Ping device030201 helps you
check whether WINS can take effective in the ZMAX-8210.
Note:
Chapter 3
Basic Settings - 10 -
Page 17

By default, the ZMAX-8210 CPE is Devicexxxxxx(xxxxxx represents the last 6
digits of MAC address).
No figure is allowed to represent initial.
When WINS undertakes interpreting, make sure the PC IP address need to be
matched the CPE. For instance, the ZMAX-8210 is 192.168.1.1, and your PC IP
should be 192.168.1. X.
Bridge and Router Mode
The ZMAX-8210 is capable of working under bridge and router modes.
Opening“IP Settings”will navigate you to the configuring mode page.
Figure 9 Configure the ZMAX-8210 to Bridge
The ZMAX-8210 provides bridge and router modes. Under the bridge mode, you are required to set
IP Address, Subnet Mask, Default Gateway and Primary (Second) DNS Server. For Router mode,
refer to “Set Router Mode”.
IP Address
The ZMAX-8210 provides two options of obtaining IP addresses, static IP address and dynamic address
from DHCP Server.
STATIC:Manually set the ZMAX-8210 IP address subnet Mask, Default Gateway and Primary
(Second) DNS Server. 255.255.255.0 is usually taken as the subnet mask.
DHCP Client:Alternatively, the ZMAX-8210 can obtain IP address subnet Mask, Default Gateway
and Primary (Second) DNS Server from DHCP Server.
Note:
Chapter 3
Basic Settings - 11 -
Page 18

If you fail to obtain IP address for the ZMAX-8210, the CPE will turn to the client
address for use.
Wireless Parameters
Opening“Radio Settings can lead you to the ZMAX-8210 wireless parameters. You can set what you
desire.
Figure 10 ZMAX-8210 Wireless Parameters
Base Station ID:This field allows you to enter the Base Station ID you want to connect, to establish
a tie between this CPE and the Base Station.
Duplex Mode:This field allows you to have the options of TDD and HFDD modes.
Note:
Under the Duplex Mode, you are required to keep the consistency in setting between
Center Frequency:This field helps you to scan the center frequency that the linked device performs
CP Size:This field displays the ratio of hardware MTU (maximum transmission unit) before
Bandwidth:This field provides the bandwidth when this device is undertaking tasks. You can get
the ZMAX-8210 and the Base station.
and shows the frequency in this field.
rotating this device.
two options-- 3.5MHz and7MHz.
Note:
The bandwidth shall be in the complete accord between the ZMAX-8210 and the
Frame Length:This field displays the frame length that the ZMAX-8210 can obtain from other
Chapter 3
Base Station connected.
Basic Settings - 12 -
Page 19

devices.
Encryption:This field provides encryption options.
Note:
When the communication is established, the encryption shall be completely
IR Bit:This field identifies whether forward “initial ranging data”。
Note:
There shall be in complete accord in the parameters between IR Bit and Base
identical between the ZMAX-8210 and the Base Station,
Station.
Create a Link between the ZMAX-8210 and WiMAX Base Station
Acting as a customer premise equipment (CPE), the ZMAX-8210 aims at establish a tie with WiMAX
Base Station to enable IP network to be connected to main arteries. We’ll elaborate how to build the
infrastructure via the ZMAX-8210. The CPE has access to connect to the WiMAX Base Station via the
Base Station ID. However, the Duplex Mode, Bandwidth and IR Bit shall conform to the requirements
set when creating a link between the ZMAX-8210 and the Base Station.
Take the following steps to build your infrastructure.
Connect this CPE to PC via a cable. And assign 192.168.1.100 as your PC IP Address.
Figure 11 Build the Infrastructure with WiMAX Base Station
Enter the ZMAX-8210 web-based management. And set proper parameters in the “Base Station
ID”, “Duplex Mode”,“Bandwidth”,“Encryption”and“IR Bit” fields, respectively to establish
a link between your CPE and the WiMAX Base Station.
Note:
Chapter 3
Basic Settings - 13 -
Page 20

The parameters set in the ZMAX-8210 shall match the ones in the WiMAX Base
Station, when the tie is established.
Using “ping” to check whether the communication is sound. Take an example as follows.
Ping 192.168.1.1 to check the communication betw een the ZMA X - 82 10 an d PC.
192.168.1.200 check the communication between the ZMAX-8210 and WiMAX Base Station.
If you fail to ping, please see Troubleshooting.
Chapter 3
Basic Settings - 14 -
Page 21

Chapter 4 Advanced Configuration
Router Mode
The ZMAX-8210 is able to carry out router function.
Opening“IP Settings”navigates you to router mode interface.
Figure 12 ZMAX-8210 Router Mode Settings
You can set proper IP addresses for WAN and LAN. Refer to the following infrastructure.
Chapter 4
Advanced Configuration
- 15 -
Page 22

Figure 13 Wireless Router Mode
Any IP
Under the router mode, the ZMAX-8210 provides Any IP,enabling you to enter whatever IP addresses
legally or illegally so as to carry out various tasks, relieving your trouble of memorizing IP address.
Take the steps below.
From the“IP Settings”,Choose“Router”and enable“Enable Any IP”.
Figure 14 Any IP
Note:
You can assign whatever IP Address, however the default gateway and DNS shall be
A legal IP means access to the internet is available via this IP Address.
Chapter 4
set.
Advanced Configuration - 16 -
Page 23

DHCP Server
Under the router mode, the ZMAX-8210 can also serve as a DHCP server, responsible for assigning IP
addresses to the devices connected to the infrastructure.
From the“IP Settings”choose“Router”. The way to assign IP Address turns “Static IP to “DHCP
Server”. Clicking“Apply”to enable “DHCP Server”.
Figure 15 DHCP server
Note:
The IP Address number that the “DHCP Server” generates shall be no less than the
ones in clients
Time Server
Compliant with NTP, the ZMAX-8210 is capable of keep its time in complete accord with the internet
time.
Opening“Basic Settings”guides you to the time setup.
Figure 16 Time Server
Time Server Setup:
Assign the proper IP address to the ZMAX-8210, ensuring this CPE to have access to the
internet. For information on setting proper address, refer to IP Address.
From the“Time Server”,enter the correct time server. The following provides the time server
website.
a) time.windows.com
b) time-a.nist.gov
c) time.nist.gov
From the“Time Server”pop-menu, select your time zone.
Chapter 4
Advanced Configuration - 17 -
Page 24

From the“Adjust for Daylight Saving Time”,you have the option of daylight saving time or
not. Finally, clicking “Apply” to complete your time server settings.
Note:
It is only when the ZMAX-8210 have access to the internet that the time server can
take effect.
HTTP Redirect
Enabled HTTP Redirect and enter the IP address that the HTTP Redirect specifies. On such condition,
when other devices attempts to login the internet for browning web via the ZMAX-8210, the first page
in view is forced to what the specified IP address shows.
Typical HTTP Redirect Case:
Assign a proper IP address to the ZMAX-8210,ensuring an access to the internet. Connected to this
CPE via a switch, PC1, PC2 and PC3 have access to the internet.
Figure 17 Typical HTTP Redirect Case
Open“HTTP Redirect”and enable HTTP Redirect. Enter an imposed. IP Address For example, IP
Address.http://www.zcom.com.tw.
Chapter 4
Advanced Configuration - 18 -
Page 25

Figure 18 HTTP Redirect
From PC1,PC2 or PC3, you want to login the internet-- http://www.sohu.com,but the web
browsers will turn to http://www.zcom.com.tw;If from the PCs to browse http://www.sohu.com
anew, this time you’ll see the exact page.
Note:
Make sure there is an access from the ZMAX-8210 to the internet, before enabling
HTTP Redirect.
HTTP Redirect will take effect every two hours. Therefore, from the client, you’ll
see the forced page instead of your designed.
Chapter 4
Advanced Configuration - 19 -
Page 26

Chapter 5 Management
View the ZMAX-8210 Basic Information
From the“Information”,the ZMAX-8210 provides the basic information about this CPE. All is
read-only. For the detailed information, refer to Basic Settings and Advanced Configuration.。
Figure 19 Basic Information
View Statistics Information
From the“Statistics”,the ZMAX-8210 provides information about sending or receiving packets out of
both the Ethernet and wireless ports. Clicking “Refresh” allows you to view the real-time information
linked to the ZMAX-8210. All is read-only.
Chapter 5
Management
- 20 -
Page 27

Figure 20 ZMAX-8210 Statistics Information
The Ethernet port provides the packet information from the Ethernet port.
The wireless port provides the packets information from the wireless port.
Password
You can change password to managing your ZMAX-8210.
Figure 21 Password Change
The length of password is no more than 19 characters. You can restore the default password by
enabling “Restore Default Password”.
Upgrade Firmware
The ZMAX-8210 provides two ways to upgrade firmware.
Upgrade Firmware via Web
Figure 22 Upgrade Firmware via web
Open“Upgrade Firmware”;
Click“Browse”to select your wanted file for upgrade.
Chapter 5
Management - 21 -
Page 28

g
y
Click“Upload”to enable the file to be loaded to your ZMAX-8210.
Reboot your ZMAX-8210 and check whether the firmware has been upgraded in the Basic
Information.
Upgrade firmware via FTP
Enter the command ftp 192.168.1.1,admin and password.
After successful commanding, enter“put mercury.rmt”. If the upgrade is successful, the
information will be shown as below.
C:\>ftp 192.168.1.1
Connected to 192.168.1.1.
220 (vsFTPd 1.1.3)
User (192.168.1.1:(none)): admin
331 Please specify the password.
Password:
230 Using binary mode to transfer files. Login successful. Have fun.
ftp> put mercury.rmt
200 PORT command successful. Consider using PASV.
150 Ok to send data.
226 File receive OK.
ftp: 发送 4075528 字节,用时 0.39Seconds 10423.35Kbytes/sec.
ftp> quit
221 Goodb
e.
The ZMAX-8210 will be forced to reboot.
Warnin
:
When upgrading the firmware via FTP, the file name shall be mercury.rmt.
When upgrading, neither the ZMAX-8210, nor other devices connected to the
infrastructure are allowed to be closed.
Backup and Retrieve
It is strongly recommended that you’d better back up some important files in case of something
unexpected. If tragedy hits the ZMAX-8210, you have access to restore the important files by the
backup. The ZMAX-8210 provides two ways to restore the backup.
Backup and Retrieve Files via Web :
Chapter 5
- 22 -
Page 29

C:\>ftp 192.168.1.1
Connected to 192.168.1.1
220 (vsFTPd 1.1.3)
User (192.168.1.1:(none)): admin
331 Please specify the password.
Password:
230 Using binary mode to transfer files. Login successful. Have fun.
ftp> get mercury.cfg
200 PORT command successful. Consider using PASV.
150 Opening BINARY mode data connection for /mnt/ramd/ mercury.cfg (11411 bytes).
226 File send OK.
ftp: 收到 11411 字节,用时 0.00Seconds 11411000.00Kbytes/sec.
ftp> put zmax8200.cfg
200 PORT command successful. Consider using PASV.
150 Ok to send data.
226 File receive OK.
ftp: 发送 11411 字节,用时 0.02Seconds 713.19Kbytes/sec.ftp> quit
221 Goodbye.
Figure 23 Retrieve and Backup Settings
From the“Backup / Restore Settings”,by clicking“Backup”,a pop-menu will appear,
suggesting you enter:C:\mercury.cfg. After “Confirm”, the mercury.cfg will be saved to your
hard disc.
From the“Backup / Restore Settings”,by clicking“Backup”,a pop-menu will appear,
suggesting you enter:C:\mercury.cfg. After “Retrieve”, the zmax8210 will retrieve your backup
file.
Backup and Retrieve Files via FTP:
Enter the command ftp 192.168.1.1 admin and password,
After successful commanding, enter“get mercury.cfg”. If the upgrade is successful, enter “get
mercury.cfg” and you’ll see the information as below. A file will be saved to your PC folder
following C:\mercury.cfg;
Enter“put mercury.cfg”,the file will be loaded to your ZMAX-8210.
Note:
Chapter 5
Management - 23 -
Page 30

The file name shall be mercury.cfg.
Restore Factory Default Settings
The ZMAX-8210 provides two ways to restore the default factory settings.
Restore the factory default settings via web:
From the “Restore Factory Default Settings”, clicking “Restore” will restore your
ZMAX-8210 default settings.
Restore the factory default settings via “Restore Button”.
When the ZMAX-8210 power adapter is connected to this device, press “Default Button”for
about over10seconds. The“Defau lt Button”is shown as below:
Hardware
Default Button
Figure 24 ZMAX-8210 Default Button
Reboot
The ZMAX-8210 supports PoE supply. You can restore web-based management to reboot this CPE.
Enabling “Yes” can reboot it.
Figure 25 Reboot
SSH
The ZMAX-8210 provides SSH management. It is recommended that Putty is your right option to
access this device’s manage ment.
Open by double clicking Putty
Enter 192.168.1.1 in the “Host Name” field and “Protocol”.
Chapter 5
Management - 24 -
Page 31

Figure 26 Putty Settings
From the “Connection”, select “SSH”; From the “Preferred SSH protocol version”, select“2”;
From the “Encryption cipher selection policy”, make“3DES”the top position.
Chapter 5
Management - 25 -
Page 32

Figure 27 Putty settings 2
Click Open and a page will open like below:
Figure 28 SSH Settings 3
Enter admin and password in the separate field.
For help information, enter” help” command.
Chapter 5
Management - 26 -
Page 33

Chapter 5
Management - 27 -
Page 34

Chapter 6 Troubleshooting
Frequently Asked Question (FAQ)
Q 1. In what way to get to know the ZMAX-8210 MAC address?
MAC Address distinguishes herself by the distinct identity among networking devices. There
are two ways available to know the address.
• In the rear of the ZMAX-8210, posted the MAC Address. Refer below.
Figure 29 ZMAX-8200 MAC Address
• Through the ZMAX-8210 web-based management, you can view the address from the Basic
Information.
Q 2. Why my PC fails to access the internet?
• Make sure your PC IP Address doesn’t clash with others’. If DHCP Server enabled, you
have to get your PC to obtain dyna mic IP Address. Finally, reboot your PC.
• Make sure the ZMAX-8210 Ethernet connector has taken effect. Or change a cable to
connect your device and PC.
Q 3. Why I fail to configure my ZMAX-8210?
• Make sure your device is perfectly connected to the power adapter.
• Make sure your PC IP address is consistent with device Address. For example, your PC IP
Address s 192.168.1.X, while your default device’s is 192.168.1.1.
• Restore the factory default settings and re-login your ZMAX-8210 web-based management.
Q 4. In what way to set IP Address for my PC with Windows XP/2000installed?
Chapter 6
• Go to StartÆClick control PanelÆDouble-click Network ConnectionsÆRight-click Local
Area ConnectionÆClick Properties
• Highlight Internet Protocol (TCP/IP) and click Properties.
Troubleshooting
- 28 -
Page 35

Figure 30 ZMAX-8210 Wireless Network Connection Properties
Q 5. In what way to restore my ZMAX-8210 to the factory default settings?
Refer to Restore Factory Default Settings.
Q 6. How to re-gain my ZMAX-8210 password if it slips off my mind?
Refer to Restore Factory Default Settings.
Q 7. How I could know my PC has connected to the ZMAX-8210?
• Click“Start”>“Run”
• Enter “cmd”
• Enter “ping 192.168.1.1”, use “ping” to check whether the tie has been established between
your ZMAX-8210 and PC
• If the tie has been established, it will be shown as below.
Chapter 6
Troubleshooting - 29 -
Page 36

Figure 31 ZMAX-8210 Ping
Chapter 6
Troubleshooting - 30 -
Page 37

Appendix A Specifications
This appendix provides technical terms for the ZMAX-8210 CPE.
Table 2 ZMAX-8210-I Spec
802.16d-2004 Outdoor CPE
Main Features as follows:
¾ Operates at 3.5GHz
¾ Built-in 16dBi directional panel antenna
¾ Power over Ethernet (PoE, non-802.3af compliant)
¾ Resistant design for outdoor environment (IP65)
¾ SNMP support
¾ RoHS
¾ Signal Status Display by LED Line
Module ZMAX-8210-I
Description ZMAX-8210-I works at 3.5GHz, compatible with 802.16d-2004
standard, designed as CPE..
ZMAX-8210 benefits from WiMAX technologies with OFDM
technology, delivering the best economics and advanced wireless
solution for fixed broadband access.
System
Operation Mode CPE
IP Router Yes
NAT Yes
Access Control Yes
Flow Control Yes
DHCP DHCP Server/DHCP Client
NTP Yes
HTTP Redirect Yes
Watchdog Yes
Features
QoS Yes(rtPS/nrtPS/UGS/BE)
Encryption DES/AES
DFS
(Dynamic Frequency Selection)
ARQ Yes
Appendix A Specifications - 31 -
Yes
Page 38

(Automatic Repeat Request)
PHS
Yes
(Payload Header Suppression)
Site Survey Yes
Signal Indicators
Radio
Standard IEEE 802.16-2004, HiperMAN/WiMAX Fixed Profile
Modulation OFDM modulation, 256FFT points; BPSK, QPSK, 16-QAM,
64-QAM
RF Frequency 3.4 to 3.6 GHz in steps of 250kHz
Bandwidth 1.75MHz, 3.5MHz & 7MHz
Duplexing Method TDD and HFDD
Spectral Efficiency 5 bits/sec/Hz (64-QAM uncoded)
Supported Frame Lengths 2.5,4,5,8,10 & 20 ms
Tx Maximum output Power
20.5dBm
(at antenna connector)
Tx Center Frequency Tolerance < ±2% subcarrier spacing
Symbol Clock Frequency Tolerance < ±5ppm
Frequency Control Automatic Frequency Control (AFC)
Spectral Mask Requirements Type-G mask ETSI-EN301021
Power Control Automatic Gain Control (AGC),
Automatic Link Control (ALC)
Adjacent Channel Rejection C/I
16-QAM 3/4 64QAM 3/4
-11dB -4dB
Nonadjacent Channel Rejection C/I
16-QAM 3/4 64QAM 3/4
-30dB -23dB
Relative Tx Constellation Error
(@20.5dBm output power)
Burst Type Typical [dB]
BPSK 1/2 -31.5
QPSK 1/2 -31.5
QPSK 3/4 -31.5
16QAM 1/2 -31.5
16QAM 3/4 -31.5
64QAM 1/2 -31.5
64QAM 3/4 -31.5
Maximum Rx Receiver Sensitivity
(BER <10-6)
Burst Type Typical [dB]
BPSK 1/2 -95.0
QPSK 1/2 -93.0
Appendix A Specifications - 32 -
Page 39

QPSK 3/4 -89.5
16QAM 1/2 -86.5
16QAM 3/4 -83.0
64QAM 1/2 -79.0
64QAM 3/4 -77.0
Management
Secure WEB Management Yes
SNMP Yes
SSH Yes
CLI Yes
F/W Upgrade Web/TFTP/FTP
Interface
LAN One 10/100-BaseTX RJ-45 Ethernet Port
Antenna Type (Built-in) 16dBi pannel antenna
Default Button Yes
Ground Interface Yes
Led 1-Power, 1-WLAN, 1-LAN, 5-Signal Indicator
Physical
Dimension 277(L)x277(W)x80(H)
Weight 1.5 Kg
Power Consumption 10W
Power Supply PoE,802.3af compliant, Remote Power 48V@500mA
Environment
Operating T em perature
-20~65 ℃
Operating Humidity 5 ~ 95% Non-Condensing
Storage Temperature
-40 oC~85 ℃
Storage Humidity 5 ~ 95% Non-Condensing
Waterproof IP65
RoHS compliant Yes
Warranty 12 months
Table 3 ZMAX-8210-E Spec
802.16d-2004 Outdoor CPE
Appendix A Specifications - 33 -
Page 40

Main Features as follows:
¾ Operates at 3.5GHz
¾ Built-in 16dBi directional panel antenna
¾ Power over Ethernet (PoE, non-802.3af compliant)
¾ Resistant design for outdoor environment (IP65)
¾ SNMP support
¾ RoHS
¾ Signal Status Display by LED Line
Module ZMAX-8210-E
Description ZMAX-8210-E works at 3.5GHz, compatible with 802.16d-2004
standard, designed as CPE..
ZMAX-8210-E benefits from WiMAX technologies with OFDM
technology, delivering the best economics and advanced wireless
solution for fixed broadband access.
System
Operation Mode CPE
IP Router Yes
NAT Yes
Access Control Yes
Flow Control Yes
DHCP DHCP Server/DHCP Client
NTP Yes
HTTP Redirect Yes
Watchdog Yes
Features
QoS Yes(rtPS/nrtPS/UGS/BE)
Encryption DES/AES
DFS
Yes
(Dynamic Frequency Selection)
ARQ
Yes
(Automatic Repeat Request)
PHS
Yes
(Payload Header Suppression)
Site Survey Yes
Signal Indicators
Radio
Standard IEEE 802.16-2004, HiperMAN/WiMAX Fixed Profile
Appendix A Specifications - 34 -
Page 41

Modulation OFDM modulation, 256FFT points; BPSK, QPSK, 16-QAM,
64-QAM
RF Frequency 3.4 to 3.6 GHz in steps of 250kHz
Bandwidth 1.75MHz, 3.5MHz & 7MHz
Duplexing Method TDD and HFDD
Spectral Efficiency 5 bits/sec/Hz (64-QAM uncoded)
Supported Frame Lengths 2.5,4,5,8,10 & 20 ms
Tx Maximum output Power
20.5dBm
(at antenna connector)
Tx Center Frequency Tolerance < ±2% subcarrier spacing
Symbol Clock Frequency Tolerance < ±5ppm
Frequency Control Automatic Frequency Control (AFC)
Spectral Mask Requirements Type-G mask ETSI-EN301021
Power Control Automatic Gain Control (AGC),
Automatic Link Control (ALC)
Adjacent Channel Rejection C/I
16-QAM 3/4 64QAM 3/4
-11dB -4dB
Nonadjacent Channel Rejection C/I
16-QAM 3/4 64QAM 3/4
-30dB -23dB
Relative Tx Constellation Error
(@20.5dBm output power)
Burst Type Typical [dB]
BPSK 1/2 -31.5
QPSK 1/2 -31.5
QPSK 3/4 -31.5
16QAM 1/2 -31.5
16QAM 3/4 -31.5
64QAM 1/2 -31.5
64QAM 3/4 -31.5
Maximum Rx Receiver Sensitivity
(BER <10-6)
Burst Type Typical [dB]
BPSK 1/2 -95.0
QPSK 1/2 -93.0
QPSK 3/4 -89.5
16QAM 1/2 -86.5
16QAM 3/4 -83.0
64QAM 1/2 -79.0
64QAM 3/4 -77.0
Management
Secure WEB Management Yes
Appendix A Specifications - 35 -
Page 42

SNMP Yes
SSH Yes
CLI Yes
F/W Upgrade Web/TFTP/FTP
Interface
LAN One 10/100-BaseTX RJ-45 Ethernet Port
Antenna One N Type (Female) Interface
Default Button Yes
Ground Interface Yes
Led 1-Power, 1-WLAN, 1-LAN, 5-Signal Indicator
Physical
Dimension 277(L)x277(W)x80(H)
Weight 1.5 Kg
Power Consumption 10W
Power Supply PoE,802.3af compliant, Remote Power 48V@500mA
Environment
Operating T em perature
-20~65 ℃
Operating Humidity 5 ~ 95% Non-Condensing
Storage Temperature
-40 oC~85 ℃
Storage Humidity 5 ~ 95% Non-Condensing
Waterproof IP65
RoHS compliant Yes
Warranty 12 months
Appendix A Specifications - 36 -
Page 43

Appendix B Technical Terms
Table 4 Technical Terms
Terms Description
IEEE 802.16 IEEE 802.16 is a wireless networking standard adopted in December, 2001.
BS BS is the abbreviation of Base Station, a basic component in WiMAX
infrastructure.
SS SS is the abbreviation of Subscriber Station, a user-client in WiMAX
infrastructure.
CPE CPE is the abbreviation of Customer-Premises Equipment, acting as a client.
DHCP、 DHCP
Client 、 DHCP
Server
IP Address and
Network Mask
LAN&WAN LAN (Local Area Network): A communications network serving users within a
Router A device that forwards data between networks. An IP router forwards data based
DHCP, Dynamic Host Configu ration Protocol . An Ethernet protocol specifying
how a centralized DHCP server can assign network configuration information to
multiple DHCP clients. The assigned information includes IP addresses, DNS
addresses, and gateway (router) addresses.
IP Address is a four-byte number uniquely defining each host on the Internet,
usually written in dotted-decimal notation with periods separating the bytes (for
example, 134.177.244.57). Ranges of addresses are assigned by Internet, an
organization formed for this purpose.
Combined with the IP address, the IP Subnet Mask allows a device to know
which other addresses are local to it, and which must be reached through a
gateway or router.
limited area, such as one floor of a building.
WAN: A long distance link used to extend or connect remotely located local area
networks. The Internet is a large WAN.
on IP source and destination addresses.
NetBIOS Network Basic Input Output System. An application programming interface
(API) for sharing services and information on local-area networks (LANs).
Provides for communication between stations of a network where each station is
given a name. These names are alphanumeric names, 16 characters in length.
Encryption To secure the communication between the wireless device and other devices,
encryption is implemented to protect secret against attack.
MAC The Media Access Control address is a unique 48-bit hardware address assigned
to every network interface card.
Ping Using “ping” command aims at checking the communication between your
Appendix B Technical Terms - 37 -
Page 44

device and other devices.
Web-based
Graphical User
A web-based management. You have access to the site via Netscape or Microsoft
Internet Explorer, monitoring and managing your device.
Interface (GUI)
WINS Server WINS. Windows Internet Naming Service is a server process for resolving
Windows-based computer names to IP addresses. If a remote network contains a
WINS server, your Windows PCs can gather information from that WINS server
about its local hosts. This allows your PCs to browse that remote network using
the Windows Network Neighborhood feature.
Appendix B Technical Terms - 38 -
Page 45

Appendix C ASCII
WEP can be configured with a 64-bit or 128-bit Shared Key (hexadecimal number or ACSII). As
defined, hexadecimal number or ACSII is represented by 0-9, A-F or a-f; likewise, ACSII is
represented by 0-9, A-F, or a-f and punctuation. Every can consist of two-digit hexadecimal.
Table 5 ASCII
ASCII
Character
! 21 9 39 Q 51 i 69
" 22 : 3A R 52 j 6A
# 23 ; 3B S 53 k 6B
$ 24 < 3C T 54 l 6C
% 25 = 3D U 55 m 6D
& 26 > 3E V 56 n 6E
‘ 27 ? 3F W 57 o 6F
( 28 @ 40 X 58 p 70
) 29 A 41 Y 59 q 71
* 2A B 42 Z 5A r 72
+ 2B C 43 [ 5B s 73
Hex
Equivalent
ASCII
Character
Hex
Equivalent
ASCII
Character
Hex
Equivalent
ASCII
Character
Hex
Equivalent
, 2C D 44 \ 5C t 74
- 2D E 45 ] 5D u 75
. 2E F 46 ^ 5E v 76
/ 2F G 47 _ 5F w 77
0 30 H 48 ` 60 x 78
1 31 I 49 a 61 y 79
2 32 J 4A b 62 z 7A
3 33 K 4B c 63 { 7B
4 34 L 4C d 64 | 7C
Appendix C ASCII - 39 -
Page 46

5 35 M 4D e 65 } 7D
6 36 N 4E f 66 ~ 7E
7 37 O 4F g 67
8 38 P 50 h 68
Appendix C ASCII - 40 -
Page 47

Appendix D SSH Settings
Table 6 SSH Settings
get set del keyword descriptions
√ √ system --- system setting
√ version --- system firmware version
√ √ devicename --- system name
√ macaddr --- system MAC address
√ √ routemode --- system route mode
anyiponrout
√ √
e
√ time
√
√ now --- Time of system
√ √ server --- Time server of system
√ √ zone --- Time zone of Tim e server
√ √ bridge --- system bridge port
√ √ iptype --- system dhcp client
√ √ ipaddr --- system IP address
√ √ netmask --- system network mask
√ √ gateway --- system gateway
daylight
saving
---system any ip on route
mode
--- Daylight Saving Time of
time server
√ √ dns primary --- system primary DNS
dns
√ √
secondary
√ √ ethernet --- system ethernet port
√ √ iptype --- system dhcp client
√ √ ipaddr --- system IP address
√ √ netmask --- system network mask
Appendix D SSH Settings - 41 -
--- system secondary DNS
Page 48

√ √ gateway --- system gateway
√ √ dns primary --- system primary DNS
dns
√ √
--- system secondary DNS
secondary
√ √ IP start --- IP range start
√ √ IP End --- IP range end
IP Range
√ √
--- IP range netmask
Netmask
√ √ wireless --- system wireless port
√ √ iptype --- system dhcp client
√ √ ipaddr --- system IP address
√ √ netmask --- system network mask
√ √ gateway --- system gateway
√ √ dns primary --- system primary DNS
dns
√ √
--- system secondary DNS
secondary
√ √ IP start --- IP range start
√ √ IP End --- IP range end
IPRange
√ √
--- IP range netmask
Netmask
--- enable spanning tree
√ √ stp
protocol
√ √ ssh --- enable remote SSH access
√ √ snmp --- SNMP setting
√ √ server --- enable SNMP agent
--- SNMP TrapServer IP
√ √ trap server
address
read
√ √
--- SNMP Readcommunity
community
Appendix D SSH Settings - 42 -
Page 49

write
√ √
--- SNMP Writecommunity
community
√ √ description ---SNMP System Description
√ √ wimax --- wireless setting
√ √ bsid --- WiMAX Base Station ID
√ √ duplex --- WiMAX Duplex Mode
√ channel ---wireless Center Frequency
√ cpsize --- WiMAX CP Size
√ √ bandwidth --- wireless Band Width
--- wireless transmit Frame
√
framelengh
Length
√ √ encryption --- wireless Encryption Mode
--- WiMAX wireless
√ √
ir-bit
parameter
√ status --- wireless status
√ password --- system password
√ reboot --- reboot system
√ exit --- logout from CLI
√ quit --- quit CLI
Appendix D SSH Settings - 43 -
 Loading...