


IEEE 802.11n Wireless LAN
PCI Card
Model: XN-990
Quick Installation Guide
Version: 1.0
Date of issue: July, 2007

INTRODUCTION
Thank you for purchasing the IEEE 802.11n Wireless LAN PCI Adapter. This product is the
Wireless adapter that base on IEEE 802.11n draft 2.0 standard that deliver up to 12x faster than
IEEE 802.11g while staying backward compatible with 802.11g and 802.11b network. This Quick
Installation Guide will guide you through the basic installation procedure. For further information,
please check the User’s Manual in the Product CD.
About your IEEE 802.11n Wireless LAN PCI Adapter
The IEEE 802.11n Wireless LAN PCI Adapter is a wireless LAN adapter for your computer. It
can be operated in Infrastructure or Ad-Hoc network configurations. Ad-Hoc mode allows IEEE
802.11n Wireless LAN PCI Adapter users to join a Basic Service Set (i.e., peer-to-peer mode,
without access point). Infrastructure mode allows 802.11n Wireless LAN PCI Adapter users to join
an Extended Basic Service Set (i.e., connect to an Access Point).
Package Content
The product package should contain the following items:
I. IEEE 802.11n Wireless LAN PCI Adapter…………….………….…….…...……………..x1
II. Product CD…………………………………………..……………………………..…………x1
III. Quick Installation Guide…………………………………………..………………………….x1
IV. Three detachable dipole antennas …………………………………………………………x1
If any of the above items are not included or damaged, please contact your local vendor for
support.
Installation Requirement
Before installation, make sure you have computer with following:
9 A minimum of 5MB available hard disk space.
9 A minimum of 32 MB RAM
9 A PCI slot port.
9 A CD-ROM drive.
9 Windows Vista/XP/2000
Installation of IEEE 802.11n Wireless LAN PCI Adapter for Windows Vista
1. Turn off your desktop PC.
2. Open the case of your desktop computer.
3. Find an available PCI slot on your computer.
4. Firmly insert the PCI Adapter into the PCI slot and close the case of the computer.
5. Connect the three antennas to the antenna connector of PCI Adapter.
6. Power on your desktop PC, it will auto-detect the IEEE802.11n Wireless LAN PCI Adapter
and a “Found New Hardware” window will show up. Select “Locate and install driver
software (recommended)” to install the driver.
7. Select “Don’t search online” to locate the driver on CD-ROM.
8. Insert the included CD into the CD-ROM drive on your laptop. And click Next.
9. The windows will appear the message about the Network Control has not passed Windows
Logo testing to verify its compatibility with Windows Vista. Select “Install this driver
software anyway” to continue installing.
10. Click Close to complete the installation.
Note: If the driver is not WHQL certified, Vista64 will not load digital-unsigned software.
To complete installation with unsi gned driver, you m ay do the following:
1. Before starting 64-bit editions of Windows Vista, press “F8” to enter advance boot options menu.
2. Choose “Disable Driver Signature Enforcement” and Windows will start again.
3. Start to install the driver and ut ility for your Wireless LAN PCI Adapter.
After you install the driver and utility and insert your wireless PCI adapter, the icon appears
in the system tray.
Right click the
icon, the below window will show up. And select Connect to a network to
configure the wireless LAN adapter.

Installation of IEEE 802.11n Wireless LAN PCI Adapter for Windows XP
1. Insert the included CD into the CD-ROM driver on your computer. Locate and double-click
setup.exe.
2. Click Next to accept installing IEEE 802.11n Wireless LAN PCI Adapter driver files.
3. Click Next to accept the default file location or click Browse to select an alternate folder.
4. Select a program folder or type a new folder name and click Next.
5. You may add a shortcut in the startup folder as desired and click Next.
6. Click on Finish to complete the installation.
7. Turn off your desktop PC.
8. Open the case of your desktop computer.
9. Find an available PCI slot on your computer.
11. Firmly insert the PCI Adapter into the PCI slot and close the case of the computer.
10. Connect the three antennas to the antenna connector of PCI Adapter.
11. Start your PC, it will auto-detect new hardware and will display a “Found New Hardware
Wizard” window. Select “Install the software automatically (Recommended)” and press
Next to install the driver
12. The windows will appear the message about the Network Control has not passed Windows
Logo testing to verify its compatibility with Windows XP. Click on Continue Anyway button
to continue installing.
13. The windows will find 802.11n Wireless LAN PCI Adapter and start copying corresponding
files into the system. Click on Next to continue.
14. Click Finish to complete the installation.
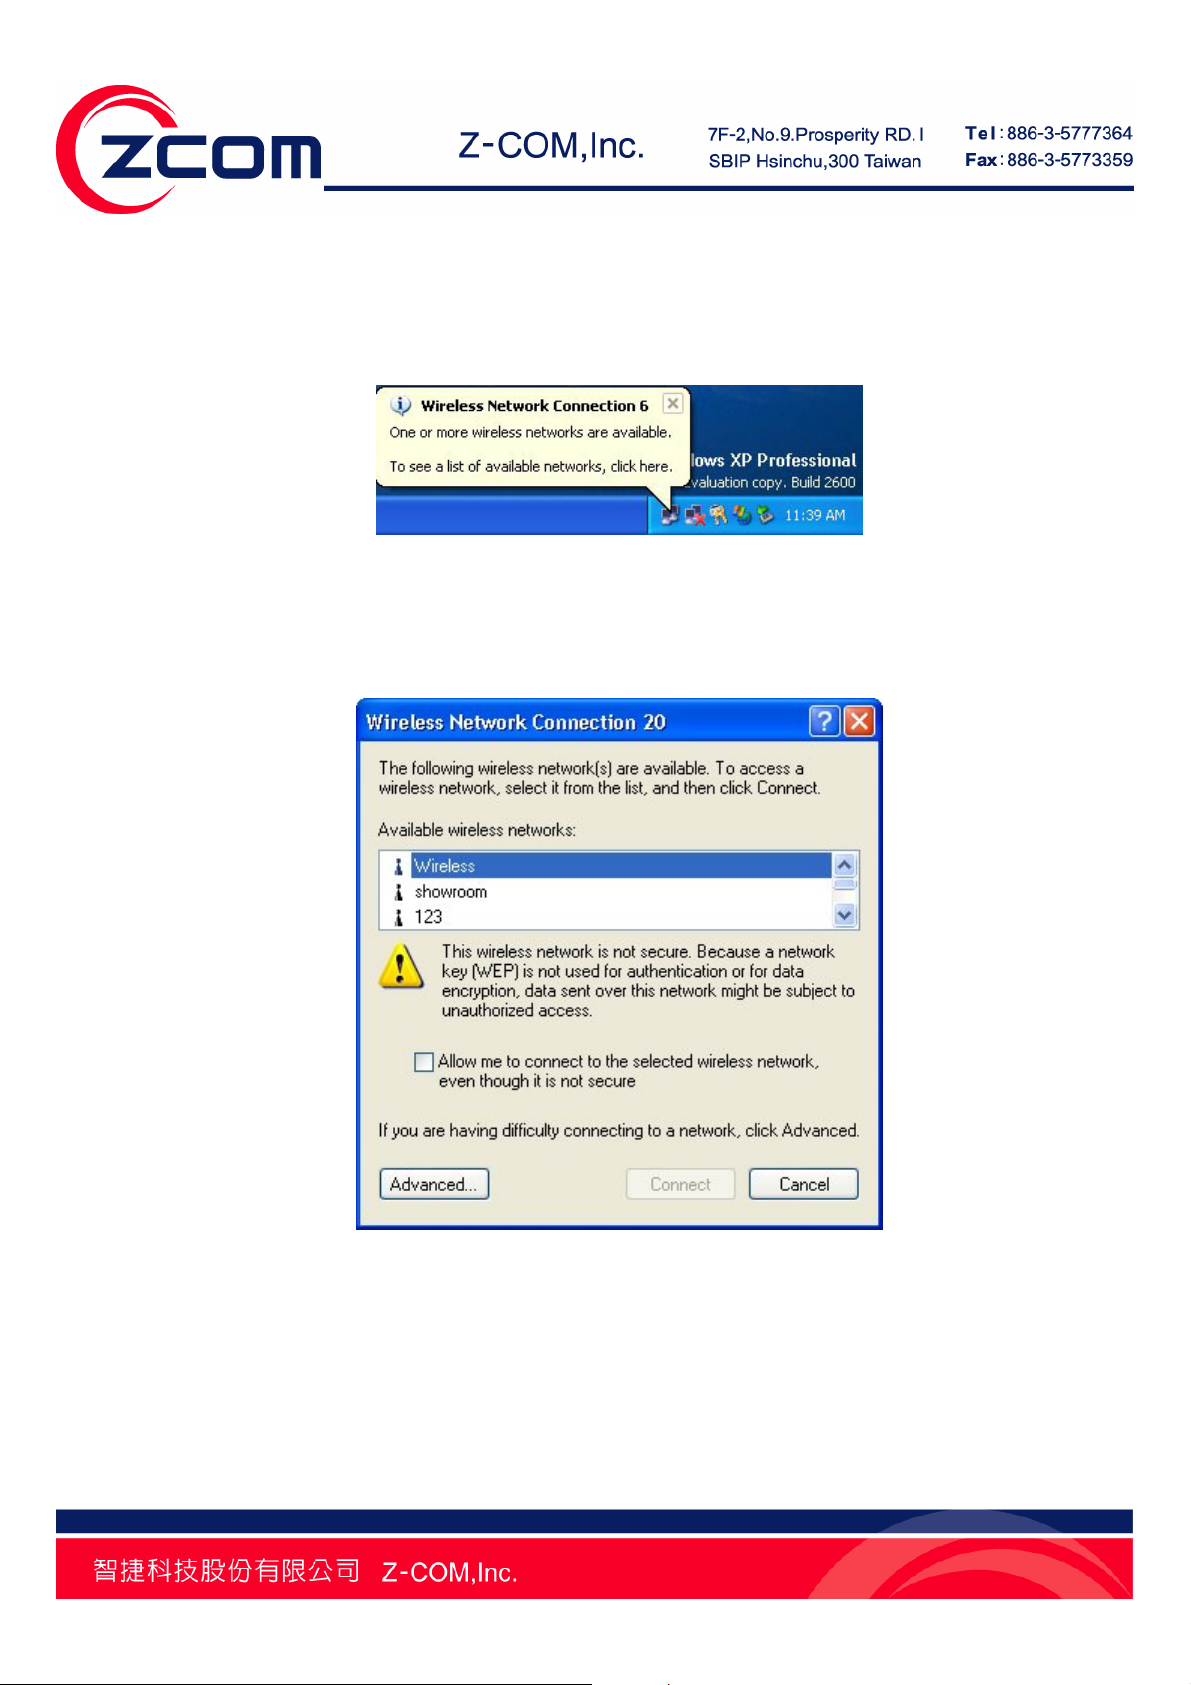
15. After installing the Wireless LAN Adapter, the Windows XP will display a “Wireless Network
Connection # ” message.
Click on the message and the “Automatic Wireless Network Configuration” will then appear
automatically. You may click on Connect button to allow users to connect to an available wireless
infrastructure network (Access Point).
You may also click the Advanced button to make advanced configuration for the Wireless LAN
Adapter, shown as below.
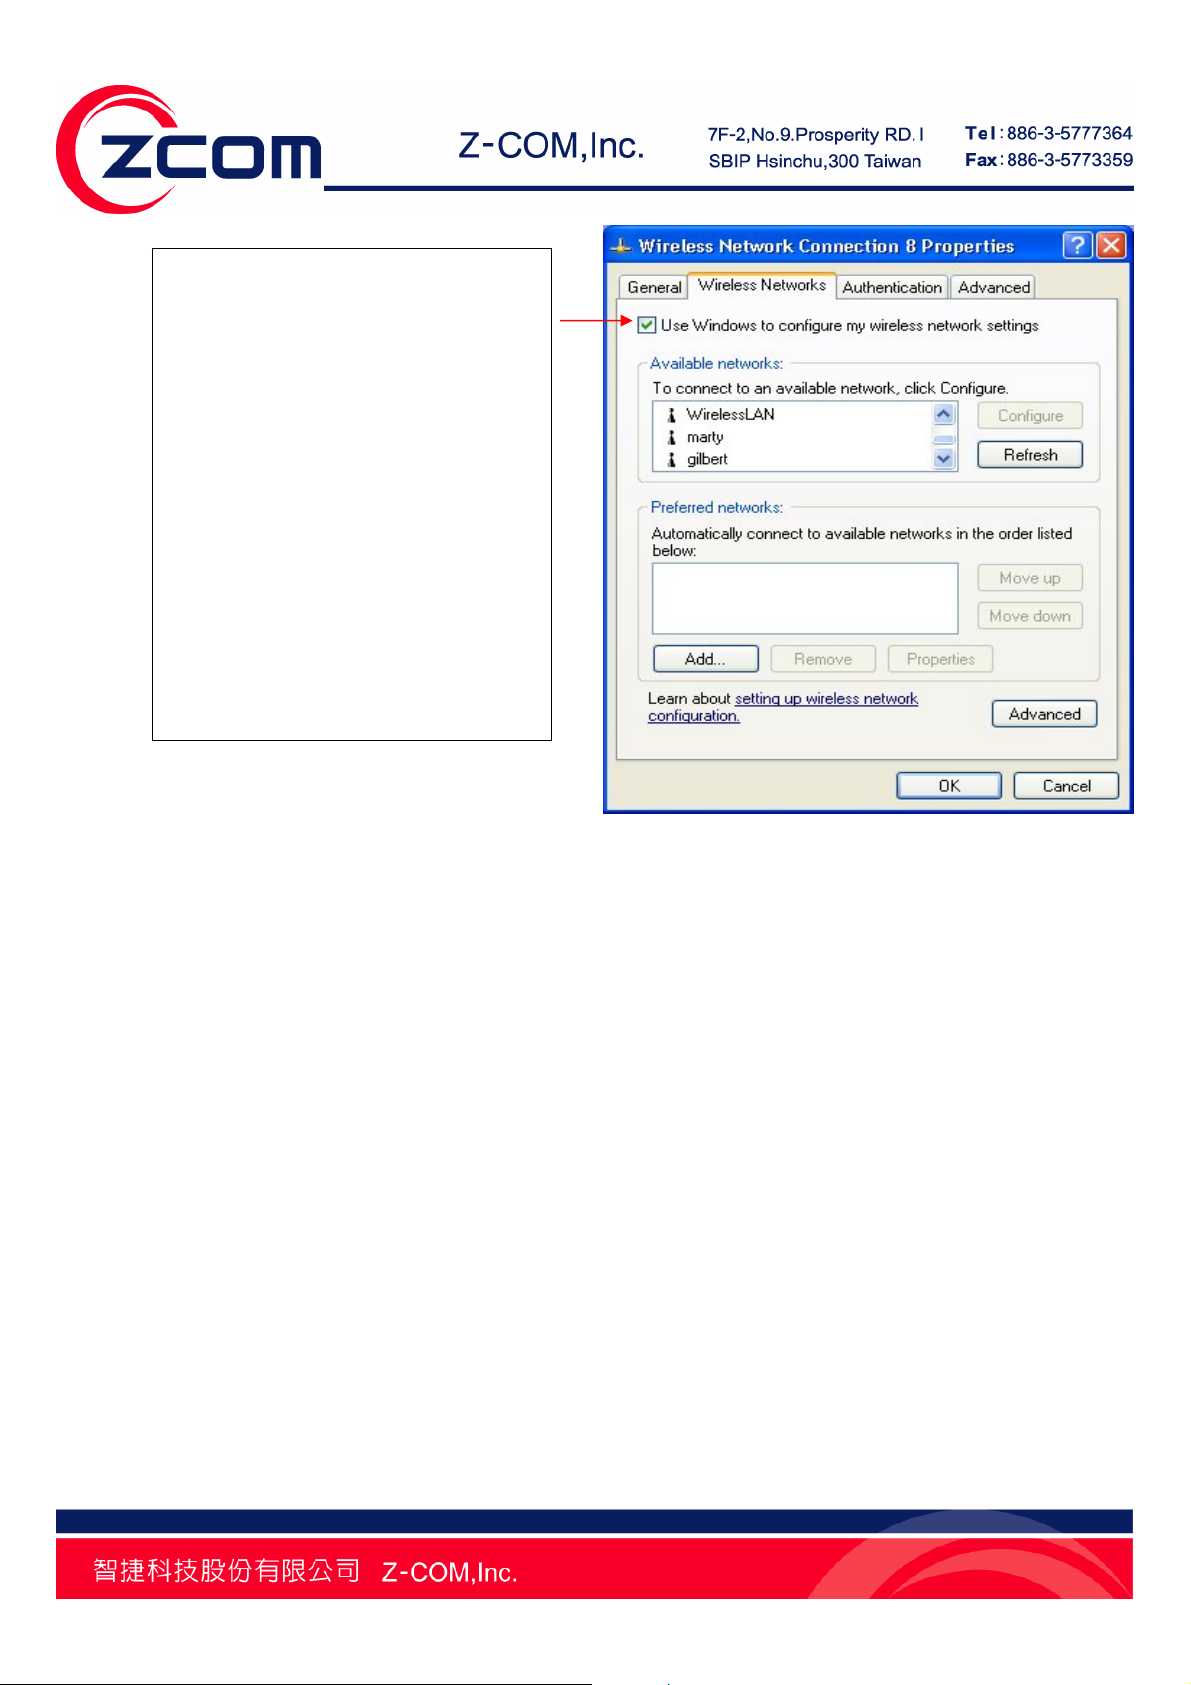
Warning: You must choose one
way to configure Wireless LAN
PC Adapter either of using our
WLAN Utility, or using Windows
XP Automatic Wireless Network
Configuration first. If you want
to switch configuration from
WLAN Utility to Zero
Configuration, you need to
check the check box “Use
Windows to configure my
wireless network settings” to
enable the WZC service.
For more information on using the Automatic Wireless Network Configuration please refer to
Windows XP Help file.
However, the WLAN Utility, whic h came with the Wireless LAN Adapter, provides you more tools
to configure the IEEE 802.11n Wireless LAN PCI Adapter and to monitor the wireless connection.
For more information on installing and using the WLAN Utility, please refer to the following
sections “Installation of the Wireless LAN Utility” and “Usage of the WLAN Utility”.
Installation of the IEEE 802.11n Wireless LAN PCI Adapter for Windows 2000
1. Insert the included CD into the CD-ROM driver on your computer. Go to Utility folder and
double-click setup.exe.
2. Click Next to accept installing IEEE 802.11n Wireless LAN PCI Adapter driver and utility files.
3. Click Next to accept the default file location or click Browse to select an alternate folder.
4. Select a program folder or type a new folder name and click Next.
5. You may add a shortcut in the startup folder as desired and click Next.

6. Click on Finish to complete the installation.
7. Turn off your desktop PC.
8. Open the case of your desktop computer.
9. Find an available PCI slot on your computer.
10. Firmly insert the PCI Adapter into the PCI slot and close the case of the computer.
11. Connect the three antennas to the antenna connector of PCI Adapter.
12. Power on your desktop PC, it will auto-detect new hardware and will display a “Found New
Hardware Wizard” window. Click Next to continue.
13. Select “Search for a suitable driver for my device (recommended)”. Insert the Product
CD-ROM into the appropriate drive. Click Next to install the driver.
14. The windows will find “IEEE 802.11n Wireless LAN PCI Adapter”. Click Next to continue.
15. A Digital Signature Not Found message may appear. Click Yes button to proceed.
16. Click Finish to complete the installation.
Installation of the Wireless LAN Utility
1. Insert the Driver and Utility CD into the CD-ROM drive. Locate and double-click setup.exe to
follow the windows instructions to install wireless utility.
2. When the Welcome screen appears, click Next.
3. The Choose Destination Location screen displays the default Destination Folder. If you want to
change the default folder, you can click Browse and choose a different destination folder.
Click Next to go to the next screen.
4. The Select Program Folder screen appears. Accept or change the default folder name and
click Next to continue.
5. Accept to add shortcut of this utility and click Next to continue.
6. Completing the utility installation.

7. Upon completion, go to Program Files and run the Wireless LAN Utility. The utility interface will
then appear and at the same time its icon appears in the System Tray in the bottom right
corner of your task bar.
WLAN Utility Summary
The WLAN Utility consists of window with 3 items for you to monitor and configure the IEEE
802.11n Wireless LAN PCI Adapter: Configuration, Site Survey and About.
The Configuration Screen
The Configuration item allows you to modify the configuration parameters for the IEEE 802.11n
Wireless LAN PCI Adapter.
Configuration
LABEL DESCRIPTION
The Profile field allows you to set values for all parameters by selecting a previously defined
Profile
profile. To create the profile, go to the Profile field, type a profile name and set the corresponding
parameters. After changing parameters, save the profile and click the Apply button to take effect.

You can have multiple profiles and modify the profile at any time.
SSID
Network Type
Ad-hoc Channel
Transmit Rate Dynamic Data Rate Scaling from 300 to 1Mbps.
State
Current Channel This field displays the radio channel the wireless LAN Adapter is currently using.
Current Tx Rate
Throughput
(Packets/sec)
The SSID is the unique ID used by Access Points and stations to identify a wireless LAN.
Wireless clients associating to any Access Point must have the same SSID.
This field displays the network type (Infrastructure or Ad Hoc) for user select.
To form Ad-Hoc network, the same channel is required. Before choosing a channel, it is advised
to use the Site Survey tool to check the quality of each channel. Afterwards, go to the Channel
field and choose a clear channel for your wireless LAN stations. Click on the Apply button to
make the change take effect.
This field displays the MAC address of the wireless device to which the wireless LAN Adapter is
associated.
This field displays the current transmission rate of the wireless LAN adapter in megabits per
second (Mbps).
This field displays the real-time statistics of the data rate.
Link Quality The status bar shows the quality of the signal.
Signal Strength The status bar shows the strength of the signal.
The Site Survey Screen
Use the Site Survey screen to scan for and connect to a wireless network automatically. By
clicking on the Rescan button, the Site Survey can display Access Points around the working
environment. Besides showing the ESSID of each Access Point, it also displays BSSID, Channel,
Capability, Signal, and Supported Rates. To join any of the displayed Access Points, highlight the
Access Point you desire to connect and then click Join.

Site Survey
LABEL DESCRIPTION
ESSID This field displays the SSID (Service Set IDentifier) of each wireless device.
BSSID This field displays the MAC address of each wireless device.
Channel This field displays the channel number used by each wireless device.
Network Type
Security
Signal This field displays the signal strength of each wireless device.
Supported Rates This field displays the supported rates of each wireless device.
This field displays the network type (Infrastructure or Ad Hoc) of the wireless device.
This field shows whether data encryption is activated (WEP (WEP or 802.1x), WPA, WPA-PSK,
WPA2, WPA2-PSK) or inactive (Disabled).
The About Screen
The About page shows the versions of the Wireless LAN Utility, driver, and firmware of the IEEE
802.11n Wireless LAN PCI Adapter. Also, the MAC address and frequency domain are displayed.

Site Survey
LABEL DESCRIPTION
Configuration
Utility
Network Driver This field displays the driver version number of the wireless LAN adapter.
NIC Firmware This field displays the firmware version number of the wireless LAN adapter.
This field displays the utility version number of the wireless LAN adapter.
Quick Tips to Configure the IEEE 802.11n Wireless LAN PCI Adapter
This Quick Start Guide covers the basic features needed to use the IEEE 802.11n Wireless LAN
PCI Adapter. Follow these steps to configure network settings.
Set the Profile (Optional)
The Profile field allows you to set values for all parameters by selecting a previously defined
profile. To create the profile, go to the Profile field, type a profile name and set the corresponding
parameters. After changing parameters, save the profile and click the Apply button to take effect.
You can have multiple profiles and modify the profile at any time.

Set the Network Type
From the Main Menu, click the Configuration tab, go to Network Type and click the down arrow
at the right of the Network Type field. You will then see 2 network types for the IEEE 802.11n
Wireless LAN PCI Adapter to operate. If you need to access wireless network or Internet via
Access Point, select “Infrastructure”. If standard “802.11 Ad-Hoc” is selected, you need to set
wireless stations with the same SSID.
Set the SSID
The default setting is ANY, which allows your Wireless LAN Adapter to automatically associate to
any Access Point (Infrastructure mode) in the vicinity of your wireless adapter. The SSID can be
set up to 32 characters and is case sensitive.
Set the Channel (for Ad-Hoc network)
To form Ad-Hoc network, the same channel is required. Before choosing a channel, it is advised
to use the Site Survey tool to check the quality of each channel. Afterwards, go to the Channel
field and choose a clear channel for your wireless LAN stations. Click on the Apply button to
make the change take effect.
Set the Advance

Wireless Mode: There are three Wireless Modes to be supported, 802.11B, 802.11B/G, and
802.11B/G/N.
Power Save Mode: The Power Save option is designed to conserve battery life of you computer.
When Power Save is enabled, your IEEE 802.11n Wireless LAN PCI Adapter will go into sleep
mode to minimize power consumption.
Set the Security:
To protect against hacker entering your system and prevent unauthorized wireless station from
accessing data transmitted over the network, the WLAN Utility offers a sophisticated security
algorithm. To activate security enable, click the check box next to Security Enable. A Privacy
Configuration window will then appear.
Privacy Configuration consists of specifying Security and Certification, as explained in the
following:

Security Tab:
Set the Authentication Mode:
Open: If you require NO authentication, select “Open” since it allows any device to join a network
without performing any security check.
Shared: If you select “Shared” mode, make sure that WEP must be enabled and configured on
both the access point and the client with a same key.
WPA (2)-PSK: Allows you to gain access to a secured wireless network that the station and the
access point use the same pre-shared key to authenticate. You must type an alphanumeric
password phrases between 8 and 63 characters in the Pre-shared key section of this menu.
WPA (2): Allows you to gain access to a more secured wireless network that requires mutual
authentication between client and access point with a Radius authentication server. In order to
access the wireless network, you must select EAP type your service provider supplied in the
section of IEEE802.11X Authentication.
Once you choose your Authentication Mode, you then need to select the Encryption Mode.
Set the Encryption Mode:
WEP: There are two methods to set the WEP keys, as described below:
Key will be generated automatically for data private
To create encryption keys automatically, click the Key will be generated automatically for data
private check box.
Pre-configured key [WEP]
You can also create encryption keys manually by pulling down the Key Length menu and select
either 64bit or 128bit encryption method
After entering the WEP keys in the key field, click the OK button to make the setting take effect.
TKIP: When TKIP is enabled, the key value will be generated automatically for data private.
AES: When AES is enabled, the key value will be generated automatically for data private.

If the Security you are configuring requires authentication, simply click the check box next to
Enable IEEE802.1X authentication for this network and you can choose an EAP type.
TLS: TLS requires the entry of Certificate Information and Login Information for mutual
authentication.

PEAP: PEAP requires the use of certificates with Certification Authority server. You also need
to input User Information and Login Information.

TTLS: LEAP requires the mutual authentication between station and access points. You must
present a User Name and Password that will be verified by TTLS-capable RADIUS server.
To save the information you entered in the appropriate field, click the OK button. Otherwise, click
the Cancel button to close the menu. If you want to return to select other EAP type, click the
Security tab.
Technical Support
You can find the most recent software and updated user documentation will be updated
periodically on the supplier Web site. If you have difficulty resolving the problem while installing or
using the IEEE 802.11n Wireless LAN PCI Adapter, please contact the supplier for support.

Federal Communications Commission (FCC) Interference
Statement
This equipment has been tested and found to comply with the limits for a Class B digital device,
pursuant to Part 15 of the FCC Rules. These limits are designed to provide reasonable protection
against harmful interference in a residential installation. This equipment generates, uses and can
radiate radio frequency energy and, if not installed and used in accordance with the instructions, may
cause harmful interference to radio communications. However, there is no guarantee that interference
will not occur in a particular installation. If this equipment does cause harmful interference to radio or
television reception, which can be determined by turning the equipment off and on, the user is
encouraged to try to correct the interference by one of the following measures:
● Reorient or relocate the receiving antenna.
● Increase the separation between the equipment and receiver.
● Connect the equipment into an outlet on a circuit different from that to which the receiver is
connected.
● Consult the dealer or an experienced radio/TV technician for help.
This device complies with Part 15 of the FCC Rules. Operation is subject to the following two
conditions: (1) This device may not cause harmful interference, and (2) this device must accept any
interference received, including interference that may cause undesired operation.
This device and its antenna(s) must not be co-located or operation in conjunction with any other
antenna or transmitter.
Warning: Changes or modifications to this unit not expressly approved by the party
responsible for compliance could void the user authority to operate the equipment.
For product available in the USA/Canada market, only channel 1~11 can be operated. Selection of
other channels is not possible.

FCC Radiation Exposure Statement:
This equipment complies with FCC radiation exposure limits set forth for an uncontrolled environment.
This equipment should be installed and operated with minimum distance 20cm between the radiator &
your body.
CE Statement:
Hereby, ZCOM, declares that this device is in compliance with the essential requirement and other
relevant provisions of the R&TTE Directive 1999/5/EC.

Distributor Information
Zcomax Technologies, Inc.
California Business
Center
New Jersey Business
Center
ZCOMAX - United Kingdom Limited
European Business
Centre
14545 VALLEY VIEW AVE., SUITE "S"
SANTA FE SPRINGS, CA 90670
98 Ford Road, Suite 3-F,
Denville, NJ 07834, USA
19 Colindale Avenue London NW9
5DS UK
Tel: +1-562-926-4588
Fax:+1-562-926-7885
Tel: +1-973-664-0310
Fax:+1-973-664-0313
Tel: +44-(0)-20-8982-8200
Fax:+44-(0)-20-8201-3232
Sales/Product Inquiries:
sales@zcomax.com
Tech
Support/Questions:
support@zcomax.com
Sales Contact
sales@zcomax.co.uk
FAE Support
support@zcomax.co.uk
 Loading...