

802.11g Wireless LAN PCI Adapter
Quick Installation Guide
Network Configuration
802.11g Wireless LAN PCI Adapter is an IEEE802.11g-compliant PCI Type DSSS wireless LAN
PCI adapter. It fully supports wireless networking under Windows 98SE/ME/2000/XP.
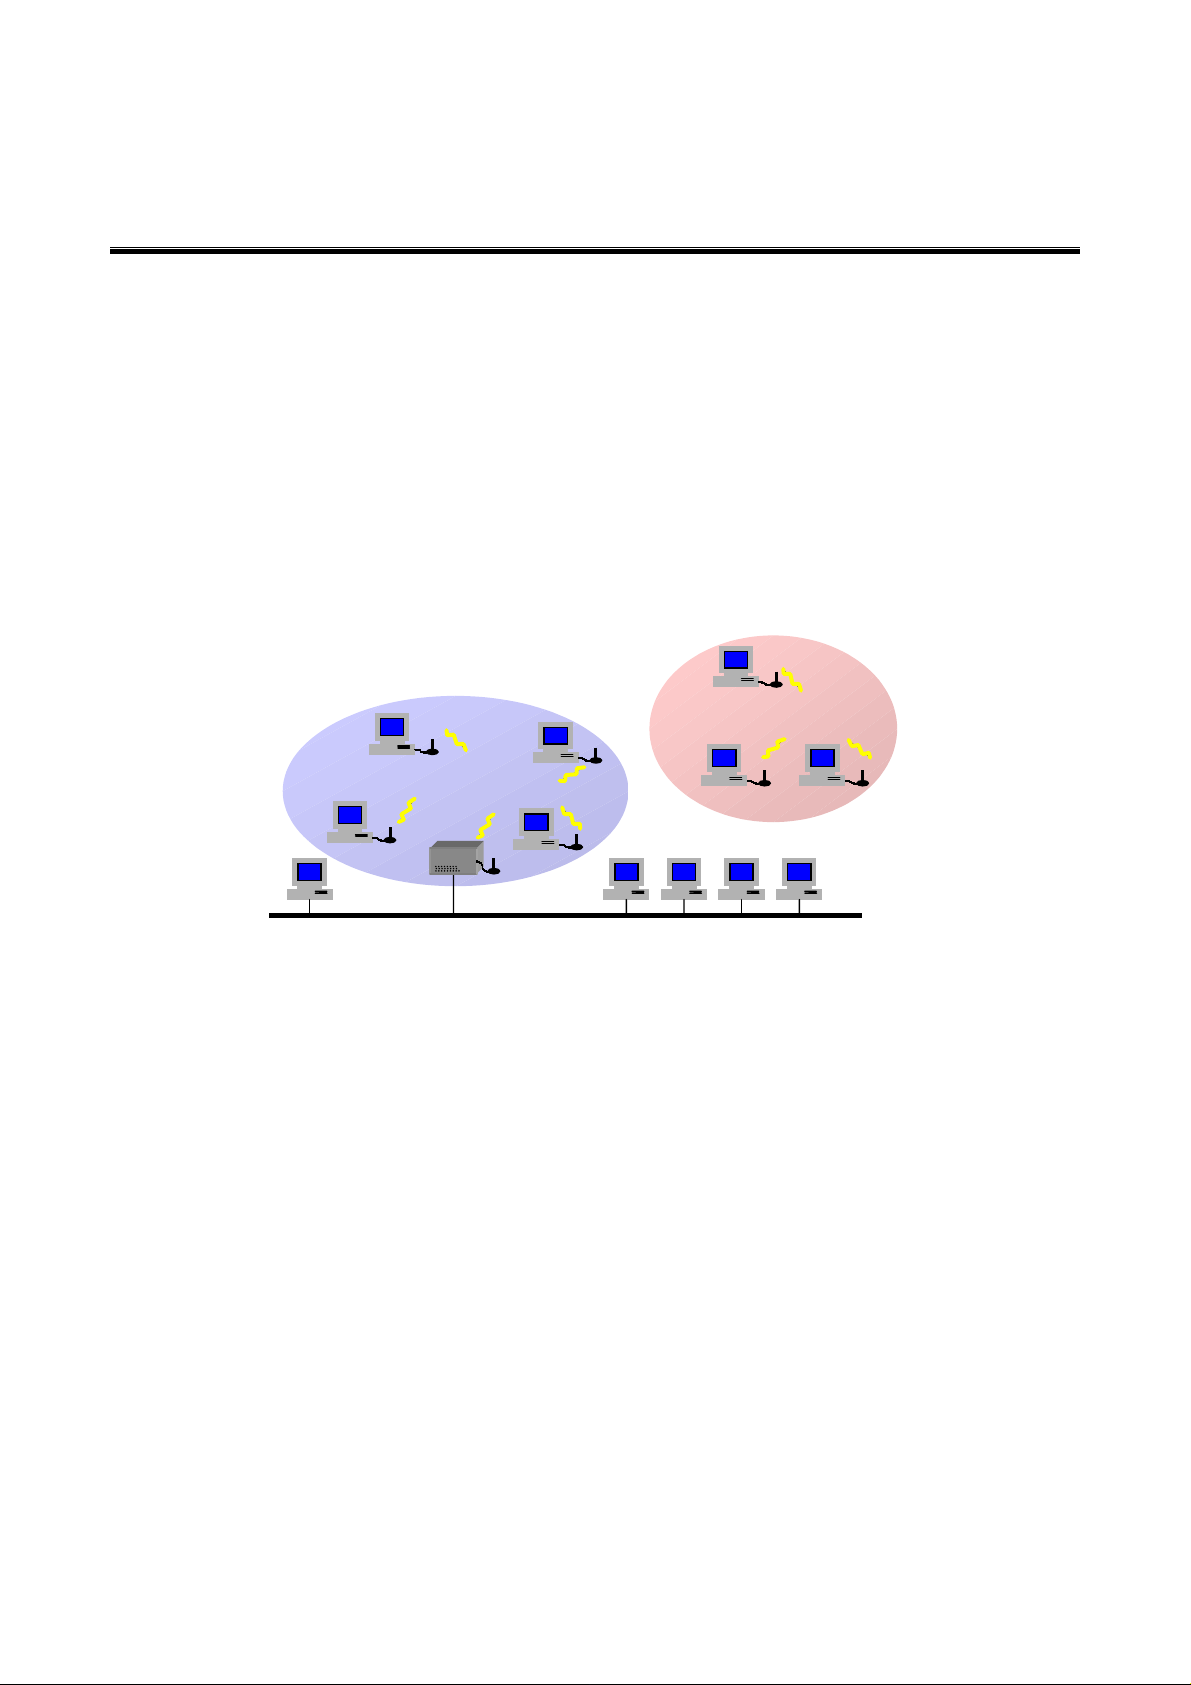
802.11g Wireless LAN PCI Adapter can be operated in Ad-Hoc or Infrastructure network
configurations. Ad-Hoc mode allows 802.11g Wireless LAN PCI Adapter users to join a Basic
Service Set (i.e., peer-to-peer mode, without access point). Infrastructure mode allows 802.11g
Wireless LAN PCI Adapter users to join an Extended Basic Service Set (i.e., connect to an Access
Point)
Wireless
Ad-hoc
Infrastructure
Access Point
Wired
Package Content
802.11g Wireless LAN PCI Adapter..………………………...……………………………… x 1
Quick Installation Guide………………………………………………………………………x 1
Product CD-ROM …………………………………………………………………………….x 1
Installation of the 802.11g Wireless LAN PCI Adapter under Windows XP
1. Insert the 802.11g Wireless LAN PCI Adapter into the PCI slot on your notebook and start
Windows. Windows will auto-detect the Wireless LAN PCI Adapter and a “Found New
Hardware Wizard” window will show up.
2. Select “Install from a list of specific location (Advanced)” and insert the Product CD-ROM
into the appropriate drive. Click on Next to install the driver.
3. Select “Search removable media (floppy, CD-ROM…) ”, click on Next to install the driver.
4. The Windows XP compatibility screen will show up. Please click Continue Anyway button
to continue.
5. Click Finish to complete the installation.
1
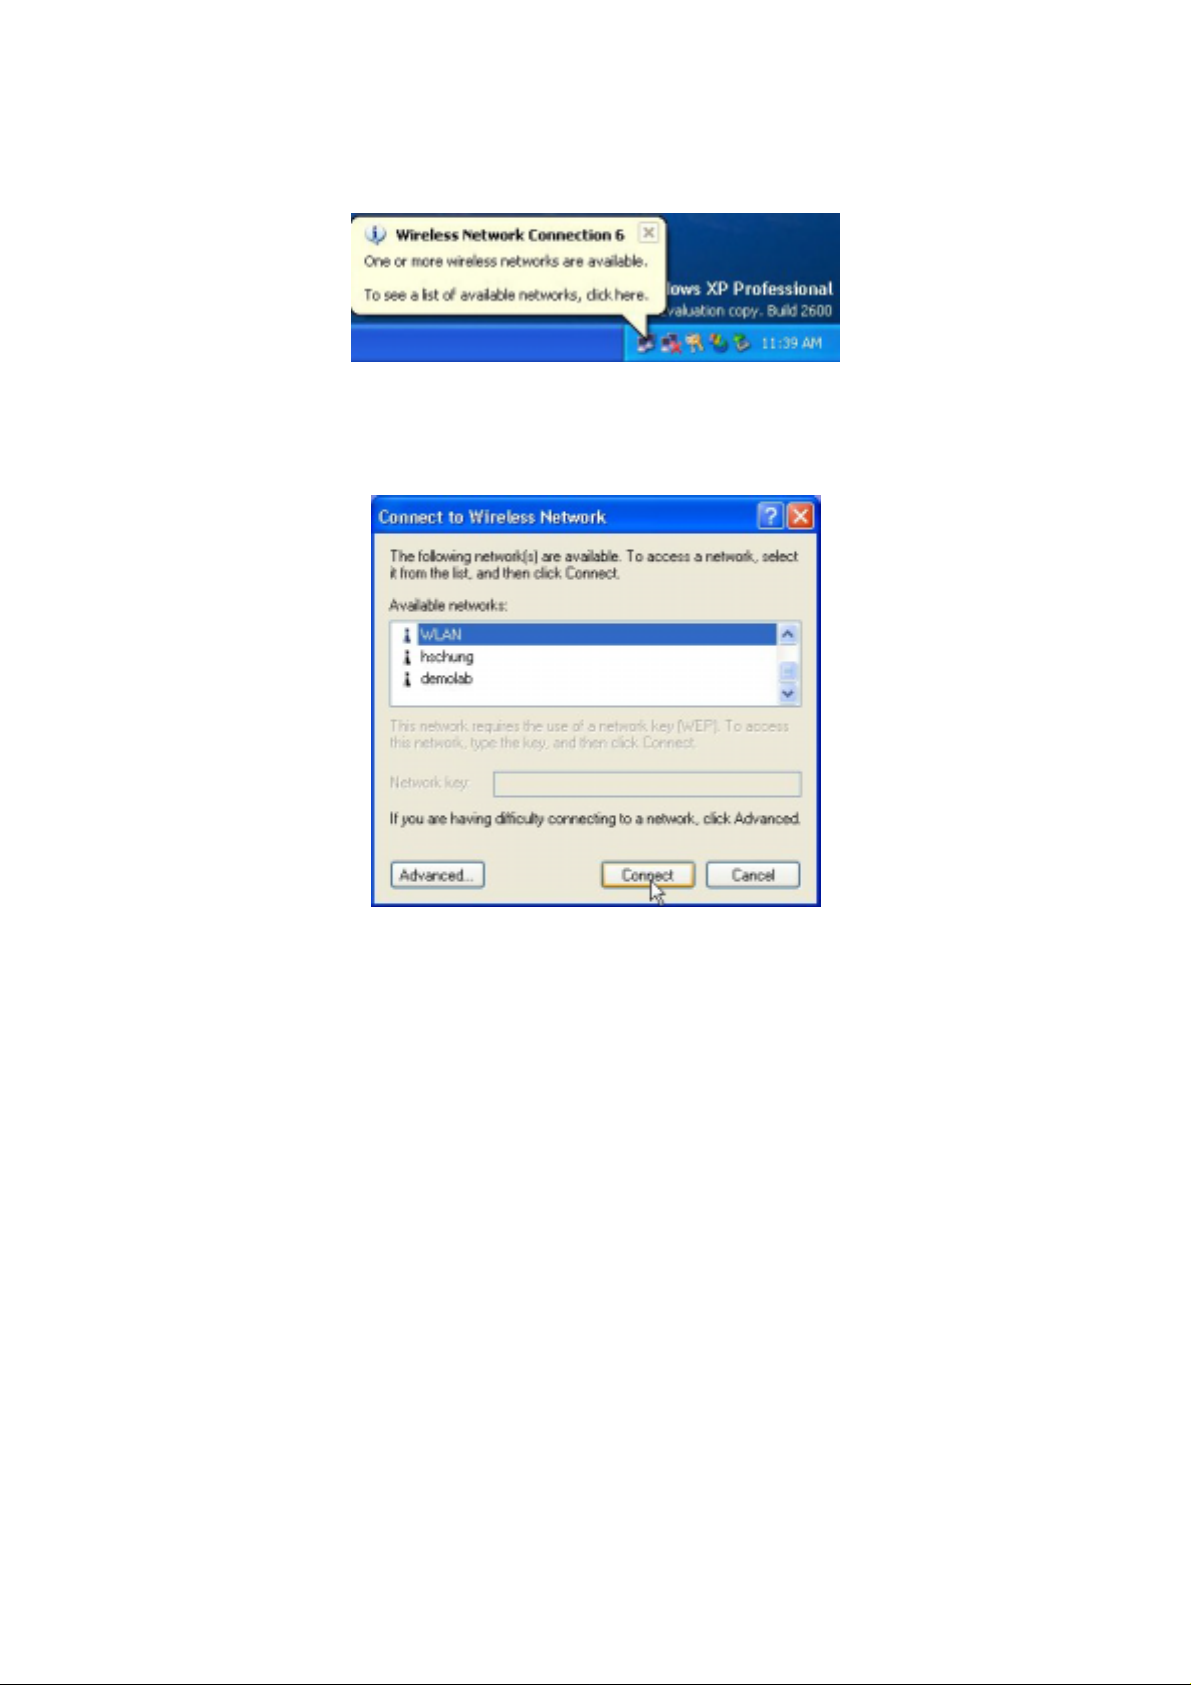
After installing the Wireless LAN PCI Adapter, the Windows XP will display a “Wireless Network
Connection # ” message.
Click on the message and the “Automatic Wireless Network Configuration” will then appear
automatically. You may click on Connect button to allow users to connect to an available wireless
infrastructure network (Access Point), shown as follows:
You may click the Advanced button to perform advanced configuration for the 802.11g Wireless
LAN PCI Adapter, shown as below.
2
Warning
one way to configure Wireless
LAN PCI Adapter either of
using our WLAN Utility by unchecking this check box or
using Windows XP Automatic
Wireless Network
Configuration first by
For more information on using the Automatic Wireless Network Configuration please refer to
Windows XP Help file.
: You must choose
However, the WLAN Utility, which came with the Wireless LAN PCI Adapter, provides you more
tools to configure the 802.11g Wireless LAN PCI Adapter and to monitor the wireless connection.
For more information on installing and using the WLAN Utility, please refer to the following
sections “Installation of the Wireless LAN Utility” and “Usage of the WLAN Utility”.
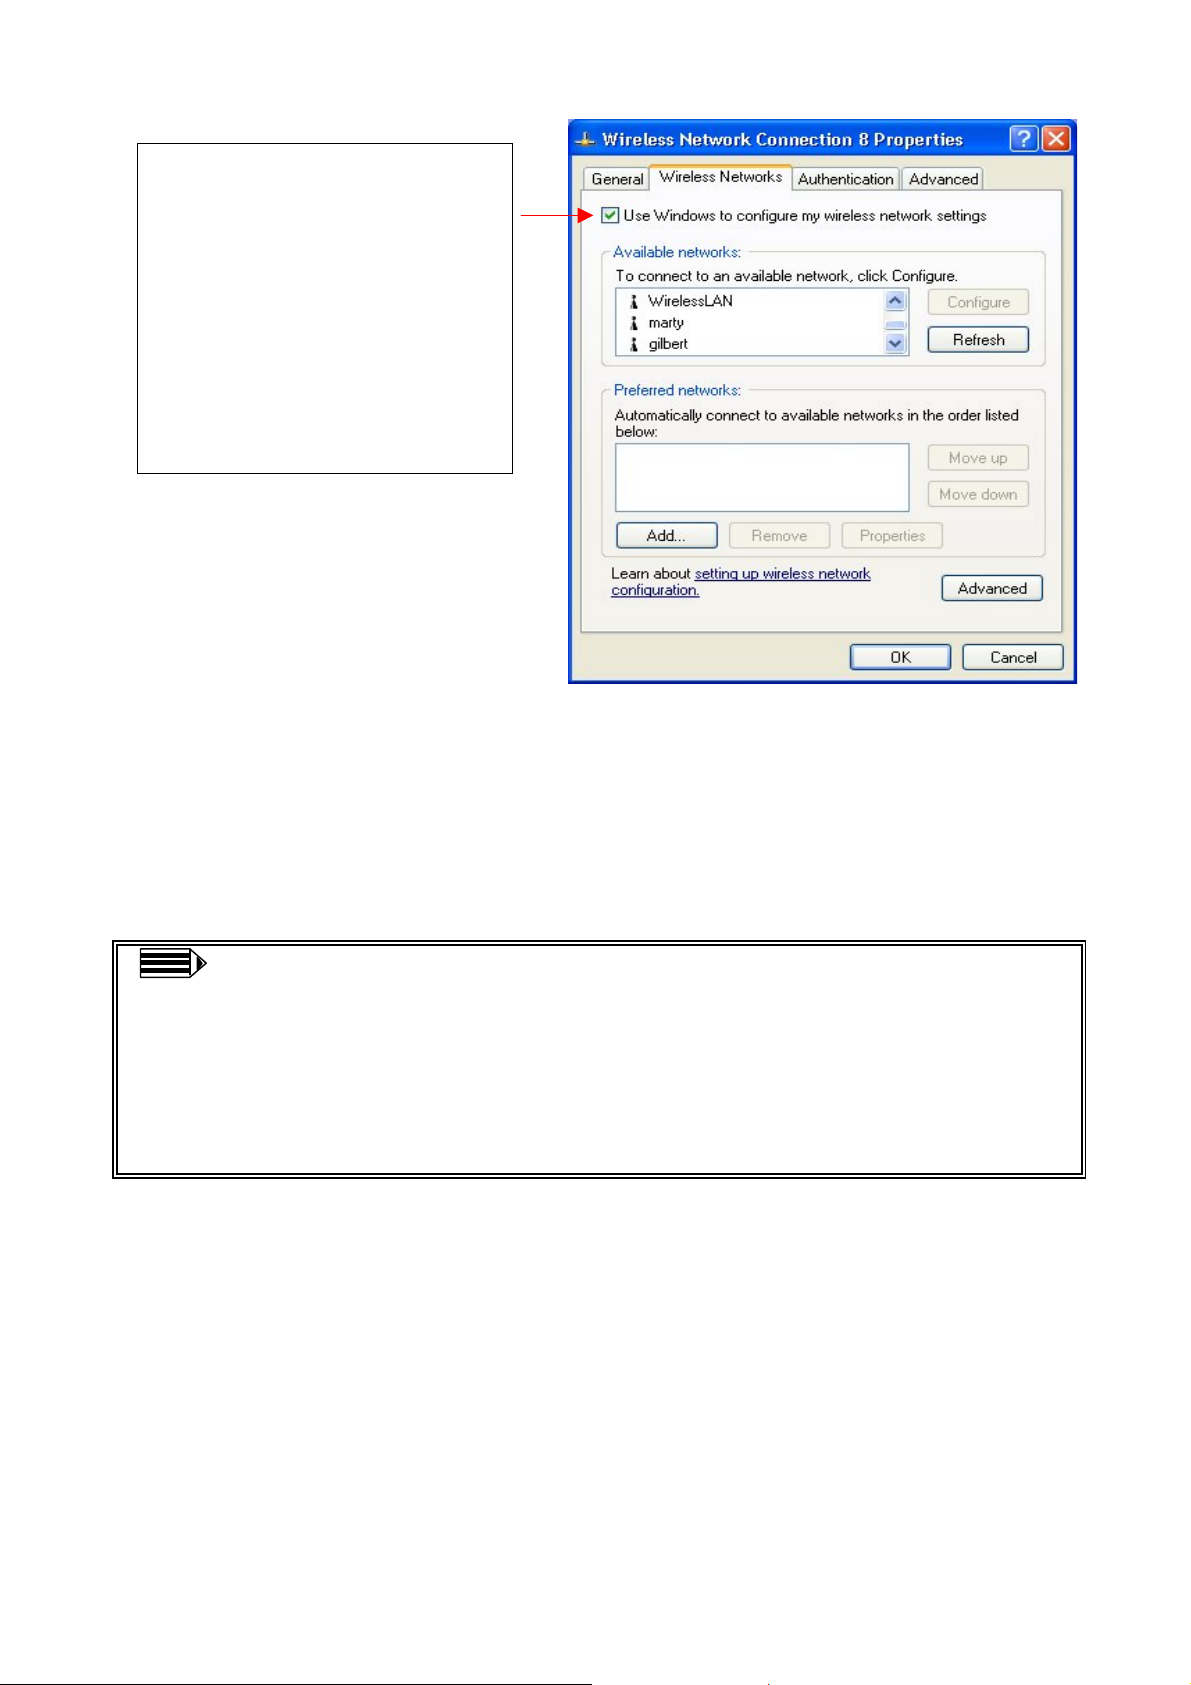
Note: To use the WLAN Utility under Windows XP, you need to disable the
Automatic Wireless Network Configuration first. Steps are described as follows:
Right click the Network Connections icon. Select Properties.
Go to the Wireless Networks tab.
Uncheck the “Use Windows to configure my wireless network settings” check
box and click the OK button (see the above picture).
Installation of the 802.11g Wireless LAN PCI Adapter under Windows 2000
1. Insert the 802.11g Wireless LAN PCI Adapter into the PCI slot on your notebook and start
Windows. Windows will auto-detect the Wireless LAN PCMCIA Card and a “Found New
Hard Wizard” window will show up. Click Continue to continue.
2. Select “Search for a suitable driver for my device (recommended)”. Insert the Product
CD-ROM into the appropriate drive. Click on Next to install the driver.
3. The windows will find “Wireless LAN 802.11g PCI Adapter (3V)”. Click on Next to
continue.
4. Click Finish to complete the installation
3

Installation of the 802.11g Wireless LAN PCI Adapter under Windows 98SE/ME
1. Insert the 802.11g Wireless LAN PCI Adapter into the PCI slot on your notebook and start
Windows. Windows will auto-detect new hardware and will display an “Add New
Hardware Wizard” window.
2. Select “Search for the best driver for your device (recommended)”. Insert the Product
CD-ROM into the CD-ROM drive. Specify the location where the driver is placed. Click on
Next to install the driver.
3. The Windows will find “Wireless LAN 802.11g PCI Adapter”. Click on Next to continue.
4. Once the [Please insert the disk labeled “Windows 98SE/ME CD-ROM”, and then
click OK] window appears, enter the path corresponding to the appropriate drives and click
OK. Usually these files can be found at C:Windows or C:Windows\system.
5. Click Finish to complete the installation. Restart Windows.
Installation of the Wireless LAN Utility
1. Insert the Product CD-ROM into the appropriate drive. Go to the utility folder and click
setup.exe. The following screen will show up. Click Continue to continue.
2. Follow the on-screen instructions to install the Wireless LAN Utility. The next screen will
indicate that Windows start and continue the installation. Click Next.
3. Upon completion, go to Program Files and run the Wireless LAN Utility. The utility
interface will then appear and at the same time its icon appears in the System Tray in the
bottom right corner of your task bar.
Usage of the WLAN Utility
The WLAN Utility consists of window with 3 items for you to monitor and configure the 802.11g
Wireless LAN PCI Adapter: Configuration, Site Survey and About.
Configuration:
The Configuration item allows you to modify the configuration parameters for the 802.11g
Wireless LAN PCI Adapter such as Profile, SSID, Network Type, AdHoc Channel, Transmit
Rate, WEP, RTS, Fragment Threshold and Power Save mode. Furthermore, you may
monitor the current status of the Wireless LAN PCI Adapter as State, Current Channel,
Current Tx Rate, Throughput, Link Quality and Signal Strength.
4

Site Survey:
By clicking the Rescan button, the Site Survey can display Access Points around the working
environment. Besides showing the ESSID of each Access Point, it also displays BSSID,
Channel, Network Type, Encryption, Signal, and Rates. To join any of the displayed Access
Points, highlight the Access Point you desire to connect and then click the Join.
5

About:
The About item shows the versions of the WLAN Utility, driver, firmware of the 802.11g
Wireless LAN PCI Adapter. Also, the MAC address and frequency domain are displayed.
Quick Tips to Configure the Wireless LAN PCMCIA Card
This Quick Start Guide covers the basic features needed to use the 802.11g Wireless LAN PCI
Adapter. Follow these steps to configure network settings.
Set the Profile (Optional)
The Profile field allows you to set values for all parameters by selecting a previously defined
profile. To create the profile, go to the Profile field, type a profile name and set the corresponding
parameters. After changing parameters, save the profile and click the Apply button to take effect.
You can have multiple profiles and modify the profile at any time.
6

Set the Network Type
From the Main Menu, click the Configuration tab, go to Network Type and click the down arrow
at the right of the Network Type field. You will then see 2 network types for the 802.11g Wireless
LAN PC Card to operate. If you need to access company network or Internet via Access Point,
select “Infrastructure”. If standard “802.11 Ad Hoc” is selected, you need to set wireless stations
with the same SS ID.
Set the SSID
The SSID is the unique ID used by Access Points and stations to identify a wireless LAN. Wireless
clients associating to any Access Point must have the same SSID. The default setting is ANY, which
allows your Wireless LAN PC Card to automatically associate to any Access Point (Infrastructure
mode) in the vicinity of your wireless adapter. The SSID can be set up to 32 characters and is case
sensitive.
Set the Channel (for Ad-Hoc network)
To form AdHoc network, the same channel is required. Before choosing a channel, it is advised to
use the Site Survey tool to check the quality of each channel. Afterwards, go to the Channel field
and choose a clear channel for your wireless LAN stations. Click the Apply button to make the
change take effect.
Set the Encryption:
To prevent unauthorized wireless stations from accessing data transmitted over the network, the
Wireless LAN Card offers highly secure data encryption, known as WEP (Wired Equivalent
Privacy). The Encryption tab allows you enable encryption and set the encryption keys, making
your data transmission over the air more secure. To activate the WEP Encryption, go to the
Configuration tab and check the WEP Enabled check box. An Encryption window will then
appear. The instructions are as follows:
From the WEP encryption item, pull down the menu and it will list two methods to set the
WEP keys, as described below:
Create Encryption Keys by Using a Passphrase
To create encryption keys by using a passphrase, click the Create Key with Passphrase check
7

box and type a character string in the Passphrase field. As you type, the utility uses an
algorithm to generate 4 keys automatically. Select either the 64bit or 128bit encryption first
and type a string in the Create Key with Passphrase field. Select one key from the 4 WEP
keys and click OK. Then click the Apply button on the Configuration tab to make the setting
take effect.
Warning:
PassPhrase must match the Key with PassPharse used by the access point with which wireless
device are planning to communicate.
When Create Key with Passphrase is enabled, the wireless device’s Key with
Create Encryption Keys Using a Passphrase (128-bit)
Create Encryption Keys Manually
You can also create up to 4 encryption keys manually by clicking the Create Keys Manually
check box.
For 64bit encryption you may choose:
Alphanumeric: 5 characters (case sensitive) ranging from “a-z”, “A-Z” and “0-9” (e.g.
MyKey)
Hexadecimal: 10 hexadecimal digits in the range of “A-F”, “a-f” and “0-9” (e.g.
11AA22BB33)
For 128bit encryption you may choose:
Alphanumeric: 13 characters (case sensitive) ranging from “a-z”, “A-Z” and “0-9”
(e.g. MyKey12345678)
Hexadecimal: 26 hexadecimal digits in the range of “A-F”, “a-f” and “0-9” (e.g.
00112233445566778899AABBCC).
After entering the WEP keys in the key field, select one key as active key, click the OK
button and then click the Apply button to make setting take effect.
8

Technical Support
You can find the most recent software and updated user documentation will be updated periodically
on the supplier Web site. If you have difficulty resolving the problem while installing or using the
802.11g Wireless LAN PC Card, please contact the supplier for support.
FCC Caution
1. The device complies with Part 15 of the FCC rules. Operation is subject to
the following two conditions:
(1)This device may not cause harmful interference.
(2)This device must accept any interference received,
including interference that may cause undesired operation.
2. FCC RF Radiation Exposure Statement: The equipment complies with
FCC RF radiation exposure limits set forth for an uncontrolled
environment. This equipment should be installed and operated with a
minimum distance of 20 centimeters between the radiator and your body.
3. This Transmitter must not be co-located or operating in conjunction with
any other antenna or transmitter.
4. Changes or modifications to this unit not expressly approved by the party
responsible for compliance could void the user authority to operate the
equipment.
This card cannot be used in laptop computers or other portable configurations and is
authorized only for use in devices where the antenna may be installed such that 20 cm may
be maintained between the antenna and users."
9
 Loading...