

Page 1
11Mbps Wireless LAN Smart Access Point
Quick Start Guide
The next-generation wireless LAN device – 11Mbps Wireless LAN Smart Access Point,
brings Ethernet-like performance to the wireless realm. Fully compliant with IEEE802.11b
standard, the 11Mbps Wireless LAN Smart Access Point also provides powerful features
such as the Windows-based configuration utility, WEP security, SNMP and more.
Maximize network efficiency while minimizing your network investment and maintenance
costs.
Version 3.0
Package Content
11Mbps Wireless LAN Smart Access Point x 1 AC Power Adapter x 1
Software and Documentation CD x 1 Quick Installation Guide x 1
Note: If any of the above items are missing or damaged, contact your local
dealer for support.
Installing the Wireless LAN Smart Access Point
Connect the Wireless LAN Smart Access Point to a hub or a PC with its UTP
Ethernet cable. Please note that, use the cross-over cable when you directly connect
the Wireless LAN Smart Access Point to a PC.
Connect the power adapter to the power socket on the Wireless LAN Smart Access
Point, and plug the other end of the power pack into an electrical outlet.
Warning 1:
Smart Access Point. Otherwise, the product may be damaged.
Note 2: The button labeled “Default” enables you to restore the Wireless LAN
Smart Access Point’s default setting. This is used when you forget the
password. Please detach the DC power plug and press the “DEFAULT” button
on the side panel of the Wireless LAN Smart Access Point. Reconnect the
power and keep holding the button for 3 seconds then release it and press and
keep holding it again for 10 seconds until the WLAN and LAN LED indicators
become blinking rapidly. This will restore the Wireless LAN Smart Access
ONLY use the power adapter supplied with the Wireless LAN
Nov/5th/2002
1
Page 2

Point’s default settings and enable you to configure the Access Point via utility
or Web again.
Configuring the Wireless LAN Smart Access Point
The 11Mbps Wireless LAN Smart Access Point allows configuration either via the
configuration utility, known as Access Point Utility, and Web Management .
Wireless Access Point Utility
The following gives instructions guiding you through the installations of the Wireless
Access Point Utility.
1. Insert the Product CD into the CD-ROM drive on your computer.
2. It will has the AutoRun function and show menu “Wireless 802.11b Smart Series” on the
Windows desktop, choose the ”Access Point” and select the “Utility Setup”.
3. Follow the on-screen instructions to install the Wireless Access Point Utility.
4. Upon completion, execute the Wireless Access Point Utility, and it will browse all the
11Mbps Wireless LAN Smart Access Point available on the network.
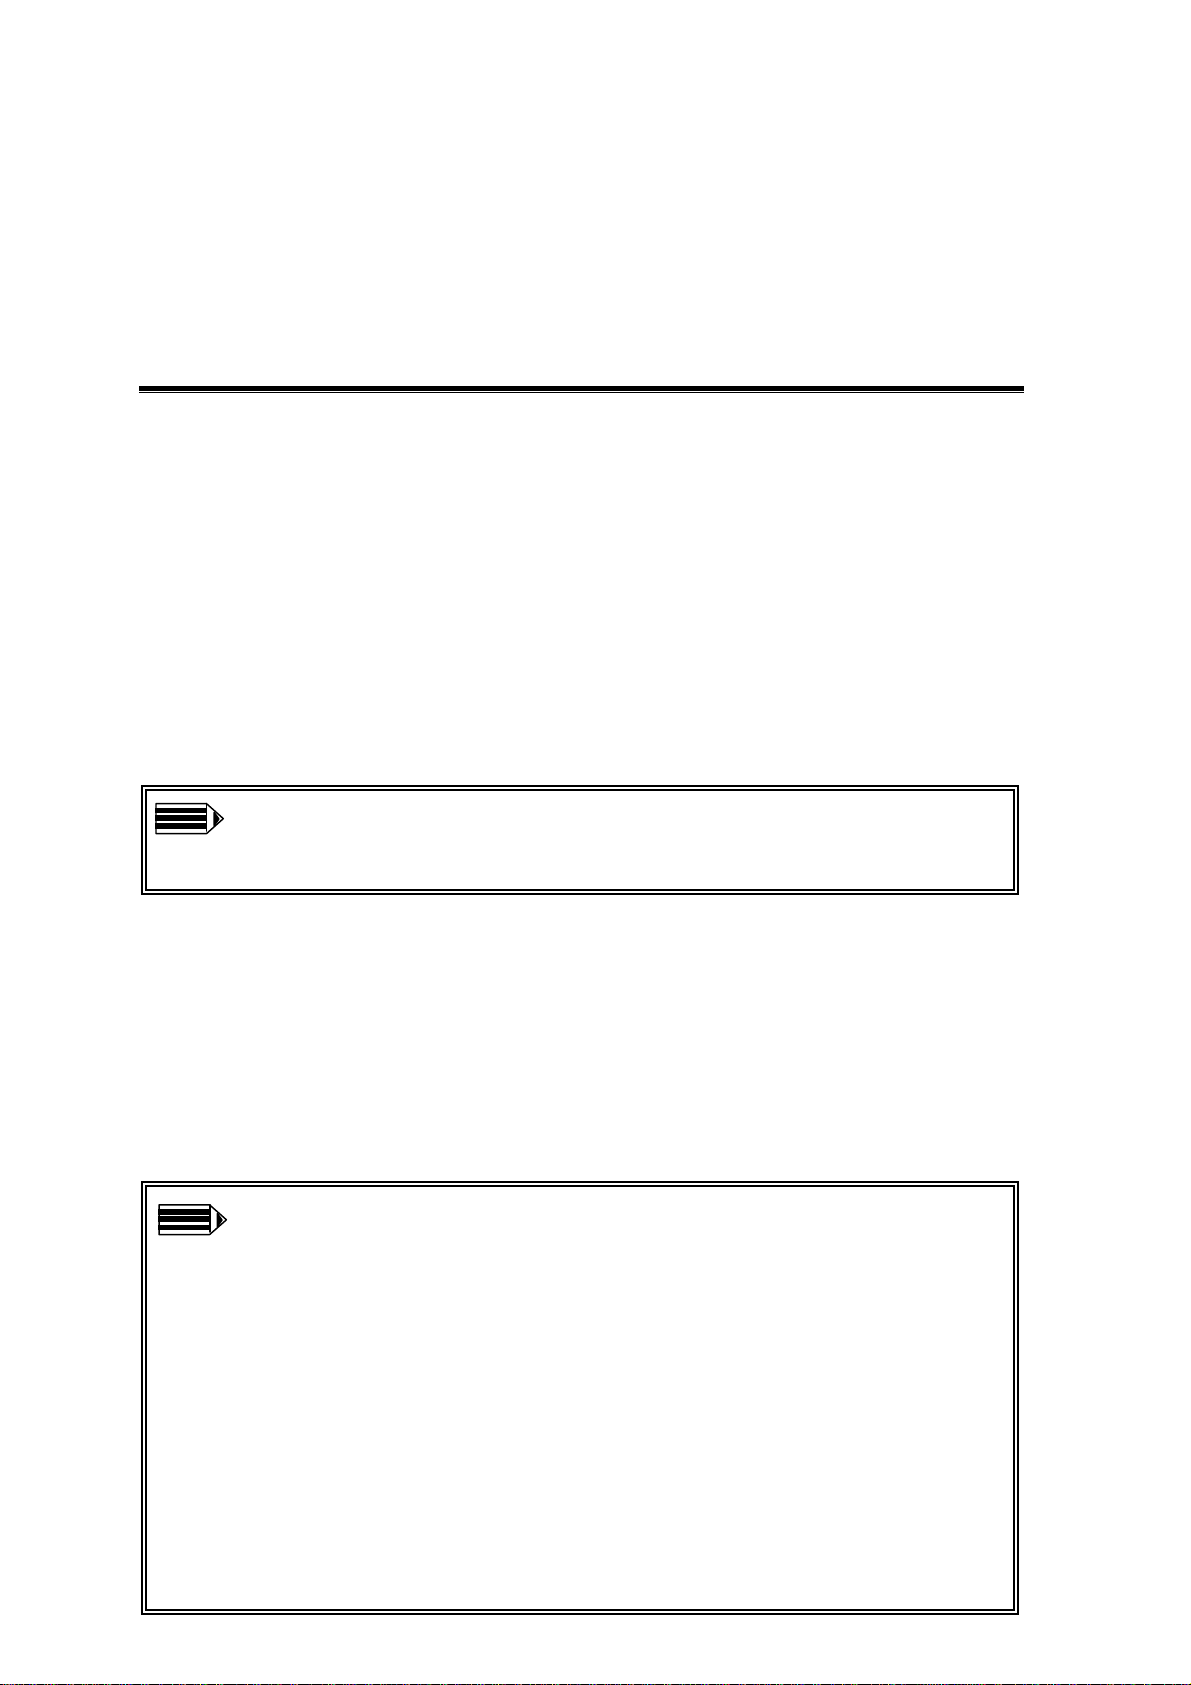
5. Select the Access Point you want to configure. Enter the default password and click the
LOGIN button. You will be able to view/make configuration of the Wireless LAN
Smart Access Point as you desire.
Note: The default password to get access to the Wireless LAN Smart Access
Point is “default”.
Nov/5th/2002
2
Page 3
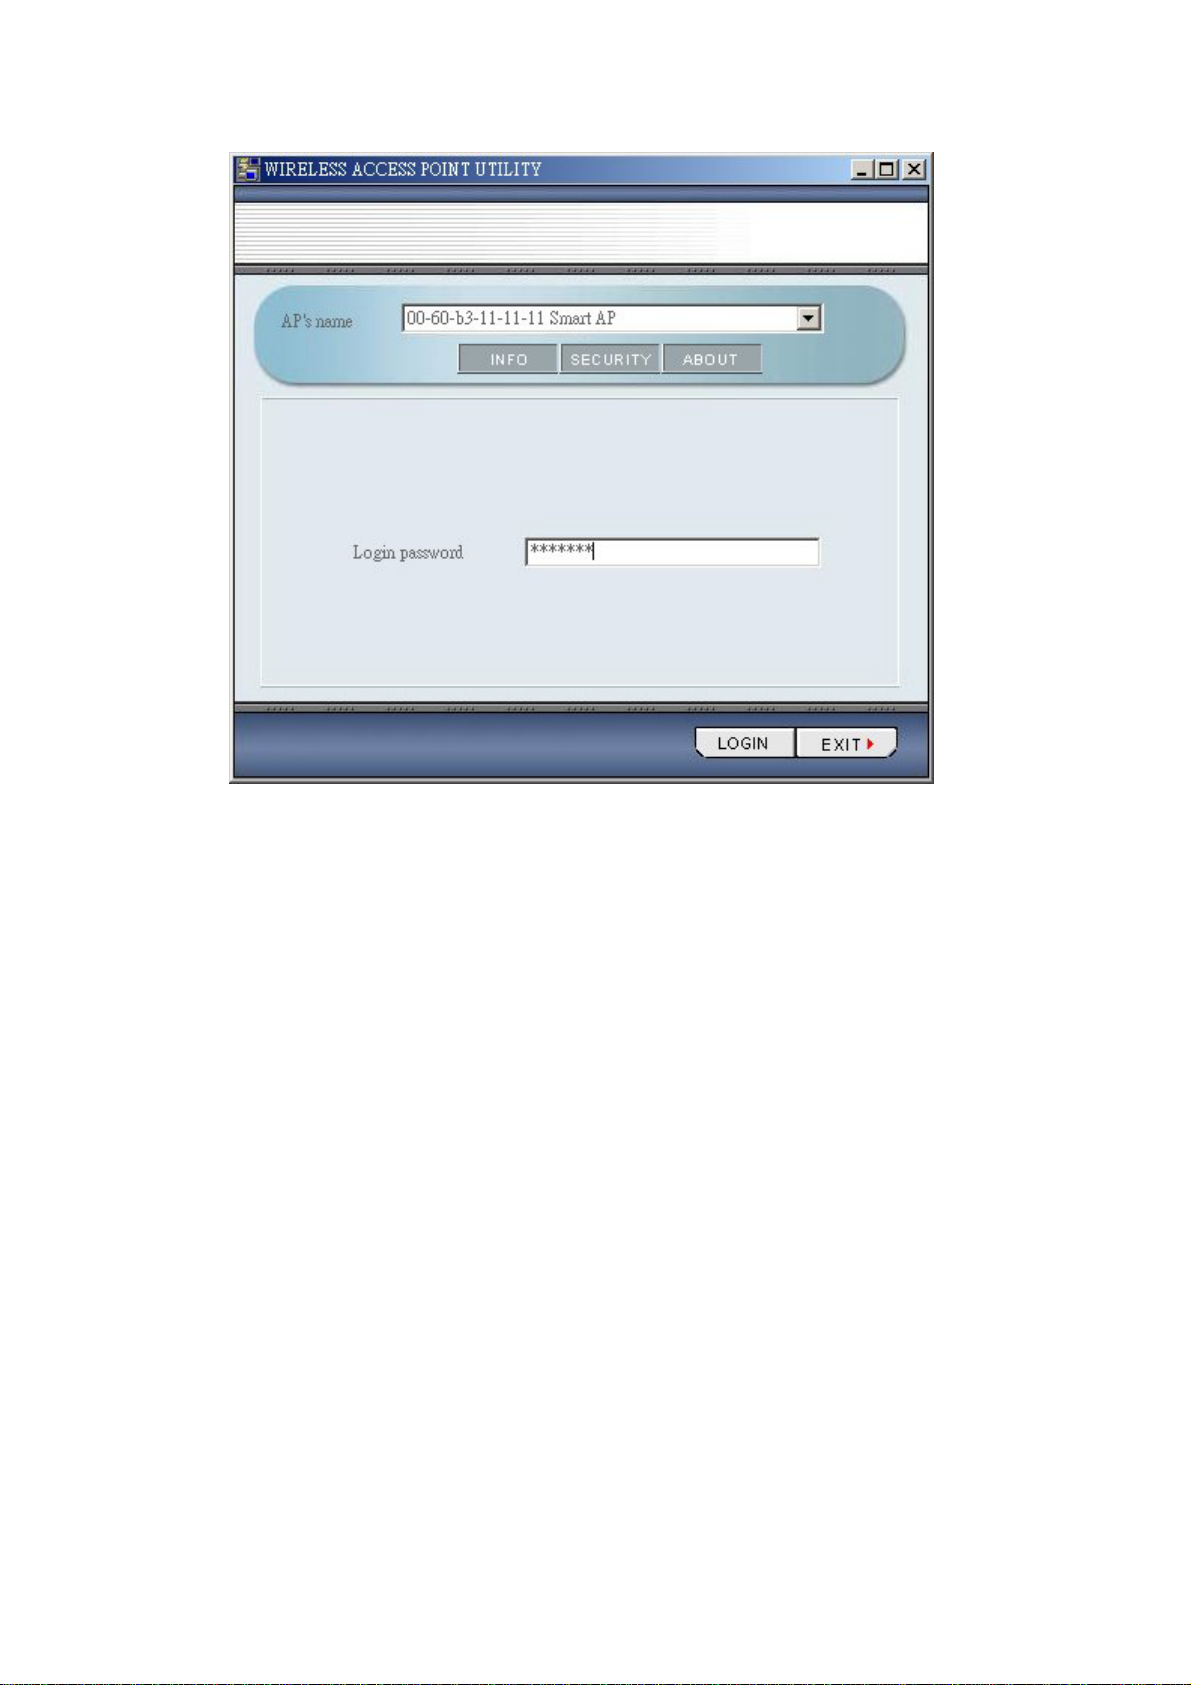
The Wireless Access Point Utility provides 3 items for you to monitor and configure the
Wireless LAN Access Point: INFO, SECURITY and ABOUT.
INFO:
This item shows the current information on the 11Mbps Wireless LAN Smart Access Point
such as BSSID, AP’s Name, SSID, Channel, Mode, SNMP, DHCP Client, IP Address,
subnetmask, default gateway, and LabelNosee.
Nov/5th/2002
3
Page 4
Nov/5th/2002
4
Page 5
You may click the SETUP button to configure those parameters.
Assigning the SSID
The SSID is a unique ID given to the Wireless LAN Smart Access Point. Assign an
SSID to your Wireless Smart Access Point. The SSID can have up to 32 characters.
Assigning the Channel
Select a clear channel as an operational channel for your Wireless LAN Smart Access
Point.
Assigning the AP’s Name
Assign specificity a unique name for the Wireless LAN Smart Access Point.
Assigning the Mode
Wireless LAN Smart Access Point can be configured in a variety of network system
configurations such as AP only, Repeater only, and AP with Repeater.
AP Only – Enables the Access Point to act as a wireless bridge connecting to your
network backbone and communicating between Ethernet LAN and Wireless station.
Nov/5th/2002
5
Page 6
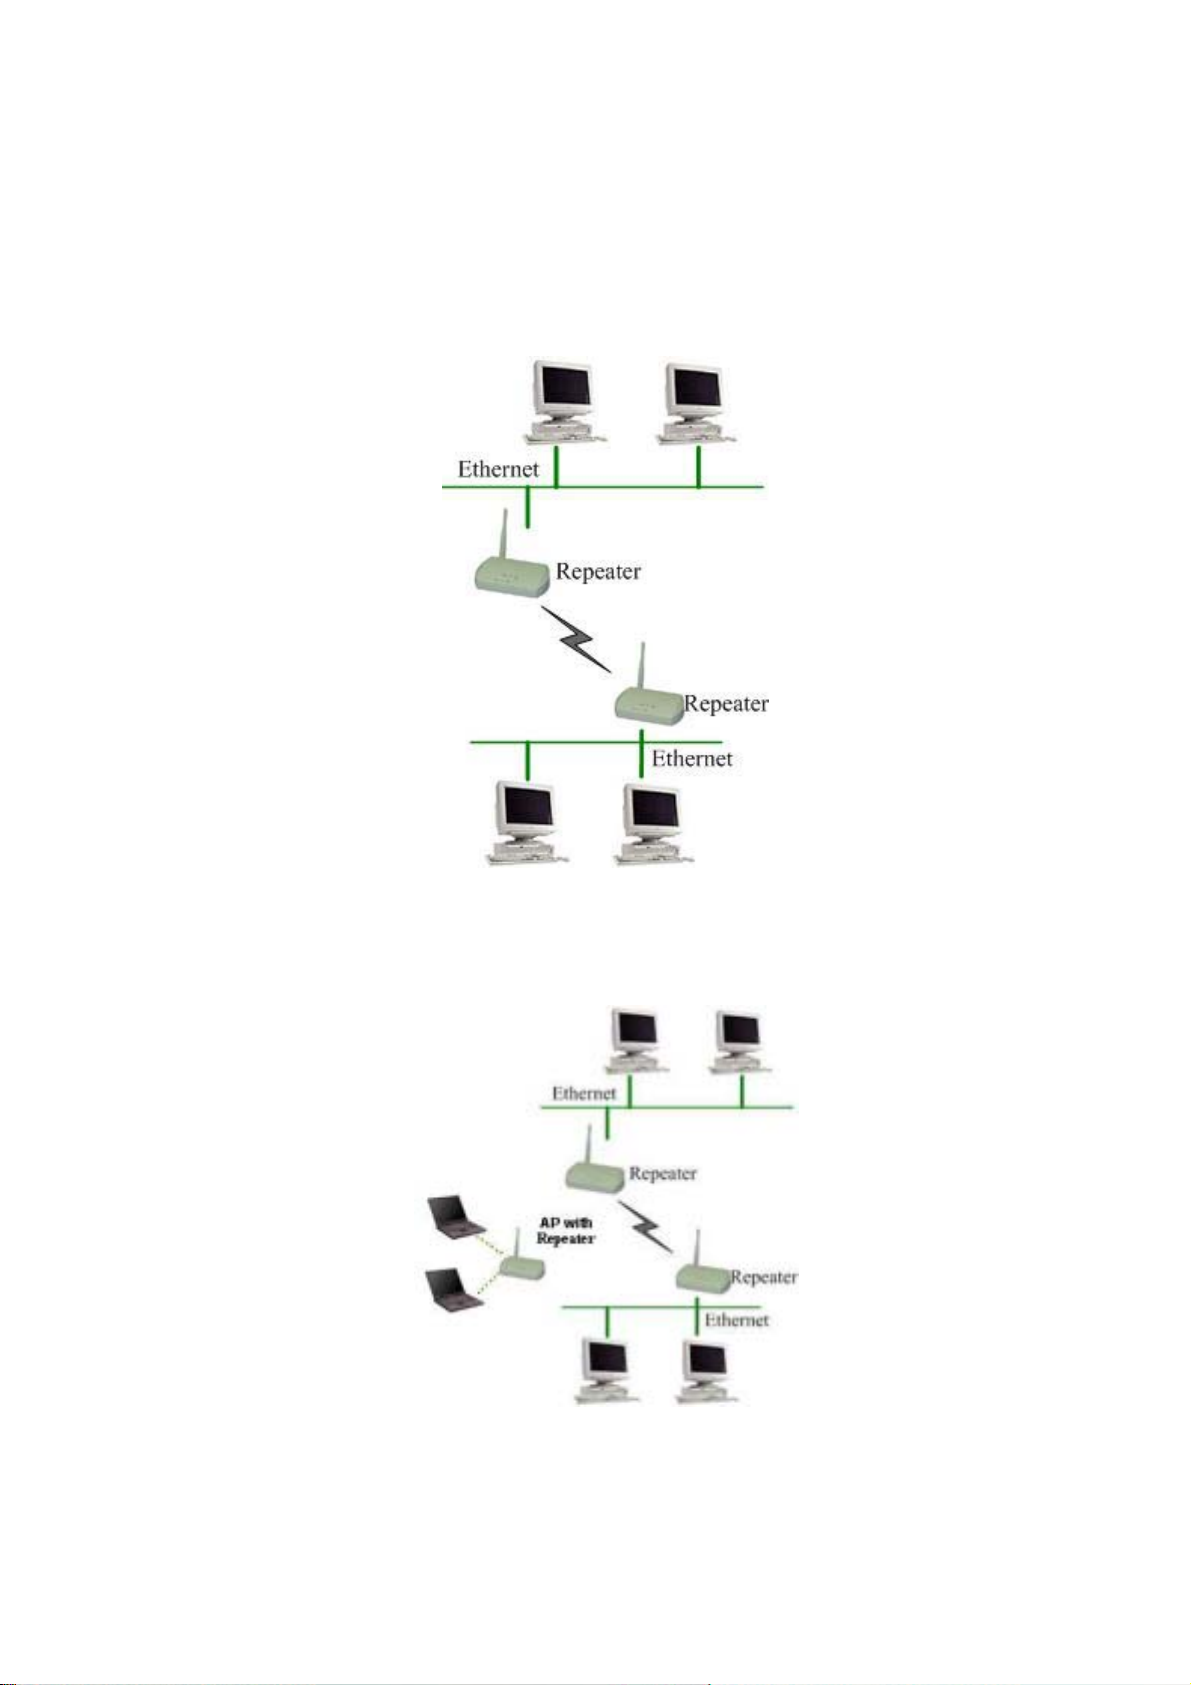
Repeater Only – The repeater mode extends the radio coverage. The repeater can be
at the center of the two (or more) Access Points that also need to set with repeater
mode in the situation in which the distance is too far apart or are separated by some
form of obstructive interference. If Repeater is selected, the repeater and Access
Point must set with the same channel to transfer data.
AP with Repeater - Allows that Access point to act as Access Point and Repeater
operation simultaneously. For repeater, the same channel is required to Access Point.
SNMP
SNMP is Simple Network Management Protocol that has became the standard to
Nov/5th/2002
6
Page 7

manage network management and monitor of network devices and their functions. If
SNMP is enabled, devices can use SNMP tool to manage and monitor the Wireless
LAN Smart Access Point from remote control.
DHCP Client
Assign an IP address to the Wireless station. You may either set the wireless station to
obtain an IP address from DHCP server, or to be assigned with a fixed IP address. If
DHCP is enabled, the IP Address field displays the IP Address that is dynamically
assigned to the AP by the network DHCP server and the IP Mask field displays the IP
Mask utilized by the network DHCP server. The default setting is: Disable
Assigning the IP Address
Assign an IP address to your Access Point if you wish to configure the Wireless
Access Point via the Web Management. Consult your network administrator to obtain
an available IP address (the default IP address is 192.168.1.1). For further setup
please refer to the following section.
Assigning the subnetmask
Assign a subnet mask to your Access Point if you wish to configure the Wireless
Access Point via the Web Management. Consult your network administrator to obtain
an available subnet mask. For further setup please refer to the following section.
Assigning the default gateway
Assign an default gateway to your Access Point if you wish to configure the Wireless
Access Point via the Web Management. Consult your network administrator to obtain
an available default gateway.
After setting the parameters, click the APPLY button to make the changes take effect. To
return the previous page, click the CANCEL button.
Default
You may click on Default button to enable you to restore the Wireless LAN Smart Access
Point’s default setting.
Nov/5th/2002
7
Page 8

Advance Setting:
You are able to do the advance setting by click Advance Setting button.
No See
To enable no see function, two or more wireless stations communicate through the
Wireless LAN Smart Access Point will not see or find each other from network
connection.
Password
It is highly recommended that you assign a new password to your Access Point for
safety issue. Enter the new password in the New Password and Confirm Password
fields respectively.
SNMP Trap Server
When certain types of events or errors occur, such as the agent has rebooted, a
managed device will send a trap message to the SNMP Trap Server.
Nov/5th/2002
8
Page 9

SNMP Readonly Community
The Readonly community is used by a Manager to monitor managed devices.
SNMP Readwrite Community
The Readwrite community is used by a Manager to monitor and control managed
devices.
After setting the parameters, click the Accept button to make the changes take effect. To
return the previous page, click the CANCEL button.
SECURITY:
To prevent unauthorized wireless stations from accessing data transmitted over the network,
the Wireless LAN Smart Access Point offers the following levels of security options.
- Data Encryption, known as WEP (Wired Equivalent Privacy), encrypts wireless data
transmitted via wireless medium.
- Access Control Table restricts wireless stations to access the Access Point.
Click the Security page you will see the current security status of the Access Point. Click
the SETUP button and you may then enable the security function.
Nov/5th/2002
9
Page 10

WEP
To enable the WEP encryption, check the “Enable static WEP key encryption” check box
and select the encryption type, either 40 bit or 128 bit. Then enter a WEP Key in the WEP
Key field.
For 40 bit encryption you may choose:
ASCII: 5 characters (case sensitive) ranging from “a-z”, “A-Z” and “0-9” (e.g.
MyKey)
Hex: 10 hexadecimal digits in the range of “A-F”, “a-f” and “0-9” (e.g.
11AA22BB33)
For 128 bit encryption you may choose:
ASCII: 13 characters (case sensitive) ranging from “a-z”, “A-Z” and “0-9” (e.g.
MyKey12345678)
Hex: 26 hexadecimal digits in the range of “A-F”, “a-f” and “0-9” (e.g.
00112233445566778899AABBCC).
After defining the WEP keys, click the APPLY button to make the configuration take
effect.
Nov/5th/2002
10
Page 11

MAC Access Control
With the Access Control Table enabled, you can authorize wireless units to access the
Access Point by identifying the MAC address of the wireless devices that are allowed
access to transmit data. To create or edit the Access Control Table, do the following:
Go to the MAC Access Control tab and select “Enable MAC Access Control”. Note that
when you enable the Access Control Table without any MAC address in the table, no
access is allowed to communicate with the Access Point.
Use the following buttons to manage the Access Control Table:
Add – to enter MAC addresses of authorized wireless devices one at a time
Modify – to change the entries in the table if you enter the incorrect MAC address
Remove – to remove MAC addresses one at a time
After add or modify any MAC addresses, click the APPLY button to make the
configuration take effect.
Hide AP Access
To prevent wireless stations access the Wireless LAN Smart Access Point. Wireless LAN
Smart Access Point also offers the Hide AP Access security option to restrict wireless
stations find and associate to the Wireless LAN Smart Access Point.
Nov/5th/2002
11
Page 12

With hide AP access enabled by checking “Hide AP Access” check box, wireless stations
will not browser and find Wireless LAN Smart Access Point. Even if the wireless stations
set ESSID is ANY. Wireless stations still cannot associate to Wireless LAN Smart Access
Point. But there is one exception that wireless station can still associate to Wireless LAN
Smart Access Point is when you set the right ESSID.
Nov/5th/2002
12
Page 13

ABOUT
The ABOUT item shows the version of the Wireless Access Point Utility and firmware
version of the Wireless LAN Smart Access Point.
Firmware Upgrade Utility
When you finished the installations of the Wireless Access Point Utility, you can find the
Firmware upgrade utility in the programs, execute the Firmware upgrade utility, and it will
browse all the 11Mbps Wireless LAN Smart Access Point available on the network.
Select the Access Point you want to upgrade. Enter the default password and click the
LOGIN button. You will be able to upgrade Firmware of the Wireless LAN Smart Access
Point as you desire.
If you check Import/Export config parameters, it will allows you to set values for all
parameters by selecting a previous defined file. Click LOGIN to start Import/Export
config parameters.
Note: The default password to get access to the Wireless LAN Smart Access
Point is “default”.
Nov/5th/2002
13
Page 14

Import/Export config parameters
1. After clicking LOGIN button, you would see the Export Config Parameters and Import
Config Parameters fields. Click the Open File in Export Config Parameters field and it
will pop-up a window that asks you to save config parameters file to proper location.
2. After you click the Save button, you could see the file exit in Export Config Parameters
filed.
Nov/5th/2002
14
Page 15

3. Click Export button, it will pop-up a window that tells you Export complete.
4. If you want to import the files that you defined, click Open File button in Import
Config Parameter field and select the file that you defined in proper location.
Nov/5th/2002
15
Page 16

5. After you open file, click Import button and widow will pop-up a message to tell you
import complete.
Upgrade
This item is used for uploading the newest firmware of the Access Point. You may either
enter the file name in the entry field or browse the file by clicking the OPEN FILE button.
After choose the correctly file, click the UPGRADE button to make the Firmware upgrade
take effect. For information about the release of the newest firmware, contact your local
reseller.
Nov/5th/2002
16
Page 17

Web Management
The built-in Web Management provides you with a set of user-friendly graphical user
interfaces (web pages) to manager your Access Points. With the assigned IP address (e.g.
http://192.168.1.1
, 192.168.1.1 is the default IP address) to the Access Point, you may
get access to the Access Point Web Pages via a web browser (e.g., Netscape Navigator 3.0
~ 4.5 or MS Internet Explorer 4.0) to monitor and configure the Access Point.
Nov/5th/2002
17
Page 18

Technical Support
You can find the most recent software and updated user documentation will be updated
periodically on the supplier Web site. If you have difficulty resolving the problem while
installing or using the 11Mbps Wireless LAN Smart Access Point, please contact the
supplier for support.
Nov/5th/2002
18
Page 19

FCC Information
This device complies with Part 15 of the FCC Rules. Operation is subject to the following
two conditions: (1) this device may not cause harmful interference, and (2) this device
must accept any interference received; including interference that may cause undesired
operation.
Federal Communications Commission (FCC) Statement
This Equipment has been tested and found to comply with the limits for a Class B and C
digital device, pursuant to Part 15 of the FCC rules. These limits are designed to provide
reasonable protection against harmful interference in a residential installation. This
equipment generates, uses and can radiate radio frequency energy and, if not installed and
used in accordance with the instructions, may cause harmful interference to radio
communications. However, there is no guarantee that interference will not occur in a
particular installation. If this equipment does cause harmful interference to radio or
television reception, which can be determined by turning the equipment off and on, the
user is encouraged to try to correct the interference by one or more of the following
measures:
- Reorient or relocate the receiving antenna.
- Increase the separation between the equipment and receiver.
- Connect the equipment into an outlet on a circuit different from that to which the receiver
is connected.
- Consult the dealer or an experienced radio/TV technician for help.
FCC RF Radiation Exposure Statement:
1. This Transmitter must not be co-located or operating in conjunction with any other
antenna or transmitter.
2. This equipment complies with FCC RF radiation exposure limits set forth for an
uncontrolled environment. This equipment should be installed and operated with a
minimum distance of 20 centimeters between the radiator and your body.
Nov/5th/2002
19
Page 20

Limited Warranty
This Warranty constitutes the sole and exclusive remedy of any buyer or reseller’s
equipment and the sole and exclusive liability of the supplier in connection with the
products and is in lieu of all other warranties, express, implied or statutory, including, but
not limited to, any implied warranty of merchantability of fitness for a particular use and
all other obligations or liabilities of the supplier.
In no even will the supplier or any other party or person be liable to your or anyone else for
any damages, including lost profits, lost savings or other incidental or consequential
damages, or inability to use the software provided on the software media even if the
supplier or the other party person has been advised of the possibility of such damages.
The following are special terms applicable to your hardware warranty as well as services
you may use during part of the warranty period. Your formal Warranty Statement,
including the warranty applicable to our Wireless LAN products, appears in the Quick
Installation Guide which accompanies your products.
Duration of Hardware Warranty: One Year
Replacement, Repair or Refund Procedure for Hardware:
If your unit needs a repair or replacement, return it to your dealer/distributor in its original
packaging. When returning a defective product for Warranty, always include the
following documents:
The Warranty Repair Card
A copy of the invoice/proof of purchase, and
The RMA Report Form (To receive a Return Materials Authorization form (RMA),
please contact the party from whom you purchased the product).
Upon proof-of-purchase we shall, at its option, repair or replace the defective item at no
cost to the buyer.
This warranty is contingent upon proper use in the application for which the products are
intended and does not cover products which have been modified without the reseller’s
approval or which have been subjected to unusual physical or electrical demands or
damaged in any way.
Nov/5th/2002
20
Page 21

Please complete the information below and include it along with your products.
Name:
Title:
Company:
Telephone:
Fax:
Email:
City/State/Zipcode:
Country:
Product Name:
Serial Number:
MAC Address:
Invoice Date:
Product Description:
If you have any further questions, please contact your local authorized reseller for support.
Nov/5th/2002
21
Page 22

FCC CAUTION
1. The device complies with Part 15 of the FCC rules. Operation is subject to the
following two conditions:
(1) This device may not cause harmful interference.
(2) This device must accept any interference received, including interference that may
cause undesired operation.
2. FCC RF Radiation Exposure Statement: The equipment complies with FCC RF
radiation exposure limits set forth for an uncontrolled environment. This equipment
should be installed and operated with a minimum distance of 20 centimeters between
the radiator and your body.
3. This Transmitter must not be co-located or operating in conjunction with any other
antenna or transmitter.
4. Changes or modifications to this unit not expressly approved by the party
responsible for compliance could void the user authority to operate the equipment.
Nov/5th/2002
22
 Loading...