

Zaxcom ZFR400 User Manual

USER MANUAL
Published June 2017
Firmware Version ZMT217
ZFR400
the ultimate stealth recorder
1

ZFR400 ......................................................................................................................................................... 4
HOME SCREEN .............................................................................................................................................. 6
MAIN MENU ................................................................................................................................................. 7
HOME SCREEN .............................................................................................................................................................................7
MICROPHONE GAIN SET ................................................................................................................................................................7
LOCK PAGE ..................................................................................................................................................................................7
SUB MENUS .................................................................................................................................................. 8
MENU GROUPS ............................................................................................................................................................................8
ACCESSING AND NAVIGATING THE MENU GROUPS ...............................................................................................................................8
ENTERING AND NAVIGATING A SUB MENU ..........................................................................................................................................8
EXITING THE EXTENDED MENU .........................................................................................................................................................8
TIME CODE MENU ......................................................................................................................................... 9
TIME CODE FRAME RATE SET ..........................................................................................................................................................9
TIME CODE SOURCE SELECT ............................................................................................................................................................9
TC JAM MODE SELECT ..................................................................................................................................................................9
MUTE TIME CODE TRANSMISSION UNTIL JAMMED ...........................................................................................................................10
AUTO FRAME RATE ENABLE ..........................................................................................................................................................10
RECORD MENU ............................................................................................................................................ 11
SD CARD FORMAT ......................................................................................................................................................................11
TIME LEFT ON CARD ....................................................................................................................................................................11
AUTOMATIC RECORD AFTER BOOT UP .............................................................................................................................................11
RECORDING MODE SET ................................................................................................................................................................12
LOW BATTERY STOP SET ..............................................................................................................................................................12
ZAXNET MENU ............................................................................................................................................. 13
ZAXNET MODE ..........................................................................................................................................................................13
ZAXNET RECEIVE FREQUENCY SET ..................................................................................................................................................13
ZAXNET TRANSMIT FREQUENCY SET ...............................................................................................................................................13
GROUP CODE SET .......................................................................................................................................................................14
UNIT CODE SET ..........................................................................................................................................................................14
ZAXNET VOTING ENABLE .............................................................................................................................................................14
ZAXNET RECEIVE BEFORE TRANSMIT TIME ......................................................................................................................................15
IFB RECEIVE PULSE SET ...............................................................................................................................................................16
RECORD BEEP SET.......................................................................................................................................................................16
AUDIO MENU............................................................................................................................................... 17
HIGH PASS FILTER .......................................................................................................................................................................17
2K NOTCH FILTER .......................................................................................................................................................................17
DYNAMICS ................................................................................................................................................................................18
2

SETUP MENU ............................................................................................................................................... 19
TEST TONE ................................................................................................................................................................................19
KEY LOCK ON BOOT UP ...............................................................................................................................................................19
ERX FIRMWARE UPDATE .............................................................................................................................................................19
LOW BATTERY STOP ....................................................................................................................................................................19
OLED BRIGHTNESS ADJUST ..........................................................................................................................................................20
OLED DISPLAY DIM ....................................................................................................................................................................20
INFORMATION PAGE ...................................................................................................................................................................20
HIDE ENCRYPTION MENU .............................................................................................................................................................20
ENCRYPTION CODE SET ................................................................................................................................................................20
HIDE NAME MENU .....................................................................................................................................................................21
NAME SET .................................................................................................................................................................................21
RECORDING FORMAT ..................................................................................................................................................................22
FIRMWARE .................................................................................................................................................. 23
UPDATING THE ZFR400 FIRMWARE ...............................................................................................................................................23
UPDATING ERX FIRMWARE WITH A ZFR400 ...................................................................................................................................23
INPUTTING AUDIO ....................................................................................................................................... 24
RECOMMENDED MICROPHONES .................................................................................................................. 24
WIRING DIAGRAMS...................................................................................................................................... 24
TWO WIRE MICROPHONE CONFIGURATION .....................................................................................................................................24
THREE WIRE MICROPHONE CONFIGURATION ...................................................................................................................................24
BALANCED LINE LEVEL AND TIME CODE INPUT ..................................................................................................................................25
PRODUCT SUPPORT ..................................................................................................................................... 26
SPECIFICATIONS ........................................................................................................................................... 27
ZAXCOM WARRANTY POLICY AND LIMITATIONS ........................................................................................... 28
3
Zaxcom ZFR400 ZFR400
3 1 2 6 4
5
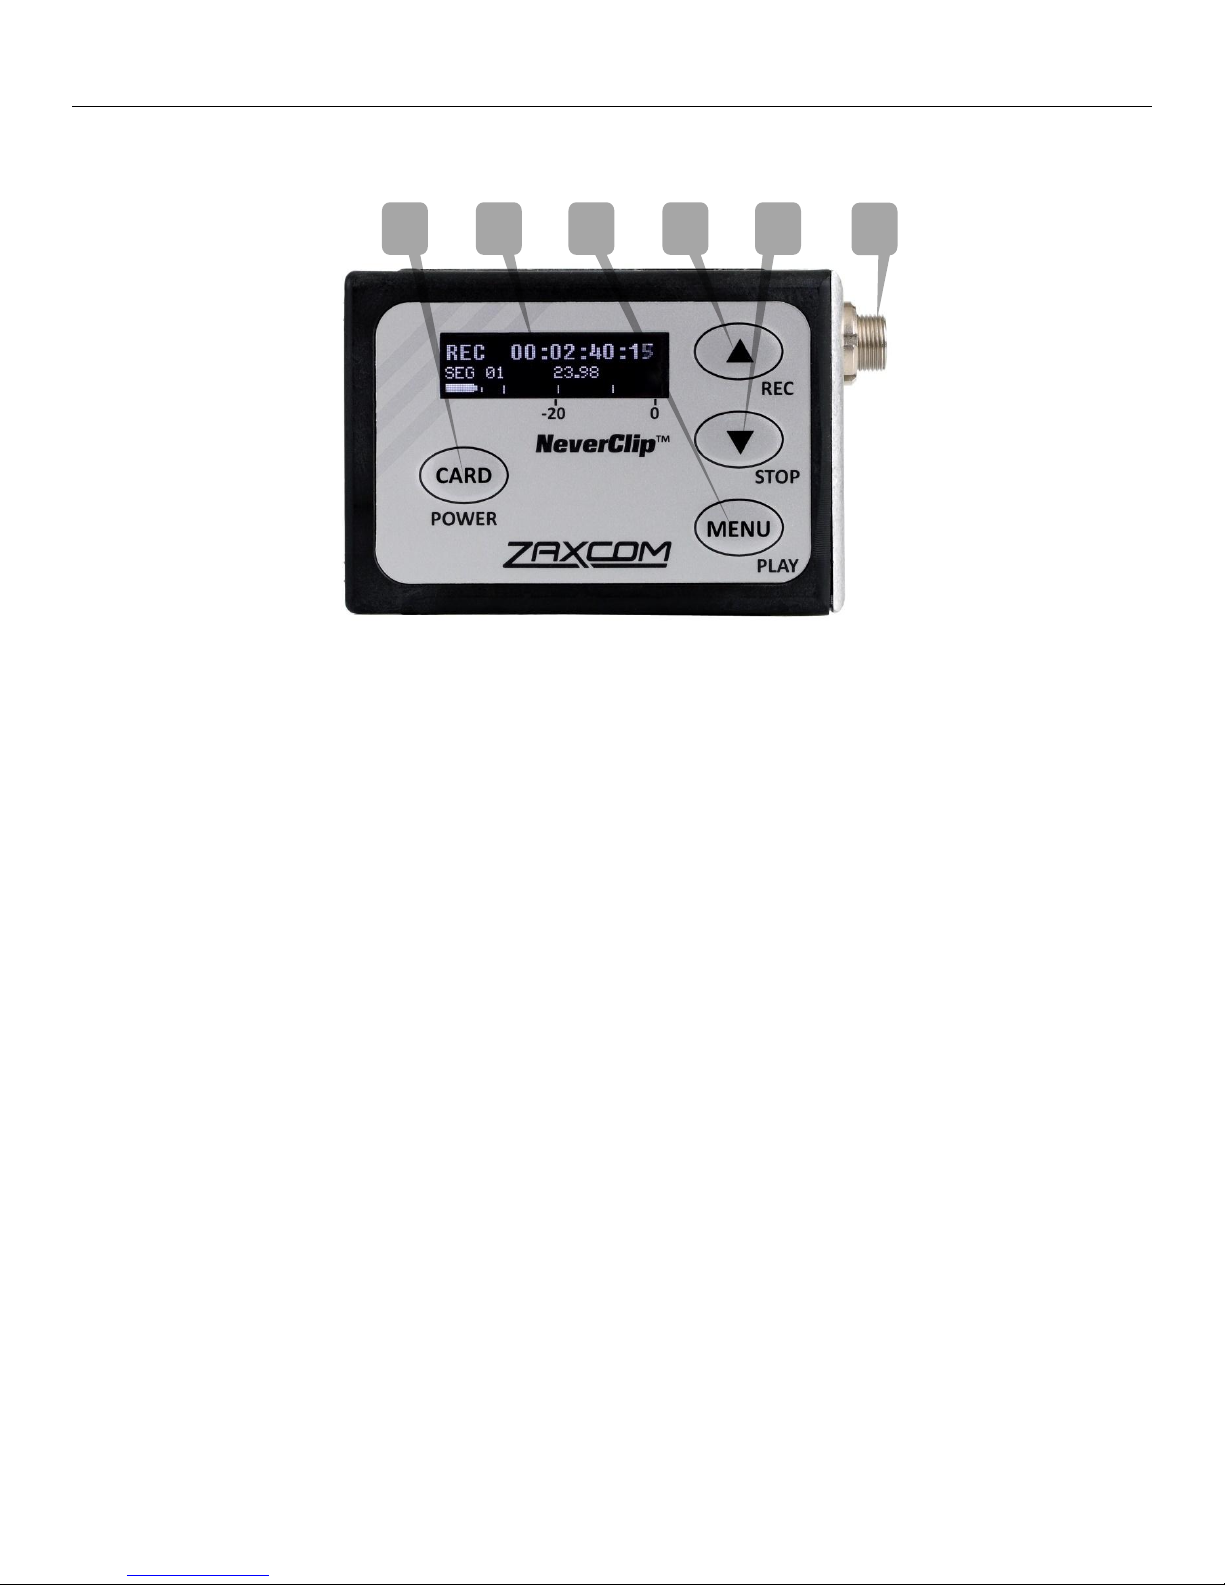
ZFR400
1. Card / Power Key
Push and hold for 2 seconds to power on the ZFR400.
Push and hold 3 seconds followed by a quick press of the MENU key to power the ZFR400 off .
Press 3 times quickly to access the sub menus.
Press 3 times quickly to return to the home screen.
2. OLED Display
3. Menu / Play Key
Press it to access the next menu item.
Press it with the CARD key to playback a segment.
4. INC / Record Key
Increases the parameters of a menu item.
Pressing INC with the CARD key will manually put the ZFR400 into record. Please note recording can be
initiated while in any menu and not only from the home screen.
Pressing while not recording will start playback.
Pressing while playing back will advance playback, multiple presses will cause playback to advance in
larger increments, press and hold will advance to the next segment.
5. DEC / Stop Key
Decreases the parameters of the menu items.
Pressing DEC with the CARD key will stop the recording. Please note recording can be stopped while in
any menu and not only from the home screen.
Pressing while playing back will cause the ZFR400 to stop playback, then if pressed again will cause
playback to jump back within that segment. Press and hold will jump back to the previous segment.
6. Microphone Connector (3 pin Lemo)
4
Zaxcom ZFR400 ZFR400
2
1
4
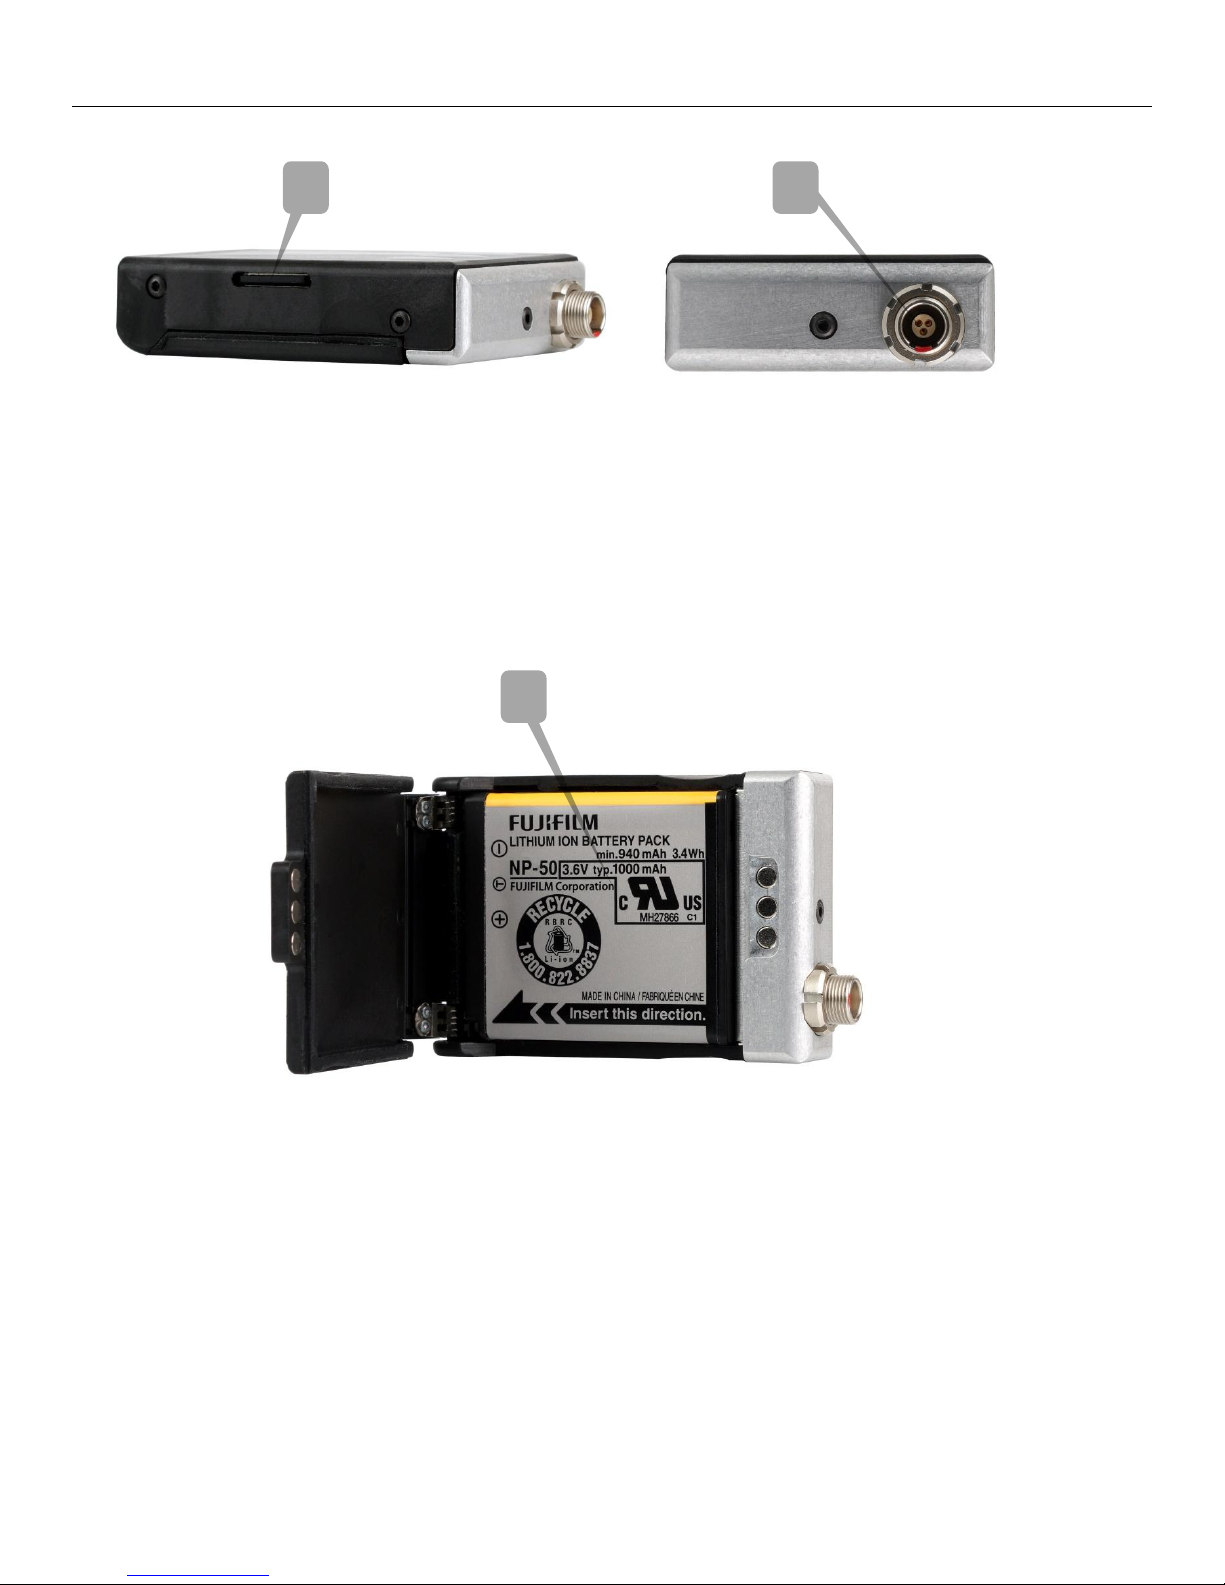
1. Micro SD Card Slot
Inserting a Micro SD card:
With the OLED screen of the ZFR400 facing you, turn the card so the finger contacts are facing away
towards the battery compartment and pointing down toward the slot. Insert the card into the slot and
press it down until there is a slight click. To remove it, press the card in until the same click is heard
again.
2. Microphone Connector (3 pin Lemo)
3. Battery Compartment
ZFR400 uses 1 NP50 battery.
Warning: Some batteries can vary in size which may cause some batteries to get caught
on the gasket when opening the battery door. If this happens DO NOT fully open the
battery door or try to reclose the door while the battery is stuck, as this can damage the
power connector and will need to be sent in for service. If a battery gets caught please
pull the battery off the door first.
5

Zaxcom ZFR400 Home Screen
Recorder Status Time Code
Segment Number Frame Rate
Battery Level Audio Meter Gain
Indicators at -20, -10, 0 dBFS
REC 09:18:05:03
SEG 001 23.98
G
Home Screen
Transport Status - Displays the current mode of the recording feature.
Time Code and Frame Rate - Displays the time code that
SEG - Displays the number of recorded segments on the micro SD card. Please note that regardless of
Battery - This displays the approximate percentage of remaining battery power.
Audio Meter - Displays the modulation of the inputted audio signal.
Gain - “G” Appears when the ZFR400 is receiving change of gain commands via ZaxNet.
STOP - Recording / Playback is stopped
LREC - ZFR400 is recording in LOOP RECORD mode.
REC - ZFR400 is recording in NON-LOOP RECORD mode.
PLAY - ZFR400 is playing back a recorded audio file.
is being recorded or playing back.
the size of the card it is limited to 500 segments.
6

Zaxcom ZFR400 Main Menu
GAIN 20 dB
Countdown clock starting at 5 seconds
After the ZFR400 locks
LOCKED 20 dB
09:18:05:02
23.98
IFB RX
LOCK 5
STOP 09:18:05:03
SEG 001 23.98
Main Menu
To cycle through the main menu press the MENU key.
Home Screen
Recorded files can be played back from the home screen.
Playing back from the home screen
Pressing the INC key while stopped will play the segment number that is displayed.
Pressing the DEC key while playing back will stop the playback.
Holding the INC key will jump ahead one segment.
Pressing the DEC key while stopped will jump back.
Pressing the INC key while in play mode will cause the playback to jump ahead, repeated quick presses will
cause playback to advance in larger increments.
Holding the DEC key will jump back one segment.
Microphone Gain Set
The microphone gain is adjusted from this menu. This menu displays the gain in decibels and a meter indicating
the audio signal. The meter is displayed horizontally from left to right. Pressing the INC key increases the gain
and pressing the DEC key will decrease the gain.
Lock Page
This page enables a key lock function so no parameters can be changes. When the lock page is landed on
a countdown clock will begin. After 5 seconds the ZFR400 will lock and the display will indicated that it is
LOCKED and after 5 seconds will go blank. If this screen is exited before the 5 seconds are up the ZFR400
will not lock. To lock the ZFR400 before the 5 seconds press and hold the DEC key.
Pressing the INC key when the ZFR400 is locked will display the ZMT’s group and unit code, and the serial
number. Pressing the DEC key will display the units name, battery voltage and current record segment
number.
Unlocking the ZFR400
Press and hold the MENU key and press INC keys 5 times. Or power down and reboot the ZFR400.
7

Zaxcom ZFR400 Menu Navigation
Sub Menus
Menu groups
The ZFR400 has five sub menu groups
Time Code - Changes the time code parameters of ZFR400.
Record - Changes the parameters of the on-board recorder.
ZaxNet - Changes the parameters of the ZaxNet transceiver.
Audio - Changes the parameters of the transmitted and recorded audio.
Setup - Changes the parameters of the general operation on the ZFR400.
Accessing and navigating the menu groups
From in the home screen press the CARD key three times, or hold the MENU key while booting up, to access the
sub menu groups. Then pressing the INC or DEC key will cycle between the menu items.
Entering and navigating a sub menu
When landing on the desired menu group, press the MENU key to enter that menu.
To return to the top of the menu press the MENU key to cycle to the top or press and hold the MENU key for 1.5
seconds.
Exiting the extended menu
Press the CARD key 3 times, or press the MENU key to cycle through the sub menu items until HOME MENU
is displayed then press the MENU key.
8

Zaxcom ZFR400 Time Code Menu
TIMECODE 23.98
GEN 09:18:05:02
TC SOURCE:
ZAXNET (RF)
TC JAM MODE:
AUTO-JAM NORMAL
TIME CODE MENU
Time Code Frame Rate Set
This menu is where the time code frame rate is set.
The ZFR400 will lock to and record all standard time code frame rates.
23.98, 24, 25, 29.97DF, 29.97DF, 30 DF, 30 NDF
Time Code Source Select
The time code source menu selects how the ZFR400 will receive its time code.
ZAXNET (RF) - The ZFR400 will receive time code via ZaxNet from a Nomad, a QRX235, IFB100/200,
TRX900CL or a TRX transmitter or another ZFR recorder that is transmitting ZaxNet time code.
AUDIO INPUT - The ZFR400, with a proper cable, will receive time code via the microphone input.
When time code is connected, it takes the ZFR400 approximately three seconds to recognize the TC. The
screen will display TIME CODE followed by JAM when it is recognized. Please note that when using the
microphone input connector, the audio level of the time code signal needs to be between -30 and -10 dBFS
on the unit’s meter. Any level above -10 may cause clipping, which will prevent proper reading of time code.
TC Jam Mode Select
This menu controls if the ZFR400 will go into record when it receives a record run time code.
AUTO-JAM NORMAL - The ZFR400 will continuously jam time code via ZaxNet and will go into record when
receiving a record command via ZaxNet or if the unit is put into record manually by pressing the CARD and
INC keys simultaneously.
AUTO-LOAD REC RUN - In Auto-Load mode the ZFR400 will go into record when it detects rolling time code,
and will stop when the time code stops. If time code is lost because the IFB signal is too weak the unit will
not stop but will continue in whatever state it was in until the time code signal is restored.
9
 Loading...