

Page 1

USER MANUAL
Published October 1, 2019
Software Version Nova 1.14
Zaxcom Nova
1
Page 2

NOVA
................................................................................................................................................................................. 6
FRONT PANEL ............................................................................................................................................................................6
LEFT SIDE ..................................................................................................................................................................................9
RIGHT SIDE ..............................................................................................................................................................................10
REAR .......................................................................................................................................................................................11
MAIN MENU .................................................................................................................................................................... 12
SUB MENUS ............................................................................................................................................................................12
ASSIGNING INPUTS TO A FADER / BANK ..................................................................................................................... 13
SETTING A CROSS POINT ...........................................................................................................................................................13
CHANGING BANKS ....................................................................................................................................................................13
NAMING TRACKS ............................................................................................................................................................ 14
HOW TO NAME A TRACK ...........................................................................................................................................................14
SELECTING FROM THE LIST OF PRESET TRACK NAMES ..................................................................................................................14
MEMORY MENU ............................................................................................................................................................. 15
STORE / RECALL MEMORY .......................................................................................................................................................15
How to store and recall a setup parameter ............................................................................................................... 15
CLEAR FADER ASSIGNS .............................................................................................................................................................15
FACTORY RESET TO DEFAULT ....................................................................................................................................................15
STORE / RECALL TO MIRROR CARD ...........................................................................................................................................15
HEADPHONE SETUP ........................................................................................................................................................ 16
SETTING UP HEADPHONE PRESETS .............................................................................................................................................16
NAMING THE HEADPHONE SETUP .............................................................................................................................................16
INVERTING THE PHASE OF A SELECTION .....................................................................................................................................16
HEADPHONE MATRIX SETUP TO DECODE MS STEREO ...............................................................................................................16
ENG MENU ...................................................................................................................................................................... 17
COMPRESSORS ........................................................................................................................................................................17
Compressor Enable ....................................................................................................................................................... 17
Compressor Parameters Set ........................................................................................................................................ 17
LEVELS ....................................................................................................................................................................................17
Internal & External Slate Levels .................................................................................................................................. 17
Extra Input Gain .............................................................................................................................................................. 17
TA5 Output Levels Adjust .............................................................................................................................................. 17
SAMPLE RATE SELECT ...............................................................................................................................................................18
PRERECORD .............................................................................................................................................................................18
TC TRANSPORT ........................................................................................................................................................................18
LCD BRIGHTNESS.....................................................................................................................................................................18
LED BRIGHTNESS .....................................................................................................................................................................18
SLATE MICROPHONE SOURCE ...................................................................................................................................................18
MULTI-TRIM ...........................................................................................................................................................................18
PLAY TO OUTPUTS ...................................................................................................................................................................18
GP REMOTE ROLL ENABLE .......................................................................................................................................................19
PUNCH-IN ...............................................................................................................................................................................19
TONE FREQUENCY ADJUST .......................................................................................................................................................19
TONE LEVEL .............................................................................................................................................................................19
2
Page 3

M
ETER PEAK HOLD SET ...........................................................................................................................................................19
TRANSPORT KEYS .....................................................................................................................................................................19
INVERTED XPOINTS ..................................................................................................................................................................19
TRACK NAME PRESET EDIT .......................................................................................................................................................19
NOTE PRESETS EDIT .................................................................................................................................................................20
HEADPHONE 1 VOLUME ..........................................................................................................................................................20
ABOUT NOVA MENU ...............................................................................................................................................................20
WARNINGS SETUP ..................................................................................................................................................................20
SETUP POWER .........................................................................................................................................................................20
ADVANCED SETUP ....................................................................................................................................................................21
Prevent Empty Pan ......................................................................................................................................................... 21
Display Speed .................................................................................................................................................................. 21
Update Bootloader ........................................................................................................................................................ 21
Update IFB Module ........................................................................................................................................................ 21
Debug Bits ....................................................................................................................................................................... 21
Allow Logging .................................................................................................................................................................. 21
Log Screen ....................................................................................................................................................................... 21
Upgrade Code ................................................................................................................................................................. 21
Slate Always On .............................................................................................................................................................. 21
EXT Meter Decay ............................................................................................................................................................ 21
EXT Meter Hold............................................................................................................................................................... 21
Slate Delay ....................................................................................................................................................................... 22
Button Hold Time ........................................................................................................................................................... 22
SETTING THE INPUT PARAMETERS ............................................................................................................................... 23
NAVAGATING THE INPUT SETUP MENU ......................................................................................................................................23
ADJUSTABLE PARAMETERS .......................................................................................................................................................23
INPUT COMPRESSOR LINKING ...................................................................................................................................................23
TIME CODE ...................................................................................................................................................................... 24
JAMMING TIME CODE AND USER BITS ......................................................................................................................................24
MANUALLY ENTERING TIME CODE AND USER BITS ....................................................................................................................24
Entering time code ......................................................................................................................................................... 24
Entering user-bits ........................................................................................................................................................... 24
TIME CODE SETUP MENU ........................................................................................................................................................25
TC Mode .......................................................................................................................................................................... 25
TC Frame Rate ................................................................................................................................................................. 25
TC Displayed .................................................................................................................................................................... 25
TC Output ........................................................................................................................................................................ 25
Increment User Bits ....................................................................................................................................................... 25
UB Date Style .................................................................................................................................................................. 25
Auto Date Jam ................................................................................................................................................................ 25
Set Time and Date .......................................................................................................................................................... 25
Time Code Slate .............................................................................................................................................................. 26
ASSIGNING INPUTS TO THE RECORD TRACKS ............................................................................................................. 27
NAVAGATING THE TRACK ASSIGN MATRIX. .................................................................................................................................27
SETTING A RECORD CROSS POINT ..............................................................................................................................................27
ZAXNET SETUP MENU .................................................................................................................................................... 28
ZAXNET ENABLE ......................................................................................................................................................................28
TX CHANNEL ...........................................................................................................................................................................28
3
Page 4

IFB
AUDIO SOURCE ............................................................................................................................................... 28
G
ROUP CODE ....................................................................................................................................................... 28
TX
POWER ............................................................................................................................................................ 28
RANSPORT COMMANDS....................................................................................................................................... 28
T
P
OWER-ROLL MODE ............................................................................................................................................. 28
TRX
OFF-ON ........................................................................................................................................................ 29
S
END ERX DELAY .................................................................................................................................................. 29
Z
AXNET TC OUT ................................................................................................................................................. 29
IFB
TEST TONE ...................................................................................................................................................... 29
U
PDATE IFB MODULE ............................................................................................................................................ 29
IFB
DEBUG ............................................................................................................................................................ 29
METADATA MENU ................................................................................................................................ 30
E
NTERING / EDITING METADATA ........................................................................................................................... 30
OTE PRESET......................................................................................................................................................... 30
N
How to select and enter a note from the preset list of notes ........................................................................ 30
CUE / PLAYBACK CONTROL MENU .................................................................................................. 31
P
LAYING BACK A FILE ............................................................................................................................................ 31
W
IRELESS AUDITION AND RE-RECORD .................................................................................................................. 31
How to audition and Re-Record a file ............................................................................................................. 31
RECORD ENABLES MATRIX ................................................................................................................ 32
E
NABLING RECORD TRACKS ................................................................................................................................... 32
OUTPUT ASSIGN ROUTING ............................................................................................................... 33
N
AVAGATING THE OUTPUT BUS MATRIX ................................................................................................................ 33
Output busses 1 thru 4: ................................................................................................................................... 33
Output busses 5 and 6 ..................................................................................................................................... 33
S
ETTING A CROSS POINT ....................................................................................................................................... 33
MEDIA MENU .......................................................................................................................................... 34
M
IRROR MODE OPTIONS ....................................................................................................................................... 34
W
RITE SOUND REPORT ......................................................................................................................................... 34
P
RIMARY CARD MENU ........................................................................................................................................... 35
Choose Primary Folder ................................................................................................................................... 35
Delete Last Segment ........................................................................................................................................ 35
Erase Current Folder ....................................................................................................................................... 35
Format Primary Card ....................................................................................................................................... 35
ISO Attenuation ............................................................................................................................................... 36
ISO Attenuation Enable ................................................................................................................................... 36
Edit Current Folder Name .............................................................................................................................. 36
M
IRROR SETTINGS MENU ....................................................................................................................................... 37
Mirror Mode Options ...................................................................................................................................... 37
Folder to Mirror .............................................................................................................................................. 37
Start Segment ................................................................................................................................................... 37
End Segment..................................................................................................................................................... 37
File Type Select ................................................................................................................................................ 37
File Resolution (bit rate) Select ....................................................................................................................... 37
File Naming Protocol ....................................................................................................................................... 38
Follow Primary ................................................................................................................................................. 38
Mirror Options ................................................................................................................................................ 38
4
Page 5

Time Code Offset ............................................................................................................................................ 38
Format Mirror Card ........................................................................................................................................ 38
WIRELESS RECEIVER SETUP ............................................................................................................... 39
R
ECEIVER VIEW ...................................................................................................................................................... 39
S
CAN MENU .......................................................................................................................................................... 40
C
ENTER FREQUENCY SET ....................................................................................................................................... 40
QRX
PROGRAM .................................................................................................................................................... 40
ADJUSTING INPUT TRIM AND REMOTE TRANSMITTER GAIN .................................................. 41
A
DJUSTING THE INPUT TRIM .................................................................................................................................. 41
A
DJUSTING THE TRANSMITTER GAIN ..................................................................................................................... 41
SETTING UP AND ENGAGING TONE ............................................................................................... 42
A
SSIGNING TONE TO OUTPUT BUSSES .................................................................................................................... 42
A
SSIGNING TONE TO CARD TRACKS ...................................................................................................................... 42
DJUSTING THE TONE FREQUENCY AND LEVEL ....................................................................................................... 42
A
T
URNING ON/OFF TONE ........................................................................................................................................ 42
USING THE ONSCREEN KEYBOARD ................................................................................................. 43
MONITORING ......................................................................................................................................... 44
C
HANGING HEADPHONE PRESETS ......................................................................................................................... 44
P
RE FADER LISTINING ............................................................................................................................................ 44
FALSE START .......................................................................................................................................... 45
COMPACT FLASH CARDS.................................................................................................................... 46
SYNCING NOVA TO A DENECKE SLATE ......................................................................................... 47
NOVA CONNECTOR ASSIGNMENTS ................................................................................................ 48
A
UDIO INPUT / OUTPUT CONNECTORS (XLR-3) .................................................................................................. 48
A
UDIO OUTPUT CONNECTORS (TA-5) ................................................................................................................. 48
S
LATE MICROPHONE INPUT CONNECTOR (1/8” TRS) ........................................................................................... 48
H
EADPHONE OUTPUT CONNECTORS (1/4” TRS) .................................................................................................. 48
P
OWER CONNECTORS (HIROSE-4 CONNECTOR) .................................................................................................. 48
AES
DIGITAL INPUT / OUTPUT CONNECTORS (DB-15) ......................................................................................... 49
UPDATING FIRMWARE ........................................................................................................................ 50
U
PDATING NOVA’S FIRMWARE .............................................................................................................................. 50
U
PDATING THE RECEIVER MODULES FIRMWARE USING A ZAXCOM TRANSMITTER ................................................... 50
PRODUCT SUPPORT ............................................................................................................................. 51
NOVA SPECIFICATIONS ...................................................................................................................... 52
ZAXCOM WARRANTY POLICY AND LIMITATIONS ..................................................................... 54
5
Page 6

Zaxcom Nova Front Panel
Nova
Front Panel
Record Key
Press to put Nova into record. The press duration is set in the ENG advanced menu. When Nova is recording the
REC key will glow red.
Stop Key
Press to stop recording or stop playback. The press duration is set in the ENG advanced menu. When stopped
the STOP key will glow blue.
Play / Input key
• A quick press will enter the input setup menu.
• Press and hold will play back the last recorded file. The press duration is set in the ENG advanced menu.
When playing back the REC and STOP key will flash green.
TC / Bank key
• A quick press will cycle through the banks and the key will glow the color associated with the fader bank.
Please note if nothing is assigned to a bank that bank will not be cycled through.
• Press and hold will open TC menu, additional presses will cycle through the additional TC menus.
Tracks / Trim
• A quick press will cause the TRIM key to blink. When the key is blinking the input trim for the source that is
assigned to a fader can be adjusted by turning that fader. Pressing the BANK will allow for adjustments to
other input trims for those banks. Pressing the TRIM key again will take Nova out of trim mode.
• Press and hold will open the track assign menu.
ZNET / Z-Net
• A quick press will cause the ZNET key to blink. When the key is blinking turning the fader that has a Zaxcom
transmitter assigned to it will remotely adjust the input gain for that transmitter via ZaxNet. Pressing the
ZNET key again will take Nova out of ZaxNet remote gain mode.
• Press and hold will open the ZaxNet setup menu for the internal ZaxNet transmitter.
Back key
Press to go back one menu.
6
Page 7

Zaxcom Nova Front Panel
Multi-Function Keys 1 thru 5
• A quick press will PFL (pre fader listen) to the input that is assigned to that fader. When PFL is engaged the
key will blink. Additional inputs can be combined by pressing another PFL key. To return to normal
monitoring press the PFL key again.
• Pressing and holding a key will open the menu for that key
- F1 - Meta Data Menu - This is where Meta Data can be entered and edited.
- F2 - Cue Menu - This is where files can be played back from and Audition and Re-Record can be launched.
- F3 - Record Enable Menu - This is where the Primary and Mirror track are enabled from.
- F4 - Output Assign Matrix - This is where the 6 output busses are assigned.
- F5 - Media Menu - This is where that parameters for the record cards are set.
Multi -Function Keys F6 thru F11
• From the meter screen these are shortcut keys.
- F6 - Headphone selector.
- F7 - Track Assign Matrix.
- F8 - Output Assign Matrix.
- F9 - Receiver Menu
- F9 - Fader Assign Matrix.
- F10 - TC Slate.
• Navigate within a menu. When a key has a function it will be labeled in the menu page.
Color LCD Screen
Daylight-readable color LCD screen.
Faders x 5 with LEDs
• Adjust the level for that input.
• When the TRIM key is blinking turning a fader will adjust the trim of the input assigned to that fader.
• When the ZNET key is blinking turning a fader will remotely adjust the input gain of the transmitter assigned
to that fader.
• The 15 LEDs around each fader will act as an input meter and will modulate with the audio, the brightest LED
will act as a pointer for the fader, the color LEDs will display the bank that is selected. If multiple inputs are
assigned to a fader there will be 3 point LEDs. When no LEDs are illuminated that indicates that noting is
assigned to that fader.
Primary and Mirror LEDs
These LEDs will illuminate when the primary or mirror card is being read or written to.
Internal Slate Microphone
When internal sale is selected this will be the slate microphone.
Headphone Volume knob
Star key
• From the any home meter screen, press it to advance to the next meter screen.
• When in a menu screen, press it to go to the home meter screen.
• In the output bus routing matrix, head phone setup matrix, and card mix matrix pressing it adds phase
reverse to the cross point options, when inverted cross points are enabled in the ENG Setup menu.
• If pressed while powering-up, Nova will look for software on the mirror card and start the software update
process.
7
Page 8

Zaxcom Nova Front Panel
Menu knob
• Press to access the main menu - Press and hold for 2 seconds when in the ENG meter screen.
• Rotate and press to select and enter a parameter.
Tone / Com key
• Press and hold to activate the com microphone.
• Shift (press a hold the MENU key) and press to turn on/off tone.
SLT key
Press and hold it to activate the slate microphone.
SMA antenna x 2
These are the antenna connectors for the internal UHF receivers..
8
Page 9
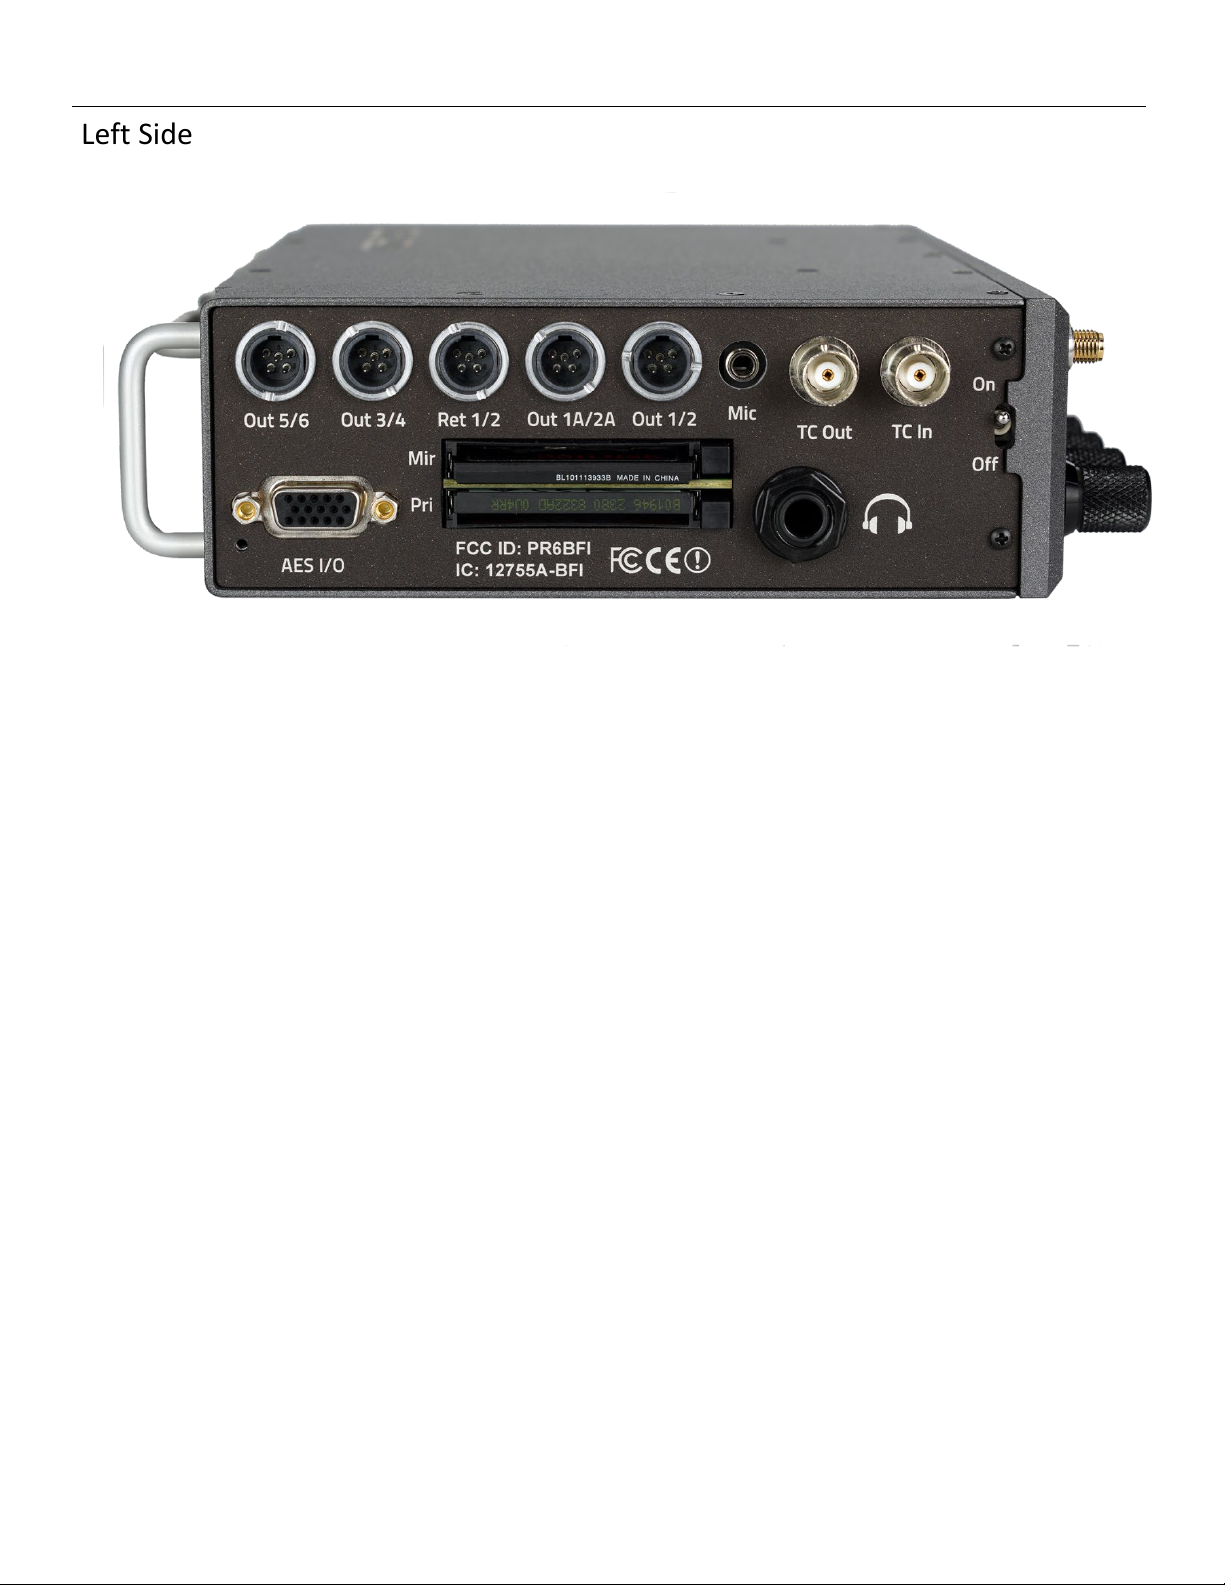
Zaxcom Nova Left Side Panel
Left Side
Outputs 1 - 6 (TA-5M) x 4
Outputs 6 channels of audio via output buses 1 thru 6
All outputs can be individually adjusted between Mic Level -35dBu, -10dBu and line level 0dBu.
• TA5 Out 1/2 carries output busses 1 and 2
• TA5 Out 1A/2A is a duplicate of busses 1 and 2
• TA5 Out 3/4 carries output busses 3 and 4
• TA5 Out 5/6 carries output busses 5 and 6
Return 1-2 (TA-5M)
This input accepts a headphone level or line level signal (Range -20dBu and +30dBu) and can act as an additional
line level analog input or a camera return.
External Slate Microphone input (1/8” (3.5mm) TRS jack)
This is where the external Com/Slate microphone is connected.
Time Code Input / Output connectors (BNC x 2)
AES Input / Output connector (DE-15F)
Nova has 4 AES inputs (2 pairs) and 6 AES output busses (3 pairs) available on this connector. There is an input
sample-rate converter, allowing each input to have a different sampling-rate. Nova will accept any unlocked AES
signal with a sampling-rate of 32 to 96 kHz. The dynamic range of the sample-rate conversion is 124 dB, offering
completely transparent conversion of digital audio from one sample-rate to another.
Compact Flash Card Primary and Mirror Media Slot
The Primary card is inserted in the bottom slot with the label to the bottom of the unit.
The Mirror card is inserted in the top slot with the label of the card to the top of the unit.
Headphone (1/4” stereo jack)
Power Switch
9
Page 10

Zaxcom Nova Right Side Panel
Right Side
ZaxNet Antenna Connector (SMA)
RS422 connector future functionality
RF loop thru connectors (SMA) x 2
These are post 35MHz filter RF connectors to connect additional receivers.
Analog Mic/Line input connectors (XLR-3F) x 4
External Power Connector (Hirose-4F) x 2
This are redundant input power connector so that two batteries can be connected. Nova will automatically
switch to the higher voltage source.
Nova will run on 10 to 18 VDC
WARNING: Do NOT connect the external power connector to a source higher than 18.0 VDC.
This is the ABSOLUTE upper limit. Anything higher can damage the unit’s power supply.
10
Page 11

Zaxcom Nova Rear
Rear
Internal Receiver Module x 2
Fan Vents - The fan speed is adjustable in the ENG menu
Please Note – Receiver arrows point down!
11
Page 12

Zaxcom Nova Main Menu
Main Menu
To access the MAIN MENU press the MENU knob.
When in the MAIN MENU scroll the MENU knob to highlight one of the sub
menus.
To access the highlighted menu item press the MENU knob.
Sub Menus
• Fader Assign - This is where the 5 hardware faders are assigned an input. All five fader banks are assignable in
this menu.
• Track Names - The individual track names are assigned from this menu.
• Memory Store/Recall - Nova has 3 internal memory presets where the entire setup parameters of the
machine can be saved and recalled. The settings can also be saved to, and recalled from, the mirror compact
flash card so the settings can be transferred to another Nova. Nova can be reset to factory defaults from this
menu. And the faders can be cleared.
• Headphone Setup - This is where the 12 headphone presets are created and named.
• ENG Setup - The engineering menu is where Nova’s operations settings are adjusted from.
12
Page 13

Main Menu Fader Assign
Assigning Inputs to a Fader / Bank
The fader assign matrix is where the five faders are assigned what inputs they
will control. All five fader banks are assigned from this menu. Any assortment of
analog inputs, digital inputs, or wireless receiver outputs can be assigned to any
fader.
Please note if a fader does not have any assignment the LED’s around the fader
will not illuminate.
Setting a Cross point
1. Select the type of input to be routed by pressing F9 - Analog, F10 - Digital, F11 - Wireless Receiver.
2. Rotate the MENU knob to scroll through the matrix to the desired cross point.
3. Press the MENU knob to select the cross point.
4. Pressing the F7 and F8 keys to navigate through fader banks.
Changing banks
Pressing the bank key once will display what is assigned to the faders in the bank
Additional presses will advance to the next bank.
Bank 1 is Red, Bank 2 is Yellow, Bank 3 is Green, Bank 4 is Blue and Bank 5 is purple.
13
Page 14

Main Menu Track Naming
Naming Tracks
When a record track is named that name is displayed within the card meters on
Nova, and is contained in the file’s metadata so post production can easily identify
the source of a recorded track.
Nova also has a list of 20 preset track names that can be created and recalled
from. The preset track list is located in the ENG menu.
How to name a track
1. Scroll the MENU knob to highlight the desired track to be named.
2. Press the MENU knob to open the on-screen keyboard.
3. After the desired name is entered, click OK.
Selecting from the list of preset track names
1. Scroll the MENU knob to highlight the desired track to be named.
2. Press the F1 key to display the preset track list.
3. Scroll to the desired preset name.
4. Press the MENU knob to select the name.
14
Page 15

Main Menu Memory Store and Recall
Memory Menu
The memory menu has three storage positions where all user settings can be
saved and recalled. The settings can also be stored to the mirror compact flash
card so the settings can be transferred between other Nova’s.
Store / Recall Memory
From the STORE and RECALL positions three full recorder setups can be saved and recalled as needed.
Please note that after doing a factory restore, all stored memories will be erased.
How to store and recall a setup parameter
1. Scroll the MENU knob to highlight the desired store / recall position.
2. Press the MENU knob.
3. Press the STAR key to store / recall or press BACK to exit.
Clear Fader Assigns
Selecting clear faders will clears all of the current fader assignments.
Factory Reset to Default
Recall factory defaults resets all of Nova’s parameters back to the factory settings. If a factory reset is done,
all user setting, will be lost and have to be re-inputted.
It is generally advised to do a factory reset when updating software.
Please note if Nova is exhibiting odd behavior there may be some conflicting settings so a factory reset is
often advised.
Store / Recall to Mirror Card
Nova has the option to save its settings to (and restore settings from) the mirror compact flash card. This
allows settings to be exchanged between multiple machines.
15
Page 16

Main Menu Headphone Setup
Headphone Setup
Nova has 12 individual headphone setup matrices available. Each matrix can
contain any combination of the following:
• 12 Card tracks (TRK)
• 4 Output Buses (OUT)
• 2 Analog return inputs (RET)
Setting up headphone presets
1. Scroll the MENU knob to highlight the desired cross-point.
L selections are sent to the left ear and R selections are sent to the right ear.
2. Press the MENU knob to put an X in the cross point.
3. When a cross point is selected a green check will appear in the enable the tab.
When a preset is enabled that setup will be available when cycling through the headphone presets.
If the preset is not enabled that preset will be skipped over when cycling through the presets.
Pressing the F10 key will toggle between enable / disable.
4. Pressing the F8 key will advance to the next setup, pressing the F7 key will navigate back one preset.
5. To exit the setup menu, press the BACK key.
Naming the headphone setup
1. From the headphone setup matrix press the F11 key to open the monitor memory name.
2. Scroll to highlight the desired position and press the MENU knob to open the onscreen keyboard.
3. Enter the name and press OK when done.
Inverting the phase of a selection
1. When in the headphone set up matrix press the STAR key, an on screen pop-“ALLOW INVERT” will appear.
2. Then when selecting a cross point in the matrix press the MENU knob a second time to invert the phase.
3. When the phase is inverted the cross point the X will appear with a line over.
Headphone matrix setup to decode MS stereo
The following is the proper setting for M-S headphone decoding. This example
uses card track 1 as the mid and card track 2 as the side.
16
Page 17
Main Menu ENG Setup Menu
ENG Menu
The Engineering menu is where Nova’s operations settings are adjusted from.
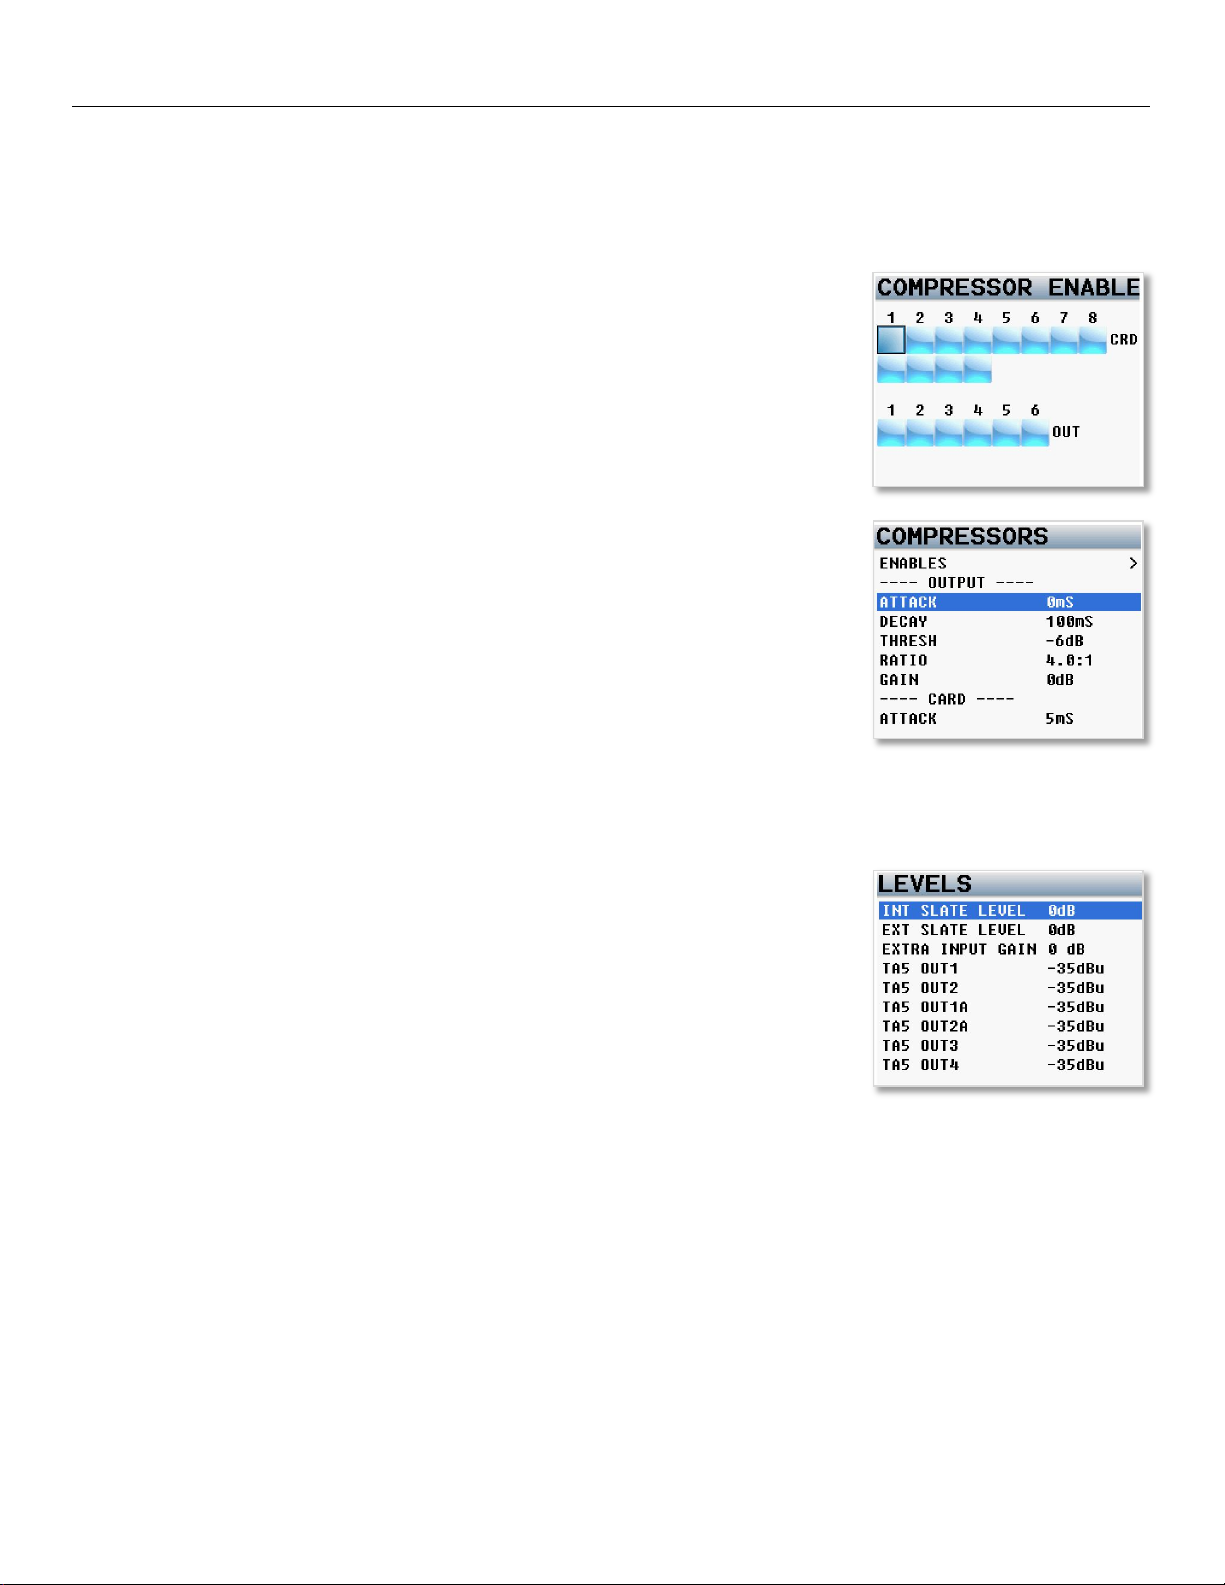
Compressors
Compressor Enable
Placing an X in the matrix will enable the compressor for that card track or output
bus. Please note that input compressors are enabled in the input setup menu for
the specific input.
Compressor Parameters Set
This is where the compressor parameters are set for the outputs, card tracks and
input parameters. The attack, decay, threshold, and ratio settings can be
adjusted. Makeup gain can be added to the output and card compressors if
desired.
Levels
Internal & External Slate Levels
This is where the internal and external slate microphone levels are adjusted. The
levels are independently adjustable in 1 dB steps from -12dB to 21dB.
Extra Input Gain
The extra input gain adds 10dB of digital gain to the analog inputs. The extra
input gain is global, meaning that when engaged the gain is applied to all analog
XLR inputs.
TA5 Output Levels Adjust
This menu manages the output audio levels for the TA5 output connectors. Each TA5 connector can carry 2
outputs. Each output can be independently adjusted to one of the following output levels:
• 0dBu - Line Level
• -10dBu - Tape / Consumer Level
• -35dBu - Mic Level
17
Page 18

Main Menu ENG Setup Menu
Sample Rate Select
This is where the sample rate is set. Please note when recording sample rates of 48048 or higher there is a
limitation of 8 tracks or less. The sample rate select menu has a matrix that allows for record tracks to be
enabled or disabled.
Prerecord
From the point the Nova is powered up, all inputted audio is being processed. When prerecord is enabled,
up to 10 seconds of that processed audio is held in a prerecord buffer. Then when the record key is pressed
that stored audio, with its time code, is included the current take. Prerecord does not use any additional
battery power.
Please note the prerecord buffer is dumped after any of the following settings are changed: sample-rate,
time code frame rate, user-bits, or record enables. After these parameters are changed the buffer will start
to re-build.
Also note that prerecord is only available when the sample is set to 48048 or lower.
TC Transport
• NORMAL - Nova will go into record when the REC key is pushed.
• AUTO LOAD - Nova will automatically go into to record when it senses record run time code coming from
an external source. Please note to use Auto-Load, time code needs to be set to record run both from the
incoming source as well as in Nova.
LCD Brightness
This is where the brightness of the LCD screen is adjusted from. The screen brightness can be set from 1 to
11 with 11 being the brightest.
LED Brightness
This is where the brightness of the LEDs are adjusted from. Please note this is a global setting, meaning that
all LEDs will be set to the same brightness. The LED brightness can be set from 0 to 11 with 0 being off and
11 being the brightest setting.
Slate Microphone Source
INTERNAL - The slate microphone located on the front panel of Nova will be used for the slate and com.
EXTERNAL - An external slate microphone connected to the 3.5mm microphone input connector on the side
of Nova will be used for the slate and com.
Multi-Trim
When turned on the Multi-Trim allows multiple inputs to be controlled with a single fader.
When a fader has multiple inputs assigned to it instead of a single LED a group of 3 LEDs will illuminate as
the pointer.
The fader will be assigned its inputs from the fader assign matrix.
Play to Outputs
Play to outputs allows Nova to play the record track to its output busses.
18
Page 19

Main Menu ENG Setup Menu
GP Remote Roll Enable
This enables a remote roll switch. The GPI will need to be wired to pin 4 on the AES I/O DB15 port Nova.
• OFF - Remote roll will not be enabled.
• POSITIVE - Remote roll will engage when there is a low to high voltage transition.
• NEGATIVE -Remote roll will engage when there is a high to low voltage transition.
Punch-In
ALLOWED - When Punch-In is allowed a new segment can be created while recording by pressing the REC
key. If the Rec/Stop warning option is enabled there will be an audible beep when a new file is created. The
beep is heard in the headphones only and is not sent to the record tracks or output busses. Please note
regardless of this setting Nova will create a new file when the current file reaches 2GB.
DISABLED - A new file cannot be created while recording. To create a new segment STOP must be pressed
first.
Tone Frequency Adjust
The frequency of the reference tone can be adjusted here. The tone frequency is adjustable from 20 to
20,000 Hz in 200Hz increments
Tone Level
The level of the reference tone can be adjusted from this menu. The tone level is adjustable between -90 to
0dB in 1 dB increments.
Meter Peak Hold Set
The peak hold sets the duration the peak indicator (the white vertical bar within the meters) is held after the
audio hits the peak. The peak hold range is from 100MS to 4000MS with a step value of 100MS.
Transport Keys
• PRESS - The REC and STOP keys will respond with a quick press.
• HOLD - The REC and STOP keys will need to be pushed and held to go in to record and stop recording. The
button hold time is set in the advanced menu.
This is to prevent Nova from accidentally going into or out of record.
Inverted Xpoints
• ON -The cross points in the track assign, output buss assign and the headphone set up matrix will have
the option to invert the phase for the assignment by pressing the STAR key.
• OFF - Pressing the STAR key will not give the option to invert the phase.
Track Name Preset Edit
This is where the preset track names are entered. There are 20 track name presets available. Existing names
can be edited and new track names can be created. To edit a track name scroll the MENU knob to the
desired preset position. Then press the MENU knob to open the on screen keyboard.
19
Page 20

Main Menu ENG Setup Menu
Note Presets Edit
This is where the preset notes are entered. There are 20 note presets available. Existing notes can edited
and new notes names can be created. To edit a note preset scroll the MENU knob to the desired preset
position. Then press the MENU knob to open the on screen keyboard.
Headphone 1 Volume
Nova has up to 12dB of digital gain that can be sent the headphone amplifier. This setting will adjust the
amount of digital gain that will be added.
About Nova Menu
This page provides information about Nova including the serial number, software and hardware versions as
well as the CPU usage.
Warnings Setup
This menu manages the alerts that pop up on the screen, and turns on and sets
the level of an audible alert that is sent to the headphones.
Audible alerts can be turned on for low battery, low card and when Nova goes into
and out of record.
After a warning pops up, press the BACK knob to acknowledge and dismiss the
warning.
Setup Power
• ANALOG INPUT - Enables / disables the analog inputs. When an analog input is unused it can be disabled.
When analog inputs are turned off Nova will use less battery power.
• TEMPERATURE - Sets the temperature scale to either Fahrenheit or Celsius.
• FAN SPEED - Sets the speed of the internal cooling fan when Nova is not recording.
• RECORD FAN SPEED - Sets the speed of the internal cooling fan when Nova go into record.
20
Page 21

Main Menu Advanced Setup
Advanced Setup
Prevent Empty Pan
Prevent empty pan removes the blank (no assign) leaving only the L, C, R option while cycling through the
panning in the ENG pan matrix or when using AutoPan
Display Speed
The display speed should normally be set to fast. When set to fast the display is updated every frame.
Though when using a lot of effects, cross points and/or are recording at a high sample rate and the user
interface is getting hard to use, change the display speed to slow which will slow down the refresh rate.
Please note the display speed will automatically go into slow when mirroring or when the unit needs more
horsepower for recording.
Update Bootloader
The bootloader is part of the software that boot up Nova. Generally the boot loader will not need to be
updated. If the boot loader needs to be updated there will be a note released with the software to do so.
The boot loader software is already contained within Nova’s software.
Update IFB Module
The IFB module is updated from this menu. Generally the IFB module will not need to be updated, if it does
need to be updated there will be a note released with the software to do so. The IFB module software is
already contained within Nova’s software.
Debug Bits
Debug bits a factory diagnostic menu and should stay set to 0.
Allow Logging
Allow logging will turn on an internal logging feature which will allow Nova to keep a log of warning and
error messages which then can be used by the factory to diagnose the unit. The logged messages are
displayed on the log screen. Please note if logging is not turned on then Nova will not log the errors.
Log Screen
The log screen is where Nova displays the logged errors and warnings.
Upgrade Code
This would be used to enter any future upgrade codes
Slate Always On
• NORMAL - This is the typical setting that would be used. With this setting pressing and holding the slate
key will activate the slate microphone.
• FORCED - When the slate microphone is activated the forced setting locks the slate microphone in the
on position. To deactivate the slate microphone power cycle Nova.
EXT Meter Decay
This adjusts the decay of the Oasis / Touch meters in milliseconds.
EXT Meter Hold
This adjusts the hold time of the Oasis / Touch meters in milliseconds.
21
Page 22

Main Menu Advanced Setup
Slate Delay
Delays the visual time code slate by the selected number of samples. The slate can be delayed or advanced.
Button Hold Time
This is the time in milliseconds that the multifunction keys will need to be held to access the second
(shifted) function. The hold time is adjustable from 300 milliseconds to 800 milliseconds in 1ms increments.
22
Page 23

Direct Access Keys Input Configure
Setting the Input parameters
To enter the input configure menu press the INPUT key.
Navagating the input setup menu
• Pressing F7 and F8 keys will navigate through inputs.
• Pressing the F9 key will jump to the analog inputs, the F10 key will jump to the digital inputs and the F11 key
will jump to the internal receiver inputs.
• When in the input set up menu pressing the PFL keys (F1 thru F5) will jump to the setup page for the input
that is assigned to that fader for the current selected bank.
Adjustable Parameters
• Input Trim - Adjusts the input trim.
• Input Type - Selectable between mic level and line level (analog inputs 1-thru 4 only).
• Input Compressor - Turns on the input compressor and set compressor groups. The compressor settings are
adjusted in the MODE menu.
• 48 Volt Phantom Power - Turns on or off phantom power (analog inputs 1 thru 4 only).
• AES-42 Power Enable - Turns on power for AES -24 microphones. AES power can be turned on
independently for AES inputs 1/2 and AES inputs 3/4 (digital inputs only).
• Delay / Delay Value- Turns on and adjust the input audio delay. The input delay is variable from .0MS to
100MS in .1MS increments.
• High Pass Filter / HPF Frequency - The HPF frequency adjusts a software filter that is adjustable between
40Hz to 230Hz in 10Hz increments.
• Two Variable Notch Filters - Notch filters with independent adjustable frequencies.
• Phase Invert - Allows for the phase of the input to be reversed.
• ZaxNet ID - Sets the ID code for a Zaxcom transmitter that would be associated with that input. This allows
the input gain of a transmitter to be remote controlled with the fader that input is assigned to.
• ZaxNet Trim - Remotely adjusts the input trim of the transmitter routed to that input. Please note the
ZaxNet ID code on the transmitter needs to match the ID code set for the input.
• TRX Frequency - Used to remotely adjust the frequency of the transmitter that is routed to that input.
Please note the ZaxNet ID code on the transmitter needs to match the ID code set for the input.
Input Compressor Linking
When using a stereo or surround microphone the input compressors (limiters) should be linked to insure that
the spatial integrity of the signal is maintained. Nova has three separate compressor groups.
For example, a stereo microphone on inputs 1 and 2 may have their limiters set to Group A. So if the signal on
input 1 needs compressing, the compressor on both 1 and 2 will activate together rather than just channel 1.
23
Page 24

Direct Access Keys Time Code Setup
Time Code
To enter the TIME CODE menu - SHIFT (press and hold the MENU key) and then press the BANK key.
Or press and hold the BANK key for the duration that the button hold time (in the ENG advanced menu) is set to.
Jamming Time Code and User Bits
Pressing the TC key will open the time code jam menu.
This page displays the time code and user bits that are being received from a
source that is connected to the time code in on the BNC connector (READER).
Also displayed is the time code and user bits from the internal time code
generator (GEN).
From this page the time code and user bits can be jammed from a connected
time code source or, jammed from Nova’s internal clock and calendar.
• JAM TC - Jams Nova’s time code from an external source, such as a camera or a
master time code unit.
• JAM TIME -The time code is created from Nova’s internal clock.
• JAM UB - Jams Nova’s user bits from an external source, such as a camera or a
master time code unit.
• JAM DATE - The user bits are created from Nova’s internal calendar.
Manually Entering Time Code and User Bits
Pressing the F11 key will open the ENTER TIME CODE page. This is where the time
code and user bits can manually be entered.
Entering time code
1. Press the MENU knob to highlight ENTER TC.
2. Rotate the MENU knob to select the desired position.
3. Press the numeric FUNCTION keys (F1 thru F9, and F10 for 0) to enter the
desired number.
4. When done press the MENU knob.
Entering user-bits
1. Press the MENU knob to highlight ENTER UB.
2. Rotate the MENU knob to select the desired position.
3. Press the numeric FUNCTION keys (F1 thru F9 and F10 for 0) to enter a numeric value.
4. To enter A - F, double click the numeric FUNCTION keys 1 - 6.
5. When done press the MENU knob.
24
Page 25

Direct Access Keys Time Code Setup
Time Code Setup Menu
Pressing the BANK key again advances to the time code setup menu.
TC Mode
• FREE-RUN - Time code runs continuously.
• REC-RUN -Time code will start to run when Nova begins to record and will stop when recording stops.
• CJAM - Time code and user bits are continuously updated from a connected external source.
• CJAM TC - Time code only is continuously updated from a connected external source.
• CJAM UB - User bits only are continuously updated from a connected external source.
TC Frame Rate
This is where Nova’s time code frame-rate is set.
Nova supports all standard SMPTE frame-rates: 23.98, 24, 25, 29.97, 29.97DF, 30, 30DF
TC Displayed
Sets what time code will be displayed on the home meter screen.
• GENERATOR - Displays the time code from Nova’s internal time code generator.
• CARD - Displays the time code from the card that is being recorded or playing back.
TC Output
Sets what time code will be sent to the time code output BNC connector.
• GENERATOR - Outputs time code from Nova’s internal time code generator.
• CARD - Outputs time code from the card that is being recorded or playing back.
Increment User Bits
• ON - User Bits will automatically increase by 1 with each take.
• OFF - User Bits will stay the same for each take.
UB Date Style
If the date from Nova’s internal calendar is being used as the User Bits this determines how the date is
displayed.
• EU - European (DDMMYY)
• US - United States (MMDDYY).
Auto Date Jam
• ON - The user bits will automatically be jammed to the internal date upon boot up.
• OFF - The user bits will stay as previously set.
Set Time and Date
This is where Nova’s internal clock and calendar is set.
Nova’s date and time is maintained by an internal battery that keeps accurate time even if Nova is powered down for
an extended time. The internal 3volt CR 2330 coin cell battery should last between two to three years.
25
Page 26

Direct Access Keys Time Code Setup
Time Code Slate
Pressing the F6 key tab will display the visual time code slate.
This is used to provide a visual sync for the camera to match picture and sound.
When the time code slate is displayed pressing the MENU knob will freeze the
time code display will freeze and a 1-frame beep tone will be sent to any bus that
has tone routed to an output.
Pressing any one of the function keys (F6 thru F11) will flip the orientation of the
slate.
The slate can also be quickly accessed from the home screen by pressing the F11
key.
26
Page 27

Direct Access Keys Track Assign
Assigning inputs to the record tracks
To enter the TRACK ASSIGN menu - SHIFT (press and hold the MENU key) and then
press the TRIM key.
Or press and hold the TRIM key for the duration that the button hold time (in the
ENG advanced menu) is set to.
Navagating the track assign matrix.
• Press the F6 key to assign OUTPUT BUSSES to a card track.
• Press the F9 key to assign the ANALOG INPUTS to a card track.
• Press the F10 key to assign the DIGITAL INPUTS to a card track.
• Press the F11 key to assign the internal RECEIVERS to a card track.
• Pressing the F7 and F8 key will navigate through the tracks (1 thru12).
Setting a record cross point
1. Select the type of input to be routed by pressing the desired function key.
2. Rotate the MENU knob to scroll through the matrix to the desired cross point.
3. Press the MENU knob to select the cross point.
27
Page 28

Direct Access Keys ZaxNet Setup
ZaxNet Setup Menu
From the ZaxNet setup menu the parameters of the ZaxNet transmitter are set up.
To enter the ZaxNet setup menu - SHIFT (press and hold the MENU key) and then
press the BANK key.
Or press and hold the ZNET key for the duration that the button hold time (in the
ENG advanced menu) is set to.
ZaxNet Enable
• ON - The ZaxNet transmitter module is turned on and Nova can transmit audio, time code and wireless
transmitter commands. Please note, be sure to attach a ZaxNet antenna whenever the module is turned
on. If not, RF can potentially leak into the microphone preamps.
• OFF - The ZaxNet transmitter module is turned off and power is saved.
TX Channel
This is the frequency that the ZaxNet transmitter in Nova will use to transmit IFB audio, time code and ZaxNet
commands on. The ZaxNet frequency range is from 2.403 GHz to 2.475 GHz. All ERX receiver and transmitters
receiving ZaxNet commands from Nova will need to be set to this frequency.
IFB Audio Source
This selects which output bus will be transmitted over ZaxNet to the ERX receiver(s).
Group Code
This is where the ZaxNet group code for Nova’s ZaxNet transmitter is set. ZaxNet uses group codes to allow a
specific “group” of transmitters to be controlled. For example, setting the group code to 1 allows Nova to
control all group 1 transmitters. Setting it to 2 allows all group 2 transmitters to be controlled. Group codes
can be set from 1 to 99. Please see the transmitter manual for setting the group code in the transmitter.
TX Power
TX power adjusts the output power level of the ZaxNet transmitter. The power range is 0 through 7 with 7
being the highest.
Transport Commands
• SLAVED - Zaxcom wireless transmitters that are being controlled via ZaxNet will start/stop recording each
time Nova starts/stops recording.
• OFF - The record status of Nova will have no effect on the internal recorder in the transmitter.
Power-Roll Mode
Power-Roll allows the transmitter(s) that are being controlled via ZaxNet to increase the output power
setting when Nova goes into record, and decrease to a lower power setting when recording stops. By
decreasing the power level when not recording allows the transmitter to conserve battery power. To use
POWER-ROLL the transmitter POWER ROLL setting must be set to “DEVA TRIGGER”. The transmitters can also
manually be adjusted by switching between the LOW and HIGH settings.
• ALWAYS LOW - The transmitter will run at the low power setting.
• DYNAMIC - The transmitter will run at low power when Nova is not recording and automatically go into
high power when Nova goes into record. Please note power roll needs to be enabled on the transmitter(s).
Please see the transmitter manual for further information on enabling power roll.
• ALWAYS HIGH - The transmitter will always be run at the high power setting.
28
Page 29

Direct Access Keys ZaxNet Setup
TRX Off-On
This controls the standby status of the wireless transmitter(s) being controlled via ZaxNet.
• ON - When set to ON the transmitter(s) will transmit as normal.
• WAKE UP - When WAKE UP is selected any transmitter that has its power up mode set to “REMOTE
STANDBY” will wake up.
A transmitter that is set to Remote Standby, in the transmitter’s set up menu, will boot up to an ultra-low
power mode. Then when the wake command is sent from here the transmitter(s) wakes up to normal
transmit mode. This setting is useful for conserving battery power when a transmitter needs to be turned
on for an extended period of time before it will be needed. The only way to put the transmitter back into
remote standby is power cycle the transmitter. Please see the transmitter manual for more information
on enabling REMOTE STANDBY.
• LOW (OFF) - When a transmitter is put in LOW mode the RF power amplifier, RF board, and mic preamps
are disabled. This cuts the power consumption of the transmitter and extend its battery life. Transmitters
can be put into, and taken out of LOW mode at any time.
Send ERX Delay
The audio being transmitted to the ERX receiver(s) can be delayed. This would is useful to sync audio to
picture when there is a video processing delay. This setting only delays the audio being sent to the ERX
receivers and does not affect any other audio. Please note that this is a global setting, meaning that all ERX
receivers will receive the same delay. Delay can be set up to 400ms in 5ms increments.
ZaxNet TC Out
• ON - The time code being outputted from Nova will have embedded ZaxNet commands. ZaxNet TC out
should be on when feeding timecode to another Zaxcom device via the BNC output.
• OFF - The time code output will not have embed ZaxNet commands. ZaxNet TC out should be set to off
when feeding time code to a non Zaxcom device.
IFB Test Tone
When turned on a 1K test tone will be sent to the ERX receiver(s).
Update IFB Module
This is where the firmware for the ZaxNet transmitter module is updated from. The ZaxNet software is
already contained in the Nova software.
IFB Debug
This is a factory diagnostic menu.
29
Page 30

Direct Access Keys Meta Data Entry
Metadata Menu
The Scene, Take and Note metadata is entered from this page.
To enter the metadata menu - SHIFT (press and hold the MENU key) and then press
the F1 key.
Or press and hold the F1 key for the duration that the button hold time (in the ENG
advanced menu) is set to.
Entering / Editing Metadata
1. Using the MENU knob select the desired segment to be edited.
2. Scroll the MENU knob to highlight one of the data fields:
(S=Scene, T=Take, N=Note)
3. Press the MENU knob to open the onscreen keyboard.
Note Preset
Nova has a 20 position preset note list that can be selected from. The note list can be edited from the ENG
menu.
How to select and enter a note from the preset list of notes
1. From the metadata page highlight the NOTE field.
2. Press the F1 key to display the preset note list.
3. Using the MENU knob scroll to highlight the desired note.
4. Press the MENU knob to select the note.
30
Page 31

Direct Access Keys Playing Back / Re-Record
Cue / Playback Control Menu
This menu is where the files are played back from.
The wireless audition and re-record feature is launched from this menu as well.
To enter the cue menu - SHIFT (press and hold the MENU key) and then press the F2
key.
Or hold the F2 key for the duration that the button hold time (in the ENG advanced
menu) is set to.
Playing Back a File
1. Using the MENU knob select the desired segment number.
2. Press the F6 key to play.
3. Use the F7 key to jump back one segment and the F8 key to advance one segment.
4. Using the MENU knob highlight scrub to scrub the file. Pressing and turning the MENU knob will
increase the scrub rate X 10.
5. Using the F10 and F11 key will toggle thru will tracks to be monitored. All 12 tracks can be selected
as well as individual ISO tracks.
Wireless Audition and Re-Record
Wireless audition and Re-Record allows for audio recorded on Zaxcom wireless
transmitter(s) to remotely sync up to a specific cue, mute the live audio from the
transmitter, and transmit the recorded audio so the scene can be re-recorded.
How to audition and Re-Record a file
Please note to Re-Record Nova’s user bits must match the transmitter’s user bits for the selected
segment.
1. From the CUE menu and press the F9 key to open the Re-Record and Audition menu.
2. Select the desired segment.
3. Using the MENU knob scrub file to a specific cue. Pressing and turning the MENU knob will increase
the scrub rate X 10.
4. Press the F7 key to audition. When auditioning the live audio from the transmitter(s) will be muted
and the recorded audio will be sent. The segment can be played back as many times as desired by
simply repressing the F7 key again.
5. Pressing the F6 key will mute the live audio and playback the recorded audio. At this point Nova will
also go into record so the playback audio will be Re-Recorded. The scene can also be re-mixed as it is
being Re-Recorded.
After the scene is re-recorded the note field in the metadata for that new segment will contain the
timecode offset so that post production can move the segment to the proper place in the timeline to
replace the original recorded segment. The segment can be re-recorded as many times as desired by
simply re-pressing the F6 key again.
6. When finished press the F11 key to send the record commands to the transmitter
31
Page 32

Direct Access Keys Record Enables
Record Enables Matrix
The record enable matrix is where the primary and mirror tracks are enabled on
from.
To enter the record enable menu - SHIFT (press and hold the MENU key) and then
press the F3 key.
Or hold the F3 key for the duration that the button hold time (in the ENG advanced
menu) is set to.
Enabling record tracks
To enable the primary or mirror tracks rotate the MENU knob to the desired cross point and press the MENU
knob to select the cross point. When an “X” appears in the matrix that track is enabled.
Please note that it is not necessary to remove any cross points from the mirror matrix because if a primary
card track is not enabled nothing will be recorded on the primary card and therefore nothing will be written
to the mirror card for that track. So as a shortcut all of the mirror tracks can be left enabled at all time.
32
Page 33

Direct Access Keys Output Routing
Output Assign Routing
The output assign matrix is where audio is routed to the output busses.
To enter the output assign menu - SHIFT (press and hold the MENU key) and then
press the F4 key.
Or hold the F4 key for the duration that the button hold time (in the ENG advanced
menu) is set to.
Navagating the output bus matrix
Output busses 1 thru 4:
Analog, digital and receiver inputs can be assigned to these busses 1 thru 4
• Press the F9 key to assign an analog input to an output bus.
• Press the F10 key to assign a digital input to an output bus. Slate, com and tone are also assigned from here.
• Press the F11 key to assign the internal receivers to an output bus.
Output busses 5 and 6
Card tracks, output busses and return inputs can be assigned to busses 5 and 6
• Press the F8 key to toggle between busses 5, 6.
Setting a Cross point
1. Select the type of input to be routed by pressing the desired function key.
2. Rotate the MENU knob to scroll through the matrix to the desired cross point.
3. Press the MENU knob to select the cross point.
33
Page 34

Direct Access Keys Media Menu
Media Menu
The Media menu is where the record parameters for the primary and mirroring card
are set.
To enter the Media menu - SHIFT (press and hold the MENU key) and then press the
F5 key.
Or hold the F5 key for the duration that the button hold time (in the ENG advanced
menu) is set to.
Please note that Nova will automatically create a new file when the file size reaches
2GB. This will be a seamless transition with no loss of audio. A letter will be added to the take number each time
Nova creates a new file. So for example if the first take is over 2GB the take numbers would be Take1 and Take 1a.
Mirror Mode Options
• OFF - Nova will not mirror any files.
• ON - Nova will only start to mirror a file when recording stops. Please note if a file is being mirrored and Nova
goes into record the mirroring will pause and pickup once stop is pressed again.
• CONTINUOUS - When Nova is recording, the audio is copied to the mirror card immediately after it is written
to the primary card. Depending on the track count and amount of processing taking place the mirror card
may lag behind a bit. If mirroring is lagging too far behind many times there are un-needed resources that are
on taking the processing power. These items will divert processing power from the mirroring and can often
be shut off to conserve the processing power and speed up mirroring. Check to see that some of these items
are not unnecessarily on: bus assignments cross points, compressor enables (input, output and card), high
pass filters, notch filters, and delays.
Write Sound Report
When write sound report is selected Nova will create a sound report of the recorded files from the current
folder, and write the report to the mirror compact flash card. The sound report will contain the metadata for
those files.
34
Page 35

Direct Access Keys Media Menu / Primary Card
Primary Card Menu
The primary compact flash menu is where the parameters of the primary record card
are adjusted from.
The Primary card will record the files as MARF files - Mobile Audio Recording Format.
MARF, is Zaxcom’s lossless fault tolerant recording system. MARF is a very robust
system where the files never need to be closed or finalized. So if power is lost during
recording, all audio right up to the point the power is lost will be preserved. MARF is
often immune from viruses and corruption that can affect standard recording
formats. MARF files can be easily be converted to WAV or MP3 files using ZaxConvert.
The latest version of ZaxConvert can be downloaded for free at www.zaxcom.com
Choose Primary Folder
All files are recorded into folders. The record folder is chosen from this menu. To select a folder scroll the
MENU knob to highlight the desired folder then press the MENU knob to select the folder. At that point a
green check will appear, the green check will indicate the folder that will be recorded to.
The folder can be named for easy identification. Please note while a named folder can have up to 19
characters only the first 9 will be shown in the folder list.
Delete Last Segment
Delete last segment will delete the last recorded segment. The segment number and the folder name
of the file that will be deleted will be displayed on the screen.
To delete the segment press the STAR key. Or press the BACK key to ignore and exit.
Erase Current Folder
Erase current folder erases the entire contents of the selected folder from the compact flash card. The
folder that will be deleted will be displayed on the screen.
To delete the segment press the STAR key. Or press the BACK key to ignore and exit.
WARNING: If a folder has been mirrored, remove the mirror card before erasing. If not, the folder
will be erased from both the primary and mirror card.
Format Primary Card
This is where the primary CF card is formatted. To start the format process press the STAR key. Nova
will then display a screen to confirm that the primary card is about to be formatted and will wait until
the STAR key is pressed again to format. Pressing the BACK key will ignore the format and exit the
format menu. After the primary card is formatted Nova will need to be rebooted.
.
35
Page 36

Direct Access Keys Media Menu / Primary Card
ISO Attenuation
The NeverClip™ inputs allow large signals to travel through the digital mixing engine using 32 bit floating point
numbers. Once these large signals are recorded into a 24-bit WAV (or MARF) file, the advantage of floating
point math is lost and these signals can clip if not using a card limiter.
ISO Attenuation allows the ISO record tracks to be attenuated by a user selectable amount of 6, 12, 18 or 24
dBs. This allows audio to be recorded unclipped even if its dynamic range would normally be too large. This
gain reduction amount is stored in the metadata of the WAV file so post production can restore the amplitude
of the ISO tracks when necessary.
ISO Attenuation Enable
The ISO attenuation matrix is where the card record tracks that will be attenuate are been enabled.
A cross point with an “X” will designate that the track will be attenuated.
Edit Current Folder Name
Each record folder can be named to identify its contents.
A folder name can be up to 19 alpha numeric characters and cannot contain any spaces or symbols.
Editing a Folder Name
1. Scroll down to the Edit Current Folder Name.
2. Press the MENU knob to access the on screen key board.
3. Using the keyboard name the folder.
36
Page 37

Direct Access Keys Media Menu / Mirror Card
Mirror Settings Menu
The mirror compact flash menu is where the parameters of the mirror card are
adjusted from.
Mirroring is the copying of the audio files from primary compact flash card to the
mirror compact flash card. The mirror compact flash card is formatted as FAT32, and
is fully compatible with all Mac & PC platforms and is generally used as a deliverable
format to post production. The mirrored files will be recorded as BWAV files.
Mirror Mode Options
• OFF - Nova will not mirror any files.
• ON - Nova will only start to mirror a file when recording stops. Please note if a file is being mirrored and
Nova goes into record the mirroring will pause and pickup once stop is pressed again.
• CONTINUOUS - When Nova is recording, the audio is copied to the mirror card immediately after it is
written to the primary card. Depending on the track count, the mirror card may lag behind a bit. Please
note if mirroring is lagging too far behind many times there are un-needed resources that are on taking
the processing power. These items will divert processing power from the mirroring and can often be shut
off to conserve the processing power and speed up mirroring. Check to see that some of these items are
not unnecessarily on: bus assignments cross points, compressor enables (input, output and card), high
pass filters, notch filters, and delays.
Folder to Mirror
The folder to mirror menu specifies which folder the audio will be mirrored (copied) to. For continuous
mirror, this folder needs to match the primary folder. Please note if FOLDER CHANGE is set to
“AUTOCHANGE” anytime the primary folder is changed the mirror folder will automatically follow.
Start Segment
The start segment number will be the first segment that Nova will mirror or re-mirror. When recording
the start segment will automatically increase with each file
End Segment
The end segment number will be the last segment that Nova will mirror or re-mirror.
File Type Select
The file type select sets the file format type Nova will write the audio as.
• BWAV MONO A BWAV MONO file is 1 file per track. So if only 1 track is recorded, 1 file will represent
that "take" from the time record is pressed to the time stop is pressed. If 2 tracks were to be recorded
2 tracks, Nova will produce 2 files, one representing track 1 and the other representing track 2.
• BWAV POLY A BWAV POLY file creates one file for that take; even if the take was recorded has multiple
tracks. So with a POLY file if a take is only 1 track, the file would be 1 track. If the take was 2 tracks, it
would still be one file with both tracks. This is often referred to as being "2 tracks wide". Similarly, if 6
tracks were recorded it would still be only one file, 6 tracks wide
File Resolution (bit rate) Select
The bit depth that Nova will mirror the files at is set here. Nova can record files as 16 bit or 24 bit.
.
37
Page 38

Direct Access Keys Media Menu / Mirror Card
File Naming Protocol
File naming sets the way the individual files are named.
• Z001001 - Creates a file name in the format of - Folder Name and Segment Number. This is the default
and recommended naming protocol.
So for example folder Z001 (or whatever name was created) and segment (for example 018) would be
Z001018.WAV (folder name / file number). The next file would be Z001019.WAV.
• 1 T2 Z001 - Creates a file name in the format of - Scene, Take, Folder Name and Segment Number.
For example scene “1”, Take “2” in folder “Z001” and segment number “18”, the file name will be
“1_T2_Z001018.WAV”. Warning - when using this naming protocol do not create a scene or take with
any characters other than letters or numbers.
• 1 T2 - Creates a file name in the format of - Scene and Take separated by and underscore.
For example scene “1”, Take “2” in folder “Z001” and the segment number is “18”, the file name will be
“1_T2.WAV”. Warning when using this naming option avoid creating duplicate file names within a
folder, if duplicate file names are created the files will not mirror properly.
• 1T2- Creates a file name in the format of - Scene and Take with no separation.
For example scene “1”, Take “2” in folder “Z001” and the segment number is “18”, the file name will be
“1T2.WAV”. Warning when using this naming option avoid creating duplicate file names within a folder,
if duplicate file names are created the files will not mirror properly.
Please note that all segment numbers will be a three digit number. The first file in a folder will always be
001.
Follow Primary
• Auto Change - When changing the primary folder the mirror folder will automatically change to follow
the selected primary folder.
• None - When changing the primary folder the mirror folder will not change.
Mirror Options
Remember mirror options after power cycle allows Nova to stay in the last mirror mode setting before
being been powered off. If this option is set to OFF, any time Nova is powered down the mirror mode
will default to OFF and will need to be turned back on. Please note that even if Nova is setup to allow
mirroring mode to be remembered after a power cycle if a CF card is not installed in the mirror slot after
the unit boots-up - mirror mode will be turned off and must be manually turned on after a mirror card is
inserted.
Time Code Offset
The time code offset is used to create an offset for the mirror files. An offset can be set from -500ms to
+500ms in 1ms increments.
Format Mirror Card
This is where the mirror CF card is formatted. To format press the STAR key. Pressing the BACK key will
exit the format page.
38
Page 39

Nova Operations Receiver Menu
Wireless Receiver Setup
Pressing F9 key will open the wireless receiver view menu.
Receiver View
Nova’s Internal receiver can be viewed and adjust from this menu.
The receiver view screen is divided into two sections, one sector for each module. Each sector will display the
following information:
• Frequency - The frequency that the receiver is set to. If the module is in dual mode both frequencies will be
displayed. The A frequency will be on the left and the B receiver will be on the right. If the frequency is
highlighted in red that means the selected frequency is outside the 35MHz filter. Keep in mind while
frequencies outside the range of the 35MHz filter may work but the performance may be less than optimal.
• Battery level - A battery indicator will display the approximate battery level for each transmitter. A fully
charged battery will display green and then turn red as the battery depletes its charge. The battery icon will
start blinking when the battery has roughly 15 to 30 minutes of charge left. Please note that when the battery
is low the transmitter may not go into record.
• Transport status -The transport status of the transmitter’s onboard recorder will be indicated just above
the RF signal strength meter:
• STOP - Recording / Playback is stopped
• REC - The transmitter is recording
• PLAY - The transmitter is playing back
• RF Signal Strength - Each module has two RF meters, one for each receiver. The meters show the amount
of RF signal being received in green. The signal level is visually displayed in the ramp shaped RF meter icon. As
the shading increases from the left to the right the more signal is present. If the icon is shaded red when the
transmitter is powered down that means the receiver is seeing unwanted RF from a source other than from the
corresponding transmitter. Within the icon the actual signal strength, in decibels, is displayed numerically.
• Audio Meter - Each module will display audio meter(s) for each signal received. If the module is set to single
mode one large meter will be shown. If the module is set to dual mode two meters will be shown. If the module
is receiving a signal from a stereo transmitter the large meter will be split in half into two smaller meters,
representing the left and right audio of the transmitter. The meters will show the audio modulation in dBFS.
Within each meter the signal level will be green (up to -20dBFS), yellow (from -20dBFS to -10dBFS), and red
(above -10 dBFS). There is also a peak hold indicator.
If a meter has a white X through it that is showing that the receiver is not receiving a valid signal.
39
Page 40

Nova Operations Receiver Menu
80 dB
40 dB
Scan Menu
A scan can be initiated from the receiver view menu by pressing the F7
key. A scan is where Nova can search the spectrum to determine what
RF is present. This will aid in finding a clear operating frequencies.
After a scan the RF that is found will be represented in the graph by a
series of vertical lines extending from the baseline up, the higher line
the stronger the RF signal is.
The horizontal lines show the strength of the signal in decibels. Any
stray RF below 40dB shouldn’t have too much effect on the performance.
• The yellow area shows the 35MHz window of the front end filter.
• The colored vertical lines will show the frequencies that that the QRX212 modules are currently set to.
70 dB
60 dB
50 dB
Center Frequency Set
Nova’s internal receivers have a 35MHz tracking front end filter that eliminates unwanted the stray RF which
can desensitize the receiver and result in poor performance. The center frequency is the middle frequency of
the 35MHz window.
After deciding on the 35MHz operating range the center frequency should be the middle of that range.
Therefore the best RF performance will be frequencies 17.5MHz above and 17.5MHz below the center
frequency. Please note that this is a global setting for both receiver modules meaning that that the 35MHz
window will be the same for both modules.
To adjust the center filter rotate the menu encoder knob to the desired frequency, or manually enter the
desired frequency using the numeric function keys (f1 thru F10). Please note that the center frequency must be
an even number.
QRX Program
This menu is where the QRX modules firmware are updated from. Upon entering the program menu the
current firmware that each module is running will be displayed. Pressing the STAR key will initiate the update
process. Please see the firmware update instructions at the back of this manual for further information on
updating the QRX module’s firmware.
40
Page 41

Nova Operations Trim / Remote Gain
Adjusting Input Trim and Remote Transmitter Gain
Adjusting the Input Trim
Press the TRIM key to engage the trim function - the TRIM Key will flash when trim is engaged. When the TRIM
key is flashing the faders will adjust the input trim for input that is routed to the fader. The trim can be adjust
for additional banks by pressing the BANK key.
Adjusting the Transmitter Gain
Press the Z-NET key to engage the ZaxNet remote gain function - the Z-NET Key will flash when remote gain is
engaged. When the Z-NET key is flashing the faders will adjust the gain for transmitter that is routed to the
fader. The gain can be adjust for additional banks by pressing the BANK key. Please note the ZaxNet ID code for
the transmitter to be controlled must be set in the INPUT CONFIGURE menu for the input.
41
Page 42

Nova Operations Tone
Setting Up and Engaging Tone
Assigning Tone to output busses
To assign tone to an output bus, press the F4 key to go to the output bus assign
matrix. When in the matrix press the F10 key (DIG/SCT) and select which output bus
will receive tone when tone is engaged by setting a cross point in the “T” row.
Please note that only the busses with tone routed to it will output the slate tone
when the visual time code slate tone is activated.
Assigning tone to card tracks
To assign tone to card tracks, press the TRIM key to go to the track assign matrix.
When in the matrix press the F10 key (DIGITAL) and select which card tracks will
receive tone when tone is engaged when tone is engaged by setting a cross point in
the “T” row.
Adjusting the tone frequency and level
Tone level and frequency can be adjusted in the ENG setup menu. Please note it is advised to keep the tone level
at -20dB for most operations.
Turning on/off tone
To turn on / off the tone generator - SHIFT (press and hold the MENU key) and then press the TONE / COM key.
42
Page 43

Nova Operations Onscreen Keyboard
Using the Onscreen Keyboard
• Scrolling the MENU knob will move the cursor laterally. When at the end of a row
the cursor will transition to the next lines.
• Use the F6 and F9 keys to move the cursor up and down.
Pressing and turning the MENU knob simultaneously will also move the cursor up
and down.
• Pressing the F7 and F8 keys will position the pointer with in the text.
• Pressing the F10 key will toggle between upper and lower case characters.
• When done select OK or press the F11 key.
43
Page 44

Nova Operations Headphone Monitoring
Monitoring
Changing Headphone Presets
• From the home screen press the F6 key. The F7 key will then display << and the F8 key will display >>
• Pressing the F7 key will go back to the previous enabled set up
• Press the F8 key will go to the next enabled set up.
Pre Fader LIstining
• The audio routed to a fader can be listed to pre-fader by pressing the Function key associated with that
fader (F1 thru F5).
• To listen to an input press a PFL key - when pressed the key will blink and the headphone monitor name
will display what input is being listened to.
• Additional inputs can be simultaneously listened to by pressing additional PFL keys.
• To remove an input press the PFL key again or press the BACK key.
44
Page 45

NOVA OPERATIONS False Start
False Start
Pressing STOP key after stopping will open the false start page. From this page a
take can be marked as a false start or just delete the file.
45
Page 46

Nova Operations Record Media
Compact Flash Cards
Currently we recommend using SanDisk or Transcend compact flash cards. Any size card 4 to 128GB will be fine.
For normal operation it is not necessary to used fast speed cards as it will not make Nova write any faster.
We do not advise using Lexar, Kingston, Delkin or off brand cards from questionable manufacturers. And please
only buy cards from reliable sources and avoid questionable retailers, because counterfeit cards do exist and
can be unreliable and cause crashing.
If planning to record at 96 kHz or 192 kHz, choose a card that claims 10 MB per second sustained write speed
maximum write speed does not count.
It is recommended to test the cards before use, even if it is a brand/size that has used in the past. To test the
cards simply preform a record test for 15 to 20 minutes, If Nova stops recording or causes a crash it is most
likely a result of bad media.
46
Page 47

Nova Operations Syncing to a Denecke Slate
Syncing Nova to a Denecke Slate
The LTC stream out of the Nova has a “jitter” in the time code signal at 29.97 fps and 23.976 fps. This can result
in the Denecke TS-C or the TS-3 slates identifying the wrong code, if the slate is set to “Auto Set”
(Position 5). In addition if “Auto Set” is used the slate can experience a time code drift.
So when setting the slate to receive time code at 29.97 or 23.976, do not use the auto set mode. Just simply set
the rotary dial to the corresponding time code frame rate. When syncing the slate “Sync Err” will be displayed.
Simply ignore it. The slate will accept the sync and the slate and Nova will stay in perfect sync with each other.
47
Page 48

Zaxcom Nova Connector Pin Assignments
Nova Connector Assignments
Audio Input / Output Connectors (XLR-3)
Pin 1 - Ground
Pin 2 - Signal (+)
Pin 3 - Signal (-)
Audio Output Connectors (TA-5)
Pin 1 - Ground
Pin 2 - Channel A (Left) ( + )
Pin 3 - Channel A (Left) ( - )
Pin 4 - Channel B (Right) ( + )
Pin 5 - Channel B (Right) ( - )
Slate Microphone Input Connector (1/8” TRS)
This is a balanced input and can be used with dynamic microphones. It can also be used unbalanced with low
voltage microphones.
Tip - ( + ) / Hot – Biased to 5 Volts
Ring - ( - ) / Cold – Biased to 5 Volts
Sleeve - Ground
Headphone Output Connectors (1/4” TRS)
Tip - Signal Left
Ring - Signal Right
Sleeve - Signal ground
Power Connectors (Hirose-4 Connector)
Pin 1 - Ground ( - )
Pin 2 - Not Connected
Pin 3 - Not Connected
Pin 4 - DC ( + )
48
Page 49

Zaxcom Nova Connector Pin Assignments
AES Digital Input / Output Connectors (DB-15)
Nova uses a mini DB-15 (DE-15) connector for the AES (digital) inputs and outputs. This connector is where a GPI
remote roll switch would be connected to.
Top row pins: 5, 4, 3, 2, 1
Middle row pins: 10, 9, 8, 7, 6
Bottom row pins: 15, 14, 13, 12, 11
DB -15 Pin
Number
1 IN 3 / 4 2 (+)
2 IN 1 / 2 2 (+)
3 OUT 5 / 6 2 (+)
4 GPI OUT
5 N/C
6 OUT 1 / 2 3 (--)
7 OUT 1 / 2 2 (+)
8 GROUND GROUND 1
9 OUT 3 / 4 3 (--)
10 OUT 3 / 4 2 (+)
11 IN 3 / 4 3 (--)
12 IN 1 / 2 3 (--)
13 OUT 5 / 6 3 (--)
14 GPI IN
15 N/C
IN / OUT
AES
PAIRS
Connects to
XLR Pin
49
Page 50

Zaxcom Nova Updating Firmware
Updating Firmware
Each Nova is shipped with the latest firmware version installed. When newer firmware becomes available, it can be
downloaded from the Zaxcom website: http://www.zaxcom.com/software-updates
Newer version of beta software may be found on the Zaxcom Forums: http://www.zaxcom.com/forum
Updating Nova’s Firmware
1. Format a compact flash card in the Mirror slot. A PC or Mac can be used as well.
2. Using a PC or Mac download the new software named (NovaProgFile_vX.XX.bin) and copy it to the card.
3. With Nova powered down, insert the CF card containing the .bin file into the mirror slot. Please make sure that
only one .bin file is on the card.
4. Press and hold the STAR key while powering on Nova.
5. Once the "Preparing to burn ROM” line is displayed, the STAR key can be released.
6. After the “POWER DOWN NOW” is displayed, cycle the power.
7. Verify that Nova is running the version just installed in the about Nova menu.
Updating the receiver modules firmware using a Zaxcom transmitter
1. Set the frequency on all the receiver modules to the same frequency that the transmitter that is being used
to send the firmware is set to.
2. Set the modules to single mode.
3. Set the modulation to MONO - confirm that the programing transmitter is set to MONO as well.
4. Confirm that the encryption code is set to off on Nova and on the transmitter.
5. Go into the QRX program menu in the RX SYSTEM menu.
6. Press the star key, each module should then display that it is “WATTING” for firmware.
7. Insert the micro SD with the program file (QR2-XXX.BIN) in the programing transmitter.
8. At the transmitter:
• Make sure the transmitter has fully charged batteries installed.
• Proceeded to the send QRX program menu.
• Press the INC key.
• The transmitter will indicate that it found the program on the card and has started sending it.
9. When the program file is being received by Nova and the QR modules are receiving the program file, the
sectors will start counting up.
10. When each module is updated “SUCCESS” will be displayed.
11. If a module does not receive all of the sectors wait, the transmitter will begin resending the firmware again
on its own, and will continue to transmit until manually stopped.
12. When all the modules are updated you may stop the transmitter.
13. Power cycle Nova and confirm that each module is running the updated firmware.
50
Page 51

Zaxcom Nova Support
Product Support
Register your product with Zaxcom: http://zaxcom.com/support/product-registration/
Download the latest Firmware from: http://zaxcom.com/support/updates/
Download the latest User Manuals from: http://zaxcom.com/support/updates/
Submit Technical Questions at: http://www.zaxcom.com/submit-a-technical-question
Submit information for Repair Services at: http://www.zaxcom.com/support/repairs
Join the Zaxcom User Forum at: http://www.zaxcom.com/forum/forum.php
Join the Zaxcom Face Book User Group at: https://www.facebook.com/groups/682199065139938/
51
Page 52

Zaxcom Nova Specifications
Nova Specifications
Analog In
Inputs: 4 Mic/line-level with 48V phantom power and 2 line-level
Connector: 4 x XLR-3F
Mic level input range: -56 to -26 dBu
Line level input range: -10 to +8 dB
Distortion: 0.0015%
ADC bit-depth: 24 bits
Dual ADC input dynamic range: 140 dB with NeverClip™
Clipping level: +28 dBu
Frequency response: 28 Hz to 22 kHz (48 kHz sampling-rate)
THD + noise: 0.0015%
Analog Out
4 Balanced TA5 (6 bus) - 0dBu, -10dBu and -35dBu
Headphone: 1/4 inch stereo bus
Output level: 0 dBu @ -20 dBFS
Output clipping level: +20 dBu
DAC Bit-depth: 24 Bits
DAC Dynamic Range: 115dB
Impedance: 30 ohm
Digital In / Out
AES / AES42 In: 2 Pair (4 Channels)
AES Out: 3 Pair (6 Busses)
Connector: DB-15 mini (DE-15)
AES Sample rate conversion: 32-96 KHz
ZaxNet RF Interface
2.4 GHz Transmitter: 50mW output power
Frequency Range: 2.403 to 2.475 GHz
Modulation Type: Spread Spectrum
Bandwidth: 1MHz
Connector: SMA female
Receiver
QRX212 Receiver module slots: 2
RF Connectors: 2 SMA
RF Impedance: 50 ohm
RF Amp Noise Figure: .5 dB
RF Amp IP3: +30 dB input
RF Filter Band Pass: 35 MHz
RF Tuning Range: 512 - 698 MHz
QRX212 Module
Receivers Channels per Module: 2
Receiver Modulation: Zaxcom Proprietary Digital
Tuning Range: 512 - 698 MHz
Power Consumption: 200 ma @ 12 VDC
Size: 5" x 3" x .8" (L x W x H)
52
Page 53

Zaxcom Nova Specifications
Recording
Track count: 12
Bit-depth: 24 bits
Sample rates (kHz): 44.1, 47.952, 48, 48.048, 96, and 192
(192 4-track maximum)
Head room: 20 to 44 dB
Format: MARF II, .BWF
Max Pre-record duration: 10 seconds
Data Storage
Internal: Dual Compact Flash
Mixer Type: 32 bit floating point DSP
A-D / D-A resolution: 24 bit
Effects
Delay: 0 to 60 mS in .1mS steps
Notch filter: 2 band, 20 Hz to 20 kHz frequency range adjustable
Compressor type: soft knee with side chain
High Pass Filter: 20 Hz to 230 Hz
Timecode Reader/Generator
Timecode type: SMPTE
Connector: BNC x 2
Input Voltage: 1-4VPP
Output Voltage: 2VPP
Clock Accuracy: 1.54 PPM
Timecode Frame-rates: 23.98, 24, 25, 29.97NDF, 29.97DF, 30NDF, 30DF
Power
External: 8 to 18 VDC
Power Connecter: Hirose
Battery Meter: Yes, on LCD display
Physical
Size (H x W x D) 2.0″ x 8.25″ x 6.0″
Weight: 2 lbs. 9 oz. without QRX212 modules / 3 lbs. 7 oz. loaded with 2 x QRX212 modules
Misc.
Tone Level Selectable: -12 to -20 dB FS
Display: Full color sunlight readable LCD
Meters: Output / Input / Card
Slate Mic: Internal / External
53
Page 54

Zaxcom Warranty Policy and Limitations
Zaxcom Inc. values your business and always attempts to provide you with the very best service.
No limited warranty is provided by Zaxcom unless your Nova (“Product”) was purchased from an authorized distributer or authorized reseller. Distributers may
sell Product to resellers who then sell Product to end users. Please see below for warranty information or obtaining service. No warranty service is provided
unless the Product is returned to Zaxcom Inc. or a Zaxcom dealer in the region where the Product was first shipped by Zaxcom.
Warranty Policy
The Product carries a Standard Warranty Period of one (1) year.
NOTE: The warranty period commences from the date of delivery from the Zaxcom dealer or reseller to the end user.
There are no warranties which extend beyond the face of the Zaxcom limited warranty. Zaxcom disclaims all other warranties, express or implied, regarding the
Product, including any implied warranties of merchantability, fitness for a particular purpose or non-infringement. In the United States, some laws do not allow
the exclusion of the implied warranties.
Troubleshooting & Repair Services
No Product should be returned to Zaxcom without first going through some basic troubleshooting steps with the dealer you purchased your gear from.
To return a product for repair service, go to the Zaxcom Repair Services page http://www.zaxcom.com/repairs and fill in your information; there is no need to
call the factory for an RMA. Then send your item(s) securely packed (in the original packaging or a suitable substitute) to the address that was returned on the
Repair Services page. Insure the package, as we cannot be held responsible for what the shipper does.
Zaxcom will return the warranty repaired item(s) via two-day delivery within the United States at their discretion. If overnight service is required, a FedEx or UPS
account number must be provided to Zaxcom to cover the shipping charges.
*Please note a great resource to troubleshoot your gear is the Zaxcom Forum: http://www.zaxcom.com/forum.
Warranty Limitations
Zaxcom’s limited warranty provides that, subject to the following limitations, each Product will be free from defects in material and workmanship and will
conform to Zaxcom’s specification for the particular Product.
Limitation of Remedies
Your exclusive remedy for any defective Product is limited to the repair or replacement of the defective Product.
Zaxcom may elect which remedy or combination of remedies to provide in its sole discretion. Zaxcom shall have a reasonable time after determining that a
defective Product exists to repair or replace a defective Product. Zaxcom’s replacement Product under its limited warranty will be manufactured from new and
serviceable used parts. Zaxcom’s warranty applies to repaired or replaced Product for the balance of the applicable period of the original warranty or thirty days
from the date of shipment of a repaired or replaced Product, whichever is longer.
Limitation of Damages
Zaxcom’s entire liability for any defective Product shall, in no event, exceed the purchase price for the defective Product. This limitation applies even if Zaxcom
cannot or does not repair or replace any defective Product and your exclusive remedy fails of its essential purpose.
No Consequential or Other Damages
Zaxcom has no liability for general, consequential, incidental or special damages. These include loss of recorded data, the cost of recovery of lost data, lost
profits and the cost of the installation or removal of any Product, the installation of replacement Product, and any inspection, testing or redesign caused by any
defect or by the repair or replacement of Product arising from a defect in any Product.
In the United States, some states do not allow exclusion or limitation of incidental or consequential damages, so the limitations above may not apply to you.
This warranty gives you specific legal rights and you may also have other rights, which vary from state to state.
Your Use of the Product
Zaxcom will have no liability for any Product returned if Zaxcom determines that:
• The Product was stolen.
• The asserted defect:
• Is not present,
• Cannot reasonably be fixed because of damage occurring when the Product is in the possession of someone other than Zaxcom, or
• Is attributable to misuse, improper installation, alteration, including removing or obliterating labels and opening or removing external covers (unless
authorized to do so by Zaxcom or an authorized Service Center), accident or mishandling while in the possession of someone other than Zaxcom.
• The Product was not sold to you as new.
Additional Limitations on Warranty
Zaxcom’s warranty does not cover Product, which has been received improperly packaged, altered or physically abused.
54
 Loading...