

Page 1

0
ZAVIO Outdoor IR Dome
Quick Installation Guide
Page 2
1
Quick Installation Guide
Please follow the installation steps below to set up your IP Camera.
Check the package contents with the list below. See P.1
Physical overview. See P.2
I/O Terminal Block Circuit. See P.3
I/O Terminal Block Pin Definition. See P.3
LED Indicator Definition. See P.4
Installation of hardware and connection of all cables. See P.4
MAC OS: using Safari Browser. See P.7
Z Plus. See P.9
Lighting environment.& Change the Web Interface into your preferred language
See P.11
Package Contents
Camera
IP Camera
Quick Installation Guide
Brief product information and quick installation
Accessory
Alignment Sticker
Screw pack for wall and ceiling mounting
Desiccant
Screw driver
Waterproof connector
Adapter plate
Software
The following software and information are available online:
- Video Management Software
- Z PLUS
- User manuals
- Camera Language Packs
You may download the above at http://www.zavio.com/downloads.php or you
may scan the below QR-Code.
To activate Video Management Software, please contact with Zavio FAE
(techsupport@zavio.com) to get the license key (Please provide camera’s Model
name/Serial number/MAC).
Page 3

2
Physical overview
CD5220/ CD6230/ CD6330
Page 4

3
I/O Terminal Block Circuit
Note: Please use the supplied waterproof RJ45 connector and seal all connectors tightly to avoid moisture.
I/O Terminal Block Pin Definition
Pin Color
Definition
Description
Max. V/A
Green & White Audio In
Connect the wires of the audio input device to GND
(White) and AUDIO LINE IN (Green).
-
White+Green
&
Orange+Black
Audio Out
Connect the wires of the audio output device to GND
(Orange+Black) and AUDIO LINE OUT (White+Gree n).
-
Purple & Black Alarm In 1
Connect to GND to activate, or leave floating (or
unconnected) to deactivate.
5V DC / 50mA
Red & Black Alarm In 2
Connect to GND to activate, or leave floating (or
unconnected) to deactivate.
5V DC / 50mA
Yellow +
Black & Green
Alarm Out
Relay contact output. Conta ct capacity with resistance
load.
0.3A at 125V AC
or 1A at 30V DC
Brown + Pink RS-485 - -
Page 5
4
LED Indicator
LED
Color
Indication
Network
Green
Solid green when network is established.
Orange
Blink orange when there is network activity.
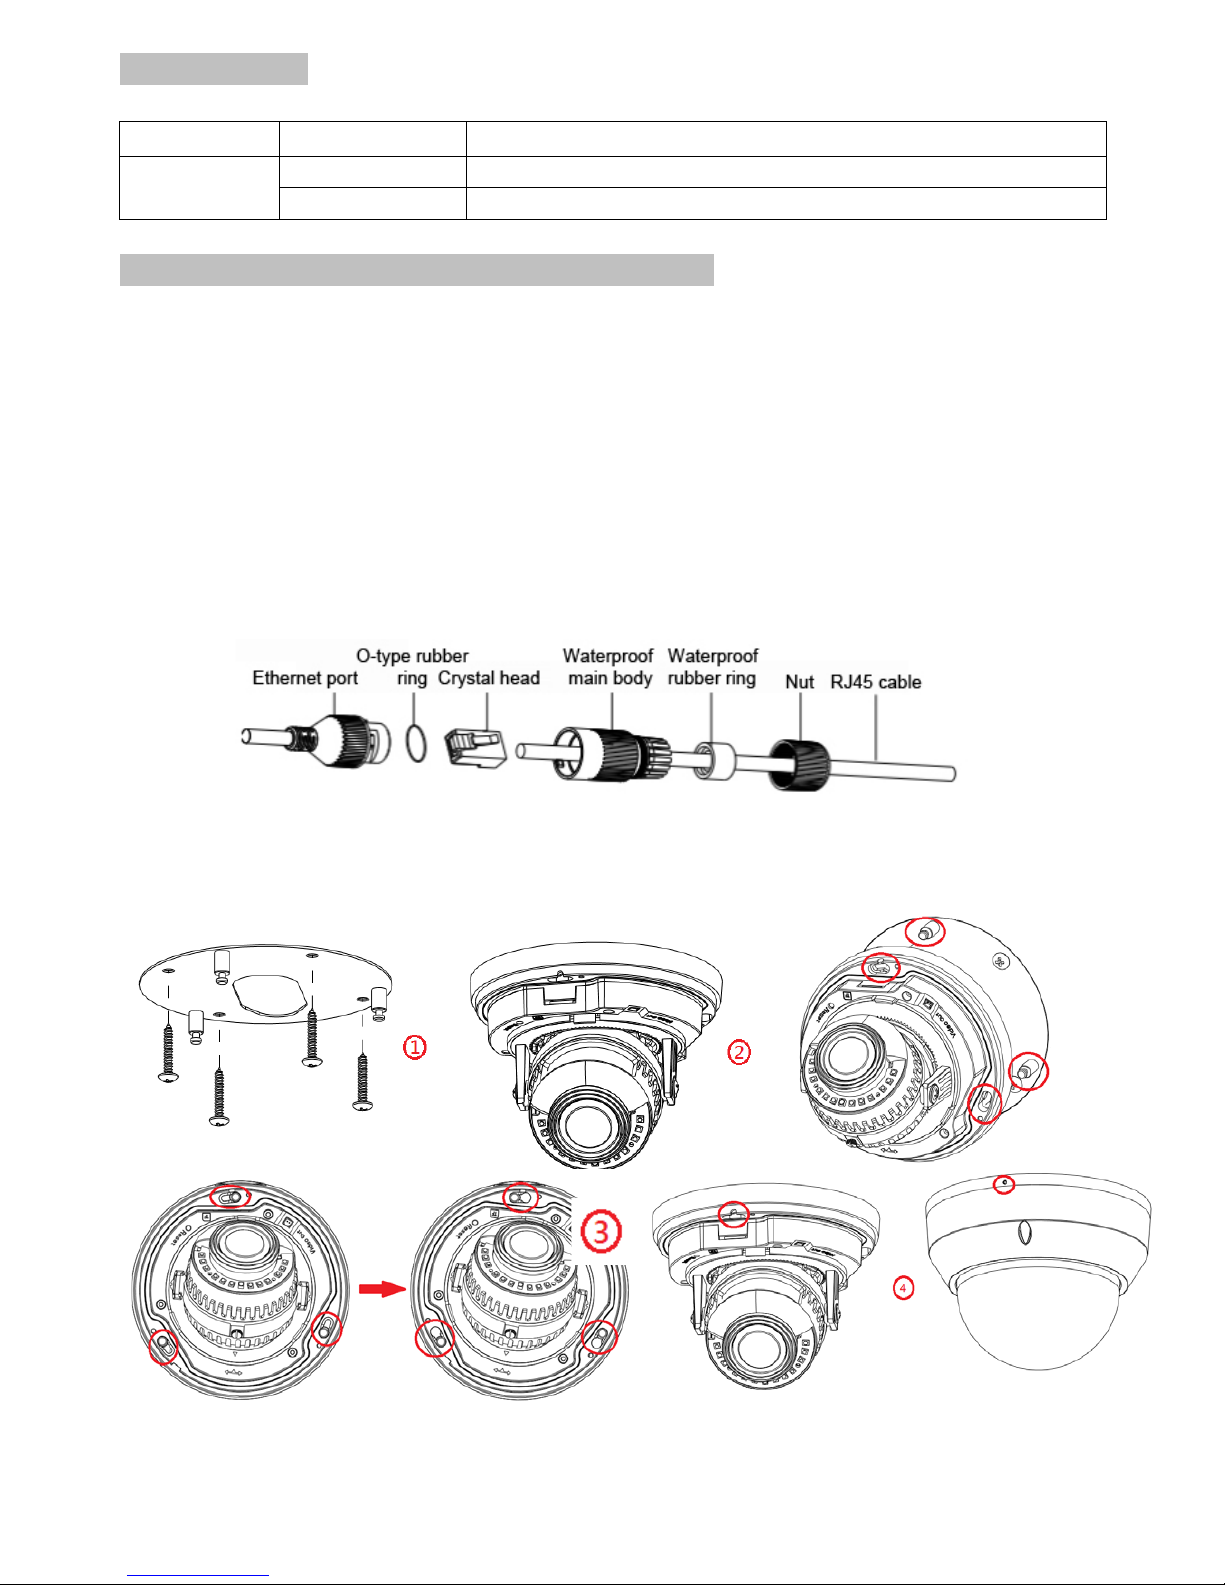
Install the hardware and connect all cables
A. RJ45 waterproof connector
1) Make sure all components are assembled as shown on the below graph.
2) Check that the ethernet port and the waterproof main body are tightly fasten.
3) Please use the supplied waterproof RJ45 connector and seal all connectors
tightly to avoid moisture.
B. Wall and ceiling mounting
(1) Adapter plate (in accessory)
Cover the bubble and seal the camera using the supplied tamper-proo f s cre ws .
Page 6

5
(2) Junction box AZ-J01 (optional accessory)
(3) Wall mount AD-M06 (optional accessory)
Page 7

6
C. Connect all cables
E1. Without Power over Ethernet (PoE) connection
1. Connect the power adaptor to the IP Camera.
2. Use a standard RJ-45 network cable and connect the IP Camera to a
hub/switch/router.
E2. Power over Ethernet (PoE)
1. Use a standard RJ-45 network cable and connect the IP Camera to a
PoE-enabled hub/switch/router.
D. To adjust the view angle- 3 axis mechanism design
1) Turn the lens module right and left to your desired pan position.
2) Turn the lens module up and down to your desired tilt position.
3) Turn the lens module to adjust the image orientation to satisfied angle.
Page 8

7
Important:
Make sure the IR LEDs are not blocked by the housing as it will affect the IR performance.
If the image is upside down, please use the image rotate function in Video Setting.
MAC OS using Safari Browser
1. Select Safari Icon
2. Click Bonjour function and select the camera you wish to access.
Page 9

8
3. Enter name and password to login to the IP camera
(Default is admin / admin)
4. Live video will display in the center of your web browser
Page 10

9
Z Plus
A. Get the image of camera with Z Plus.
1. Download Z Plus from ZAVIO official website..
2. Follow the instruction and install Z Plus.
3. Click the icon and get into the software.
Page 11

10
B. Cam era setti ng
Page 12

11
Lighting environment setting
Default setting for lighting environment is Auto. You may change exposu re
frequency to 50 or 60 Hz at Set ti ng > Live Vi ew > Ca m era Setting > Image
Setting.
Change the Web Interface into your preferred language
Before accessing the Setting page to change the language of the web interface,
you must download the language pack.
1. Go to
http://www.zavio.com/downloads.php and download the language pack
corresponding to your IP camera model.
2. Go to the IP camera setting page and upload the preferred language from the
language pack downloaded from step 1.
Setting > System > Maintenance > Language > Upload
3. Once the upload is complete, the browser will automatically change the
language.
 Loading...