


FREEZER
CONGELADOR
CONGELADOR
ZV 210 R
INSTRUCTION BOOKLET
LIBRO DE INSTRUCCIONES
MANUAL DE INSTRUÇÕES
2222 050-51
General Safety
¥ This appliance is designed to be operated by
adults. Children should not be allowed to tamper
with the controls or play with the product.
¥ It is dangerous to alter the specifications or modi-
fy this product in any way.
¥ Before any cleaning or maintenance work is car-
ried out, be sure to switch off and unplug the
appliance.
¥ This appliance is heavy. Care should be taken
when moving it
¥ ce lollies can cause frost burns if consumed
straight from the appliance.
Service/Repair
¥ Any electrical work required to install this appli-
ance should be carried out by a qualified electrician or competent person
¥ This product should be serviced by an authorized
Service Centre, and only genuine spare parts
should be used.
¥ Under no circumstances should you attempt to
repair the appliance yourself. Repairs carried out
by inexperienced persons may cause injury or
more serious malfunctioning. Refer to your local
Service Centre, and always
Use
¥ The domestic refrigerators and freezers are
designed to be used specifically for the storage
of edible foodstuffs only.
¥ Frozen food must not be re-frozen once it has
been thawed out.
¥ ManufacturersÕ storage recommendations should
be strictly adhered to. Refer to relevant instructions.
¥ The inner lining of the appliance consists of
channels through which the refrigerant passes. If
these should be punctured this would damage
the appliance beyond repair and cause food loss.
DO NOT USE SHARP INSTRUMENTS to scrape
off frost or ice. Frost may be removed by using
the scraper provided. Under no circumstances
should solid ice be forced off the liner. Solid ice
should be allowed to thaw when defrosting the
appliance. See defrost instructions.
¥ Do not place carbonated or fizzy drinks in the
freezer as it creates pressure on the container,
which may cause it to explode, resulting in damage to the appliance.
Installation
¥ There are working parts in this product which
heat up. Always ensure that there is adequate
ventilation as a failure to do this will result in
component failure and possible food loss. See
installation instructions.
¥ Care must be taken to ensure that the appliance
does not stand on the electrical supply cable.
Important: if the supply cord is damaged, it must
be replaced by a special cord or assembly available from the manufacturer or its service agent.
¥ Parts which heat up should not be exposed.
Wherever possible the back of the product
should be against a wall.
¥ If the appliance has been transported horizontal-
ly, it is possible that the oil contained in the compressor flows in the refrigerant circuit. It is advisable to wait at least two hours before connecting
the appliance to allow the oil to flow back in the
compressor.
Environment Protection
This appliance does not contain gasses which
could damage the ozone layer, in either its
refrigerant circuit or insulation materials. The
appliance shall not be discarded together with
the urban refuse and rubbish. Avoid damaging
the cooling unit, especially at the rear near the
heat exchanger. Information on your local disposal sites may be obtained from municipal
authorities. The materials used on this appliance
marked by the symbol are recyclable.
It is most important that this instruction book should be retained with the appliance for future reference. Should the appliance be sold or transferred to another owner, or should you move house and
leave the appliance, always ensure that the book is supplied with the appliance in order that the new
owner can be acquainted with the functioning of the appliance and the relevant warnings.
If this appliance featuring magnetic door seals is to replace an older appliance having a spring lock
(latch) on the door or lid, be sure to make that spring lock unusable before you discard the old appliance. This will prevent it from becoming a death-trap for a child.
These warnings are provided in the interest of safety. You must read them carefully before installing or
using the appliance.
WARNINGS
Printed on recycled paper2
3
Warnings 2
Use 3
Cleaning the interior 3
Control panel 3
Operation 3
Temperature regulation 4
Fast freezing 4
Warning light 4
Freezing fresh food 4
Storage of frozen food 4
Thawing 4
Ice-cube production 4
Cold accumulator 4
Hints 5
Hints for freezing 5
Hints for storage of frozen food 5
Maintenance 6
Periodic cleaning 6
Periods of no operation 6
Defrosting 6
Customer service and spare parts 7
Installation 7
Location 7
Electrical connection 7
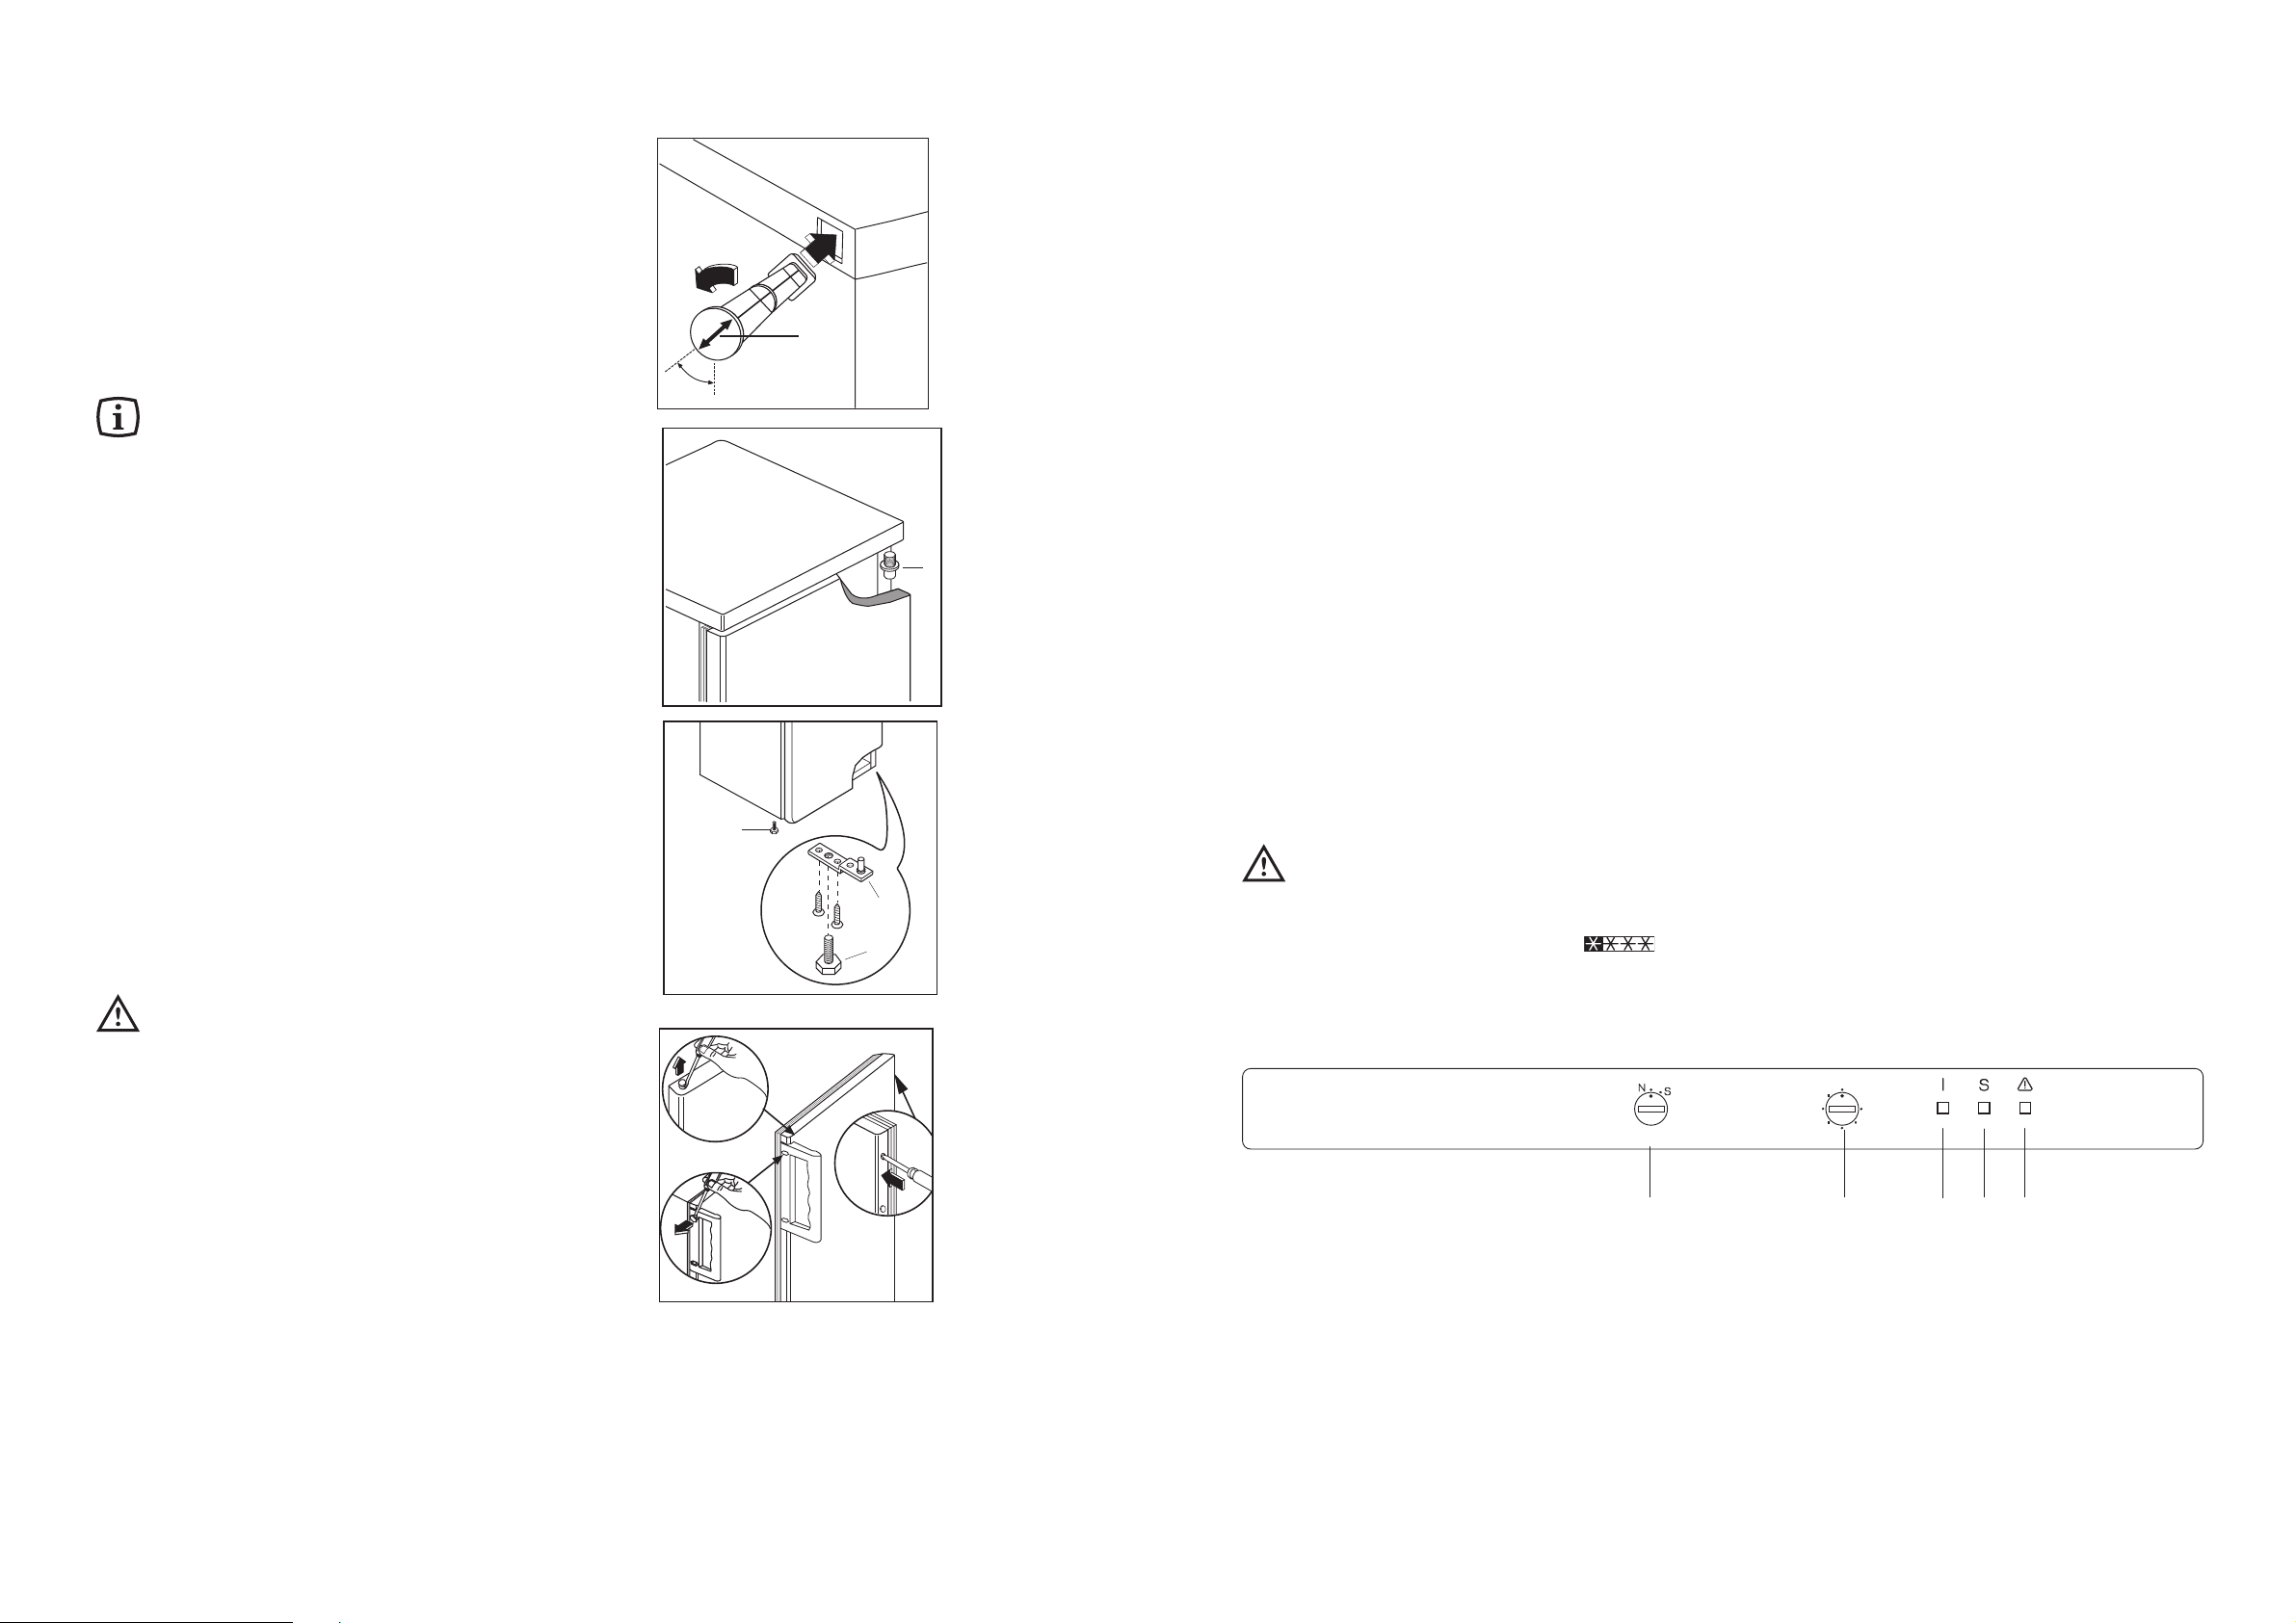
Rear spacers 8
Door reversal 8
Cleaning the interior
Before using the appliance for the first time, wash
the interior and all internal accessories with lukewarm water and some neutral soap so as to remove
the typical smell of a brand-new product, then dry
thoroughly.
Do not use detergents or abrasive
powders, as these will damage the finish.
CONTENTS
USE
This freezer has been marked with the symbol, which means that it is suited to the freezing of fresh
foods, the conservation of frozen foods and the production of ice-cubes.
The control panel
E
DCB
A
0
6
5
4
3
2
1
A. N/S knob
B. Thermostat knob
C. Function indicator light
D. Quick-freezing indicator light
E. Temperature alarm light
Operation
Insert the plug into the wall socket. The pilot light
will light up, indicating that the appliance is in
operation.
To stop the appliance, turn the thermostat knob to
position Ç0È.
2222 050-51
22
Espa•adores traseiros
Dentro do envelope de pl‡stico juntamente com toda
a documenta•‹o relativa ao electrodomŽstico,
tambŽm existem dois espa•adores para inserir nos
furos apropriados, que se encontram nas traseiras
do aparelho. Inserir os espa•adores nos furos
antepostos, assegurando-se que a seta (A) esteja
orientada no sentido que demonstra a Ilustra•‹o.
Sucessivamente rod‡-los de 45¡ (seta (A) na
direc•‹o vertical) atŽ que se bloqueiem na posi•‹o
correcta.
Reversibilidade da porta
Desligue o aparelho da corrente antes de efectuar
qualquer opera•‹o. Para mudar o sentido de
abertura da porta proceda da seguinte maneira:
1. desmontar a dobradi•a inferior (1), e o pŽ (2);
2. retirar a porta do perno (G), desaparafusar este e
voltar a aparafus‡-lo no lado oposto;
3. desaparafusar o pŽ anterior esquerdo (3) e voltar
a aparafus‡-lo no lado oposto;
4. desaparafusar, no lado anterior esquerdo, os dois
parafusos que disfar•am os furos para a fixa•‹o
da dobradi•a;
5. voltar a montar a porta;
6. voltar a montar a dobradi•a inferior (1), e o pŽ (2)
no lado oposto seguindo as indica•›es da figura;
7. inverter o puxador tirando primeiro as pe•as de
cobertura dos parafusos, aplicadas por engate.
Os furos n‹o utilizados s‹o disfar•ados por
pequenas tampas de pl‡stico que v•m dentro do
saco de acess—rios.
Aten•‹o
Depois de mudado o sentido de abertura da porta,
controre se a veda•‹o magnŽtica fica pegada ao
m6vel. Se a temperatura ambiente for fria (por ex.
no inverno) pode acontecer que a veda•‹o n‹o
pegue perfettamente ao m6vel. Nesse caso, pode
esperar pela natural recupera•‹o da veda•‹o ou
tornar mais r‡pido esse processo aquecendo a parte
interessada com um normal secador de cabelos.
G
D715 PIED/M
1
2
3
D162/1
PR60
A
45°

4
Temperature regulation
The temperature is automatically regulated and can
be increased to achieve a higher temperature
(warmer) by rotating the thermostat knob towards
minimum or reduced (colder) by rotating the knob
towards maximum. However, the exact setting
should be chosen keeping in mina that the
temperature inside the refrigerator depends on:
room temperature;
how often the door is opened;
the quantity of food stored;
location of appliance.
A medium setting is generally the most suitable.
To stop operation, simply turn the thermostat knob to
position Ç0È.
Fast freezing
For quick-freezing, turn the N/S knob (A) to the ÇSÈ
symbol. The quick-freezing indicator light (D) will
then light up.
Warning light
Warning light (E) lights up when the temperature
inside the freezer compartment has increased to a
value which might endanger the long-term storage of
food in the compartment. When the appliance is
switched on for the first time or when food is placed
in the compartment for freezing, it is normal for this
light to remain on until the temperature has reached
the level required for correct storage.
Freezing food
Set the freezer to quick-freezing operational status.
Wait at least 3 hours before introducing fresh foods
into the freezer if it has only recently been turned on.
If the freezer has already been working for some
time, turn the respective knob to the ÇSÈ position at
least 24 hours before introducing the food into the
freezer in order to ensure better freezing results.
This period of time may be shortened according to
the quantity of food. When quick-freezing is being
performed, the compressor works continuously,
employing all of its refrigerating power to the
maximum. Keep the knob as it is for another 24
hours after the introduction of the food into the
freezer and then return the knob to the ÇNÈ position.
Bear in mind the freezing capacity of your freezer;
that is, the maximum quantity of food that may be
frozen in 24 hours. This freezing capacity is 22 kg.
Distribute the packages in the two upper baskets.
Arrange the foods to be frozen in the upper
compartments. When the necessary freezing time
has elapsed, distribute the newly-frozen foods into
the drawers to free the compartments for new foods
to be frozen.
Important
When electrical current happens to be cut off, the
freezer door must not be opened. If the power failure
is short (up to 6-8 hours) and the freezer is full, there
is no risk that the food will spoil. If the power failure
lasts longer, the food must be consumed as rapidly
as possible, or otherwise cooked and re-frozen
again.
Note
On the inner door you will find a list of foods followed
by a number. These numbers indicate the maximum
period of time for which the food in question may be
conserved (in months).
Frozen food storage
When the freezer is being turned on for the first time,
or after a prolonged period of disuse, turn the N/S
knob to the Quick-freezing position and then wait at
least two hours before introducing the food to be
conserved. You may then return the knob to the ÇNÈ
position. This two-hour waiting period may be
avoided if the freezer has already been in operation.
Thawing out frozen foods
Frozen foods must be allowed to thaw out before
use either in the refrigerator (meat, poultry, fish, etc.)
or at room temperature (ali other foods) according to
the available time. Frozen products which come in
small-sized or separate packages may be cooked
directly without thawing; obviously, in this case, the
cooking time will fast a little longer.
Ice-cube production
Fill the trays with water to 3/4 of their height, to
permit the expansion of the ice, then put them in the
space below the quick-freezing compartment (see
the diagram). If the water in your area is rich in
minerai salts (limestone, in particular), we advise you
to use noncarbonated mineral water for the
production of ice cubes. The ice-cubes may be
shaken out of the plastic trays with a slight twist.
Cold accumulator
A cold accumulator is supplied in the freezer; this
increases the leght of time for which food will keep in
the event of the power failure or breakdown. It must
be placed in the top drawer.
21
Coloca•‹o
Coloque o aparelho longe de qualquer fonte de calor
(aquecimento, fog›es, ou raios solares demasiado
intensos). Para conseguir bons resultados, o
aparelho deve ser colocado num local onde a
temperatura seja compreendida entre
+18¡C e +43¡C (classe T);
+18¡C e +38¡C (classe ST);
+16¡C e +32¡C (classe N);
+10¡C e +32¡C (classe SN).
A classe Ž indicada na placa sinalŽtica.
Verifique que nas partes posterior, superior e inferior
o ar pode circular livremente. Para um melhor
funcionamento verifique que a parte superior t•m
pelo menos 100 mm de distancia de algum m—vel
suspenso por cima do aparelho (A). A solu•‹o
prefir’vel Ž indicada na Fig. B (sem m—vel). Um ou
v‡rios pŽs niveladores situados na base t•m a
fun•‹o de nivelar o aparelho correctamente.
Importante
Verifique se a tomada de corrente da parede est‡
em bom estado e apta a receber a ficha do fio de
alimenta•‹o do aparelho.
Esta œltima est‡ conforme ˆs normas em vigor e
possui uma entrada para a liga•‹o ˆ terra.
Essa ficha pode ser ligada a qualquer tomada de
corrente desde que esta tenha uma ponta de liga•‹o
ˆ terra. No caso em que a tomada n‹o tenha a
liga•‹o ˆ terra, ligar o aparelho a uma instala•‹o de
liga•‹o ˆ terra separada, conforme as normas em
vigor, consultandopara isso um tŽcnico
especializado.
A Casa Construtora declina toda e qualquer
responsabilidade no caso de esta norma contra
os acidentes n‹o ser cumprida e se verificarem
acidentes originados por deficiente liga•‹o ˆ
terra, ou falta dela .Este aparelho est‡ conforme
com a Directiva da C.E.E n¡ 87/308 de 2/6/87
respeitante ˆ supress‹o das interfer•ncias radioelŽctricas.
Este aparelho est‡ conforme as seguintes
Directrizes Comunit‡rias:
- 73/23 CEE 19/02/73 (Baixa Tens‹o) e sucessivas
modifica•›es;
- 89/336 CEE 03/05/89 (Compatibilidade
ElectromagnŽtica) e sucessivas modifica•›es.
Liga•‹o elŽctrica
Verifique, antes de ligar o aparelho, se a voltagem e
a frequ•ncia indicadas na placa sinalŽtica
correspondem ˆs da sua rede.
100 mm10 mm
10 mm
A
B
NP006
ASSISTæNCIA TƒCNICA E PE‚AS DE
SUBSTITUI‚ÌO
Caso o aparelho apresentar anomalias de
funcionamento, controle:
¥ se a ficha est‡ bem inserida na tomada de
corrente e se o interruptor da instala•‹o elŽctrica
est‡ fechado;
¥ se falta a energia elŽctrica;
¥ se os comandos est‹o na posi•‹o correcta;
¥ se, havendo sinais de ‡gua no fundo do
refrigerador, o orif’cio de escoamento da ‡gua de
descongela•‹o est‡ obstruido (veja cap’tulo
ÒDescongela•‹oÓ).
Ap—s esses controlos, se a anomalia de
funcionamento persistir, dirija-se ao Centro de
Assist•ncia TŽcnica mais pr—ximo.
Para uma interven•‹o sol’cita Ž importante, no
momento da chamada, indicar as refer•ncias
completas do aparelho, ou seja moderlo e
nœmero de sŽrie, que figuram no cart‹o da
garantia ou na placa sinalŽtica no interno do
aparelho, lado esquerdo em baixo.
INSTALA‚ÌO
 Loading...