

Zanussi ZT 415 User Manual

INSTRUCTION BOOKLET
DISHWASHER
ZT 415

CONTENTS
Warnings . . . . . . . . . . . . . . . . . . . . . . . . . . . . . . . . . . . . . . . . . . . . . . . . . . . . . . . . . . . . . . . . . . . . . . .page 3
Installation . . . . . . . . . . . . . . . . . . . . . . . . . . . . . . . . . . . . . . . . . . . . . . . . . . . . . . . . . . . . . . . . . . . . . .page 4
Positioning, levelling, water supply connections, water outlet connection . . . . . . . . . . . . . . . . . . . . . . . .page 4
The electrical connections . . . . . . . . . . . . . . . . . . . . . . . . . . . . . . . . . . . . . . . . . . . . . . . . . . . . . . . . . . . .page 5
Use . . . . . . . . . . . . . . . . . . . . . . . . . . . . . . . . . . . . . . . . . . . . . . . . . . . . . . . . . . . . . . . . . . . . . . . . . . . . .page 6
Control panel . . . . . . . . . . . . . . . . . . . . . . . . . . . . . . . . . . . . . . . . . . . . . . . . . . . . . . . . . . . . . . . . . . . . . .page 6
The water softener, filling with salt . . . . . . . . . . . . . . . . . . . . . . . . . . . . . . . . . . . . . . . . . . . . . . . . . . . . . .page 7
Use of rinse aid, use of detergent . . . . . . . . . . . . . . . . . . . . . . . . . . . . . . . . . . . . . . . . . . . . . . . . . . . . . . .page 8
Loading the machine, use of the lower basket, use of the upper basket . . . . . . . . . . . . . . . . . . . . . . . . .page 9
Adjusting the height of the upper basket . . . . . . . . . . . . . . . . . . . . . . . . . . . . . . . . . . . . . . . . . . . . . . . . .page 10
Helpful hints . . . . . . . . . . . . . . . . . . . . . . . . . . . . . . . . . . . . . . . . . . . . . . . . . . . . . . . . . . . . . . . . . . . .page 10
Washing programmes . . . . . . . . . . . . . . . . . . . . . . . . . . . . . . . . . . . . . . . . . . . . . . . . . . . . . . . . . . .page 11
Operating sequence . . . . . . . . . . . . . . . . . . . . . . . . . . . . . . . . . . . . . . . . . . . . . . . . . . . . . . . . . . . .page 12
Maintenance and cleaning . . . . . . . . . . . . . . . . . . . . . . . . . . . . . . . . . . . . . . . . . . . . . . . . . . . . . .page 13
Cleaning the central filters, cleaning the large filter, internal and external cleaning . . . . . . . . . . . . . . . . .page 13
Prolonged periods of Non-Operation . . . . . . . . . . . . . . . . . . . . . . . . . . . . . . . . . . . . . . . . . . . . . . . . . . . .page 13
Servicing . . . . . . . . . . . . . . . . . . . . . . . . . . . . . . . . . . . . . . . . . . . . . . . . . . . . . . . . . . . . . . . . . . . . . . .page 14
Building-in . . . . . . . . . . . . . . . . . . . . . . . . . . . . . . . . . . . . . . . . . . . . . . . . . . . . . . . . . . . . . . . . . . . . . .page 16
Peace of mind for twenty four months . . . . . . . . . . . . . . . . . . . . . . . . . . . . . . . . . . . . . . . . . .page 18
TECHNICAL SPECIFICATIONS
DIMENSIONS Width cm 44,6
Height cm 82 - 88
Max depth cm 55,5
Max depth with door open cm 115
ELECTRICAL CONNECTION Voltage 220-240 V/50Hz
POWER OF HEATING ELEMENT 2570 W
OVERALL POWER 2770 W
WATER SUPPLY PRESSURE minimum 7 psi - 49 KN/cm
maximum 110 psi - 758 KN/cm
CAPACITY (STANDARD IEC PLACE SETTINGS) 9
CONSUMPTION: Water 18 lt
Electricity 1.2 kW/h
This appliance complies with the following E.E.C. Directives:
- 73/23 of 19.2.73 (Low Voltage Directive) and subsequent modifications;
- 89/336 of 3.5.89 (Electromagnetic Compatibility Directive) and subsequent modifications.
PID20GB
2
2
2

WARNINGS
It is most important that this instruction book should be retained with the appliance for future reference.
Should the appliance be sold or transferred to another owner, or should you move house and leave the
appliance, always ensure that the book is left with the appliance in order that the new owner can get to
know the functioning of the appliance and the relevant warnings.
These warnings are provided in the interest of safety. You MUST read them carefully before installing or
using the appliance.
Installation
■ This appliance is heavy. Care should be taken
when moving it.
■ It is dangerous to alter the specifications or attempt
to modify this product in any way.
■ Care must be taken to ensure that the appliance
does not stand on the electrical supply cable.
■ Any electrical work required to install this appliance
should be carried out by a qualified electrician or
competent person.
■ Any plumbing work required to install this
appliances should be carried out by a qualified
plumber or competent person.
■ Built-in dishwashers only: The appliance must be
secured to the underside of the worktop using the
brackets provided. Failure to do this could result
in an unstable appliance which may cause damage
or injury.
Child Safety
■ This appliance is designed to be operated by
adults. Children should not be allowed to tamper
with the controls or play with the product.
■ Do not put in your dishwasher; cutlery with wooden
or horn handles or glued parts, bronze cutlery,
saucepans with wooden handles, unless they are
sold as dishwasher proof, aluminium ware, crystal
ware, leaded glass, plastic articles unless sold as
dishwasher proof, antique china or fine decorated
china unless sold as dishwasher proof. Always
check with the manufacturer of the item if in any
doubt.
■ A chemical reaction can occur between silver
cutlery and stainless steel cutlery. As a precaution,
do not wash together.
■ Care should be taken when cleaning the bottom
door seal and hinge area as any exposed metal
edges may cut if care is not taken.
■ This product should be serviced by an authorised
Zanussi engineer, and only genuine Zanussi spare
parts should be used.
■ Under no circumstances should you attempt to
repair the machine yourself. Repairs carried out by
inexperienced persons may cause injury or serious
malfunctioning. Contact your local Zanussi Service
Centre. Always insist on genuine Zanussi Spare
Parts.
Conservation
During Use
■ Zanussi dishwashers are designed to be used for
washing normal household utensils. Items that are
contaminated by petrol, paint, steel or iron debris,
corrosive, acidic or alkaline chemicals are not to be
washed in a dishwasher.
■ Under no circumstances should you open the door
whilst,the appliance is in operation. Always turn off
the appliance before opening the door.
■ When finishing loading or unloading close the door,
as an open door can be a hazard.
■ Unplug the appliance and turn off the water after
use.
■ If your house is fitted with a water softening unit or if
you live in a soft water area, it is not necessary to
add salt to the water softening unit in the dishwasher.
In the interests of the Environment:
When disposing of your old appliance:
■ Help to keep your country tidy - use authorised
disposal sites for your old appliances.
■ The materials used on this appliance marked with
the symbol are recyclable.
■ Check with your local Council or Environmental
Health Office to see if there are facilities in your
area for re-cycling this appliance.
■ If you are discarding an old appliance that has a
lock or catch on the door, you must ensure that it is
made unusable to prevent young children being
trapped inside.
PAV04GB
3
INSTALLATION
Remove all packaging before positioning the
machine.
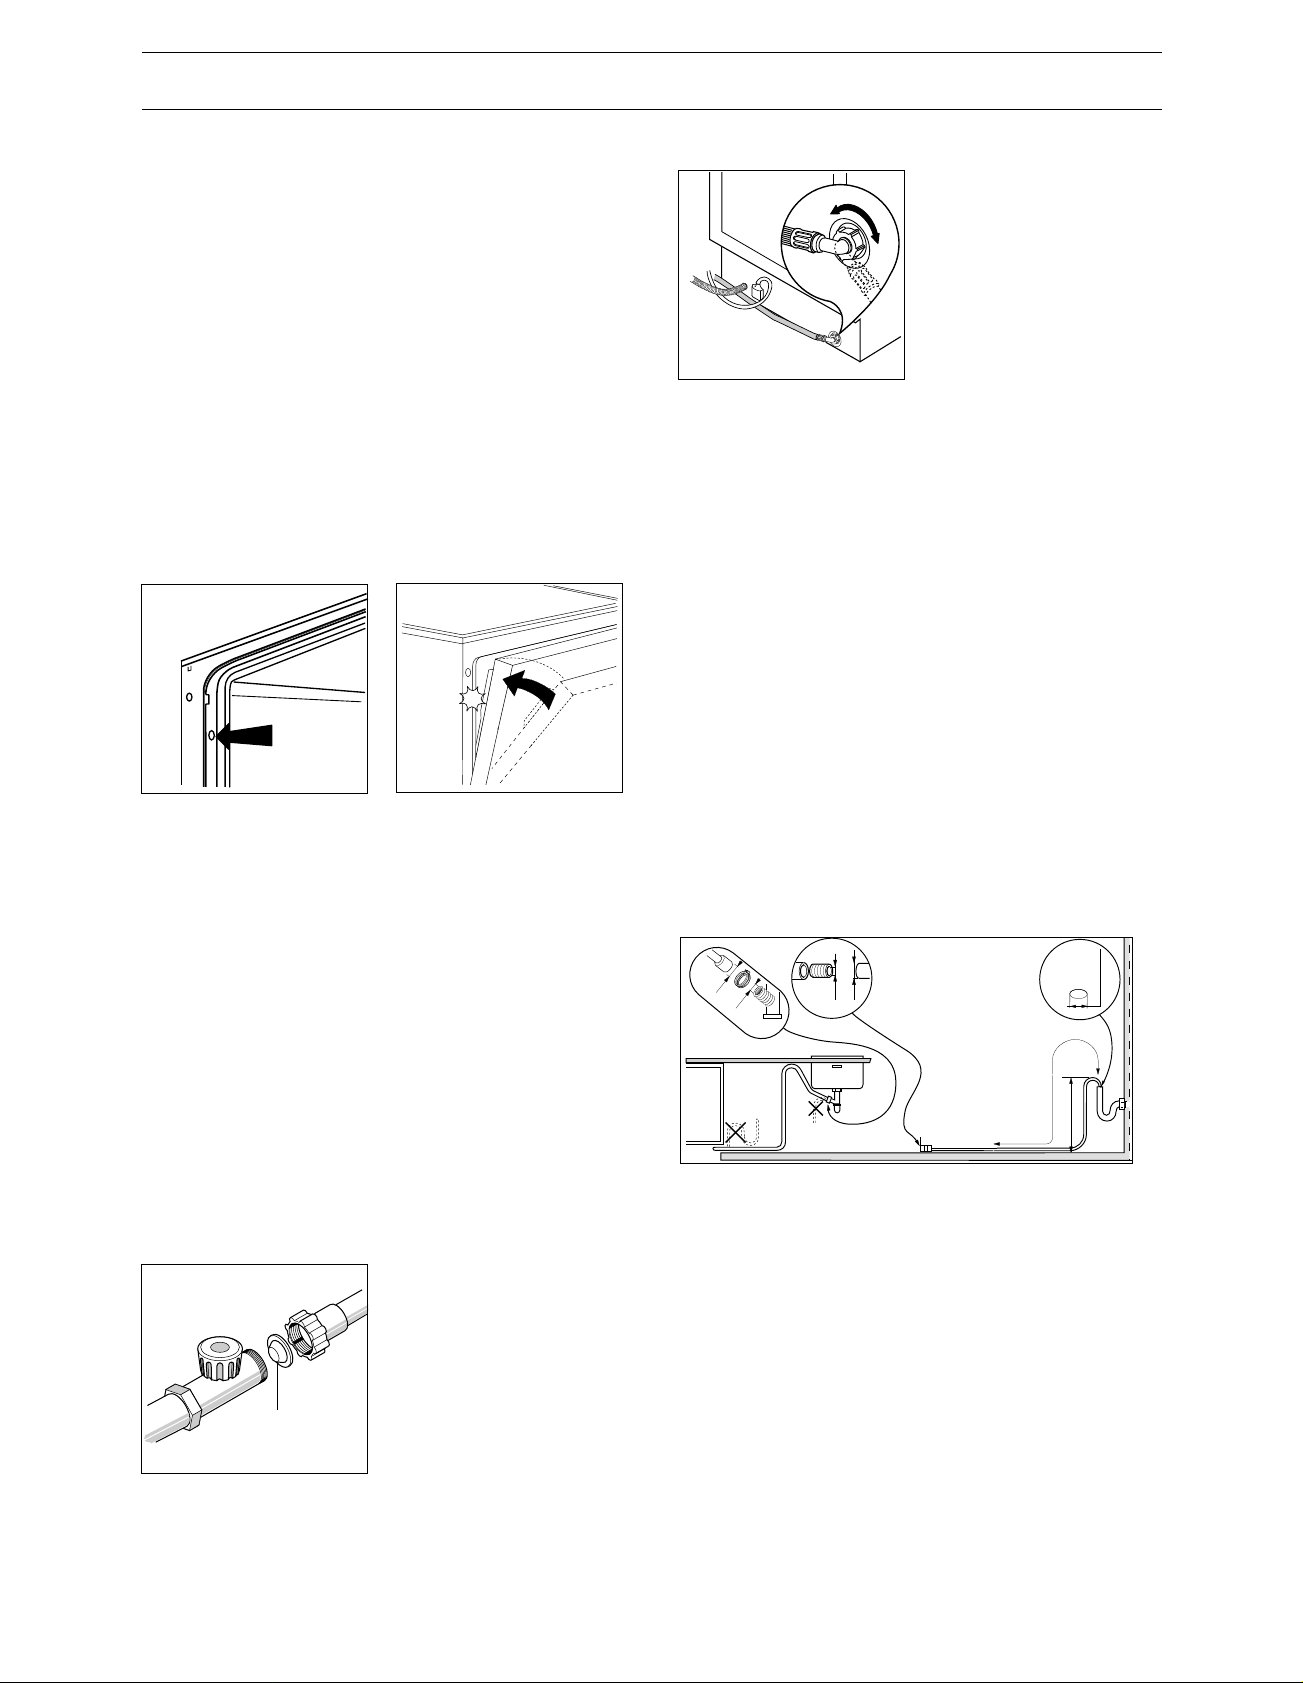
Positioning
If possible, position the machine next to a water tap
and a drain.
The dishwasher features fill and drain hoses which
can be turned either to the left or the right to suit the
installation .
Levelling
Good levelling is essential for correct closure and
sealing of the door.
When the appliance is correctly levelled, the door will
not catch on the spacers on either side of the cabinet.
IN11
IN12
If the door does not close correctly, loosen or tighten
the adjustable support feet, until the machine is
perfectly level.
Water Supply Connections
This dishwasher must be permanently plumbed into a
cold water supply.
The water pressure must be within the limits given in
the technical specifications, as it will not function correctly if pressure is outside these specifications.
To make this easier, the
hose itself may be turned to
the left or the right. In either
case, be sure to incorporate
the strainer (A) supplied
with the machine into the
joint. See picture.
CA06
Caution: the retaining ring must be correctly fitted to
avoid water leaks.
Avoid bends or kinks in the hose which could prevent
or slow down the flow of water.
If the machine is connected to new pipes or pipes
which have not been used for a long time, you are
advised to run the water for a few minutes before
connecting the inlet hose. This will prevent deposits of
sand or rust clogging the inlet hose filter.
Water Outlet Connection
The end of the drain hose can be connected as
follows:
to the sink outlet siphon, securing it if necessary with
a clip;
to a wall outlet provided with vent-hole, minimum
internal diameter 4 cm;
The waste connection must be at a height of between
30 cm (minimum) and 100 cm (maximum) from the
floor.
Ø 21
Ø 18
Ø 18
Ø 21
min 4 cm
Your local Water Authority will advise you on the average
mains pressure in your area.
Where the water is supplied via a cold water storage
cistern, you can work out the pressure yourself by measuring the vertical distance (or «head») between the
machine's inlet hose and the outlet from the cold water
storage cistern, allowing roughly 1 psi for every 2 feet.
For making the connection
itself, the coupling nut fitted
to the machine's supply
hose is designed to screw
onto either a 3/4 inch gas
thread spout, or to a pur-
A
pose made quick-coupling
tap such as the Press
CA04
Block.
CS05
+ 2 m max
It makes no difference which way the drain hose
faces, either to the right or left of the dishwasher.
Avoid bending or kinking the hose as this could
prevent or slow down the discharge of water.
If you use a drain hose extension it must be no longer
than 2 metres and its internal diameter must be no
smaller than the diameter of the hose provided.
Likewise the internal diameter of the couplings used
for connection to the waste outlet must be no smaller
than the diameter of the drain hose.
Note: The sink plug must not be in place when the
machine is draining as this could cause the water to
siphon back into the machine.
PIN07GB
4
min 30 cm
max 100 cm
The electrical connections
WARNING: THIS APPLIANCE MUST BE EARTHED.
The manufacturer declines any liability should
this safety measure not be observed.
A replacement cover/carrier must be obtained from
your local Zanussi Service Force Centre whose
address is listed in the Customer Care Booklet which
accompanies your instruction manual.
This appliance complies with the following E.E.C. Directives:
If the plug that is fitted to your appliance is not
suitable for your socket outlet, it must be cut off and
the appropriate plug fitted.
Remove the fuse from the cut off plug.
The cut off plug should then be disposed of to prevent
the hazard of shocks in case it should be plugged into
a 13 amp socket in another part of your home.
Important
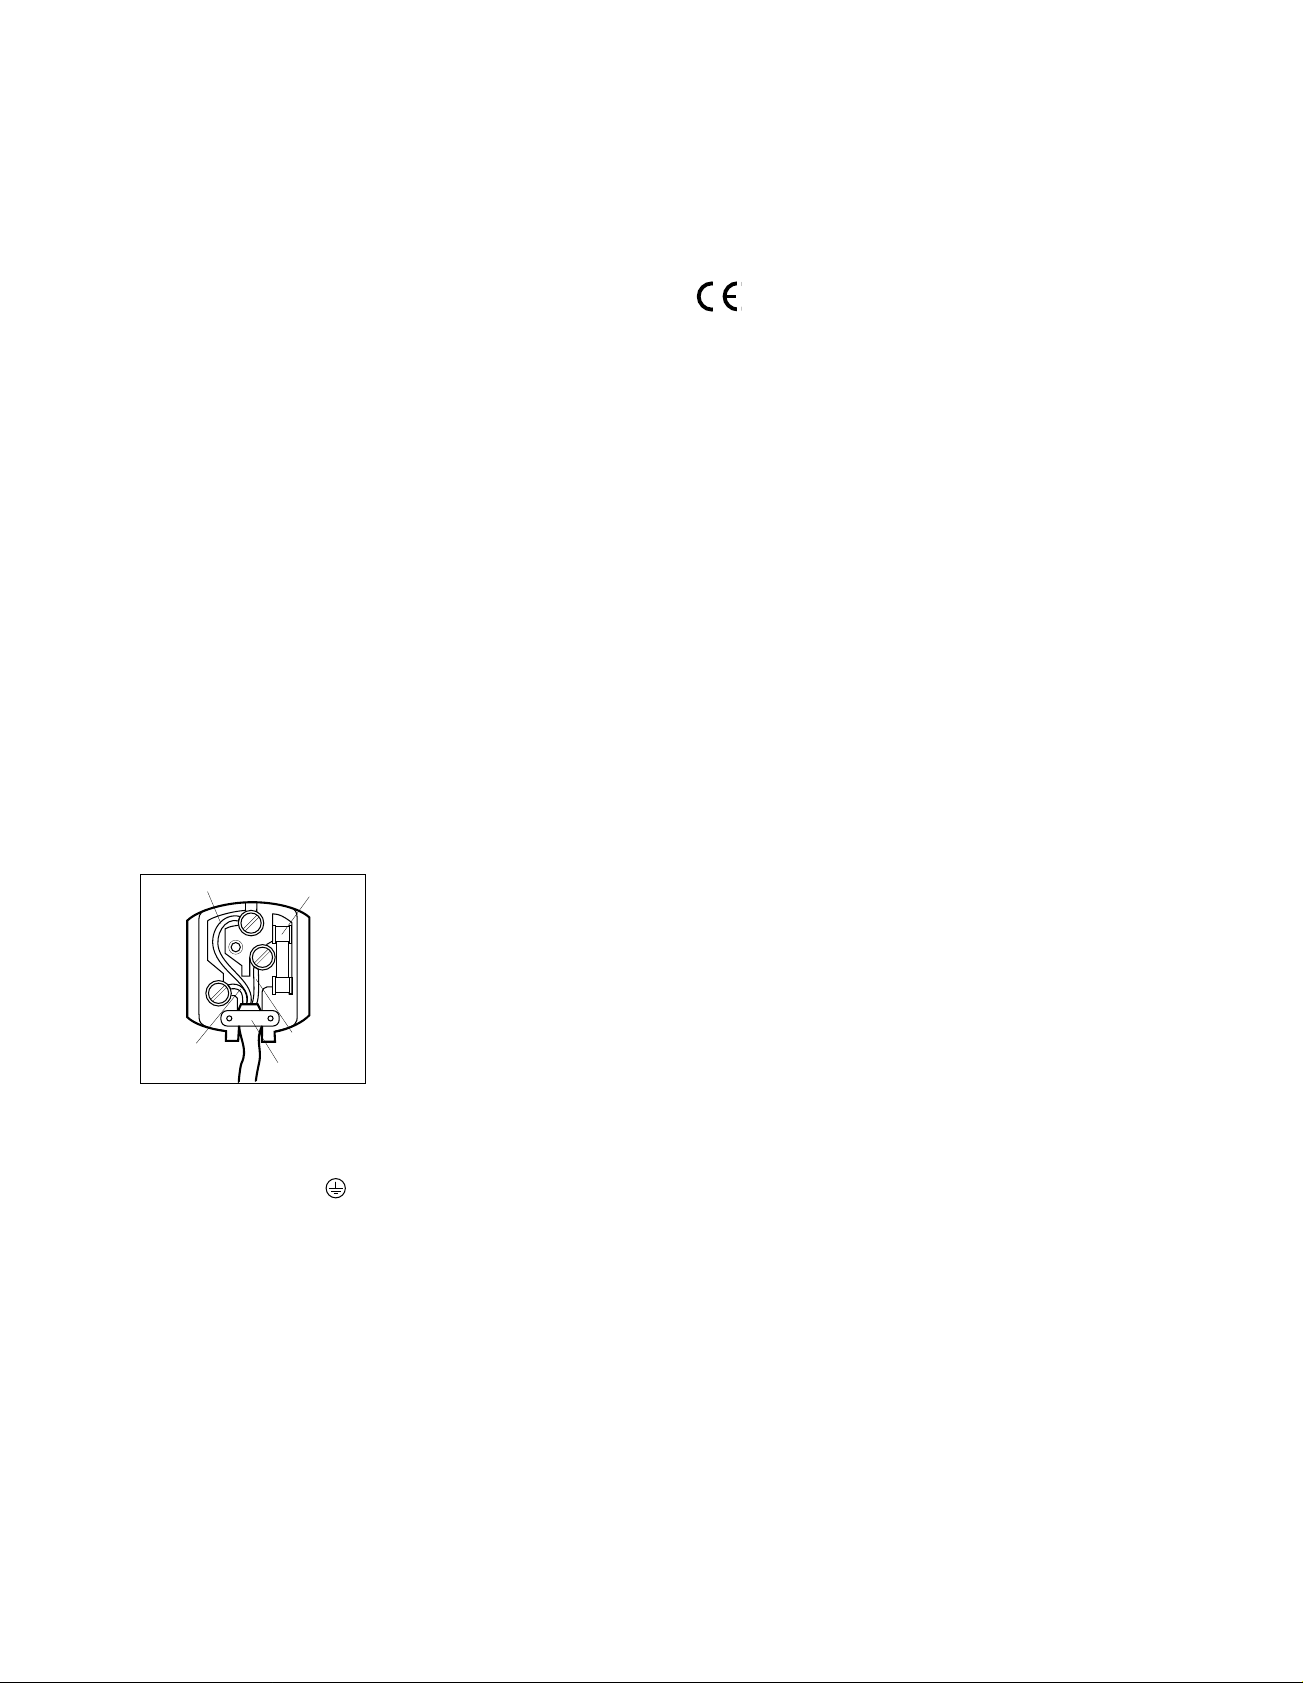
The wires in the mains lead are coloured in accordance with the following code:
Green and Yellow - Earth
Blue - Neutral
Brown - Live
If you fit your own plug, the colours of the wires in the
mains lead of your appliance may not correspond with
the markings identifying the terminals in your plug,
proceed as follows:
GREEN & YELLOW
13 AMP FUSE
- 73/23 of 19.2.73 (Low Voltage Directive) and subsequent modifications;
- 89/336 of 3.5.89 (Electromagnetic Compatibility
Directive) and subsequent modifications.
Please ensure that when the appliance is installed
it is easily accessible for the engineer in the event
of a breakdown.
13 AMP
BLUE
CE01
BROWN
CORD CLAMP
Connect the Green and Yellow (earth) wire to the terminal in the plug which is marked with the letter «E»
or the earth symbol or coloured green and yellow.
Connect the Blue (neutral) wire to the terminal in the
plug which is marked with the letter «N» or coloured
black.
Connect the Brown (live) wire to the terminal in the
plug which is marked with the letter «L» or coloured
red.
The plug moulded onto the lead incorporates a fuse.
For replacement, use a 13amp BSI362 fuse.
Only ASTA or BSI approved fuses should be used.
The plug must not be used if the fuse cover/carrier is
lost. The cover/carrier is indicated by the coloured insert at the base of the plug.
PIN08GB
5
USE
Control panel
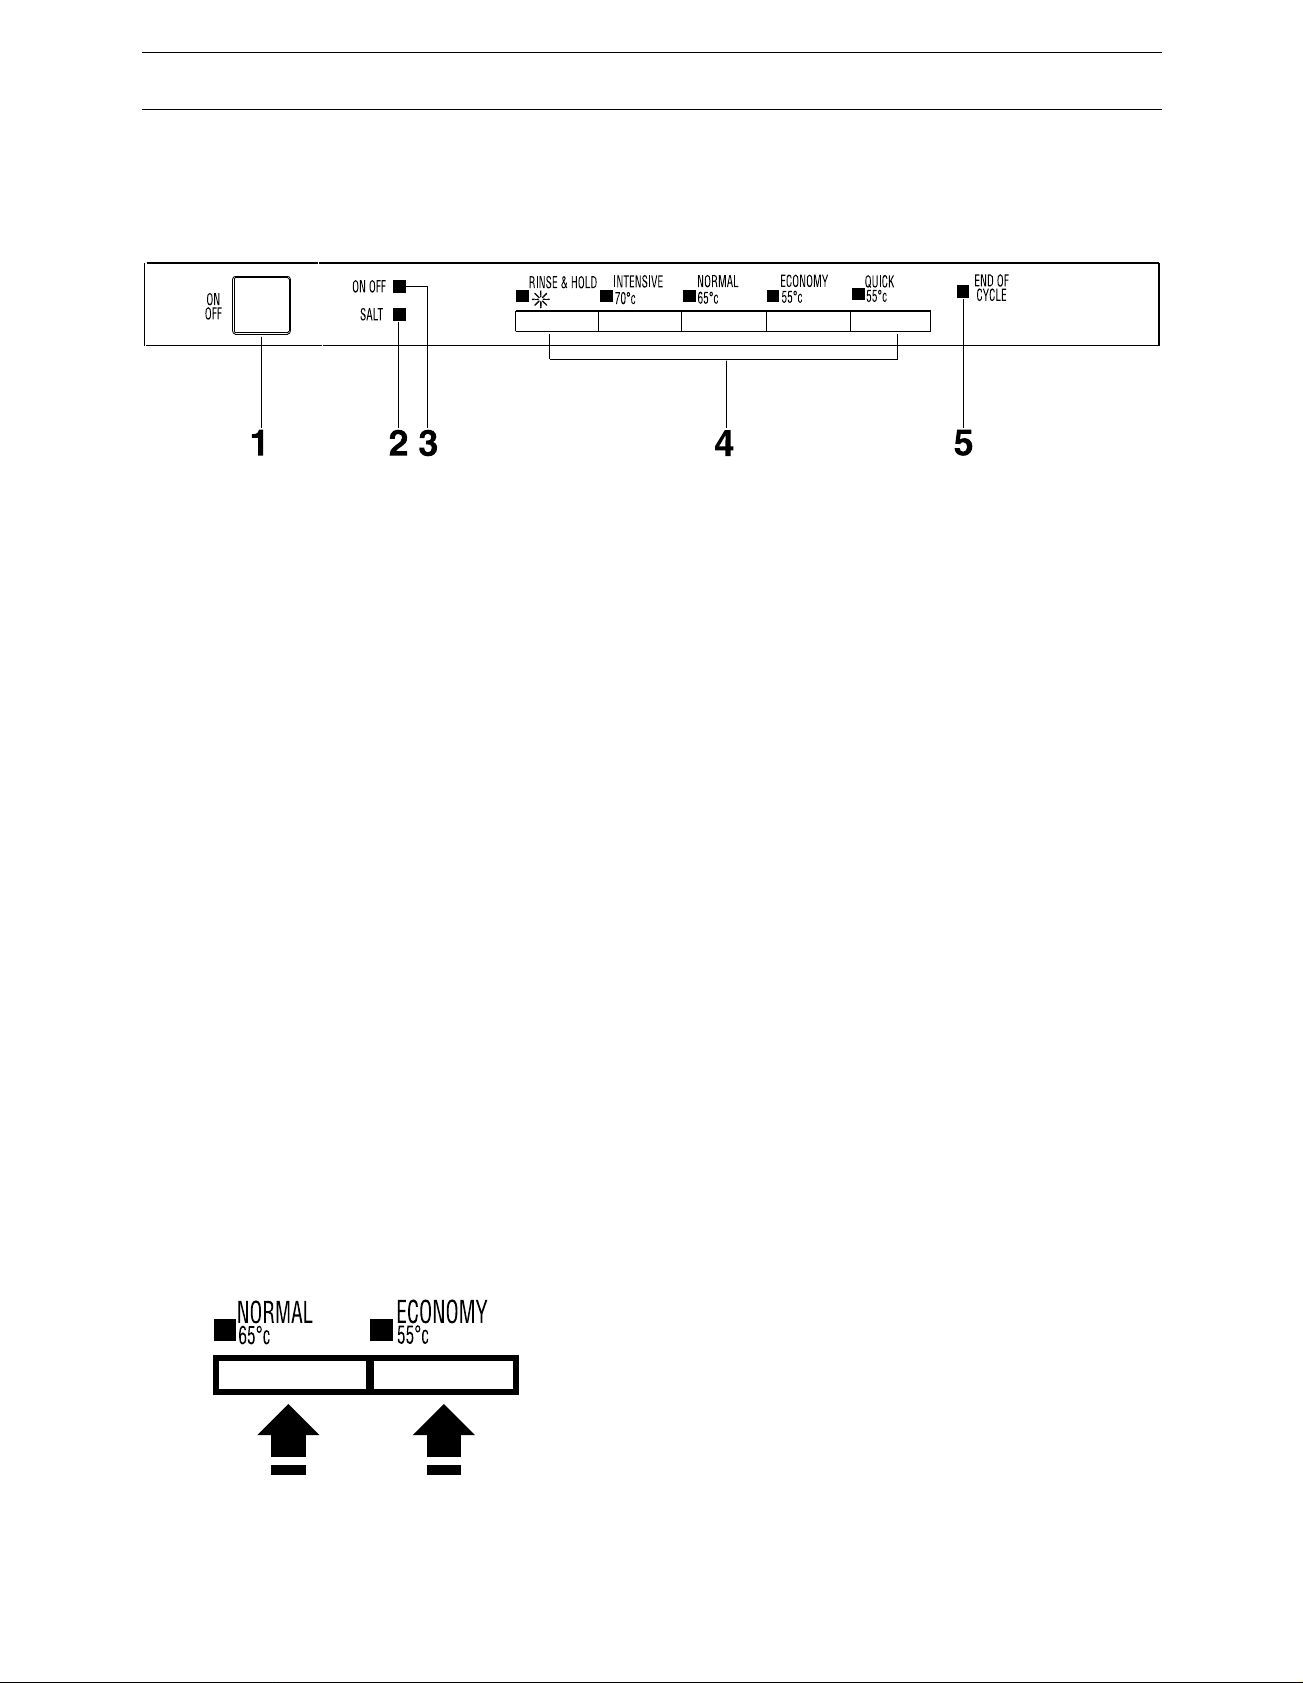
THE CONTROLS
In this fully integrated appliance the controls are located
on the top of the door. When selecting a programme,
the door needs to be partially opened.
Audible signals have been introduced to help indicate
which operations the dishwasher is performing.
Short «instruction accepted» signal
When any of the buttons are pressed: a short audible
signal informs you that the machine has accepted the
instruction given.
Long «programme run» signal
A continuous audible signal lasting about one second,
heard only when you close the dishwasher door,
informs you that the washing programme is starting.
Intermittent «end of programme» signal
An intermittent audible signal, lasting in total five seconds, informs you that the wash programme has ended. If you wish to deactivate these audible signals,
press both the NORMAL 65°c and ECONOMY 55°c
programme buttons together for about 3 seconds,
until the intermittent audible signal can no longer be
heard.
1. ON/OFF Pushbutton
Depress this pushbutton to switch the dishwasher on.
The ON/OFF indicator light (3) illuminates indicating
that the washing programme can be selected and
started. Depress again this button to switch the appliance off.
2. Salt Refill Indicator Light "SALT"
This light illuminates when the salt container needs
refilling. This light will remain on in a soft water area
where salt is not required.
3. ON/OFF Indicator Light
This illuminates when the ON/OFF button (1 ) is
depressed, indicating that the machine is on.
4. Programme Selector Buttons
Depress the button corresponding to the desired
washing programme (see washing programme chart).
5 End of Cycle Indicator Light
SO82
To reactivate the audible signals, press both buttons
together again for about 3 seconds, until an intermittent audible signal is heard.
This light flashes when the programme has finished.
To switch it off depress the ON/OFF pushbutton (1).
PPC21GB
6
 Loading...