

Zanussi ZS 1063 Instruction Manual

BUILT-IN OVEN
ZBS 1063
INSTRUCTION BOOKLET
Please read this instruction booklet before using the appliance
GB
Important Safety Information
You MUST read hese warnings carefully before installing or using the hob. If you need
assistance, contact our Customer Care Department on 08705 727727
Installation
• This oven must be installed by qualified personnel to
the relevant British Standards.
• This oven is heavy. Take care when moving it.
• Remove all packaging, both inside and outside the
oven, before using the oven.
• Do not attempt to modify the oven in any way.
Child Safety
• This oven is designed to be operated by adults. Do not
allow children to play near or with the oven.
• The oven gets hot when it is in use. Children should be
kept away until it has cooled.
• This appliance is not intended for use by children or
other persons whose physical, sensory or mental
capabilities or lack of experience and knowledge
prevents them from using the appliance safely without
supervision or instruction by a responsible person to
ensure that they can use the appliance safely.
During Use
• This oven is intended for domestic cooking only. It is
not designed for commercial or industrial purposes.
• Appliances become very hot with use, and retain their
heat for long periods after use. Care should be taken
to avoid touching heating elements inside the oven.
• Always stand back from the oven when opening
the oven door during cooking or at the end of it
to allow any build up of steam or heat to release.
• Never line any part of the oven with aluminium foil.
• Do not allow heatproof cooking material, e.g. roasting
bags, to come into contact with oven elements.
• Do not leave cookware containing foodstuffs, e.g. fat
or oil in or on the oven in case it is inadvertently
switched ON.
• When using other electrical appliances, ensure the
cable does not come into contact with the hot surfaces
of the oven.
Maintenance and Cleaning
• Only clean this oven in accordance with the instructions.
• The oven should be kept clean at all times. A build-up
of fats or other foodstuffs could result in a fire,
especially in the grill pan.
• Never use steam or high pressure steam cleaners to
clean the appliance.
• Do not use harsh abrasive cleaners or sharp metal
scraper to clean the oven door glass since they can
scratch the surface, which may result in shattering of
the glass.
• Always allow the oven to cool down and switch off the
electrical supply before carrying out any cleaning or
maintenance work.
Service
• This oven should only be repaired or serviced by an
authorised Service Engineer and only genuine approved
spare parts should be used.
Environmental Information
• After installation, please dispose of the packaging
with due regard to safety and the environment.
• When disposing of an old appliance, make it unusable,
by cutting off the cable. Remove any door catches,
to prevent small children being trapped inside.
• Never place plastic or any other material which may
melt in or on the oven.
• Do not place sealed cans or aerosols inside the oven.
They may explode if they are heated.
• Do not hang towels, dishcloths or clothes from the
oven or its handle.
• Do not use this oven if it is in contact with water and
never operate it with wet hands.
• Take great care when heating fats and oils as they will
ignite if they become too hot.
• Always use oven gloves to remove and replace food in
the oven.
• Ensure that all control knobs are in the OFF position
when not in use.
2
• The symbol on the product or on its packaging
indicates that this product may not be treated as
household waste. Instead it shall be handed over to
the applicable collection point for the recycling of
electrical and electronic equipment. By ensuring this
product is disposed of correctly, you will help prevent
potential negative consequences for the environment
and human health, which could otherwise be caused
by inappropriate waste handling of this product.
For more detailed information about recycling of this
product, please contact your local city office, your
household waste disposal service or the shop where
you purchased the product.
Keep this instruction book for future reference
and ensure it is passed on to any new owner.

Content s
For the User For the Inst aller
Important Safety Information 2
Description of the Oven 4
The Oven Electronic Control 5
When the Oven is First Installed 6
Before the First use of the Oven 7
Cooking Functions 9
Programming the Oven 9
Safety and Energy Saving Functions 11
The "Recipe Selection" Function 13
Using the Oven 14
Hints and Tips 14
The Conventional Oven 15
The Fan Oven 16
Cooking Chart-Conventional and Fan Oven 17
Grilling 18
Cooking Chart-Grilling 19
Installation 24
Technical Data 24
Electrical Connection 24
Building In 25
Pizza Oven 20
Defrosting 20
Cleaning the Oven 21
Care of Catalytic Liners 22
Something not Working 23
Guarantee/Customer Service 26
European Guarantee 27
Guide to use the instructions
The following symbols will be found in the text to guide
you throughout the Instructions:
Safety Instructions
Step by step instructions for an operation
Hints and Tips
Environmental information
This appliance complies with the following E.E.C.
Directives:
*73/23 - 90/683 (Low VoltageDirective);
*93/68 (General Directives);
*89/336 (Electromagnetical Compatibility Directive)
and subsequent modifications.
3
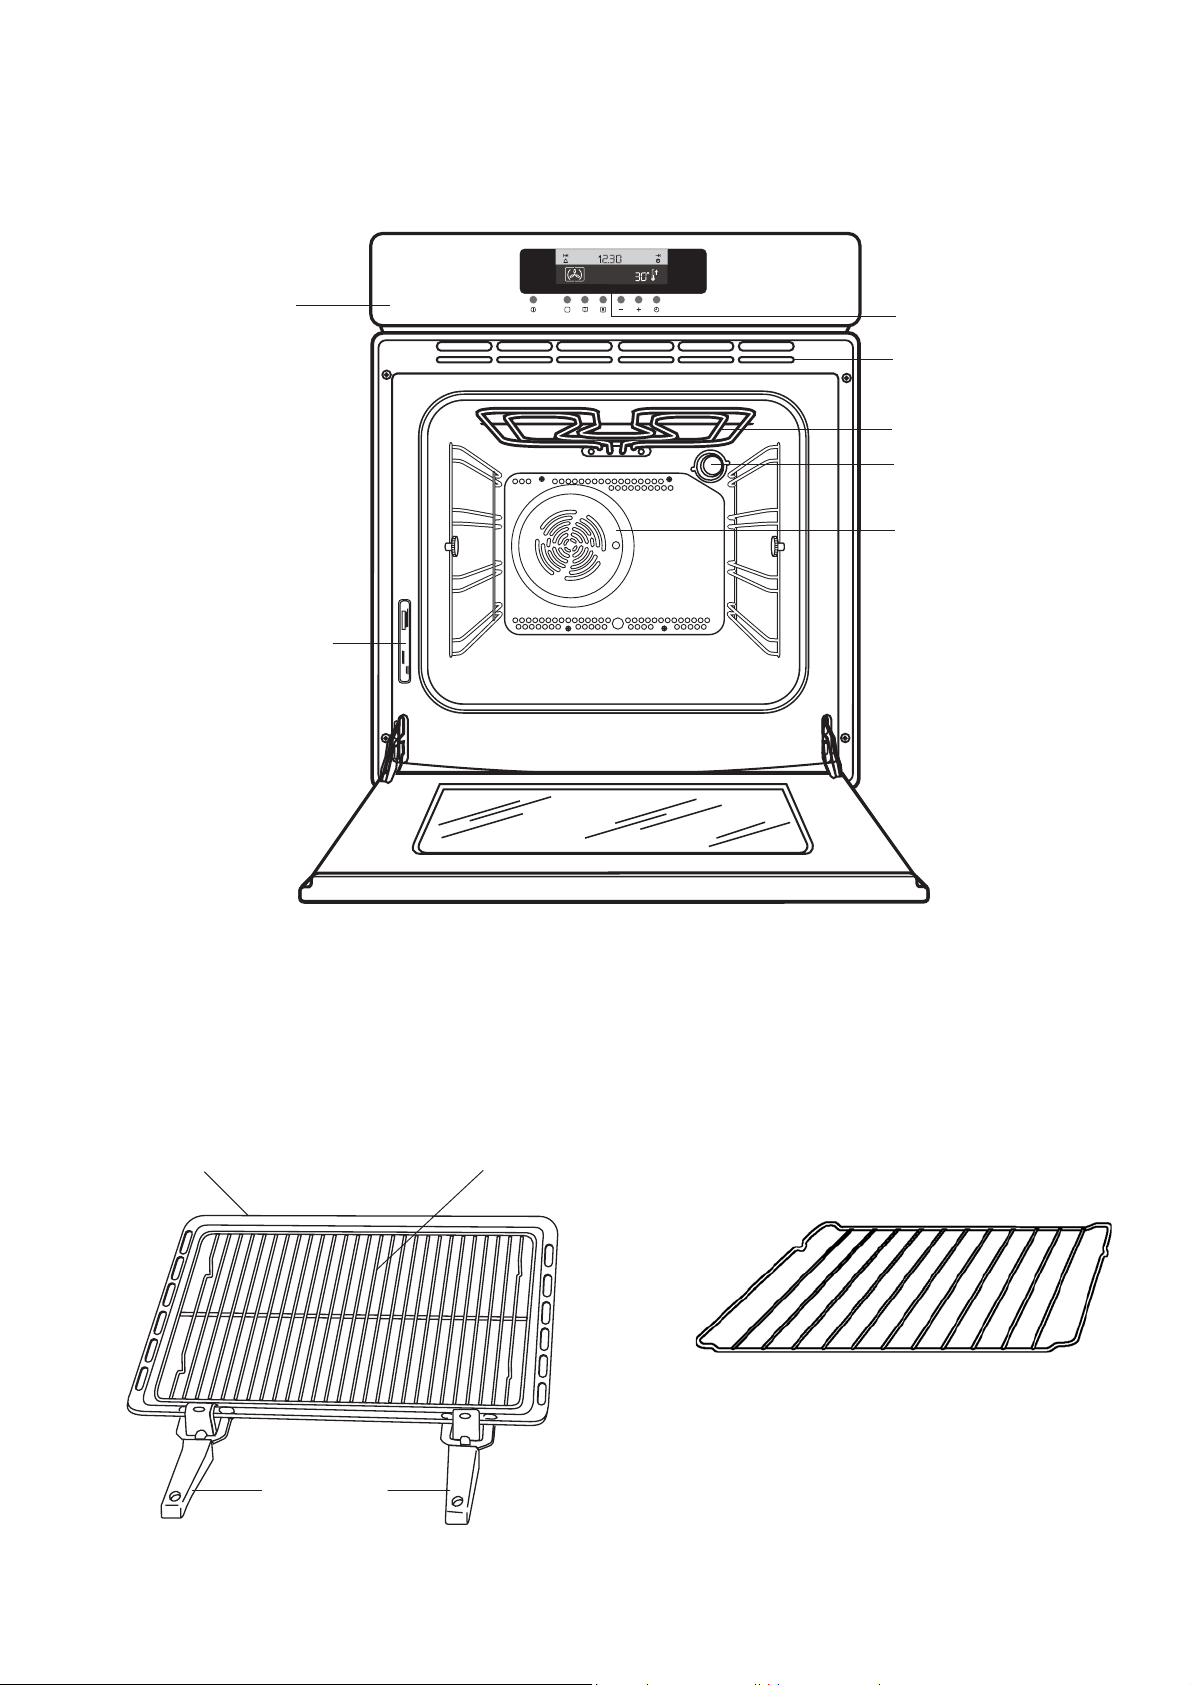
Description of the Oven
Contro Panel
Rating Plate
Oven Electronic Control
Air Vents for Cooling Fan
Grill Element
Oven Light
Oven Fan
Oven accessories
Grill/roasting
pan
Removable
handles
4
Grill trivet
Anti-tip shelf (x 2)
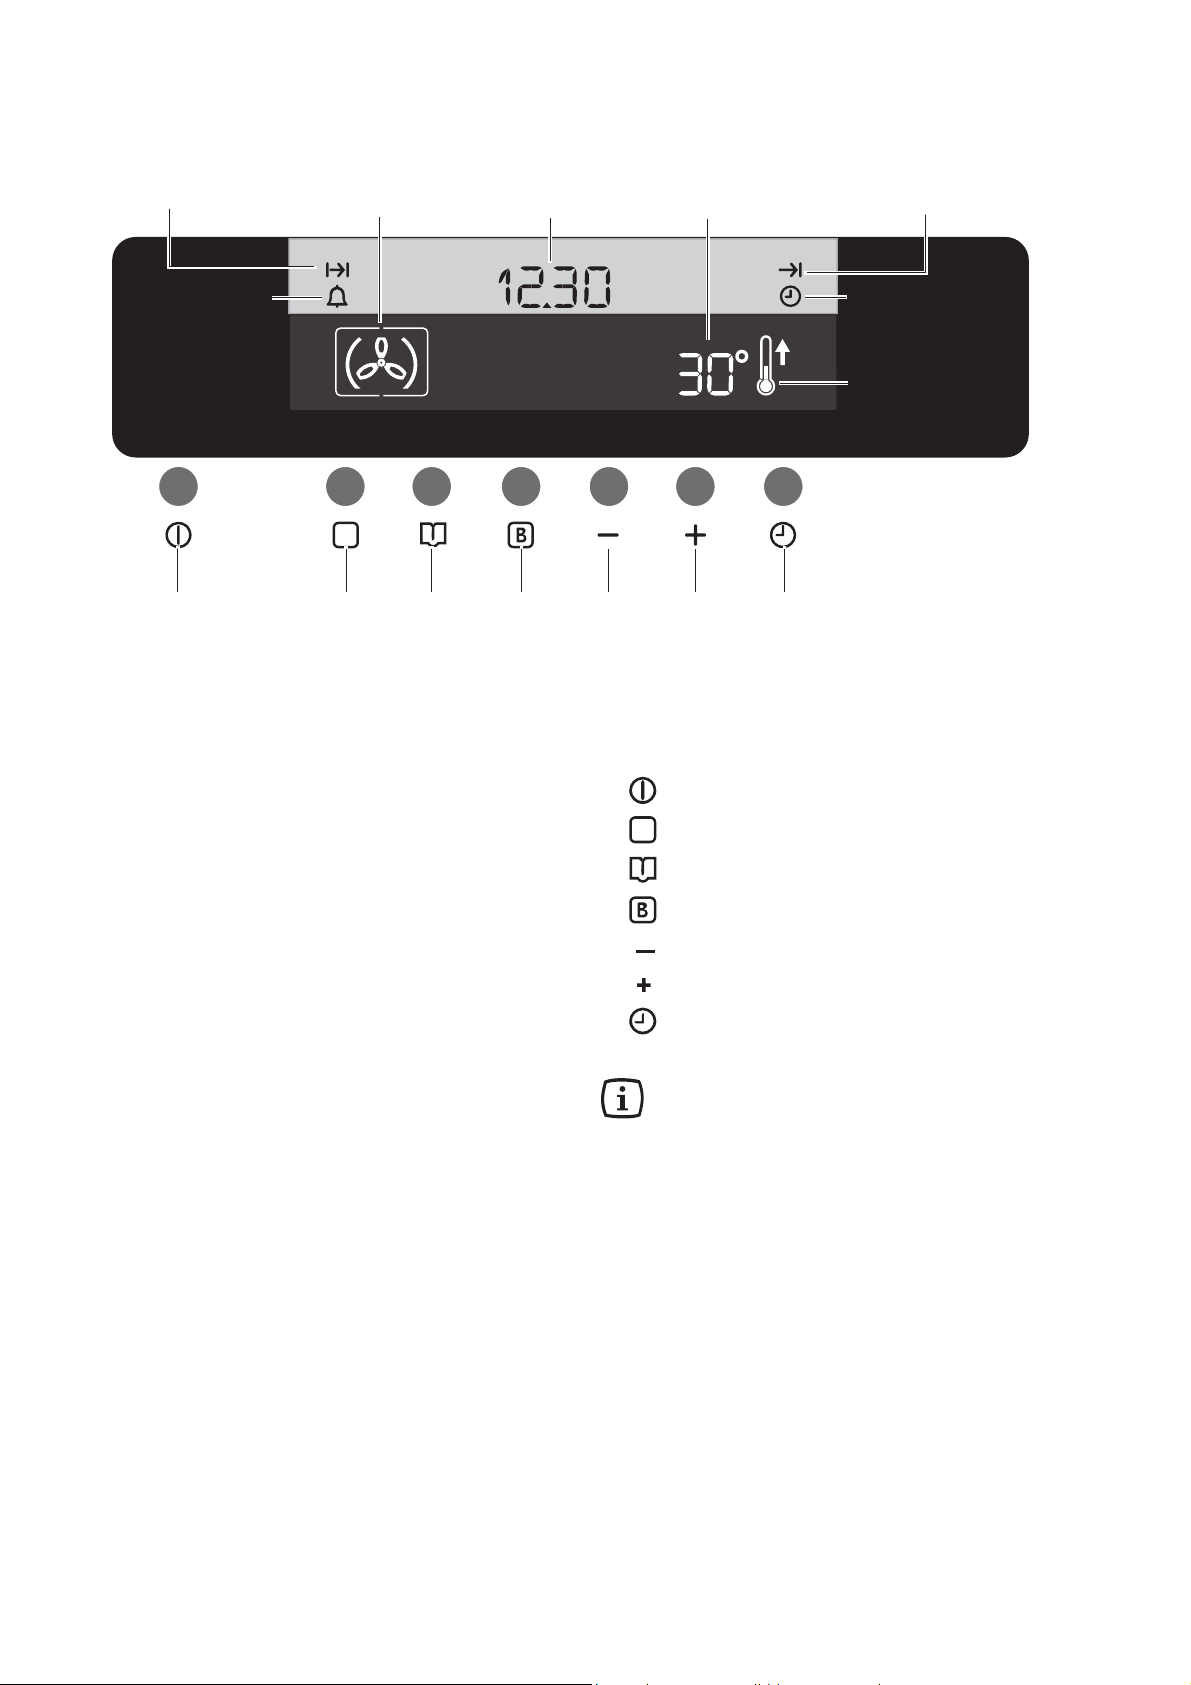
The Oven Electronic Control
Cooking Duration
Symbol
Minute Minder
Symbol
Cooking Functions
display
Time
display
1234567
General Features of The Oven
Electronic Control
All the oven functions are controlled by an electronic
device. You can select any combination of cooking
function, cooking temperature and automatic timing.
Temperature
display
End Of Cooking Time
Symbol
Clock
Symbol
Thermometer
Symbol
The Oven Electronic Control
Buttons
1. ON / OFF Button
2. Cooking Functions Control
The Oven Electronic Control
Display
The display has two sections.
The upper section has a grey background and black
symbols and digits. It gives information about the time
(the current time of day, the programmed cooking
duration, the programmed end of cooking time, etc.),
and shows the name of the selected cooking function
or recipe.
The lower section has a black background and red
symbols and digits. It gives information about the
selected cooking function, the selected temperature and
the current temperature inside the oven.
3. Recipe Selection Button
4. Fast Heat Up Function Button
5. " " Decreasing Control (Time or Temperature)
6. " " Increasing Control (Time or Temperature)
7. Time Function Button
In the event of a power failure, the programmer will
keep all the settings (time of day, programme
setting or programme in operation) for about 3
minutes. If power is not restored within 3 minutes,
all the settings will be cancelled. When the power
is restored, you will have to re-set the programmer.
The Oven Safety Devices
The Safety Thermostat
This oven is provided with a safety thermostat. In case of
malfunctioning of the main thermostat, and consequential
over-heating, the safety device will stop the power supply
to the appliance. If this happens, call your local Service
Force Centre. Under no circumstances should you
attempt to repair the appliance yourself.
The cooling fan
The cooling fan operates during cooking. Air is expelled
through vents between the oven door and the control panel,
as shown in the diagram (page 4).
The cooling fan may run on after the oven is switched off
to keep the controls cool. This is quite normal.
5
When the Oven is First Installed
When the oven is first connected to the electrical supply,
or when supply is restored after a long power failure, the
upper section of the display shows this message:
"WELCOME TO * KRONOS-3 * BASIC -2 * DANSK *
DEUTSCH * ENGLISH * ESPANOL * FRANCAIS *
ITALIANO * NEDERLANDS * NORSK * PORTUGUES *
SVENSKA"
This message lists all the languages which can be chosen
to operate with the Oven Electronic Control (Fig. 1).
Symbol flashing near the "Clock Symbol" means
that you need to set the current time of day before using
the oven.
T o set the Correct Time of Day
1. Press the "Time Function Button" . While symbol
flashes near the "Clock Symbol" , set the
current time of day pressing buttons " " or " " (Fig.
2). Once you have set the time, the symbol keeps
flashing for 5 seconds and then disappears. This
means that the setting has been stored in the
Electronic Control memory.
2. If symbol stops flashing before you have had time
to set the clock, press the "Time Function Button"
twice. The symbol starts flashing again.
Then, proceed as described at point 1.
Fig. 1
Fig. 2
To Select the Language
You can choose the language to be used in the Oven
Electronic Control display.
The oven must be OFF when carrying out this operation.
1. Press the "Cooking Function Button" and the
"Recipe Selection Button" at the same time and
keep them pressed for 2 seconds at least. The
Electronic Control beeps once and the display shows
the current language selection. (Fig. 3).
2. Within 5 seconds, press button " " to select your
language (Fig. 4).
3. Once you selected your language, you have 5 seconds
to confirm your selection by pressing the "Cooking
Function Button" and the "Recipe Selection Button"
at the same time and keeping them pressed for 2
seconds at least.
Please note that anytime you carry out a step of
this procedure, you have 5 seconds to carry out the
following step. If you wait more than 5 seconds the
Electronic Control switches off and the selection is
not stored in its memory.
Here follows the list of available languages:
Danish (DANSK), German (DEUTSCH), English
(ENGLISH), Spanish (ESPANOL ), French (FRANCAIS),
Italian (ITALIANO), Dutch (NEDERLANDS), Norwegian
(NORSK), Portuguese (PORTUGUES) and Swedish
(SVENSKA).
Fig. 3
Fig. 4
6
Before the First use of the Oven
Remove all packaging, both inside and
outside the oven, before using it.
The oven will work only if the time of day has
been set.
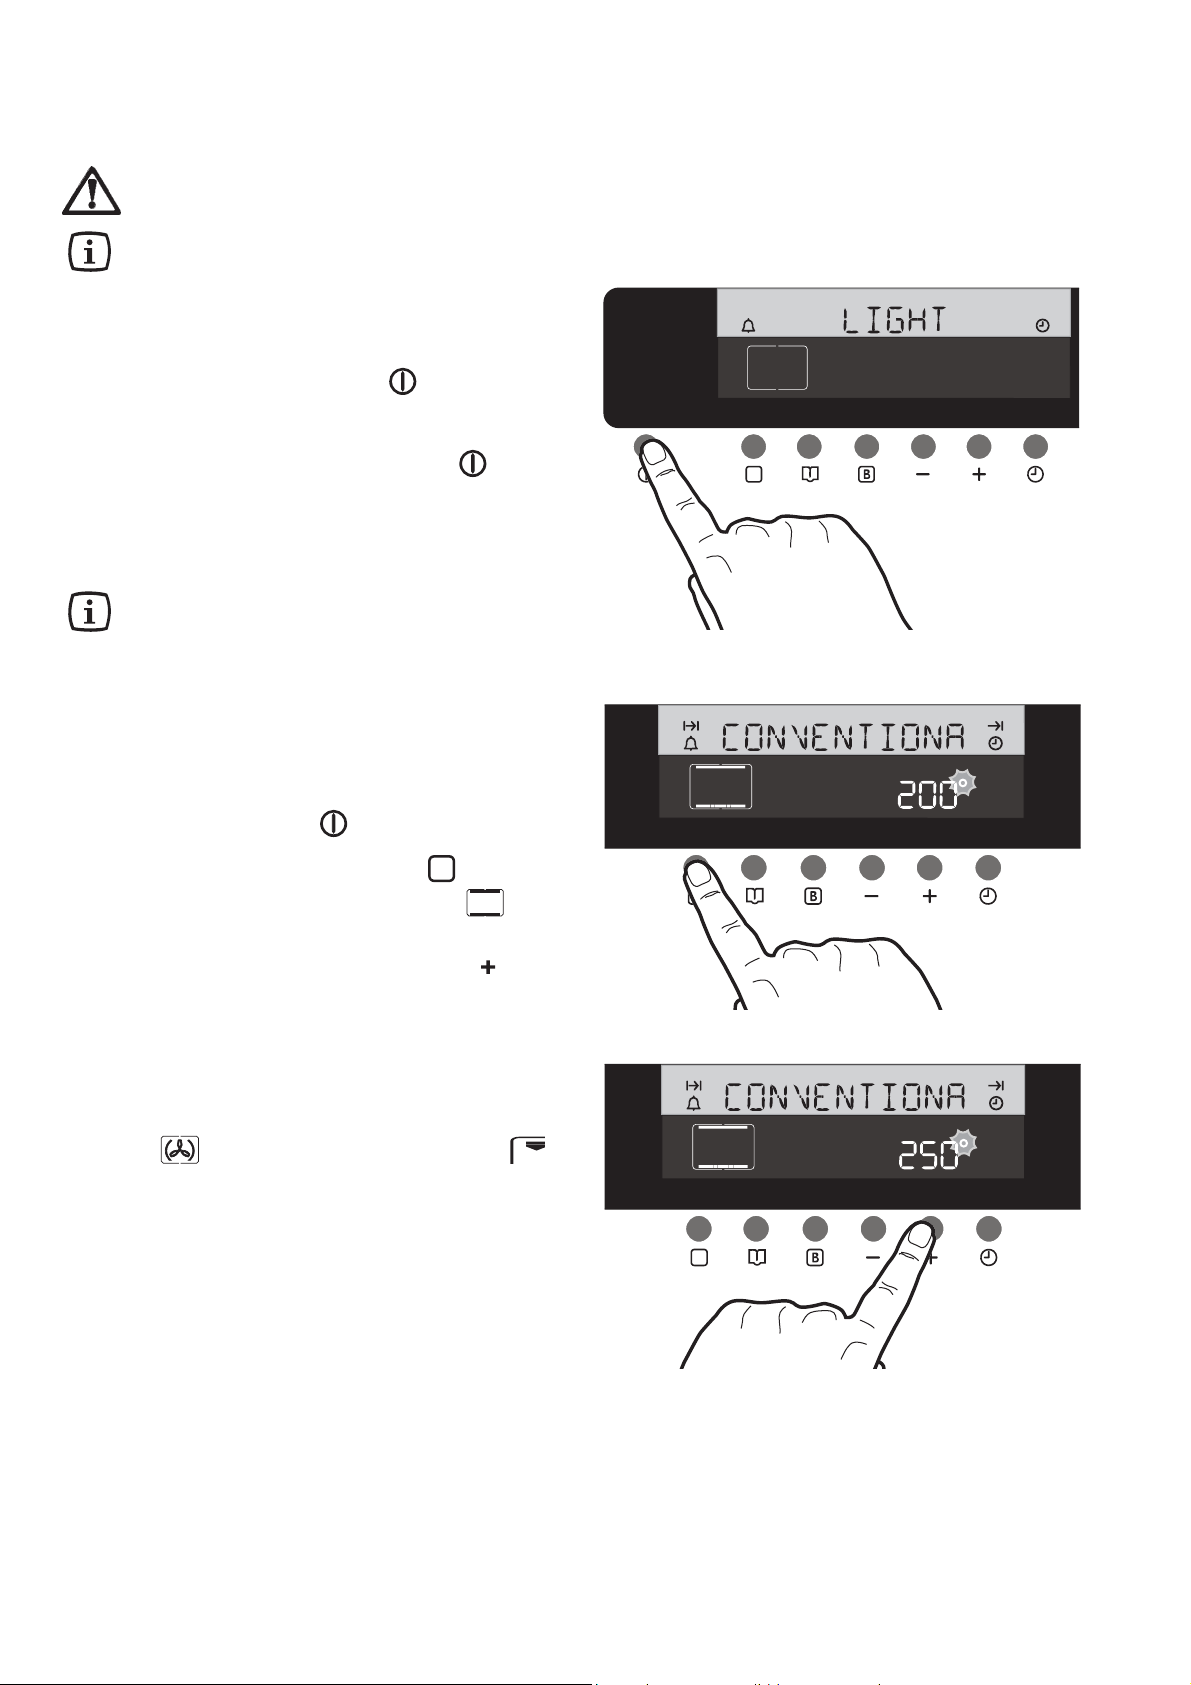
To switch the oven on and off
The oven must be switched on before setting any cooking
function or programme. When button is pressed, the
oven light will switch on. The oven symbol and the
message "LIGHT" appear on the display (Fig. 5).
To switch off the oven, you can press button at any
time. Any cooking function or programme will stop, the
oven light will switch off and the time display will show
the time of day only.
Before first use, the oven should be heated without
food.
During this time, an unpleasant odour may be
emitted. This is absolutely normal, and is
caused by residues of manufacturing.
Ensure the room is well ventilated.
Fig. 5
1. Set the time of day with the electronic programmer
(see paragraph "To set the correct time of day").
2. Press the "On/Off" button to switch on the oven.
3. Press the "Cooking Functions" button twice and
select the "Conventional Cooking" function (Fig.
6).
4. Set the temperature to 250°C using button “ “ (Fig.
7).
5. Allow the oven to run empty for approximately 45
minutes.
6. Open a window for ventilation.
This procedure should be repeated with the "Fan
Cooking" function and the "Double Grill"
function for approximately 5-10 minutes.
Once this operation is carried out, let the oven
cool down, then clean the oven cavity with a
soft cloth soaked in warm water to which a little
mild washing-up liquid has been added.
Before cooking for the first time, carefully wash
the oven accessories.
Fig. 6
Fig. 7
7

T o select a cooking function
1. Switch on the oven by pressing the
"On/Off"
button .
2. Press the "Cooking Functions" button
the required oven function. Each time button
pressed, a different cooking symbol appears in the
lower section of the display and the description of
the cooking function appears as a message in the
upper section. The pre-set temperature for each
function is shown in the lower section, and symbol
"" flashes on the right hand (Fig. 8).
3. Symbol " " flashing means that it is possible to
adjust the pre-set temperature by pressing button
“ “
or
“ “ (Fig. 9).
degree steps. Please note that symbol "" will flash
for 5 seconds.
4. When 5 seconds elapse, symbol "" will disappear
showing that the temperature level has been stored
in the Electronic Control memory. The thermometer
symbol rises slowly , indicating the degree to
which the oven is currently heated.
5. When the required temperature is reached, an
acoustic alarm will sound for a short time and the
thermometer symbol will light permanently.
Temperature level is adjusted in 5
to select
is
To set the temperature and
time
Fig. 8
Fig. 9
Button “ “ and “ “ are used to adjust both the
temperature and the time settings. Details about using
them according to the different functions of the Oven
Electronic Control are given in the following chapters.
As a general rule, please note that:
> Buttons “ “ and “ “ are used to increase or decrease
the temperature settings while symbol "" flashes
on the right hand of the temperature display. When
you choose a cooking function, symbol "" keeps
flashing for 5 seconds only. This is the useful interval
to press buttons “ “ or “ “ and select your temperature
setting. Once these 5 seconds elapse, symbol ""
disappears and the thermometer symbol comes
on: this means that the current selection has been
stored in the Oven Electronic Control memory and
that the oven is currently heating up.
> Buttons “ “ and “ “ are used to increase or
decrease the time settings while the symbol is
flashing near the "Clock" symbol , the "Minute
Minder" symbol , the "Cooking Duration"
symbol or the "End Of Cooking Time" symbol .
When you choose a time function, symbol keeps
flashing for 5 seconds only. This is the useful interval
to press buttons “ “ or “ “ and select your time
setting. Once these 5 seconds elapse, symbol
stops flashing: this means that the current selection
has been stored in the Oven Electronic Control
memory.
8
Cooking Functions
The following list displays in sequence all the available
cooking functions.
1
2
3
4
FAN COOKING - This setting allows you to
roast or roast and bake simultaneously using
any shelf, without flavour transference. Pre-set
temperature: 175°C.
CONVENTIONAL COOKING - The heat comes
from both the top and bottom element, ensuring
even heating inside the oven. Pre-set
temperature: 200°C.
GRILL - It can be used for grilling small
quantities. Pre-set temperature: 250°C.
THERMAL GRILLING - This function offers an
alternative method of cooking food items,
normally associated with conventional grilling.
The grill element and the oven fan operate
together, circulating hot air around the food.
Pre-set temperature: 180°C.
Select a maximum temperature of 200°C.
5
6
7
8
9
PIZZA - The bottom element provides direct
heat to the base of pizzas, quiches or pies,
while the fan ensures air is circulated to cook
the pizza toppings or pie fillings.
Pre-set temperature: 175°C.
DOUBLE GRILL - The full grill element will be
on. Recommended for large quantities. Pre-set
temperature: 250°C.
BOTTOM - The heat comes from the bottom of
the oven only, to allow you to finish your dishes.
Pre-set temperature: 250°C.
TOP - The heat comes from the top of the oven
only, to allow to you finish your dishes. Pre-set
temperature: 250°C.
DEFROST
heat and circulates the air, at room temperature,
inside the oven. This function is particularly
suitable for defrosting delicate food which could
be damaged by heat, e.g. cream filled gateaux,
iced cakes, pastries, bread and other yeast
products.
– The oven fan operates without
Programming the Oven
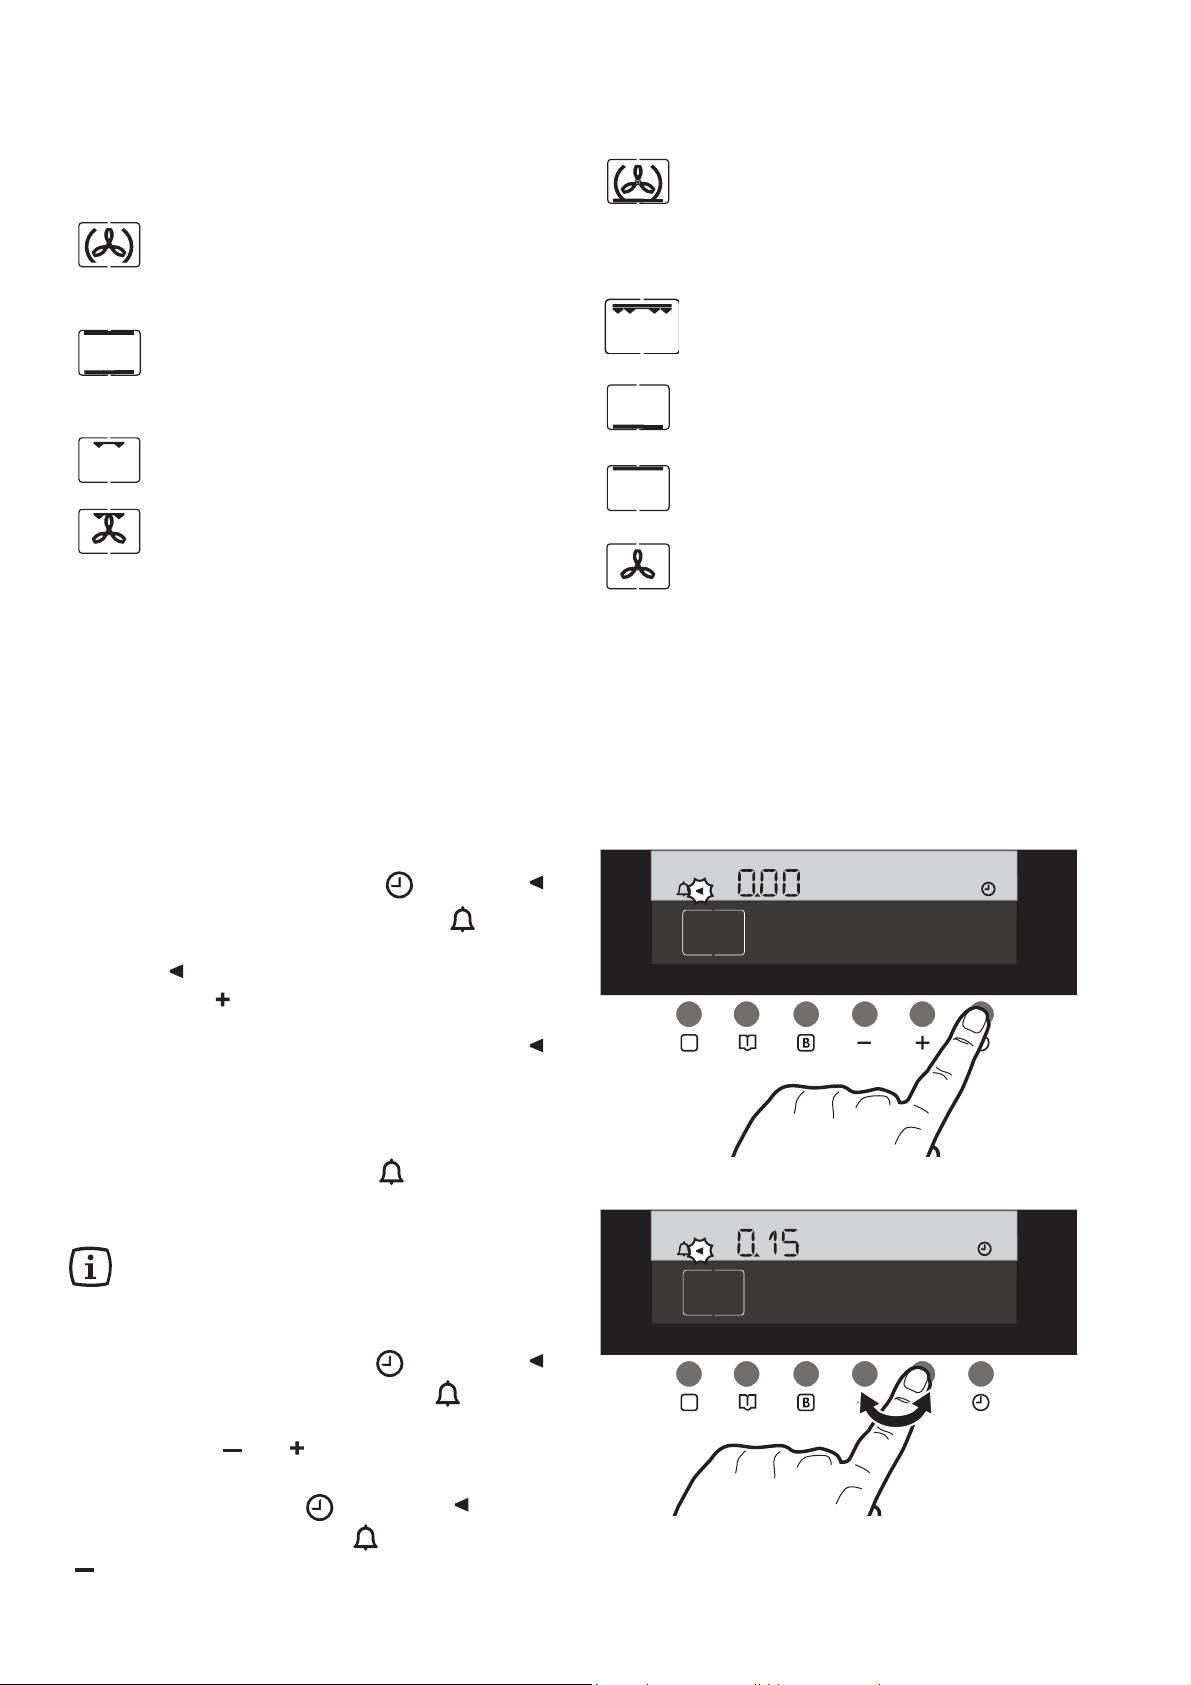
How to set the minute minder
1. Press the "Time Function" button . The symbol
flashes near the "Minute Minder" symbol and the
time display shows "0.00" (Fig. 10).
2. Symbol will flash for 5 seconds. Within this time,
press button “ “ to select the required time (Fig. 11).
Maximum time is 23 hours 59 minutes. After another
5 seconds after you have set the time, the symbol
stops flashing. This means that the setting has been
stored in the Electronic Control memory and that the
countdown started.
3. When the programmed time has elapsed, you hear
an acoustic alarm while symbol flashes and the
time display shows "0.00".
4. To switch off the acoustic alarm, press any button.
The oven will NOT switch off if in use.
The Minute Minder function can also be used
when the oven is off.
To change the Minute Minder setting
Press the "Time Function" button : the symbol
flashes near the "Minute Minder" symbol . It is now
possible to change the Minute Minder setting by
pressing button “ “ or “ “ (Fig.11).
Fig. 10
Fig. 11
To cancel the Minute Minder:
Press time function button : the symbol flashes
near the "Minute Minder" symbol . Then press button
“ “ until the time display shows "0.00".
9
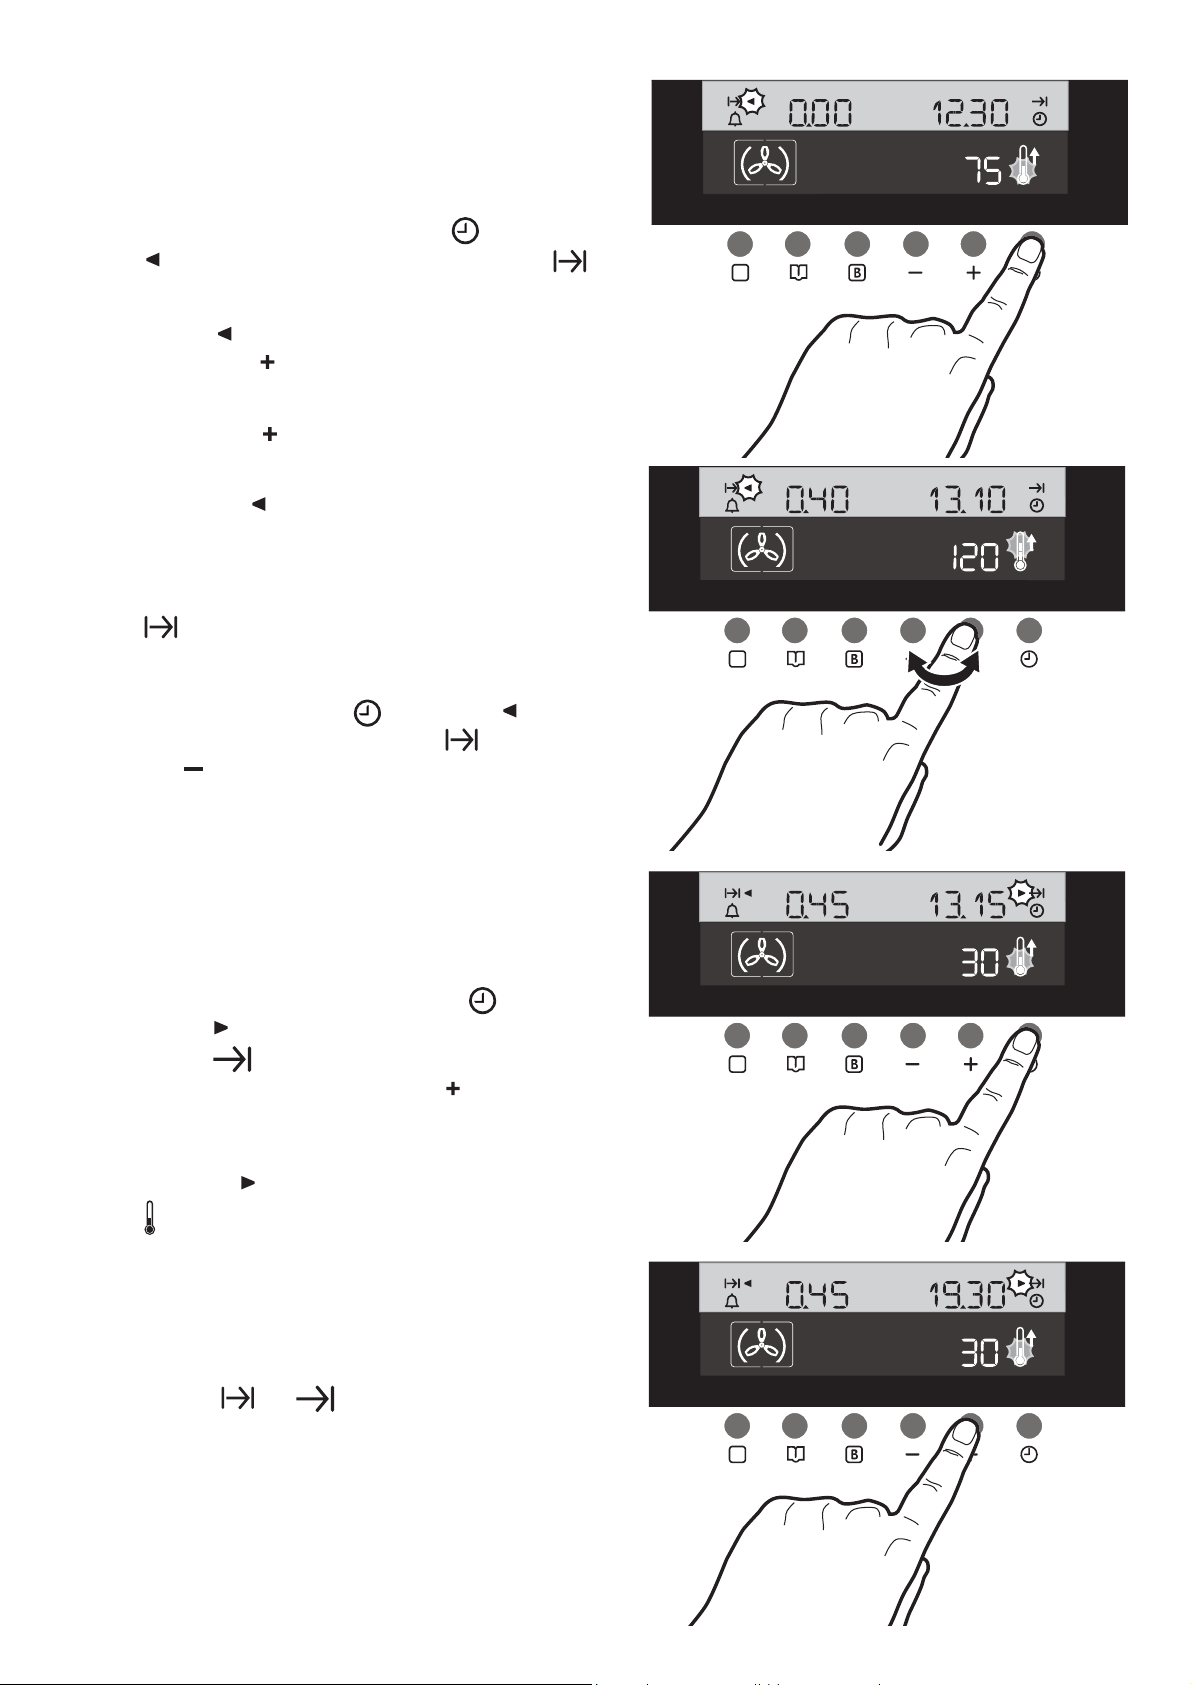
To programme the oven to
switch off
1. Switch the oven on, place food in the oven, select
a cooking function and adjust the cooking temperature, if required.
2. Press the "Time Function" button . The symbol
flashes near the "Cooking Duration" symbol .
The time display shows "0.00" at the left hand and
the current time of day at the right hand (Fig. 12).
3. Symbol will flash for 5 seconds. Within this time,
press button “ “ to select the required time. Maximum
time is 23 hours 59 minutes. Note that the time
indication on the right hand will also change as you
press button “ “, showing at which time the oven will
automatically switch off (fig. 13).
4. After another 5 seconds after you have set the time,
the symbol stops flashing. This means that the
setting has been stored in the Electronic Control
memory and that the countdown started.
5. When cooking time is over, the oven automatically
switches off. You hear an acoustic alarm while symbol
flashes and the time display shows "0.00".
6. To switch off the acoustic alarm, press any button.
Fig. 12
To cancel the Cooking Duration Time:
Press time function button : the symbol flashes
near the "Cooking Duration" symbol . Then press
button “ “ until the time display shows "0.00".
Please note that, if you cancel the "Cooking Duration",
the oven does not switch off.
To programme the Oven to
switch on and off
1. Carry out the "Cooking Duration" setting as
described at points 1 to 4 in the previous chapter.
2. Press the "Time Function" button twice: the
symbol flashes near the "End of Cooking Time"
symbol (Fig. 14).
3. Within 5 seconds, press button “ “ to select the
required end of cooking time, which is shown at the
right hand of the time display (Fig. 15).
4. After another 5 seconds after you have set the time,
the symbol stops flashing, the thermometer symbol
comes off, the temperature display shows "30"
and the oven switches off. This means that the setting
has been stored in the Electronic Control memory
and that the countdown started.
5. The oven will switch on and off automatically
according to your settings. When cooking is
completed, you hear an acoustic alarm while both
symbols and flash. The time display shows
"0.00" at the left hand.
6. To switch off the acoustic alarm, press any button.
To cancel the programme, simply cancel the
Cooking Duration time as described at the end of
the previous chapter.
Fig. 13
Fig. 14
Fig. 15
10
 Loading...