

Page 1
NL
Gebruiksaanwijzing 2
EN
User manual 13
FR
Notice d'utilisation 24
DE
Benutzerinformation 36
EL
Οδηγίες Χρήσης 48
Koelkast
Refrigerator
Réfrigérateur
Kühlschrank
Ψυγείο
ZRG614SW
Page 2
Inhoud
Veiligheidsinformatie _ _ _ _ _ _ _ _ _ _ _ _ _ _ _ _ 2
Bediening _ _ _ _ _ _ _ _ _ _ _ _ _ _ _ _ _ _ _ _ _ _ 4
Het eerste gebruik _ _ _ _ _ _ _ _ _ _ _ _ _ _ _ _ _ _ 4
Dagelijks gebruik _ _ _ _ _ _ _ _ _ _ _ _ _ _ _ _ _ _ 4
Nuttige aanwijzingen en tips _ _ _ _ _ _ _ _ _ _ _ _ _ 5
Veiligheidsinformatie
In het belang van uw veiligheid en om een correct gebruik
te kunnen waarborgen is het van belang dat u, alvorens
het apparaat te installeren en in gebruik te nemen, deze
gebruiksaanwijzing, inclusief de tips en waarschuwingen,
grondig doorleest. Om onnodige vergissingen en ongevallen te voorkomen is het belangrijk ervoor te zorgen dat
alle mensen die het apparaat gebruiken, volledig bekend
zijn met de werking ervan en de veiligheidsvoorzieningen.
Bewaar deze instructies en zorg ervoor dat zij bij het apparaat blijven als het wordt verplaatst of verkocht, zodat iedereen die het apparaat gedurende zijn hele levensduur
gebruikt, naar behoren is geïnformeerd over het gebruik
en de veiligheid van het apparaat.
Voor de veiligheid van mensen en eigendommen dient u
zich aan de voorzorgsmaatregelen uit dit instructieboekje
te houden, de fabrikant is niet verantwoordelijk voor schade die door het niet opvolgen van de aanwijzingen veroorzaakt is.
Veiligheid van kinderen en kwetsbare mensen
• Dit apparaat is niet bedoeld voor gebruik door personen (waaronder begrepen kinderen) met verminderde
fysieke, zintuiglijke vermogens of een gebrek aan ervaring en kennis, tenzij dit onder toezicht gebeurt van een
voor hun veiligheid verantwoordelijke persoon of tenzij
zij van een dergelijke persoon instructie hebben ontvangen over het gebruik van het apparaat.
Houd kinderen uit de buurt om te voorkomen dat ze
met het apparaat gaan spelen.
• Houd alle verpakkingsmateriaal buiten het bereik van
kinderen. Gevaar voor verstikking.
• Als u het apparaat afdankt trek dan de stekker uit het
stopcontact, snij de voedingskabel door (zo dicht mogelijk bij het apparaat) en verwijder de deur om te
voorkomen dat kinderen een elektrische schok krijgen
of zichzelf in het apparaat opsluiten.
Onderhoud en reiniging _ _ _ _ _ _ _ _ _ _ _ _ _ _ _ 6
Problemen oplossen _ _ _ _ _ _ _ _ _ _ _ _ _ _ _ _ 7
Technische gegevens _ _ _ _ _ _ _ _ _ _ _ _ _ _ _ _ 9
Montage _ _ _ _ _ _ _ _ _ _ _ _ _ _ _ _ _ _ _ _ _ _ 9
Het milieu _ _ _ _ _ _ _ _ _ _ _ _ _ _ _ _ _ _ _ _ _ 12
Wijzigingen voorbehouden
• Als dit apparaat, dat voorzien is van een magnetische
deursluiting, een ouder apparaat vervangt, dat voorzien
is van een veerslot (slot) op de deur of het deksel, zorg
er dan voor dat u het slot onbruikbaar maakt voordat u
het oude apparaat weggooit. Dit voorkomt dat kinderen
er in opgesloten kunnen raken.
Algemene veiligheid
Let op! Houd de ventilatie-openingen altijd vrij van
obstructies.
• Dit apparaat is bedoeld voor het bewaren van levensmiddelen en/of dranken in een gewoon huishouden,
zoals uitgelegd in dit instructieboekje.
• Gebruik geen mechanische hulpmiddelen of kunstgrepen om het ontdooiproces te versnellen.
• Gebruik geen andere elektrische apparaten (bijvoorbeeld ijsmachines) in koelkasten, tenzij ze voor dit doel
goedgekeurd zijn door de fabrikant.
• Let op dat u het koelcircuit niet beschadigt.
• Het koelmiddel isobutaan (R600a) bevindt zich in het
koelcircuit van het apparaat, dit is een natuurlijk gas
dat weliswaar milieuvriendelijk is, maar ook uiterst ontvlambaar.
Controleer of de onderdelen van het koelcircuit tijdens
transport en installatie van het apparaat niet beschadigd zijn geraakt.
Indien het koelcircuit beschadigd is:
– open vuur en ontstekingsbronnen vermijden
– de ruimte waar het apparaat zich bevindt grondig
ventileren
• Het is gevaarlijk om wijzigingen aan te brengen in de
specificaties of dit product op enigerlei wijze te modificeren. Een beschadigd netsnoer kan kortsluiting, brand
en/of een elektrische schok veroorzaken.
2
Page 3
Waarschuwing! Alle elektrische onderdelen (net-
snoer, stekker, compressor) mogen om gevaar te
voorkomen uitsluitend worden vervangen door een erkende onderhoudsdienst of gekwalificeerd onderhoudspersoneel.
1. Het netsnoer mag niet verlengd worden.
2. Verzeker u ervan dat de stekker niet platgedrukt of
beschadigd wordt door de achterkant van het apparaat. Een platgedrukte of beschadigde stekker
kan oververhit raken en brand veroorzaken.
3. Verzeker u ervan dat u de stekker van het apparaat
kunt bereiken.
4. Trek niet aan het snoer.
5. Als de stekker los zit, steek hem dan niet in het
stopcontact. Dan bestaat er een risico op een elektrische schok of brand.
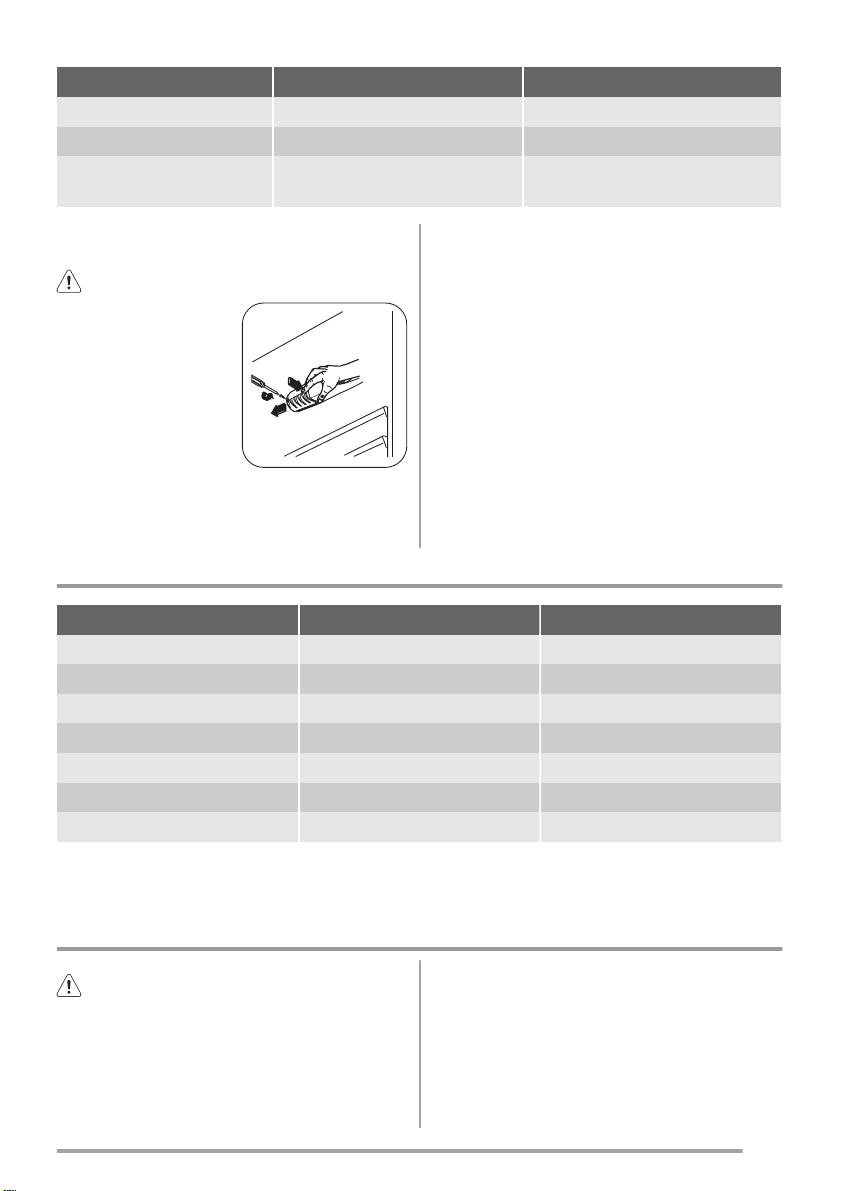
6. U mag het apparaat niet gebruiken zonder de af-
1)
dekking van het lampje
voor de binnenverlich-
ting.
• Dit apparaat is zwaar. Wees voorzichtig als u het apparaat verplaatst.
• Haal geen artikelen uit het vriesvak en raak ze niet aan
als uw handen vochtig/nat zijn, dit kan uw huid beschadigen of vrieswonden veroorzaken.
• Stel het apparaat niet langdurig bloot aan direct zonlicht.
•
Gloeilampjes
2)
gebruikt voor dit apparaat is een speciaal lampje voor huishoudelijke apparaten. De lampjes
zijn niet geschikt voor de verlichting van ruimtes.
Dagelijks gebruik
• Zet geen hete potten op de kunststof onderdelen in het
apparaat.
• Bewaar geen brandbare gassen of vloeistoffen in het
apparaat, deze kunnen ontploffen.
• Zet geen levensmiddelen direct tegen de luchtopening
in de achterwand.
• Diepgevroren voedsel mag niet opnieuw worden ingevroren als het eenmaal ontdooid is.
• Bewaar voorverpakte diepvriesproducten volgens de
aanwijzingen van de fabrikant.
• U dient zich strikt te houden aan de aanbevelingen van
de fabrikant van het apparaat met betrekking tot het be-
1) Als er een afdekking voor het lampje is voorzien.
2) Als er is voorzien in een lamp.
3) Als het apparaat vorstvrij is.
3)
waren van voedsel. Raadpleeg de betreffende aanwijzingen.
• Leg geen koolzuurhoudende of mousserende dranken
in de vriezer, deze veroorzaken druk op de fles die
daardoor kan ontploffen, dit kan schade toebrengen
aan het apparaat.
• IJslollies kunnen vrieswonden veroorzaken als ze
rechtstreeks vanuit het apparaat geconsumeerd worden.
Onderhoud en reiniging
• Schakel het apparaat uit en trek de stekker uit het stopcontact voordat u onderhoudshandelingen verricht.
• Maak het apparaat niet schoon met metalen voorwerpen.
• Gebruik geen scherpe voorwerpen om ijs van het apparaat te krabben. Gebruik een kunststof schraper.
• Controleer de afvoer in de koelkast regelmatig op dooiwater. Maak de afvoer, indien nodig, schoon. Als de afvoer verstopt is, zal er water op de bodem van het apparaat liggen.
Installatie
Belangrijk! Voor de aansluiting van elektriciteit dienen de
instructies in de desbetreffende paragrafen nauwgezet te
worden opgevolgd.
• Pak het apparaat uit en controleer of er beschadigingen
zijn. Sluit het apparaat niet aan als het beschadigd is.
Meld mogelijke beschadigingen onmiddellijk bij de
winkel waar u het apparaat gekocht heeft. Gooi in dat
geval de verpakking niet weg.
• Wij adviseren u om 4 uur te wachten voordat u het apparaat aansluit, dan kan de olie terugvloeien in de
compressor.
• Rond het apparaat dient adequate luchtcirculatie te zijn,
anders kan dit tot oververhitting leiden. Om voldoende
ventilatie te verkrijgen de instructies met betrekking tot
de installatie opvolgen.
• De achterkant dient zo mogelijk tegen een muur geplaatst te worden, teneinde te voorkomen dat hete onderdelen (compressor, condensator) aangeraakt kunnen worden en brandwonden veroorzaken.
• Het apparaat mag niet vlakbij radiatoren of kooktoestellen geplaatst worden.
3
Page 4
• Verzeker u ervan dat de stekker bereikbaar is nadat het
apparaat geïnstalleerd is.
• Sluit het apparaat alleen aan op een drinkwaterleiding.
4)
Onderhoud
• Alle elektrotechnische werkzaamheden die noodzakelijk
zijn voor het uitvoeren van onderhoud aan het apparaat, dienen uitgevoerd te worden door een gekwalificeerd elektricien of competent persoon.
• Dit product mag alleen worden onderhouden door een
erkend onderhoudscentrum en er dient alleen gebruik
te worden gemaakt van originele reserveonderdelen.
Bediening
Bescherming van het milieu
Dit apparaat bevat geen gassen die de ozonlaag
kunnen beschadigen, niet in het koelcircuit en evenmin in de isolatiematerialen. Het apparaat mag niet worden weggegooid bij het normale huishoudelijke afval. Het
isolatieschuim bevat ontvlambare gassen: het apparaat
moet weggegooid worden conform de van toepassing
zijnde regels die u bij de lokale overheidsinstanties kunt
verkrijgen. Voorkom beschadiging aan de koeleenheid,
vooral aan de achterkant bij de warmtewisselaar. De materialen die gebruikt zijn voor dit apparaat en die voorzien
zijn van het symbool
zijn recyclebaar.
Inschakelen
Steek de stekker in het stopcontact.
Draai de thermostaatknop op een gemiddelde stand.
Uitschakelen
Draai de thermostaatknop op de stand "O" om het apparaat uit te schakelen.
Temperatuurregeling
De temperatuur wordt automatisch geregeld.
Ga als volgt te werk om het apparaat in werking te stellen:
• draai de thermostaatknop op een lagere stand om de
minimale koude te verkrijgen.
• draai de thermostaatknop op een hogere stand om de
maximale koude te verkrijgen.
Een gemiddelde instelling is over het algemeen het
meest geschikt.
Het eerste gebruik
De binnenkant schoonmaken
Voordat u het apparaat voor de eerste keer gebruikt, wast
u de binnenkant en de interne accessoires met lauwwarm
water en een beetje neutrale zeep om de typische geur van
Dagelijks gebruik
De exacte instelling moet echter gekozen worden rekening
houdend met het feit dat de temperatuur in het apparaat
afhankelijk is van:
• de omgevingstemperatuur
• hoe vaak de deur geopend wordt
• de hoeveelheid voedsel die bewaard wordt
• plaatsing van het apparaat.
Belangrijk! Als de omgevingstemperatuur hoog is of als
het apparaat volledig gevuld is en de thermostaatknop op
de koudste instelling staat, kan het apparaat continu
werken waardoor er ijs op de achterwand gevormd wordt.
In dat geval moet de knop op een hogere temperatuur
gezet worden om automatische ontdooiing mogelijk te
maken en zodoende het energieverbruik te beperken.
een nieuw product weg te nemen. Droog daarna grondig
af.
Belangrijk! Gebruik geen oplosmiddelen of schuurpoeders. Deze beschadigen de lak.
Vers voedsel invriezen
Het vriesvak is geschikt voor het invriezen van vers voedsel en voor het voor een lange periode bewaren van ingevroren en diepgevroren voedsel.
4) Indien er een wateraansluiting voorzien is.
4
Om vers voedsel in te vriezen moet de gemiddelde instelling veranderd worden.
Om het invriezen sneller te laten verlopen moet u de thermostaatknop echter op een hogere stand instellen om de
maximale koude te kunnen verkrijgen.
Page 5
Belangrijk! In deze omstandigheden kan de temperatuur in
de koelkast tot onder de 0°C dalen. Als dat gebeurt de
thermostaatknop op een warmere stand instellen.
Het bewaren van ingevroren voedsel
Als u het apparaat voor het eerst of na een periode dat het
niet gebruikt is inschakelt, het apparaat minstens 2 uur op
een hoge instelling laten werken voordat u er producten in
plaatst.
Belangrijk! In het geval van onbedoelde ontdooiing,
bijvoorbeeld als de stroom langer is uitgevallen dan de
duur die op de kaart met technische kenmerken onder
"tijdsduur" is vermeld, moet het ontdooide voedsel snel
geconsumeerd worden of onmiddellijk bereid worden en
dan weer worden ingevroren (nadat het afgekoeld is).
Ontdooien
Diepgevroren of ingevroren voedsel kunt, voordat het gebruikt wordt, in het koelvak of op kamertemperatuur laten
ontdooien, afhankelijk van de hoeveelheid tijd die hiervoor
nodig is.
Kleine stukken kunnen zelfs rechtstreeks vanuit de vriezer
gekookt worden als ze nog bevroren zijn: in dat geval zal
de bereiding iets langer duren.
Nuttige aanwijzingen en tips
Verplaatsbare schappen
De wanden van de koelkast zijn voorzien van een aantal
geleiders zodat de schappen op de gewenste plaats gezet
kunnen worden.
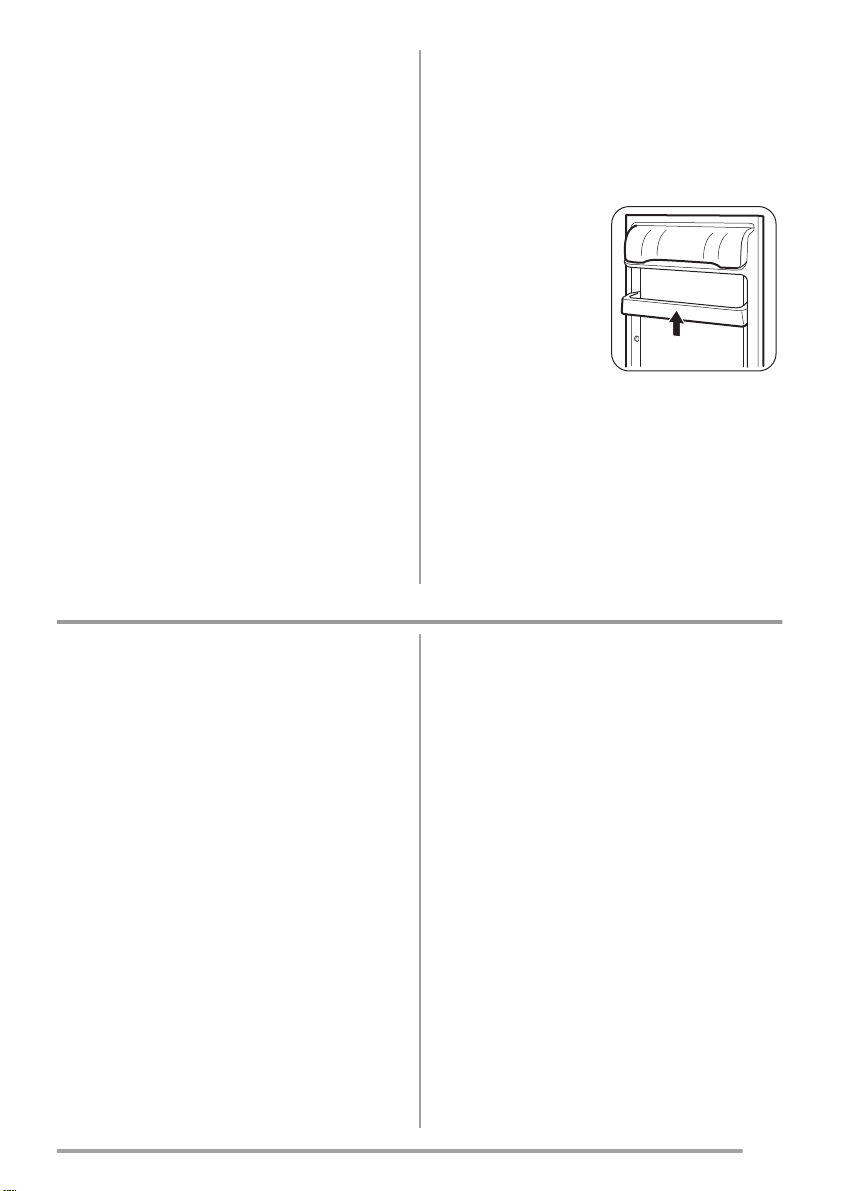
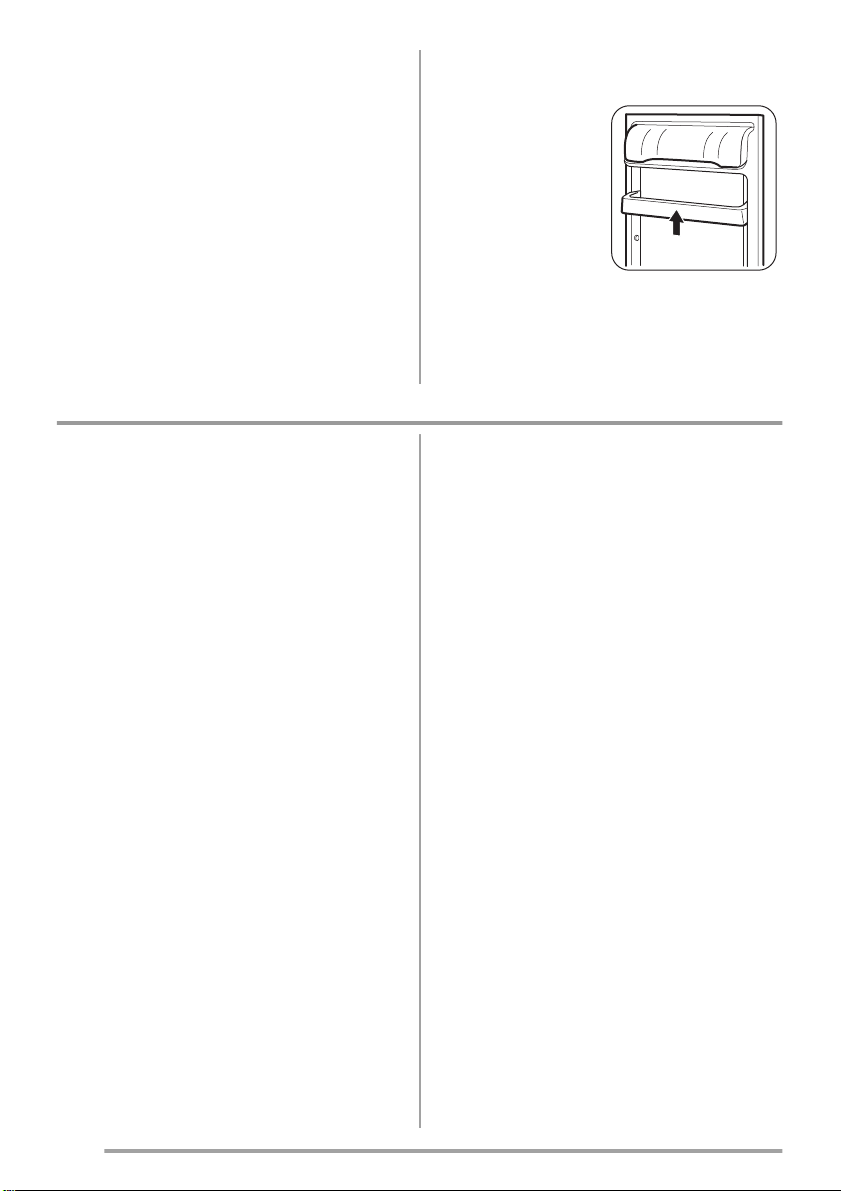
Het plaatsen van de deurschappen
Om het bewaren van voedselpakketten van verschillende afmetingen mogelijk
te maken, kunnen de
schappen op verschillende
hoogtes geplaatst worden.
Trek het schap geleidelijk
in de richting van de pijlen
totdat het los komt en
plaats op een andere gewenste hoogte terug.
Normale bedrijfsgeluiden
• U kunt een zwak gorgelend en borrelend geluid horen
wanneer het koelmiddel door leidingen wordt gepompt.
Dat is normaal.
• Als de compressor aan staat, wordt het koelmiddel
rondgepompt en dan zult u een zoemend en kloppend
geluid van de compressor horen. Dat is normaal.
• De thermische uitzetting kan een plotseling krakend
geluid veroorzaken. Dit is een natuurlijk, niet gevaarlijk
fysisch verschijnsel. Dat is normaal.
• Als de compressor in- of uitgeschakeld wordt, zult u
een zacht "klikje" van de thermostaat horen. Dat is normaal.
Tips voor energiebesparing
• De deur niet vaker openen of open laten staan dan
strikt noodzakelijk.
• Als de omgevingstemperatuur hoog is, de thermostaatknop op een lage temperatuur staat en het apparaat
volledig gevuld is, kan de compressor continu aan
staan waardoor er ijs op de verdamper ontstaat. Als dit
gebeurt, zet u de thermostaatknop naar een warmere
instelling om de koelkast automatisch te laten ontdooien en zo elektriciteitsverbruik te besparen.
Tips voor het koelen van vers voedsel
Om de beste prestatie te verkrijgen:
• Zet geen warm voedsel of verdampende vloeistoffen in
de koelkast
• dek het voedsel af of verpak het, in het bijzonder als het
een sterke geur heeft
• plaats het voedsel zodanig dat de lucht er vrijelijk omheen kan circuleren
Nuttige tips voor het koelen
Nuttige tips:
Vlees (alle soorten) in plastic zakken verpakken en op het
glazen schap leggen, boven de groentelade.
Bewaar het, voor de veiligheid, slechts een of maximaal
twee dagen op deze manier.
Gekookt voedsel, koude schotels, enz.: deze moeten afgedekt worden en mogen op willekeurig welk schap gezet
worden.
5
Page 6
Fruit en groente: deze moeten zorgvuldig schoongemaakt
worden en in de speciaal daarvoor bedoelde lade(n) geplaatst worden.
Boter en kaas: dit moet in speciale luchtdichte bakjes gelegd of in aluminiumfolie of plastic zakjes gewikkeld worden om zoveel mogelijk lucht buiten te sluiten.
Melkflessen: deze moeten een afdekdop hebben en opgeslagen worden in het flessenrek in de deur.
Bananen, aardappelen, uien en knoflook, indien niet verpakt, mogen niet in de koelkast bewaard worden.
Tips voor het invriezen
Om u te helpen om het beste van het invriesproces te maken, volgen hier een paar belangrijke tips:
• de maximale hoeveelheid voedsel die in 24 uur ingevroren kan worden. is vermeld op het typeplaatje;
• het invriesproces duurt 24 uur. Voeg gedurende deze
periode niet meer in te vriezen voedsel toe;
• vries alleen vers en grondig schoongemaakte levensmiddelen van uitstekende kwaliteit in;
• bereid het voedsel in kleine porties voor, zo kan het
snel en volledig worden ingevroren en zo kunt u later
alleen die hoeveelheid laten ontdooien die u nodig
heeft;
• wikkel het voedsel in aluminiumfolie of plastic en zorg
ervoor dat de pakjes luchtdicht zijn;
• leg vers, nog niet ingevroren voedsel niet tegen het al
ingevroren voedsel, om te voorkomen dat dit laatste
warm wordt;
• smalle pakjes zijn makkelijker op te bergen dan dikke;
zout maakt voedsel minder lang houdbaar;
• water bevriest, als dit rechtstreeks uit het vriesvak geconsumeerd wordt, kan het aan de huid vastvriezen;
• het is aan te bevelen de invriesdatum op elk pakje te
vermelden, dan kunt u zien hoe lang het al bewaard is;
Tips voor het bewaren van ingevroren voedsel
Om de beste resultaten van dit apparaat te verkrijgen,
dient u:
• er zich van te verzekeren dat de commercieel ingevroren levensmiddelen op geschikte wijze door de detailhandelaar werden opgeslagen;
• ervoor te zorgen dat de ingevroren levensmiddelen zo
snel mogelijk van de winkel naar uw vriezer gebracht
worden;
• de deur niet vaker te openen of open te laten staan dan
strikt noodzakelijk.
• Als voedsel eenmaal ontdooid is, bederft het snel en
kan het niet opnieuw worden ingevroren.
• Bewaar het voedsel niet langer dan de door de fabrikant
aangegeven bewaarperiode.
Onderhoud en reiniging
Let op! Voordat u welke onderhoudshandeling dan
ook verricht, de stekker uit het stopcontact trekken.
Het koelcircuit van dit apparaat bevat koolwaterstoffen; onderhoud en herladen mag alleen uitgevoerd
worden door bevoegde technici.
Periodieke reiniging
Het apparaat moet regelmatig worden schoongemaakt:
• maak de binnenkant en de accessoires schoon met
lauw water en wat neutrale zeep.
• controleer de afdichtingen regelmatig en wrijf ze
schoon om u ervan te verzekeren dat ze schoon zijn en
vrij van restjes zijn.
• spoel ze af en maak ze grondig droog.
Belangrijk! Trek niet aan leidingen en/of kabels aan de
binnenkant van de kast en verplaats of beschadig ze niet.
Gebruik nooit schoonmaakmiddelen, schuurpoeders, erg
geparfumeerde reinigingsproducten en
6
waspolijstmiddelen om de binnenkant schoon te maken,
aangezien deze het oppervlak beschadigen en een sterke
geur achterlaten.
Maak de condensor (zwart rooster) en de compressor op
de achterkant van het apparaat schoon met een borstel of
stofzuiger. Deze handeling zal de prestatie van het apparaat verbeteren en het elektriciteitsverbruik besparen.
Belangrijk! Zorg ervoor dat u het koelsysteem niet
beschadigt.
Veel normaal verkrijgbare keukenreinigers bevatten chemicaliën die de kunststoffen die in dit apparaat gebruikt
zijn kunnen aantasten/beschadigen. Daarom wordt het
aanbevolen de buitenkant van dit apparaat alleen schoon
te maken met warm water met een beetje afwasmiddel.
Steek, na het schoonmaken van het apparaat, de stekker
weer in het stopcontact.
Page 7
Het ontdooien van de koelkast
Rijp wordt elke keer als de compressormotor tijdens normale werking stopt, automatisch van de verdamper van
het koelvak verwijderd. Het dooiwater loopt via een gootje
in een speciale opvangbak aan de achterkant van het apparaat, boven de compressormotor, waar het verdampt.
Het is belangrijk om het afvoergaatje van het dooiwater in
het midden van het koelvak regelmatig schoon te maken,
om te voorkomen dat het water overloopt en op het voedsel in de koelkast gaat druppelen. Gebruik daarvoor de
speciale reiniger, die al in het afvoergaatje zit.
De vriezer ontdooien
Een zekere hoeveelheid rijp zal zich altijd vormen op
de schappen van de vriezer en rond het bovenste
vak.
Belangrijk! Ontdooi de vriezer wanneer de rijplaag een
dikte van ongeveer 3-5 mm bereikt heeft.
Volg onderstaande aanwijzingen om de rijp te verwijderen:
1. Schakel het apparaat uit.
2. Verwijder al het ingevroren voedsel, wikkel het in een
paar lagen krantenpapier en leg het op een koele
plaats.
3. Laat de deur open staan.
4. Na afloop van het ontdooien de binnenkant grondig
droog maken en de dop terugzetten.
5. Schakel het apparaat in.
6. Zet de thermostaatknop op de maximale koude en laat
het apparaat twee tot drie uur in deze instelling werken.
7. Zet het eerder verwijderde voedsel terug in het vriesvak.
Belangrijk! Gebruik nooit scherpe metalen om de rijp van
de verdamper te krabben, deze zou beschadigd kunnen
raken. Gebruik geen mechanische of kunstmatige
middelen om het ontdooiproces te versnellen, behalve die
middelen die door de fabrikant zijn aanbevolen. Een
temperatuurstijging tijdens het ontdooien van de
ingevroren levensmiddelen, kan de veilige bewaartijd
verkorten.
Periodes dat het apparaat niet gebruikt wordt
Als het apparaat gedurende lange tijd niet gebruikt wordt,
neem dan de volgende voorzorgsmaatregelen:
1. Trek de stekker uit het stopcontact.
2. Haal al het voedsel eruit.
3. Ontdooi het apparaat en toebehoren en maak alles
schoon.
4. Laat de deur/deuren op een kier staan om de vorming
van onaangename luchtjes te voorkomen.
Belangrijk! Als uw apparaat aan blijft staan, vraag dan
iemand om het zo nu en dan te controleren, om te
voorkomen dat het bewaarde voedsel bederft, als de
stroom uitvalt.
Problemen oplossen
Waarschuwing! Voordat u problemen opspoort,
moet u eerst de stekker uit het stopcontact trekken.
Het opsporen van storingen die niet in deze handleiding
vermeld zijn, dient te worden verricht door een
gekwalificeerd technicus of deskundig persoon.
Probleem Mogelijke oorzaak Oplossing
Het apparaat maakt lawaai Het apparaat wordt niet goed onder-
steund
Belangrijk! Er zijn tijdens de normale werking geluiden te
horen (compressor, koelcircuit).
Controleer of het apparaat stabiel staat
(alle vier de voetjes moeten op de vloer
staan)
7
Page 8
Probleem Mogelijke oorzaak Oplossing
Het apparaat werkt niet. Het
Het apparaat is uitgeschakeld. Schakel het apparaat in.
lampje brandt niet.
De stekker zit niet goed in het stop-
contact.
Het apparaat krijgt geen stroom. Er
staat geen spanning op het stopcontact.
Steek de stekker goed in het stopcontact.
Sluit een ander elektrisch apparaat aan
op het stopcontact.
Neem contact op met een gekwalificeerd
elektricien.
Het lampje werkt niet. Het lampje staat in stand-by. Sluit en open de deur.
Het lampje is stuk. Zie 'Het lampje vervangen'.
De compressor werkt continu. De temperatuur is niet goed ingesteld. Stel een hogere temperatuur in.
De deur is niet goed gesloten. Zie 'De deur sluiten'.
De deur is te vaak geopend. Laat de deur niet langer dan nodig
openstaan.
De temperatuur van het product is te
hoog.
Laat het product afkoelen tot kamertem-
peratuur voordat u het opbergt.
De kamertemperatuur is te hoog. Verlaag de kamertemperatuur.
Er loopt water over de achterkant
van de koelkast.
Tijdens het automatische ontdooiproces ontdooit de rijp tegen de achter-
Dit is normaal.
wand.
Er loopt water in de koelkast. De waterafvoer is verstopt. Reinig de waterafvoer.
Producten verhinderen dat water in de
wateropvangbak kan stromen.
Er loopt water over de vloer. De dooiwaterafvoer loopt niet in de
verdamperbak boven de compressor.
De temperatuur in het apparaat is
te laag.
De temperatuur in het apparaat is
te hoog.
De thermostaatknop is niet goed inge-
steld.
De thermostaatknop is niet goed inge-
steld.
Zorg ervoor dat de producten de achterwand niet raken.
Maak de dooiwaterafvoer vast op de verdamperbak.
Stel een hogere temperatuur in.
Stel een lagere temperatuur in.
De deur is niet goed gesloten. Zie 'De deur sluiten'.
De temperatuur van het product is te
hoog.
Er zijn veel producten tegelijk opge-
Laat het product afkoelen tot kamertemperatuur voordat u het opbergt.
Berg minder producten tegelijk op.
borgen.
De temperatuur in de koelkast is
te hoog.
De temperatuur in het vriesvak is
te hoog.
Er is geen koude luchtcirculatie in het
apparaat.
Producten zijn te dicht opelkaar ge-
plaatst.
Zorg ervoor dat er koude luchtcirculatie
in het apparaat is.
Berg de producten zo op dat er een koude luchtcirculatie is.
8
Page 9
Probleem Mogelijke oorzaak Oplossing
Er is te veel rijp. Het product is niet goed verpakt. Verpak het op de juiste manier.
De deur is niet goed gesloten. Zie 'De deur sluiten'.
De thermostaatknop is niet goed inge-
steld.
Stel een hogere temperatuur in.
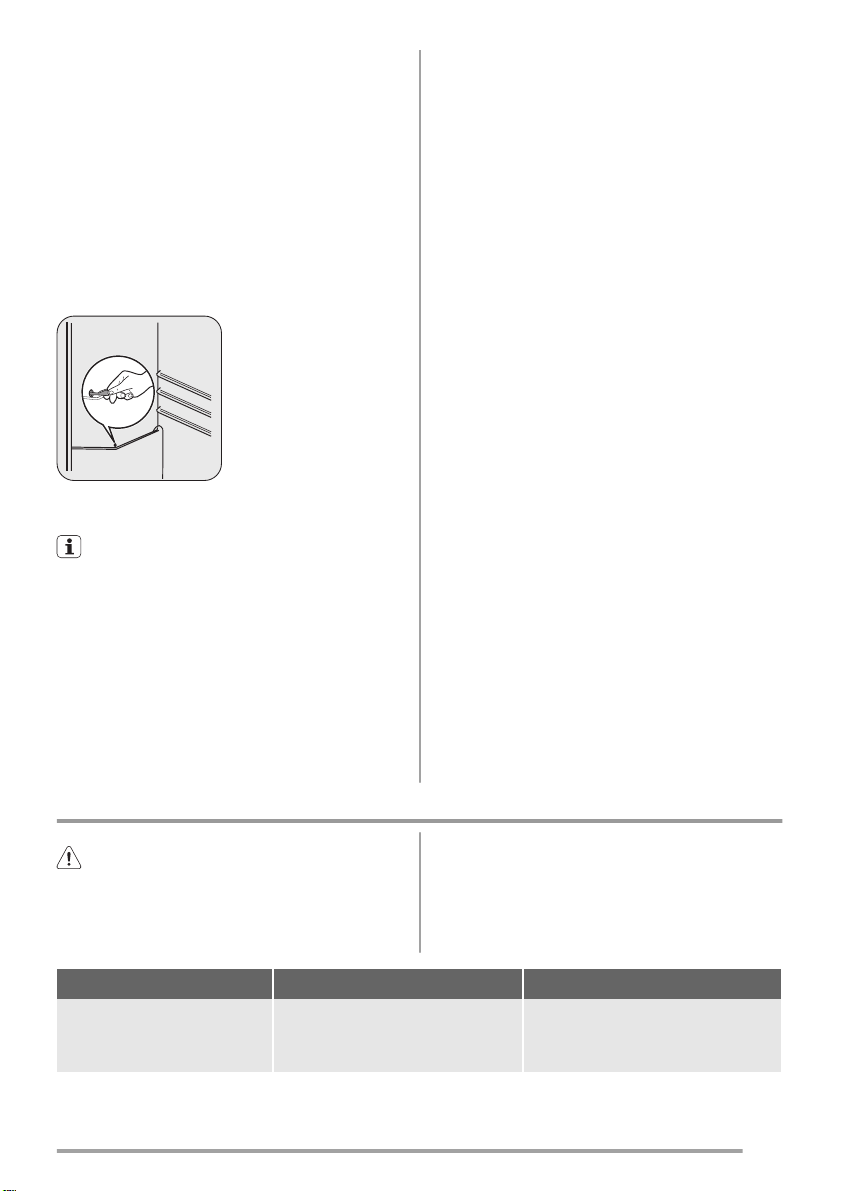
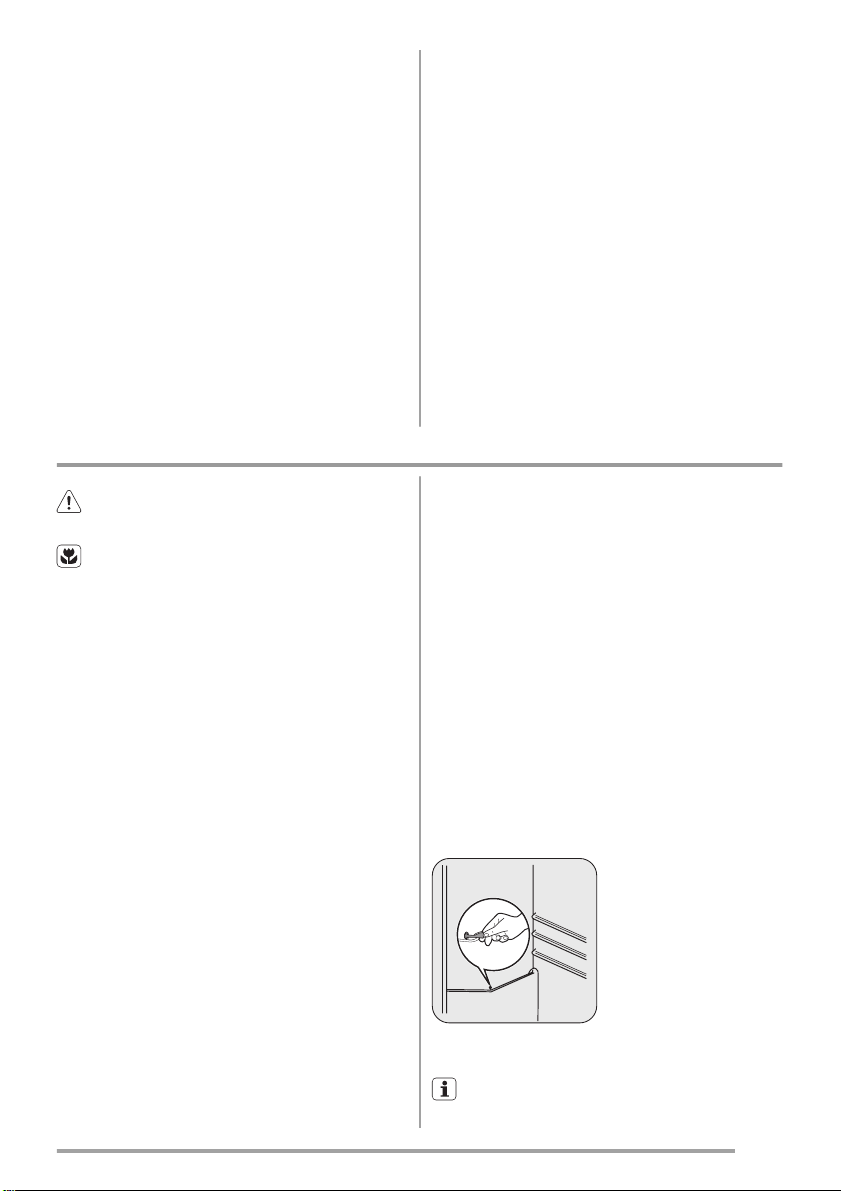
Het lampje vervangen
Let op! Trek de stekker uit het stopcontact.
1. Verwijder de
schroef van de afdekking van het
lampje.
2. Verwijder de afdekking van het lampje
(raadpleeg de afbeelding).
3. Vervang het kapotte
lampje door een nieuw lampje met hetzelfde vermogen dat speciaal bedoeld is voor huishoudelijke ap-
paraten (het maximumvermogen is vermeld op de afdekking van het lampje).
4. Installeer de afdekking van het lampje.
5. Draai de schroef van de afdekking van het lampje
vast.
6. Steek de stekker in het stopcontact.
7. Open de deur. Controleer of het lampje gaat branden.
De deur sluiten
1. Maak de afdichtingen van de deur schoon.
2. Stel de deur, indien nodig, af. Raadpleeg "Montage".
3. Vervang, indien nodig, de defecte deurafdichtingen.
Neem contact met de service-afdeling.
Technische gegevens
Afmetingen
Hoogte 850 mm
Breedte 550 mm
Diepte 612 mm
Tijdsduur 11 uur
Spanning 230 V
Frequentie 50 Hz.
De technische gegevens staan op het typeplaatje aan de
linker binnenkant in het apparaat en op het energielabel.
Montage
Let op! Lees voor uw eigen veiligheid en correcte
werking van het apparaat eerst de
"veiligheidsinformatie" aandachtig door, alvorens het
apparaat te installeren.
Opstelling
Dit apparaat kan ook in een droge, goed geventileerde
binnenruimte (garage of kelder) geïnstalleerd worden,
maar voor de beste prestatie kunt u het apparaat beter installeren op een plaats waar de omgevingstemperatuur
overeenkomt met de klimaatklasse die staat aangegeven
op het typeplaatje van het apparaat.
9
Page 10

Klimaat-
Omgevingstemperatuur
klasse
SN +10°C tot + 32°C
N +16°C tot + 32°C
ST +16°C tot + 38°C
T +16°C tot + 43°C
Plaats
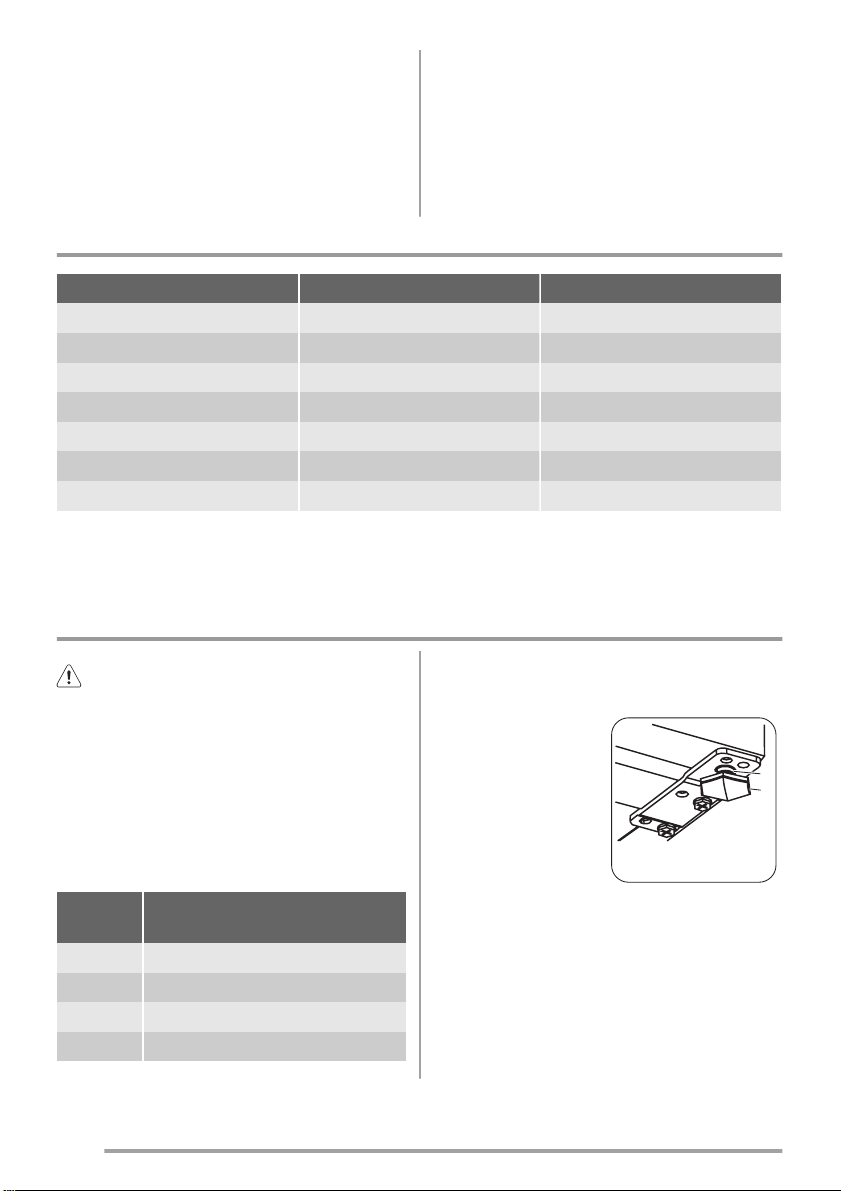
Waterpas zetten
Zorg er voor dat het apparaat waterpas staat wanneer u het plaatst. Deze
stand kan bereikt worden
met de twee afstelbare
voetjes (2) die aan de
voorkant en onderkant van
het apparaat bevestigd
zijn. Stel de voetjes indien
nodig bij door het afstandsstuk (1) te verwijderen.
1
2
Het apparaat moet ver van hittebronnen, zoals radiatoren,
boilers, direct zonlicht enz., vandaan worden geïnstalleerd. Zorg er voor dat lucht vrij kan circuleren aan de
achterkant van de kast. Als het apparaat onder een muur
met een afdakje wordt geplaatst, moet de minimale afstand tussen de bovenkant van de kast en de muur ten
minste 100 mm bedragen om optimale prestaties te garanderen. Voor de beste prestatie kunt u het apparaat echter beter niet onder een afdakje zetten. De afstelbare voetjes aan de onderkant van het apparaat garanderen een
nauwkeurig horizontale uitlijning.
Als de kast in een hoek is geplaatst en de zijkant bevat
scharnieren die naar de muur wijzen, moet de afstand tussen de muur en de kast ten minste 10 mm zijn om de deur
ver genoeg open te krijgen zodat de planken verwijderd
kunnen worden.
Omkeerbaarheid van de deur
Belangrijk! Om de volgende handelingen uit te voeren,
raden we aan dat dit wordt gedaan met de hulp van een
tweede persoon die de deuren van het apparaat stevig
vasthoudt tijdens de werkzaamheden.
Waarschuwing!
min.100 mm
15 mm
15 mm
Het moet mogelijk zijn het apparaat van de hoofdstroomtoevoer af te halen; de stekker moet daarom na installatie
gemakkelijk toegankelijk zijn.
Om de draairichting van de deur te veranderen, gaat u als
volgt te werk:
10
Page 11
1. Trek de stekker uit het
stopcontact.
2. Kantel het apparaat voorzichtig naar achteren zodat
de compressor de vloer niet
kan raken.
3. Schroef beide afstelbare
voetjes los.
4. Draai de schroeven van
het onderste scharnier van
de deur los. Verwijder het
scharnier. Breng de pin
over in de richting van de
pijl.
5. Draai de schroef los en
monteer deze aan de andere
kant.
6. Monteer het scharnier
aan de andere kant.
7. Schroef de afstelbare
voetjes vast.
1) indien nodig
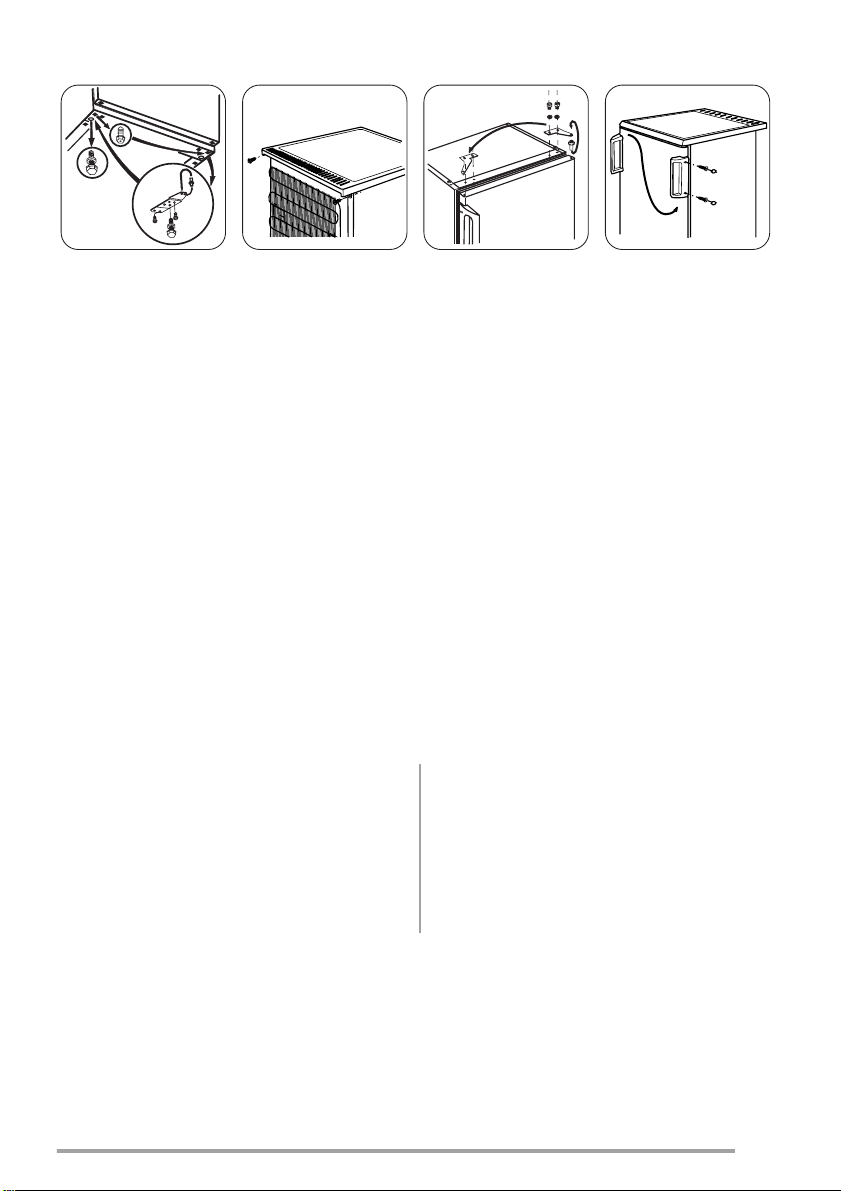
8. Draai de beide schroeven
aan de achterkant los.
9. Duw de bovenplaat naar
achteren en til hem op uit
de bevestigingselementen.
10. Draai de schroeven van
het bovenste deurscharnier
los.
11. Verwijder het scharnier.
Breng de pin over in de
richting van de pijl. Monteer het scharnier aan de
andere kant.
12. Draai het scharnier
vast.
13. Leg de bovenplaat weer
op zijn plaats.
14. Trek hem naar voren.
15. Draai de schroeven aan
de achterkant weer vast.
16. Verwijder en monteer
het handvat
1)
op de tegen-
overliggende zijde.
17. Zet het apparaat op zijn
plaats, zet het waterpas,
wacht minstens vier uur en
steek dan de stekker in het
stopcontact.
Controleer goed en verzeker u ervan dat:
• alle schroeven zijn aangehaald,
• de deur goed open en dicht gaat.
Als de omgevingstemperatuur laag is (bijv. in de winter),
kan het zijn dat de pakking niet precies op de kast past.
Wacht in dat geval tot de pakking op natuurlijke wijze passend wordt.
Als u bovenstaande handelingen liever niet zelf uitvoert,
neem dan contact op met de dichtstbijzijnde Klantenservice. De deskundige van de Klantenservice zal de draairichting van de deuren op uw kosten veranderen.
11
Page 12
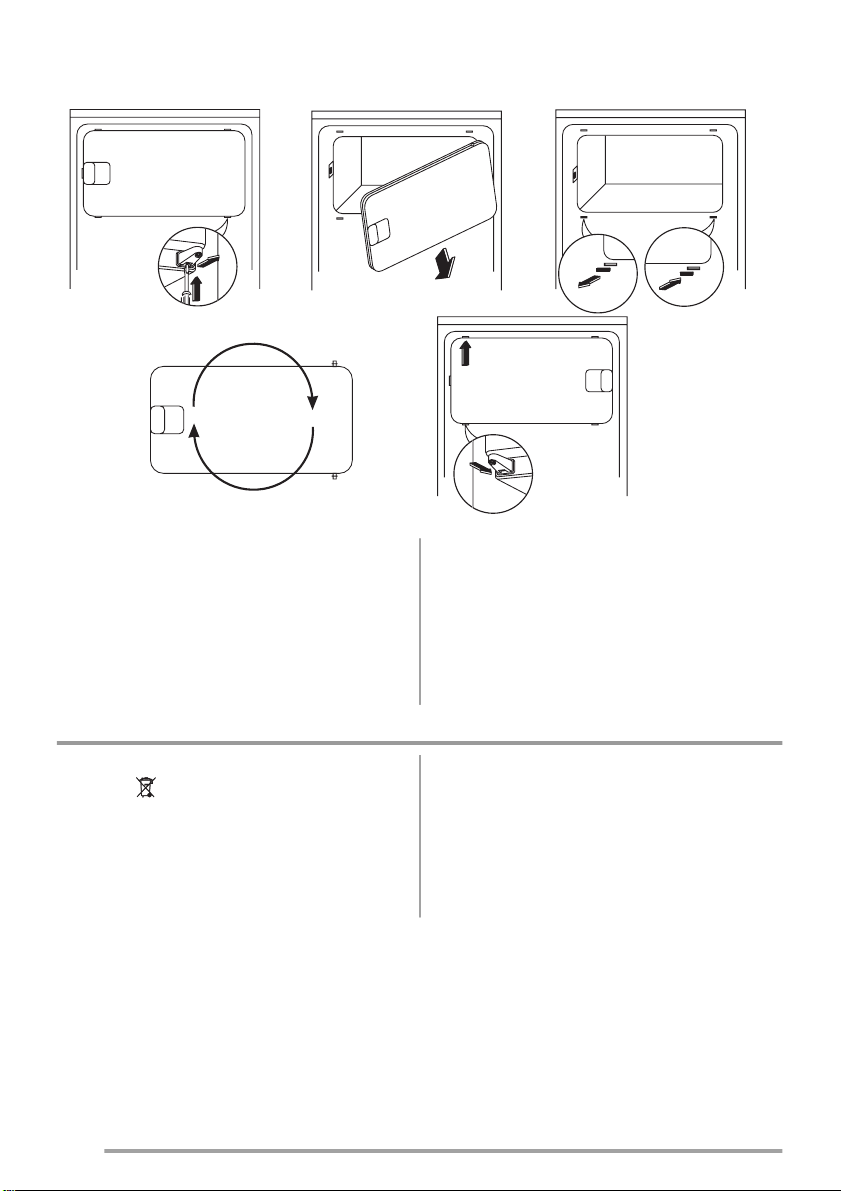
Omkeerbaarheid van de deur van de vriezer
180˚
Elektrische aansluiting
Zorg er vóór het aansluiten voor dat het voltage en de frequentie op het typeplaatje overeenkomen met de stroomtoevoer in uw huis.
Het apparaat moet geaard zijn. De netsnoerstekker is voorzien van een contact voor dit doel. Als het stopcontact niet
geaard is, sluit het apparaat dan aan op een afzonderlijk
Het milieu
Het symbool op het product of op de verpakking wijst
erop dat dit product niet als huishoudafval mag worden
behandeld, maar moet worden afgegeven bij een
verzamelpunt waar elektrische en elektronische apparatuur
wordt gerecycled. Als u ervoor zorgt dat dit product op de
juiste manier wordt verwijderd, voorkomt u mogelijke
aardepunt, in overeenstemming met de geldende regels,
raadpleeg hiervoor een gekwalificeerd elektricien.
De fabrikant neemt geen verantwoordelijkheid op zich als
de bovenstaande veiligheidsmaatregelen niet worden nageleefd.
Dit apparaat voldoet aan de EU. richtlijnen.
negatieve gevolgen voor mens en milieu die zich zouden
kunnen voordoen in geval van verkeerde afvalverwerking.
Voor gedetailleerdere informatie over het recyclen van dit
product, kunt u contact opnemen met de gemeente, de
gemeentereiniging of de winkel waar u het product hebt
gekocht.
12
Page 13
Contents
Safety information _ _ _ _ _ _ _ _ _ _ _ _ _ _ _ _ _ 13
Operation _ _ _ _ _ _ _ _ _ _ _ _ _ _ _ _ _ _ _ _ _ 15
First use _ _ _ _ _ _ _ _ _ _ _ _ _ _ _ _ _ _ _ _ _ _ 15
Daily use _ _ _ _ _ _ _ _ _ _ _ _ _ _ _ _ _ _ _ _ _ 15
Helpful hints and tips _ _ _ _ _ _ _ _ _ _ _ _ _ _ _ 16
Safety information
In the interest of your safety and to ensure the correct use,
before installing and first using the appliance, read this
user manual carefully, including its hints and warnings.
To avoid unnecessary mistakes and accidents, it is important to ensure that all people using the appliance are thoroughly familiar with its operation and safety features. Save
these instructions and make sure that they remain with the
appliance if it is moved or sold, so that everyone using it
through its life will be properly informed on appliance use
and safety.
For the safety of life and property keep the precautions of
these user's instructions as the manufacturer is not responsible for damages caused by omission.
Children and vulnerable people safety
• This appliance is not intended for use by persons (including children) with reduced physical, sensory or
mental capabilities, or lack of experience and knowledge, unless they have been given supervision or instruction concerning use of the appliance by a person
responsible for their safety.
Children should be supervised to ensure that they do
not play with the appliance.
• Keep all packaging well away from children. There is
risk of suffocation.
• If you are discarding the appliance pull the plug out of
the socket, cut the connection cable (as close to the
appliance as you can) and remove the door to prevent
playing children to suffer electric shock or to close
themselves into it.
• If this appliance featuring magnetic door seals is to replace an older appliance having a spring lock (latch)
on the door or lid, be sure to make that spring lock unusable before you discard the old appliance. This will
prevent it from becoming a death trap for a child.
Care and cleaning _ _ _ _ _ _ _ _ _ _ _ _ _ _ _ _ _ 17
What to do if… _ _ _ _ _ _ _ _ _ _ _ _ _ _ _ _ _ _ 18
Technical data _ _ _ _ _ _ _ _ _ _ _ _ _ _ _ _ _ _ _ 20
Installation _ _ _ _ _ _ _ _ _ _ _ _ _ _ _ _ _ _ _ _ 20
Environmental concerns _ _ _ _ _ _ _ _ _ _ _ _ _ _ 23
Subject to change without notice
General safety
Caution! Keep ventilation openings clear of
obstruction.
• The appliance is intended for keeping foodstuff and/or
beverages in a normal household as explained in this
instruction booklet.
• Do not use a mechanical device or any artificial means
to speed up the thawing process.
• Do not use other electrical appliances (such as ice
cream makers) inside of refrigerating appliances, unless they are approved for this purpose by the manufacturer.
• Do not damage the refrigerant circuit.
• The refrigerant isobutane (R600a) is contained within
the refrigerant circuit of the appliance, a natural gas
with a high level of environmental compatibility, which
is nevertheless flammable.
During transportation and installation of the appliance,
be certain that none of the components of the refrigerant circuit become damaged.
If the refrigerant circuit should become damaged:
– avoid open flames and sources of ignition
– thoroughly ventilate the room in which the appli-
ance is situated
• It is dangerous to alter the specifications or modify this
product in any way. Any damage to the cord may cause
a short-circuit, fire and/or electric shock.
Warning! Any electrical component (power cord,
plug, compressor) must be replaced by a certified
service agent or qualified service personnel to avoid hazard.
1. Power cord must not be lengthened.
2. Make sure that the power plug is not squashed or
damaged by the back of the appliance. A squashed
13
Page 14

or damaged power plug may overheat and cause a
fire.
3. Make sure that you can come to the mains plug of
the appliance.
4. Do not pull the mains cable.
5. If the power plug socket is loose, do not insert the
power plug. There is a risk of electric shock or fire.
6. You must not operate the appliance without the
5)
lamp cover
of interior lighting.
• This appliance is heavy. Care should be taken when
moving it.
• Do not remove nor touch items from the freezer compartment if your hands are damp/wet, as this could
cause skin abrasions or frost/freezer burns.
• Avoid prolonged exposure of the appliance to direct
sunlight.
•
Bulb lamps
6)
used in this appliance are special purpose lamps selected for household appliances use only. They are not suitable for household room illumination.
Daily Use
• Do not put hot pot on the plastic parts in the appliance.
• Do not store flammable gas and liquid in the appliance,
because they may explode.
• Do not place food products directly against the air outlet on the rear wall.
• Frozen food must not be re-frozen once it has been
thawed out.
• Store pre-packed frozen food in accordance with the
frozen food manufacturer's instructions.
• Appliance's manufacturers storage recommendations
should be strictly adhered to. Refer to relevant instructions.
• Do not place carbonated or fizzy drinks in the freezer
compartment as it creates pressure on the container,
which may cause it to explode, resulting in damage to
the appliance.
• Ice lollies can cause frost burns if consumed straight
from the appliance.
7)
Care and cleaning
• Before maintenance, switch off the appliance and disconnect the mains plug from the mains socket.
• Do not clean the appliance with metal objects.
• Do not use sharp objects to remove frost from the appliance. Use a plastic scraper.
• Regularly examine the drain in the refrigerator for defrosted water. If necessary, clean the drain. If the drain
is blocked, water will collect in the bottom of the appliance.
Installation
Important! For electrical connection carefully follow the
instructions given in specific paragraphs.
• Unpack the appliance and check if there are damages
on it. Do not connect the appliance if it is damaged.
Report possible damages immediately to the place you
bought it. In that case retain packing.
• It is advisable to wait at least four hours before connecting the appliance to allow the oil to flow back in
the compressor.
• Adequate air circulation should be around the appliance, lacking this leads to overheating. To achieve sufficient ventilation follow the instructions relevant to installation.
• Wherever possible the back of the product should be
against a wall to avoid touching or catching warm parts
(compressor, condenser) to prevent possible burn.
• The appliance must not be located close to radiators or
cookers.
• Make sure that the mains plug is accessible after the
installation of the appliance.
•
Connect to potable water supply only.
8)
Service
• Any electrical work required to do the servicing of the
appliance should be carried out by a qualified electrician or competent person.
• This product must be serviced by an authorized Service
Centre, and only genuine spare parts must be used.
5) If the lamp cover is foreseen.
6) If the lamp is foreseen.
7) If the appliance is Frost Free.
8) If a water connection is foreseen.
14
Page 15
Environment Protection
This appliance does not contain gasses which could
damage the ozone layer, in either its refrigerant circuit or insulation materials. The appliance shall not be
discarded together with the urban refuse and rubbish. The
Operation
insulation foam contains flammable gases: the appliance
shall be disposed according to the applicable regulations
to obtain from your local authorities. Avoid damaging the
cooling unit, especially at the rear near the heat exchanger. The materials used on this appliance marked by the
symbol
are recyclable.
Switching on
Insert the plug into the wall socket.
Turn the Temperature regulator clockwise to a medium
setting.
Switching off
To turn off the appliance, turn the Temperature regulator
to the "O" position.
Temperature regulation
The temperature is automatically regulated.
To operate the appliance, proceed as follows:
• turn the Temperature regulator toward lower settings to
obtain the minimum coldness.
• turn the Temperature regulator toward higher settings
to obtain the maximum coldness.
First use
Cleaning the interior
Before using the appliance for the first time, wash the interior and all internal accessories with lukewarm water and
some neutral soap so as to remove the typical smell of a
brand-new product, then dry thoroughly.
Daily use
Freezing fresh food
The freezer compartment is suitable for freezing fresh food
and storing frozen and deep-frozen food for a long time.
To freeze fresh foods it is not necessary to change the medium setting.
However, for a faster freezing operation, turn the temperature regulator toward higher settings to obtain the maximum coldness.
Important! In this condition, the refrigerator compartment
temperature might drop below 0°C. If this occurs reset the
temperature regulator to a warmer setting.
A medium setting is generally the most suitable.
However, the exact setting should be chosen keeping in
mind that the temperature inside the appliance depends
on:
• room temperature
• how often the door is opened
• the quantity of food stored
• the location of the appliance.
Important! If the ambient temperature is high or the
appliance is fully loaded, and the appliance is set to the
lowest temperatures, it may run continuously causing
frost to form on the rear wall. In this case the dial must be
set to a higher temperature to allow automatic defrosting
and therefore reduced energy consumption.
Important! Do not use detergents or abrasive powders, as
these will damage the finish.
Storage of frozen food
When first starting-up or after a period out of use, before
putting the products in the compartment let the appliance
run at least 2 hours on the higher settings.
Important! In the event of accidental defrosting, for
example due to a power failure, if the power has been off
for longer than the value shown in the technical
characteristics chart under "rising time", the defrosted
food must be consumed quickly or cooked immediately
and then re-frozen (after cooling).
15
Page 16
Thawing
Deep-frozen or frozen food, prior to being used, can be
thawed in the refrigerator compartment or at room temperature, depending on the time available for this operation.
Small pieces may even be cooked still frozen, directly
from the freezer: in this case, cooking will take longer.
Movable shelves
The walls of the refrigerator are equipped with a series of
runners so that the shelves can be positioned as desired.
Helpful hints and tips
Positioning the door shelves
To permit storage of food
packages of various sizes,
the door shelves can be
placed at different heights.
Gradually pull the shelf in
the direction of the arrows
until it comes free, then
reposition as required.
Normal Operating Sounds
• You may hear a faint gurgling and a bubbling sound
when the refrigerant is pumped through the coils or
tubing. This is correct.
• When the compressor is on, the refrigerant is being
pumped around and you will hear a whirring sound
and a pulsating noise from the compressor. This is
correct.
• The thermic dilatation might cause a sudden cracking
noise. It is natural, not dangerous physical phenomenon. This is correct.
• When the compressor switches on or switches off, you
will hear a faint "click" of the temperature regulator.
This is correct.
Hints for energy saving
• Do not open the door frequently or leave it open longer
than absolutely necessary.
• If the ambient temperature is high and the Temperature
Regulator is set to low temperature and the appliance is
fully loaded, the compressor may run continuously,
causing frost or ice on the evaporator. If this happens,
set the Temperature Regulator toward warmer settings
to allow automatic defrosting and so a saving in electricity consumption.
Hints for fresh food refrigeration
To obtain the best performance:
• do not store warm food or evaporating liquids in the
refrigerator
• do cover or wrap the food, particularly if it has a strong
flavour
• position food so that air can circulate freely around it
Hints for refrigeration
Useful hints:
Meat (all types) : wrap in polythene bags and place on the
glass shelf above the vegetable drawer.
For safety, store in this way only one or two days at the
most.
Cooked foods, cold dishes, etc..: these should be covered
and may be placed on any shelf.
Fruit and vegetables: these should be thoroughly cleaned
and placed in the special drawer(s) provided.
Butter and cheese: these should be placed in special airtight containers or wrapped in aluminium foil or polythene
bags to exclude as much air as possible.
Milk bottles: these should have a cap and should be stored in the bottle rack on the door.
Bananas, potatoes, onions and garlic, if not packed, must
not be kept in the refrigerator.
Hints for freezing
To help you make the most of the freezing process, here
are some important hints:
• the maximum quantity of food which can be frozen in
24 hrs. is shown on the rating plate;
• the freezing process takes 24 hours. No further food to
be frozen should be added during this period;
• only freeze top quality, fresh and thoroughly cleaned,
foodstuffs;
16
Page 17
• prepare food in small portions to enable it to be rapidly
and completely frozen and to make it possible subsequently to thaw only the quantity required;
• wrap up the food in aluminium foil or polythene and
make sure that the packages are airtight;
• do not allow fresh, unfrozen food to touch food which
is already frozen, thus avoiding a rise in temperature of
the latter;
• lean foods store better and longer than fatty ones; salt
reduces the storage life of food;
• water ices, if consumed immediately after removal from
the freezer compartment, can possibly cause the skin to
be freeze burnt;
• it is advisable to show the freezing in date on each individual pack to enable you to keep tab of the storage
time.
Care and cleaning
Hints for storage of frozen food
To obtain the best performance from this appliance, you
should:
• make sure that the commercially frozen foodstuffs were
adequately stored by the retailer;
• be sure that frozen foodstuffs are transferred from the
foodstore to the freezer in the shortest possible time;
• not open the door frequently or leave it open longer
than absolutely necessary.
• Once defrosted, food deteriorates rapidly and cannot be
refrozen.
• Do not exceed the storage period indicated by the food
manufacturer.
Caution! Unplug the appliance before carrying out
any maintenance operation.
This appliance contains hydrocarbons in its cooling
unit; maintenance and recharging must therefore
only be carried out by authorized technicians.
Periodic cleaning
The equipment has to be cleaned regularly:
• clean the inside and accessories with lukewarm water
and some neutral soap.
• regularly check the door seals and wipe clean to ensure
they are clean and free from debris.
• rinse and dry thoroughly.
Important! Do not pull, move or damage any pipes and/or
cables inside the cabinet.
Never use detergents, abrasive powders, highly perfumed
cleaning products or wax polishes to clean the interior as
this will damage the surface and leave a strong odour.
Clean the condenser (black grill) and the compressor at
the back of the appliance with a brush or a vacuum cleaner. This operation will improve the performance of the appliance and save electricity consumption.
Important! Take care of not to damage the cooling system.
Many proprietary kitchen surface cleaners contain chemi-
cals that can attack/damage the plastics used in this appliance. For this reason it is recommended that the outer
casing of this appliance is only cleaned with warm water
with a little washing-up liquid added.
After cleaning, reconnect the equipment to the mains supply.
Defrosting of the refrigerator
Frost is automatically eliminated from the evaporator of
the refrigerator compartment every time the motor compressor stops, during normal use. The defrost water
drains out through a trough into a special container at the
back of the appliance, over the motor compressor, where
it evaporates.
It is important to periodically clean the defrost water drain
hole in the middle of the refrigerator compartment channel
to prevent the water overflowing and dripping onto the
food inside. Use the special cleaner provided, which you
will find already inserted into the drain hole.
Defrosting the freezer
A certain amount of frost will always form on the
freezer shelves and around the top compartment.
17
Page 18

Important! Defrost the freezer when the frost layer reaches
a thickness of about 3-5 mm.
To remove the frost, do these steps:
1. Switch off the appliance.
2. Remove any stored food, wrap it in several layers of
newspaper and put it in a cool place.
3. Leave the door open.
4. When defrosting is completed, dry the interior thor-
oughly and refit the plug.
5. Switch on the appliance.
6. Set the temperature regulator to obtain the maximum
coldness and run the appliance for two or three hours
using this setting.
7. Reload the previously removed food into the compart-
ment.
Important! Never use sharp metal tools to scrape off frost
from the evaporator as you could damage it. Do not use a
What to do if…
mechanical device or any artificial means to speed up the
thawing process other than those recommended by the
manufacturer. A temperature rise of the frozen food packs,
during defrosting, may shorten their safe storage life.
Periods of non-operation
When the appliance is not in use for long periods, take the
following precautions:
1. disconnect the appliance from electricity supply
2. remove all food
3. defrost and clean the appliance and all accessories
4. leave the door/doors open to prevent unpleasant
smells.
Important! If the cabinet will be kept on, ask somebody to
check it once in a while to prevent the food inside from
spoiling in case of a power failure.
Warning! Before troubleshooting, disconnect the
mains plug from the mains socket.
Only a qualified electrician or competent person must do
the troubleshooting that is not in this manual.
Problem Possible cause Solution
The appliance is noisy The appliance is not supported prop-
erly
The appliance does not operate.
The lamp does not operate.
The mains plug is not connected to the
The appliance has no power. There is
The lamp does not work. The lamp is in stand-by. Close and open the door.
The lamp is defective. Refer to "Replacing the lamp".
The compressor operates contin-
ually.
The door is not closed correctly. Refer to "Closing the door".
The door has been opened too fre-
The appliance is switched off. Switch on the appliance.
mains socket correctly.
no voltage in the mains socket.
The temperature is not set correctly. Set a higher temperature.
quently.
Important! There are some sounds during normal use
(compressor, refrigerant circulation).
Check if the appliance stands stable (all
the four feet should be on the floor)
Connect the mains plug to the mains
socket correctly.
Connect a different electrical appliance
to the mains socket.
Contact a qualified electrician.
Do not keep the door open longer than
necessary.
18
Page 19

Problem Possible cause Solution
The product temperature is too high. Let the product temperature decrease to
room temperature before storage.
The room temperature is too high. Decrease the room temperature.
Water flows on the rear plate of
the refrigerator.
Water flows into the refrigerator. The water outlet is clogged. Clean the water outlet.
Products prevent that water flows into
Water flows on the ground. The melting water outlet does not flow
The temperature in the appliance
is too low.
The temperature in the appliance
is too high.
The door is not closed correctly. Refer to "Closing the door".
The product temperature is too high. Let the product temperature decrease to
Many products are stored at the same
The temperature in the refrigerator is too high.
The temperature in the freezer is
too high.
There is too much frost. Food is not wrapped correctly. Wrap the food correctly.
The door is not closed correctly. Refer to "Closing the door".
The temperature regulator is not set
During the automatic defrosting process, frost defrosts on the rear plate.
the water collector.
in the evaporative tray above the compressor.
The temperature regulator is not set
correctly.
The temperature regulator is not set
correctly.
time.
There is no cold air circulation in the
appliance.
Products are too near to each other. Store products so that there is cold air
correctly.
This is correct.
Make sure that products do not touch
the rear plate.
Attach the melting water outlet to the
evaporative tray.
Set a higher temperature.
Set a lower temperature.
room temperature before storage.
Store less products at the same time.
Make sure that there is cold air circula-
tion in the appliance.
circulation.
Set a higher temperature.
Replacing the lamp
Caution! Disconnect the plug from the mains
socket.
1. Remove the screw
from the lamp cover.
2. Remove the lamp
cover (refer to the
illustration).
3. Replace the used
lamp with a new
lamp of the same
power and specifically designed for household appliances (the maximum power is shown on the lamp
cover).
19
Page 20
4. Install the lamp cover.
5. Tighten the screw to the lamp cover.
6. Connect the plug to the mains socket.
7. Open the door. Make sure that the light comes on.
2. If necessary, adjust the door. Refer to "Installation".
3. If necessary, replace the defective door gaskets. Contact the Service Center.
Closing the door
1. Clean the door gaskets.
Technical data
Dimension
Height 850 mm
Width 550 mm
Depth 612 mm
Rising Time 11 h
Voltage 230 V
Frequency 50 Hz
The technical information are situated in the rating plate
on the internal left side of the appliance and in the energy
label.
Installation
Caution! Read the "Safety Information" carefully for
your safety and correct operation of the appliance
before installing the appliance.
Positioning
This appliance can be installed in a dry, well ventilated indoor (garage or cellar) also, but for optimum performance
install this appliance at a location where the ambient temperature corresponds to the climate class indicated on the
rating plate of the appliance:
Climate
class
SN +10°C to + 32°C
N +16°C to + 32°C
ST +16°C to + 38°C
T +16°C to + 43°C
20
Ambient temperature
Levelling
When placing the appliance ensure that it stands
level. This can be achieved
by two adjustable feet at
the bottom in front (2). If
necessary adjust the feet
by removing the spacer
(1).
1
2
Page 21

Location
The appliance should be installed well away from sources
of heat such as radiators, boilers, direct sunlight etc. Ensure that air can circulate freely around the back of the
cabinet. To ensure best performance, if the appliance is
positioned below an overhanging wall unit, the minimum
distance between the top of the cabinet and the wall unit
must be at least 100 mm . Ideally, however, the appliance
should not be positioned below overhanging wall units.
Accurate levelling is ensured by one or more adjustable
feet at the base of the cabinet.
If the cabinet is placed in a corner and the side with the
hinges facing the wall, the distance between the wall and
the cabinet must be at least 10 mm to allow the door to
open enough so that the shelves can be removed.
Door reversibility
Important! To carry out the following operations, we
suggest that this be made with another person that will
keep a firm hold on the doors of the appliance during the
operations.
Warning!
min.100 mm
15 mm
15 mm
It must be possible to disconnect the appliance from the
mains power supply; the plug must therefore be easily accessible after installation.
To change the opening direction of the door, do these
steps:
21
Page 22

1. Remove the plug from
the power socket.
2. Tilt back the appliance
carefully so that the compressor cannot touch the
floor.
3. Unscrew both adjustable
feet.
4. Unscrew the screws of
the door bottom hinge. Remove the hinge. Put over
the pin in the direction of
the arrow.
5. Unscrew and install the
screw on the opposite side.
6. Install the hinge on the
opposite side.
7. Screw both adjustable
feet.
1) If foreseen
8. Unscrew both screws on
the rear side.
9. Push back the top and
lift it from the fixing elements.
10. Unscrew the screws of
the door top hinge.
11. Remove the hinge. Put
over the pin in the direction
of the arrow. Install the
hinge on the opposite side.
12. Tighten the hinge.
13. Put the top in position.
14. Pull it forward.
15. Screw both screws on
the rear side.
16. Remove and install the
1)
handle
on the opposite
side.
17. Reposition, level the
appliance, wait for at least
four hours and then connect it to the power socket.
Do a final check to make sure that:
• All screws are tightened.
• The door opens and closes correctly.
If the ambient temperature is cold (i.e. in Winter), the gasket may not fit perfectly to the cabinet. In that case, wait
for the natural fitting of the gasket.
22
In case you do not want to carry out the above mentioned
operations, contact the nearest After Sales Service Force.
The After Sales Service specialist will carry out the reversibility of the doors at your cost.
Page 23

Reversibility of the freezer door
180˚
Electrical connection
Before plugging in, ensure that the voltage and frequency
shown on the rating plate correspond to your domestic
power supply.
The appliance must be earthed. The power supply cable
plug is provided with a contact for this purpose. If the do-
Environmental concerns
The symbol on the product or on its packaging
indicates that this product may not be treated as
household waste. Instead it should be taken to the
appropriate collection point for the recycling of electrical
and electronic equipment. By ensuring this product is
disposed of correctly, you will help prevent potential
mestic power supply socket is not earthed, connect the
appliance to a separate earth in compliance with current
regulations, consulting a qualified electrician.
The manufacturer declines all responsibility if the above
safety precautions are not observed.
This appliance complies with the E.E.C. Directives.
negative consequences for the environment and human
health, which could otherwise be caused by inappropriate
waste handling of this product. For more detailed
information about recycling of this product, please contact
your local council, your household waste disposal service
or the shop where you purchased the product.
23
Page 24

Sommaire
Consignes de sécurité _ _ _ _ _ _ _ _ _ _ _ _ _ _ _ 24
Fonctionnement _ _ _ _ _ _ _ _ _ _ _ _ _ _ _ _ _ _ 26
Première utilisation _ _ _ _ _ _ _ _ _ _ _ _ _ _ _ _ 26
Utilisation quotidienne _ _ _ _ _ _ _ _ _ _ _ _ _ _ _ 27
Conseils utiles _ _ _ _ _ _ _ _ _ _ _ _ _ _ _ _ _ _ _ 27
Consignes de sécurité
Pour votre sécurité et garantir une utilisation correcte de
l'appareil, lisez attentivement cette notice, y compris les
conseils et avertissements, avant d'installer et d'utiliser
l'appareil pour la première fois. Pour éviter toute erreur ou
accident, veillez à ce que toute personne qui utilise l'appareil connaisse bien son fonctionnement et ses fonctions
de sécurité. Conservez cette notice avec l'appareil. Si l'appareil doit être vendu ou cédé à une autre personne, veillez à remettre cette notice au nouveau propriétaire, afin
qu'il puisse se familiariser avec son fonctionnement et sa
sécurité.
Pour la sécurité des personnes et des biens, conservez et
respectez les consignes de sécurité figurant dans cette notice. Le fabricant décline toute responsabilité en cas de
dommages dus au non-respect de ces instructions.
Sécurité des enfants et des personnes vulnérables
• Cet appareil n'est pas destiné à être utilisé par des enfants ou des personnes dont les capacités physiques,
sensorielles ou mentales, ou le manque d'expérience et
de connaissance les empêchent d'utiliser l'appareil
sans risque lorsqu'ils sont sans surveillance ou en
l'absence d'instruction d'une personne responsable qui
puisse leur assurer une utilisation de l'appareil sans
danger.
Empêchez les enfants de jouer avec l'appareil.
• Ne laissez pas les différents emballages à portée des
enfants. Ils pourraient s'asphyxier.
• Si l'appareil doit être mis au rebut, veillez à couper le
câble d'alimentation électrique au ras de l'appareil pour
éviter les risques d'électrocution. Démontez la porte
pour éviter que des enfants ne restent enfermés à l'intérieur.
• Cet appareil est muni de fermetures magnétiques. S'il
remplace un appareil équipé d'une fermeture à ressort,
nous vous conseillons de rendre celle-ci inutilisable
avant de vous en débarrasser. Ceci afin d'éviter aux en-
Entretien et nettoyage _ _ _ _ _ _ _ _ _ _ _ _ _ _ _ 28
En cas d'anomalie de fonctionnement _ _ _ _ _ _ _ _ 30
Caractéristiques techniques _ _ _ _ _ _ _ _ _ _ _ _ 32
Installation _ _ _ _ _ _ _ _ _ _ _ _ _ _ _ _ _ _ _ _ 32
En matière de sauvegarde de l'environnement _ _ _ _ 35
Sous réserve de modifications
fants de s'enfermer dans l'appareil et de mettre ainsi
leur vie en danger.
Mesures générales de sécurité
Attention Veillez à ce que les orifices de ventilation
ne soient pas obstrués.
• Cet appareil est destiné uniquement à la conservation
d’aliments et/ou de boissons dans le cadre d’un usage
domestique normal, tel que celui décrit dans la présente notice.
• N'utilisez pas d'appareils électriques, d'agents chimiques ou tout autre système artificiel pour accélérer le
processus de dégivrage.
• N’utilisez pas d'autres appareils électriques (par exemple, sorbetières) à l'intérieur d’appareils réfrigérants
sauf s’ils sont homologués pour cet usage par leur fabricant.
• Faites très attention lorsque vous déplacez l'appareil
afin de ne pas endommager des parties du circuit de
refroidissement et ainsi d'éviter des risques de fuite.
• Le circuit de refroidissement de l’appareil contient de
l’isobutane (R600a), un gaz naturel offrant un haut niveau de compatibilité avec l’environnement mais qui
est néanmoins inflammable.
Pendant le transport et l'installation de l’appareil, assurez-vous qu'aucune pièce du circuit de refroidissement
n'est endommagée.
Si tel est le cas :
– Évitez les flammes vives (briquet) et tout autre allu-
mage (étincelles).
– Aérez soigneusement la pièce où se trouve l'appa-
reil.
• Ne modifiez pas les spécifications de l'appareil. Un
cordon d'alimentation endommagé peut être la cause
de courts-circuits, d'incendies et/ou de décharges
électriques.
24
Page 25

Avertissement Les éventuelles réparations ou inter-
ventions sur votre appareil, ainsi que le remplacement du câble d'alimentation, ne doivent être effectuées
que par un professionnel qualifié.
1. L'appareil ne doit pas être raccordé à l'aide d'un
prolongateur, d'une prise multiple ou d'un raccordement multiple (risque d'incendie).
2. Assurez-vous que la prise n'est pas écrasée ou endommagée par l'arrière de l'appareil. Une prise de
courant endommagée peut surchauffer et provoquer un incendie.
3. Vérifiez que la prise murale reste accessible une
fois que l'installation est terminée.
4. Ne débranchez pas l'appareil en tirant sur le câble,
particulièrement lorsque l'appareil est tiré de son
logement.
5. Si la fiche du cordon d'alimentation est desserrée,
ne la branchez pas dans la prise murale. Risque
d'électrocution ou d'incendie !
6. N'utilisez pas l'appareil si le diffuseur de l'ampou-
9)
le d'éclairage n'est pas présent
pour l'éclairage
intérieur.
• Cet appareil est lourd. Faites attention en le déplaçant.
• Ne touchez pas avec les mains humides les surfaces
givrées et les produits congelés (risque de brûlure et
d'arrachement de la peau).
• Évitez une exposition prolongée de l'appareil aux rayons solaires.
•
Ampoules
10)
utilisées dans cet appareil sont des ampoules spéciales dédiées uniquement à un usage avec
des appareils ménagers. Elles ne conviennent pas à
l'éclairage des pièces d'une habitation.
Utilisation quotidienne
• Ne posez pas d'éléments chauds sur les parties en
plastique de l'appareil.
• Ne stockez pas de gaz ou de liquides inflammables
dans l'appareil (risque d'explosion).
• Ne placez pas d'aliments directement contre la sortie
d'air sur la paroi arrière de l'appareil.
• Un produit décongelé ne doit jamais être recongelé.
• Conservez les aliments emballés conformément aux
instructions de leur fabricant.
9) Si le diffuseur est prévu.
10) Si l'ampoule est prévue.
11) Si l'appareil est sans givre.
11)
• Respectez scrupuleusement les conseils de conservation donnés par le fabricant de l'appareil. Consultez les
instructions respectives.
• Ne mettez pas de bouteilles ni de boîtes de boissons
gazeuses dans le compartiment congélateur, car la
pression se formant à l'intérieur du contenant pourrait
le faire éclater et endommager ainsi l'appareil.
• Ne consommez pas certains produits tels que les bâtonnets glacés dès leur sortie de l'appareil, car ils peuvent provoquer des brûlures.
Entretien et nettoyage
• Avant toute opération d'entretien, mettez l'appareil hors
tension et débranchez-le de la prise de courant.
• N'utilisez pas d'objets métalliques pour nettoyer l'appareil.
• N'utilisez pas d'objet tranchant pour gratter la couche
de givre. Utilisez une spatule en plastique.
• Contrôlez régulièrement l'orifice d'évacuation de l'eau
de dégivrage dans le compartiment réfrigérateur. Nettoyez-le, si besoin. Si l'orifice est bouché, l'eau s'écoulera en bas de l'appareil.
Installation
Important Avant de procéder au branchement électrique,
respectez scrupuleusement les instructions fournies dans
cette notice.
• Déballez l'appareil et vérifiez qu'il n'est pas endommagé. Ne branchez pas l'appareil s'il est endommagé. Signalez immédiatement au revendeur de l'appareil les
dommages constatés. Dans ce cas, gardez l'emballage.
• Il est conseillé d'attendre au moins quatre heures avant
de brancher l'appareil pour que le circuit frigorifique
soit stabilisé.
• Veillez à ce que l'air circule librement autour de l'appareil pour éviter qu'il ne surchauffe. Pour assurer une
ventilation suffisante, respectez les instructions de la
notice (chapitre Installation).
• Placez l'appareil dos au mur pour éviter tout contact
avec le compresseur et le condenseur (risque de brûlure).
• Placez de préférence votre appareil loin d'une source
de chaleur (chauffage, cuisson ou rayons solaires trop
intenses).
25
Page 26

• Assurez-vous que la prise murale reste accessible
après l'installation de l'appareil.
• Branchez à l'alimentation en eau potable uniquement.
12)
Maintenance
• Les branchements électriques nécessaires à l'entretien
de l'appareil doivent être réalisés par un électricien
qualifié ou une personne compétente.
• Cet appareil ne doit être entretenu et réparé que par un
Service après-vente autorisé, exclusivement avec des
pièces d'origine.
Protection de l'environnement
Le système frigorifique et l'isolation de votre appareil ne contiennent pas de C.F.C. contribuant ainsi à
Fonctionnement
préserver l'environnement. L'appareil ne doit pas être mis
au rebut avec les ordures ménagères et les déchets urbains. La mousse d'isolation contient des gaz inflammables : l'appareil sera mis au rebut conformément aux règlements applicables disponibles auprès des autorités locales. Veillez à ne pas détériorer les circuits frigorifiques,
notamment au niveau du condenseur. Les matériaux utilisés dans cet appareil identifiés par le symbole
recyclables.
sont
Mise en fonctionnement
Branchez l'appareil sur une prise murale.
Tournez le bouton du thermostat dans le sens des aiguilles d'une montre sur une position moyenne.
Mise à l'arrêt
Pour mettre à l'arrêt l'appareil, tournez le bouton du thermostat sur la position "O".
Réglage de la température
La température est réglée automatiquement.
Pour faire fonctionner l'appareil, procédez comme suit :
• tournez le bouton du thermostat vers le bas pour obtenir un réglage de froid minimum.
• tournez le bouton du thermostat vers le haut pour obtenir un réglage de froid maximum.
Une position moyenne est la plus indiquée.
Première utilisation
Nettoyage intérieur
Avant d'utiliser l'appareil pour la première fois, nettoyez
l'intérieur et tous les accessoires internes avec de l'eau
tiède savonneuse pour supprimer l'odeur caractéristique
du "neuf" puis séchez soigneusement.
Toutefois, le réglage doit être choisi en tenant compte du
fait que la température à l'intérieur de l'appareil dépend de
plusieurs facteurs :
• la température ambiante
• la fréquence d'ouverture de la porte
• la quantité de denrées stockées
• l'emplacement de l'appareil.
Important Si le thermostat est réglé sur la position de froid
maximum, lorsque la température ambiante est élevée et
que l'appareil est plein, il est possible que le compresseur
fonctionne en régime continu. Dans ce cas, il y a un
risque de formation excessive de givre sur la paroi
postérieure à l'intérieur de l'appareil. Pour éviter cet
inconvénient, placez le thermostat sur une température
plus élevée de façon à permettre un dégivrage
automatique et, par conséquent, des économies de
courant.
Important N'utilisez pas de produits abrasifs, poudre à récurer, éponge métallique pour ne pas abîmer la finition.
12) Si un branchement sur le réseau d'eau est prévu.
26
Page 27

Utilisation quotidienne
Congélation d'aliments frais
Le compartiment congélateur est idéal pour congeler des
denrées fraîches et conserver les aliments surgelés ou
congelés pendant longtemps.
Pour congeler des aliments frais, il n'est pas nécessaire
de modifier le réglage moyen.
Toutefois, pour une congélation plus rapide, tournez le
thermostat vers le haut pour obtenir plus de froid.
Important Dans ce cas, la température du compartiment
réfrigérateur peut chuter au-dessous de 0°C. Si cela se
produit, repositionnez le thermostat sur un réglage plus
chaud.
Conservation des aliments congelés
À la mise en service ou après un arrêt prolongé, placez le
thermostat sur la position Max pendant 2 heures environ,
avant d'introduire les produits dans le compartiment.
Important En cas de dégivrage accidentel, dû par exemple
à une panne de courant, si la panne doit se prolonger plus
longtemps qu'il n'est indiqué à la rubrique "temps
d'augmentation" dans la section Caractéristiques
techniques, consommez les aliments décongelés le plus
rapidement possible ou recongelez-les après les avoir
cuits (une fois refroidis).
La décongélation
Les aliments surgelés ou congelés peuvent être décongelés dans le compartiment réfrigérateur ou à température
ambiante, avant d'être utilisés, en fonction du temps disponible pour cette opération.
Les petites pièces peuvent même être cuites sans décongélation préalable : dans ce cas, la cuisson est plus longue.
Clayettes amovibles
Les parois du réfrigérateur sont équipées d'une série de
glissières pour que les clayettes puissent être placées en
fonction des besoins.
Emplacement des balconnets de la porte
Selon la taille des emballages des aliments conservés, les balconnets de la
porte peuvent être positionnés à différentes hauteurs.
Tirez progressivement
dans le sens des flèches
pour les dégager, puis repositionnez-les selon les
besoins.
Conseils utiles
Bruits de fonctionnement normaux
• Le liquide de refroidissement qui passe dans le circuit
d'évaporation peut produire un bruit de gargouillis ou
de bouillonnement. Ce phénomène est normal.
• Le compresseur peut produire un ronronnement aigu
ou un bruit de pulsation. Ce phénomène est normal.
• La dilatation thermique peut provoquer un soudain, léger bruit de craquement. C'est un phénomène normal
et sans gravité. Ce phénomène est normal.
• Un léger claquement se produit lors de la mise en
fonctionnement/à l'arrêt du compresseur. Ce phénomène est normal.
Conseils pour l'économie d'énergie
• N'ouvrez pas la porte trop souvent ou plus longtemps
que nécessaire.
• Si la température ambiante est élevée, le dispositif de
réglage de température est sur la position de froid
maximum et l'appareil est plein : il est possible que le
compresseur fonctionne en régime continu, d'où un
risque de formation excessive de givre sur l'évaporateur. Pour éviter ceci, modifiez la position du dispositif
de réglage de température de façon à obtenir des périodes d'arrêt du compresseur et ainsi permettre un dégivrage automatique, d'où des économies d'énergie.
Conseils pour la réfrigération de denrées fraîches
Pour obtenir les meilleures performances possibles :
27
Page 28

• N'introduisez pas d'aliments encore chauds ou de liquides en évaporation dans le réfrigérateur.
• Couvrez ou enveloppez soigneusement les aliments,
surtout s'ils sont aromatiques.
• Placez les aliments pour que l'air puisse circuler librement autour.
Conseils pour la réfrigération
Conseils utiles :
Viande (tous les types) : enveloppez-la dans des sachets
en plastique et placez-la sur la tablette en verre au-dessus
du bac à légumes.
La période de conservation est de 1 à 2 jours au maximum.
Aliments cuits, plats froids, etc. : placez-les bien couverts
sur une clayette.
Fruits et légumes : placez-les une fois nettoyés dans le(s)
bac(s) à légumes fourni(s).
Beurre et fromage : placez-les dans des récipients étanches spéciaux ou enveloppez-les soigneusement dans des
feuilles d'aluminium ou de polyéthylène, pour emmagasiner le moins d'air possible.
Lait en bouteille : bouchez-le et placez-le dans le balconnet de la contreporte réservé aux bouteilles.
Bananes, pommes de terre, oignons et ail ne se conservent pas au réfrigérateur, s'ils ne sont pas correctement
emballés.
Conseils pour la congélation
Pour obtenir les meilleurs résultats, voici quelques conseils importants :
• la quantité maximale de denrées que vous pouvez congeler par 24 heures est indiquée sur la plaque signalétique.
• le temps de congélation est de 24 heures. Aucune autre
denrée à congeler ne doit être ajoutée pendant cette période.
• congelez seulement les denrées alimentaires fraîches,
de qualité supérieure (une fois nettoyées).
• préparez la nourriture en petits paquets pour une congélation rapide et uniforme, adaptés à l'importance de
la consommation.
• enveloppez les aliments dans des feuilles d'aluminium
ou de polyéthylène et assurez-vous que les emballages
sont étanches ;
• ne laissez pas des aliments frais, non congelés, toucher des aliments déjà congelés pour éviter une remontée en température de ces derniers.
• les aliments maigres se conservent mieux et plus longtemps que les aliments gras ; le sel réduit la durée de
conservation des aliments
• la température très basse à laquelle se trouvent les bâtonnets glacés, s'ils sont consommés dès leur sortie
du compartiment congélateur, peut provoquer des brûlures.
• L'identification des emballages est importante : indiquez la date de congélation du produit, et respectez la
durée de conservation indiquée par le fabricant.
Conseils pour la conservation des produits surgelés
et congelés du commerce
Pour une bonne conservation des produits surgelés et
congelés, vous devez :
• vous assurer qu'ils ont bien été conservés au magasin ;
• prévoir un temps réduit au minimum pour leur transport du magasin d'alimentation à votre domicile ;
• éviter d'ouvrir trop souvent la porte du congélateur et
ne la laisser ouverte que le temps nécessaire.
• une fois décongelés, les aliments se détériorent rapidement et ne peuvent pas être recongelés.
• respecter la durée de conservation indiquée par le fabricant.
Entretien et nettoyage
Attention débrancher l'appareil avant toute opération
d'entretien.
Cet appareil contient des hydrocarbures dans son
circuit réfrigérant : l'entretien et la recharge ne doi-
vent donc être effectués que par du personnel autorisé.
28
Nettoyage périodique
Cet appareil doit être nettoyé régulièrement :
• Nettoyez l'intérieur et tous les accessoires avec de l'eau
tiède savonneuse.
Page 29

• Vérifiez régulièrement les joints de porte et nettoyez-les
en les essuyant pour éviter toute accumulation de déchets.
• Rincez et séchez soigneusement.
Important Ne pas tirer, déplacer ou endommager les
tuyaux et/ou câbles qui se trouvent à l'intérieur de
l'appareil.
Ne JAMAIS utiliser de produits abrasifs ou caustiques ni
d'éponges avec grattoir pour nettoyer l'intérieur de façon à
ne pas l'abîmer et laisser de fortes odeurs.
Nettoyer le condenseur (grille noire) et le compresseur situés à l'arrière de l'appareil avec une brosse ou un aspirateur. Cette opération améliore les performances de l'appareil et permet des économies d'énergie.
Important Attention à ne pas endommager le système de
réfrigération.
De nombreux détergents pour la cuisine recommandés
par les fabricants contiennent des produits chimiques qui
peuvent attaquer/endommager les pièces en plastique utilisées dans cet appareil. Il est par conséquent recommandé d'utiliser seulement de l'eau chaude additionnée d'un
peu de savon liquide pour nettoyer la carrosserie de l'appareil.
Après le nettoyage, rebranchez l'appareil.
Dégivrage du réfrigérateur
Le givre est automatiquement éliminé de l'évaporateur du
compartiment réfrigérateur à chaque arrêt du compresseur, en cours d'utilisation normale. L'eau de dégivrage
est collectée dans un récipient spécial situé à l'arrière de
l'appareil, au-dessus du compresseur, d'où elle s'évapore.
Il est important de nettoyer régulièrement l'orifice d'écoulement de la gouttière d'évacuation de l'eau de dégivrage
située au milieu du compartiment réfrigérateur pour empêcher l'eau de déborder et de couler sur les aliments qui
se trouvent à l'intérieur. Nettoyez l'orifice d'écoulement de
l'eau de dégivrage avec le bâtonnet spécial se trouvant déjà dans l'orifice.
Dégivrage du congélateur
Une certaine quantité de givre se forme toujours sur
les clayettes du congélateur et autour du comparti-
ment supérieur.
Important Dégivrez le congélateur lorsque l'épaisseur de
la couche de givre est d'environ 3-5 mm.
Pour enlever le givre, suivez les instructions ci-dessous :
1. Mettez l'appareil à l'arrêt.
2. Sortez les denrées congelées, enveloppez celles-ci
dans plusieurs feuilles de papier journal et conservez-les dans un endroit frais.
3. Laissez la porte ouverte.
4. Le dégivrage terminé, épongez et séchez bien l'intérieur, et remettez le bouchon.
5. Mettez l'appareil en fonctionnement.
6. Réglez le thermostat pour obtenir plus de froid et faites fonctionner l'appareil pendant deux ou trois heures en utilisant ce réglage.
7. Replacez les produits surgelés ou congelés dans le
compartiment.
Important N'utilisez en aucun cas de couteau ou tout autre
objet tranchant, d'objet métallique pour gratter la couche
de givre, vous risquez de détériorer irrémédiablement
l'évaporateur. N'utilisez aucun autre dispositif mécanique
ou moyen artificiel que ceux qui sont recommandés par le
fabricant pour accélérer le dégivrage de votre appareil.
Une élévation de la température des denrées congelées,
pendant la décongélation, peut réduire leur durée de
conservation.
En cas d'absence prolongée ou de non-utilisation
Prenez les précautions suivantes :
1. débranchez l'appareil
2. retirez tous les aliments
3. dégivrez et nettoyez l'appareil et tous les accessoires
4. laissez la porte/les portes ouverte(s) pour prévenir la
formation d'odeurs désagréables.
Important Si, toutefois, vous n'avez pas la possibilité de
débrancher et de vider l'appareil, faites vérifier
régulièrement son bon fonctionnement pour éviter la
détérioration des aliments en cas de panne de courant.
29
Page 30

En cas d'anomalie de fonctionnement
Avertissement Avant d'intervenir sur l'appareil,
débranchez-le.
Tout problème non mentionné dans le présent manuel,
doit être exclusivement confié à un électricien qualifié ou
une personne compétente.
Anomalie Cause possible Remède
L'appareil est bruyant L'appareil n'est pas stable Vérifiez la stabilité (les quatre pieds doi-
L'appareil ne fonctionne pas.
L'ampoule ne fonctionne pas.
La fiche n'est pas correctement bran-
Le courant n'arrive pas à l'appareil. La
L'ampoule ne fonctionne pas. L'éclairage est en mode veille Ouvrez et fermez la porte.
L'ampoule est défectueuse. Consultez le paragraphe " Remplace-
Le compresseur fonctionne en
permanence.
La porte n'est pas bien fermée. Consultez le paragraphe " Fermeture de
La porte a été ouverte trop souvent. Ne laissez pas la porte ouverte plus
La température du produit est trop éle-
La température ambiante est trop éle-
De l'eau s'écoule sur la plaque
arrière du réfrigérateur.
De l'eau s'écoule dans le réfrigérateur.
Des aliments empêchent l'eau de
De l'eau coule sur le sol. L'eau de dégivrage ne s'écoule pas
L'appareil est éteint. Mettez l'appareil en fonctionnement.
chée à la prise de courant.
prise de courant n'est pas alimentée.
La température n'est pas bien réglée. Sélectionnez une température plus éle-
vée.
vée.
Pendant le dégivrage automatique, le
givre fond sur la plaque arrière.
L'orifice d'écoulement de l'eau est
obstrué.
s'écouler dans le réservoir d'eau.
dans le plateau d'évaporation situé audessus du compresseur.
Important Certains bruits pendant le fonctionnement
(compresseur, circuit de réfrigérant) sont normaux.
vent être en contact avec le sol)
Branchez correctement la fiche à la prise
de courant.
Branchez un autre appareil électrique à
la prise de courant pour voir s'il fonctionne.
Faites appel à un électricien qualifié.
ment de l'ampoule ".
vée.
la porte ".
longtemps que nécessaire.
Laissez le produit revenir à température
ambiante avant de le ranger dans le
congélateur.
Réduisez la température ambiante.
Ce phénomène est normal.
Nettoyez l'orifice.
Assurez-vous que les aliments ne touchent pas la plaque arrière.
Fixez le tuyau de sortie de l'eau au plateau d'évaporation.
30
Page 31

Anomalie Cause possible Remède
La température à l'intérieur de
l'appareil est trop basse.
La température à l'intérieur de
l'appareil est trop élevée.
La porte n'est pas bien fermée. Consultez le paragraphe " Fermeture de
La température du produit est trop éle-
Trop de produits ont été introduits si-
La température du compartiment
réfrigérateur est trop élevée.
La température du congélateur
est trop élevée.
Il y a trop de givre. Les aliments ne sont pas bien embal-
La porte n'est pas bien fermée. Consultez le paragraphe " Fermeture de
Le thermostat n'est pas bien réglé. Sélectionnez une température plus éle-
Le thermostat n'est pas bien réglé. Sélectionnez une température plus éle-
vée.
Le thermostat n'est pas bien réglé. Sélectionnez une température plus bas-
se.
la porte ".
Laissez le produit revenir à température
vée.
multanément.
L'air froid ne circule pas dans l'appa-
reil.
Les produits sont trop près les uns
des autres.
lés.
ambiante avant de le ranger dans le
congélateur.
Introduisez moins de produits en même
temps.
Assurez-vous que l'air froid circule dans
l'appareil.
Stockez les produits de façon à permettre la circulation de l'air froid.
Enveloppez les aliments correctement.
la porte ".
vée.
Remplacement de l'ampoule
Attention Débranchez l'appareil du secteur.
1. Retirez la vis du
diffuseur.
2. Retirez le diffuseur
(voir l'illustration).
3. Remplacez l'am-
poule défectueuse
par une ampoule
neuve de puissance
identique, spécifiquement conçue pour les appareils électroménagers
(la puissance maximale est indiquée sur le diffuseur).
4. Installez le diffuseur.
5. Serrez la vis du diffuseur.
6. Branchez l'appareil sur le secteur.
7. Ouvrez la porte. Vérifiez que l'ampoule s'allume.
Fermeture de la porte
1. Nettoyez les joints de la porte.
2. Si nécessaire, ajustez la porte. Consultez le paragraphe "Installation".
3. Si nécessaire, remplacez les joints défectueux. Contactez le Service Après-vente.
31
Page 32

Caractéristiques techniques
Dimensions
Hauteur 850 mm
Largeur 550 mm
Profondeur 612 mm
Autonomie de fonctionnement 11 h
Tension 230 V
Fréquence 50 Hz
Les informations techniques se trouvent sur la plaque signalétique sur la paroi intérieure gauche de l'appareil et
sur l'étiquette énergétique.
Installation
Attention Pour votre sécurité et le bon
fonctionnement de l'appareil, veuillez lire
attentivement les "Consignes de sécurité" avant d'installer
l'appareil.
Emplacement
Pour le bon fonctionnement de l'appareil, il est impératif
de respecter les températures ambiantes du local où doit
être placé l'appareil, suivant la classe climatique (indiquée
sur la plaque signalétique) pour lequel il est prévu. Au delà de ces températures, ses performances peuvent s'en
trouver diminuées : les différentes classes climatiques
existantes et les températures ambiantes correspondantes
en fonction du modèle de l'appareil sont les suivantes :
Classe cli-
matique
SN +10 °C à +32 °C
N +16 °C à +32 °C
ST +16 °C à +38 °C
T +16 °C à +43 °C
Température ambiante
Mise à niveau
Lorsque vous installez
l'appareil, veillez à le placer de niveau. Servez-vous
des deux pieds réglables
se trouvant à l'avant de
l'appareil (2). Si besoin
est, réglez les pieds en retirant l'entretoise (1).
1
2
32
Page 33

Emplacement
L'appareil doit être installé à bonne distance de toute
source de chaleur telle que radiateurs, chauffe-eau, lumière directe du soleil etc. Assurez-vous que l'air circule
librement à l'arrière de l'appareil. Pour garantir un rendement optimum si l'appareil est installé sous un élément
suspendu, la distance entre le haut de l’appareil et l'élément suspendu doit être de 100 mm minimum. Si possible, évitez de placer l'appareil sous des éléments suspendus. La mise à niveau se fait à l'aide d'un ou de plusieurs pieds réglables à la base de la carrosserie de l’appareil.
Si l'appareil est placé dans un angle et si le côté avec les
charnières est face au mur, la distance entre le mur et
l'appareil doit être de 10 mm minimum afin de permettre
à la porte de s'ouvrir suffisamment pour pouvoir sortir les
clayettes.
Réversibilité de la porte
Important Pour effectuer les opérations suivantes, il est
conseillé de se faire aider par une autre personne pour
maintenir fermement les portes de l'appareil pendant les
opérations.
Avertissement
min.100 mm
15 mm
15 mm
L'appareil doit pouvoir être débranché à tout moment ; il
est donc nécessaire que la prise murale reste accessible
après l'installation.
Pour changer le sens d'ouverture de la porte, suivez les
étapes suivantes :
33
Page 34

1. Retirez la fiche de la prise de courant.
2. Inclinez l'appareil avec
précaution vers l'arrière
pour que le compresseur
ne touche pas le sol.
3. Dévissez les deux pieds
réglables.
4. Dévissez les vis de la
charnière inférieure de la
porte. Retirez la charnière.
Placez la goupille dans le
sens de la flèche.
5. Dévissez et installez la
vis sur le côté opposé.
6. Installez la charnière sur
le côté opposé.
7. Vissez les deux pieds réglables.
1) si cela est prévu,
8. Dévissez les deux vis à
l'arrière.
9. Repoussez le dessus et
soulevez-le pour le dégager
des éléments de fixation.
10. Dévissez les vis de la
charnière supérieure de la
porte.
11. Retirez la charnière.
Placez la goupille dans le
sens de la flèche. Installez
la charnière sur le côté opposé.
12. Serrez la charnière.
13. Remettez le dessus en
place.
14. Tirez-le vers l'avant.
15. Vissez les deux vis à
l'arrière.
16. Retirez, puis installez la
1)
poignée,
de l'autre côté.
17. Remettez l'appareil en
place, mettez-le d'aplomb,
attendez quatre heures au
moins puis branchez-le à la
prise de courant.
Contrôlez une dernière fois pour vous assurer que :
• Toutes les vis sont correctement serrées.
• La porte ouvre et ferme correctement.
Si la température ambiante est basse (en hiver, par exemple), il se peut que le joint n'adhère pas parfaitement.
Dans ce cas, attendez que le joint reprenne sa taille naturelle.
34
Si vous ne voulez pas effectuer personnellement les opérations décrites ci-dessus, contactez le S.A.V. le plus proche. Un technicien du S.A.V. pourra inverser le sens d'ouverture de la porte, mais cette intervention vous sera facturée.
Page 35

Réversibilité de la porte du congélateur
180˚
Branchement électrique
Contrôlez, avant de brancher l'appareil, si la tension et la
fréquence indiquées sur la plaque signalétique correspondent à celles de votre réseau.
L'appareil doit être relié à la terre. La fiche du câble d'alimentation comporte un logement pour mise à la terre. Si
la prise de courant murale n'est pas mise à la terre, bran-
En matière de sauvegarde de l'environnement
Le symbole sur le produit ou son emballage indique
que ce produit ne peut être traité comme déchet ménager.
Il doit être remis au point de collecte dédié à cet effet
(collecte et recyclage du matériel électrique et
électronique).
En procédant à la mise au rebut de l'appareil dans les
règles de l’art, nous préservons l'environnement et notre
chez l'appareil sur une prise de terre conformément aux
normes en vigueur, en demandant conseil à un électricien
qualifié.
Le fabricant décline toute responsabilité en cas d'incident
suite au non-respect des consignes de sécurité sus-mentionnées.
Cet appareil est conforme aux directives communautaires.
sécurité, s’assurant ainsi que les déchets seront traités
dans des conditions optimum.
Pour obtenir plus de détails sur le recyclage de ce produit,
veuillez prendre contact avec les services de votre
commune ou le magasin où vous avez effectué l'achat.
35
Page 36

Inhalt
Sicherheitshinweise _ _ _ _ _ _ _ _ _ _ _ _ _ _ _ _ 36
Betrieb _ _ _ _ _ _ _ _ _ _ _ _ _ _ _ _ _ _ _ _ _ _ 38
Erste Inbetriebnahme _ _ _ _ _ _ _ _ _ _ _ _ _ _ _ _ 38
Täglicher Gebrauch _ _ _ _ _ _ _ _ _ _ _ _ _ _ _ _ 39
Praktische Tipps und Hinweise _ _ _ _ _ _ _ _ _ _ _ 39
Sicherheitshinweise
Lesen Sie zu Ihrer Sicherheit und für die optimale Geräteanwendung vor der Installation und dem Gebrauch des
Gerätes die vorliegende Benutzerinformation aufmerksam
durch, einschließlich der Ratschläge und Warnungen. Es
ist wichtig, dass zur Vermeidung von Fehlern und Unfällen alle Personen, die das Gerät benutzen, mit der Bedienung und den Sicherheitsvorschriften vertraut sind. Heben
Sie die Benutzerinformation gut auf und übergeben Sie sie
bei einem Weiterverkauf des Gerätes dem neuen Besitzer,
so dass jeder während der gesamten Lebensdauer des Gerätes über Gebrauch und Sicherheit informiert ist.
Halten Sie sich zu Ihrer Sicherheit und zum Schutz Ihres
Eigentums strikt an die Vorsichtsmaßnahmen der vorliegenden Benutzerinformation, da der Hersteller bei Missachtung derselben von jeder Haftung freigestellt ist.
Sicherheit von Kindern und hilfsbedürftigen
Personen
• Das Gerät darf von Personen (einschließlich Kindern),
deren physische, sensorische Fähigkeiten und deren
Mangel an Erfahrung und Kenntnissen einen sicheren
Gebrauch des Gerätes ausschließen nur unter Aufsicht
oder nach ausreichender Einweisung durch eine verantwortungsbewusste Person benutzt werden, die sicherstellt, dass sie sich der Gefahren des Gebrauchs
bewusst sind.
Kinder müssen beaufsichtigt werden, damit sie nicht
am Gerät herumspielen können.
• Halten Sie das Verpackungsmaterial unbedingt von
Kindern fern. Erstickungsgefahr!
• Ziehen Sie vor der Entsorgung des Gerätes den Netzstecker, schneiden Sie das Netzkabel (so nah wie möglich am Gerät) ab und entfernen Sie die Tür, so dass
spielende Kinder vor elektrischem Schlag geschützt
sind und sich nicht in dem Gerät einschließen können.
• Wenn dieses Gerät mit magnetischer Türdichtung ein
älteres Modell mit Schnappverschluss (Türlasche) an
Reinigung und Pflege _ _ _ _ _ _ _ _ _ _ _ _ _ _ _ 40
Was tun, wenn … _ _ _ _ _ _ _ _ _ _ _ _ _ _ _ _ _ 42
Technische Daten _ _ _ _ _ _ _ _ _ _ _ _ _ _ _ _ _ 44
Montage _ _ _ _ _ _ _ _ _ _ _ _ _ _ _ _ _ _ _ _ _ _ 44
Hinweise zum Umweltschutz _ _ _ _ _ _ _ _ _ _ _ _ 47
Änderungen vorbehalten
der Tür oder auf dem Deckel ersetzt, machen Sie den
Schnappverschluss vor dem Entsorgen des Altgerätes
unbrauchbar. So verhindern Sie, dass das Gerät nicht
zu einer Todesfalle für Kinder wird.
Allgemeine Sicherheitshinweise
Vorsicht! Die Belüftungsöffnungen müssen immer
frei zugänglich sein.
• Das Gerät ist für die Aufbewahrung von Lebensmitteln
und/oder Getränken in einem normalen Haushalt bestimmt, wie in der vorliegenden Gebrauchsanweisung
beschrieben wird.
• Benutzen Sie keine mechanischen oder sonstigen
Hilfsmittel, um den Abtauprozess zu beschleunigen.
• Verwenden Sie keine anderen Elektrogeräte (wie Speiseeisbereiter) in Kühlgeräten, wenn solche Geräte nicht
ausdrücklich vom Hersteller für diesen Zweck zugelassen sind.
• Achten Sie darauf, den Kältekreislauf nicht zu beschädigen.
• Das Kältemittel Isobutan (R600a) im Kältekreislauf des
Gerätes ist ein natürliches und sehr umweltfreundliches Gas, das jedoch leicht entflammbar ist.
Achten Sie beim Transport und bei der Aufstellung des
Gerätes darauf, nicht die Komponenten des Kältekreislaufs zu beschädigen.
Bei einer eventuellen Beschädigung des Kältekreislaufs:
– Offene Flammen und Zündfunken vermeiden
– Den Raum, in dem das Gerät installiert ist, gut lüften
• Änderungen der technischen Eigenschaften oder am
Gerät sind gefährlich. Ein defektes Netzkabel kann
Kurzschlüsse und einen Brand verursachen und/oder
zu Stromschlägen führen.
36
Page 37

Warnung! Elektrische Bauteile (Netzkabel, Stecker,
Kompressor) dürfen nur vom Kundendienst oder ei-
ner Fachkraft ausgewechselt werden.
1. Das Netzkabel darf nicht verlängert werden.
2. Vergewissern Sie sich, dass der Netzstecker nicht
von der Geräterückseite gequetscht oder beschädigt wird. Ein gequetschter oder beschädigter
Netzstecker überhitzt und kann einen Brand verursachen.
3. Vergewissern Sie sich, dass der Netzstecker des
Gerätes frei zugänglich ist.
4. Ziehen Sie nicht am Netzkabel.
5. Stecken Sie den Netzstecker nie in eine lockere
Steckdose. Es besteht Brand- und Stromschlaggefahr.
6. Betreiben Sie das Gerät nicht ohne Lampenabde-
13)
, der Innenbeleuchtung.
ckung
• Dieses Gerät ist schwer. Vorsicht beim Transport.
• Entnehmen oder berühren Sie nie mit nassen/feuchten
Händen Tiefkühlgut, da dies zu Hautverletzungen oder
Kälteverbrennungen führen kann.
• Das Gerät nicht direkter Sonneneinstrahlung aussetzen.
•
Die Leuchtmittel
14)
in diesem Gerät sind Speziallampen, die nur für Haushaltsgeräte geeignet sind. Sie eignen sich nicht zur Raumbeleuchtung.
Täglicher Gebrauch
• Stellen Sie keine heißen Töpfe auf die Kunststoffteile
des Gerätes.
• Lagern Sie keine feuergefährlichen Gase oder Flüssigkeiten in dem Gerät. Explosionsgefahr.
• Legen Sie Lebensmittel nicht direkt vor den Luftauslass
auf der Rückwand.
• Ein aufgetautes Produkt darf nicht wieder eingefroren
werden.
• Abgepackte Tiefkühlkost immer entsprechend den Herstellerangaben aufbewahren.
• Die Lagerempfehlungen des Geräteherstellers sollten
strikt eingehalten werden. Halten Sie sich an die betreffenden Anweisungen.
• Keine kohlensäurehaltigen Getränke oder Sprudel in
den Tiefkühlschrank stellen, da der Druckanstieg in
15)
den Behältern zur Explosion führen und das Gerät beschädigen kann.
• Eis am Stiel kann Kälteverbrennungen verursachen,
wenn es direkt nach der Entnahme aus dem Gefrierschrank gegessen wird.
Reinigung und Pflege
• Schalten Sie vor Wartungsarbeiten immer das Gerät ab
und ziehen Sie den Netzstecker aus der Steckdose.
• Reinigen Sie das Gerät nicht mit Metallgegenständen.
• Keine scharfen Gegenstände zum Entfernen von Reif
und Eis im Gerät verwenden. Verwenden Sie einen
Kunststoffschaber.
• Kontrollieren Sie den Tauwasserabfluss im Kühlraum
in regelmäßigen Abständen. Reinigen Sie den Ablauf,
falls nötig. Bei verstopftem Wasserabfluss sammelt
sich das Wasser auf dem Boden des Geräts an.
Montage
Wichtig! Halten Sie sich für den elektrischen Anschluss
strikt an die Anweisungen der betreffenden Abschnitte.
• Kontrollieren Sie nach dem Auspacken das Gerät auf
eventuelle Beschädigungen. Nehmen Sie das Gerät
nicht in Betrieb, wenn es beschädigt ist. Melden Sie
die Schäden umgehend dem Händler, bei dem Sie es
erworben haben. Bewahren Sie in diesem Fall die Verpackung auf.
• Lassen Sie das Gerät mindestens vier Stunden stehen,
bevor Sie es elektrisch anschließen, damit das Öl in
den Kompressor zurückfließen kann.
• Ausreichenden Freiraum zur Luftzirkulation um das Gerät lassen; anderenfalls besteht Überhitzungsgefahr.
Halten Sie sich für die Belüftung an die Installationsanweisungen.
• Das Gerät sollte zur Vermeidung von Verbrennungen
durch Berührung von heißen Bauteilen (Kompressor,
Kondensator) möglichst mit der Rückseite gegen eine
Wand aufgestellt werden.
• Das Gerät darf nicht in der Nähe von Heizkörpern oder
Kochern installiert werden.
• Vergewissern Sie sich, dass der Netzstecker des Gerätes nach der Installation frei zugänglich ist.
13) Falls Lampenabdeckung vorhanden.
14) Falls Lampe vorhanden.
15) Wenn das Gerät mit dem Frost-Free-System ausgestattet ist.
37
Page 38

• Verbinden Sie das Gerät ausschließlich mit einer Trinkwasserzuleitung.
16)
Kundendienst
• Sollte die Wartung des Gerätes elektrische Arbeiten
verlangen, so dürfen diese nur von einem qualifizierten
Elektriker oder einem Elektro-Fachmann durchgeführt
werden.
• Wenden Sie sich für Reparaturen und Wartung nur an
Fachkräfte der autorisierten Kundendienststellen und
verlangen Sie stets Original-Ersatzteile.
Umweltschutz
Das Gerät enthält im Kältekreis oder in dem Isoliermaterial keine ozonschädigenden Gase. Das Gerät
Betrieb
darf nicht wie normaler Hausmüll entsorgt werden. Die
Isolierung enthält entzündliche Gase: das Gerät muss gemäß den geltenden Vorschriften entsorgt werden; sie erhalten diese bei Ihrer Gemeindeverwaltung. Nicht das Kälteaggregat beschädigen, insbesondere nicht in der Nähe
des Wärmetauschers. Die Materialien, die bei der Herstellung dieses Geräts verwendet wurden und mit dem Sym-
markiert sind, können recycelt werden.
bol
Einschalten des Geräts
Stecken Sie den Stecker in die Wandsteckdose.
Drehen Sie den Temperaturregler im Uhrzeigersinn auf eine mittlere Einstellung.
Ausschalten des Geräts
Drehen Sie den Temperaturregler zum Ausschalten des
Geräts in die Position "O".
Temperaturregelung
Die Temperatur wird automatisch geregelt.
Bedienen Sie das Gerät wie folgt:
• drehen Sie den Temperaturregler auf eine niedrigere
Einstellung, um die minimal mögliche Kühlung zu erreichen.
• drehen Sie den Temperaturregler auf eine höhere Einstellung, um die maximal mögliche Kühlung zu erreichen.
eine mittlere Einstellung ist im Allgemeinen am besten geeignet.
Erste Inbetriebnahme
Reinigung des Innenraums
Bevor Sie das Gerät in Betrieb nehmen, beseitigen Sie den
typischen "Neugeruch" am besten durch Auswaschen der
Innenteile mit lauwarmem Wasser und einem neutralen
Reinigungsmittel. Sorgfältig nachtrocknen.
Allerdings muss für eine exakte Einstellung berücksichtigt
werden, dass die Temperatur im Innern des Gerätes von
verschiedenen Faktoren abhängt:
• von der Raumtemperatur
• von der Häufigkeit der Türöffnung
• von der Menge der eingelagerten Lebensmittel
• und vom Standort des Geräts.
Wichtig! Ist die Umgebungstemperatur hoch oder das
Gerät voll beladen, dieses aber auf die niedrigste
Temperatur eingestellt, so kann es bei andauerndem
Betrieb des Geräts an der Rückwand zu Frostbildung
kommen. In diesem Fall muss eine höhere Temperatur
gewählt werden, die ein automatisches Abtauen
ermöglicht und damit auch einen niedrigeren
Energieverbrauch.
Wichtig! Verwenden Sie keine Reinigungsmittel oder
Scheuerpulver, da hierdurch die Oberfläche beschädigt
wird.
16) Falls ein Wasseranschluss erforderlich ist.
38
Page 39

Täglicher Gebrauch
Einfrieren frischer Lebensmittel
Das Gefrierfach eignet sich zum Einfrieren von frischen
Lebensmitteln und zum Lagern von gefrorenen und tiefgefrorenen Lebensmitteln für einen längeren Zeitraum.
Für das Einfrieren frischer Lebensmittel ist eine Änderung
der mittleren Einstellung nicht erforderlich.
Möchten Sie den Gefriervorgang beschleunigen, drehen
Sie bitte den Temperaturregler auf eine höhere Einstellung, um die maximal mögliche Kühlung zu erreichen.
Wichtig! In diesem Fall kann die Temperatur im
Kühlschrank unter 0°C fallen. Ist dies der Fall, drehen Sie
den Temperaturregler auf eine wärmere Einstellung.
Lagerung gefrorener Produkte
Lassen Sie das Gerät vor der ersten Inbetriebnahme oder
nach einer Zeit, in der das Gerät nicht benutzt wurde, mindestens zwei Stunden lang auf den höheren Einstellungen
laufen, bevor Sie Lebensmittel in das Gefrierfach hinein
legen.
Wichtig! Kam es zum Beispiel durch einen Stromausfall,
der länger dauerte als der in der Tabelle mit den
technischen Daten angegebene Wert (siehe
"Ausfalldauer") zu einem ungewollten Abtauen, dann
müssen die aufgetauten Lebensmittel sehr rasch
verbraucht oder sofort gekocht und (nach dem Abkühlen)
erneut eingefroren werden.
Kleinere Gefriergutteile können unter Umständen sogar direkt aus dem Gefrierschrank entnommen und anschließend sofort gekocht oder gegart werden: in diesem Fall
dauert der Garvorgang allerdings etwas länger.
Verstellbare Ablagen
Die Wände des Kühlschranks sind mit einer Anzahl von
Führungsschienen ausgestattet, die verschiedene Möglichkeiten für das Einsetzen der Ablagen bieten.
Positionierung der Türeinsätze
Die Türeinsätze können in
verschiedener Höhe positioniert werden; damit ermöglichen Sie das Lagern
verschieden großer Lebensmittelpackungen.
Ziehen Sie das Türabstellfach nach und nach in
Pfeilrichtung, bis es sich
herausheben lässt, dann
setzen Sie es in die neue
Position ein.
Auftauen
Tiefgefrorene oder gefrorene Lebensmittel können vor der
Verwendung je nach der zur Verfügung stehenden Zeit im
Kühlschrank oder bei Raumtemperatur aufgetaut werden.
Praktische Tipps und Hinweise
Normale Betriebsgeräusche
• Unter Umständen ist ein leichtes Gurgeln und Blubbern
zu hören, wenn das Kältemittel durch die Leitungen gepumpt wird. Das ist normal.
• Bei eingeschaltetem Kompressor wird das Kältemittel
umgewälzt und Sie hören ein Surren und ein pulsierendes Geräusch vom Kompressor. Das ist normal.
• Die thermische Ausdehnung kann ein plötzliches Krachen verursachen. Das ist eine natürliche und nicht gefährliche physikalische Erscheinung. Das ist normal.
• Beim Ein- oder Ausschalten des Kompressors ist ein
leises "Klicken" des Temperaturreglers zu hören. Das
ist normal.
Energiespartipps
• Öffnen Sie die Tür nicht zu häufig, und lassen Sie diese
nicht länger offen als unbedingt notwendig.
• Wenn die Umgebungstemperatur hoch ist und der
Temperaturregler auf eine niedrige Temperatur eingestellt und das Gerät voll beladen ist, kann es zu andauerndem Betrieb des Kompressors und damit zu Reifoder Eisbildung am Verdampfer kommen. Stellen Sie
39
Page 40

in diesem Fall den Temperaturregler auf eine höhere
Einstellung ein, die ein automatisches Abtauen und damit auch einen niedrigeren Energieverbrauch ermöglicht.
Hinweise für die Kühlung frischer Lebensmittel
So erzielen Sie beste Ergebnisse:
• Legen Sie bitte keine warmen Lebensmittel oder
dampfende Flüssigkeiten in den Kühlschrank.
• Decken Sie die Lebensmittel ab oder verpacken Sie
diese entsprechend, besonders wenn diese stark riechen.
• Legen Sie die Lebensmittel so hinein, dass um sie Luft
frei zirkulieren kann.
Hinweise für die Kühlung
Tipps:
Fleisch (alle Sorten): wickeln Sie Fleisch in lebensmittelechte Tüten und legen Sie diese auf die Glasablage über
der Gemüseschublade.
Bitte lagern Sie Fleisch aus Sicherheitsgründen nur einen
oder maximal zwei Tage auf diese Weise.
Gekochte Lebensmittel, kalte Gerichte usw.: diese können
abgedeckt auf eine Ablage gelegt werden.
Obst und Gemüse: bitte waschen Sie Obst und Gemüse
gründlich und legen Sie es in die speziell dafür vorgesehene(n) Schublade(n).
Butter und Käse: diese sollten stets in speziellen luftdichten Behältern verpackt sein oder in Aluminiumfolie bzw. in
lebensmittelechte Tüten eingepackt werden, um so wenig
Luft wie möglich in der Verpackung zu haben.
Milchflaschen: bitte bewahren Sie Milchflaschen stets mit
Deckel im Flaschenregal in der Tür auf.
Bananen, Kartoffeln, Zwiebeln und Knoblauch sollten
nicht im Kühlschrank aufbewahrt werden, außer diese sind
dafür speziell verpackt.
Hinweise zum Einfrieren
Im Folgenden finden Sie einige wertvolle Tipps für einen
optimalen Gefriervorgang:
• die maximale Menge an Lebensmitteln, die innerhalb
von 24 Stunden eingefroren werden kann. ist auf dem
Typschild angegeben;
• der Gefriervorgang dauert 24 Stunden. Legen Sie während dieses Zeitraums keine weiteren einzufrierenden
Lebensmittel in das Gefrierfach;
• frieren Sie ausschließlich frische und gründlich gewaschene Lebensmittel von sehr guter Qualität ein;
• teilen Sie die Lebensmittel in kleinere Portionen ein,
damit diese schnell und vollständig gefrieren und Sie
später nur die Menge auftauen müssen, die Sie gerade
benötigen;
• die einzufrierenden Lebensmittelportionen sollten stets
luftdicht in Aluminiumfolie oder in lebensmittelechte
Gefrierbeutel verpackt werden, um so wenig Luft wie
möglich in der Verpackung zu haben;
• achten Sie beim Hineinlegen von frischen, noch ungefrorenen Lebensmitteln darauf, dass diese keinen Kontakt mit Gefriergut bekommen, da dieses sonst antauen
kann;
• weniger fetthaltige Lebensmittel lassen sich besser lagern als fetthaltigere; Salz verkürzt die Lagerzeit von
Lebensmitteln im Gefrierfach;
• werden Gefrierwürfel direkt nach der Entnahme aus
dem Gefrierfach verwendet, können Sie zu Frostbrand
auf der Haut führen;
• es empfiehlt sich, das Einfrierdatum auf jeder einzelnen
Packung zu notieren, um einen genauen Überblick über
die Lagerzeit zu haben.
Hinweise zur Lagerung gefrorener Produkte
So erzielen Sie die besten Ergebnisse mit Ihrem Gerät:
• Prüfen Sie sorgfältig, dass die im Handel erworbenen
gefrorenen Lebensmittel sachgerecht gelagert wurden.
• Achten Sie unbedingt darauf, die eingekauften gefrorenen Lebensmittel in der kürzest möglichen Zeit in Ihren
Gefrierschrank zu bringen.
• Öffnen Sie die Tür nicht zu häufig, und lassen Sie diese
nicht länger offen als unbedingt notwendig.
• Abgetaute Lebensmittel verderben sehr schnell und
eignen sich nicht für ein erneutes Einfrieren.
• Das Haltbarkeitsdatum auf der Tiefkühlkostverpackung
sollte nicht überschritten werden.
Reinigung und Pflege
Vorsicht! Ziehen Sie bitte vor jeder Reinigungsarbeit
immer den Netzstecker aus der Steckdose.
40
Der Kältekreis des Gerätes enthält Kohlenwasserstoffe; Wartungsarbeiten und Nachfüllen von Kälte-
Page 41

mittel dürfen daher nur durch vom Hersteller autorisiertes
Fachpersonal ausgeführt werden.
Regelmäßige Reinigung
Der gesamte Kühlschrank muss regelmäßig gereinigt werden:
• Reinigen Sie die Innenseiten und die Zubehörteile mit
lauwarmem Wasser und etwas Neutralseife.
• Prüfen und säubern Sie die Türdichtungen in regelmäßigen Abständen und kontrollieren Sie, dass diese sauber und frei von Verunreinigungen sind.
• Spülen und trocknen Sie diese sorgfältig ab.
Wichtig! Ziehen Sie nicht an Leitungen und/oder Kabeln
im Innern des Kühlschranks und achten Sie darauf, diese
nicht zu verschieben oder zu beschädigen.
Benutzen Sie zur Reinigung des Innenraums keinesfalls
Putzmittel, Scheuerpulver, stark parfümierte
Reinigungsmittel oder Wachspolituren, da diese die
Oberfläche des Innenraums beschädigen und einen
starken Eigengeruch hinterlassen können.
Reinigen Sie den Kondensator (schwarzes Gitter) und den
Motorkompressor auf der Geräterückseite mit einer Bürste
oder einem Staubsauger. Dadurch verbessert sich die
Leistung des Geräts und es verbraucht weniger Strom.
Wichtig! Bitte achten Sie darauf, das Kühlsystem nicht zu
beschädigen.
Viele Haushaltsreiniger für Küchen enthalten Chemikalien,
die den im Gerät verwendeten Kunststoff angreifen können. Aus diesem Grund ist es empfehlenswert, das Gerät
außen nur mit warmem Wasser und etwas flüssigem Tellerspülmittel zu reinigen.
Schließen Sie das Gerät nach der Reinigung wieder an die
Netzversorgung an.
Abtauen des Kühlschranks
Bei normalem Betrieb wird Reif bei jedem Anhalten des
Motorkompressors automatisch aus dem Verdampfer des
Kühlschranks entfernt. Das Tauwasser läuft durch eine
Rinne in einen speziellen Behälter an der Rückseite des
Geräts über dem Motorkompressor, wo es verdampft.
Reinigen Sie deshalb regelmäßig die Abflussöffnung des
Tauwassers in der Mitte des Kühlschrankkanals, damit
das Wasser nicht überfließt und auf die gelagerten Lebensmittel tropft. Benutzen Sie dazu bitte das mitgelieferte
Reinigungswerkzeug, das sich bereits in der Ablauföffnung befindet.
Abtauen des Gefrierschranks
Auf den Ablagen des Gefrierschranks und im Innern
des oberen Fachs wird sich stets etwas Reif bilden.
Wichtig! Tauen Sie den Gefrierschrank ab, wenn die
Reifschicht eine Stärke von etwa 3 bis 5 mm erreicht hat.
Entfernen Sie den Reif wie nachstehend erläutert:
1. Schalten Sie das Gerät aus.
2. Nehmen Sie das gesamte Gefriergut heraus, verpacken Sie es in mehrere Schichten Zeitungspapier und
lagern Sie es an einem kühlen Ort.
3. Lassen Sie die Tür offen.
4. Ist das Geräteinnere vollständig abgetaut, trocken Sie
die nassen Oberflächen gründlich ab und setzen Sie
den Stopfen wieder ein.
5. Schalten Sie das Gerät ein.
6. Drehen Sie den Temperaturregler auf eine höhere Einstellung, um die maximal mögliche Kühlung zu erreichen, und lassen Sie das Gerät zwei bis drei Stunden
mit dieser Einstellung laufen.
7. Legen Sie die ausgelagerten Lebensmittel wieder in
das Fach hinein.
Wichtig! Verwenden Sie bitte niemals scharfe
Gegenstände zum Entfernen von Reif und Eis vom
Verdampfer, da dieser dadurch beschädigt werden könnte.
Benutzen Sie keine mechanischen oder sonstigen
Hilfsmittel, um den Abtauprozess zu beschleunigen;
halten Sie sich dazu ausschließlich an die Angaben des
Geräteherstellers. Ein Temperaturanstieg des Gefrierguts
während des Abtauens des Gerätes kann die Lagerzeit
dieser Lebensmittel verkürzen.
Stillstandzeiten
Bei längerem Stillstand des Geräts müssen Sie folgendermaßen vorgehen:
1. Trennen Sie das Gerät von der Netzversorgung.
2. Entnehmen Sie alle Lebensmittel.
41
Page 42

3. Tauen Sie das Gerät ab; reinigen Sie den Innenraum
und das gesamte Zubehör.
4. Lassen Sie die Türen offen, um das Entstehen unangenehmer Gerüche zu vermeiden.
Wichtig! Möchten Sie bei einer längeren Abwesenheit das
Gerät weiter laufen lassen, bitten Sie jemanden,
Was tun, wenn …
gelegentlich die Temperatur zu prüfen, damit das
Gefriergut bei einem möglichen Stromausfall nicht im
Innern des Geräts verdirbt.
Warnung! Ziehen Sie vor der Fehlersuche immer
den Netzstecker aus der Steckdose.
Die Fehlersuche, die in der vorliegenden
Gebrauchsanweisung nicht beschrieben ist, darf nur von
Störung Mögliche Ursache Abhilfe
Das Gerät ist zu laut Unebenheiten im Boden sind durch
Unterlegen nicht ausgeglichen worden
Das Gerät funktioniert nicht. Die
Lampe funktioniert nicht.
Der Netzstecker steckt nicht richtig in
Das Gerät bekommt keinen Strom. Es
Die Lampe funktioniert nicht. Die Lampe ist im Standby-Modus. Öffnen und schließen Sie die Tür.
Die Lampe ist defekt. Siehe hierzu "Austauschen der Lampe".
Der Kompressor arbeitet ständig. Die Temperatur ist nicht richtig einge-
Die Tür ist nicht richtig geschlossen. Siehe hierzu "Schließen der Tür".
Die Tür wurde zu häufig geöffnet. Lassen Sie die Tür nicht länger als un-
Die Temperatur der zu kühlenden Le-
Die Raumtemperatur ist zu hoch. Senken Sie die Raumtemperatur.
Wasser fließt an der Rückwand
des Kühlschranks hinunter.
Das Gerät ist abgeschaltet. Schalten Sie das Gerät ein.
der Steckdose.
liegt keine Spannung an der Netzsteckdose an.
stellt.
bensmittel ist zu hoch.
Beim automatischen Abtauen fließt das
abgetaute Wasser an der Rückwand
des Kühlschranks hinunter.
einem qualifizierten Elektriker oder einer kompetenten
Person durchgeführt werden.
Wichtig! Während das Gerät in Betrieb ist, entstehen
bestimmte Geräusche (Kompressor und Kühlkreislauf).
Kontrollieren Sie, ob eventuelle Unebenheiten der Standfläche korrekt ausgeglichen wurden, so dass alle vier Füße fest auf dem Boden stehen
Stecken Sie den Netzstecker richtig in
die Steckdose.
Testen Sie bitte, ob ein anderes Gerät an
dieser Steckdose funktioniert.
Kontaktieren Sie gegebenenfalls einen
qualifizierten Elektriker.
Stellen Sie eine höhere Temperatur ein.
bedingt erforderlich offen.
Lassen Sie die Lebensmittel auf Raum-
temperatur abkühlen, bevor Sie sie in
das Gerät legen.
Das ist normal.
42
Page 43

Störung Mögliche Ursache Abhilfe
Wasser fließt in den Innenraum
des Kühlschranks.
Die eingelagerten Lebensmittel verhin-
Wasser fließt auf den Boden. Der Tauwasserablauf läuft nicht in die
Die Temperatur im Gerät ist zu
niedrig.
Die Temperatur im Gerät ist zu
hoch.
Die Tür ist nicht richtig geschlossen. Siehe hierzu "Schließen der Tür".
Die Temperatur der zu kühlenden Le-
Es wurden zu viele Lebensmittel auf
Die Temperatur im Kühlschrank
ist zu hoch.
Die Temperatur im Gefrierraum
ist zu hoch.
Es bildet sich zu viel Reif oder
Eis.
Die Tür ist nicht richtig geschlossen. Siehe hierzu "Schließen der Tür".
Die Temperatur ist nicht richtig einge-
Der Wasserabflusskanal ist verstopft. Reinigen Sie den Ablauf.
Stellen Sie sicher, dass die Lebensmittel
dern, dass das Wasser zum Kollektor
fließt.
Verdampferschale über dem Kompressor.
Die Temperatur ist nicht richtig eingestellt.
Die Temperatur ist nicht richtig eingestellt.
bensmittel ist zu hoch.
einmal eingelegt.
Die Kaltluft kann nicht im Gerät zirku-
lieren.
Die einzufrierenden Packungen liegen
zu dicht aneinander.
Die Lebensmittel sind nicht richtig
verpackt.
stellt.
nicht die Rückwand berühren.
Befestigen Sie den Tauwasserablauf an
der Verdampferschale.
Stellen Sie eine höhere Temperatur ein.
Stellen Sie eine niedrigere Temperatur
ein.
Lassen Sie die Lebensmittel auf Raum-
temperatur abkühlen, bevor Sie sie in
das Gerät legen.
Legen Sie weniger Lebensmittel auf ein-
mal ein.
Stellen Sie sicher, dass die Kaltluft im
Gerät zirkulieren kann.
Stellen Sie sicher, dass die Kaltluft im
Gerät zirkuliert und die Lebensmittel
dies nicht verhindern.
Verpacken Sie die Lebensmittel richtig.
Stellen Sie eine höhere Temperatur ein.
Lampe wechseln
Vorsicht! Trennen Sie den Netzstecker von der
Netzversorgung.
1. Lösen Sie die
Schraube an der
Lampenabdeckung.
2. Nehmen Sie die
Lampenabdeckung
ab (siehe hierzu die
Abbildung).
3. Ersetzen Sie die alte Lampe durch ei-
ne Lampe der gleichen Leistung (die maximal erlaubte Leistung steht auf der Lampenabdeckung), die speziell für Haushaltsgeräte vorgesehen ist.
4. Bringen Sie die Lampenabdeckung an.
5. Ziehen Sie die Schraube an der Lampenabdeckung
fest.
6. Stecken Sie den Netzstecker in die Steckdose.
7. Öffnen Sie die Tür. Prüfen Sie, dass die Lampe
brennt.
Schließen der Tür
1. Reinigen Sie die Türdichtungen.
43
Page 44

2. Stellen Sie die Tür nach Bedarf ein. Siehe hierzu
"Montage".
3. Ersetzen Sie die defekten Türdichtungen, falls erforderlich. Kontaktieren Sie den Kundendienst.
Technische Daten
Abmessungen
Höhe 850 mm
Breite 550 mm
Tiefe 612 mm
Ausfalldauer 11 h
Spannung 230 V
Frequenz 50 Hz
Die technischen Informationen befinden sich auf dem
Typschild innen links im Gerät sowie auf der Energieplakette.
Montage
Vorsicht! Lesen Sie bitte die "Sicherheitshinweise"
sorgfältig vor der Aufstellung des Geräts durch, um
Gefahren für Sie selbst zu vermeiden und einen korrekten
Betrieb des Geräts zu gewährleisten.
Aufstellung
Dieses Gerät kann auch in einer trockenen, gut belüfteten
Garage oder in einem Keller installiert werden, doch für
eine optimale Leistung sollte dieses Gerät an einem Ort
installiert werden, an dem die Umgebungstemperatur mit
der Klimaklasse übereinstimmt, die auf dem Typschild des
Geräts angegeben ist:
Klimaklas-
se
SN +10 °C bis 32 °C
N +16 °C bis 32 °C
ST +16 °C bis 38 °C
T +16 °C bis 43 °C
Umgebungstemperatur
Ausrichten
Bei der Aufstellung des
Gerätes ist dieses waagerecht auszurichten. Dies
lässt sich mit zwei
Schraubfüßen (2) am vorderen Sockel des Gerätes
erreichen. Bei Bedarf kann
zum Einstellen der
Schraubfüße das Distanzstück (1) entfernt werden.
1
2
44
Page 45

Standort
Das Gerät sollte möglichst weit entfernt von Wärmequellen wie Heizungen, Boilern oder direktem Sonnenlicht
usw. aufgestellt werden. Die Luft muss frei auf der Geräterückseite zirkulieren können. Damit das Gerät die optimale Leistung bringen kann, wenn es unter einem Oberschrank installiert wird, muss der Mindestabstand zwischen der Geräteoberseite und dem Oberschrank mindestens 100 mm betragen. Allerdings sollte die Aufstellung
des Geräts unter einer überhängenden Wand nach Möglichkeit vermieden werden. Die korrekte waagerechte Ausrichtung des Geräts kann mit Hilfe eines oder mehrerer
Schraubfüße am Sockel des Geräts erfolgen.
Wird das Gerät in einer Ecke aufgestellt, und zeigt die
Scharnierseite dabei zur Wand, so muss der Abstand zwischen Wand und Gerät mindestens 10 mm betragen, damit die Tür zum Herausnehmen der Ablagen geöffnet werden kann.
Wechsel des Türanschlags
Wichtig! Die nachfolgend beschriebenen Tätigkeiten
müssen mit Hilfe einer zweiten Person durchgeführt
werden, um ein Herunterfallen der Türen zu vermeiden.
Warnung!
min.100 mm
15 mm
15 mm
Es muss möglich sein, das Gerät vom Netz zu trennen.
Nach der Installation muss die Steckdose daher zugänglich bleiben.
Beim Wechsel des Türanschlags muss wie folgt vorgegangen werden:
45
Page 46

1. Ziehen Sie den Stecker
aus der Steckdose.
2. Neigen Sie das Gerät
vorsichtig nach hinten, so
dass der Kompressor nicht
den Boden berühren kann.
3. Schrauben Sie beide
Schraubfüße ab.
4. Lösen Sie die Schrauben
des unteren Türscharniers.
Nehmen Sie das Scharnier
ab. Stecken Sie den Bolzen
in Pfeilrichtung um.
5. Lösen Sie die Schraube
und bringen Sie sie an der
gegenüberliegenden Seite
wieder an.
6. Befestigen Sie das
Scharnier an der gegenüberliegenden Seite.
7. Schrauben Sie beide
Schraubfüße wieder an.
1) falls dies vorgesehen ist,
8. Lösen Sie die beiden
Schrauben an der Rückseite.
9. Schieben Sie die Abdeckung nach hinten und heben Sie sie aus den Halterungen heraus.
10. Lösen Sie die Schrauben am oberen Türscharnier.
11. Nehmen Sie das Scharnier ab. Stecken Sie den
Bolzen in Pfeilrichtung um.
Befestigen Sie das Scharnier an der gegenüber liegenden Seite.
12. Ziehen Sie das Scharnier fest.
13. Installieren Sie die Abdeckung an der vorgesehenen Position.
14. Ziehen Sie sie nach
vorn.
15. Schrauben Sie die beiden Schrauben an der
Rückseite wieder fest.
16. Entfernen Sie den Griff
und montieren Sie in wie-
1)
der,
auf der gegenüber-
liegenden Seite.
17. Schieben Sie das Gerät
wieder an seinen Standort,
richten Sie es waagerecht
aus und nehmen Sie es
mindestens vier Stunden
lang nicht in Betrieb.
Schließen Sie es dann an
die Stromversorgung an.
Prüfen Sie alles erneut, um sicherzustellen, dass:
• Alle Schrauben fest angezogen sind.
• Die Tür korrekt öffnet und schließt.
Bei niedrigen Umgebungstemperaturen (z.B. im Winter)
kann es sein, dass die Türdichtung nicht richtig am Gerät
anliegt. Warten Sie in diesem Fall auf die natürliche Anpassung der Dichtung.
46
Wenden Sie sich bitte an den Kundendienst, falls Sie die
oben beschriebenen Tätigkeiten nicht selber durchführen
möchten. Ein Kundendiensttechniker wird die Türen dann
auf Ihre Kosten umbauen.
Page 47

Wechsel des Gefrierschranks-Türanschlags
180˚
Elektrischer Anschluss
Kontrollieren Sie vor der ersten Benutzung des Gerätes,
ob die Netzspannung und -frequenz Ihres Hausanschlusses mit den auf dem Typenschild angegebenen Anschlusswerten übereinstimmen.
Das Gerät muss geerdet sein. Zu diesem Zweck ist die
Netzkabelsteckdose mit einem Schutzkontakt ausgestattet.
Falls die Steckdose Ihres Hausanschlusses nicht geerdet
Hinweise zum Umweltschutz
Das Symbol auf dem Produkt oder seiner Verpackung
weist darauf hin, dass dieses Produkt nicht als normaler
Haushaltsabfall zu behandeln ist, sondern an einem
Sammelpunkt für das Recycling von elektrischen und
elektronischen Geräten abgegeben werden muss. Durch
Ihren Beitrag zum korrekten Entsorgen dieses Produkts
sein sollte, lassen Sie das Gerät bitte gemäß den geltenden Vorschriften erden und fragen Sie dafür einen qualifizierten Elektriker.
Der Hersteller übernimmt keinerlei Haftung für Schäden
oder Verletzungen, die durch Missachtung der oben genannten Sicherheitshinweise entstehen.
Das Gerät entspricht den EU- Richtlinien.
schützen Sie die Umwelt und die Gesundheit Ihrer
Mitmenschen. Umwelt und Gesundheit werden durch
falsches Entsorgen gefährdet. Weitere Informationen über
das Recycling dieses Produkts erhalten Sie von Ihrem
Rathaus, Ihrer Müllabfuhr oder dem Geschäft, in dem Sie
das Produkt gekauft haben.
47
Page 48

Περιεχόμενα
Πληροφορίες ασφαλείας _ _ _ _ _ _ _ _ _ _ 48
Λειτουργία _ _ _ _ _ _ _ _ _ _ _ _ _ _ _ _ _ 50
Πρώτη χρήση _ _ _ _ _ _ _ _ _ _ _ _ _ _ _ _ 51
Καθημερινή χρήση _ _ _ _ _ _ _ _ _ _ _ _ _ 51
Χρήσιμες συμβουλές _ _ _ _ _ _ _ _ _ _ _ _ 52
Πληροφορίες ασφαλείας
Χάρη της ασφάλειάς σας και για να εξασφαλι‐
στεί η σωστή χρήση, πριν την εγκατάσταση
και την πρώτη χρήση της συσκευής, διαβάστε
προσεκτικά αυτό το εγχειρίδιο χρήστη, συ‐
μπεριλαμβανομένων των συμβουλών και των
προειδοποιήσεών του. Για την αποφυγή πε‐
ριττών λαθών και ατυχημάτων, είναι σημαντι‐
κό να εξασφαλίσετε ότι όλα τα άτομα που
χρησιμοποιούν τη συσκευή γνωρίζουν καλά
τη λειτουργία της και τα χαρακτηριστικά
ασφαλείας της. Φυλάξτε τις οδηγίες αυτές και
βεβαιωθείτε ότι παραμένουν με τη συσκευή
εάν μετακινηθεί ή πωληθεί, έτσι ώστε οποιο‐
σδήποτε τη χρησιμοποιήσει κατά τη διάρκεια
της ζωής της να είναι σωστά ενημερωμένος
για τη συσκευή και την ασφάλεια.
Για την ασφάλεια της ζωής και της περιου‐
σίας, φυλάξτε τις προφυλάξεις αυτών των
οδηγιών χρήσης επειδή ο κατασκευαστής δεν
φέρει ευθύνη για ζημιές που θα προκληθούν
από παραλείψεις.
Ασφάλεια παιδιών και ευπαθών ατόμων
• Η συσκευή αυτή δεν προορίζεται για χρήση
από άτομα (συμπεριλαμβανομένων των
παιδιών) με μειωμένη σωματική ή πνευματι‐
κή ικανότητα ή έλλειψη εμπειρίας και γνώ‐
σης, εκτός και εάν επιβλέπονται ή έχουν
λάβει οδηγίες σχετικά με τη χρήση της συ‐
σκευής από άτομο υπεύθυνο για την ασφά‐
λειά τους.
Τα παιδιά πρέπει να εποπτεύονται ώστε να
εξασφαλίζεται ότι δεν παίζουν με τη συ‐
σκευή.
• Κρατήστε όλα τα υλικά της συσκευασίας
μακριά από τα παιδιά. Υπάρχει κίνδυνος
ασφυξίας.
Φροντίδα και καθάρισμα _ _ _ _ _ _ _ _ _ _ 53
Τι να κάνετε αν... _ _ _ _ _ _ _ _ _ _ _ _ _ _ 55
Τεχνικά χαρακτηριστικά _ _ _ _ _ _ _ _ _ _ 57
Εγκατάσταση _ _ _ _ _ _ _ _ _ _ _ _ _ _ _ _ 58
Περιβαλλοντικά θέματα _ _ _ _ _ _ _ _ _ _ 61
Υπόκειται αε αλλαγές χωρίς προειδποίηση
• Εάν απορρίψετε τη συσκευή, βγάλτε το φις
του ηλεκτρικού καλωδίου από την πρίζα,
κόψτε το καλώδιο σύνδεσης (όσο μπορείτε
πιο κοντά στη συσκευή) και αφαιρέστε την
πόρτα για να την αποφυγή ηλεκτροπληξίας
ή παγίδευσης μέσα στη συσκευή παιδιών
που παίζουν.
• Εάν η συσκευή, η οποία διαθέτει μαγνητικά
λάστιχα πόρτας, θα αντικαταστήσει μια πα‐
λαιότερη συσκευή με μάνδαλο στην πόρτα
ή το καπάκι, μην παραλείψετε να καταστρέ‐
ψετε το μάνδαλο προτού απορρίψετε την
παλαιά συσκευή. Με αυτό τον τρόπο θα
αποτρέψετε τη μετατροπή του ψυγείου σε
θανάσιμη παγίδα για παιδιά.
Γενική ασφάλεια
ΠΡΟΣΟΧΗ Μη φράζετε τα ανοίγματα
εξαερισμού.
• Η συσκευή προορίζεται για τη φύλαξη τρο‐
φίμων ή/και αναψυκτικών σε ένα συνηθι‐
σμένο νοικοκυριό, όπως εξηγείται στο πα‐
ρόν φυλλάδιο οδηγιών.
• Μη χρησιμοποιείτε μηχανικές συσκευές ή
άλλα τεχνητά μέσα για την επιτάχυνση της
διαδικασίας ξεπαγώματος.
• Μη χρησιμοποιείτε άλλες ηλεκτρικές συ‐
σκευές (όπως παγωτομηχανές) στο εσωτε‐
ρικό ψυκτικών συσκευών, εκτός αν είναι
εγκεκριμένες για το σκοπό αυτό από τον
κατασκευαστή.
• Μην προκαλείτε ζημιά στο κύκλωμα ψυκτι‐
κού υγρού.
• Το ψυκτικό ισοβουτάνιο (R600a) που πε‐
ριέχεται στο κύκλωμα ψυκτικού υγρού της
συσκευής, είναι ένα φυσικό αέριο με υψηλό
48
Page 49

επίπεδο περιβαλλοντικής συμβατότητας, το
οποίο ωστόσο είναι εύφλεκτο.
Κατά τη μεταφορά και εγκατάσταση της συ‐
σκευής, βεβαιωθείτε ότι δεν προκαλείται ζη‐
μιά σε κανένα εξάρτημα του κυκλώματος
ψυκτικού υγρού.
Εάν προκληθεί ζημιά στο κύκλωμα ψυκτι‐
κού υγρού:
– αποφύγετε τις γυμνές φλόγες και τις πη‐
γές ανάφλεξης
– εξαερίστε καλά το χώρο στον οποίο βρί‐
σκεται η συσκευή
• Η οποιαδήποτε αλλαγή των τεχνικών χαρα‐
κτηριστικών ή η τροποποίηση αυτού του
προϊόντος είναι επικίνδυνη. Εάν το καλώδιο
υποστεί οποιαδήποτε ζημιά, μπορεί να
προκληθεί βραχυκύκλωμα, πυρκαγιά ή/και
ηλεκτροπληξία.
ΠΡΟΕΙΔΟΠΟΙΗΣΗ Η αντικατάσταση των
ηλεκτρικών εξαρτημάτων (καλώδιο τρο‐
φοδοσίας, φις, συμπιεστής) πρέπει να γίνεται
από πιστοποιημένο αντιπρόσωπο ή από κα‐
ταρτισμένο προσωπικό σέρβις.
1. Το καλώδιο τροφοδοσίας δεν πρέπει να
επιμηκύνεται.
2. Προσέξτε να μη συνθλιβεί ή να μην
υποστεί ζημιά το φις τροφοδοσίας στο
πίσω μέρος της συσκευής. Εάν το φις
του καλωδίου τροφοδοσίας συνθλιβεί ή
υποστεί ζημιά, ενδέχεται να υπερθερ‐
μανθεί και να προκαλέσει πυρκαγιά.
3. Βεβαιωθείτε ότι έχετε πρόσβαση στο φις
τροφοδοσίας της συσκευής.
4. Μην τραβάτε το καλώδιο τροφοδοσίας.
5. Εάν η ηλεκτρική πρίζα είναι χαλαρή,
μην εισάγετε το φις. Υπάρχει κίνδυνος
ηλεκτροπληξίας ή πρόκλησης πυρκα‐
γιάς.
6. Η συσκευή δεν πρέπει να χρησιμοποιεί‐
ται χωρίς το κάλυμμα του λαμπτήρα
17)
εσωτερικού φωτισμού.
• Η συσκευή είναι βαριά. Πρέπει να προσέ‐
χετε κατά τη μεταφορά της.
17) Εάν προβλέπεται κάλυμμα λαμπτήρα.
18) Εάν προβλέπεται λαμπτήρας.
19) Αν η συσκευή δεν συγκεντρώνει πάγο.
• Μην αφαιρείτε και μην αγγίζετε αντικείμενα
από την κατάψυξη αν τα χέρια σας είναι
νωπά/βρεγμένα, καθώς μπορεί να προκλη‐
θούν εκδορές στο δέρμα ή κρυοπαγήματα.
• Αποφεύγετε την παρατεταμένη έκθεση της
συσκευής σε άμεσο ηλιακό φως.
•
Οι λαμπτήρες
18)
που χρησιμοποιούνται σε
αυτήν τη συσκευή είναι ειδικοί λαμπτήρες
που έχουν επιλεγεί για χρήση μόνο σε οι‐
κιακές συσκευές. Δεν είναι κατάλληλοι για
το φωτισμό δωματίων.
Καθημερινή χρήση
• Μην τοποθετείτε ζεστές κατσαρόλες στα
πλαστικά μέρη της συσκευής.
• Μην φυλάσσετε εύφλεκτα αέρια και υγρά
στη συσκευή επειδή μπορεί να εκραγούν.
• Μην τοποθετείτε τρόφιμα απευθείας πάνω
στην έξοδο αέρα στο πίσω τοίχωμα.
19)
• Τα κατεψυγμένα τρόφιμα δεν πρέπει να κα‐
ταψύχονται και πάλι αφού αποψυχθούν.
• Αποθηκεύετε τα προσυσκευασμένα κατε‐
ψυγμένα τρόφιμα σύμφωνα με τις οδηγίες
του κατασκευαστή για κατεψυγμένα τρόφι‐
μα.
• Θα πρέπει να τηρούνται αυστηρά οι συστά‐
σεις αποθήκευσης των παρασκευαστών
της συσκευής. Ανατρέξτε στις σχετικές οδη‐
γίες.
• Μην τοποθετείτε ανθρακούχα ποτά στον
καταψύκτη εφόσον δημιουργείται πίεση στο
δοχείο, το οποίο μπορεί να εκραγεί, προκα‐
λώντας ζημιές στη συσκευή.
• Τα παγωτά τύπου ξυλάκι γρανίτα μπορεί
να προκαλέσουν εγκαύματα από πάγο εάν
καταναλωθούν απευθείας από τη συσκευή.
Φροντίδα και καθαρισμός
• Πριν από τη συντήρηση, απενεργοποιήστε
τη συσκευή και αποσυνδέστε το φις τροφο‐
δοσίας από την πρίζα. Εάν δεν μπορείτε να
πλησιάσετε την πρίζα, διακόψτε την παρο‐
χή ρεύματος.
• Μην καθαρίζετε τη συσκευή με μεταλλικά
αντικείμενα.
49
Page 50

• Μη χρησιμοποιείτε αιχμηρά αντικείμενα για
να αφαιρείτε τον πάγο από τη συσκευή.
Χρησιμοποιείτε πλαστική ξύστρα.
• Ελέγχετε τακτικά την αποστράγγιση του
ψυγείου για νερό απόψυξης. Εάν χρειαστεί,
καθαρίστε την αποστράγγιση. Εάν η απο‐
στράγγιση είναι φραγμένη, θα συσσωρεύε‐
ται νερό στο κάτω μέρος της συσκευής.
Εγκατάσταση
ΣΗΜΑΝΤΙΚΟ Για τη σύνδεση του ηλεκτρικού
ακολουθήστε προσεκτικά τις οδηγίες που
δίνονται στις αντίστοιχες παραγράφους.
• Αποσυσκευάστε τη συσκευή και ελέγξτε αν
έχει υποστεί ζημιές. Μη συνδέετε τη συ‐
σκευή εάν έχει υποστεί ζημιά. Αναφέρετε
αμέσως ενδεχόμενες ζημιές στο μέρος
όπου αγοράσατε τη συσκευή. Σε αυτή την
περίπτωση, φυλάξτε τη συσκευασία.
• Είναι σκόπιμο να περιμένετε τουλάχιστον
δύο ώρες προτού συνδέσετε τη συσκευή,
ώστε το έλαιο να επιστρέψει και πάλι στο
συμπιεστή.
• Θα πρέπει να υπάρχει επαρκή κυκλοφορία
του αέρα γύρω από τη συσκευή. Διαφορετι‐
κά θα προκληθεί υπερθέρμανση. Για την
επίτευξη επαρκούς κυκλοφορίας αέρα ακο‐
λουθήστε τις σχετικές οδηγίες της εγκατά‐
στασης.
• Όποτε είναι δυνατό, η πλάτη της συσκευής
πρέπει να βρίσκεται κοντά σε τοίχο για την
αποφυγή επαφής ή πιασίματος με ζεστά
μέρη (συμπιεστής, συμπυκνωτής) και της
πιθανότητας εγκαύματος.
• Η συσκευή δεν πρέπει να τοποθετείται κο‐
ντά σε σώματα καλοριφέρ ή φούρνους.
• Βεβαιωθείτε ότι υπάρχει εύκολη πρόσβαση
στο φις τροφοδοσίας μετά την εγκατάσταση
της συσκευής.
• Συνδέετε μόνο με παροχή πόσιμου νερού.
20)
Σέρβις
• Οι ηλεκτρολογικές εργασίες που απαιτού‐
νται για το σέρβις της συσκευής θα πρέπει
να εκτελούνται από επαγγελματία ηλεκτρο‐
λόγο ή άλλο ειδικό.
• Το προϊόν αυτό θα πρέπει να επισκευάζε‐
ται από εξουσιοδοτημένα Κέντρα Σέρβις,
ενώ θα πρέπει να χρησιμοποιούνται μόνο
γνήσια ανταλλακτικά.
Προστασία του περιβάλλοντος
Η συσκευή αυτή δεν περιέχει αέρια τα
οποία μπορούν να προκαλέσουν ζημιά
στο στρώμα του όζοντος, είτε στο κύκλωμα
ψυκτικού υγρού ή στα μονωτικά υλικά της. Η
συσκευή δε θα πρέπει να απορρίπτεται μαζί
με τα οικιακά απορρίμματα. Ο αφρός μόνω‐
σης περιέχει εύφλεκτα αέρια: Η συσκευή θα
πρέπει να απορρίπτεται σύμφωνα με τους
ισχύοντες κανονισμούς που θα λάβετε από τις
τοπικές αρχές. Αποφύγετε να προκαλέσετε
ζημιά στην ψυκτική μονάδα, ειδικά στο πίσω
μέρος κοντά στον εναλλάκτη θερμότητας. Τα
υλικά που χρησιμοποιούνται σε αυτή τη συ‐
σκευή και σημειώνονται με το σύμβολο
ναι ανακυκλώσιμα.
εί‐
Λειτουργία
Ενεργοποίηση
Συνδέστε το φις στην πρίζα.
Περιστρέψτε το ρυθμιστή θερμοκρασίας δε‐
ξιόστροφα σε μια μέτρια ρύθμιση.
Απενεργοποίηση
Για να απενεργοποιηθεί η συσκευή, περι‐
στρέψτε το ρυθμιστή θερμοκρασίας στη θέση
"O".
20) Εάν προβλέπεται σύνδεση νερού.
50
Ρύθμιση θερμοκρασίας
Η θερμοκρασία ρυθμίζεται αυτόματα.
Για να χρησιμοποιήσετε τη συσκευή, κάντε τα
εξής:
• Περιστρέψτε το ρυθμιστή θερμοκρασίας
στις χαμηλότερες ρυθμίσεις για την επίτευ‐
ξη των μικρότερων θερμοκρασιών.
Page 51

• Περιστρέψτε το ρυθμιστή θερμοκρασίας
στις υψηλότερες ρυθμίσεις για την επίτευξη
των μεγαλύτερων θερμοκρασιών.
Μια μεσαία ρύθμιση είναι σε γενικές
γραμμές η πλέον κατάλληλη.
Ωστόσο, η ακριβής ρύθμιση πρέπει να επιλε‐
γεί έχοντας υπόψη ότι η θερμοκρασία στο
εσωτερικό του ψυγείου εξαρτάται από:
• τη θερμοκρασία του δωματίου
• πόσο συχνά ανοίγει η πόρτα
• την ποσότητα των τροφίμων που αποθη‐
κεύονται
Πρώτη χρήση
• τη θέση της συσκευής.
ΣΗΜΑΝΤΙΚΟ Εάν η θερμοκρασία
περιβάλλοντος είναι υψηλή ή η συσκευή είναι
εντελώς φορτωμένη και έχει ρυθμιστεί στις
χαμηλότερες θερμοκρασίες, ίσως λειτουργεί
συνεχώς δημιουργώντας πάγο στο πίσω
τοίχωμα. Σε αυτή την περίπτωση πρέπει να
επιλέγεται υψηλότερη θερμοκρασία ώστε να
είναι δυνατή η αυτόματη απόψυξη κι
επομένως η μειωμένη κατανάλωση ενέργειας.
Καθάρισμα του εσωτερικού
Προτού χρησιμοποιήσετε τη συσκευή για
πρώτη φορά, πλύντε το εσωτερικό και όλα τα
εσωτερικά εξαρτήματα με χλιαρό νερό και λίγο
ουδέτερο σαπούνι για να αφαιρέσετε την τυ‐
Καθημερινή χρήση
Κατάψυξη φρέσκων τροφίμων
Ο θάλαμος του καταψύκτη είναι κατάλληλος
για την κατάψυξη φρέσκων τροφίμων και τη
μακροχρόνια αποθήκευση κατεψυγμένων και
βαθιά κατεψυγμένων τροφίμων.
Για την κατάψυξη φρέσκων τροφίμων δεν εί‐
ναι απαραίτητο να αλλάξετε τη μέτρια ρύθμι‐
ση.
Ωστόσο, για λειτουργία πιο γρήγορης κατά‐
ψυξης, περιστρέψτε το ρυθμιστή θερμοκρα‐
σίας στις υψηλότερες ρυθμίσεις για την επί‐
τευξη των μεγαλύτερων θερμοκρασιών.
ΣΗΜΑΝΤΙΚΟ Σε αυτή την περίπτωση, η
θερμοκρασία στο θάλαμο ψύξης μπορεί να
μειωθεί κάτω από τους 0°C. Εάν συμβεί κάτι
τέτοιο, γυρίστε και πάλι το ρυθμιστή
θερμοκρασίας σε μια πιο θερμή ρύθμιση.
Αποθήκευση κατεψυγμένων τροφίμων
Κατά την αρχική ενεργοποίηση ή μετά από
μια περίοδο μη λειτουργίας, προτού τοποθε‐
τήσετε τα προϊόντα στο θάλαμο, η συσκευή
πρέπει να λειτουργήσει για τουλάχιστον 2
ώρες σε υψηλότερες ρυθμίσεις.
πική μυρωδιά των καινούριων προϊόντων και
στη συνέχεια στεγνώστε καλά.
ΣΗΜΑΝΤΙΚΟ Μη χρησιμοποιείτε απορρυπα‐
ντικά ή σκόνες που χαράσσουν, διότι κατα‐
στρέφουν το φινίρισμα.
ΣΗΜΑΝΤΙΚΟ Σε περίπτωση κατά λάθος
απόψυξης, για παράδειγμα σε περίπτωση
διακοπής ρεύματος, εάν το ρεύμα ήταν
κομμένο για περισσότερο από την τιμή που
αναγράφεται στον πίνακα τεχνικών
χαρακτηριστικών στην ενότητα "χρόνος
ανόδου", τα αποψυγμένα τρόφιμα πρέπει να
καταναλωθούν σύντομα ή να μαγειρευτούν
αμέσως και στη συνέχεια να καταψυχθούν και
πάλι (μετά την ψύξη).
Ξεπάγωμα
Τα τρόφιμα βαθιάς ή μη κατάψυξης, πριν τη
χρήση τους, μπορούν να ξεπαγώνονται στο
θάλαμο ψύξης ή σε θερμοκρασία δωματίου,
ανάλογα το διαθέσιμο χρόνο ξεπαγώματος.
Τα μικρά τεμάχια μπορούν να μαγειρεύονται
ακόμη και κατεψυγμένα, απευθείας από τον
καταψύκτη: σε αυτή την περίπτωση, το μαγεί‐
ρεμα διαρκεί περισσότερο.
Μετακινούμενα ράφια
Τα τοιχώματα του ψυγείου είναι εφοδιασμένα
με μια σειρά από οδηγούς, ώστε τα ράφια να
μπορούν να τοποθετούνται όπως επιθυμείτε.
51
Page 52

Τοποθέτηση των ραφιών της πόρτας
Για να είναι δυνατή η
αποθήκευση συ‐
σκευασιών τροφίμων
διαφόρων μεγεθών,
τα ράφια της πόρτας
μπορούν να τοποθε‐
τούνται σε διαφορετι‐
κό ύψος.
Τραβήξτε σταδιακά
το ράφι προς την κα‐
τεύθυνση των βελών
μέχρι να απελευθε‐
ρωθεί και στη συν‐
έχεια τοποθετήστε το
και πάλι όπως θέλε‐
τε.
Χρήσιμες συμβουλές
Κανονικοί ήχοι λειτουργίας
• Κατά την άντληση του ψυκτικού μέσω των
πηνίων ή των σωληνώσεων μπορεί να
ακούσετε έναν ήχο κελαρύσματος ή παρα‐
γωγής φυσαλίδων. Αυτό είναι φυσιολογικό.
• Όταν ο συμπιεστής είναι ενεργοποιημένος,
το ψυκτικό αντλείται κυκλικά και ακούγεται
ένας ήχος στροβιλισμού ή ένας παλλόμε‐
νος θόρυβος από το συμπιεστή. Αυτό είναι
φυσιολογικό.
• Λόγω της θερμικής διαστολής μπορεί να
ακουστεί ξαφνικά ένας οξύς κρότος. Αυτό
είναι φυσιολογικό και δεν ενέχει κινδύνους.
Αυτό είναι φυσιολογικό.
• Κατά την ενεργοποίηση ή την απενεργο‐
ποίηση του συμπιεστή, θα ακουστεί ένας
ελαφρύς ήχος "κλικ" από το ρυθμιστή θερ‐
μοκρασίας. Αυτό είναι φυσιολογικό.
Συμβουλές εξοικονόμησης ενέργειας
• Μην ανοίγετε την πόρτα συχνά και μην την
αφήνετε ανοικτή για περισσότερο από ότι
είναι απολύτως απαραίτητο.
• Εάν η θερμοκρασία περιβάλλοντος είναι
υψηλή, ο ρυθμιστής θερμοκρασίας βρίσκε‐
ται στην υψηλότερη ρύθμιση και η συσκευή
είναι εντελώς φορτωμένη, ο συμπιεστής
ίσως λειτουργεί συνεχώς δημιουργώντας
πάγο στον εξατμιστήρα. Εάν προκύψει αυ‐
τό, περιστρέψτε το ρυθμιστή θερμοκρασίας
προς τις χαμηλότερες ρυθμίσεις ώστε να εί‐
ναι δυνατή η αυτόματη απόψυξη κι επομέ‐
νως η εξοικονόμηση ηλεκτρικής ενέργειας.
Συμβουλές ψύξης φρέσκων τροφίμων
Για να έχετε τα καλύτερα αποτελέσματα:
• μην αποθηκεύετε στο ψυγείο ζεστά τρόφιμα
ή υγρά που εξατμίζονται
• μην καλύπτετε ή τυλίγετε τα τρόφιμα, ιδιαί‐
τερα εάν μυρίζουν έντονα
• τοποθετείτε τα τρόφιμα με τέτοιο τρόπο
ώστε ο αέρας να κυκλοφορεί ελεύθερα γύ‐
ρω τους
Συμβουλές ψύξης
Χρήσιμες συμβουλές:
Κρέας (όλοι οι τύποι) τυλίξτε σε πλαστικές σα‐
κούλες και τοποθετήστε το στο γυάλινο ράφι
επάνω από το συρτάρι των λαχανικών.
Για λόγους ασφαλείας, αποθηκεύστε με αυτό
τον τρόπο μόνο για μια ή δύο ημέρες το πολύ.
52
Page 53

Μαγειρεμένα τρόφιμα, κρύα πιάτα, κλπ: αυτά
θα πρέπει να καλύπτονται και μπορούν να το‐
ποθετούνται σε οποιοδήποτε ράφι.
Φρούτα και λαχανικά: αυτά θα πρέπει να πλέ‐
νονται καλά και να τοποθετούνται στο(α) ειδι‐
κό(ά) συρτάρι(α) που παρέχεται(ονται).
Βούτυρο και τυρί: αυτά θα πρέπει να τοποθε‐
τούνται σε ειδικά αεροστεγή δοχεία ή να τυλί‐
γονται με αλουμινόχαρτο ή σε πλαστικές σα‐
κούλες αφαιρώντας όσο το δυνατόν περισσό‐
τερο τον αέρα.
Μπουκάλια γάλακτος: αυτά θα πρέπει να είναι
ταπωμένα και θα πρέπει να αποθηκεύονται
στη σχάρα μπουκαλιών στην πόρτα.
Οι μπανάνες, οι πατάτες, τα κρεμμύδια και το
σκόρδο, εάν δεν είναι συσκευασμένα, πρέπει
να διατηρούνται στο ψυγείο.
Συμβουλές κατάψυξης
Για να σας βοηθήσουμε να εκμεταλλεύεστε
στο έπακρο τη διαδικασία κατάψυξης, ακο‐
λουθούν ορισμένες σημαντικές συμβουλές:
• η μέγιστη ποσότητα τροφίμων που μπορεί
να καταψυχθεί σε 24 ώρες. αναγράφεται
στην πινακίδα τεχνικών στοιχείων;
• η διαδικασία κατάψυξης διαρκεί 24 ώρες.
Κατά τη διάρκεια αυτής της περιόδου δε θα
πρέπει να προστίθενται άλλα τρόφιμα για
κατάψυξη;
• καταψύχετε μόνο πρώτης ποιότητας, φρέ‐
σκα και καλά καθαρισμένα τρόφιμα;
• αποθηκεύετε τα τρόφιμα σε μικρές μερίδες
ώστε να είναι δυνατή η γρήγορη και πλή‐
ρης κατάψυξή του και το μεταγενέστερο ξε‐
πάγωμα μόνο της απαιτούμενης ποσότη‐
τας;
• τυλίγετε τα τρόφιμα σε αλουμινόχαρτο ή
πλαστικές σακούλες και εξασφαλίζετε ότι οι
συσκευασίες είναι αεροστεγείς;
• μην αφήνετε φρέσκα, μη κατεψυγμένα τρό‐
φιμα να έρχονται σε επαφή με ήδη κατε‐
ψυγμένα τρόφιμα, ώστε να αποτρέπεται η
αύξηση της θερμοκρασίας των δεύτερων;
• τα άπαχα τρόφιμα αποθηκεύονται καλύτερα
και για μεγαλύτερο διάστημα από τα λιπα‐
ρά; το αλάτι μειώνει τη δυνατή διάρκεια
αποθήκευσης των τροφίμων;
• οι γρανίτες, εάν καταναλωθούν αμέσως με‐
τά την έξοδό τους από την κατάψυξη, μπο‐
ρούν να προκαλέσουν στο δέρμα εγκαύμα‐
τα από πάγο;
• είναι σκόπιμο να γράφετε την ημερομηνία
κατάψυξης σε κάθε συσκευασία ώστε να
μπορείτε να συνάγετε το χρόνο αποθήκευ‐
σης;
Συμβουλές για την αποθήκευση
κατεψυγμένων τροφίμων
Για να πετύχετε την καλύτερη απόδοση από
αυτή τη συσκευή, θα πρέπει:
• να είστε σίγουροι ότι οι συνθήκες διατήρη‐
σης των κατεψυγμένων τροφίμων του
εμπορίου ήταν κατάλληλες στο κατάστημα
αγοράς;
• να εξασφαλίζετε την ταχύτερη δυνατή μετα‐
φορά των κατεψυγμένων τροφίμων από το
κατάστημα αγοράς τους στον καταψύκτη;
• μην ανοίγετε την πόρτα συχνά και μην την
αφήνετε ανοικτή για περισσότερο από ότι
είναι απολύτως απαραίτητο.
• Μετά το ξεπάγωμα, τα τρόφιμα χαλάνε γρή‐
γορα και δεν μπορούν να καταψυχθούν και
πάλι.
• Μην υπερβαίνετε τους χρόνους αποθήκευ‐
σης που υποδεικνύονται από τους παρα‐
σκευαστές των τροφίμων.
Φροντίδα και καθάρισμα
ΠΡΟΣΟΧΗ Πριν από οποιαδήποτε
εργασία συντήρησης αποσυνδέετε τη
συσκευή από την πρίζα.
Η συσκευή αυτή περιέχει υδρογονάνθρα‐
κες στην ψυκτική μονάδα της; Οι εργα‐
σίες συντήρησης και επαναφόρτισης θα πρέ‐
πει επομένως να πραγματοποιούνται μόνο
από εξουσιοδοτημένους τεχνικούς.
Τακτικό καθάρισμα
Η συσκευή πρέπει να καθαρίζεται τακτικά:
53
Page 54

• Καθαρίστε το εσωτερικό και τα εξαρτήματα
με χλιαρό νερό και λίγο φυσικό σαπούνι.
• Ελέγχετε τακτικά τα λάστιχα της πόρτας και
σκουπίστε τα για να εξασφαλίσετε ότι είναι
καθαρά και δεν φέρουν ακαθαρσίες.
• Ξεπλύντε και στεγνώστε καλά.
ΣΗΜΑΝΤΙΚΟ Μην τραβάτε, μετακινείτε ή
προκαλείτε ζημιά σε σωλήνες ή/και καλώδια
που βρίσκονται στο εσωτερικό του θαλάμου.
Ποτέ μη χρησιμοποιείτε απορρυπαντικά,
σκόνες που χαράζουν, καθαριστικά με πολύ
άρωμα ή γυαλιστικό κερί για να καθαρίσετε το
εσωτερικό, διότι αυτά τα υλικά φθείρουν την
επιφάνεια και αφήνουν έντονη οσμή.
Καθαρίστε το συμπυκνωτή (μαύρη γρίλια) και
το συμπιεστή στο πίσω μέρος της συσκευής
με μια βούρτσα ή μια ηλεκτρική σκούπα. Κάτι
τέτοιο βελτιώνει την απόδοση της συσκευής
και εξοικονομεί ηλεκτρική ενέργεια.
ΣΗΜΑΝΤΙΚΟ Προσέχετε ώστε να μην
προκληθεί ζημιά στο ψυκτικό σύστημα.
Πολλά ιδιοσκευάσματα καθαρισμού για την
κουζίνα περιέχουν χημικά που μπορούν να
προσβάλλουν/ καταστρέψουν τα πλαστικά
που χρησιμοποιούνται σε αυτή τη συσκευή.
Για το λόγο αυτό συστήνεται το εξωτερικό πε‐
ρίβλημα της συσκευής να καθαρίζεται μόνο με
χλιαρό νερό αφού προσθέσετε και λίγο υγρό
για τα πιάτα.
Μετά τον καθαρισμό, συνδέστε ξανά τον εξο‐
πλισμό στην κεντρική παροχή.
Απόψυξη του ψυγείου
Ο πάγος εξαλείφεται αυτόματα από τον εξα‐
τμιστήρα του θαλάμου ψύξης κάθε φορά που
σταματά ο συμπιεστής κινητήρα κατά τη διάρ‐
κεια της κανονικής χρήσης. Το νερό από τον
πάγο αποστραγγίζεται μέσω μιας σκάφης σε
ένα ειδικό δοχείο στο πίσω μέρος της συ‐
σκευής, επάνω από το συμπιεστή κινητήρα,
όπου και εξατμίζεται.
Είναι σημαντικό να καθαρίζεται τακτικά η οπή
αποστράγγισης του νερού από τον πάγο στη
μέση του καναλιού του θαλάμου ψύξης ώστε
να αποτρέπεται η υπερχείλιση και το στάξιμο
νερού στα τρόφιμα στο εσωτερικό του. Χρησι‐
μοποιείτε τον ειδικό καθαριστήρα που παρέ‐
χεται, τον οποίο θα βρείτε ήδη τοποθετημένο
μέσα στην οπή αποστράγγισης.
Απόψυξη του καταψύκτη
Πάντα θα δημιουργείται μικρή ποσότητα
πάγου στα ράφια του καταψύκτη και γύ‐
ρω από τον πάνω θάλαμο.
ΣΗΜΑΝΤΙΚΟ Κάντε απόψυξη του καταψύκτη
όταν το στρώμα πάγου φθάσει πάγος
περίπου 3 έως 5 mm.
Για να αφαιρέσετε τον πάγο, ακολουθήστε αυ‐
τά τα βήματα:
1. Απενεργοποιήστε τη συσκευή.
2. Απομακρύνετε τα αποθηκευμένα τρόφιμα,
τυλίξτε τα με πολλές εφημερίδες και τοπο‐
θετήστε τα σε ένα δροσερό μέρος.
3. Αφήστε την πόρτα ανοιχτή.
4. Όταν ολοκληρωθεί η απόψυξη, στεγνώστε
καλά το εσωτερικό και βάλτε ξανά το φις
στην πρίζα.
5. Ενεργοποιήστε τη συσκευή.
6. Ρυθμίστε το ρυθμιστή θερμοκρασίας για
την επίτευξη μεγαλύτερων θερμοκρασιών
και αφήστε τη συσκευή να λειτουργήσει
για περίπου δύο ή τρεις ώρες σε αυτή τη
ρύθμιση.
7. Τοποθετήστε ξανά στο θάλαμο τα τρόφιμα
που είχατε αφαιρέσει.
54
Page 55

ΣΗΜΑΝΤΙΚΟ Ποτέ μη χρησιμοποιείτε
αιχμηρά μεταλλικά εργαλεία για την απόξεση
του πάγου από τον εξατμιστήρα, διότι μπορεί
να προκαλέσουν ζημιά. Μη χρησιμοποιείτε
μηχανικές συσκευές ή άλλα τεχνητά μέσα για
την επιτάχυνση της διαδικασίας ξεπαγώματος
διαφορετικά από αυτά που συστήνει ο
κατασκευαστής. Μια αύξηση της
θερμοκρασίας των συσκευασιών
κατεψυγμένων τροφίμων, κατά τη διάρκεια
της απόψυξης, μπορεί να μειώσει τη διάρκεια
ασφαλούς αποθήκευσής τους.
Περίοδοι εκτός λειτουργίας
Όταν η συσκευή δεν χρησιμοποιείται για με‐
γάλα χρονικά διαστήματα, λαμβάνετε τις ακό‐
λουθες προφυλάξεις:
Τι να κάνετε αν...
1. Αποσυνδέστε τη συσκευή από την ηλεκ‐
τρική τροφοδοσία.
2. Αφαιρέστε όλα τα τρόφιμα.
3. Κάντε απόψυξη και καθαρίστε τη συσκευή
και όλα τα εξαρτήματα.
4. Αφήστε τις πόρτες ανοικτές για να αποτρέ‐
ψετε τις δυσάρεστες οσμές.
ΣΗΜΑΝΤΙΚΟ Αν ο θάλαμος πρόκειται να
παραμείνει ενεργοποιημένος, ζητήστε από
κάποιο άτομο να ελέγχει το θάλαμο ανά τακτά
διαστήματα, ώστε να μη χαλάσουν τα τρόφιμα
στο εσωτερικό σε περίπτωση διακοπής
ρεύματος.
ΠΡΟΕΙΔΟΠΟΙΗΣΗ Πριν από την
αντιμετώπιση προβλημάτων,
αποσυνδέστε το φις τροφοδοσίας από την
πρίζα.
Η αντιμετώπιση των προβλημάτων που δεν
αναφέρονται στο παρόν εγχειρίδιο θα πρέπει
Πρόβλημα Πιθανή αιτία Αντιμετώπιση
Η συσκευή κάνει θόρυβο Η συσκευή δεν στηρίζεται σω‐
στά
Η συσκευή δεν λειτουργεί.
Ο λαμπτήρας δεν λειτουρ‐
γεί.
Δεν έχει συνδεθεί σωστά το
Η συσκευή δεν τροφοδοτείται
Δεν λειτουργεί ο λαμπτή‐
ρας.
Ο λαμπτήρας είναι ελαττωμα‐
Η συσκευή είναι απενεργο‐
ποιημένη.
φις τροφοδοσίας στην πρίζα.
με ρεύμα. Δεν υπάρχει τάση
ρεύματος στην πρίζα.
Ο λαμπτήρας βρίσκεται σε κα‐
τάσταση αναμονής.
τικός.
να διεξάγεται μόνο από επαγγελματία
ηλεκτρολόγο ή άλλο κατάλληλα καταρτισμένο
άτομο.
ΣΗΜΑΝΤΙΚΟ Ακούγονται κάποιοι ήχοι κατά
τη διάρκεια της κανονικής χρήσης
(συμπιεστής, κυκλοφορία ψυκτικού).
Βεβαιωθείτε ότι η συσκευή είναι
σταθερή (πρέπει να ακουμπούν
στο δάπεδο και τα τέσσερα πό‐
δια)
Ενεργοποιήστε τη συσκευή.
Συνδέστε σωστά το φις στην
πρίζα.
Συνδέστε μια άλλη ηλεκτρική
συσκευή στην πρίζα.
Επικοινωνήστε με επαγγελματία
ηλεκτρολόγο.
Κλείστε και ανοίξτε την πόρτα.
Ανατρέξτε στην ενότητα «Αντι‐
κατάσταση του λαμπτήρα».
55
Page 56

Πρόβλημα Πιθανή αιτία Αντιμετώπιση
Ο συμπιεστής λειτουργεί
συνεχώς.
Δεν έχει ρυθμιστεί σωστά η
θερμοκρασία.
Η πόρτα δεν έχει κλείσει σω‐
στά.
Ανοίγετε την πόρτα πολύ συ‐
χνά.
Η θερμοκρασία των προϊό‐
ντων είναι πολύ υψηλή.
Η θερμοκρασία δωματίου είναι
πολύ υψηλή.
Υπάρχει ροή νερού στην
πίσω πλάκα του ψυγείου.
Κατά τη διάρκεια της αυτόμα‐
της διαδικασίας απόψυξης, ο
πάγος αποψύχεται στην πίσω
πλάκα.
Υπάρχει ροή νερού στο
εσωτερικό του ψυγείου.
Η έξοδος νερού είναι φραγμέ‐
νη.
Υπάρχουν προϊόντα που
εμποδίζουν τη ροή του νερού
στο συλλέκτη νερού.
Υπάρχει ροή νερού στο
δάπεδο.
Η έξοδος του νερού απόψυξης
δε ρέει στο δίσκο εξάτμισης
πάνω από το συμπιεστή.
Η θερμοκρασία στη συ‐
σκευή είναι πολύ χαμηλή.
Η θερμοκρασία στη συ‐
σκευή είναι πολύ υψηλή.
Δεν έχει ρυθμιστεί σωστά η
θερμοκρασία.
Δεν έχει ρυθμιστεί σωστά η
θερμοκρασία.
Η πόρτα δεν έχει κλείσει σω‐
στά.
Η θερμοκρασία των προϊό‐
ντων είναι πολύ υψηλή.
Αποθηκεύετε ταυτόχρονα με‐
γάλο αριθμό προϊόντων.
Η θερμοκρασία στο ψυ‐
γείο είναι πολύ υψηλή.
Δεν υπάρχει καθόλου κυκλο‐
φορία κρύου αέρα στη συ‐
σκευή.
Ρυθμίστε υψηλότερη θερμοκρα‐
σία.
Ανατρέξτε στην ενότητα «Κλεί‐
σιμο της πόρτας».
Μην κρατάτε την πόρτα ανοιχτή
περισσότερο από όσο χρειάζε‐
ται.
Αφήστε τη θερμοκρασία των
προϊόντων να μειωθεί στη θερ‐
μοκρασία δωματίου πριν από
την αποθήκευση.
Μειώστε τη θερμοκρασία δωμα‐
τίου.
Αυτό είναι φυσιολογικό.
Καθαρίστε την έξοδο νερού.
Βεβαιωθείτε ότι τα προϊόντα δεν
έρχονται σε επαφή με την πίσω
πλάκα.
Συνδέστε την έξοδο του νερού
απόψυξης στο δίσκο εξάτμισης.
Ρυθμίστε υψηλότερη θερμοκρα‐
σία.
Ρυθμίστε χαμηλότερη θερμο‐
κρασία.
Ανατρέξτε στην ενότητα «Κλεί‐
σιμο της πόρτας».
Αφήστε τη θερμοκρασία των
προϊόντων να μειωθεί στη θερ‐
μοκρασία δωματίου πριν από
την αποθήκευση.
Αποθηκεύστε λιγότερα προϊό‐
ντα ταυτόχρονα.
Βεβαιωθείτε ότι υπάρχει κυκλο‐
φορία κρύου αέρα στη συ‐
σκευή.
56
Page 57

Πρόβλημα Πιθανή αιτία Αντιμετώπιση
Η θερμοκρασία στον κα‐
ταψύκτη είναι πολύ υψη‐
λή.
Έχει σχηματιστεί πολύς
πάγος.
Η πόρτα δεν έχει κλείσει σω‐
Δεν έχει ρυθμιστεί σωστά η
Τα προϊόντα είναι τοποθετημέ‐
να πολύ κοντά μεταξύ τους.
Τα τρόφιμα δεν είναι σωστά
τυλιγμένα.
στά.
θερμοκρασία.
Αποθηκεύστε τα προϊόντα κατά
τρόπον ώστε να υπάρχει κυ‐
κλοφορία κρύου αέρα.
Τυλίξτε τα τρόφιμα σωστά.
Ανατρέξτε στην ενότητα «Κλεί‐
σιμο της πόρτας».
Ρυθμίστε υψηλότερη θερμοκρα‐
σία.
Αντικατάσταση του λαμπτήρα
ΠΡΟΣΟΧΗ Αποσυνδέστε το φις από την
πρίζα.
1. Αφαιρέστε τη
βίδα από το κά‐
λυμμα του λαμ‐
πτήρα.
2. Αφαιρέστε το
κάλυμμα του
λαμπτήρα
(ανατρέξτε
στην εικόνα).
3. Αντικαταστήστε το χρησιμοποιημένο λαμ‐
πτήρα με ένα νέο λαμπτήρα ίδιας ισχύος
(η μέγιστη ισχύς αναγράφεται στο κάλυμ‐
μα του λαμπτήρα).
4. Τοποθετήστε το κάλυμμα του λαμπτήρα.
5. Σφίξτε τη βίδα στο κάλυμμα του λαμπτή‐
ρα.
6. Συνδέστε το φις στην πρίζα.
7. Ανοίξτε την πόρτα. Βεβαιωθείτε ότι ο λαμ‐
πτήρας ανάβει.
Κλείσιμο της πόρτας
1. Καθαρίστε τα στεγανοποιητικά λάστιχα
της πόρτας.
2. Εάν χρειαστεί, προσαρμόστε την πόρτα.
Ανατρέξτε στο "Εγκατάσταση".
3. Εάν χρειαστεί, αντικαταστήστε τα ελαττω‐
ματικά στεγανοποιητικά λάστιχα της πόρ‐
τας. Επικοινωνήστε με το κέντρο σέρβις.
Τεχνικά χαρακτηριστικά
Διαστάσεις
Ύψος 850 χιλιοστά
Πλάτος 550 χιλιοστά
Βάθος 612 χιλιοστά
Χρόνος ανόδου 11 ω
Τάση 230 V
Συχνότητα 50 Hz
Τα τεχνικά στοιχεία βρίσκονται στην πινακίδα
τεχνικών στοιχείων στην εσωτερική αριστερή
πλευρά της συσκευής και στην ετικέτα ενέρ‐
γειας.
57
Page 58

Εγκατάσταση
ΠΡΟΣΟΧΗ Πριν την εγκατάσταση της
συσκευής διαβάστε προσεκτικά τις
"Πληροφορίες ασφάλειας" για την ασφάλειά
σας και τη σωστή λειτουργία της συσκευής.
Τοποθέτηση
Η συσκευή αυτή μπορεί επίσης να εγκαταστα‐
θεί σε στεγνό, καλά αεριζόμενο εσωτερικό
χώρο (γκαράζ ή κελάρι), αλλά για βέλτιστη
απόδοση εγκαταστήστε την σε χώρο όπου η
θερμοκρασία περιβάλλοντος αντιστοιχεί στην
κλιματική κατηγορία που αναγράφεται στην
πινακίδα τεχνικών στοιχείων της συσκευής:
Κλιματι‐
κή κατη‐
γορία
SN +10°C to + 32°C
N +16°C to + 32°C
ST +16°C to + 38°C
T +16°C to + 43°C
Θερμοκρασία περιβάλλοντος
Οριζοντίωση
Κατά την τοποθέτη‐
ση της συσκευής, βε‐
βαιωθείτε ότι είναι
επίπεδη. Αυτό μπο‐
ρεί να επιτευχθεί με
δύο ρυθμιζόμενα πό‐
δια, από κάτω στο
εμπρόσθιο μέρος
(2). Εάν χρειαστεί,
ρυθμίστε τα πόδια
αφαιρώντας τον
αποστάτη (1).
1
2
58
Page 59

Θέση
Η συσκευή πρέπει να εγκαθίσταται μακριά
από πηγές θερμότητας, όπως σώματα καλο‐
ριφέρ, λέβητες, άμεσο ηλιακό φως, κ.λπ. Βε‐
βαιωθείτε ότι ο αέρας μπορεί να κυκλοφορεί
ελεύθερα πίσω από το θάλαμο. Για να εξα‐
σφαλίσετε τη βέλτιστη απόδοση, εάν η συ‐
σκευή έχει τοποθετηθεί κάτω από κρεμαστό
ντουλάπι, η ελάχιστη απόσταση μεταξύ του
επάνω μέρους του θαλάμου και του ντουλα‐
πιού πρέπει να είναι τουλάχιστον 100 mm.
Ιδανικά, ωστόσο, η συσκευή δεν πρέπει να
τοποθετείται κάτω από κρεμαστά ντουλάπια.
Η ακριβής οριζοντίωση εξασφαλίζεται από
ένα ή περισσότερα ρυθμιζόμενα πόδια στη
βάση του θαλάμου.
Εάν ο θάλαμος τοποθετηθεί σε γωνία, και η
πλευρά με τους μεντεσέδες είναι προς τον τοί‐
χο, η απόσταση ανάμεσα στον τοίχο και το
θάλαμο θα πρέπει να είναι τουλάχιστον 10
mm για να μπορεί να ανοίξει αρκετά η πόρτα
ώστε να αφαιρεθούν τα ράφια.
Αντιστροφή πόρτας
ΣΗΜΑΝΤΙΚΟ Για να πραγματοποιήσετε τις
ακόλουθες ενέργειες, συστήνουμε να σας
βοηθήσει ακόμη ένα άτομο το οποίο θα
ΠΡΟΕΙΔΟΠΟΙΗΣΗ
min.100 mm
15 mm
15 mm
Πρέπει να είναι δυνατή η αποσύνδεση της
συσκευής από την ηλεκτρική παροχή. Επομέ‐
νως, η πρόσβαση στο φις πρέπει να είναι εύ‐
κολη μετά την εγκατάσταση.
συγκρατεί καλά τις πόρτες της συσκευής κατά
τη διάρκεια αυτών των ενεργειών.
Για να αλλάξετε την πλευρά ανοίγματος της
πόρτας, ακολουθήστε τα εξής βήματα:
59
Page 60

1. Αποσυνδέστε το
φις τροφοδοσίας από
την πρίζα.
2. Γείρετε προσεκτικά
προς τα πίσω τη συ‐
σκευή, έτσι ώστε ο
συμπιεστής να μην
μπορεί να ακουμπή‐
σει στο δάπεδο.
3. Ξεβιδώστε και τα
δύο ρυθμιζόμενα πό‐
δια.
4. Ξεβιδώστε τις βίδες
του κάτω μεντεσέ της
πόρτας. Αφαιρέστε το
μεντεσέ. Τοποθετήστε
από πάνω τον πείρο
στην κατεύθυνση του
βέλους.
5. Ξεβιδώστε και το‐
ποθετήστε τη βίδα
στην αντίθετη πλευ‐
ρά.
6. Τοποθετήστε το
μεντεσέ στην αντίθετη
πλευρά.
7. Βιδώστε και τα δύο
ρυθμιζόμενα πόδια.
1) Εάν προβλέπεται
8. Ξεβιδώστε και τις
δύο βίδες στην πίσω
πλευρά.
9. Σπρώξτε προς τα
πίσω το άνω τμήμα
και ανασηκώστε το
από τα στοιχεία συγ‐
κράτησης.
10. Ξεβιδώστε τις βί‐
δες του επάνω μεντε‐
σέ της πόρτας.
11. Αφαιρέστε το με‐
ντεσέ. Τοποθετήστε
από πάνω τον πείρο
στην κατεύθυνση του
βέλους. Τοποθετήστε
το μεντεσέ στην αντί‐
θετη πλευρά.
12. Σφίξτε το μεντεσέ.
13. Τοποθετήστε το
άνω τμήμα στη θέση
του.
14. Τραβήξτε το
μπροστά.
15. Βιδώστε τις δύο
βίδες στην πίσω
πλευρά.
16. Αφαιρέστε και το‐
ποθετήστε τη λαβή
στην αντίθετη πλευ‐
ρά.
17. Τοποθετήστε ξα‐
νά τη συσκευή στη
θέση της, ευθυγραμ‐
μίστε την, περιμένετε
για τουλάχιστον τέσ‐
σερις ώρες και κατό‐
πιν συνδέστε τη στην
πρίζα.
1)
Κάντε ένα τελικό έλεγχο για να βεβαιωθείτε
ότι:
• Όλες οι βίδες είναι σφιγμένες.
• Η πόρτα ανοίγει και κλείνει σωστά.
Εάν η θερμοκρασία περιβάλλοντος είναι χα‐
μηλή (δηλ. το χειμώνα), το λάστιχο μπορεί να
μην εφαρμόζει απόλυτα στο θάλαμο. Σε εκεί‐
60
νη την περίπτωση, περιμένετε το φυσικό ταί‐
ριασμα του λάστιχου.
Εάν δεν θέλετε να εκτελέσετε εσείς οι ίδιοι τις
διαδικασίες που περιγράφονται παραπάνω,
επικοινωνήστε με το Κέντρο Σέρβις. Ο τεχνι‐
κός του Κέντρου Σέρβις θα αντιστρέψει τις
πόρτες με δικά σας έξοδα.
Page 61

Αντιστρεψιμότητα της πόρτας του καταψύκτη
180˚
Ηλεκτρική σύνδεση
Πριν από τη σύνδεση, επαληθεύστε ότι η τά‐
ση και η συχνότητα που αναγράφονται στην
πινακίδα τεχνικών χαρακτηριστικών αντιστοι‐
χούν στα χαρακτηριστικά της παροχής σας.
Η συσκευή πρέπει να γειώνεται. Το φις του
καλωδίου τροφοδοσίας διαθέτει μια επαφή γι'
αυτό το σκοπό. Εάν η πρίζα δεν είναι γειωμέ‐
νη, συνδέστε τη συσκευή σε μια μεμονωμένη
Περιβαλλοντικά θέματα
Το σύµβολο στο προϊόν ή επάνω στη
συσκευασία του υποδεικνύει ότι δεν πρέπει
να µ εταχειρίζεστε το προϊόν αυτό ως οικιακό
απόρριµµα . Αντιθέτως θα πρέπει να
παραδίδεται στο κατάλληλο σηµείο συλλογής
για την ανακύκλωση ηλεκτρικού και
ηλεκτρονικού εξοπλισµού. Εξασφαλίζοντας
ότι το προϊόν αυτό διατίθεται σωστά,
συµβάλλετε στην αποτροπή ενδεχόµενων
αρνητικών συνεπειών για το περιβάλλον και
γείωση σύμφωνα με τους τρέχοντες κανονι‐
σμούς, αφού συμβουλευθείτε έναν επαγγελ‐
ματία ηλεκτρολόγο.
Σε περίπτωση μη τήρησης των παραπάνω
προφυλάξεων ασφαλείας, ο κατασκευαστής
δε φέρει καμία ευθύνη.
Αυτή η συσκευή είναι σύμφωνη με τις ακόλου‐
θες Οδηγίες της. ΕΟΚ.
την ανθρώπινη υγεία, οι οποίες θα
µπορούσαν διαφορετικά να προκληθούν από
ακατάλληλο χειρισµό απόρριψης του
προϊόντος αυτού. Για λεπτοµερέστερες
πληροφορίες σχετικά µε την ανακύκλωση του
προϊόντος αυτού, επικοινωνήστε µε το
δηµαρχείο της περιοχής σας, την τοπική σας
υπηρεσία αποκοµιδής οικιακών
απορριµµάτων ή µε το κατάστηµα όπου
αγοράσατε το προϊόν.
61
Page 62

62
Page 63

63
Page 64

www.zanussi.com/shop
200383748-A-452010
 Loading...