

Page 1
GETTING
STARTED?
EASY.
User Manual
ZOB65301
EN User Manual 2
Oven
FR Notice d'utilisation 25
Four
Page 2

SAFETY INFORMATION
Before the installation and use of the appliance, carefully read the
supplied instructions. The manufacturer is not responsible for any
injuries or damages that are the result of incorrect installation or
usage. Always keep the instructions in a safe and accessible
location for future reference.
CHILDREN AND VULNERABLE PEOPLE SAFETY
• This appliance can be used by children aged 8 years and
above and by persons with reduced capabilities provided that
they have been given instruction and/or supervision regarding
the safe use of the appliance and understand the potential
hazards involved.
• Do not let children play with the appliance.
• Keep all packaging away from children and dispose of it
appropriately.
• Keep children and pets away from the appliance when it
operates or when it cools down. Accessible parts are hot.
• If the appliance has a child safety device, this should be
activated.
• Children shall not carry out cleaning and user maintenance of
the appliance without supervision.
• Children under 3 years of age should be kept away from the
appliance unless continuously supervised.
GENERAL SAFETY
• Only a qualified person must install this appliance and replace
the cable.
• Internally the appliance becomes hot when in operation. Do not
touch the heating elements that are in the appliance. Always
use oven gloves to remove or put in accessories or ovenware.
• Before maintenance cut the power supply.
• Ensure that the appliance is switched off before replacing the
lamp to avoid the possibility of electric shock.
• Do not use a steam cleaner to clean the appliance.
2
Page 3
• Do not use harsh abrasive cleaners or sharp metal scrapers to
clean the glass door since they can scratch the surface, which
may result in shattering of the glass.
• If the mains power supply cable is damaged, it must be
replaced by the manufacturer, its Authorised Service Centre or
similarly qualified persons to avoid an electrical hazard.
SAFETY INSTRUCTIONS
INSTALLATION
WARNING! Only a qualified person
must install this appliance.
• Remove all the packaging and the transit bolts.
• Do not install or use a damaged appliance.
• Follow the installation instruction supplied with
the appliance.
• Always take care when moving the appliance as
it is heavy. Always use safety gloves and
enclosed footwear.
• Do not pull the appliance by the handle.
• Keep the minimum distance from the other
appliances and units.
• Make sure that the appliance is installed below
and adjacent safe structures.
• The sides of the appliance must stay adjacent to
appliances or to units with the same height.
ELECTRICAL CONNECTION
WARNING! Risk of fire and electrical
shock.
• All electrical connections should be made by a
qualified electrician.
• The appliance must be earthed.
• Make sure that the electrical information on the
rating plate agrees with the power supply. If not,
contact an electrician.
• Always use a correctly installed shockproof
socket.
• Do not use multi-plug adapters and extension
cables.
• Make sure not to cause damage to the mains
plug and to the mains cable. Should the mains
cable need to be replaced, this must be carried
out by our Authorised Service Centre.
• Do not let mains cables touch or come near the
appliance door, especially when the door is hot.
• The shock protection of live and insulated parts
must be fastened in such a way that it cannot be
removed without tools.
• Connect the mains plug to the mains socket
only at the end of the installation. Make sure that
there is access to the mains plug after the
installation.
• If the mains socket is loose, do not connect the
mains plug.
• Do not pull the mains cable to disconnect the
appliance. Always pull the mains plug.
• Use only correct isolation devices: line
protecting cut-outs, fuses (screw type fuses
removed from the holder), earth leakage trips
and contactors.
• The electrical installation must have an isolation
device which lets you disconnect the appliance
from the mains at all poles. The isolation device
must have a contact opening width of minimum
3 mm.
• This appliance complies with the E.E.C.
Directives.
USE
WARNING! Risk of injury, burns and
electrical shock or explosion.
• This appliance is for household use only.
• Do not change the specification of this
appliance.
• Make sure that the ventilation openings are not
blocked.
• Do not let the appliance stay unattended during
operation.
• Deactivate the appliance after each use.
• Be careful when you open the appliance door
while the appliance is in operation. Hot air can
release.
• Do not operate the appliance with wet hands or
when it has contact with water.
• Do not apply pressure on the open door.
• Do not use the appliance as a work surface or
as a storage surface.
• Open the appliance door carefully. The use of
ingredients with alcohol can cause a mixture of
alcohol and air.
3
Page 4

• Do not let sparks or open flames to come in
contact with the appliance when you open the
door.
• Do not put flammable products or items that are
wet with flammable products in, near or on the
appliance.
• Do not use microwave function to preheat the
oven.
WARNING! Risk of damage to the
appliance.
• To prevent damage or discoloration to the
enamel:
– do not put aluminium foil directly on the
bottom of the appliance.
– do not put water directly into the hot
appliance.
– do not keep moist dishes and food in the
appliance after you finish the cooking.
– be careful when you remove or install the
accessories.
• Discoloration of the enamel has no effect on the
performance of the appliance. It is not a defect
in the sense of the warranty law.
• Use a deep pan for moist cakes. Fruit juices
cause stains that can be permanent.
• This appliance is for cooking purposes only. It
must not be used for other purposes, for
example room heating.
• Always cook with the oven door closed.
• If the appliance is installed behind a furniture
panel (e.g. a door) make sure the door is never
closed when the appliance is in operation. Heat
and moisture can build up behind a closed
furniture panel and cause subsequent damage
to the appliance, the housing unit or the floor.
Do not close the furniture panel until the
appliance has cooled down completely after
use.
CARE AND CLEANING
WARNING! Risk of injury, fire, or
damage to the appliance.
• Before maintenance, deactivate the appliance
and disconnect the mains plug from the mains
socket.
• Make sure the appliance is cold. There is the
risk that the glass panels can break.
• Replace immediately the door glass panels
when they are damaged. Contact the
Authorised Service Centre.
• Be careful when you remove the door from the
appliance. The door is heavy!
• Clean regularly the appliance to prevent the
deterioration of the surface material.
• Clean the appliance with a moist soft cloth. Only
use neutral detergents. Do not use abrasive
products, abrasive cleaning pads, solvents or
metal objects.
• If you use an oven spray, obey the safety
instructions on the packaging.
• Do not clean the catalytic enamel (if applicable)
with any kind of detergent.
INTERNAL LIGHT
• The type of light bulb or halogen lamp used for
this appliance is only for household appliances.
Do not use it for house lighting.
WARNING! Risk of electrical shock.
• Before replacing the lamp, disconnect the
appliance from the power supply.
• Only use lamps with the same specifications.
DISPOSAL
WARNING! Risk of injury or
suffocation.
• Disconnect the appliance from the mains
electrical and water supplies.
• Cut off the mains electrical cable close to the
appliance and dispose of it.
• Remove the door catch to prevent children or
pets from becoming trapped in the drum.
SERVICE
• To repair the appliance contact an Authorised
Service Centre.
• Use original spare parts only.
4
Page 5
PRODUCT DESCRIPTION
9
8
12
5
4
1
2
3
4 7631 52
10
11
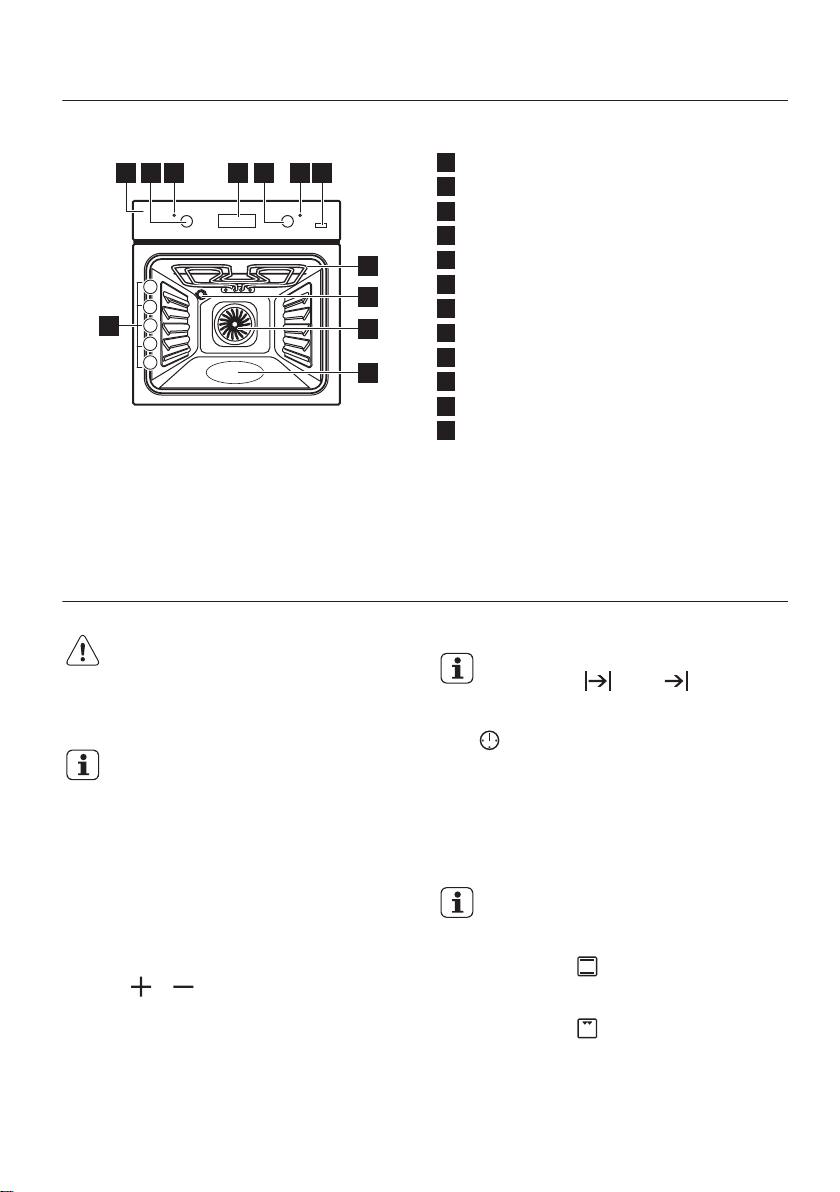
GENERAL OVERVIEW
Control panel
1
Knob for the oven functions
2
Power lamp / symbol / indicator
3
Electronic programmer
4
Knob for the temperature
5
Temperature lamp / symbol / indicator
6
Plus Steam button
7
Heating element
8
Lamp
9
Fan
10
Cavity embossment
11
Shelf positions
12
ACCESSORIES
• Wire shelf
For cookware, cake tins, roasts.
• Combi pan
BEFORE FIRST USE
WARNING! Refer to Safety chapters.
INITIAL CLEANING
Remove all accessories from the appliance.
Refer to "Care and cleaning" chapter.
Clean the appliance before first use.
Put the accessories back to their initial position.
SETTING THE TIME
You must set the time before you operate the oven.
The indicator for the Time of day function flashes
when you connect the appliance to the electrical
supply, when there was a power cut or when the
timer is not set.
Press the
After approximately five seconds, the flashing stops
and the display shows the time of day you set.
or button to set the correct time.
For cakes and biscuits. To bake and roast or as
a pan to collect fat.
CHANGING THE TIME
You cannot change the time of day if
the Duration or End function
operates.
Press again and again until the indicator for the
Time of Day function flashes.
To set a new time, refer to "Setting the time".
PREHEATING
Preheat the empty appliance to burn off the
remaining grease.
For True Fan Cooking PLUS function
refer to "Activating the True Fan
Cooking PLUS function".
1. Set the function and the maximum
temperature.
2. Let the appliance operate for 1 hour.
3. Set the function and set the maximum
temperature.
4. Let the appliance operate for 15 minutes.
5
Page 6

5. Set the function , press and set the
maximum temperature.
6. Let the appliance operate for 15 minutes.
Accessories can become hotter than usual. The
appliance can emit an odour and smoke. This is
DAILY USE
WARNING! Refer to Safety chapters.
ACTIVATING AND DEACTIVATING THE APPLIANCE
It depends on the model if your
appliance has lamps, knob
symbols or indicators:
• The lamp comes on when the
appliance operates.
• The symbol shows whether the
knob controls the oven functions or
the temperature.
• The indicator comes on when the
oven heats up.
OVEN FUNCTIONS
Oven function Application
normal. Make sure that the airflow in the room is
sufficient.
1. Turn the knob for the oven functions to select
an oven function.
2. Turn the knob for the temperature to select a
temperature.
3. To deactivate the appliance turn the knobs for
the oven functions and temperature to the off
position.
Off position The appliance is off.
Light To activate the lamp without a cooking function.
Top / Bottom
Heat
Top Heat To brown bread, cakes and pastries. To finish cooked dishes.
Bottom Heat To bake cakes with crispy bottom and to preserve food.
Grilling To grill flat food and to toast bread.
Fast Grilling To grill flat food in large quantities and to toast bread.
6
To bake and roast food on 1 shelf position.
Page 7
A B C
Oven function Application
Turbo Grilling To roast larger meat joints or poultry with bones on 1 shelf
True Fan Cooking To bake on up to 3 shelf positions at the same time and to dry
ACTIVATING THE TRUE FAN COOKING PLUS FUNCTION
This function allows to have an improvement of
humidity during the cooking.
WARNING! Risk of burns and
damage to the appliance.
Released humidity can cause burns:
• Do not open the appliance door during the True
Fan Cooking PLUS operation.
• Open the appliance door with care after the
True Fan Cooking PLUS operation.
Refer to “Hints and tips” chapter.
1. Open the oven door.
2. Fill the cavity embossment with tap water.
The maximum capacity of the cavity
embossment is 250 ml.
Fill the cavity embossment with water only
when the oven is cold.
3. Put food in the appliance and close the oven
door.
True Fan Cooking
PLUS
Pizza Setting To bake food on 1 shelf position for a more intensive brown-
position. Also to make gratins and to brown.
food. Set the temperature 20 - 40 °C lower than for Top /
Bottom Heat.
To add humidity during the cooking. To get the right colour
and crispy crust during baking. To give more juiciness during
reheating.
ing and a crispy bottom. Set the temperature 20 - 40 °C lower than for Top / Bottom Heat.
4. Set the True Fan Cooking PLUS function:
.
5. Press the Plus Steam button .
The Plus Steam button works only with the
True Fan Cooking PLUS function.
The indicator comes in.
6. Turn the knob for the temperature to select a
temperature.
CAUTION! Do not refill the cavity
embossment with water during
cooking or when the oven is hot.
7. To deactivate the appliance, press the Plus
Steam button , turn the knobs for the oven
functions and temperature to the off position.
The indicator of the Plus Steam button goes out.
8. Remove water from the cavity embossment.
WARNING! Make sure that the
appliance is cool before you
remove the remaining water from
the cavity embossment.
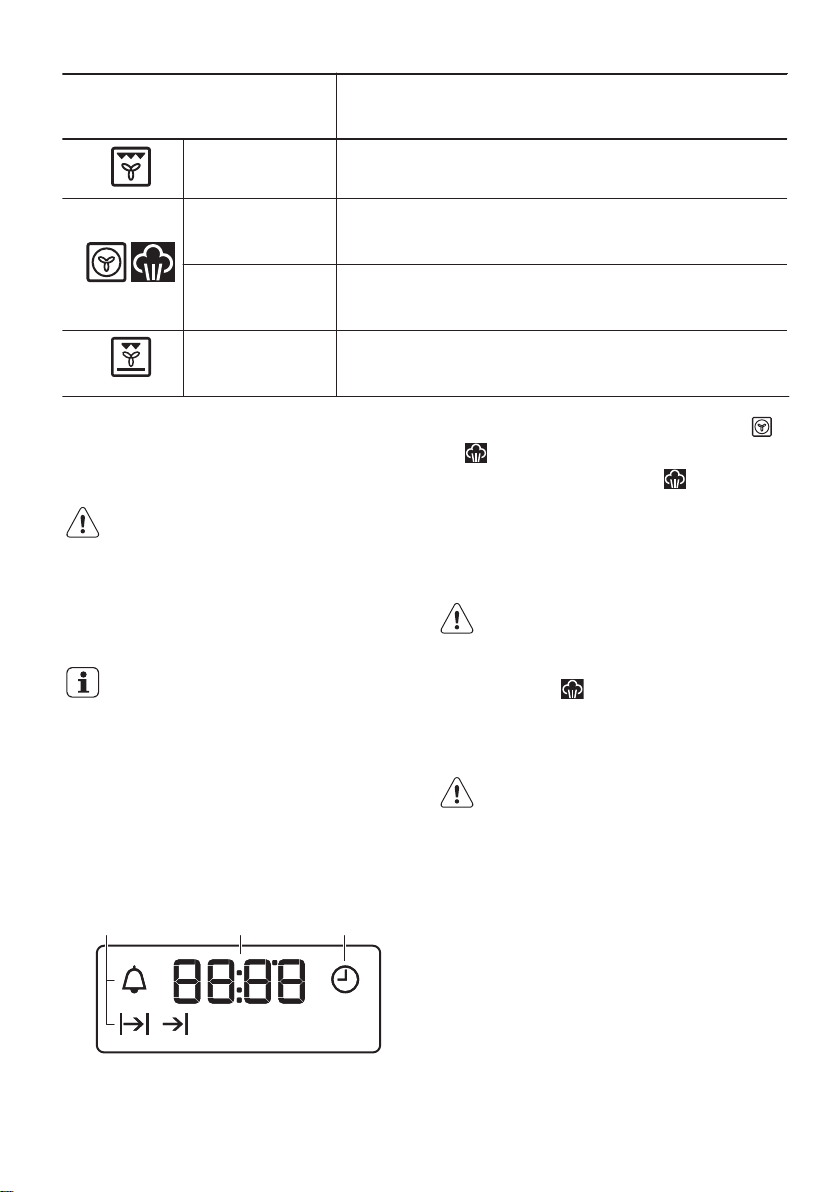
DISPLAY
A. Function indicators
B. Time display
C. Function indicator
7
Page 8
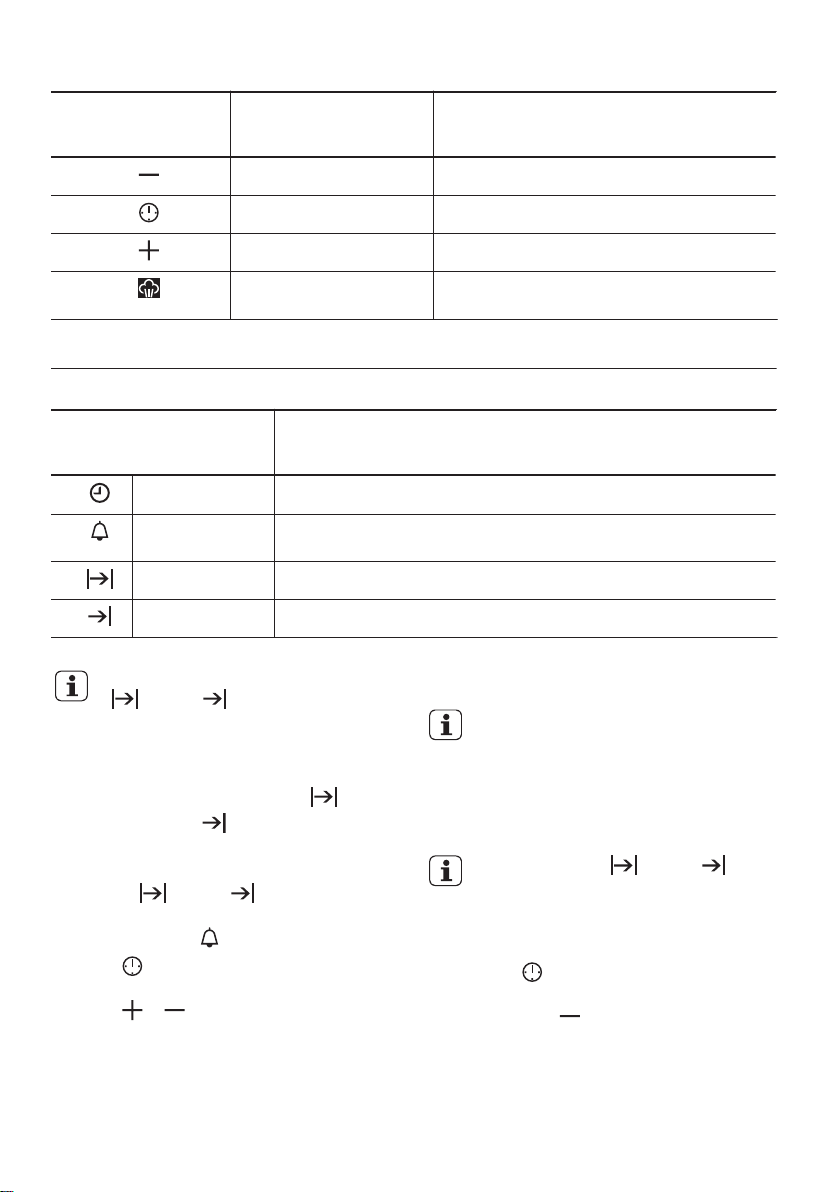
BUTTONS
Button Function Description
MINUS To set the time.
CLOCK To set a clock function.
PLUS To set the time.
Plus Steam To activate the True Fan Cooking PLUS func-
CLOCK FUNCTIONS
CLOCK FUNCTIONS TABLE
Clock function Application
Time of day To set, change or check the time of day.
Minute Minder To set countdown time. This function has no effect on the operation
Duration To set the cooking time of the oven.
End To set the time of day when the oven should deactivate.
You can use the functions Duration
and End at the same time to
set the time for how long the appliance
should operate and when the
appliance should deactivate. This lets
you activate the appliance with a delay
in time. First set the Duration and
then the End .
of the appliance.
The clock function operates. The display shows the
indicator for the clock function you set.
3. When the time ends the indicator of the clock
4. Turn the knob for the oven functions and the
tion.
For the Minute Minder function the
display shows the time left.
function flashes and an acoustic signal sounds.
Press a button to stop the signal.
knob for the temperature to the off position.
SETTING THE CLOCK FUNCTIONS
For Duration and End , set an oven function
and temperature of cooking. This is not necessary
for the Minute Minder
1. Press again and again until the indicator for
the necessary clock function starts to flash.
2. Press or to set the time for the
necessary clock function.
8
.
With the Duration and End
functions, the appliance deactivates
automatically.
CANCELLING THE CLOCK FUNCTIONS
1. Press the again and again until the
necessary function indicator flashes.
2. Press and hold .
The clock function goes out after some seconds.
Page 9
USING THE ACCESSORIES
WARNING! Refer to Safety chapters.
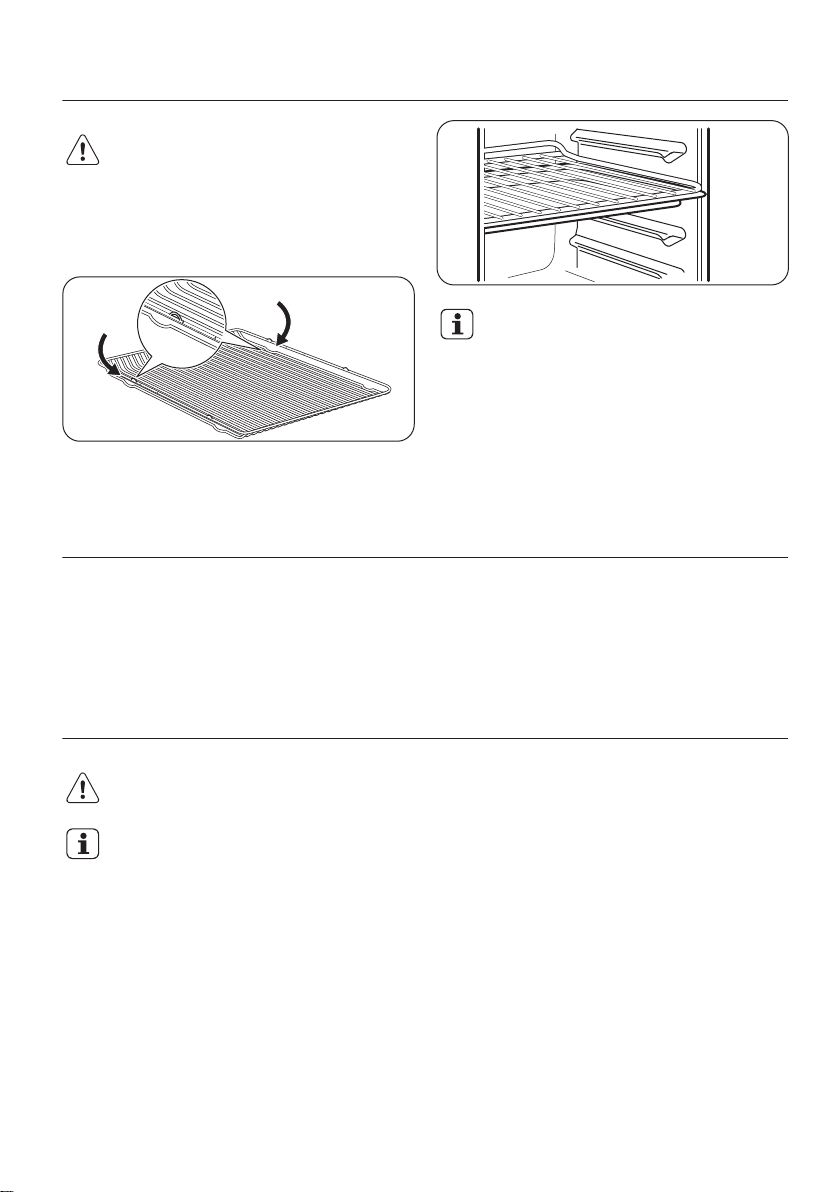
INSERTING THE ACCESSORIES
Wire shelf:
Push the shelf between the guide bars of the shelf
support and make sure that the feet point down.
Deep pan:
Push the deep pan between the guide bars of the
shelf support.
ADDITIONAL FUNCTIONS
• All accessories have small
indentations at the top of the right
and left side to increase safety. The
indentations are also anti-tip
devices.
• The high rim around the shelf is a
device which prevents cookware
from slipping.
COOLING FAN
When the appliance operates, the cooling fan
activates automatically to keep the surfaces of the
appliance cool. If you deactivate the appliance, the
cooling fan can continue to operate until the
appliance cools down.
HINTS AND TIPS
WARNING! Refer to Safety chapters.
The temperature and baking times in
the tables are guidelines only. They
depend on the recipes and the quality
and quantity of the ingredients used.
GENERAL INFORMATION
• The appliance has five shelf positions. Count
the shelf positions from the bottom of the
appliance floor.
• The appliance has a special system which
circulates the air and constantly recycles the
steam. With this system you can cook in a
steamy environment and keep the food soft
inside and crusty outside. It decreases the
SAFETY THERMOSTAT
Incorrect operation of the appliance or defective
components can cause dangerous overheating. To
prevent this, the oven has a safety thermostat which
interrupts the power supply. The oven activates
again automatically when the temperature drops.
cooking time and energy consumption to a
minimum.
• Moisture can condense in the appliance or on
the door glass panels. This is normal. Always
stand back from the appliance when you open
the appliance door while cooking. To decrease
the condensation, operate the appliance for 10
minutes before cooking.
• Clean the moisture after each use of the
appliance.
• Do not put the objects directly on the appliance
floor and do not put aluminium foil on the
components when you cook. This can change
the baking results and cause damage to the
enamel.
BAKING CAKES
• Do not open the oven door before 3/4 of the set
cooking time is up.
9
Page 10
• If you use two baking trays at the same time,
keep one empty level between them.
COOKING MEAT AND FISH
• Use a deep pan for very fatty food to prevent the
oven from stains that can be permanent.
• Leave the meat for approximately 15 minutes
before carving so that the juice does not seep
out.
• To prevent too much smoke in the oven during
roasting, add some water into the deep pan. To
Initially, monitor the performance when you cook.
Find the best settings (heat setting, cooking time,
etc.) for your cookware, recipes and quantities
when you use this appliance.
TRUE FAN COOKING PLUS
Before preheating fill the cavity
embossment with water only when the
oven is cold. Refer to "Activating the
True Fan Cooking PLUS function".
prevent the smoke condensation, add water
each time after it dries up.
COOKING TIMES
Cooking times depend on the type of food, its
consistency, and volume.
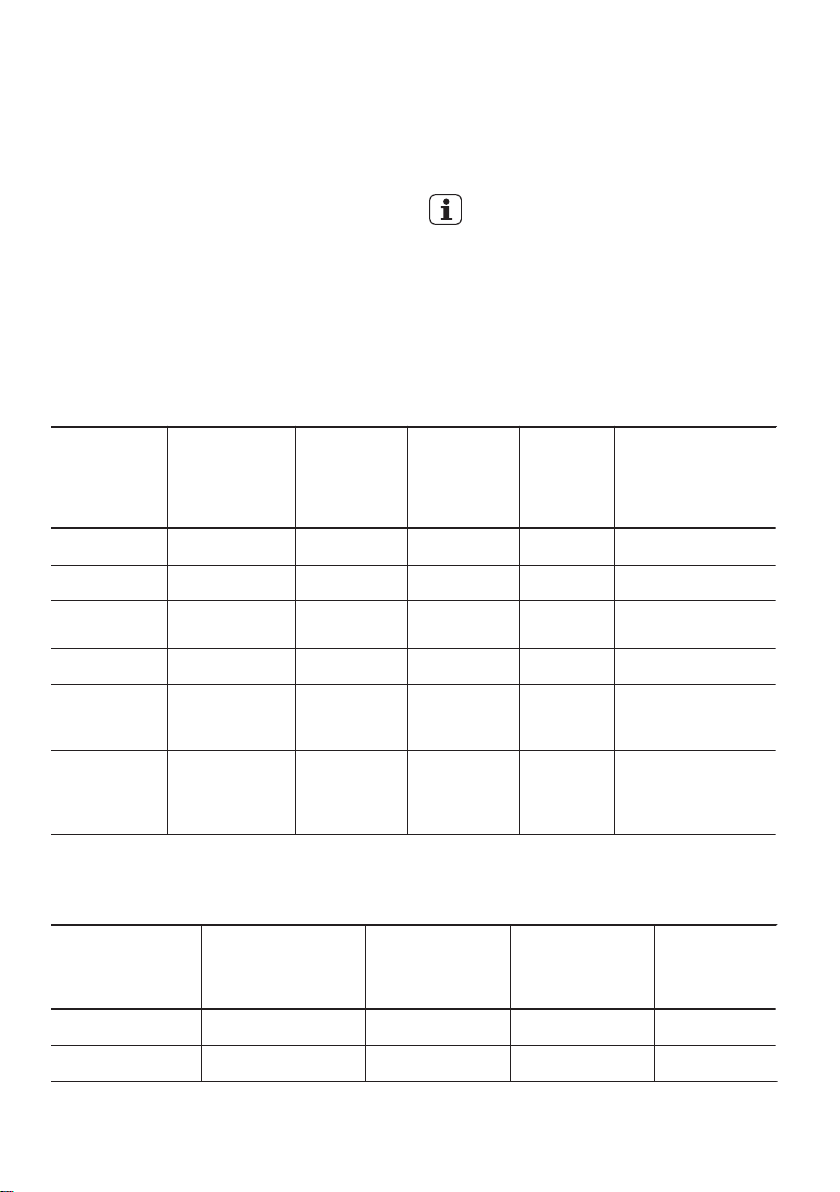
Bakery products
Food
Water in the
cavity emboss-
ment (ml)
Temperature
(°C)
Time (min)
Bread 100 180 35 - 40 2
Bread rolls 100 200 20 - 25 2
Homestyle
100 230 10 - 20 2
pizza
Focaccia 100 200 - 210 10 - 20 2
Cookies,
100 150 - 180 10 - 20 2
scones,
croissants
Plum cake,
100 - 150 160 - 180 30 - 60 2
apple pie,
cinnamon
rolls
1) Preheat in an empty oven for 5 minutes before cooking.
Shelf posi-
tion
Comments
Use baking tray.
Use baking tray.
Use baking tray.
Use baking tray.
Use baking tray.
Use cake mould.
1)
1)
1)
1)
1)
1)
Cook from frozen
Food
Water in the cavity
embossment (ml)
Temperature (°C) Time (min) Shelf position
Pizza frozen 150 200 - 210 10 - 20
Frozen lasagna 200 180 - 200 35 - 50
10
1)
2
1)
2
Page 11
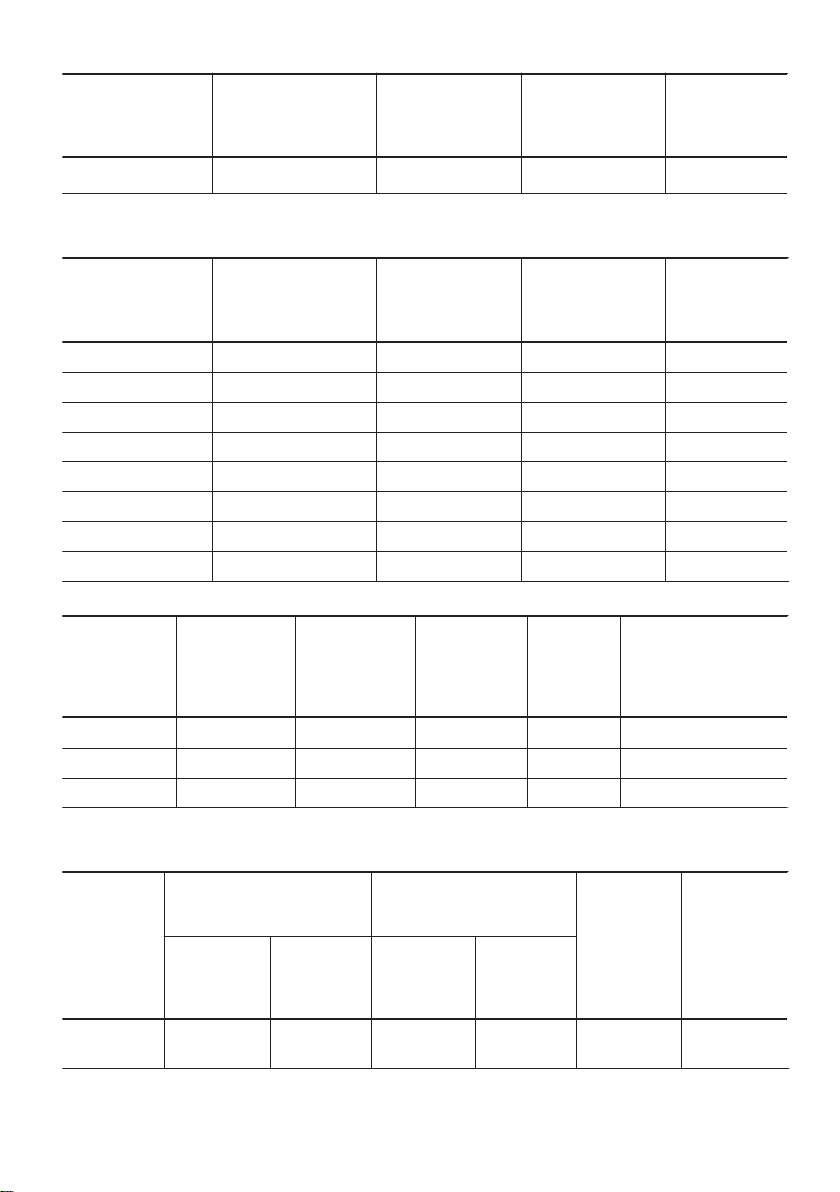
Food
Frozen croissant 150 170 - 180 15 - 25
1) Preheat in an empty oven for 10 minutes before cooking.
Food regeneration
Food
Bread 100 110 15 - 25 2
Bread rolls 100 110 10 - 20 2
Homestyle pizza 100 110 15 - 25 2
Focaccia 100 110 15 - 25 2
Vegetables 100 110 15 - 25 2
Rice 100 110 15 - 25 2
Pasta 100 110 15 - 25 2
Meat 100 110 15 - 25 2
Roasting
Food
Water in the cavity
embossment (ml)
Water in the cavity
embossment (ml)
Water in the
cavity emboss-
ment (ml)
Temperature (°C) Time (min) Shelf position
Temperature (°C) Time (min) Shelf position
Temperature
(°C)
Time (min)
Shelf posi-
tion
1)
2
Comments
Roast pork 200 180 65 - 80 2 Pyrex round tray
Roast beef 200 200 50 - 60 2 Pyrex round tray
Chicken 200 210 60 - 80 2 Pyrex round tray
BAKING AND ROASTING TABLE
Cakes
Top / Bottom Heat True Fan Cooking
Food
Whisked
recipes
Temperature
(°C)
170 2 160 3 (2 and
Shelf posi-
tion
Temperature
(°C)
Shelf posi-
4)
tion
Time (min) Comments
45 - 60 In a cake
mould
11
Page 12

Top / Bottom Heat True Fan Cooking
Food
Shortbread
Temperature
(°C)
Shelf posi-
tion
Temperature
(°C)
Shelf posi-
170 2 160 3 (2 and
4)
tion
Time (min) Comments
20 - 30 In a cake
mould
dough
Buttermilk
cheesecake
Apple
cake (Ap-
ple pie)
170 1 165 2 60 - 80 In a 26 cm
170 2 160 2 (left and
80 - 100 In two 20
right)
1)
cake
mould
cm cake
moulds on
a wire shelf
Strudel 175 3 150 2 60 - 80 In a baking
tray
Jam-tart 170 2 165 2 (left and
right)
30 - 40 In a 26 cm
cake
mould
Sponge
cake
170 2 160 2 50 - 60 In a 26 cm
cake
mould
Christmas
cake /
Rich fruit
1)
cake
Plum
1)
cake
Small
cakes -
160 2 150 2 90 - 120 In a 20 cm
cake
mould
175 1 160 2 50 - 60 In a bread
tin
170 3 140 - 150 3 20 - 30 In a baking
tray
one level
Small
cakes -
- - 140 - 150 2 and 4 25 - 35 In a baking
tray
two levels
Small
cakes -
- - 140 - 150 1, 3 and 5 30 - 45 In a baking
tray
three levels
Biscuits /
pastry
140 3 140 - 150 3 30 - 35 In a baking
tray
stripes one level
12
Page 13

Top / Bottom Heat True Fan Cooking
Food
Biscuits /
pastry
Temperature
(°C)
Shelf posi-
tion
Temperature
(°C)
Shelf posi-
tion
- - 140 - 150 2 and 4 35 - 40 In a baking
Time (min) Comments
tray
stripes two levels
Biscuits /
pastry
- - 140 - 150 1, 3 and 5 35 - 45 In a baking
tray
stripes three levels
Meringues
- one level
Merin-
gues- two
1)
levels
1) 190 3 190 3 12 - 20 In a baking
Buns
Eclairs one level
Eclairs two levels
120 3 120 3 80 - 100 In a baking
tray
- - 120 2 and 4 80 - 100 In a baking
tray
tray
190 3 170 3 25 - 35 In a baking
tray
- - 170 2 and 4 35 - 45 In a baking
tray
Plate tarts 180 2 170 2 45 - 70 In a 20 cm
cake
mould
Rich fruit
cake
160 1 150 2 110 - 120 In a 24 cm
cake
mould
Victoria
sandwich
170 1 160 2 (left and
right)
50 - 60 In a 20 cm
cake
mould
1) Preheat the oven for 10 minutes.
13
Page 14

Bread and pizza
Top / Bottom Heat True Fan Cooking
Food
White
bread
1)
Temperature
(°C)
Shelf posi-
tion
Temperature
(°C)
Shelf posi-
tion
190 1 190 1 60 - 70 1 - 2
Time (min) Comments
pieces,
500 gr per
piece
Rye bread 190 1 180 1 30 - 45 In a bread
tin
Bread
1)
rolls
1) 230 - 250 1 230 - 250 1 10 - 20 In a baking
Pizza
190 2 180 2 (2 and
4)
25 - 40 6 - 8 rolls
in a baking
tray
tray or a
deep pan
1) 200 3 190 3 10 - 20 In a baking
Scones
tray
1) Preheat the oven for 10 minutes.
Flans
Top / Bottom Heat True Fan Cooking
Food
Temperature
(°C)
Shelf posi-
tion
Temperature
(°C)
Shelf posi-
tion
Time (min) Comments
Pasta flan 200 2 180 2 40 - 50 In a mould
Vegetable
200 2 175 2 45 - 60 In a mould
flan
1) 180 1 180 1 50 - 60 In a mould
Quiches
1) 180 - 190 2 180 - 190 2 25 - 40 In a mould
Lasagne
Cannello-
1)
ni
180 - 190 2 180 - 190 2 25 - 40 In a mould
1) Preheat the oven for 10 minutes.
14
Page 15

Meat
Top / Bottom Heat True Fan Cooking
Food
Temperature
(°C)
Beef 200 2 190 2 50 - 70 On a wire
Pork 180 2 180 2 90 - 120 On a wire
Veal 190 2 175 2 90 - 120 On a wire
English
roast beef,
rare
English
roast beef,
medium
English
roast beef,
well done
Shoulder
of pork
Shin of
pork
Lamb 190 2 175 2 110 - 130 Leg
Chicken 220 2 200 2 70 - 85 Whole
Turkey 180 2 160 2 210 - 240 Whole
Duck 175 2 220 2 120 - 150 Whole
Goose 175 2 160 1 150 - 200 Whole
Rabbit 190 2 175 2 60 - 80 Cut in
Hare 190 2 175 2 150 - 200 Cut in
Pheasant 190 2 175 2 90 - 120 Whole
210 2 200 2 50 - 60 On a wire
210 2 200 2 60 - 70 On a wire
210 2 200 2 70 - 75 On a wire
180 2 170 2 120 - 150 With rind
180 2 160 2 100 - 120 2 pieces
Shelf posi-
tion
Temperature
(°C)
Shelf posi-
tion
Time (min) Comments
shelf
shelf
shelf
shelf
shelf
shelf
pieces
pieces
15
Page 16
Fish
Top / Bottom Heat True Fan Cooking
Food
Temperature
(°C)
Trout /
Sea bream
Tuna fish /
Salmon
GRILLING
Preheat the empty oven for 3 minutes
before cooking.
Food
Fillet
steaks
Beef
steaks
Sausages 8 - max. 12 - 15 10 - 12 4
Pork
chops
Chicken
(cut in 2)
Kebabs 4 - max. 10 - 15 10 - 12 4
Breast of
chicken
Hambur-
ger
Fish fillet 4 400 max. 12 - 14 10 - 12 4
Toasted
sandwiches
Toast 4 - 6 - max. 2 - 4 2 - 3 4
190 2 175 2 40 - 55 3 - 4 fish
190 2 175 2 35 - 60 4 - 6 fillets
Pieces (g) 1st side 2nd side
4 800 max. 12 - 15 12 - 14 4
4 600 max. 10 - 12 6 - 8 4
4 600 max. 12 - 16 12 - 14 4
2 1000 max. 30 - 35 25 - 30 4
4 400 max. 12 - 15 12 - 14 4
6 600 max. 20 - 30 - 4
4 - 6 - max. 5 - 7 - 4
Shelf posi-
Quantity
tion
Temperature
(°C)
Temperature
(°C)
Shelf posi-
tion
Time (min) Comments
Time (min)
Shelf posi-
tion
16
Page 17

TURBO GRILLING
Beef
Food Quantity Temperature (°C) Time (min) Shelf position
Roast beef or fillet,
1)
rare
Roast beef or fillet,
1)
medium
Roast beef or fillet,
well done
1)
per cm of thickness
per cm of thickness
per cm of thickness
190 - 200 5 - 6 1 or 2
180 - 190 6 - 8 1 or 2
170 - 180 8 - 10 1 or 2
1) Preheat the oven.
Pork
Food Quantity (kg) Temperature (°C) Time (min) Shelf position
Shoulder, neck, ham
1 - 1.5 160 - 180 90 - 120 1 or 2
joint
Chop, spare rib 1 - 1.5 170 - 180 60 - 90 1 or 2
Meat loaf 0.75 - 1 160 - 170 50 - 60 1 or 2
Pork knuckle (pre-
0.75 - 1 150 - 170 90 - 120 1 or 2
cooked)
Veal
Food Quantity (kg) Temperature (°C) Time (min) Shelf position
Roast veal 1 160 - 180 90 - 120 1 or 2
Knuckle of veal 1.5 - 2 160 - 180 120 - 150 1 or 2
Lamb
Food Quantity (kg) Temperature (°C) Time (min) Shelf position
Leg of lamb,
1 - 1.5 150 - 170 100 - 120 1 or 2
roast lamb
Saddle of lamb 1 - 1.5 160 - 180 40 - 60 1 or 2
17
Page 18

Poultry
Food Quantity (kg) Temperature (°C) Time (min) Shelf position
Poultry portions 0.2 - 0.25 each 200 - 220 30 - 50 1 or 2
Chicken, half 0.4 - 0.5 each 190 - 210 35 - 50 1 or 2
Chicken, poulard 1 - 1.5 190 - 210 50 - 70 1 or 2
Duck 1.5 - 2 180 - 200 80 - 100 1 or 2
Goose 3.5 - 5 160 - 180 120 - 180 1 or 2
Turkey 2.5 - 3.5 160 - 180 120 - 150 1 or 2
Turkey 4 - 6 140 - 160 150 - 240 1 or 2
Fish (steamed)
Food Quantity (kg) Temperature (°C) Time (min) Shelf position
Whole fish 1 - 1.5 210 - 220 40 - 60 1 or 2
DRYING - TRUE FAN COOKING
• Cover trays with grease proof paper or baking
parchment.
Vegetables
Food Temperature (°C) Time (h)
Beans 60 - 70 6 - 8 3 1 / 4
Peppers 60 - 70 5 - 6 3 1 / 4
Vegetables for
sour
Mushrooms 50 - 60 6 - 8 3 1 / 4
Herbs 40 - 50 2 - 3 3 1 / 4
60 - 70 5 - 6 3 1 / 4
• For a better result, stop the oven halfway
through the drying time, open the door and let it
cool down for one night to complete the drying.
Shelf position
1 position 2 positions
18
Page 19

Fruit
Shelf position
Food Temperature (°C) Time (h)
1 position 2 positions
Plums 60 - 70 8 - 10 3 1 / 4
Apricots 60 - 70 8 - 10 3 1 / 4
Apple slices 60 - 70 6 - 8 3 1 / 4
Pears 60 - 70 6 - 9 3 1 / 4
CARE AND CLEANING
WARNING! Refer to Safety chapters.
NOTES ON CLEANING
• Clean the front of the appliance with a soft cloth
with warm water and a cleaning agent.
• To clean metal surfaces, use a dedicated
cleaning agent.
• Clean the appliance interior after each use. Fat
accumulation or other food remains may result
in a fire. The risk is higher for the grill pan.
• Clean stubborn dirt with a special oven cleaner.
• Clean all accessories after each use and let
them dry. Use a soft cloth with warm water and
a cleaning agent.
• If you have nonstick accessories, do not clean
them using aggressive agents, sharp-edged
objects or a dishwasher. It can cause damage
to the nonstick coating.
STAINLESS STEEL OR ALUMINIUM APPLIANCES
Clean the oven door with a damp cloth
or sponge only. Dry it with a soft cloth.
Do not use steel wool, acids or
abrasive materials as they can damage
the oven surface. Clean the oven
control panel with the same
precautions.
CLEANING THE CAVITY EMBOSSMENT
The cleaning procedure removes limestone residual
from the cavity embossment after the humidity
cooking process.
We recommend to do the cleaning
procedure at least every 5 - 10 True
Fan Cooking PLUS cycles.
1. Put 250 ml of white vinegar into the cavity
embossment at the bottom of the oven.
Use maximum 6% vinegar without herbs.
2. Let the vinegar dissolve the residual limestone
at the ambient temperature for 30 minutes.
3. Clean the cavity with warm water and a soft
cloth.
CLEANING THE DOOR GASKET
• Regularly do a check of the door gasket. The
door gasket is around the frame of the oven
cavity. Do not use the appliance if the door
gasket is damaged. Contact an Authorised
Service Centre.
• To clean the door gasket, refer to the general
information about cleaning.
AQUA CLEANING
The Aqua cleaning procedure uses humidity to help
remove remaining fat and food particles from the
oven.
1. Put 200 ml of water into the cavity
embossment at the bottom of the oven.
2. Set the True Fan Cooking PLUS function
and press the Plus Steam button .
3. Set the temperature to 90 °C.
4. Let the appliance operate for 30 minutes.
5. Deactivate the appliance and let it cool down.
6. When the appliance is cool, clean the inner
surfaces of the oven with a cloth.
19
Page 20

90°
2
1
WARNING! Make sure that the
appliance is cool before you touch
it. There is a risk of burns.
CLEANING THE OVEN DOOR
The oven door has two glass panels. You can
remove the oven door and the internal glass panel
to clean it.
1 2 3 4
5
Open the door fully and hold the two door hinges.1
Lift and turn the levers on the two hinges.2
Close the oven door halfway to the first opening position. Then pull forward and remove the door from
3
its seat.
Put the door on a soft cloth on a stable surface.4
Release the locking system to remove the internal glass panel.5
Turn the two fasteners by 90° and remove them from their seats.6
First lift carefully and then remove the glass panel.7
6
The oven door can close if you try to
remove the internal glass panel before
you remove the oven door.
CAUTION! Do not use the appliance
without the internal glass panel.
7
Clean the glass panel with water and soap. Dry the
glass panel carefully.
When the cleaning is completed, install the glass
panel and the oven door. Do the above steps in the
opposite sequence.
The screen-printing zone must face the inner side
of the door. Make sure that after the installation the
surface of the glass panel frame on the screenprinting zones is not rough when you touch it.
Make sure that you install the internal glass panel in
the seats correctly.
20
Page 21

REPLACING THE LAMP
Put a cloth on the bottom of the interior of the
appliance. It prevents damage to the lamp glass
cover and the cavity.
WARNING! Danger of electrocution!
Disconnect the fuse before you
replace the lamp.
The lamp and the lamp glass cover
can be hot.
CAUTION! Always hold the halogen
lamp with a cloth to prevent grease
residue from burning on the lamp.
1. Deactivate the appliance.
2. Remove the fuses from the fuse box or
deactivate the circuit breaker.
The back lamp
1. Turn the lamp glass cover counterclockwise to
remove it.
2. Clean the glass cover.
3. Replace the lamp with a suitable 300 °C heat-
resistant lamp.
4. Install the glass cover.
TROUBLESHOOTING
WARNING! Refer to Safety chapters.
WHAT TO DO IF...
Problem Possible cause Remedy
The oven does not heat up. The oven is deactivated. Activate the oven.
The oven does not heat up. The clock is not set. Set the clock.
The oven does not heat up. The necessary settings are not
The oven does not heat up. The fuse is blown. Make sure that the fuse is the
The lamp does not operate. The lamp is defective. Replace the lamp.
Steam and condensation settle
on the food and in the cavity of
the oven.
The display shows "12.00". There was a power cut. Reset the clock.
There is no good cooking per-
formance using the True Fan
Cooking PLUS function.
There is no good cooking performance using the True Fan
Cooking PLUS function.
set.
You left the dish in the oven for
too long.
You did not activate the True
Fan Cooking PLUS function.
You did not fill the cavity embossment with water.
Make sure that the settings are
correct.
cause of the malfunction. If the
fuse is blown again and again,
contact a qualified electrician.
Do not leave the dishes in the
oven for longer than 15 - 20
minutes after the cooking
process ends.
Refer to "Activating the True
Fan Cooking PLUS function".
Refer to "Activating the True
Fan Cooking PLUS function".
21
Page 22

Problem Possible cause Remedy
There is no good cooking performance using the True Fan
Cooking PLUS function.
You want to activate the True
Fan Cooking function, but the
indicator of the Plus Steam
button is on.
The water in the cavity embossment does not boil.
The water comes out of the
cavity embossment.
SERVICE DATA
If you cannot find a solution to the problem yourself,
contact your dealer or an Authorised Service
Centre.
The necessary data for the service centre is on the
rating plate. The rating plate is on the front frame of
We recommend that you write the data here:
You did not activate correctly
the True Fan Cooking PLUS
function with the Plus Steam
button.
The True Fan Cooking PLUS
function operates.
The temperature is too low. Set the temperature at least to
There is too much water in the
cavity embossment.
Refer to "Activating the True
Fan Cooking PLUS function".
Push the Plus Steam button
to stop the True Fan Cook-
ing PLUS function.
110 °C.
Refer to “Hints and tips” chapter.
Deactivate the oven and make
sure that the appliance is cold.
Wipe the water with a cloth or
sponge. Add the correct
amount of water to the cavity
embossment. Refer to the specific procedure.
the appliance cavity. Do not remove the rating plate
from the appliance cavity.
Model (MOD.) .........................................
Product number (PNC) .........................................
Serial number (S.N.) .........................................
INSTALLATION
WARNING! Refer to Safety chapters.
22
Page 23

594
16
573
21548
min. 550
20
600
558
589
114
594
min. 560
3
5
558
21548
min. 550
20
589
594
114
16
573
590
min. 560
594
3
5
A
B
BUILDING IN
SECURING THE APPLIANCE TO THE CABINET
ELECTRICAL INSTALLATION
The manufacturer is not responsible if
you do not follow the safety
precautions from the Safety chapters.
This appliance is supplied only with a main cable.
CABLE
Cable types applicable for installation or
replacement:
H07 RN-F, H05 RN-F, H05 RRF, H05 VV-F, H05
V2V2-F (T90), H05 BB-F
For the section of the cable refer to the total power
on the rating plate. You can also refer to the table:
Total power (W)
maximum 1380 3 x 0.75
maximum 2300 3 x 1
maximum 3680 3 x 1.5
The earth cord (green / yellow cable) must be 2 cm
longer than phase and neutral cables (blue and
brown cables).
Section of the cable
(mm²)
23
Page 24

ENERGY EFFICIENCY
PRODUCT FICHE AND INFORMATION ACCORDING TO EU 65-66/2014
Supplier's name Zanussi
Model identification ZOB65301XK
Energy Efficiency Index 101.2
Energy efficiency class A
Energy consumption with a standard load, conventional
mode
Energy consumption with a standard load, fan-forced mode 0.85 kWh/cycle
Number of cavities 1
Heat source Electricity
Volume 68 l
Type of oven Built-In Oven
Mass 28.6 kg
0.89 kWh/cycle
EN 60350-1 - Household electric cooking
appliances - Part 1: Ranges, ovens, steam ovens
and grills - Methods for measuring performance.
ENERGY SAVING
The appliance contains features which help you
save energy during everyday cooking.
• General hints
– Make sure that the oven door is closed
properly when the appliance operates and
keep it closed as much as possible during
the cooking.
– Use metal dishes to improve the energy
saving.
– When possible, put the food inside the
oven without heating it up.
ENVIRONMENTAL CONCERNS
Recycle the materials with the symbol . Put the
packaging in applicable containers to recycle it.
Help protect the environment and human health
and to recycle waste of electrical and electronic
appliances. Do not dispose appliances marked with
24
– When the cooking duration is longer than
30 minutes, reduce the oven temperature to
minimum, 3 - 10 minutes before the end of
the cooking time, depending on the
duration of the cooking. The residual heat
inside the oven will continue to cook.
– Use the residual heat to warm up other
foods.
• Cooking with fan - when possible, use the
cooking functions with fan to save energy.
• Keep food warm - if you want to use the
residual heat to keep the meal warm, choose the
lowest possible temperature setting.
the symbol with the household waste. Return the
product to your local recycling facility or contact
your municipal office.
Page 25

CONSIGNES DE SÉCURITÉ
Avant d'installer et d'utiliser cet appareil, lisez soigneusement les
instructions fournies. Le fabricant ne pourra être tenu pour
responsable des blessures et dégâts résultant d'une mauvaise
installation ou utilisation. Conservez toujours les instructions dans
un lieu sûr et accessible pour vous y référer ultérieurement.
SÉCURITÉ DES ENFANTS ET DES PERSONNES VULNÉRABLES
• Cet appareil peut être utilisé par des enfants de plus de 8 ans
et par des personnes dont les capacités sont réduites, à
condition qu'ils soient surveillés ou qu'ils aient reçu des
instructions concernant l'utilisation sécurisée de l'appareil et
qu'ils comprennent les risques encourus.
• Ne laissez pas les enfants jouer avec l'appareil.
• Ne laissez pas les emballages à la portée des enfants et jetez-
les convenablement.
• Tenez les enfants et les animaux éloignés de l'appareil lorsqu'il
est en cours de fonctionnement ou lorsqu'il refroidit. Les parties
accessibles sont chaudes.
• Si l'appareil est équipé d'un dispositif de sécurité enfants, nous
vous recommandons de l'activer.
• Les enfants ne doivent pas nettoyer ni entreprendre une
opération de maintenance sur l'appareil sans surveillance.
• Les enfants de moins de 3 ans doivent être tenus à l'écart de
l'appareil, à moins d'être surveillés en permanence.
SÉCURITÉ GÉNÉRALE
• L'appareil doit être installé et le câble remplacé uniquement par
un professionnel qualifié.
• L'intérieur de l'appareil devient chaud lorsqu'il est en
fonctionnement. Ne touchez pas les éléments chauffants se
trouvant dans l'appareil. Utilisez toujours des gants de cuisine
pour retirer ou enfourner des accessoires ou des plats allant au
four.
25
Page 26

• Avant toute opération de maintenance, déconnectez
l'alimentation électrique.
• Assurez-vous que l'appareil est éteint et débranché avant de
remplacer l'éclairage afin d'éviter tout risque de choc électrique.
• N'utilisez pas de nettoyeur vapeur pour nettoyer l'appareil.
• N'utilisez pas de produits abrasifs ni de racloirs pointus en
métal pour nettoyer la porte en verre car ils peuvent rayer sa
surface, ce qui peut briser le verre.
• Si le câble d'alimentation est endommagé, il doit être remplacé
par le fabricant, un service de maintenance agréé ou un
technicien qualifié afin d'éviter tout danger lié à l'électricité.
INSTRUCTIONS DE SÉCURITÉ
INSTRUCTIONS D’INSTALLATION
AVERTISSEMENT! L'appareil doit
être installé uniquement par un
professionnel qualifié.
• Retirez l'intégralité de l'emballage et les boulons
de transport.
• N'installez pas et ne branchez pas un appareil
endommagé.
• Suivez scrupuleusement les instructions
d'installation fournies avec l'appareil.
• Soyez toujours vigilants lorsque vous déplacez
l'appareil car il est lourd. Utilisez toujours des
gants de sécurité et des chaussures fermées.
• Ne tirez jamais l'appareil par la poignée.
• Respectez l'espacement minimal requis par
rapport aux autres appareils et éléments.
• Vérifiez que l'appareil est installé sous et à
proximité de structures sûres.
• Les côtés de l'appareil doivent rester à côté
d'appareils ou d'éléments ayant la même
hauteur.
BRANCHEMENT ÉLECTRIQUE
AVERTISSEMENT! Risque
d'incendie ou d'électrocution.
• L'ensemble des branchements électriques doit
être effectué par un technicien qualifié.
• L'appareil doit être relié à la terre.
• Vérifiez que les données électriques figurant sur
la plaque signalétique correspondent à celles
de votre réseau. Si ce n'est pas le cas,
contactez un électricien.
• Utilisez toujours une prise de courant de
sécurité correctement installée.
• N'utilisez pas d'adaptateurs multiprises ni de
rallonges.
• Veillez à ne pas endommager la fiche secteur ni
le câble d'alimentation. Le remplacement du
cordon d'alimentation de l'appareil doit être
effectué par notre service après-vente agréé.
• Ne laissez pas les câbles d'alimentation entrer
en contact avec la porte de l'appareil,
particulièrement lorsque la porte est chaude.
• La protection contre les chocs des parties sous
tension et isolées doit être fixée de telle manière
qu'elle ne peut pas être enlevée sans outils.
• Ne branchez la fiche d'alimentation à la prise de
courant qu'à la fin de l'installation. Assurez-vous
que la prise de courant est accessible une fois
l'appareil installé.
• Si la prise de courant est lâche, ne branchez
pas la fiche d'alimentation secteur.
• Ne tirez jamais sur le câble d'alimentation pour
débrancher l'appareil. Tirez toujours sur la fiche.
• N'utilisez que des systèmes d'isolation
appropriés : des coupe-circuits, des fusibles
(les fusibles à visser doivent être retirés du
support), un disjoncteur différentiel et des
contacteurs.
• L'installation électrique doit être équipée d'un
dispositif d'isolement à coupure omnipolaire. Le
dispositif d'isolement doit présenter une
distance d'ouverture des contacts d'au moins
3 mm.
• Cet appareil est conforme aux directives CEE.
26
Page 27

UTILISATION
AVERTISSEMENT! Risque de
blessures, de brûlures, d'électrocution
ou d'explosion.
• Cet appareil est exclusivement destiné à une
utilisation domestique.
• Ne modifiez pas les caractéristiques de cet
appareil.
• Assurez-vous que les orifices de ventilation ne
sont pas bouchés.
• Ne laissez jamais l'appareil sans surveillance
pendant son fonctionnement.
• Éteignez l'appareil après chaque utilisation.
• Soyez prudent lors de l'ouverture de la porte de
l'appareil lorsque celui-ci est en fonctionnement.
De l'air brûlant peut s'en échapper.
• N'utilisez jamais cet appareil avec les mains
mouillées ou lorsqu'il est en contact avec de
l'eau.
• N'exercez jamais de pression sur la porte
ouverte.
• N'utilisez jamais l'appareil comme plan de travail
ou comme plan de stockage.
• Ouvrez prudemment la porte de l'appareil. Si
vous utilisez des ingrédients contenant de
l'alcool, un mélange d'alcool et d'air facilement
inflammable peut éventuellement se former.
• Ne laissez pas des étincelles ou des flammes
nues entrer en contact avec l'appareil lorsque
vous ouvrez la porte.
• Ne placez pas de produits inflammables ou
d'éléments imbibés de produits inflammables à
l'intérieur ou à proximité de l'appareil, ni sur
celui-ci.
• N'utilisez pas la fonction micro-ondes pour
préchauffer le four.
AVERTISSEMENT! Risque
d'endommagement de l'appareil.
• Pour éviter tout endommagement ou
décoloration de l'émail :
– ne placez jamais de feuilles d'aluminium
directement sur le fond de l'appareil.
– ne versez jamais d'eau directement dans
l'appareil lorsqu'il est chaud.
– une fois la cuisson terminée, ne laissez
jamais d'aliments ou de plats humides à
l'intérieur de l'appareil.
– faites attention lorsque vous retirez ou
remettez en place les accessoires.
• La décoloration de l'émail est sans effet sur les
performances de l'appareil. Il ne s'agit pas d'un
défaut dans le cadre de la garantie.
• Utilisez un plat à rôtir pour obtenir des gâteaux
moelleux. Les jus de fruits causent des taches
qui peuvent être permanentes.
• Cet appareil est exclusivement destiné à un
usage culinaire. Ne l'utilisez pas pour des
usages autres que celui pour lequel il a été
conçu, à des fins de chauffage par exemple.
• La porte du four doit toujours être fermée
pendant la cuisson.
• Si l'appareil est installé derrière la paroi d'un
meuble (par ex. une porte), veuillez à ce que la
porte ne soit jamais fermée lorsque l'appareil est
en marche. La chaleur et l'humidité peuvent
s'accumuler derrière la porte fermée du meuble
et provoquer d'importants dégâts sur l'appareil,
le meuble ou le sol. Ne fermez pas la paroi du
meuble tant que l'appareil n'a pas complètement
refroidi.
ENTRETIEN ET NETTOYAGE
AVERTISSEMENT! Risque de
blessure corporelle, d'incendie ou de
dommage matériel à l'appareil.
• Avant toute opération d'entretien, éteignez
l'appareil et débranchez la fiche de la prise
secteur.
• Vérifiez que l'appareil est froid. Les panneaux de
verre risquent de se briser.
• Remplacez immédiatement les vitres de la porte
si elles sont endommagées. Contactez le
service après-vente agréé.
• Soyez prudent lorsque vous démontez la porte
de l'appareil. La porte est lourde !
• Nettoyez régulièrement l'appareil afin de
maintenir le revêtement en bon état.
• Nettoyez l'appareil avec un chiffon doux humide.
Utilisez uniquement des produits de lavage
neutres. N'utilisez pas de produits abrasifs, de
tampons à récurer, de solvants ni d'objets
métalliques.
• Si vous utilisez un spray pour four, suivez les
consignes de sécurité figurant sur l'emballage.
• N'utilisez aucun produit détergent pour nettoyer
l'émail catalytique (le cas échéant).
ÉCLAIRAGE INTÉRIEUR
• Les ampoules classiques ou halogènes utilisées
dans cet appareil sont destinées uniquement à
un usage avec des appareils ménagers. Ne les
utilisez pas pour éclairer votre logement.
AVERTISSEMENT! Risque
d'électrocution.
• Avant de changer l'ampoule, débranchez
l'appareil de la prise secteur.
27
Page 28

9
8
12
5
4
1
2
3
4 7631 52
10
11
• N'utilisez que des ampoules ayant les mêmes
spécifications.
MISE AU REBUT
AVERTISSEMENT! Risque de
blessure ou d'asphyxie.
• Débranchez l'appareil de l'alimentation
électrique et de l'arrivée d'eau.
• Coupez le câble d'alimentation au ras de
l'appareil et mettez-le au rebut.
DESCRIPTION DE L'APPAREIL
VUE D'ENSEMBLE
• Retirez le dispositif de verrouillage du hublot
pour empêcher les enfants et les animaux de
s'enfermer dans le tambour.
MAINTENANCE
• Pour réparer l'appareil, contactez un service
après-vente agréé.
• Utilisez exclusivement des pièces d'origine.
Bandeau de commande
1
Manette de sélection des fonctions du four
2
Voyant/symbole/indicateur de puissance
3
Programmateur électronique
4
Manette du thermostat
5
Voyant/symbole/indicateur de température
6
Touche Vapeur Plus
7
Résistance
8
Éclairage
9
Ventilateur
10
Bac de la cavité
11
Position des grilles
12
ACCESSOIRES
• Grille métallique
Permet de poser des plats (rôtis, gratins) et des
moules à gâteau/pâtisserie.
• Plat multi-usages
AVANT LA PREMIÈRE UTILISATION
AVERTISSEMENT! Reportez-vous
aux chapitres concernant la sécurité.
PREMIER NETTOYAGE
Retirez tous les accessoires de l'appareil.
Nettoyez l'appareil avant de l'utiliser pour la
première fois.
Remettez les accessoires en place.
28
Reportez-vous au chapitre « Entretien
et nettoyage ».
Pour la cuisson de gâteaux et de biscuits/
gâteaux secs. Pour cuire et griller ou à utiliser
comme plat pour recueillir la graisse.
RÉGLAGE DE L'HEURE
Vous devez régler l'heure avant de mettre le four en
marche.
Le voyant de la fonction Heure du jour clignote
lorsque vous branchez l'appareil à l'alimentation
électrique, lorsqu'il y a eu une coupure de courant
ou que le minuteur n'est pas réglé.
Appuyez sur la touche ou pour régler
l'heure.
Au bout d'environ 5 secondes, le clignotement
s'arrête et l'heure réglée s'affiche.
Page 29

MODIFICATION DE L'HEURE
Vous ne pouvez pas changer l'heure
du jour si la fonction Durée ou Fin
est activée.
Appuyez sur à plusieurs reprises jusqu'à ce que
le voyant de l'heure du jour clignote.
Pour régler l'heure, reportez-vous au chapitre
« Réglage de l'heure ».
PRÉCHAUFFAGE
Préchauffez le four à vide afin de faire brûler les
résidus de graisse.
Pour la fonction Chaleur tournante
PLUS, reportez-vous au chapitre
« Activation de la fonction Chaleur
tournante PLUS ».
UTILISATION QUOTIDIENNE
AVERTISSEMENT! Reportez-vous
aux chapitres concernant la sécurité.
ACTIVATION ET DÉSACTIVATION DE L'APPAREIL
Selon le modèle de votre appareil,
s'il dispose de symboles de
manette, d'indicateurs ou de
voyants :
• Le voyant s'allume lorsque
l'appareil est en marche.
• Le symbole indique si la manette
contrôle les fonctions du four ou la
température.
• L'indicateur s'allume lorsque le four
monte en température.
1. Sélectionnez la fonction et la température
maximale.
2. Laissez l'appareil en fonctionnement pendant
1 heure.
3. Sélectionnez la fonction et la température
maximale.
4. Laissez l'appareil en fonctionnement pendant
15 minutes.
5. Sélectionnez la fonction
touche et la température maximale.
6. Laissez l'appareil en fonctionnement pendant
15 minutes.
Les accessoires peuvent chauffer plus que
d'habitude. Une odeur et de la fumée peuvent
s'échapper de l'appareil. C'est normal. Assurezvous que la ventilation dans la pièce est suffisante.
1. Tournez la manette des fonctions du four pour
sélectionner une fonction.
2. Tournez la manette du thermostat pour
sélectionner la température souhaitée.
3. Pour éteindre l'appareil, tournez les manettes
des fonctions du four et celle de température
en position ARRET.
, appuyez sur la
FONCTIONS DU FOUR
Fonction du four Utilisation
Position Arrêt L'appareil est éteint.
Eclairage four Pour allumer l'éclairage même si aucune fonction de cuisson
n'est sélectionnée.
29
Page 30

Fonction du four Utilisation
Convection naturelle
Voûte Pour faire dorer du pain, des gâteaux et des petites pâtisse-
Sole Pour cuire des gâteaux à fond croustillant et pour stériliser
Gril Pour faire griller des aliments peu épais et du pain.
Gril fort Pour griller des aliments peu épais en grandes quantités et
Turbo gril Pour rôtir de grosses pièces de viande ou de la volaille sur un
Chaleur tournante Pour faire cuire sur 3 niveaux en même temps et pour déshy-
ACTIVATION DE LA FONCTION CHALEUR TOURNANTE PLUS
Cette fonction vous permet d'apporter plus
d'humidité en cours de cuisson.
AVERTISSEMENT! Risque de
brûlures et de dommages matériels à
l'appareil.
L'humidité qui s'échappe peut provoquer des
brûlures :
• N'ouvrez pas la porte de l'appareil lorsque la
fonction Chaleur tournante PLUS est en cours.
• Soyez prudent en ouvrant la porte de l'appareil
après la fonction Chaleur tournante PLUS.
Reportez-vous au chapitre
« Conseils ».
1. Ouvrez la porte du four.
Chaleur tournante
PLUS
Sole pulsée Pour cuire des aliments sur un seul niveau et leur donner un
Pour cuire et rôtir des aliments sur 1 seul niveau.
ries. Pour terminer la cuisson des plats.
des aliments.
pour griller du pain.
seul niveau. Également pour gratiner et faire dorer.
drater des aliments.Diminuez les températures de 20 à 40 °C
par rapport à la Convection naturelle.
Pour ajouter de l'humidité en cours de cuisson. Pour obtenir
une belle couleur et une croûte croustillante en cours de cuisson. Pour rester plus juteux en cours de réchauffage.
brunissement plus intense et une pâte bien croustillante. Diminuez les températures de 20 à 40 °C par rapport à la Convection naturelle.
2. Remplissez le bac de la cavité avec de l'eau du
robinet.
Le bac de la cavité a une contenance maximale
de 250 ml.
Remplissez le bac de la cavité d'eau
uniquement lorsque le four est froid.
3. Placez les aliments dans le four et fermez la
porte.
4. Sélectionnez de la fonction Chaleur tournante
PLUS : .
5. Appuyez sur la touche Vapeur Plus .
La touche Vapeur plus fonctionne uniquement
avec la fonction Chaleur tournante PLUS.
Le voyant s'allume.
6. Tournez la manette du thermostat pour
sélectionner la température souhaitée.
30
Page 31

A B C
ATTENTION! Ne remplissez pas
le bac de la cavité d'eau en cours
de cuisson, ou lorsque le four est
chaud.
7. Pour éteindre l'appareil, appuyez sur la touche
Vapeur Plus , tournez les manettes des
fonctions du four et celle de température en
position ARRET.
AFFICHAGE
TOUCHES
Touche Fonction Description
MOINS Pour régler l'heure.
HORLOGE Pour régler une fonction de l'horloge.
PLUS Pour régler l'heure.
Le voyant de la touche Vapeur Plus s'éteint.
8. Videz l'eau du bac de la cavité.
AVERTISSEMENT! Assurez-
vous que l'appareil a refroidi avant
de vider l'eau du bac de la cavité.
A. Indicateurs des fonctions
B. Affichage du temps
C. Indicateur de fonction
Vapeur Plus Pour activer la fonction Chaleur tournante
FONCTIONS DE L'HORLOGE
TABLEAU DES FONCTIONS DE L'HORLOGE
Fonction de l'horloge Utilisation
Heure du jour Pour régler, modifier ou vérifier l'heure.
Minuteur Pour régler un décompte. Cette fonction est sans effet sur le fonc-
tionnement de l'appareil.
Durée Pour régler la durée de cuisson du four.
Fin Pour régler l'heure à laquelle le four doit s'éteindre.
PLUS.
31
Page 32

Vous pouvez utiliser simultanément les
fonctions Durée et Fin pour
définir la durée pendant laquelle
l'appareil doit fonctionner, et l'heure à
laquelle l'appareil doit se s'éteindre.
Cela vous permet d'activer l'appareil
en différé. Réglez d'abord la fonction
Durée puis la fonction Fin .
RÉGLAGE DES FONCTIONS DE L'HORLOGE
Pour les fonctions Durée et Fin , réglez une
fonction du four et une température de cuisson. Ce
n'est pas nécessaire pour le minuteur .
1. Appuyez sur à plusieurs reprises jusqu'à ce
que le voyant de la fonction de l'horloge
souhaitée commence à clignoter.
2. Appuyez sur la touche ou pour régler la
fonction de l'horloge souhaitée.
La fonction de l'horloge est activée. Le voyant de la
fonction de l'horloge que vous avez sélectionnée
s'affiche.
UTILISATION DES ACCESSOIRES
AVERTISSEMENT! Reportez-vous
aux chapitres concernant la sécurité.
Pour la fonction Minuteur, l'affichage
indique le temps restant.
3. Dès que la durée est écoulée, le voyant de la
fonction de l'horloge clignote et un signal
sonore retentit. Appuyez sur une touche pour
arrêter le signal sonore.
4. Tournez la manette des fonctions du four et la
manette du thermostat sur la position Arrêt.
Avec les fonctions Durée et Fin
, l'appareil s'éteint
automatiquement.
ANNULATION DES FONCTIONS DE L'HORLOGE
1. Appuyez sur à plusieurs reprises jusqu'à ce
que le voyant de la fonction souhaitée clignote.
2. Maintenez la touche enfoncée.
La fonction de l'horloge s'éteint au bout de
quelques secondes.
INSTALLATION DES ACCESSOIRES
Grille métallique :
Poussez la grille entre les barres de guidage des
supports de grille et assurez-vous que les pieds
sont orientés vers le bas.
Plat à rôtir :
Poussez le plat à rôtir entre les rails du support de
grille choisi.
32
• Tous les accessoires sont dotés de
petites indentations en haut, à
droite et à gauche, afin
d'augmenter la sécurité. Les
indentations sont également des
dispositifs anti-bascule.
• Le rebord élevé de la grille est un
dispositif complémentaire pour
empêcher les ustensiles de cuisine
de glisser.
Page 33

FONCTIONS SUPPLÉMENTAIRES
VENTILATEUR DE REFROIDISSEMENT
Lorsque le four fonctionne, le ventilateur de
refroidissement se met automatiquement en
marche pour refroidir les surfaces de l'appareil. Si
vous éteignez l'appareil, le ventilateur de
refroidissement continue à fonctionner jusqu'à ce
que l'appareil refroidisse.
THERMOSTAT DE SÉCURITÉ
Un mauvais fonctionnement de l'appareil ou des
composants défectueux peuvent causer une
CONSEILS
AVERTISSEMENT! Reportez-vous
aux chapitres concernant la sécurité.
La température et les temps de
cuisson indiqués sont fournis
uniquement à titre indicatif. Ils varient
en fonction des recettes ainsi que de
la qualité et de la quantité des
ingrédients utilisés.
INFORMATIONS GÉNÉRALES
• L'appareil dispose de cinq niveaux de grille.
Comptez les niveaux de grille à partir du bas de
l'appareil.
• L'appareil est doté d'un système spécial qui
permet à l'air de circuler et qui recycle
perpétuellement la vapeur. Dans cet
environnement, ce système permet de cuisiner
des plats tout en maintenant ceux-ci tendres à
l'intérieur et croquants à l'extérieur. Le temps de
cuisson et la consommation énergétique sont
donc réduits au minimum.
• De l'humidité peut se déposer dans l'enceinte
du four ou sur les vitres de la porte. C'est
normal. Veillez à reculer un peu lorsque vous
ouvrez la porte de l'appareil en fonctionnement.
Pour diminuer la condensation, faites
fonctionner l'appareil 10 minutes avant
d'enfourner vos aliments.
• Essuyez la vapeur après chaque utilisation de
l'appareil.
• Ne placez jamais d'aluminium ou tout autre
ustensile, plat et accessoire directement en
contact avec la sole de votre four. Cela
entraînerait une détérioration de l'émail et
modifierait les résultats de cuisson.
surchauffe dangereuse. Pour éviter cela, le four
dispose d'un thermostat de sécurité interrompant
l'alimentation électrique. Le four se remet
automatiquement en fonctionnement lorsque la
température baisse.
CUISSON DE GÂTEAUX
• N'ouvrez la porte du four qu'aux 3/4 du temps
de cuisson.
• Si vous utilisez deux plateaux de cuisson en
même temps, laissez un niveau libre entre les
deux.
CUISSON DE VIANDE ET DE POISSON
• Pour les aliments très gras, utilisez un plat à rôtir
pour éviter de salir le four de manière
irréversible.
• Avant de couper la viande, laissez-la reposer
pendant environ 15 minutes afin d'éviter que le
jus ne s'écoule.
• Pour éviter qu'une trop grande quantité de
fumée ne se forme dans le four, ajoutez de l'eau
dans le plat à rôtir. Pour éviter que la fumée ne
se condense, ajoutez à nouveau de l'eau dans le
plat à rôtir à chaque fois qu'il n'en contient plus.
TEMPS DE CUISSON
Le temps de cuisson varie selon le type d'aliment,
sa consistance et son volume.
Au départ, surveillez la cuisson lorsque vous
cuisinez. Ainsi, vous trouverez les meilleurs
réglages (fonction, temps de cuisson, etc.) pour
vos ustensiles, vos recettes et les quantités lorsque
vous utiliserez l'appareil.
CHALEUR TOURNANTE PLUS
Avant le préchauffage et uniquement
lorsque le four est froid, remplissez le
bac de la cavité d'eau. Reportez-vous
au chapitre « Activation de la fonction
Chaleur tournante PLUS ».
33
Page 34

Pains et pâtisseries
Plat
Eau dans le bac
de la cavité (ml)
Température
(°C)
Durée (min)
Positions
des grilles
Commentaires
Pain 100 180 35 - 40 2 Utilisez le plateau
de cuisson.
Petits pains 100 200 20 - 25 2 Utilisez le plateau
de cuisson.
Pizza maison 100 230 10 - 20 2 Utilisez le plateau
de cuisson.
Focaccia 100 200 - 210 10 - 20 2 Utilisez le plateau
de cuisson.
Biscuits,
scones,
croissants
Gâteau aux
prunes, tarte
aux pom-
100 150 - 180 10 - 20 2 Utilisez le plateau
de cuisson.
100 - 150 160 - 180 30 - 60 2 Utilisez le moule à
1)
gâteau.
mes, petits
pains à la
cannelle
1) Préchauffez-le dans un four vide pendant 5 minutes avant la cuisson.
Produits surgelés
Plat
Eau dans le bac de
la cavité (ml)
Température (°C) Durée (min)
Positions des
grilles
1)
1)
1)
1)
1)
Pizza surgelée 150 200 - 210 10 - 20
Lasagnes, surge-
200 180 - 200 35 - 50
lées
Croissants, sur-
150 170 - 180 15 - 25
gelés
1) Avant la cuisson, faites préchauffer votre four vide pendant 10 minutes.
Régénération des aliments
Plat
Eau dans le bac de
la cavité (ml)
Température (°C) Durée (min)
Pain 100 110 15 - 25 2
Petits pains 100 110 10 - 20 2
34
1)
2
1)
2
1)
2
Positions des
grilles
Page 35

Plat
Pizza maison 100 110 15 - 25 2
Focaccia 100 110 15 - 25 2
Légumes 100 110 15 - 25 2
Riz 100 110 15 - 25 2
Pâtes 100 110 15 - 25 2
Viande 100 110 15 - 25 2
Rôtissage
Plat
Rôti de porc 200 180 65 - 80 2 Plaque ronde en
Rôti de
boeuf
Poulet 200 210 60 - 80 2 Plaque ronde en
TABLEAU DE RÔTISSAGE ET DE CUISSON DES GÂTEAUX
Gâteaux
Eau dans le bac de
la cavité (ml)
Eau dans le
bac de la cavi-
té (ml)
200 200 50 - 60 2 Plaque ronde en
Température
Température (°C) Durée (min)
(°C)
Durée (min)
des grilles
Positions
Positions des
Commentaires
Pyrex
Pyrex
Pyrex
grilles
Plat
Pâtes à
gâteaux
Pâte sablée
Gâteau au
fromage
Convection naturelle Chaleur tournante
Durée (min)
Température
(°C)
170 2 160 3 (2 et 4) 45 - 60 Dans un
170 2 160 3 (2 et 4) 20 - 30 Dans un
170 1 165 2 60 - 80 Dans un
Positions
des grilles
Température
(°C)
Positions
des grilles
Commentai-
moule à
gâteau
moule à
gâteau
moule à
gâteau de
26 cm
res
35
Page 36

Plat
Convection naturelle Chaleur tournante
Température
(°C)
Positions
des grilles
Température
(°C)
Positions
des grilles
Durée (min)
Commentai-
res
Tarte aux
pommes
170 2 160 2 (gauche
1)
et droit)
80 - 100 Dans deux
moules à
gâteau de
20 cm sur
une grille
métallique
Strudel 175 3 150 2 60 - 80 Sur un pla-
teau de
cuisson
Tarte à la
confiture
170 2 165 2 (gauche
et droit)
30 - 40 Dans un
moule à
gâteau de
26 cm
Génoise/
Gâteau
Savoie
170 2 160 2 50 - 60 Dans un
moule à
gâteau de
26 cm
Gâteau de
Noël/Cake
aux fruits
Gâteau
aux pru-
1)
nes
Petits gâ-
teaux - sur
un seul ni-
160 2 150 2 90 - 120 Dans un
1)
175 1 160 2 50 - 60 Dans un
170 3 140 - 150 3 20 - 30 Sur un pla-
moule à
gâteau de
20 cm
moule à
pain
teau de
cuisson
veau
Petits gâ-
teaux - sur
deux ni-
- - 140 - 150 2 et 4 25 - 35 Sur un plateau de
cuisson
veaux
Petits gâ-
teaux - sur
trois ni-
- - 140 - 150 1, 3 et 5 30 - 45 Sur un plateau de
cuisson
veaux
36
Page 37

Plat
Convection naturelle Chaleur tournante
Température
(°C)
Positions
des grilles
Température
(°C)
Positions
des grilles
Durée (min)
Commentai-
res
Biscuits/
Gâteaux
secs/Tresses feuilletées sur un
seul niveau
Biscuits/
Gâteaux
secs/Tresses feuilletées sur deux
niveaux
Biscuits/
Gâteaux
secs/Tresses feuilletées sur trois
niveaux
Meringues
- sur un
seul niveau
Meringues
- sur deux
1)
niveaux
Petits
1)
pains
Éclairs sur un
seul niveau
Éclairs sur deux
niveaux
140 3 140 - 150 3 30 - 35 Sur un pla-
teau de
cuisson
- - 140 - 150 2 et 4 35 - 40 Sur un plateau de
cuisson
- - 140 - 150 1, 3 et 5 35 - 45 Sur un plateau de
cuisson
120 3 120 3 80 - 100 Sur un pla-
teau de
cuisson
- - 120 2 et 4 80 - 100 Sur un plateau de
cuisson
190 3 190 3 12 - 20 Sur un pla-
teau de
cuisson
190 3 170 3 25 - 35 Sur un pla-
teau de
cuisson
- - 170 2 et 4 35 - 45 Sur un plateau de
cuisson
37
Page 38

Plat
Convection naturelle Chaleur tournante
Température
(°C)
Positions
des grilles
Température
(°C)
Positions
des grilles
Durée (min)
Commentai-
res
Tourtes 180 2 170 2 45 - 70 Dans un
Cake aux
160 1 150 2 110 - 120 Dans un
fruits
Gâteau à
étages
170 1 160 2 (gauche
et droit)
50 - 60 Dans un
1) Préchauffez le four pendant 10 minutes.
Pain et pizza
Convection naturelle Chaleur tournante
Plat
Pain
blanc
Pain de
1)
Durée (min)
Température
(°C)
Positions
des grilles
Température
(°C)
Positions
des grilles
190 1 190 1 60 - 70 1 à 2 piè-
190 1 180 1 30 - 45 Dans un
Commentai-
seigle
Petits
1)
pains
1) 230 - 250 1 230 - 250 1 10 - 20 Sur un
Pizza
190 2 180 2 (2 et 4) 25 - 40 6 à 8 pe-
moule à
gâteau de
20 cm
moule à
gâteau de
24 cm
moule à
gâteau de
20 cm
res
ces, 500 g
par pièce
moule à
pain
tits pains
sur un plateau de
cuisson
plateau de
cuisson ou
un plat à
rôtir
38
Page 39

Convection naturelle Chaleur tournante
Plat
Température
(°C)
1) 200 3 190 3 10 - 20 Sur un
Scones
Positions
des grilles
1) Préchauffez le four pendant 10 minutes.
Préparations à base d'œufs
Convection naturelle Chaleur tournante
Plat
Température
(°C)
Positions
des grilles
Température
(°C)
Température
(°C)
Positions
des grilles
Positions
des grilles
Durée (min)
Durée (min)
Commentai-
res
plateau de
cuisson
Commentai-
res
Gratin de
200 2 180 2 40 - 50 Dans un
pâtes
Gratin aux
200 2 175 2 45 - 60 Dans un
légumes
1) 180 1 180 1 50 - 60 Dans un
Quiches
Lasa-
1)
gnes
Cannello-
1)
ni
180 - 190 2 180 - 190 2 25 - 40 Dans un
180 - 190 2 180 - 190 2 25 - 40 Dans un
1) Préchauffez le four pendant 10 minutes.
Viande
Convection naturelle Chaleur tournante
Plat
Température
(°C)
Positions
des grilles
Température
(°C)
Durée (min)
Positions
des grilles
Commentai-
Bœuf 200 2 190 2 50 - 70 Sur une
Porc 180 2 180 2 90 - 120 Sur une
moule
moule
moule
moule
moule
res
grille métallique
grille métallique
39
Page 40

Plat
Convection naturelle Chaleur tournante
Température
(°C)
Positions
des grilles
Température
(°C)
Positions
des grilles
Durée (min)
Commentai-
res
Veau 190 2 175 2 90 - 120 Sur une
Rôti de
boeuf, saignant
Rôti de
boeuf, cuit
à point
Rôti de
boeuf,
bien cuit
Épaule de
porc
Jarret de
porc
Agneau 190 2 175 2 110 - 130 Gigot
Poulet 220 2 200 2 70 - 85 Entier
Dinde 180 2 160 2 210 - 240 Entière
Canard 175 2 220 2 120 - 150 Entier
Oie 175 2 160 1 150 - 200 Entière
Lapin 190 2 175 2 60 - 80 En mor-
Lièvre 190 2 175 2 150 - 200 En mor-
Faisan 190 2 175 2 90 - 120 Entier
210 2 200 2 50 - 60 Sur une
210 2 200 2 60 - 70 Sur une
210 2 200 2 70 - 75 Sur une
180 2 170 2 120 - 150 Avec
180 2 160 2 100 - 120 2 mor-
grille métallique
grille métallique
grille métallique
grille métallique
couenne
ceaux
ceaux
ceaux
Poisson
Plat
Truite/
daurade
40
Convection naturelle Chaleur tournante
Durée (min)
Température
(°C)
190 2 175 2 40 - 55 3 - 4 pois-
Positions
des grilles
Température
(°C)
Positions
des grilles
Commentai-
sons
res
Page 41

Plat
Convection naturelle Chaleur tournante
Température
(°C)
Positions
des grilles
Température
(°C)
des grilles
Positions
Durée (min)
Commentai-
res
Thon/
saumon
GRIL
Préchauffez votre four à vide pendant
3 minutes avant la cuisson.
Plat
Filet de
bœuf
Steaks de
bœuf
Saucisses 8 - max. 12 - 15 10 - 12 4
Côtelettes
de porc
Poulet
(coupé en
deux)
Brochettes 4 - max. 10 - 15 10 - 12 4
Escalope
de poulet
Steak ha-
ché
Filet de
poisson
Sandwi-
ches toastés
Toasts 4 - 6 - max. 2 - 4 2 - 3 4
190 2 175 2 35 - 60 4 - 6 filets
Quantité
Température
(°C)
Morceaux (g) 1re face 2e face
4 800 max. 12 - 15 12 - 14 4
4 600 max. 10 - 12 6 - 8 4
4 600 max. 12 - 16 12 - 14 4
2 1000 max. 30 - 35 25 - 30 4
4 400 max. 12 - 15 12 - 14 4
6 600 max. 20 - 30 - 4
4 400 max. 12 - 14 10 - 12 4
4 - 6 - max. 5 - 7 - 4
Durée (min)
Positions
des grilles
41
Page 42

TURBO GRIL
Viande de bœuf
Plat Quantité Température (°C) Durée (min)
Rôti ou filet de bœuf
1)
saignant
Rôti ou filet de bœuf
1)
à point
Rôti ou filet de bœuf
1)
bien cuit
Par cm d’épaisseur
Par cm d’épaisseur
Par cm d’épaisseur
190 - 200 5 - 6 1 ou 2
180 - 190 6 - 8 1 ou 2
170 - 180 8 - 10 1 ou 2
1) Préchauffer le four.
Filet mignon de porc
Plat Quantité (kg) Température (°C) Durée (min)
Épaule, collier, jam-
1 - 1.5 160 - 180 90 - 120 1 ou 2
bon à l'os
Côtelette, côte le-
1 - 1.5 170 - 180 60 - 90 1 ou 2
vée
Pâté à la viande 0.75 - 1 160 - 170 50 - 60 1 ou 2
Jarret de porc (pré-
0.75 - 1 150 - 170 90 - 120 1 ou 2
cuit)
Veau
Positions des
grilles
Positions des
grilles
Plat Quantité (kg) Température (°C) Durée (min)
Positions des gril-
Rôti de veau 1 160 - 180 90 - 120 1 ou 2
Jarret de veau 1.5 - 2 160 - 180 120 - 150 1 ou 2
Agneau
Plat Quantité (kg) Température (°C) Durée (min)
Gigot d'agneau,
1 - 1.5 150 - 170 100 - 120 1 ou 2
Positions des gril-
rôti d'agneau
Selle d’agneau 1 - 1.5 160 - 180 40 - 60 1 ou 2
42
les
les
Page 43

Volaille
Plat Quantité (kg) Température (°C) Durée (min)
Morceaux de volaille
Demi-poulet 0.4 - 0.5 chacun 190 - 210 35 - 50 1 ou 2
Volaille, poularde 1 - 1.5 190 - 210 50 - 70 1 ou 2
Canard 1.5 - 2 180 - 200 80 - 100 1 ou 2
Oie 3.5 - 5 160 - 180 120 - 180 1 ou 2
Dinde 2.5 - 3.5 160 - 180 120 - 150 1 ou 2
Dinde 4 - 6 140 - 160 150 - 240 1 ou 2
Poisson (à l'étuvée)
Plat Quantité (kg) Température (°C) Durée (min)
Poisson entier 1 - 1.5 210 - 220 40 - 60 1 ou 2
DÉSHYDRATATION - CHALEUR TOURNANTE
• Utilisez des plaques recouvertes de papier
sulfurisé.
• Pour obtenir un meilleur résultat, arrêtez le four à
la moitié de la durée de déshydratation, ouvrez
Légumes
0,2 - 0,25 chacun
200 - 220 30 - 50 1 ou 2
la porte et laissez refroidir pendant une nuit pour
terminer le séchage.
Positions des gril-
Positions des gril-
les
les
Positions des grilles
Plat Température (°C) Durée (h)
1 position 2 positions
Haricots 60 - 70 6 - 8 3 1 / 4
Poivrons 60 - 70 5 - 6 3 1 / 4
Légumes pour
potage
Champignons 50 - 60 6 - 8 3 1 / 4
Fines herbes 40 - 50 2 - 3 3 1 / 4
60 - 70 5 - 6 3 1 / 4
43
Page 44

Fruits
Positions des grilles
Plat Température (°C) Durée (h)
1 position 2 positions
Prunes 60 - 70 8 - 10 3 1 / 4
Abricots 60 - 70 8 - 10 3 1 / 4
Pommes, lamel-
les
Poires 60 - 70 6 - 9 3 1 / 4
60 - 70 6 - 8 3 1 / 4
ENTRETIEN ET NETTOYAGE
AVERTISSEMENT! Reportez-vous
aux chapitres concernant la sécurité.
REMARQUES CONCERNANT L'ENTRETIEN
• Nettoyez la façade du four à l'aide d'une éponge
humide additionnée d'eau savonneuse tiède.
• Utilisez un produit courant destiné au nettoyage
des surfaces en métal.
• Nettoyez l'intérieur de l'appareil après chaque
utilisation. L'accumulation de graisses ou
d'autres résidus alimentaires peut provoquer un
incendie. Ce risque est élevé pour la lèchefrite.
• En cas de salissures importantes, nettoyez à
l'aide de produits spécifiques pour four.
• Après chaque utilisation, lavez tous les
accessoires et séchez-les. Utilisez un chiffon
doux additionné d'eau chaude savonneuse.
• Si vous avez des accessoires anti-adhérents, ne
les nettoyez pas avec des produits agressifs,
des objets pointus ni au lave-vaisselle. Cela
risque d'endommager le revêtement antiadhésif.
APPAREILS EN ACIER INOXYDABLE OU EN ALUMINIUM
Nettoyez la porte uniquement avec
une éponge ou un chiffon humides.
Séchez-la avec un chiffon doux.
N'utilisez jamais de produits abrasifs
ou acides ni d'éponges métalliques
car ils peuvent endommager la surface
du four. Nettoyez le bandeau de
commande du four en observant ces
mêmes recommandations.
NETTOYAGE DU BAC DE LA CAVITÉ
Le processus de nettoyage élimine les résidus
calcaires qui s'accumulent dans le bac de la cavité
après une cuisson à la vapeur.
Nous vous conseillons de procéder au
nettoyage au moins tous les 5 à
10 cycles de Chaleur tournante PLUS.
1. Versez 250 ml de vinaigre blanc dans le bac de
la cavité au fond du four.
Utilisez du vinaigre à 6 degrés maximum, sans
herbes.
2. Laissez le vinaigre dissoudre les résidus
calcaires à température ambiante pendant
30 minutes
3. Nettoyez la cavité à l'eau tiède avec un chiffon
doux.
NETTOYAGE DU JOINT D'ÉTANCHÉITÉ DE LA PORTE
• Vérifiez régulièrement le joint d'étanchéité de la
porte. Le joint d'étanchéité de la porte est posé
sur l'encadrement de la cavité du four. N'utilisez
pas l'appareil si le joint d'étanchéité de la porte
est endommagé. Faites appel à un service après
vente agréé.
• Pour le nettoyage du joint d'étanchéité de la
porte, consultez les informations générales
concernant le nettoyage.
NETTOYAGE AQUA CLEAN
Le processus de nettoyage Aqua Clean utilise
l'humidité pour aider à retirer la graisse et les
particules alimentaires restant dans le four.
1. Versez 200 ml d'eau dans le bac de la cavité
au fond du four.
44
Page 45

90°
2
1
2. Sélectionnez la fonction Chaleur tournante
PLUS et appuyez sur la touche Vapeur
Plus .
3. Réglez la température à 90 °C.
4. Laissez l'appareil en fonctionnement pendant
30 minutes.
5. Désactivez l'appareil puis laissez-le refroidir.
6. Lorsque l'appareil est froid, nettoyez les
surfaces intérieures du four avec un chiffon.
AVERTISSEMENT! Veillez à ce
que l'appareil soit froid avant de le
toucher. Risque de brûlure !
1 2 3 4
5
6
NETTOYAGE DE LA PORTE DU FOUR
La porte du four est dotée de deux panneaux de
verre. Vous pouvez retirer la porte du four et le
panneau de verre intérieur pour le nettoyer.
Si vous tentez d'extraire le panneau de
verre intérieur sans avoir au préalable
retiré la porte du four, celle-ci peut se
refermer brusquement.
ATTENTION! N'utilisez pas l'appareil
sans le panneau de verre intérieur.
7
Ouvrez complètement la porte et saisissez les 2 charnières de porte.1
Soulevez et faites tourner les leviers sur les 2 charnières.2
Fermez la porte du four à la première position d'ouverture (mi-parcours). Tirez la porte vers l'avant et
3
retirez-la de son logement.
Déposez la porte sur une surface stable recouverte d'un tissu doux.4
Désengagez le système de verrouillage pour retirer le panneau de verre intérieur.5
Faites pivoter les deux fixations de 90° et retirez-les de leurs logements.6
Soulevez doucement puis sortez le panneau de verre.7
Nettoyez le panneau de verre à l'eau savonneuse.
Séchez soigneusement le panneau de verre.
Une fois le nettoyage terminé, remettez le panneau
de verre et la porte du four en place. Suivez les
étapes ci-dessus dans l'ordre inverse.
La zone imprimée doit faire face à l'intérieur de la
porte. Après l'installation, vérifiez que la surface du
panneau de verre où se trouve la zone imprimée est
lisse au toucher (le relief doit être de l'autre côté).
Veillez à installer correctement le panneau de verre
intérieur dans son logement.
45
Page 46

1. Éteignez l'appareil
2. Retirez les fusibles de la boîte à fusibles ou
coupez le disjoncteur.
Éclairage arrière
1. Retirez le diffuseur en verre de l'ampoule en le
tournant vers la gauche.
2. Nettoyez-le.
REMPLACEMENT DE L'ÉCLAIRAGE
Placez un chiffon au fond de la cavité de l'appareil.
Cela évitera d'endommager le diffuseur en verre et
la cavité.
AVERTISSEMENT! Risque
d'électrocution ! Déconnectez le
fusible avant de remplacer l'ampoule.
L'éclairage et le diffuseur en verre
peuvent être très chauds.
3. Remplacez l'ampoule par une ampoule
adéquate résistant à une température de
300 °C.
4. Replacez le diffuseur en verre.
EN CAS D'ANOMALIE DE FONCTIONNEMENT
AVERTISSEMENT! Reportez-vous
aux chapitres concernant la sécurité.
ATTENTION! Tenez toujours
l'ampoule halogène avec un chiffon
afin d'éviter que des résidus de
graisse ne brûlent sur l'ampoule.
EN CAS D'ANOMALIE DE FONCTIONNEMENT
Problème Cause probable Solution
Le four ne chauffe pas. Le four est éteint. Mettez le four en marche.
Le four ne chauffe pas. L'horloge n'est pas réglée. Réglez l'horloge.
Le four ne chauffe pas. Les réglages nécessaires n'ont
Le four ne chauffe pas. Le fusible a disjoncté. Vérifiez que le fusible est bien
L'éclairage ne fonctionne pas. L'éclairage est défectueux. Remplacez l'ampoule.
De la vapeur et de la conden-
sation se forment sur les aliments et dans la cavité du four.
« 12.00 » s'affiche. Il y a eu une coupure de cou-
46
pas été effectués.
Le plat est resté trop longtemps dans le four.
rant.
Vérifiez que les réglages sont
corrects.
la cause de l'anomalie. Si les
fusibles disjonctent de manière
répétée, faites appel à un électricien qualifié.
Ne laissez pas les plats dans le
four pendant plus de 15 à
20 minutes après la fin de la
cuisson.
Réglez de nouveau l'horloge.
Page 47

Problème Cause probable Solution
La fonction Chaleur tournante
PLUS ne fournit pas de bons
résultats de cuisson.
La fonction Chaleur tournante
PLUS ne fournit pas de bons
résultats de cuisson.
La fonction Chaleur tournante
PLUS ne fournit pas de bons
résultats de cuisson.
Vous souhaitez activer la fonction Chaleur tournante mais le
voyant de la touche Vapeur
plus est allumé.
L'eau dans le bac de la cavité
ne bout pas.
De l'eau s'écoule du bac de la
cavité.
INFORMATIONS DE MAINTENANCE
Si vous ne trouvez pas de solution au problème,
veuillez contacter votre revendeur ou le service
après-vente.
Les informations à fournir au service après-vente
figurent sur la plaque signalétique. La plaque
Vous n'avez pas activé la fonction Chaleur tournante PLUS.
Vous n'avez pas rempli le bac
de la cavité d'eau.
Vous n'avez pas correctement
activé la fonction Chaleur tournante PLUS avec la touche Vapeur Plus.
La fonction Chaleur tournante
PLUS est en cours.
La température est trop basse. Sélectionnez une température
Le bac de la cavité est trop
rempli.
Reportez-vous au chapitre
« Activation de la fonction
Chaleur tournante PLUS ».
Reportez-vous au chapitre
« Activation de la fonction
Chaleur tournante PLUS ».
Reportez-vous au chapitre
« Activation de la fonction
Chaleur tournante PLUS ».
Appuyez sur la touche Vapeur
plus pour arrêter la fonc-
tion Chaleur tournante PLUS.
d'au moins 110 °C.
Reportez-vous au chapitre
« Conseils ».
Éteignez le four et assurezvous que l'appareil est froid.
Épongez l'excédent d'eau. Versez la quantité d'eau adaptée
dans le bac de la cavité. Reportez-vous à la procédure
correspondante.
signalétique se trouve sur le cadre avant de la
cavité de l'appareil. Ne retirez pas la plaque
signalétique de l'appareil.
Nous vous recommandons de noter ces informations ici :
Modèle (MOD.) .........................................
Référence du produit (PNC) .........................................
Numéro de série (S.N.) .........................................
INSTALLATION
AVERTISSEMENT! Reportez-vous
aux chapitres concernant la sécurité.
47
Page 48

594
16
573
21548
min. 550
20
600
558
589
114
594
min. 560
3
5
558
21548
min. 550
20
589
594
114
16
573
590
min. 560
594
3
5
A
B
ENCASTREMENT
FIXATION DE L'APPAREIL AU MEUBLE
INSTALLATION ÉLECTRIQUE
Le fabricant ne pourra être tenu pour
responsable si vous ne respectez pas
les précautions de sécurité du
chapitre « Consignes de sécurité ».
Cet appareil n'est fourni qu'avec un câble
d'alimentation.
48
CÂBLE
Types de câbles compatibles pour l'installation ou
le remplacement :
H07 RN-F, H05 RN-F, H05 RRF, H05 VV-F, H05
V2V2-F (T90), H05 BB-F
Pour la section du câble, consultez la puissance
totale sur la plaque signalétique. Vous pouvez
également consulter le tableau :
Puissance totale (W)
maximum 1 380 3 x 0.75
maximum 2 300 3 x 1
maximum 3 680 3 x 1.5
Le fil de masse (fil jaune/vert) doit faire 2 cm de
plus que les fils de phase et neutre (fils bleu et
marron).
Section du câble
(mm²)
Page 49

RENDEMENT ÉNERGÉTIQUE
FICHE DU PRODUIT ET INFORMATIONS CONFORMÉMENT À LA NORME EU 65-66/2014
Nom du fournisseur Zanussi
Identification du modèle ZOB65301XK
Index d'efficacité énergétique 101.2
Classe d'efficacité énergétique A
Consommation d'énergie avec charge standard et mode
traditionnel
Consommation d'énergie avec charge standard et mode air
pulsé
Nombre de cavités 1
Source de chaleur Électricité
Volume 68 l
Type de four Four encastrable
Masse 28.6 kg
0.89 kWh/cycle
0.85 kWh/cycle
EN 60350-1 - Appareils de cuisson domestiques
électriques - Partie 1 : Plages, fours, fours à vapeur
et grils - Méthodes de mesure des performances.
ÉCONOMIE D'ÉNERGIE
Cet appareil est doté de caractéristiques qui vous
permettent d'économiser de l'énergie lors de votre
cuisine au quotidien.
• Conseils généraux
– Assurez-vous que la porte du four est
correctement fermée lorsque vous faites
fonctionner l'appareil, et ouvrez-la le moins
possible durant la cuisson.
– Utilisez des plats en métal pour augmenter
les économies d'énergie.
– Si possible, placez le plat dans le four, sans
préchauffage.
– Si la cuisson doit durer plus de 30 minutes,
réduisez la température du four au minimum
3 à 10 minutes avant la fin de la cuisson, en
fonction de la durée de la cuisson. La
chaleur résiduelle à l'intérieur du four
poursuivra la cuisson.
– Utilisez la chaleur résiduelle pour réchauffer
d'autres plats.
• Cuisson avec ventilation - si possible, utilisez
les fonctions de cuisson avec la ventilation pour
économiser de l'énergie.
• Maintien au chaud - si vous souhaitez utiliser
la chaleur résiduelle pour maintenir un plat au
chaud, sélectionnez le réglage de température
le plus bas possible.
EN MATIÈRE DE PROTECTION DE L'ENVIRONNEMENT
Recyclez les matériaux portant le symbole .
Déposez les emballages dans les conteneurs
prévus à cet effet. Contribuez à la protection de
l'environnement et à votre sécurité, recyclez vos
produits électriques et électroniques. Ne jetez pas
les appareils portant le symbole avec les ordures
ménagères. Emmenez un tel produit dans votre
centre local de recyclage ou contactez vos services
municipaux.
*
49
Page 50

50
Page 51

51
Page 52

WWW.ZANUSSI.COM/SHOP
867323817-A-462015
 Loading...