

Zanussi ZK32/18E3, ZK36/18E3, ZK36/14E3, ZK32/11E3, ZK32/16E3 USER MANUAL

15
m DO NOT USE SHARP INSTRUMENTS to
scrap off frost or ice. Frost may be removed
by using a plastic scraper. (See defrosting
instructions).
m Frozen food must not be re-frozen once it
has been thawed out.
m Manufacturer’s storage recommendations
should be strictly complied with.
m Lollies can cause frost burns if consumed
right away from the freezer.
m Do not place carbonate or fizzy drinks in the
freezer as these may explode.
m When an old freezer is to be discarded
make sure to:
m Dismount the doors in order to prevent
children from getting trapped inside.
Have the gas from the cooling system
withdrawn before making it to scrap iron.
m
Warnings for your safety
Warnings for your safety. Carefully read these instructions before installing and using the machine.
m This freezer is designed to be operated by
adults only. Children should not be allowed to
tamper with the controls or play with the product.
m Any electrical work required to install the
appliance should be carried out by a qualified
electrician or competent person.
m This appliance is heavy. Care should be taken
when moving it.
m Make sure that the cable is not trapped under-
neath the appliance, nor touches the motor.
m Repairs carried out by inexperienced persons
may cause injuries or serious malfunctioning.
Refer to the nearest Authorized Dealer.
m Make sure the rear part of the appliance stands
against a wall as there are working parts which
heat up and should not be of easy access.
m Make sure that there is a continous and ade-
quate ventilation as a failure to do so may
result in damage to the appliance or deterioration of the food.
m The appliance should be left for at least 4 hours
after installation before it is turned on ill order
to allow the refrigerant to settle.
m This product must be serviced only by an AUT-
HORIZED DEALER, and only GENUINE
SPARE PARTS must be employed.
m Before cleaning or reparing the appliance,
make sure it is unplugged.
m It is dangerous to alter the specifications or
modify this product in any way.
m These domestic refrigerators are designed to
be used specifically for the storage and conservation of food.

16
Índex
Warnings for your safety pag. 15
Installation pag. 17
Changing the opening directions
of the doors and Panelling pag. 18
Regulation and Control pag. 19
How to use your
Refrigerator-Freezer pag. 20 - 21
Maintenance of your
Refrigerator-Freezer pag. 22 - 23
Something not working pag. 24 - 25
Normal noises when
functioning pag. 26
Guarantee, Service
and Spare Parts pag. 27
Tecnical Features pag. 28
17
Installation
PPoossiittiioonniinngg
• Place the refrigerator away from direct sunlight
and heat sources.
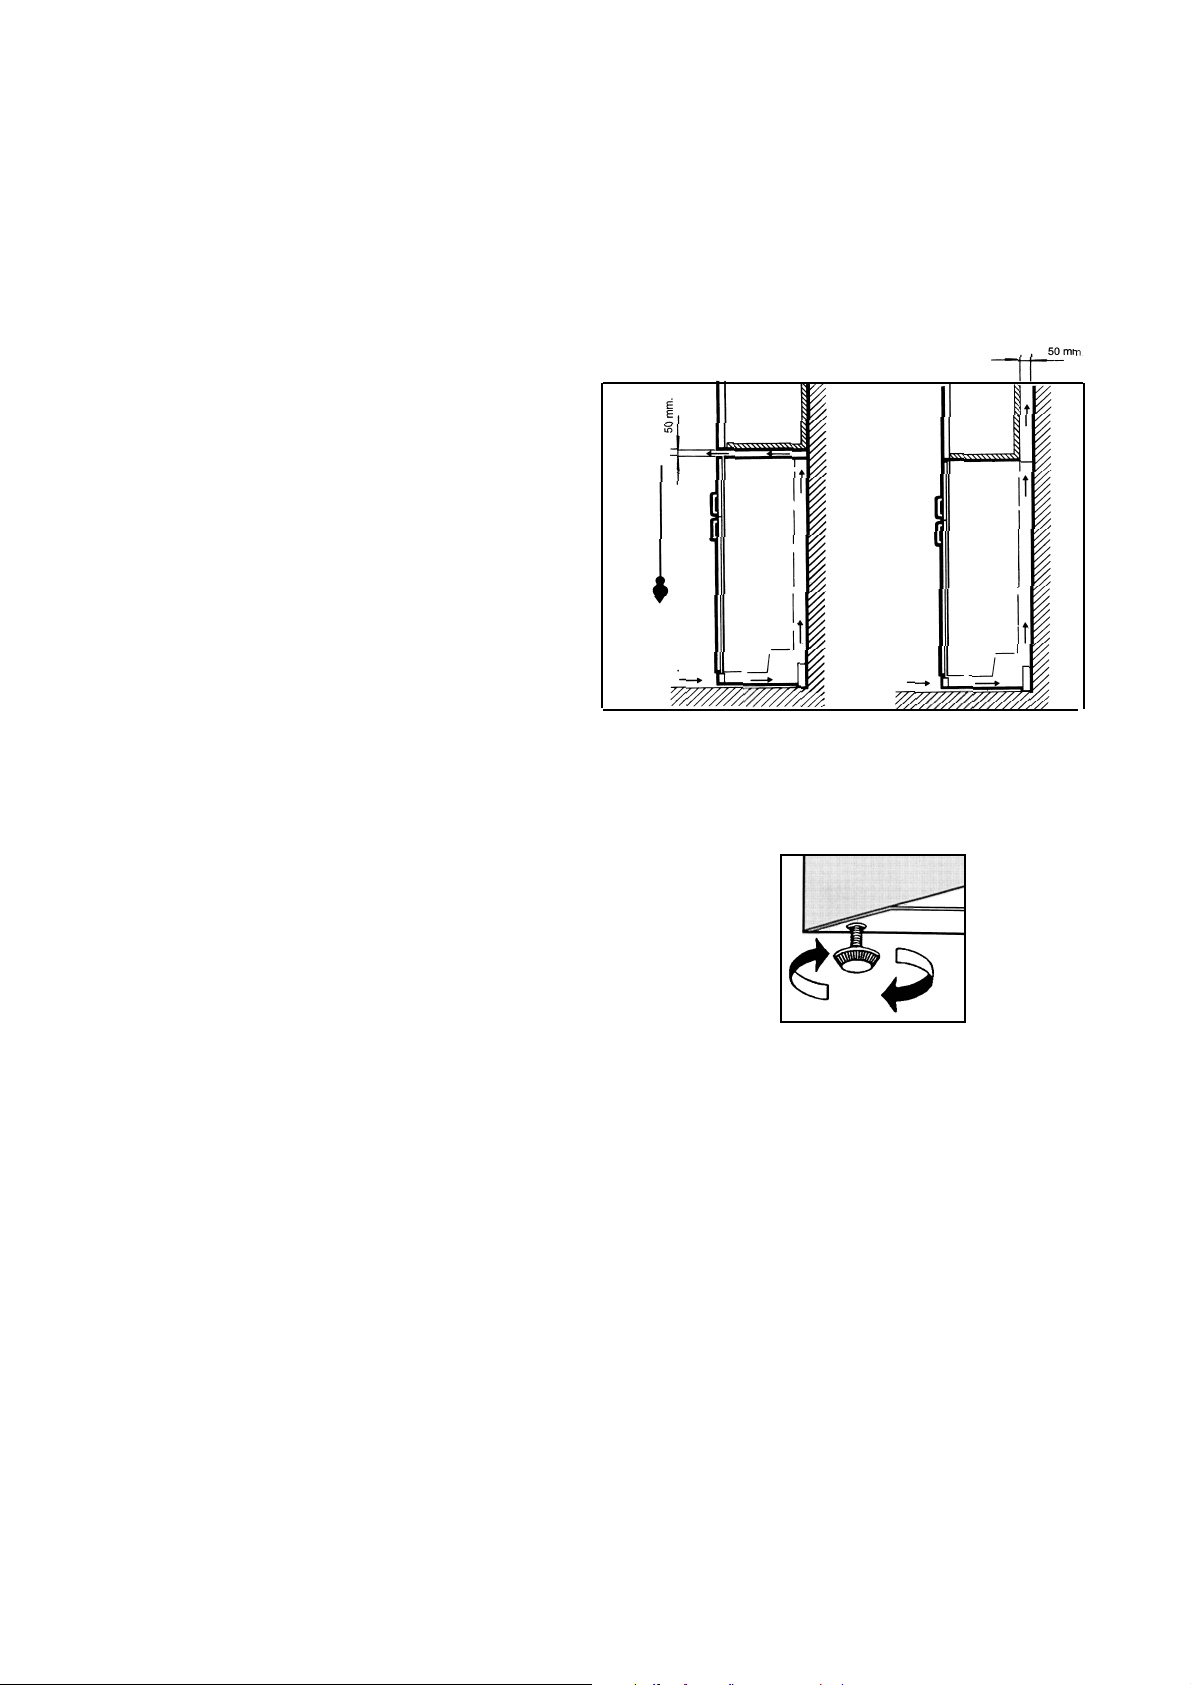
• Maintain recommended ventilation - see Fig. 1.
• Make sure the refrigerator is accurately levelled
turning the adjustable feet in order to avoid vibrations and noises, Fig. 2.
• This is a built in design to be aligned with other
furniture
CClleeaanniinngg tthhee iinntteerriioorr
• Do not use alcohol or any cleanig product containing alcohol because it can damage the cabinet.
• Before using the appliance for the first time wash
the interior whith luke warm water and some neutral soap so as to remove the typical smell of a
brand-new product arid then dry thoroughly.
• Do not use detergents or abrasive powders as
these will damage the finish.
• Remove security used for transportation.
EElleeccttrriiccaall ccoonnnneeccttiioonn
m Before plugging the appliance make sure that the
voltage and frequency shown on the «Technical
Features» correspond to your home supply.
It is essential that the appliance be efficiently
earthed.
m For this purpose the supply cable plug incorpora-
tes a special earth contact. If the sockets of your
domestic wiring system are not grounded, have
the appliance connected to a separate ground
wire in accordance with existing safety regula-
tions.
«THE MANUFACTURER DECLINES TO
ACCEPT ANY LIABILITY IF THIS SAFETY RULE
IS NOT OBSERVED».
SSttaarrttiinngg –– uupp
• Plug the appliance into the mains.
• Make sure the inner light turns on when opening
the door.
• Turn to intermediate position the knobs of the
«temperature regulators»: «A» for refrigerating
compartment and «C» for freezing compartment.
Fig. 2
Fig. 1

18
Changing the opening direction
of doors and Panelling
If you wish to change the opening side of the doors
proceed as follows:
1... Take off the plinth pressed onto cabinet. (In
some models).
2... Remove the lower hinge taking care for the lower
door not to fall off. Using a 10mm spanner, unscrew the hinge pin and reassemble it on the
opposite side.
3... Lift the lower door off the central hinge.
4... Remove the central hinge taking care for the
upper door not to fall off and not to lose the plastic washer.
5... Take the upper door off the upper hinge. Be
carefull not to lose the plastic washer.
6... Unscrew the plastic plugs located on the opposi-
te side of the central hinge and introduce them in
the holes occupied before by the hinge.
7…Unscrew the axle of the upper hing and screw it
into the hinge on the opposite side. Make sure to
fit in the metal washer for blocking.
8…Place upper door.
9...Dismantle the vertical handles (in some models)
and assemble them in the opposite side. Cover
the holes with the plastic lids that were situated
where the handles are presently.
For the remaining parts proceed the other way
round.
Once finished make sure that all joints close
perfectly well all around the door and chek that
the internal light turns of when the fridge door
closes.

19
Regulation and Control
TTeemmppeerraattuurree RReegguullaattoorr ffoorr RReeffrriiggee--rraattoorr::
«A»
Allows to adjust the temperature inside the refrige-
rator according to use and external conditions.
• Pos. O = Minimum cold.
• Pos. O = Maximum cold.
• Pos. P = Motor disconnected.
TTeemmppeerraattuurree RReegguullaattoorr ffoorr FFrreeeezzeerr::
«C»
Allows to adjust the temperature inside the freezer
according to use and external conditions.
• Pos. O = Minimum cold.
• Pos. O = Maximum cold.
• Pos. P = Motor disconnected.
GGrreeeenn lliigghhtt::
«D» (some models only).
Indicates connection to mains when lighted.
OOrraannggee lliigghhtt::
«F» (some models only).
Indicates that the freezer is on freezing mode (S).
RReedd lliigghhtt::
«G» (some models only).
Whent lighted indicates abnormal temperature conditions in the freezer, but for the exceptions appearing of Pag «Freezing of Food» and Page
«Something not working».
IInntteerriioorr lliigghhtt::
Comes on when opening the door of the refrigerating compartment.
When changing the light bulb, first remove the protective cover «X» (see point A-3 «IF SOMETHING
DOES NOT WORK»).
SSuuppeerr sswwiittcchh::
«E»
Allows you to choose the freezing type you want in
the freezer compartiment.
To keep the equipment in good working
order, please consult the «Freezing
of food» paragraph.
GGrreeeenn ppiilloott::
«B» (some models only).
It is on when the fridge compartiment engines is
working.
DDiinnaammiicc RReeffrriiggeerraattiioonn::
(some models only)
The Dynamic Refrigeration System give, in the
fridge compartment, extra efficiency showed in:
• Quicker refrigeration.
• More homogeneous temperature.
DAC (Dynamic Air Cooling system) has been
mainly designed for hot weather (ambient temperature above 25°), and also when the refrigerator is plenty of food.
To start working, push the switch.
When DAC is switched on, the cold production
es higher, thus you should turn the temperature
regulator to an adequate position to avoid excesive cold.
G
F
E
D
CB
A
 Loading...