

Zanussi ZI 9121 FA User Manual

FREEZER
ZI 9121 FA
INSTRUCTION BOOKLET
2222 753-65
2 Printed on paper manufactured with environmentally sound processes
General Safety
• This appliance contains hydrocarbons in its
cooling unit; maintenance and recharging must
therefore only be carried out by authorised
technicians.
• Take utmost care when handling your
appliance so as not to cause any damages to
the cooling unit with consequent possible fluid
leakages.
• The appliance must not be located close to
radiators or boilers.
• Avoid prolonged exposure of the appliance to
direct sunlight.
• Do not use other electrical appliances (such as
ice cream makers) inside of refrigerating
appliances.
During Use
• This appliance is designed for domestic use only,
specifically for the storage of edible foodstuffs. It is
not intended for commercial or industrial use.
• Containers with flammable gases or liquids can
leak at low temperatures. Do not store any
containers with flammable materials, such as spray
cans, fire extinguisher refill cartridges etc. in the
freezer.
• Frozen food should not be refrozen once it has
thawed out.
• Do not place carbonated or fizzy drinks in the
freezer compartment.
• Ice lollies can cause ‘frost/freezer burns’ if
consumed straight from the freezer.
• Do not remove items from the freezer compartment
if your hands are damp/wet, as this could cause
skin abrasions or frost/freezer burns.
• Bottles and cans must not be placed in the freezer
as they can burst when the contents freeze.
• Manufacturers’ recommended storage times should
be adhered to. Refer to relevant instructions.
Maintenance and Cleaning
• Before cleaning, always switch off the appliance
and disconnect from the electrical supply.
• When unplugging always pull the plug from the
mains socket, do not pull on the cable.
Prior to Installation
• Check the appliance for transport damage. Under
no circumstance should a damaged appliance be
installed. In the event of damage please contact
your retailer.
Installation
• This appliance is heavy. Care should be taken
when moving it.
• It is dangerous to alter the specifications or attempt
to modify this product in any way.
• Ensure that the appliance does not stand on the
electrical supply cable.
Important: if the supply cable is damaged, it must
be replaced by a cable available from the
manufacturer or your local Service Force Centre.
• Any electrical work required to install this appliance
should be carried out by a qualified electrician or
competent person.
• Parts which heat up should not be exposed.
Whenever possible, the back of the appliance
should be close to a wall, but leaving the required
distance for ventilation, as stated in the installation
instructions.
• The appliance should be left for 2 hours after
installation before it is turned on, in order to allow
the refrigerant to settle.
Refrigerant
• The refrigerant isobutane (R600a) is contained
within the refrigerant circuit of the appliance, a
natural gas with a high level of environmental
compatibility, which is nevertheless flammable.
• During transportation and installation of the
appliance, be certain that none of the components
of the refrigerant circuit become damaged.
• If the refrigerant circuit should become damaged:
- avoid open flames and sources of ignition.
- thoroughly ventilate the room in which the
appliance is situated.
Child Safety
• Do not allow children to tamper with the controls or
play with the product.
• There is a risk of suffocation! Keep packaging
material away from children!
Important Safety Instructions
These warnings are provided in the interests of your safety. Ensure that you understand them all before
installing or using this appliance. Your safety is of paramount importance. If you are unsure about any
of the meanings of these warnings contact the Customer Care Department.

Servicing
• This product should be serviced by an authorised
engineer and only genuine spare parts should be
used.
• Under no circumstances should you attempt to
repair the appliance yourself. Repairs carried out
by inexperienced persons may cause injury or
serious malfunctioning. Contact your local Service
Force Centre.
At the end of the Appliance Life
• When disposing of your appliance use an
authorised disposal site.
The symbol on the product or on its packaging
indicates that this product may not be treated as
household waste. Instead it shall be handed over
to the applicable collection point for the recycling of
electrical and electronic equipment. By ensuring
this product is disposed of correctly, you will help
prevent potential negative consequences for the
environment and human health, which could
otherwise be caused by inappropriate waste
handling of this product. For more detailed
information about recycling of this product, please
contact your local city office, your household waste
disposal service or the shop where you purchased
the product.
• Remove the plug and ensure that any locks or
catches are removed, to prevent young children
being trapped inside.
Contents
Instructions for the User
Important Safety Instructions . . . . . . . . . . . . . . . .2
Operation . . . . . . . . . . . . . . . . . . . . . . . . . . . . . . . . .4
Before use . . . . . . . . . . . . . . . . . . . . . . . . . . . . . . .4
Freezer controls . . . . . . . . . . . . . . . . . . . . . . . . . . .4
Starting your appliance . . . . . . . . . . . . . . . . . . . . . .4
Temperature control . . . . . . . . . . . . . . . . . . . . . . . .4
Quick-freezing . . . . . . . . . . . . . . . . . . . . . . . . . . . .4
Warning light (red) . . . . . . . . . . . . . . . . . . . . . . . . .5
Temperature acoustic alarm . . . . . . . . . . . . . . . . . .5
Freezing fresh food . . . . . . . . . . . . . . . . . . . . . . . .5
Frozen food storage . . . . . . . . . . . . . . . . . . . . . . . .5
Freezing calendar . . . . . . . . . . . . . . . . . . . . . . . . .6
Thawing . . . . . . . . . . . . . . . . . . . . . . . . . . . . . . . . .6
Making ice cubes . . . . . . . . . . . . . . . . . . . . . . . . . .6
Normal operating sounds . . . . . . . . . . . . . . . . . . . .6
Health and Safety Guidelines . . . . . . . . . . . . . . . .7
Defrosting . . . . . . . . . . . . . . . . . . . . . . . . . . . . . . . .8
Maintenance and Cleaning . . . . . . . . . . . . . . . . . .9
Internal cleaning / Changing the light bulb . . . . . .9
Something Not Working? . . . . . . . . . . . . . . . . . . .10
Service and Spare Parts . . . . . . . . . . . . . . . . . . . .11
Customer Care Department . . . . . . . . . . . . . . . . .11
Guarantee Conditions . . . . . . . . . . . . . . . . . . . . .12
Instructions for the Installer
Technical specifications . . . . . . . . . . . . . . . . . . . .13
Installation . . . . . . . . . . . . . . . . . . . . . . . . . . . . . .13
Positioning . . . . . . . . . . . . . . . . . . . . . . . . . . . . . .13
Door reversal . . . . . . . . . . . . . . . . . . . . . . . . . . . . .14
Electrical Connection . . . . . . . . . . . . . . . . . . . . . .15
Building in . . . . . . . . . . . . . . . . . . . . . . . . . . . . . . .16
3

4
Freezer controls
Starting your appliance
Insert the plug into the wall socket.
The appliance can be activated by turning the
thermostat knob (2) beyond the «O» position. When
the pilot light (1) is illuminated and a sound is on only
for 2 sec. this shows that the appliance is on.
Push the button (4), the sound signal alarm will get
off and pushing the button a second time the super
control light (3) light up. The freezer will start to
operate.
The freezer is switched off by turning knob (2) to
position «O» and a sound is on only for 2 sec.
all these factors have to be considered and some
experimentation may be necessary.
To obtain a lower temperature, turn the thermostat
control to the highers numbers; to obtain a higher
temperature turn the control to the lower numbers.
When altering the temperature setting, allow 24
hours for the temperature to stablise before making
further changes.
1 Pilot light (green)
2 Thermostat control knob
3 Fast-freezing indicator light (yellow)
4 Push button for fast-freezing and for stopping the
audible signal (warning light on)
5 Warning light (red)
Temperature control
The temperature inside the freezer is regulated by a
thermostat with different temperature positions and
one «OFF» (O) position.
Position «1» = minimum cold
Position «6» = maximum cold
Turn the thermostat dial to the required position.
An intermediate position is usually the most suitable,
although the temperature will be affected by:
• Room temperature
• How often the door is opened
• How much food is stored
• Position of the appliance
In determining the correct temperature control setting
5
6
4
2
1
3
➁➁ ➂➂ ➃➃ ➄➄➀➀
Operation
Before use
Remove all securing tapes. Wash inside the
appliance with lukewarm water and bicarbonate of
soda (5 ml to 0.5 litre of water). Do not use soap or
detergent as the smell may linger. Dry thoroughly.
Quick freezing
For quick-freezing, push the button
(4)
. The super
control light
(3)
will then light up.
If the quick-freezing function is not ended manually,
the appliance switch off the quick-freezing function
after 52 hours. The yellow light goes out.
The quick-freezing function can be ended manually
at any time by pressing the button
(4)
again. The
yellow light goes out.
5
Temperature acoustic alarm
This appliance incorporates an alarm which gives off
an audible signal whenever the warning light comes
on. This signal can be temporarily stopped by
depressing the push button for fast-freezing (4). The
fast-freezing push button can be released as soon as
the warning light is off.
Warning light (red)
If the temperature warning light (5) lights up, it
indicates that the temperature within the freezer has
reached a level where safe food storage is no longer
ensured (warmer than -12°C).
When the freezer is first switched on, the warning
light will stay on until the temperature has dropped to
a safe level for the storage of frozen food.
Freezing fresh food
In any 24 hour period you can freeze up to 16 kg of
fresh food.
Activate fast freeze by depressing the fast-freeze
button (1) 24 hours before you want to freeze your
fresh food, the yellow light (2) illuminates. This time
can be shortened, depending on the quantity of food
to be frozen.
After the time has elapsed place the food to be
frozen in the appliance's two top compartments; if
freezing only a small amount of food, use the top
compartment.
In the top compartment, products must only be
stacked up to the mark on the cabinet interior so as
to ensure that air circulation is not obstructed.
You should never freeze more than 16 kg of fresh
food at anyone time.
Once the food is completely frozen (which could take
up to 24 hours) the fast freeze function can be ended
at any time by depressing the button (4) again.
The yellow light (3) goes out.
Distribute the frozen food packages in the other
compartments, so that the top compartments can be
used for a further freezing operation.
Only freeze top quality, fresh and thoroughly cleaned
foodstuffs.
Do not allow fresh food to touch food which is
already frozen.
During the freezing process, ensure that the freezer
door remains closed.
Frozen food storage
When you first start the freezer or if the freezer has
been out of use for some time, we advise you to run
your appliance for at least two hours in the «fast
freeze» mode before storing frozen food.
To obtain the best performance from this appliance,
we strongly recommend that you make sure that the
commercially frozen foodstuffs were adequately
stored by the retailer and, furthermore, be sure that
these frozen foodstuffs are transferred from the
foodstore to the consumer in the shortest possible
time (a temperature increase of the frozen food could
shorten its storage period).
It is also advisable not to exceed the storage period
indicated by the producer of the food.
Finally, do not open the door frequently or leave it
open longer than is absolutely necessary.
Important
Do not put carbonated liquids, (fizzy drinks
etc.), in the freezer compartment.
Ice lollies, if consumed immediately after
removal from the freezer, can possibly result in
a low temperature skin burn.
Do not remove items from the freezer if your
hands are damp/wet, as this could cause skin
abrasions or "frost/freezer burns".
If there is a power failure during the storage of
frozen food, do not open the door during the
whole time of the power failure. If the freezer is
fully loaded, the frozen food will not be
affected if the power cut is of short duration;
otherwise, it is recommended to consume the
food within a very short time.
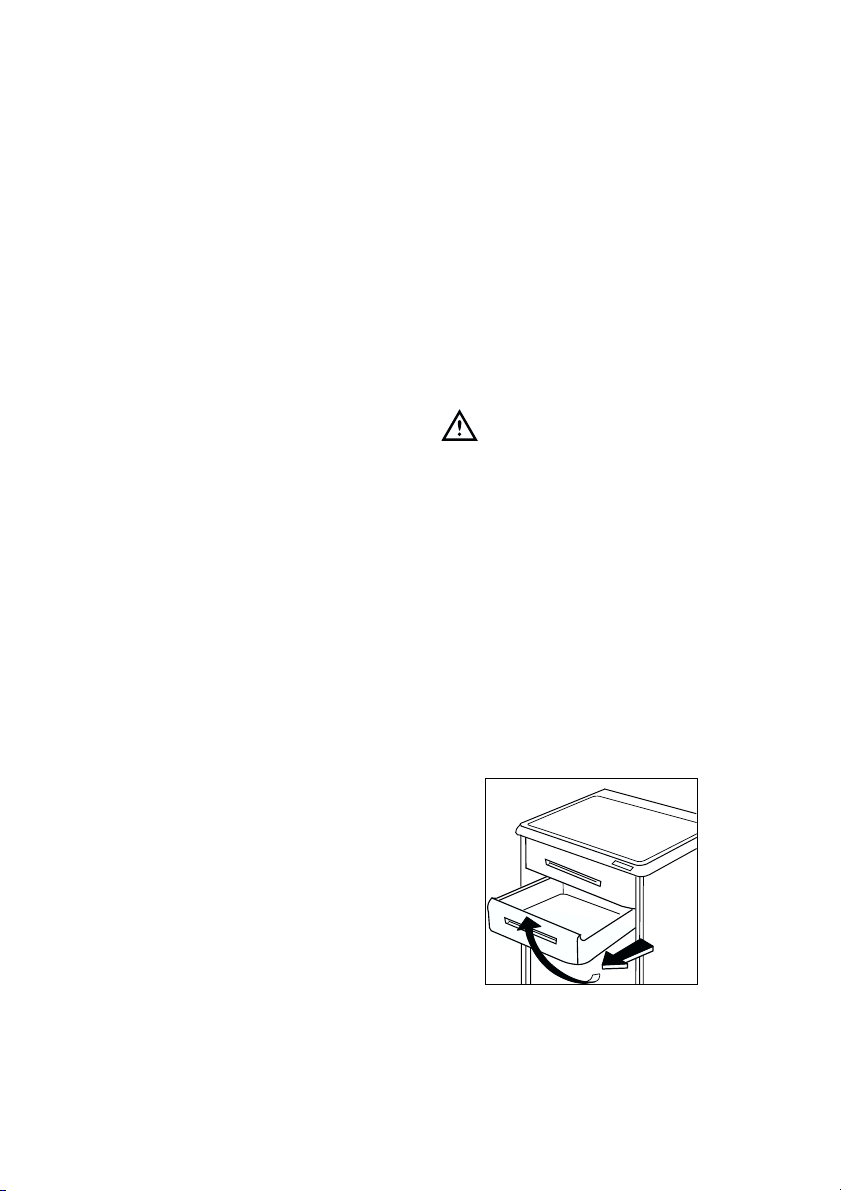
To remove the drawers, proceed as follows: pull the
drawer out until it comes to a stop, then tilt it upwards
(see figure).
PR001c

6
Normal Operating Sounds
You may hear faint gurgling or bubbling sounds when
the refrigerant is pumped through the coils or tubing
at the rear, to the fixed freezer shelves.
When the compressor is on, the refrigerant is being
pumped round, and you will hear a whirring sound or
pulsating noise from the compressor.
A thermostat controls the compressor, and you will
hear a faint ‘click’ when the thermostat cuts in and
out.
Freezing calendar
The symbols on the drawers show different types of
frozen goods.
The numbers indicate storage times in months for
the appropriate types of frozen goods. Whether the
upper or lower value of the indicated storage time is
valid depends on the quality of the foods and pretreating before freezing.
Thawing
Frozen food, prior to being used, can be thawed in
the fridge or at room temperature depending on the
time available. Small food items may even be cooked
from frozen; in this case cooking will take longer. Any
frozen food which is allowed to thaw accidentally
should either be eaten as soon as possible or thrown
away. Alternatively, if the food is uncooked and has
not been completely defrosted it can be cooked and
then refrozen.
Defrosted cooked food must never be refrozen.
Making ice cubes
The appliance is provided with a plastic ice cube tray.
Fill the tray 3/4 full to allow the ice to expand and
place it in the freezer. To turn out the ice cubes
simply give the tray a slight twist to release the
cubes.
Never tray to free an ice tray that is frozen to the
freezer using a sharp or pointed object.
 Loading...