

Zanussi ZGF753ICX User Manual

GAS HOB
√A«OBAfl
BAPO◊HAfl
œOBEPXHOCT‹
ZGF 753
ZGF 783
INSTRUCTION BOOKLET
P”OBOƒCTBO œO ›CœÀ”ATA÷»»
GB
RU

2
ENGLISH
For Your Safety
These warnings are provided in the interest of safety. You MUST read them carefully before
installing or using the appliance.
It is most important that this instruction book should be retained with the appliance for future
reference. Should the appliance be sold or transferred, always ensure that the book is left with
the appliance in order that the new owner can get to know the functions of the appliance and
the relevant warnings.
During Operation
• This appliance has been designed to be operated by
adults and children under supervision. Young children
MUST NOT be allowed to tamper with the controls or
play near or with the oven.
• This appliance has been designed for cooking
edible foodstuff and to be used for domestic nonprofessional purposes only. It must not be used for
any other purpose.
• It is dangerous to alter the specification in any way.
• For hygiene and safety reasons, this appliance should
be kept clean at all times. A build-up of fats or other
foodstuff could result in a fire.
• Accessible parts of this appliance may become hot
when it is in use. Children should be KEPT AWAY until
it has cooled.
• Under no circumstances should you attempt to repair
the appliance yourself. Repairs carried out by
unexperienced persons may cause injury or serious
malfunctioning. Refer to your local Zanussi Service
Centre. Always insist on genuine Zanussi spare
parts.
• Ensure that all control knobs are in the OFF position
when not in use.
• Should you connect any electrical tool to a plug near
this cooking appliance, ensure that electric cables
are not in contact with it and keep them far enough
from the heated parts of this appliance.
• If the appliance is out of order, disconnect it from the
electric supply.
About Installation, Cleaning
and Manteinance
• It is mandatory that all operations required for the
installation are carried out by a qualified or competent
person, in accordance with existing rules and
regulations.
• Disconnect the appliance from the electrical supply,
before carrying out any cleaning or manteinance
work.
• Ensure a good ventilation around the appliance. A
poor air supply could cause lack of oxygen.
• Ensure that the gas supply complies with the gas
type stated on the identification label, placed near
the gas supply pipe.
• Using a gas cooking appliance will produce heat
and moisture in the room which it has been
installed in. Ensure a continuous air supply,
keeping the air vents in good conditions or
installing a cooker hood with discharge tube.
• In case of intensive or long time use of the
appliance, make the ventilation more efficient,
by opening a window or increasing the electric
exhaust fan power.
• Once you removed all packaging from the appliance,
ensure that it is not damaged and the electric cable
is in perfect conditions. Otherwise, contact your
dealer before proceeding with the installation.
• The manufacturer disclaims any responsability
should all the safety measures not be carried
out.
MANUFACTURER:
ELECTROLUX HOME PRODUCTS ITALY S.p.A.
Viale Bologna 298 - 47100 FORLI’ (Italy)
These instructions are only for the countries stated by the symbol
printed on the front cover of this instruction book.
This appliance complies with the following
E.E.C. Directives:
- 73/23 - 90/683 (Low Voltage Directive);
- 89/336
- 90/396 (Gas Appliances)
- 93/68 (General Directives)
and subsequent modifications.
(Electromagnetical Compatibility Directive);
3
Contents
Instruction for the User ................. Pag. 4
Cleaning and Maintenance ............ Pag. 5
Electrical Connection..................... Pag. 7
Adaptation to different
types of gas ..................................... Pag. 8
Technical Data ................................ Pag. 6
Instruction for the Installer ............ Pag. 6
Building In ....................................... Pag. 9
Guarantee ........................................ Pag. 12
Instruction for the User
HOB BURNERS CONTROL KNOBS
The hob burners control knobs are situated on the hob
front panel. The symbols on the knobs mean that :
there is no gas supply
there is maximum gas supply
there is minimum gas supply
LIGHTING THE BURNERS
• For easier lighting, proceed before putting a pan
on the pan support.
• In models provided with automatic ignition, depress
the relevant switch marked with a small spark. Then,
push the relevant knob down and turn it anti-clockwise
until it reaches the "maximum" position.
• In models provided with semi-automatic ignition,push
the relevant knob down and turn it anti-clockwise
until it reaches the "maximum" position.
USING THE HOB CORRECTLY
To ensure maximum burner efficiency, it is strongly
recommended that you use only pots and pans with a
bottom fitting the size of the burner used, so that flame
will not spread beyond the bottom of the vessel (see the
table beside).
It is also advisable, as soon as a liquid starts boiling, to
turn down the flame so that it will barely keep the liquid
simmering.
• Use only pans or pots with flat bottom.
Carefully supervise cookings with fats or oil,
since these types of foodstuff can result in a fire,
if over-heated.
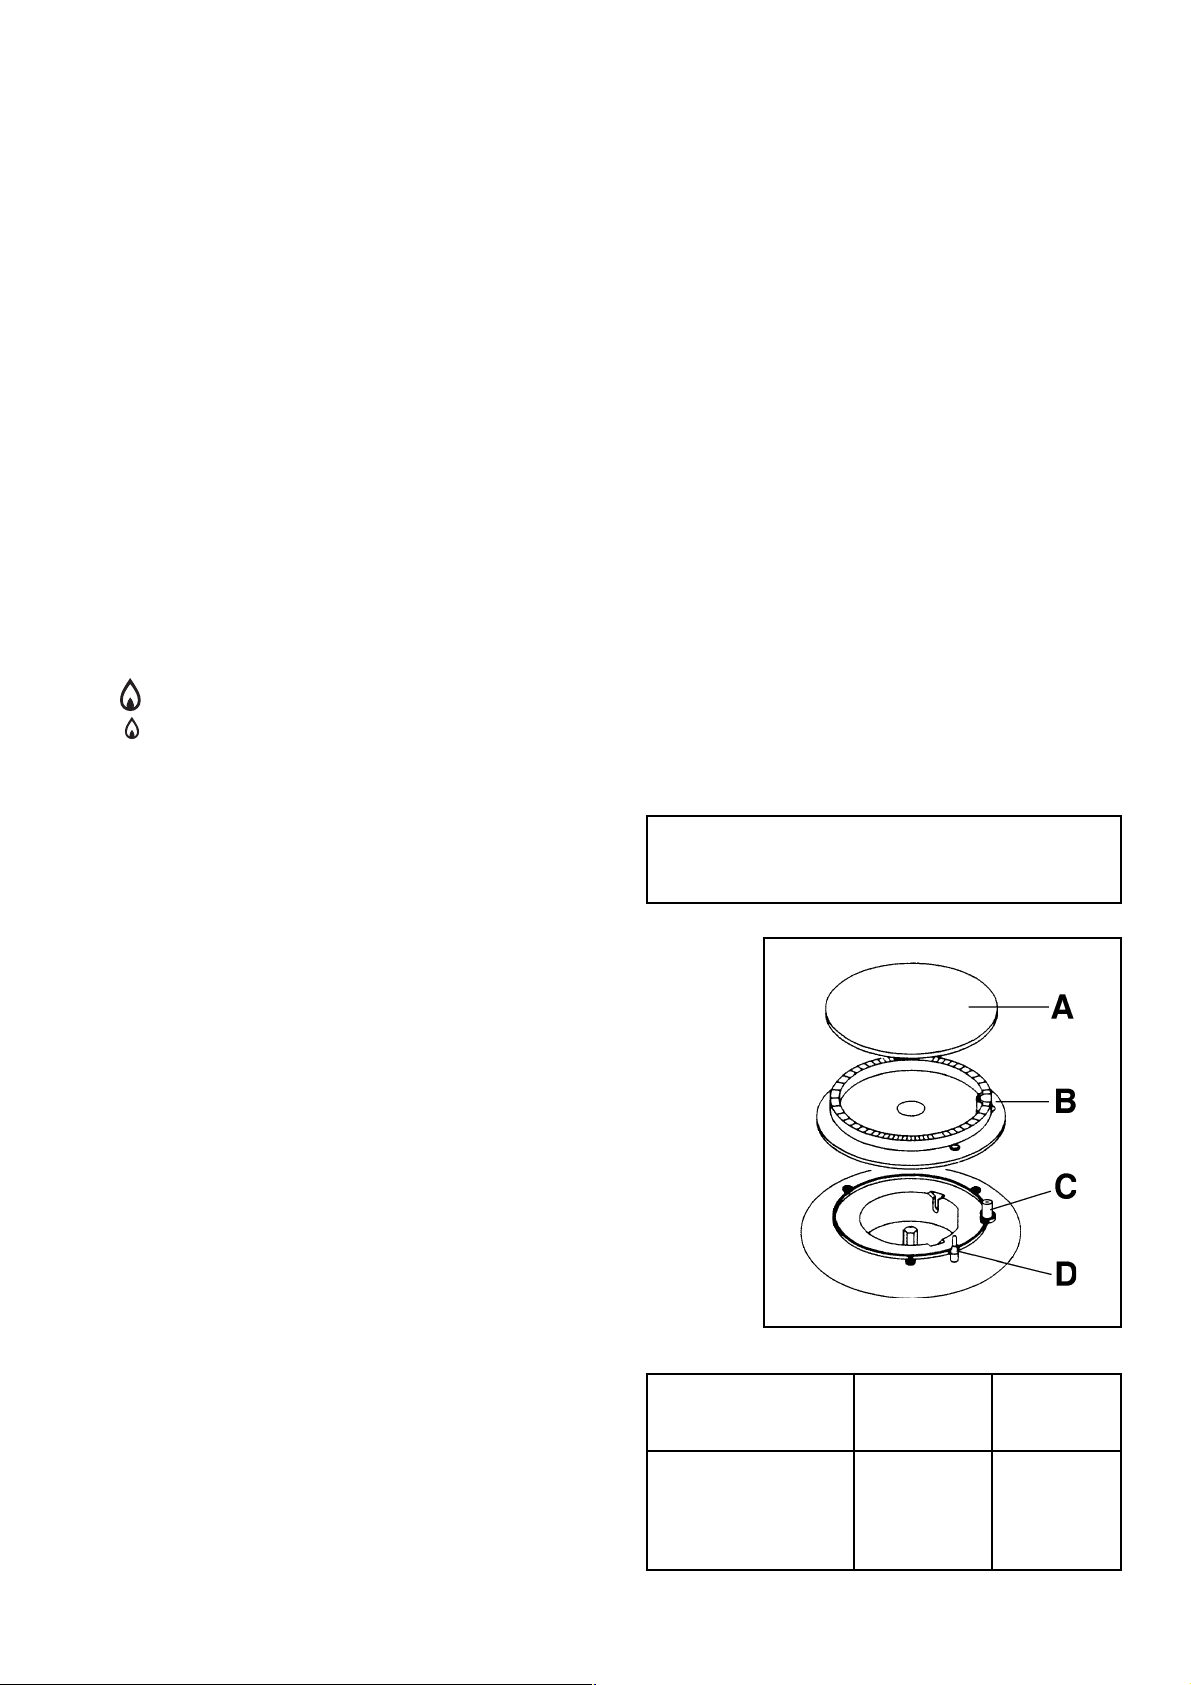
After lighting the flame, keep the knob pushed down for
about 5 seconds. This will allow the "thermocouple"
(Fig. 1 lett. D) to be heated and the safety device to be
switched off, otherwise the gas supply would be
interrupted. Then, check the flame is regular and adjust
it as required.
If you cannot light the flame even after several attempts,
check the "cap" (Fig. 1 lett. A) and the "crown" (Fig. 1 lett.
B) are in the correct position. To put the flame out, turn
the knob to the symbol .
• In the absence of electricity, ignition can occur
without the electrical device; in this case approach
the burner with a flame, push the relevant knob down
and turn it anti-clockwise until it reaches the
"maximum" position.
• Always turn the flame down or put it out before
taking the pans off the burner.
4
Fig. 1
Burner minimum maximum
Double Crown 180 mm. 260 mm.
Big (rapid) 180 mm. 260 mm.
Medium (semirapid) 120 mm. 220 mm.
Small (Auxiliary) 80 mm. 160 mm.
FO 0204
diameter diameter
 Loading...