

Page 1
FR
NL
DE
GB
820 41 81 93
CONGÉLATURE - VRIESKIST -
GEFRIERTRUHE - CHEST FREEZER
ZFC 229 S
ZFC 269 S
ZFC 309 S
ZFC 389 S
ZANUSSI
NOTICE D’UTILISATION
GEBRUIKSAANWIJZING EN INSTALLATIE
MONTAGE- UND GEBRAUCHSANLEITUNG
OPERATING AND INSTALLATION MANUAL
Page 2
16
It is vital that these instructions are kept with the freezer for future use. If the freezer is sold or given to another user, or if you move and
leave the freezer behind, you must ensure that the instructions accompany the freezer to enable the next user to use the freezer correctly and read the relevant warnings.It is vital that these instructions are kept with the freezer for future use. If the freezer is sold or given to
another user, or if you move and leave the freezer behind, you must ensure that the instructions accompany the freezer to enable the next
user to use the freezer correctly and read the relevant warnings.
Make sure that the power plug is not squashed or damaged by the back of the fridge/freezer.
- A damaged power plug may overheat and cause a fire.
Do not place heavy articles or the fridge/freezer itself on the power cord.
- There is a risk of a short circuit and fire.
Do not remove the power cord by pulling on its lead, particularly when the fridge/freezer is being pulled out of its niche.
- Damage to the cord may cause a short-circuit, fire and/or electric shock.
- If the power cord is damaged, it must be replaced by a certified service agent or qualified ser vice personnel.
If the power plug socket is loose, do not insert the power plug.
- There is a risk of electric shock or fire.
The symbol on the product or on its packaging indicates that this product may not be treated as household waste. Instead it shall
be handed over to the applicable collection point for the recycling of electrical and electronic equipment. By ensuring this product is disposed of correctly, you will help prevent potential negative consequences for the environment and human health, which could
otherwise be caused by inappropriate waste handling of this product. For more detailed information about recycling of this product,
please contact your local city office, your household waste disposal service or the shop where you purchased the product.
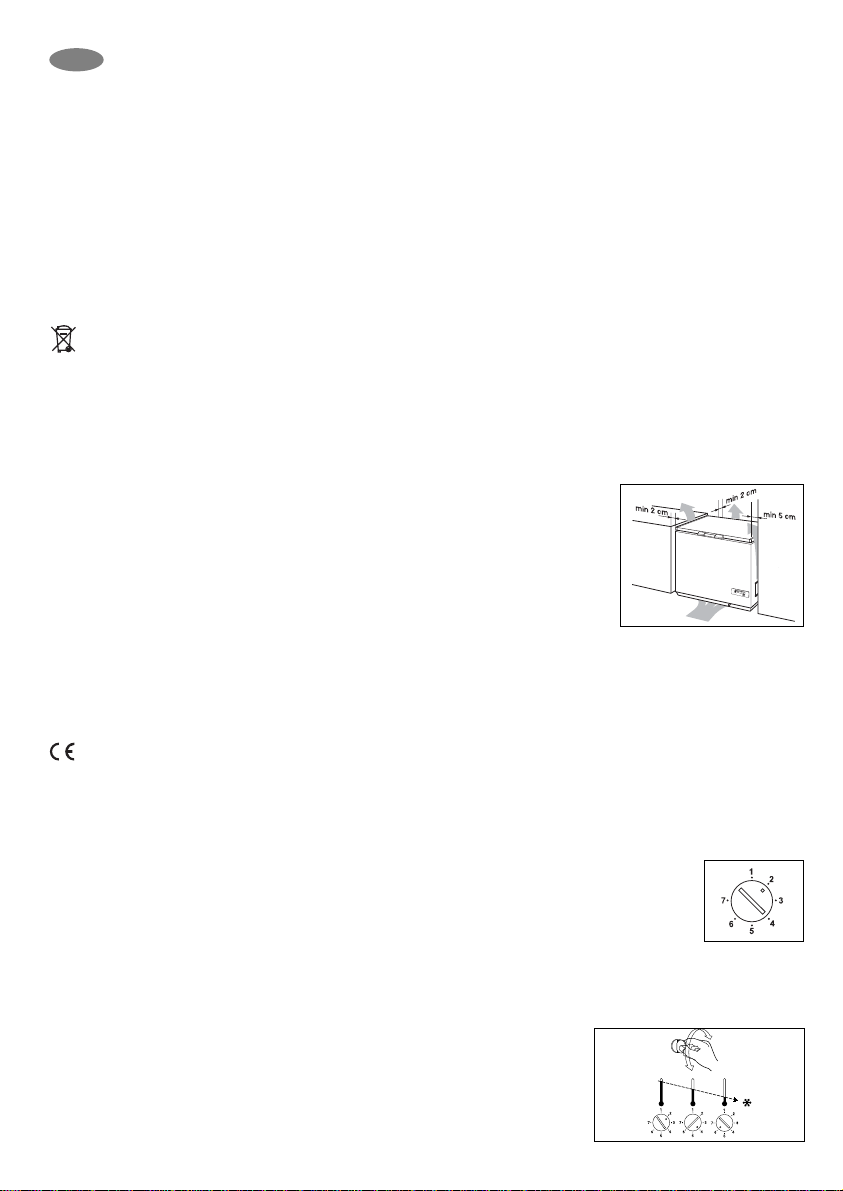
POSITION
Place the freezer horizontally on a firm surface, resting on all four plastic feet. Use a wooden block or similar object to compensate for any
bumps/holes in the surface. The room should be dry and adequately ventilated. Temperatures of the external environment have an impact
on the energy consumption of the device. Therefore:
- do not put the device to a place exposed to sunshine ore besides a radiator or oven,
- put it to a place where the temperature of the environment corresponds to the climatic classification for which the device was designed.
Climatic classification Ambient temperature limits
SN from +10°C to +32°C
N from +16°C to +32°C
ST from +18°C to +38°C
T from +18°C to +43°C
If the freezer has been handled standing on end it should be allowed to stand in normal position for about
12 hours before switching it on. Please ensure that when the appliance is installed it is easily accessible for the engineer in the event of a breakdown.
ELECTRICAL REQUIREMENTS
Before switching on, make sure that the voltage of your electricity supply is the same as that indicated on the rating plate, located inside
the lid.
Warning: This appliance must be earthed.
this appliance complies with the following EC Directives:
- 73/23/EEC of 19. 02. 1973 - Low-Voltage Directive
- 89/336/EEC of 03. 05. 1989 (including Amendment Directive 92/31/EEC - EMC Directive.
Some of the models are not available in all countries.
Testing has been carried out in accordance with ISO 5155 regarding the determination of freezer capacity, energy consumption and
hold-overtime.
Information for test institute: A plan of the positioning of test packages may be obtained directly from the manufacturer.
SWITCHING ON
Before switching on, the freezer should be cleaned inside. See under “Maintenance”. Set the thermostat button in
middle position. Allow the freezer to run for several hours before placing food inside.
OPENING/CLOSING THE LID
The lid is fitted with a tightly closing sealing strip to prevent moisture getting inside the freezer and increasing the amount of frost formed.
When the lid is opened the air inside the freezer becomes slightly warmer and expands. As soon as the lid is closed again the air is
cooled immediately. This may lead to the creation of a vacuum which makes it hard to open the lid immediately after it has been closed.
This is quite normal. Wait a few minutes until the vacuum has disappeared, then open the lid by pulling gently. Never pull the handle violently.
TEMPERATURE CONTROL
The thermostat ensures that the required temperature is maintained in the freezer. Turning the thermostat button towards no. 7 makes the temperature in the freezer colder, and turning the button towards
no. 1 makes the temperature warmer. The correct setting can be found by measuring the temperature
of the top package in the middle of the freezer. This should not have a temperature higher than –18°C.
GB
Page 3

17
THE ROLE OF THE PRESSURE EQUALISATION VALVE
The pressure equalisation valve installed in your freezer automatically eliminates the pressure difference
which otherwise would make it very difficult or even impossible to open the lid. It may be possible to
hear the operation of the valve as the air flows in through the airing outlet in the rear wall of the cabinet. For a safe operation, keep the two openings of the valve clear, do not cover them!
CONTROL PANEL
The green light is illuminated as long as the freezer is connected. The yellow light is illuminated
when the “Super” button is depressed. See under “Freezing”. The red warning light is illuminated
when the temperature in the freezer is higher than the thermostat setting (alarm). The panel has
an acoustic alarm which emits a “beep” sound when the red warning light comes on. This sound
can be stopped by pressing the “Super” button (yellow light comes on). The red warning light
remains on as long as the temperature in the freezer is higher than the thermostat setting. Once
the freezer has returned to normal temperature and the red warning light is off, press the “Super”
button again (yellow light goes off). The alarm can be due to:
Insertion of a large amount of fresh food. The alarm will stop after a while. Opening the lid too
long. The alarm will stop after a while. A defect in the system. See under “If something does not
work”.
CAPACITY
The freezing capacity of the freezer is stated in the data plate (kg/24 hours). Do not exceed the
amount stated - if you do, the freezing time will be extended. The data plate is located inside the
lid.
IMPORTANT The freezing capacity stated can be utilised to the full occasionally to
freeze large amounts of fresh food. However, if the freezer is filled with large amounts
of food for freezing every day, the capacity stated is reduced by about one-third.
LOCK
Insert the key in the lock, and turn. The key kan be removed.
Remember to keep the key out of the reach of children.
BASKET
The baskets are designed for the storage of food which has already been frozen. The handles
can be placed in two positions, as shown in the drawings.The baskets can either be placed
inside the freezer or hung on the edge of the casing.
DEFROSTING
The formation of frost on the inside of freezers cannot be avoided. Frost is formed when moisture contained in the air comes into contact with the cold surfaces of the freezer. Consequently,
the lid should only be opened when necessary, and it should never be left open. A thin layer of
ice or frost does not affect the function of the freezer adversely, and can be removed carefully
using the scraper provided.
IMPORTANT Never use a knife or any other sharp implement to remove frost.
When the frost or ice layer is 10-15 mm thick, the freezer should be defrosted. We suggest that
you defrost your freezer when there is little or no food inside. Switch off the current. Remove the
contents of the freezer, wrap them in newspapers, and leave them in a cold place. The speed
of defrosting can be increased by placing one or more bowls of hot (not boiling) water inside the
freezer and closing the lid. Open the lid after a while, and remove the layer of ice carefully. The
defrost water can be collected in a bowl as shown in the drawing. Do not try to speed up defrosting by using anything other than hot
water, since this may damage the freezer. After defrosting, clean the inside of the freezer.
IMPORTANT Remember to replace the plug in the drip water drain.
HOW TO CLEAN YOUR FREEZER INSIDE
Remove the plug from the mains socket, and remove all loose accessories before cleaning the freezer. The best time to clean your
freezer is after defrosting and before the electricity supply is connected again. Use a damp cloth to clean your freezer. Use hot water,
and a mild, non-aromatic cleaning agent. After cleaning the freezer, clean the basket/baskets before replacing them.
IMPORTANT Never use strong cleaning agents, scouring powder or strongly aromatic cleaning agents to clean your freezer inside, since this will damage the inside and leave a strong smell.
WHEN NOT IN USE
Disconnect the appliance from the electricity supply. Remove all goods from the freezer. Clean the freezer as described above.
Leave the lid slightly open.
Green light
Red light
„SUPER”
Yellow light
Thermostat
button
FFRREEEEZZIINNGG
CCAAPPAACCIITTYY
GB
Page 4

18
HOW TO CHANGE THE BULB
Before changing the bulb, isolate the appliance from the electricity supply. Unscrew the bulb, and
replace it with a new bulb (max. 15W). Then reconnect the electricity supply. Extra bulbs are available
from your local Zanussi Service Force Centre.
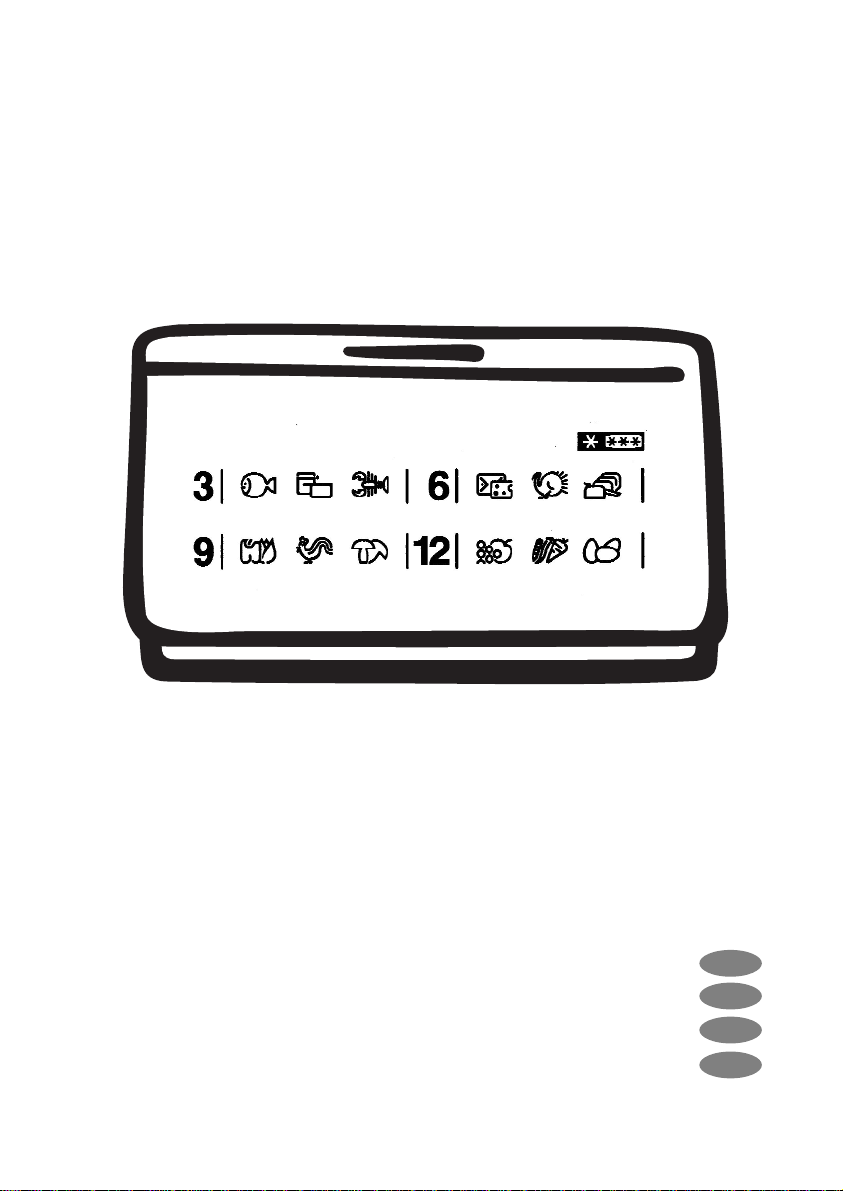
ACCESSORIES
Spare baskets can be obtained from your local Service Centre. The illustrations on this page show how many baskets can be placed in the various freezer models.Measure the length of your freezer and find the appropriate illustration. The number above each illustration indicates its length in millimetres.
ZANUSSI STANDARD GUARANTEE CONDITIONS
This guarantee is in addition to your statutory and other legal rights which will not be excluded or in any way diminished by
the return of this guarantee card.We, Zanussi Ltd., undertake that if within twelve months of the date of the purchase, this
ZANUSSI appliance or any part thereof is proved to be defective by reason only of faulty workmanship or materials, the
company will, at its option repair or replace the same FREE OF ANY CHARGE for labour, materials or carriage on condition that: The appliance has been correctly installed and used only on the electricity supply stated on the rating plate. The
appliance has been used for normal domestic purposes only, and in accordance with the munufacturer’s operating and
maintenance instructions. The appliance has not been serviced, maintained, repaired, taken apart or tampered with by
any person not authorised by us. The appliance is still in the possession of the original purchaser. All service work under
this guarantee must be undertaken by a Zanussi Service Force Centre. Home visits are made between 8.30am and 5.30pm Monday to Friday. Visits may
be available outside these hours in which case a premium will be charged. Any appliance or defective part replaced shall become the property of this company.
EXCLUSIONS
This guarantee does not cover: Damage or calls resulting from transportation, improper use or neglect, the replacement of any light
bulbs or removable parts of glass or plastic. Costs incurred for calls to put right machines improperly installed or calls to machines outside the United Kingdom. Appliances found to be in use within a commercial environment, plus those which are the subject of rental
agreements. Products of Zanussi manufacture which are NOT marketed by Zanussi Ltd. EEC Countries - the standard guarantee is
applicable but is subject to the owner’s responsibility and cost to ensure the appliance meets the standards set by the country to which
the product is taken. The Zanussi Company in the contry co cerned will be pleased to advise further. Sight of your purchase receipt
will be required by them.
Defect:
Freezer not
cold enough
Freezer too
cold
Too much
frost
formed
Check if:
Green light not on
Green and red light on
Green light on, red
light not on
Yellow light on
Yellow light not on
Lid does not close
completely
Lot of moisture in the
room
Goods packed poorly
The pressure equalisation valve does not
close appropriately.
Possible cause:
Plug not connected correctly
Defect in switch or fuse
Power failure
Fresh food recently placed in freezer
Lid open too long
Thermostat set too warm
Lot of frost and ice formed
“Super” function active
Thermostat set too cold
Lid in contact with goods in free-
zer
Moisture from washing machine,
tumble-dryer, etc.
Lot of moisture from goods
Some pollution has got into the
valve.
Action:
Check plug and socket
Check fuse, call electrician
Wait until current returns
Wait a couple of hours
Wait a couple of hours
Set thermostat colder
Defrost freezer
Press “Super” button out
Set thermostat warmer
Re-arrange goods, check that lid
closes correctly
Move freezer to a room with less
moisture, or air regularly
Re-pack goods, see under
“How to use”
The valve must be blown through
from the airing outlet in the rear wall.
IF YOUR FREEZER DOES NOT FUNCTION SATISFACTORILY
Check the following before calling for service staff:
GB
Page 5

19
Page 6

Printed by Océ Hungária Kft. 2005. 12. 16.
 Loading...