

Zanussi ZFC 352 WBB, ZFC 332 WBB, ZFC 328 WBB User Manual

ZFC 352 WBB
ZFC 332 WBB
ZFC 328 WBB
ZANUSSI
USER MANUAL
EN

2
EN
Disposal
By ensuring this product is disposed of correctly, you will help prevent potential damaging consequences for the environment and human health.
The symbol on the product indicates that this product may not be treated as household waste, it should be taken to
a suitable collection point for the recycling of electrical and electronic equipment. For more detailed information
about recycling of this product, please contact your local council, your household waste disposal service or the shop
where you purchased the appliance.
Safety Information
Before installing and using the appliance read this user's instruction book carefully. It contains safety precautions, hints,
information and ideas. If the freezer is used in compliance with the instructions written, it will operate properly and provide you with great satisfaction.
These warnings are provided in the interest of safety. You must read them carefully before installing or using the appliance.
Use the freezer only for storing frozen food, freezing fresh food and making ice cubes.
Do not eat ice cubes or ice lollies immediately after taking them out of the freezer, as they may cause frost burns.
Do not allow children to play or hide inside the freezer, as they may become trapped inside and suffocate.
Do not store glass containers with liquids in the freezer, as they may burst.
Ensure that the freezer is not resting on the power supply cable.
Before servicing or cleaning, always unplug the appliance or disconnect the power supply.
Do not use other electrical appliances (such as ice cream makers) inside the appliance.
Your appliance contains an environmentally friendly natural gas, isobuthane (R600a). Caution is required however,
since isobuthane is flammable. Therefore it is essential to ensure that the refrigerant pipelines are not damaged.
It is most important that this instruction book should be retained with the appliance for future reference.
Product Description
Control panel
A. Green light: Illuminates when the appliance is on.
B. Red light: Illuminates when the freezer temperature is not suffi-
ciently low.
C. Yellow light: Illuminates when the Super Freeze function is activated.
D. Super Freeze button: Activates/deactivates the Super Freeze
function for large quantities for fresh food.
E. Thermostat knob
Installation
Wait at least 2 hours before connecting the freezer to the power supply to ensure the refrigerant circuit is fully efficient.
Install the freezer in a dry, well ventilated room. Avoid locations near a source of heat or in direct sunlight.
The room temperature should correspond to the climatic classification for which the freezer was designed, see chapter "Technical data".
Place the freezer horizontally on a firm surface, resting on all four feet.
For optimum operation and in order to avoid damage when the lid is opened, leave a space of at least 5 cm from the
rear wall and 5 cm at the sides.
Before connecting the freezer to the power supply, ensure that the voltage corresponds to that indicated in chapter
"Technical data" under "Voltage".
Danger!
Ensure that the freezer is not resting on the power supply cable.
1. Lid handle
2. Seal
3. Defrost water drain
4. Control panel and Thermostat knob
5. Upper edge
6. Light
3
Do not remove the power supply cable by pulling on its lead, particularly when the freezer is being pulled out of its
niche.
The power supply cable may only be replaced by qualified service personnel.
Ensure that the power plug is not squashed or damaged by the back of the freezer.
There must be adequate ventilation around the appliance.
Any electrical work required to install this appliance should be carried out by a qualified electrician.
Warning! This appliance must be earthed.
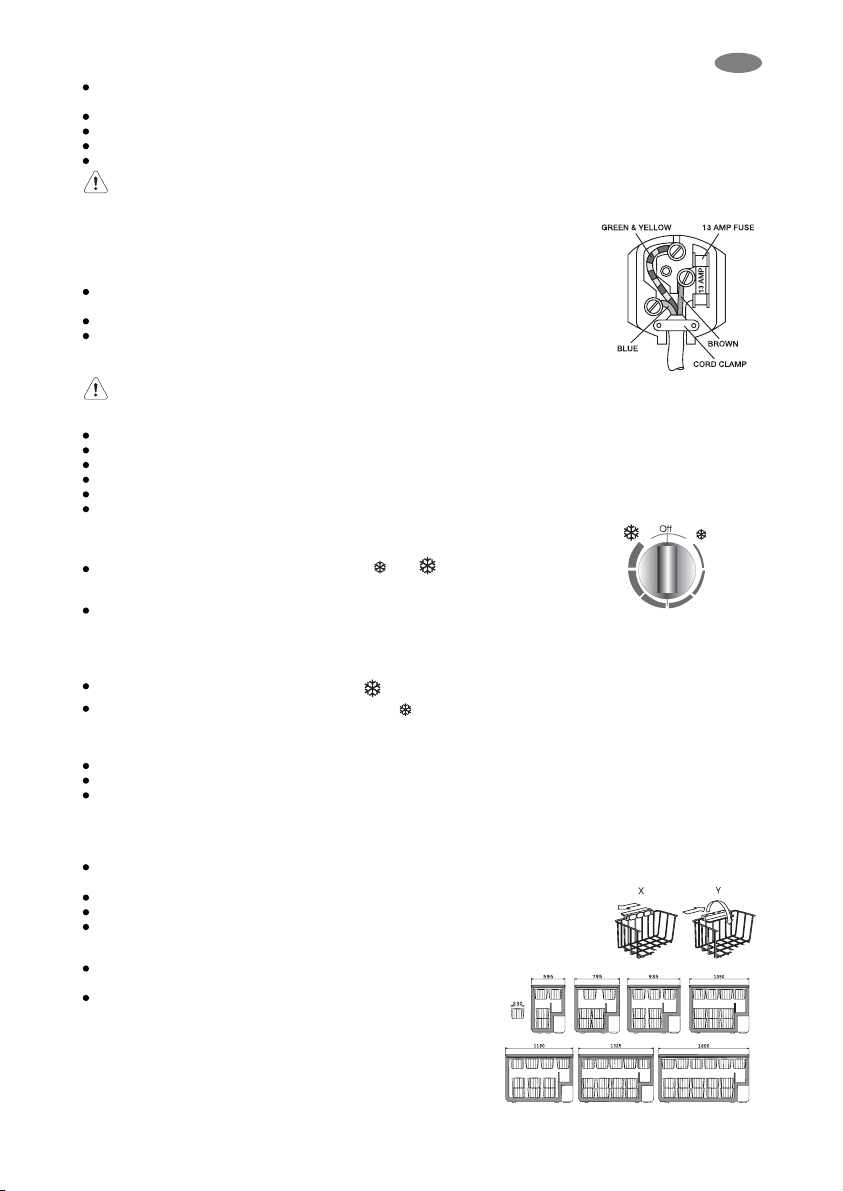
Electrical connection
The appliance is supplied with a 13amp plug fitted. In the event of having to change the
fuse in the plug supplied, a 13amp ASTA approved (BS1362) fuse must be used. Should
the plug need to be replaced for any reason. The wires in the power supply cable are
coloured in accordance with the following code:
Green and Yellow - Earth: must be connected to the terminal marked with the letter "E"
or by the earth symbol or coloured green and yellow.
Blue - Neutral: must be connected to the terminal "N" or coloured black.
Brown - Live: must be connected to the terminal marked "L" or coloured red.
Upon completion there must be no cut, or stray strands of wire present and the cord
clamp must be secure over the outer sheath.
Warning! This appliance must be earthed.
First use
Before first use, the freezer should be cleaned inside, see chapter "Care and cleaning".
Plug in the appliance.
The green light will come on.
The red light will also switch on to indicate that the temperature inside the freezer is not yet sufficiently low for food storage.
The red light will normally switch off after several hours.
Only place food inside the freezer once the red light has switched off.
Switch on-off
Switch on the freezer
Turn the thermostat knob to a postion between and .
Switch off the freezer
Turn the thermostat knob to the Off position.
Daily use
Temperature adjustment
To adjust the temperature of the freezer, proceed as follows:
Turn the thermostat knob clockwise towards for a colder storage temperature.
Turn the thermotat knob counter-clockwise towards for a less cold storage temperature.
Super Freeze function
If more than 3-4 kg of fresh food is to be frozen, the freezer needs to be pre-cooled.
At least 24 hours before placing fresh food in the freezer, press button (D).
The yellow light comes on.
Place the food in the freezer. This function can be de-activated any time by pressing button (D) again.
Alarm
If the freezer temperature is not sufficiently low, the red light will come on.
The red light remains on as long as the temperature in the freezer is higher than the thermostat setting.
The alarm can be due to:
Insertion of a large amount of fresh food.
Opening the lid too long.
A defect in the system, see chapter "What to do if...".
Storage baskets
Hang the baskets on the upper edge (X) or place the stackable bas-
kets inside the freezer (Y).
Turn and fix the handles for these two positions, as shown in the draw-
ings.
Spare baskets can be obtained from your local Service Force Centre. The
illustrations on this page show how many baskets can be placed in the various freezer models.
EN
 Loading...