

Page 1

AFWASAUTOMAAT
LAVA-VAISSELLE
GESCHIRRSPÜLER
DISHWASHER
ZDI 6142
Gebruiksaanwijzing - (deel 2) bladzijde 2
Notice d’utilisation - (partie 2) page 9
Bedienungsanleitung - (Teil 2) Seite 16
Instruction book - (part 2) page 23
NL
F
D
GB
Page 2
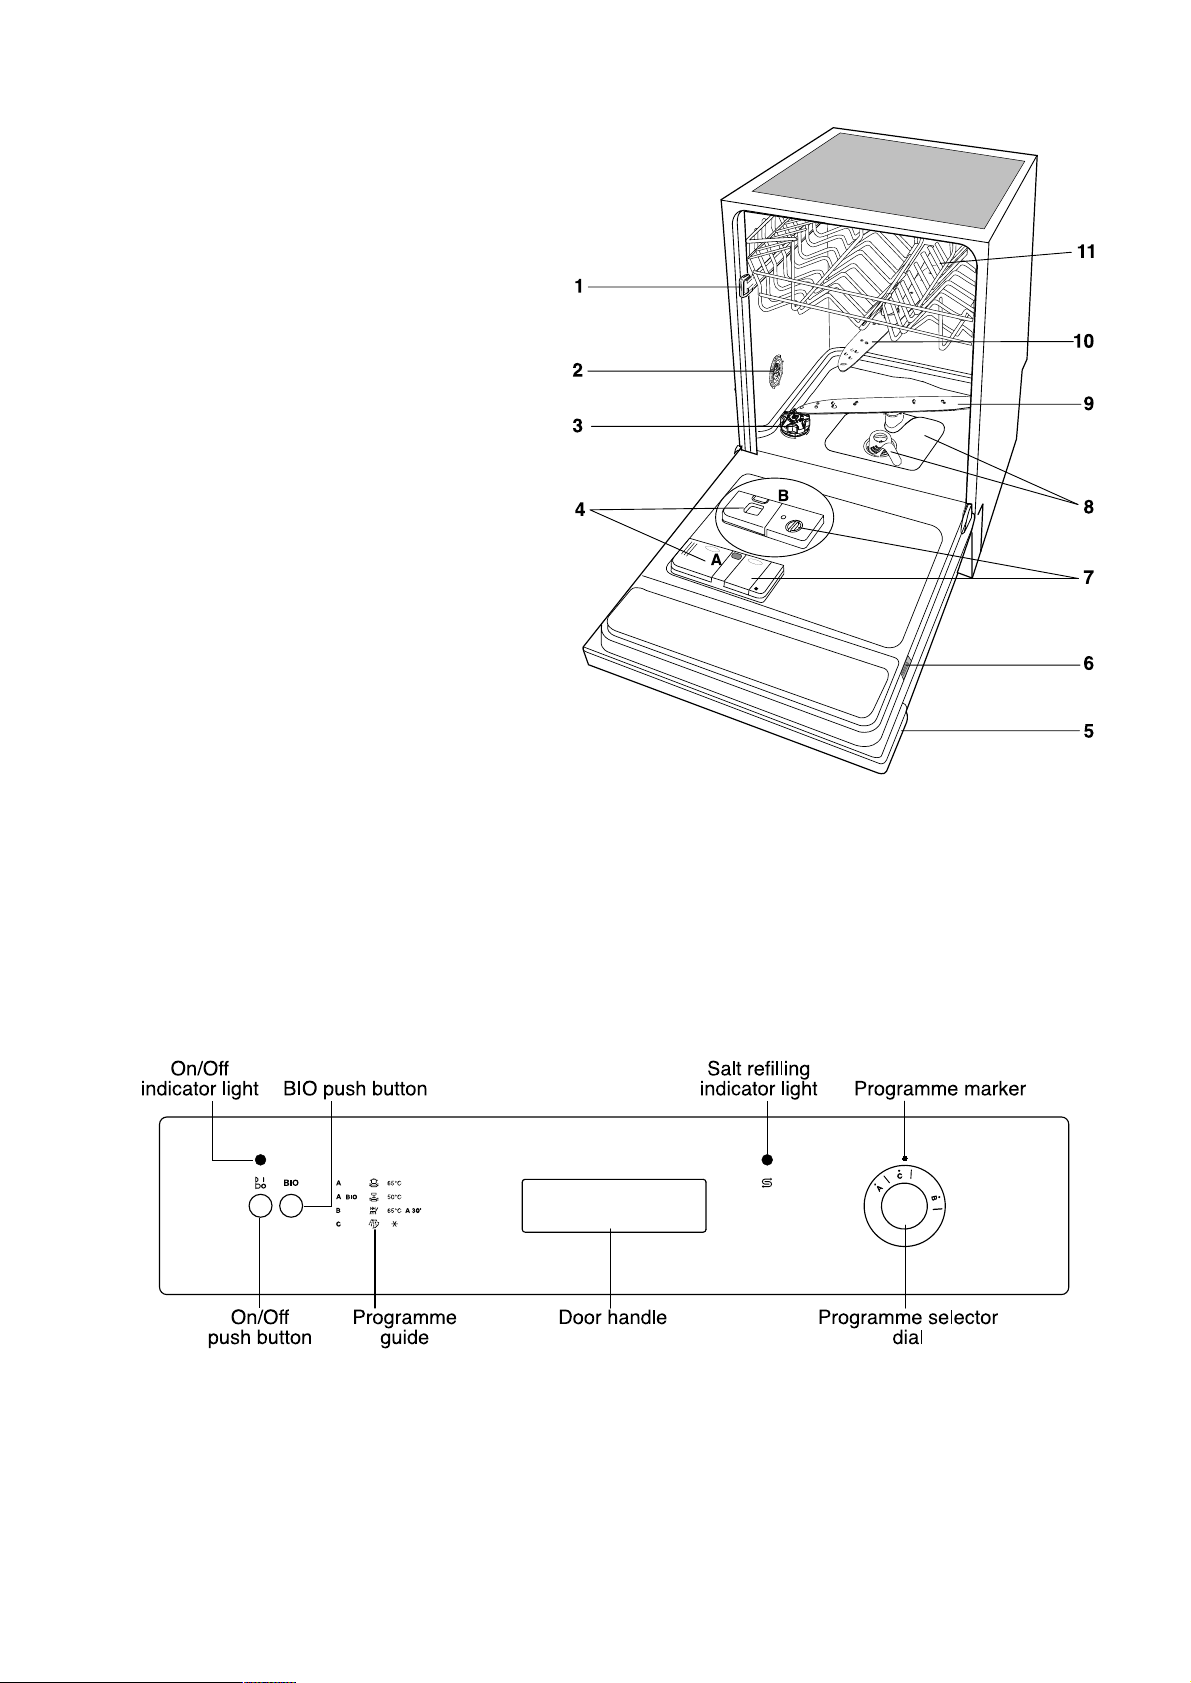
The control panel
23
1. Upper basket stop
2. Water hardness switch
3. Salt container
4. Detergent dispenser (type A/ type B)
5. Control panel
6. Rating plate
7. Rinse aid dispenser (type A/ type B)
8. Filters
9. Lower spray arm
10. Upper spray arm
11. Upper basket
Description of the appliance
IN143
Page 3
24
● Check if it’s necessary to refill with special salt or rinse aid
● Load cutlery and dishes into the dishwasher.
● Fill with dishwasher detergent .
● Select a wash programme suitable for the cutlery and
dishes.
● Start the wash programme.
Loading cutlery and dishes
Sponges, household cloths and any object that can
absorb water may not be washed in the dishwasher.
● Before loading the dishes, you should:
- Remove large left-overs.
- Soften remnants of burnt food in pans
● When loading the dishes and cutlery, please note:
- Dishes and cutlery must not impede the rotation of the
spray arms .
- Load hollow items such as cups, glasses, pans, etc. with
the opening downwards so that water cannot collect in the
container or a deep base.
- Dishes and items of cutlery must not lie inside one
another, or cover each other.
- To avoid damage to glasses, they must not touch.
- Lay small objects in the cutlery basket.
Open the door and slide out the baskets to load the dishes.
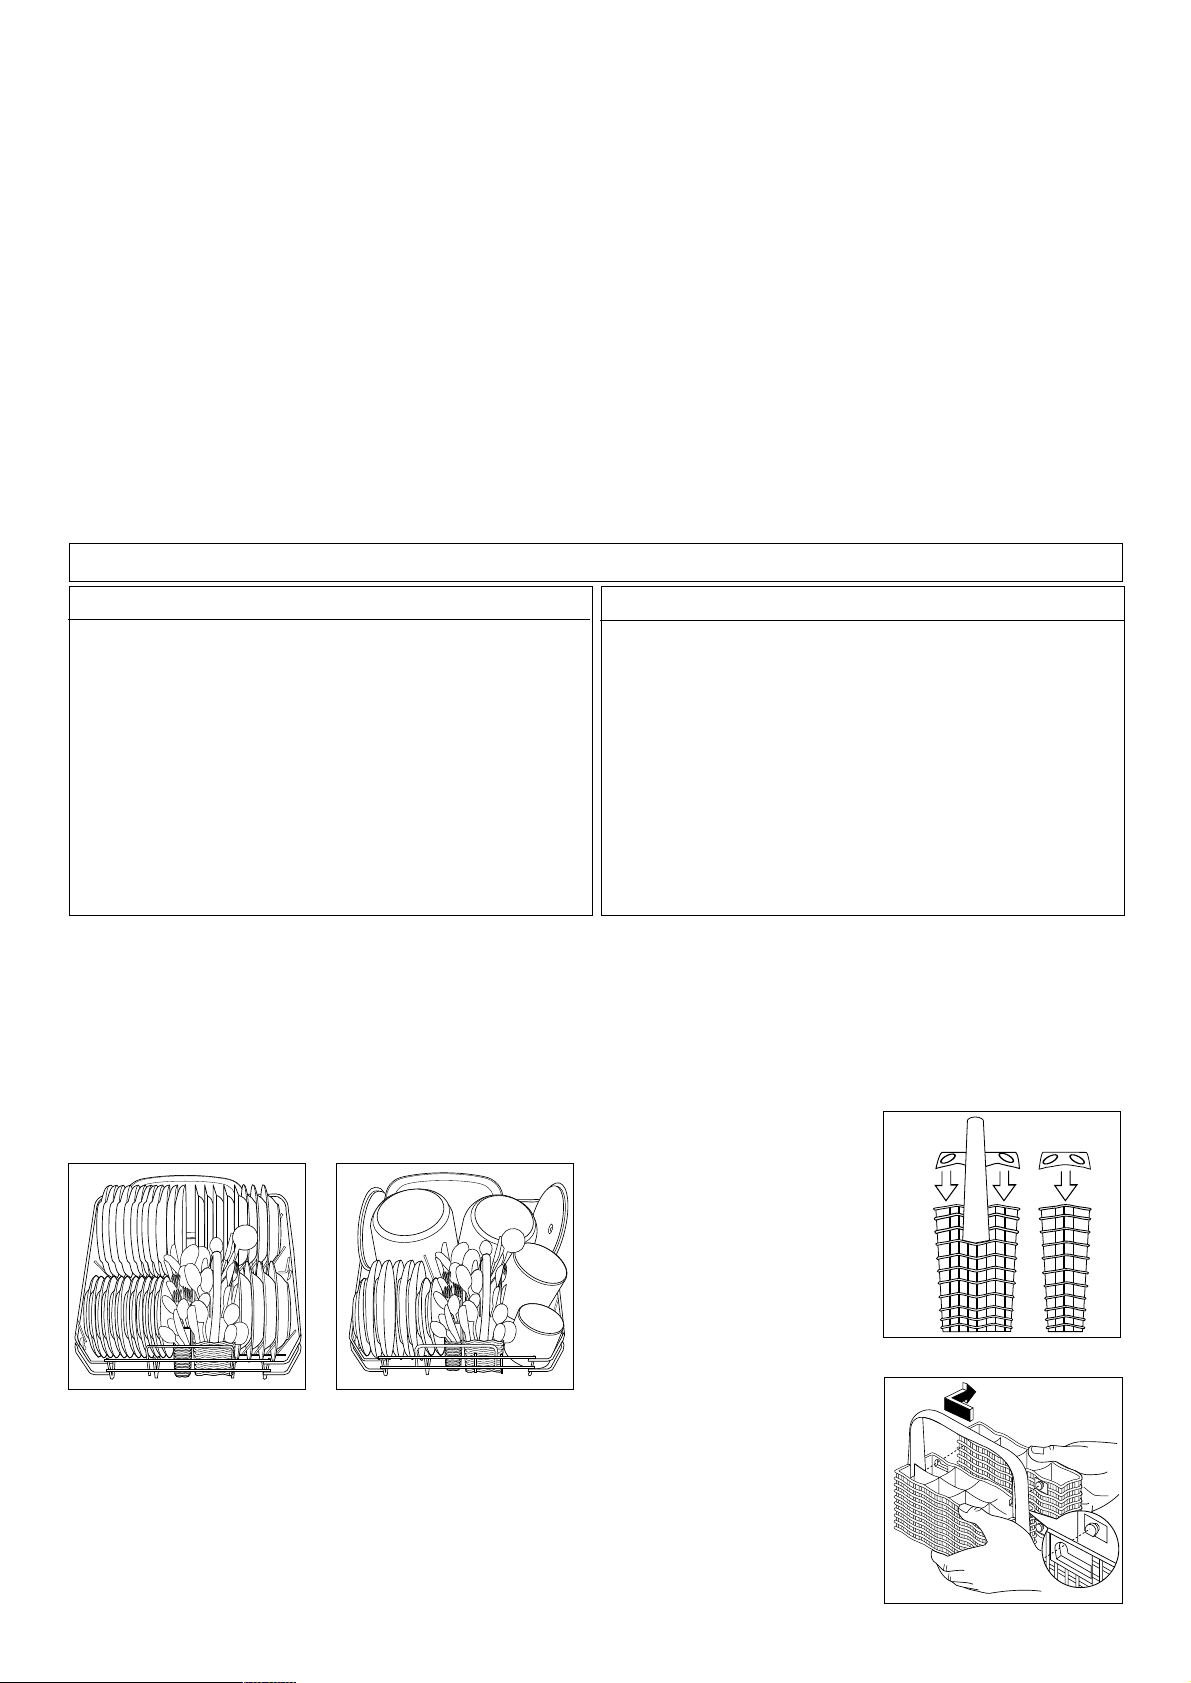
The lower basket
The lower basket is designed to take saucepans, lids, plates,
salad bowls, cutlery etc.
Serving dishes and large lids should be arranged around the
edge of the basket, ensuring that the upper spray arm can turn
freely.
The cutlery basket
Long bladed knives stored in an upright position are a
potential hazard.
Long and/or sharp items of cutlery such as carving knives
must be positioned horizontally in the upper basket.
Take care when loading or unloading sharp items such as
knives.
Cutlery should be placed in the removable cutlery basket with
the handles facing downwards. If the handles protrude from
the bottom of the basket, obstructing the lower spray arm, load
the cutlery with the handles facing upwards.
Mix spoons with other cutlery to prevent them from sticking
together.
For best results we
recommend you to use the
cutlery grids provided (if the
size and dimensions of the
cutlery allow it).
The cutlery basket is in two
parts which can be separated
to give greater loading
flexibility. To separate the two
parts, slide them horizontally
in opposite directions and
pull them apart. To
reassemble, reverse the
procedure.
In daily use
For washing in the dishwasher the following cutlery/dishes
are of limited suitability:
- Only wash stoneware in the dishwasher if it is specifically
marked as being dishwasher-safe by the manufacturer.
- Glazed patterns may fade if machine washed frequently
- Silver and aluminium parts have a tendency to discolour
during washing. Left-overs, e.g. egg white, egg yolk and
mustard often cause discolouring and staining on silver.
Therefore always clean left-overs from silver immediately, if
it is not to be washed straight after use.
- Some types of glass can become dull after a large number
of washes
are not suitable:
- Cutlery with wooden, horn, china or
mother-of-pearl handles
- Plastic items that are not heat resistant
- Older cutlery with glued parts that is not
temperature resistant
- Bonded cutlery items or dishes
- Pewter or copper items
- Lead crystal glass
- Steel items subject to rusting
- Wooden platters
- Items made from synthetic fibres
UI48
UI21
UI63
UI62
Page 4
25
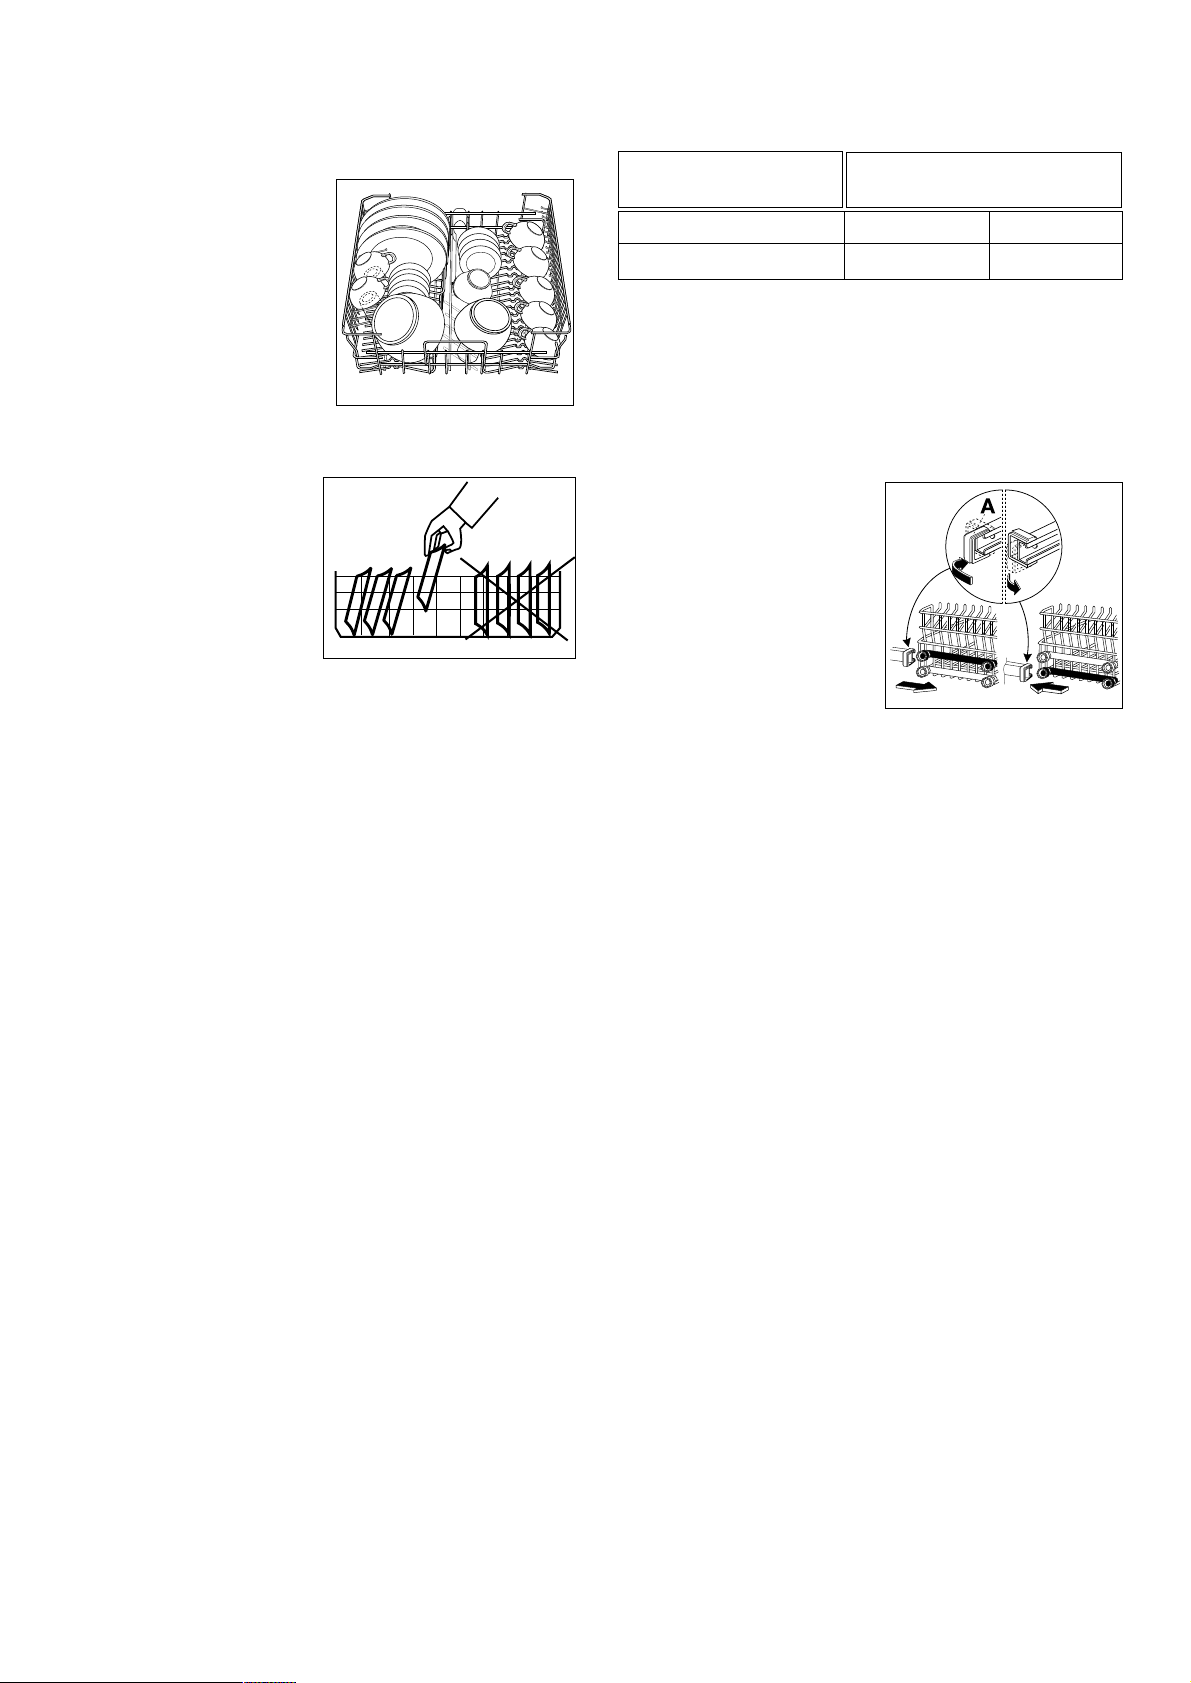
The upper basket
The upper basket is designed for plates (dessert plates,
saucers, dinner plates of up to 25 cm in diameter), salad
bowls, cups and glasses.
Arrange items on and
underneath the cup racks so
that water can reach all
surfaces.
Glasses with long stems can
be placed upside down in the
cup racks.
Light items (plastic bowls
etc.) must be loaded in the
upper basket and arranged
so they do not move.
In case that plates are loaded in the upper
basket:
load them starting from the
rear positions of the basket;
tilting them slightly forwards
and avoiding the front
positions near the door.
Before closing the door, ensure that the spray arms can
rotate freely.
Adjusting the height of the upper basket
If washing very large plates you can load them in the lower
basket after moving the upper basket to the higher position.
To move to the higher position proceed as
follows:
1. Move the front runner stops (A) of the upper basket
outwards and slide the basket out.
2. Refit the basket in the higher position and replace the stops
(A) in their original position.
After loading your machine always close the door, as an
open door can be a hazard.
With upper basket raised 20 cm 31 cm
With upper basket lowered 25 cm 27 cm
Maximum height of the dishes in
upper basket lower basket
US64
US71
RC01
Page 5

26
Washing programmes
(1) Testing programme for EN 50242 (see "Hints for Test Centres). This programme, developed for the use of detergents with
enzymes, allows you to achieve, with reduced consumption of energy the same cleaning results that would otherwise be
obtained only with the 65°C programmes and conventional detergents. To compensate the lower temperature, the duration of
the programme has been extended.
(2) Ideal for washing crockery and cutlery of breakfast and dinner (fresh soil).
Characterised by a short duration.
This is the perfect daily programme, made to meet the needs of a family of 4 persons who only wish to load breakfast
and dinner crockery and cutlery.
(3) The consumption values are intended as a guide and depends on the pressure and the temperature of the water and also by
the variations of the power supply.
Required
temperature
push button
Starting
position of the
programme
selector dial
BIO
Type of load
and
degree of soil
Normal soil.
Crockery, cutlery,
pots and pans
Normal soil.
Crockery and
cutlery
Fresh soil.
Crockery and
cutlery
Any.
Partial load (to be
completed later in
the day).
Programme
Normal 65°C
(2) Quick wash
65A 30
I
Rinse and Hold
(1) Bio 50°C
Cycle
description
(3) Consumption values
Cold prewash
Main wash up to 65°C
2 cold rinses
1 hot rinse
Drying
Main wash up to 65°C
1 hot rinse
1 cold rinse (to avoid
food scraps from
sticking together).
Cold prewash
Main wash up to 50°C
1 cold rinse
1 hot rinse
Drying
Programme
duration
(in minutes)
Energy
consumption
(in kWh)
Water
consumption
(litres)
125 - 135 1,40 - 1,50 18 - 20
115 - 125 0,95 - 1,05 16 - 18
30 - 40 1,15 - 1,05 11 - 13
12 0,1 10
A
A
B
C
Page 6

27
1. Check that the baskets have been
loaded correctly and that the spray
arms can rotate freely
2. Turn on the water tap
3. Close the dishwasher door
4. Setting and starting the programme
Turn the programme selector dial clockwise until the
letter of the programme you wish to select corresponds
with the programme marker on the control panel (see
"Washing programmes" chart).
If necessary select the temperature of the main wash
according to the instructions given in the "Washing
programmes" chart (see "Required temperature push
button").
Depress the On/Off push button; the On/Off indicator
light will come on and the machine will start.
5. Interrupting a washing programme
Interrupt a washing programme in progress ONLY if
it’s absolutely necessary
To interrupt a washing programme
Attention! Hot steam may escape when the door is
opened. There is risk of scalding. Open the door
carefully.
● Open the dishwasher door; the programme will stop.
Close the door; the programme will start from the
point in which it was interrupted.
● Pressing the On/Off (in this case the On/Off indicator
light turns off). Press the On/Off push button again;
the programme will start from the point in which it was
interrupted.
6. End of the washing programme
The dishwasher will automatically stop.
Switch off the dishwasher by pressing the On/Off push
button, the On/Off indicator light turns off.
Hot steam may escape from the appliance when opening
the door immediately after the end of the programme,
therefore, open the door carefully.
Unloading the dishwasher
Hot dishes are sensitive to knocks. The dishes should
therefore be allowed to cool down before removing from
the appliance.
Leave the dishes in the dishwasher for approx. 15
minutes, with the door ajar, after the end of programme
so that they dry better and will be cooler.
Empty the lower basket first and then the upper one; this
will avoid water dripping from the upper basket onto the
dishes in the lower one.
When the washing programme has finished, it is
recommended that the dishwasher is unplugged and the
water tap turned off.
Starting a washing programme
Page 7

28
Building-in
This dishwasher is designed to be fitted under a kitchen
counter or worksurface.
Attention!
Carefully follow the instructions on the enclosed template for
building in the dishwasher and fitting the furniture panel.
No further openings for the venting of the dishwasher are
required, but only to let the water fill and drain hose and power
supply cable pass through.
The dishwasher incorporates adjustable feet to allow the
adjustment of the height.
During all operations that involve accessibility to internal
components the dishwasher has to be unplugged.
When inserting the machine, ensure that the water inlet hose,
the drain hose and the supply cable are not kinked or
squashed.
Levelling
Good levelling is essential for correct closure and sealing of
the door.
When the appliance is correctly levelled, the door will not catch
on either side of the cabinet.
If the door does not close correctly, loosen or tighten the
adjustable feet until the machine is perfectly level.
Fixing to the adjacent units
The dishwasher must be secured against tilting.
Therefore make sure that the counter it is fixed under, is
suitably secured to a fixed structure (adjacent kitchen units
cabinets, wall).
Water inlet hose with safety valve
After connecting the double-walled water inlet hose, the safety
valve is next to the tap. Therefore the water inlet hose is only
under pressure while the water is running. If the water inlet
hose starts to leak during this operation, the safety valve cuts
off the running water.
Please take care when installing the water inlet hose:
- The distance between the bottom edge of the safety value
and the floor on which the dishwasher is standing must be at
least 30 cm:
- The electrical cable for the safety valve is in the doublewalled water inlet hose. Do not immerse the water inlet hose
or the safety valve in water.
- If water inlet hose or the safety valve is damaged, remove
the mains plug immediately.
- Awater inlet hose with safety valve must only be replaced by
a specialist or by the consumer services department.
- Place the water inlet hose in such a way that it is never
higher than the bottom edge of the safety valve.
Dimensions Width 59.6 cm
Height 81.8 - 87.8 cm
Max depth 57.5 cm
Electrical connection: Information on the electrical connection is given on the rating plate on the
Voltage inner edge of the dishwasher’s door on the right.
Overall power
Fuse
Water supply pressure Minimum 50 kPa (0.5 bar)
Maximum 800 kPa (8 bar)
Capacity 12 place settings
Technical specifications
This appliance complies with the following E.E.C. Directives:
- 73/23 or 19.2.73 (Low Voltage Directive) and subsequent modifications;
- 89/336 or 3.5.89 (Electromagnetic Compatibility Directive) and subsequent modifications.
CS19
Page 8

29
Testing in accordance with EN 60704 must be carried out with appliance fully loaded and using the test programme (see "Washing
programmes" chart).
Test in accordance with EN 50242 must be carried out when the salt dispenser and rinse aid container have been filled with salt and
rinse aid respectively and using the test programme (see "Washing programmes" chart).
Hints for test centres
Load: 12 standard place settings
Rinse aid setting
Rinse aid dispenser (type A): position 4 (type III)
Rinse aid dispenser (type B): position 5 (type III)
Detergent dosage: 5g + 25g (type B)
Arrangement upper basket
Arrangement lower basket
Arrangement cutlery basket
Page 9

Page 10

Page 11

From the Electrolux Group. The world’s No.1 choice.
The Electrolux Group is the world’s largest producer of powered appliances for kitchen,
cleaning and outdoor use. More than 55 million Electrolux Group products (such as
refrigerators, cookers, vacuum cleaners, chain saws and lawn mowers) are sold each year
to a value of approx. 14 billion USD in more than 150 countries around the world.
Wijzigingen voorbehouden
Sous réserve de modifications
Änderungen vorbehalten
Subject to change without notice
152971 53/0 0 11/02
From the Electrolux Group. The world’s No.1 choice.
Le Groupe Electrolux est le premier fabricant mondial d’appareils domestiques, d’entretien
et d’extérieur. Plus de 55 millions de produits du Groupe Electrolux (tels que réfrigérateurs,
cuisinières, lave-linge, aspirateurs, tronçonneuses, tondeuses à gazon) sont vendus
chaque année pour un montant d’environ 14 milliards d’Euros dans plus de 150 pays à
travers le monde.
 Loading...