

Page 1

NL
Gebruiksaanwijzing 2
EN
User manual 14
ET
Kasutusjuhend 25
FR
Notice d'utilisation 37
DE
Benutzerinformation 50
PT
Manual de instruções 62
Afwasautomaat
Dishwasher
Nõudepesumasin
Lave-vaisselle
Geschirrspüler
Máquina de lavar loiça
ZDI12010XA
Page 2
Inhoud
Veiligheidsvoorschriften _ _ _ _ _ _ _ _ _ _ _ 2
Bedieningspaneel _ _ _ _ _ _ _ _ _ _ _ _ _ _ 4
Programma’s _ _ _ _ _ _ _ _ _ _ _ _ _ _ _ _ _ 4
Voor het eerste gebruik _ _ _ _ _ _ _ _ _ _ _ 5
Dagelijks gebruik _ _ _ _ _ _ _ _ _ _ _ _ _ _ 7
Veiligheidsvoorschriften
Lees zorgvuldig de meegeleverde instructies
voor installatie en gebruik van het apparaat. De
fabrikant is niet verantwoordelijk voor letsel en
schade veroorzaakt door een foutieve installatie. Bewaar de instructies van het apparaat
voor toekomstig gebruik.
Veiligheid van kinderen en kwetsbare
mensen
Waarschuwing! Gevaar voor verstikking,
letsel of permanente invaliditeit.
• Mensen, met inbegrip van kinderen, met beperkte lichamelijke, zintuiglijke of verstandelijke vermogens of gebrek aan ervaring en
kennis, mogen dit apparaat niet bedienen.
Zij moeten onder toezicht staan of instructies krijgen over het gebruik van dit apparaat
van iemand die verantwoordelijk is voor hun
veiligheid.
• Laat kinderen niet met het apparaat spelen.
• Houd alle verpakkingsmaterialen uit de buurt
van kinderen.
• Houd alle reinigingsmiddelen uit de buurt
van kinderen.
• Houd kinderen en huisdieren uit de buurt
van het apparaat als de deur open is.
Installatie
• Verwijder alle verpakkingsmaterialen.
• Installeer en gebruik geen beschadigd apparaat.
• Installeer of gebruik het apparaat niet op
een plek waar de temperatuur onder de 0
°C komt.
• Volg de installatie-instructies op die zijn
meegeleverd met het apparaat.
2
Aanwijzingen en tips _ _ _ _ _ _ _ _ _ _ _ _ _ 9
Onderhoud en reiniging _ _ _ _ _ _ _ _ _ _ 10
Probleemoplossing _ _ _ _ _ _ _ _ _ _ _ _ 11
Technische informatie _ _ _ _ _ _ _ _ _ _ _ 13
Milieubescherming _ _ _ _ _ _ _ _ _ _ _ _ _ 13
Wijzigingen voorbehouden.
Aansluiting aan het elektriciteitsnet
Waarschuwing! Gevaar voor brand en
elektrische schokken.
• Dit apparaat moet worden aangesloten op
een geaard stopcontact.
• Controleer of de elektrische informatie op
het typeplaatje overeenkomt met de stroomvoorziening. Zo niet, neem dan contact op
met een elektromonteur.
• Gebruik altijd een correct geïnstalleerd,
schokbestendig stopcontact.
• Gebruik geen meerwegstekkers en verlengsnoeren.
• Zorg dat u de hoofdstekker en kabel niet
beschadigt. Neem contact op met de service-afdeling of een elektromonteur om een
beschadigde hoofdkabel te vervangen.
• Steek de stekker pas in het stopcontact als
de installatie is voltooid. Zorg ervoor dat het
netsnoer na installatie bereikbaar is.
• Trek niet aan het aansluitnoer om het apparaat los te koppelen. Trek altijd aan de stekker.
Aansluiting aan de waterleiding
• Zorg dat u de waterslangen niet beschadigt.
• Laat het water stromen tot het schoon is
voordat u het apparaat aansluit op nieuwe
leidingen of leidingen die lang niet zijn gebruikt.
• Zorg dat er geen lekkages zijn als u het apparaat de eerste keer gebruikt.
• De watertoevoerslang heeft een veiligheidsventiel en een dubbel omhulsel met een
hoofdkabel aan de binnenkant.
www.zanussi.com
Page 3
Waarschuwing! Gevaarlijke spanning.
Als de watertoevoerslang beschadigd is,
•
haal dan onmiddellijk de stekker uit het
stopcontact. Neem contact op met de service-afdeling om de watertoevoerslang te vervangen.
Gebruik van het apparaat
• Dit apparaat is bedoeld voor huishoudelijk
gebruik of gelijksoortige toepassingen zoals:
– Personeelskeukens in winkels, kantoren
of andere werkomgevingen
– Boerderijen
– Door gasten in hotels, motels en andere
woonomgevingen
– Bed-and-breakfast-accommodatie.
Waarschuwing! Gevaar op letsel,
brandwonden of elektrische schokken.
• De specificatie van het apparaat mag niet
worden veranderd.
• Doe messen en bestek met scherpe punten
in het bestekmandje met de punten omlaag
in horizontale positie.
• Laat de deur van het apparaat niet open
staan zonder toezicht om te voorkomen dat
er iemand over struikelt.
• Ga niet op de open deur zitten of staan.
• Vaatwasmiddel is gevaarlijk. Volg de veiligheidsinstructies op de verpakking van het
vaatwasmiddel op.
• Speel niet met het water van het apparaat
en drink het niet op.
• Verwijder de borden pas uit het apparaat als
het programma is voltooid. Er kan vaatwasmiddel op de borden zitten.
• Het apparaat kan hete stoom laten ontsnappen als u de deur opent terwijl er een programma wordt uitgevoerd.
• Plaats geen ontvlambare producten of items
die vochtig zijn door ontvlambare producten
in, bij of op het apparaat.
• Gebruik geen waterstralen of stoom om het
apparaat te reinigen.
Verwijdering
Waarschuwing! Gevaar voor letsel of
verstikking.
• Haal de stekker uit het stopcontact.
• Snijd het netsnoer van het apparaat af en
gooi dit weg.
• Verwijder de deurgreep om te voorkomen
dat kinderen en huisdieren opgesloten raken
in het apparaat.
Servicedienst
• Contact opnemen met de klantenservice
voor reparatie van het apparaat. Wij raden
uitsluitend het gebruik van originele onderdelen aan.
• Zorg er als u contact opneemt met de klantenservice voor dat u de volgende informatie
heeft van het typeplaatje.
Model:
Productnummer:
Serienummer:
www.zanussi.com
3
Page 4
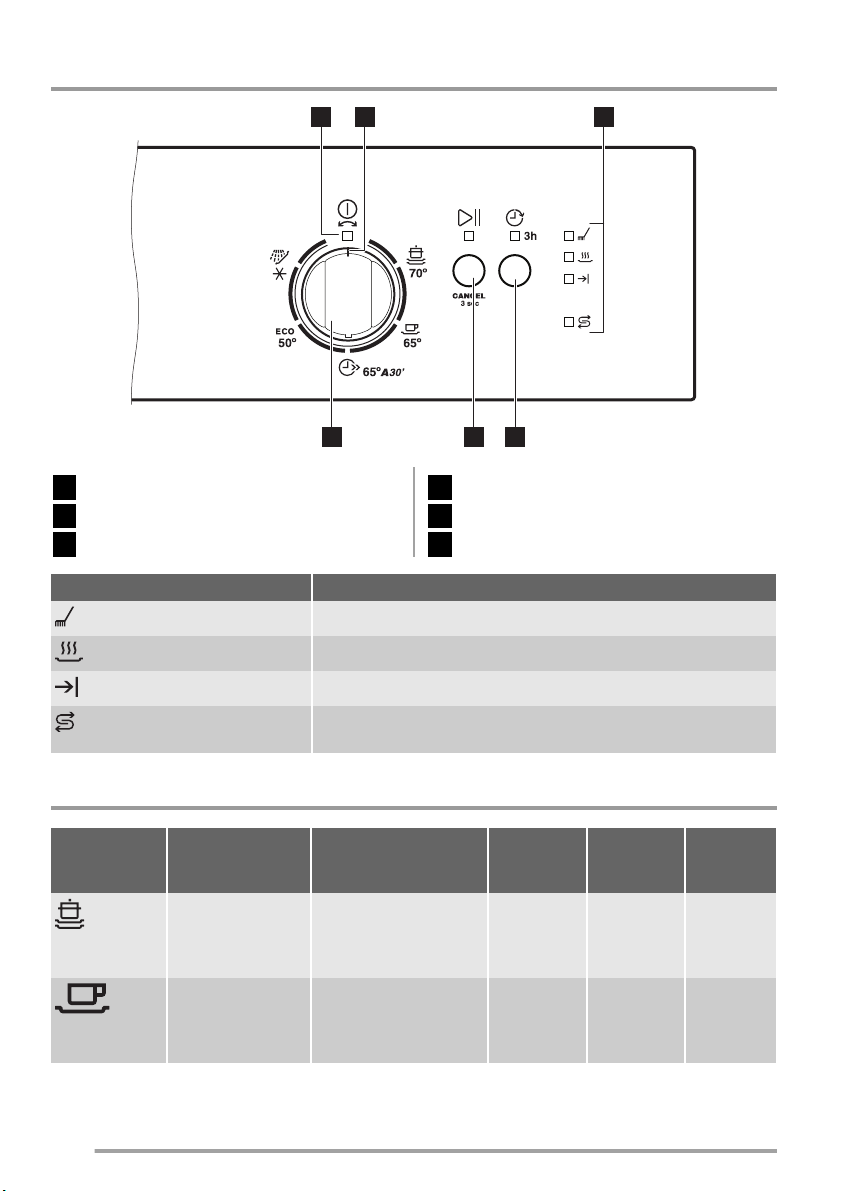
Bedieningspaneel
1 2 3
456
Controlelampje Aan/uit
1
Programmawijzer
2
Indicatielampjes
3
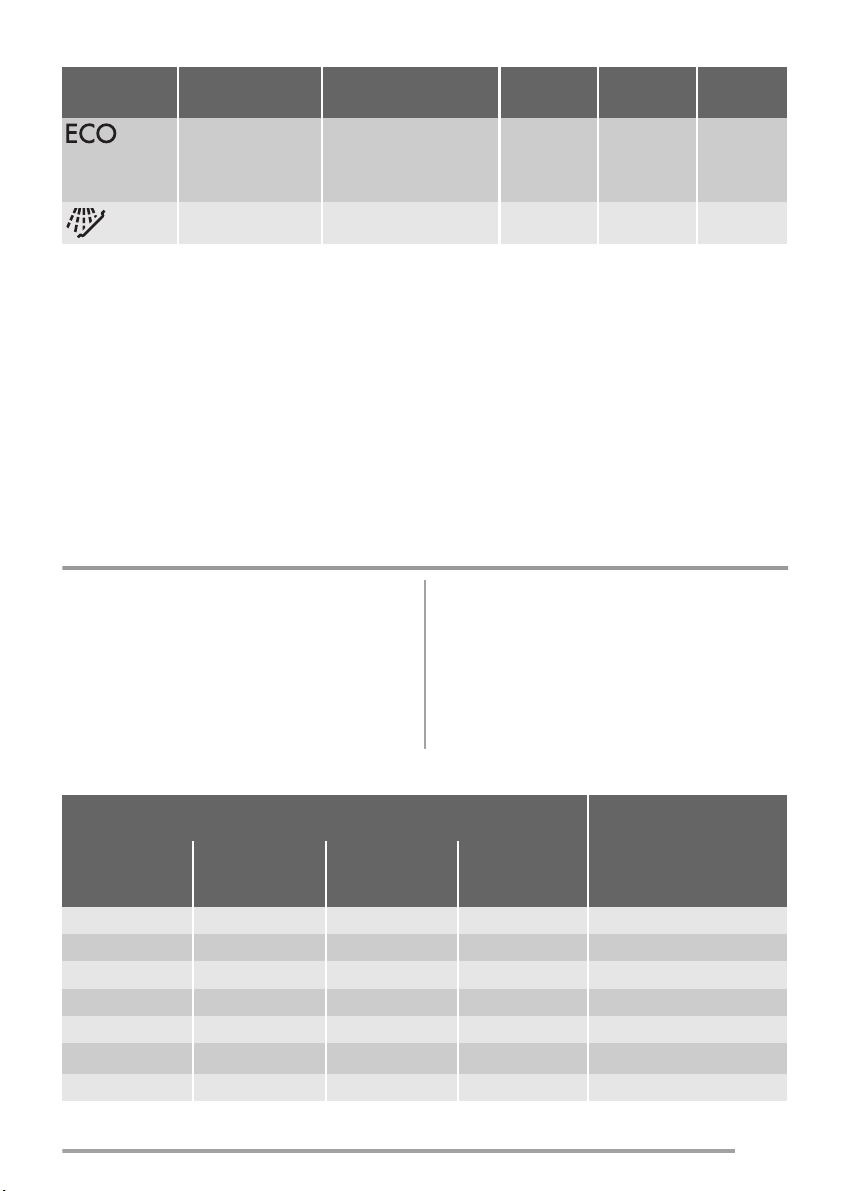
Indicatielampjes Beschrijving
Programma’s
1)
Programma
Mate van vervui-
Sterk bevuild
Serviesgoed, bestek en pannen
Normaal bevuild
Serviesgoed en
bestek
ling
Type lading
Toets uitgestelde start
4
Starttoets
5
Programmaknop
6
Wasfase-indicatielampje.
Droogfase-indicatielampje.
Einde-indicatielampje.
Zoutindicatielampje. Dit indicatielampje is uit als het programma
werkt.
Programma
fasen
Voorspoelen
Afwassen 70 °C
Spoelgangen
Drogen
Voorspoelen
Afwassen 65 °C
Spoelgangen
Drogen
Berei-
dingsduur
(min)
130 - 150 1.3 - 1.4 13 - 15
100 - 110 1.2 - 1.6 15 - 16
Energie
(kWh)
Water
(l)
4
www.zanussi.com
Page 5
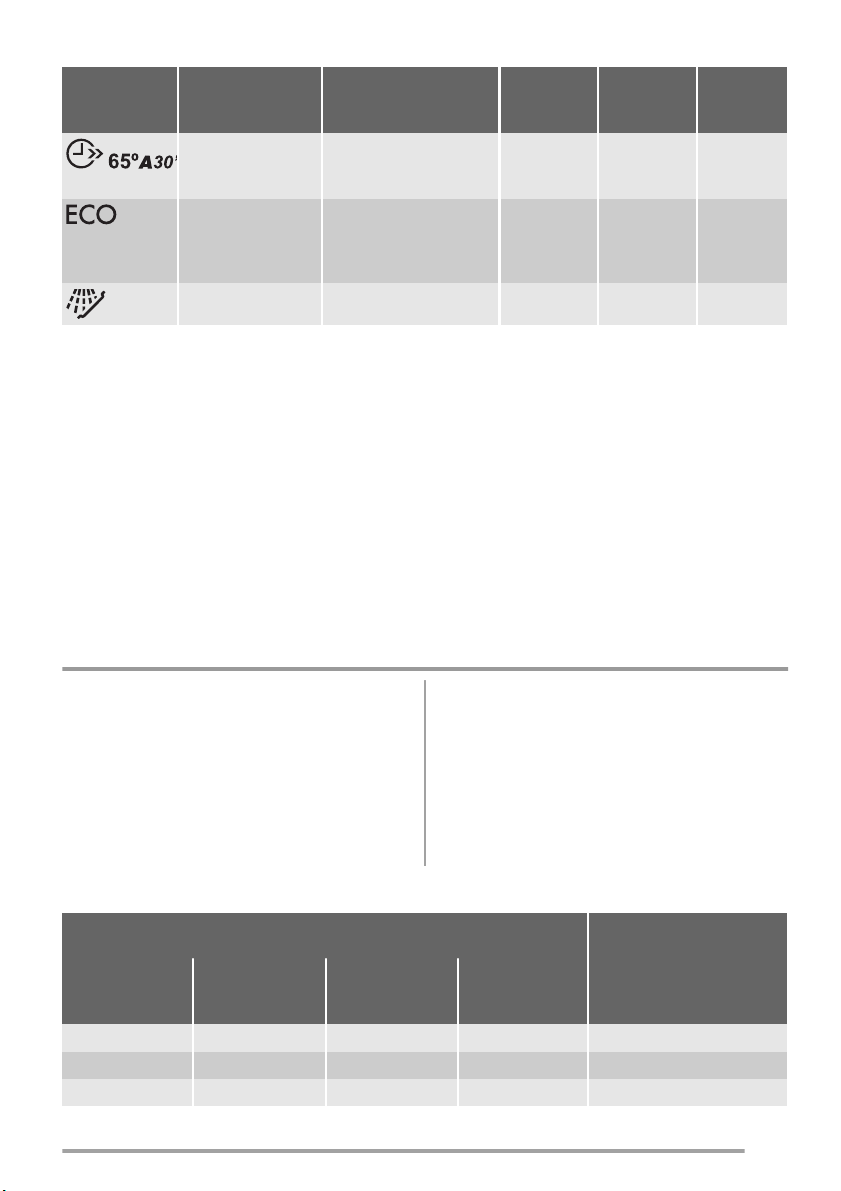
1)
Programma
2)
3)
4)
1) De druk en temperatuur van het water, de variaties in stroomtoevoer, de opties en de hoeveelheid vaat kan
de verbruikswaarden veranderen.
2) Met dit programma kunt u een pas bevuilde lading afwassen. Het biedt goede afwasresultaten in een kort
tijdsbestek.
3) Dit programma biedt het meest efficiënte water- en energieverbruik voor normaal bevuild serviesgoed en
bestek. (Dit is het standaard programma voor testinstituten.)
4) Gebruik dit programma om het serviesgoed snel te spoelen. Hierdoor kunnen voedselresten niet aan het
serviesgoed vastkoeken en ontstaan er geen vieze geurtjes in het apparaat.
U hoeft voor dit programma geen afwasmiddel te gebruiken.
Mate van vervui-
ling
Type lading
Pas bevuild
Serviesgoed en
bestek
Normaal bevuild
Serviesgoed en
bestek
Alles Voorspoelen 14 0.1 4
Programma
fasen
Afwassen 65 °C
Spoeling
Voorspoelen
Afwassen 50 °C
Spoelgangen
Drogen
Berei-
dingsduur
(min)
30 0.8 9
195 1.02 11
Energie
(kWh)
Water
(l)
Aanwijzingen voor testinstituten
Stuur voor alle benodigde informatie over testprestaties een e-mail naar:
info.test@dishwasher-production.com
Schrijf het productnummer (PNC) op dat u op het typeplaatje vindt.
Voor het eerste gebruik
1. Controleer of het ingestelde niveau van de
waterontharder juist is voor de waterhardheid in uw omgeving. Als dat niet het geval
is, stelt u de waterontharder in. Neem contact op met uw plaatselijke waterinstantie
voor informatie over de hardheid van het
water in uw omgeving.
3. Vul het glansmiddeldoseerbakje.
4. Draai de waterkraan open.
5. Er kunnen afwasmiddelen in het apparaat
achtergebleven zijn. Start een programma
om dit te verwijderen. Gebruik geen afwasmiddel en gebruik de mandjes niet.
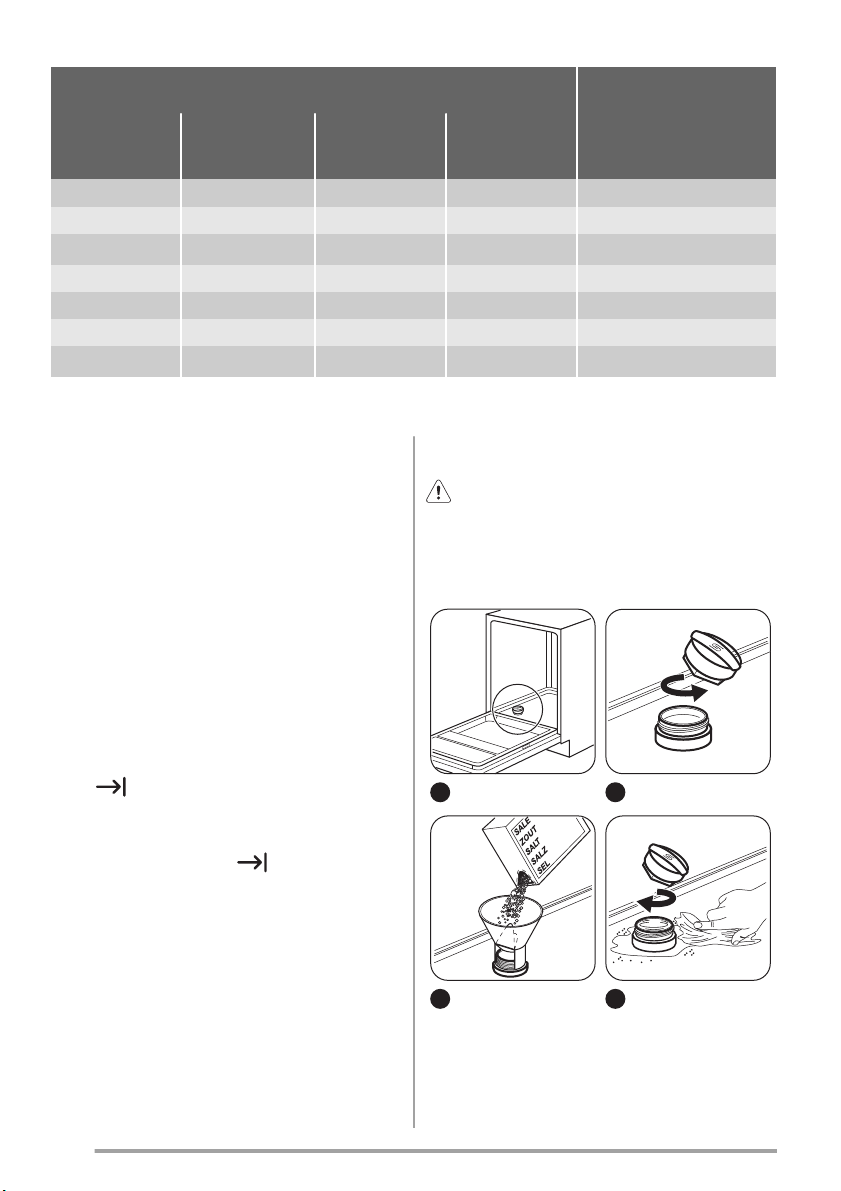
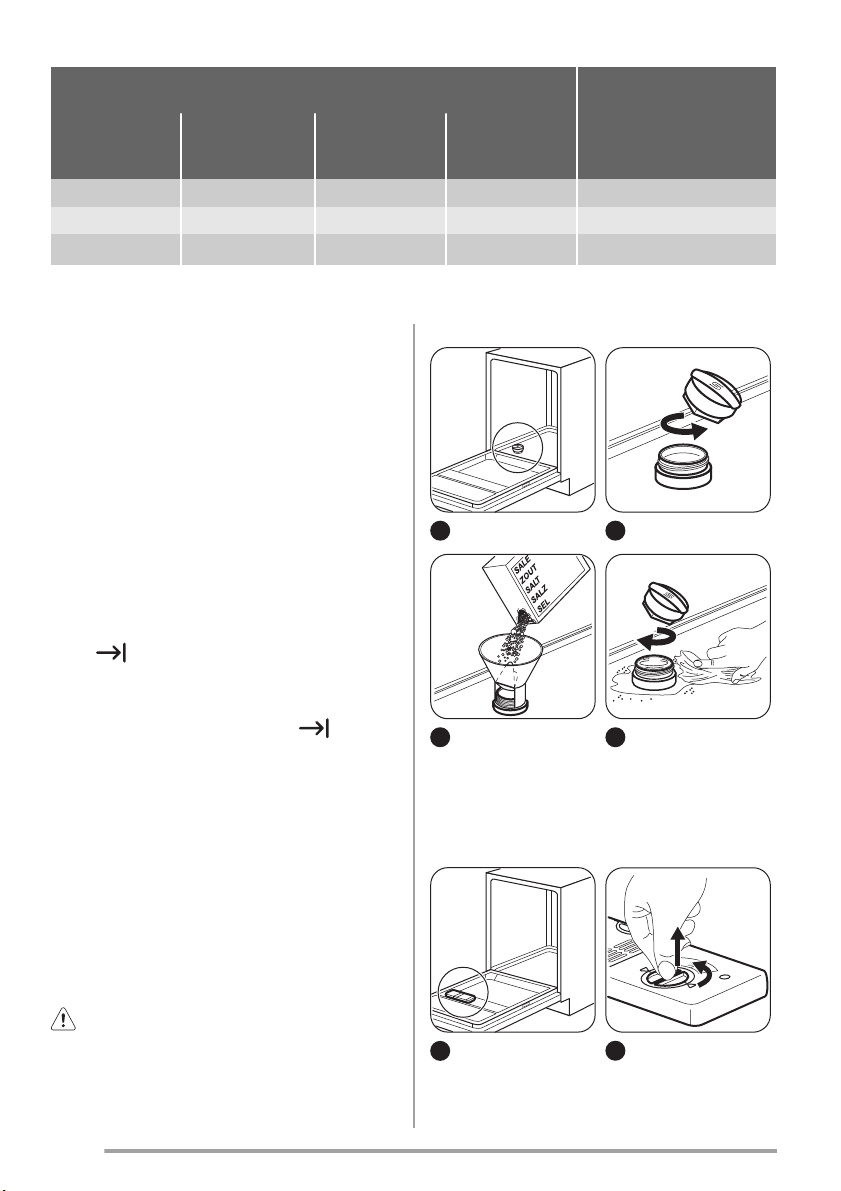
2. Vul het zoutreservoir.
De waterontharder instellen
Waterhardheid
Duitse
graden
(°dH)
47 - 50 84 - 90 8.4. - 9.0 58 - 63 10
43 - 46 76 - 83 7.6 - 8.3 53 - 57 9
37 - 42 65 - 75 6.5 - 7.5 46 - 52 8
Franse
graden
(°fH)
mmol/l Clarke-
graden
www.zanussi.com
Waterontharder
afstelling
Niveau
5
Page 6
Waterhardheid
Duitse
graden
(°dH)
29 - 36 51 - 64 5.1 - 6.4 36 - 45 7
23 - 28 40 - 50 4.0 - 5.0 28 - 35 6
19 - 22 33 - 39 3.3 - 3.9 23 - 27
15 - 18 26 - 32 2.6 - 3.2 18 - 22 4
11 - 14 19 - 25 1.9 - 2.5 13 - 17 3
4 - 10 7 - 18 0.7 - 1.8 5 - 12 2
< 4 < 7 < 0.7 < 5
1) Fabrieksinstelling
2) Gebruik geen zout op dit niveau.
Franse
graden
(°fH)
mmol/l Clarke-
graden
Waterontharder
afstelling
Niveau
1)
5
2)
1
Het instellen van het niveau van de
waterontharder
1. Zorg ervoor dat de programma-aanwijzer
op de knop op één lijn staat met het lampje
aan/uit.
2. Druk op de uitsteltoets en houd deze ingedrukt. Draai tegelijkertijd de programmaschakelaar linksom, totdat de programmaaanwijzer overeenkomt met het eerste programma.
3. Laat de uitsteltoets los wanneer het controlelampje aan/uit en het controlelampje
starten beginnen te knipperen.
4. Druk op de toets uitgestelde start.
•
gaat knipperen.
• Het indicatielampje aan/uit en het indi-
catielampje start blijven knipperen.
•
Het knipperen van
duidt op het huidig ingestelde niveau, bijv. 5 knipperingen + pauze + 5 knipperingen = niveau
5.
5. Druk herhaaldelijk op de uitsteltoets om de
instelling te wijzigen. Telkens als u op de
uitstelknop drukt, gaat het niveaunummer
omhoog.
6. Draai om de instelling te bevestigen en het
apparaat uit te schakelen aan de knop totdat de programmamarkering overeenkomt
met de aan-/uit-stand.
6
Het zoutreservoir vullen
Let op! Water en zout kunnen uit het
zoutreservoir stromen als u het bijvult.
Gevaar voor roest. Start om dit te voorkomen
een programma nadat u het zoutreservoir heeft
bijgevuld.
1
3
2
4
Doe 1 liter water in het zoutreservoir (alleen de
eerste keer).
www.zanussi.com
Page 7
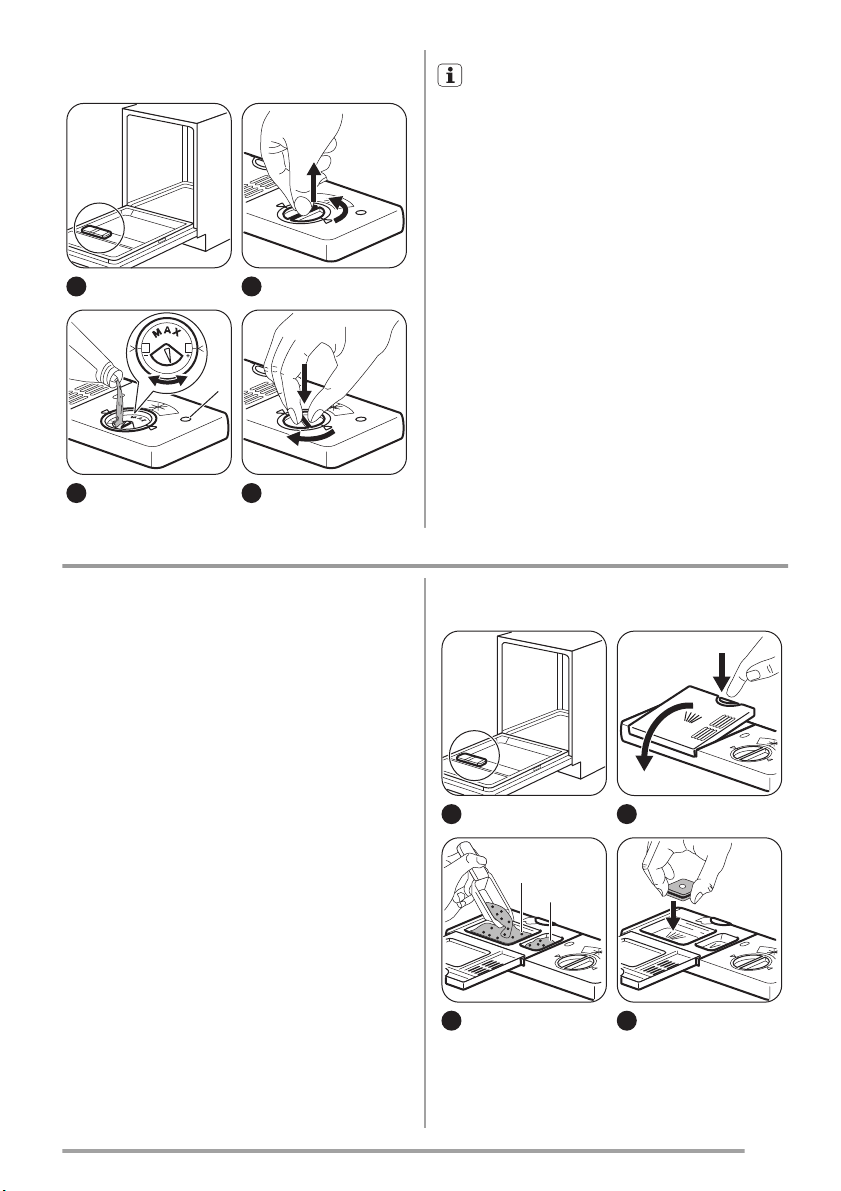
Het glansmiddeldoseerbakje vullen
2
1
Vul het glansmiddeldoseerbakje bij wanneer de glansmiddelindicatie (A) door-
zichtig is.
U kunt het schuifje voor de vrij te geven hoeveelheid instellen tussen stand 1 (laagste hoeveelheid) en stand 4 (hoogste hoeveelheid).
1
1
4
2
3
2
A
1
2
3
4
Dagelijks gebruik
1. Draai de waterkraan open.
2. Draai de programmaschakelaar tot de programmamarkering op één lijn staat met het
programma dat u wilt instellen. Zorg dat
het apparaat in de instelmodus staat. Zie
'Een programma instellen en starten'. U
dient het juiste programma in te stellen
voor het type lading en de mate van vervuiling.
• Vul het zoutreservoir als het zoutindica-
tielampje brandt.
3. Ruim de korven in.
4. Voeg vaatwasmiddel toe.
5. Het programma starten.
Vaatwasmiddel gebruiken
1
2
A
B
3
0
2
0
1
2
3
0
2
0
www.zanussi.com
3
4
Doe de vaatwastablet in het doseerbakje (A)
Als het programma over een voorspoelfase
7
Page 8

beschikt, plaats dan een kleine dosis afwasmiddel in doseerbakje (B).
Gebruik van gecombineerde
afwastabletten
Als u tabletten gebruikt die zout en glansmiddel bevatten, is het niet nodig om de doseerbakjes voor zout en glansmiddel te vullen. De
glansmiddelindicatie gaat altijd aan als het
glansmiddel op is.
1. Stel de waterontharder op het laagste niveau in.
2. Stel de dosering van het glansmiddel in op
de laagste stand.
Voer deze stappen uit als u stopt met het
gebruik van gecombineerde
afwastabletten en voordat u begint met
het gebruik van afzonderlijk
afwasmiddel, glansmiddel en
regenereerzout:
1. Stel de waterontharder in op het hoogste
niveau.
2. Zorg ervoor dat het zoutreservoir en het
glansmiddeldoseerbakje gevuld zijn.
3. Start het kortste programma met een
spoelfase, zonder afwasmiddel en zonder
vaat.
4. Stel de waterontharder af op de waterhardheid in uw omgeving.
5. Stel de hoeveelheid glansmiddel in.
Een programma instellen en starten
Instelmodus
Het apparaat moet in de instelmodus
staan om een programma te starten.
Draai de programmaschakelaar totdat de programma-aanwijzer overeenkomt met het programma op het bedieningspaneel. Het indicatielampje aan/uit gaat branden en het startindicatielampje gaat knipperen, het apparaat staat
in de instelmodus.
Druk op de startknop ingedrukt als het bedieningspaneel andere omstandigheden weergeeft, tot het apparaat in de instelmodus staat.
Een programma starten zonder een
uitgestelde start
1. Draai de waterkraan open.
2. Sluit de deur van het apparaat.
3. Draai de programmaschakelaar tot de programmamarkering op één lijn staat met het
symbool van het programma dat u wilt instellen.
• Het controlelampje aan/uit gaat branden.
• Het indicatielampje start begint te knip-
peren.
4. Druk op Start om het programma te starten.
• Het indicatielampje aan/uit en het indi-
catielampje start gaan aan.
Een programma starten met een
uitgestelde start
1. Stel het programma in
2. Druk op de toets startuitstel om de start
van het afwasprogramma met drie uur uit
te stellen.
• Het controlelampje startuitstel gaat
branden.
3. Druk op de startknop om het aftellen te
starten.
• Het startindicatielampje gaat branden.
De deur openen als het apparaat in
werking is
Als u de deur opent, stopt het apparaat. Als u
de deur weer sluit, gaat het apparaat verder
vanaf het punt van onderbreking.
De uitgestelde start annuleren tijdens
het aftellen
1. Houd de startknop ingedrukt tot het indicatielampje start gaat knipperen.
2. Druk op de startknop om het programma te
starten.
Controleer of er afwasmiddel in het afwasmiddeldoseerbakje aanwezig is voor-
dat u een nieuw programma start.
8
www.zanussi.com
Page 9
Het programma annuleren
1. Houd de startknop ingedrukt tot het indicatielampje start gaat knipperen.
Controleer of er afwasmiddel in het afwasmiddeldoseerbakje aanwezig is voor-
dat u een nieuw programma start.
Aan het einde van het programma.
Als het programma is voltooid, gaat
den. Als u het apparaat niet binnen 5 minuten
uitschakelt, gaan alle indicatielampjes uit. Dit
helpt het energieverbruik te verminderen.
1. Draai om het apparaat uit te schakelen de
programmaschakelaar totdat de program-
bran-
Aanwijzingen en tips
mamarkering overeenkomt met de aan-/uitstand.
2. Draai de waterkraan dicht.
Let op
• Laat de borden afkoelen voordat u deze uit
het apparaat neemt. Hete borden zijn gevoelig voor beschadigingen.
• Ruim eerst het onderrek en dan het bovenrek uit.
• Er kan water liggen aan de zijkanten en op
de deur van het apparaat. Roestvrij staal
koelt sneller af dan borden.
De waterontharder
Hard water bevat een grote hoeveelheid mineralen die schade aan het apparaat en slechte
schoonmaakresultaten kan veroorzaken. De
waterontharder neutraliseert deze mineralen.
Het regenereerzout houdt de waterontharder
schoon en in goede staat. Het is belangrijk om
het correcte niveau voor de waterontharder in
te stellen. Dit zorgt ervoor dat de waterontharder de juiste hoeveelheid regenereerzout en
water gebruikt.
Met behulp van zout, glansmiddel en
afwasmiddel
• Gebruik alleen zout, glansmiddel en afwasmiddel voor afwasautomaten. Andere producten kunnen het apparaat beschadigen.
• Het glansmiddel helpt om tijdens de laatste
spoelfase het servies te drogen zonder strepen en vlekken.
• Gecombineerde afwastabletten bevatten
vaatwasmiddel, glansmiddel en andere middelen. Zorg ervoor dat deze tabletten geschikt zijn voor de waterhardheid in uw omgeving. Zie de instructies op de verpakking
van de producten.
• Vaatwastabletten worden bij korte programma's niet helemaal opgelost. Wij bevelen u
aan de tabletten alleen bij lange programma's te gebruiken, om restjes afwasmiddel
op uw serviesgoed te voorkomen.
www.zanussi.com
Gebruik niet meer dan de juiste hoeveelheid vaatwasmiddel. Zie de instructies
van de vaatwasmiddelfabrikant.
De korven inruimen
Zie de meegeleverde folder voor voorbeelden van het inruimen van de korven.
• Gebruik het apparaat alleen om voorwerpen
af te wassen die vaatwasbestendig zijn.
• Doe geen voorwerpen in het apparaat die
gemaakt zijn van hout, hoorn, aluminium, tin
en koper.
• Plaats geen voorwerpen in het apparaat die
water kunnen absorberen (sponzen, keukenhanddoeken).
• Verwijder alle voedselresten van de voorwerpen.
• Voor het gemakkelijk verwijderen van aangebrande voedselresten weekt u de pannen
eerst in water voordat u ze in het apparaat
plaatst.
• Plaats holle voorwerpen (bijv. kopjes, glazen
en pannen) met de opening naar beneden.
• Zorg ervoor dat serviesgoed en bestek niet
in elkaar schuiven. Meng lepels met ander
bestek.
• Zorg er voor dat glazen andere glazen niet
aanraken
• Leg kleine voorwerpen in de bestekmand.
9
Page 10
• Leg lichte voorwerpen in de bovenste korf.
Zorg ervoor dat de voorwerpen niet verschuiven.
• Zorg er voor dat de sproeiarmen vrij kunnen
ronddraaien voordat u een programma start.
Voor het starten van een programma
Controleer of:
• De filters schoon zijn en correct zijn geplaatst.
• De sproeiarmen niet zijn verstopt.
Onderhoud en reiniging
• De positie van de items in de mandjes correct is.
• Het programma van toepassing is op het type lading en de mate van bevuiling.
• De juiste hoeveelheid afwasmiddel is gebruikt.
• Er regenereerzout en glansmiddel is toegevoegd (tenzij u gecombineerde afwastabletten gebruikt).
• De dop van het zoutreservoir goed dicht zit.
Waarschuwing! Schakel het apparaat
uit en trek de stekker uit het stopcontact
voordat u onderhoudshandelingen verricht.
Vuile filters en verstopte sproeiarmen ver-
minderen de wasresultaten.
Controleer regelmatig de filters en reinig deze
zo nodig.
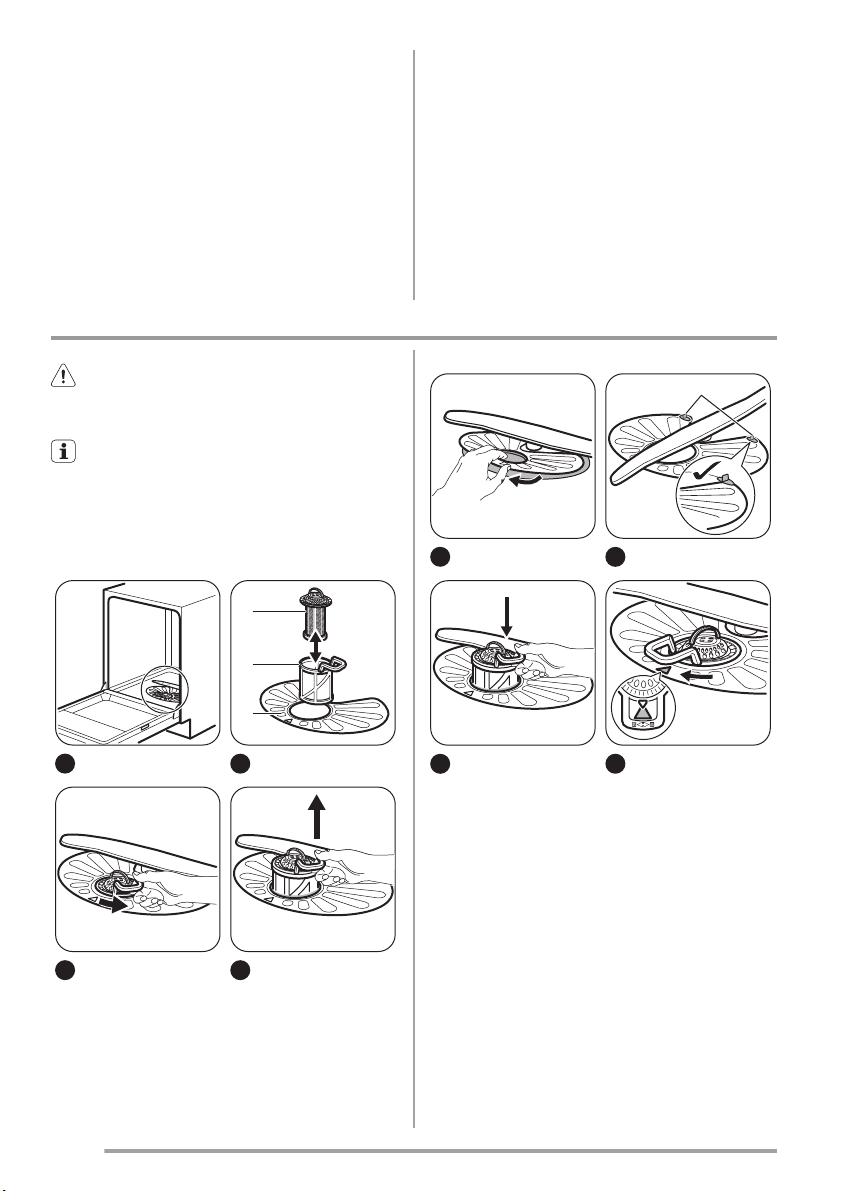
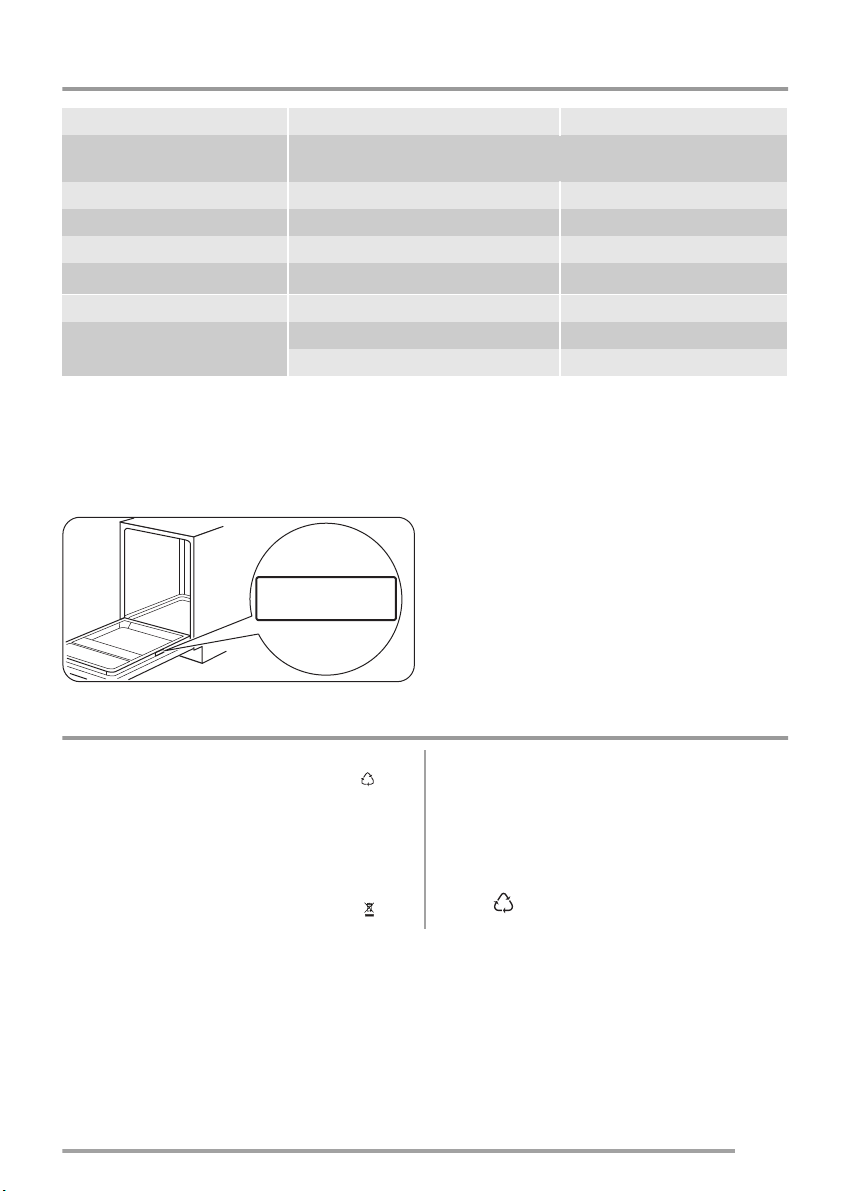
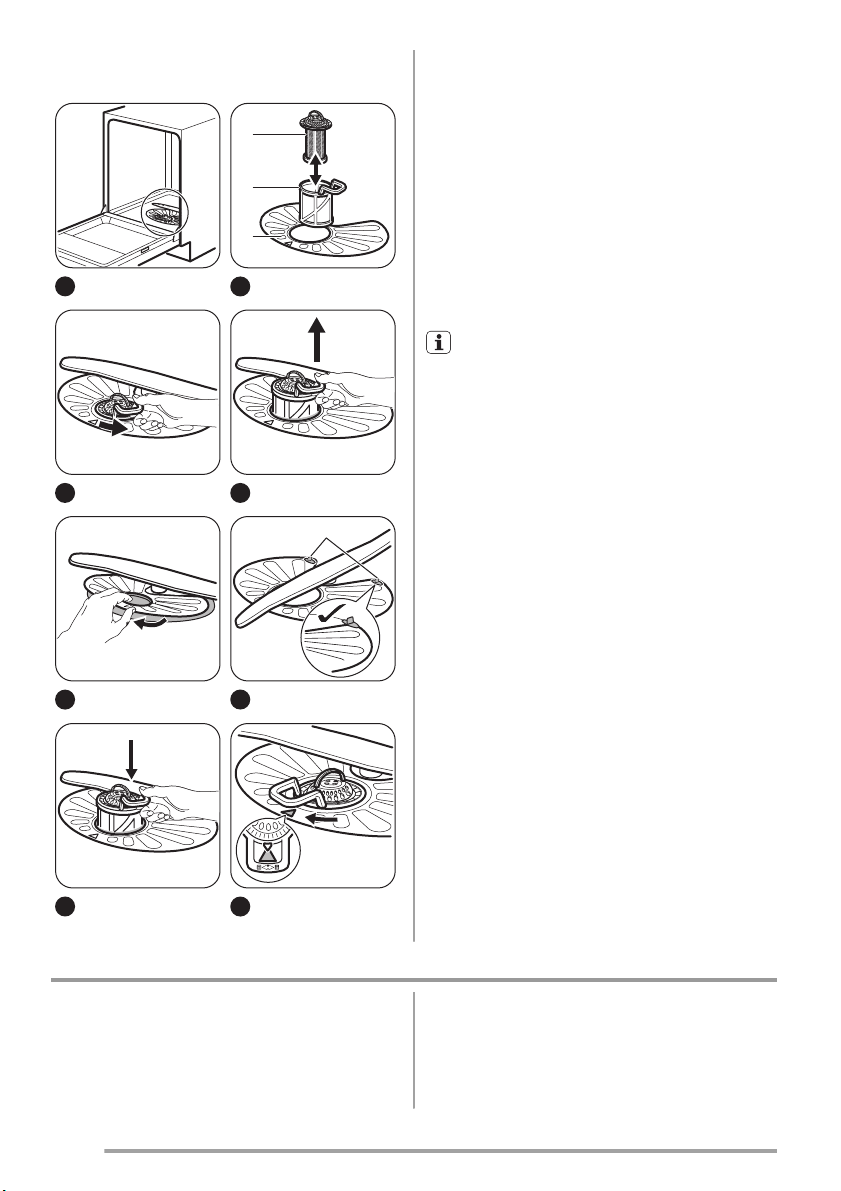
De filters reinigen
C
B
A
1
3
2
4
D
5
7
Draai om de filters (B) en (C) te verwijderen de
hendel naar links. Haal filter (B) en (C) uit elkaar. Reinig de filters met water.
Verwijder filter (A). Reinig het filter met water.
Zorg er voordat u het filter (A) terugplaatst
voor dat er geen etensresten of vuil in en rond
de rand van de opvangbak zit.
Zorg ervoor dat het filter (A) juist wordt geplaatst onder de 2 geleiders (D).
Zet filters (B) en (C) in elkaar. Plaats ze op hun
plek in filter (A). Draai de hendel rechtsom
draaien tot het vastzit.
6
8
10
www.zanussi.com
Page 11
Een onjuiste plaatsing van de filters kan
leiden tot slechte wasresultaten en het
apparaat beschadigen.
De sproeiarmen reinigen
Probeer niet de sproeiarmen te verwijderen.
Als etensresten de openingen in de sproeiarmen hebben verstopt, verwijder deze dan met
een smal en puntig voorwerp.
Buitenkant reinigen
Maak het apparaat schoon met een vochtige,
zachte doek.
Probleemoplossing
Gebruik alleen neutrale schoonmaakmiddelen.
Gebruik geen schuurmiddelen, schuursponsjes of oplosmiddelen.
De binnenkant van de machine reinigen
Als u regelmatig korte programma's gebruikt
dan kunnen er vetresten en kalkaanslag achterblijven in het apparaat.
Om dit te voorkomen raden we aan minstens 2
keer per maand progamma's met een lange
duur te gebruiken.
Het apparaat start of stopt niet tijdens de
werking.
Raadpleeg voordat u contact opneemt met de
service-afdeling, de informatie die volgt voor
Bij sommige problemen knipperen bepaalde lampjes continu en/of met tussenpozen en wordt er tegelijkertijd een
alarmcode weergegeven.
oplossing van het probleem.
Foutcode Probleem
• Het startindicatielampje blijft knipperen.
• Het eindlampje knippert 1 keer onderbroken.
• Het startindicatielampje blijft knipperen.
• Het eindlampje knippert 2 keer onderbroken.
• Het startindicatielampje blijft knipperen.
• Het eindlampje knippert 3 keer onderbroken.
Waarschuwing! Schakel het apparaat
uit voordat u controles uitvoert. Draai de
Het apparaat wordt niet met water gevuld.
Het apparaat pompt geen water weg.
Het beschermingssysteem tegen lekkage is aan.
aanwijzer overeenkomt met het aan-/uitindicatielampje.
programmaschakelaar totdat de programma-
Storing Mogelijke oplossing
U kunt het apparaat niet activeren. Zorg dat de stekker in het stopcontact zit.
Zorg dat er geen zekering in de zekeringenkast is doorge-
Het programma start niet. Zorg dat de deur van het apparaat is gesloten.
Druk op de starttoets.
Als de starttijdkeuze start is ingesteld, annuleert u deze
Het apparaat wordt niet met water gevuld. Controleer of de waterkraan is geopend.
Zorg dat de waterdruk niet te laag is. Neem hiervoor zo no-
Controleer of de waterkraan niet verstopt is.
brand.
functie of wacht u tot het einde van het aftellen.
dig contact op met uw lokale waterleidingbedrijf.
www.zanussi.com
11
Page 12

Storing Mogelijke oplossing
Controleer of het filter in de toevoerslang niet verstopt is.
Controleer of er geen knikken of bochten in de watertoe-
Het apparaat pompt geen water weg. Controleer of de gootsteenafvoer niet verstopt is.
Controleer of er geen knikken of bochten in de wateraf-
Het beschermingssysteem tegen lekkage is
aan.
voerslang aanwezig zijn.
voerslang aanwezig zijn.
Draai de waterkraan dicht en neem contact op met de servi-
ce-afdeling.
Draai nadat de controles zijn uitgevoerd de
programmaknop zo dat de programma-aanduiding op één lijn staat met het programma dat
bezig was toen het probleem ontstond. Het
programma gaat verder vanaf het punt waar
het werd onderbroken.
Als het probleem opnieuw optreedt, neemt u
contact op met onze service-afdeling.
Neem ook contact op met de service-afdeling
als andere alarmcodes worden weergegeven.
De was- en droogresultaten zijn niet
naar tevredenheid
Witte strepen of een blauwe waas op
glazen en serviesgoed
• De vrijgegeven hoeveelheid glansmiddel is
te hoog. Zet de dosering van het glansmiddel op een lagere stand.
• Er is te veel vaatwasmiddel gebruikt.
Vlekken en opgedroogde watervlekken
op glazen en servies
• De vrijgegeven hoeveelheid glansmiddel is
te laag. Zet de dosering van het glansmiddel
op een hogere stand.
• De kwaliteit van het vaatwasmiddel kan de
oorzaak zijn.
Het serviesgoed is nat
• Het programma heeft geen droogfase of
een te lage droogtemperatuur.
• Het glansmiddeldoseerbakje is leeg.
• De kwaliteit van het glansmiddel kan de oorzaak zijn.
Zie ‘AANWIJZINGEN EN TIPS’ voor andere mogelijke oorzaken.
12
www.zanussi.com
Page 13
Technische informatie
Afmeting Breedte / hoogte / diepte (mm) 596 / 818 - 898 / 575
Aansluiting op het elektriciteits-
net
Voltage 220-240 V
Tijd 50 Hz
Waterdruk Min. / max. (bar / MPa) (0.5 / 0.05 ) / (8 / 0.8 )
Watertoevoer
Vermogen Couverts 12
Energieverbruik Modus aan 0.50 W
1) Sluit de slang aan op een kraan met 3/4”-schroefdraad.
2) Als het hete water door alternatieve, milieuvriendelijkere energiebronnen geproduceerd wordt (bijv.
zonnepanelen en windenergie), gebruik dan een heetwatervoorziening om het energieverbruik te
verminderen.
1)
Typeplaatje
Zie het typeplaatje.
Koud water of warm water
Modus uit 0.50 W
Mod. ... ... ...
Prod. No. ... ... ...
Ser. No. ...
2)
max. 60 °C
Milieubescherming
Recycle de materialen met het symbool .
Gooi de verpakking in een geschikte
verzamelcontainer om het te recyclen.
Help om het milieu en de volksgezondheid te
beschermen en recycle het afval van
elektrische en elektronische apparaten. Gooi
apparaten gemarkeerd met het symbool
www.zanussi.com
niet
weg met het huishoudelijk afval. Breng het
product naar het milieustation bij u in de buurt
of neem contact op met de gemeente.
• Gooi het verpakkingsmateriaal op juiste wijze weg. Recycle de materialen met het sym-
.
bool
13
Page 14
Contents
Safety instructions _ _ _ _ _ _ _ _ _ _ _ _ _ 14
Control panel _ _ _ _ _ _ _ _ _ _ _ _ _ _ _ _ 16
Programmes _ _ _ _ _ _ _ _ _ _ _ _ _ _ _ _ 16
Before first use _ _ _ _ _ _ _ _ _ _ _ _ _ _ _ 17
Daily use _ _ _ _ _ _ _ _ _ _ _ _ _ _ _ _ _ _ 19
Safety instructions
Before the installation and use of the appliance, carefully read the supplied instructions.
The manufacturer is not responsible if an incorrect installation and use causes injuries and
damages. Always keep the instructions with
the appliance for future reference.
Children and vulnerable people safety
Warning! Risk of suffocation, injury or
permanent disability.
• Do not let persons, children included, with
reduced physical sensory, reduced mental
functions or lack of experience and knowledge use the appliance. They must have supervision or instruction for the operation of
the appliance by a person who is responsible for their safety.
• Do not let children play with the appliance.
• Keep all packaging away from children.
• Keep all detergents away from children.
• Keep children and pets away from the appliance door when it is open.
Installation
• Remove all the packaging.
• Do not install or use a damaged appliance.
• Do not install or use the appliance where
the temperature is less than 0 °C.
• Obey the installation instruction supplied
with the appliance.
Electrical connection
Warning! Risk of fire and electrical
shock.
• The appliance must be earthed.
Hints and tips _ _ _ _ _ _ _ _ _ _ _ _ _ _ _ 21
Care and cleaning _ _ _ _ _ _ _ _ _ _ _ _ _ 21
Troubleshooting _ _ _ _ _ _ _ _ _ _ _ _ _ _ 22
Technical information _ _ _ _ _ _ _ _ _ _ _ 24
Environment concerns _ _ _ _ _ _ _ _ _ _ _ 24
Subject to change without notice.
• Make sure that the electrical information on
the rating plate agrees with the power supply. If not, contact an electrician.
• Always use a correctly installed shockproof
socket.
• Do not use multi-plug adapters and extension cables.
• Make sure not to cause damage to the
mains plug and to the mains cable. Contact
the Service or an electrician to change a
damaged mains cable.
• Connect the mains plug to the mains socket
only at the end of the installation. Make sure
that there is access to the mains plug after
the installation.
• Do not pull the mains cable to disconnect
the appliance. Always pull the mains plug.
Water connection
• Make sure not to cause damage to the water hoses.
• Before you connect the appliance to new
pipes or pipes not used for a long time, let
the water flow until it is clean.
• The first time you use the appliance, make
sure that there is no leakage.
• The water inlet hose has a safety valve and
a sheath with an inner mains cable.
14
www.zanussi.com
Page 15

Warning! Dangerous voltage.
If the water inlet hose is damaged, imme-
•
diately disconnect the mains plug from the
mains socket. Contact the service to replace the water inlet hose.
Use
• This appliance is intended to be used in
household and similar applications such as:
– Staff kitchen areas in shops, offices and
other working environments
– Farm houses
– By clients in hotels, motels and other resi-
dential type environments
– Bed and breakfast type environments.
Warning! Risk of injury, burns, electrical
shock or fire.
• Do not change the specification of this appliance.
• Put knives and cutlery with sharp points in
the cutlery basket with the points down or in
a horizontal position.
• Do not keep the appliance door open without supervision to prevent to fall on it.
• Do not sit or stand on the open door.
• Dishwasher detergents are dangerous.
Obey the safety instructions on the detergent packaging.
• Do not drink and play with the water in the
appliance.
• Do not remove the dishes from the appliance until the programme is completed.
There can be detergent on the dishes.
• The appliance can release hot steam if you
open the door while a programme operates.
• Do not put flammable products or items that
are wet with flammable products in, near or
on the appliance.
• Do not use water spray and steam to clean
the appliance.
Disposal
Warning! Risk of injury or suffocation.
• Disconnect the appliance from the mains
supply.
• Cut off the mains cable and discard it.
• Remove the door catch to prevent children
and pets to get closed in the appliance.
Service
• Contact the Service to repair the appliance.
We recommend only the use of original
spare parts.
• When you contact the Service, ensure that
you have the following information that is
available on the rating plate.
Model :
PNC :
Serial Number :
www.zanussi.com
15
Page 16
Control panel
1 2 3
456
On/off indicator
1
Programme marker
2
Indicators
3
Indicators Description
Programmes
Programme1)Degree of soil
2)
Type of load
Heavy soil
Crockery, cutlery,
pots and pans
Normal soil
Crockery and cutlery
Fresh soil
Crockery and cutlery
Delay button
4
Start button
5
Programme knob
6
Washing phase indicator.
Drying phase indicator.
End indicator.
Salt indicator. This indicator is off while the programme operates.
Programme
phases
Prewash
Wash 70 °C
Rinses
Dry
Prewash
Wash 65 °C
Rinses
Dry
Wash 65 °C
Rinse
Duration
(min)
130 - 150 1.3 - 1.4 13 - 15
100 - 110 1.2 - 1.6 15 - 16
30 0.8 9
Energy
(kWh)
Water
(l)
16
www.zanussi.com
Page 17
Programme1)Degree of soil
3)
4)
1) The pressure and the temperature of the water , the variations of the mains supply, the options and the
quantity of dishes can change the values.
2) With this programme you can wash a load with fresh soil. It gives good washing results in a short time.
3) With this programme you have the most efficient use of water and energy consumption for crockery and
cutlery with normal soil. (This is the standard programme for test institutes).
4) Use this programme to quickly rinse the dishes. This prevents the remaining food to bond on the dishes
and bad odours to come out from the appliance.
Do not use detergent with this programme.
Type of load
Normal soil
Crockery and cutlery
All Prewash 14 0.1 4
Programme
phases
Prewash
Wash 50 °C
Rinses
Dry
Duration
(min)
195 1.02 11
Energy
(kWh)
Water
(l)
Information for test institutes
For all the necessary information for test performance. send an email to:
info.test@dishwasher-production.com
Write down the product number (PNC) that is on the rating plate.
Before first use
1. Make sure that the set level of the water
softener agrees with the water hardness in
your area. If not, adjust the water softener.
Contact your local water authority to know
the water hardness in your area.
4. Open the water tap.
5. Processing residues can stay in the appliance. Start a programme to remove them.
Do not use detergent and do not load the
baskets.
2. Fill the salt container.
3. Fill the rinse aid dispenser.
Adjusting the water softener
Water hardness
German
degrees
(°dH)
47 - 50 84 - 90 8.4. - 9.0 58 - 63 10
43 - 46 76 - 83 7.6 - 8.3 53 - 57 9
37 - 42 65 - 75 6.5 - 7.5 46 - 52 8
29 - 36 51 - 64 5.1 - 6.4 36 - 45 7
23 - 28 40 - 50 4.0 - 5.0 28 - 35 6
19 - 22 33 - 39 3.3 - 3.9 23 - 27
15 - 18 26 - 32 2.6 - 3.2 18 - 22 4
French
degrees
(°fH)
mmol/l Clarke
degrees
www.zanussi.com
Water softener
adjustment
Level
1)
5
17
Page 18
Water hardness
German
degrees
(°dH)
11 - 14 19 - 25 1.9 - 2.5 13 - 17 3
4 - 10 7 - 18 0.7 - 1.8 5 - 12 2
< 4 < 7 < 0.7 < 5
1) Factory position.
2) Do not use salt at this level.
French
degrees
(°fH)
mmol/l Clarke
degrees
How to adjust the level of the water
softener
1. Make sure that the programme marker on
the knob is aligned with the on/off indicator.
2. Press and hold the delay button. At the
same time turn the knob counterclockwise
until the programme marker is aligned with
the first programme.
1
3. Release the delay button when the start indicator and the on/off indicator start to
flash.
4. Press the delay button.
•
starts to flash.
• The start indicator and the on/off indica-
tor continue to flash.
•
The intermittent flashing of
the current set level, e.g. 5 flashes +
pause + 5 flashes = level 5.
5. Press the delay button again and again to
change the setting. Each time you press
the delay button the level number increa-
refers to
3
Put 1 litre of water in the salt container (only
for the first time).
Filling the rinse aid dispenser
ses.
6. To confirm the setting and deactivate the
appliance, turn the knob until the programme marker is aligned with the on/off
button.
Filling the salt container
Caution! Water and salt can come out
from the salt container when you fill it.
Risk of corrosion. To prevent it, after you fill
1
the salt container, start a programme.
Water softener
adjustment
Level
2)
1
2
4
2
2
1
18
www.zanussi.com
Page 19
Fill the rinse aid dispenser when the lens
(A) is clear.
1
4
2
3
A
1
To adjust the released quantity of rinse aid,
turn the selector between position 1 (lowest
quantity) and position 4 (highest quantity).
2
3
4
Daily use
1. Open the water tap.
2. Turn the programme knob until the programme marker is aligned with the programme you want to set. Make sure that
the appliance is in setting mode, refer to
“Setting and starting a programme”. Set
the correct programme for the type of load
and the degree of soil.
• If the salt indicator is on, fill the salt con-
tainer.
3. Load the baskets.
4. Add the detergent.
5. Start the programme.
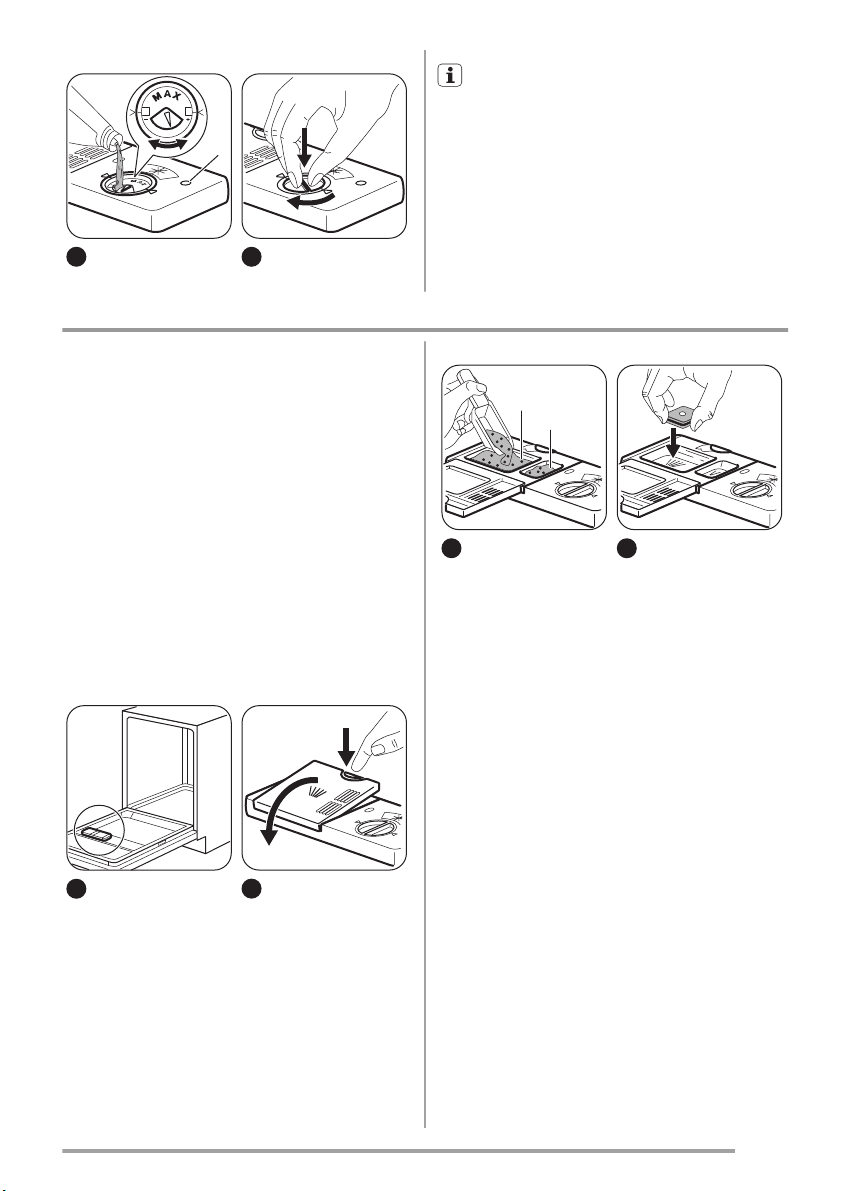
Using the detergent
1
2
1
2
A
B
3
0
2
0
3
3
0
2
0
4
Put the detergent or the tablet in compartment
(A) If the programme has a prewash phase,
put a small quantity of detergent in compartment (B).
Using the combi detergent tablets
When you use tablets, that contain salt and
rinse aid, do not fill the salt container and the
rinse aid dispenser. The rinse aid indicator always comes on if the rinse aid dispenser is
empty.
1. Adjust the water softener to the lowest level.
2. Set the rinse aid dispenser to the lowest
position.
If you stop to use the combi detergent
tablets, before you start to use
separately detergent, rinse aid and
dishwasher salt, do these steps:
1. Set the water softener to the highest level.
2. Make sure that the salt container and the
rinse aid dispenser are full.
www.zanussi.com
19
Page 20

3. Start the shortest programme with a rinsing phase, without detergent and without
dishes.
4. Adjust the water softener to the water
hardness in your area.
5. Adjust the released quantity of rinse aid.
Setting and starting a programme
Setting mode
The appliance must be in setting mode to
start a programme.
Turn the programme knob until the programme
marker is aligned with a programme on the
control panel. If the on/off indicator comes on
and the start indicator starts to flash the appliance is in setting mode.
If the control panel does not show this condition, press and hold the start button until the
appliance is in setting mode
Starting a programme without delay start
1. Open the water tap.
2. Close the appliance door.
3. Turn the knob until the programme marker
is aligned with the symbol of the programme you want to set.
• On/off indicator comes on.
• Start indicator starts to flash.
4. Press Start to start the programme.
• On/off indicator and start indicator are
on.
Starting a programme with delay start
1. Set the programme
2. Press the delay button to delay the start of
the programme of 3 hours.
• The delay indicator comes on.
3. Press the start button to start the countdown.
• The start indicator comes on.
Opening the door while the appliance
operates
If you open the door, the appliance stops.
When you close the door, the appliance continues from the point of interruption.
20
Cancelling the delay start while the
countdown operates
1. Press and hold the start button until the
start indicator starts to flash.
2. Press the start button to start the programme.
Make sure that there is detergent in the
detergent dispenser before you start a
new programme.
Cancelling the programme
1. Press and hold the start button until the
start indicator starts to flash.
Make sure that there is detergent in the
detergent dispenser before you start a
new programme.
At the end of the programme
When the programme is completed
comes on. If you do not deactivate the appliance within 5 minutes all indicators goes off.
This helps to decrease energy consumption.
1. To deactivate the appliance, turn the knob
until the programme marker is aligned with
the on/off indicator.
2. Close the water tap.
Important
• Let the dishes become cold before you re-
move them from the appliance. Hot dishes
can be easily damaged.
• First remove the items from the lower bas-
ket, then from the upper basket.
• There can be water on the sides and on the
door of the appliance. Stainless steel becomes cool more quickly than the dishes.
www.zanussi.com
Page 21
Hints and tips
The water softener
Hard water contains a high quantity of minerals that can cause damage to the appliance
and bad washing results. The water softener
neutralises these minerals.
The dishwasher salt keeps the water softener
clean and in good conditions. It is important to
set the right level of the water softener. This
makes sure that the water softener uses the
correct quantity of dishwasher salt and water.
Using salt, rinse aid and detergent
• Only use salt, rinse aid and detergent for
dishwasher. Other products can cause
damage to the appliance.
• The rinse aid helps, during the last rinsing
phase, to dry the dishes without streaks and
stains.
• Combi detergent tablets contain detergent,
rinse aid and other added agents. Be sure
that these tablets are applicable to the water hardness in your area. Refer to the instructions on the packaging of the products.
• Detergent tablets do not fully dissolve with
short programmes. To prevent detergent
residues on the tableware, we recommend
that you use the tablets with long programmes.
Do not use more than the correct quantity
of detergent. Refer to the instructions on
the detergent packaging.
Loading the baskets
Refer to the supplied leaflet with examples of the load of the baskets.
• Only use the appliance to wash items that
are dishwasher-safe.
• Do not put in the appliance items made of
wood, horn, aluminium, pewter and copper.
• Do not put in the appliance items that can
absorb water (sponges, household cloths).
• Remove remaining food from the items.
• To remove easily remaining burned food,
soak pots and pans in water before you put
them in the appliance.
• Put hollow items (cups, glasses and pans)
with the opening down.
• Make sure that cutlery and dishes do not
bond together. Mix spoons with other cutlery.
• Make sure that glasses do not touch other
glasses.
• Put the small items in the cutlery basket.
• Put the light items in the upper basket.
Make sure that they do not move.
• Make sure that the spray arms can move
freely before you start a programme.
Before starting a programme
Make sure that:
• The filters are clean and correctly installed.
• The spray arms are not clogged.
• The position of the items in the baskets is
correct.
• The programme is applicable for the type of
load and for the degree of soil.
• The correct quantity of detergent is used.
• There is dishwasher salt and rinse aid (unless you use combi detergent tablets).
• The cap of the salt container is tight.
Care and cleaning
Warning! Before maintenance,
deactivate the appliance and disconnect
the mains plug from the mains socket.
Dirty filters and clogged spray arms decrease the washing results.
www.zanussi.com
Make a check regularly and, if necessary,
clean them.
21
Page 22
Cleaning the filters
1
3
5
To remove filters (B) and (C), turn the handle
counterclockwise and remove. Pull apart filter
(B) and (C). Wash the filters with water.
C
B
A
2
4
D
6
Remove filter (A). Wash the filter with water.
Before you put the filter (A) back, make sure
that there are no residues of food or soil in or
around the edge of the sump.
Make sure that filter (A) is correctly positioned
under the 2 guides (D).
Assemble filters (B) and (C). Put them back in
filter (A). Turn the handle clockwise until it
locks.
An incorrect position of the filters can
cause bad washing results and damage
to the appliance.
Cleaning the spray arms
Do not remove the spray arms.
If the holes in the spray arms are clogged, remove remaining parts of soil with a thin pointed object.
External cleaning
Clean the appliance with a moist soft cloth.
Only use neutral detergents. Do not use abrasive products, abrasive cleaning pads or solvents.
Internal cleaning
If you regularly use short duration programmes, these can leave deposits of grease
and limescale inside the appliance.
To prevent this, we recommend to run long
duration programmes at least 2 times per
month.
7
8
Troubleshooting
The appliance does not start or it stops during
operation.
Before you contact the Service, refer to the information that follows for a solution to the
problem.
22
With some problems, different indicators
flash continuously or intermittently at
the same time to show an alarm code.
www.zanussi.com
Page 23

Alarm code Problem
• The start indicator flashes continuously.
• The end indicator flashes 1 time intermittently.
• The start indicator flashes continuously.
• The end indicator flashes 2 times intermittently.
• The start indicator flashes continuously.
• The end indicator flashes 3 times intermittently.
The appliance does not fill with water.
The appliance does not drain the water.
The anti-flood device is on.
Warning! Deactivate the appliance
before you do the checks. Turn the
Problem Possible solution
You cannot activate the appliance. Make sure that the mains plug is connected to the mains
socket.
Make sure that there is not a damaged fuse in the fuse box.
The programme does not start. Make sure that the appliance door is closed.
Press the start button.
If the delay start is set, cancel the setting or wait for the end
of the countdown.
The appliance does not fill with water. Make sure that the water tap is open.
Make sure that the pressure of the water supply is not too
low. For this information, contact your local water authority.
Make sure that the water tap is not clogged.
Make sure that the filter in the inlet hose is not clogged.
Make sure that the inlet hose has no kinks or bends.
The appliance does not drain the water. Make sure that the sink spigot is not clogged.
Make sure that the drain hose has no kinks or bends.
The anti-flood device is on. Close the water tap and contact the Service.
After the checks are completed, turn the programme knob until the programme marker is
aligned with programme that was in operation
when the problem occurred. The programme
continues from the point of interruption.
If the problem occurs again, contact the Service.
If other alarm codes show, contact the Service.
programme knob until the programme marker
is aligned with the on/off indicator.
If the washing and drying results are not
satisfactory
Whitish streaks or bluish layers on
glasses and dishes
• The released quantity of rinse aid is too
much. Adjust the rinse aid selector to a lower position.
• The quantity of detergent is too much.
Stains and dry water drops on glasses
and dishes
• The released quantity of rinse aid is not sufficient. Adjust the rinse aid selector to a
higher position.
www.zanussi.com
23
Page 24

• The quality of the detergent can be the
cause.
Dishes are wet
• The programme is without a drying phase or
with a low temperature drying phase.
• The rinse aid dispenser is empty.
• The quality of the rinse aid can be the
cause.
Refer to ‘HINTS AND TIPS’ for other possible causes.
Technical information
Dimensions Width / Height / Depth (mm) 596 / 818 - 898 / 575
Electrical connection Refer to the rating plate.
Voltage 220-240 V
Frequency 50 Hz
Water supply pressure Min. / max. (bar / MPa) (0.5 / 0.05 ) / (8 / 0.8 )
Water supply
Capacity Place settings 12
Power consumption Left-on mode 0.50 W
1) Connect the water inlet hose to a water tap with a 3/4'' thread.
2) If the hot water comes from alternative sources of energy, (e.g. solar panels, aeolian energy), use the hot
water supply to decrease energy consumption.
1)
Cold water or hot water
Off-mode 0.50 W
Rating plate
2)
max. 60 °C
Mod. ... ... ...
Prod. No. ... ... ...
Ser. No. ...
Environment concerns
Recycle the materials with the symbol . Put
the packaging in applicable containers to
recycle it.
Help protect the environment and human
health and to recycle waste of electrical and
electronic appliances. Do not dispose
24
appliances marked with the symbol with the
household waste. Return the product to your
local recycling facility or contact your
municipal office.
• Discard correctly the packaging material.
Recycle the materials with the symbol
.
www.zanussi.com
Page 25

Sisukord
Ohutusjuhised _ _ _ _ _ _ _ _ _ _ _ _ _ _ 25
Juhtpaneel _ _ _ _ _ _ _ _ _ _ _ _ _ _ _ 27
Programmid _ _ _ _ _ _ _ _ _ _ _ _ _ _ _ 27
Enne esimest kasutamist _ _ _ _ _ _ _ _ 28
Igapäevane kasutamine _ _ _ _ _ _ _ _ _ 30
Ohutusjuhised
Enne seadme paigaldamist ja kasutamist lugege kaasasolev juhend tähelepanelikult läbi. Tootja ei vastuta vale paigaldamise või
ebaõige kasutuse tõttu tekkinud vigastuste
ja kahjude eest. Hoidke juhend alles, et
saaksite seda ka edaspidi kasutada.
Laste ja ohustatud inimeste turvalisus
Hoiatus Lämbumise, vigastuse või
püsiva kahjustuse oht!
• Ärge lubage seadet kasutada lastel ega
füüsilise või sensoorse puudega inimestel
ega isikutel, kel puuduvad selleks vajalikud kogemused või oskused. Kui nad seadet siiski kasutavad, peab neid selle töö
juures jälgima isik, kes nende turvalisuse
eest vastutab.
• Ärge lubage lastel seadmega mängida.
• Hoidke pakendid lastele kättesaamatuna.
• Hoidke puhastusvahendid lastele kättesaamatuna.
• Hoidke lapsed ja lemmikloomad seadme
uksest eemal, kui see on avatud.
Paigaldamine
• Eemaldage kõik pakkematerjalid.
• Kahjustatud seadet ei tohi paigaldada ega
kasutada.
• Ärge paigaldage seadet ruumi, mille temperatuur on alla 0 °C.
• Järgige seadmega kaasas olevaid paigaldusjuhiseid.
Elektriühendus
Hoiatus Tulekahju- ja elektrilöögioht!
• Seade peab olema maandatud.
www.zanussi.com
Vihjeid ja näpunäiteid _ _ _ _ _ _ _ _ _ _ 32
Puhastus ja hooldus _ _ _ _ _ _ _ _ _ _ _ 33
Veaotsing _ _ _ _ _ _ _ _ _ _ _ _ _ _ _ _ 34
Tehnilised andmed _ _ _ _ _ _ _ _ _ _ _ 35
Jäätmekäitlus _ _ _ _ _ _ _ _ _ _ _ _ _ _ 35
Jäetakse õigus teha muutusi.
• Kontrollige, kas andmesildil toodud elektrilised parameetrid vastavad vooluvõrgu
näitajatele. Vastasel juhul võtke ühendust
elektrikuga.
• Kasutage alati nõuetekohaselt paigaldatud
ohutut pistikupesa.
• Ärge kasutage mitmikpistikuid ega pikenduskaableid.
• Veenduge, et te ei vigastaks toitepistikut
ega -juhet. Vigastatud toitejuhtme vahetamiseks võtke ühendust teeninduskeskusega.
• Ühendage toitepistik seinakontakti alles
pärast paigalduse lõpuleviimist. Veenduge, et pärast paigaldamist säilib juurdepääs toitepistikule.
• Seadet vooluvõrgust eemaldades ärge
tõmmake toitekaablist. Tõmmake alati toitepistikust.
Veeühendus
• Veenduge, et te veevoolikuid ei vigastaks.
• Enne seadme ühendamist uute voolikutega või pikalt kasutamata voolikutega laske
neist vett läbi voolata, kuni voolikud on
puhtad.
• Seadme esmakordsel kasutamisel veenduge, et kusagil ei oleks lekkeid.
• Vee sisselaskevoolikul on kaitseklapp ja
kattega sisemine toitejuhe.
25
Page 26

Hoiatus Ohtlik pinge.
Kui vee sisselaskevoolik on on kahjus-
•
tada saanud, eemaldage pistik koheselt
seinakontaktist. Vee sisselaskevooliku
asendamiseks võtke ühendust teeninduskeskusega.
Kasutamine
• See seade on mõeldud kasutamiseks koduses majapidamises või muudes sarnastes kohtades, näiteks:
– kauplustes, kontorites ja mujal, kus on
töötajatele mõeldud köögid;
– talumajapidamistes;
– hotellides, motellides ja muudes maju-
tuskohtades;
– hommikusöögiga-tüüpi ööbimiskohta-
des.
Hoiatus Vigastuse, põletuse või
elektrilöögioht!
• Ärge muutke seadme tehnilisi omadusi.
• Pange noad ja teravate otsadega söögiriistad söögiriistade korvi otsaga allapoole
või horisontaalasendis.
• Ärge jätke seadme ust lahti; vastasel korral võib keegi selle otsa komistada.
• Ärge avatud uksel istuge ega seiske.
• Nõudepesumasina pesuained on ohtlikud.
Järgige pesuainepakendil olevaid kasutusjuhiseid.
• Ärge jooge ega kasutage seadmes olnud
vett.
• Ärge eemaldage nõusid seadmest enne,
kui programm on lõppenud. Nõudele võib
olla jäänud pesuainet.
• Kui avate ukse pesuprogrammi töötamise
ajal, võib ukse vahelt välja paiskuda kuuma auru.
• Ärge pange süttivaid või süttiva ainega
määrdunud esemeid seadmesse, selle lähedusse või peale.
• Ärge kasutage seadme puhastamiseks
vee- või aurupihustit.
Jäätmekäitlus
Hoiatus Lämbumis- või vigastusoht!
• Eemaldage seade vooluvõrgust.
• Lõigake toitekaabel seadme küljest lahti ja
visake ära.
• Eemaldage seadme uks, et vältida laste ja
loomade seadmesse lõksujäämist.
Hooldus
• Seadme remontimiseks võtke ühendust
hooldusega. Soovitame alati kasutada ainult originaalvaruosi.
• Hooldusesse pöördudes veenduge, et teil
on olemas järgnev andmeplaadil kirjas
olev teave.
Mudel:
PNC:
Seerianumber:
26
www.zanussi.com
Page 27

Juhtpaneel
1 2 3
456
Sisse/välja-indikaator
1
Programmi tähis
2
Indikaatorid
3
Indikaatorid Kirjeldus
Programmid
Programm
1)
Tugev määrdumine
Lauanõud, söögiriistad, potid ja
pannid
Tavaline määrdumine
Lauanõud ja söögiriistad
Määrdumisaste
Nõude tüüp
Viitkäivituse nupp
4
Käivitusnupp
5
Programminupp
6
Pesutsükli indikaator.
Kuivatustsükli indikaator.
Lõpuindikaator.
Soolaindikaator. Programmi töötamise ajal see indikaator ei põle.
Programmi
faasid
Eelpesu
Pesu 70 °C
Loputused
Kuivatamine
Eelpesu
Pesu 65 °C
Loputused
Kuivatamine
Kestus
(min)
130 - 150 1.3 - 1.4 13 - 15
100 - 110 1.2 - 1.6 15 - 16
Energia
(kWh)
Vesi
(l)
www.zanussi.com
27
Page 28

1)
Programm
2)
3)
4)
1) Veesurve ja -temperatuur, elektripinge kõikumine, erinevad valikud ja nõude kogus võivad
tarbimisväärtusi mõjutada.
2) See programm sobib äsja kasutatud nõude pesemiseks. Seda kasutades saate head pesutulemused
lühikese ajaga.
3) Selle programmiga kasutate te tavalise määrdumisastmega lauanõude ja söögiriistade pesemiseks
vett ja energiat kõige efektiivsemalt. (See on standardprogramm testimisasutustele.)
4) Kasutage seda programmi nõude kiireks loputamiseks. See hoiab ära toidujääkide kleepumise
nõudele ja ebameeldiva lõhna tekkimise seadmes.
Ärge kasutage selle programmi puhul pesuainet.
Määrdumisaste
Nõude tüüp
Värske määrdumine
Lauanõud ja söögiriistad
Tavaline määrdumine
Lauanõud ja söögiriistad
Kõik Eelpesu 14 0.1 4
Programmi
faasid
Pesu 65 °C
Loputus
Eelpesu
Pesu 50 °C
Loputused
Kuivatamine
Kestus
(min)
30 0.8 9
195 1.02 11
Energia
(kWh)
Vesi
(l)
Teave testimisasutustele
Kogu vajaliku teabe saamiseks testimise kohta saatke meil aadressile:
info.test@dishwasher-production.com
Pange kirja tootenumber (PNC), mis asub andmeplaadil.
Enne esimest kasutamist
1. Kontrollige, kas veepehmendaja on regu-
leeritud vastavalt teie piirkonna vee karedusele. Vajadusel reguleerige veepehmendajat. Piirkonna vee kareduse kohta
saate teavet kohalikult vee-ettevõttelt.
4. Keerake veekraan lahti.
5. Seadmes võib olla tootmisjääke. Nende
eemaldamiseks käivitage programm. Ärge kasutage pesuainet ega pange nõusid
korvidesse.
2. Täitke soolamahuti.
3. Täitke loputusvahendi jaotur.
Veepehmendaja reguleerimine
Vee karedus
Saksa
kraadid
(°dH)
47 - 50 84 - 90 8.4. - 9.0 58 - 63 10
43 - 46 76 - 83 7.6 - 8.3 53 - 57 9
37 - 42 65 - 75 6.5 - 7.5 46 - 52 8
Prantsuse
kraadid
(°fH)
mmol/l Clarke'i
kraadid
28
Veepehmendaja
reguleerimine
Tasand
www.zanussi.com
Page 29

Vee karedus
Saksa
kraadid
(°dH)
29 - 36 51 - 64 5.1 - 6.4 36 - 45 7
23 - 28 40 - 50 4.0 - 5.0 28 - 35 6
19 - 22 33 - 39 3.3 - 3.9 23 - 27
15 - 18 26 - 32 2.6 - 3.2 18 - 22 4
11 - 14 19 - 25 1.9 - 2.5 13 - 17 3
4 - 10 7 - 18 0.7 - 1.8 5 - 12 2
< 4 < 7 < 0.7 < 5
1) Tehaseseadistus.
2) Selle taseme puhul ärge soola kasutage.
Prantsuse
kraadid
(°fH)
mmol/l Clarke'i
kraadid
Veepehmendaja
reguleerimine
Tasand
1)
5
2)
1
Veepehmendaja taseme reguleerimine
1. Jälgige, et nupul olev programmi tähis
oleks kohakuti sisse/välja-indikaatoriga.
2. Vajutage ja hoidke viitkäivitusnuppu. Samal ajal keerake nuppu vastupäeva, kuni
programmi tähis on kohakuti esimese
programmiga.
3. Vabastage viitkäivitusnupp, kui käivitusindikaator ja sisse/välja-indikaator hakkavad vilkuma.
4. Vajutage viitkäivitusnuppu.
•
hakkab vilkuma.
• Käivitusindikaator ja sisse/välja-indi-
kaator jätkavad vilkumist.
•
Lõpuindikaatori
katkendlik vilkumine näitab valitud taset, nt 5 vilkumist +
paus + 5 vilkumist = 5. tase.
5. Seadistuse muutmiseks vajutage korduvalt viitkäivitusnuppu. Igakordsel viitkäivitusnupu vajutamisel taseme number suureneb.
6. Valiku kinnitamiseks ja seadme väljalülitamiseks keerake nuppu, kuni programmi
tähis on kohakuti sisse/välja-nupuga.
Soolamahuti täitmine
Ettevaatust Vesi ja sool võivad
soolamahutist täitmise ajal välja tulla.
Roosteoht! Selle vältimiseks käivitage pärast
soolamahuti täitmist programm.
1
3
2
4
Valage soolamahutisse 1 liiter vett (ainult
esimesel korral).
www.zanussi.com
29
Page 30

Loputusvahendi jaoturi täitmine
2
Täitke loputusvahendi jaoturit niikaua,
kuni indikaator (A) muutub läbipaist-
vaks.
Loputusvahendi koguse reguleerimiseks
keerake valikunuppu asendite 1 (väikseim
kogus) ja 4 (suurim kogus) vahel.
1
1
1
4
2
3
2
A
1
2
3
4
Igapäevane kasutamine
1. Keerake veekraan lahti.
2. Keerake programminuppu, kuni programmitähis on kohakuti soovitud programmiga. Veenduge, et seade oleks seadistusrežiimil, vt jaotist "Programmi valimine ja
käivitamine". Valige nõude tüübile ja
määrdumisastmele vastav programm.
• Kui soolaindikaator põleb, täitke soola-
mahuti.
3. Pange nõud korvidesse.
4. Lisage pesuaine.
5. Käivitage programm.
Pesuaine kasutamine
1
A
B
3
0
2
0
1
2
2
3
0
2
0
30
3
4
Pange pesuaine või pesutablett lahtrisse
(A). Kui programmil on ka eelpesutsükkel,
www.zanussi.com
Page 31

pange väike kogus pesuainet ka lahtrisse
(B).
Pesuaine kombi-tablettide kasutamine
Soola ja loputusvahendit sisaldavate tablettide puhul jätke soolamahuti ja loputusvahendi jaotur tühjaks. Loputusvahendi jaoturi indikaator süttib alati, kui loputusvahendi jaotur
on tühi.
1. Seadke veepehmendaja madalaimale tasemele.
2. Seadke loputusvahendi jaotur madalaimasse asendisse.
Kui te lõpetate kombineeritud
pesutablettide kasutamise, siis enne
pesuaine, loputusvahendi ja
nõudepesumasina soola eraldi kasutama
hakkamist tehke järgmist.
1. Seadke veepehmendaja kõrgeimale tasemele.
2. Veenduge, et soolamahuti ja loputusvahendi jaotur on täis.
3. Käivitage kõige lühem programm loputusfaasiga ilma pesuaine ja nõudeta.
4. Reguleerige veepehmendajat vastavalt
oma piirkonna vee karedusele.
5. Reguleerige eraldatava loputusvahendi
kogust.
Programmi valimine ja käivitamine
Seadistusrežiim
Mõne toimingu jaoks peab seade olema
seadistusrežiimis.
Keerake programminuppu, kuni programmi
tähis on kohakuti juhtpaneelil oleva programmiga. Kui süttib sisse/välja-indikaator ja käivitusindikaator hakkab vilkuma, on seade
seadistusrežiimis.
Kui juhtpaneelil sellist olekut ei näidata, vajutage ja hoidke käivitusnuppu, kuni seade on
seadistusrežiimis.
Programmi käivitamine ilma
viitkäivituseta
1. Keerake veekraan lahti.
2. Sulgege seadme uks.
3. Keerake nuppu, kuni programmi tähis on
kohakuti soovitud programmi sümboliga.
• Sisse/välja indikaator süttib.
• Käivitusindikaator hakkab vilkuma.
4. Programmi käivitamiseks vajutage käivitusnuppu.
• Sisse/välja-indikaator ja käivitusindi-
kaator põlevad.
Programmi käivitamine viitkäivitusega
1. Programmi valimine
2. Vajutage viitkäivituse nuppu, et programmi käivitusaeg 3 tundi edasi lükata.
• Süttib viitkäivituse indikaator.
3. Pöördloenduse käivitamiseks vajutage
käivitusnuppu.
• Süttib käivitusindikaator.
Ukse avamine seadme töö ajal
Kui te ukse avate, katkeb seadme töö. Kui
panete ukse uuesti kinni, jätkub seadme töö
kohast, kus see katkes.
Viitkäivituse tühistamine pöördloenduse
ajal
1. Vajutage ja hoidke käivitusnuppu, kuni
käivitusindikaator hakkab vilkuma.
2. Programmi käivitamiseks vajutage käivitusnuppu.
Enne uue programmi käivitamist veenduge, et pesuaine jaoturis on pesuainet.
Programmi tühistamine
1. Vajutage ja hoidke käivitusnuppu, kuni
käivitusindikaator hakkab vilkuma.
Enne uue programmi käivitamist veenduge, et pesuaine jaoturis on pesuainet.
Programmi lõpus
Kui programm on lõppenud, süttib
. Kui
te seadet ise 5 minuti jooksul välja ei lülita,
kustuvad kõik indikaatorid. See vähendab
energiatarvet.
1. Seadme väljalülitamiseks keerake nup-
pu, kuni programmitähis on kohakuti sisse/välja-indikaatoriga.
www.zanussi.com
31
Page 32

2. Sulgege veekraan.
Tähelepanu
• Laske nõudel jahtuda, enne kui need
seadmest välja võtate. Tulised nõud purunevad kergesti.
Vihjeid ja näpunäiteid
• Võtke kõigepealt välja nõud alumisest korvist, seejärel ülemisest korvist.
• Seadme külgedel ja uksel võib olla vett.
Roostevaba teras jahtub kiiremini kui lauanõud.
Veepehmendaja
Kare vesi sisaldab suurt kogust mineraale,
mis võivad kahjustada teie seadet ning põhjustada halvemaid pesutulemusi. Veepehmendaja neutraliseerib need mineraalid.
Nõudepesumasina sool hoiab veepehmendaja puhtana ning õigetes tingimustes. Kindlasti tuleb valida õige veepehmendaja tase.
See tagab, et veepehmendaja kasutab õiges
koguses nõudepesumasina soola ja vett.
Soola, loputusvahendi ja pesuaine
kasutamine
• Kasutage ainult nõudepesumasina jaoks
mõeldud soola, loputusvahendit ja pesuainet. Teised tooted võivad seadet kahjustada.
• Loputusvahendi manustamine viimase loputustsükli ajal aitab ära hoida triipude ja
plekkide tekkimise kuivatamisel.
• Kombi-pesutabletid sisaldavad nii pesu- ja
loputusvahendit kui ka teisi aineid. Veenduge, et tabletid sobiksid teie piirkonna
vee karedusega. Vaadake tootepakendil
olevat juhendit.
• Lühikeste programmidega ei jõua pesuainetabletid täielikult lahustuda. Et nõudele
ei jääks pesuainejääke, soovitatakse pesuainetablette kasutada ainult pikkade
programmidega.
Ärge kasutage pesuainet rohkem, kui
ette nähtud. Vt pesuaine pakendil ole-
vaid juhiseid.
Korvide täitmine
Korvide täitmise kohta leiate näiteid
kaasasolevast brošüürist.
• Kasutage seadet ainult nõudepesumasinakindlate nõude pesemiseks.
32
• Ärge pange seadmesse puust, sarvest,
alumiiniumist, tinast ega vasest esemeid.
• Ärge pange seadmesse vett imavaid esemeid (käsnu või lappe).
• Eemaldage nõudelt toidujäägid.
• Kõrbenud toidujääkide hõlpsaks eemaldamiseks leotage potte ja panne enne seadmesse panekut vees.
• Asetage õõnsad esemed (tassid, klaasid
ja pannid) masinasse avausega allapoole.
• Veenduge, et söögiriistad ja lauanõud
üksteise küljes kinni ei oleks. Pange lusikad teiste söögiriistade juurde.
• Veenduge, et klaasid ei puutuks omavahel
kokku.
• Pange väikesed esemed söögiriistade korvi.
• Pange kerged esemed ülemisse korvi.
Veenduge, et need liikuma ei pääseks.
• Enne programmi käivitamist veenduge, et
pihustikonsool saab vabalt liikuda.
Enne programmi käivitamist
Veenduge järgmises.
• Filtrid on puhtad ja õigesti paigaldatud.
• Pihustuskonsoolid ei ole ummistunud.
• Esemete paigutus korvides on õige.
• Valitud programm sobib pestavate esemete tüübi ja määrdumisastmega.
• Kasutatav pesuainekogus on õige.
• Nõudepesumasina sool ja loputusvahend
on mahutites (juhul, kui te ei kasuta kombi-pesutablette).
• Soolamahuti kork on kindlalt kinni.
www.zanussi.com
Page 33

Puhastus ja hooldus
Hoiatus Enne hooldust lülitage seade
välja ja ühendage toitepistik
pistikupesast lahti.
Mustad filtrid ja ummistunud pihustikon-
soolid põhjustavad halvemaid pesemistulemusi.
Kontrollige nende seisukorda regulaarselt;
vajadusel puhastage.
Filtrite puhastamine
C
B
A
1
3
5
www.zanussi.com
2
4
D
6
7
Filtrite (B) ja (C) eemaldamiseks keerake
käepidet vastupäeva ja võtke välja. Eraldage
filter (B) filtrist (C). Peske filtreid voolava
veega.
Eemaldage filter (A). Peske filtrit voolava
veega.
Enne filtri (A) tagasiasetamist kontrollige,
ega settevanni äärte ümber pole kogunenud
toidujäätmeid.
Jälgige, et filter (A) asuks täpselt kahe juhiku
(D) all.
Pange filtrid (B) ja (C) kokku. Pange need
tagasi filtrisse (A). Keerake käepidet päripäeva, kuni see kohale lukustub.
Filtrite ebaõige asend võib põhjustada
kehva pesutulemust ja kahjustada sea-
det.
Pihustikonsoolide puhastamine
Ärge pihustikonsoole eemaldage.
Kui pihustikonsoolide avad on ummistunud,
eemaldage mustus peenikese teravaotsalise
esemega.
Välispinna puhastamine
Puhastage seadet pehme niiske lapiga.
Kasutage ainult neutraalseid puhastusaineid. Ärge kasutage abrasiivseid tooteid,
küürimisšvamme ega lahusteid.
Sisemuse puhastamine
Kui kasutate tihti lühikesi programme, võib
sellega kaasneda rasvajääkide ja katlakivi
kogunemine seadmesse.
Selle ärahoidmiseks on soovitatav vähemalt
kaks korda kuus kasutada ka pikki programme.
8
33
Page 34

Veaotsing
Seade ei käivitu või seiskub töö käigus.
Enne teenindusse pöördumist tutvuge probleemi lahendamiseks pakutava teabega.
Veakood Probleem
• Käivitusindikaator vilgub pidevalt.
• Lõpuindikaator vilgub 1 kord katkendlikult.
• Käivitusindikaator vilgub pidevalt.
• Lõpuindikaator vilgub 2 korda katkendlikult.
• Käivitusindikaator vilgub pidevalt.
• Lõpuindikaator vilgub 3 korda katkendlikult.
Hoiatus Enne kontrollima asumist
lülitage seade välja. Keerake
Probleem Võimalik lahendus
Seade ei käivitu. Veenduge, et pistik on pistikupesasse ühendatud.
Veenduge, et kaitsmekapis ei ole kaitse läbi läinud.
Programm ei käivitu. Veenduge, et seadme uks on suletud.
Vajutage käivitusnuppu.
Kui olete valinud viitkäivituse, siis tühistage see või ooda-
ke pöördloenduse lõppemiseni.
Seade ei täitu veega. Veenduge, et veekraan on lahti.
Veenduge, et veevarustuse surve ei ole liiga väike. Selle
teabe saamiseks pöörduge kohaliku vee-ettevõtte poole.
Veenduge, et veekraan ei ole ummistunud.
Veenduge, et sisselaskevooliku filter ei ole ummistunud.
Veenduge, et sisselaskevoolik ei oleks muljutud ega vää-
natud.
Seade ei tühjene veest. Veenduge, et valamu äravool ei ole ummistunud.
Veenduge, et tühjendusvoolik ei ole muljutud ega vääna-
tud.
Üleujutuse-vastane seade töötab. Sulgege veekraan ja pöörduge teeninduskeskusse.
Mõne probleemi puhul vilguvad erinevad
indikaatorid ühtlaselt ja/või katkendlikult
ning samal ajal kuvatakse veakood.
Seade ei täitu veega.
Seade ei tühjene veest.
Üleujutuse-vastane seade töötab.
programminuppu, kuni programmitähis on
kohakuti sisse/välja-indikaatoriga.
Pärast kontrollimise lõpetamist keerake programminuppu, kuni programmitähis on kohakuti programmiga, mida probleemi ilmnemisel kasutasite. Programm jätkub kohast, kus
see katkes.
Kui viga ilmneb uuesti, pöörduge teeninduskeskusse.
34
Muude veakoodide ilmumisel pöörduge teeninduskeskusse.
www.zanussi.com
Page 35

Pesu- ja kuivatustulemused ei ole
rahuldavad
Valged jooned ja plekid või sinakas kiht
klaasidel ja nõudel
• Eraldatava loputusvahendi kogus on liiga
suur. Seadke loputusvahendi eraldaja madalamasse asendisse.
• Pesuaine kogus on liiga suur
Plekid ja kuivanud veetilkade jäljed
nõudel ja klaasidel
• Põhjuseks võib olla pesuaine kvaliteet.
Nõud on märjad
• Programmil puudub kuivatustsükkel või
kasutate madala temperatuuriga kuivatustsüklit.
• Loputusvahendi jaotur on tühi.
• Põhjuseks võib olla loputusvahendi kvaliteet.
Muude võimalike põhjuste kohta vt jaotist "VIHJEID JA NÄPUNÄITEID".
• Eraldatava loputusvahendi kogus on liiga
väike Seadke loputusvahendi eraldaja kõrgemasse asendisse.
Tehnilised andmed
Mõõdud Kõrgus / Laius / Sügavus (mm) 596 / 818 - 898 / 575
Elektriühendus Vt andmeplaati.
Pinge 220-240 V
Sagedus 50 Hz
Veesurve Min. / maks. (baari / MPa) (0.5 / 0.05 ) / (8 / 0.8 )
Veevarustus
Mahutavus Koha seaded 12
Voolutarve Ooterežiim 0.50 W
1) Ühendage vee sisselaskevoolik 3/4'' keermega kraani külge.
2) Kui kuum vesi tuleb alternatiivsest energiaallikast (nt päikesepaneelid, tuuleenergia), kasutage
energiakulu vähendamiseks neid kuumaveeallikaid.
1)
Külm või kuum vesi
Väljas-režiim 0.50 W
2)
maks. 60 °C
Andmesilt
Mod. ... ... ...
Prod. No. ... ... ...
Ser. No. ...
Jäätmekäitlus
Sümboliga tähistatud materjalid võib
ringlusse suunata. Selleks viige pakendid
vastavatesse konteineritesse
www.zanussi.com
Aidake hoida keskkonda ja inimeste tervist
ja suunake elektri- ja elektroonilised jäätmed
ringlusse. Ärge visake sümboliga
35
Page 36

tähistatud seadmeid muude
majapidamisjäätmete hulka. Viige seade
kohalikku ringluspunkti või pöörduge abi
saamiseks kohalikku omavalitsusse.
• Kõrvaldage pakkematerjal nõuetekohaselt. Sümboliga
tähistatud materjalid
saatke ringlusse.
36
www.zanussi.com
Page 37

Sommaire
Instructions de sécurité _ _ _ _ _ _ _ _ _ _ 37
Bandeau de commande _ _ _ _ _ _ _ _ _ _ 39
Programmes _ _ _ _ _ _ _ _ _ _ _ _ _ _ _ _ 39
Avant la première utilisation _ _ _ _ _ _ _ _ 40
Utilisation quotidienne _ _ _ _ _ _ _ _ _ _ _ 42
Conseils _ _ _ _ _ _ _ _ _ _ _ _ _ _ _ _ _ _ 44
Instructions de sécurité
Avant d'installer et d'utiliser cet appareil, lisez
soigneusement les instructions fournies. Le fabricant ne peut être tenu pour responsable
des dommages et blessures liés à une mauvaise installation ou utilisation. Conservez toujours cette notice avec votre appareil pour
vous y référer ultérieurement.
Sécurité des enfants et des personnes
vulnérables
Avertissement Risque d'asphyxie, de
blessure ou d'invalidité permanente.
• Cet appareil n'est pas destiné à être utilisé
par des enfants ou des personnes dont les
capacités physiques, sensorielles ou mentales, ou le manque d'expérience et de connaissance les empêchent d'utiliser l'appareil
sans risque lorsqu’ils sont sans surveillance
ou en l’absence d’instruction d’une personne responsable qui puisse leur assurer une
utilisation de l’appareil sans danger.
• Ne laissez pas les enfants jouer avec l'appareil.
• Ne laissez pas les emballages à la portée
des enfants.
• Ne laissez pas les détergents à la portée
des enfants.
• Tenez les enfants et les animaux éloignés de
la porte de l'appareil lorsque celle-ci est ouverte.
Installation
• Retirez l'intégralité de l'emballage.
• N'installez pas et ne branchez pas un appareil endommagé.
Entretien et nettoyage _ _ _ _ _ _ _ _ _ _ _ 45
En cas d'anomalie de fonctionnement _ _ 46
Caracteristiques techniques _ _ _ _ _ _ _ _ 48
En matière de protection de l'environnement
_ _ _ _ _ _ _ _ _ _ _ _ _ _ _ _ _ _ _ _ _ _ _ 49
Sous réserve de modifications.
• N'installez pas l'appareil ou ne l'utilisez pas
dans un endroit où la température ambiante
est inférieure à 0 °C.
• Suivez scrupuleusement les instructions
d'installation fournies avec l'appareil.
Branchement électrique
Avertissement Risque d'incendie ou
d'électrocution.
• L'appareil doit être relié à la terre.
• Vérifiez que les données électriques figurant
sur la plaque signalétique correspondent à
celles de votre réseau. Si ce n'est pas le
cas, contactez un électricien.
• Utilisez toujours une prise de courant de sécurité correctement installée.
• N'utilisez pas d'adaptateurs multiprises ni de
rallonges.
• Veillez à ne pas endommager la fiche secteur ni le câble d'alimentation. Contactez le
service après-vente ou un électricien pour
remplacer le câble d'alimentation s'il est endommagé.
• Ne connectez la fiche d'alimentation à la prise de courant qu'à la fin de l'installation. Assurez-vous que la prise de courant est accessible une fois l'appareil installé.
• Ne tirez pas sur le câble électrique pour débrancher l'appareil. Tirez toujours sur la prise.
Raccordement à l'arrivée d'eau
• Veillez à ne pas endommager les tuyaux de
circulation d'eau.
www.zanussi.com
37
Page 38

• Avant de brancher l'appareil à des tuyaux
neufs ou n'ayant pas servi depuis longtemps, laissez couler l'eau jusqu'à ce qu'elle
soit propre.
• Avant d'utiliser l'appareil pour la première
fois, assurez-vous de l'absence de fuites.
• Le tuyau d'arrivée d'eau comporte une vanne de sécurité et une gaine avec un câble
d'alimentation intérieur.
Avertissement Tension dangereuse.
Si le tuyau d'arrivée d'eau est endomma-
•
gé, débranchez immédiatement la fiche de
la prise secteur. Contactez le service aprèsvente pour remplacer le tuyau d'arrivée
d'eau.
Utilisation
• Cet appareil est conçu uniquement pour un
usage domestique et des situations telles
que :
– Cuisines réservées aux employés dans
des magasins, bureaux et autres lieux de
travail
– Bâtiments de ferme
– Pour une utilisation privée, par les clients,
dans des hôtels et autres lieux de séjour
– En chambre d'hôte.
Avertissement Risque de blessures, de
brûlures, d'électrocution ou d'incendie.
• Ne modifiez pas les caractéristiques de cet
appareil.
• Placez les couteaux et les couverts avec
des bouts pointus dans le panier à couverts
avec les pointes tournées vers le bas ou en
position horizontale.
• Ne laissez pas la porte de l'appareil ouverte
sans surveillance pour éviter tout risque de
chute.
• Ne montez pas sur le hublot ouvert de votre
appareil ; ne vous asseyez pas dessus.
• Les produits de lavage pour lave-vaisselle
sont dangereux. Suivez les consignes de
sécurité figurant sur l'emballage du produit
de lavage.
• Ne buvez pas l'eau de l'appareil ; ne jouez
pas avec.
• N'enlevez pas la vaisselle de l'appareil avant
la fin du programme. Il peut rester du produit de lavage sur la vaisselle.
• De la vapeur chaude peut s'échapper de
l'appareil si vous ouvrez la porte pendant le
déroulement d'un programme.
• Ne placez pas de produits inflammables ou
d'éléments imbibés de produits inflammables à l'intérieur ou à proximité de l'appareil,
ni sur celui-ci.
• Ne pulvérisez pas d'eau ni de vapeur pour
nettoyer l'appareil.
Mise au rebut
Avertissement Risque de blessure ou
d'asphyxie.
• Débranchez l'appareil de l'alimentation électrique.
• Coupez le câble d'alimentation au ras de
l'appareil et mettez-le au rebut.
• Retirez le dispositif de verrouillage de la
porte pour empêcher les enfants et les animaux de s'enfermer dans l'appareil.
Maintenance
• Contactez le service après-vente pour faire
réparer l'appareil. N'utilisez que des pièces
de rechange d'origine.
• Lorsque vous contactez le service, assurezvous de disposer des informations suivantes
(qui se trouvent sur la plaque signalétique).
Modèle :
PNC :
Numéro de série :
38
www.zanussi.com
Page 39

Bandeau de commande
1 2 3
456
Voyant Marche/Arrêt
1
Indicateur de programme
2
Voyants
3
Voyants Description
Programmes
1)
Programme
Degré de salis-
Type de vaissel-
Très sale
Vaisselle, couverts,
plats et casseroles
Normalement sale
Vaisselle et couverts
sure
le
Touche Départ différé
4
Touche Départ
5
Sélecteur de programme
6
Voyant de phase de lavage.
Voyant de phase de séchage.
Voyant de fin.
Voyant du réservoir à sel régénérant. Ce voyant est éteint pendant
le déroulement du programme.
Phases du
programme
Prélavage
Lavage à 70 °C
Rinçages
Séchage
Prélavage
Lavage à 65 °C
Rinçages
Séchage
Durée
(min)
130 - 150 1.3 - 1.4 13 - 15
100 - 110 1.2 - 1.6 15 - 16
Consom-
mation
électrique
(kWh)
Eau
(l)
www.zanussi.com
39
Page 40

1)
Programme
2)
3)
4)
1) Les valeurs de consommation peuvent changer en fonction de la pression et de la température de l'eau,
des variations de l'alimentation électrique, de la quantité de vaisselle chargée ainsi que des options
sélectionnées.
2) Ce programme permet de laver une charge de vaisselle fraîchement salie. Il offre de bons résultats de
lavage en peu de temps.
3) Ce programme vous permet d'optimiser votre consommation d'eau et d'énergie pour la vaisselle et les
couverts normalement sales. (Il s'agit du programme standard pour les instituts de tests.)
4) Ce programme permet un rinçage rapide. Cela empêche les restes de nourriture de coller sur la vaisselle
et évite les mauvaises odeurs.
N'utilisez pas de produit de lavage avec ce programme.
Degré de salis-
sure
Type de vaissel-
le
Vaisselle fraîchement salie
Vaisselle et couverts
Normalement sale
Vaisselle et couverts
Tous Prélavage 14 0.1 4
Phases du
programme
Lavage à 65 °C
Rinçage
Prélavage
Lavage à 50 °C
Rinçages
Séchage
Durée
(min)
30 0.8 9
195 1.02 11
Consom-
mation
électrique
(kWh)
Eau
(l)
Informations pour les instituts de test
Pour toute information relative aux performances de test, envoyez un courrier électronique à
l'adresse :
info.test@dishwasher-production.com
Notez le numéro du produit (PNC) situé sur la plaque signalétique.
Avant la première utilisation
1. Assurez-vous que le niveau réglé pour
l'adoucisseur d'eau correspond à la dureté
de l'eau de votre région. Dans le cas contraire, réglez le niveau de l'adoucisseur
d'eau. Contactez votre compagnie des
eaux pour connaître la dureté de l'eau de
votre région.
2. Remplissez le réservoir de sel régénérant.
3. Remplissez le distributeur de liquide de
rinçage.
40
4. Ouvrez le robinet d'eau.
5. Des résidus du processus de fabrication
peuvent subsister dans l'appareil. Démarrez un programme pour les évacuer. N'utilisez pas de produit de lavage et ne chargez
pas les paniers.
www.zanussi.com
Page 41

Réglage de l'adoucisseur d'eau
Dureté de l'eau
Degrés
allemands
(°dH)
47 - 50 84 - 90 8.4. - 9.0 58 - 63 10
43 - 46 76 - 83 7.6 - 8.3 53 - 57 9
37 - 42 65 - 75 6.5 - 7.5 46 - 52 8
29 - 36 51 - 64 5.1 - 6.4 36 - 45 7
23 - 28 40 - 50 4.0 - 5.0 28 - 35 6
19 - 22 33 - 39 3.3 - 3.9 23 - 27
15 - 18 26 - 32 2.6 - 3.2 18 - 22 4
11 - 14 19 - 25 1.9 - 2.5 13 - 17 3
4 - 10 7 - 18 0.7 - 1.8 5 - 12 2
< 4 < 7 < 0.7 < 5
1) Réglage d'usine.
2) N'utilisez pas de sel à ce niveau.
Comment régler le niveau de
l'adoucisseur d'eau
1. Assurez-vous que l'indicateur de programme du sélecteur est aligné sur l'indicateur
Marche/Arrêt.
2. Appuyez sur la touche Départ différé et
maintenez-la enfoncée. Simultanément,
tournez le sélecteur vers la gauche jusqu'à
ce que l'indicateur de programme soit aligné avec le premier programme.
3. Relâchez la touche Départ différé lorsque
les voyants Marche/Arrêt et Départ clignotent.
4. Appuyez sur la touche de départ différé.
•
commence à clignoter.
Degrés
français
(°fH)
mmol/l Degrés
Clarke
niveau augmente à chaque fois que vous
appuyez sur la touche Départ différé.
6. Pour confirmer le réglage et éteindre l'appareil, tournez le sélecteur jusqu'à ce que
l'indicateur de programme soit aligné sur la
touche Marche/Arrêt.
Remplissage du réservoir de sel
régénérant
Attention De l'eau et du sel peuvent
sortir du réservoir de sel régénérant
lorsque vous le remplissez. Risque de
corrosion. Afin d'éviter cela, après avoir rempli
le réservoir de sel régénérant, démarrez un
programme.
Réglage de l'adoucis-
• Le voyant Marche/Arrêt et le voyant Départ continuent de clignoter.
• Le nombre de clignotements du voyant
indique le niveau actuellement réglé. Par exemple, 5 clignotements +
pause + 5 clignotements = niveau 5.
5. Appuyez plusieurs fois sur la touche de
départ différé pour modifier le réglage. Le
www.zanussi.com
seur
d'eau
Niveau
1)
5
2)
1
41
Page 42

1
4
2
3
A
1
2
1
3
2
4
Mettez 1 litre d'eau dans le réservoir de sel régénérant (uniquement la première fois).
Remplissage du distributeur de liquide
de rinçage
2
1
1
2
3
4
Remplissez le distributeur de liquide de
rinçage lorsque l'indicateur (A) est vide.
Pour régler la quantité de liquide de rinçage libérée, tournez le sélecteur entre la position 1
(quantité minimale) et la position 4 (quantité
maximale).
Utilisation quotidienne
1. Ouvrez le robinet d'eau.
2. Tournez le sélecteur jusqu'à ce que l'indicateur de programme soit aligné sur le
programme souhaité. Assurez-vous que
l'appareil est en mode Programmation ; reportez-vous au chapitre « Réglage et départ d'un programme ». Réglez le programme adapté au type de vaisselle et au degré
de salissure.
42
• Si le voyant du réservoir de sel régénérant est allumé, remplissez le réservoir.
3. Chargez les paniers.
4. Ajoutez du produit de lavage.
5. Lancez le programme.
www.zanussi.com
Page 43

Utilisation du produit de lavage
1
2
1
2
A
B
3
0
2
0
3
3
0
2
0
4
Versez du produit de lavage ou placez une
pastille dans le compartiment (A). Si le programme comporte une phase de prélavage,
versez une petite quantité de produit de lavage
dans le compartiment (B).
Utilisation de pastilles de détergent
multifonctions
Si vous utilisez des pastilles qui contiennent
du sel et du liquide de rinçage, ne remplissez
pas le réservoir de sel régénérant ni le distributeur de liquide de rinçage. Le voyant du réservoir de liquide de rinçage reste allumé si le
distributeur de liquide de rinçage est vide.
1. Réglez l'adoucisseur d'eau au niveau minimal.
2. Réglez le distributeur de liquide de rinçage
sur le niveau le plus faible.
Si vous cessez d'utiliser des pastilles de
détergent multifonctions, avant de
commencer à utiliser à la fois du produit
de lavage, du liquide de rinçage et du sel
régénérant, effectuez ces étapes :
1. Réglez l'adoucisseur d'eau au niveau maximal.
2. Assurez-vous que le réservoir de sel régénérant et le distributeur de liquide de rinçage sont pleins.
3. Démarrez le programme le plus court par
une phase de rinçage, sans produit de lavage ni vaisselle.
4. Réglez l'adoucisseur d'eau en fonction de
la dureté de l'eau de votre région.
5. Ajustez la quantité de liquide de rinçage libérée.
Réglage et départ d'un programme
Mode Programmation
L'appareil doit être en mode Programmation pour lancer un programme.
Tournez le sélecteur jusqu'à ce que l'indicateur
de programme soit aligné sur un programme
sur le bandeau de commande. Si le voyant
Marche/Arrêt s'allume et le voyant Départ se
met à clignoter, l'appareil est en mode Programmation.
Si le bandeau de commande ne présente pas
ces conditions, maintenez enfoncée la touche
Départ jusqu'à ce que l'appareil se mette en
mode Programmation.
Démarrage d'un programme sans départ
différé
1. Ouvrez le robinet d'eau.
2. Fermez la porte de l'appareil.
3. Tournez le sélecteur jusqu'à ce que l'indicateur de programme soit aligné sur symbole du programme souhaité.
• Le voyant Marche/Arrêt s'allume.
• Le voyant Départ commence à clignoter.
4. Appuyez sur la touche Départ pour lancer
le programme.
• Le voyant Marche/Arrêt et le voyant Dé-
part sont allumés.
Démarrage d'un programme avec départ
différé
1. Sélectionnez le programme
2. Appuyez sur la touche Départ différé pour
retarder le début du programme de lavage
de 3 heures.
www.zanussi.com
43
Page 44

• Le voyant du départ différé s'allume.
3. Appuyez sur la touche Départ pour lancer
le décompte.
• Le voyant Départ s'allume.
Ouverture de la porte au cours du
fonctionnement de l'appareil
Si vous ouvrez la porte, l'appareil s'arrête.
Lorsque vous refermez la porte, l'appareil reprend là où il a été interrompu.
Annulation du départ différé au cours du
décompte
1. Maintenez la touche Départ enfoncées jusqu'à ce que le voyant Départ se mette à
clignoter.
2. Appuyez sur la touche Départ pour lancer
le programme.
Assurez-vous que le distributeur de produit de lavage n'est pas vide avant de dé-
marrer un nouveau programme de lavage.
Annulation du programme
1. Maintenez la touche Départ enfoncées jusqu'à ce que le voyant Départ se mette à
clignoter.
Assurez-vous que le distributeur de produit de lavage n'est pas vide avant de dé-
marrer un nouveau programme de lavage.
À la fin du programme
Lorsque le programme est terminé, le voyant
s'allume. Si vous n'éteignez pas l'appareil
au bout de 5 minutes, tous les voyants s'éteignent. Cela permet de diminuer la consommation d'énergie.
1. Pour éteindre l'appareil, tournez le sélec-
teur jusqu'à ce que l'indicateur de programme soit aligné sur l'indicateur Marche/
Arrêt.
2. Fermez le robinet d'eau.
Important
• Attendez que la vaisselle refroidisse avant
de la retirer du lave-vaisselle. La vaisselle
encore chaude est sensible aux chocs.
• Déchargez d'abord le panier inférieur, puis
le panier supérieur.
• Les côtés et la porte de l'appareil peuvent
être mouillés. L'acier inoxydable refroidit
plus rapidement que la vaisselle.
Conseils
Adoucisseur d'eau
L'eau dure contient une grande quantité de minéraux pouvant endommager l'appareil et donner de mauvais résultats de lavage. L'adoucisseur d'eau neutralise ces minéraux.
Le sel régénérant préserve la propreté et le
bon état de l'adoucisseur d'eau. Il est important de régler l'adoucisseur d'eau sur un niveau adéquat. Cela garantit que l'adoucisseur
d'eau utilise la quantité correcte de sel régénérant et d'eau.
Utilisation de sel régénérant, de liquide
de rinçage et de produit de lavage
• Utilisez uniquement du sel régénérant, du liquide de rinçage et du produit de lavage
conçus pour les lave-vaisselle. D'autres produits peuvent endommager l'appareil.
44
• Lors de la dernière phase de rinçage, le liquide de rinçage permet de sécher la vaisselle sans laisser de traînées ni de taches.
• Les pastilles de détergent multifonctions
contiennent du produit de lavage, du liquide
de rinçage et d'autres adjuvants. Assurezvous que ces pastilles sont adaptées à la
dureté de l'eau de votre région. Reportezvous aux instructions figurant sur l'emballage de ces produits.
• Les tablettes de détergent ne se dissolvent
pas complètement durant les programmes
courts. Pour éviter que des résidus de produit de lavage ne se déposent sur la vaisselle, nous recommandons d'utiliser des pastilles de détergent avec des programmes
longs.
www.zanussi.com
Page 45

N'utilisez que la quantité nécessaire de
produit de lavage. Reportez-vous aux instructions figurant sur l'emballage du produit de
lavage.
Chargement des paniers
Reportez-vous à la brochure fournie pour
consulter des exemples de charge des
paniers.
• Utilisez uniquement cet appareil pour laver
des articles qui peuvent passer au lave-vaisselle.
• Ne mettez pas dans le lave-vaisselle des ar-
ticles en bois, en corne, en aluminium, en
étain et en cuivre.
• Ne placez pas dans l'appareil des objets
pouvant absorber l'eau (éponges, chiffons
de nettoyage).
• Enlevez les restes d'aliments sur les articles.
• Pour retirer facilement les résidus d'aliments
brûlés, faites tremper les plats et les casseroles dans l'eau avant de les placer dans
l'appareil.
• Chargez les articles creux (tasses, verres et
casseroles) en les retournant.
• La vaisselle et les couverts ne doivent pas
être insérés les uns dans les autres ni se
chevaucher. Mélangez les cuillères avec
d'autres couverts.
• Vérifiez que les verres ne se touchent pas
pour éviter qu'ils ne se brisent.
• Placez les petits articles dans le panier à
couverts.
• Placez les articles légers dans le panier supérieur. Disposez-les de façon à ce qu'ils ne
puissent pas se retourner.
• Assurez-vous que les bras d'aspersion tournent librement avant de lancer un programme.
Avant le démarrage d'un programme
Assurez-vous que :
• Les filtres sont propres et correctement installés.
• Les bras d'aspersion ne sont pas obstrués.
• La vaisselle est bien positionnée dans les
paniers.
• Le programme est adapté au type de vaisselle et au degré de salissure.
• Vous utilisez la bonne quantité de produit
de lavage.
• Vous avez utilisé du sel régénérant et du liquide de rinçage (sauf si vous utilisez des
pastilles de détergent multifonctions).
• Le bouchon du réservoir de sel régénérant
est vissé.
Entretien et nettoyage
Avertissement Avant toute opération
d'entretien, éteignez l'appareil et
débranchez la prise secteur.
Les filtres sales et les bras d'aspersion
obstrués diminuent les résultats de lavage.
Contrôlez-les régulièrement et nettoyez-les si
nécessaire.
www.zanussi.com
Nettoyage des filtres
1
C
B
A
2
45
Page 46

3
5
7
Pour retirer les filtres (B) et (C), tournez la poignée vers la gauche et enlevez-la. Démontez
les filtres (B) et (C). Lavez les filtres à l'eau
courante.
Retirez le filtre (A). Lavez le filtre à l'eau courante.
4
D
6
8
Avant de remettre le filtre (A) en place, assurez-vous qu'il ne reste aucun résidu alimentaire
ni salissure à l'intérieur ou autour du bord du
collecteur d'eau.
Assurez-vous que le filtre (A) est correctement
positionné, sous les 2 guides (D).
Remontez les filtres (B) et (C). Remettez-les
en place dans le filtre (A). Tournez la poignée
vers la droite jusqu'à la butée.
Une position incorrecte des filtres peut
donner de mauvais résultats de lavage et
endommager l'appareil.
Nettoyage des bras d'aspersion
Ne retirez pas les bras d’aspersion.
Si des résidus ont bouché les orifices des
bras d'aspersion, éliminez ceux-ci à l'aide d'un
objet fin et pointu.
Nettoyage extérieur
Nettoyez l'appareil avec un chiffon doux humide.
Utilisez uniquement des produits de lavage
neutres. N'utilisez pas de produits abrasifs, de
tampons à récurer ni de solvants.
Nettoyage intérieur
Si vous utilisez régulièrement des programmes
de courte durée, des dépôts de graisse et des
dépôts calcaires peuvent se former à l'intérieur
de l'appareil.
Pour éviter cela, nous recommandons de lancer un programme long au moins 2 fois par
mois.
En cas d'anomalie de fonctionnement
L'appareil ne démarre pas ou s'arrête en cours
de programme.
Veuillez vous reporter aux informations suivantes avant de contacter le service après-vente
pour résoudre un problème.
46
Pour certaines anomalies, différents voyants clignotent simultanément de façon
continue ou intermittente pour indiquer
un code d'alarme.
www.zanussi.com
Page 47

Code d'alarme Problème
• Le voyant Départ clignote en permanence.
• Le voyant Fin clignote une fois de façon intermittente.
• Le voyant Départ clignote en permanence.
• Le voyant Fin clignote 2 fois de façon intermittente.
• Le voyant Départ clignote en permanence.
• Le voyant Fin clignote 3 fois de façon intermittente.
L'appareil ne se remplit pas d'eau.
L'appareil ne vidange pas l'eau.
Le système de sécurité anti-débordement s'est déclenché.
Avertissement Éteignez l'appareil avant
de procéder aux vérifications. Tournez le
programme soit aligné sur l'indicateur Marche/
Arrêt.
sélecteur jusqu'à ce que l'indicateur de
Problème Solution possible
L'appareil ne s'allume pas. Assurez-vous que la fiche du câble d'alimentation est bien
Assurez-vous qu'aucun fusible n'est grillé dans la boîte à fu-
Le programme ne démarre pas. Vérifiez que la porte de l'appareil est fermée.
Appuyez sur la touche Départ.
Si vous avez sélectionné un départ différé, annulez-le ou at-
L'appareil ne se remplit pas d'eau. Assurez-vous que le robinet d'eau est ouvert.
Assurez-vous que la pression de l'arrivée d'eau n'est pas
Assurez-vous que le robinet d'eau n'est pas obstrué.
Assurez-vous que le filtre du tuyau d'arrivée d'eau n'est pas
Assurez-vous que le tuyau d'arrivée d'eau n'est pas tordu ni
L'appareil ne vidange pas l'eau. Assurez-vous que le siphon de l'évier n'est pas obstrué.
Assurez-vous que le tuyau de vidange n'est pas tordu ni
Le système de sécurité anti-débordement
s'est déclenché.
insérée dans la prise de courant.
sibles.
tendez la fin du décompte.
trop basse. Pour obtenir cette information, contactez votre
compagnie des eaux.
obstrué.
plié.
plié.
Fermez le robinet d'eau et contactez le service après-vente.
Après avoir effectué les vérifications, tournez
le sélecteur jusqu'à ce que l'indicateur de programme soit aligné sur le programme qui était
en cours lorsque le problème s'est produit. Le
programme reprend là où il s'était interrompu.
www.zanussi.com
Si le problème persiste, contactez le service
après-vente.
Si tout autre code d'alarme s'affiche, contactez
le service après-vente.
47
Page 48

Si les résultats de lavage et de séchage
ne sont pas satisfaisants
Traînées blanchâtres ou pellicules
bleuâtres sur les verres et la vaisselle
• La quantité de liquide de rinçage libérée est
trop importante. Placez le sélecteur de dosage du liquide de rinçage sur le niveau le
plus faible.
• La quantité de produit de lavage est excessive.
Taches et traces de gouttes d'eau
séchées sur les verres et la vaisselle
• La quantité de liquide de rinçage libérée
n'est pas suffisante. Placez le sélecteur de
dosage du liquide de rinçage sur un niveau
plus élevé.
• Il se peut que la qualité du produit de lavage
soit en cause.
La vaisselle est mouillée
• Le programme ne contient pas de phase de
séchage ou une phase de séchage à basse
température.
• Le distributeur de liquide de rinçage est vide.
• Il se peut que la qualité du liquide de rinçage soit en cause.
Pour trouver d'autres causes possibles,
reportez-vous au chapitre « CONSEILS ».
Caracteristiques techniques
Dimensions Largeur / Hauteur / Profondeur (mm) 596 / 818 - 898 / 575
Branchement électrique Reportez-vous à la plaque signalétique.
Tension 220-240 V
Fréquence 50 Hz
Pression de l'arrivée d'eau Min. / max. (bar / MPa) (0.5 / 0.05 ) / (8 / 0.8 )
Arrivée d'eau
Capacité Couverts 12
Consommation électrique Mode « Veille » 0.50 W
1) Raccordez le tuyau d'arrivée d'eau à un robinet fileté (3/4 pouce).
2) Si l'eau chaude est produite à partir de sources d'énergie respectueuses de l'environnement (par exemple,
panneaux solaires ou énergie éolienne), utilisez une arrivée d'eau chaude afin de réduire la consommation
d'énergie.
1)
Eau froide ou eau chaude
Mode « Arrêt » 0.50 W
2)
max. 60 °C
Plaque signalétique
48
Mod. ... ... ...
Prod. No. ... ... ...
Ser. No. ...
www.zanussi.com
Page 49

En matière de protection de l'environnement
Recyclez les matériaux portant le symbole .
Déposez les emballages dans les conteneurs
prévus à cet effet.
Contribuez à la protection de l'environnement
et à votre sécurité, recyclez vos produits
électriques et électroniques. Ne jetez pas les
appareils portant le symbole
avec les
ordures ménagères. Emmenez un tel produit
dans votre centre local de recyclage ou
contactez vos services municipaux.
• Veuillez jeter les matériaux d'emballage de
manière appropriée. Recyclez les matériaux
portant le symbole
.
www.zanussi.com
49
Page 50

Inhalt
Sicherheitshinweise _ _ _ _ _ _ _ _ _ _ _ _ 50
Bedienfeld _ _ _ _ _ _ _ _ _ _ _ _ _ _ _ _ _ 52
Programme _ _ _ _ _ _ _ _ _ _ _ _ _ _ _ _ _ 52
Vor der ersten Inbetriebnahme _ _ _ _ _ _ 53
Täglicher Gebrauch _ _ _ _ _ _ _ _ _ _ _ _ 55
Sicherheitshinweise
Lesen Sie vor der Montage und dem Gebrauch des Geräts zuerst die Gebrauchsanleitung. Der Hersteller übernimmt keine Verantwortung für Verletzungen und Beschädigungen durch unsachgemäße Montage. Bewahren Sie die Gebrauchsanleitung griffbereit auf.
Sicherheit von Kindern und
schutzbedürftigen Personen
Warnung! Es besteht Erstickungsgefahr,
Risiko von Verletzungen oder
permanenten Behinderungen.
• Lassen Sie keine Personen (einschließlich
Kinder) mit eingeschränkten physischen,
sensorischen oder geistigen Fähigkeiten,
mangelnder Erfahrung oder mangelndem
Wissen dieses Gerät benutzen. Solche Personen müssen von einer Person, die für ihre
Sicherheit verantwortlich ist, beaufsichtigt
oder bei der Bedienung des Geräts angeleitet werden.
• Kinder dürfen nicht mit dem Gerät spielen.
• Alle Verpackungsmaterialien von Kindern
fernhalten.
• Halten Sie alle Reinigungsmittel von Kindern
fern.
• Halten Sie Kinder und Haustiere vom geöffneten Gerät fern.
Montage
• Entfernen Sie das gesamte Verpackungsmaterial.
• Stellen Sie ein beschädigtes Gerät nicht auf
und benutzen Sie es nicht.
• Stellen Sie das Gerät nicht an einem Ort
auf, an dem die Temperatur unter 0 °C absinken kann, und benutzen Sie das Gerät
50
Tipps und Hinweise _ _ _ _ _ _ _ _ _ _ _ _ 57
Reinigung und Pflege _ _ _ _ _ _ _ _ _ _ _ 58
Fehlersuche _ _ _ _ _ _ _ _ _ _ _ _ _ _ _ _ 59
Technische Daten _ _ _ _ _ _ _ _ _ _ _ _ _ 61
Umwelttipps _ _ _ _ _ _ _ _ _ _ _ _ _ _ _ _ 61
Änderungen vorbehalten.
nicht, wenn die Temperatur unter 0 °C absinkt.
• Halten Sie sich an die mitgelieferte Montageanleitung.
Elektrischer Anschluss
Warnung! Brand- und
Stromschlaggefahr.
• Das Gerät muss geerdet sein.
• Stellen Sie sicher, dass die elektrischen Daten auf dem Typenschild den Daten Ihrer
Stromversorgung entsprechen. Wenden Sie
sich andernfalls an einen Elektriker.
• Schließen Sie das Gerät nur an eine sachgemäß installierte Schutzkontaktsteckdose
an.
• Verwenden Sie keine Mehrfachsteckdosen
oder Verlängerungskabel.
• Achten Sie darauf, Netzstecker und Netzkabel nicht zu beschädigen. Wenden Sie sich
zum Austausch des beschädigten Netzkabels an den Kundendienst oder einen Elektriker.
• Stecken Sie den Netzstecker erst nach Abschluss der Montage in die Steckdose.
Stellen Sie sicher, dass der Netzstecker
nach der Montage noch zugänglich ist.
• Ziehen Sie nicht am Netzkabel, wenn Sie
das Gerät vom Stromnetz trennen möchten.
Ziehen Sie dazu immer direkt am Netzstecker.
Wasseranschluss
• Achten Sie darauf, die Wasserschläuche
nicht zu beschädigen.
www.zanussi.com
Page 51

• Bevor Sie neue oder lange Zeit nicht benutzte Schläuche an das Gerät anschließen,
lassen Sie Wasser durch die Schläuche
fließen, bis es sauber austritt.
• Achten Sie darauf, dass beim ersten Gebrauch des Geräts keine Undichtheiten vorhanden sind.
• Der Wasserzulaufschlauch verfügt über ein
Sicherheitsventil und eine Ummantelung mit
einem innenliegenden Netzkabel.
Warnung! Gefährliche Spannung.
Ziehen Sie den Netzstecker sofort aus
•
der Steckdose, wenn der Wasserzulauf-
schlauch beschädigt ist. Wenden Sie sich
für den Austausch des Wasserzulaufschlauchs an den Kundendienst.
Gebrauch
• Dieses Gerät ist für die Verwendung im
Haushalt und ähnliche Zwecke vorgesehen,
wie z. B.:
– Personalküchenbereiche in Geschäften,
Büros und anderen Arbeitsumfeldern
– Bauernhöfe
– Für Gäste in Hotels, Motels und anderen
wohnungsähnlichen Räumlichkeiten
– In Pensionen und vergleichbaren Unter-
bringungsmöglichkeiten.
Warnung! Es besteht Verletzungs-,
Verbrennungs-, Stromschlag- oder
Brandgefahr.
• Nehmen Sie keine technischen Änderungen
am Gerät vor.
• Stellen Sie Messer und Besteck mit scharfen Spitzen mit der Spitze nach unten in den
Besteckkorb oder legen Sie sie waagerecht
in das Gerät.
www.zanussi.com
• Lassen Sie die Gerätetür nicht ohne Beaufsichtigung offen stehen, damit von der Tür
keine Stolpergefahr ausgeht.
• Setzen oder stellen Sie sich nie auf die offene Tür.
• Geschirrspüler-Reinigungsmittel sind gefährlich. Beachten Sie die Sicherheitsanweisungen auf der Reinigungsmittelverpackung.
• Trinken Sie nicht das Wasser aus dem Gerät und verwenden Sie es nicht zum Spielen.
• Nehmen Sie kein Geschirr aus dem Gerät,
bevor das Programm beendet ist. Es könnte
sich noch Reinigungsmittel auf dem Geschirr befinden.
• Es kann heißer Dampf aus dem Gerät austreten, wenn Sie die Tür während des Ablaufs eines Programms öffnen.
• Platzieren Sie keine entflammbaren Produkte oder Gegenstände, die mit entflammbaren Produkten benetzt sind, im Gerät, auf
dem Gerät oder in der Nähe des Geräts.
• Reinigen Sie das Gerät nicht mit einem
Wasser- oder Dampfstrahl.
Entsorgung
Warnung! Verletzungs- und
Erstickungsgefahr.
• Trennen Sie das Gerät von der Stromversorgung.
• Schneiden Sie das Netzkabel ab und entsorgen Sie es.
• Entfernen Sie das Türschloss, um zu verhindern, dass sich Kinder oder Haustiere in
dem Gerät einschließen.
Kundendienst
• Wenden Sie sich zur Reparatur des Geräts
an den Kundendienst. Wir empfehlen nur
Originalersatzteile zu verwenden.
• Wenn Sie sich an den Kundendienst wenden, sollten Sie folgende Angaben, die Sie
auf dem Typenschild finden, zur Hand haben.
Modell:
Produkt-Nummer (PNC):
Seriennummer:
51
Page 52

Bedienfeld
1 2 3
456
Ein/Aus-Anzeige
1
Referenzmarkierung
2
Anzeigen
3
Anzeigen Beschreibung
Programme
Programm
1)
Verschmut-
zungsgrad
Beladung
Stark verschmutzt
Geschirr, Besteck,
Töpfe und Pfannen
Normal verschmutzt
Geschirr und Besteck
Zeitvorwahl-Taste
4
Start-Taste
5
Programmwahlschalter
6
Hauptspülgang-Anzeige.
Trocknungsphase-Anzeige.
Programmende-Anzeige.
Salz-Anzeige. Diese Anzeige erlischt während des Programmbetriebs.
Programm-
phasen
Vorspülen
Hauptspülgang 70 °C
Spülgänge
Trocknen
Vorspülen
Hauptspülgang 65 °C
Spülgänge
Trocknen
Dauer
(Min.)
130 - 150 1.3 - 1.4 13 - 15
100 - 110 1.2 - 1.6 15 - 16
Energie-
verbrauch
(kWh)
Wasser
(l)
52
www.zanussi.com
Page 53

1)
Programm
2)
3)
4)
1) Druck und Temperatur des Wassers, die Schwankungen in der Stromversorgung, die ausgewählten
Optionen und die Geschirrmenge können die Werte verändern.
2) Mit diesem Programm können Sie vor kurzem benutztes Geschirr spülen. Sie erhalten gute
Spülergebnisse in kurzer Zeit.
3) Dieses Programm gewährleistet den wirtschaftlichsten Wasser- und Energieverbrauch für normal
verschmutztes Geschirr und Besteck. (Dies ist das Standardprogramm für Prüfinstitute.)
4) Verwenden Sie dieses Programm zum schnellen Abspülen des Geschirrs. Damit wird vermieden, dass
sich Essensreste am Geschirr festsetzen und unangenehme Gerüche aus dem Gerät entweichen.
Verwenden Sie für dieses Programm kein Reinigungsmittel.
Verschmut-
zungsgrad
Beladung
Vor kurzem benutztes Geschirr
Geschirr und Besteck
Normal verschmutzt
Geschirr und Besteck
Alle Vorspülen 14 0.1 4
Programm-
phasen
Hauptspülgang 65 °C
Spülgang
Vorspülen
Hauptspülgang 50 °C
Spülgänge
Trocknen
Dauer
(Min.)
30 0.8 9
195 1.02 11
Energie-
verbrauch
(kWh)
Wasser
(l)
Informationen für Prüfinstitute
Möchten Sie Informationen zum Leistungstest erhalten, schicken Sie eine E-Mail an:
info.test@dishwasher-production.com
Notieren Sie die Produktnummer (PNC), die Sie auf dem Typenschild finden.
Vor der ersten Inbetriebnahme
1. Prüfen Sie, ob der Wasserenthärter entsprechend der Wasserhärte in Ihrem Gebiet eingestellt ist. Passen Sie die Einstellung bei Bedarf entsprechend an. Wenden
Sie sich an das örtliche Wasserversorgungsunternehmen, um die Wasserhärte in
Ihrem Gebiet zu erfahren.
2. Füllen Sie den Salzbehälter.
Einstellen des Wasserenthärters
Wasserhärte
Deutsche
Wasserhärte-
grade
(°dH)
47 - 50 84 - 90 8.4. - 9.0 58 - 63 10
Französische
Wasserhärte-
grade
(°fH)
mmol/l Clarke
www.zanussi.com
3. Füllen Sie den Klarspülmittel-Dosierer.
4. Drehen Sie den Wasserhahn auf.
5. Möglicherweise haben sich im Gerät Rückstände angesammelt. Starten Sie ein Programm, um diese zu entfernen. Verwenden
Sie kein Reinigungsmittel und beladen Sie
die Körbe nicht.
Wasserhärte-
grade
Wasserenthärter-
Einstellung
Stufe
53
Page 54

Wasserhärte
Deutsche
Wasserhärte-
grade
(°dH)
43 - 46 76 - 83 7.6 - 8.3 53 - 57 9
37 - 42 65 - 75 6.5 - 7.5 46 - 52 8
29 - 36 51 - 64 5.1 - 6.4 36 - 45 7
23 - 28 40 - 50 4.0 - 5.0 28 - 35 6
19 - 22 33 - 39 3.3 - 3.9 23 - 27
15 - 18 26 - 32 2.6 - 3.2 18 - 22 4
11 - 14 19 - 25 1.9 - 2.5 13 - 17 3
4 - 10 7 - 18 0.7 - 1.8 5 - 12 2
< 4 < 7 < 0.7 < 5
1) Werkseinstellung.
2) Verwenden Sie kein Salz bei diesen Werten.
Französische
Wasserhärte-
grade
(°fH)
mmol/l Clarke
Wasserhärte-
grade
Wasserenthärter-
Einstellung
Stufe
1)
5
2)
1
Einstellen der Wasserenthärterstufe
1. Drehen Sie den Programmwahlschalter,
bis die Referenzmarkierung auf die Position
„Ein/Aus“ zeigt.
2. Halten Sie die Taste „Zeitvorwahl“ gedrückt. Drehen Sie gleichzeitig den Programmwahlschalter entgegen dem Uhrzeigersinn, bis die Referenzmarkierung auf
das erste Programm zeigt.
3. Lassen Sie die Zeitvorwahl-Taste los, sobald die Kontrolllampen „Start“ und „Ein/
Aus“ blinken.
4. Drücken Sie die Taste „Zeitvorwahl“.
•
beginnt zu blinken.
• Die Kontrolllampen „Start“ und „Ein/
Aus“ blinken weiterhin.
•
Die Anzahl der Blinkzeichen von
zeigt die aktuelle Einstellung an, z. B. 5
Blinkzeichen + Pause + 5 Blinkzeichen
= Stufe 5.
5. Drücken Sie zur Einstellungsänderung wiederholt die Taste „Zeitvorwahl“. Mit jeder
Betätigung der Taste „Zeitvorwahl“ erhöht
sich die Härtestufe.
6. Um die Einstellung zu bestätigen und das
Gerät auszuschalten, drehen Sie den
Wahlschalter, bis die Referenzmarkierung
auf die Taste „Ein/Aus“ zeigt.
Befüllen des Salzbehälters
Vorsicht! Beim Befüllen des
Salzbehälters können Wasser und Salz
austreten. Korrosionsgefahr. Starten Sie ein
Programm, nachdem Sie den Salzbehälter
befüllt haben, um die Korrosion zu vermeiden.
1
2
54
www.zanussi.com
Page 55

1
4
2
3
A
1
2
3
4
Füllen Sie 1 Liter Wasser in den Salzbehälter
(nur beim ersten Mal).
Befüllen des Klarspülmittel-Dosierers
2
1
1
2
Täglicher Gebrauch
1. Drehen Sie den Wasserhahn auf.
2. Drehen Sie den Programmwahlschalter,
bis die Referenzmarkierung auf das gewünschte Programm zeigt. Stellen Sie sicher, dass sich das Gerät im Einstellmodus befindet, siehe Abschnitt „Einstellen
und Starten eines Programms“. Stellen Sie
je nach Beladung und Verschmutzungsgrad das passende Programm ein.
• Füllen Sie den Salzbehälter auf, wenn
die Kontrolllampe „Salz“ leuchtet.
3. Beladen Sie die Körbe.
4. Füllen Sie Reinigungsmittel ein.
5. Starten Sie das Programm.
3
4
Füllen Sie den Klarspülmittel-Dosierer,
wenn das Schauglas (A) transparent ist.
Sie können die Zugabemenge des Klarspülmittels einstellen, indem Sie den entsprechenden Regler zwischen Position 1 (geringste
Menge) und Position 4 (größte Menge) einstellen.
Verwendung des Reinigungsmittels
1
2
1
2
www.zanussi.com
55
Page 56

A
B
3
0
2
0
3
3
0
2
0
4
Geben Sie das Reinigungsmittel oder die Reinigungstablette in das Fach (A). Wenn das
Programm einen Vorspülgang hat, schütten
Sie eine kleine Menge Reinigungsmittel in das
Fach (B).
Verwendung von KombiReinigungstabletten
Wenn Sie Tabletten verwenden, die Salz und
Klarspülmittel enthalten, müssen der Salzbehälter und Klarspülmittel-Dosierer nicht zusätzlich befüllt werden. Die Kontrolllampe für Klarspülmittel leuchtet, wenn der KlarspülmittelDosierer leer ist.
1. Stellen Sie den Wasserenthärter auf die
niedrigste Stufe ein.
2. Stellen Sie den Klarspülmittel-Dosierer auf
die niedrigste Einstellung.
Wenn Sie nicht länger KombiReinigungstabletten verwenden, führen
Sie die folgenden Schritte aus, bevor Sie
ein anderes Reinigungsmittel, ein
anderes Klarspülmittel oder ein anderes
Geschirrspülsalz verwenden:
1. Stellen Sie den Wasserenthärter auf die
höchste Stufe ein.
2. Stellen Sie sicher, dass der Salzbehälter
und der Klarspülmittel-Dosierer gefüllt
sind.
3. Starten Sie das kürzeste Programm mit einem Spülgang ohne Reinigungsmittel und
ohne Geschirr.
4. Stellen Sie den Wasserenthärter entsprechend der Wasserhärte in Ihrem Gebiet
ein.
5. Stellen Sie die Menge des Klarspülmittels
ein.
56
Einstellen und Starten eines Programms
Einstellmodus
Das Gerät muss sich zum Starten eines
Programms im Einstellmodus befinden.
Drehen Sie den Programmwahlschalter, bis
die Referenzmarkierung auf das Programm auf
dem Bedienfeld zeigt. Wenn die Kontrolllampe
„Ein/Aus“ aufleuchtet und die Kontrolllampe
„Start“ blinkt, befindet sich das Gerät im Einstellmodus.
Wenn auf dem Bedienfeld nicht diese Bedingung angezeigt wird, halten Sie die Start-Taste gedrückt, bis sich das Gerät im Einstellmodus befindet.
Starten eines Programms ohne
Zeitvorwahl
1. Öffnen Sie den Wasserhahn.
2. Schließen Sie die Gerätetür.
3. Drehen Sie den Programmwahlschalter,
bis die Referenzmarkierung auf das Symbol des gewünschten Programms zeigt.
• Die Kontrolllampe „Ein/Aus“ leuchtet.
• Die Kontrolllampe „Start“ blinkt.
4. Drücken Sie die Start-Taste, um das Programm zu starten.
• Die Kontrolllampen „Ein/Aus“ und
„Start“ leuchten.
Starten eines Programms mit
Zeitvorwahl
1. Wählen Sie das Programm.
2. Drücken Sie die Taste „Zeitvorwahl“, um
den Start des Programms um drei Stunden
zu verzögern.
• Die Kontrolllampe der Zeitvorwahl leuch-
tet auf.
3. Drücken Sie die Start-Taste, um die Zeitvorwahl zu starten.
• Die Start-Kontrolllampe leuchtet auf.
Öffnen der Tür während eines laufenden
Programms
Wenn Sie die Tür öffnen, unterbricht das Gerät das Programm. Wenn Sie die Tür wieder
www.zanussi.com
Page 57

schließen, läuft das Programm ab dem Zeitpunkt der Unterbrechung weiter.
Abbrechen einer eingestellten
Zeitvorwahl während des Countdowns
1. Halten Sie die Start-Taste gedrückt, bis
die Kontrolllampe „Start“ blinkt.
2. Drücken Sie die Start-Taste, um das Programm zu starten.
Bevor Sie ein neues Programm starten,
stellen Sie sicher, dass der Reinigungs-
mittelbehälter gefüllt ist.
Beenden des Programms
1. Halten Sie die Start-Taste gedrückt, bis
die Kontrolllampe „Start“ blinkt.
Bevor Sie ein neues Programm starten,
stellen Sie sicher, dass der Reinigungs-
mittelbehälter gefüllt ist.
Am Programmende
Nach Abschluss des Programms leuchtet
. Wenn Sie das Gerät nicht ausschalten, erlö-
Tipps und Hinweise
schen alle Kontrolllampen nach 5 Minuten.
Diese Funktion hilft bei der Senkung des Energieverbrauchs.
1. Um das Gerät auszuschalten, drehen Sie
den Wahlschalter, bis die Referenzmarkierung auf die Position „Ein/Aus“ zeigt.
2. Schließen Sie den Wasserhahn.
Wichtig
• Lassen Sie das Geschirr abkühlen, bevor
Sie es aus dem Gerät nehmen. Heißes Geschirr ist stoßempfindlich.
• Nehmen Sie das Geschirr zuerst aus dem
Unterkorb und dann aus dem Oberkorb.
• An den Innenseiten und an der Tür des Ge-
rätes kann sich Wasser niederschlagen.
Edelstahl kühlt schneller ab als Geschirr.
Der Wasserenthärter
Hartes Wasser enthält viele Mineralien, die
das Gerät beschädigen können und zu
schlechten Spülergebnissen führen. Der Wasserenthärter neutralisiert diese Mineralien.
Das Geschirrspülsalz hält den Wasserenthärter sauber und in gutem Zustand. Der Wasserenthärter muss unbedingt auf die richtige Stufe eingestellt werden. So stellen Sie sicher,
dass der Wasserenthärter die richtige Menge
Geschirrspülsalz und Wasser verwendet.
Verwendung von Salz, Klarspülmittel und
Reinigungsmittel
• Verwenden Sie nur Salz, Klarspülmittel und
Reinigungsmittel für Geschirrspüler. Andere
Produkte können das Gerät beschädigen.
• Das Klarspülmittel lässt das Geschirr während der letzten Spülphase ohne Streifen
und Flecken trocknen.
• Kombi-Reinigungstabletten enthalten Reinigungsmittel, Klarspülmittel und andere Zu-
www.zanussi.com
sätze. Achten Sie darauf, dass die Tabletten
der Wasserhärte in Ihrer Region entsprechen. Beachten Sie die Anweisungen auf
der Reinigungsmittelverpackung.
• Geschirrspüler-Tabs lösen sich bei kurzen
Programmen nicht vollständig auf. Wir empfehlen, die Tabletten nur mit langen Programmen zu verwenden, damit keine Reinigungsmittel-Rückstände auf dem Geschirr
zurückbleiben.
Verwenden Sie nicht mehr als die ange-
gebene Reinigungsmittelmenge. Siehe
hierzu die Angaben auf der Reinigungsmittelverpackung.
Beladen der Körbe
Beispiele für die Beladung der Körbe fin-
den Sie in der mitgelieferten Broschüre.
• Spülen Sie im Gerät nur spülmaschinenfes-
tes Geschirr.
57
Page 58

• Spülen Sie im Gerät keine Geschirrteile aus
Holz, Horn, Aluminium, Zinn oder Kupfer.
• Spülen Sie in diesem Gerät keine Gegenstände, die Wasser aufnehmen können
(Schwämme, Geschirrtücher, usw.).
• Entfernen Sie Speisereste vom Geschirr.
• Um eingebrannte Essensreste leicht zu beseitigen, weichen Sie diese ein, bevor Sie
das Kochgeschirr in das Gerät stellen.
• Ordnen Sie hohle Gefäße (z. B. Tassen,
Gläser, Pfannen) mit der Öffnung nach unten ein.
• Stellen Sie sicher, dass Geschirr und Besteck nicht aneinander haften. Mischen Sie
Löffel mit anderem Besteck.
• Achten Sie darauf, dass Gläser einander
nicht berühren.
• Ordnen Sie kleine Gegenstände in den Besteckkorb ein.
• Ordnen Sie leichte Gegenstände im Oberkorb an. Achten Sie darauf, dass diese nicht
verrutschen können.
Reinigung und Pflege
Warnung! Schalten Sie vor
Reinigungsarbeiten immer das Gerät aus
und ziehen Sie den Netzstecker aus der
Steckdose.
Verschmutzte Filter und verstopfte Sprüh-
arme beeinträchtigen das Spülergebnis.
Prüfen Sie die Filter regelmäßig und reinigen
Sie diese, falls nötig.
Reinigen der Filter
• Vergewissern Sie sich, dass sich die Sprüharme ungehindert bewegen können, bevor
Sie ein Programm starten.
Vor dem Starten eines Programms
Kontrollieren Sie folgende Punkte:
• Die Filter sind sauber und ordnungsgemäß
eingesetzt.
• Die Sprüharme sind nicht verstopft.
• Die Geschirrteile sind richtig in den Körben
angeordnet.
• Das Programm eignet sich für die Beladung
und den Verschmutzungsgrad.
• Die Reinigungsmittelmenge stimmt.
• Geschirrspülsalz und Klarspülmittel sind
vorhanden (außer Sie verwenden KombiReinigungstabeletten).
• Der Deckel des Salzbehälters ist fest geschlossen.
3
4
D
58
C
B
A
5
1
2
6
www.zanussi.com
Page 59

7
8
Zum Entfernen der Filter (B) und (C) den Hebel gegen den Uhrzeigersinn drehen und entfernen. Ziehen Sie die Filter (B) und (C) auseinander. Reinigen Sie die Filter mit Wasser.
Entfernen Sie den Filter (A). Reinigen Sie den
Filter mit Wasser.
Prüfen Sie, bevor Sie den Filter (A) wieder einsetzen, dass sich keine Lebensmittelreste oder
Verschmutzungen in oder um den Rand der
Wanne befinden.
Stellen Sie sicher, dass der Filter (A) korrekt
unter den beiden Führungen (D) eingesetzt
wurde.
Setzen Sie die Filter (B) und (C) zusammen.
Setzen Sie sie in den Filter (A) ein. Drehen Sie
den Hebel im Uhrzeigersinn, bis er einrastet.
Eine falsche Anordnung der Filter führt zu
schlechten Spülergebnissen und kann
das Gerät beschädigen.
Reinigen der Sprüharme
Bauen Sie die Sprüharme nicht aus.
Falls die Löcher in den Sprüharmen verstopft
sind, reinigen Sie sie mit einem dünnen spitzen
Gegenstand.
Reinigen der Außenseiten
Reinigen Sie das Geräts mit einem weichen,
feuchten Tuch.
Verwenden Sie ausschließlich Neutralreiniger.
Benutzen Sie keine Scheuermittel, scheuernde
Reinigungsschwämmchen oder Lösungsmittel.
Reinigung des Geräteinneren
Wenn Sie regelmäßig Kurzprogramme verwenden, können diese zu Fett- und Kalkablagerungen im Gerät führen.
Um dieses zu vermeiden, wird empfohlen, mindestens zweimal im Monat Programme mit langer Laufzeit zu verwenden.
Fehlersuche
Das Gerät startet nicht oder bleibt während
des Betriebs stehen.
Prüfen Sie, ob Sie die Störung mit den folgenden Hinweisen selbst beheben können, bevor
Sie den Kundendienst rufen.
Alarmcode Problem
• Die Start-Anzeige blinkt kontinuierlich.
• Die Kontrolllampe „Programmende“ blinkt einmal.
• Die Start-Anzeige blinkt kontinuierlich.
• Die Kontrolllampe „Programmende“ blinkt zweimal.
• Die Start-Anzeige blinkt kontinuierlich.
• Die Kontrolllampe „Programmende“ blinkt dreimal.
Warnung! Schalten Sie das Gerät aus,
bevor Sie die Überprüfungen vornehmen.
www.zanussi.com
Bei einigen Problemen zeigen kontinuierlich und/oder periodisch blinkende
Kontrolllampen den Alarmcode an.
Es läuft kein Wasser in das Gerät.
Das Gerät pumpt das Wasser nicht ab.
Das Aqua-Control-System ist eingeschaltet.
59
Page 60

Drehen Sie den Programmwahlschalter, bis
die Referenzmarkierung auf die Ein/AusPosition zeigt.
Problem Mögliche Abhilfe
Das Gerät lässt sich nicht einschalten. Vergewissern Sie sich, dass der Netzstecker in die Netz-
Vergewissern Sie sich, dass im Sicherungskasten keine Si-
Das Programm startet nicht. Vergewissern Sie sich, dass die Tür geschlossen ist.
Drücken Sie die Start-Taste.
Wenn die Zeitvorwahl eingestellt ist, brechen Sie die Zeit-
Es läuft kein Wasser in das Gerät. Vergewissern Sie sich, dass der Wasserzulauf geöffnet ist.
Vergewissern Sie sich, dass der Wasserdruck der Wasser-
Vergewissern Sie sich, dass der Wasserzulauf nicht ver-
Vergewissern Sie sich, dass der Filter im Zulaufschlauch
Vergewissern Sie sich, dass der Zulaufschlauch nicht ge-
Das Gerät pumpt das Wasser nicht ab. Vergewissern Sie sich, dass der Siphon nicht verstopft ist.
Vergewissern Sie sich, dass der Ablaufschlauch nicht ge-
Das Aqua-Control-System ist eingeschaltet. Drehen Sie den Wasserhahn zu und wenden Sie sich an
steckdose eingesteckt ist.
cherung ausgelöst hat.
vorwahl ab oder warten Sie, bis sie abgelaufen ist.
versorgung nicht zu niedrig ist. Diese Information erhalten
Sie von Ihrem Wasserversorger.
stopft ist.
nicht verstopft ist.
knickt oder zu stark gekrümmt ist.
knickt oder zu stark gekrümmt ist.
den Kundendienst.
Wenn Sie alles überprüft haben, drehen Sie
den Programmwahlschalter, bis die Referenzmarkierung auf das Programm zeigt, bei dem
das Problem aufgetreten ist. Das Programm
wird an der Stelle fortgesetzt, an der es unterbrochen wurde.
Tritt das Problem erneut auf, wenden Sie sich
an den Kundendienst.
Wenn andere Alarmcodes angezeigt werden,
wenden Sie sich an den Kundendienst.
60
Die Spül- und Trocknungsergebnisse
sind nicht zufriedenstellend.
Weiße Streifen oder blau schimmernder
Belag auf Gläsern und Geschirr
• Die zugegebene Klarspülmittelmenge ist zu
hoch. Stellen Sie den Dosierwähler für Klarspülmittel niedriger ein.
• Die Reinigungsmittelmenge ist zu hoch.
Wasserflecken und andere Flecken auf
Gläsern und Geschirr
• Die zugegebene Klarspülmittelmenge ist zu
niedrig. Stellen Sie den Dosierwähler für
Klarspülmittel höher ein.
• Die Ursache kann in der Qualität des Reinigungsmittels liegen.
www.zanussi.com
Page 61

Das Geschirr ist noch nass.
• Das Programm enthält keine Trocknungsphase oder eine Trocknungsphase mit niedriger Temperatur.
• Die Ursache kann in der Qualität des Klarspülmittels liegen.
Mögliche andere Ursachen finden Sie unter „Tipps und Hinweise“.
• Der Klarspülmittel-Dosierer ist leer.
Technische Daten
Abmessungen Breite / Höhe / Tiefe (mm) 596 / 818 - 898 / 575
Elektrischer Anschluss Siehe Typenschild.
Spannung 220-240 V
Frequenz 50 Hz
Wasserdruck Min. / max. (bar / MPa) (0.5 / 0.05 ) / (8 / 0.8 )
Wasserversorgung
Fassungsvermögen Gedecke 12
Leistungsaufnahme Unausgeschaltet 0.50 W
1) Schließen Sie den Zulaufschlauch an einen Wasserhahn mit einem 3/4"-Außengewinde an.
2) Wenn Sie Heißwasser mit umweltfreundlichen, alternativen Energiequellen (z. B. Solaranlagen oder
Windkraft) aufbereiten, können Sie durch den Anschluss des Geräts an die Heißwasserversorgung
Energie sparen.
1)
Kalt- oder Warmwasser
Ausgeschaltet 0.50 W
Typenschild
2)
max. 60 °C
Mod. ... ... ...
Prod. No. ... ... ...
Ser. No. ...
Umwelttipps
Recyceln Sie Materialien mit dem Symbol .
Entsorgen Sie die Verpackung in den
entsprechenden Recyclingbehältern.
Recyceln Sie zum Umwelt- und
Gesundheitsschutz elektrische und
elektronische Geräte. Entsorgen Sie Geräte
mit diesem Symbol
www.zanussi.com
nicht mit dem Hausmüll.
Bringen Sie das Gerät zu Ihrer örtlichen
Sammelstelle oder wenden Sie sich an Ihr
Gemeindeamt.
• Entsorgen Sie das Verpackungsmaterial
ordnungsgemäß. Recyceln Sie Materialien
mit dem Symbol
.
61
Page 62

Índice
Instruções de segurança _ _ _ _ _ _ _ _ _ 62
Painel de controlo _ _ _ _ _ _ _ _ _ _ _ _ _ 64
Programas _ _ _ _ _ _ _ _ _ _ _ _ _ _ _ _ _ 64
Antes da primeira utilização _ _ _ _ _ _ _ _ 65
Utilização diária _ _ _ _ _ _ _ _ _ _ _ _ _ _ 67
Instruções de segurança
Leia atentamente as instruções fornecidas antes de instalar e utilizar o aparelho. O fabricante não é responsável por lesões ou danos resultantes de instalação e utilização incorrectas. Guarde sempre as instruções junto do
aparelho para futura referência.
Segurança para crianças e pessoas
vulneráveis
Advertência Risco de asfixia, ferimentos
ou incapacidade permanente.
• Não permita que o aparelho seja utilizado
por pessoas, incluindo crianças, com capacidades físicas e sensoriais reduzidas, funções mentais reduzidas ou sem experiência
e conhecimento de utilização do mesmo.
Essas pessoas devem ser vigiadas ou ensinadas a utilizar o aparelho por uma pessoa
que seja responsável pela sua segurança.
• Não permita que as crianças brinquem com
o aparelho.
• Mantenha todos os materiais de embalagem
fora do alcance das crianças.
• Mantenha todos os detergentes fora do alcance das crianças.
• Mantenha as crianças e os animais domésticos afastados da porta do aparelho quando
esta estiver aberta.
Instalação
• Remova toda a embalagem.
• Não instale nem utilize o aparelho se ele estiver danificado.
• Não instale nem utilize o aparelho em locais
com temperatura inferior a 0 °C.
62
Sugestões e dicas _ _ _ _ _ _ _ _ _ _ _ _ _ 69
Manutenção e limpeza _ _ _ _ _ _ _ _ _ _ _ 70
Resolução de problemas _ _ _ _ _ _ _ _ _ 71
Informação técnica _ _ _ _ _ _ _ _ _ _ _ _ _ 72
Preocupações ambientais _ _ _ _ _ _ _ _ _ 73
Sujeito a alterações sem aviso prévio.
• Cumpra as instruções de instalação fornecidas com o aparelho.
Ligação eléctrica
Advertência Risco de incêndio e
choque eléctrico.
• O aparelho tem de ficar ligado à terra.
• Certifique-se de que a informação sobre a
ligação eléctrica existente na placa de características está em conformidade com a
fonte de alimentação. Se não estiver, contacte um electricista.
• Utilize sempre uma tomada devidamente
instalada e à prova de choques eléctricos.
• Não utilize adaptadores de tomadas duplas
ou triplas, nem cabos de extensão.
• Certifique-se de que não danifica a ficha e o
cabo de alimentação eléctrica. Contacte a
Assistência Técnica ou um electricista para
substituir o cabo de alimentação se estiver
danificado.
• Ligue a ficha à tomada de alimentação eléctrica apenas no final da instalação. Certifique-se de que a ficha fica acessível após a
instalação.
• Não puxe o cabo de alimentação eléctrica
para desligar o aparelho. Puxe sempre a ficha.
Ligação à rede de abastecimento de
água
• Certifique-se de que não danifica as mangueiras de água.
• Antes de ligar o aparelho a canos novos ou
canos que não sejam usados há muito tempo, deixe a água correr até sair água limpa.
www.zanussi.com
Page 63

• Na primeira utilização do aparelho, certifique-se de que não há fugas de água.
• A mangueira de entrada de água possui
uma válvula de segurança e um revestimento com um cabo de alimentação no seu interior.
Advertência Voltagem perigosa.
Se a mangueira de entrada de água esti-
•
ver danificada, desligue imediatamente a fi-
cha da tomada eléctrica. Contacte a Assistência Técnica para substituir a mangueira
de entrada de água.
Utilização
• Este aparelho destina-se exclusivamente a
utilizações domésticas ou semelhantes, tais
como:
– Áreas de cozinha destinadas ao pessoal
em lojas, escritórios e outros ambientes
de trabalho
–Turismo rural
– Utilização por clientes de hotéis, motéis e
outros ambientes hoteleiros
– Ambientes hoteleiros tipo residencial.
Advertência Risco de ferimentos,
queimaduras, choque eléctrico ou
incêndio.
• Não altere as especificações deste aparelho.
• Coloque as facas e todas as cutelarias de
ponta afiada no cesto de talheres com as
pontas viradas para baixo ou na horizontal.
• Para evitar quedas, não deixe a porta do
aparelho aberta sem supervisão.
• Não se sente nem se apoie na porta aberta.
• Os detergentes de máquina de lavar loiça
são perigosos. Cumpra as instruções de segurança existentes na embalagem do detergente.
• Não beba a água do aparelho, nem a utilize
para qualquer outro fim.
• Não retire a loiça do aparelho enquanto o
programa não estiver concluído. Pode ainda
haver detergente na loiça.
• O aparelho pode libertar vapor quente se
abrir a porta quando um programa estiver
em funcionamento.
• Não coloque produtos inflamáveis ou objectos molhados com produtos inflamáveis, no
interior, perto ou em cima do aparelho.
• Não utilize jactos de água ou vapor para
limpar o aparelho.
Eliminação
Advertência Risco de ferimentos e
asfixia.
• Desligue o aparelho da alimentação eléctrica.
• Corte o cabo de alimentação eléctrica e elimine-o.
• Remova o trinco da porta para evitar que
crianças ou animais de estimação possam
ficar aprisionados no interior do aparelho.
Assistência Técnica
• Contacte a Assistência Técnica se for necessário reparar o aparelho. Recomendamos que utilize apenas peças originais.
• Quando contactar a Assistência Técnica,
certifique-se de que dispõe da seguinte informação, que pode encontrar na placa de
características.
Modelo:
PNC:
Número de série:
www.zanussi.com
63
Page 64

Painel de controlo
1 2 3
456
Indicador on/off
1
Marcador de programas
2
Indicadores
3
Indicadores Descrição
Programas
1)
Programa
Nível de sujida-
Tipo de carga
Sujidade intensa
Faianças, talheres,
tachos e panelas
Sujidade normal
Faianças e talheres
de
Botão Início diferido
4
Botão Iniciar
5
Selector de programas
6
Indicador da fase de lavagem.
Indicador da fase de secagem.
Indicador de fim.
Indicador de sal. Este indicador está desligado quando um programa está a funcionar.
Fases do
programa
Pré-lavagem
Lavagem a 70 °C
Enxaguamentos
Secagem
Pré-lavagem
Lavagem a 65 °C
Enxaguamentos
Secagem
Duração
(min.)
130 - 150 1.3 - 1.4 13 - 15
100 - 110 1.2 - 1.6 15 - 16
Energia
(kWh)
Água
(l)
64
www.zanussi.com
Page 65

1)
Programa
2)
3)
4)
1) A pressão e a temperatura da água, as variações da corrente eléctrica, as opções e a quantidade de loiça
podem alterar estes valores.
2) Este programa destina-se à lavagem de uma carga com sujidade recente. Proporciona bons resultados
de lavagem em pouco tempo.
3) Com este programa, terá o consumo de água e energia mais eficiente para faianças e talheres com
sujidade normal. (Este é o programa standard para testes.)
4) Utilize este programa para enxaguar rapidamente a loiça. Isto evita que os resíduos de comida adiram à
loiça e que saiam odores desagradáveis do aparelho.
Não utilize detergente com este programa.
Nível de sujida-
de
Tipo de carga
Sujidade recente
Faianças e talheres
Sujidade normal
Faianças e talheres
Tudo Pré-lavagem 14 0.1 4
Fases do
programa
Lavagem a 65 °C
Enxaguamento
Pré-lavagem
Lavagem a 50 °C
Enxaguamentos
Secagem
Duração
(min.)
30 0.8 9
195 1.02 11
Energia
(kWh)
Água
(l)
Informação para teste
Para obter a informação necessária para testes de desempenho, por favor envie um e-mail para:
info.test@dishwasher-production.com
Anote o número do produto (PNC) indicado na placa de características.
Antes da primeira utilização
1. Certifique-se de que o nível definido para
o amaciador da água corresponde à dureza da água na sua área. Caso contrário,
ajuste o amaciador da água. Contacte os
serviços de abastecimento de água locais
para saber qual é a dureza da água na sua
área.
2. Encha o depósito de sal.
Regular o amaciador da água
Dureza da água
Graduação
alemã
(°dH)
47 - 50 84 - 90 8,4 - 9,0 58 - 63 10
43 - 46 76 - 83 7,6 - 8,3 53 - 57 9
Graduação
francesa
(°fH)
mmol/l Graduação
www.zanussi.com
3. Encha o distribuidor de abrilhantador.
4. Abra a torneira da água.
5. É possível que fiquem resíduos de processamento no aparelho. Inicie um programa
para os remover. Não utilize detergente e
não carregue os cestos.
graus
Regulação do
amaciador da água
Nível
65
Page 66

Dureza da água
Graduação
alemã
(°dH)
37 - 42 65 - 75 6,5 - 7,5 46 - 52 8
29 - 36 51 - 64 5,1 - 6,4 36 - 45 7
23 - 28 40 - 50 4,0 - 5,0 28 - 35 6
19 - 22 33 - 39 3,3 - 3,9 23 - 27
15 - 18 26 - 32 2,6 - 3,2 18 - 22 4
11 - 14 19 - 25 1,9 - 2,5 13 - 17 3
4 - 10 7 - 18 0,7 - 1,8 5 - 12 2
< 4 < 7 < 0,7 < 5
1) Posição de fábrica.
2) Não utilize sal neste nível.
Graduação
francesa
(°fH)
mmol/l Graduação
graus
Regulação do
amaciador da água
Nível
1)
5
2)
1
Como ajustar o nível do amaciador da
água
1. Certifique-se de que o marcador de programa no selector está alinhado com o indicador On/Off.
2. Mantenha premido o botão do início diferido. Em simultâneo, rode o selector no sentido anti-horário até que o marcador de
programa fique alinhado com o primeiro
programa.
3. Liberte o botão do início diferido quando o
indicador Iniciar e o indicador On/Off começarem a piscar.
4. Prima o botão do início diferido.
•
começa a piscar.
• O indicador Início e o indicador On/Off
continuam intermitentes.
•
As intermitências de
indicam o nível
que está definido, por exemplo, 5 intermitências + pausa + 5 intermitências =
nível 5.
5. Prima o botão do início diferido repetidamente para alterar a definição. Sempre que
premir o botão do início diferido, o nível
aumenta um número.
6. Para confirmar a selecção e desactivar o
aparelho, rode o selector até que o marca-
dor de programa fique alinhado com o indicador On/Off.
Encher o depósito de sal
Cuidado É possível que saia água e sal
do depósito de sal quando estiver a
enchê-lo. Isso representa risco de corrosão.
Para o evitar, inicie um programa depois de
encher o depósito de sal.
1
3
2
4
66
www.zanussi.com
Page 67

Coloque 1 litro de água no depósito de sal
(apenas na primeira vez).
Encher o distribuidor de abrilhantador
1
4
2
3
A
1
2
1
1
2
Utilização diária
1. Abra a torneira da água.
2. Rode o selector de programas até que o
marcador de programa fique alinhado com
o programa desejado. Certifique-se de que
o aparelho está no modo de selecção.
Consulte “Seleccionar e iniciar um programa”. Seleccione o programa correcto para
o tipo de carga e grau de sujidade.
• Se o indicador de sal estiver aceso, en-
cha o depósito de sal.
3. Coloque loiça nos cestos.
4. Adicione o detergente.
5. Inicie o programa.
Utilizar o detergente
1
2
1
2
2
3
4
Encha o distribuidor de abrilhantador
quando a lente (A) estiver transparente.
Para ajustar a quantidade de abrilhantador libertado, rode o selector para uma posição entre 1 (quantidade menor) e 4 (quantidade maior).
A
B
3
0
2
0
3
3
0
2
0
4
Coloque o detergente em pó ou pastilha no
compartimento (A). Se o programa tiver uma
fase de pré-lavagem, coloque uma pequena
quantidade de detergente no compartimento
(B).
Utilizar pastilhas de detergente
combinadas
Quando utilizar pastilhas que contenham sal e
abrilhantador, não encha o depósito de sal e o
distribuidor de abrilhantador. O indicador de
abrilhantador acende-se sempre que o distribuidor de abrilhantador estiver vazio.
1. Regule o nível da dureza da água para o
nível mais baixo.
2. Regule o distribuidor de abrilhantador para
a posição mais baixa.
www.zanussi.com
67
Page 68

Se deixar de utilizar pastilhas de
detergente combinadas, execute estes
passos antes de começar a utilizar
detergente, abrilhantador e sal para
máquinas de lavar loiça em separado:
1. Regule o sal para o nível mais elevado.
2. Certifique-se de que o depósito de sal e o
distribuidor de abrilhantador estão cheios.
3. Inicie o programa mais curto que tenha fase de enxaguamento e não coloque detergente nem loiça.
4. Regule o amaciador da água para a dureza
da água da sua área.
5. Regule a quantidade de abrilhantador a libertar.
Seleccionar e iniciar um programa
Modo de selecção
É necessário que o aparelho esteja no
modo de selecção para se poder iniciar
um programa.
Rode o selector de programas até que o marcador de programa fique alinhado com um
programa no painel de comandos. Se o indicador On/Off acender e o indicador Início começar a piscar, o aparelho está no modo de
selecção.
Se o painel de comandos não estiver nesta
condição, mantenha premido o botão Início
até que o aparelho fique no modo de selecção.
Iniciar um programa sem início diferido
1. Abra a torneira da água.
2. Feche a porta do aparelho.
3. Rode o selector até que o marcador de
programa fique alinhado com o símbolo do
programa que pretender.
• O indicador On/Off acende-se.
• O indicador Início começa a piscar.
4. Prima o botão Início para iniciar o programa.
• O indicador On/Off e o indicador Início
estão acesos.
Iniciar um programa com início diferido
1. Seleccione o programa
2. Prima o botão do início diferido para atrasar o início do programa por 3 horas.
• O indicador de início diferido acende-
-se.
3. Prima o botão Início para iniciar a contagem decrescente.
• O indicador Início acende-se.
Abrir a porta do aparelho durante o
funcionamento
Se abrir a porta, o aparelho pára de funcionar.
Quando fechar a porta, o aparelho continua a
partir do ponto de interrupção.
Cancelar o início diferido com a
contagem decrescente já iniciada
1. Mantenha premido o botão Início até que o
indicador Início comece a piscar.
2. Prima o botão Início para iniciar o programa.
Certifique-se de que existe detergente no
distribuidor de detergente antes de iniciar
um novo programa.
Cancelar o programa
1. Mantenha premido o botão Início até que o
indicador Início comece a piscar.
Certifique-se de que existe detergente no
distribuidor de detergente antes de iniciar
um novo programa.
No fim do programa
Quando o programa tiver terminado, o indica-
acende-se. Se não desactivar o apa-
dor
relho no período de 5 minutos, todos os indicadores são apagados. Isto ajuda a reduzir o
consumo de energia.
1. Para desactivar o aparelho, rode o selector
até que o marcador de programa fique alinhado com o indicador On/Off.
2. Feche a torneira da água.
68
www.zanussi.com
Page 69

Importante
• Permita que a loiça arrefeça antes de a retirar do aparelho. A loiça quente danifica-se
facilmente.
Sugestões e dicas
• Retire primeiro a loiça do cesto inferior e só
depois a do cesto superior.
• Pode haver água nas partes laterais e na
porta do aparelho. O aço inoxidável arrefece
mais rapidamente do que os pratos.
Descalcificador da água
A água mais dura contém uma grande quantidade de minerais que podem danificar o aparelho e piorar o resultado da lavagem. O descalcificador da água neutraliza estes minerais.
O sal para máquinas de lavar loiça mantém o
descalcificador da água limpo e em boas condições. É importante definir o nível correcto do
descalcificador da água. Isto garante que é
utilizada a quantidade correcta de água e sal
para máquinas de lavar loiça.
Utilizar sal, abrilhantador e detergente
• Utilize apenas sal, abrilhantador e detergente próprios para máquina de lavar loiça. Outros produtos podem danificar o aparelho.
• O abrilhantador ajuda a secar a loiça sem
riscos e manchas durante a fase de enxaguamento.
• As pastilhas de detergente combinadas
contêm detergente, abrilhantador e outros
agentes. Certifique-se de que as pastilhas
que utiliza são apropriadas para a dureza da
água na sua área. Consulte as instruções
das embalagens dos produtos.
• As pastilhas de detergente não se dissolvem totalmente nos programas curtos. Para
evitar resíduos de detergente na loiça, recomendamos que utilize as pastilhas apenas
com programas longos.
Não utilize mais do que a quantidade correcta de detergente. Consulte as instru-
ções da embalagem do detergente.
Colocar loiça nos cestos
Consulte o folheto fornecido para ver
exemplos de colocação de loiça nos ces-
tos.
• Utilize o aparelho apenas para lavar loiça
que pode ser lavada na máquina.
www.zanussi.com
• Não coloque loiça de madeira, marfim, alumínio, estanho ou cobre no aparelho.
• Não coloque itens que possam absorver
água na máquina (esponjas, panos domésticos).
• Remova os resíduos de comida da loiça.
• Para remover facilmente resíduos de alimentos queimados, coloque os pratos e os
tachos de molho antes de os colocar no
aparelho.
• Coloque as peças ocas (chávenas, copos e
panelas) com a abertura para baixo.
• Certifique-se de que os talheres e os pratos
não ficam colados. Misture colheres com
outros talheres.
• Certifique-se de que os copos não tocam
noutros copos.
• Coloque as peças pequenas no cesto de
talheres.
• Coloque as peças leves no cesto superior.
Certifique-se de que não poderão mover-
-se.
• Certifique-se de que os braços aspersores
podem mover-se livremente antes de iniciar
um programa.
Antes de iniciar um programa
Certifique-se de que:
• Os filtros estão limpos e bem instalados.
• Os braços aspersores não estão obstruídos.
• A loiça está colocada correctamente nos
cestos.
• O programa é adequado ao tipo de carga e
ao grau de sujidade.
• Utiliza a quantidade de detergente correcta.
69
Page 70

• Existe abrilhantador e sal para máquinas de
lavar loiça (excepto se utilizar pastilhas de
detergente combinadas).
Manutenção e limpeza
Advertência Antes de qualquer acção
de manutenção, desactive o aparelho e
desligue a ficha da tomada eléctrica.
Se os filtros estiverem sujos e os braços
aspersores estiverem obstruídos, os resultados de lavagem são inferiores.
Verifique-os regularmente e limpe-os se for
necessário.
Limpar os filtros
C
B
A
1
3
5
2
4
D
6
• A tampa do depósito de sal está bem apertada.
7
Para retirar os filtros (B) e (C), rode o manípulo para a esquerda e remova-o. Separe as partes (B) e (C) do filtro. Lave os filtros com água.
Remova o filtro (A). Lave o filtro com água.
Antes de voltar a colocar o filtro (A), certifi-
que-se de que não há resíduos de alimentos
ou sujidade dentro e à volta da borda do colector.
Certifique-se de que o filtro (A) está bem posicionado debaixo das 2 guias (D).
Junte as partes (B) e (C) do filtro. Volte a colocá-las no filtro (A). Rode o manípulo para a direita até bloquear.
Uma posição incorrecta dos filtros pode
causar resultados de lavagem insatisfató-
rios e danos no aparelho.
Limpar os braços aspersores
Não retire os braços aspersores.
Se os orifícios dos braços aspersores ficarem
obstruídos, retire a sujidade com um objecto
fino e afiado.
Limpeza externa
Limpe o aparelho com um pano macio e húmido.
Utilize apenas detergentes neutros. Não utilize
produtos abrasivos, esfregões ou solventes.
Limpeza interior
Se utilizar frequentemente programas de curta
duração, estes poderão deixar depósitos de
gordura e calcário no interior do aparelho.
8
70
www.zanussi.com
Page 71

Para evitar isso, recomendamos que execute
programas de longa duração pelo menos 2
vezes por mês.
Resolução de problemas
O aparelho não arranca ou pára durante o funcionamento.
Antes de contactar a Assistência Técnica,
consulte as informações seguintes para tentar
Com alguns problemas, alguns indicadores ficam intermitentes continuamente
em simultâneo para indicar um código
de erro.
resolver o problema.
Código de erro Problema
• O indicador de início está intermitente continuamente.
• O indicador de fim pisca 1 vez intermitentemente.
• O indicador de início está intermitente continuamente.
• O indicador de fim pisca 2 vezes intermitentemente.
• O indicador de início está intermitente continuamente.
• O indicador de fim pisca 3 vezes intermitentemente.
Advertência Desactive o aparelho antes
de realizar as verificações. Rode o
O aparelho não se enche com água.
O aparelho não escoa a água.
O dispositivo anti-inundação está activado.
o marcador de programa fique alinhado com o
indicador On/Off.
comando para selecção de programas até que
Problema Solução possível
Não consegue activar o aparelho. Certifique-se de que a ficha está ligada na tomada eléctri-
Certifique-se de que não há um disjuntor desligado no qua-
O programa não inicia. Certifique-se de que a porta do aparelho está fechada.
Prima o botão Início.
Se tiver seleccionado o Início Diferido, cancele-o ou aguar-
O aparelho não se enche com água. Certifique-se de que a torneira da água está aberta.
Certifique-se de que a pressão do fornecimento de água
Certifique-se de que a torneira da água não está obstruída.
Certifique-se de que o filtro da mangueira de entrada não
ca.
dro eléctrico.
de até a contagem decrescente terminar.
não é demasiado baixa. Para obter essa informação, contacte os serviços de abastecimento de água locais.
está obstruído.
www.zanussi.com
71
Page 72

Problema Solução possível
Certifique-se de que a mangueira de entrada não tem do-
O aparelho não escoa a água. Certifique-se de que o sifão do lava-loiça não está obstruí-
Certifique-se de que a mangueira de escoamento não tem
O dispositivo anti-inundação está activado. Feche a torneira da água e contacte a Assistência Técnica.
bras ou vincos.
do.
dobras ou vincos.
Após concluir as verificações, rode o selector
de programas até que o marcador de programa fique alinhado com o programa que estava
em curso quando o problema ocorreu. O programa continua a partir do ponto de interrupção.
Se o problema voltar a ocorrer, contacte a Assistência Técnica.
Se aparecerem outros códigos de alarme,
contacte a Assistência Técnica.
Se os resultados de lavagem e de
secagem não forem satisfatórios
Riscos esbranquiçados ou camadas
azuladas nos copos e pratos
• Foi libertado demasiado abrilhantador. Ajuste o regulador de abrilhantador para uma
posição inferior.
Manchas e marcas de água secas nos
copos e nos pratos
• A quantidade de abrilhantador libertado não
é suficiente. Ajuste o regulador de abrilhantador para uma posição superior.
• A causa pode estar na qualidade do detergente.
Os pratos estão molhados
• O programa não tem fase de secagem ou a
fase de secagem usa uma temperatura baixa.
• O distribuidor de abrilhantador está vazio.
• A causa pode estar na qualidade do abrilhantador.
Consulte "SUGESTÕES E DICAS" para
conhecer outras causas possíveis.
• A quantidade de detergente é demasiada.
Informação técnica
Dimensões Largura / Altura / Profundidade (mm) 596 / 818 - 898 / 575
Ligação eléctrica Consulte a placa de características.
Voltagem 220-240 V
Frequência 50 Hz
Pressão do fornecimento de
água
Fornecimento de água
Capacidade Requisitos do local de instalação 12
Consumo de energia Modo On (ligado) 0.50 W
1) Ligue a mangueira de entrada de água a uma torneira de água com rosca de 3/4".
2) Se a água quente for proveniente de fontes de energias renováveis (ex.: painéis solares, energia eólica),
utilize-a para diminuir o consumo de energia.
1)
Mín. / máx. (bar / MPa) (0,5 / 0,05 ) / (8 / 0,8 )
Água fria ou água quente
Modo Off (desligado) 0.50 W
2)
máx. 60 °C
72
www.zanussi.com
Page 73

Placa de características
Mod. ... ... ...
Prod. No. ... ... ...
Ser. No. ...
Preocupações ambientais
Recicle os materiais que apresentem o
símbolo
. Coloque a embalagem nos
contentores indicados para reciclagem.
Ajude a proteger o ambiente e a saúde
pública através da reciclagem de aparelhos
eléctricos e electrónicos. Não elimine os
aparelhos que tenham o símbolo
juntamente
com os resíduos domésticos. Coloque o
produto num ponto de recolha para
reciclagem local ou contacte as suas
autoridades municipais.
• Elimine correctamente os materiais da embalagem. Recicle os materiais que apresen-
tem o símbolo
.
www.zanussi.com
73
Page 74

74
www.zanussi.com
Page 75

www.zanussi.com
75
Page 76

www.zanussi.com/shop
156970910-A-382013
 Loading...