

Zanussi ZDI12001 User Manual

EN
User manual
Dishwasher
ZDI12001
Contents
Safety information _ _ _ _ _ _ _ _ _ _ _ _ _ _ _ _ _ _ 2
Product description _ _ _ _ _ _ _ _ _ _ _ _ _ _ _ _ _ 3
Control panel _ _ _ _ _ _ _ _ _ _ _ _ _ _ _ _ _ _ _ _ 3
Programmes _ _ _ _ _ _ _ _ _ _ _ _ _ _ _ _ _ _ _ _ 4
Before first use _ _ _ _ _ _ _ _ _ _ _ _ _ _ _ _ _ _ _ 4
Daily use _ _ _ _ _ _ _ _ _ _ _ _ _ _ _ _ _ _ _ _ _ _ 7
Care and cleaning _ _ _ _ _ _ _ _ _ _ _ _ _ _ _ _ _ _ 9
Troubleshooting _ _ _ _ _ _ _ _ _ _ _ _ _ _ _ _ _ _ 9
Technical information _ _ _ _ _ _ _ _ _ _ _ _ _ _ _ 12
Environment concerns _ _ _ _ _ _ _ _ _ _ _ _ _ _ _ 12
Subject to change without notice
Safety information
Before the installation and use of the appliance, carefully
read the supplied instructions. The manufacturer is not responsible if an incorrect installation and use causes injuries and damages. Always keep the instructions with the
appliance for future reference.
Children and vulnerable people safety
Warning! Risk of suffocation, injury or permanent
disability.
• Do not let persons, children included, with reduced
physical sensory, reduced mental functions or lack of
experience and knowledge use the appliance. They
must have supervision or instruction for the operation
of the appliance by a person who is responsible for
their safety. Do not let children play with the appliance.
• Keep all packaging away from children.
• Keep all detergents away from children.
• Keep children and pets away from the appliance door
when it is open.
Installation
Warning! This appliance must be installed by a
qualified or competent person.
• Remove all the packaging.
• Do not install or use a damaged appliance.
• Do not install or use the appliance where the temperature is less than 0 °C.
• Obey the installation instruction supplied with the appliance.
• Make sure that the appliance is installed below and adjacent to safe structures.
Water connection
• Make sure not to cause damage to the water hoses.
• Use only new hoses to connect the appliance to the
water supply. Do not use old hoses again.
• Before you connect the appliance to new pipes or pipes
not used for a long time, let the water flow until it is
clean.
• The first time you use the appliance, make sure that
there is no leakage.
Electrical connection
Warning! Risk of fire and electrical shock.
• The appliance must be earthed.
• Make sure that the electrical information on the rating
plate agrees with the power supply. If not, contact an
electrician.
• Always use a correctly installed shockproof socket.
• Do not use multi-plug adapters and extension cables.
• Make sure not to cause damage to the mains plug and
to the mains cable. Contact the Service or an electrician to change a damaged mains cable.
• Connect the mains plug to the mains socket only at the
end of the installation. Make sure that there is access
to the mains plug after the installation.
• Do not pull the mains cable to disconnect the appliance. Always pull the mains plug.
• Only for UK and Ireland. The appliance has a 13 amp
mains plug. If it is necessary to change the fuse in the
mains plug, use a 13 amp ASTA (BS 1362) fuse.
Use
Warning! Risk of injury.
• Use this appliance in a household environment.
• Do not change the specification of this appliance.
• Put knives and cutlery with sharp points in the cutlery
basket with the points down or in a horizontal position.
2
• Do not keep the appliance door open without supervision to prevent to fall on it.
• Do not sit or stand on the open door.
• Dishwasher detergents are dangerous. Obey the safety
instructions on the detergent packaging.
• Do not drink and play with the water in the appliance.
• Do not remove the dishes from the appliance until the
programme is completed. There can be detergent on
the dishes.
Warning! Risk of electrical shock, fire or burns.
• Do not put flammable products or items that are wet
with flammable products in, near or on the appliance.
• Do not use water spray and steam to clean the appliance.
• The appliance can release hot steam if you open the
door while a programme operates.
Disposal
Warning! Risk of injury or suffocation.
• Disconnect the appliance from the mains supply.
• Cut off the mains cable and dispose of it.
• Remove the door catch to prevent children and pets to
get closed in the appliance.
Customer Care and Service
Contact the Service to repair the appliance. We recommend only the use of original spare parts.
When you contact the Service, ensure that you have the
following information that is available on the rating plate.
Model : ..............................................................
PNC : ................................................................
Serial Number : ................................................
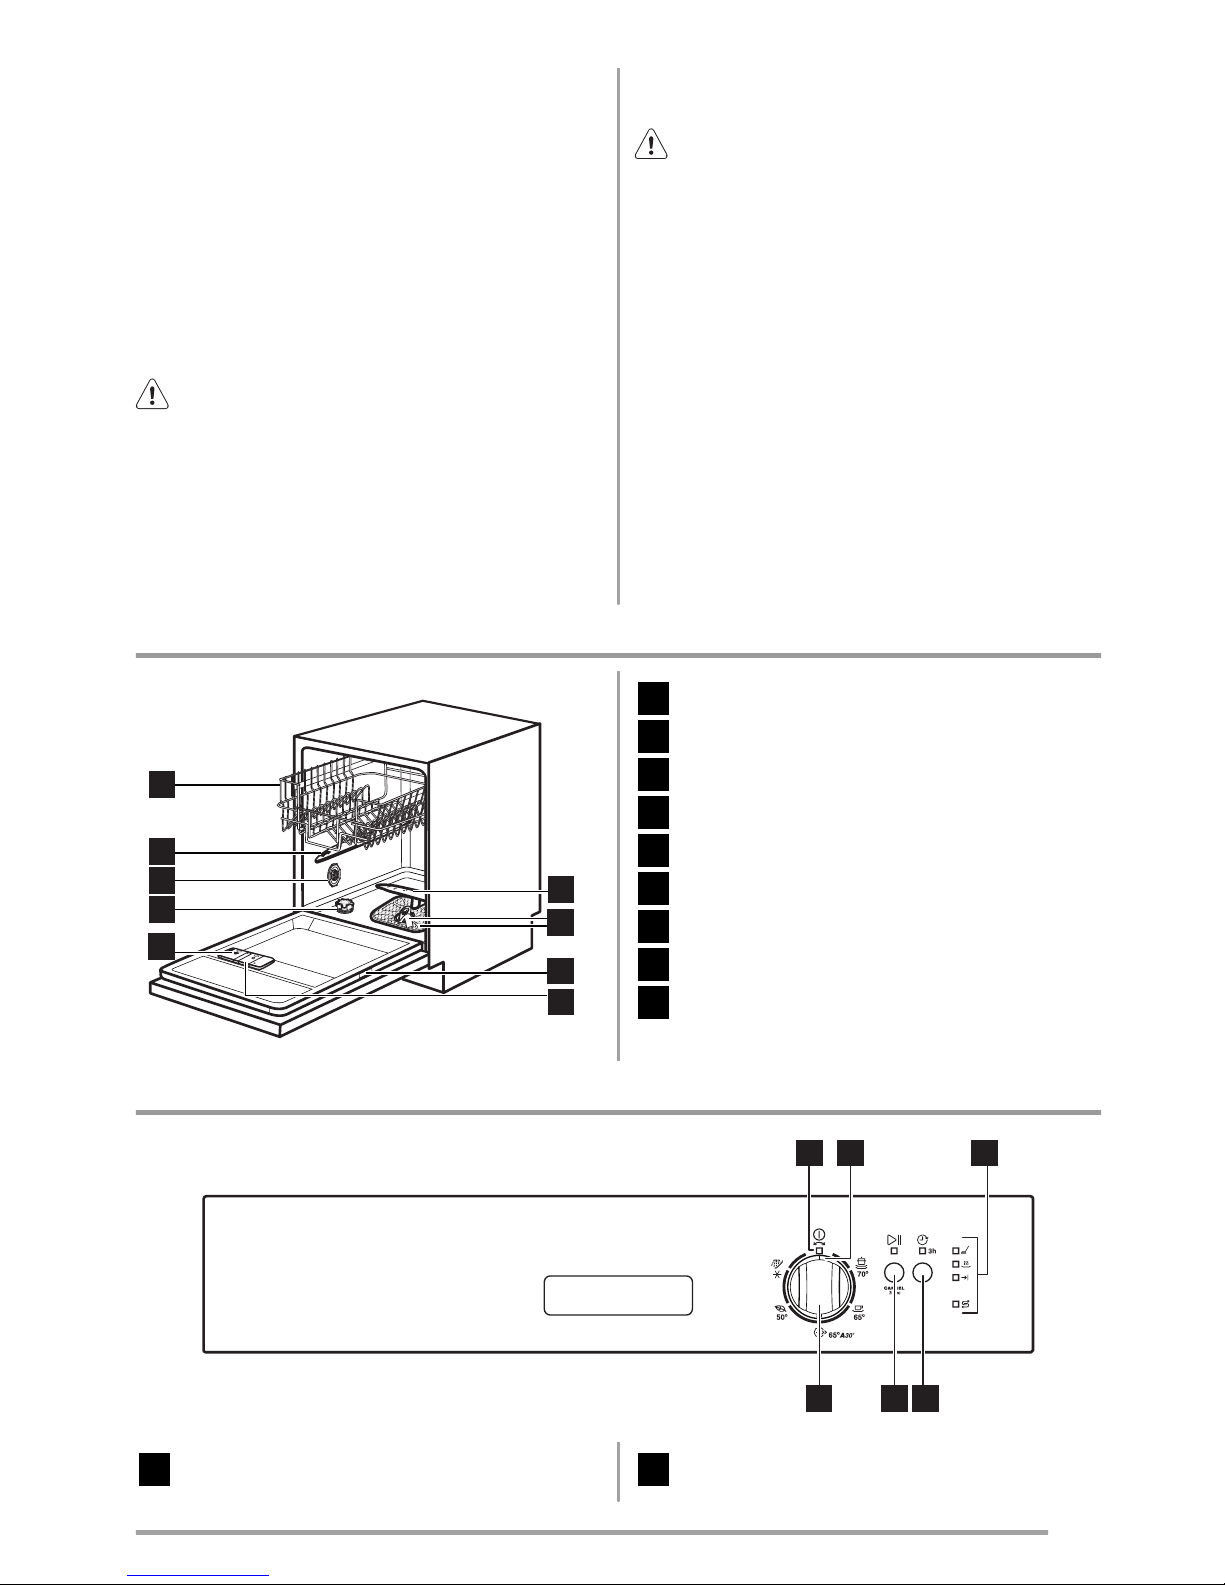
Product description
2
1
2
3
4
9
8
6
7
5
1
Lower spray arm
2
Filters
3
Rating plate
4
Rinse aid dispenser
5
Detergent dispenser
6
Salt container
7
Water hardness dial
8
Upper spray arm
9
Upper basket
Control panel
1 23
5
64
1
On/off indicator
2
Programme marker
3
3
Indicators
4
Delay button
5
Start button
6
Programme knob
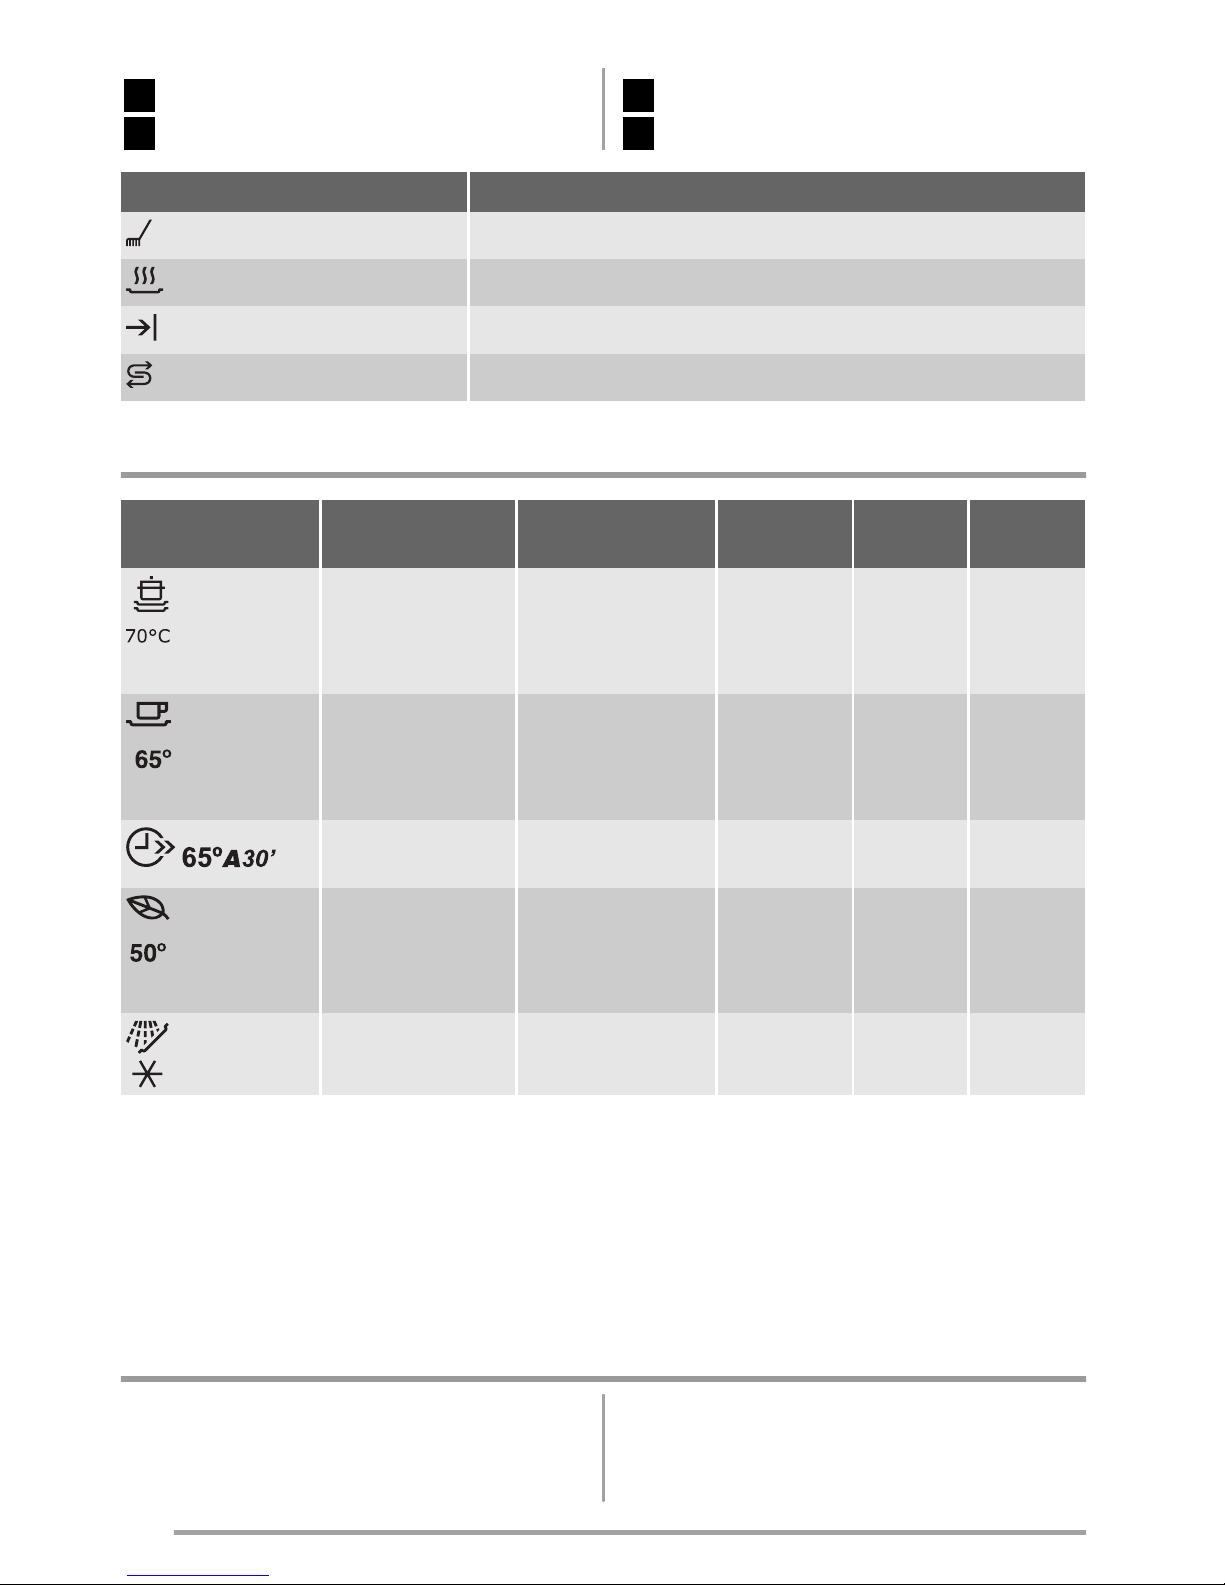
Indicators Description
Washing phase indicator.
Drying phase indicator.
End indicator.
Salt indicator. This indicator is off while the programme operates.
Programmes
Programme
1)
Degree of soil
Type of load
Programme phases Duration
(min)
Energy
(kWh)
Water
(l)
Heavy soil
Crockery, cutlery,
pots and pans
Prewash
Wash 70 °C
Rinses
Dry
85-95 1,8-2,0 22-25
Normal soil
Crockery and cutlery
Prewash
Wash 65 °C
Rinses
Dry
100-110 1,4-1,6 19-21
2)
Fresh soil
Crockery and cutlery
Wash 65 °C
Rinse
30 0,9 9
3)
Normal soil
Crockery and cutlery
Prewash
Wash 50 °C
Rinses
Dry
130-140 1,0-1,2 14-16
4)
All Prewash 12 0,1 5
1) The water pressure and temperature, the variations of the mains supply, the options and the quantity of dishes can change the
programme duration and the consumption values.
2) With this programme you can wash a load with fresh soil. It gives good washing results in a short time.
3) This is the standard programme for test institutes. With this programme you have the most efficient use of water and energy
consumption for crockery and cutlery with normal soil. Refer to the supplied leaflet for test information.
4) Use this programme to quickly rinse the dishes. This prevents the remaining food to bond on the dishes and bad odours to come out
from the appliance.
Do not use detergent with this programme.
Before first use
1. Make sure that the set level of the water softener
agrees with the water hardness in your area. If not,
adjust the water softener. Contact your local water authority to know the water hardness in your area.
2. Fill the salt container.
4
3. Fill the rinse aid dispenser.
4. Open the water tap.
5. Processing residues can stay in the appliance. Start a
programme to remove them. Do not use detergent
and do not load the baskets.
Adjusting the water softener
Hard water contains a high quantity of minerals that can
cause damage to the appliance and bad washing results.
The water softener neutralises these minerals.
The dishwasher salt keeps the water softener clean and in
good conditions. Refer to the table to adjust the water
softener to the right level. It makes sure that the water
softener uses the correct quantity of dishwasher salt and
water.
You must adjust the water softener manually and
electronically.
Water hardness
Water softener
adjustment
German
degrees
(°dH)
French
degrees
(°fH)
mmol/l Clarke
degrees
Manual Electronic
51 - 70 91 - 125 9.1 - 12.5 64 - 88
2
1)
10
43 - 50 76 - 90 7.6 - 9.0 53 - 63
2
1)
9
37 - 42 65 - 75 6.5 - 7.5 46 - 52
2
1)
8
29 - 36 51 - 64 5.1 - 6.4 36 - 45
2
1)
7
23 - 28 40 - 50 4.0 - 5.0 28 - 35
2
1)
6
19 - 22 33 - 39 3.3 - 3.9 23 - 27
2
1)
5
1)
15 - 18 26 - 32 2.6 - 3.2 18 - 22 1 4
11 - 14 19 - 25 1.9 - 2.5 13 - 17 1 3
4 - 10 7 - 18 0.7 - 1.8 5 - 12 1 2
< 4 < 7 < 0.7 < 5
1
2)
1
2)
1) Factory position.
2) Do not use salt at this level.
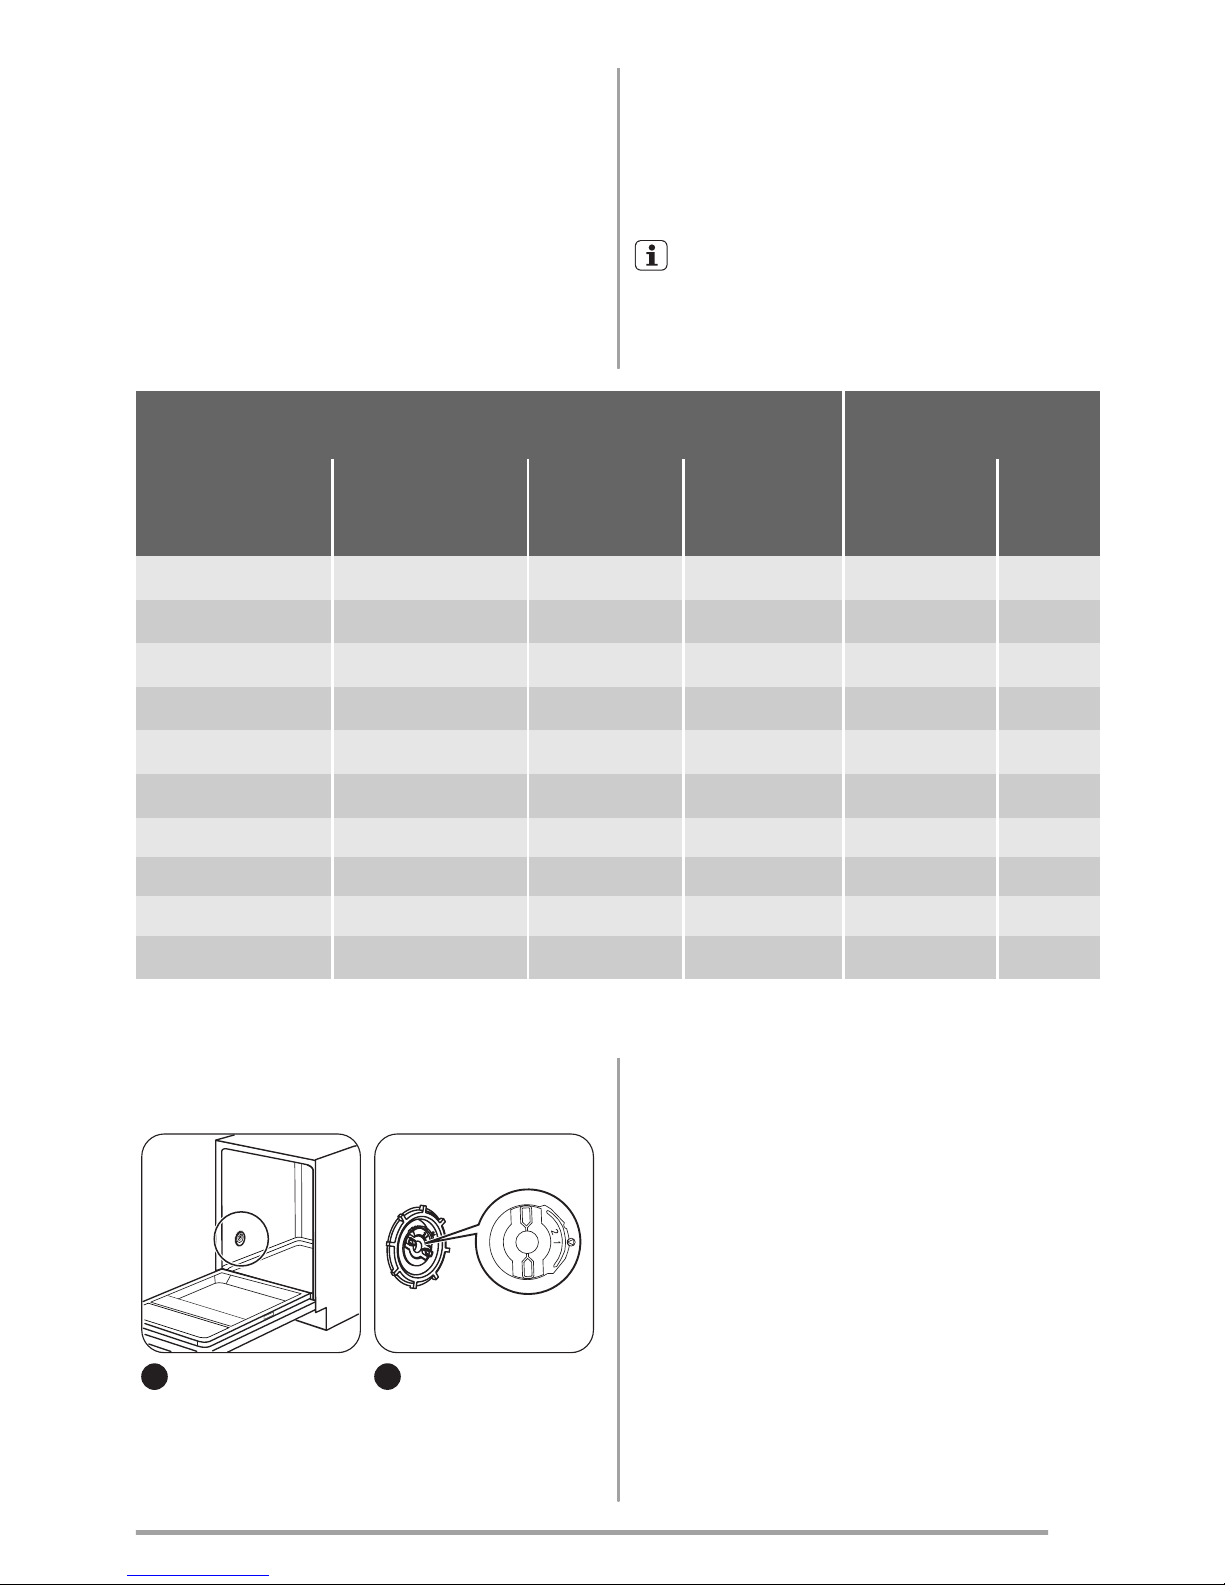
Manual adjustment
1
2
Turn the water hardness
dial to the position 1 or 2.
Electronic adjustment
1. Make sure that the programme marker on the programme knob is aligned with the on/off indicator.
2. Press and hold the start button. At the same time turn
the programme knob clockwise until the programme
marker is aligned with the first programme on the
control panel.
3. Release the start button when the start indicator and
the on/off indicator start to flash.
• The end indicator flashes intermittently. The num-
ber of flashes shows the level of the water softener.
Example: 5 flashes + pause + 5 flashes = level 5.
5
 Loading...