

Zanussi ZDI11004XA User Manual

HR
Upute za uporabu 2
(1
8VHUPDQXDO
EL
ȅįȘȖȓİȢ ȋȡȒıȘȢ 26
HU
Használati útmutató 40
RO
Manual de utilizare 53
SL
Navodila za uporabo 65
Perilica posuÿa
'LVKZDVKHU
ȆȜȣȞIJȒȡȚȠ ʌȚȐIJȦȞ
Mosogatógép
Maúină de spălat vase
Pomivalni stroj
=',;$
www.preciz.hu

Sadr•aj
Sigurnosne upute _ _ _ _ _ _ _ _ _ _ _ _ _ 2
Opis proizvoda _ _ _ _ _ _ _ _ _ _ _ _ _ _ 4
Upravljaþka ploþa _ _ _ _ _ _ _ _ _ _ _ _ _ 4
Programi _ _ _ _ _ _ _ _ _ _ _ _ _ _ _ _ _ 5
Prije prve uporabe _ _ _ _ _ _ _ _ _ _ _ _ 5
Svakodnevna uporaba _ _ _ _ _ _ _ _ _ _ 7
Savjeti _ _ _ _ _ _ _ _ _ _ _ _ _ _ _ _ _ _ 9
ýi!üenje i odr"avanje _ _ _ _ _ _ _ _ _ _ 10
Rje!avanje problema _ _ _ _ _ _ _ _ _ _ 11
Tehniþki podaci _ _ _ _ _ _ _ _ _ _ _ _ _ 13
Briga za okoli! _ _ _ _ _ _ _ _ _ _ _ _ _ _ 13
Zadr"ava se pravo na izmjene.
Sigurnosne upute
Prije postavljanja i uporabe ureÿaja, pa"ljivo
proþitajte isporuþene upute. Proizvoÿaþ nije
odgovoran ako nepravilno postavljanje i
uporaba ureÿaja uzrokuje ozljede i o!teüenja. Upute uvijek þuvajte s ureÿajem, za
buduüe potrebe.
Sigurnost djece i slabijih osoba
Upozorenje Opasnost od gu!enja,
ozljede ili trajne nesposobnosti.
# Osobama, ukljuþujuüi i djecu, sa
smanjenim fiziþkim, osjetilnim ili mentalnim funkcijama ili osobama bez iskustva
i znanja nikada nemojte dozvoliti da koriste ureÿaj. Njih prilikom rukovanja ure-
ÿajem mora nadzirati ili u rukovanje ure-
ÿajem uputiti osoba odgovorna za njihovu
sigurnost.
# Ne dozvolite djeci da se igraju s ureÿajem.
# Svu ambala"u þuvajte izvan dohvata
djece.
# Sve deterd"ente þuvajte izvan dohvata
djece.
# Djecu i kuüne ljubimce dr"ite podalje od
vrata ureÿaja dok su otvorena.
Postavljanje
# Odstranite svu ambala"u.
# Ne postavljajte i ne koristite o!teüeni ure-
ÿaj.
# Ureÿaj nemojte postavljati na mjesta na
kojima je temperatura manja od 0°C.
# Pridr"avajte se uputa za postavljanje ispo-
ruþenih s ureÿajem.
# Provjerite je li ureÿaj postavljen ispod i
blizu sigurnih konstrukcija.
Elektriþni prikljuþak
Upozorenje Opasnost od po"ara i
strujnog udara.
# Ureÿaj mora biti uzemljen.
# Provjerite podudaraju li se elektriþni pod-
aci na nazivnoj ploþici s elektriþnim napajanjem. Ako to nije sluþaj, kontaktirajte
elektriþara.
# Uvijek koristite pravilno ugraÿenu utiþnicu
sa za!titom od strujnog udara.
# Ne koristite adaptere s vi!e utiþnica i pro-
du"ne kabele.
# Pazite da ne o!tetite utikaþ i kabel na-
pajanja. Ako je potrebno zamijeniti
elektriþni kabel, to mora izvr!iti na! servis.
# Utikaþ kabela napajanja utaknite u utiþni-
cu tek po zavr!etku postavljanja. Provjerite postoji li pristup utikaþu nakon postavljanja.
# Ne povlaþite kabel napajanja kako biste
utikaþ izvukli iz utiþnice. Uvijek uhvatite i
povucite utikaþ.
# Kabel napajanja ili utikaþ ne dodirujte
vla"nim rukama.
# Ovaj je ureÿaj usklaÿen s direktivama EU.
Spajanje na dovod vode
# Pripazite da ne o!tetite crijeva za vodu.
# Prije prikljuþivanja ureÿaja na nove cijevi
ili cijevi koje se dugo nisu koristile neka
voda teþe sve dok ne postane potpuno þista.
2
www.zanussi.com
www.preciz.hu
• Prilikom prve upotrebe ureÿaja provjerite
da nema curenja.
• Crijevo za dovod vode ima sigurnosni ventil i oblogu s unutarnjim glavnim vodom.
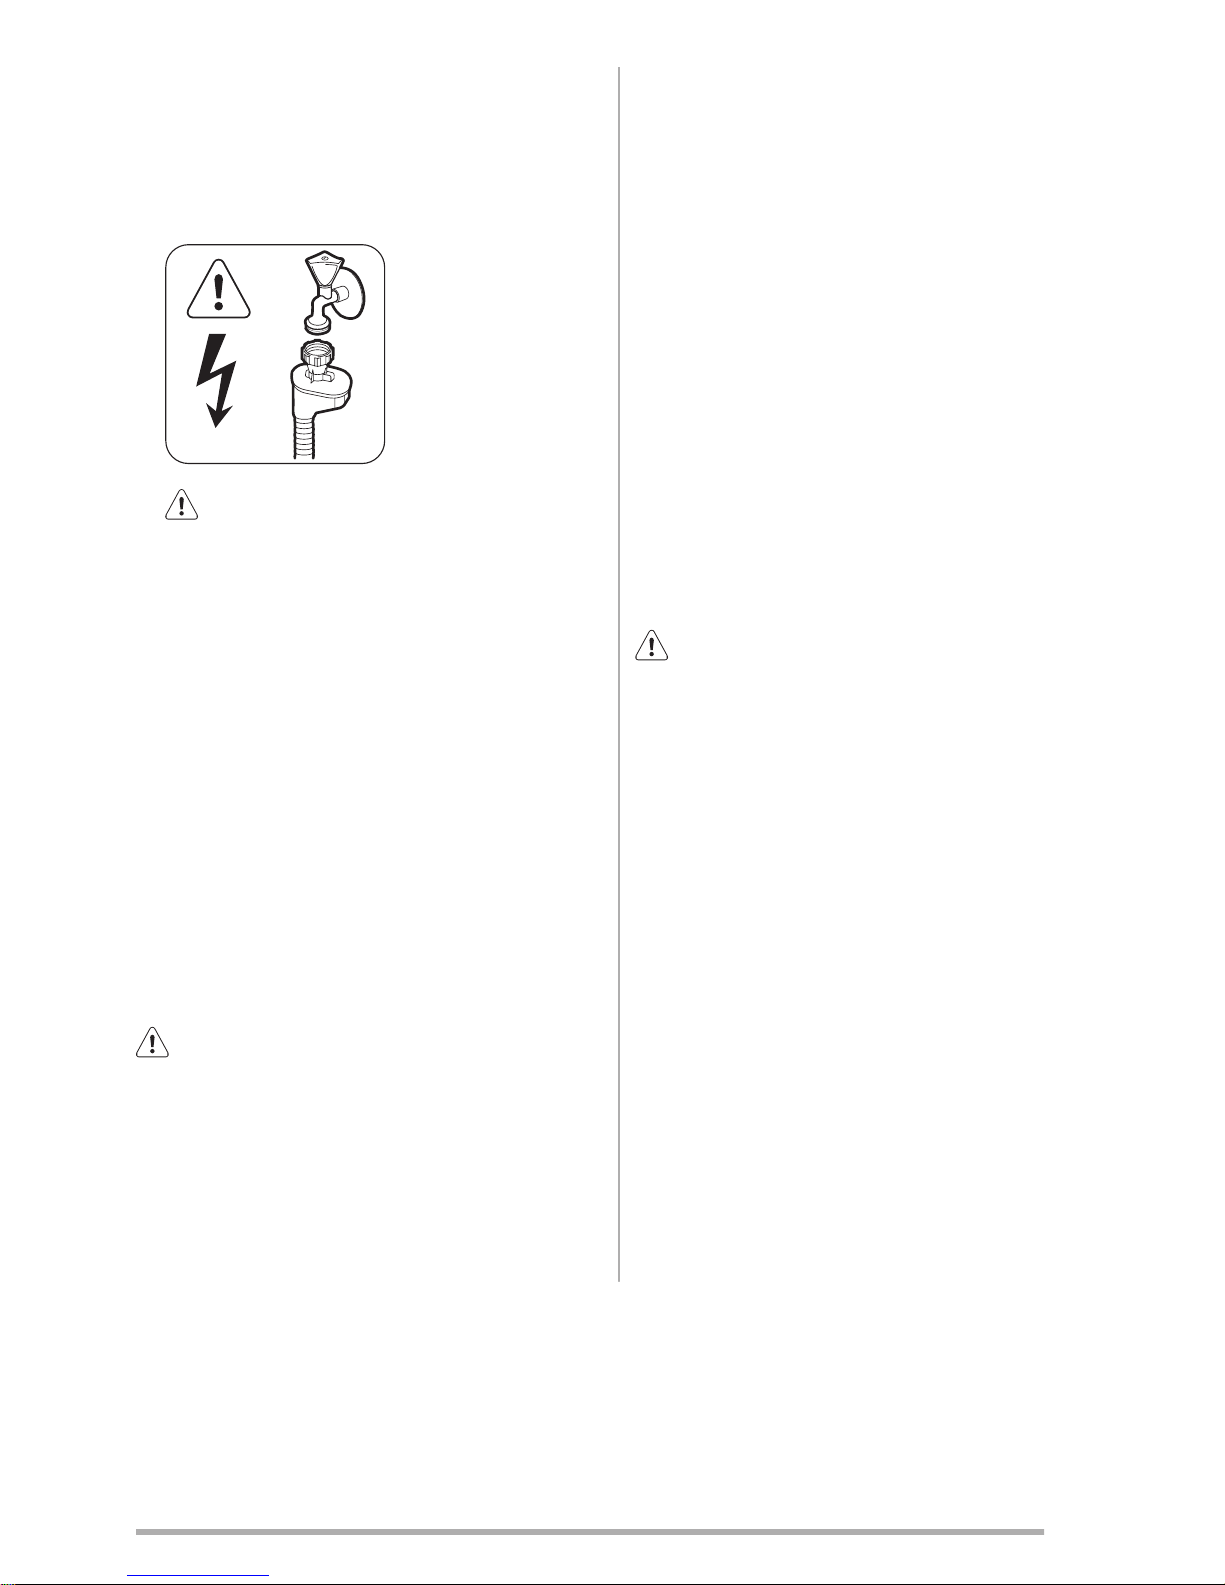
Upozorenje Opasan napon.
• Ako je crijevo za dovod vode o!teüeno,
odmah iskopþajte utikaþ iz utiþnice
elektriþne mre"e. Za zamjenu crijeva za
dovod vode kontaktirajte servisera.
Upotreba
• Ovaj ureÿaj je namijenjen za upotrebu u
kuüanstvu i za sliþne namjene kao !to su:
# ýajne kuhinje koje upotrebljavaju za-
posleni u prodavaonicama, uredima i
drugim radnim prostorima
# Kuüe za odmor (vikendice)
# Turistiþki apartmani u ili izvan hotela,
motela i drugih vrsta smje!taja
# Za þajne kuhinje u prenoüi!tima (tipa
bed and breakfast) .
Upozorenje Opasnost od ozljede,
opeklina, strujnog udara ili po"ara.
• Ne mijenjajte specifikacije ovog ureÿaja.
• No"eve i pribor s o!trim vrhovima u ko!aru za pribor za jelo stavite vrhom okrenutim prema dolje ili u vodoravan polo"aj.
• Ne dr"ite vrata ureÿaja otvorena bez nadzora kako biste sprijeþili pad preko njih.
• Ne sjedajte i ne stojte na otvorenim vratima.
• Deterd"enti za perilicu posuÿa su opasni.
Pridr"avajte se sigurnosnih uputa na
ambala"i deterd"enta.
• Ne pijte i ne igrajte se s vodom u ureÿaju.
• Ne vadite posuÿe iz ureÿaja prije zavr!etka programa. Na posuÿu mo"e ostati
deterd"enta.
• Ureÿaj mo"e ispu!tati vruüu paru ako otvorite vrata dok je program u tijeku.
• Zapaljive predmete ili predmete namoþene zapaljivim sredstvima ne stavljajte u
ureÿaj, pored ili na njega.
• Za þi!üenje ureÿaja ne koristite raspr!ivanje vode i pare.
Odlaganje
Upozorenje Opasnost od ozljede ili
gu!enja.
• Ureÿaj iskopþajte iz elektriþne mre"e.
• Odre"ite elektriþni kabel i bacite ga.
• Uklonite bravicu vrata kako biste sprijeþili
da se djeca i kuüni ljubimci zatvore u ureÿaj.
Servis
• Za popravak ureÿaja kontaktirajte servis.
Preporuþujemo kori!tenje iskljuþivo originalnih rezervnih dijelova.
• Kada kontaktirate servis, provjerite imate li
sljedeüe informacije, dostupne na nazivnoj
ploþici.
Model:
PNC:
Serijski broj:
3
www.zanussi.com
www.preciz.hu

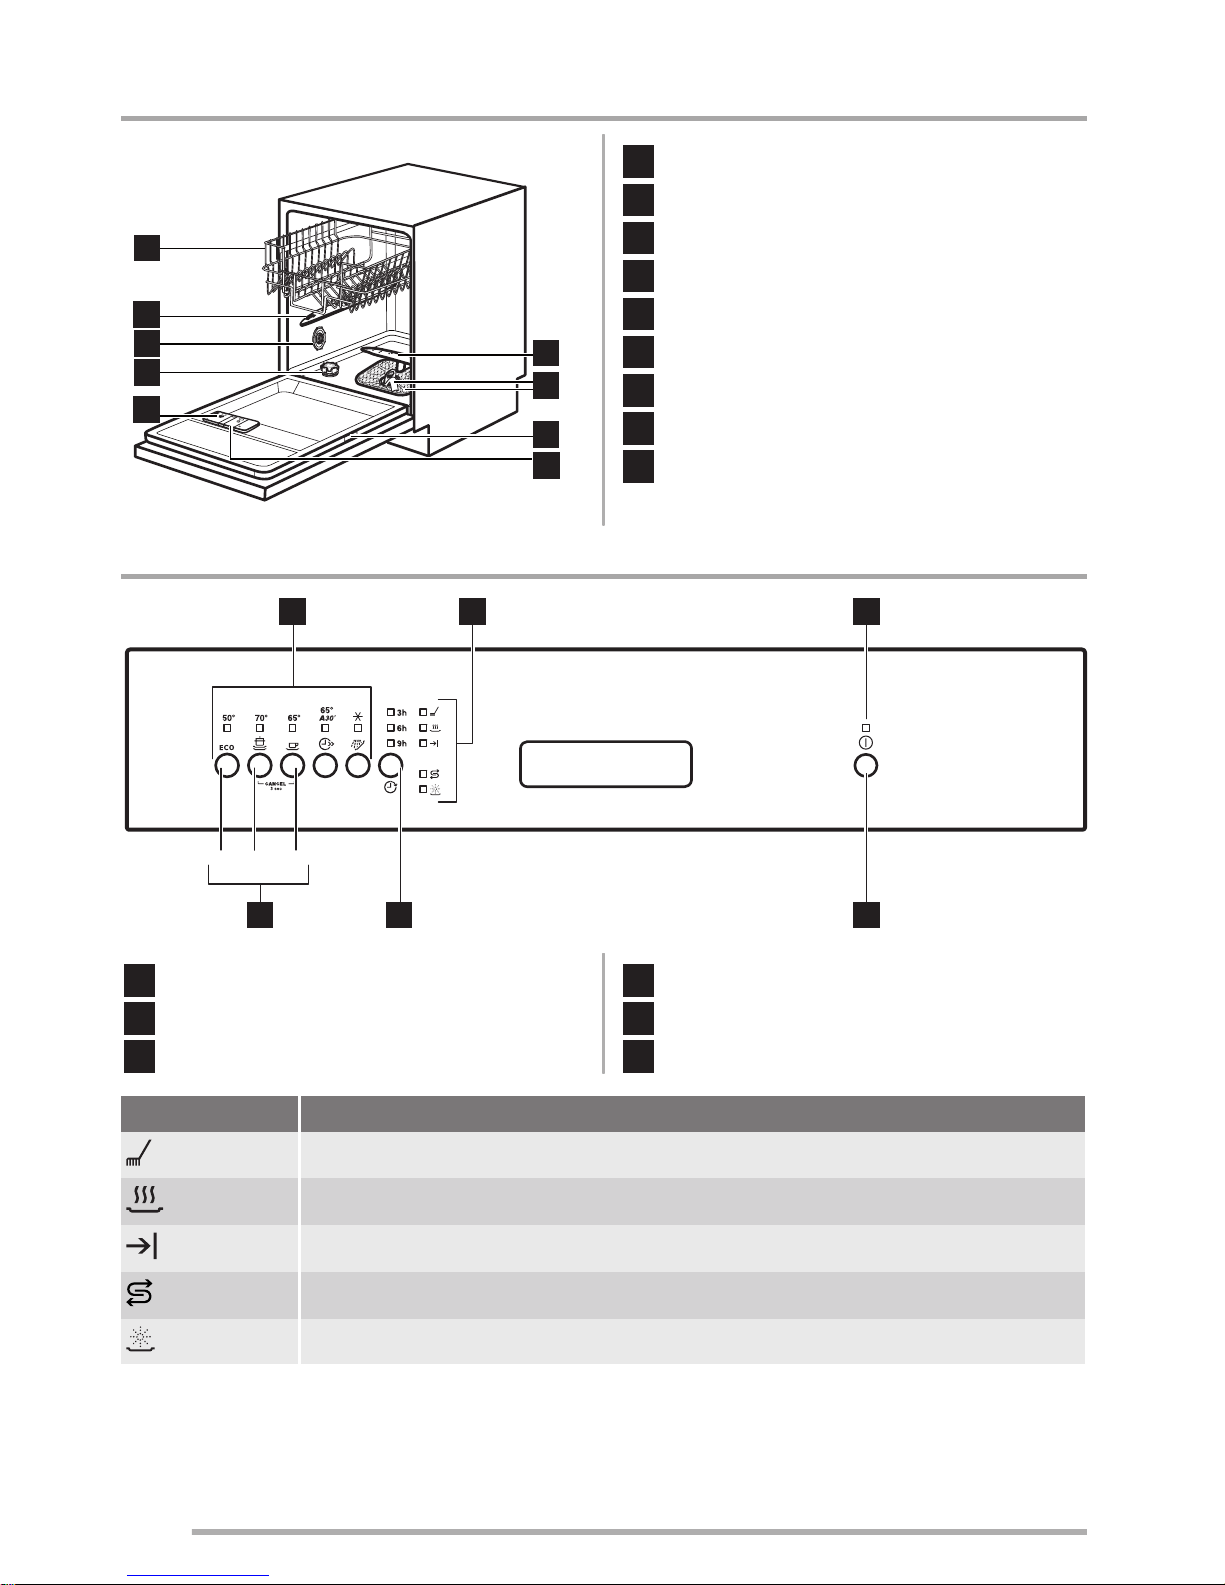
Opis proizvoda
2
1
2
3
4
9
8
6
7
5
1
Donja mlaznica
2
Filtri
3
Nazivna ploþica
4
Spremnik sredstva za ispiranje
5
Spremnik za deterdžent
6
Spremnik soli
7
Tipka za odabir tvrdoüe vode
8
Gornja mlaznica
9
Gornja košara
Upravljaþka ploþa
A B C
1 2 3
456
1
Programske tipke
2
Indikatori
3
Indikator ukljuþeno/Iskljuþeno
4
Tipka za ukljuþivanje/iskljuþivanje
5
Tipka za odgodu poþetka
6
Funkcijske tipke
Indikatori Opis
Indikator faze pranja.
Indikator faze sušenja.
Indikator završetka programa.
Indikator za sol. Ovaj je indikator iskljuþen dok program radi.
Indikator sredstva za ispiranje. Ovaj je indikator iskljuþen dok program radi.
4
www.zanussi.com
www.preciz.hu
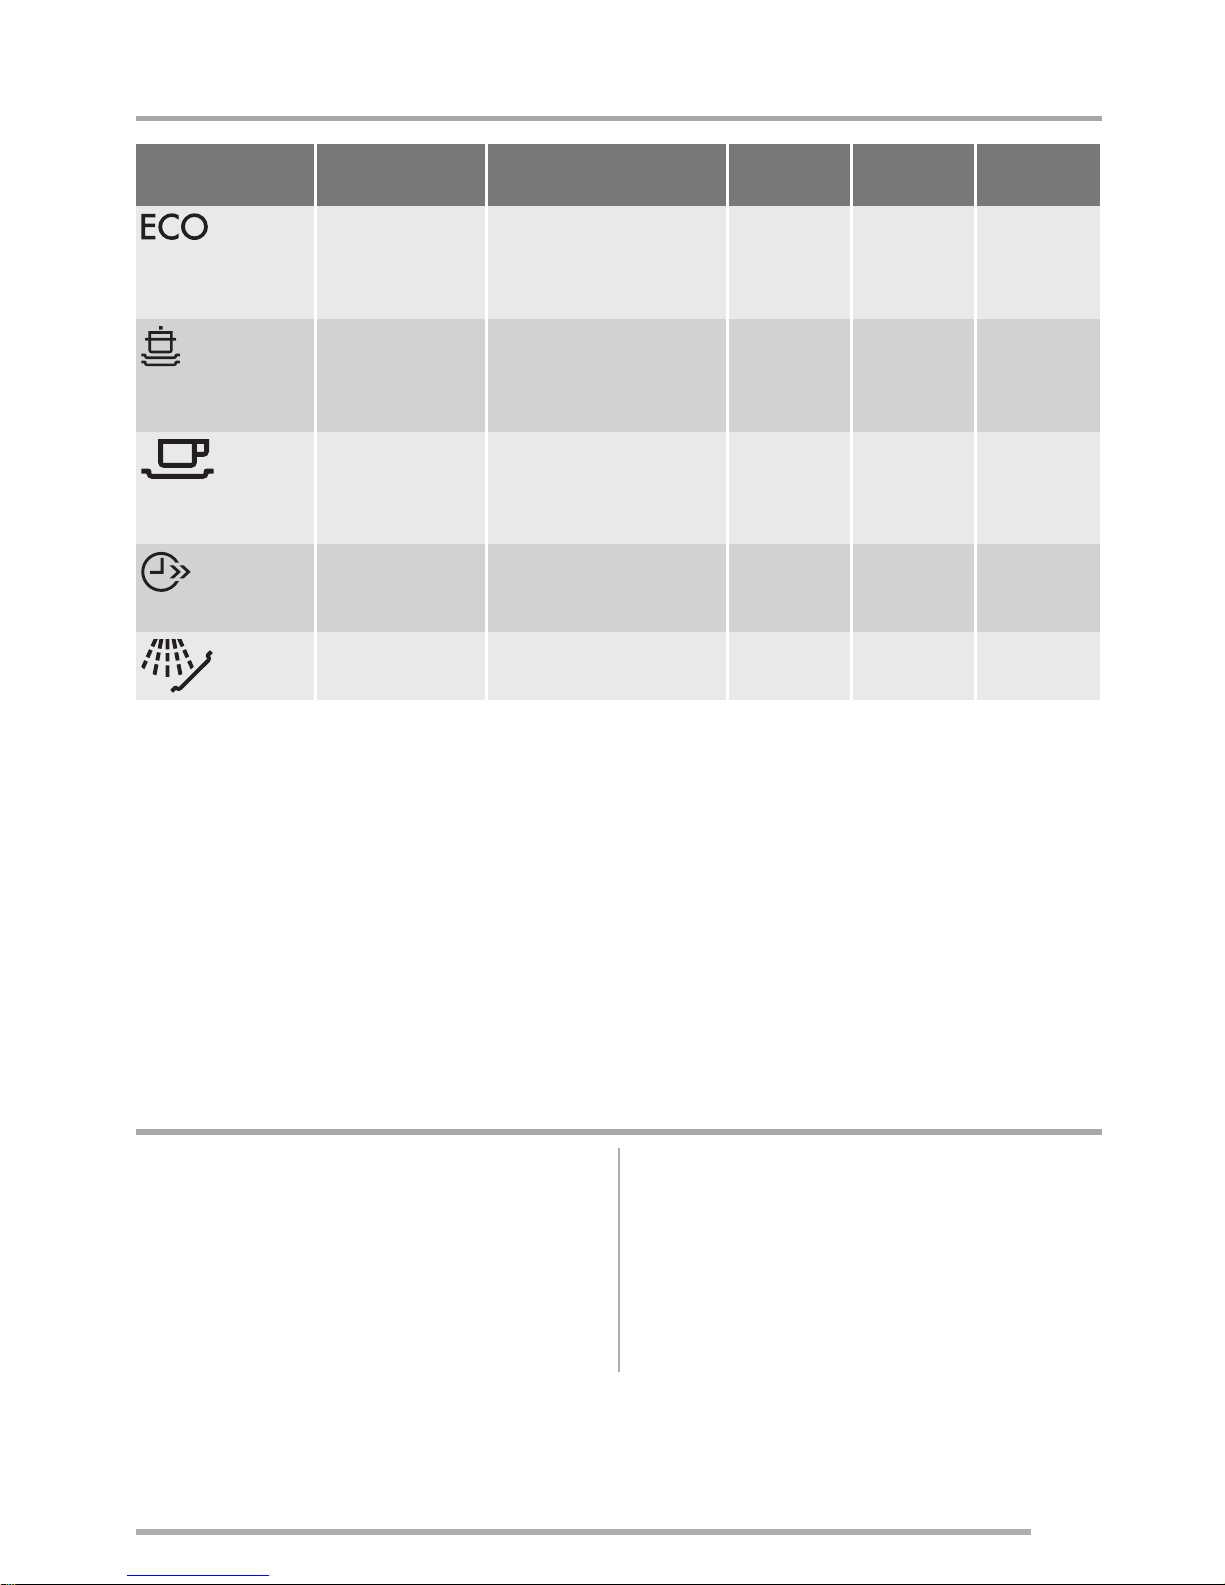
Programi
Program
1)
Stupanj
zaprljanosti
Vrsta punjenja
Faze
programa
Trajanje
(min)
Snaga
(kWh)
Voda
(l)
2)
Normalno
zaprljano
Posuÿe i pribor
za jelo
Predpranje
Pranje 50 °C
Ispiranja
Su!enje
168 1.01 12.4
Jako zaprljano
Posuÿe, pribor
za jelo, tave i
posude
Predpranje
Pranje 70 °C
Ispiranja
Su!enje
90 - 100 1.7 - 1.9 19 - 21
Normalno
zaprljano
Posuÿe i pribor
za jelo
Predpranje
Pranje 65 °C
Ispiranja
Su!enje
100 - 110 1.3 - 1.4 15 - 16
3)
Svje"e
zaprljano posuÿe
Posuÿe i pribor
za jelo
Pranje 65 °C
Ispiranje
30 0.8 8
4)
Sve Predpranje 12 0.1 3
1) Tlak i temperatura vode, oscilacije u napajanju elektriþne mre"e, opcije te koliþina posuÿa mogu
promijeniti trajanje programa i potro!nju.
2) Pomoüu ovog programa mo"ete najuþinkovitije iskoristiti vodu i u!tedjeti energiju za uobiþajeno
zaprljano posuÿe i pribor za jelo. (Ovo je standardni program za ustanove za testiranje).
3) Ovim programom mo"ete prati svje"e zaprljano posuÿe. Daje sjajne rezultate pranja u kratkom
vremenu.
4) Ovaj program koristite za brzo ispiranje posuÿa. Time se sprjeþava da se ostaci hrane zalijepe za
posuÿe i da iz ureÿaja izlaze neugodni mirisi.
Uz ovaj program nemojte koristiti deterd"ent.
Informacije za ustanove za testiranje
Za sve potrebne informacije po pitanju karakteristika testiranja po!aljite poruku
elektronskom po!tom:
info.test@dishwasher-production.com
Zapi!ite broj proizvoda (PNC) koji se nalazi na nazivnoj ploþici.
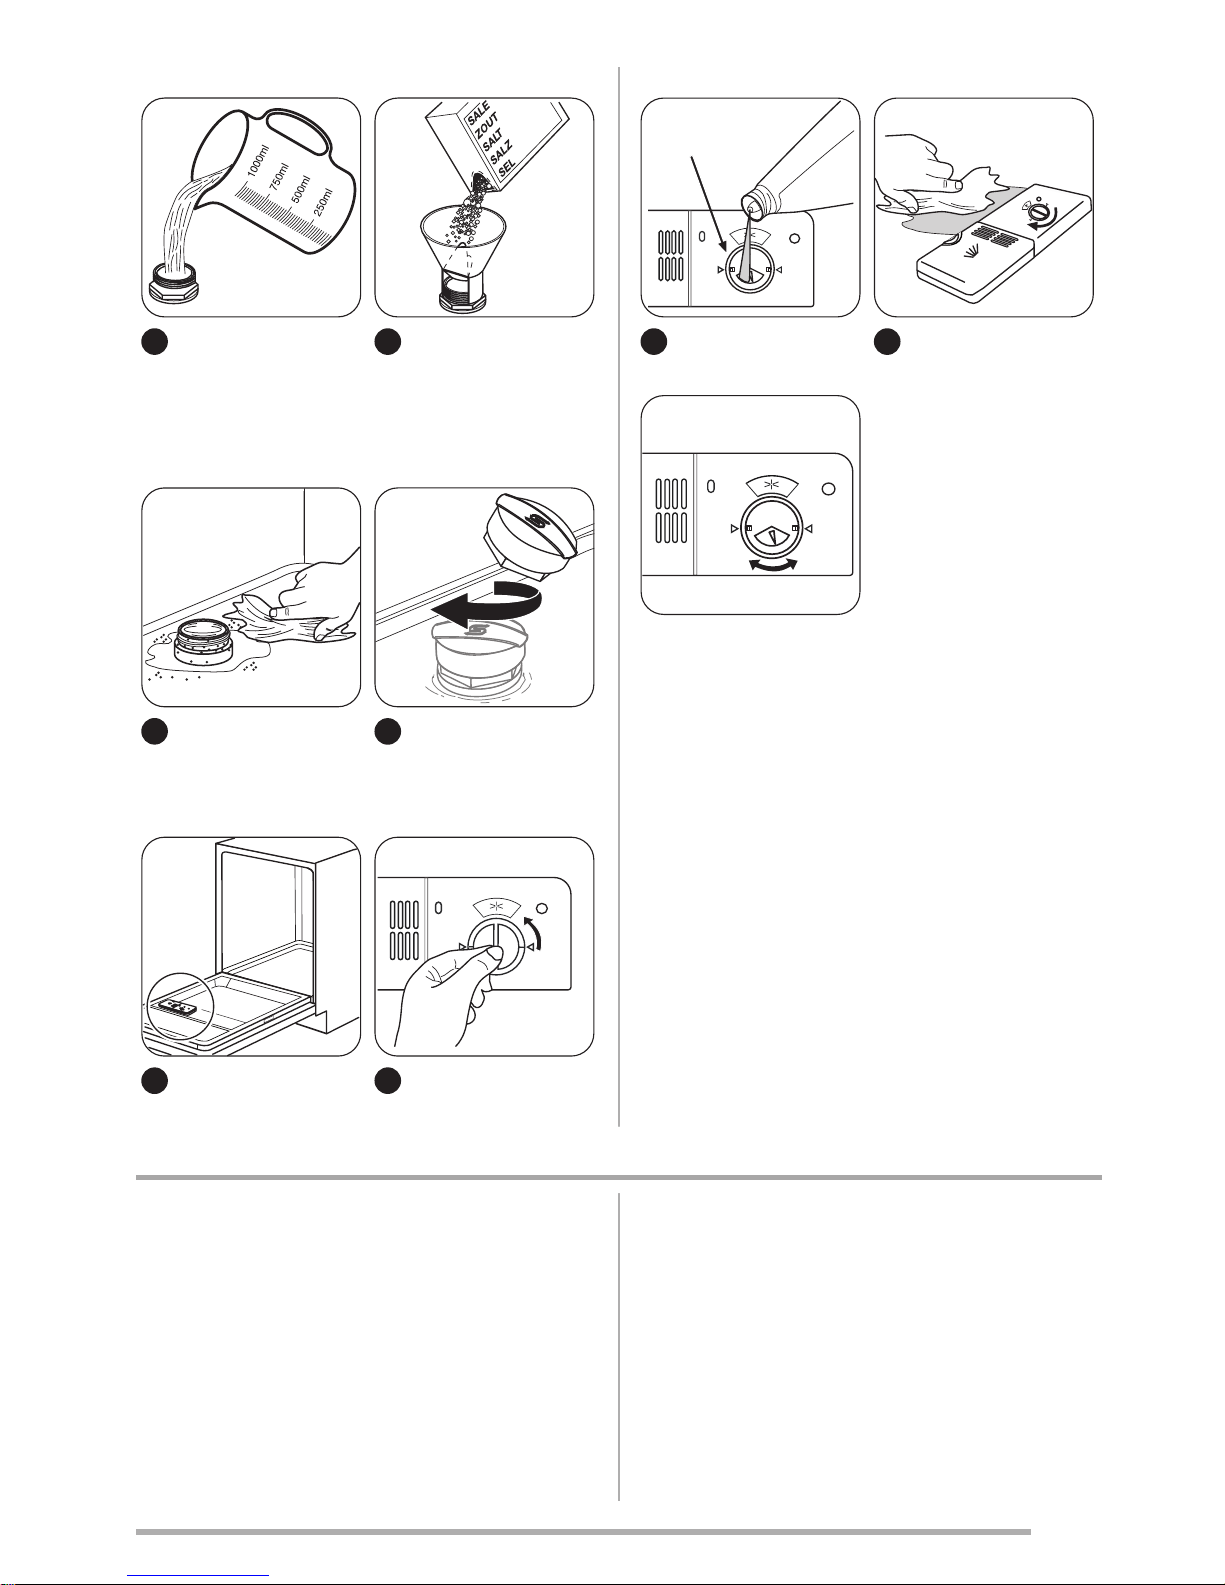
Prije prve uporabe
1. Provjerite odgovara li postavka omek!i-
vaþa vode tvrdoüi vode u va!em podruþju. Ako nije usklaÿena, podesite
omek!ivaþ vode. Obratite se lokalnom distributeru vode kako biste saznali tvrdoüu vode u svom podruþju.
2. Napunite spremnik za sol.
3. Napunite spremnik sredstva za ispiranje.
4. Otvorite slavinu.
5. Ostaci obrade mogu se zadr"ati u ureÿaju. Pokrenite program kako biste ih
uklonili. Ne koristite deterd"ent i ne punite ko!are.
5
www.zanussi.com
www.preciz.hu
Pode•avanje omek•ivaþa vode
Tvrdoüa vode
Omek•ivaþ vode
prilagoÿavanje
Njemaþki
stupnjevi
(°dH)
Francuski
stupnjevi
(°fH)
mmol/l Clarkeovi
stupnjevi
Razina
47 - 50 84 - 90 8.4. - 9.0 58 - 63 10
43 - 46 76 - 83 7.6 - 8.3 53 - 57 9
37 - 42 65 - 75 6.5 - 7.5 46 - 52 8
29 - 36 51 - 64 5.1 - 6.4 36 - 45 7
23 - 28 40 - 50 4.0 - 5.0 28 - 35 6
19 - 22 33 - 39 3.3 - 3.9 23 - 27
5
1)
15 - 18 26 - 32 2.6 - 3.2 18 - 22 4
11 - 14 19 - 25 1.9 - 2.5 13 - 17 3
4 - 10 7 - 18 0.7 - 1.8 5 - 12 2
< 4 < 7 < 0.7 < 5
1
2)
1) Tvorniþki postavljeno.
2) Nemojte koristiti sol na ovoj razini.
Elektroniþko prilagoÿavanje
1. Za ukljuþivanje ureÿaja, pritisnite tipku za
ukljuþivanje/iskljuþivanje. Ukljuþuje se indikator ukljuþeno/iskljuþeno. Provjerite je
li ureÿaj u naþinu postavljanja.
Pogledajte "ODABIR I POKRETANJE
PROGRAMA".
2. Istovremeno pritisnite i dr!ite pritisnutima
funkcijske tipke (B) i (C) dok indikatori
funkcijskih tipki (A), (B) i (C) ne zapoþnu
treptati.
3. Pritisnite funkcijsku tipku (A).
# Indikatori funkcijskih tipki (B) i (C) se
iskljuþuju.
# Indikator funkcijske tipke (A) nastavlja
treptati.
# Indikator kraja programa prikazuje po-
stavku omek$ivaþa vode.
% Broj treptaja indikatora kraja pro-
grama prikazuje razinu omek$ivaþa
vode.
Na primjer: 5 treptaja + pauza + 5
treptaja = razina 5.
4. Za promjenu postavke priti$üite
funkcijsku tipku (A). Svakim pritiskom
funkcijske tipke (A) prelazite na sljedeüu
razinu.
5. Za potvrdu iskljuþite ureÿaj.
Punjenje spremnika za sol
Pozor Voda i sol mogu izlaziti iz
spremnika za sol tijekom punjenja.
Opasnost od korozije. Kako biste je sprijeþili,
nakon punjenja spremnika za sol pokrenite
program.
1 2
6
www.zanussi.com
www.preciz.hu
3
Stavite 1 litru vode u
spremnik za sol
(samo prvi put).
4
5
6
Punjenje spremnika sredstva za ispiranje
1
2
max
M
A
X
1
2
3
4
+
3 4
M
A
X
1
2
3
4
+
Za pode!avanje ispu!tene koliþine sredstva za ispiranje, okreüite biraþ izmeÿu
polo"aja 1 (najmanja koliþina) i polo"aja 4
(najveüa koliþina).
Svakodnevna uporaba
1. Otvorite slavinu.
2. Za ukljuþivanje ureÿaja pritisnite tipku za
ukljuþivanje/iskljuþivanje. Provjerite je li
ureÿaj u naþinu rada postavljanje,
pogledajte “Odabir i pokretanje programa”.
• Ako je indikator soli ukljuþen, napunite
spremnik za sol.
• Ako je indikator sredstva za ispiranje
ukljuþen, napunite spremnik sredstva
za ispiranje.
3. Napunite ko!are.
4. Dodajte deterd"ent.
5. Postavite i pokrenite odgovarajuüi program koji odgovara vrsti i zaprljanosti
punjenja.
7
www.zanussi.com
www.preciz.hu
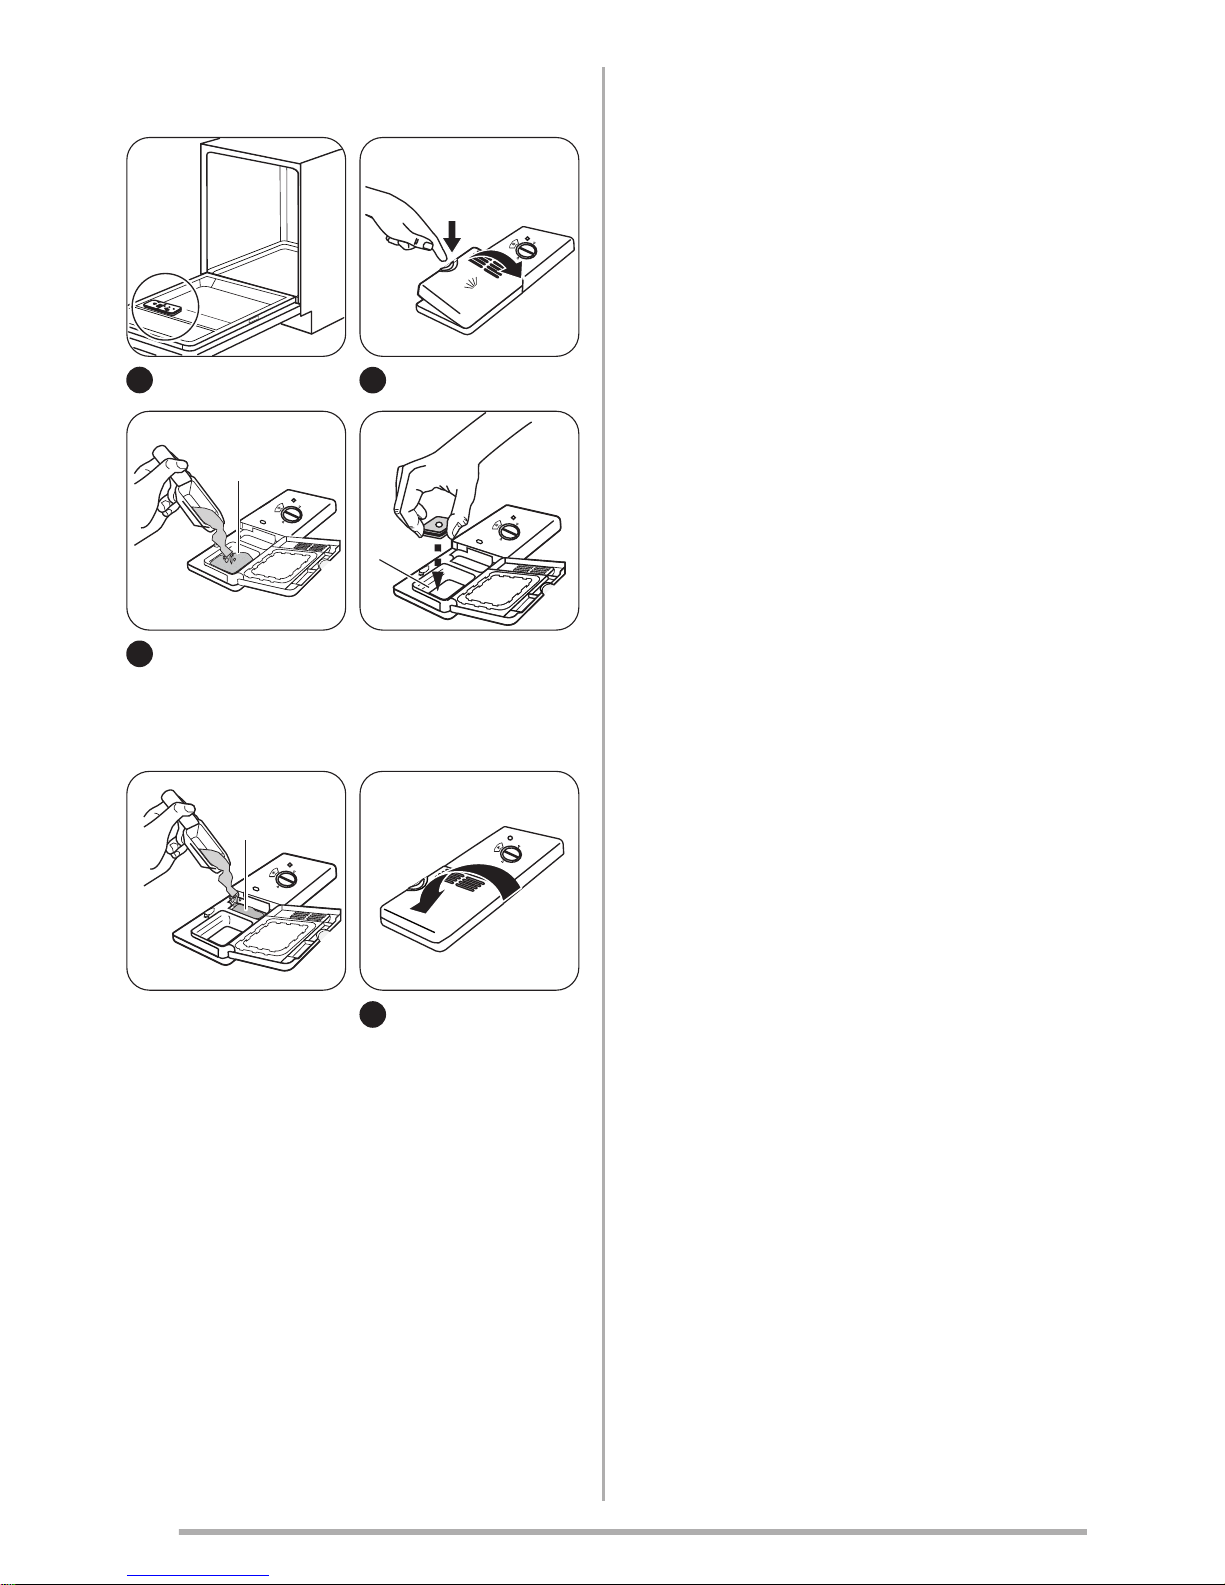
Upotreba deterd•enta
1 2
A
3
Stavite deterd•ent ili
tabletu u odjeljak
(A) .
A
B
Ako program pranja
ima fazu pretpranja,
stavite malu koliþinu
deterd•enta u
spremnik (B).
4
Kombinirani deterd!ent u tableti
Te tablete sadr•e deterd•ent, sredstvo za
ispiranje i ostale dodatke. Provjerite jesu li te
tablete prikladne za tvrdoüu vode u va!em
podruþju. Pogledajte upute na pakiranju proizvoda.
Kada koristite tablete koje sadr•e sol i sredstvo za ispiranje, nemojte puniti spremnik za
sol i spremnik sredstva za ispiranje. Indikator sredstva za ispiranje uvijek se
ukljuþuje kada je spremnik sredstva za ispiranje prazan.
1. Omek!ivaþ vode postavite na najni•u ra-
zinu.
2. Postavite koliþinu sredstva za ispiranje u
najni•i polo•aj.
Ako prekinete uporabu kombiniranih
tableta s deterd!entom, prije poþetka
odvojene uporabe deterd!enta, sredstva
za ispiranje i soli za perilicu posuÿa
obavite sljedeüe korake:
1. Pritisnite tipku za ukljuþivanje/iskljuþivanje za ukljuþivanje ureÿaja.
2. Postavite omek!ivaþ vode na najvi!u razinu.
3. Provjerite jesu li spremnik za sol i
spremnik sredstva za ispiranje puni.
4. Pokrenite najkraüi program s fazom ispi-
ranja, bez deterd•enta i bez posuÿa.
5. Omek!ivaþ vode prilagodite tvrdoüi vode
u va!em podruþju.
6. Podesite ispu!tenu koliþinu sredstva za
ispiranje.
Postavljanje i pokretanje programa
Naþin postavljanja
Za prihvaüanje nekih radnji, ureÿaj mora biti
u naþinu rada postavljanje.
Ureÿaj je u naþinu rada postavljanje kada,
nakon ukljuþivanja:
" se ukljuþe svi indikatori programa.
Ako upravljaþka ploþa prikazuje ostale
uvjete, istovremeno pritisnite i dr•ite pritisnutima funkcijske tipke (B) i (C) dok ureÿaj ne
prijeÿe u naþin rada postavljanje.
Pokretanje programa bez odgode
poþetka
1. Otvorite slavinu.
2. Za postavljanje programa, vrata ureÿaja
ostavite pritvorena.
3. Za ukljuþivanje ureÿaja pritisnite tipku za
ukljuþivanje/iskljuþivanje. Ukljuþuje se indikator ukljuþeno/iskljuþeno.
4. Provjerite je li ureÿaj u naþinu rada za
postavljanje.
8
www.zanussi.com
www.preciz.hu

5. Pritisnite tipku programa kojeg •elite postaviti.
• Ukljuþuje se odgovarajuüi indikator
programa.
• Ukljuþuju se indikatori faze po-
stavljenog programa.
6. Zatvorite vrata ureÿaja. Program se
pokreüe.
• Ukljuþeno je indikatorsko svjetlo faze u
tijeku.
Pokretanje programa s odgodom poþetka
1. Postavite program.
2. Ponovno pritisnite tipku odgode poþetka
sve dok se ne ukljuþi indikator broja sati
koje •elite postaviti. Mo•ete postaviti 3, 6
ili 9 sati.
3. Zatvorite vrata ureÿaja. Zapoþinje odbrojavanje.
• Indikator odgode poþetka prestaje
treptati.
• Iskljuþuju se indikatori faze po-
stavljenog programa.
• Kada odbrojavanje zavr!i, program se
pokreüe.
" Ukljuþen je indikator faze u tijeku.
" Indikator odgode poþetka se iskljuþuje.
Mo•ete odabrati program pranja i odgo-
du poþetka i kada su vrata zatvorena. U
tom sluþaju imate samo 3 sekunde do poþetka rada ureÿaja nakon svake postavke.
Otvaranje vrata dok ureÿaj radi
Ako otvorite vrata, ureÿaj se zaustavlja. Kada zatvorite vrata, ureÿaj nastavlja raditi od
toþke u kojoj je prekinuo rad.
Poni!tavanje odgode poþetka
Istovremeno pritisnite i dr•ite pritisnutima
funkcijske tipke (B) i (C) dok se ne iskljuþi indikator odgode poþetka, a ukljuþe se svi indikatori programa.
Kada poni!tite odgodu poþetka, ureÿaj
se vraüa u naþin rada za postavljanje.
Morate ponovno postaviti program.
Otkazivanje programa
Istovremeno pritisnite i dr•ite pritisnutima
funkcijske tipke (B) i (C) dok se ne ukljuþe
svi indikatori programa.
Prije pokretanja novog programa
provjerite nalazi li se deterd•ent u
spremniku za deterd•ent.
Po zavr!etku programa
Kada program zavr!i, ukljuþuje se indikator
kraja programa.
1. Za iskljuþivanje ureÿaja pritisnite tipku za
ukljuþivanje/iskljuþivanje. Indikator
ukljuþeno/iskljuþeno se iskljuþuje.
2. Zatvorite slavinu.
• Pustite da se posuÿe ohladi prije nego ga izvadite iz ureÿaja. Vruüe posuÿe mo•e se lako o!tetiti.
• Najprije ispraznite predmete iz donje
ko!are, zatim iz gornje ko!are.
• Na stranicama i na vratima ureÿaja
mo•e biti vode. Nehrÿajuüi þelik hladi
se br•e od posuÿa.
Savjeti
Omek!ivaþ vode
Tvrda voda sadr•i visoku koliþinu minerala
koji mogu uzrokovati o!teüenje ureÿaja i
lo!e rezultate pranja. Omek!ivaþ vode neutralizira te minerale.
Sol za perilicu posuÿa odr•ava omek!ivaþ
vode þistim i u dobrim uvjetima. Va•no je postaviti pravu razinu omek!ivaþa vode. To
osigurava da omek!ivaþ vode koristi ispravnu koliþinu soli za perilicu posuÿa i vode.
Upotreba soli, sredstva za ispiranje i
deterd"enta
• Upotrebljavajte samo sol, sredstvo za ispiranje i deterd•ent za perilice posuÿa.
9
www.zanussi.com
www.preciz.hu
Ostali proizvodi mogu prouzroþiti o!te-
üenja na ureÿaju.
" Sredstvo za ispiranje, tijekom zadnje faze
ispiranja, poma#e u su!enju posuÿa bez
crtica i mrlja.
" Kombinirane tablete za pranje sadr#e de-
terd#ent, sredstvo za ispiranje i ostale dodatke. Provjerite jesu li te tablete prikladne
za tvrdoüu vode u va!em podruþju.
Pogledajte upute na pakiranju proizvoda.
" Deterd#ent u tabletama ne otapa se do
kraja prilikom kori!tenja kratkih programa.
Kako bi se sprijeþila pojava tragova deterd#enta na posuÿu preporuþujemo upotrebu sredstva za pranje u tabletama samo
za du#e programe pranje.
Nemojte koristiti vi!e od toþne koliþine
deterd#enta. Pogledajte upute na
pakiranju deterd#enta.
Punjenje ko•ara
Pogledajte isporuþeni letak s primjerima
punjenja ko!ara.
" Ureÿaj koristite iskljuþivo za pranje
predmeta namijenjenih za pranje u perilici.
" U ureÿaj ne stavljajte predmete od drveta,
roga, aluminija, kositra i bakra.
" Nemojte u ureÿaj stavljati predmete koji
mogu apsorbirati vodu (spu#ve, kuüanske
krpe).
" Uklonite preostalu hranu s predmeta.
" Za lak!e uklanjanje zagorjele hrane,
namoþite lonce i tave prije nego !to ih stavite u ureÿaj.
" Stavite !uplje predmete (!alice, þa!e i lon-
ce) otvorom okrenutim prema dolje.
" Provjerite da se pribor i posuÿe meÿusob-
no ne preklapa. $lice pomije!ajte s drugim
priborom.
" Stakleni predmeti ne smiju se meÿusobno
dodirivati.
" Male predmete polo#ite u ko!aru za pribor
za jelo.
" Lagano posuÿe stavite u gornju ko!aru.
Pazite da se ne miþe.
" Prije poþetka programa provjerite mogu li
se mlaznice slobodno kretati.
Prije pokretanja programa
Provjerite sljedeüe:
" Filtri su þisti i pravilno postavljeni.
" Mlaznice nisu zaþepljene.
" Polo#aj predmeta u ko!arama je ispravan.
" Program odgovara vrsti i zaprljanosti
punjenja.
" Upotrebljava se odgovarajuüa koliþina de-
terd#enta.
" U ureÿaju ima soli i sredstava za ispiranje
za perilice posuÿe (osim ako ne upotrebljavate kombinirane tablete s deterd#entom).
" Poklopac spremnika za sol je þvrst.
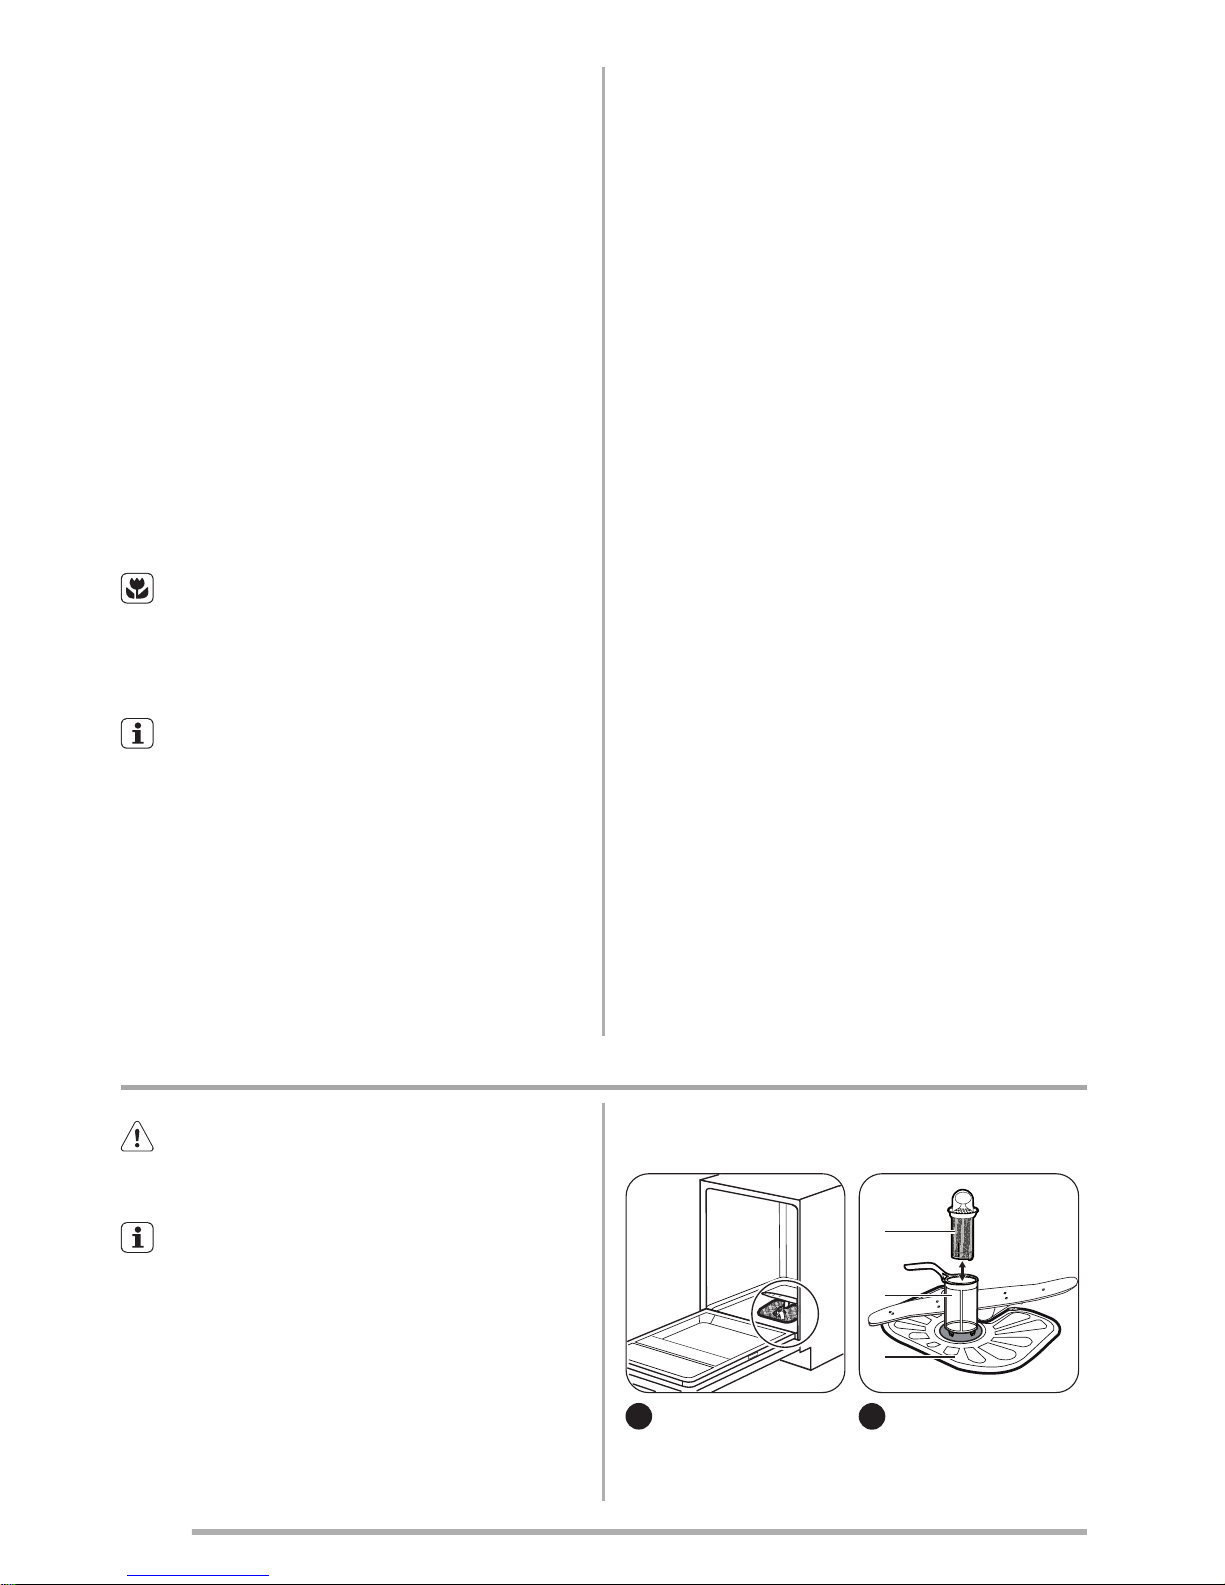
ýi•üenje i odr!avanje
Upozorenje Prije odr#avanja, iskljuþite
ureÿaj i izvucite utikaþ iz utiþnice
elektriþne struje.
Neþisti filtri i zaþepljene mlaznice
smanjuju rezultate pranja.
Redovno ih provjeravajte i ako je potrebno
oþistite ih.
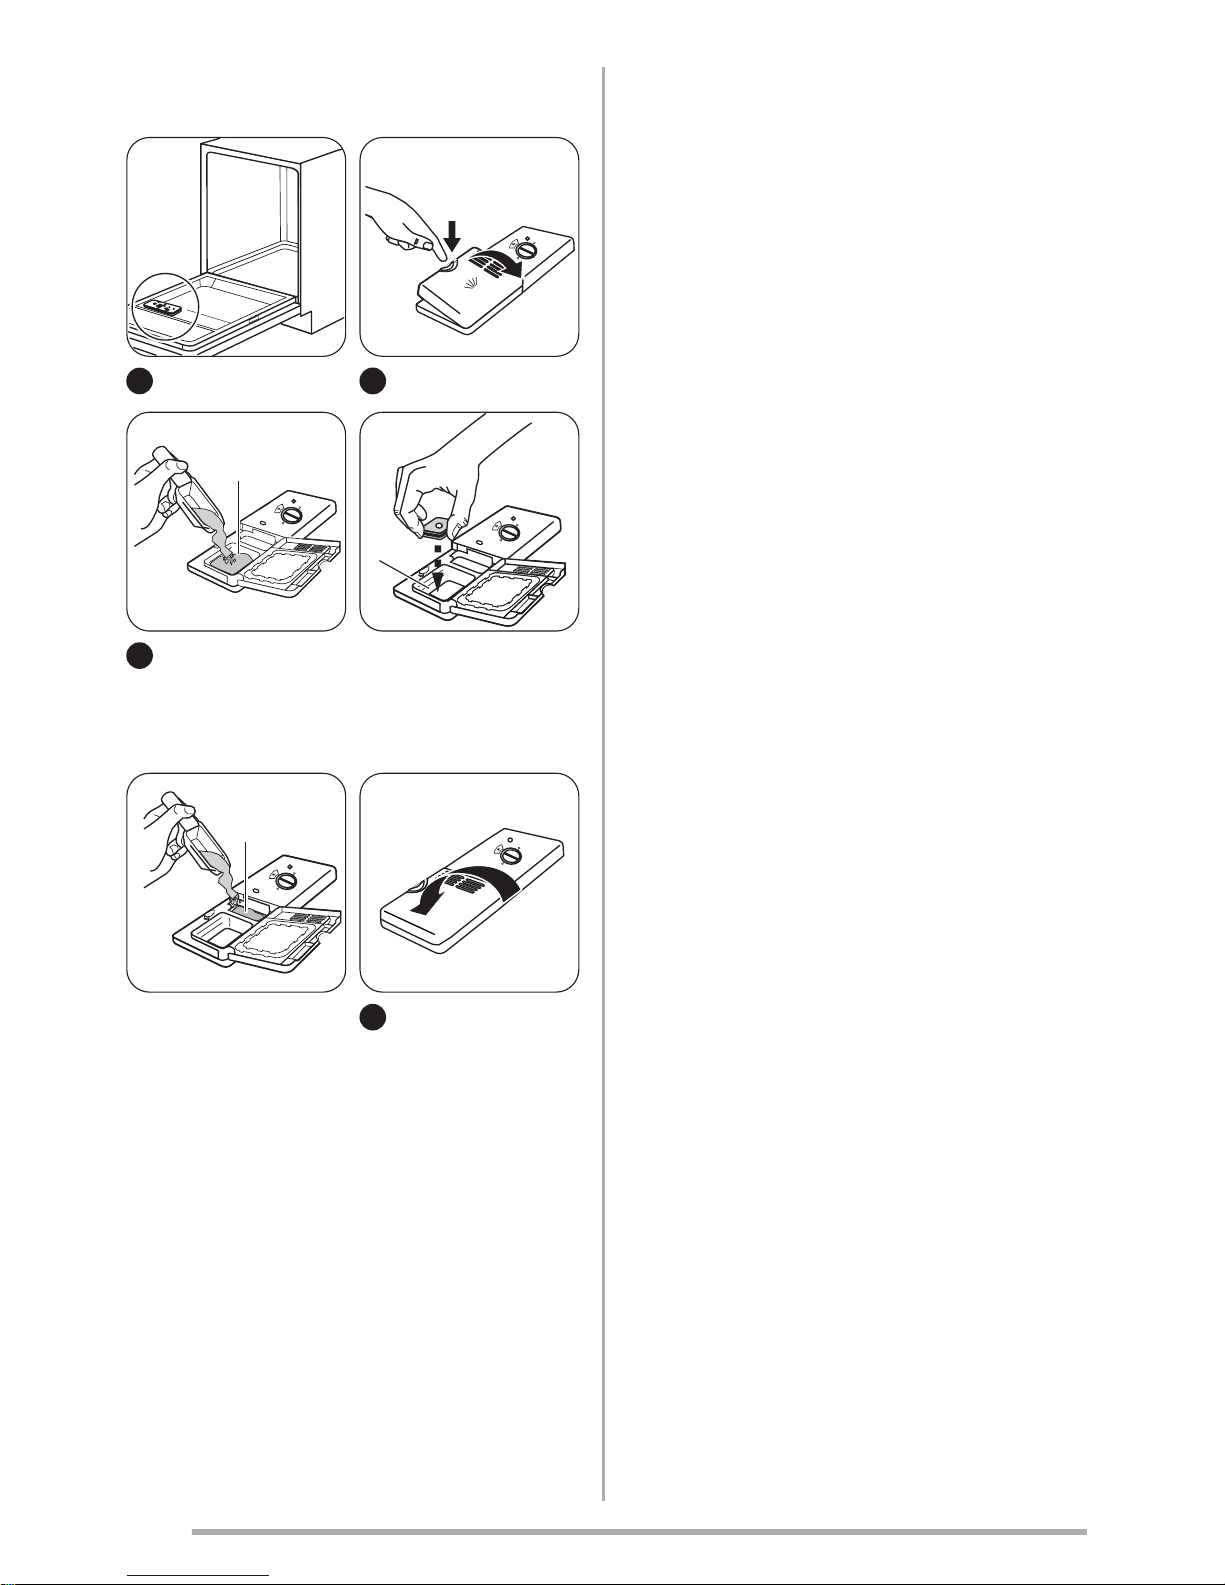
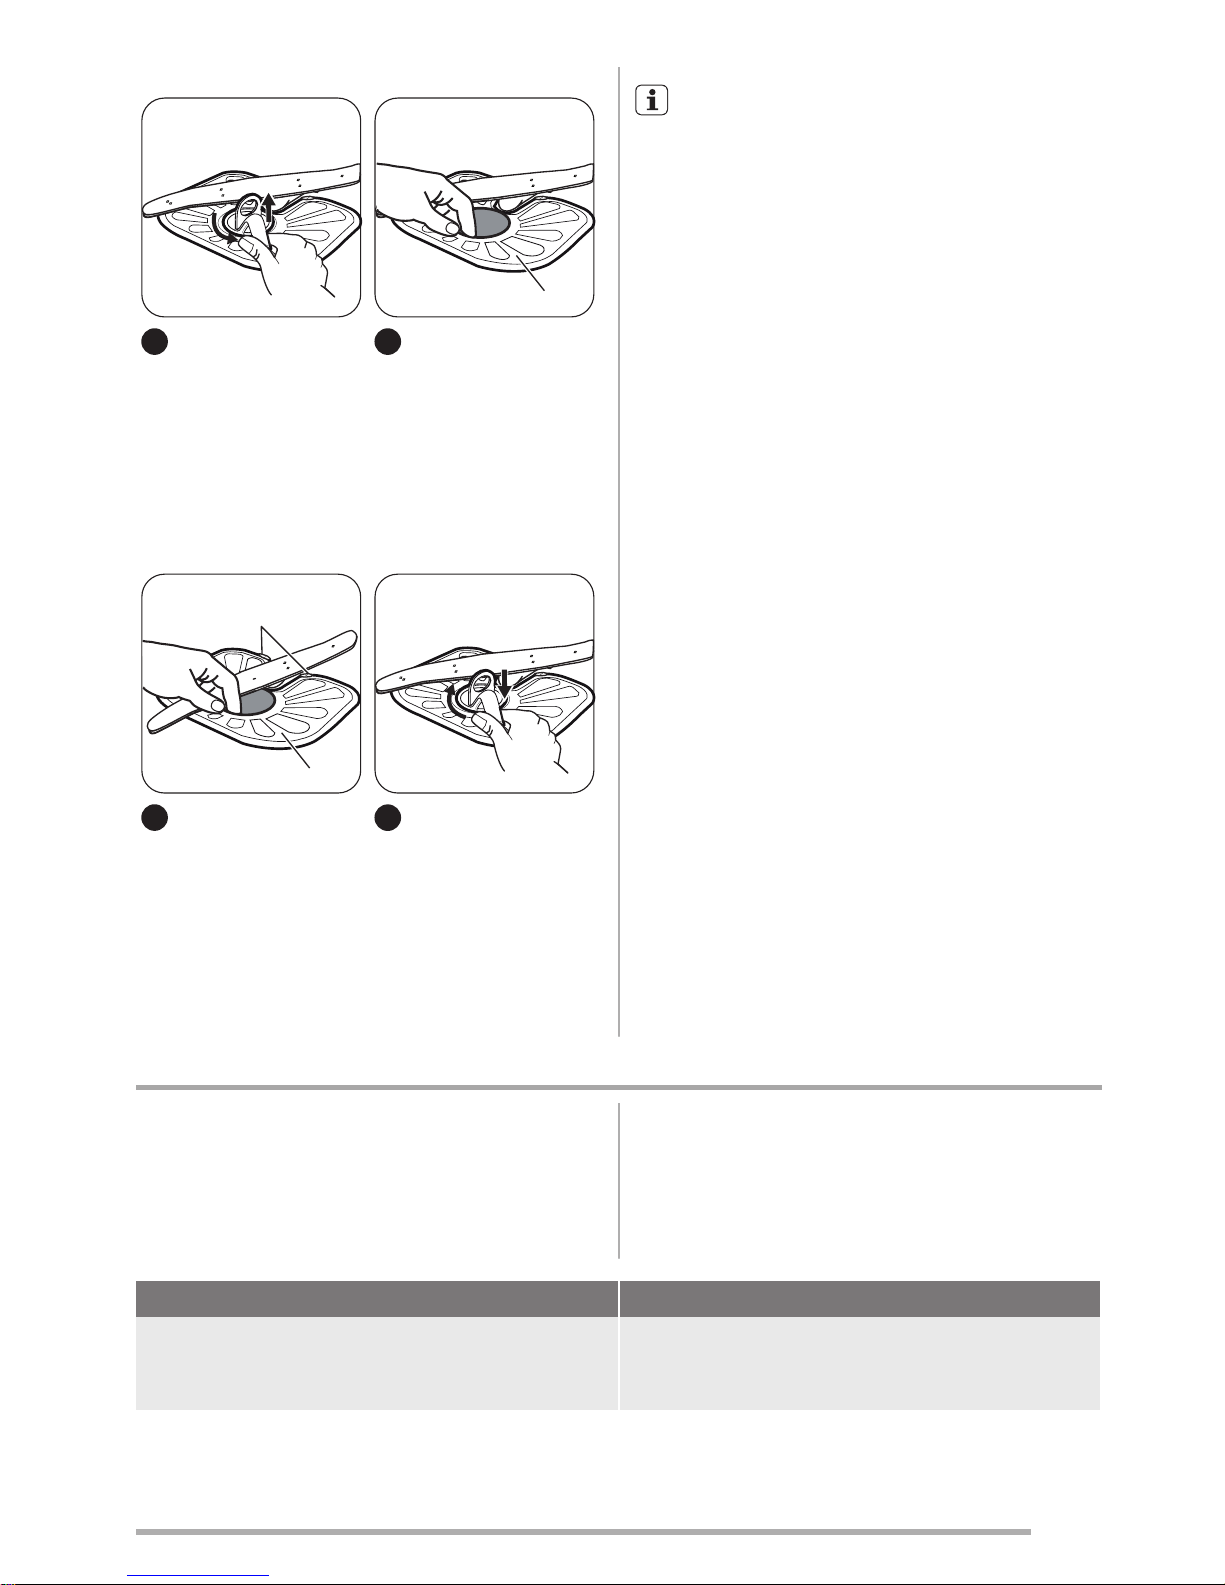
ýi•üenje filtara
1
C
B
A
2
10
www.zanussi.com
www.preciz.hu

3
Za skidanje filtara
(B) i (C), okrenite
ruþicu u smjeru suprotnom od smjera
kazaljke na satu i
skinite. Odvojeno izvucite filtar (B) i (C).
Operite filtre vodom.
A
4
Skinite filtar (A).
Operite filtar vodom.
D
A
5
Postavite filtar (A) u
poþetni polo!aj.
Provjerite je li pravilno spojen pod
dvije vodilice (D).
6
Spojite filtre (B) i
(C). Stavite ih u
polo!aj u filtru (A) .
Okrenite ruþicu u
smjeru kazaljki na
satu dok se ne
zakljuþa.
Neispravan polo!aj filtara mo!e uz-
rokovati slabe rezultate pranja i ošte-
üenje ureÿaja.
ýišüenje mlaznica
Ne uklanjajte mlaznice.
Ako se otvori u mlaznicama zaþepe, uklonite
ostatke zaprljanja tankim oštrim predmetom.
Vanjsko þišüenje
Obrišite ureÿaj vlažnom mekom krpom.
Koristite samo neutralna sredstva za þišüenje. Nikada ne koristite abrazivna sredstva, jastuþiüe za ribanje ili otapala.
Unutrašnje þišüenje
Ako redovito upotrebljavate program kratkog
trajanja, može doüi do taloženja masnoüa i
kamenca unutar ureÿaja.
Kako bi se to sprijeþilo, preporuþujemo da
najmanje 2 puta mjeseþno pokrenete program s dugim trajanjem.
Rješavanje problema
Ureÿaj se ne pokreüe ili se zaustavlja
tijekom rada.
Prije nego što kontaktirate servis pogledajte
sljedeüe informacije kako biste našli rješenje
problema.
Kod nekih problema, neki indikatori istovremeno stalno ili isprekidano trepere
kako bi pokazali kod alarma.
Kod alarma Problem
# Indikator postavljenog programa stalno treperi.
# Indikator kraja programa povremeno 1 put za-
treperi.
Ureÿaj se ne puni vodom.
11
www.zanussi.com
www.preciz.hu
Kod alarma Problem
• Indikator postavljenog programa stalno treperi.
• Indikator kraja programa povremeno zatreperi 2
puta.
Ureÿaj ne izbacuje vodu.
• Indikator postavljenog programa stalno treperi.
• Indikator kraja programa povremeno zatreperi 3
puta.
Ukljuþen je ureÿaj za za!titu od poplave.
Upozorenje Prije kontrole iskljuþite
ureÿaj.
Problem Moguüe rje!enje
Ne mo"ete ukljuþiti ureÿaj. Provjerite je li kabel glavnog napajanja ukljuþen u utiþni-
cu.
Provjerite da u kutiji s osiguraþima nema o!teüenog osi-
guraþa.
Program ne zapoþinje s radom. Provjerite jesu li vrata ureÿaja zatvorena.
Ako je postavljena odgoda poþetka, poni!tite postavku ili
priþekajte zavr!etak odbrojavanja.
Ureÿaj se ne puni vodom. Provjerite je li slavina otvorena.
Provjerite da tlak dovoda vode nije prenizak. Ovu in-
formaciju potra"ite kod lokalnog distributera vode.
Provjerite da slavina nije zaþepljena.
Provjerite da filtar u dovodnom crijevu nije zaþepljen.
Provjerite da dovodno crijevo nije prignjeþeno ili savijeno.
Ureÿaj ne izbacuje vodu. Provjerite da sifon nije zaþepljen.
Provjerite da odvodno crijevo nije prignjeþeno ili savijeno.
Ukljuþen je ureÿaj za za!titu od poplave. Zatvorite slavinu i kontaktirajte servis.
Nakon zavr!etka provjera, ukljuþite ureÿaj.
Program se nastavlja iz toþke u kojoj je
prekinut.
Ako se problem i dalje javlja, kontaktirajte
servis.
Ako se pojavi neki drugi kod alarma, kontaktirajte servis.
Ako rezultati pranja i su!enja nisu
zadovoljavajuüi
Bijele crte i mrlje ili plaviþasti slojevi na
þa!ama i posuÿu.
• Ispu!tena koliþina sredstva za ispiranje je
prevelika. Postavite biraþ sredstva za ispiranje u ni"i polo"aj.
• Koliþina deterd"enta bila je prevelika.
Osu!ene kapljice vode ostaju na þa!ama
i posuÿu
• Ispu!tena koliþina sredstva za ispiranje
nije dovoljna. Postavite biraþ sredstva za
ispiranje u vi!i polo"aj.
• Uzrok mo"e biti kvaliteta deterd"enta.
Posuÿe je mokro
• Program nema fazu su!enja ili ima fazu
su!enja na niskoj temperaturi.
• Spremnik sredstva za ispiranje je prazan.
• Uzrok mo"e biti kvaliteta sredstva za ispiranje.
Ostale moguüe uzroke potra"ite u
poglavlju ‘SAVJETI I PREPORUKE’.
12
www.zanussi.com
www.preciz.hu
Tehniþki podaci
Dimenzije irina!/!Visina!/!Dubina!(mm) 596!/!818!-!898!/!575
Spajanje!na!elektriþnu!mre"u Pogledajte!natpisnu!ploþicu.
! Napon 220-240!V
! Frekvencija 50!Hz
Tlak!dovoda!vode Min.!/!maks.!(bar!/!MPa) (0.5!/!0.05!)!/!(8!/!0.8!)
Dovod!vode!
1)
Hladna!ili!topla!voda
2)
maks.!60!°C
Kapacitet Broj!kompleta!posuÿa 12
Potro#nja!energije Ukljuþen 0.99!W
Iskljuþen 0.10!W
1) Crijevo za dovod vode spojite na slavinu s navojem 3/4".
2) Ako topla voda dolazi iz alternativnih izvora energije (npr., solarni paneli, energija vjetra), upotrijebite
toplu vodu kako biste smanjili potro!nju energije.
Briga za okoli!
Reciklirajte materijale sa simbolom .
Ambala#u za recikliranje odlo#ite u prikladne
spremnike.
Pomozite u za!titi okoli!a i ljudskog zdravlja,
kao i u recikliranju otpada od elektriþnih i
elektroniþkih ureÿaja. Ureÿaje oznaþene
simbolom ne bacajte zajedno s kuünim
otpadom. Proizvod odnesite na lokalno
recikla#no mjesto ili kontaktiraje nadle#nu
slu#bu.
$ Ispravno odlo#ite ambala#u. Reciklirajte
materijale koji na sebi imaju oznaku
.
13
www.zanussi.com
www.preciz.hu
Contents
Safety instructions _ _ _ _ _ _ _ _ _ _ _ _ _ 14
Product description _ _ _ _ _ _ _ _ _ _ _ _ 16
Control panel _ _ _ _ _ _ _ _ _ _ _ _ _ _ _ _ 16
Programmes _ _ _ _ _ _ _ _ _ _ _ _ _ _ _ _ 17
Before first use _ _ _ _ _ _ _ _ _ _ _ _ _ _ _ 17
Daily use _ _ _ _ _ _ _ _ _ _ _ _ _ _ _ _ _ _ 19
Hints and tips _ _ _ _ _ _ _ _ _ _ _ _ _ _ _ 21
Care and cleaning _ _ _ _ _ _ _ _ _ _ _ _ _ 22
Troubleshooting _ _ _ _ _ _ _ _ _ _ _ _ _ _ 23
Technical information _ _ _ _ _ _ _ _ _ _ _ 25
Environment concerns _ _ _ _ _ _ _ _ _ _ _ 25
Subject to change without notice.
Safety instructions
Before the installation and use of the appliance, carefully read the supplied instructions.
The manufacturer is not responsible if an incorrect installation and use causes injuries and
damages. Always keep the instructions with
the appliance for future reference.
Children and vulnerable people safety
Warning! Risk of suffocation, injury or
permanent disability.
• Do not let persons, children included, with
reduced physical sensory, reduced mental
functions or lack of experience and knowledge use the appliance. They must have supervision or instruction for the operation of
the appliance by a person who is responsible for their safety.
• Do not let children play with the appliance.
• Keep all packaging away from children.
• Keep all detergents away from children.
• Keep children and pets away from the appliance door when it is open.
Installation
• Remove all the packaging.
• Do not install or use a damaged appliance.
• Do not install or use the appliance where
the temperature is less than 0 °C.
• Obey the installation instruction supplied
with the appliance.
• Make sure that the appliance is installed below and adjacent to safe structures.
Electrical connection
Warning! Risk of fire and electrical
shock.
• The appliance must be earthed.
• Make sure that the electrical information on
the rating plate agrees with the power supply. If not, contact an electrician.
• Always use a correctly installed shockproof
socket.
• Do not use multi-plug adapters and extension cables.
• Make sure not to cause damage to the
mains plug and to the mains cable. Should
the appliance power supply cable need to
be replaced, this must be carried out by our
Service Centre.
• Connect the mains plug to the mains socket
only at the end of the installation. Make sure
that there is access to the mains plug after
the installation.
• Do not pull the mains cable to disconnect
the appliance. Always pull the mains plug.
• Do not touch the mains cable or the mains
plug with wet hands.
• This appliance complies with the E.E.C. Directives.
Water connection
• Make sure not to cause damage to the water hoses.
• Before you connect the appliance to new
pipes or pipes not used for a long time, let
the water flow until it is clean.
14
www.zanussi.com
www.preciz.hu
• The first time you use the appliance, make
sure that there is no leakage.
• The water inlet hose has a safety valve and
a sheath with an inner mains cable.
Warning! Dangerous voltage.
• If the water inlet hose is damaged, immediately disconnect the mains plug from the
mains socket. Contact Service to replace
the water inlet hose.
Use
• This appliance is intended to be used in
household and similar applications such as:
– Staff kitchen areas in shops, offices and
other working environments
– Farm houses
– By clients in hotels, motels and other resi-
dential type environments
– Bed and breakfast type environments.
Warning! Risk of injury, burns, electrical
shock or fire.
• Do not change the specification of this appliance.
• Put knives and cutlery with sharp points in
the cutlery basket with the points down or in
a horizontal position.
• Do not keep the appliance door open without supervision to prevent to fall on it.
• Do not sit or stand on the open door.
• Dishwasher detergents are dangerous.
Obey the safety instructions on the detergent packaging.
• Do not drink and play with the water in the
appliance.
• Do not remove the dishes from the appliance until the programme is completed.
There can be detergent on the dishes.
• The appliance can release hot steam if you
open the door while a programme operates.
• Do not put flammable products or items that
are wet with flammable products in, near or
on the appliance.
• Do not use water spray and steam to clean
the appliance.
Disposal
Warning! Risk of injury or suffocation.
• Disconnect the appliance from the mains
supply.
• Cut off the mains cable and discard it.
• Remove the door catch to prevent children
and pets to get closed in the appliance.
Service
• Contact the Service to repair the appliance.
We recommend only the use of original
spare parts.
• When you contact the Service, ensure that
you have the following information that is
available on the rating plate.
Model :
PNC :
Serial Number :
15
www.zanussi.com
www.preciz.hu
Product description
2
1
2
3
4
9
8
6
7
5
1
Lower spray arm
2
Filters
3
Rating plate
4
Rinse aid dispenser
5
Detergent dispenser
6
Salt container
7
Water hardness dial
8
Upper spray arm
9
Upper basket
Control panel
A B C
1 2 3
456
1
Programme buttons
2
Indicators
3
On/off indicator
4
On/off button
5
Delay button
6
Function buttons
Indicators Description
Washing phase indicator.
Drying phase indicator.
End indicator.
Salt indicator. This indicator is off while the programme operates.
Rinse aid indicator. This indicator is off while the programme operates.
16
www.zanussi.com
www.preciz.hu
Programmes
Programme
1)
Degree of soil
Type of load
Programme
phases
Duration
(min)
Energy
(kWh)
Water
(l)
2)
Normal soil
Crockery and
cutlery
Prewash
Wash 50 °C
Rinses
Dry
168 1.01 12.4
Heavy soil
Crockery, cutlery, pots and
pans
Prewash
Wash 70 °C
Rinses
Dry
90 - 100 1.7 - 1.9 19 - 21
Normal soil
Crockery and
cutlery
Prewash
Wash 65 °C
Rinses
Dry
100 - 110 1.3 - 1.4 15 - 16
3)
Fresh soil
Crockery and
cutlery
Wash 65 °C
Rinse
30 0.8 8
4)
All Prewash 12 0.1 3
1) The pressure and the temperature of the water, the variations of the mains supply, the options and the
quantity of dishes can change the programme duration and the consumption values.
2) With this programme you have the most efficient use of water and energy consumption for crockery and
cutlery with normal soil. (This is the standard programme for test institutes).
3) With this programme you can wash a load with fresh soil. It gives good washing results in a short time.
4) Use this programme to quickly rinse the dishes. This prevents the remaining food to bond on the dishes
and bad odours to come out from the appliance.
Do not use detergent with this programme.
Information for test institutes
For all the necessary information for test performance. send an email to:
info.test@dishwasher-production.com
Write down the product number (PNC) that is on the rating plate.
Before first use
1. Make sure that the set level of the water
softener agrees with the water hardness in
your area. If not, adjust the water softener.
Contact your local water authority to know
the water hardness in your area.
2. Fill the salt container.
3. Fill the rinse aid dispenser.
4. Open the water tap.
5. Processing residues can stay in the appliance. Start a programme to remove them.
Do not use detergent and do not load the
baskets.
17
www.zanussi.com
www.preciz.hu

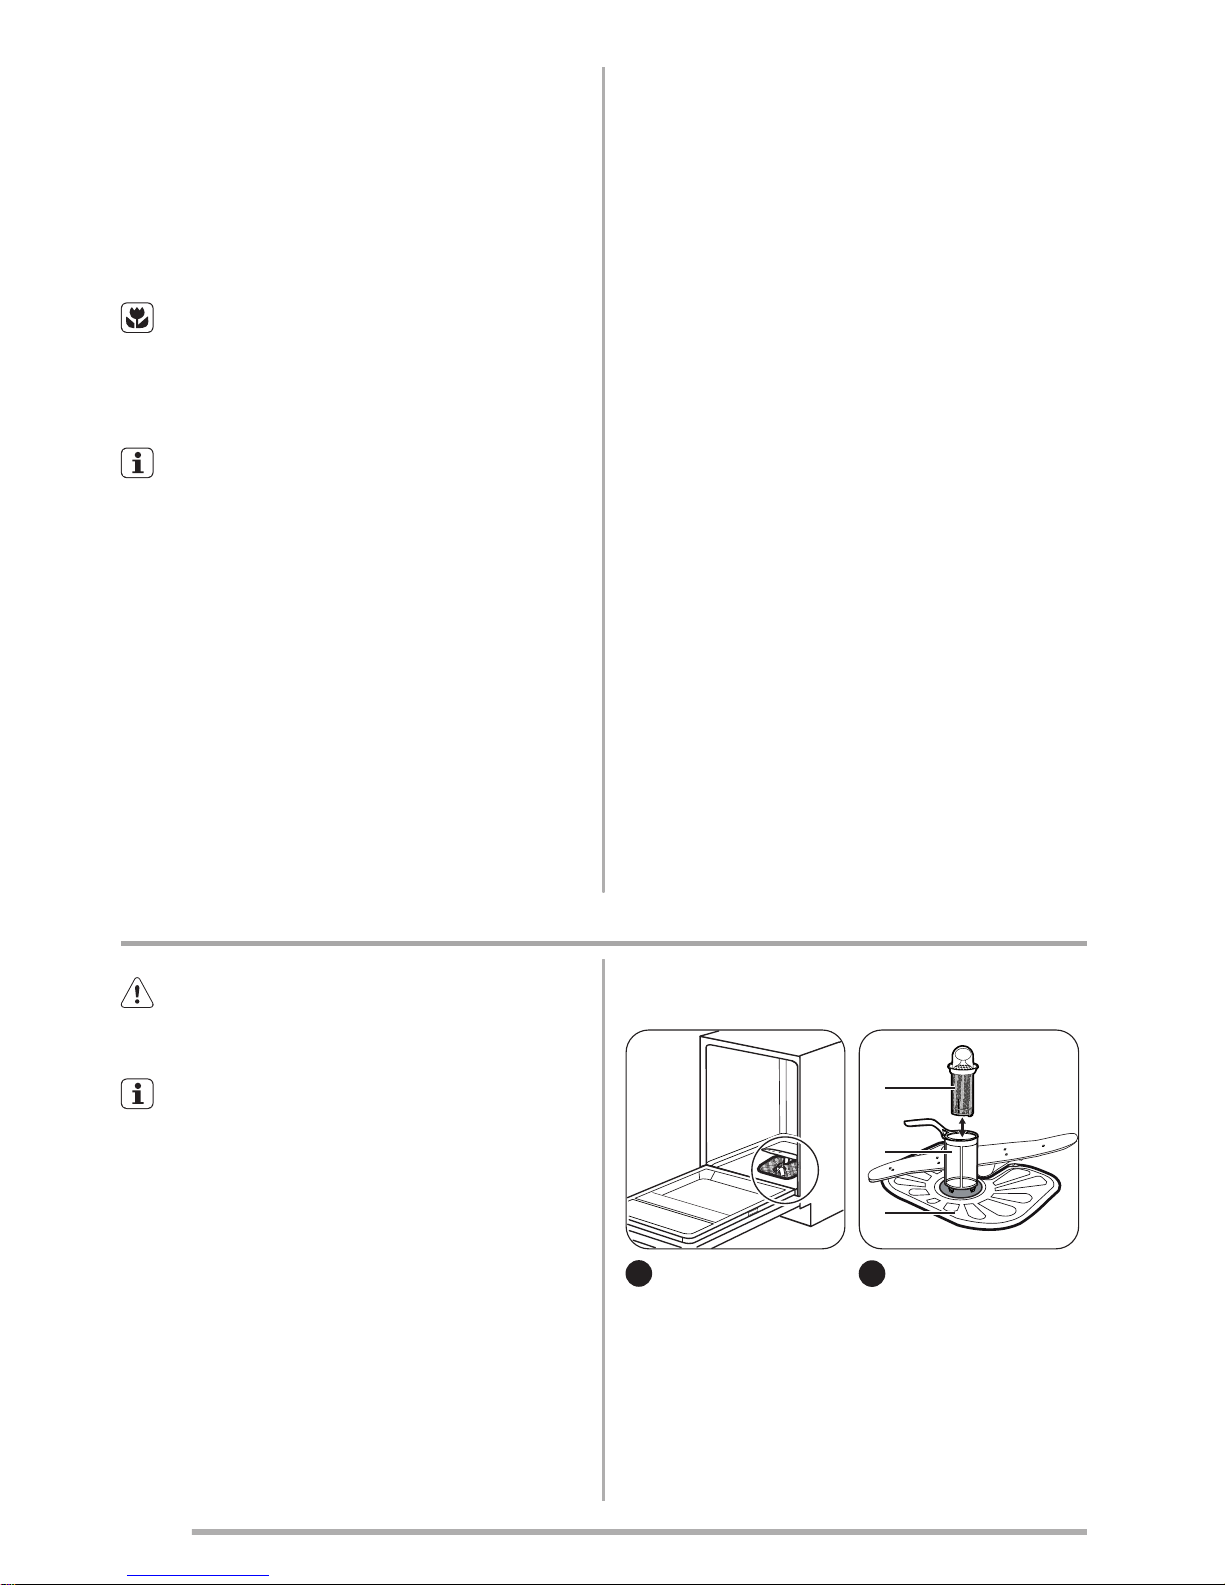
Adjusting the water softener
Water hardness
Water softener
adjustment
German
degrees
(°dH)
French
degrees
(°fH)
mmol/l Clarke
degrees
Level
47 - 50 84 - 90 8.4. - 9.0 58 - 63 10
43 - 46 76 - 83 7.6 - 8.3 53 - 57 9
37 - 42 65 - 75 6.5 - 7.5 46 - 52 8
29 - 36 51 - 64 5.1 - 6.4 36 - 45 7
23 - 28 40 - 50 4.0 - 5.0 28 - 35 6
19 - 22 33 - 39 3.3 - 3.9 23 - 27
5
1)
15 - 18 26 - 32 2.6 - 3.2 18 - 22 4
11 - 14 19 - 25 1.9 - 2.5 13 - 17 3
4 - 10 7 - 18 0.7 - 1.8 5 - 12 2
< 4 < 7 < 0.7 < 5
1
2)
1) Factory position.
2) Do not use salt at this level.
Electronic adjustment
1. Press the on/off button to activate the appliance. The on/off indicator comes on.
Make sure that the appliance is in setting
mode. Refer to ‘SETTING AND STARTING
A PROGRAMME’.
2. Press and hold function buttons (B) and
(C) at the same time until the indicators of
function buttons (A), (B) and (C) flash.
3. Press function button (A).
• The indicators of function buttons (B)
and (C) go off.
• The indicator of function button (A) con-
tinues to flash.
• The end indicator flashes showing the
setting of the water softener.
– The number of flashes of the end indi-
cator shows the level of the water
softener.
Example: 5 flashes + pause + 5 flashes = level 5.
4. Press function button (A) again and again
to change the setting. Each time you press
function button (A) you go to the next level.
5. Deactivate the appliance to confirm.
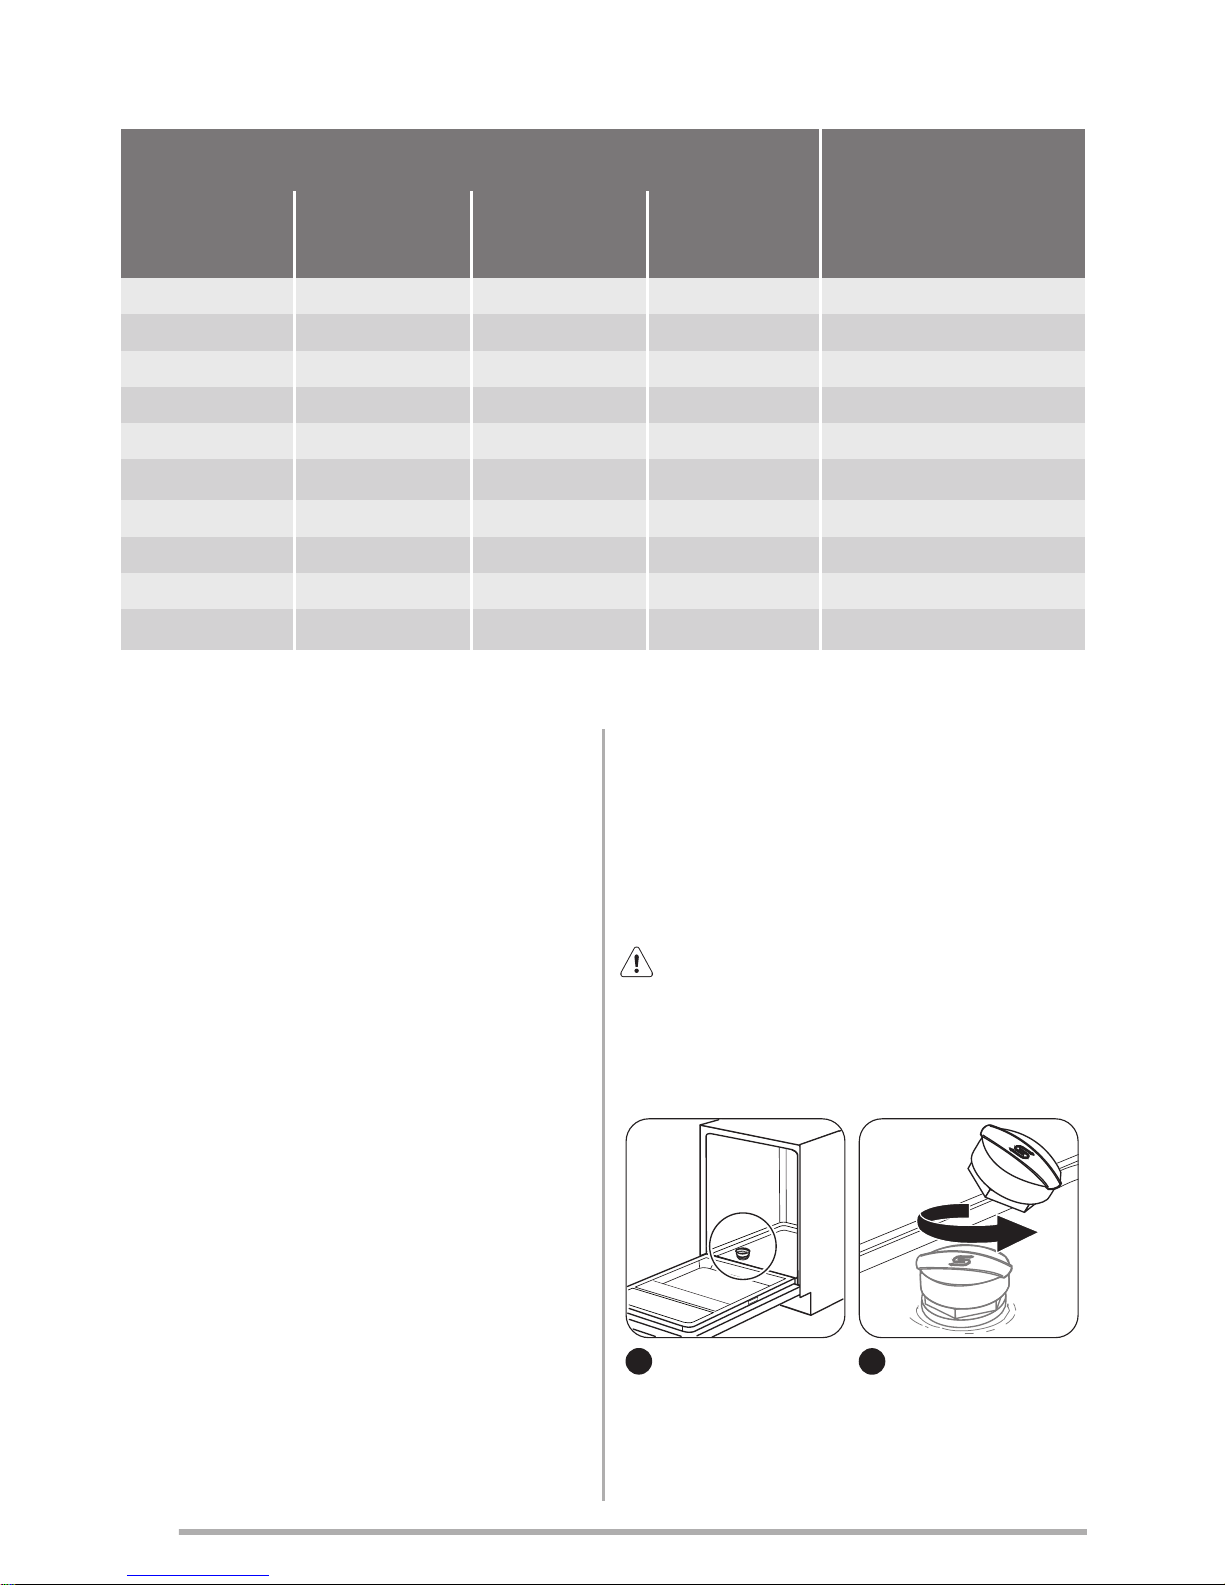
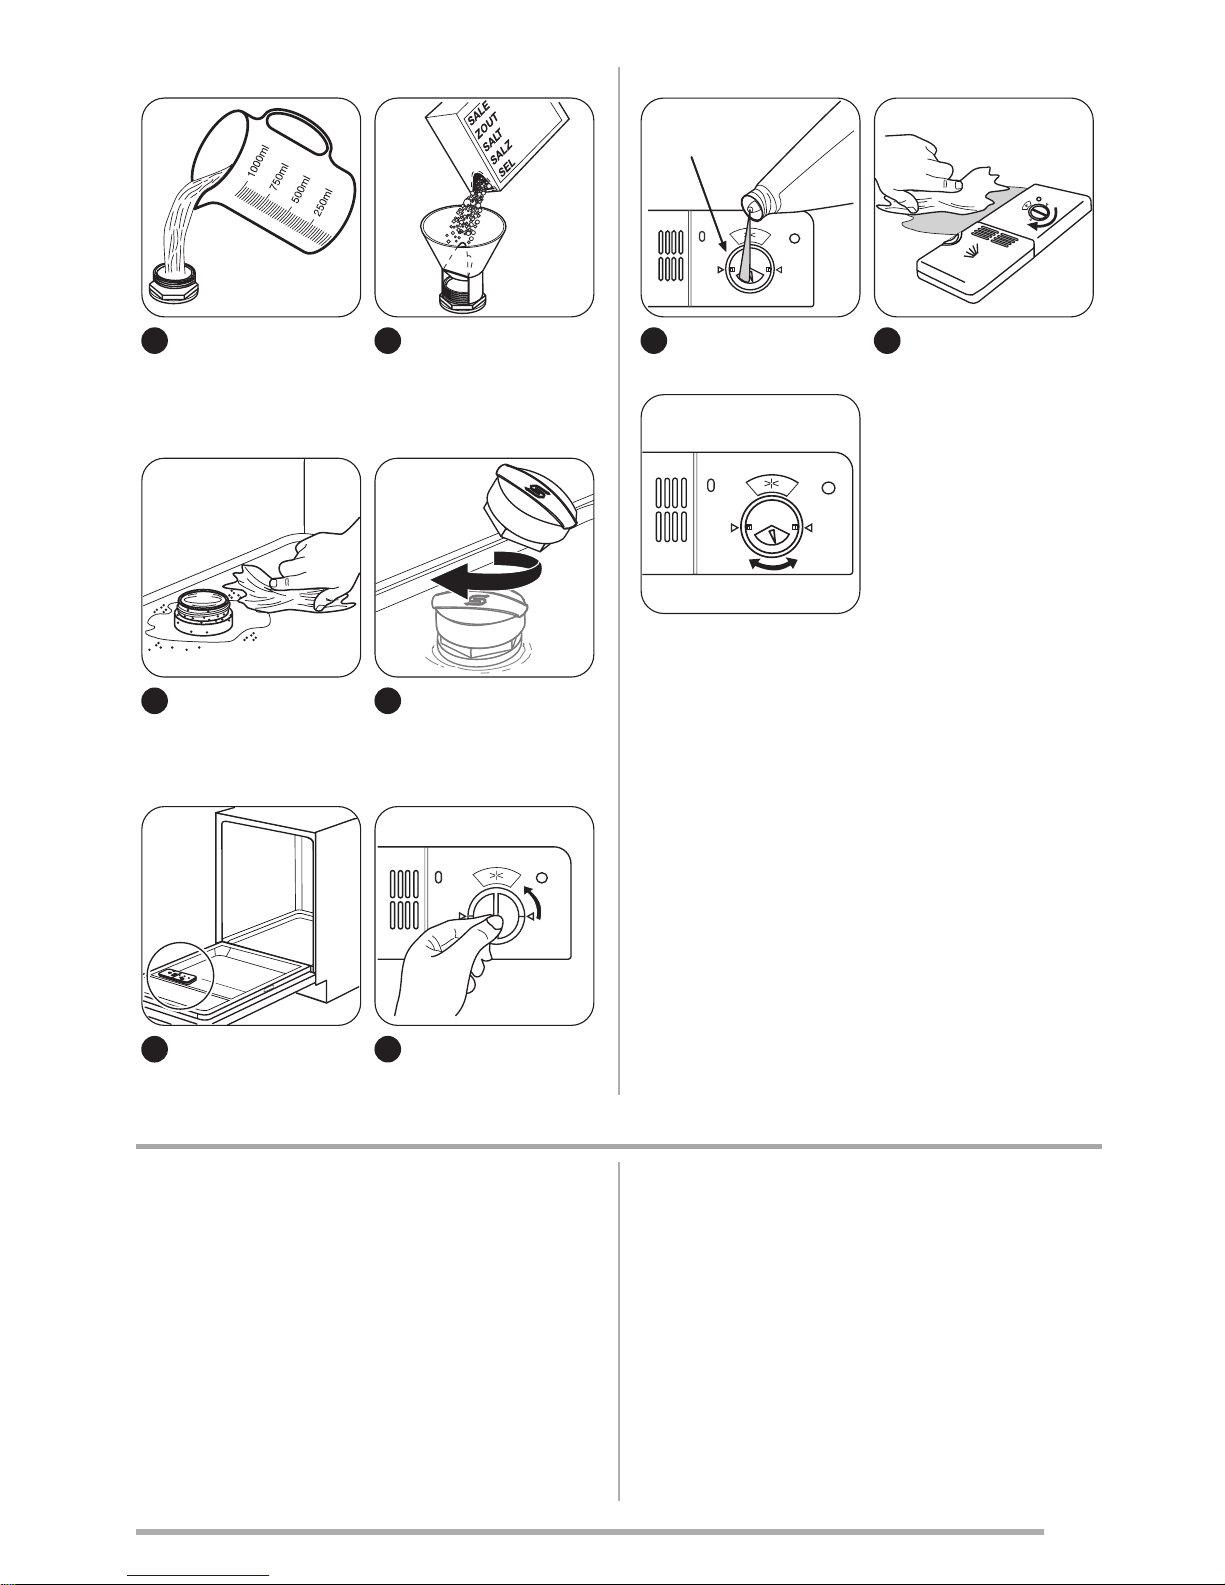
Filling the salt container
Caution! Water and salt can come out
from the salt container when you fill it.
Risk of corrosion. To prevent it, after you fill
the salt container, start a programme.
1
2
18
www.zanussi.com
www.preciz.hu
3
Put 1 litre of water in
the salt container
(only for the first
time).
4
5
6
Filling the rinse aid dispenser
1
2
max
M
A
X
1
2
3
4
+
3 4
M
A
X
1
2
3
4
+
To adjust the released quantity of rinse aid,
turn the selector between position 1 (lowest
quantity) and position 4 (highest quantity).
Daily use
1. Open the water tap.
2. Press the on/off button to activate the appliance. Make sure that the appliance is in
setting mode, refer to “Setting and starting
a programme”.
• If the salt indicator is on, fill the salt con-
tainer.
• If the rinse aid indicator is on, fill the
rinse aid dispenser.
3. Load the baskets.
4. Add the detergent.
5. Set and start the correct programme for
the type of load and the degree of soil.
19
www.zanussi.com
www.preciz.hu
Using the detergent
1
2
A
3
Put the detergent or
the tablet in compartment (A).
A
B
If the programme has
a prewash phase, put
a small quantity of
detergent in compartment (B).
4
Combi detergent tablets
These tablets contain detergent, rinse aid and
other added agents. Be sure that these tablets
are applicable to the water hardness in your
area. Refer to the instructions on the packaging of the products.
When you use tablets, that contain salt and
rinse aid, do not fill the salt container and the
rinse aid dispenser. The rinse aid indicator always comes on if the rinse aid dispenser is
empty.
1. Adjust the water softener to the lowest level.
2. Set the rinse aid dispenser to the lowest
position.
If you stop to use the combi detergent
tablets, before you start to use
separately detergent, rinse aid and
dishwasher salt, do these steps:
1. Press the on/off button to activate the appliance.
2. Set the water softener to the highest level.
3. Make sure that the salt container and the
rinse aid dispenser are full.
4. Start the shortest programme with a rinsing phase, without detergent and without
dishes.
5. Adjust the water softener to the water
hardness in your area.
6. Adjust the released quantity of rinse aid.
Setting and starting a programme
Setting mode
The appliance must be in setting mode to accept some operations.
The appliance is in setting mode when, after
the activation:
• All the programme indicators are on.
If the control panel shows other conditions,
press and hold function buttons (B) and (C) at
the same time until the appliance is in setting
mode.
Starting a programme without delay start
1. Open the water tap.
2. To set a programme, keep the appliance
door ajar.
3. Press the on/off button to activate the appliance. The on/off indicator comes on.
4. Make sure that the appliance is in setting
mode.
5. Press the button of the programme you
want to set.
• The related programme indicator comes
on.
20
www.zanussi.com
www.preciz.hu
• The phase indicators of the set programme come on.
6. Close the appliance door. The programme
starts.
• The indicator of the phase in operation is
on.
Starting a programme with delay start
1. Set the programme.
2. Press the delay button again and again until the indicator of the number of hours you
want to set flashes. You can set 3, 6 or 9
hours.
3. Close the appliance door. The countdown
starts.
• The delay indicator stops flashing.
• The phase indicators of the set pro-
gramme go off.
• When the countdown is completed, the pro-
gramme starts.
– The indicator of the phase in operation
comes on.
– The delay indicator goes off.
You can set a programme and the delay
start also with the appliance door closed.
In this condition, you have only 3 seconds after
each setting before the appliance starts to operate.
Opening the door while the appliance
operates
If you open the door, the appliance stops.
When you close the door, the appliance continues from the point of interruption.
Cancelling the delay start
Press and hold function buttons (B) and (C) at
the same time until the delay indicator goes off
and all the programme indicators come on.
When you cancel a delay start, the appliance goes back to setting mode. You
have to set the programme again.
Cancelling the programme
Press and hold function buttons (B) and (C) at
the same time until all the programme indicators come on.
Make sure that there is detergent in the
detergent dispenser before you start a
new programme.
At the end of the programme
When the programme is completed, the end
indicator comes on.
1. Press the on/off button to deactivate the
appliance. The on/off indicator goes off.
2. Close the water tap.
• Let the dishes become cold before you
remove them from the appliance. Hot
dishes can be easily damaged.
• First remove the items from the lower
basket, then from the upper basket.
• There can be water on the sides and
on the door of the appliance. Stainless
steel becomes cool more quickly than
the dishes.
Hints and tips
The water softener
Hard water contains a high quantity of minerals that can cause damage to the appliance
and bad washing results. The water softener
neutralises these minerals.
The dishwasher salt keeps the water softener
clean and in good conditions. It is important to
set the right level of the water softener. This
makes sure that the water softener uses the
correct quantity of dishwasher salt and water.
Using salt, rinse aid and detergent
• Only use salt, rinse aid and detergent for
dishwasher. Other products can cause
damage to the appliance.
• The rinse aid helps, during the last rinsing
phase, to dry the dishes without streaks and
stains.
• Combi detergent tablets contain detergent,
rinse aid and other added agents. Be sure
that these tablets are applicable to the wa-
21
www.zanussi.com
www.preciz.hu
ter hardness in your area. Refer to the instructions on the packaging of the products.
• Detergent tablets do not fully dissolve with
short programmes. To prevent detergent
residues on the tableware, we recommend
that you use the tablets with long programmes.
Do not use more than the correct quantity
of detergent. Refer to the instructions on
the detergent packaging.
Loading the baskets
Refer to the supplied leaflet with examples of the load of the baskets.
• Only use the appliance to wash items that
are dishwasher-safe.
• Do not put in the appliance items made of
wood, horn, aluminium, pewter and copper.
• Do not put in the appliance items that can
absorb water (sponges, household cloths).
• Remove remaining food from the items.
• To remove easily remaining burned food,
soak pots and pans in water before you put
them in the appliance.
• Put hollow items (cups, glasses and pans)
with the opening down.
• Make sure that cutlery and dishes do not
bond together. Mix spoons with other cutlery.
• Make sure that glasses do not touch other
glasses.
• Put the small items in the cutlery basket.
• Put the light items in the upper basket.
Make sure that they do not move.
• Make sure that the spray arms can move
freely before you start a programme.
Before starting a programme
Make sure that:
• The filters are clean and correctly installed.
• The spray arms are not clogged.
• The position of the items in the baskets is
correct.
• The programme is applicable for the type of
load and for the degree of soil.
• The correct quantity of detergent is used.
• There is dishwasher salt and rinse aid (unless you use combi detergent tablets).
• The cap of the salt container is tight.
Care and cleaning
Warning! Before maintenance,
deactivate the appliance and disconnect
the mains plug from the mains socket.
Dirty filters and clogged spray arms de-
crease the washing results.
Make a check regularly and, if necessary,
clean them.
Cleaning the filters
1
C
B
A
2
22
www.zanussi.com
www.preciz.hu
3
To remove filters (B)
and (C), turn the handle counterclockwise
and remove. Pull
apart filter (B) and
(C). Wash the filters
with water.
A
4
Remove filter (A).
Wash the filter with
water.
D
A
5
Put filter (A) to its initial position. Make
sure that it assembles correctly under
the two guides (D).
6
Assemble filters (B)
and (C). Put them into position in filter
(A). Turn the handle
clockwise until it
locks.
An incorrect position of the filters can
cause bad washing results and damage
to the appliance.
Cleaning the spray arms
Do not remove the spray arms.
If the holes in the spray arms are clogged, remove remaining parts of soil with a thin pointed object.
External cleaning
Clean the appliance with a moist soft cloth.
Only use neutral detergents. Do not use abrasive products, abrasive cleaning pads or solvents.
Internal cleaning
If you regularly use short duration programmes, these can leave deposits of grease
and limescale inside the appliance.
To prevent this, we recommend to run long
duration programmes at least 2 times per
month.
Troubleshooting
The appliance does not start or it stops during
operation.
Before you contact the Service, refer to the information that follows for a solution to the
problem.
With some problems, different indicators
flash continuously or intermittently at
the same time to show an alarm code.
Alarm code Problem
• The indicator of the set programme flashes continuously.
• The end indicator flashes 1 time intermittently.
The appliance does not fill with water.
23
www.zanussi.com
www.preciz.hu
Alarm code Problem
• The indicator of the set programme flashes continuously.
• The end indicator flashes 2 times intermittently.
The appliance does not drain the water.
• The indicator of the set programme flashes continuously.
• The end indicator flashes 3 times intermittently.
The anti-flood device is on.
Warning! Deactivate the appliance
before you do the checks.
Problem Possible solution
You cannot activate the appliance. Make sure that the mains plug is connected to the mains
socket.
Make sure that there is not a damaged fuse in the fuse box.
The programme does not start. Make sure that the appliance door is closed.
If the delay start is set, cancel the setting or wait for the end
of the countdown.
The appliance does not fill with water. Make sure that the water tap is open.
Make sure that the pressure of the water supply is not too
low. For this information, contact your local water authority.
Make sure that the water tap is not clogged.
Make sure that the filter in the inlet hose is not clogged.
Make sure that the inlet hose has no kinks or bends.
The appliance does not drain the water. Make sure that the sink spigot is not clogged.
Make sure that the drain hose has no kinks or bends.
The anti-flood device is on. Close the water tap and contact the Service.
After the checks are completed, activate the
appliance. The programme continues from the
point of interruption.
If the problem occurs again, contact the Service.
If other alarm codes appear, contact the Service.
If the washing and drying results are not
satisfactory
Whitish streaks or bluish layers on
glasses and dishes
• The released quantity of rinse aid is too
much. Adjust the rinse aid selector to a lower position.
• The quantity of detergent is too much.
Stains and dry water drops on glasses
and dishes
• The released quantity of rinse aid is not sufficient. Adjust the rinse aid selector to a
higher position.
• The quality of the detergent can be the
cause.
Dishes are wet
• The programme is without a drying phase or
with a low temperature drying phase.
• The rinse aid dispenser is empty.
• The quality of the rinse aid can be the
cause.
Refer to ‘HINTS AND TIPS’ for other possible causes.
24
www.zanussi.com
www.preciz.hu
 Loading...