

Zanussi ZDC 5465 User Manual

822 61 10-22

- 2 -
Contents
For the user
Safety Information 3
Description of the appliance 4-5
- Spray arm
- Coarse filter/microfilter
- Fine filter
- Detergent dispenser
- Rinse aid dispenser
- Water softener
The control panel 6
Adjusting the water softener 7
- Switching the rinse aid dispenser off
Programme chart 8
Using the appliance 9
- Starting the programme
- Stopping the programme temporarily
- Cancelling the programme
- Pause function
- Cancelling the drying phase
- Switching the dishwasher off
Loading and unloading 10
Maintenance and cleaning 11
Something Not Working 12
Service 13
- Service and Spare Parts
- Customer Care Department
Information for test centres 13
Guarantee Conditions 14
For the Installer
Technical Specifications 15
Unpacking 16
- Damages
- Use
Installation 17-23
- Position
- Measurements for fitting a wooden door
- Preparing the outer door
- Mounting plate
- Fitting the outer door
- Fitting protective and cap strips
- Mounting the dishwasher
- Water inlet
- Water drainage
- Power supply
Guide to use the instruction book
The following symbols will be found in the text to guide you throughout the instructions:
Safety information
Step by step instructions
Hints and tips
Environmental information

Before installing and first using the dishwasher, read this instruction booklet carefully, including its
hints and warnings. To avoid unnecessary mistakes and accidents, it is important to ensure that all
people using the dishwasher are thoroughly familiar with its operation and safety features.
Save these instructions and make sure they remain with the dishwasher if it is moved or sold, so
that everyone using it through its life can be properly informed on appliance use and safety.
Installation and servicing
● All installation and service work done on the product
must be carried out by a qualified technician. Work
performed by persons with inadequate knowledge may
adversely affect the satisfactory functioning of the
product and may cause personal injury or damage.
Before any work is carried out on the dishwasher, it
must be isolated from the electrical supply. To do this
the power plug must be removed from the wall socket.
● Water connection shall be made via an easily accessible
stopcock.
● The power cable must be plugged into an earthed
socket, which must to be easily accessible. Permanent
installation must only be carried out by an authorized
electrician.
● If the power cable is damaged, it must be replaced
by a special cable or assembly available from the
manufacturer or its service agent.
● Make sure that the power cable is not nipped or other-
wise damaged and that the hoses do not get crushed
or kinked when moving the dishwasher in connection
with installation or cleaning etc.
● Servicing and possible repairs must be carried out by
a service company authorized by the supplier. Use only
spare parts supplied by these. Never try to repair the
dishwasher yourself.
Child Safety
● The dishwasher should be used by adults only. Do not
let children play with the controls or other parts of it.
● Remember that the plastic bags included in the
packaging can be fatal playthings for small children.
● Keep all detergents in safe place out of children´s
reach.
● Prevent children from sitting, swinging or standing
on the open door.
During Use
● This dishwasher is designed solely for washing house-
hold utensils suitable for machine washing. Using it for
other purposes could lead to physical injury or damage
to property and invalidate the guarantee.
● Avoid opening the door while the dishwasher is running,
as hot steam may escape.
● Only use detergent specifically designed for use in
dishwashers.
● Do not place sharp knives with their points upwards.
It is much safer to lay them horizontally in the basket.
● If you take any dishes out of the dishwasher before the
end of the dishwashing cycle, it is extremely important
to rinse them thoroughly under running water to remove
any remaining detergent.
● The water safety system protects against water damages.
The following requirements must be fulfilled:
- The dishwasher must be electrically connected when
it is switched off.
- The dishwasher must be correctly installed.
- Always shut off the water supply whenever the dishwasher is left unattended for an extended period.
● In the event of flooding or leakage, switch off the water
supply immediately by closing the stopcock and disconnect the power supply by unplugging the power cable
or removing the fuse. When removing the electrical
plug, grip the plug, not the cable.
Disposal
- packaging:
All materials used in packaging this appliance are
environmentally-friendly. The various plastics used are
identified and can be recycled:
● PE stands for polyethylene, which is used for the
bag around the appliance and the bag in which these
instructions were supplied.
● PS stands for polystyrene (moulded), which is used
for the sections of packaging needed to cushion the
appliance.
The cardboard components of the packaging are made
from recyclable paper and should be taken to a collection
point for recycling.
The appliance contains plastic and rubber components.
These have identifying marks to show what they are
made from, so they can be recycled or disposed of
properly at the end of the appliance's life cycle.
The materials are identified according to international
standards.
- old appliances:
At the end of the appliance's useful life, disconnect the
electrical plug from the power supply, then cut the electrical
cable at the point where it enters the appliance. Make
quite sure that children will not be able to play with it.
Safety information
- 3 -
822 61 10-22
Description of the appliance
- 4 -
4 5
- 5 -
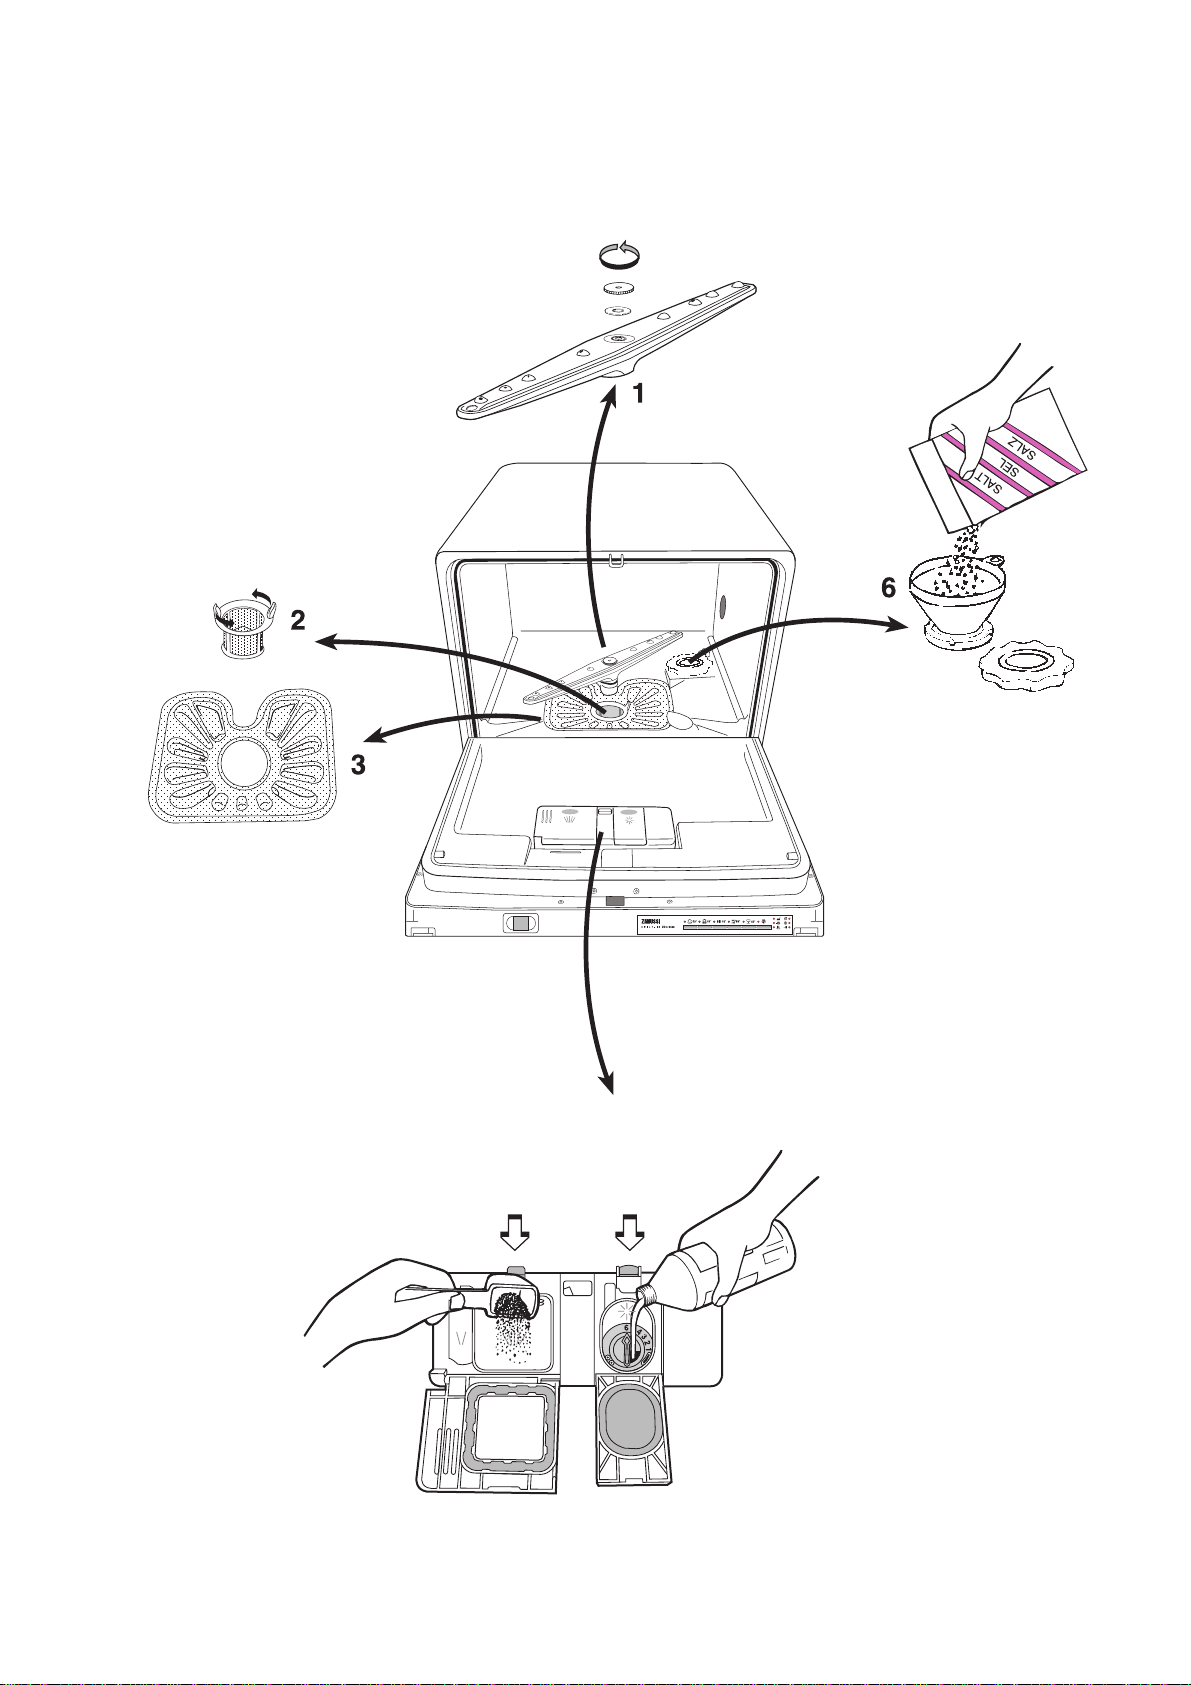
Spray arm (1)
It is important to keep all the holes in the spray arm clear.
A clogged hole can seriously affect washing efficiency.
If the spray arm needs cleaning, unscrew the nut anticlockwise, remove the washer and lift off the spray arm.
Clear the holes and shake out any food remnants.
Coarse filter/microfilter (2)
The purpose of the coarse filter is to catch large objects
such as toothpicks and pieces of eggshell. Make sure
that the filter is always clean. Turn the coarse filter anticlockwise. Lift it out and rinse it under running water
whenever necessary.
Fine filter (3)
It is just as important to keep this filter clean. A dirty or
clogged filter will always impair washing efficiency.
The fine filter can easily be lifted out for cleaning when
you have removed the coarse filter.
Detergent dispenser (4)
Open the lid to the dispenser by pressing the lid catch
towards the compartment. Consult the instructions on the
detergent packet, fill the compartment accordingly and
close the lid. Remember that the instructions usually refer
to full-size dishwashers, for example when using detergent
tablets, it is sufficient to use just half a tablet. Pre-wash
detergent is poured into the smaller compartment to the
left when needed. This detergent is used during the prerinsing. Make sure that nothing prevents the lid from
opening.
Only use detergents specially designed for dishwashers.
Rinse aid dispenser (5)
Use of rinse aid will result in cleaner and faster drying of
the load, since it helps water and residues to run off.
Too much rinse aid may result in streakiness, too little
may cause white spots. The dispenser holds about 150 ml.
This is enough for approx. 60 wash cycles, depending
on the dosage setting. Adjust the dosage setting according
to the hardness of the water.
You can set the dosage between 1 - 6, the appliance is factory set to 1.
Begin at the lowest dosage setting and increase
if necessary by turning the setting arrow with e.g.
the handle of a spoon.
The indicator light on the control panel is lit when the
dispenser requires refilling.
1. Open the lid to the dispenser by pressing the lid
catch towards the compartment and lift the lid.
2. Fill up with rinse aid; do not overfill.
3. Wipe off any spillage carefully to prevent excessive
foaming during the next wash programme.
4. Close the lid and press until it locks again.
Do not fill the rinse aid dispenser with liquid
detergent.
Zanussi recommends the use of Finish dishwasher detergent and Rinse Aid.
Water softener (6)
This dishwasher is equipped with a water softener for hard
water. The lime in hard water causes white deposits to
occur on dishes and to the interior of the dishwasher.
To prevent this, the water has to pass through a special
container where the hardness is removed.
Since the water softener uses dishwasher salt, you will
have to refill the salt container after a certain number of
dishwasher cycles.
It is extremely important, that the salt container
is filled up with the dishwasher salt before using
the dishwasher for the first time.
The indicator light on the control panel is lit when the
container requires refilling.
1. Unscrew the filler cap to the salt container anticlockwise.
2. Fill the salt container with water (only the first
time).
3. Fill the container with dishwasher salt, using the
funnel supplied.
4. Remove the funnel and wipe off any spillage
around the filler opening.
5. Screw the filler cap back properly in place.
The water softener is now ready for the first load of dishes.
Always make sure that there is dishwasher salt in the
container, which holds about 1 litre.
How to adjust the water softener, see chapter ”Adjusting
the water softener”.
Only use special salt for dishwashing machines,
ordinary domestic salt, especially table salt, can
damage the water softener.
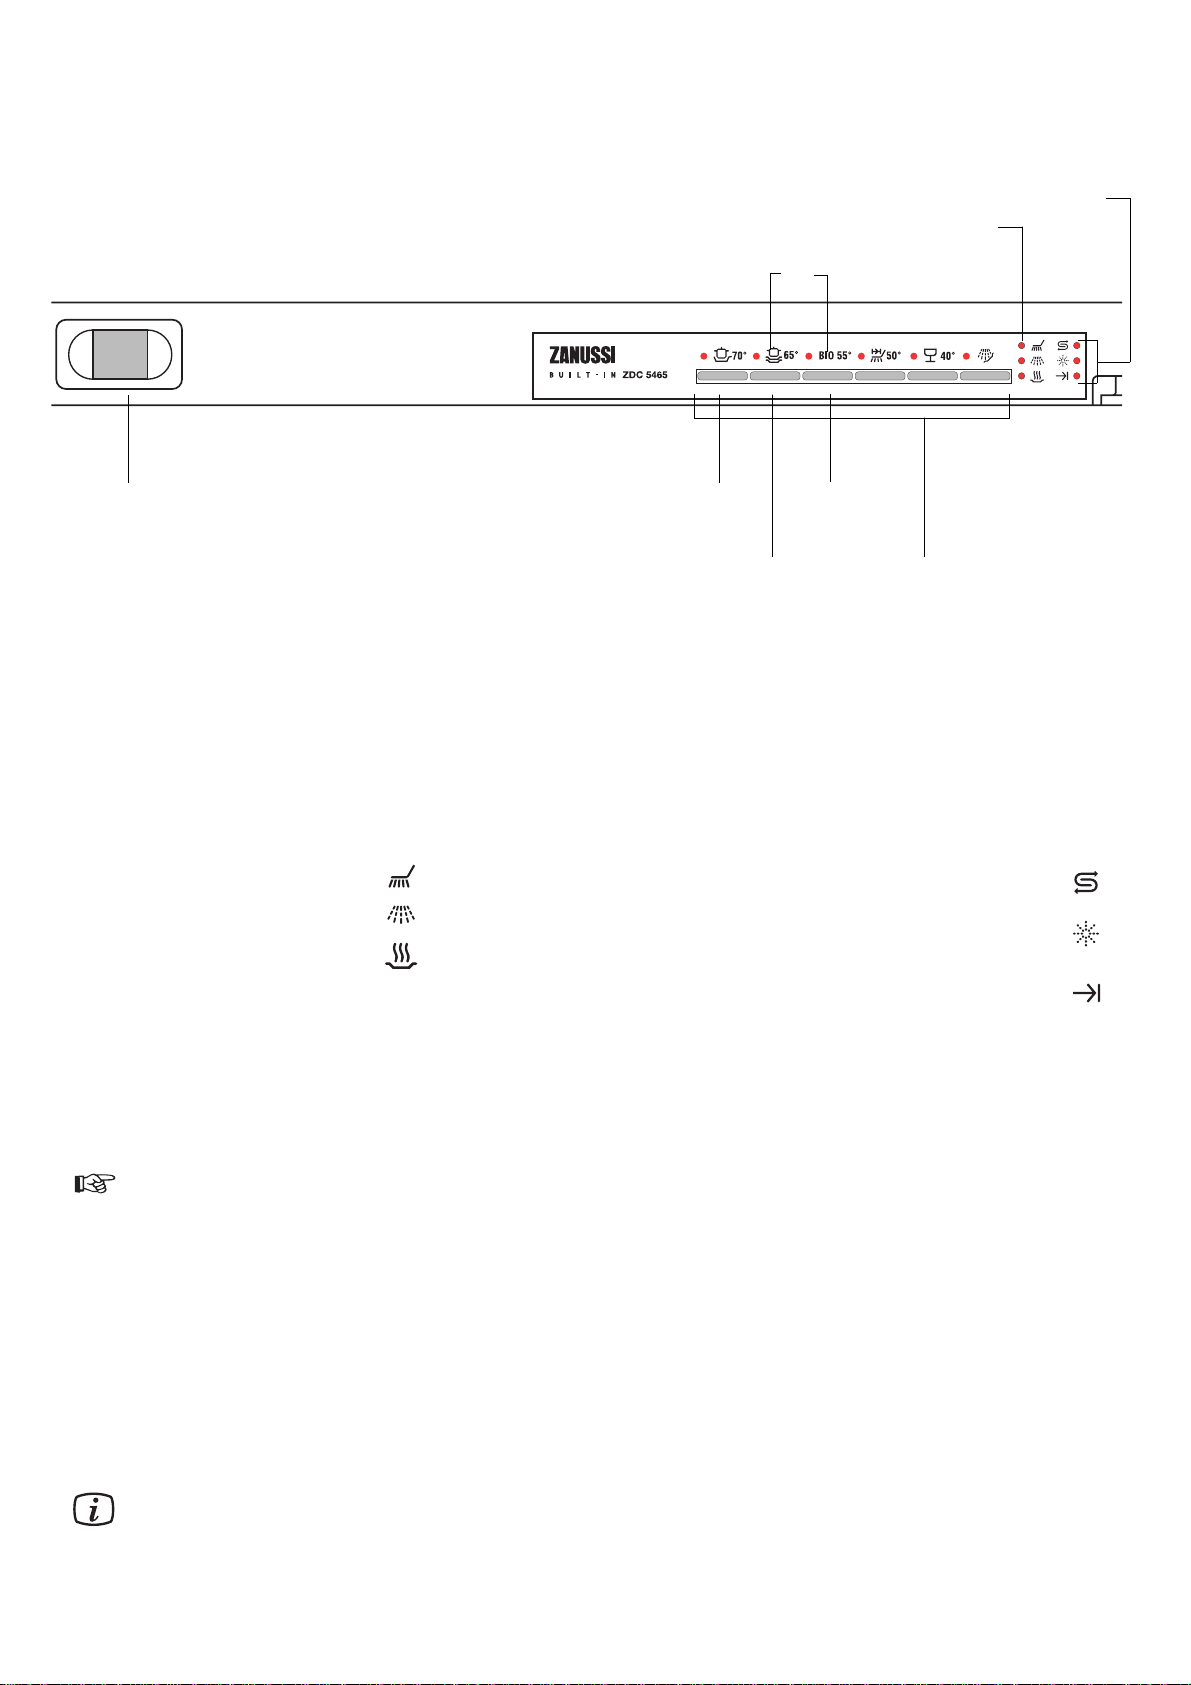
The control panel
- 6 -
Switching the buzzer off
Before switching the buzzer off all programmes must have
been completed.
1. Press in the On/Off button.
2. Press the combination buttons simultaneously
and hold them pressed in. When the first three
programme indicator lamps starts to flash, you
can let go of the buttons.
3. Press the buzzer button once. The lamp for
the buzzer button starts to flash and the lamp
for the ended programme cycle is lit. Press the
button once more and the lamp for the ended
programme cycle goes out. Now the buzzer is off.
4. Press out the On/Off button to complete the setting.
To reset the function, follow steps 1 and 2 above
and then press the buzzer button twice, until
the end of programme lamp is illuminated again.
Combination buttons ”A”
In addition to selecting a programme, you can press
these two buttons to adjust the setting of the water
softener, switch off the buzzer and rinse aid dispenser.
Indicator lamps:
Shows • Wash cycle in progress top lamp
• Rinse cycle in progress middle lamp
• Drying in progress lowest lamp
Control lamps:
Shows that • Refilling of salt container is necessary
• Refilling of the rinse aid dispenser
is necessary
• The selected programme has
finished
Programme
buttons
Water softener
button
Buzzer
button
On/Off button
Rinse aid
button
Indicator lamps
Control lamps
A
- 7 -
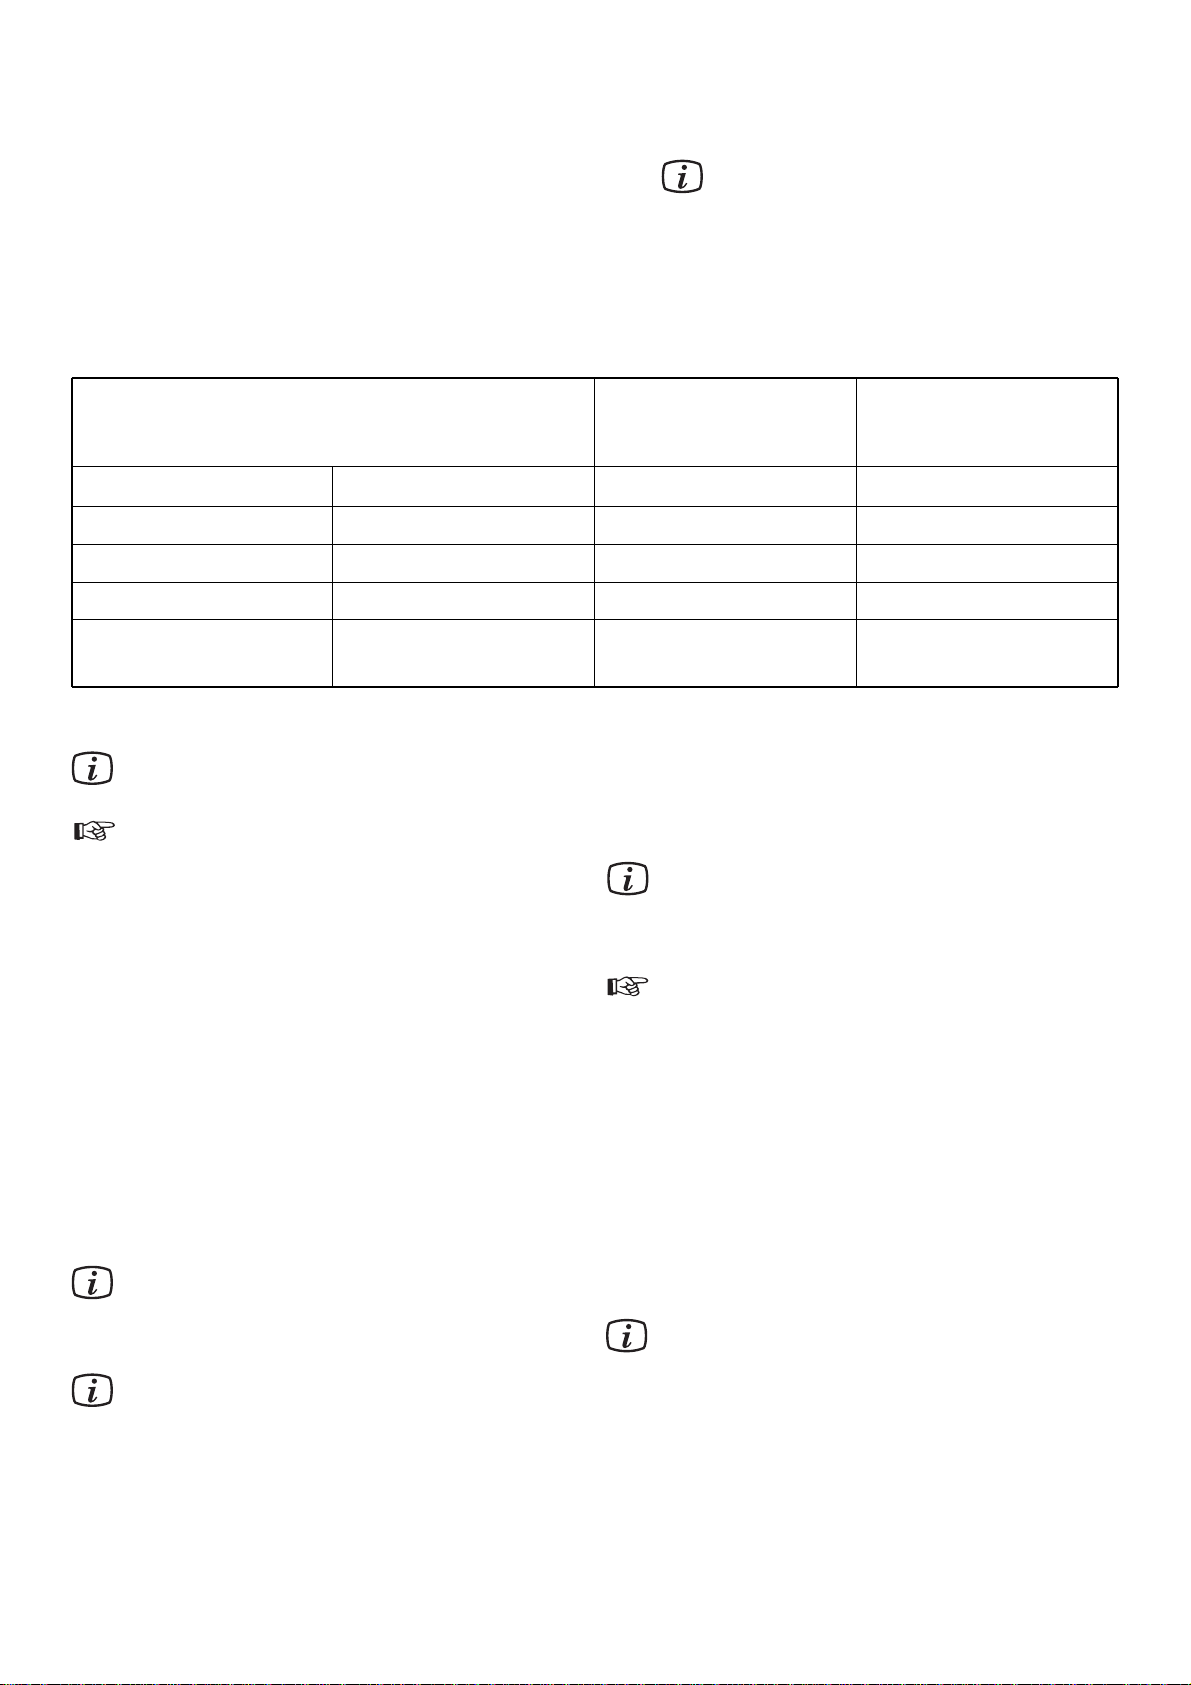
Water hardness level
°d
1)
mmol/l
2)
Setting on the
water softener
Number of light
and sound signals
> 24 4,2
18 - 24 3,2 - 4,2
12 - 18 2,1 - 3,2
4 - 12 0,7 - 2,1
below 4 below 0,7
5
4
3*
2
1
5
4
3
2
1
no salt is needed
1. Press in the On/Off button.
2. Press the combination buttons simultaneously
and hold them pressed in. When the first three
programme indicator lamps starts to flash, you
can let go of the buttons.
3. Press the water softener button once. The lamps
for the water softener and for the end of programme
starts to flash and a buzzer will sound, unless it
is switched off.
- The number of flashes for the end of programme
and sound signals are equivalent with the set
water hardness level.
- This sequence of flashes and sound is repeated
several times after a few seconds pause.
4. The water hardness level is raised by 1 step
every time you press the water softener button.
After hardness level 5 comes hardness level 1.
5. Press the On/Off button when the required water
hardness level is selected. This saves the selection.
If the setting 1 is chosen, the salt indicator lamp
is not lit.
1) german degree of measurement for the water
hardness
2) millimol, internationel unit for water hardness
*) factory setting
Switching the rinse aid dispenser off
If dishwasher detergent with rinse aid is used,
you can switch off the rinse aid dispenser and
the lamp that indicates that the rinse aid dispenser
is empty.
1. Press in the On/Off button.
2. Press the combination buttons simultaneously
and hold them pressed in. When the first three
programme indicator lamps starts to flash, you
can let go of the buttons.
3. Press the rinse aid button once. The lamp for
the rinse aid button starts to flash and the lamp
for the end of programme is lit. Press the button
once more and the lamp for the ended programme
cycle goes out. Now the function for the rinse
aid dispenser is off and the control lamp is out.
4. Press out the On/Off button to complete the setting.
To reset the function, follow steps 1 and 2 above
and then press the rinse aid button twice, until
the end of programme lamp is illuminated again.
Adjusting the water softener
To prevent limescaling on the dishes and to the interior of the
dishwasher, the dishes must be washed with soft water.
This dishwasher is equipped with a water softener, where tapwater which is harder than 4 °d (german degree) is softened.
Adjust the water softener according to the table below for the
water hardness level for your area.
Contact your local Water Authority to find the
exact water hardness level for your area.
The water softener has 5 settings:
In both of the following settings the dishwasher must be switched off and all programmes completed.
See chapter ”Using the appliance” for information on how to complete the programme.
13 minutes
- 8 -
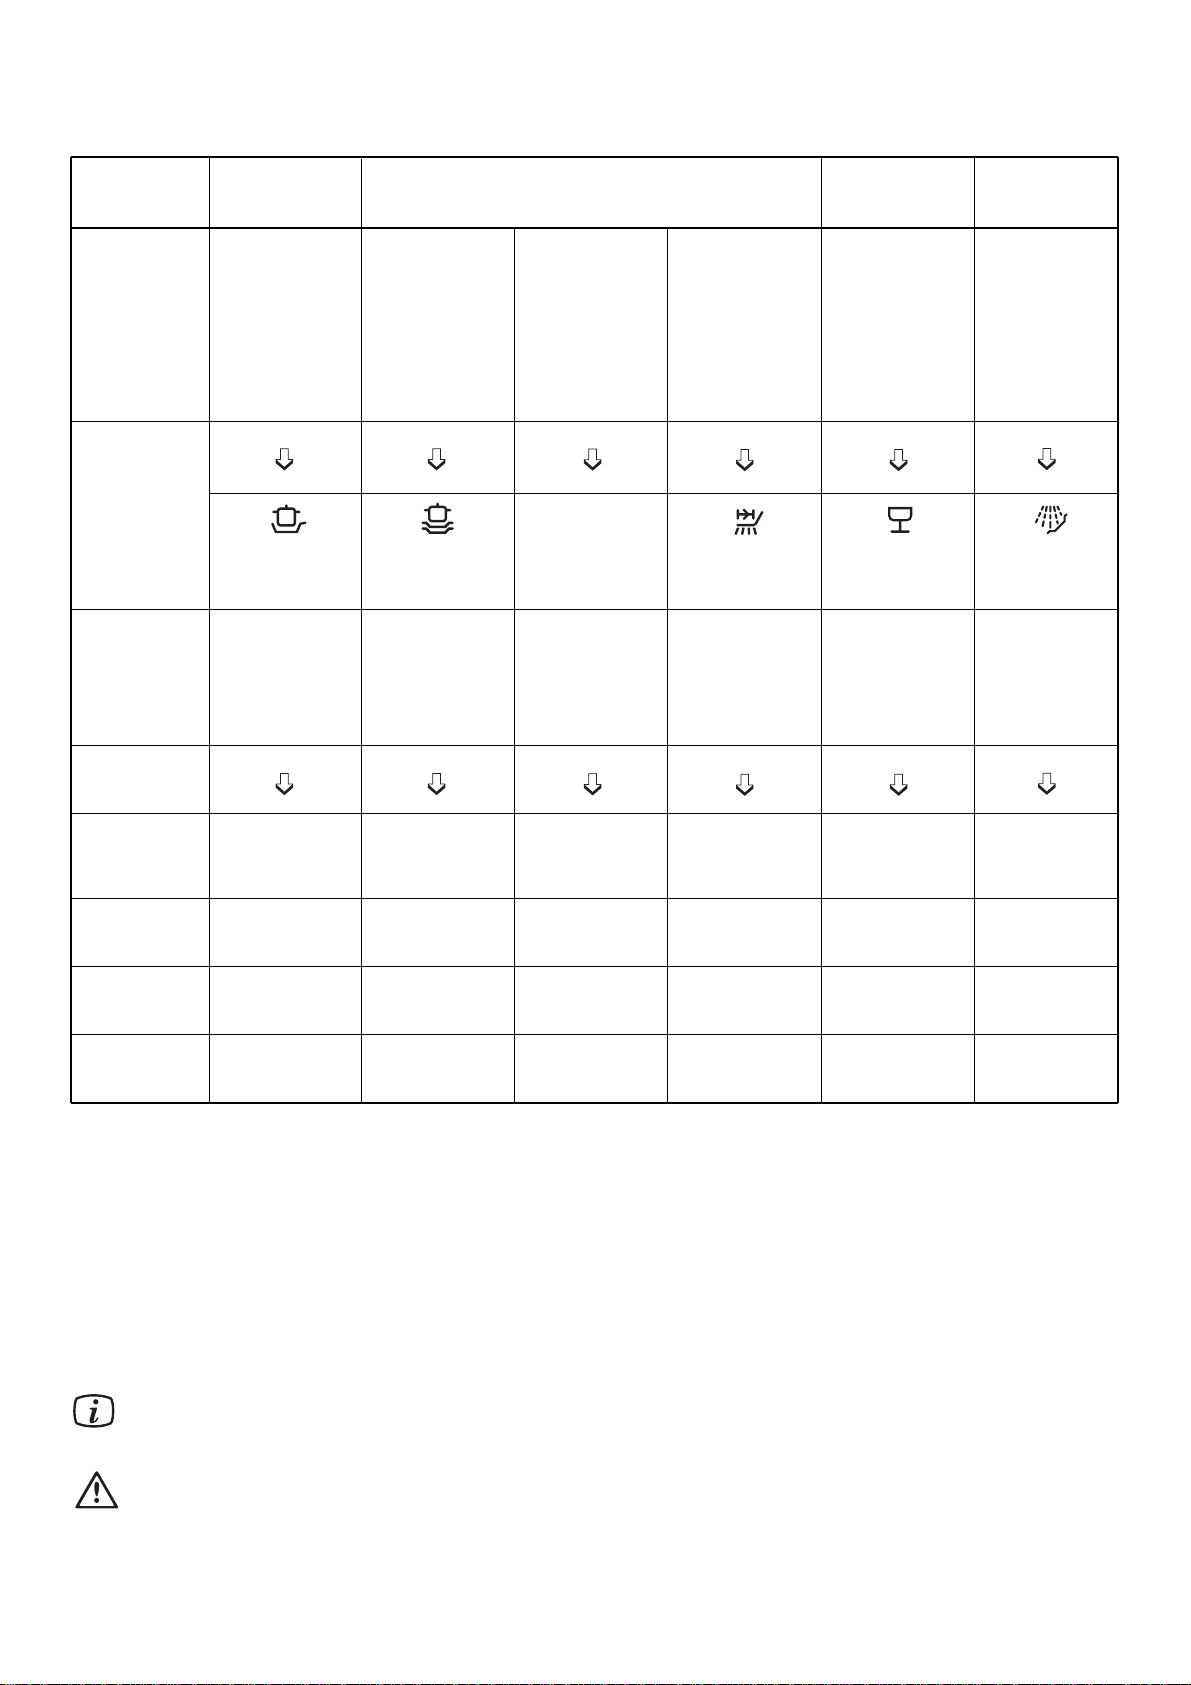
Programme chart
Type of
dishes
Type of
soil:
• normaly
soiled
• dried-on food
remnants
• heavily
soiled
• dried-on food
remnants
especially
eggwhite and
starch
• normaly
soiled
• lightly
soiled
• lightly
soiled
4)
Washing
time with
drying:
92 minutes112 minutes 150 minutes 35 minutes 30 minutes
7 minutes
Programme
cycle:
1)
Pre-wash
Washing
Rinse
Final rinse
Drying
Pre-wash
Washing
2 x rinses
Final rinse
Drying
Pre-wash
Washing
Rinse
Final rinse
Drying
Washing
Rinse
Final rinse
-
-
Washing
Rinse
Final rinse
-
Prerinse
-
-
-
-
Suitable
programme:
NORMAL
65° C
INTENSIVE
70° C
Plates and
cooking pots
Coffee cups,
delicate items
All types of
dishes
All types of
dishes
Energy:
0,80 kWh 0,63 kWh 0,40 kWh 0,35 kWh
0,01 kWh
Water:
7 litres
1,15 kWh
Drying time:
54 minutes — —
—
13 minutes
9 litres
7 litres 6 litres 6 litres
1,8 litres
BIO
55° C
3)
QUICK
50° C
GLASS
40° C
PRERINSE
-
Consumption
figures:
2)
1) Different parts of the wash programme may not sound the same, because the wash action is more intensive
at some stages.
2) Consumption figures have been calculated for nominal conditions. The figures can vary depending on inlet
water temperature and how full the main and cutlery basket are.
3) Consumption figures and performance is according to the BIO programme cycle.
4) Prerinse is used if you want to wait until you have a full load. This cycle rinses the load and keeps it moist,
making the main wash easier later on. No detergent should be used.
All programmes begin with a drain.
Dishwashing detergent in tablet form is not suitable for use in the Quick and Glass programme cycles because
some tablets cannot develop their full cleaning power during short programmes.
 Loading...