

Page 1

TABLE DE CUISSON ELECTRIQUE
ELECTRISCHE KOOKPLAT
ELECTRIC HOB
ELEKTRO-KOCHMULDE
ENCIMERA ELECTRICA
PLACA ELETRICA
SETÜSTÜ OCAK
ZDB 310
NOTICE D’UTILISATION
GEBRUIKSAANWIJZING
GEBRAUCHSANWEISUNG
INSTRUCTION BOOLET
MANUAL DE INSTRUCCIONES
INSTRUÇÕES DE UTILITZAÇÃO
KULLANIM KILAVUZU
BE ES PT TR
Page 2
29
Installation
• It is mandatory that all operations required for the
installation are carried out by a qualified or competent
person, in accordance with existing rules and
regulations.
• Disconnect the appliance from the electrical supply,
before carrying out any cleaning or manteinance work.
• Once you removed all packaging from the appliance,
ensure that it is not damaged and the electric cable is
in perfect conditions. Otherwise, contact your dealer
before proceeding with the installation.
• The manufacturer disclaims any responsability
should all the safety measures not be carried out.
Child Safety
• This appliance has been designed to be operated by
adults and children under supervision. Young children
must not be allowed to tamper with the controls or play
near or with the oven.
• Accessible parts of this appliance may become hot
when it is in use. Children should be kept away until
it has cooled.
During Operation
• It is most important that this instruction book should
be retained with the appliance for future reference.
Should the appliance be sold or transferred, always
ensure that the book is left with the appliance in order
that the new owner can get to know the functions of the
appliance and the relevant warnings.
• This appliance has been designed for non professional
purpose in private houses only. It is meant to cook
edible foodstuff only and MUST NOT be used for any other
purposes.
• It is dangerous to alter the specification in any way.
• For hygiene and safety reasons, this appliance should
be kept clean at all times. A build-up of fats or other
foodstuff could result in a fire.
• Under no circumstances should you attempt to repair
the appliance yourself. Repairs carried out by
unexperienced persons may cause injury or serious
malfunctioning. Refer to your local Service Centre.
Always insist on genuine spare parts.
• Ensure that all control knobs are in the OFF position
when not in use.
These warnings are provided in the interest of safety. You MUST read them carefully before installing or using
the appliance.
Important Safety Information
• Should you connect any electrical tool to a plug near
this cooking appliance, ensure that electric cables are
not in contact with it and keep them far enough from
the heated parts of this appliance.
• If the appliance is out of order, disconnect it from the
electric supply.
Service
• Under no circumstances should you attempt to repair
the appliance yourself. Repairs carried out by
unexperienced persons may cause injury or serious
malfunctioning. Refer to your local Service Centre.
Always insist on genuine spare parts.
Environmental Information
• After installation, please dispose of the packaging with
due regard to safety and the environment.
• When disposing of an old appliance, make it unusable,
by cutting off the cable.
The symbol on the product or on its packaging
indicates that this product may not be treated as household
waste. Instead it shall be handed over to the applicable
collection point for the recycling of electrical and electronic
equipment. By ensuring this product is disposed of
correctly, you will help prevent potential negative
consequences for the environment and human health,
which could otherwise be caused by inappropriate waste
handling of this product. For more detailed information
about recycling of this product, please contact your local
city office, your household waste disposal service or the
shop where you purchased the product.
These instructions are only for the countries
stated by the symbol printed on the front cover
of this instruction book.
English
This appliance complies with the following
E.E.C. Directives:
- 73/23 - 90/683 (Low Voltage Directive);
- 89/336
(Electromagnetical Compatibility Directive);
- 93/68 (General Directives)
and subsequent modifications.
Page 3
30
Guide to Use the instructions
The following symbols will be found in the text to guide
you throughout the Instructions:
Safety Instructions
Step by step instructions for an operation
Hints and Tips
Environmental information
MANUFACTURER:
ELECTROLUX HOME PRODUCTS ITALY S.p.A.
Viale Bologna, 298 I-47100 FORLÌ (Italy)
Contents
For the User
Important Safety Information 29
Description of the appliance 30
Before the first use 31
Operation of the appliance 31
Hints and tips 32
Cleaning and maintenance 32
For the Installer
Technical Data 33
Instruction for the Installer 33
Possibilities for insertion 34
Electrical connection 35
Guarantee 36
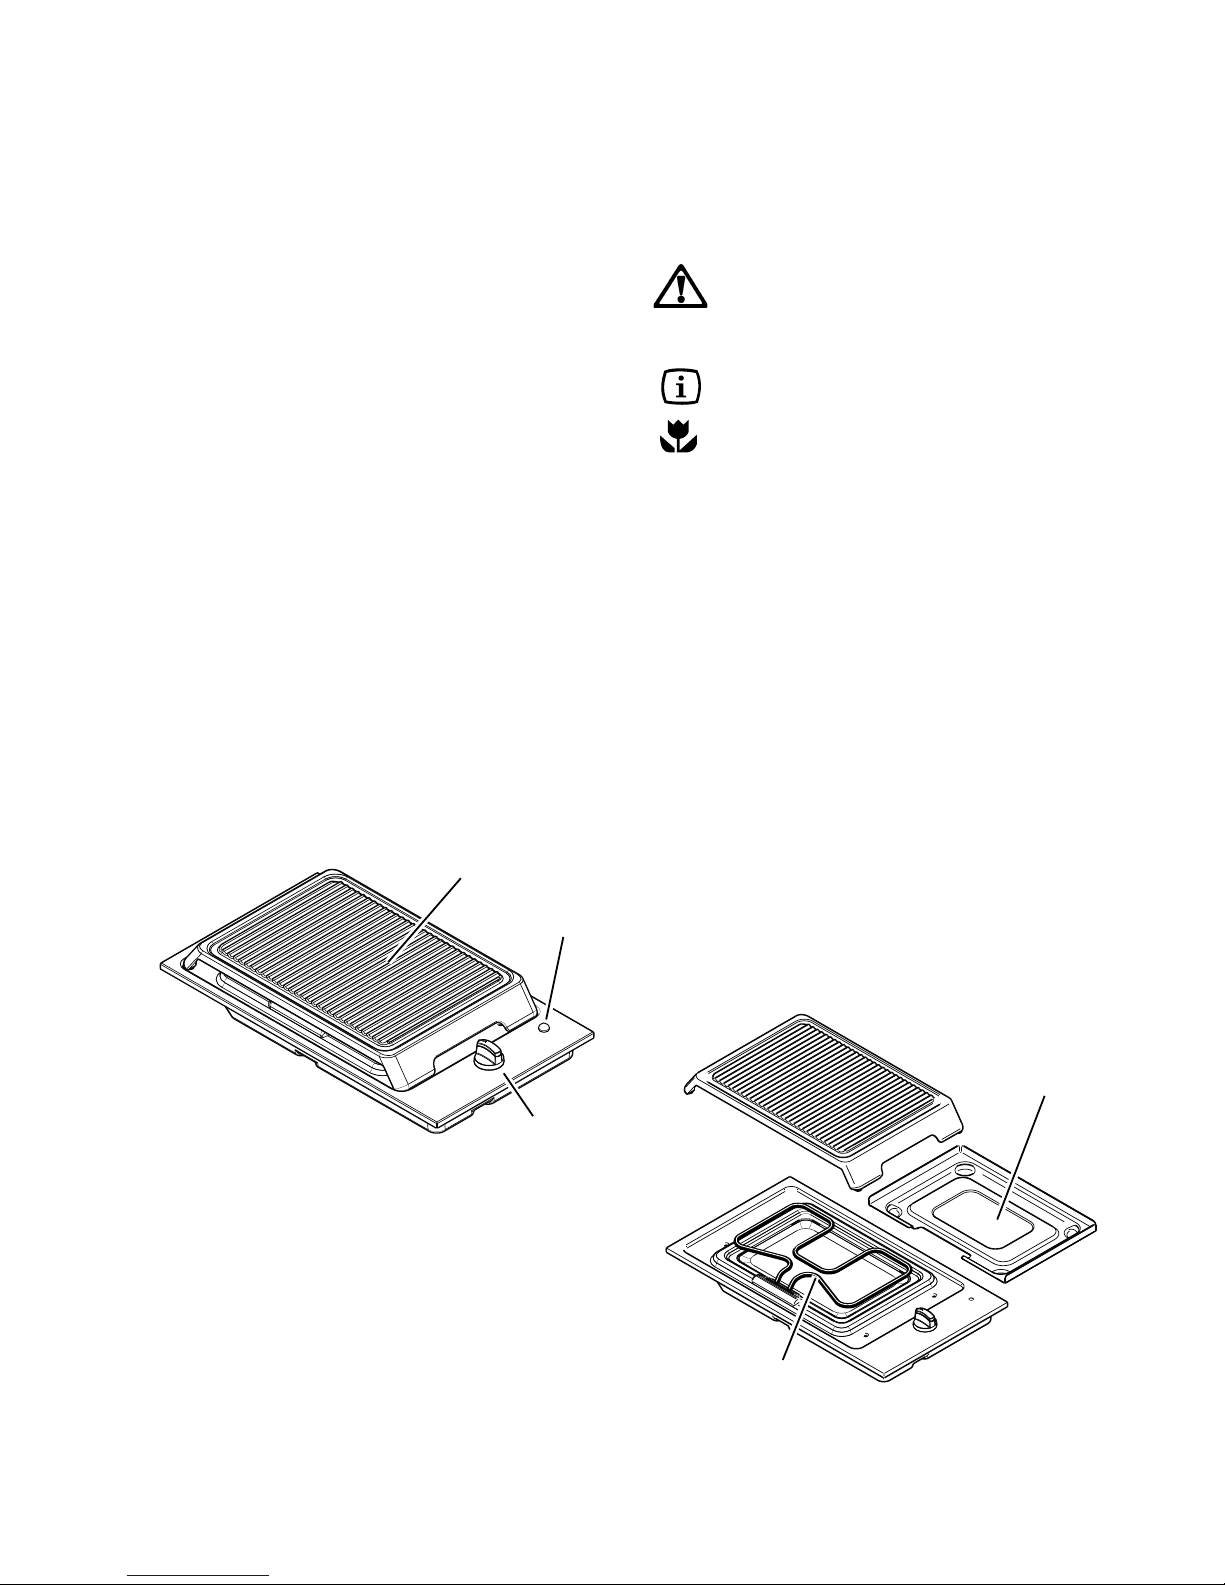
Description of the appliance
Cast Iron Broiler
Pilot Lamp
Control Knob
Steel Protection
Pan
Heating Element
Page 4
31
Operation of the appliance
Before the first use
Before using the appliance remove all
packaging, including the advertising labels
and any protective film.
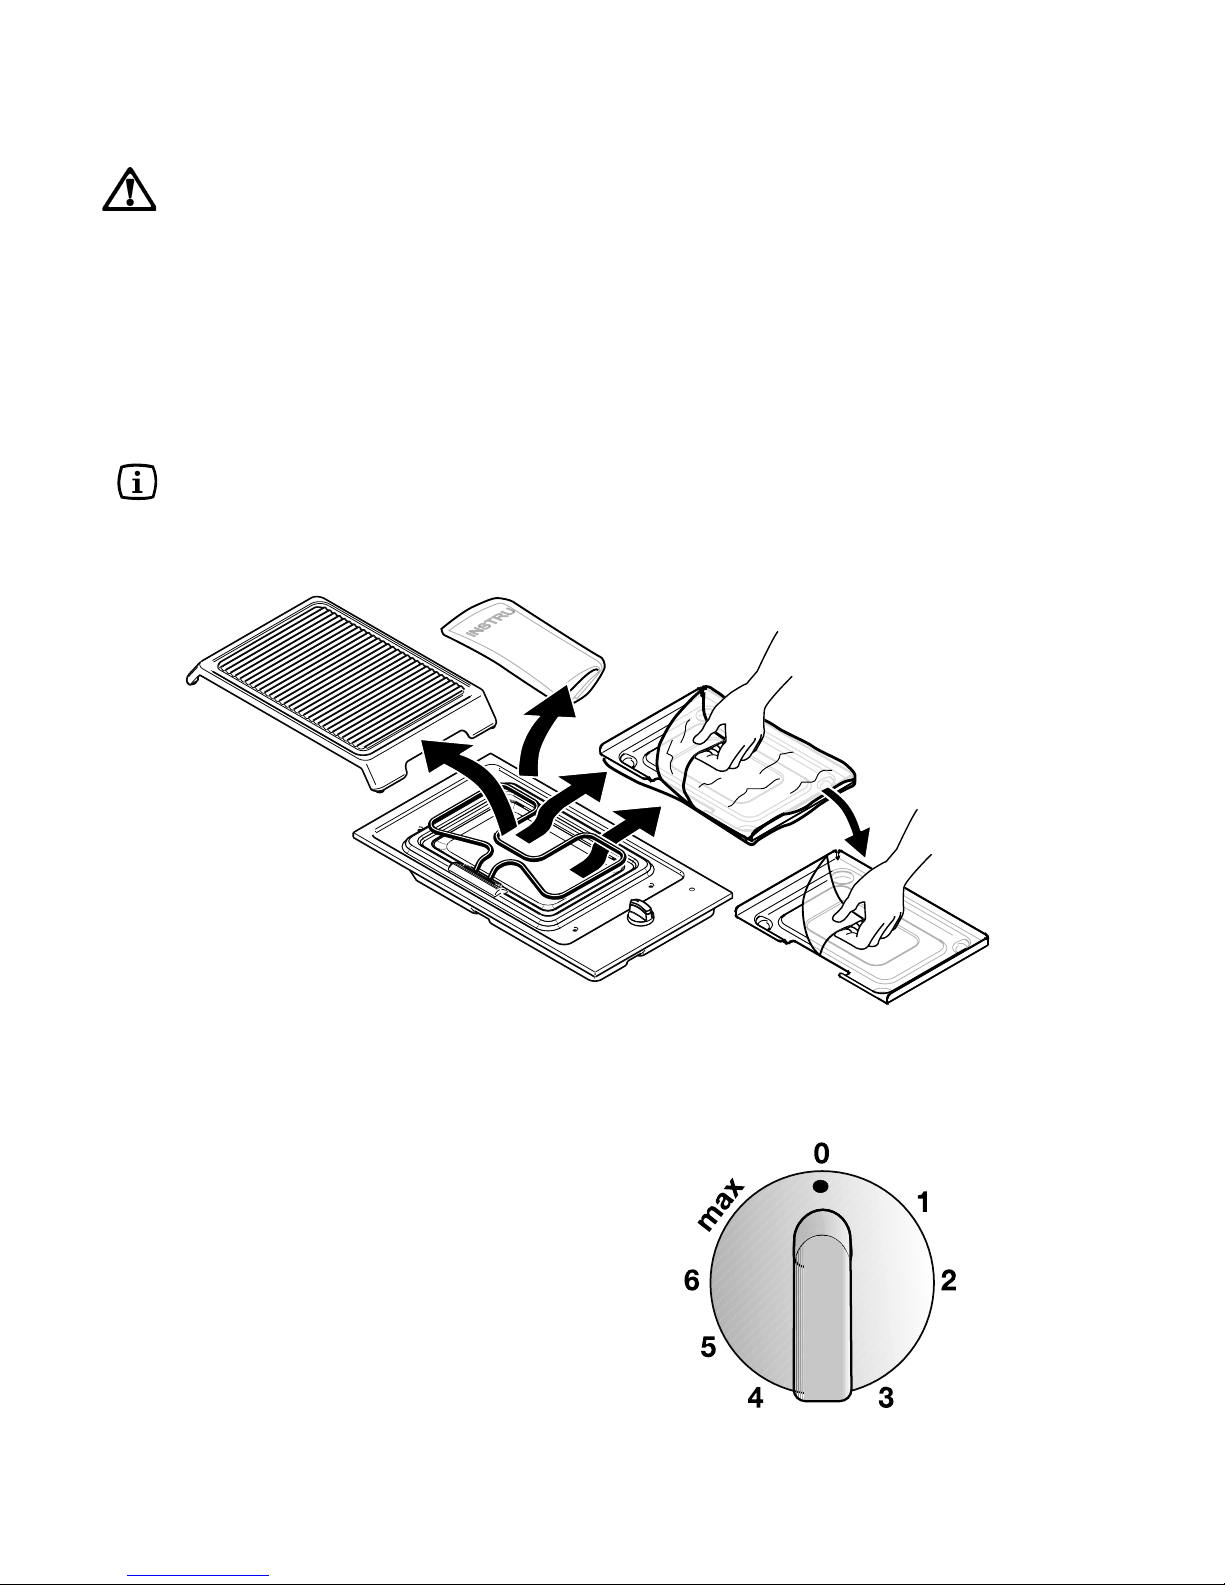
1. Remove all parts under the cast iron broiler:
the plastic bag with the instruction booklet, the
sealing gasket for the installation procedure,
the polyphrene sheet and the protective film
which cover the steel protection pan.
2. Re-fit the steel protection pan and the cast iron
broiler into their original position.
3. Switch the empty broiler on for about 10
minutes at the maximum setting.
It is important to note that the cast iron broiler
may smoke a little and produce a slightly
unpleasant odour when used for the first time. This
is quite normal and will disappear after a few
minutes.
To switch on the broiler, turn the relevant control knob to
the required heat setting.
The control knob is numbered 0 (OFF) - max (Maximum).
Preheat the broiler on the maximum setting for 15
minutes, then adjust the heat setting as desired.
Fig. 1
cast iron broiler
Protective film
Plastic bag with
instruction booklet
Polyphrene sheet
Page 5
32
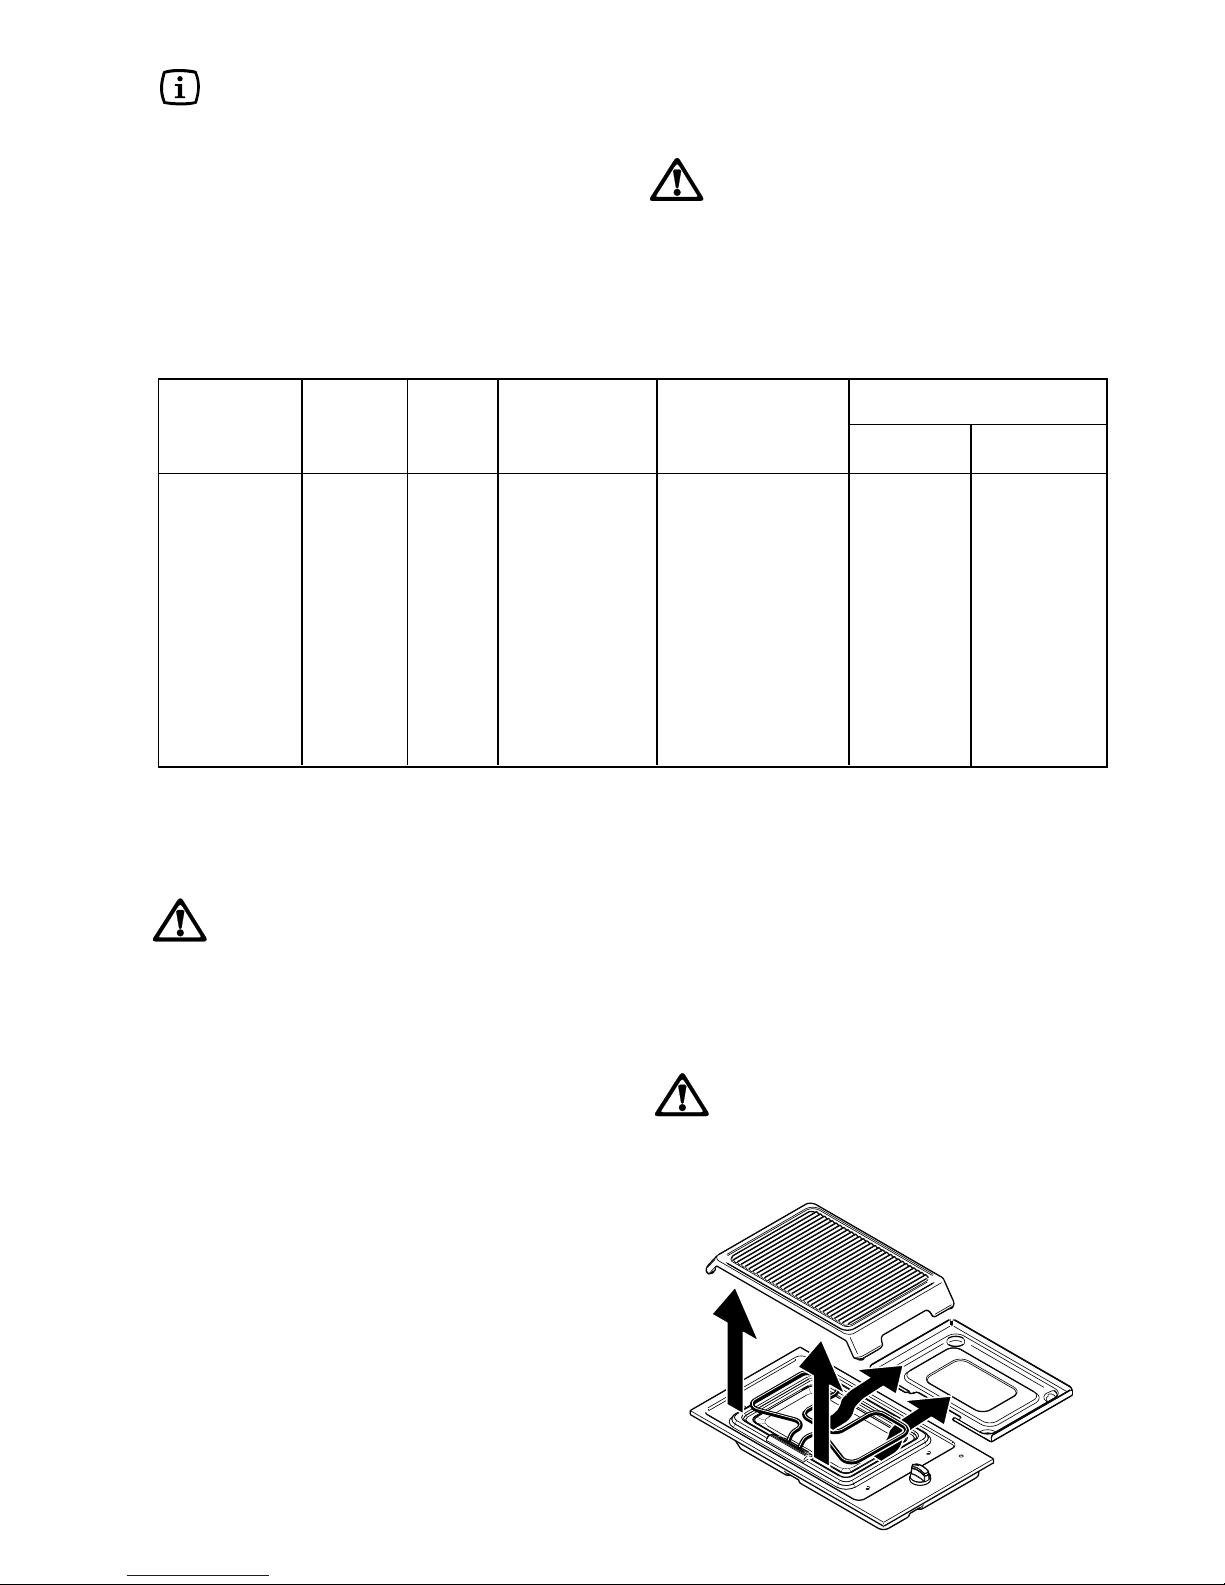
Suggestions for the correct setting of the broiler are given
in the relevant table on this page. The settings and
cooking times are intended as a guide only. It may be
necessary to increase or decrease the temperatures to
suit individual preferences and requirements. When
cooking fat foods (bacon, sausages, etc.) it is
recommended to use intermediate settings in order to
avoid smoke.
Type of food Quantity Pieces Temperature Pre-heat Cooking time (in minutes)
Gr. Setting minutes
Upper side Lower side
Sausages about 500 6 4 15 8-10 6-8
Pork
chops about 400 4 max 10 5-6 5-6
Steak about 600 1 max 10 5-6 5-6
Bacon about 400 4 5 15 4-5 4-5
Aubergine - - max 10 6-7 5-6
Chicory - - 4 10 4-5 3-4
Stale bread - 6 slices max 10 6-7 5-6
Dry bread - 6 slices max 10 5-6 3-4
Tomatoes - 4 max 10 6-7 6-7
Hints and Tips
After switching off the broiler, especially after long
cooking sessions, its front part will remain hot for
at least 45 minutes. Always use oven gloves to
remove and replace food on the broiler.
Take care when cooking food using hot oil or fat,
as the overheated splashes could easily ignite.
Never leave the broiler on without food or a pan on
it or with an empty pan on it.
Cleaning and Maintenance
Before any maintenance or cleaning can be carried
out, you must DISCONNECT the hob from the
electricity supply.
The hob is best cleaned whilst it is still warm, as spillage
can be removed more easily than if it is left to cool.
The Hob Top
Regularly wipe over the hob top using a soft cloth well
wrung out in warm water to which a little washing up liquid
has been added. Avoid the use of the following:
- household detergent and bleaches;
- impregnated pads unsuitable for non-stick saucepans;
- steel wool pads;
- bath/sink stain removers.
Should the hob top become heavily soiled, the following
products are recommended:
- For stainless steal hobs use a proprietary stainless
steel cleaner.
- For other hobs use warm water and soft detergent.
The control knobs may be removed by carefully pulling
them upward for easier cleaning.
The Cast Iron Broiler
Always clean the cast iron broiler after it has cooled down.
Wash it in the sink with warm water and soft detergent,
or using a soft cloth well wrung out in warm water.
Carefully dry the cast iron broiler before placing it back
in its position on the hob.
Caution! If you remove the steel protection pan
under the heating element for a more thorough
cleaning (Fig.2), ensure the protection pan is
placed back in its correct position. This is utmost
important for the proper functioning of the hob.
Fig. 2
Page 6
33
Technical Data
Brolier heating element 1,0 kW
Total energy 1,0 kW
Voltage 230 V - 50 Hz
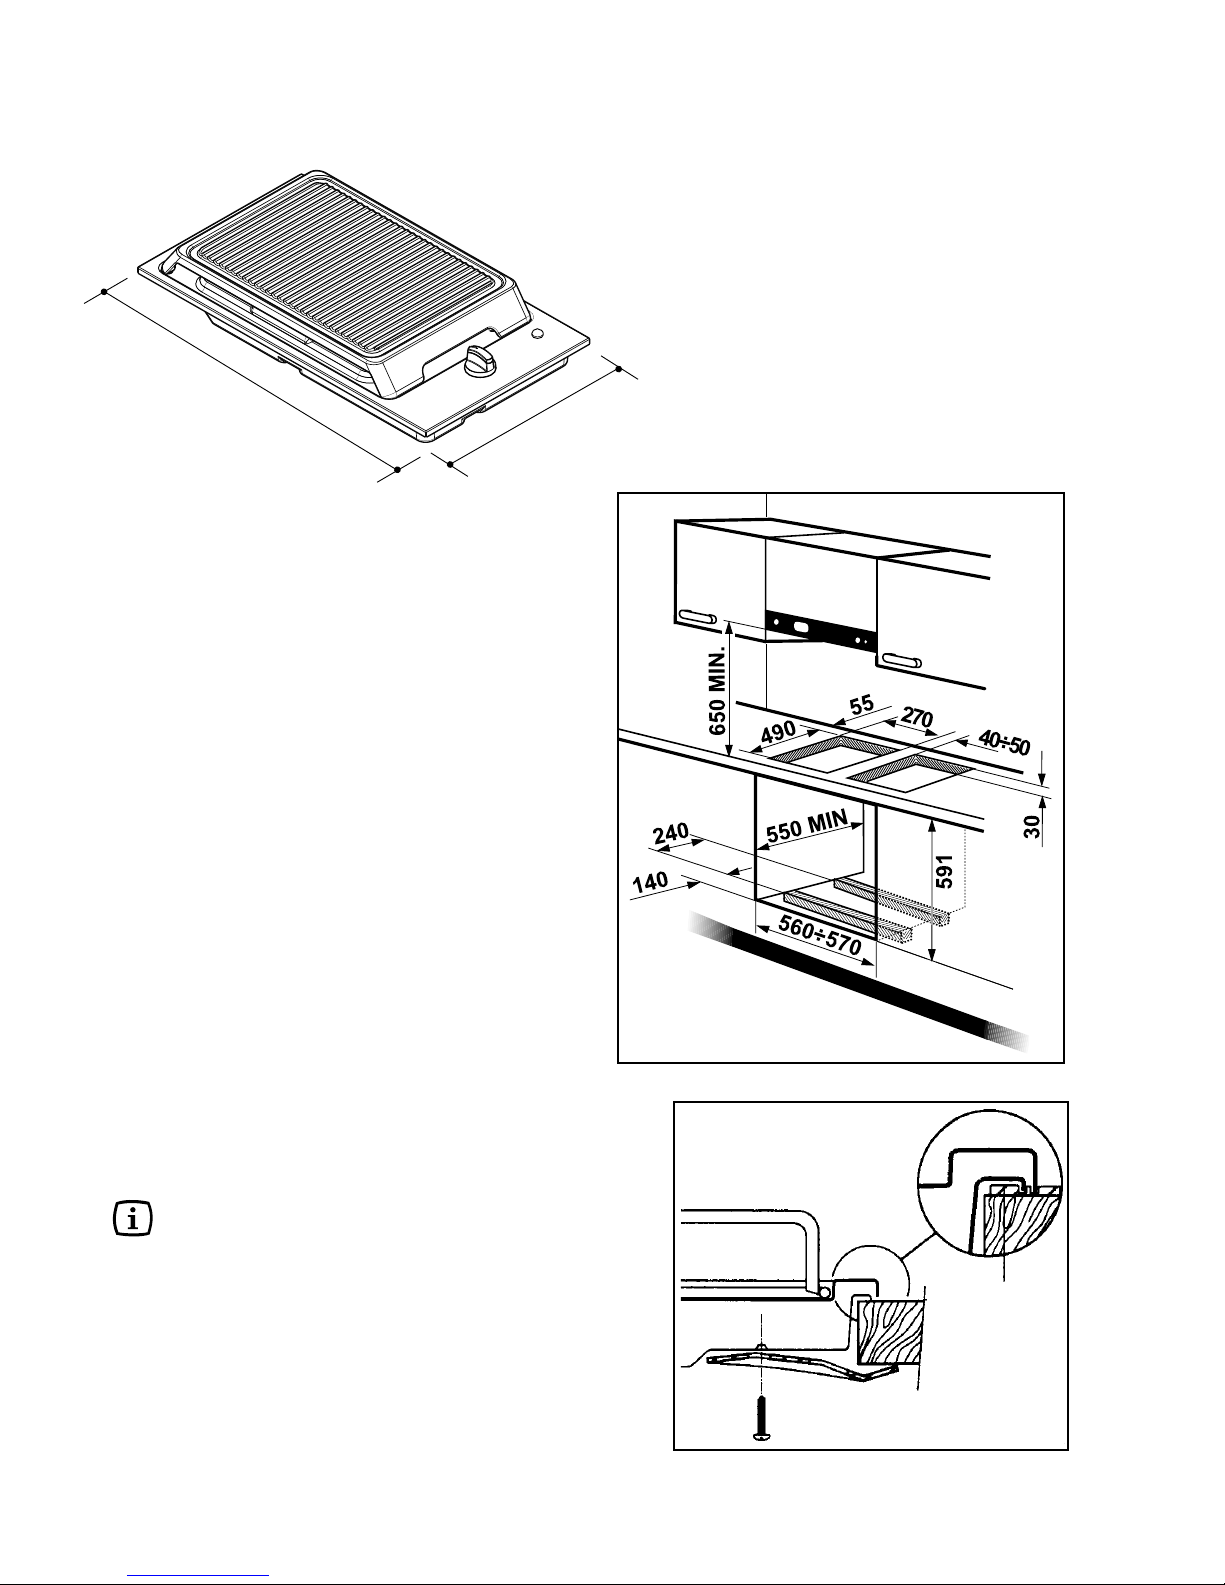
Hob recess dimensions
Length 490 mm.
Width 270 mm.
Instruction for the Installer
Insertion and assembly
Dimensions for building in a kitchen unit are given in
Fig. 3.
The side walls of the unit must not exceed the height of
the hob. Avoid installing the appliance in the proximity
of inflammable materials (e.g. curtains, tea towels, etc.).
Before fitting the hob into the cut out, a sealing gasket
supplied with the hob must be fitted to the edge of the
cut out. It is essential that no gaps are left in this seal in
order to prevent spillage near the hob seeping into the
cabinet below.
1. Place the sealing gasket all around the edge
of the cut out, taking care that the adges meet
without overlapping/
2. Place the hob into the cut out and secure it by
means of the relevant fixing clamps and screws,
as shown in Fig.4.
3. Remove the excess seal
The edge of the hob forms a double seal which prevents
the ingress of liquids.
If several 30cm hobs are to be installed side by
side into the same cut out, an assembly kit
including a support side bracket and
supplementary sealings is available at our After
Sales Centres. The relevant installation
instructions are supplied within the kit package.
Fig. 4
a) Seal
FO 0199
a
Fig. 3
290
510
Page 7
34
Fig. 5 Fig. 6 Fig. 7
a) Removable panel
b) Space for connections
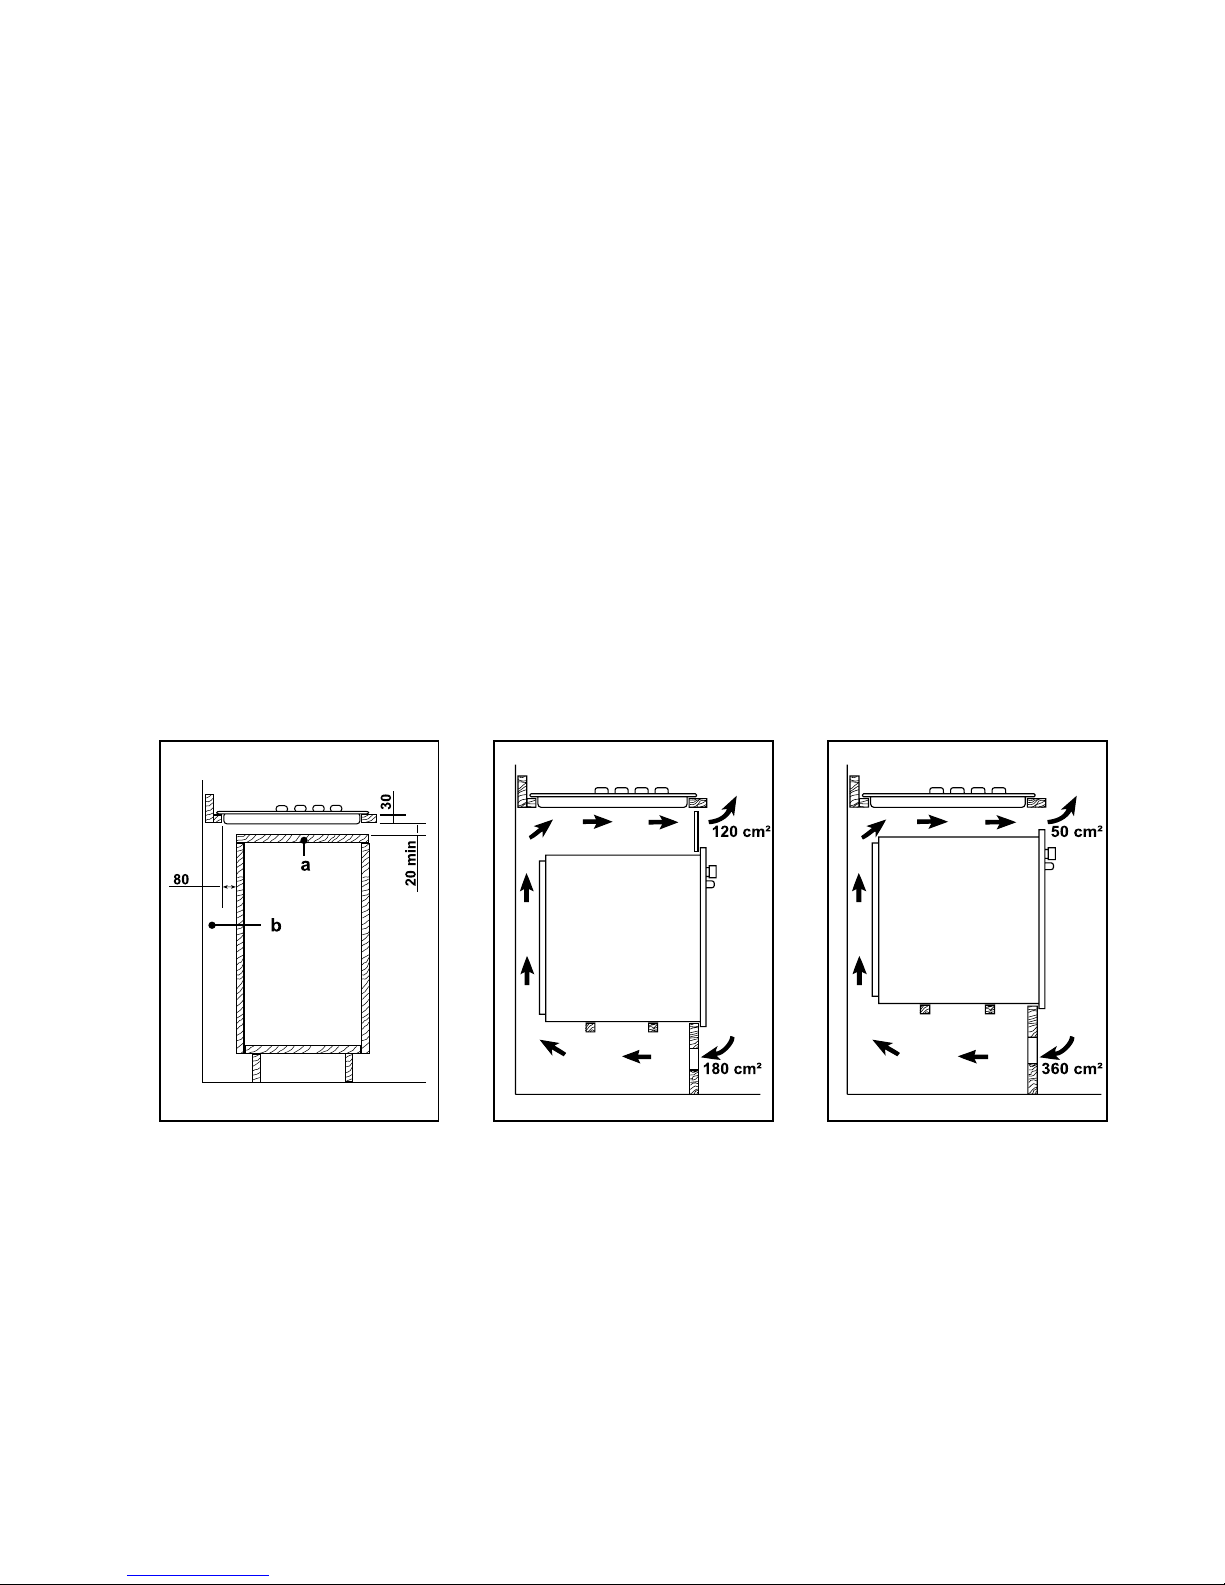
Building over a kitchen unit with
door
Proper arrangements must be taken in designing the
furniture unit, in order to avoid any contact with the bottom
of the hob which can be hot when in operation. The
recommended solution is shown in Fig. 5.
The panel fitted under the hob ("a") should be easily
removable to allow easy access if technical assistance
is needed. The space behind the kitchen unit ("b") can
be used for connections.
Kitchen unit with oven
The hob recess dimensions must comply the indication
given in Fig. 3 and the kitchen unit must be provided with
proper openings to allow a continuous supply of air.
Suggestions to ensure a proper ventilation are shown in
Figs. 6 e 7.
The electrical connection for the hob must be separate
from the electrical connection for the oven, to ensure
safety and to allow an easy removal of the oven from the
unit, if necessary.
Possibilities for insertion
FO 0938FO 0939
FO 2166
Page 8
35
Electrical connection
The appliance is designed to be connected to 230 V
monophase electricity supply.
The connection must be carried out in compliance with
the laws and regulations in force.
Before the appliance is connected:
1. check that the main fuse and the domestic installation
can support the load (see the rating label);
2. check that the power supply is properly earthed in
compliance with the current rules;
3. check the socket or the double pole switch used for
the electrical connection can be easily reached with
the appliance built in the forniture unit.
The appliance is supplied with a connection cable. This
has to be provided with a proper plug, able to support the
load marked on the identification plate. The yellow/green
earth wire must be approximately 2 cm. longer than the
phase wires. The plug has to be fitted in a proper socket.
If connecting the appliance directly to the electric system,
it is necessary that you install a double pole switch
between the appliance and the electricity supply, with a
minimum gap of 3 mm. between the switch contacts and
of a type suitable for the required load in compliance with
the current rules.
The connection cable has to be placed in order that, in
each part, it cannot reach a 90 °C temperature.
The brown coloured phase cable (fitted in the terminal
block contact marked with "L") must always be connected
to the live phase.
Replacement of the connection cable
If the connection cable must be replaced, only a type
H05V2V2-F T90 cable must be used. The cable section
must be suitable to the voltage and the working
temperature.
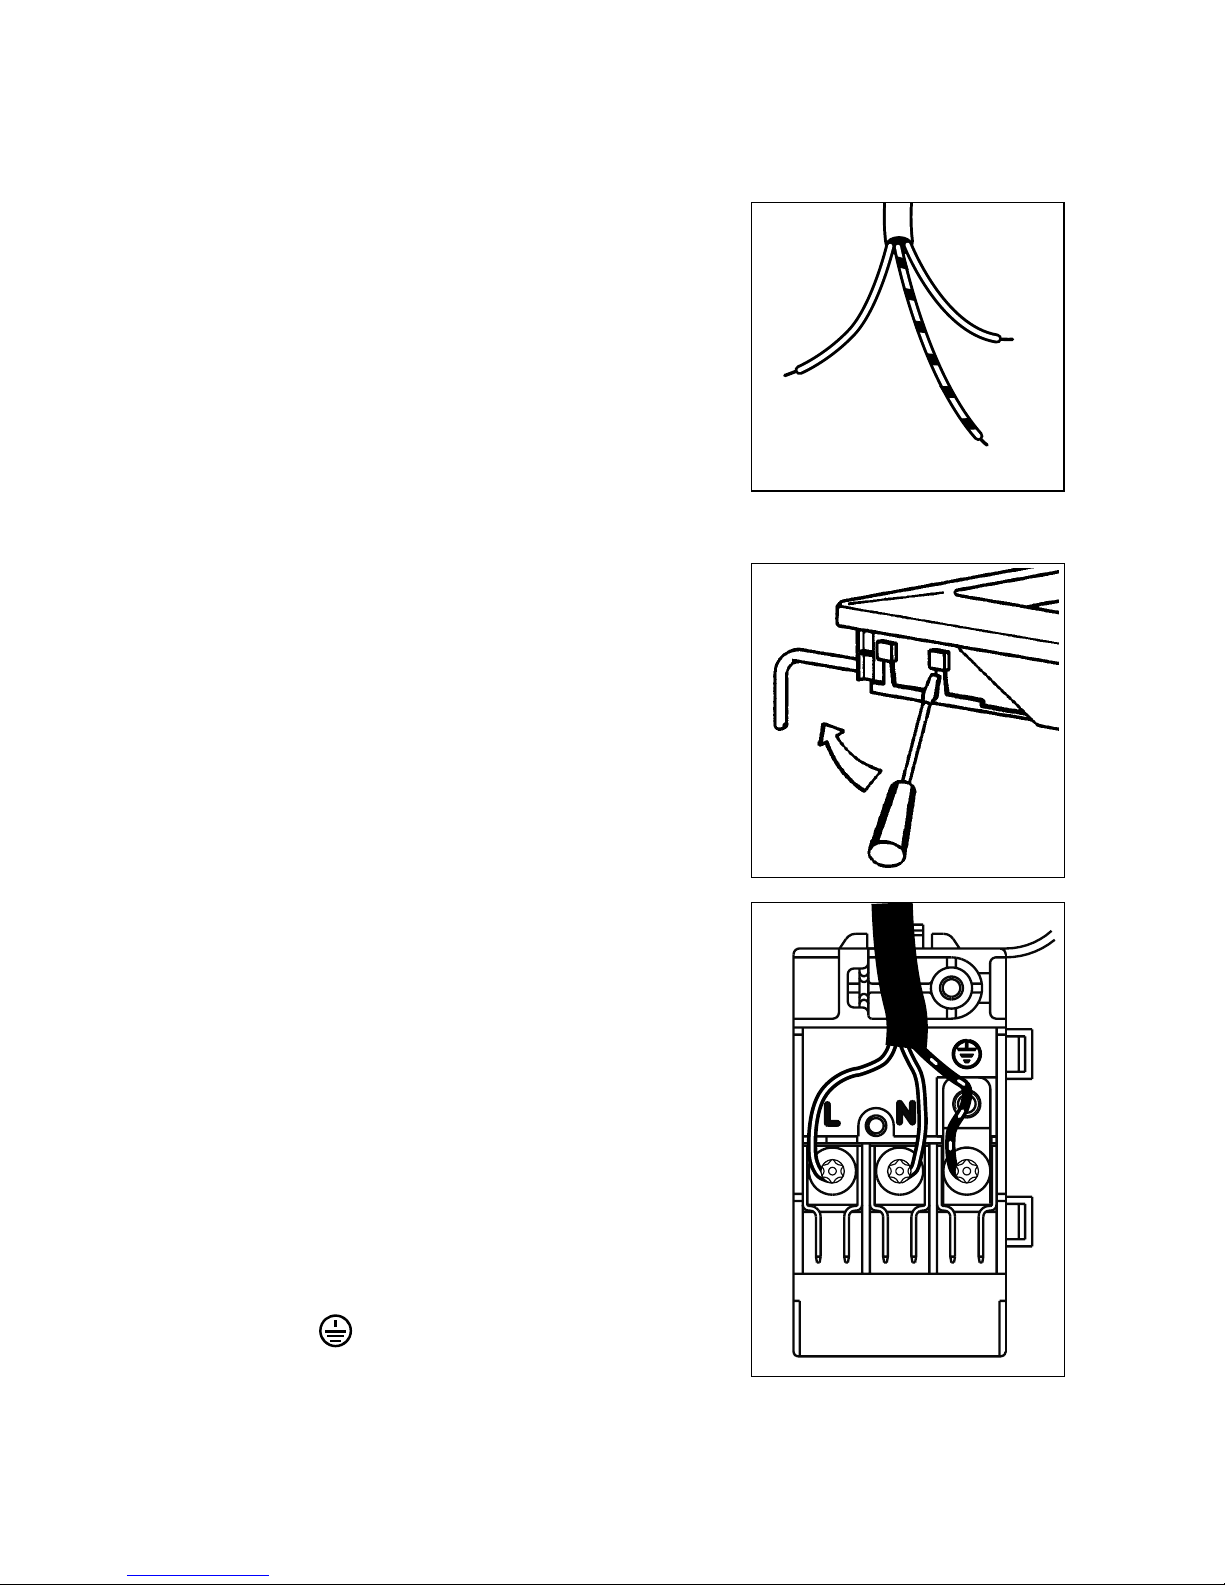
The yellow/green earth wire must be approximately 2
cm. longer than the phase wires (Fig. 8).
To open the terminal block and reach the terminals,
proceed as follows:
1. insert the point of a screwdriver into the visible
protrunding part of the terminal block;
2. exert a light pressure and lift (Fig. 9)
The hob is supplied with a three pole terminal block
designed for a 230 V connection (Fig. 10).
The earth wire must always be connected to the terminal
marked with the symbol .
Upon completion, secure the connection cable with the
cable clamp.
Fig. 10
FO 0257
Fig. 9
Fig.8
Neutral
Earth wire (yellow/green)
Page 9
36
Our appliances are produced with the greatest of care.
However, a defect may still occur. Our consumer
services department will repair this upon request,
either during or after the guarantee period. The service
life of the appliance will not, however, be reduced as a
result.
This declaration of guarantee terms is based on European Union Directive 99/44/EC and the provisions of
the Civil Code. The statutory rights that the consumer
has under this legislation are not affected by this
declaration of guarantee terms.
This declaration does not affect the vendor’s statutory
warranty to the end user. The appliance is guaranteed
within the context of and in adherence with the following terms:
1. In accordance with provisions laid down in paragraphs 2 to 15, we will remedy free of charge any
defect that occurs within 24 months from the date
the appliance is delivered to the first end user.
These guarantee terms do not apply in the event of
use for professional or equivalent purposes.
2. Performing the guarantee means that the appliance is returned to the condition it was in before
the defect occurred. Defective parts are replaced
or repaired. Parts replaced free of charge become
our property.
3. So as to avoid more severe damage, the defect
must be brought to our attention immediately.
4. Applying the guarantee is subject to the consumer
providing proof of purchase showing the purchase
and/or delivery date.
5. The guarantee will not apply if damage caused to
delicate parts, such as glass (vitreous ceramic),
synthetic materials and rubber, is the result of
inappropriate use.
6. The guarantee cannot be called on for minor faults
that do not affect the value or the overall reliability
of the appliance.
7. The statutory warranty does not apply when defects are caused by:
· a chemical or electrochemical reaction caused
by water,
· abnormal environmental conditions in gen-
eral,
· unsuitable operating conditions,
· contact with harsh substances.
8. The guarantee does not apply to defects due to
transport which have occurred outside of our responsibility. Nor will the guarantee cover those
caused by inadequate installation or assembly,
lack of maintenance or failure to respect the
assembly instructions or directions for use.
9. Defects that result from repairs or measures carried out by people who are not qualified or expert
or defects that result from the addition of nonoriginal accessories or spare parts are not covered
DECLARATION OF GUARANTEE TERMS
(BELGIUM)
by the guarantee.
10. Appliances that are easy to transport may be
delivered or sent to the consumer services department. Home repairs are only anticipated for bulky
appliances or built-in appliances.
11. If the appliances are built-in, built-under, fixed or
suspended in such a way that removing and
replacing them in the place where they are fitted
takes more than half an hour, the costs that result
therefrom will be charged for. Connected damage
caused by these removal and replacement operations will be the responsibility of the user.
12. If, during the guarantee period, repairing the same
defect repeatedly is not conclusive, or if the repair
costs are considered disproportionate, in agreement with the consumer, the defective appliance
may be replaced with another appliance of the
same value.
In this event, we reserve the right to ask for a
financial contribution calculated according to the
length of time it has been used.
13. A repair under guarantee does not mean that the
normal guarantee period will be extended nor that
a new guarantee period begins.
14. We give a twelve month guarantee for repairs,
limited to the same defect.
15. Except in the event where liability is legally imposed, this declaration of guarantee terms excludes any compensation for damage outside the
appliance for which the consumer wishes to assert his rights. In the event of legally admitted
liability, compensation will not exceed the purchase price paid for the appliance.
These guarantee terms are only valid for appliances
purchased and used in Belgium. For exported appliances, the user must first make sure that they satisfy
the technical conditions (e.g.: voltage, frequency,
installation instructions, type of gas, etc.) for the
country concerned and that they can withstand the
local climatic and environmental conditions. For appliances purchased abroad, the user must first ensure
that they meet the qualifications required in Belgium.
Non-essential or requested adjustments are not covered by the guarantee and are not possible in all
cases.
Our consumer services department is always at your
disposal, even after the guarantee period has expired.
Address for our consumer services department:
ELECTROLUX HOME PRODUCTS BELGIUM
Bergensesteenweg, 719 – 1502 LEMBEEK
Tel. 02.3630444
Page 10
 Loading...