

Page 1

INSTRUCTION BOOKLET
IL
MIXED FUEL
COOKER
ZCM 6605
35690-6211
Page 2

2
Important Safety Information
You MUST read these warnings carefully before installing or using the hob. If you need assistance,
contact our Customer Care Department.
• The work of installation must be carried out by
competent and qualified installers according to the
regulations in force.
• Any modifications to the domestic electrical mains
which may be necessary for the installation of the
appliance should be carried out only by competent
personnel.
• Check your appliance for any transport damage.
Never connect a damaged appliance. If your appliance
is damaged, contact your supplier.
• It is dangerous to modify, or attempt to modify, the
characteristics of this appliance.
• Avoid installation of the appliance near inflammable
material (e.g. curtains, tea towels, etc.).
• This appliance is heavy. Take care when moving it.
• This appliance cannot be positioned on a base.
• Remove all packaging before using the appliance.
•
Some parts have a shock-resistant plastic film
protection. Be sure to remove this plastic film before
you start operating the appliance and clean the parts
involved using a soft cloth wrung out in warm water
to which a little washing up liquid has been added.
• Ensure that the gas and electrical supply complies
with the type stated on the rating plate, located near
the gas supply pipe.
Child Safety
• This appliance is designed to be operated by adults.
Do not allow children to play near or with the
appliance.
• The appliance gets hot when it is in use. Children
should be kept away until it has cooled.
• Children can also injure themselves by pulling pans
or pots off the appliance.
During Use
• This appliance is intended for domestic cooking only.
It is not designed for commercial or industrial
purposes.
• Ensure a good ventilation around the appliance. A poor
air supply could cause lack of oxygen.
• This appliance is not connected to a combustion
products evacuation device. It shall be installed and
connected in accordance with current installation
regulations. Particular attention shall be given to the
relevant requirements regarding ventilation.
• When in use the appliance will produce heat and
moisture in the room in which it has been installed.
Ensure there is a continuous air supply, keeping air
vents in good condition or installing a cooker hood
with a venting hose.
• When using the appliance for a long period of time,
the ventilation should be improved, by opening a
window or increasing the extractor speed.
•
If the appliance is fitted with a cover, its function is to
protect the surface from dust when closed and to accumulate splashes of grease when open. Do not use
for other purposes.
•
Always clean the cover before closing.
• Leave the burners and/or plates to cool before closing
the cover.
• All the covers, in plate glass or enamel, are removable
to facilitate cleaning.
• Do not use this appliance if it is in contact with water.
Do not operate the appliance with wet hands.
• Ensure the control knobs are in the ‘OFF’ position
when not in use.
• During use the appliance becomes hot. Care should
be taken to avoid touching heating elements inside
the oven.
• Always stand back from the oven when opening the
oven door, to allow any build-up of steam or heat to
release.
• When using other electrical appliances, ensure the
cable does not come into contact with the hot
surfaces of the appliance.
• Unstable or misshapen pans should not be used on
the hob burners as unstable pans can cause an
accident by tipping or spillage.
•
To facilitate ignition, light the burners before
placing pans on the grid. After having lit the
burners check that the flame is regular.
•
Always lower the flame or turn it off before removing
the pan.
• Never leave the appliance unattended when cooking
with oil and fats.
• This appliance should be kept clean at all times. A
build-up of fats or foodstuffs could result in a fire.
• Never use plastic dishes in the oven or on the hob
burners.
Never line any part of the oven with aluminium
foil.
• Always ensure that the oven vent which is located at
the centre back of the hob is left unobstructed to
ensure ventilation of the oven cavity.
• Perishable food, plastic items and areosols may be
affected by heat and should not be stored above the
appliance.
•
Only heat-resistant plates may be placed in the
drawer situated under the oven. Do not p ut
combustible materials there.
• Never use steam or high pressure steam cleaners to
clean the appliance.
Page 3
3
Guide to Use the instructions
The following symbols will be found in the text to guide
you throughout the Instructions:
Safety Instructions
Step by step instructions for an operation
Hints and Tips
Environmental Information
Contents
For the User
Keep this instruction book for future reference
and ensure it is passed on to any new owner.
This appliance is manufactured according to
the following EEC directives:
73/23 EEC - 90/683 EEC - 93/68 EEC 89/336 EEC - 90/396 EEC,
current edition.
Important Safety Information 2
Control Panel 4
The Gas Burner Controls 5
Hints and Tips for using the Hob 6
The minute minder 6
Electric Oven 7
Before the First Use of the Appliance 8
Using the Oven 9
Hints and Tips for using the Oven 10
Defrosting 11
Cooking Chart - Conventional and Fan Oven 12
Cooking Chart - Grilling 13
Cooking Chart - Pizza 13
Maintenance and Cleaning 14
Cleaning the Oven 15
Something not working 18
Service and Spare Parts 19
For the Installer
Instructions for the Installer 20
Technical data 20
Gas connection 22
Electrical connection 23
These instructions are only valid for countries
whose identification symbols are shown on
the cover of this instruction booklet and on the
appliance itself.
Service
• This appliance should only be repaired or serviced by
an authorised Service Engineer and only genuine
approved spare parts should be used.
Environmental Information
• After installation, please dispose of the packaging
with due regard to safety and the environment.
• When disposing of an old appliance, make it unusable,
by cutting off the cable.
• The symbol on the product or on its packaging
indicates that this product may not be treated as
household waste. Instead it shall be handed over to
the applicable collection point for the recycling of
electrical and electronic equipment. By ensuring this
product is disposed of correctly, you will help prevent
potential negative consequences for the environment
and human health, which could otherwise be caused
by inappropriate waste handling of this product. For
more detailed information about recycling of this
product, please contact your local city office, your
household waste disposal service or the shop where
you purchased the product.
Page 4
4
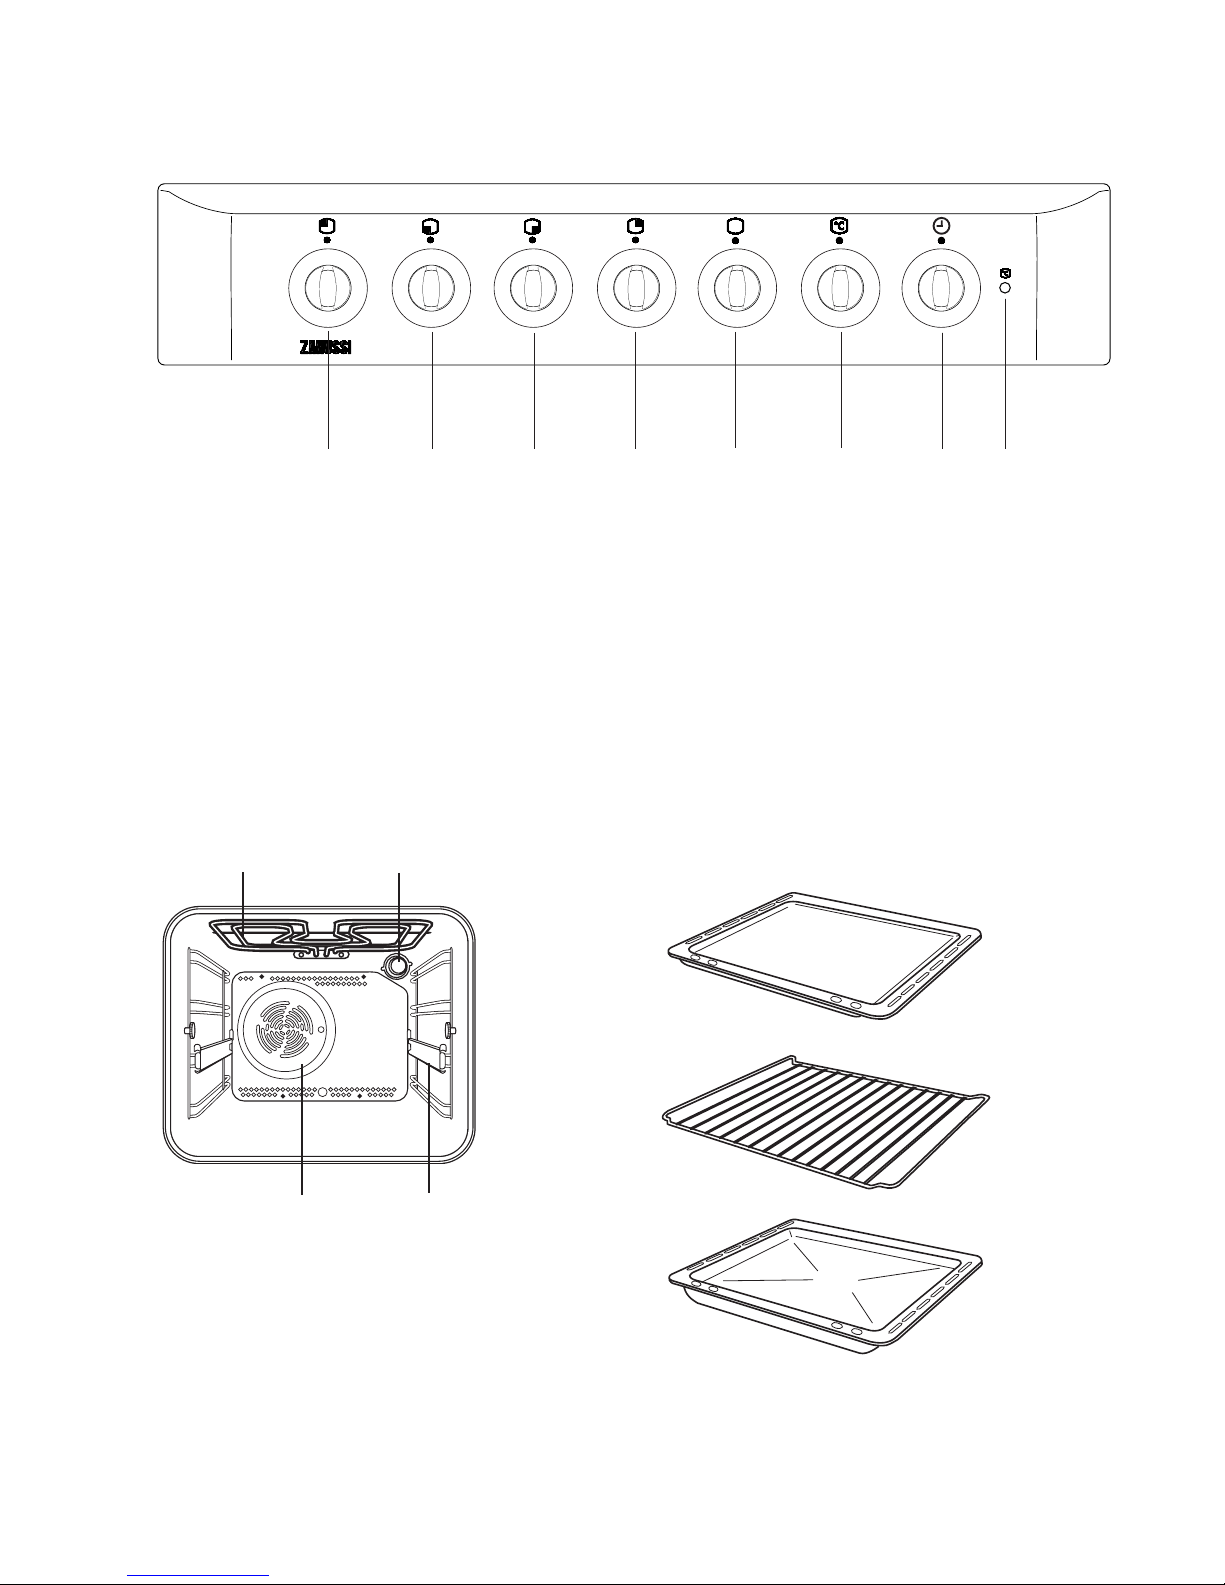
The Oven Cavity
Accessories
Control Panel
1. Back left burner control knob (semi-rapid)
2. Front left burner control knob (triple crown)
3. Front right burner control knob (auxiliary)
4. Back right burner control knob (semi-rapid)
5. Oven function control knob
6. Oven thermostat control knob
7. Minute minder
8. Oven Thermostat Pilot Light
Oven Shelf
Dripping Pan
6
5
4321 7
8
Baking tray
Grill element
Oven Light
Oven fan Telescopic shelf
support
Page 5
5
To light a burner:
1. push the relevant control knob in completely
and turn it anticlockwise to the maximum position
( );
2. upon ignition, keep the knob pushed down for
about 5 seconds. This will allow the
"thermocouple" (see picture - D) to be heated
and the safety device to be switched off, otherwise
the gas supply would be interrupted;
3. then, check the flame is regular and adjust it
as required.
If the burner does not ignite, turn the control knob to zero,
and try again.
If after a few attempts the burner does not ignite, check
that the burner cap and crown (see picture - A, B) are
correctly positioned.
To interrupt the supply of gas, turn the knob in a
clockwise direction to the position "".
When switching on the mains, after installation or
a power cut, it is quite normal for the spark
generator to be activated automatically.
If you use a saucepan which is smaller than the
recommended size, the flame will spread beyond
the bottom of the pan, causing the handle to
overheat.
As soon as a liquid starts boiling, turn down the
flame so that it will barely keep the liquid
simmering.
Take care when frying food in hot oil or fat,
as the overheated splashes could easily
ignite.
If the control knobs become difficult to turn, please
contact your local Service Force Centre.
Burner minimum maximum
diameter diameter
Large (triple crown) 160 mm. 260 mm.
Medium (semi-rapid) 120 mm. 220 mm.
Small (auxiliary) 80 mm. 160 mm.
The Gas Burner Controls
To ensure maximum burner efficiency, you should only
use pots and pans with a flat bottom fitting the size of
the burner used (see table).
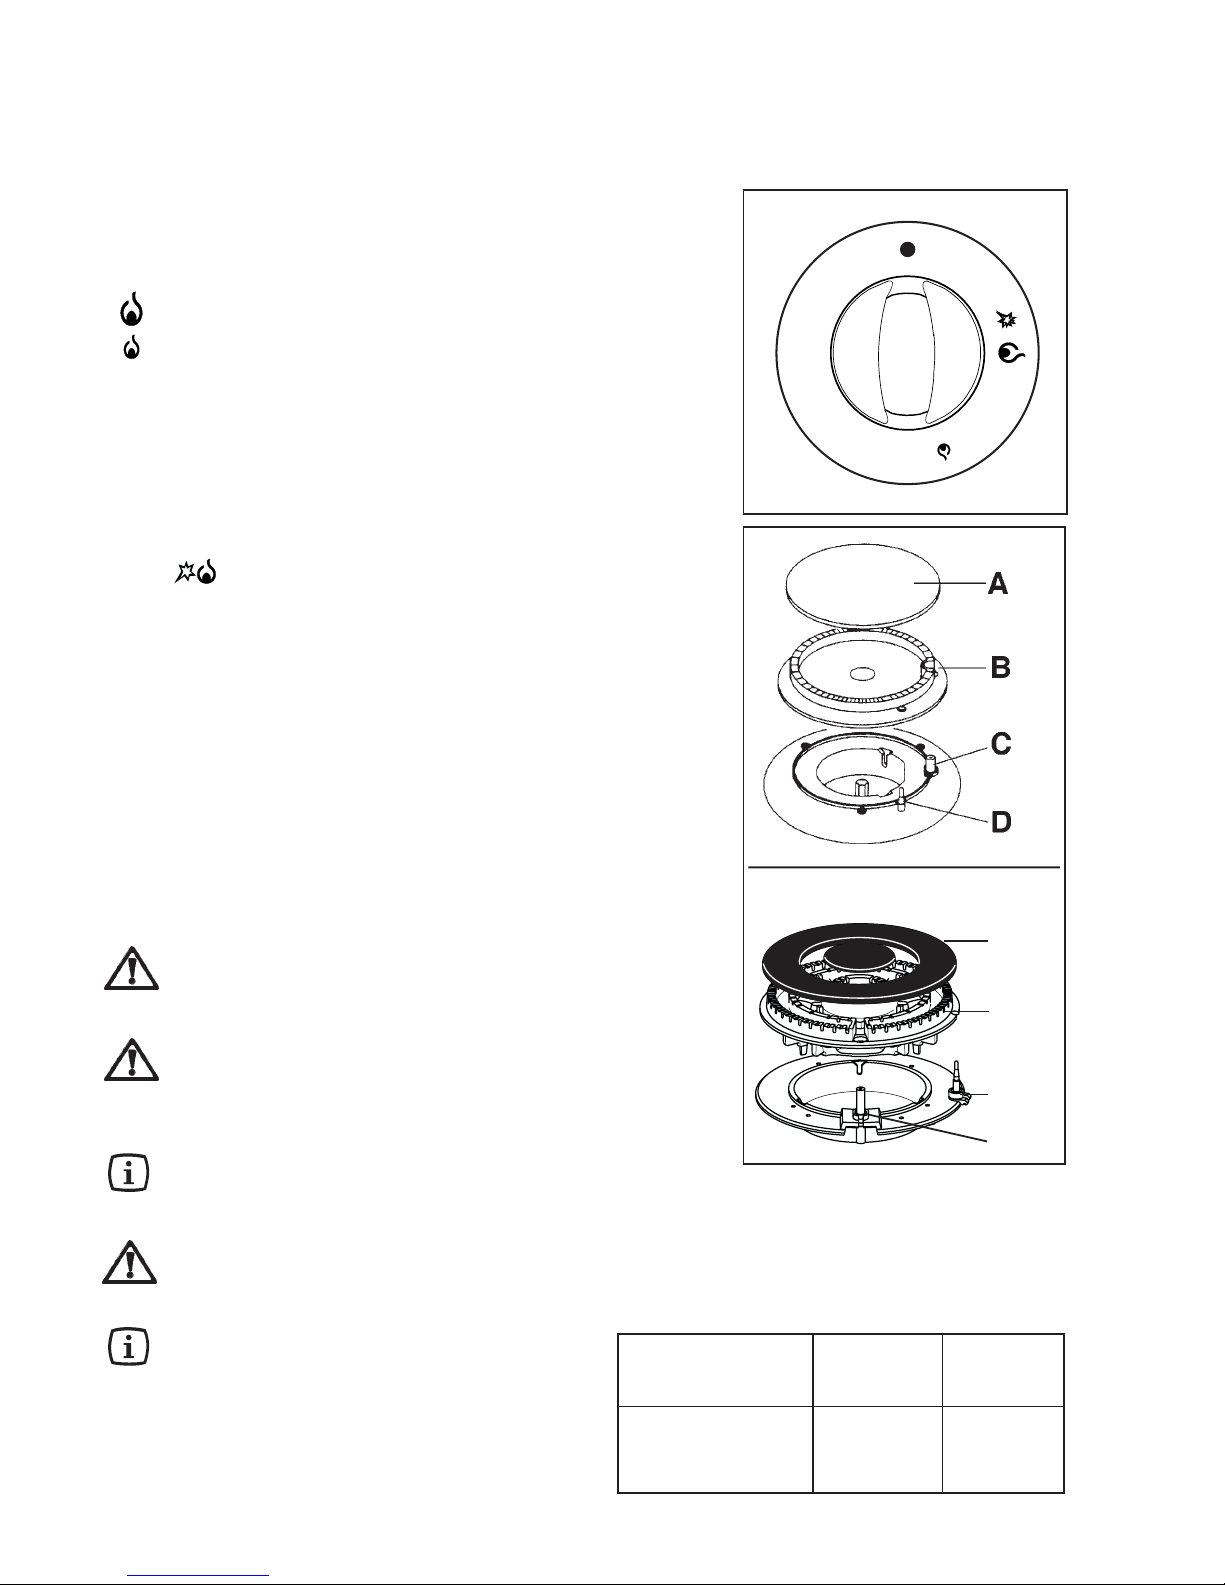
Hob Control knobs (Fig. 1)
The knobs for using the gas hob are found on the control
panel. The knobs are marked with the following symbols:
• No gas supply
Maximum gas supply
Minimum gas supply
This appliance is equipped with a safety-valve. In case
of extinction of the flame this device will operate stopping
gas supply (ex.: overflowing, draughts).
A - Burner cap
B - Burner crown
C - Ignition electrode
D - Thermocouple
A
B
D
C
Triple crown burner
Page 6
6
Hints and Tips for using the Hob
Pottery
Remember that a wide-bottomed pan allows a faster
cooking than a narrow one.
Always use pots which properly fit what you have to cook.
Particularly make sure that the pans are not too small
for liquids, since these could easily overflow.
Moreover, the pans should not be too large for a faster
cooking. In fact, grease and juices may spread on the
bottom and burn easily.
It is better to use non-openable moulds for baking cakes.
In fact, an openable mould lets juices and sugar leak
through, falling on the bottom of the oven and
consequently burning on the bottom of the baking tray,
making cleaning difficult.
Avoid putting plastic-handled pans in the oven as they
are not heat-proof.
You should use pans with the right diameter to fit the
burner, in order to make the most out of it, thus reducing
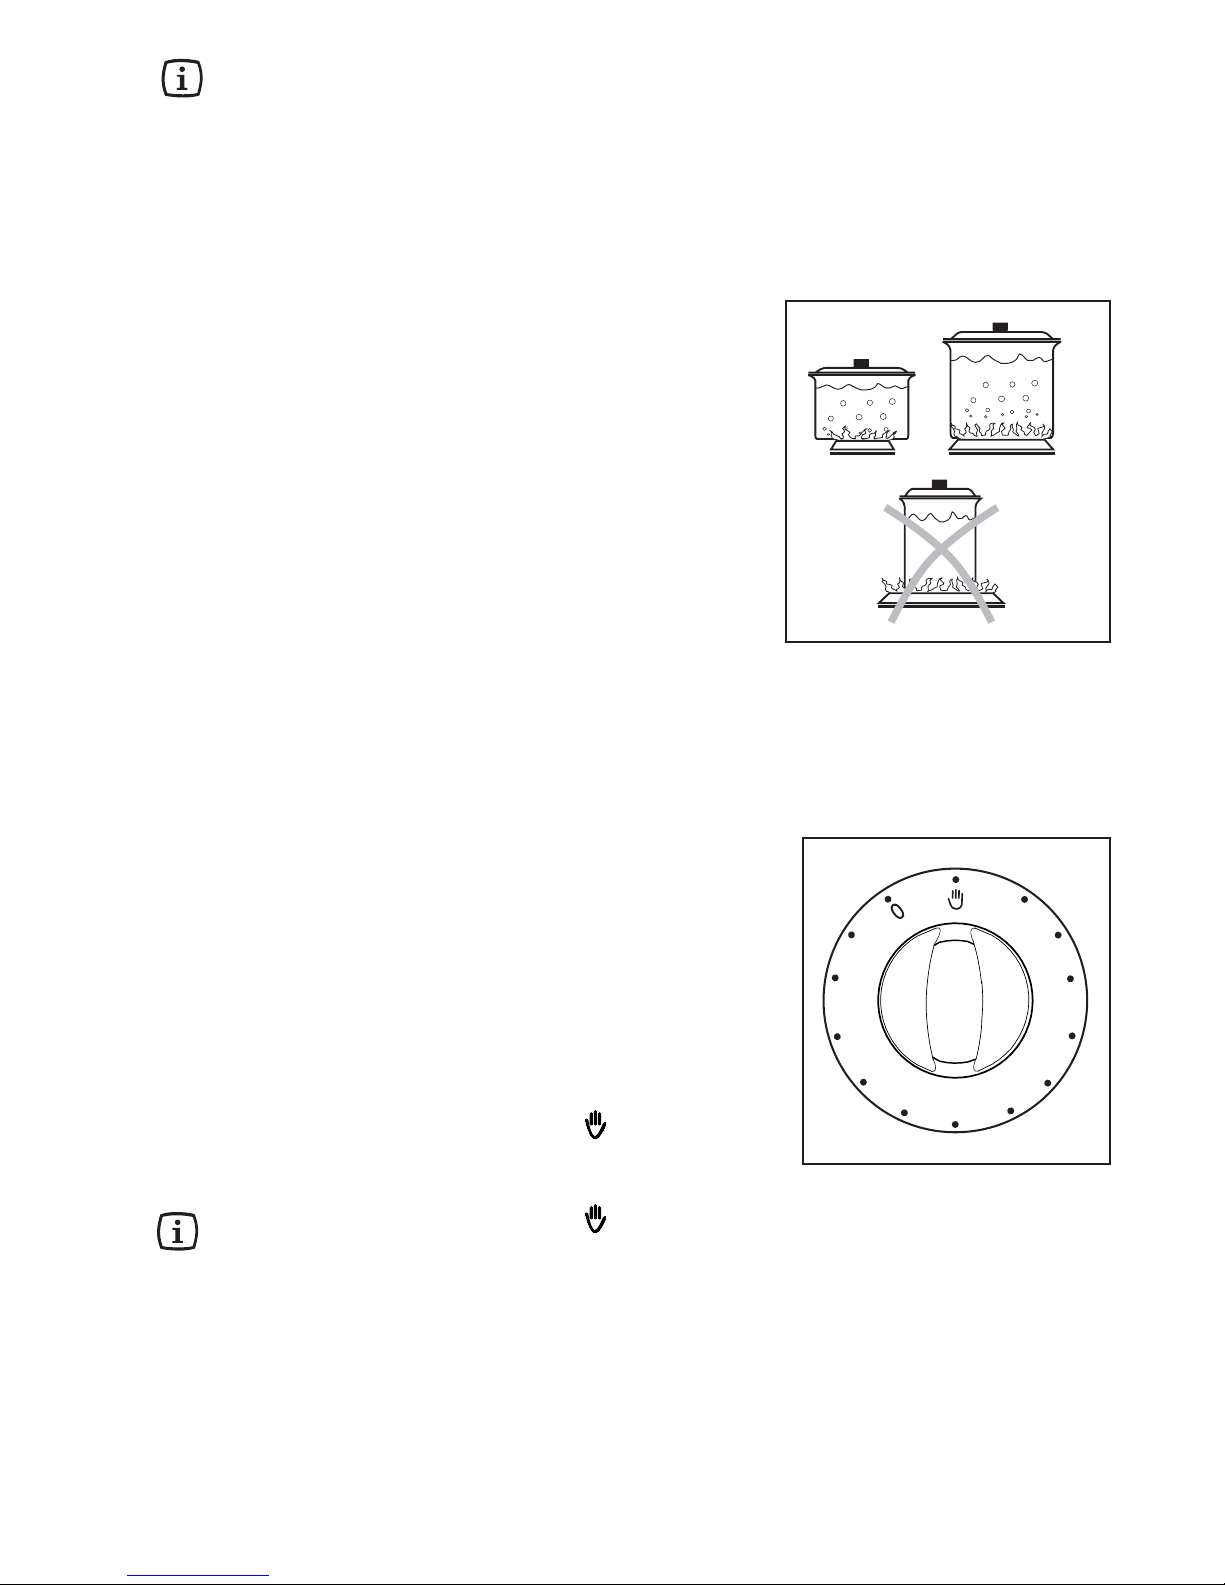
gas consumption as shown in the picture.
It is also advisable to cover any boiling casserole and,
as soon as the liquid starts boiling, lower the flame
enough to keep the boiling point.
The minute minder will mark the end of a timed period with
an acoustic alarm. The maximum timing is 120 minutes.
To set the minute minder:
1. Select the desired cooking function with the
oven function control knob.
2. Turn the minute minder control knob clockwise
until the 120-minute position and then back to
the required time.
3. Once the pre-set time has elapsed, an acoustic
signal will be heard and the oven will
automatically switch off.
Turn the minute minder control knob to the
position and the oven function and thermostat
control knobs to OFF position.
The minute minder
Turn the minute minder control knob to the
position if you want to cook without setting a timed
period.
20
40
60
80
100
120
Page 7
7
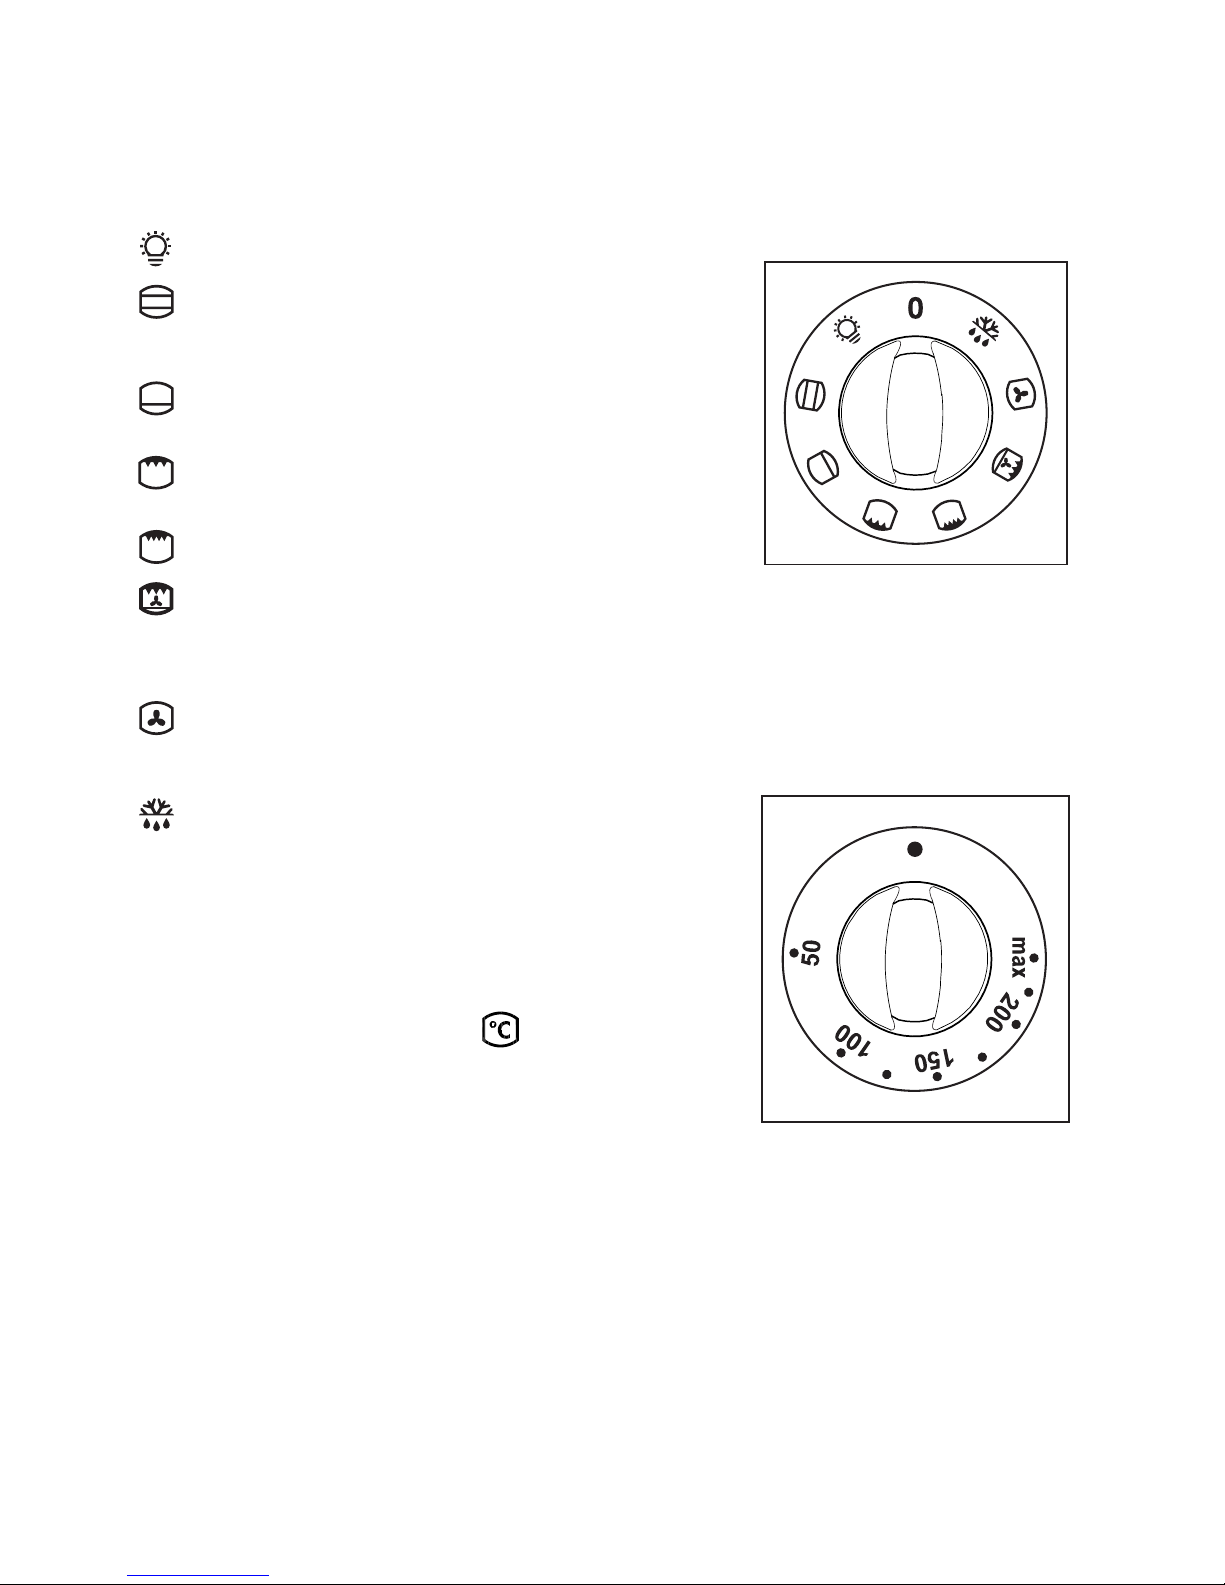
Oven Function Control Knob
0 The oven is off.
The oven light is on.
Conventional cooking - The heat comes
from both the top and bottom element,
ensuring even heating inside the oven.
Bottom heating element - The heat comes
from the bottom of the oven only.
Inner grill - It can be used for grilling small
quantities.
Full grill - The full grill element will be on.
Pizza - The bottom element provides direct
heat to the base of pizzas, quiches or pies,
while the fan ensures air is circulated to cook
the pizza toppings or pie fillings.
Fan cooking - This allows you to roast or roast
and bake simoultaneously using any shelf,
without flavour transference.
Defrost Setting - This setting is intended to
assist in thawing of frozen food.
Thermostat Control Knob
Turn the thermostat control knob clockwise to select
temperatures between 50°C and 230°C (MAX).
Thermostat Control Light
The thermostat control light will come on when the
thermostat control knob is turned. The light will remain on
until the correct temperature is reached. It will then cycle
on and off to show the temperature is being maintained.
The Safety Thermostat
This oven is provided with a safety thermostat. In case of
malfunctioning of the main thermostat, and consequential
over-heating, the safety device will stop the power supply
to the appliance. If this happens, call your local Service
Force Centre. Under no circumstances should you
attempt to repair the appliance yourself.
Electric Oven
Page 8
8
Before the First Use of the Appliance
Before using the appliance, remove all packaging,
both inside and outside the appliance, including
the advertising labels and any protective film.
Before using the oven, make sure the minute
minder control knob is in the position.
Before first use, the oven should be heated without food.
During this time, an unpleasant odour may be emitted.
This is quite normal.
1. Switch the oven function control knob to
conventional cooking .
2. Set the thermostat control knob to MAX.
3. Open a window for ventilation.
4. Allow the oven to run empty for approximately 45
minutes.
This procedure should be repeated with the full grill
function and the fan cooking function for approximately
5-10 minutes.
Once this operation is carried out, let the oven cool
down, then clean the oven cavity with a soft cloth
soaked in warm water to which a little mild washingup liquid has been added.
Storage Drawer
The storage drawer is located underneath the oven cavity.
During cooking the storage drawer may become
hot if the oven is on high for a long period of time,
therefore flammable materials such as oven gloves,
tea towels, plastic aprons etc. should not be
stored in the drawer.
Oven accessories such as baking sheets, will also
become hot, therefore care should be taken when
removing these items from the drawer whilst the
oven is in use or still hot.
Page 9
9
Using the Oven
Always cook with the oven door closed.
Stand clear when opening the drop down oven
door. Do not allow it to fall open - support the
door using the door handle, until it is fully open.
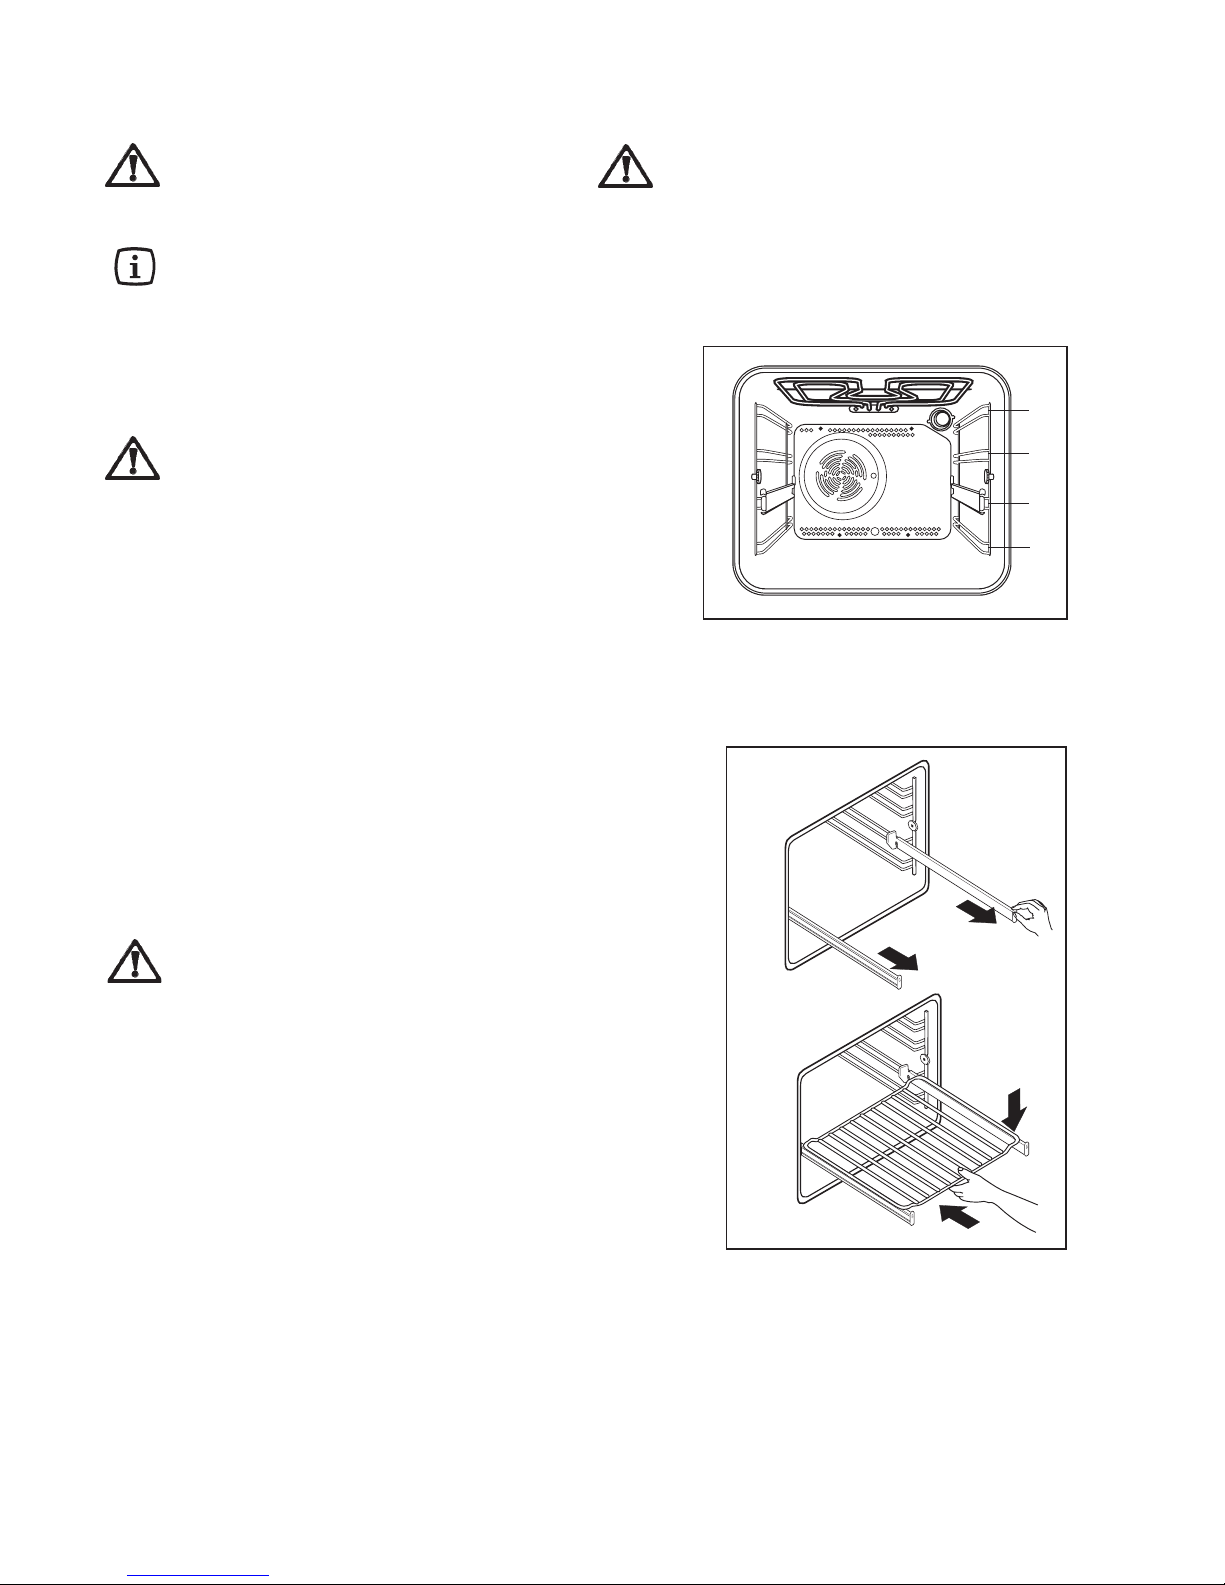
The oven has four shelf levels, and is supplied
with one shelf. The shelf positions are counted
from the bottom of the oven as shown in the
diagram.
It is important that the shelf is correctly positioned.
Do not place cookware directly on the oven
base.
When cooking with the oven or grill, the
cover must be kept open to avoid overheating.
Attention! - Do not place objects on the oven base
and do not cover any part of the oven with
aluminium foil while cooking, as this could cause
a heat build-up which would affect the baking
results and damage the oven enamel. Always
place pans, heat-resisting pans and aluminium
trays on the shelf which has been inserted in the
shelf runners.
Telescopic shelf supports
Shelf level 2 is fitted with telescopic shelf supports.
1. Pull the right and left hand telescopic shelf supports
completely out, as shown in the diagram.
2. Place the shelf or the grill pan on the telescopic shelf
supports as shown in the diagram, then gently push
them all inside the oven.
Do not attempt to close the oven door if the
telescopic shelf supports are not completely
inside the oven. This could damage the door
enamel and glass.
4
3
2
1
Page 10

10
Condensation and Steam
The oven is supplied with an exclusive system which
produces a natural circulation of air and the constant
recycling of steam. This system makes it possible
to cook in a steamy environment and keep the
dishes soft inside and crusty outside. Moreover,
the cooking time and energy consumption are
reduced to a minimum. During cooking steam may
be produced which can be released when opening
the oven door. This is absolutely normal.
However, always stand back from the oven
when opening the oven door during cooking or
at the end of it to allow any build up of steam
or heat to release.
When food is heated, it produces steam in the
same way as a boiling kettle does. When
steam comes in contact of the oven door
glass, it will condense and produce water
droplets.
To reduce condensation, ensure the oven is
well heated before placing food in the oven
cavity. A short oven pre-heating (about 10
minutes) will then be necessary before any
cooking.
We recommend you to wipe away
condensation after each use of the appliance.
Cookware
• Use any oven proof cookware which will withstand
temperatures of 230 °C.
• Baking trays, oven dishes, etc. should not be placed
directly against the grid covering the fan at the back of
the oven, or placed on the oven base.
• Do not use baking trays larger than 30 cm x 35 cm (12
in x 14 in) as they will restrict the circulation of heat
and may affect performance.
The effects of dishes on cooking
results
Dishes and tins vary in their thickness, conductivity,
colour, etc. which affects the way they transmit heat to
the food inside them.
A Aluminium, earthenware, oven glassware and bright
shiny utensils reduce cooking and base browning.
B Enamelled cast iron, anodized aluminium, aluminium
with non-stick interior and coloured exterior and dark,
heavy utensils increase cooking and base browning.
Hints and Tips for using the Oven
Pottery
Remember that a wide-bottomed pan allows a faster
cooking than a narrow one. Always use pots which
properly fit what you have to cook. Particularly make
sure that the pans are not too small for liquids, since
these could easily overflow. Moreover, the pans should
not be too large for a faster cooking. In fact, grease and
juices may spread on the bottom and burn easily.
It is better to use non-openable moulds for baking cakes.
In fact, an openable mould lets juices and sugar leak
through, falling on the bottom of the oven and
consequently burning on the bottom of the baking tray,
making cleaning difficult. Avoid putting plastic-handled
pans in the oven as they are not heat-proof. You should
use pans with the right diameter to fit the burner, in order
to make the most out of it, thus reducing gas
consumption. It is also advisable to cover any boiling
casserole and, as soon as the liquid starts boiling, lower
the flame enough to keep the boiling point.
Page 11

11
Hints and Tips on Cooking Fish and
Meat
You can place meat in oven proof dishes, or directly on the
oven shelf. In this case, remember to place the drip tray
in the first position from the bottom with some water in it.
The dripping pan will avoid the falling of melted fat on the
oven base.
White meat, poultry and fish in general, need to be
cooked at a medium temperature (between 150 and
175°C). If you need to cook red meat (slightly browned on
the outside and more gently cooked in the inside), a
higher temperature (between 200 and 230°C) for a short
time is recommended.
Hints and Tips on baking
Cakes usually need to be cooked at a medium temperature (between 150 and 200°C).
A short oven pre-heating (about 10 minutes) is
recommeded when cooking cakes or baking. Once the
cooking has been started, keep the oven door closed
during all the cooking time, and check the cooking results
through the oven door glass.
Hints and Tips on grilling
If you need to grill meat or fish, place them directly on the
shelf after spreading a little oil on them.
In the grill function, heat comes only from the top element.
Therefore, you need to adjust the cooking level depending
on meat or fish's thickness.
Always remember to place the dripping pan in the lower
position with some water in it.
Cooking times
Cooking times vary according to the type of food to be
cooked, its consistency, and volume.We suggest that
you take particular note of your first cooking experiments
with the oven, since operating in the same conditions for
the same dishes you will of course obtain similar results.
Only experience will enable you to make the appropriate
changes to values given on charts.
.
Defrosting
The oven fan operates without heat and circulates the
air, at room temperature, inside the oven. This increases
the speed of defrosting. However, please note that the
temperature of the kitchen will influence the speed of
defrosting.
This function is particularly suitable for delicate food which
could be damaged by heat, e.g. cream filled gateaux,
iced cakes, pastries, bread and other yeast products.
How to Use Defrosting
Turn the oven function control knob to ans set the
thermostat control knob to OFFposition .
Hints and Tips
• Cover food with a lid, aluminium foil or plastic film to
prevent drying out during defrosting.
• ALWAYS COOK THOROUGHLY IMMEDIATELY
AFTER THAWING.
• Frozen food should be placed in a single layer when
ever possible and turned over half way through the
defrosting process.
• Only joints of meat and poultry up to 2 kg. (4 lb.) are
suitable for defrosting in this way.
Refer to the following table for approximate defrosting
times.
Page 12
12
4
3
2
1
4
3
2
1
CAKES
Whipped up kneading
2 170 2 (1 and 3)* 160 45 ~ 60 In cake mould
Shortbread dough
2 170 2 (1 and 3)* 160 20 ~ 30 In cake mould
Butter-milk cheese cake
1 160 2 150 60 ~ 80 In cake mould
Apple cake 1 180 2 (1 and 3)* 170 40 ~ 60 In cake mould
Strudel 2 175 2 150 60 ~ 80
Jam-tart 2 175 2 (1 and 3)* 160 30 ~ 40
Fruit cake 1 175 1 160 45 ~ 60 In bread pan
Sponge cake 1 175 2 (1 and 3)* 160 30 ~ 40 In cake mould
Christmas cake 1 170 1 160 40 ~ 60 In cake mould
Plum cake 1 170 1 160 50 ~ 60 In bread pan
Flat cake 2 170 2 160 35 ~ 45 In baking tray
Small cakes 2 175 2 (1 and 3)* 160 25 ~ 35 In baking tray
Biscuits 2 160 2 (1 and 3)* 150 20 ~ 30 In baking tray
Meringues 2 100 2 (1 and 3)* 100 90 ~ 120 In baking tray
Buns 2 190 2 (1 and 3)* 180 12 ~ 20 In baking tray
Pastry: Choux 2 200 2 (1 and 3)* 190 15 ~ 25 In baking tray
BREAD AND PIZZA
1000 White bread 1 190 2 180 40 ~ 60 1-2 pieces
500 Rye bread 1 190 1 180 30 ~ 45 In bread pan
500 Bread rolls 2 200 2 (1 and 3)* 175 20 ~ 35 6-8 rolls
700 Pizza, large 1 210 1 200 15 ~ 25 in baking tray
500 Pizza, small 1 210 1 200 10 ~ 20 in baking tray
FLANS
Pasta flan 2 200 2 (1 and 3)* 175 40 ~ 50 in mould
Vegetable flan 2 200 2 (1 and 3)* 175 45 ~ 60 in mould
Quiches 1 200 2 (1 and 3)* 180 35 ~ 45 in mould
Lasagne 2 180 2 160 45 ~ 60 in mould
Cannelloni 2 200 2 175 40 ~ 55 in mould
MEAT
1000 Beef 2 190 2 175 50 ~ 70 On grid
1200 Pork 2 180 2 175 100 ~ 130 On grid
1000 Veal 2 190 2 175 90 ~ 120 On grid
1500
English roast beef
1500 underdone 2 210 2 200 50 ~ 60 On grid
1500 done 2 210 2 200 60 ~ 70 On grid
1500 well done 2 210 2 200 70 ~ 80 On grid
2000 Shoulder of pork 2 180 2 170 120 ~ 150 With rind
1200 Shin of pork 2 180 2 160 100 ~ 120 2 pieces
1200 Lamb 2 190 2 175 110 ~ 130 Leg
1000 Chicken 2 190 2 175 60 ~ 80 Whole
4000 Turkey 2 180 2 160 210 ~ 240 Whole
1500 Duck 2 175 2 160 120 ~ 150 Whole
3000 Goose 2 175 2 160 150 ~ 200 Whole
1200 Rabbit 2 190 2 175 60 ~ 80 Cut in pieces
1500 Hare 2 190 2 175 150 ~ 200 Cut in pieces
800 Pheasant 2 190 2 175 90 ~ 120 Whole
Meat loaf 2 180 2 160 40 ~ 60 in bread pan
FISH
1200 Trout/Sea bream 2 190 2 (1 and 3)* 175 30 ~ 40 3-4 fishes
1500 Tuna fish/Salmon 2 190 2 (1 and 3)* 175 25 ~ 35 4-6 fillets
Weight (gr.)
TYPE OF DISH
Level
Fan Oven
NOTES
Cooking
time
minutes
temp. °C
Level
temp. °C
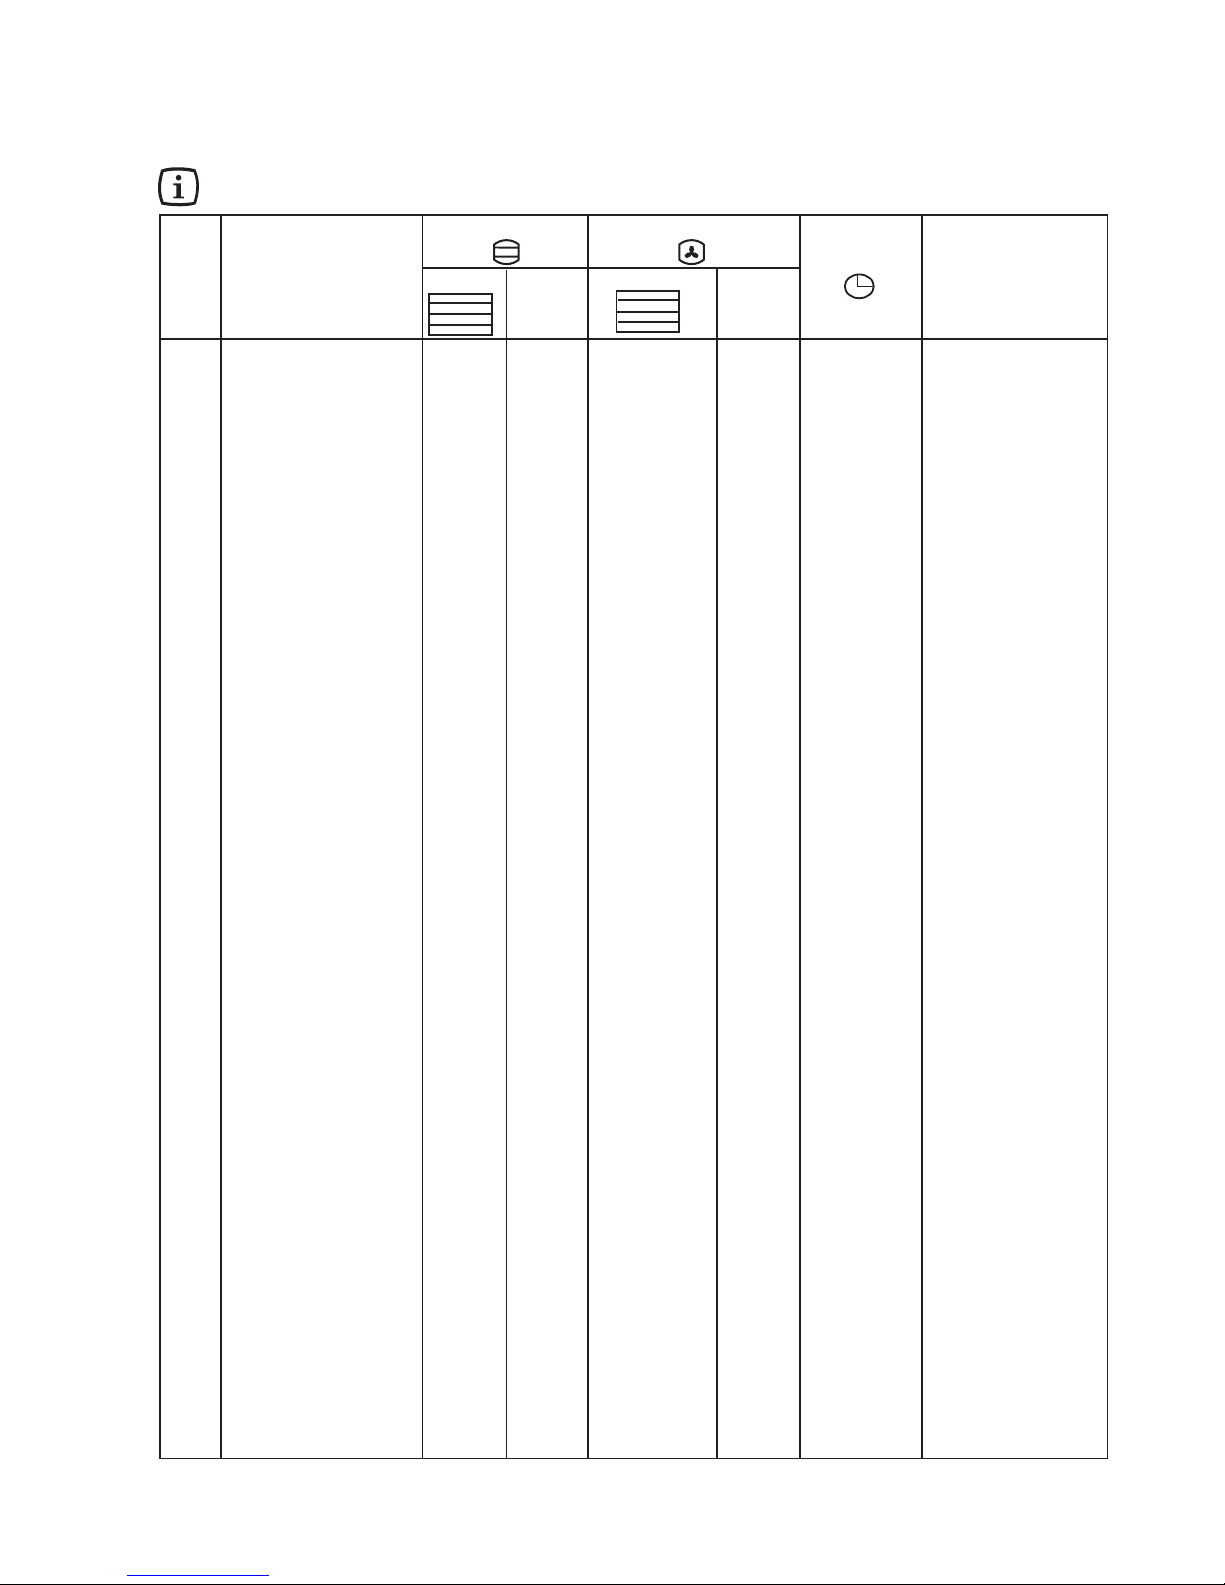
Cooking Chart- Conventional and Fan Oven
Cooking times do not include pre-heating time.A short oven pre-heating (about 10 minutes) is necessary before any cooking.
Conventional Oven
These charts are intended as a guide only. It may be necessary to increase or decrease the temperature to suit your
individual requirements. Only experience will enable you to determine the correct setting for your personal requirements.
If you wish to cook more than one dish at the same time, we suggest that you change the cooking levels of your dishes during
the last 5-10 minutes in order to obtain a more uniform colour of your dishes.
(*) If you need to cook more than one dish at the same time, we recommend you to place them on the levels quoted between
brackets. Shelf positions are counted from bottom of the oven.
Page 13
13
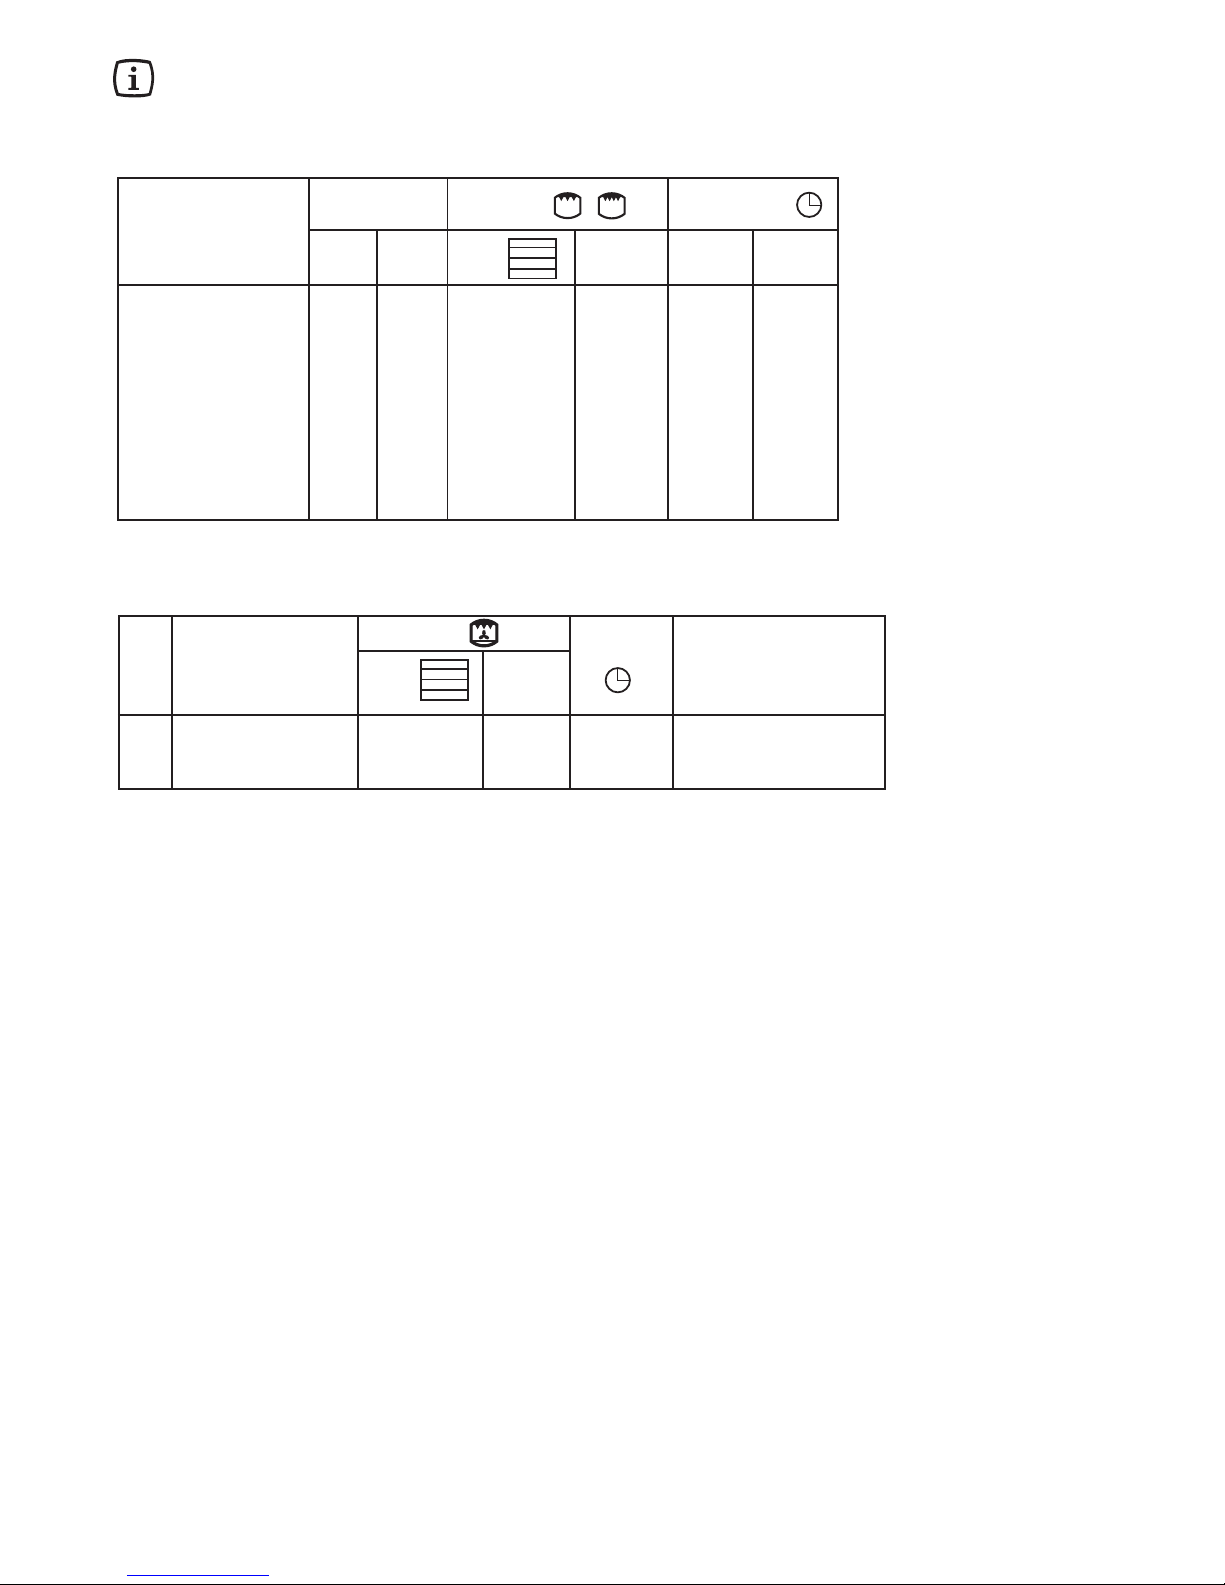
Fillet steaks
4 800 3 max 12 ~ 15 12 ~ 14
Beef-steaks 4 600 3 max 10 ~ 12 6 ~ 8
Sausages 8 — 3 max 12 ~ 15 10 ~ 12
Pork chops 4 600 3 max 12 ~ 16 12 ~ 14
Chicken (cut in two) 2 1000 3 max 30 ~ 35 25 ~ 30
Kebabs 4 — 3 max 10 ~ 15 10 ~ 12
Chicken (breast) 4 400 3 max 12 ~ 15 12 ~ 14
Hamburger 6 600 3 max 10 ~ 15 8 ~ 10
Fish (fillets) 4 400 3 max 12 ~ 14 10 ~ 12
Sandwiches 4-6 — 3 max 3 ~ 7 —
Toast 4-6 — 3 max 2 ~ 4 2 ~ 3
Grilling
Upper
side
°C
temp.
Pieces Weight
Quantity
Cooking time
(minutes)
Lower
side
Grilling -
TYPE OF DISH
Level
4
3
2
1
Cooking times in the tables do not include pre-heating. We recommend to pre-heat the oven for about 10
minutes before cooking.
4
3
2
1
700 Pizza, large 1 200 15 ~ 25 on baking tray
500 Pizza, small 1 20 0 10 ~ 20 on baking tray or on grid
500 Flat cake 1 200 15 ~ 25 on baking tray
Weight (gr.)
TYPE OF DISH
Level temp. °C
Cooking
time
minutes
NOTES
Pizza
Pizza
Page 14

14
Before any maintenance or cleaning can be carried
out, you must DISCONNECT the appliance from
the electricity supply.
This appliance cannot be cleaned with steam or
with a steam cleaning machine.
The Hob Top
The hob is best cleaned whilst it is still warm, as spillage
can be removed more easily than if it is left to cool.
Regularly wipe over the hob top using a soft cloth well
wrung out in warm water to which a little wasing up liquid
has been added. Avoid the use of the following:
- household detergent and bleaches;
- impregnated pads unsuitable for non-stick saucepans;
- steel wool pads;
- bath/sink stain removers.
Should the hob top become heavily soiled, it is
recommended that a cleaning product such as Hob Brite
or Bar Keepers Friend is used.
Pan Supports
The pan supports are dishwasher proof. If washing them
by hand, take care when drying them as the enamelling
process occasionally leaves rough edges. If necessay,
remove stubborn stains using a paste cleaner.
The Burners
The burner caps and crowns can be removed for cleaning.
Wash the burner caps and crowns using hot soapy
water, and remove marks with a mild paste cleaner. A
well moistened soap impregnated steel wool pad can
be used with caution, if the marks are particularly difficult
to remove.
After cleaning, be sure to wipe dry with a soft cloth.
Ignition electrode
The electric ignition is obtained through a ceramic
"electrode" and a metal electrode. Keep these
components well clean, to avoid difficult lighting, and
check that the burner crown holes are not obstructed.
Maintenance and Cleaning
Page 15

15
Oven lamp replacement
Disconnect the appliance from the electricity
supply.
If the oven bulb needs replacing, it must comply with
the following specifications: electric power, 15 W/25 W;
electric rate, 230 V (50 Hz); resistant to temperatures
of 300°C; connection type: E14. These bulbs are
available from your local Service Force Centre.
To replace the faulty bulb:
1. Ensure the oven is disconnected from the electrical
supply.
2. Turn the glass cover anticlockwise.
3. Remove the faulty bulb and replace it with the new
one.
4. Refit the glass cover.
5. Reconnect to the electrical supply.
Cleaning the Oven
The oven should be kept clean at all times. A
build-up of fats or other foodstuffs could result in
a fire, especially in the grill pan.
Cleaning materials
Before using any cleaning materials on your oven, check
that they are suitable and that their use is recommended
by the manufacturer.
Cleaners that contain bleach should NOT be used as
they may dull the surface finishes. Harsh abrasives should
also be avoided.
• Never use steam or steam machines to clean the
appliance.
Never line any part of the oven with aluminium
foil. It would result in an accumulation of heat
which might damage the cooking results and
also damage the enamel.
External cleaning
Regularly wipe over the control panel, oven door and door
seal using a soft cloth well wrung out in warm water to
which a little washing up liquid has been added.
To prevent damaging or weakening the door glass
panels avoid the use of the following:
• Household detergent and bleaches
• Impregnated pads unsuitable for non-stick
saucepans
• Brillo/Ajax pads or steel wool pads
• Chemical oven pads or aerosols
• Rust removers
• Bath/Sink stain removers
Clean the outer and inner door glass using warm soapy
water. Should the inner door glass become heavily soiled
it is recommended that a cleaning product such as Hob
Brite, or Bar Keepers Friend is used.
Page 16
16
Oven Cavity
The enamelled oven cavity is best cleaned whilst the
oven is still warm.
Wipe the oven over with a soft cloth soaked in warm
soapy water after each use. From time to time it will be
necessary to do a more thorough cleaning, using a
proprietary oven cleaner.
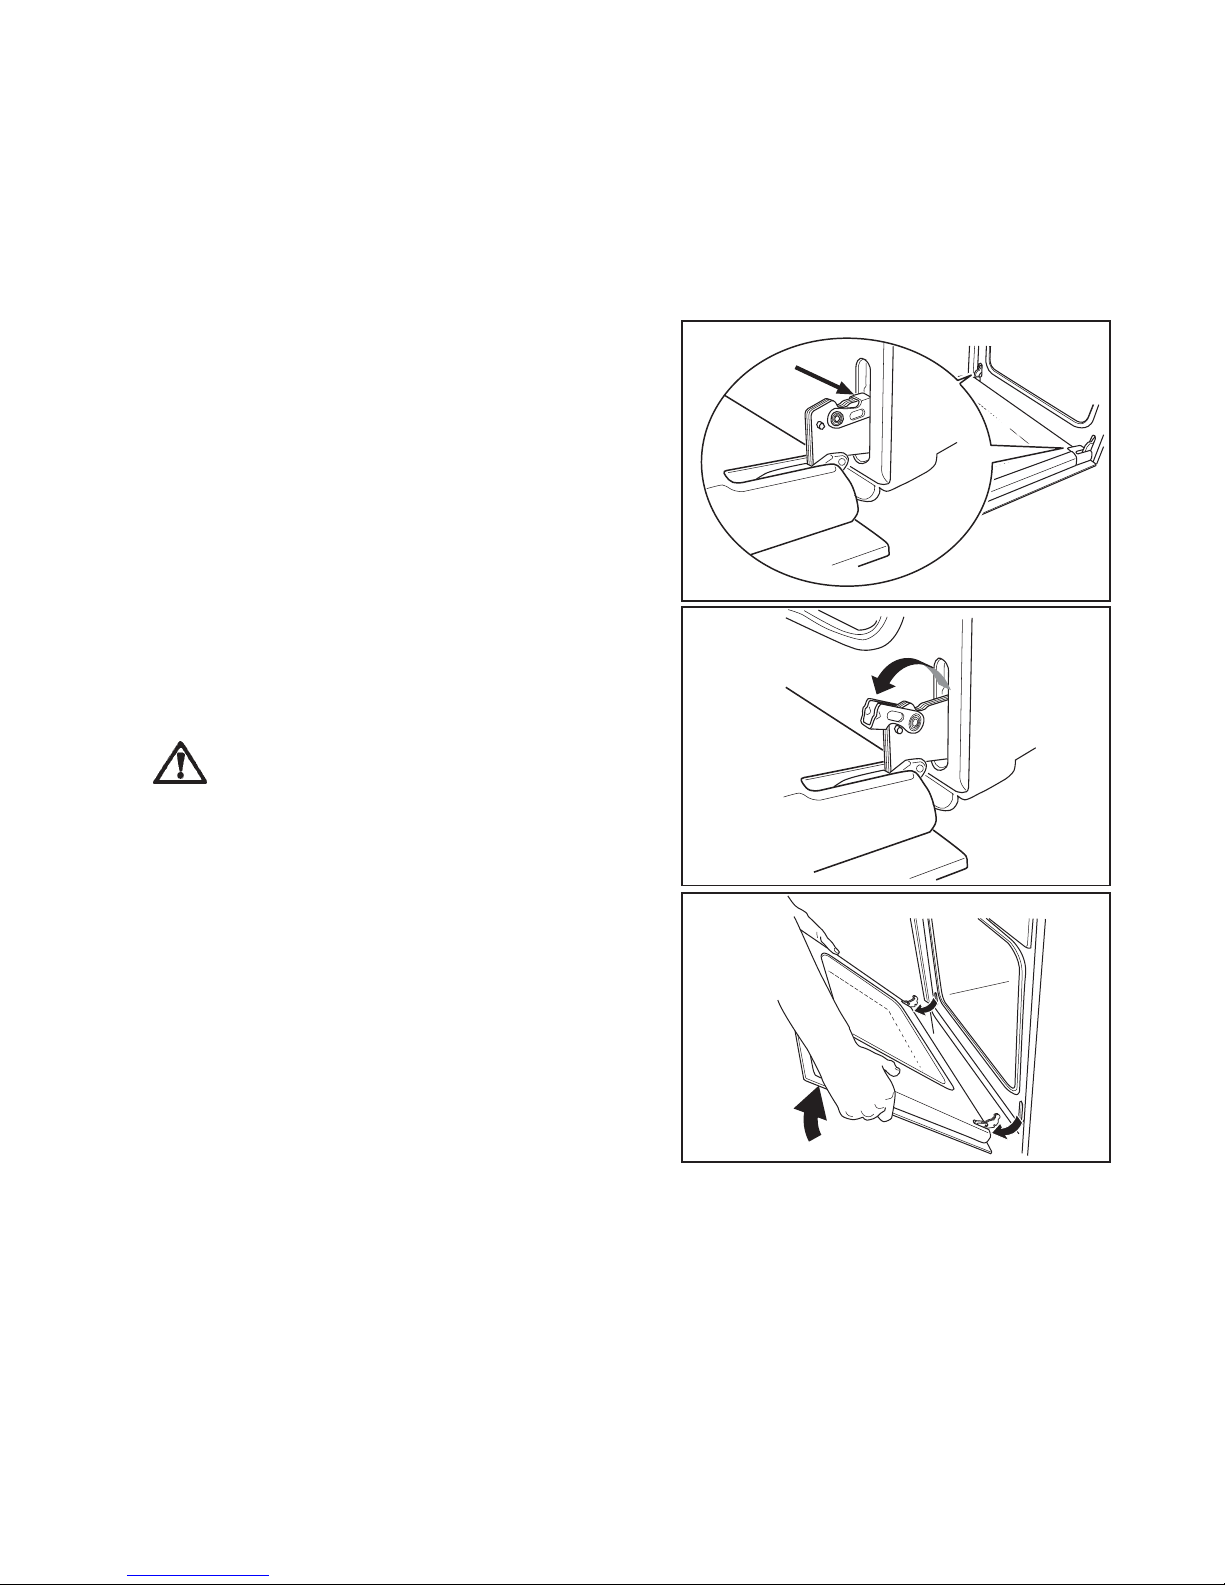
The Oven Door and its gasket
Before cleaning the oven door, we recommend you to
remove it from the oven.
Proceed as follows:
1. open the oven door completely;
2. find the hinges linking the door to the oven (see
picture 1);
3. unlock and turn the small levers located on the two
hinges (see picture 2);
4. handle the door by its left- and right-hand sides,
then slowly turn it towards the oven until it is halfclosed (see picture 3);
5. gently pull the oven door off its site (see picture 3);
6. place it on a steady plan;
Clean the oven door glass with warm soapy water and a
softh cloth only. Never use harsh abrasives.
Once the cleaning is carried out, refit the oven door,
following the procedure in reverse.
DO NOT clean the oven door while the glass
panels are warm. If this precaution is not observed
the glass panel may shatter.
If the door glass panel becomes chipped or has
deep scratches, the glass will be weakened and
must be replaced to prevent the possibility of the
panel shattering. Contact your local Service Centre
who will be pleased to advise further.
Models in stainless steel or aluminium:
We recommend to clean the oven door using only a wet
sponge and dry it up after cleaning with a soft cloth.
Never use steel wool, acids or abrasive products as they
can damage the oven surface.
Clean the oven control panel following the same
precautions.
The correct operation of the oven is ensured by a gasket
placed round the edge of the oven cavity.
• Periodically check the condition of this gasket. If
necessary, clean it without using abrasive cleaning
products.
•
If the gasket shows to be damaged, call you local
Service Centre. Do not use the oven until it has been
repaired.
1
2
3
Page 17

17
Lid cleaning
All the cooker lids can be disassembled, to allow a
better cleaning.
The crystal lid can be dissasembled as shown in the
diagram.
Clean the crystal lid only with warm water and avoid the
use of rough cloths or abrasive substances.
After a proper cleaning, carefully reposition the lid
into its hinges.
Balancing the lid
Appliances provided with crystal lids are equipped with
specially balanced springs, inserted in the hinges at the
back of the appliance, to allow the lid to be closed
smoothly and easily.
You can use a screwdriver to adjust the closure of the
lid. The necessary force for opening/closing the lid can
be increased by turning the adjusting screw 2 or 3 times
as shown in the diagram.
Controls - Sundries
Periodically check the condition of the flexible pipe of
gas connection and make it replaced by skilled
technicians as soon as it shows abnormalities. Annual
replacement is recommended.
Have the cocks periodically lubricated by skilled
technicians. In case of unusual working have the range
checked by skilled technicians.
Oven Shelves and Shelf
Supports
To clean the oven shelves, soak in warm soapy water and
remove stubborn marks with a well wetted soap
impregnated pad.
Rinse well and dry with a soft cloth.
The shelf supports can be removed for easy cleaning.
Proceed as follows:
1) remove the front screw while keeping the shelf support
in position with the other hand (diagram 1);
2) disengage the rear hook and take off the shelf support
(diagram 2);
3) once the cleaning is carried out, refit the shelf supports
following the procedure in reverse.
Please, ensure the retaining nuts are secure when
refitting the shelf support.
When cleaning the shelf supports, take care not
to remove the lubricating grease behind the
telescopic runners. This is meant to ensure their
good operation.
1
2
Page 18
18
Something not working
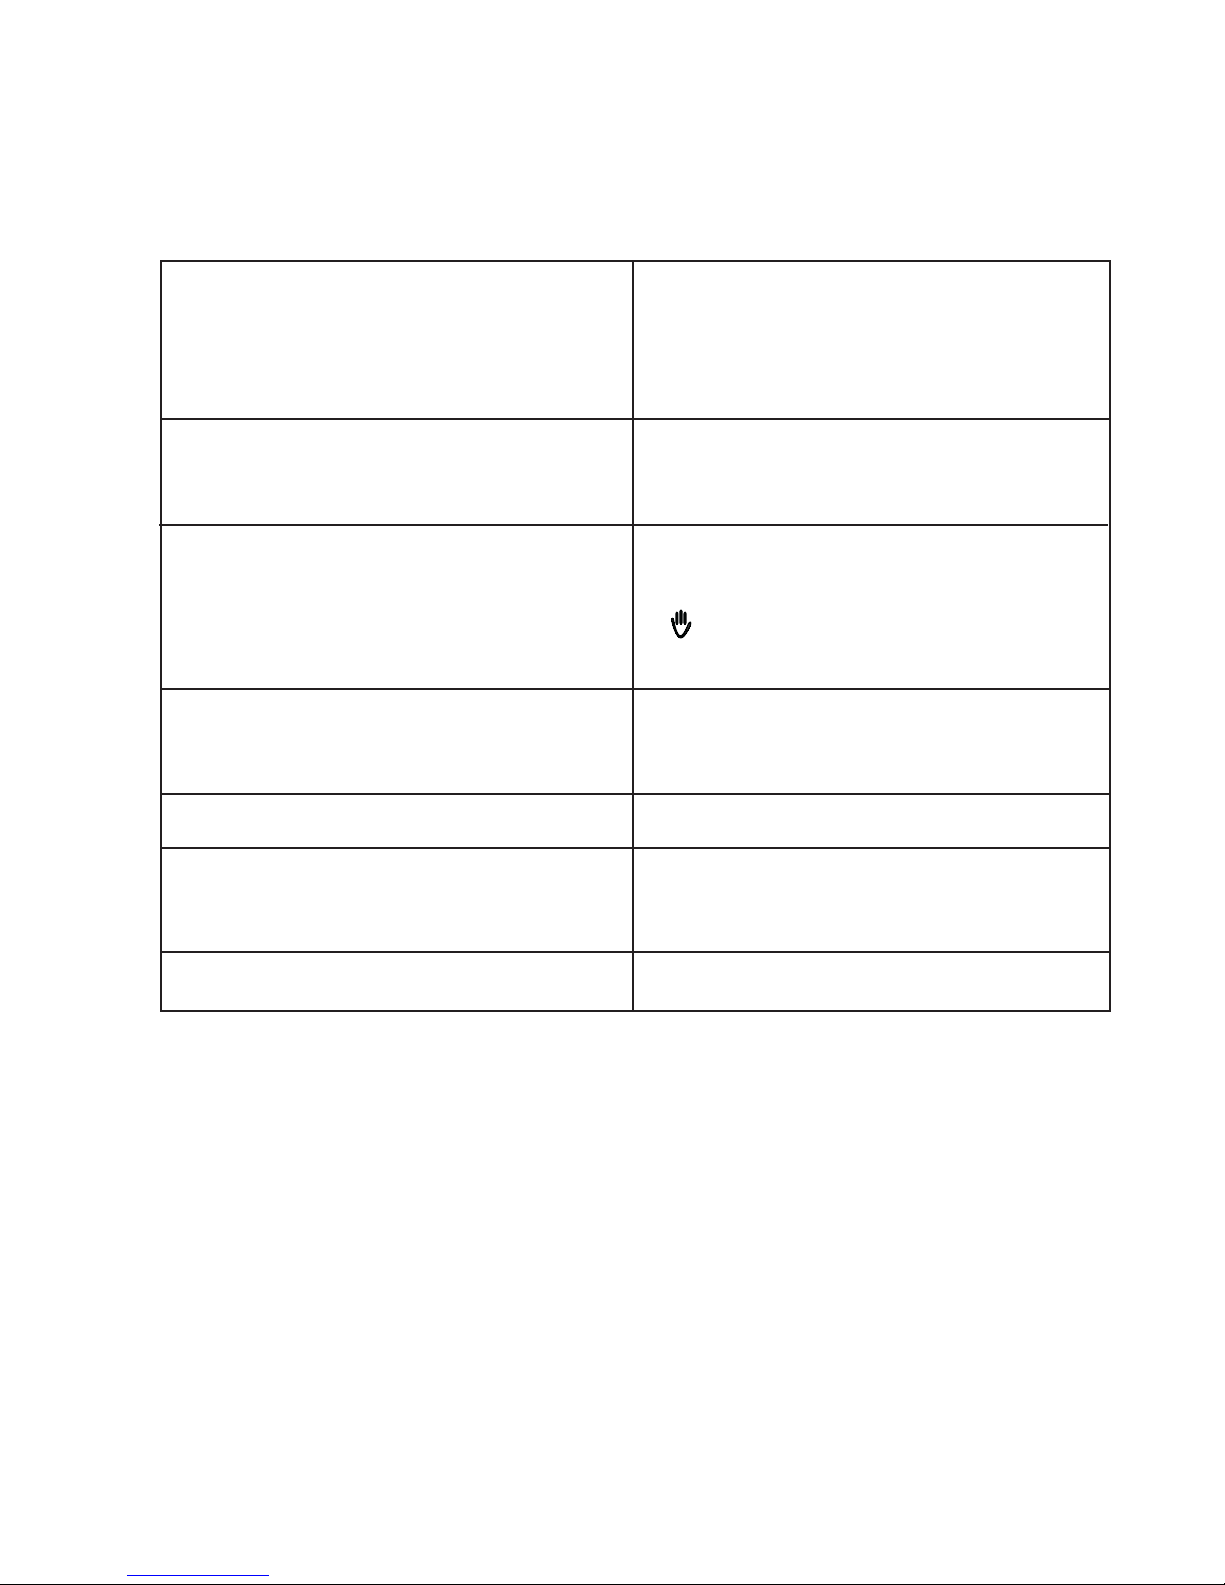
SYMPTOM
There is no spark when lighting the gas.
The gas ring burns unevenly.
The oven does not come on.
The oven light does not come on.
It takes too long to finish the dishes, or they are
cooked too fast.
Steam and condensation settle on the food and the
oven cavity.
The oven fan is noisy.
SOLUTION
Check that the unit is plugged in and the electrical
supply is switched on
Check the mains fuse has not blown
Check the burner cap and crown have been
replaced correctly, e.g. after cleaning.
Check the main jet is not blocked and the burner
crown is clear of food particles.
Check the burner cap and crown have been
replaced correctly, e.g. after cleaning.
Check that a cooking function has been selected.
Check that the oven door is completely closed.
Check that he minute minder control knob is in the
position.
Check that the socket switch or the switch from the
mains supply to the appliance are ON.
Select a function with the oven function control
knob.
Check the light bulb, and replace it if necessary
(see "Oven lamp replacement").
The temperature may need adjusting.
Refer to the contents of this booklet, especially to
the chapter “Using the Oven”.
Leave dishes inside the oven no longer than 15-20
minutes after the cooking is completed.
Check that shelves and bakeware are not vibrating
in contact with the oven back panel.
If after all these checks, the appliance still does not work, contact your local Service Force Centre.
If the appliance is not working correctly, please carry out the following checks, before contacting your local Service
Centre.
IMPORTANT:
If you call out an engineer to a fault listed below, or to repair a fault caused by incorrect use or installation,
a charge will be made even if the appliance is under guarantee.
Page 19

19
Service and Spare Parts
If your appliance does not work correctly, even after
carrying out all the checks whichare listed in the previous
chapter, then please contact your local Service Centre,
specifying the type of malfunctioning, the appliance model
(Mod.), the product number (Prod. No.) and the serial
number (Ser. No.) marked on the identification plate.This
plate is placed on the front external edge of the oven
cavity (see figure).Service and Spare Parts
Original spareparts, certified by the
product manufacturer and carrying
this symbol are only available at our
Service Centre and authorized
spareparts shops
Page 20

20
Technical Data
Appliance Class 2 sub class 1 and Class 1
APPLIANCE CATEGORY: I3
APPLIANCE GAS SUPPLY: LPG 30 mbar
Dimensions
Height 900 mm
Depth 600 mm
Width 600 mm
Oven Capacity 53 litres
Hob
Front left burner (triple crown) 3,60 kW
Rear left burner (semi-rapid) 1,60 kW
Front right burner (auxiliary) 0,95 kW
Rear right burner (semi-rapid) 1,60 kW
Instructions for the Installer
Oven
Top heating element 800 W
Bottom heating element 1,000 W
Oven elements 1,800 W
Grill Element 1,650 W
Convection element 2,000 W
Pizza 2,675 W
Convection fan 25 W
Oven light 25 W
Total appliance electric rating 2,700 W
Supply voltage (50 Hz) 230 V
Characteristics of Burners, Nozzles and Taps
Burner Nominal Power LPG (Butane "A") Diameter Feeding
Tap. By-Pass Pressure
kW kCal/h Nozzle g/h mbar (*)
Auxiliary 0,95 814 50 75 28
Semi-rapid 1,60 1368 65 126 35 30
Triple crown 3,60 3080 98 284 56
(*) 1 mbar = 10 mm. water coloumn
Page 21

21
Instructions for the installer
This appliance cannot be positioned on a
base.
The following instructions are meant for a qualified
installer, in order that the operations of installation,
regulation, and service are executed according to the
existing regulations.
Before using the unit, take off the special protective layer
which protects the stainless steel and anodyzed tin
parts. Whenever changes are mode involving the
disconnection of the machine it is necessary to proceed
with maximum caution.
Positioning and levelling
In order to function normally it is imperative that this unit
is installed in a well ventilated kitchen (regarding the
installation follow the existing regulations). The appliance
is of freestanding type and must be installed according
to the existing regulations.
Feet Assembly
Before installing the cooker, it is necessary to
assemble the supplied feet.
1. Remove the hob pan supports, the burner caps and
crowns and the oven accessories.
2. Carefully lean the cooker on its back, paying attention
not to cause any damage.
3. Adjust the feet height by unscrewing the bottom part
of each foot, until you obtain the required height (height
can be adjusted from 850 to 880 mm).
4. Insert the feet into the relevant holes indicated in the
diagram.
5. Lift the cooker in vertical position. Replace the crowns,
the burner caps, the hob pan supports and the oven
accessories.
6. If necessary, adjust the cooker horizontal levelling by
turning the bottom part of the feet, until the appliance
is completely stable.
FO 2283
THE MANUFACTURING COMPANY DECLINES
ANY RESPONSABILITY FOR POSSIBLE
DAMAGES RESULTING FROM AN
INSTALLATION WHICH DOESN'T COMPLY
WITH THE RULES IN FORCE
Page 22

22
The connection of the cooker to the gas bottle or to the
mains should only be carried out after the unit has been
regulated for use with the type of gas which will be
supplied. Be sure that you are going to connect the unit
to the same kind of gas written on the plate. For safe
operation, minimum consumption and longer duration of
the unit, make sure that the pressure of supply is equal
to the value indicated in the Technical Data section.
IMPORTANT
Once installation is complete, check the perfect
seal of every pipe fitting, using a soapy solution,
never a flame.
Rigid connection
For a greater safety, it is advisable to make a rigid
connection to the gas installation. The coupling to the
unit is of Gc 1/2 type. If the connection pipe is in metal,
an insulated adaptor must be interposed between the
coupling and the tube.
Connection with flexible pipe
Use a flexible gas pipe, according to the characteristics
indicated by the existing regulations. The pipe should be
well fitted and fixed by means of a clamp. To reach the
supply connection, the pipe should be passed behind
the cooker as shown in the diagram. We bring to your
attention some of the main existing regulations. The
flexible tube must not be reach in any point a temperature higher than 90°C, it should not be no longer than 1,5m.
It should not be subjected to any kind of traction or torsion
and it should not be allowed to be excessively bent. An
easy access should be allowed to periodically check its
condition.
Should any leaking occur, do not repair il but instead
replace it.
Service
To guarantee good working order and safety, the
regulation taps should be periodically greased. Service
can be made in the following way: Remove the knobs
and the control panel after having removed the fixing
screws. Unscrew the 2 screws placed at the sides of the
burner valve shaft. Unwind the cone and clean it with
care; then spread over the valve a thin layer of grease not
soluble by hydrocarbon. Pay attention to the fact that
too much grease can obstruct the passage of gas. To fit
again the burner valve in the normal position, you should
reverse the procedure outlined above.
Gas connection
FO 0163
Electric cable
Flexible pipe
Page 23
23
Electrical connection
Before making the connection make sure that the energy
power available in the user's house is sufficient for the
normal supply of this appliance (see rating plate), the unit
is correctly connected to earth through a suitable plug
and according to the installation country laws.
This appliance is supplied with connection cable provided
with plug. The plug must be connected to a proper
socket.
The socket or the omnipolar switch used for the
connection must be easily reached with the installed
appliance. The applinace is supplied with a plug. The plug
has to be connected to an adequate socket.
If you wish to directly connect to the mains, you have to
interpose an omnipolar switch with a minimum opening
between contacts of 3mm, between the unit and the
mains, complying with the existing regulations. The
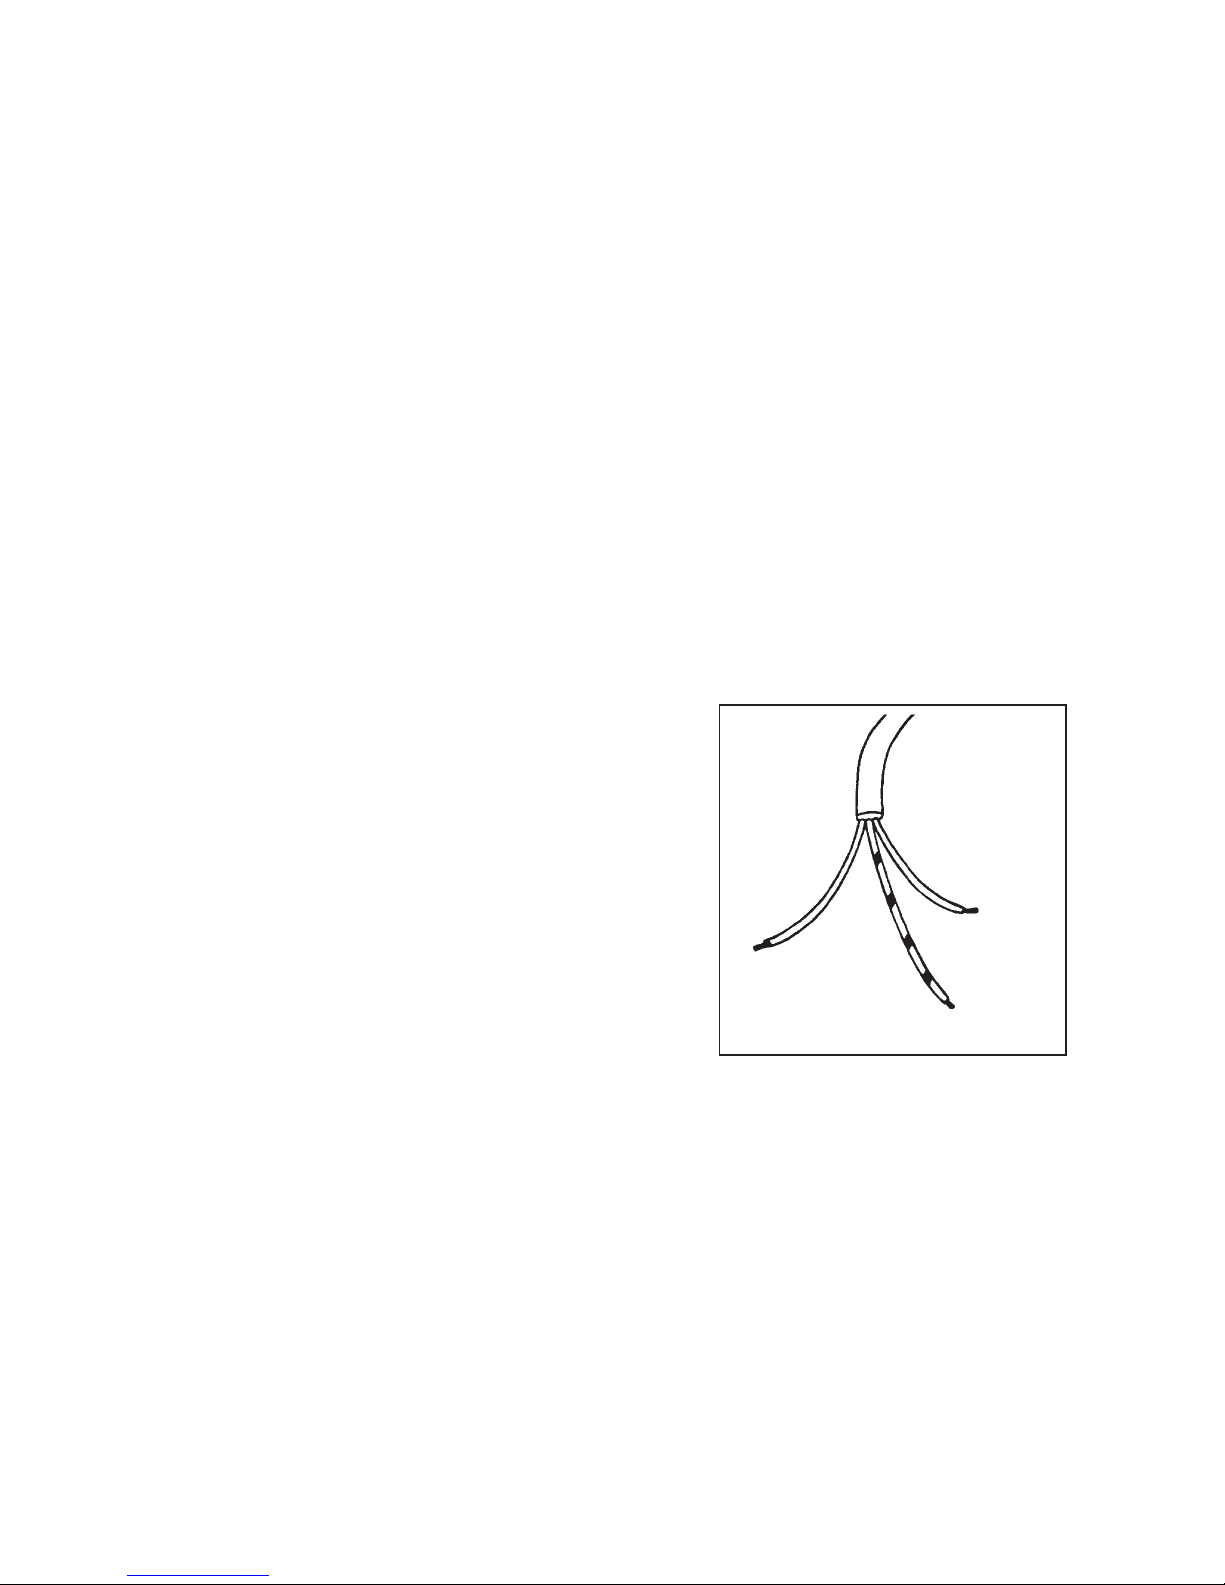
yellow/green earth wire must not be interrupted by the
switch. The brown live wire (originating from the clamp of
the cooker junction box) must always be connected to
the phase of the mains supply. In any case, the supply
cord must be positioned in such a way as it doesn't
reach in any point a temperature higher than 90°C.
Replacement of the supply cable
Should the supply cord need to be replaced, choose only
cable types from the following:H07 RN-F, H05 RN-F, H05
RR-F, H05 VV-F, H05 V2V2-F (T90), H05 BB-F (section:
3 x 1 mm2). It is necessary that the yellow/green earth
wire is about 2cm longer than the live and neutral ones.
After the connection, test the heating elements for about
3 minutes to ensure that they are working correctly.
The manufacturer refuses any responsability in
cases where normal safety measures are not
observed.
Earthwire (yellow - green)
Neutral wire
Phase
Page 24

From the Electrolux Group. The world’s No.1 choice.
The Electrolux Group is the world’s largest producer of powered appliances for kitchen, cleaning and outdoor use. More than
55 million Electrolux Group products (such as refrigerators, cookers, washing machines, vacuum cleaners, chain saws and
lawn mowers) are sold each year to a value of approx. USD 14 billion in more than 150 countries around the world.
ZCM 6605
0,78 kWh
41 min.
53
1130 cm²
0,79 kWh
43 min.
 Loading...