

Zanussi ZCM6603X, ZCM6603W User Manual

MIXED FUEL
COOKER
ZCM 6603
35690-6201
INSTRUCTION BOOKLET
IL

ENGLISH
Important Safety Information
You MUST read these warnings carefully before installing or using the hob. If you need assistance,
contact our Customer Care Department.
• The work of installation must be carried out by
competent and qualified installers according to the
regulations in force.
• Any modifications to the domestic electrical mains
which may be necessary for the installation of the
appliance should be carried out only by competent
personnel.
• Check your appliance for any transport damage.
Never connect a damaged appliance. If your appliance
is damaged, contact your supplier.
• It is dangerous to modify, or attempt to modify, the
characteristics of this appliance.
• Avoid installation of the appliance near inflammable
material (e.g. curtains, tea towels, etc.).
• This appliance is heavy. Take care when moving it.
• This appliance cannot be positioned on a base.
• Remove all packaging before using the appliance.
• Some parts have a shock-resistant plastic film
protection. Be sure to remove this plastic film before
you start operating the appliance and clean the parts
involved using a soft cloth wrung out in warm water
to which a little washing up liquid has been added.
• Ensure that the gas and electrical supply complies
with the type stated on the rating plate, located near
the gas supply pipe.
Child Safety
• This appliance is designed to be operated by adults.
Do not allow children to play near or with the
appliance.
• The appliance gets hot when it is in use. Children
should be kept away until it has cooled.
• Children can also injure themselves by pulling pans
or pots off the appliance.
During Use
• This appliance is intended for domestic cooking only.
It is not designed for commercial or industrial
purposes.
• Ensure a good ventilation around the appliance. A poor
air supply could cause lack of oxygen.
• This appliance is not connected to a combustion
products evacuation device. It shall be installed and
connected in accordance with current installation
regulations. Particular attention shall be given to the
relevant requirements regarding ventilation.
• When in use the appliance will produce heat and
moisture in the room in which it has been installed.
Ensure there is a continuous air supply, keeping air
vents in good condition or installing a cooker hood
with a venting hose.
• When using the appliance for a long period of time,
the ventilation should be improved, by opening a
window or increasing the extractor speed.
•
If the appliance is fitted with a cover, its function is to
protect the surface from dust when closed and to accumulate splashes of grease when open. Do not use
for other purposes.
•
Always clean the cover before closing.
• Leave the burners and/or plates to cool before closing
the cover.
• All the covers, in plate glass or enamel, are removable
to facilitate cleaning.
• Do not use this appliance if it is in contact with water.
Do not operate the appliance with wet hands.
• Ensure the control knobs are in the ‘OFF’ position
when not in use.
• During use the appliance becomes hot. Care should
be taken to avoid touching heating elements inside
the oven.
• Always stand back from the oven when opening the
oven door, to allow any build-up of steam or heat to
release.
• When using other electrical appliances, ensure the
cable does not come into contact with the hot
surfaces of the appliance.
• Unstable or misshapen pans should not be used on
the hob burners as unstable pans can cause an
accident by tipping or spillage.
•
To facilitate ignition, light the burners before
placing pans on the grid. After having lit the
burners check that the flame is regular.
•
Always lower the flame or turn it off before removing
the pan.
• Never leave the appliance unattended when cooking
with oil and fats.
• This appliance should be kept clean at all times. A
build-up of fats or foodstuffs could result in a fire.
• Never use plastic dishes in the oven or on the hob
burners.
foil.
• Always ensure that the oven vent which is located at
the centre back of the hob is left unobstructed to
ensure ventilation of the oven cavity.
• Perishable food, plastic items and areosols may be
affected by heat and should not be stored above the
appliance.
•
Only heat-resistant plates may be placed in the
drawer situated under the oven. Do not p ut
combustible materials there.
• Never use steam or high pressure steam cleaners to
clean the appliance.
Never line any part of the oven with aluminium
2
Contents
For the User
Important Safety Information 2
Control Panel 4
The Gas Burner Controls 5
Hints and Tips for using the Hob 6
The Minute Minder 6
Electric Oven 7
Before the First Use of the Appliance 8
Using the Oven 9
Hints and Tips for using the Oven 9
Defrosting 10
Cooking Chart - Conventional and Fan Oven 11
Cooking Chart - Grilling 12
Cooking Chart - Pizza 12
Maintenance and Cleaning 12
Cleaning the Oven 13
Something not working 15
Guide to Use the instructions
The following symbols will be found in the text to guide
you throughout the Instructions:
Safety Instructions
Step by step instructions for an operation
Hints and Tips
Environmental Information
Keep this instruction book for future reference
and ensure it is passed on to any new owner.
These instructions are only valid for countries
whose identification symbols are shown on
the cover of this instruction booklet and on the
appliance itself.
Service and Spare Parts 16
For the Installer
Instructions for the Installer 16
Technical data 16
Gas connection 18
Electrical connection 19
Service
• This appliance should only be repaired or serviced by
an authorised Service Engineer and only genuine
approved spare parts should be used.
Environmental Information
• After installation, please dispose of the packaging
with due regard to safety and the environment.
• When disposing of an old appliance, make it unusable,
by cutting off the cable.
• The symbol on the product or on its packaging
indicates that this product may not be treated as
household waste. Instead it shall be handed over to
the applicable collection point for the recycling of
electrical and electronic equipment. By ensuring this
product is disposed of correctly, you will help prevent
potential negative consequences for the environment
and human health, which could otherwise be caused
by inappropriate waste handling of this product. For
more detailed information about recycling of this
product, please contact your local city office, your
household waste disposal service or the shop where
you purchased the product.
This appliance is manufactured according to
the following EEC directives:
73/23 EEC - 90/683 EEC - 93/68 EEC 89/336 EEC - 90/396 EEC,
current edition.
3
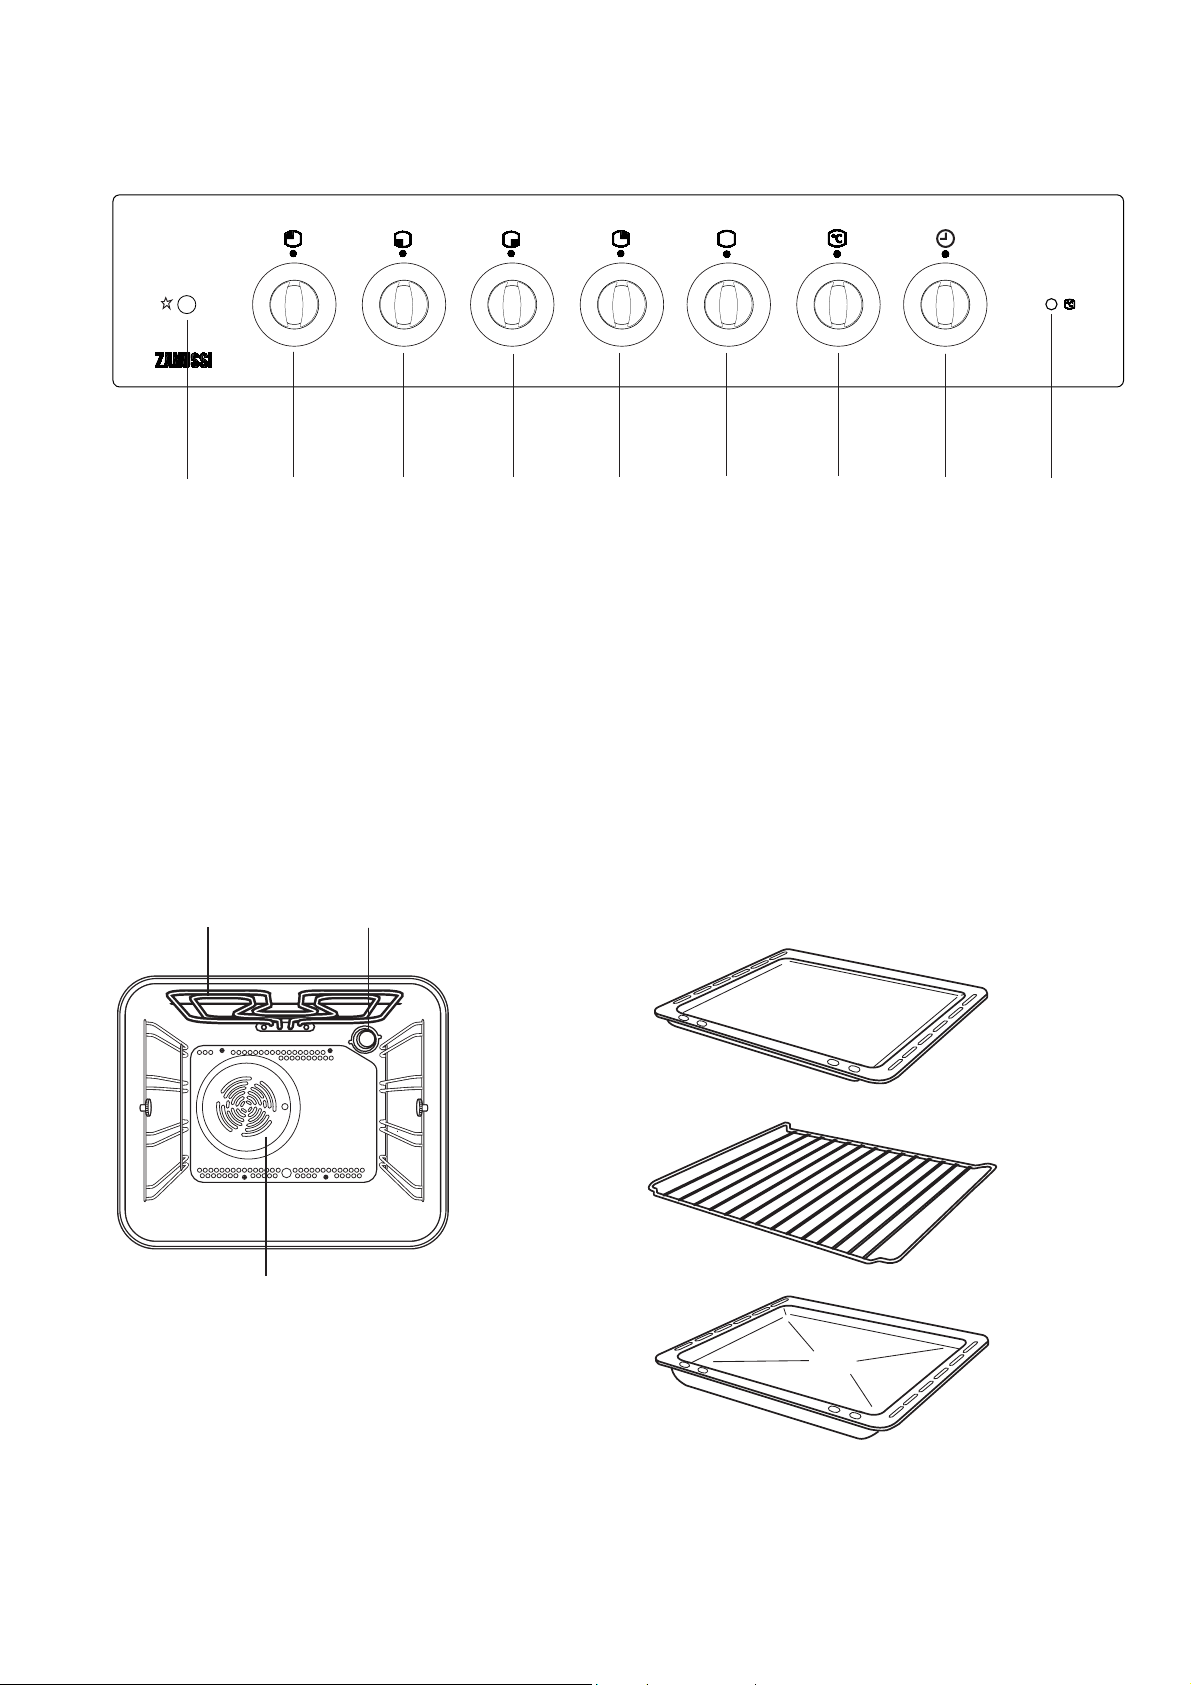
Control Panel
1
1. Ignition switch
2. Back left burner control knob (semi-rapid)
3. Front left burner control knob (rapid)
4. Front right burner control knob (auxiliary)
5. Back right burner control knob (semi-rapid)
2
The Oven Cavity
Grill element
Oven Light
543
6. Oven function control knob
7. Oven thermostat control knob
8. Minute minder
9. Oven Thermostat Pilot Light
6
7
Accessories
8
9
Baking tray
Oven Shelf
Oven fan
Dripping Pan
4
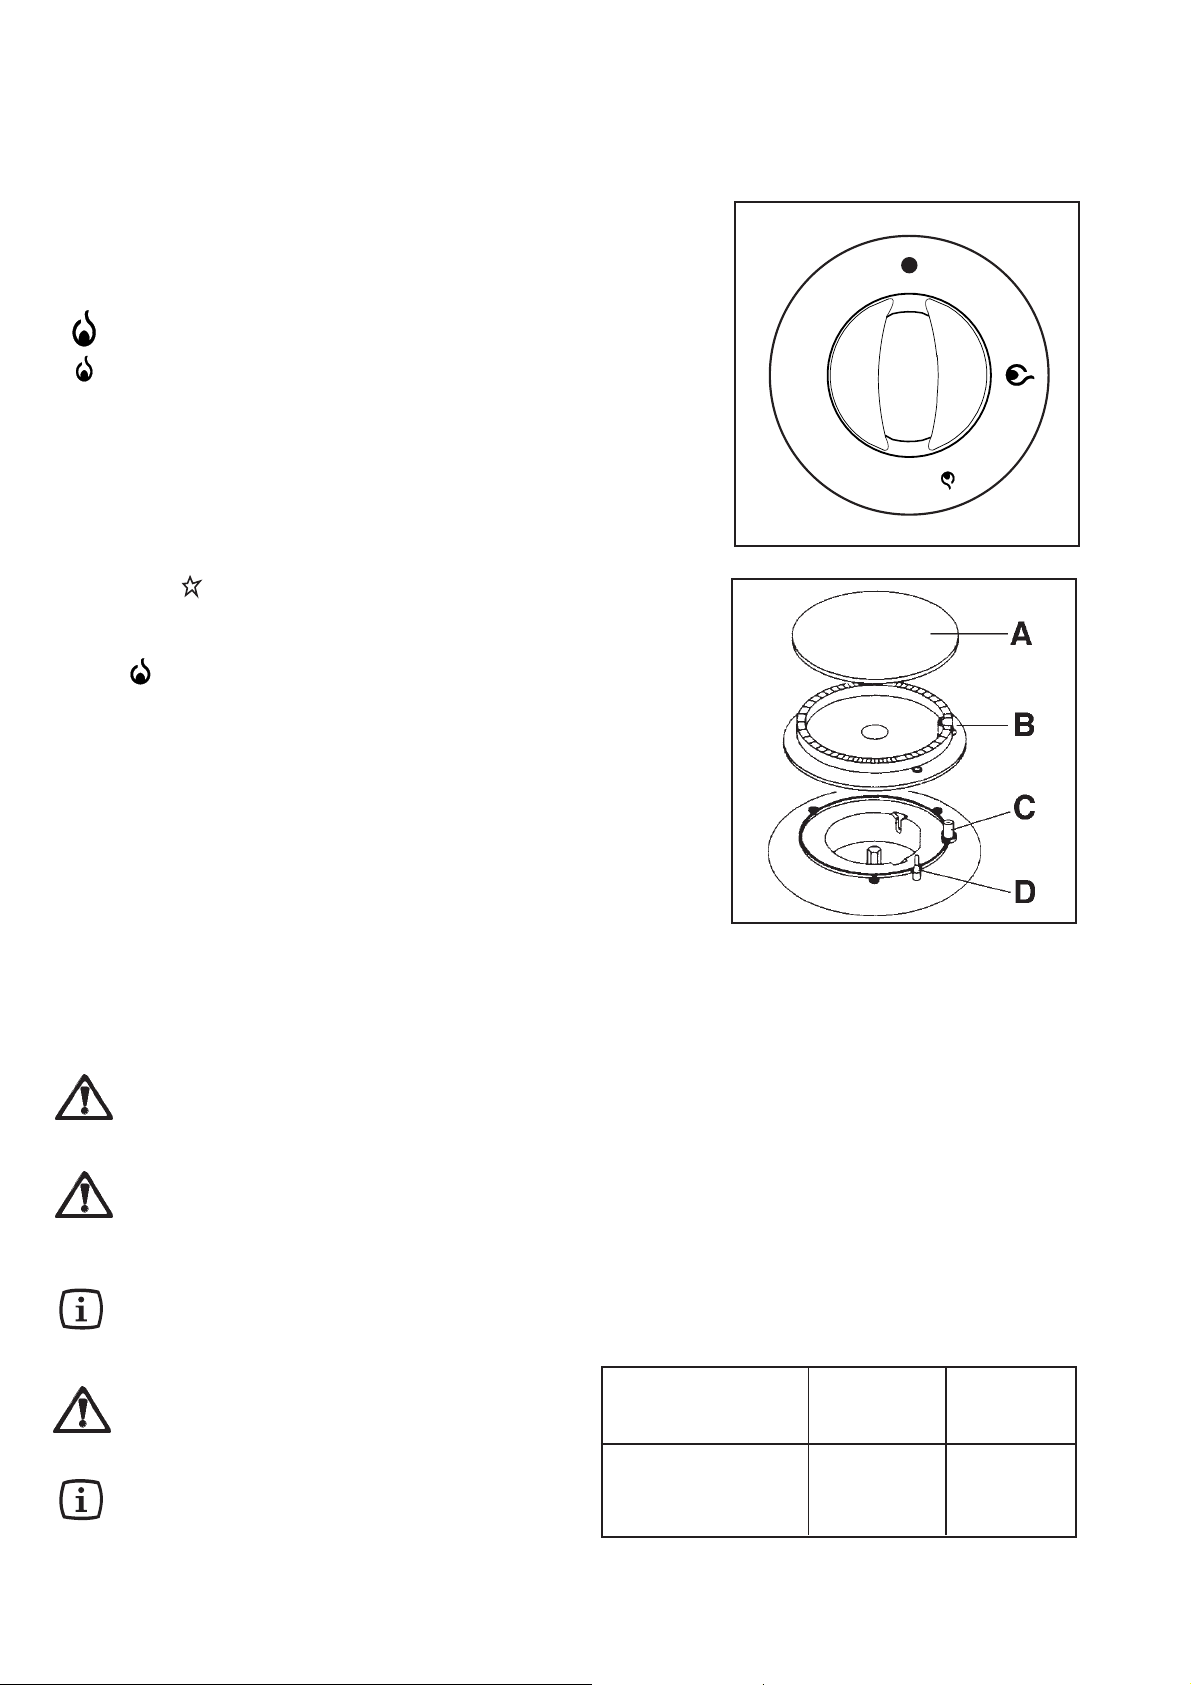
The Gas Burner Controls
Hob Control knobs (Fig. 1)
The knobs for using the gas hob are found on the control
panel. The knobs are marked with the following symbols:
• No gas supply
Maximum gas supply
Minimum gas supply
This appliance is equipped with a safety-valve. In case
of extinction of the flame this device will operate stopping
gas supply (ex.: overflowing, draughts).
To light a burner:
1. press the ignition switch marked by a small
spark ( );
2. push the relevant control knob in completely
and turn it anticlockwise to the maximum position
( );
3. upon ignition, keep the knob pushed down for
about 5 seconds. This will allow the
"thermocouple" (see picture - D) to be heated
and the safety device to be switched off, otherwise
the gas supply would be interrupted;
4. then, check the flame is regular and adjust it
as required.
If the burner does not ignite, turn the control knob to zero,
and try again.
If after a few attempts the burner does not ignite, check
that the burner cap and crown (see picture - A, B) are
correctly positioned.
To interrupt the supply of gas, turn the knob in a
clockwise direction to the position "".
When switching on the mains, after installation or
a power cut, it is quite normal for the spark
generator to be activated automatically.
If you use a saucepan which is smaller than the
recommended size, the flame will spread beyond
the bottom of the pan, causing the handle to
overheat.
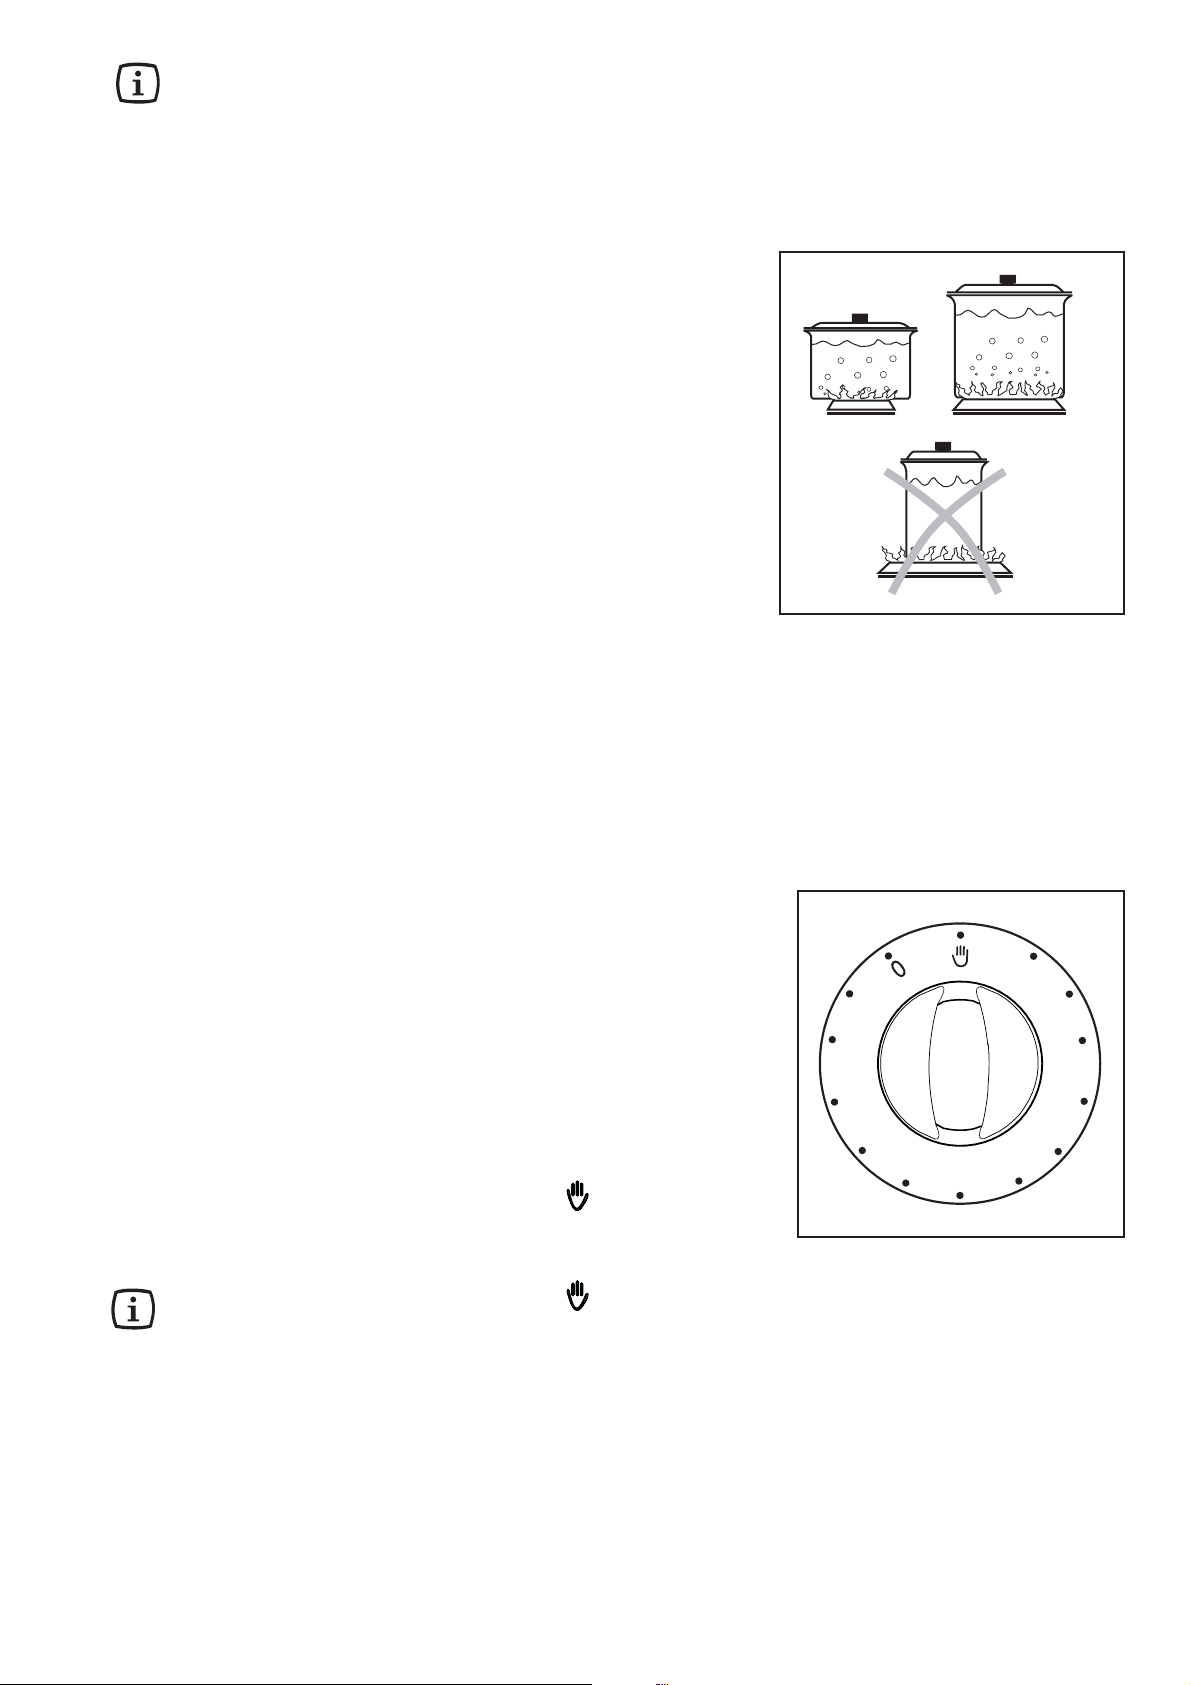
As soon as a liquid starts boiling, turn down the
flame so that it will barely keep the liquid
simmering.
Take care when frying food in hot oil or fat,
as the overheated splashes could easily
ignite.
If the control knobs become difficult to turn, please
contact your local Service Force Centre.
A - Burner Cap
B - Burner crown
C - Spark generator
D - Thermocouple
To ensure maximum burner efficiency, you should only
use pots and pans with a flat bottom fitting the size of
the burner used (see table).
Burner minimum maximum
diameter diameter
Large (rapid) 160 mm. 260 mm.
Medium (semi-rapid) 120 mm. 220 mm.
Small (auxiliary) 80 mm. 160 mm.
5
Hints and Tips for using the Hob
20
40
60
80
100
120
Pottery
Remember that a wide-bottomed pan allows a faster
cooking than a narrow one.
Always use pots which properly fit what you have to cook.
Particularly make sure that the pans are not too small
for liquids, since these could easily overflow.
Moreover, the pans should not be too large for a faster
cooking. In fact, grease and juices may spread on the
bottom and burn easily.
It is better to use non-openable moulds for baking cakes.
In fact, an openable mould lets juices and sugar leak
through, falling on the bottom of the oven and
consequently burning on the bottom of the baking tray,
making cleaning difficult.
Avoid putting plastic-handled pans in the oven as they
are not heat-proof.
You should use pans with the right diameter to fit the
burner, in order to make the most out of it, thus reducing
gas consumption as shown in the picture.
It is also advisable to cover any boiling casserole and,
as soon as the liquid starts boiling, lower the flame
enough to keep the boiling point.
The Minute Minder
The minute minder will mark the end of a timed period with
an acoustic alarm. The maximum timing is 120 minutes.
To set the minute minder:
1. Select the desired cooking function with the
oven function control knob.
2. Turn the minute minder control knob clockwise
until the 120-minute position and then back to
the required time.
3. Once the pre-set time has elapsed, an acoustic
signal will be heard and the oven will
automatically switch off.
Turn the minute minder control knob to the
position and the oven function and thermostat
control knobs to OFF position.
Turn the minute minder control knob to the
position if you want to cook without setting a timed
period.
6
 Loading...