

Zanussi ZCM 64 Operating Instructions Manual

OPERATING INSTRUCTIONS
AU
MIXED FUEL
COOKER
ZCM 64

This appliance has been designed for use by adults.
Take care, therefore, that children do not attempt to
play with it.
This appliance is not intended for use by young
children of infirm persons without supervision.
Young children should be supervised to ensure that
they do not play with the appliance.
This appliance has been designed for cooking
purposes only. It must not be used for any other
purposes, or be destined to professional or
industrial use.
Where this appliance is installed in marine craft or
in caravans, it shall not be used as a space heater.
The work of installation must be carried out by
competent and qualified installers according to the
regulations in force.
The appliance must be installed at a minimum
distance of 50 cm. from curtains or other
combustible material.
Any modifications to the domestic electrical mains
which may be necessary for the installation of the
appliance should only be carried out by competent
personnel.
If the supply cord is damaged, it shall be replaced by
a special cord or assembly available from Service
Force Centres.
In case of repairs contact an authorized Technical
Assistance Centre and insist on original spareparts.
It is dangerous to modify, or attempt to modify, the
characteristics of this appliance.
Unstable or deformed pans should not be placed on
the burners or plates in order to avoid accidents
caused by upsetting or boiling over.
Particular care should be taken when cooking with oil
or fat.
Burners, plates, grills and pans remain hot for a long
time after being switched off. Supervise children at all
times when in use paying attention that they do not
Important Safety Information
It is most important that this instruction brochure should be kept together with the appliance for future consultation. If the
appliance is sold or transferred to another person, ascertain that the brochure is also given, in order that the new user can
be aware of the correct use of the machine and the relative warnings. THESE WARNINGS HAVE BEEN PREPARED FOR YOUR
SAFETY AND FOR THAT OF OTHERS, WE THEREFORE REQUEST YOU TO READ THEM CAREFULLY BEFORE INSTALLING
AND USING THE APPLIANCE.
touch surfaces or remain in the vicinity of the appliance
when in use or when not completely cooled.
During use the appliance becomes hot. Care should
be taken to avoid touching heating elements inside the
oven.
WARNING - Ensure that the appliance is switched off
before replacing the lamp to avoid the possibility of
electric shock.
WARNING - Accessible parts will become hot when in
use. To avoid burns and scalds children should be kept
away.
Always check that the switch is in the « » position
when the appliance is not in use.
Ensure that air can circulate around the gas appliance.
Poor ventilation can produce a lack of oxygen.
Supply the appliance with the type of gas stamped on
the relevant adhesive label situated in the immediate
vicinity of the gas connection tube.
Before maintenance or cleaning disconnect the
appliance and allow to cool.
DO NOT store or use gasoline or other flammable
vapours, liquids or items in the vicinity of this or any
other appliance.
Do not spray areosols in the vicinity of this
appliance while it is in operation.
To facilitate ignition, light the burner before placing the
pan on the grill.
After having lit the burner check that the flame is
regular.
Always lower the flame or turn it off before removing
the pan.
In case of repairs, do not atempt to correct yourself.
Repairs carried out by unqualified persons can cause
damage. Contact the nearest Assistance Centre and
use only original spareparts.
Guide to Use the instructions
The following symbols will be found in the text to guide
you throughout the Instructions:
Safety Instructions
Step by step instructions for an operation
Hints and Tips
Environmental information
The use of a gas cooking appliance
produces heat and humidity in the
room in which it is installed. Ensure
good ventilation of the room by
keeping natural ventilation openings
clear or installing an extractor hood
with a discharge tube.
A prolonged and intensive use of the
appliance may necessitate
supplementary ventilation, for
example the opening of a window or
a more efficient ventilation by
increasing the power of mechanical
extraction, if existing.
Contents
MANUFACTURER:
ELECTROLUX HOME PRODUCTS ITALY S.p.a.
Viale Bologna, 298
47100 Forlì (Italy)
Important Safety Information 2
Control Panel 3
Using the Hob 4
Using the Oven 5
Before the First Use of the Oven 6
Hints and Tips 6
Using the Conventional Oven 7
Grilling 8
Using the Fan Oven 9
Defrosting 9
Cleaning the Hob 10
Cleaning the Oven 10
If something goes wrong 13
Service and Spare Parts 13
For the User
For the Installer
Instructions for the Installer 14
Location 15
Feet Assembly 15
Fitting the Splash back 16
Fitting the Stability Bracket 16
Installation 17
Adaptation to different types of gas 18
Electrical connections 19
Your safety is of paramount importance.
Therefore, if you are unsure about any of the
meanings of these WARNINGS, contact the
Customer Care Department.
Keep this instruction book for future reference
and ensure it is passed on to any new owner.
8
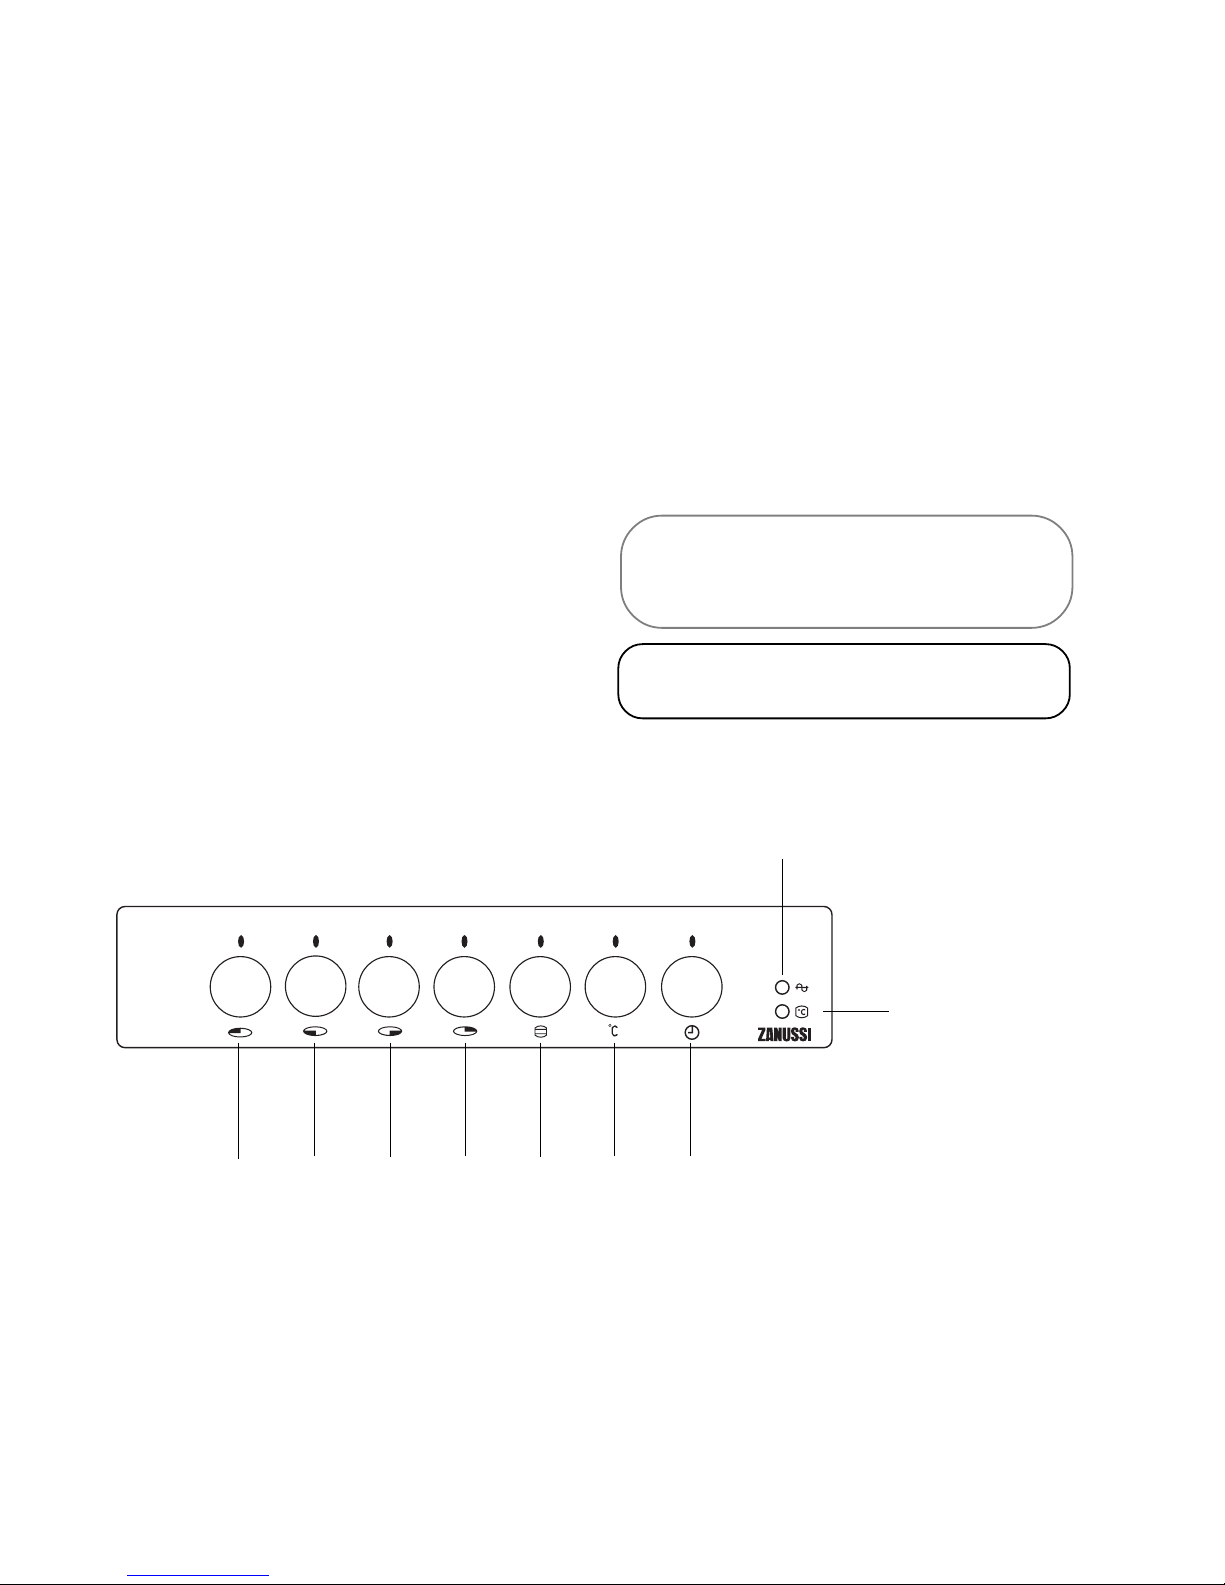
9
1. Back left burner control knob (normal)
2. Front left burner control knob (triple crown)
3. Front right burner control knob (simmer)
4. Back right burner control knob (normal)
5. Oven function control knob
6. Thermostat control knob
7. Timer control knob
8. General control lamp
9. Thermostat control lamp
Control Panel
7654312
4
Hob burners
To light a burner:
Push the electric ignition button which is marked with
a little spark ( ).
At the same time, push in and turn the relevant control
knob anticlockwise to maximum position.
Upon ignition, keep the knob pushed down about five
seconds until the safety valve (“thermocouple - Fig.
1-D”) automatically keeps the flame lit.
Then adjust the flame as required.
If the burner does not ignite, turn the control knob to
zero, and try again.
When switching on the mains, after installation
or a power cut, it is quite normal for the spark
generator to be activated automatically.
If you use a saucepan which is smaller than the
recommended size, the flame will spread beyond
the bottom of the vessel, causing the handle to
overheat.
As soon as a liquid starts boiling, turn down
the flame so that it will barely keep the liquid
simmering.
Take care when frying food in hot oil or fat, as
the overheated splashes could easily ignite.
If the control knobs become difficult to turn, please
contact your local Service Centre.
Using the Hob
Using the Wok Stand
A wok stand is provided to enable you to use a round
bottomed wok on the hob. The wok stand must only be
used on the triple crown burner, and should not be used
with any other type of wok or pan.
When fitting the wok stand, ensure the recesses in the
frame fit securely onto the bars of the pan supports, as
shown in the diagram (Fig. 2 - b).
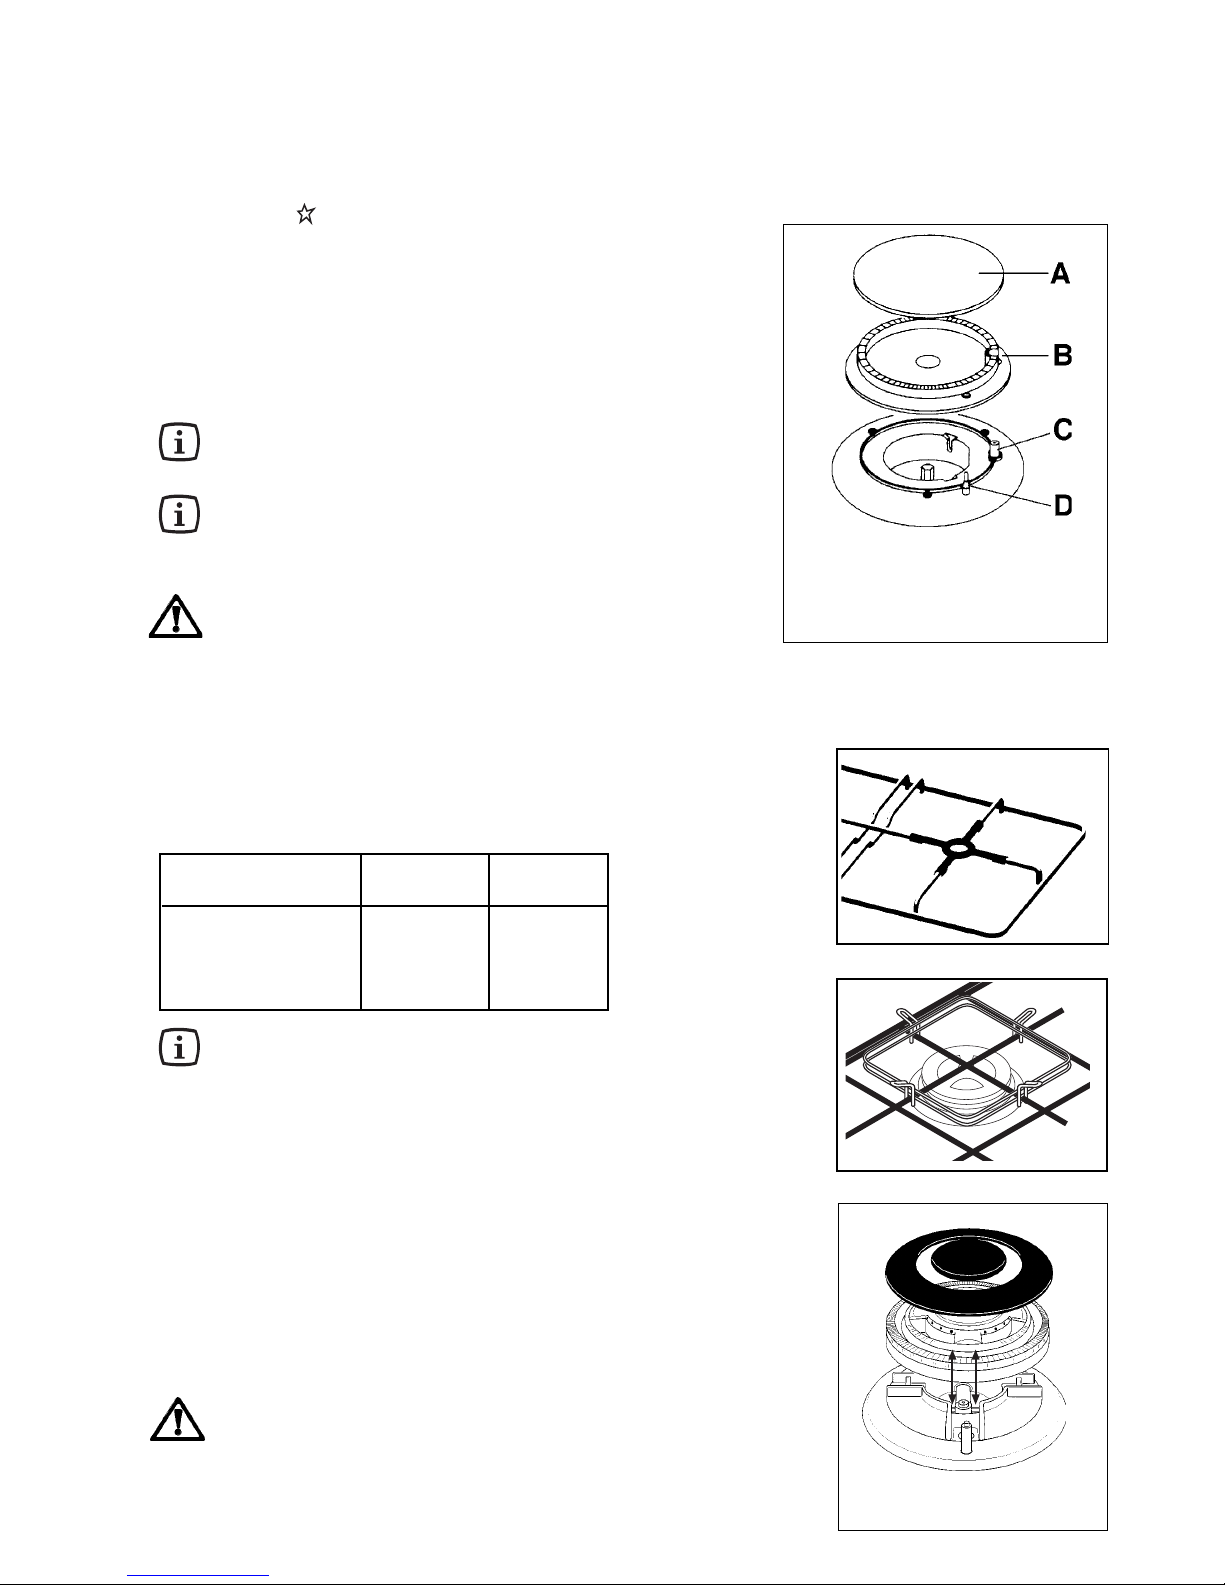
Triple-crown burner
Always ignite the burner before putting the
pans on.
If after a few attempts the burner does not ignite,
check that the burner cap and crown are correctly
positioned (Fig. 3).
FO 2389
Fig. 2 - a
Burner minimum maximum
diameter diameter
Large
(triple crown) 180 mm. 260 mm.
Medium (semi-rapid) 120 mm. 240 mm.
Small (auxiliary) 80 mm. 160 mm.
Semi-rapid and auxiliary burners:
A) Burner Cap
B) Burner Crown
C) Ignition Candle
D) Thermocouple
When using the auxiliary burner (with pans
having a diameter equal or higher than 50mm),
place the special grid on the pan support, as
shown in the diagram (Fig. 2 - a).
Triple crown (ultra-rapid)
Fig. 2 - b
To ensure maximum burner efficiency, you should only
use pots and pans with a flat bottom fitting the size of
the burner used (see table).
Fig. 3
Fig. 1
5
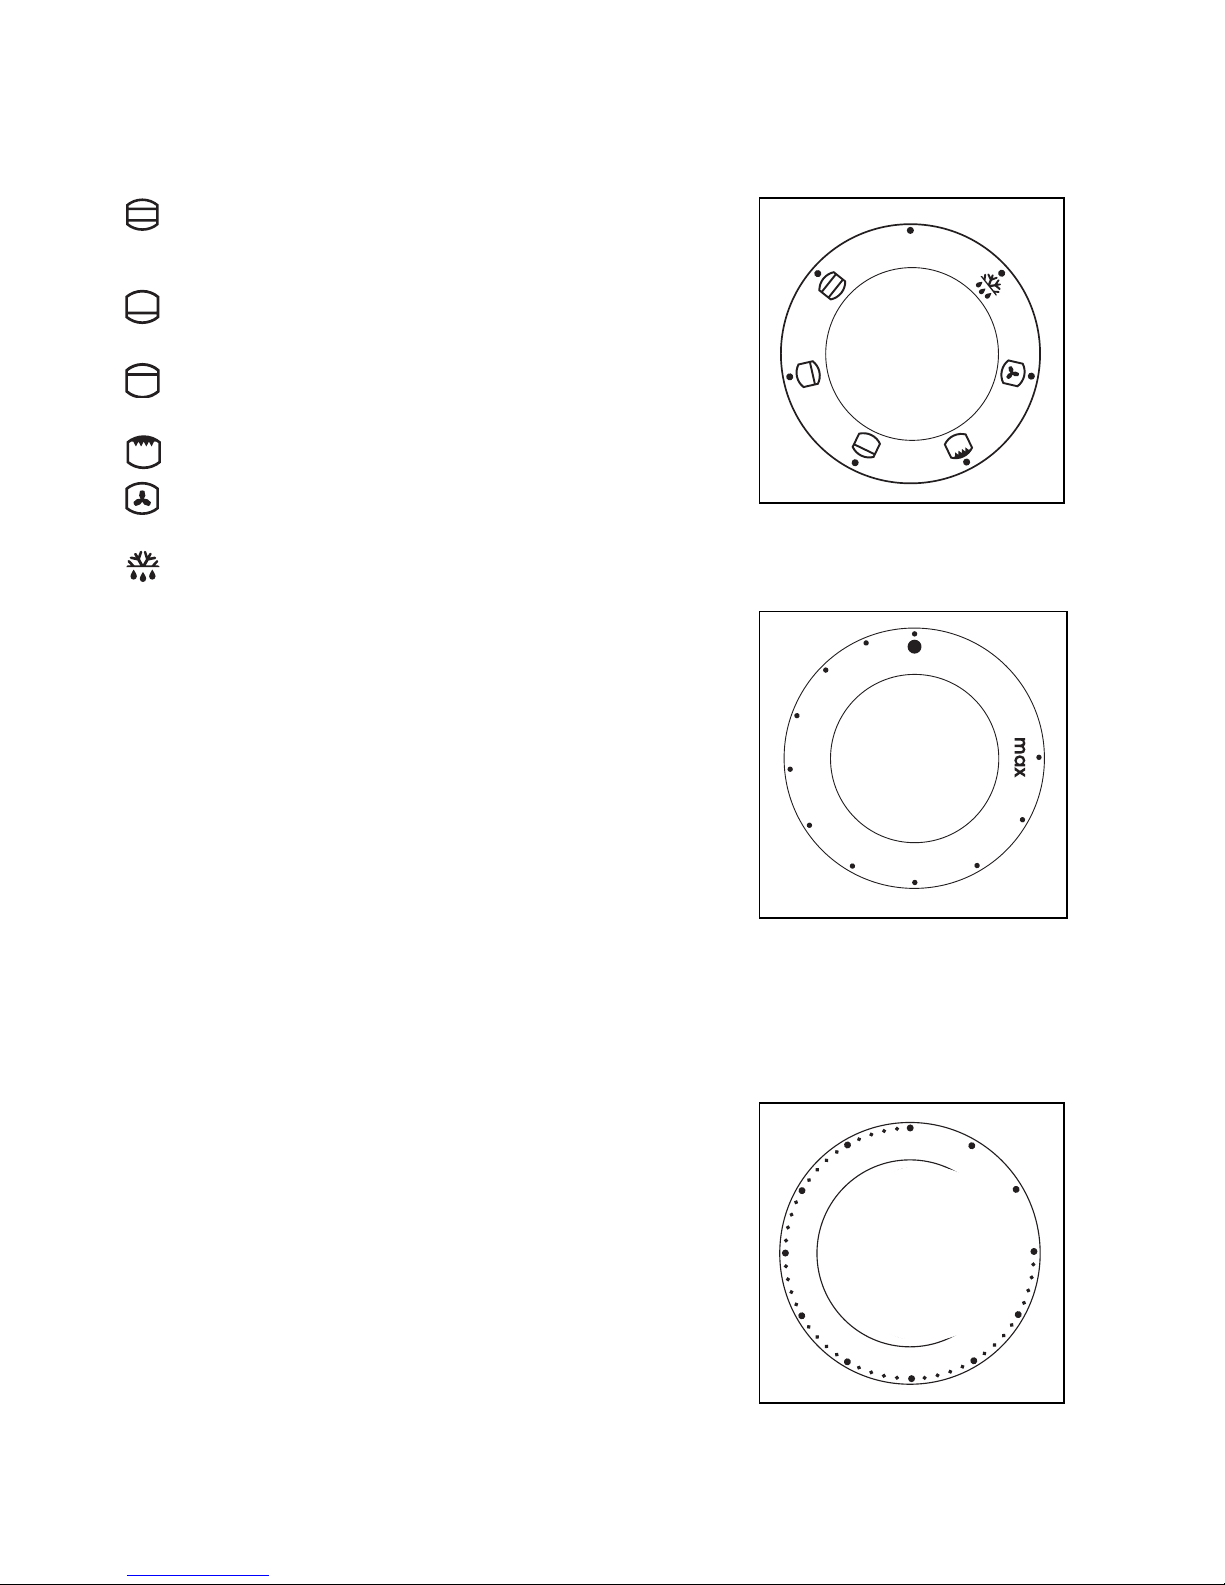
Oven Function Control Knob
0 Oven switched off
Conventional cooking - The heat comes from
both the top and bottom element, ensuring even
heating inside the oven.
Bottom heating element - The heat comes from
the bottom of the oven only
Top heating element - The heat comes from the
top of the oven only
Grill - The heat comes only from the top element.
Fan cooking - This function allows you to roast
or roast and bake simultaneously using any shelf.
Defrosting - This function can also be used to
assist in thawing of frozen food.
Mains on Light
The mains on light will come on when the oven function
control knob is set.
Thermostat Control Knob
Turn the thermostat control knob clockwise to select
temperatures between 50°C and 250°C (MAX).
Thermostat Control Light
The thermostat control light will come on when the
thermostat control knob is turned. The light will remain
on until the correct temperature is reached. It will then
cycle on and off to show the temperature is being
maintained.
Things to note
The oven light will come on when the oven function
control knob is set.
The thermostat control light will remain on until the
correct temperature is reached. It will then cycle on
and off to show that temperature is being maintained.
Minute minder
The minute minder will mark the end of a timed period
with an acoustic alarm. The maximum timing is 60
minutes (Fig. 6).
Turn the Minute Minder knob clockwise to the maximum
time position, then turn it back to the required time.
The Minute minder will not affect in any way the oven
operation, if it is in use.
Using the Oven
FO 1098
FO 2487
0
5
0
1
0
5
1
0
0
2
0
0
Fig. 6
0
5
01
51
0
3
04
05
0
2
FO 2244
Fig. 4
Fig. 5

6
Condensation and steam
When food is heated it produces steam in the same
way as a boiling kettle. The oven vents allow some of
this steam to escape. However, always stand back
from the oven when opening the oven door to allow
any build up of steam or heat to release.
If the steam comes into contact with a cool surface on
the outside of the oven, e.g. a trim, it will condense and
produce water droplets. This is quite normal and is not
a fault with the oven.
To prevent discoloration, regularly wipe away
condensation and also soilage from surfaces.
Cookware
• Use any oven proof cookware which will withstand
temperatures of 250°C.
• Baking trays, oven dishes, etc. should not be placed
directly against the grid covering the fan at the back
of the oven, or placed on the oven base.
• Do not use baking trays larger than 30 cm x 35 cm
(12 in x 14 in) as they will restrict the circulation of
heat and may affect performance.
Hints and Tips
Storage Drawer
The storage drawer is located underneath the oven
cavity.
During cooking the storage drawer may become hot if
the oven is on high for a long period of time, therefore
flammable materials such as oven gloves, tea towels,
plastic aprons etc. should not be stored in the drawer.
Oven accessories such as baking sheets, will also
become hot, therefore care should be taken when
removing these items from the drawer whilst the oven
is in use or still hot.
Before the First Use of the Oven
Remove all packaging, both inside and outside
the oven, before using the oven.
Before first use, the oven should be heated without food.
During this time, an unpleasant odour may be emitted.
This is quite normal.
1. Switch the oven function control knob to
conventional cooking .
2. Set the thermostat control knob to MAX.
3. Open a window for ventilation.
4. Allow the oven to run empty for
approximately 45 minutes.
This procedure should be repeated with the fan cooking
and grill function for approximately 5-10 minutes.
• Always cook with the oven door closed.
• Stand clear when opening the drop down oven
door. Do not allow it to fall open - support the
door using the door handle, until it is fully open.
• The oven has fourteen shelf levels.
• The shelf positions are counted from the bottom of
the oven.
• It is important that these shelves are correctly
positioned as shown in Fig. 7.
• Do not place cookware directly on the oven base.
Using the Oven
Fig. 7
The effects of dishes
on cooking results
Dishes and tins vary in their thickness, conductivity,
colour, etc. which affects the way they transmit heat to
the food inside them.
A Aluminium, earthenware, oven glassware and bright
shiny utensils reduce cooking and underneath
browning.
B Enamelled cast iron, anodized aluminium, aluminium
with non-stick interior and coloured exterior and dark,
heavy utensils increase cooking and underneath
browning.
FO 2078
 Loading...