

Zanussi ZCM611X User Manual

MIXED FUEL
COOKER
ZCM 611
INSTRUCTION BOOKLET
Please read this instruction booklet before using the appliance
GB
Important Safety Information
You MUST read these warnings carefully before installing or using the hob. If you need assistance,
contact our Customer Care Department on 08705 727727
Installation
l This cooker must be installed by qualified personnel,
according to the manufacturers instructions and to
the relevant British Standards.
l This cooker is heavy. Take care when moving it.
l Any gas installation must be carried out by a
registered CORGI installer.
l Remove all packaging before using the cooker.
l Ensure that the gas and electrical supply complies
with the type stated on the rating plate, located near
the gas supply pipe.
l Do not attempt to modify the cooker in any way.
Child Safety
l This cooker is designed to be operated by adults. Do
not allow children to play near or with the cooker.
l The cooker gets hot when it is in use. Children should
be kept away until it has cooled.
l Children can also injure themselves by pulling pans
or pots off the cooker.
During Use
l Never use plastic dishes in the oven or on the hob
burners.
Never line any part of the oven with aluminium
foil.
l Always ensure that the oven vent which is located at
the centre back of the hob is left unobstructed to
ensure ventilation of the oven cavity.
l Perishable food, plastic items and areosols may be
affected by heat and should not be stored above the
cooker.
Service
l This cooker should only be repaired or serviced by an
authorised Service Engineer and only genuine
approved spare parts should be used.
Environmental Information
l After installation, please dispose of the packaging with
due regard to safety and the environment.
l When disposing of an old appliance, make it unusable,
by cutting off the cable.
l This cooker is intended for domestic cooking only. It
is not designed for commercial or industrial purposes.
l When in use a gas cooker will produce heat and
moisture in the room in which it has been installed.
Ensure there is a continuous air supply, keeping air
vents in good condition or installing a cooker hood
with a venting hose.
l When using the cooker for a long period of time, the
ventilation should be improved, by opening a window
or increasing the extractor speed.
l Do not use this cooker if it is in contact with water.
Do not operate the cooker with wet hands.
l Ensure the control knobs are in the OFF position
when not in use.
l When using other electrical appliances, ensure the
cable does not come into contact with the hot surfaces
of the cooker.
l Unstable or misshapen pans should not be used on
the hob burners as unstable pans can cause an
accident by tipping or spillage.
l Never leave the cooker unattended when cooking with
oil and fats.
l This cooker should be kept clean at all times. A
build-up of fats or foodstuffs could result in a fire.
Keep this instruction book for future reference
and ensure it is passed on to any new owner.
Guide to Use the instructions
The following symbols will be found in the text to guide
you throughout the Instructions:
Safety Instructions
Step by step instructions for an operation
Hints and Tips
F
Environmental Information
This appliance is manufactured according to
the following EEC directives:
73/23 EEC - 90/683 EEC - 93/68 EEC 89/336 EEC - 90/396 EEC,
current edition.
2

Contents
For the User
Important Safety Information 2
Description of the Cooker 3
Controls 5
Electric Oven 6
Before the First Use of the Cooker 6
24 Hour Clock and Timer 7
Using the Oven 10
Using the Fan Oven 11
Hints and Tips 12
Defrosting 13
Grilling 14
Maintenance and Cleaning 15
Cleaning the Oven 16
Something not working 17
Service and Spare Parts 17
Customer Care Department 18
For the Installer
Instructions for the Installer 19
Important Safety Requirements 19
Installation 20
Electrical connections 22
Commissioning 23
Conversion from Natural Gas to LPG 23
Oven Door Protection Device
(Stainless steel models only)
All our appliances comply with the European
safety standards. Nevertheless, in order to ensure
the highest safety level, and avoid small children
to be exposed to the heat when the appliance is
operated, it is possible to fit a special protection
device to the oven door. This device can be
purchased in our Service Force Centres,
specifying the relevant code (35791) and the
Product No. shown on the rating plate.
Guarantee Conditions 18
Description of the Cooker
Splash back
Semi-Rapid burner
Rapid burner
Control panel
Shelf
SET
TIME
S
T
O
P
Semi-rapid burner
Auxiliary burner
Oven door
Storage drawer
3
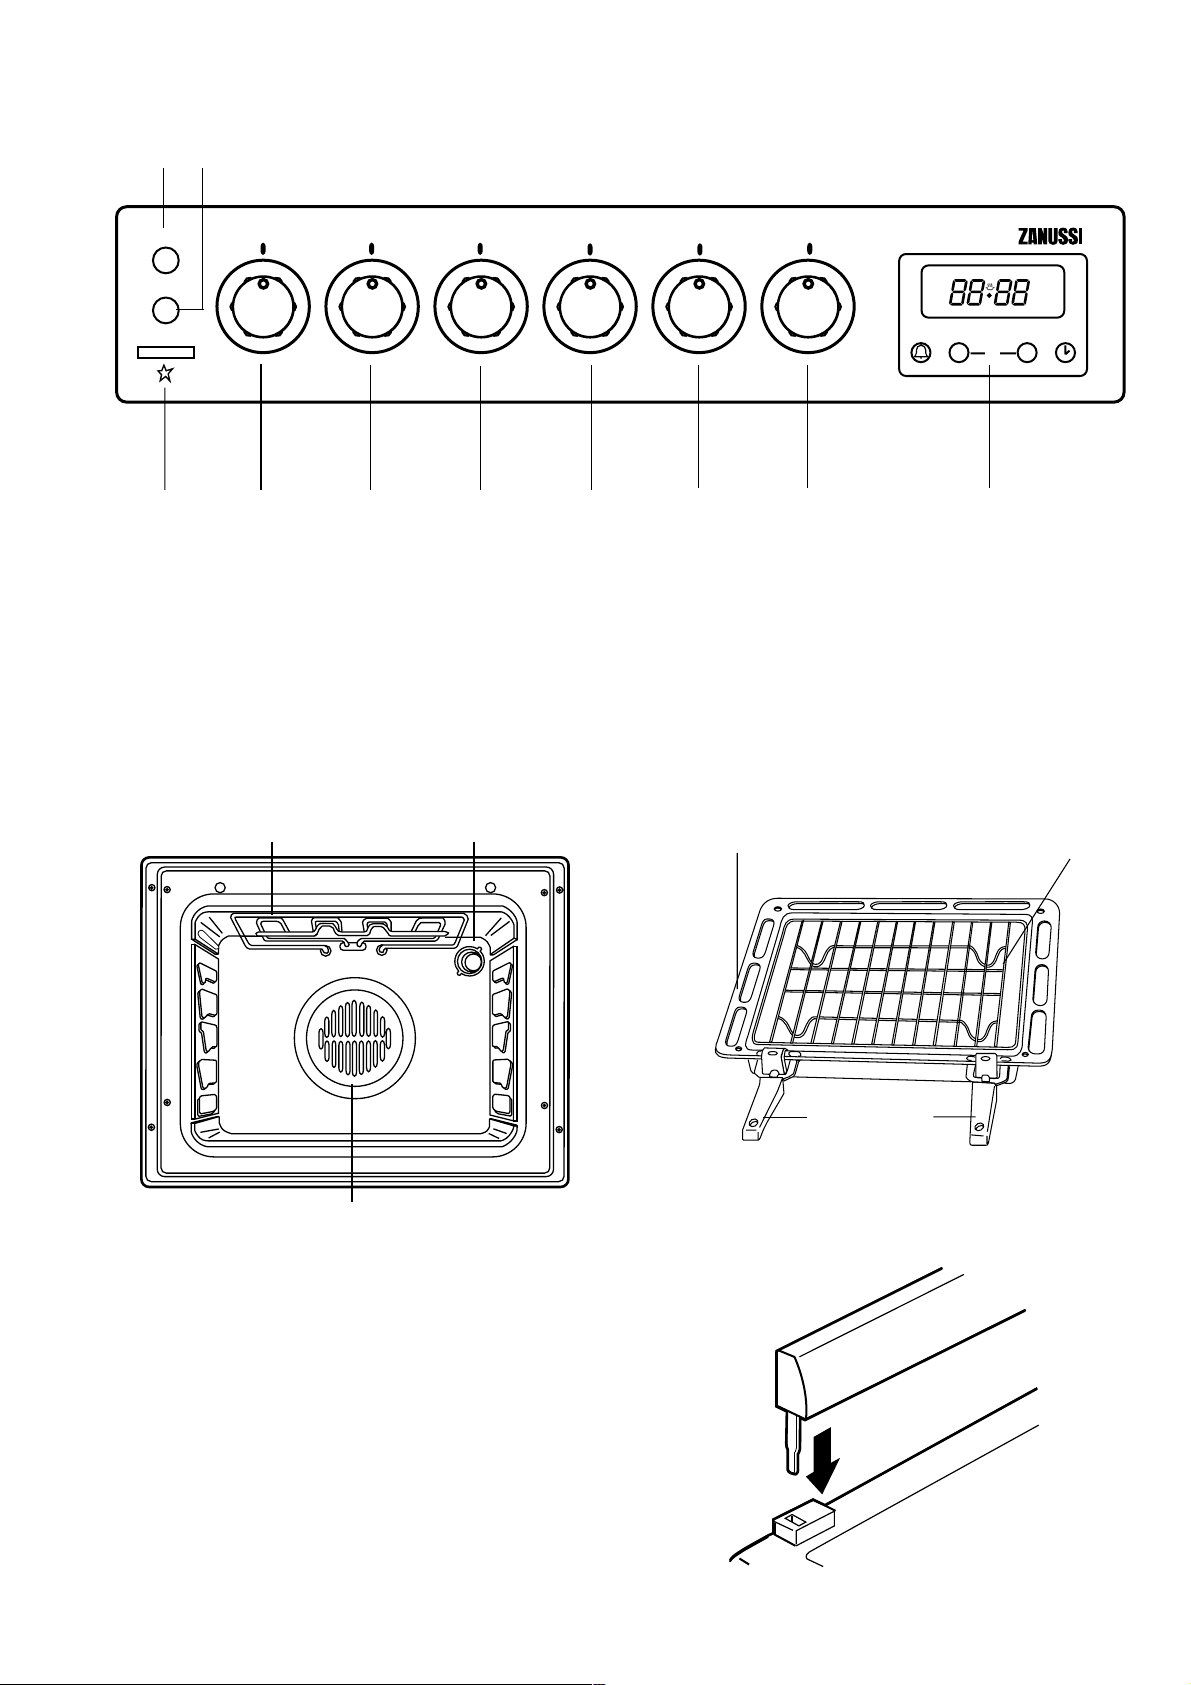
Control Panel
2
1
MAINS ON
THERMOSTAT
IGNITION
3
BACK LEFT FRONT LEFT FRONT RIGHT
4
1. Cooker Operation Pilot Light
2. Oven Thermostat Pilot Light
3. Electric ignition push button
4. Back left burner control knob (semi-rapid)
5. Front left burner control knob (rapid)
The Oven Cavity
BACK RIGHT OVEN FUNCTION TEMPERATURE
98765
6. Front right burner control knob (auxiliary)
7. Back right burner control knob (semi-rapid)
8. Oven function control knob
9. Oven thermostat control knob
10. 24 hour clock and Timer
Accessories
OVEN PROGRAMMER
OVEN TIMER
-
STOP
10
TIME
+
SET
PUSH
BOTH
Grill element
Oven Light
Oven fan
Fitting the Splash back
A stainless steel splash back is supplied with the
appliance. This is meant to be fitted on the rear edge of
the cooker's hob. The splash back package is in the
oven cavity.
1. Unpack the splash back and dispose of the packaging
with due regard to safety and the environment.
2. Slide the two bayonets of the splash back into the
relevant supports on the rear edge of the cooker's
hob.
Grill/roasting pan
Grill trivet
Removable
handles
4
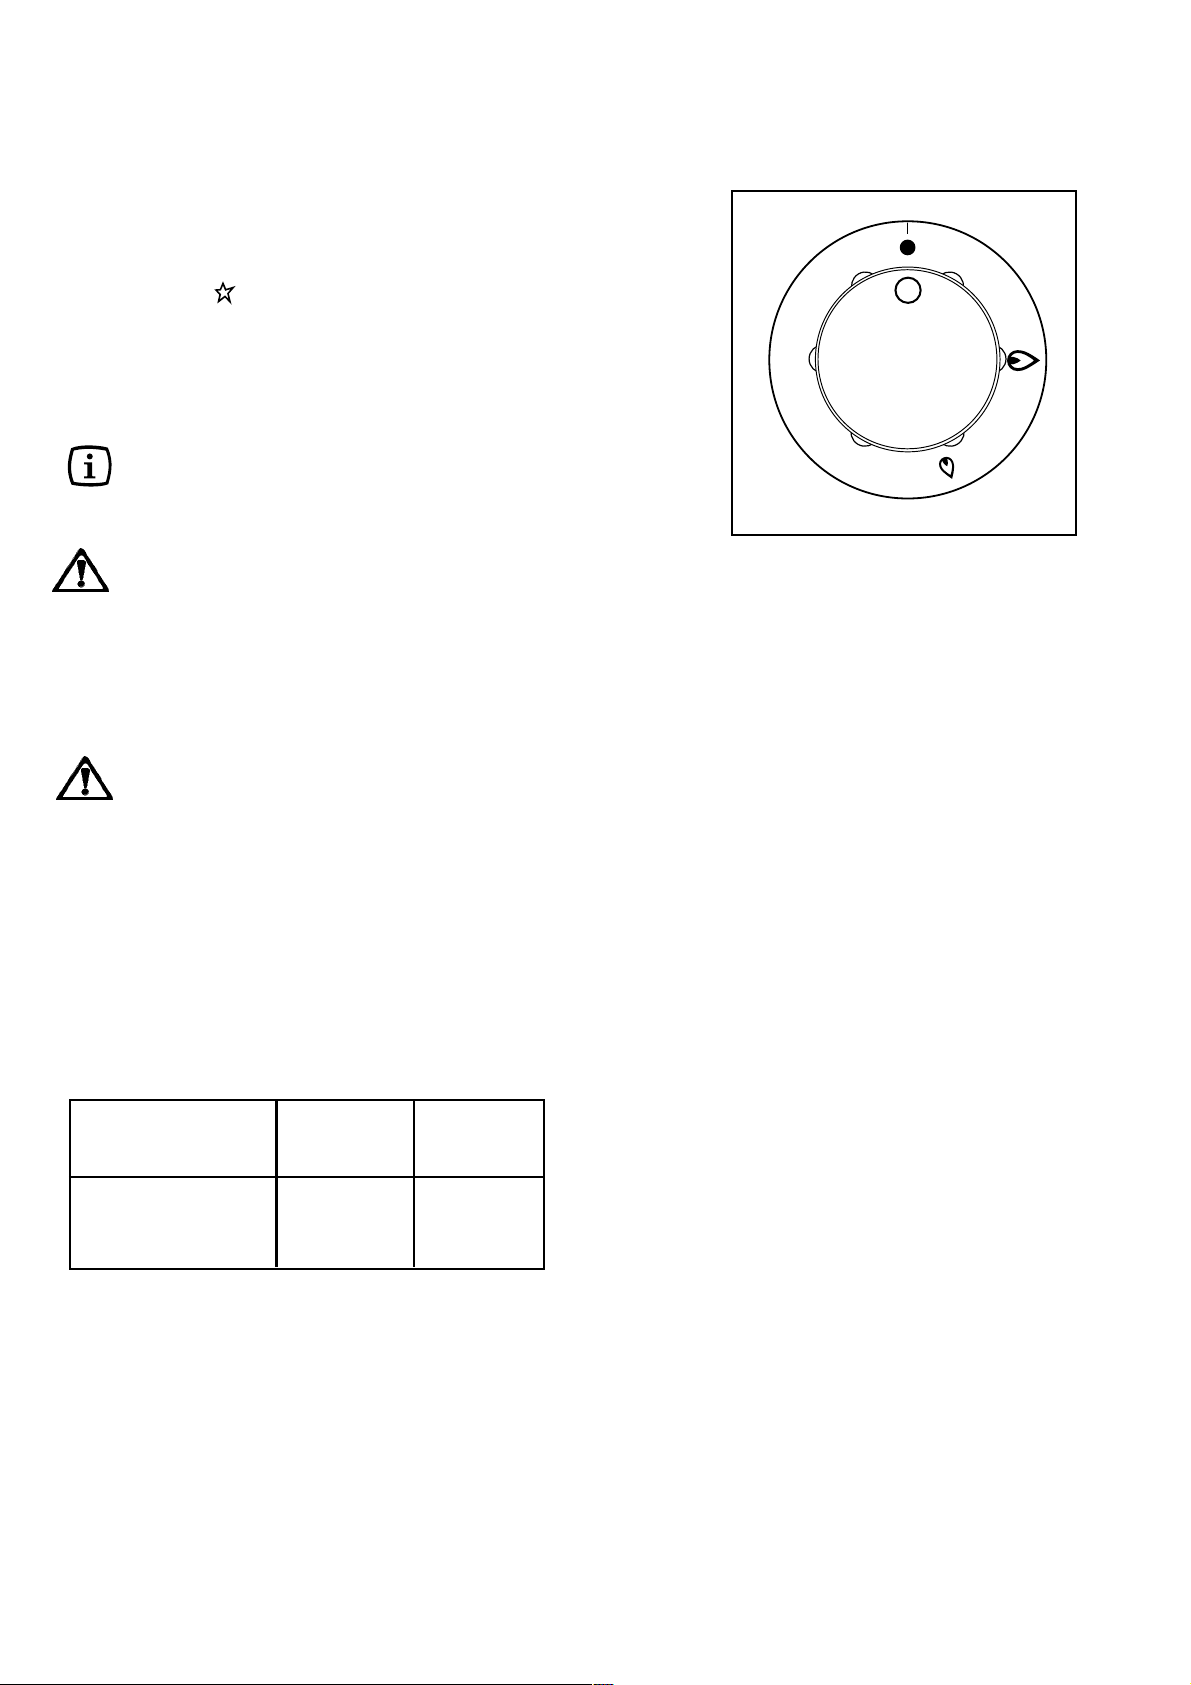
Controls
Hob burners
To light a burner:
F
l Push the electric ignition button which is marked with
a little spark ( ).
l At the same time, push in and turn the relevant control
knob anticlockwise to maximum position.
l Then adjust the flame as required.
l If the burner does not ignite, turn the control knob to
zero, and try again.
When switching on the mains, after installation or
a power cut, it is quite normal for the spark
generator to be activated automatically.
If you use a saucepan which is smaller than the
recommended size, the flame will spread beyond
the bottom of the pan, causing the handle to
overheat.
As soon as a liquid starts boiling, turn down the
flame so that it will barely keep the liquid
simmering.
FO 2177
Take care when frying food in hot oil or fat,
as the overheated splashes could easily
ignite.
If the control knobs become difficult to turn, please
contact your local Service Force Centre.
To ensure maximum burner efficiency, you should only
use pots and pans with a flat bottom fitting the size of
the burner used (see table).
Burner minimum maximum
diameter diameter
Large (rapid) 180 mm. 260 mm.
Medium (semi-rapid) 120 mm. 220 mm.
Small (Auxiliary) 80 mm. 160 mm.
5
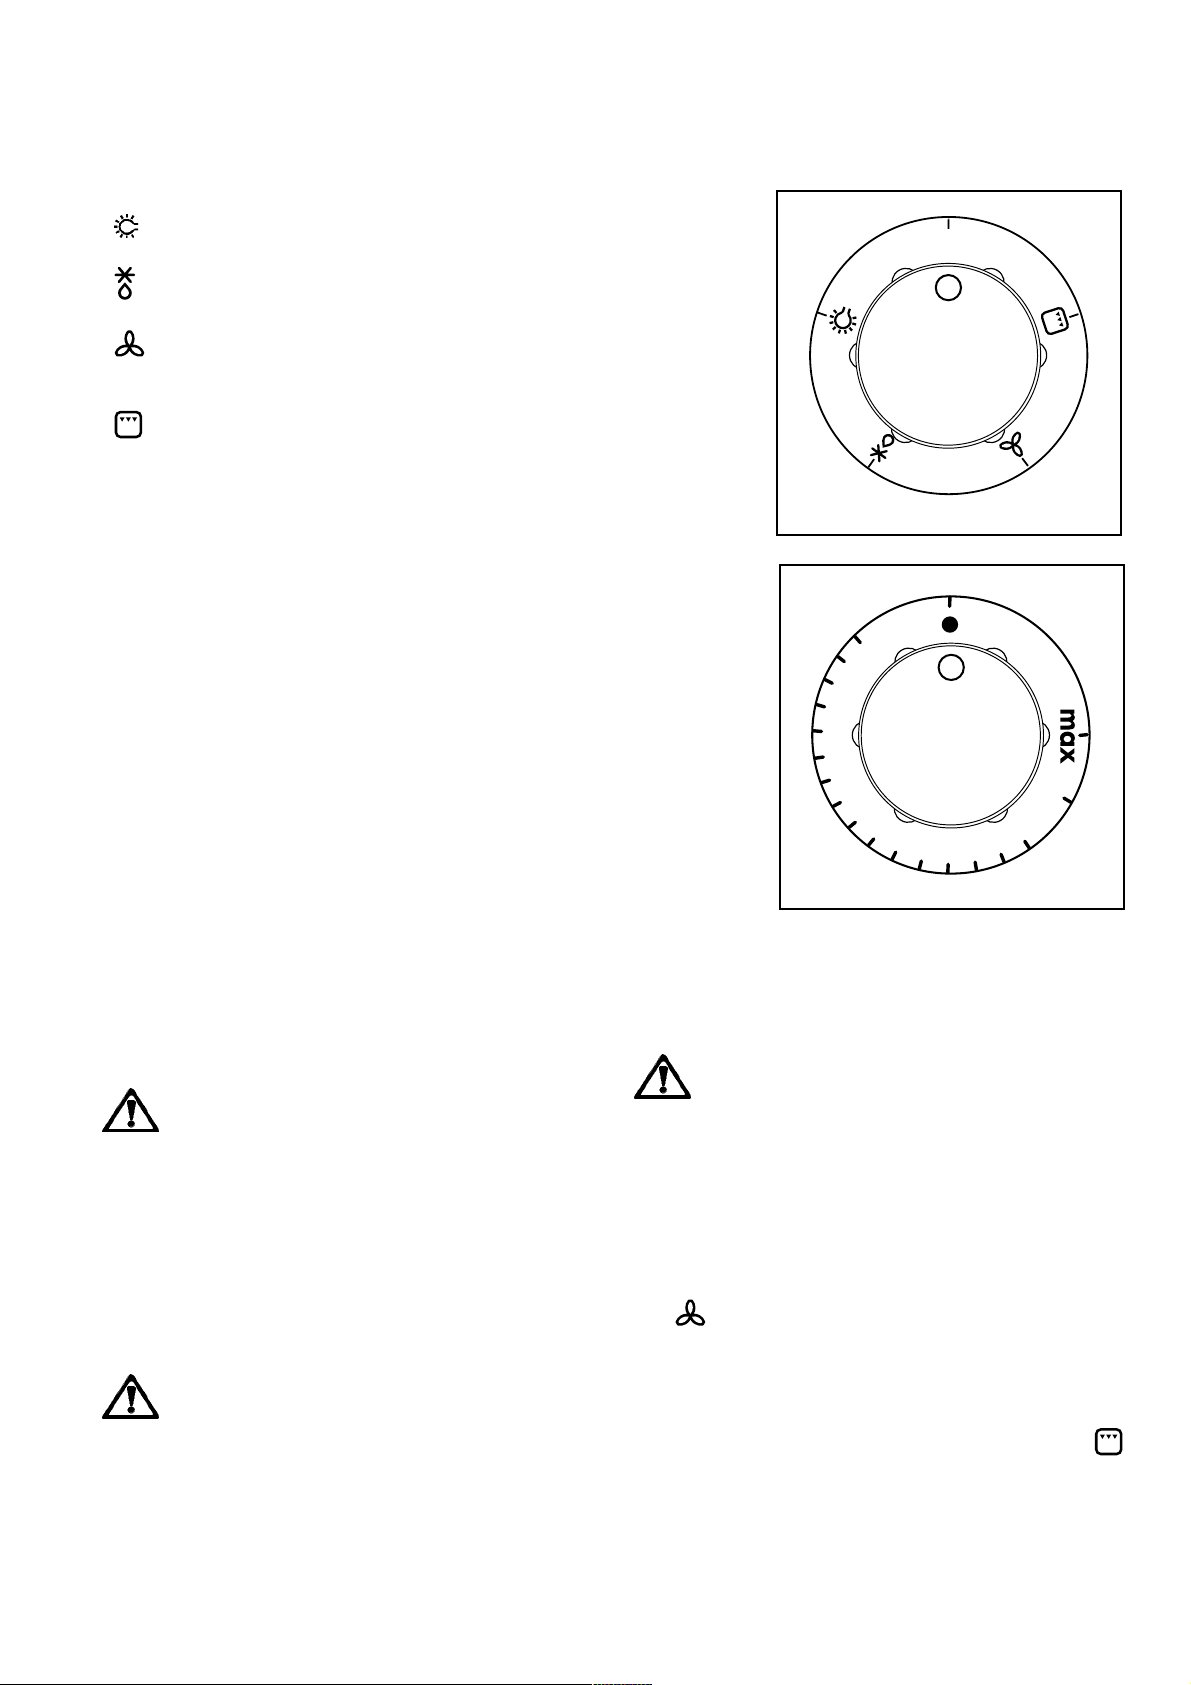
Electric Oven
0
100
150
200
50
Oven Function Control Knob
Oven Light - The oven light will be on without any
cooking function
Defrost Setting - This setting is intended to assist in
thawing of frozen food.
Fan cooking - This allows you to roast or roast and
bake simultaneously using any shelf, without flavour
transference.
Grill - The heat comes only from the top element.
Thermostat Control Knob
Turn the thermostat control knob clockwise to select
temperatures between 50°C and 250°C (max).
Mains on Light
The mains on light will come on when the oven function
control knob is set.
Thermostat Control Light
The thermostat control light will come on when the
thermostat control knob is turned. The light will remain on
until the correct temperature is reached. It will then cycle
on and off to show the temperature is being maintained.
Before the First Use of the Cooker
INSTALLATION
Any gas installation must be carried out by a
CORGI registered installer, and in accordance with
existing rules and regulations.
The relevant instructions are to be found in the second
section of this manual.
Please ensure that when the appliance is installed, it is
easily accessible for the engineer in the event of a
breakdown.
WHEN THE COOKER IS FIRST INSTALLED
Once the cooker has been installed, it is important
to remove any protective materials, which were
put on in the factory.
FO 2372
FO 2371
Remove all packaging, both inside and outside
the cooker, before using it.
Before first use, the oven should be heated without food.
During this time, an unpleasant odour may be emitted.
This is quite normal.
1. Set the time of day with the electronic programmer
(see chapter "24 Hour Clock and Timer").
2. Switch the oven function control knob to fan cooking
.
3. Set the thermostat control knob to MAX.
4. Open a window for ventilation.
5. Allow the oven to run empty for approximately 45
minutes.
This procedure should be repeated with the grill
function for approximately 5-10 minutes.
6
24 Hour Clock and Timer
1. DECREASE CONTROL ( )
A
U
T
O
PUSH
SET
STOP
TIME
BOTH
12
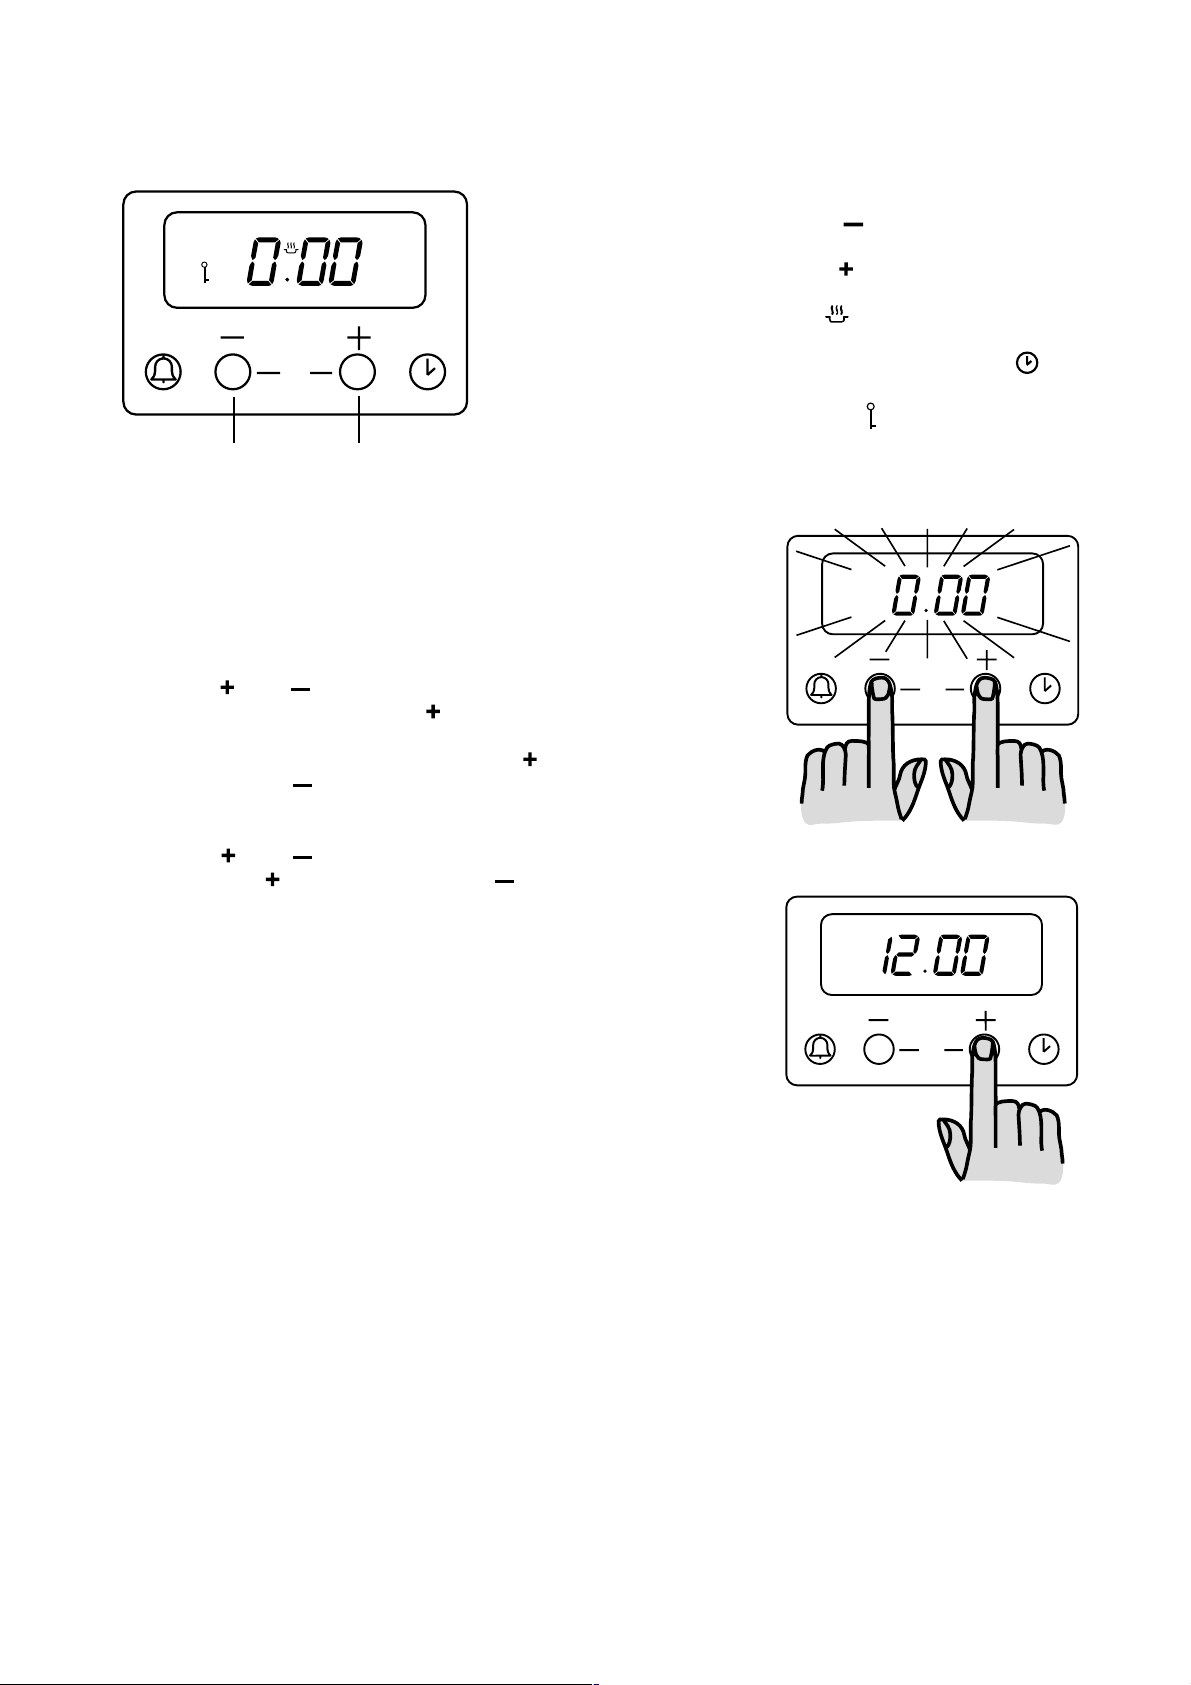
Setting the time of day
When the power supply is first switched on, or after a
power failure, 0.00 and AUTO will flash alternatively in the
display.
To set the correct time of day:
1. Press button and together (See Fig. 1).
2. Release buttons, then press button : 12.00 will
show in the display (See Fig. 2).
3. Within 5 seconds press and hold either button
to increase or button to decrease the time until
the correct time of day on the 24 hour clock is reached.
To reset the correct time of day:
1. Press button and together. Then press and
hold either button to increase or button to
decrease the time until the correct time of day on the
24 hour clock is reached.
2. INCREASE CONTROL ( )
COOKPOT SYMBOL ( )
PUSH BOTH CLOCK SETTING SYMBOL ( )
CHILD SAFETY SYMBOL ( )
Fig. 1
STOP
SET
TIME
A
U
T
O
PUSH
BOTH
NOTE: The increase and decrease control buttons
operate slowly at first and then more rapidly. They
should be pressed separately.
Fig. 2
STOP
SET
TIME
PUSH
BOTH
7
Setting the timer
STOP
SET
TIME
PUSH
BOTH
STOP
SET
TIME
PUSH
BOTH
A
U
T
O
STOP
SET
TIME
PUSH
BOTH
A
U
T
O
The timer can be used to time a set cooking period. At
the end of the cook time the timer will automatically switch
off the oven if in use.
The timer gives an audible signal at the end of any period
of cooking up to 23 hours and 59 minutes.
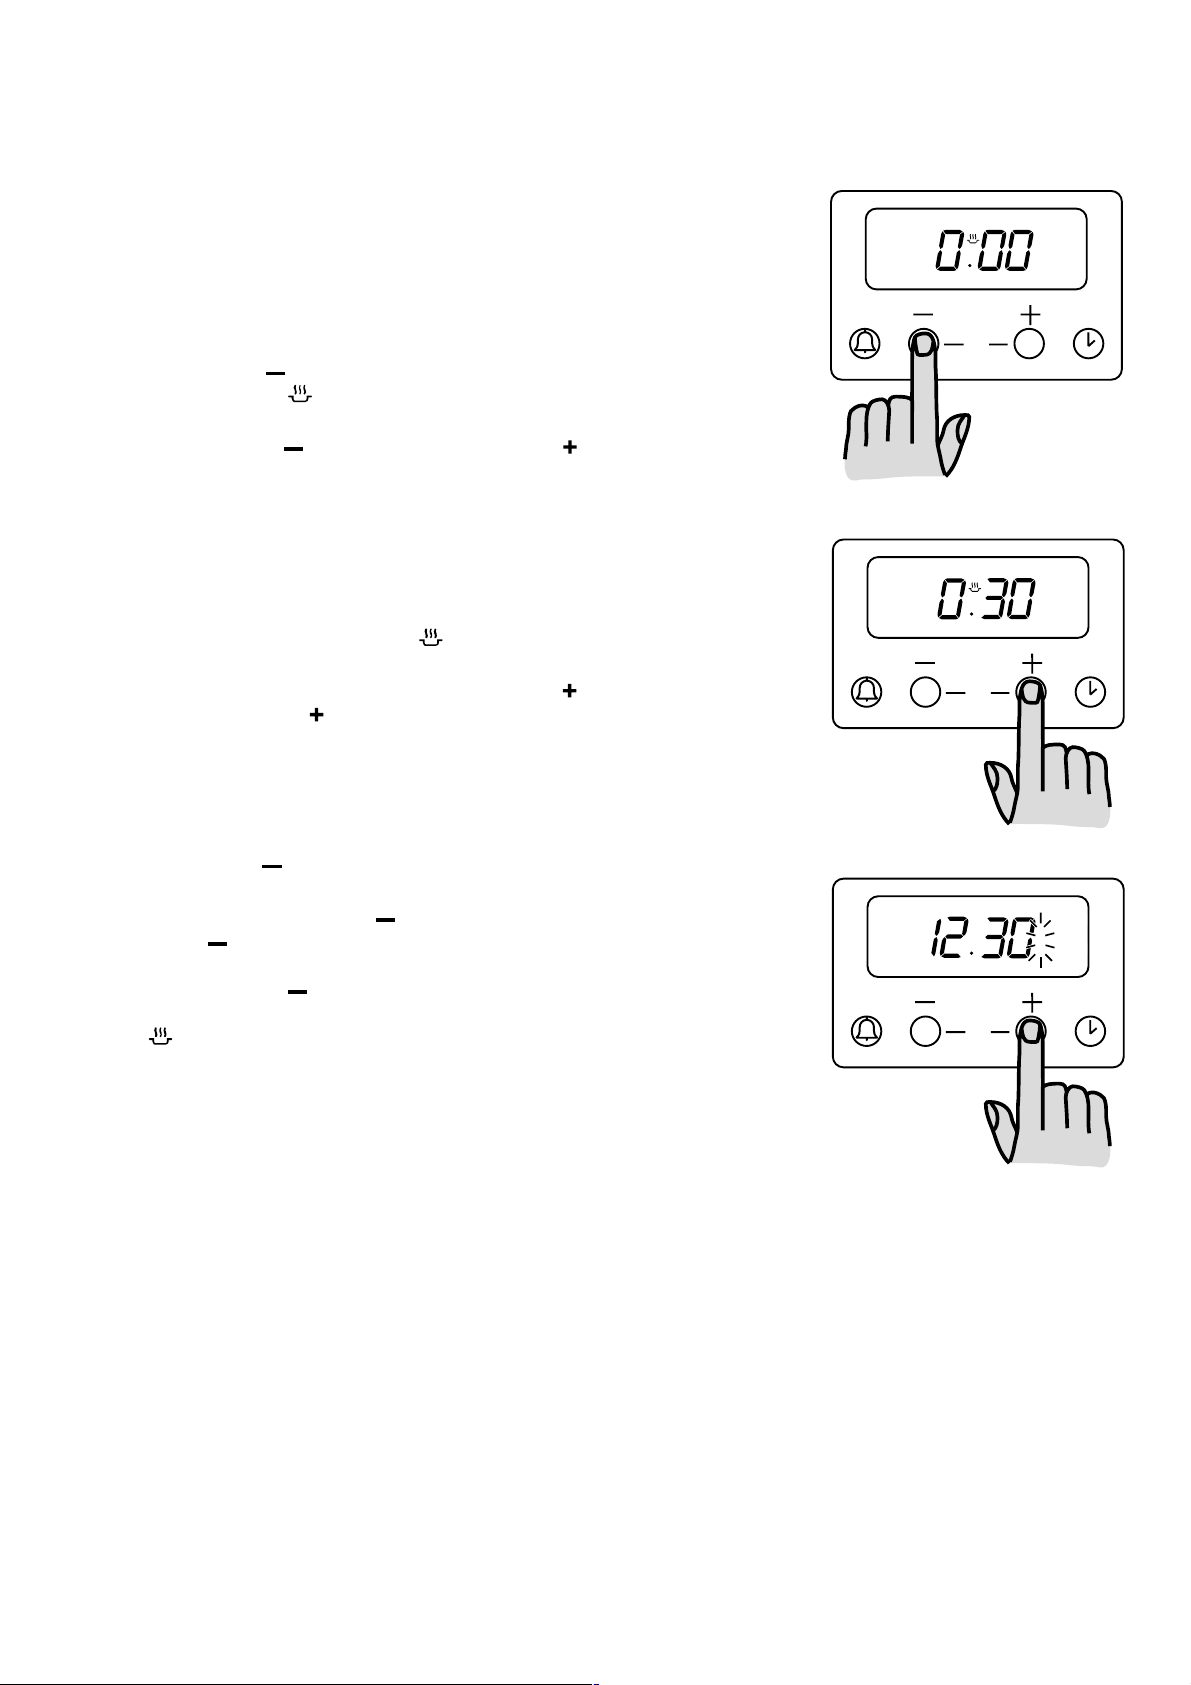
To set the timer:
1. Press button : the display will read 0.00 and the
cookpot symbol ( ) will come on in the display (See
Fig. 3).
2. Release button , then press and hold button .
The AUTO symbol will come on in the display.
The display will count up in one minute intervals until
the interval to be timed is reached, e.g. 30 minutes
(See Fig. 4). The timer will begin to count down once
set and the display will revert to the time of day.
3. At the end of the timed period, the oven will be
switched off automatically and an acoustic alarm will
be heard. The cookpot symbol ( ) will go out, and
the AUTO symbol will flash in the display (See fig. 5).
To switch off the acoustic alarm, press button .
Then press button once again: the AUTO symbol
will go out.
NOTE: remember to turn the oven function and
the thermostat control knob to zero when cooking
is over.
To reset the timer:
1. Press button , then proceed as described above.
To cancel the timer:
1. Press and release button . Then press and hold
button : the display will count down in one minute
intervals to 0.00. The AUTO symbol will go out.
2. Release button . After a few seconds the display
will revert to the time of day and the cookpot symbol
( ) will go out.
If the oven is in use, it will switch OFF after a few
seconds. To reset, proceed as described in the
previous paragraphs.
Fig. 3
Fig. 4
Fig. 5
Things to note
1. The time of day must be set before the oven will operate. There will be a few seconds delay before the
oven switches on.
2. The timer function controls the oven only and will
switch the oven OFF at the end of a timed period.
This function is useful if you want to begin cooking
immediately and have the oven switch OFF
automatically.
3. If you have used the timer to time food cooking in the
oven you will need to reset the timer before the oven
can operate again.
8
 Loading...