

Zanussi ZCM565NW User Manual

MIXED FUEL COOKER
КОМБИНИРАНА
ГОТВАРСКАМ
ПЕЧКА
ZCM 565NW
BG
INSTRUCTION BOOK
Книга с инструкции

2

WARNINGS
It is most important that this instruction book should be retained with the appliance for future
reference. Should the appliance be sold or transferred, always ensure that the book is left with
the appliance in order that the new owner can get to know the functions of the appliance and
the relevant warnings. These warnings are provided in the interest of safety. You MUST read
them carefully before installing or using the appliance.
Installation
• This cooker must be installed by qualified
personnel, according to the manufacturer's
instructions.
• This cooker is heavy. Take care when moving it.
• Remove all packaging before using the cooker.
• Prior to installation, ensure that the local
distribution conditions (nature of gas and
pressure) and the adjustement of the
appliance are compatible.
• The adjustement conditions for this
appliance are stated on the label.
• This appliance is not connected to a
combustion products evacuation device. It
shall be installed and connected in accordance
with current installation regulations. Particular
attention shall be given to the relevant
requirements regarding ventilation.
• Ensure that the electrical supply complies
with the type stated on the rating plate.
• Do not attempt to modify the cooker in any way.
Child Safety
• This cooker is designed to be operated by
adults. Do not alow children to play near or with
the cooker.
• The cooker gets hot when it is in use and retain
their heat for a long period after use. Children
should be kept away until it has cooled.
• Children can also injure themselves by pulling
pans or pots off the cooker.
During use
• This cooker is intended for domestic cooking
only. It is not designed for commercial or
industrial purposes.
• The use of a cooking appliance produces,
heat and humidity in the room in which it is
installed. Ensure good ventilation of the
room keeping natural ventilation openings
clear or installing a mechanic ventilating
device.
• Do not use this cooker if it is in contact with
water. Do not operate the cooker with wet
hands.
• An intensive and prolonged use of the
cooker could necessitate a supplementary
airing by opening the window, or a more
effective ventilation by increasing the
mechanical device power, if there is.
• When using other electr ical appliances, ensure
the cable does not come into contact with the
hot surfaces of the cooker.
• Never leave the cooker unattended when
cooking with oil and fats.
• Unstable or misshapen pans should not be
used on the hob burners as unstable pans
can cause an accident by tipping or spillage.
• The grill pan will become hot during use,
always use oven gloves when removing or
replacing a hot grill pan.
• During use the appliance becomes hot.
Care should be taken to avoid touching
heating elements inside the oven.
• Ensure the control knobs are in the ‘OFF’
position when not in use.
• This cooker should be kept clean at all times.
A build-up of fats or foodstuffs could result in
a fire.
• Only clean this oven in accordance with the
instructions.
• Never use plastic dishes in the oven or on the
hob burners. Never line any part of the oven
with aluminium foil.
• Always ensure that the oven vent which is
located at the centre back of the hob is left
unobstructed to ensure ventilation of the oven
cavity.
• The oven must be switched off before
removing the guard and after cleaning the
guard must be replaced in accordance
with the manufacturer's instructions.
• Never pule the appliance by the oven handle.
• The appliance is fitted with a lid. It is designed
as a dust cover when closed, and as a splash
back when open. Do not use for any other
pur po s e. When the oven is in use the lid has to
be opened.
• Always remove any spillage from the surface
of the lid before opening, and the appliance
should be allowed to cool before closing the lid.
• After using the cooker, the lid MUST NOT be
closed until the hob and oven are completely
cold.
Service
This cooker should only be repaired or serviced
by an authorised Service Engineer and only
genuine approved spare parts should be used.
Environmental Information
• After installation, please dispose of the
packaging with due regard to safety and the
environment.
• When disposing of an old appliance, make it
unusable, by cutting off the cable.
3
Instructions for the Installer
CONTENTS
Tehnical features
Installation
Location
Electrical connections
Gas connection
Conversion of gas
Instructions for the User
Use and care
Before the first use of the oven
Electric oven
Traditional cooking
Grilling
Rotisserie
Convection cooking
Defrost
Using the Hob
Maintenance and cleaning
Oven bulb remplacement
Something not working
Guarantee conditions
After sales service
5
6
6
7
8
9
11
12
13
14
14
15
15
16
17
21
22
23
24
24
How to read the instruction book
The symbols below will guide you when reading the
instruction book
Safety instructions
Step by Step Operation
Advice and recommendations
Environmental Information
4
INSTRUCTIONS FOR THE INSTALLER
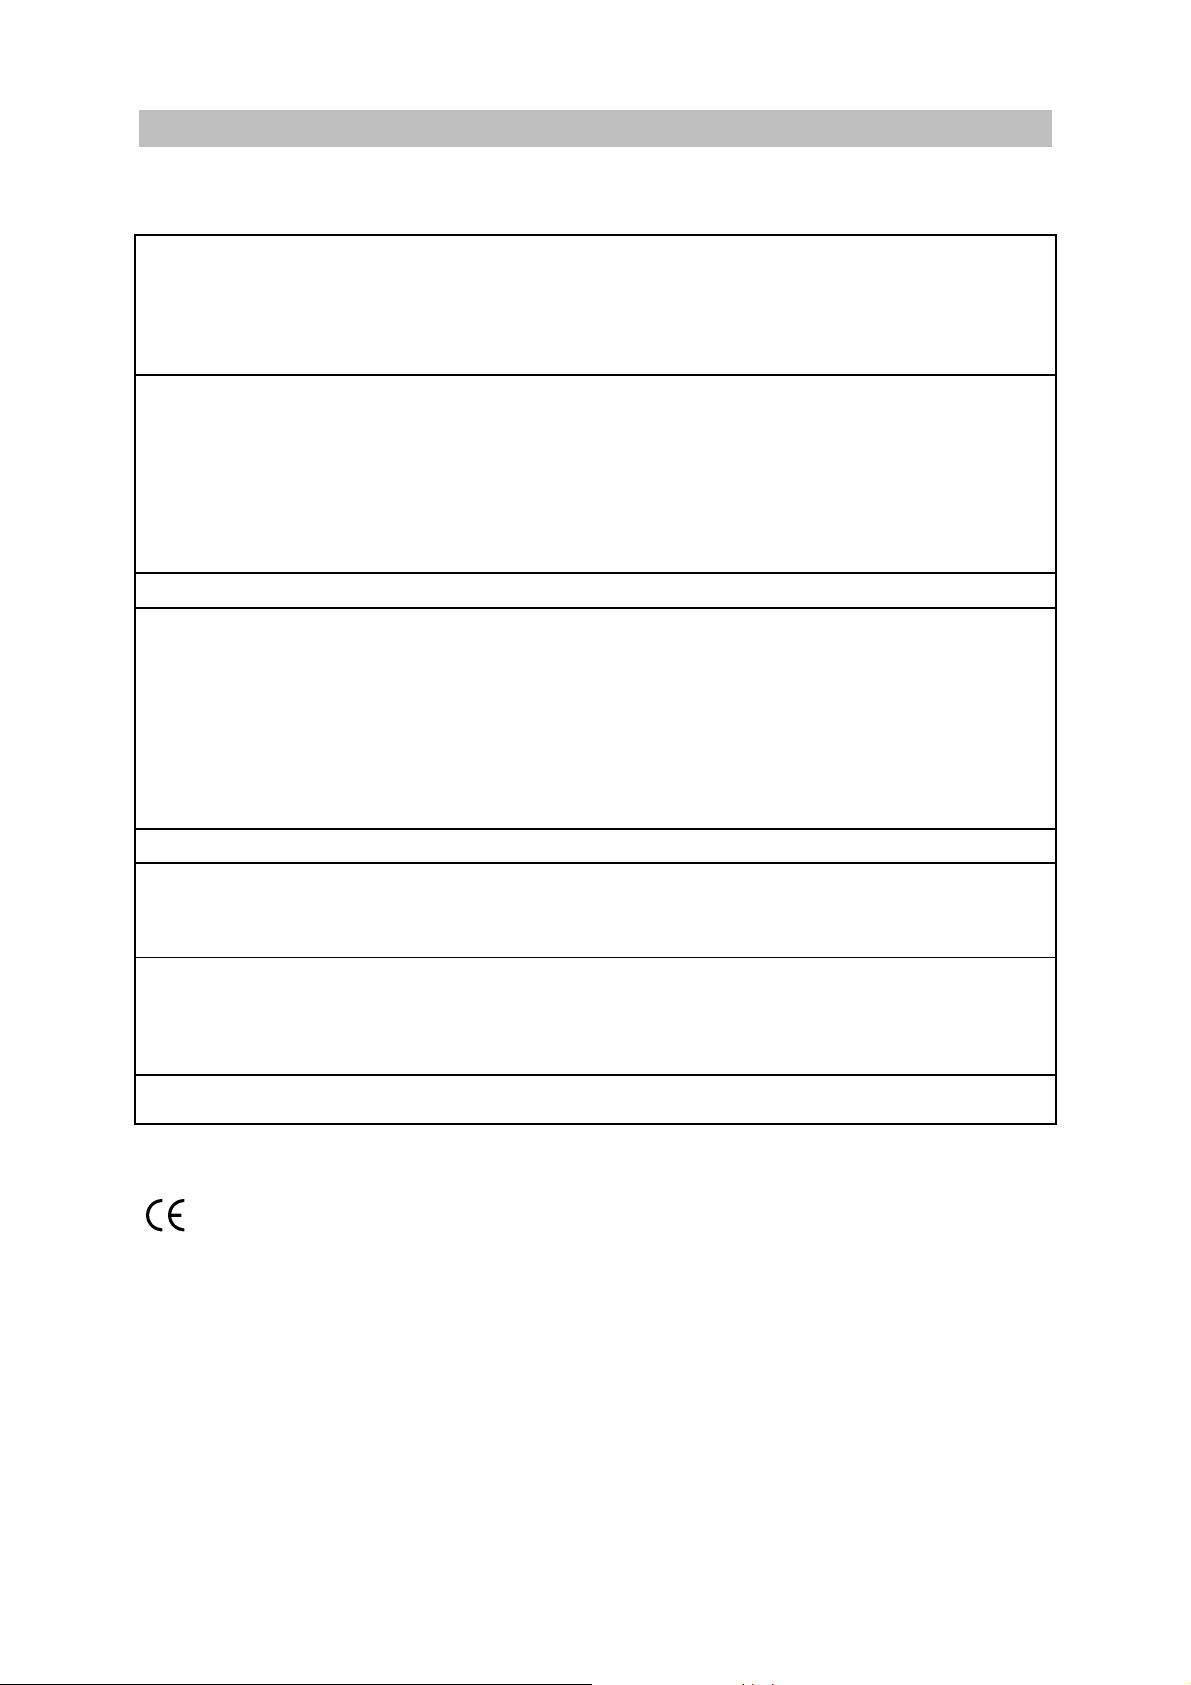
TECHNICAL FEATURES
Dimensions Height
Width
Depth
Oven Capacity
Hob Lid
Pan support
Front right burner
Back right burner
Front left element
Back left element
Ignition
Total hob rating 2500,6 W
Oven Oven element
- Bottom heating element
- Top heating element
Grill element
Convection fan
Light in the oven
Turn spit
Cleaning
Total oven rating 1960 W
Painted
Enamelled
Rapid
Auxiliary
Electric hotplate Ø 145 mm
Electric hotplate Ø 145 mm
Lamp 25W type E14
855 mm
500 mm
600 mm
45 l
3000 W
1000 W
1000 W
1500 W
0,6 W
900 W
1000 W
1900 W
35 W
4 W
manual
Supply Rated voltage
Rated frequency
Accessories Oven shelf
Roasting tray
Backing tray
Total cooker rating
This appliance complies with the following EEC
Directives :
73/23 - 90/683 ; (Low Voltage Directive) and
subsequent modifications,
89/336 (Electromagnetical Compatibility
Directive)
93/68 (General Directives) and subsequent
modifications.
230/400 V
50 Hz
Enamelled
Enamelled
4460,6 W
5
INSTALLATION
It is mandatory that all operations required for the
installation be carried out by QUALIFIED
PERSONNEL in accordance with existing rules
and regulations.
The appliance must be installed in accordance
with " X " specification (EN60.335-2.6). The
cooker must not be installed higher than the
worktop.
Please ensure that when the appliance is
installed it is easily accessible for the
engineer in the event of a breakdown.
Before your appliance is connected to the mains
electricity supply, check to ensure that the voltage
and the frequency shown on the rating plate
corresponds with your supply voltage.
This appliance must be earthed.
LOCATION
The cooker has been registered as a “Class
X”appliance according to Fire Risk Regulations.
Any adjacent cabinets or walls must not exceed
the cooker’s height.
The cooker may be located in a kitchen, a
kitchen/diner or bed sitting room, but not in a
bathroom or shower room.
Before installation ensure that the local distribution
conditions (gas type and pressure) and the presetting of the appliance are consistent.
This appliance must not connected to a chimney.
It has to be installed and connected in
accordance with the rules in force. Special
attention should be paid to the applicable
disposal concerning ventilation.
The adjusting conditions of this appliance are
mentioned on the rating plate.
Connection to gas supply.
Check that the gas flow and the diameter of the
supply pipe is sufficient to supply all the
appliances of the installation.
• Check that all connections are tight.
• Install an accessible and visible gas tap to
isolate the appliance.
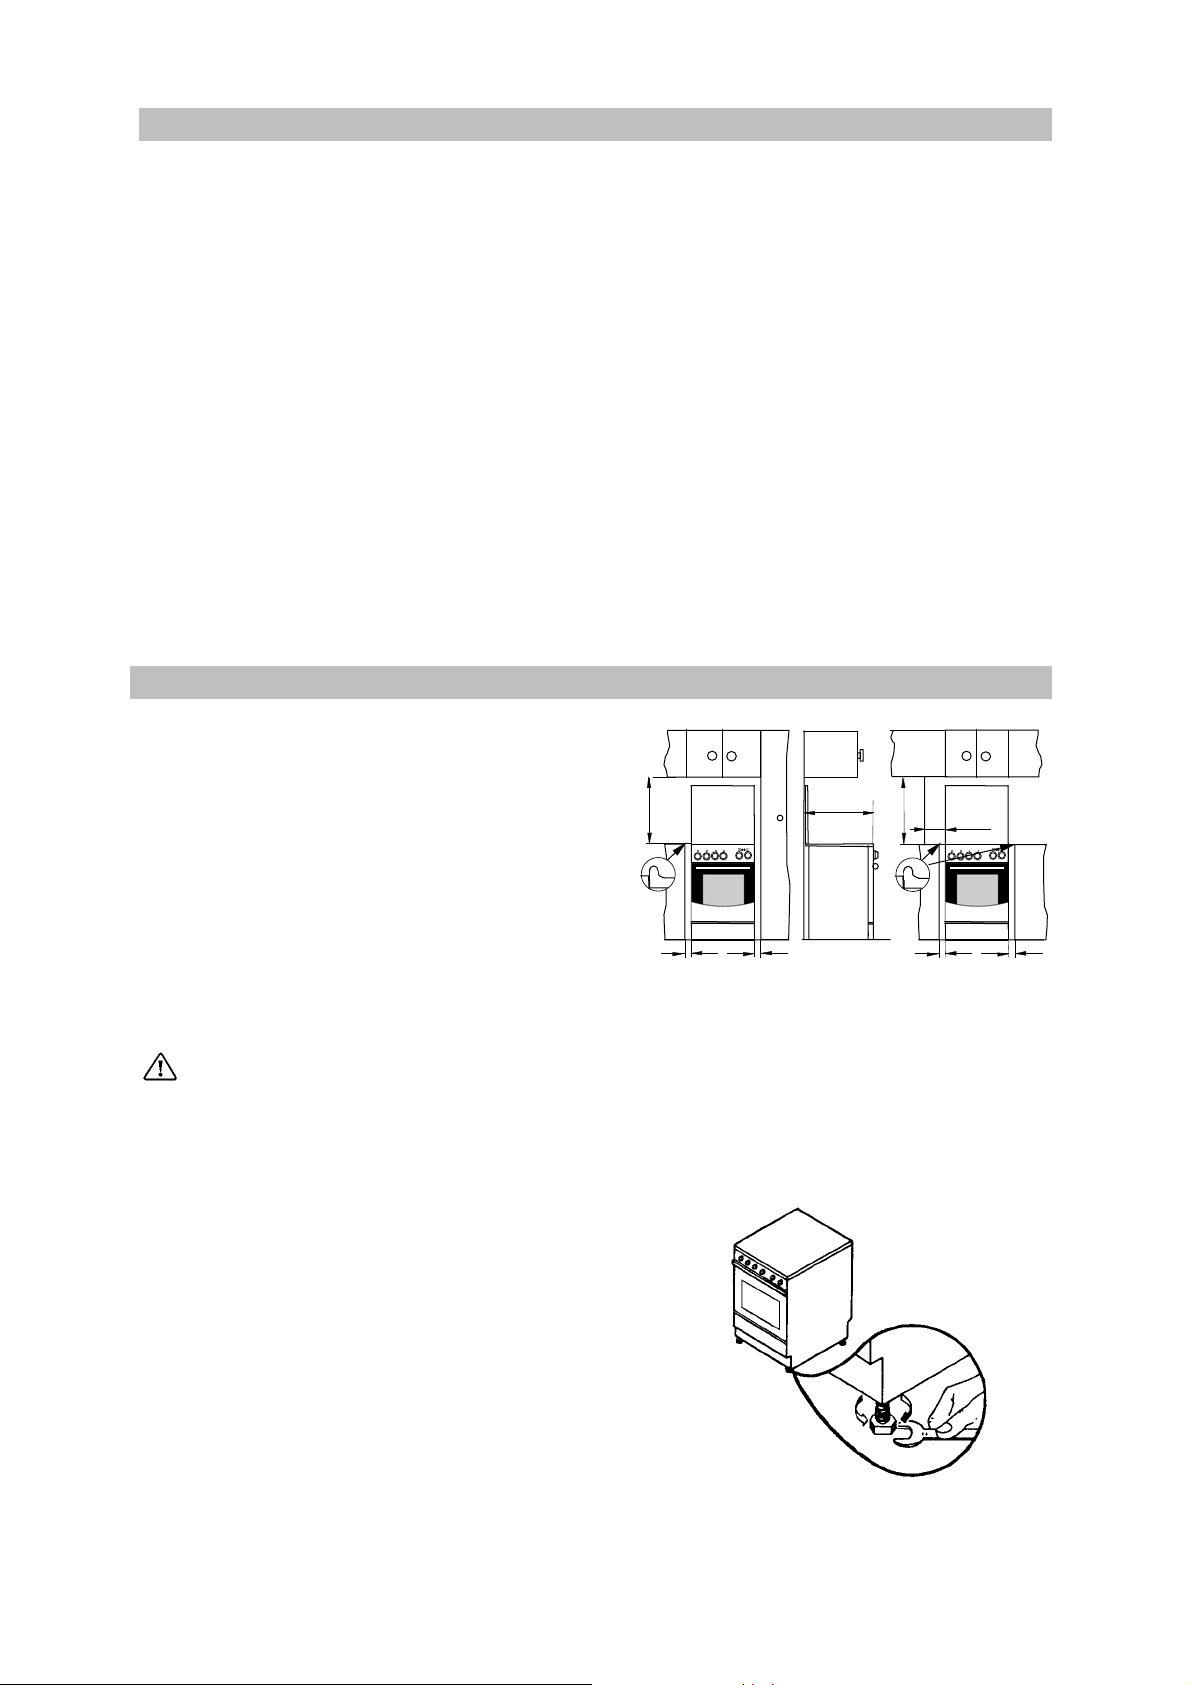
69cm
62 cm
69cm
15 cm
The minimum distance combustible material can
be fitted above the cooker in line with the edges
of the cooker is 69 cm (see fig.)
It is mandatory to keep 2cm distance to the
adjacent furniture.
The appliance must be set on a heatproof
floor. The adjustable feet must not be
removed.
Levelling
The appliance is provided with adjustable small
feet placed in the back and front corners of the
base.
By adjusting the small feet it is possible to
change the height of the appliance so as to
ensure a better levelling with other surfaces and
an even distribution of the liquids contained in
pots and pans.
2 cm
2 cm
2 cm
2 cm
6
ELECTRICAL CONNECTIONS
Any electrical work required to install
this hob and the supply cable should be
carried out by a qualified electrician or
competent person, in accordance with the
current regulations.
THIS COOKER MUST BE EARTHED.
The manufacturer declines any liability
should these safety measures not be
observed.
This cooker is designed to be connected to a
230/400V, 50Hz electrical supply.
To connect to the electricity supply, use cable
type H05 RR-F.
Before switching on, make sure the electricity
supply voltage is the same as that indicated on
the rating plate.
The cooker is supplied without supply cable. A
flexible supply cable must be fitted, in
accordance with the specification gived in the
relevant table no. 1.
In case of a direct connection to the mains you
have to interpose an omnipolar switch a
minimum opening between contacts of 3 mm.
The switch should be sited within 2m of the hob
and be easily accessible upon completion of the
installation.
The yellow-green grounding cable has not to be
interrupted by the switch.
NOTE: The earth wire should be about 2 cm
longer than the live and neutral wires.
If the supply cord is damaged, it must
be replaced by the manufacturer or its
service agent or a similarly qualified person
in order to avoid a hazard.
After installation and connecting, the
cable must be placed so that it cannot at any
point reach a temperature of more than 50°C
above the ambient temperature.
supply
cable
The manufacturer disclaims any responsibility
should these safety instructions not be
carried out.
Before connecting check that:
• fuse and household electric installation can
bear the charge of the appliance (see rating
plate);
• The socket or the omnipolar switch used for
connection is easily reachable when the
appliance is installed.
How to proceed?
• Unscrew and remove the protective cover at
the back of the appliance;
• Connect the power cord to the terminal of the
cooker according to the table no.1;
• Fix by means of cable clamp;
• Make sure that the connection to the terminal
is matching the network power;
• Remount and screw the protective cover at the
back of the appliance.
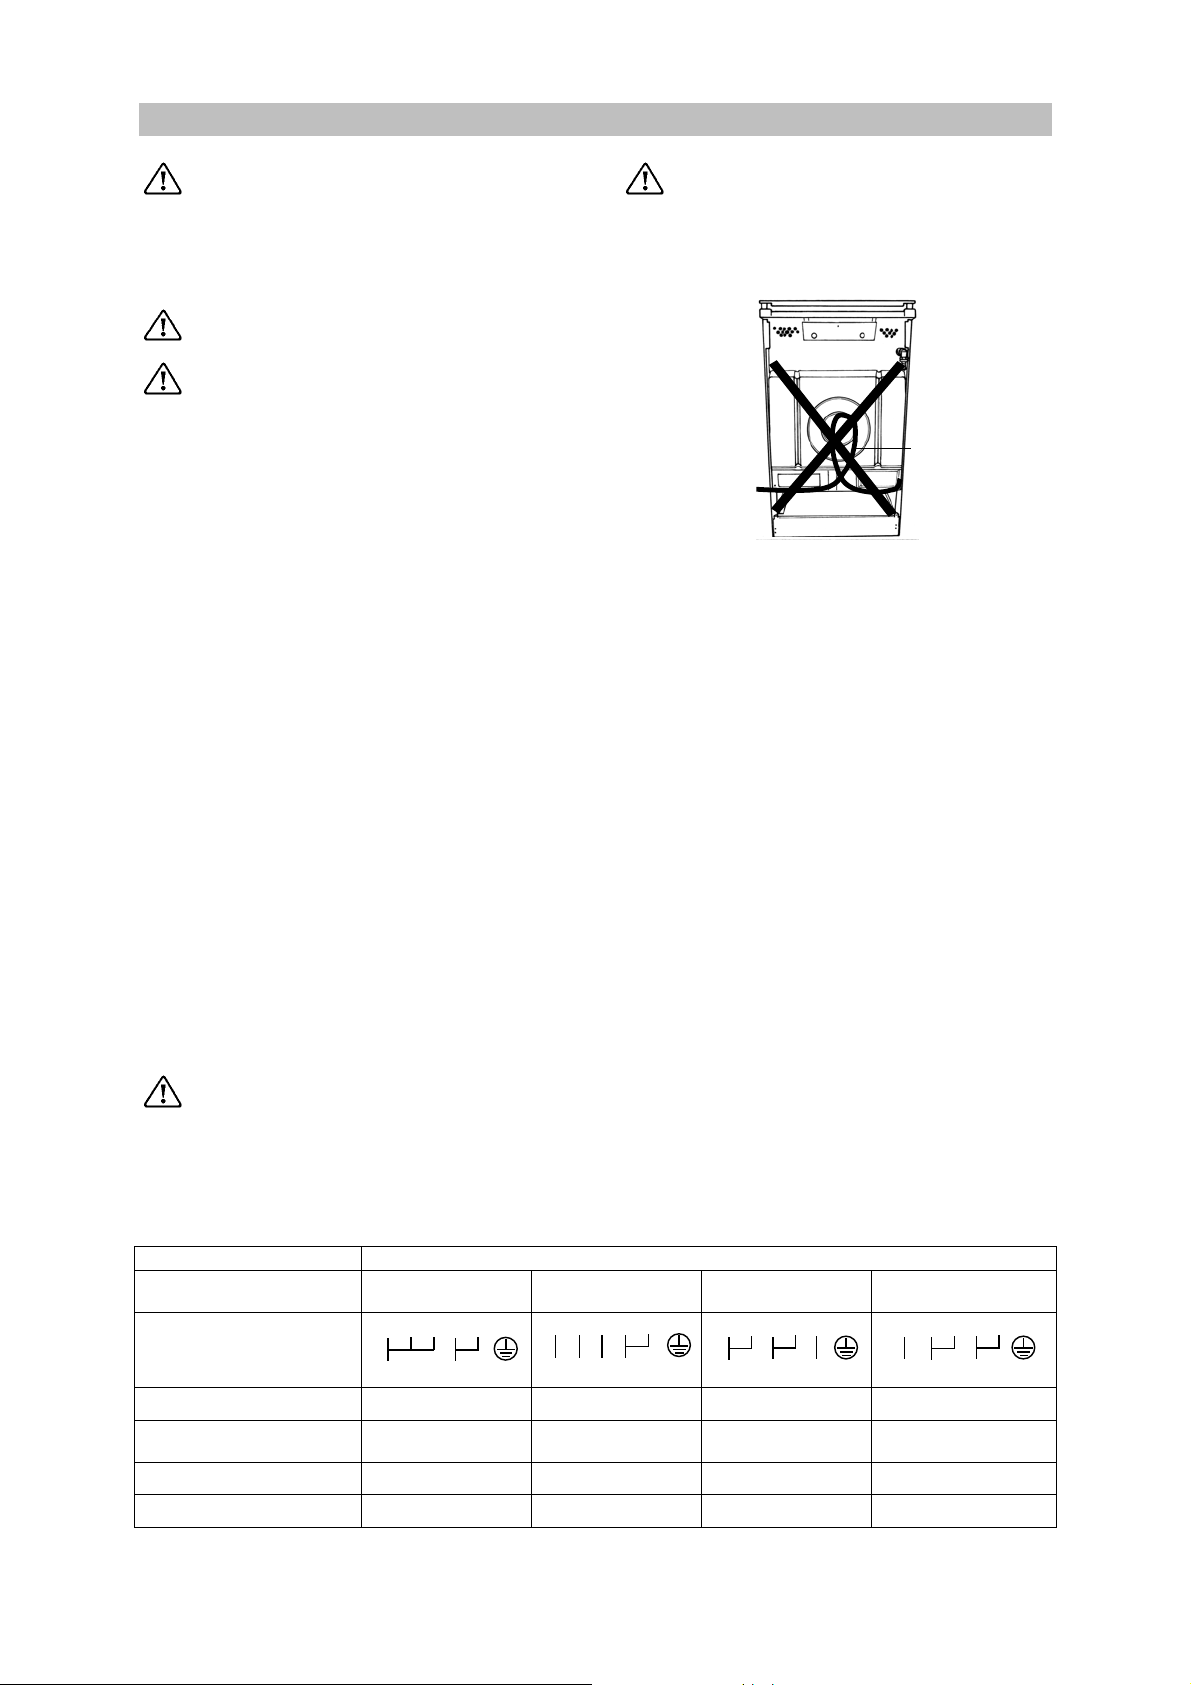
Table no. 1
Rated voltage 230V 1N, 230/400V 3N, 230V 3~, 230/400V 2N
Connection type Single phase
Cable connection to the
terminal plate
Network voltage
Voltage of heating
elements
Fusible capacity
Cable section
1 2 3
L1
1N/230 V 3N/400 V 3/230 V 2N/400 V
230 V 230 V 230 V 230 V
3 x 4 mm
4 5
N
20 A 3 x 10 A 3 x 20 A 2 x 10 A
2
Tri-phase Y 3 ph.
1
PE
+ neutral
4 5
2
3
N
L3L1
L2
5 x 2,5 mm
2
PE
Tri-phase
1 2
L1 L2
4 x 4 mm
3 4
L3
Tri-phase Y 2 ph. +
neutral
5
PE
2
2 3
1
4 5
N
L2L1
4 x 2,5 mm
PE
2
7
GAS CONNECTION
Y
Y
Gas connection must be carried out according to
the rules in force.
The manufacturing company release the unit,
once tested, adjusted for the kind of gas stated
on the adjustment label located on the back of
the range, next to connection pipe. Be sure that
you are going to connect the unit to the same
kind of gas written on the plate. Otherwise,
follow all the instructions of the paragraph
“Change of gas”.
For best efficiency and lowest consumption, be
sure that manifolds gas pressure respects the
values in the table of “Specification
nozzles”.
Connection using a rigid pipe or a
flexible metal pipe
To ensure higher safety, it is recommended to
carry out the connection to the gas system using
rigid pipes (ex. copper) or using flexible stainless
steel pipes, to avoid any stress to the unit.
Gas feeding pipe fitting is Gc 1/2.
ES
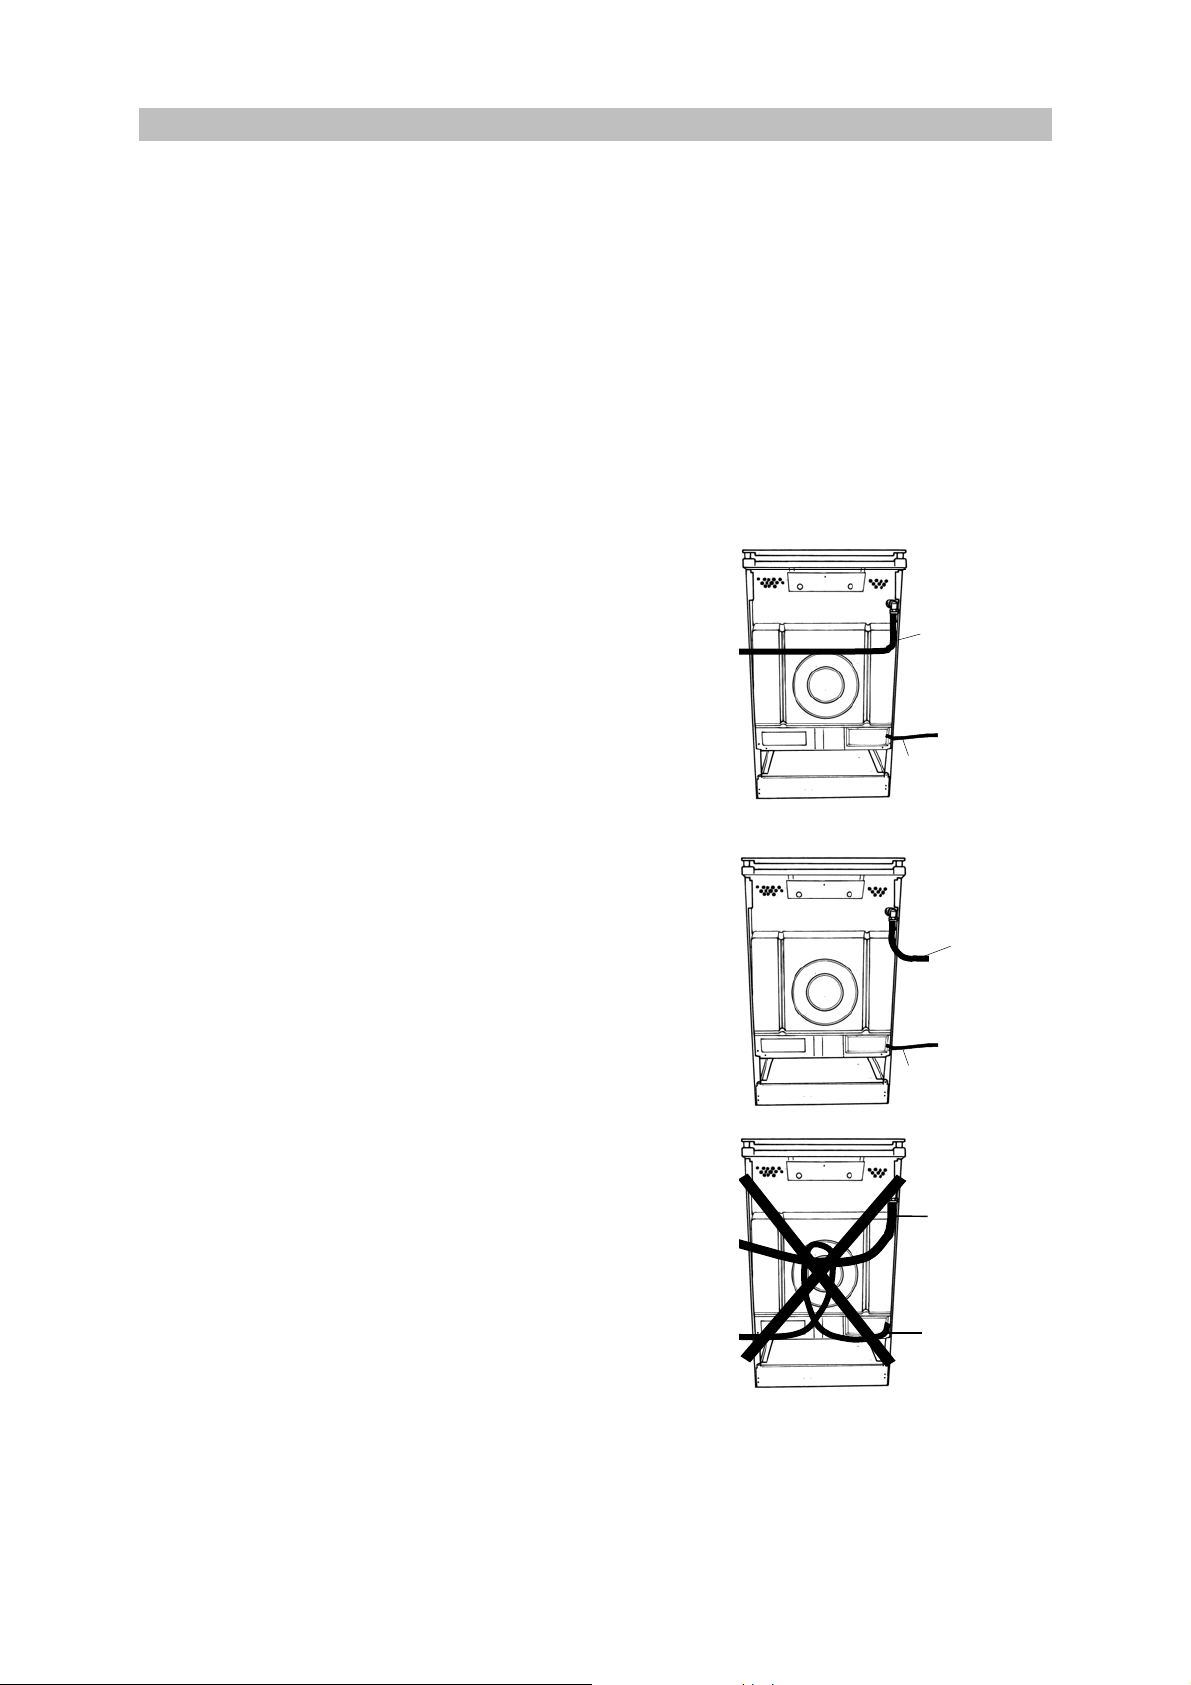
rigid pipe
If the pipe, to reach the cock, must run
behind the range, connection to the gas
supply should be carried out using only rigid
pipes in conformity with rules in force.
Connection using flexible, non metal pipes
When the connection can be easily inspected in
its full extent, there is the chance to use a
flexible pipe according to the rules in force.
The flexible pipe should be made ready for use
in such a way that:
- nowhere it can reach overtemperature, other
than room temperature, higher than 30°C;
- it is no longer than 1500 mm;
- it shows no throttles;
- it is not subject to traction or torsion;
- it doesn’t get in touch with cutting edges or
corners;
- it can be easily inspected in order to check its
condition.
IMPORTANT
Once installation is complete, check the perfect
seal of every pipe fitting, using a soapy solution,
never a flame.
supply
cable
ES
connection
of flexible
hose
supply
cable
NO
connection
of flexible
hose
supply
cable
8
CONVERSION OF GAS
Your cooker is designed to work with natural
gas, propane or butane. It is not designed for
butane or propane air.
Connection to the LPG bottle should be carried
out in accordance with the enclosed picture.
The LPG conversion kit is available from your
Service Force Centre and must be fitted by an
authorised Service Engineer.
For changing the gas type it is necessary to:
• replace the nozzles (hob);
• adjust the minimum level (hob);
• check the gas connection;
Stick the label supplied with the
appliance (in the nozzles bag) corresponding
to the gas type utilised.
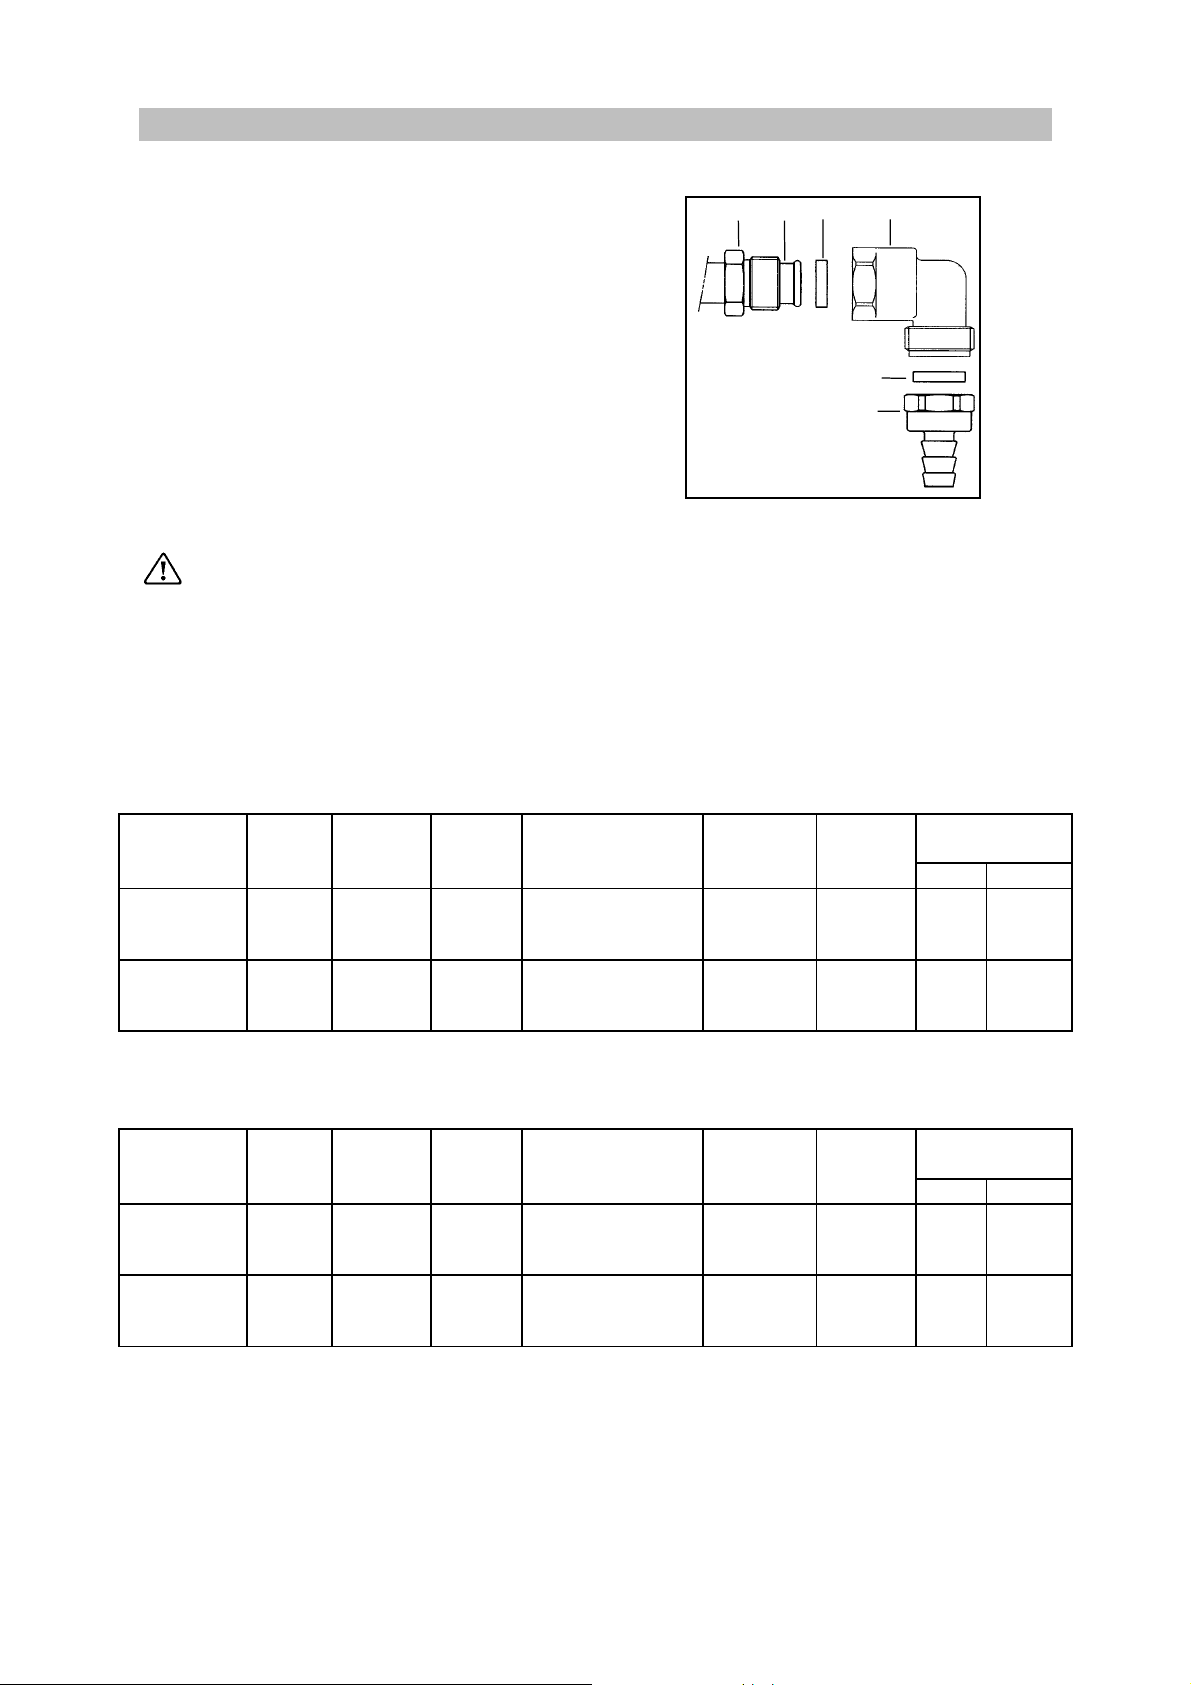
SPECIFICATION NOZZLES
Cat : II
B A C E
C
D
A – Distributor pipe
B – Nut 1/2"
C – Gasket
D – Hose nipple
E – Elbow
2E +3+
BURNERS
RAPID
AUXILIARY
BURNERS
RAPID
AUXILIARY
NOM.
POWER
(kW)
Reduced
power
(kW)
By-pass
(mm)
3,00 0,72 0,42
1,00 0,35 0,29
NOM.
POWER
(kW)
3,00
3,00
2,60
1,00
1,00
0,85
Reduced
power
(kW)
0,72
0,72
0,63
0,35
0,35
0,31
By-pass
(mm)
0,42
0,29
TYPE OF GAS
Natural gas G20
Butane G30
Propane G31
Natural gas G20
Butane G30
Propane G31
Cat : II
2H 3B/P
TYPE OF GAS
Natural gas G20
Butane G30
Propane G31
Natural gas G20
Butane G30
Propane G31
PRESSURE
(mbar)
20
28-30
37
20
28-30
37
PRESSURE
(mbar)
20
30
30
20
30
30
NOZZLE
DIAM.
(mm)
1,19
0,88
0,88
0,70
0,50
0,50
NOZZLE
DIAM.
(mm)
1,19
0,88
0,88
0,70
0,50
0,50
Cons.
3
/h g/h
m
0,267
-
-
0,095
-
-
Cons.
3
/h g/h
m
0,267
-
-
0,095
-
-
218,1
214,2
-
72,7
71,4
218,1
185,7
-
72,7
60,7
9
Replace the nozzles of the hob burners
Every appliance has spare nozzles for every gas.
The whole of every nozzle is marked in
millimetres on the nozzle.
Before any modifications or adapt the
range to a kind of different gas, you must
DISCONNECT the cooker from the electricity
supply and ensure that all control knobs are
in the OFF position, and the appliance has
cooled completely.
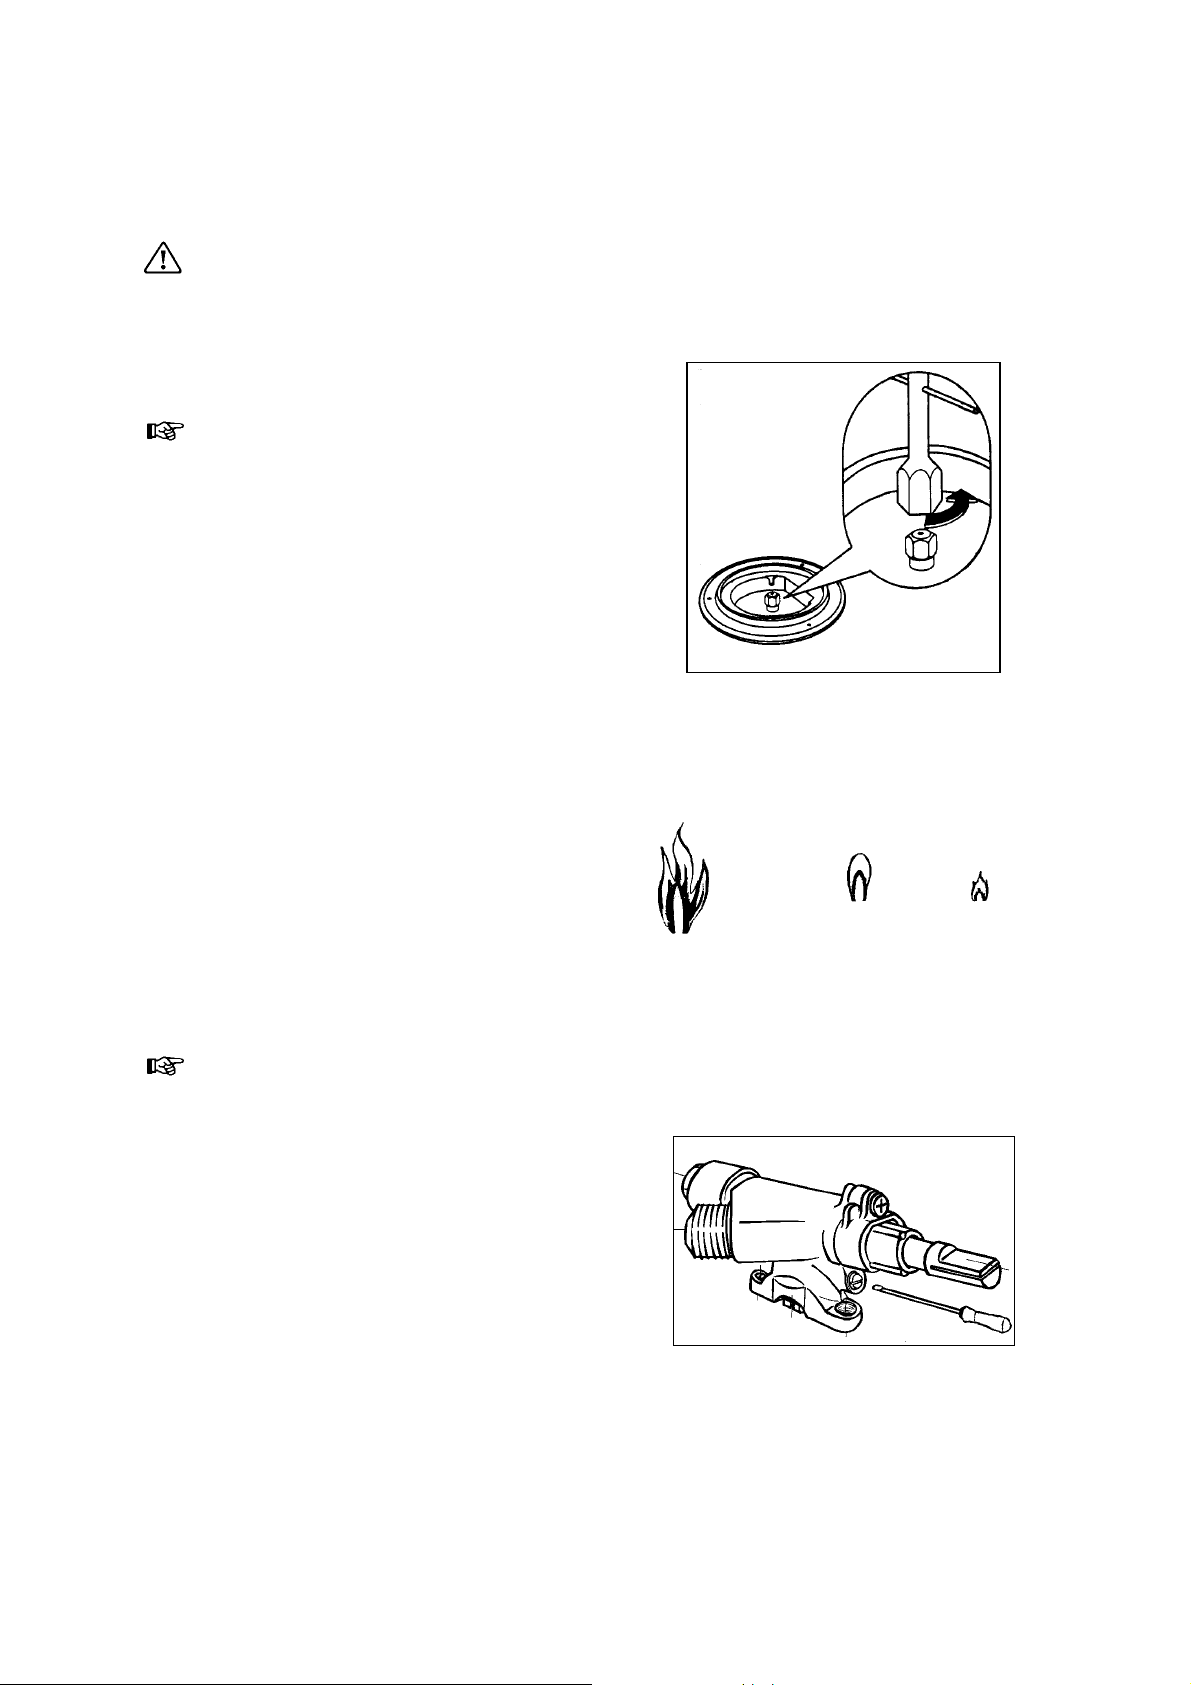
Hob burners
• Remove the pan supports;
• Remove the caps and the burner crowns;
• Using a No 7 socket spanner unscrew the
nozzles and replace them with those required
for the type of gas in use (see table
"Specification nozzles").
Reassemble the parts following the same
procedure in reverse.
These burners do not need any primary air
regulation.
Adjustment of minimum level for the hob
burners
The burner is correctly adjusted when the flame
is stable silent and goes out without any noise.
When changing the type of gas check that the
minimum level is correct. The air admission is
correct when the flame is about 4 mm in length.
The top burners do not need adjustment of
primary air.
Check that, turning the knob quickly from the
maximum position to the minimum one, the flame
does not go out.
Hob burners
To adjust the minimum level:
• Light the burner
• Turn the knob to the position of the minimum
flame;
• Remove the knob;
• Unscrew or screw the by-pass screw (below
of tap shaft) until a regular small flame is
reached.
• For LPG screw completely the by-pass
screw.
Reassemble the parts following the same
procedure in reverse.
Check that, when turning the knob quickly from
the maximum position to the minimum one, the
flame does not go out.
no air
correct
adjustment
excess of
air
10
USE AND CARE
A
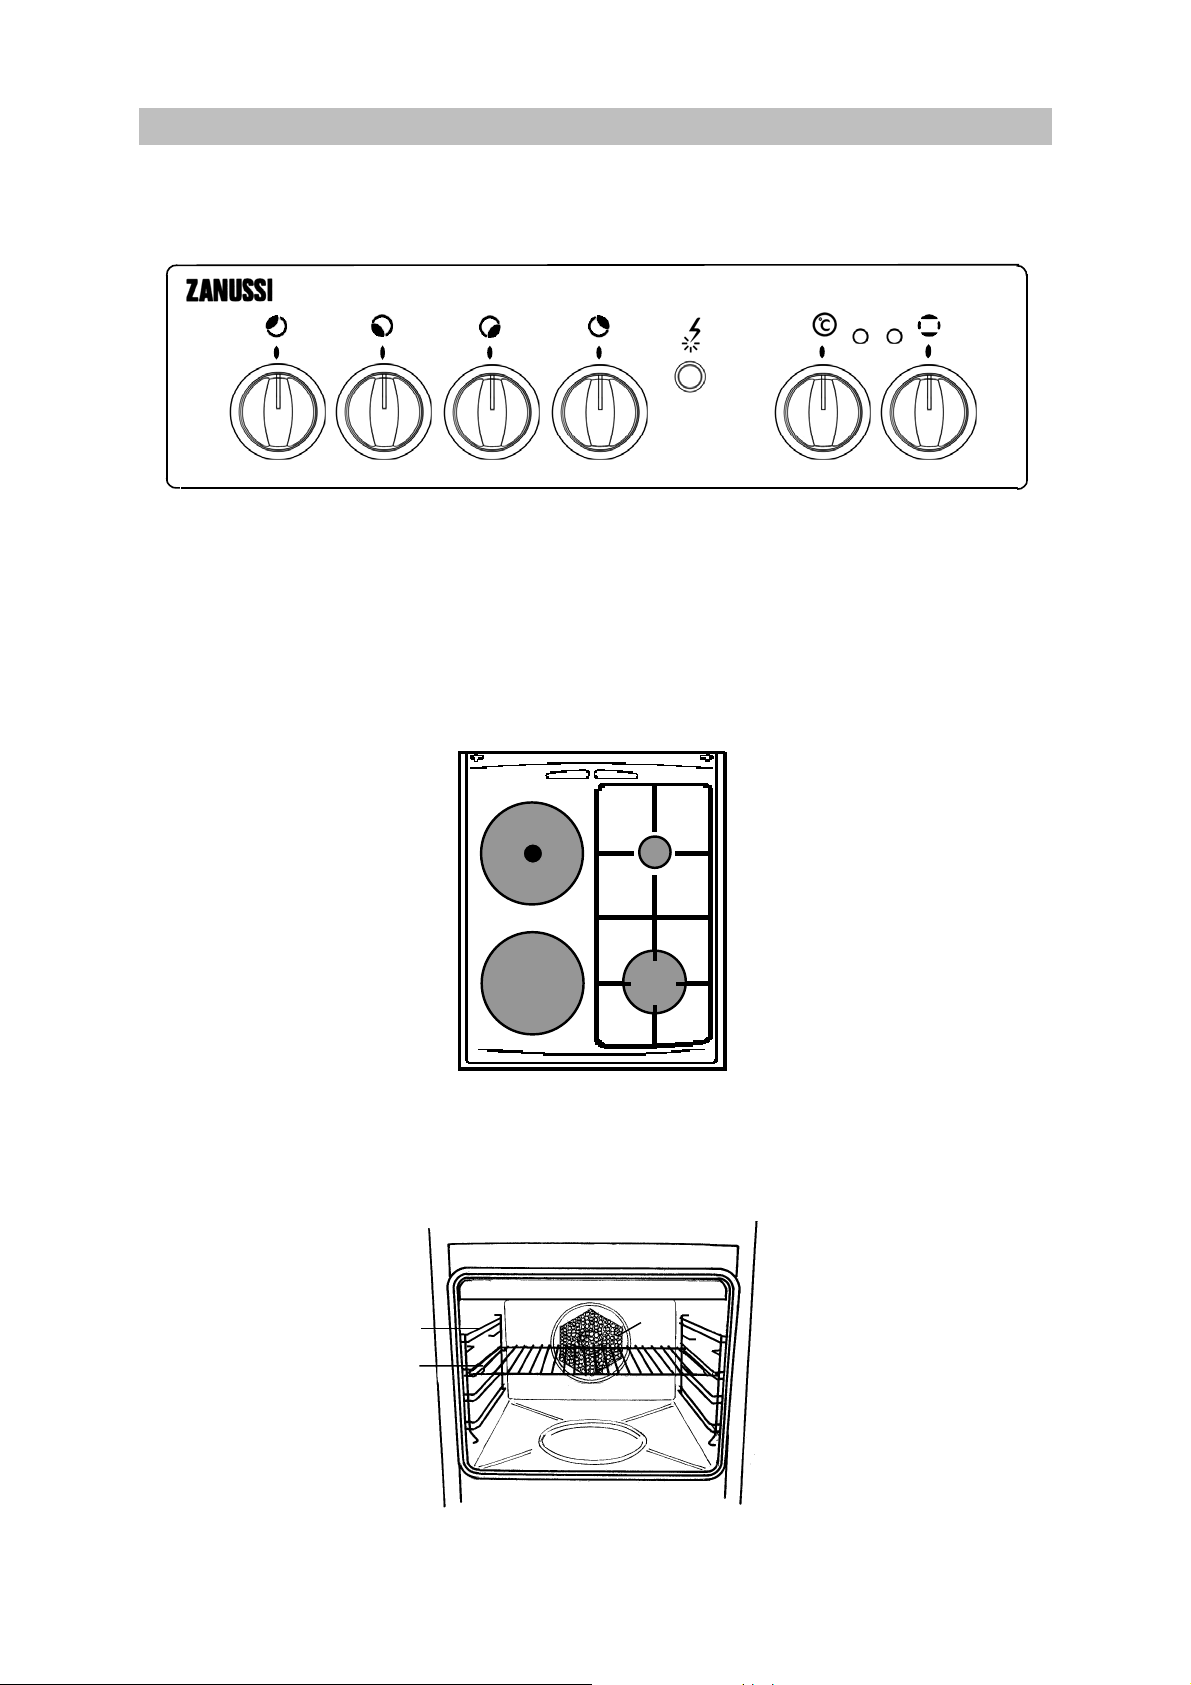
CONTROL PANEL
INSTRUCTIONS FOR THE USER
19
1. Back left hotplate control knob
2. Front left hotplate control knob
3. Front right burner control knob
4. Back right burner control knob
2
Hob
3
1
2
4
5. Ignition switch
6. Oven thermostat knob
7. Oven thermostat pilot light
8. Main pilot light
9. Oven function control knob
5
4
3
7
6
8
1. Hotplate - ∅ 145 (rapid)
2. Hotplate - ∅ 145 (normal)
3. Front right burner (rapid)
4. Back right burner (auxiliary)
Oven
C
A.
B
Shelf supports
B.
Shelf
C.
Fan
11
USE OF APPLIANCE
Before the First Use of the Oven
Remove all packaging, both inside and
outside the oven, before using the
oven.
Before first use, the oven should be heated
without food. During this time, an unpleasant
odour may be emitted. This is quite normal.
1. Remove the oven accessories.
2. Remove any adhesive labels or protective
films, if there are any.
3. Heat the oven the corresponding knob on
position “250” for about 45 min.
This procedure should be repeated with the grill
function for approximately 5-10 minutes.
Clean the accessories with a soft detergent.
Rinse and dry carefully.
Rating Plate
The model number of your cooker can be found
on the rating plate on the lower front frame of
the cooker upon opening the door.
The cooker must be protected by a suitably
rated fuse or circuit breaker. The rating of the
cooker is given on the rating plate.
About condensation and steam
When food is heated it produces steam in the
same way as a boiling kettle. The oven vents
allow some of this steam to escape. However,
always stand back from the oven when
opening the oven door to allow any build up of
steam or heat to release.
If the steam comes into contact with a cool
surface on the outside of the oven, e.g. a trim, it
will condense and produce water droplets. This
is quite normal and is not a fault with the oven.
To prevent discoloration, regularly wipe away
condensation and also soilage from surfaces.
Cookware
Use any ovenproof cookware, which will
withstand temperatures of 250
Oven dishes, etc. should not be placed
directly on the oven base.
During cooking in the oven the oven
door is hot. Take care that children do
not play near it.
When using the oven the lid has to be
opened to avoid over-heating.
°
C.
12
ELECTRIC OVEN
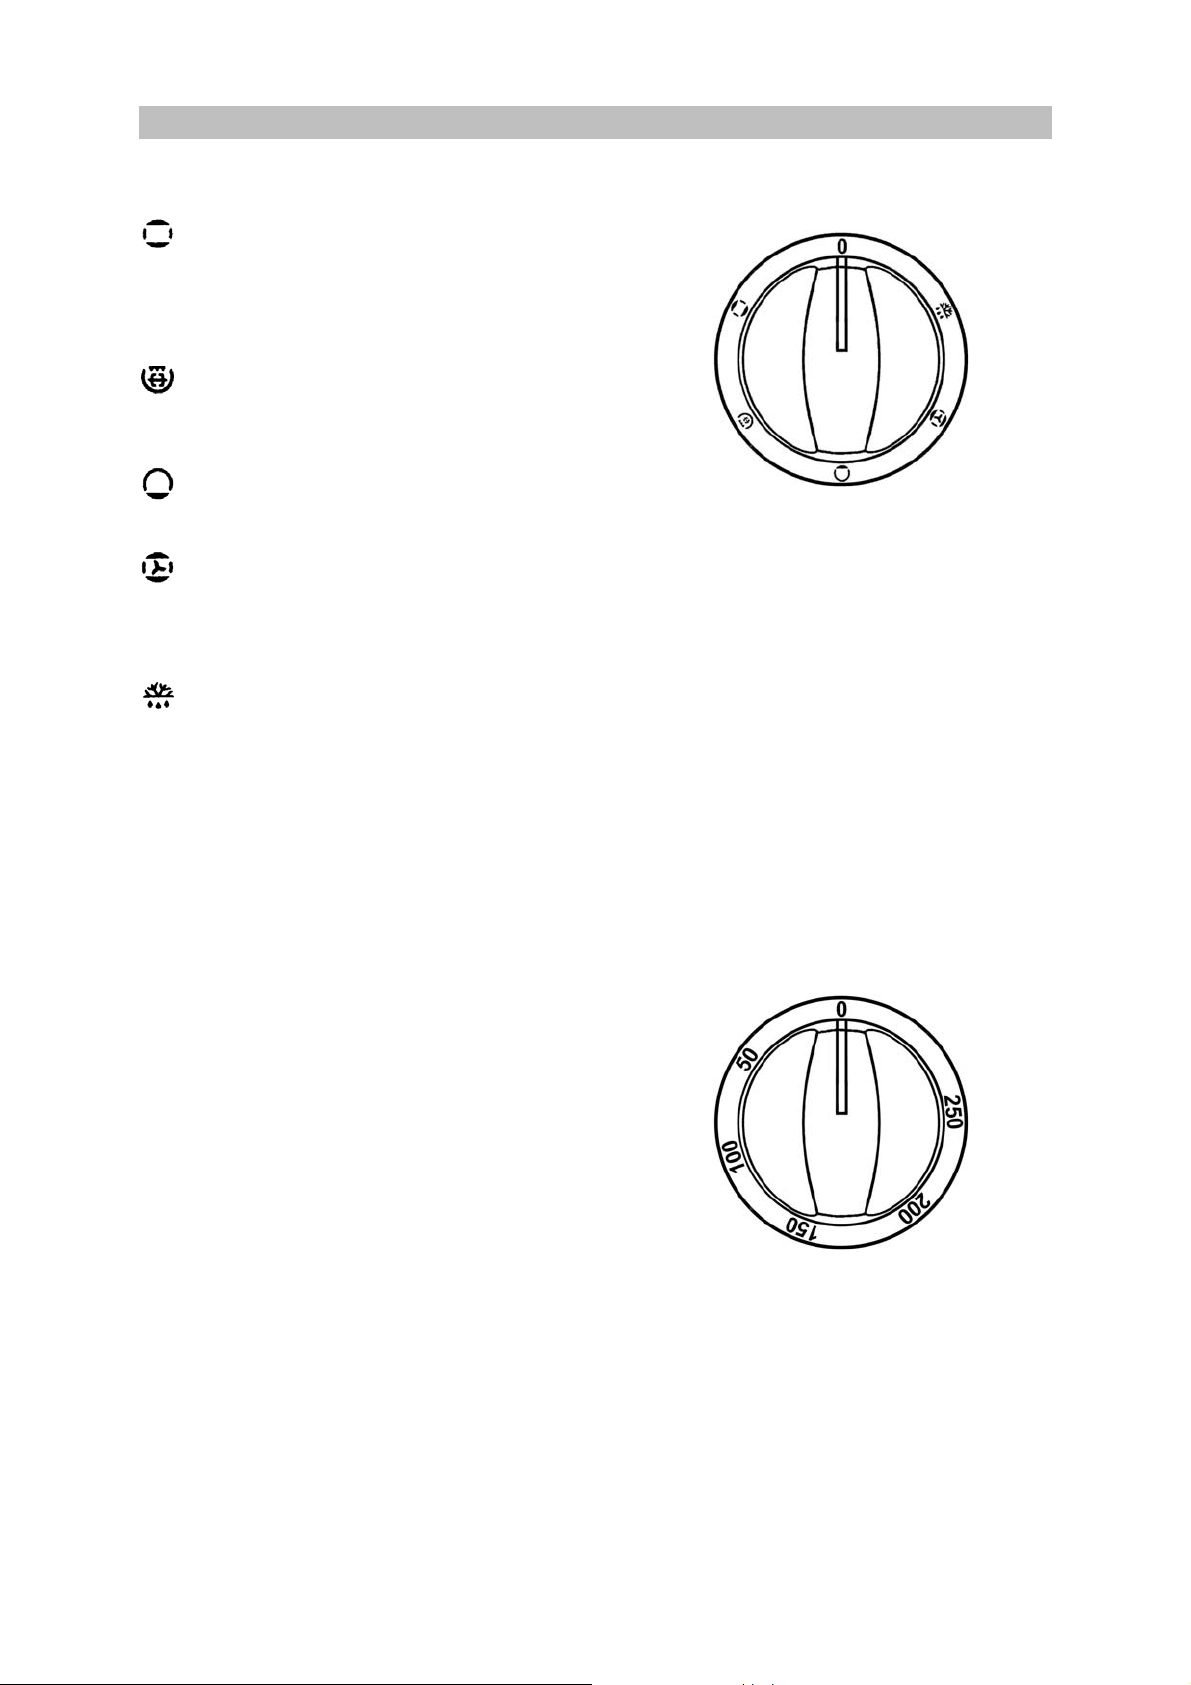
Oven Function Control Knob
Upper and lower heating elements - used
the top and bottom element; this function will
enable you to use your favourite recipes without
having to adapt the temperatures. It is
necessary to pre-heat the oven in this instance.
Grill and turn spit- The grill cannot be used
at the same time as the oven. The oven door
must be closed when grilling.
Bottom oven element - enables you to
finish off dishes on the bottom only.
Upper and lower heating elements – Fan
Heat is transmitted to food by means of preheated air throughout a fan located on the back
wall of the oven.
Defrost – (This is NOT a cooking position).
This position is intended to assist in thawing of
frozen foods.
Caution
Do not place pans, dripping pans, biscuits pans
or aluminium foil directly on the base of the
oven. This could cause a heat build-up which
could affect the performance of the oven and
damage the oven enamel.
Thermostat Control Knob
By turning the oven control knob clockwise, you
select the cooking temperature.
The temperatures shown here are on the actual
control knob.
Temperature selection starts at 50°C and will
reach approximately 250°C at the centre of the
oven.
The thermostat controlling the temperature is
variable so it is possible to select temperatures
between those marked.
The maximum setting is particularly suitable for
grilling.
Things to note
• Once the oven temperature has been
selected, the oven thermostat pilot light will
come on and remain on until the oven has
reached the correct setting; after that, it will
go on and off with the thermostat, showing
how the temperature is being maintained.
• The oven light will come on when the oven
function control knob is set.
13
Traditional cooking
Grilling
Heat is conveyed both from the top and bottom
of the oven. This allows you to cook on a single
level and is particularly suitable for dishes which
require extra base browning such as quiches
and flans. Gratins, lasagnes and hotpots which
require extra top browning also cook well in the
conventional oven.
This form of cooking gives you the opportunity to
cook without the fan in operation.
- Turn the oven function control knob to the
position
- Turn the thermostat control knob to the
selected temperature.
Bottom oven element only
This function is particularly useful when blindbaking pastry or cooking pizza. It may also be
used to finish off quiches or flans to ensure the
base pastry is cooked through.
During use the appliance becomes hot.
Care should be taken to avoid touching
heating elements inside the oven.
Hints and Tips
There should always be at least 2.5cm between
the top of the food and the element. This gives
the best cooking results and allows room for rise
in yeast mixtures, Yorkshire puddings, etc.
When cooking cakes, pastry, scones, bread,
etc., place the tins or baking trays centrally
below element.
Ensure that food is placed centrally on the shelf
and there is sufficient room around the baking
tray/dish to allow for maximum circulation.
Stand dishes on suitably sized baking trays to
prevent spillage onto the oven base and to help
reduce cleaning.
Enamelware, dark, or heavy utensils increase
base browning. Shiny aluminium or polished
steel trays reflect the heat away and give less
base browning.
DO NOT place dishes directly onto the oven
base as it becomes very hot and damage may
occur.
DO NOT use the grill pan or meat tin as a
baking tray as this will increase base browning
of the food.
For economy leave the door open for the
shortest possible time, particularly when placing
food into a preheated oven.
When grilling, the accessible parts of
the appliance are hot and the appliance
should not be left unattended. Take care that
children do not play near it.
The grill pan will become hot during
use, always use oven gloves when removing
or replacing a hot grill pan.
All grilling must be carried out with the
oven door closed .
To switch on the grill, turn the oven
function control knob to GRILL, then turn the
thermostat knob to the maximum temperature .
Most foods should be placed on the grid in the
grill pan to allow maximum circulation of air to lift
the food out of the fats and juices. Food such as
fish, liver and kidneys may be placed directly on
the grill pan, if preferred.
Adjust the grid and grill pan runner position to
allow for different thicknesses of food.
Food should be thoroughly dried before grilling
to minimise splashing. Brush lean meats and
fish lightly with a little oil or melted butter to keep
them moist during cooking.
Accompaniments such as tomatoes and
mushrooms may be placed underneath the grid
when grilling meats.
When toasting bread, we suggest that the top
runner position is used with the grid in its 'high'
position.
Preheat the grill on a full setting for a few
minutes before sealing steaks or toasting. Adjust
the heat setting and the shelf as necessary,
during cooking.
The food should be turned over during cooking,
as required.
NOTE: For safety in use, the grill element is
controlled by the thermostat. During cooking,
the grill cycles on and off to prevent
overheating.
Cooking time depends on the thickness of the
meat and not on its weight.
14
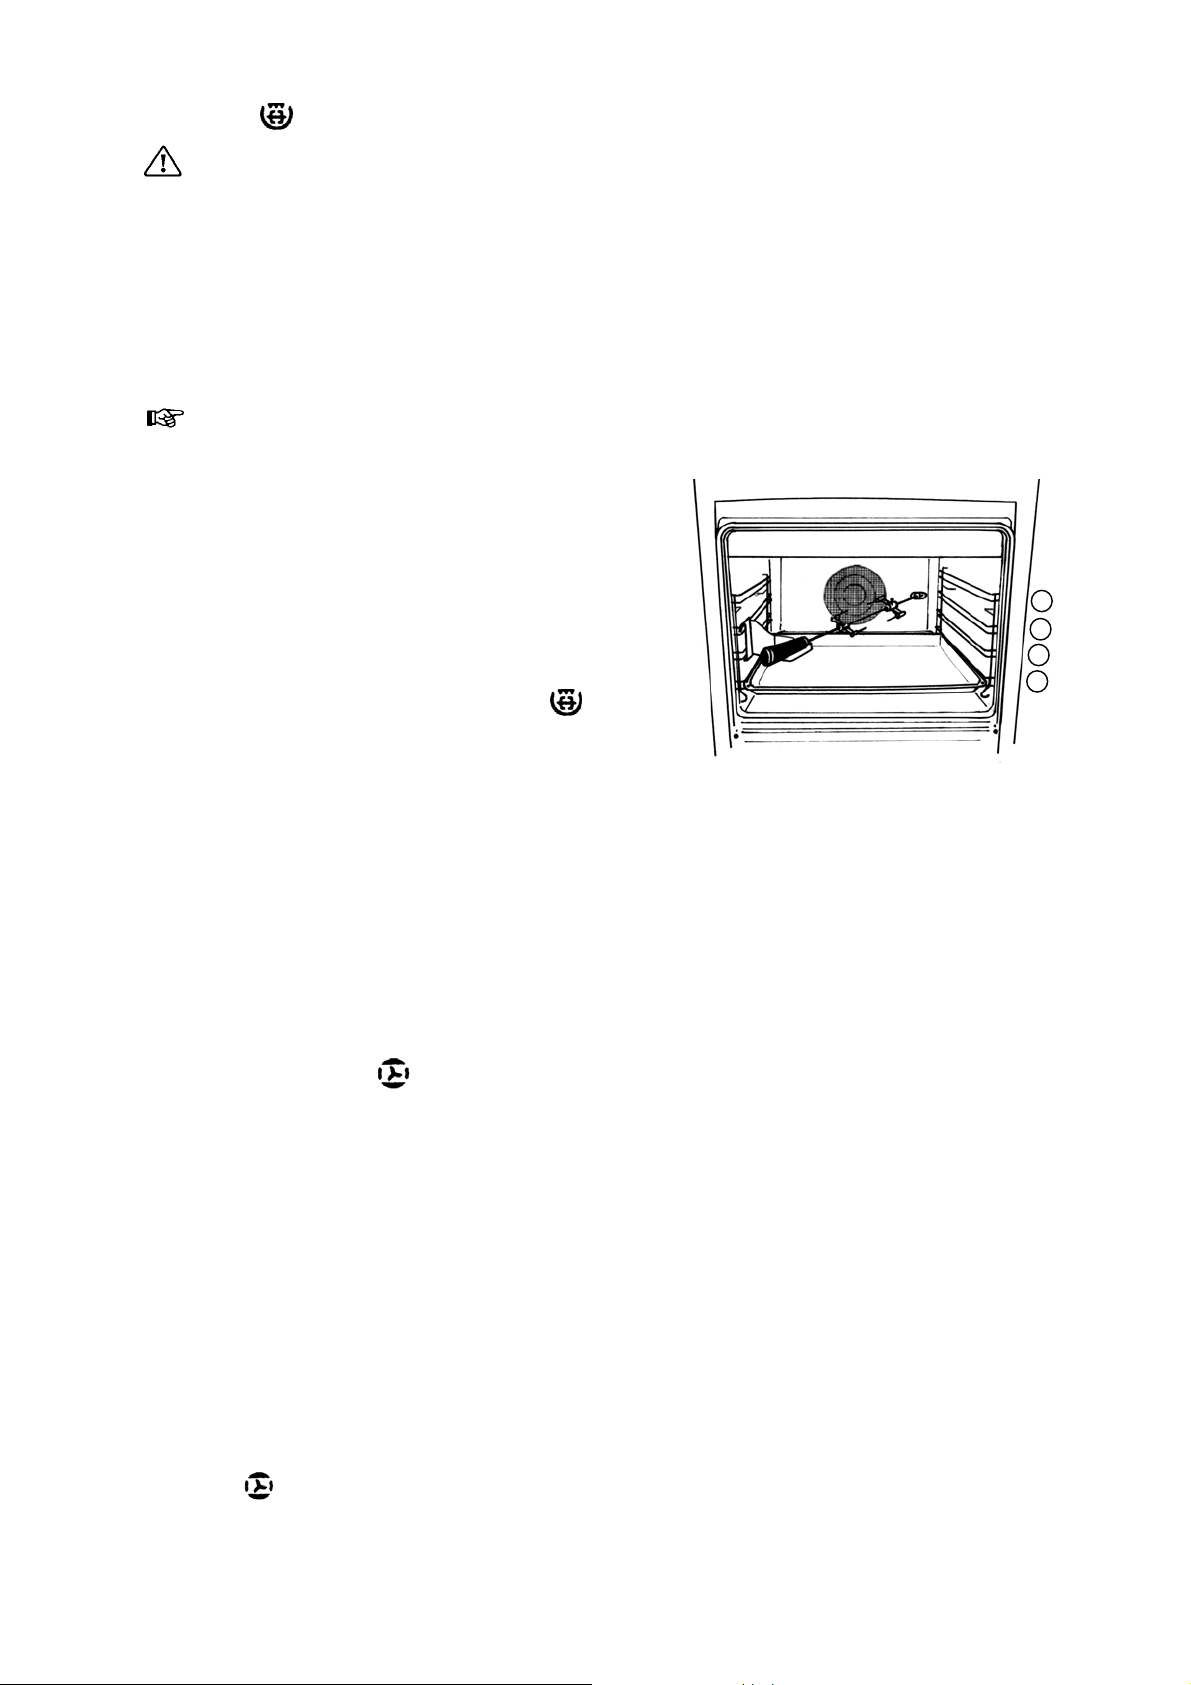
Rotisserie
When using the rotisserie, the accessible
parts of the appliance are hot and the appliance
should not be left unsupervised. Take care that
children do not play near it. While the rotisserie
is operating leave the door closed. After use
the rotisserie and its support are hot, use oven
gloves to remove food.
The rotisserie can be used for either spit roasting
meat or for kebabs and smaller pieces of meat.
How to use the rotisserie
1. Slide the meat on the skewer, making sure
that the fork nearest the handle is in place
and that the meat is central.
2. Push on the second fork and tighten both
forks.
3. Fit the bracket on the shelf levels 3 and 2.
Push the skewer into the motor shaft in the
back panel and locate the handle end in the
support bracket.
4. Place the grill pan in a lower shelf position.
5. Remove the handle and close the door.
6. Select grill with the function control knob
and check that the spit is rotating.
7. When the food is cooked, switch off the grill
and refit the handle. Remove the skewer
from the motor, after releasing the front
support bracket. It is advisable to remove
the grill pan at the same time, to ensure that
any dripping fat is contained in the pan.
8. It is advisable to wear protective oven gloves
at all times when using the rotisserie, as very
high temperatures exist in the area of the
grill.
4
3
2
1
The maximum weight permitted on the
rotisserie is 4·5 kg.
Convection cooking
Heat is transmitted to food by means of preheated air throughout a fan located on the back
wall of the oven. In this way heat can rapidly
reach every part of the oven and cook
simultaneously many dishes placed on several
shelves. Thanks to the elimination of dampness
and the consequently drier air, this kind of
cooking prevents any flavour transference.
However the oven can also be used for cooking
on one shelf only. In this case use the lower
shelves to better control cooking. Moreover, this
oven is particularly suitable for a rapid thawing,
sterilizing suitable preserves and home-made
fruit in syrup, and for dryng mushrooms and fruit.
- Turn the oven function control knob to the
position
- Turn the thermostat control knob to the
selected temperature.
.
15
 Loading...