

Zanussi ZCM561MW1 Operating & Installation Instructions Manual
3
0
6
2
4
5
1
50
0
150
200
250
100
0
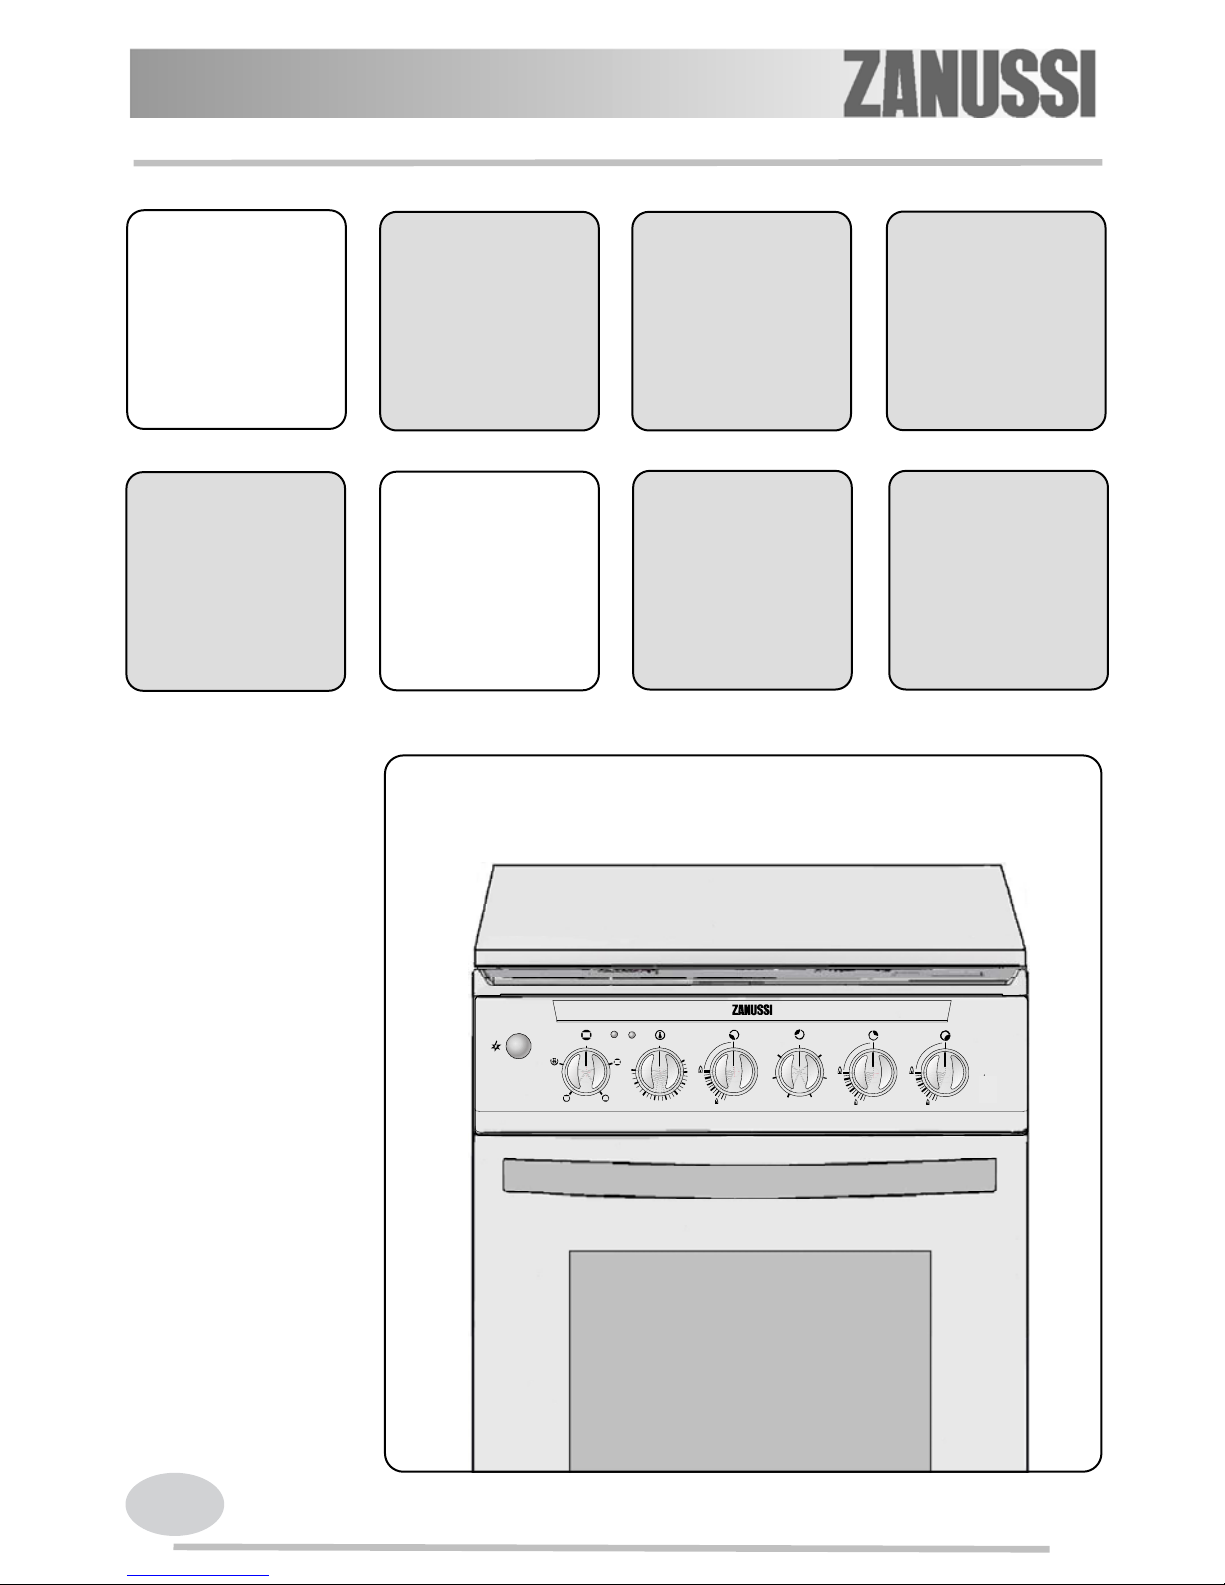
ZCM561MW1
EN
Operating &
Installation
Instructions
Cooker
2
Contents
Safety Information
Description of the appliance
Use of the appliance
Operating instruction
Accessories delivered with the appliance
2
4 4 5 11
Cleaning and care
Something not working
Technical data
Installation
Environmental Information
12
14
15
16
20
How to read the instruction book?
The symbols below will guide you when reading the instruction book
Safety instructions
Description of operations step by step
Advice and recommendation
Information environment protection
Important safety information
It is most important that this instruction book should
be retained with the appliance for future reference.
Should the appliance be sold or transferred, always
ensure that the book is left with the appliance in order
that the new owner can get to know the functions of
the appliance and the relevant warnings. These
warnings are provided in the interest of safety. You
MUST read them carefully before installing or using
the appliance.
Installation
• Qualified personnel, according to the
manufacturer’s instructions, must install this
cooker.
• This cooker is heavy. Take care when moving it.
• Remove all packaging before using the cooker.
• The adjustment conditions for this appliance
are stated on the label.
• This appliance is not connected to a combustion
products evacuation device. It shall be installed
and connected in accordance with current
installation regulations. Particular attention shall be
given to the relevant requirements regarding
ventilation.
• This cooker is designed to be connected to a
230V, 50Hz electrical supply.
• Ensure that the gas and electrical supply complies
with the type stated on the rating plate, located
near the gas supply pipe.
• Do not attempt to modify the cooker in any way.
Child Safety
• This cooker is designed to be operated by adults.
Do not allow children to play near or with the cooker.
• Children can also injure themselves by pulling
pans or pots off the cooker.
• During use the appliance becomes hot. Care
should be taken to avoid touching heating
elements inside the oven.
• This appliance is not intended for use by persons
(including children) with reduced physical, sensory
or mental capabilities, or lack of experience and
knowledge, unless they have been given
supervision or instruction concerning use of the
appliance by a person responsible for their safety.
During use
• This cooker is intended for domestic cooking
only. It is not designed for commercial or
industrial purposes or for heating the room.
• When in use a gas cooker will produce heat
and moisture in the room in which it has been
installed. Ensure there is a continuous air
supply, by keeping air vents in good condition
or installing a cooker hood with a venting hose.
• When using the cooker for a long period time,
opening a window or increasing the extractor
speed should improve the ventilation.

3
• The cooker gets hot when it is in use and retains
their heat for a long period after use. Children should
be kept away until it has cooled.
• Do not use this cooker if it is in contact with
water. Do not operate the cooker with wet
hands.
• When using other electrical appliances, ensure
the cable does not come into contact with the
hot surfaces of the cooker.
• Never leave the cooker unattended when
cooking with oil and fats.
• Unstable or misshapen pans should not be used
on the hob burners as unstable pans can cause
an accident by tipping or spillage.
• The grill pan will become hot during use,
always use oven gloves when removing or
replacing a hot grill pan.
• During use the appliance becomes hot. Care
should be taken to avoid touching heating
elements inside the oven.
• The oven must be switched off before
removing the guard and after cleaning the
guard must be replaced in accordance with
the manufacturer's instructions.
• Ensure the control knobs are in the ‘OFF’
position when not in use.
• This cooker should be kept clean at all times. A
build-up of fats or foodstuffs could result in a fire.
• Only clean this oven in accordance with the
instructions.
• Never use plastic dishes in the oven or on the
hob burners. Never line any part of the oven
with aluminium foil.
• Always ensure that the oven vent, which is
located at the centre back of the hob, is left
unobstructed to ensure ventilation of the oven
cavity.
• Perishable food, plastic items and aerosols may
be affected by heat and should not be stored
above the cooker.
• Never pule the appliance by the oven handle.
• On the open oven door never put:
- heavy things,
- ensure that children do not climb up or sit on
it.
• Prolonged intensive use of the appliance may
call for additional ventilation, for example
opening of a window, or more effective
ventilation, for example increasing the level of
mechanical ventilation where present.
• The appliance is fitted with a lid: this is
designed as a dust cover when closed, and as
a splash back when open. Do not use for any
other purpose.
• Always remove any spillage from the surface of
the lid before opening, and the appliance
should be allowed to cool before closing the lid.
• After using the cooker, the lid MUST NOT be
closed until the hob and oven are completely
cold.
Service
• This
cooker should only be repaired or serviced
by an authorised Service Engineer and only
genuine approved spare parts should be used.
• We decline our responsibility for possible
damages resulting from bad use and nonobserving of safety rules in force.
• Do observe strictly the cleaning and
maintenance instructions.
4
Instructions for the user
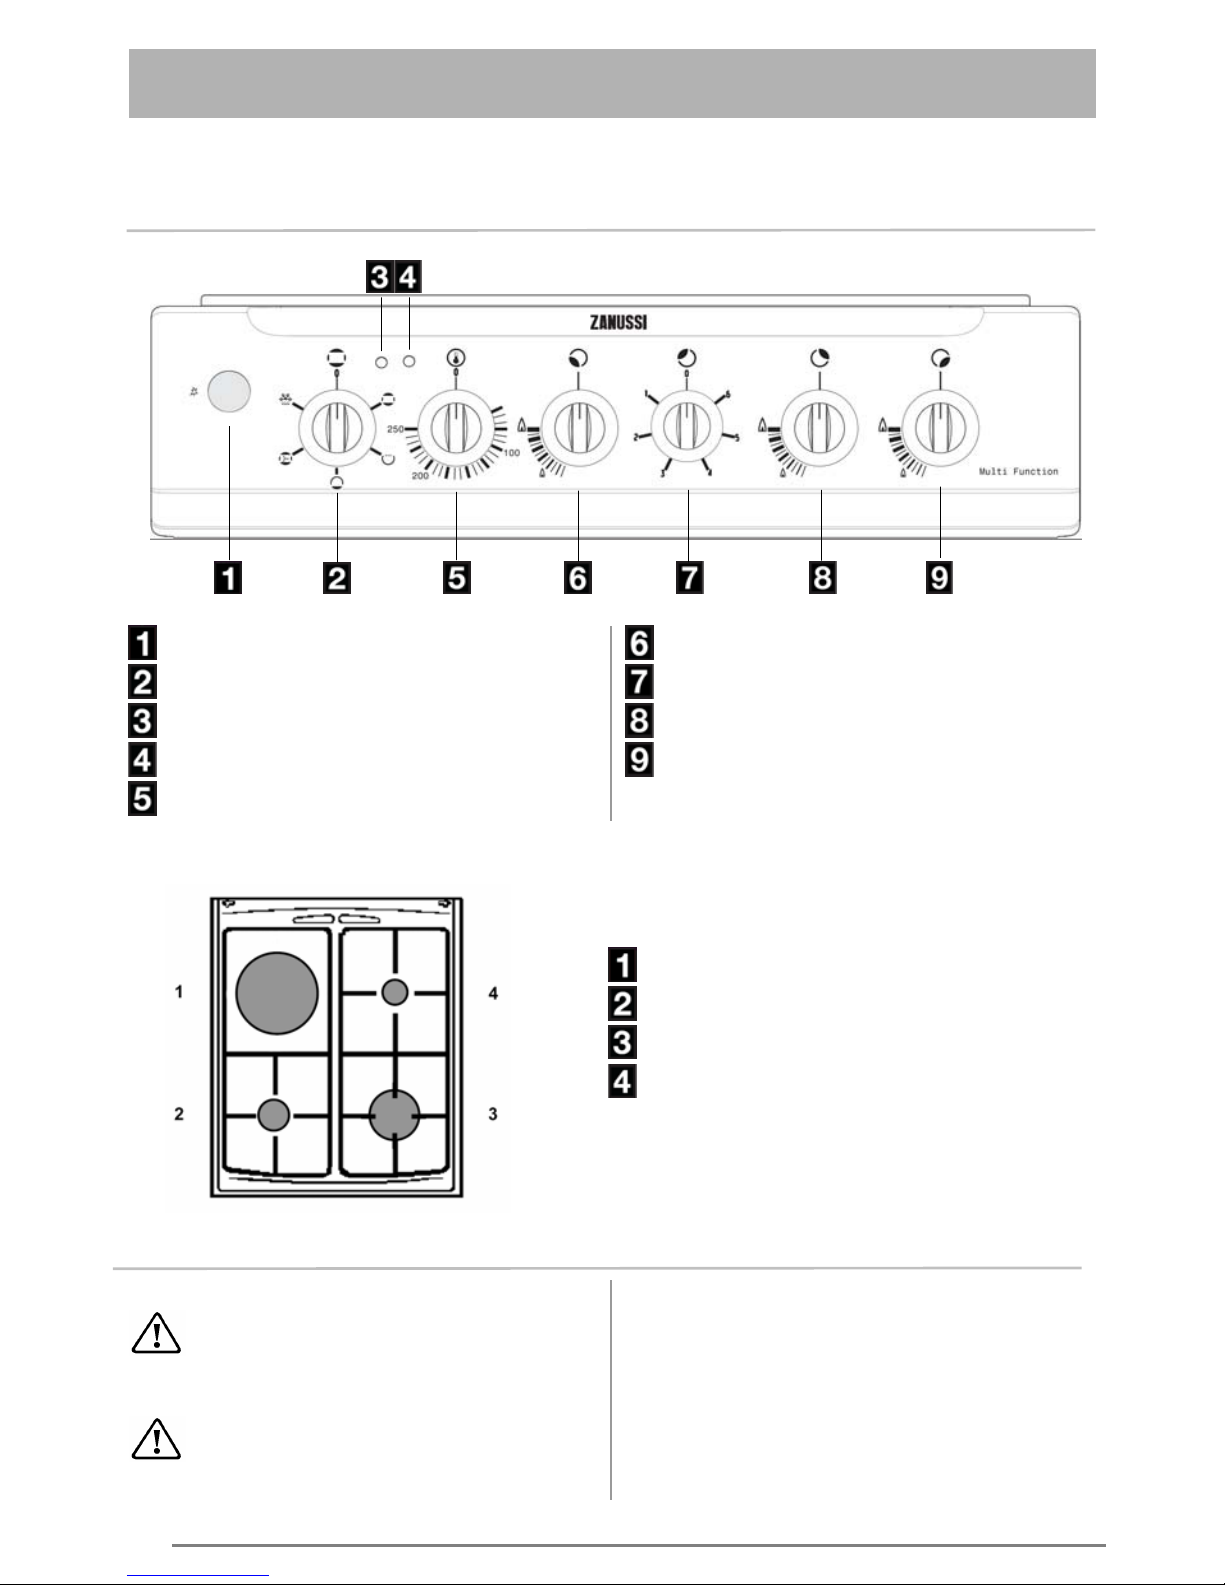
Description of the appliance
Control panel
Ignition switch
Oven function knob
Hob plates/ oven pilot light
Oven thermostat pilot light
Oven thermostat knob
Front left burner control knob
Back left hotplate control knob
Back right burner control knob
Front right burner control knob
Hob
Use of appliance
Before the First Use of the Oven
Before the first use ensure that the room is
well ventilated: V.M.C. (Mechanic ventilation) or
opened window.
Remove all packaging, both inside and
outside the oven, before using the oven.
Before first use, the oven should be heated without
food. During this time, an unpleasant odour may be
emitted. This is quite normal.
1. Remove the oven accessories.
2. Remove any adhesive labels or protective films,
if there are any.
Solid hot plate - 1000W/145 mm
Semi Rapid burner - 2000W
Rapid burner – 2600W
Auxiliary burner - 1000W
5
3. Heat the oven the corresponding knob on
position “250” for about 45 min.
This procedure should be repeated with the grill
function for approximately 5-10 minutes.
Clean the accessories with a soft detergent. Rinse
and dry carefully.
Rating Plate
The model number of your cooker can be found on
the rating plate on the lower front frame of the cooker
upon opening the door.
The cooker must be protected by a suitably rated fuse
or circuit breaker. The rating of the cooker is given on
the rating plate.
About condensation and steam
When food is heated it produces steam in the same
way as a boiling kettle. The oven vents allow some of
this steam to escape.
However, always stand back from the oven when
opening the oven door to allow any build up of
steam or heat to release.
If the steam comes into contact with a cool surface on
the outside of the oven, e.g. a trim, it will condense
and produce water droplets. This is quite normal and
is not a fault with the oven.
To prevent discolouration, regularly wipe away
condensation and also soilage from surfaces.
Cookware
Use any ovenproof cookware, which will withstand
temperatures of 250
°
C.
Oven dishes, etc. should not be placed directly
on the oven base.
During cooking in the oven the oven door is
hot. Take care that children do not play near it
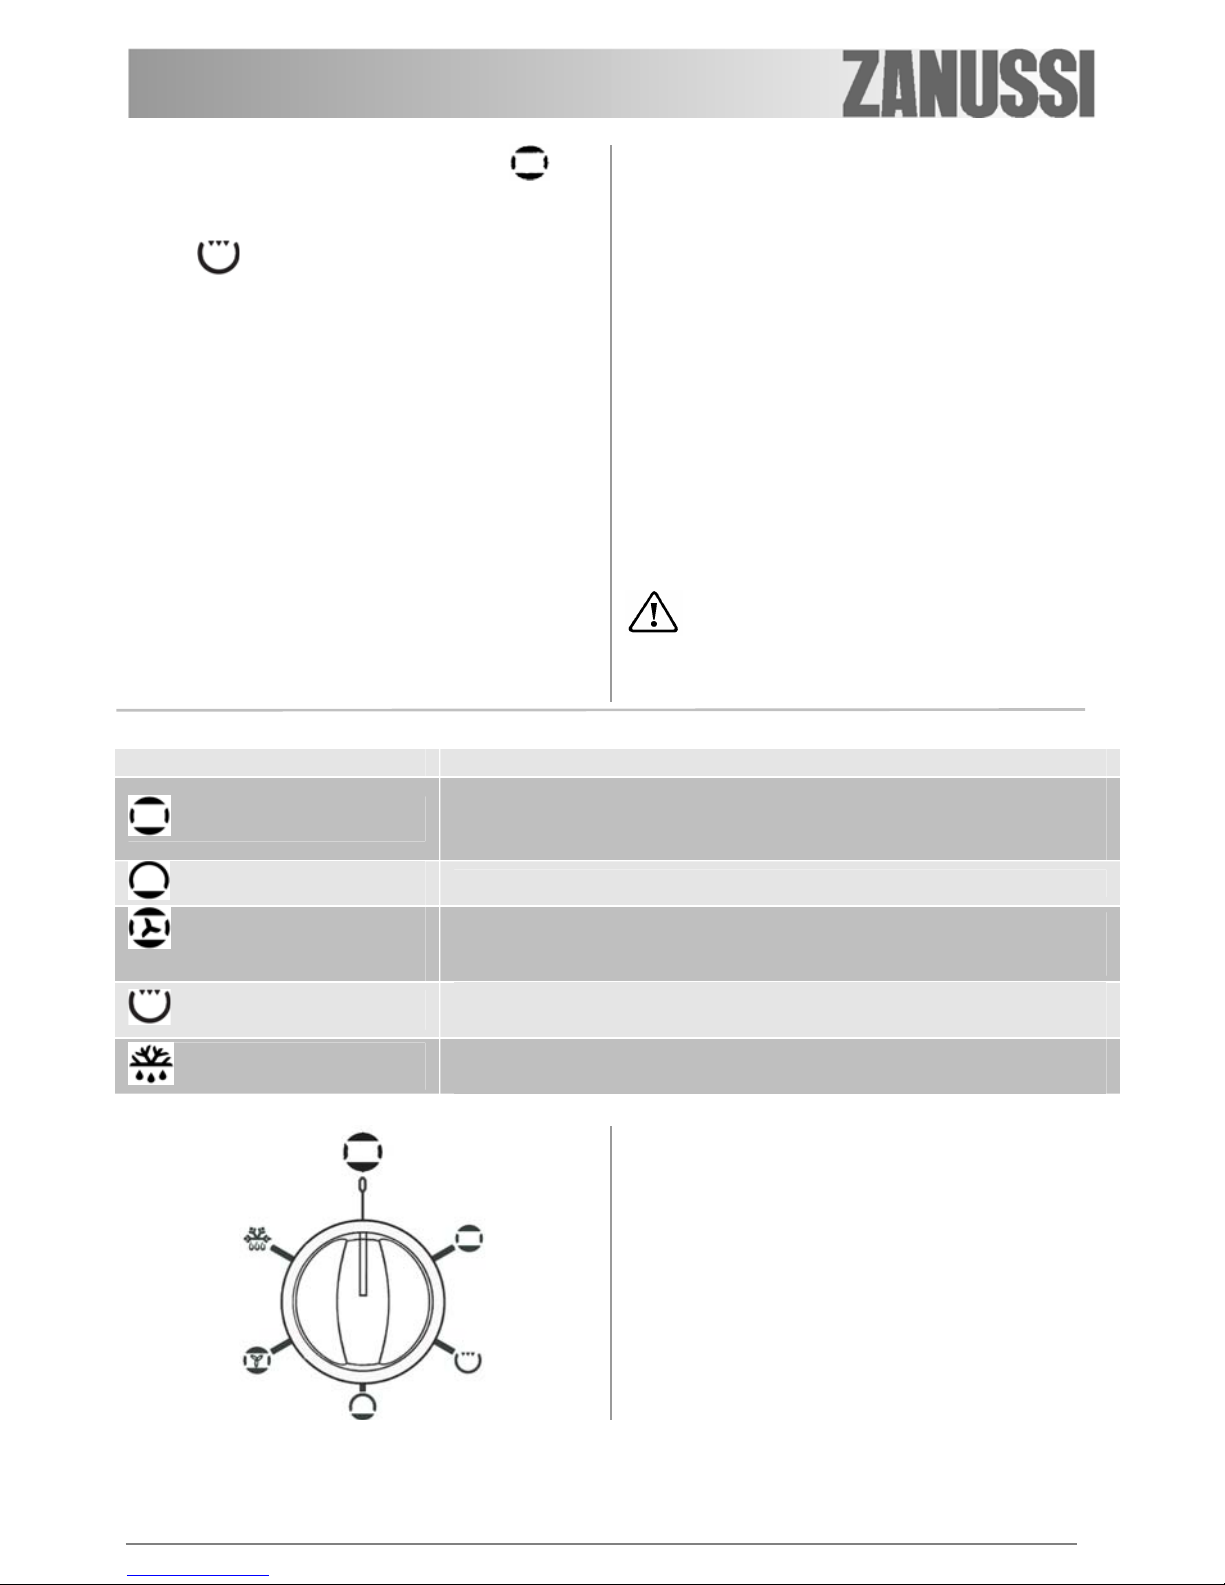
Functions of the oven
0 Off
Conventional cooking
Use the top and bottom element; this function will enable you to use your
favorite recipes without having to adapt the temperatures. It is necessary
to pre-heat the oven in this instance.
Bottom oven element
Enables you to finish off dishes on the bottom only.
Upper and lower oven
elements – Fan
Heat is transmitted to food by means of pre-heated air throughout a fan
located on the back wall of the oven.
Grill
The oven door must be closed when grilling. Attention: use the grill
function at max. 210°C.
Defrost
This is NOT a cooking position. This position is intended to assist in
thawing of frozen foods.
Hob plates pilot light
This light will illuminate when the hotplate knob is turned
on and remains lit while these is in use.
Oven thermostat pilot light
This light will illuminate when a temperature is
selected and remain lit until the selected temperature
has been reached. It then cycles on and off to
indicate that the temperature is being maintained.
6
Oven light
It’s lighted once the oven control knob is turned on
and lights during the oven functioning
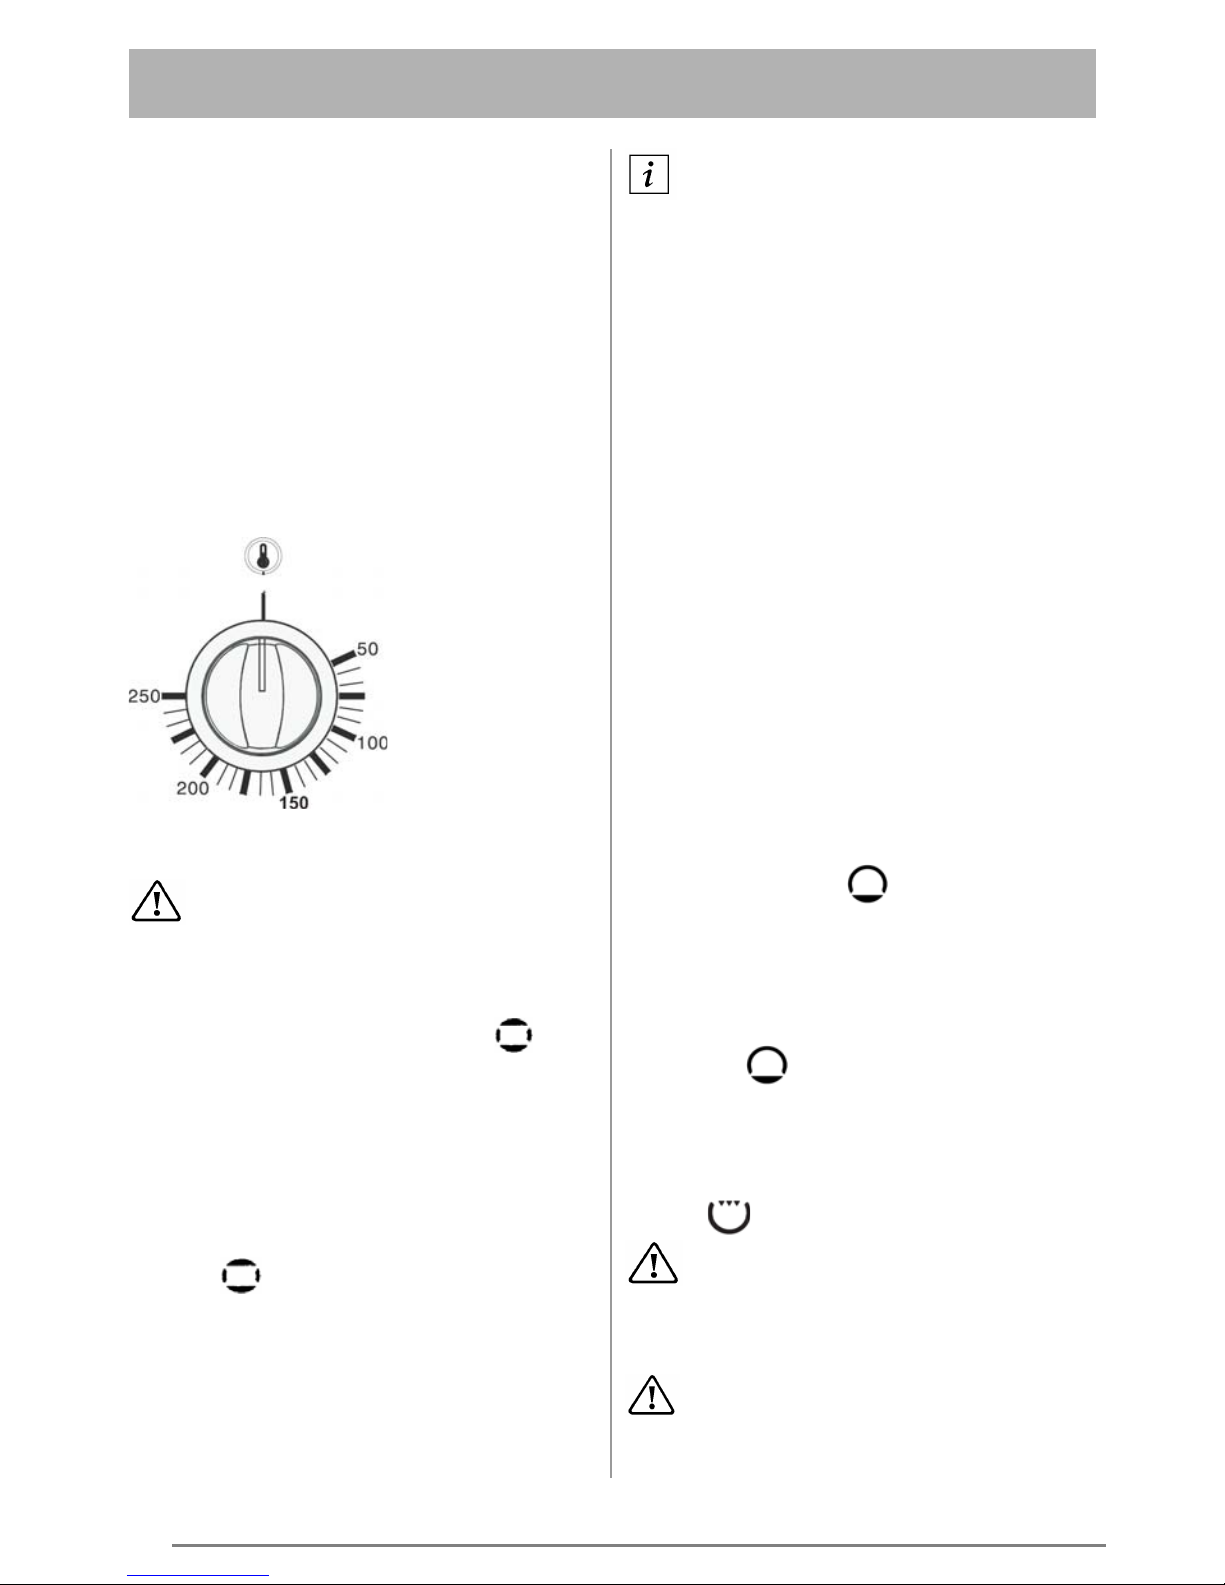
Thermostat Control Knob
By turning the oven control knob clockwise, you
select the cooking temperature.
The temperatures shown here are on the actual
control knob.
Temperature selection starts at 50°C and will reach
approximately 250°C at the centre of the oven.
The thermostat controlling the temperature is variable
so it is possible to select temperatures between those
marked.
Cooking in the oven
During use the appliance becomes hot.
Care should be taken to avoid touching heating
elements inside the oven.
Conventional cooking (Traditional)
Conventional cooking is made by natural convection of
the heated air.
It is necessary to preheat the oven.
How to proceed?
For small cakes, pastry, beaten mixture cakes in moulds.
1. Preheat the oven, the oven function knob on
position
:
- about 8 min. for position 50ºC to 150ºC;
- about 15 min for position 175ºC to 250ºC;
2. Insert the meal. Turn the oven thermostat knob
on to the required temperature.
Hints and Tips
There should always be at least 2.5cm between the
top of the food and the element. This gives the best
cooking results and allows room for rise in yeast
mixtures, Yorkshire puddings, etc. When cooking
cakes, pastry, scones, bread, etc., place the tins or
baking trays centrally below element.
Ensure that food is placed centrally on the shelf and
there is sufficient room around the baking tray/dish to
allow for maximum circulation.
Stand dishes on suitably sized baking trays to prevent
spillage onto the oven base and to help reduce
cleaning.
Enamelware, dark, or heavy utensils increase base
browning. Shiny aluminium or polished steel trays
reflect the heat away and give less base browning.
DO NOT place dishes directly onto the oven base as
it becomes very hot and damage may occur.
DO NOT use the grill pan or meat tin as a baking tray
as this will increase base browning of the food.
For economy leave the door open for the shortest
possible time, particularly when placing food into a
preheated oven.
Bottom oven element
The heat comes only from the bottom of the oven.
Thisposition of the oven function knob is
recommended forfinishing cooked dishes.
How to proceed?
1. Preheat the oven, the oven function knob on
position
for about 10 minutes with the oven
thermostatknob on maximum position.
2. Insert the meal. Turn the oven thermostat knob
on thedesire temperature.
Grilling
When grilling, the accessible parts of the
appliance are hot and the appliance should not be
left unattended. Take care that children do not
play near it.
All grilling must be carried out with the
oven door closed. Attention: use the grill function
at maximum 210°C.
7
To switch on the grill, turn the oven function knob to
position
and then turn the oven thermostat knob to
210°C temperature.
Most foods should be placed on the grid in the grill pan to
allow maximum circulation of air to lift the food out of the fats
and juices. Food such as fish, liver and kidneys may be
placed directly on the grill pan, if preferred.
Adjust the grid and grill pan runner position to allow
for different thicknesses of food.
Food should be thoroughly dried before grilling to
minimise splashing. Brush lean meats and fish lightly
with a little oil or melted butter to keep them moist
during cooking.
Accompaniments such as tomatoes and mushrooms
may be placed underneath the grid when grilling
meats.
When toasting bread, we suggest that the top runner
position is used with the grid in its 'high' position.
Preheat the grill for a few minutes before sealing
steaks or toasting. Adjust the shelf as necessary,
during cooking.
The food should be turned over during cooking, as
required.
NOTE: for safety in use, the thermostat controls
the grill element. During cooking, the grill cycles
on and off to prevent overheating.
Cooking time depends on the thickness of the meat
and not on its weight.
Caution: Accessible parts may be hot
when the grill is in use. Young children should be
kept away.
Upper and lower oven elements – Fan
Heat is transmitted to food by means of pre-heated
air throughout a fan located on the back wall of the
oven. In this way heat can rapidly reach every part of
the oven and cook simultaneously many dishes
placed on several shelves. Thanks to the elimination
of dampness and the consequently drier air, this kind
of cooking prevents any flavour transference.
However the oven can also be used for cooking on
one shelf only. In this case use the lower shelves to
better control cooking. Moreover, this oven is
particularly suitable for a rapid thawing, sterilizing
suitable preserves and homemade fruit in syrup, and
for dryng mushrooms and fruit.
- Turn the oven function knob to the position
.
- Turn the oven thermostat knob to the selected
temperature.
Defrost
The defrosting function allows you to defrost frozen
foods. The oven fan operates without heat and
circulates the air, at room temperature, inside the
oven.
This increases the rate at which defrosting takes
place.
This function is particularly suitable for delicate food
that could be damaged by heat, e.g. cream filled
gateaux, iced cakes, pastries, bread and other yeast
products.
- Turn the oven function knob to position
, to
start the motor fan that will permit a quick
thawing by blowing cold air throughout the oven.
- With the oven function knob in this position turn
the oven thermostat knob up to the position «0 ».
Hints and tips
• Cover food with a lid, aluminium foil or plastic film
to prevent drying out during defrosting.
• Place the food to be defrosted in a single layer
where possible and turn it over half way through
the defrosting process.
• DO NOT leave food at room temperature once it
is defrosted. Cook raw food immediately or store
cooked food in the fridge.
• Take care to follow the basic rules for hygiene
when handling fresh, frozen, raw and cooked
foods.
8
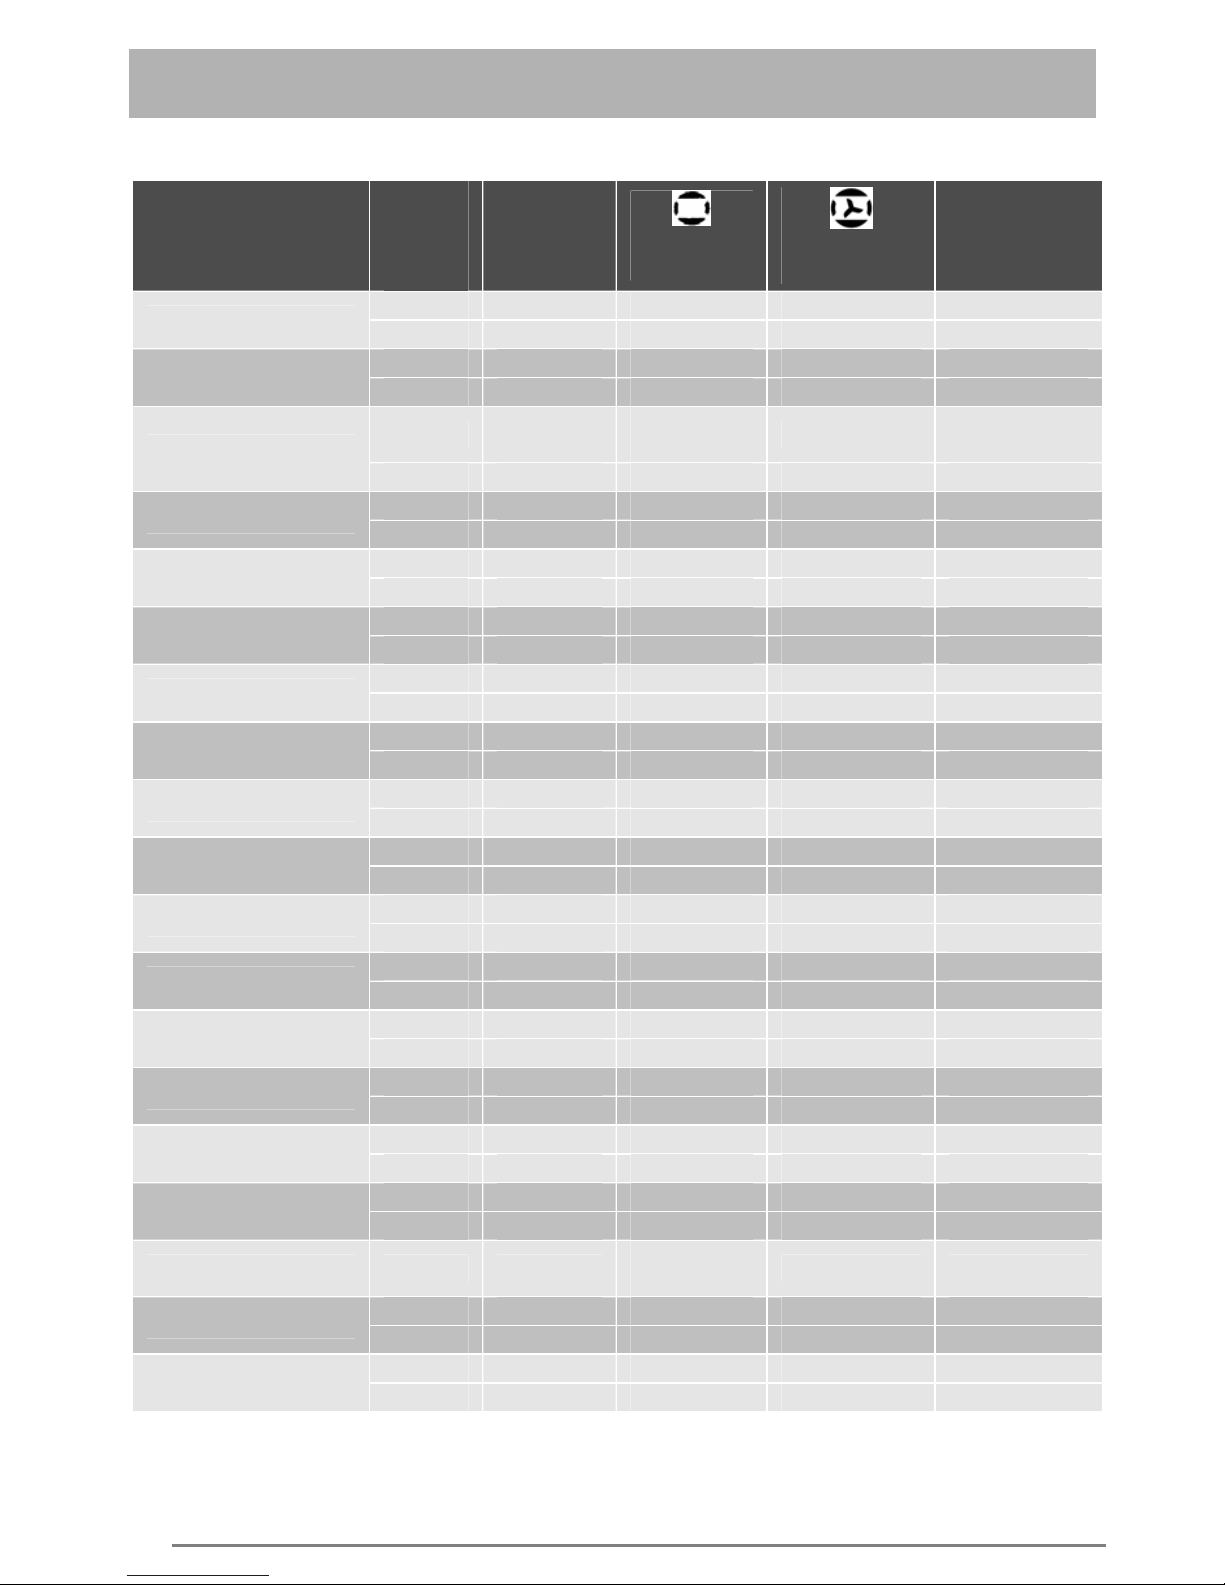
Cooking chart
Food
Shelf
position
from the
bottom
Preheating
min
Temperature
°C
Temperature
°C
Duration
min.
2 8-10 160-170 ---- 15-20
Pastry stripes
1+2 8-10 ---- 150-160 15-20
2 10-12 160-170
---- 20-25
Small cakes
1+2 10-12 ---- 155-165 20-25
2 15-20
250*
160-170
---- 45+10**
Christmas cake
2 ---- ---- 150-160 45+10**
2 15-20 180-190
---- 30-35
Crumble cake
2 ---- ---- 170-180 35-45
2 ---- 130-140
---- 40-50
Meringue
1+2 ---- ---- 120-130 45-55
2 10-15 210-220
---- 10-15
Yeast buns
1+2 10-13 ---- 200-210 10-15
2 10-12 170-180
---- 30-35
Flat cake
1+2 8-10 ---- 160-170 30-40
2 10-12 160-170
---- 25-30
Fatless sponge cake
2 8-10 ---- 150-160 30-35
2 ---- 170-180
---- 55-75
Cheese cake
2 ---- ---- 150-160 55-75
2 10-13 170-180
---- 15-20
Swiss roll
2 10-13 ---- 160-170 10-20
2 10-15 190-200
---- 10-20
Petit Choux
2 10-13 ---- 190-200 10-20
2 ---- 180-190
---- 40-50
Yeast cake with apples
2 ---- ---- 160-170 40-50
2+2 12-15 175-185
---- 60-65
Apple pie
1+2 ---- ---- 165-175 50-55
2 ---- 170-180
---- 45-50
Drip pan cake
1+2 ---- ---- 160-170 45-50
2 ---- 160-170
---- 30-40 Tradiţional Romanian
sponge cake
2 ---- ---- 150-160 30-40
2 10-13 160-170
---- 40-50
Romanian sponge cake
2 10-13 ---- 150-160 40-50
Peasant bread 2 15-20
250*
190-200
---- 50-60
2 15-20 220-230
---- 20-30
Quiche Lorraine
1 10-15 ---- 200-210 20-30
2 ---- 210-220
---- 30-35
Pizza
1 ---- ---- 210-220 30-35
*
- preheating time
**
- maintaining time in the oven after switching off of the oven function control knob
 Loading...